
G-NOTE 5000 - Digital recorder GENIUS - Free user manual and instructions
Find the device manual for free G-NOTE 5000 GENIUS in PDF.

| Product Type | Digital Handwritten Note Recorder |
| Brand | Genius |
| Model | G-Note 5000 |
| Dimensions | 281 x 180 x 12 mm |
| Weight | 358 g (without batteries) |
| Supported Paper Size | A5 (150 x 210 mm) |
| Max Paper Pad Thickness | 15 mm (approx. 150 sheets) |
| Capture Technology | Electromagnetic Digitizer |
| Internal Memory | 32 MB flash memory (approx. 511 digital pages) |
| Power Supply (Recorder) | 4 AAA 1.5 V alkaline batteries |
| Battery Life (Recorder) | Approx. 100 hours continuous use |
| Power Consumption | 60 mW ± 15 mW |
| Auto Standby | 3 to 60 minutes (configurable) |
| Interface | USB 1.1 |
| Digital Pen | Ballpoint pen with replaceable ink cartridge |
| Pen Power Supply | 1 button cell 1.4 V (PR48) |
| Pen Battery Life | Approx. 14 months (normal use) |
| Supported File Formats | DNT, DNF (proprietary); export JPG, BMP, PDF |
| Required Operating System | Windows 2000, XP or later |
| Minimum PC Configuration | Pentium III 500 MHz, 128 MB RAM, 32 MB free disk, USB port, CD-ROM drive |
| Included Accessories | A5 paper pad, 2 pens (black and red), ink refills, USB cable, software CD-ROM, mini screwdriver, installation guide |
| Maintenance and Cleaning | Clean with a soft, slightly damp cloth (water or mild detergent). Do not immerse. |
| Safety | Remove batteries if not used for a long time. Do not disassemble the device (warranty void). |
| Spare Parts and Repairability | Batteries, ink cartridges and button cells available. Repair by qualified technician only. |
Frequently Asked Questions - G-NOTE 5000 GENIUS
User questions about G-NOTE 5000 GENIUS
0 question about this device. Answer the ones you know or ask your own.
Ask a new question about this device
Download the instructions for your Digital recorder in PDF format for free! Find your manual G-NOTE 5000 - GENIUS and take your electronic device back in hand. On this page are published all the documents necessary for the use of your device. G-NOTE 5000 by GENIUS.
USER MANUAL G-NOTE 5000 GENIUS
Federal Communications Commission (FCC) Radio Frequency Interference Statement
This equipment has been tested and found to comply within the limits of a Class B digital device, pursuant to Part 15 of the FCC Rules. These limits are designed to provide reasonable protection against harmful interference in a residential installation. This equipment generates, uses, and can radiate radio frequency energy and, if not installed and used in accordance with the instructions, may cause harmful interference to radio communications. However, there is no guarantee that interference will not occur in a particular installation. If this equipment does cause harmful interference to radio or television reception, which can be determined by turning the equipment off and on, the user is encouraged to try to correct the interference by one or more of the following measures:
Reorient or relocate the receiving antenna.
- Increase the separation between the equipment and receiver.
- Connect the equipment to an outlet on a circuit different from that to which the receiver is connected.
- Consult the dealer or an experienced radio/TV technician for help.
Trademark Information
Genius and G-Note are registered trademarks of KYE SYSTEM Corporation.
Microsoft and Windows are registered trademarks of Microsoft Corporation.
Pentium is a registered trademark of Intel Corporation.
Adobe and Acrobat are registered trademarks of Adobe Systems Inc.
All other trademarks are the property of their respective owners.
Copyright Notice
© 2005 KYE SYSTEM Corp. All rights reserved. No part of this publication may be reproduced, stored in a retrieval system, or transmitted, in any form or by any means (electronic, mechanical, photocopying, recording, or otherwise), without the prior written permission of the publisher.
Note: Specifications mentioned in this manual are subject to change without notice.
Contents
1. INTRODUCTION 4
1.1 POSSIBLE APPLICATIONS 4
1.2 PACKAGE CONTENTS 4
1.3 SYSTEM REQUIREMENTS 4
2. PARTS OF THE G-NOTE 5000 5
2.1 INSTALLATION OF THE BATTERIES 6
2.2 INSTALLATION OF THE INK PEN BATTERY 6
2.3 ATTACHING A PAPER NOTEPAD 7
2.4 BUILT IN STORAGE DEVICE 7
3. G-NOTE OPERATION INSTRUCTIONS 7
3.1 FRONT PANEL BUTTONS 7
3.2 TURNING ON THE EQUIPMENT 7
3.3 STARTING A NEW PAGE 9
3.4 MODIFYING NOTES 10
3.5 DELETING PAGES 10
3.6 CONFIGURING YOUR G-NOTE 11
3.6.1 THE ROTATE MENU 12
3.6.2 THE WORKBOOK MENU 13
3.6.3 THE WORKBOOK - FORMAT DISK COMMAND 14
3.6.4 SETTING THE AUTO-SUSPEND TIMER 15
3.6.5 THE REMAINING DISK SPACE / BATTERY POWER DISPLAY 16
3.7 TURNING OFF THE G-NOTE 16
4. THE DIGITAL ORGANIZER 17
4.1 INSTALLING THE DIGITAL ORGANIZER SOFTWARE 17
4.2 DOWNLOADING DIGITAL PAGES FROM THE G-NOTE 17
4.3 IMPORTING DIGITAL PAGES (WINDOWS XP) 18
4.4 IMPORTING DIGITAL PAGES (WINDOWS 2000 & XP) 19
4.5 USING THE G-NOTE AS A PEN TABLET 20
4.6 THE DIGITAL ORGANIZER MAIN SCREEN 20
4.7 THE STANDARD TOOLBAR 21
4.8 THE ANNOTATE TOOLBAR 26
4.9 THE DIGITAL PAGE TOOLBAR 29
APPENDIX 31
REPLACING THE INK CARTRIDGE OF THE DIGITAL PEN 31
REPLACING THE BATTERY OF THE DIGITAL PEN 31
TAKING CARE OF YOUR G-NOTE 5000 31
TROUBLESHOOTING 34
GLOSSARY 34
TECHNICAL SPECIFICATIONS 35
1. Introduction
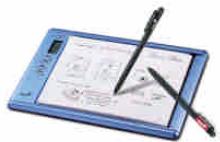
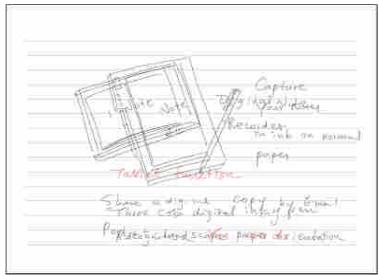
The G-Note 5000 digital note recorder allows you to instantly capture notes or diagrams written in ink on normal paper, and then transfer a digital copy to a PC for viewing, editing, or sharing by email. The G-Note 5000 supports both portrait and landscape mode, and its unique multi-color ink recognition concept greatly adds to the versatility and functionality of the device.
1.1 Possible applications
The G-Note 5000 can be deployed in any situation where both a paper hardcopy and a digitized soft copy are required, such as taking meeting minutes and lecture notes, but also in the electronic capture of signatures, the processing of police and medical records, or to conduct polls and the completion of forms.
1.2 Package contents
The following items are included in your G-Note 5000 package:
G-Note 5000 digital note recorder
- 1 x A5 paper pad
- 1 x black digital ink pen
1xreddigitalinkpen
- 3 x black ink refills (stored in the battery compartment)
USB cable for G-Note 5000 (100cm)
- 4 × 1.5 volt AAA-size batteries for G-Note 5000
- 2 × 1.4 ~V button cell battery for digital ink pens
Digital Organizer software CD-ROM with electronic user manual
- Mini screw driver
- Quick installation guide
Please contact your retailer if some of these items are missing or damaged.
1.3 System requirements
- Windows 2000, XP, or higher
- Pentium III - 500Mhz CPU or equivalent or higher
- Minimum 128MB RAM
- Minimum 32MB free hard disk space
One free USB port - CD-ROM drive
2. Parts of the G-NOTE 5000

USB port
Battery compartment
Pen slot
Writing area
The writing area is the area on the G-Note 5000 where the paper pad is placed and everything you write or draw with the digital ink pen is captured by its built in digitizer. The writing area is 150 × 210mm ( 5.9'' × 8.3'' ).
Thickness of the paper pad
The G-Note 5000 supports standard A5 paper pads with a maximum thickness of 15mm (about 150 sheets of paper).
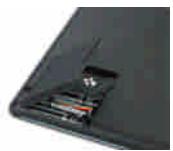
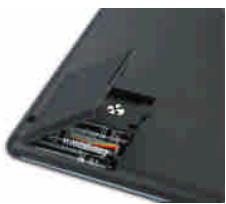
2.1 Installation of the batteries
- Remove the small shipping screw of the battery compartment cover with the included mini screw driver.
- Open the battery compartment of the G-Note 5000 by lifting its cover while pressing the release latch inward. Insert four batteries (1.5 volt, size AAA) into the battery compartment observing the pole directions as indicated on the inside of the cover. Close the battery compartment by snapping its cover into place.

Battery compartment
Always turn off the G-Note 5000 before inserting new batteries.
Removing batteries without turning off the equipment will cause file errors.
Incorrect battery installation may cause file errors.
Do not mix new and used batteries.
Four AAA alkaline batteries will last for approximately 100 hours of continuous use. Battery run time varies based on the usage pattern of an individual user. Different brand batteries may influence battery life.
2.2 Installation of the ink pen battery
Unscrew the top part of the digital ink pen and insert the included button cell battery with the negative (-) pole facing the pen tip. Screw both barrel parts together until tight.

Incorrect battery installation will result in the malfunction of the digital ink pen.
The battery of the digital ink pen will last for approximately 14 months.
Recommended button-cell batteries:
| Brand: | GP | IEC/JIS | Eveready | Varta | Duracell |
| Type: | GPZA13 | PR48 | AC13E | V13 | DA13X |
2.3 Attaching a paper notepad
Attach a standard A5 (150 x 210mm) paper pad with a maximum thickness of 15mm by sliding its carton backing as far as possible down into the notepad slot.
A Do not try to force too large a paper pad into the G-Note 5000
2.4 Built in storage device
The G-Note 5000 is equipped with a built-in 32MB flash memory to store your handwritten notes as a series of digital pages in a G-Note file (.dnt). Windows will recognize the flash memory as a removable disk.
3. G-Note operation instructions
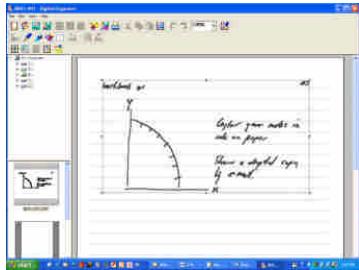
After you have completed the installation of the batteries and the paper pad you can start making handwritten notes or drawings with the digital ink pen. Your notes will instantly be captured and stored in the memory of the G-Note 5000 as a series of digital pages in a G-Note file for later retrieval on your PC. This section will explain the main functions of the G-Note 5000.
3.1 Front panel buttons
| Note taking mode | Configuration menu | ||
| POWER | Power on/off | MENU | Call up menu |
| NEW | Start new page | ENTER | Confirm |
| UP | Previous page | UP | Select value up |
| DOWN | Next page | DOWN | Select option down |
| DELETE | Erase page in memory | ESC | Cancel and return |
3.2 Turning on the equipment
Powering up the G-NOTE 5000
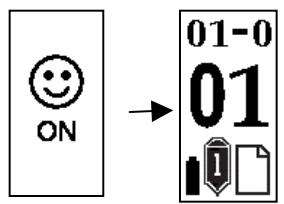
Press and hold the Power button on the front panel for a few seconds until you see the power-on smiley appears on the LCD display. After a second the main screen of the G-Note 5000 will appear.
Testing the digital ink pen
Make sure that you have installed the button cell battery in the digital pen before proceeding with the following tests (see section 1.6 for battery installation instructions).

Hover the digital pen closely over the paper pad. The pen icon on the LCD display will turn white to indicate that the pen is operational and within reading distance of the built-in digitizer of the G-Note 5000.

The pen icon on the main screen will turn black as soon as you touch the pen tip down on the paper pad. The G-Note 5000 will now record all pen strokes that you write on paper.

If the Pen icon does not appear while you are writing, verify if the button cell battery is properly installed and has not run out of power.

You may use the digital pen as a normal ballpoint to write on any piece of paper. However, do not use a normal ballpoint to write on the G-Note 5000 as notes will not be recorded.
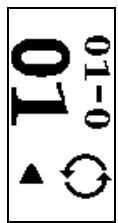
The LCD display
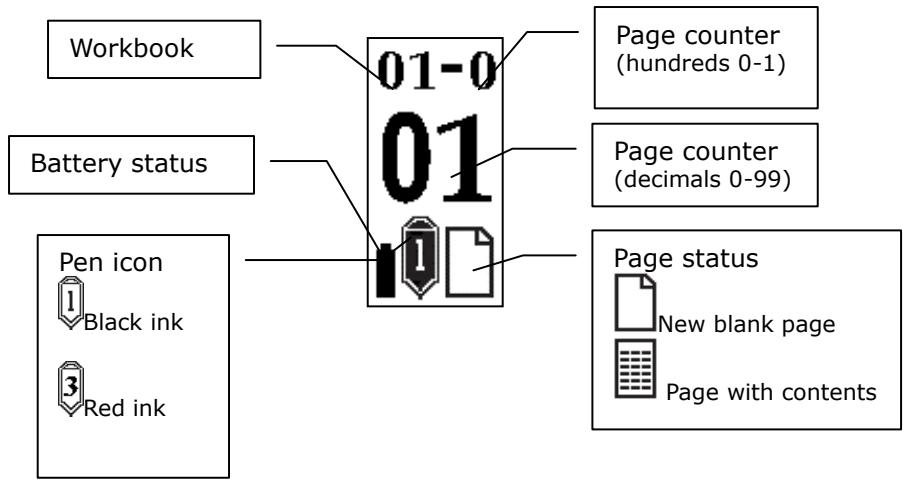
Page counter
| The decimal two digits of the page counter are enlarged in the center of the screen, whereas the hundreds (0-1) are displayed behind the hyphen in the top row of the display. | |
| Although the G-Note 5000 theoretically has the ability to manage up to 99 workbooks of 199 digital pages each, in practice such ability is limited to the maximum storage capacity of the built-in flash memory. The G-Note 5000 has a storage capacity of 32MB, which equals 511 digital pages. |
3.3 Starting a new page

Press the New button every time you turn a paper sheet on the notepad to start a new page.

It is strongly recommended to number the sheets on your notepad and copy the workbook and page number on the LCD display each time you turn a sheet. This will help to synchronize the paper sheets with the workbooks and digital pages in the G-Note's memory.

To avoid the creation of superimposed digital pages, make sure that the page status indicator on the LCD screen displays an empty page before you start writing on a new page.
A densely written paper sheet will take up more memory space than a half empty one.
3.4 Modifying notes
Press the Page Up button to browse to previous sheets to make corrections or additional notes.
You may turn back several sheets at a time to check earlier notes. However, if you want to make additions on a particular sheet, you must synchronize the page counter by repeatedly pressing the Page Up button until the page counter indicates the same number as the one you have marked on the sheet itself. Press the Page Down button to continue working on the sheet with your most recent notes.
Press the Page Down button after browsing previous sheets on your notepad. This will return the digital page record to the sheet with your most recent notes.
3.5 Deleting pages
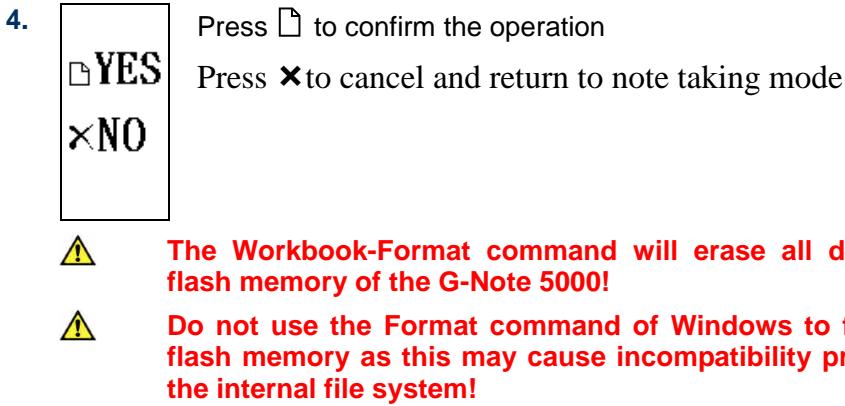
× Pressing the Delete button equals tearing off or crossing out a paper sheet of the notepad.

After pressing the Delete button a security warning will appear on the LCD screen.
Press to confirm the operation
Press × to cancel and return to note taking mode
Be very prudent not to push the Delete button accidentally, as the contents of an erased digital page in memory can not be recovered, and page number synchronization may become corrupt!
Although deleting pages using the Delete button will free up memory space, this method is mainly provided as an emergency option. It is recommended to use the Digital Organizer software that comes with the G-Note 5000 to delete pages from memory after download to a PC.
3.6 Configuring your G-Note
The G-Note is designed to be used in a wide variety of applications and environments. With its built-in menus you can easily configure the G-Note 5000 to your specific needs. The menus will allow you, for instance, to change the paper orientation from portrait to landscape, start a new workbook, or adjust battery power saving options.
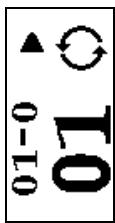
Accessing the main menu
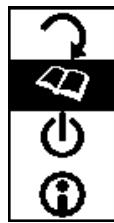
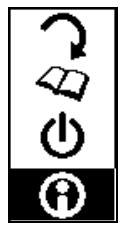
You can access the main menu anytime while taking notes by shortly pressing the Power button on the front panel. The main menu will appear on the LCD display. By pressing the or the function buttons on the front panel you can select one of the following four menus:
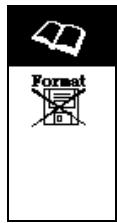
| ? | Rotate: This menu allows you to adjust the paper orientation from portrait to landscape or even use the G-Note 5000 upside down. |
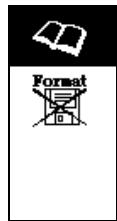
| Format | Workbook: Start a new workbook (e.g. at the start of a new meeting), or after changing a paper pad. Workbook - Format disk: Use this option to format the flash memory and erase all of its content. |
| Suspend: You can significantly prolong battery life by adjusting the auto shut-down timer of the G-Note 5000. | |
| Status: This option lets you check the status of the batteries or the amount of memory space left for recording notes. |
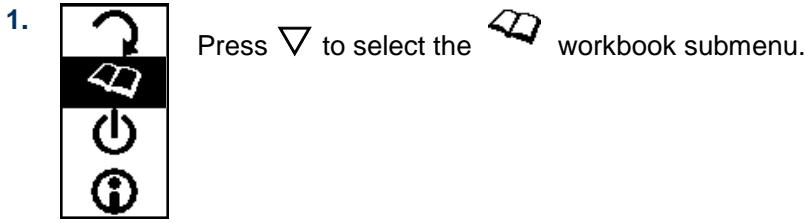
3.6.1 The Rotate menu

Press to select the

rotate submenu.
2.

Press [ENTER] to confirm.
3.
Press to adjust the paper orientation with steps of 90^ each:


4.
Press to confirm and return to the main menu

nter
Esc Return to main menu

Return to note taking mode
3.6.2 The Workbook menu
1.
Press

to select the

workbook submenu.
2.
Press [ENTER] to confirm.
3.

Press to increase the workbook number.
4.
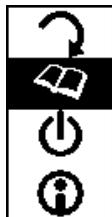
Press to confirm and return to the main menu.

Enter

sc Return to main menu

Return to note taking mode
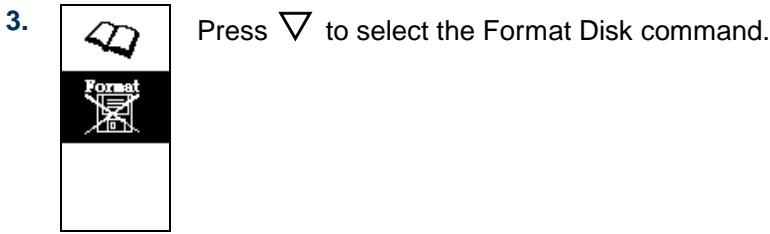
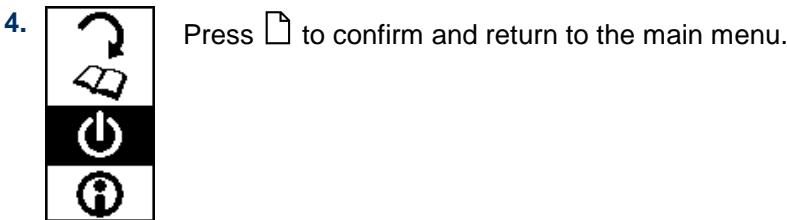
3.6.3 The Workbook - Format Disk command
- Press [ENTER] to confirm.
Press

[ENTER] to confirm.

Enter

Esc Return to main menu

Return to note taking mode
3.6.4 Setting the auto-suspend timer

- Press [ENTER] to confirm.

- Press or to increase or decrease the idle time (from 3~60 minutes) after which the G-Note will automatically switch off.


Enter

Esc Return to main menu

Return to note taking mode
3.6.5 The remaining disk space / battery power display
1.
Press to select the

status menu.
2.

Press [ENTER] to confirm.

Remaining disk space in %
Remaining battery power in %
3.

Press × to return to the main menu.


Enter

sc Return to main menu

Return to note taking mode
3.7 Turning off the G-Note

OFF
Press and hold the Power button for about three seconds to manually switch off the G-Note.
4. The Digital Organizer
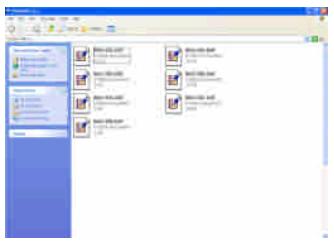
The Digital Organizer lets you view, edit, annotate, or e-mail your digital pages in Windows. You can download the digital pages from the G-Note's built in memory to your computer, and organize, rename, delete, or save them in most frequently used file formats like JPG, BMP, or PDF.
4.1 Installing the Digital Organizer software
- Turn on your computer and start Windows
- Insert the Digital Organizer CD into the CD-ROM drive. If your system has the "Autorun" function enabled, your screen will display the setup screen menu. If the setup screen did not appear after a while, double click My computer on the Windows desktop, and then the Compact Disc icon and the Setup icon in succession.

- Confirm the location of the destination folder (recommended) and click [OK].
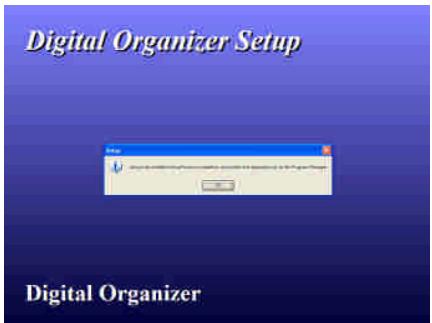
- To proceed with the installation, click [OK], wait until the installation is completed, and click [OK] again.
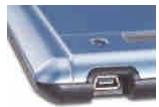
4.2 Downloading digital pages from the G-Note
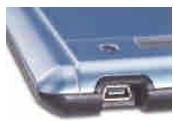
Take the G-Note 5000 USB cable that is included in the package, and plug the small connector of the cable into the USB connector on the G-Note 5000. Make sure your computer is turned on and plug the wide connector of the cable into an available USB port on your computer
USB connector
The LCD display will show a USB connector diagram to confirm that you have successfully established a USB connection between the G-Note and your PC, and that the G-Note 5000 is in pent tablet mode (see section 4.5).
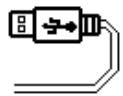
G-Note in pen tablet mode
The G-Note 5000 will not be able to capture notes while it is in pen tablet mode.
Do not use the 32MB flash memory of the G-Note 5000 as a storage disk as file
errors may occur!

The G-Note 5000 won't use battery power but will receive its power from a computer during the USB connection.
4.3 Importing digital pages (Windows XP)
After you plug in the USB connector to your PC, Windows XP will automatically detect the built-in 32MB flash memory of the G-Note 5000 as a removable storage device, and display its contents as a series of digital pages with .dnt file extensions.
Double-click on a .dnt file to open the Digital Organizer and import the selected page into the Organizer's main screen.
4.4 Importing digital pages (Windows 2000 & XP)
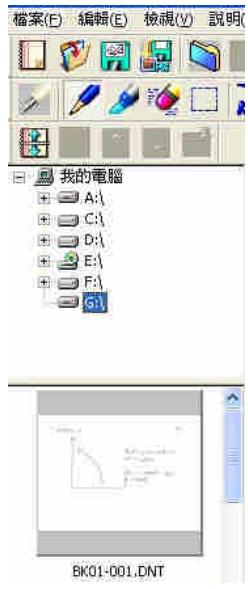
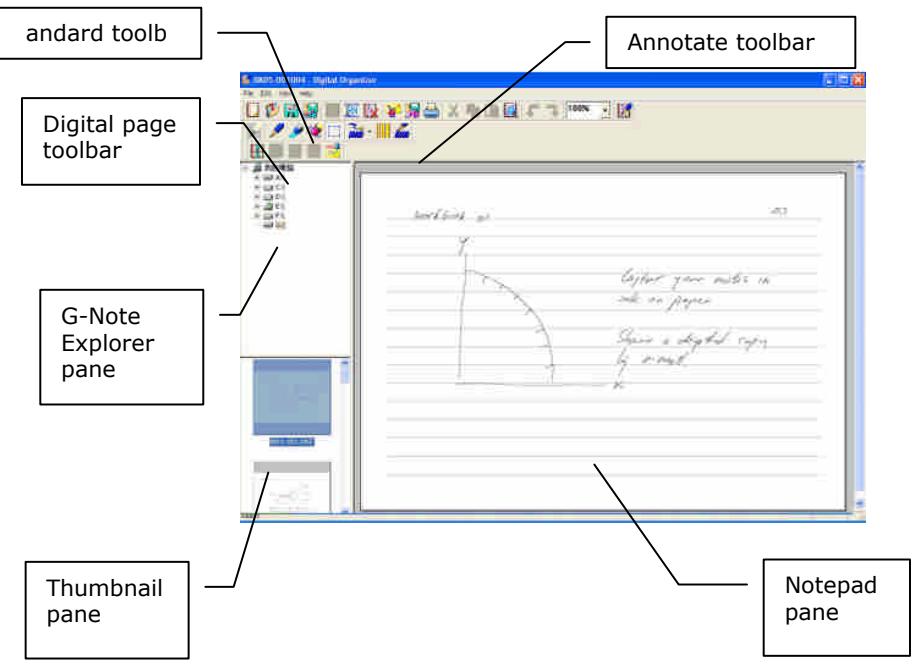
The functionalities of G-Note Explorer at the upper left side of the main screen are very similar to Windows Explorer. You can select drives, create new folders, and copy files across like you would do in Windows itself.
After you have connected the G-Note 5000 to your PC, the internal flash memory will appear as a removable disk (e.g. G:) in the G-Note explorer pane.
The Thumbnail pane at the lower left side of the main screen displays a series of miniaturized representations of all the digital pages in the current G-Note file. Use the slider in the pane's scrollbar to browse through the entire G-Note file.
Left-click a thumbnail to select a digital page. Double-click the thumbnail to import the digital page into the Notepad pane.
G-Note explorer pane (top) with Thumbsail pane (bottom)
4.5 Using the G-Note as a pen tablet

As soon as you have established a USB connection with your PC, the G-Note 5000 will instantly double as a pen tablet. You can use the black digital ink pen – marked as pen number 1 on the LCD display in note taking mode – as an input stylus in a much the same way as the stylus of a traditional pen tablet, a tablet PC, or handheld computer.
In pen tablet mode, you can hover the pen over the writing area to navigate the cursor across the screen, tap and double-tap on program icons to select and open them, and annotate your notes in the Digital Organizer program as well as in mainstream applications that allow freehand pen input.
Genius

For a correct mapping of the screen you must turn the G-Note 5000 in landscape (horizontal) position with the front panel buttons at you left hand side.

Avoid direct contact between the pen tip and the writing area surface. Cover the writing area with a sheet of paper, or just use an empty page of your paper pad when using the G-Note in pen tablet mode. This will avoid scratches or ink traces on the G-Note's surface.
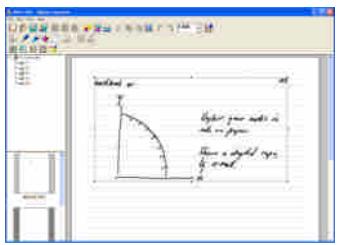
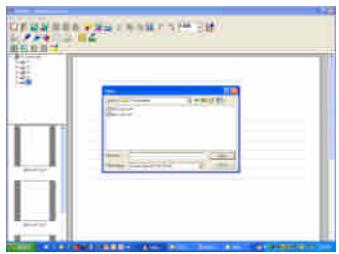
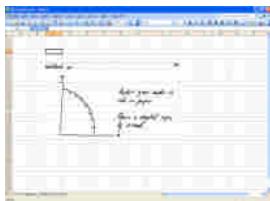
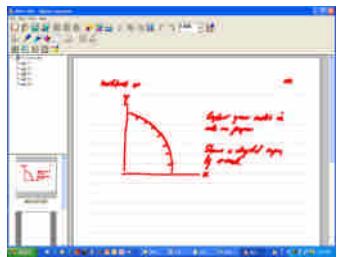
4.6 The Digital Organizer main screen
To start the program in Windows 2000 (or XP), double click on the G-Note icon on the Windows desktop. Alternatively, click [Start] [Programs] [G-Note] [G-Note icon]. The Digital Organizer's main window will appear on your screen:

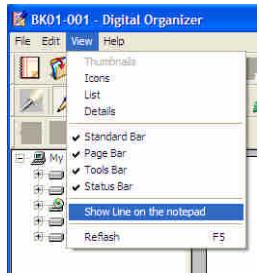
Select Show lines on the notepad from the View menu to show or hide the lines on the Notepad pane.
the lines on the Notepad pane.

4.7 The standard toolbar

Located at the upper left of the screen, the standard toolbar contains icons for all usual desktop functions like opening, saving, and printing files, cut, copy, or paste selections, etc. A detailed description of its icons follows below.

New
Create a new G-Note digital page from scratch.

Open
Open an existing G-Note file. Use the dialog to locate the file in the G-Note 5000 flash memory, or on your hard disk

Save
Save the currently selected digital page. The page will be saved as a G-Note digital page with a .dnt file name extension.
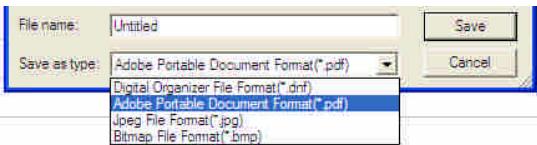
Save the currently selected digital page under another file name or in another file format (e.g. .jpg, .bmp, .pdf, etc.)
New folder: Organizing digital pages on your hard disk

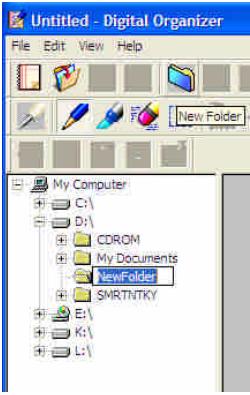
In G-Note Explorer, click on a folder where you want to create a subfolder, and click on the New folder icon. Key in an appropriate folder name, and press [Enter].
You can easily move a specific selection of digital pages by dragging the thumbnails from the Thumbnail pane to the new folder in the GNote Explorer pane.
Select and hold down the Shift-key on the thumbnails to select consecutive pages, or the Ctrl-key to select non-consecutive pages, and drag the pages to the new folder you created in the G-Note Explorer pane.
Freeing up space on the flash memory

You can free up space or even totally erase the flash memory of the G-Note 5000 by moving a selection or all digital pages to your hard disk: Select the G-Note's Removable Disk in the G-Note explorer, select the digital pages you want to erase (see section 4.9 under Selection techniques), and click on the Delete icon in the Standard toolbar.

Make sure to make back-ups of the digital pages in the flash memory of the G-Note 5000 by copying them to a folder on your hard disk before erasing them. Once erased digital pages cannot be recovered!

Rename
Click on the Rename icon and key in the new name in the thumbnail's caption.
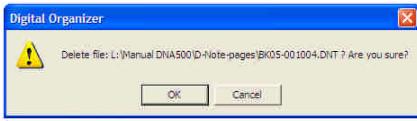
Click on the Delete icon to delete the selected digital page(s). Click [OK] to
confirm, or [Cancel] to abort this action.

Digital pages that are deleted using this function can be recovered!
Delete

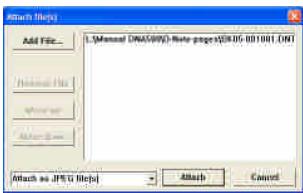
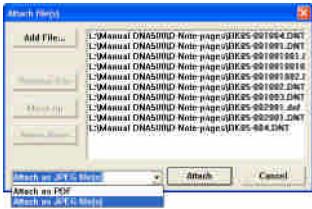
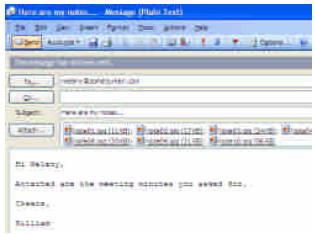
Use the E-Mail icon to attach your selection of digital pages in the Thumbnail pane as a series of JPG file attachments, or as a multipage PDF file, in e-mail programs such as MS Outlook or Outlook Express.
- After clicking on the E-Mail icon your selection will appear in the Attach file(s) dialog box.
- Hold down the Shift-key and move the cursor to the right to select consecutive pages.
- Or hold down the Ctrl-key and click on individual file names to select non-consecutive pages.
- Click on the [Add File...] button in the dialog box, and browse to the digital page files on you hard disk that you would like to add to your selection. Click on the [Move up] or [Move down] buttons to change the order of the pages. In the drop down menu, select whether you want to attach the pages as
JPG files or a PDF file.
- Click on the [Attach] button in the dialog box to finalize the operation. Your e-mail program will open and your pages will be attached as a series of JPG files, or...
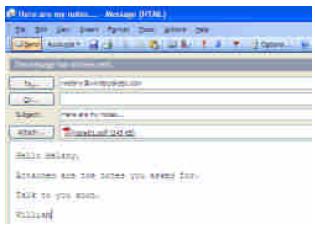
- ...as a multi-page PDF file.
Save as PDF

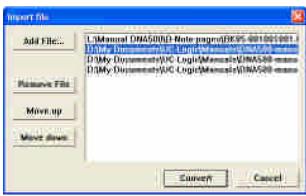
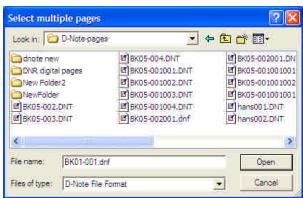
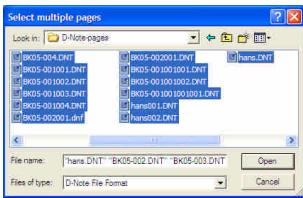
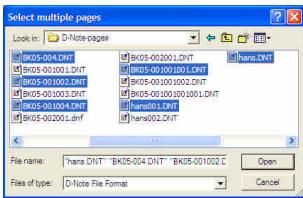
With the Save as PDF icon you can compile and save your digital pages as a multi-page PDF file. First, create a selection of digital pages in the Thumbnail pane by holding down the Shift-key to select consecutive pages, or the Ctrl-key to select nonconsecutive pages.
Then click on the Save as PDF icon to open the dialog box and select the digital pages(s) you wish to save as a multi-page PDF file.
To add files to your selection from other places on your hard disk click on the [Add File...] button in the dialog box, and browse to the files you want to add. Click on the [Move up] or [Move down] buttons to change the order of the pages in the PDF file, or [Remove file] to remove a digital page from your selection.
Click the [Convert] button to finalize the operation and save your selection in a folder of your choice on you hard disk.

Print Print the currently selected digital page

Cut Cut the selected strokes or objects in the Notepad pane

Copy Copy the selected strokes or objects in the Notepad pane

Paste Paste the selected strokes or objects in the Notepad pane

Search Click on the Search icon to search for a G-Note digital page on your hard disk.

Undo Undo the last action

Redo Redo the last action

Zoom
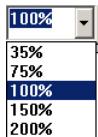
Click on the down arrow in the Zoom drop down menu and select the zoom factor.

About
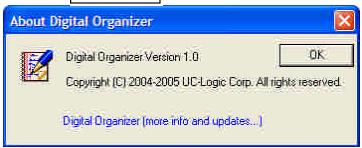
Click on the About icon to check for the latest software updates of the Digital Organizer program.
4.8 The annotate toolbar

The Annotate toolbar lets you annotate your digital pages with pencils and highlighters in various colors and shapes. A built-in eraser function is provided to easily make corrections. You can use the pen tablet functionality of the GNote 5000 (see section 4.5) to quickly and conveniently annotate your digital pages.
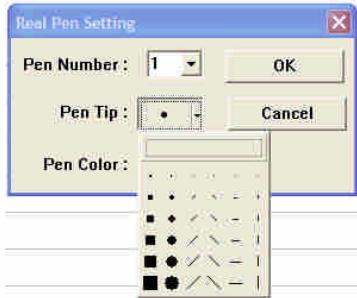
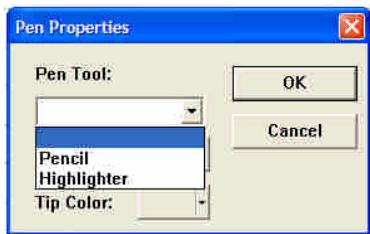
G-Note pen properties

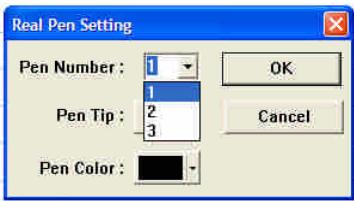
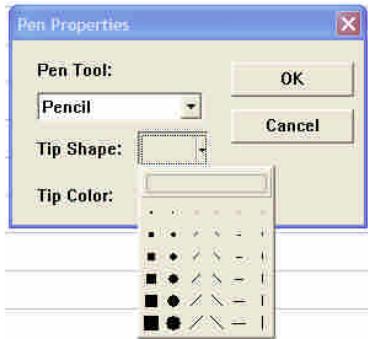
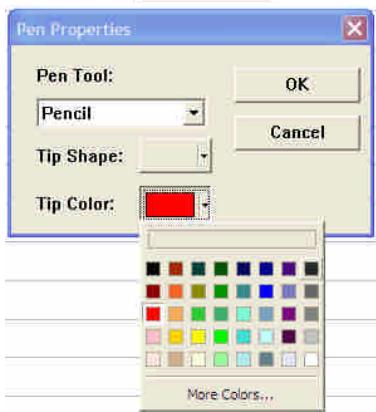
Use this dialog box to select the pen type, and the color and shape of the pen tip, and modify the recorded notes in the Notepad pane.
-
Start with selecting the objects you want to modify with the Select tool (see below). The selection will then appear in a selection box. You can now change pen tip colors and shapes, and click the [OK] button to confirm.
-
Select the pen-tip shape. Click the [OK] button to confirm.
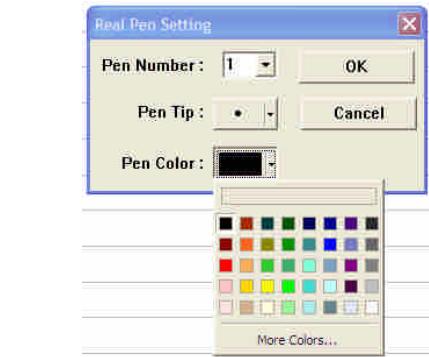
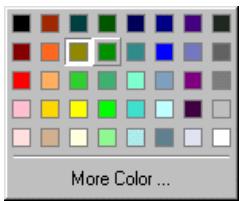
- Select the pen color. Click on the [More Colors...] button to expand the color menu. Click the [OK] button to confirm.

Pencil
Select the Pencil icon to annotate the Notepad pane with the pencil tool.

Highlighter
Select the Highlighter icon to highlight parts of the Notepad pane with transparent highlighter ink.

Erase stroke
Select the Erase stroke icon to clear pen strokes or objects one by one by moving the eraser cursor over the stroke(s) you want to delete.
Select tool: Copying and moving objects

Drag the cursor over the area or objects in the Notepad pane that you want to select for cutting, copying, or pasting through the Cut, Copy, or Paste commands, or restyle through the Annotate pen properties command.

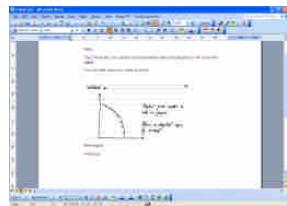
You can directly copy and paste your selection in Microsoft Office programs such as Word, Excel, and Outlook for further processing or sending by e-mail.
MS Outlook
MS Word
MS Excel
Annotate pen properties

Use this Pen Properties dialog box to modify the annotations in the Notepad pane.
-
Start with selecting the objects you want to modify with the Select tool (see above). The selection will appear in a selection box. You can now change pen tip colors and shapes, and click the [OK] button to confirm.
-
Select the pen tip shape. Click the [OK] button to confirm.
-
Select the pen color. Click on the [More Colors...] button to expand the color menu. Click the [OK] button to confirm.
Result

Pen tip shape
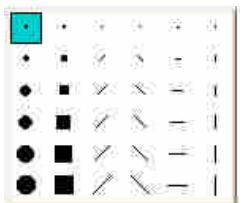

Pen tip color
Click on the Pen tip shape icon to select the size and shape of the pen tip. Changing the pen tip shape allows you to create some stunning calligraphy.
Click on the Pen tip color icon to open the color menu and select or change the colors of the pencil or highlighter. Click on [More Color...] to expand the color menu.
4.9 The Digital page toolbar
The Digital page toolbar offers some powerful functions to manipulate and repair your digital pages.

Untangle superimposed pages

A commonly mistake made by users is to forget pressing the New page front panel button each and every time they turn a paper sheet on the notepad to start a new digital page in memory.
This will unavoidably result in superimposed digital pages in the GNote's memory with notes and diagrams of a later recorded page being superimposed over an earlier one. Such superimposed pages will then appear as gibberish in the Digital Organizer window.
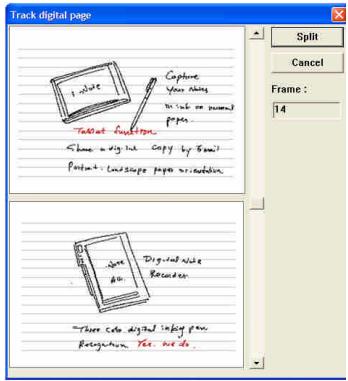
With the Untangle function you can track the recorded notes as a sequence of frames, and split the superimposed page at the point in time where you forgot to press the New page button. The result will be two separate and perfectly readable pages again:
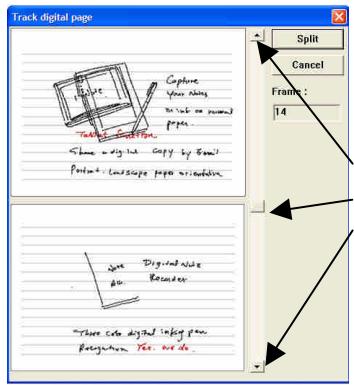
Frame slider and up and down arrows
Click on the Untangle icon to open a dialog box consisting of two pages:
The top page will present the earlier recorded page. The Digital Organizer software will automatically try to guess at what point in time you forgot to press the New page button. The bottom page will show the notes and diagrams of the superimposed page.
You can fine tune the untangling process by dragging the frame slider up or down the scroll bar, and release the left mouse button.
You can also click on the up or down arrows at the top or bottom of the scroll bar to step through the note recording frame by frame.
Click on the [Untangle] button to divide the superimposed pages into two new and repaired ones.

Rotate page
Rotate the currently selected digital page clockwise or counterclockwise.


Page up
Move to the previous digital page in the Thumbnail pane.

Page down
Move to the next digital page in the Thumbnail pane.

Comments
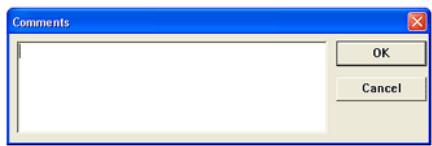
Key in the comments that you want to attach to the selected digital page, and click [OK] to confirm.
Appendix
Replacing the ink cartridge of the digital pen
Open the battery compartment of the G-Note 5000 by lifting its cover while pressing the release latch inward, and locate the ink cartridge and the notch to extract the cartridge from the pen.
Battery compartment
- Hold the digital pen upright and insert the cartridge tip into the center of the notch.
- Gently push the pen inside the notch.
- Gently pull out the ink cartridge from the pen.
- Insert a new cartridge and press the tip firmly against a hard surface until it snaps into place.
Replacing the battery of the digital pen
Even though the battery of the digital pen will last for approximately 14 months, the battery in the pen may be exhausted if you receive erratically missing, lengthened, shortened, or twisted digital ink strokes, or a significant decrease of the thickness of the strokes. If so, please replace the battery (refer to section 1.6 for instructions as to how to replace the pen's battery).
Taking care of your G-Note 5000
To assure proper functioning of the G-Note 5000, please observe the following precautions:
- Remove the batteries from the G-Note 5000 if it is not expected to be used for long periods. This will eliminate the possibility of battery liquid leaking from the batteries and corroding internal components.
- Remove the button-cell battery from the digital ink pen if it is not expected to be used for long periods.
- Avoid placing magnetic media or hot or heavy items on the surface of the G-Note 5000.
-
Clean the pen and the housing of with a soft cloth lightly dampened with water or a neutral detergent.
-
Never drop the digital pen or the note recorder. The G-Note 5000 may malfunction if subjected to strong shocks or vibration.
- Avoid cutting or scratching the surface of the G-Note 5000.
- Never immerse the pen or digital not recorder in liquid.
- Avoid operating or storing the pen and the recorder in extremely hot or cold temperatures, or where the relative humidity is high.
- Never take the G-Note 5000 or pen apart as this will void warranty. Leave servicing of the device to qualified technicians
- Do not use or store the G-Note 5000 in the vicinity of equipment that generates strong electromagnetic radiation or magnetic fields.
Troubleshooting
? A superimposed digital page is created.
Make sure to press the New button on the front panel every time you turn a paper sheet on the notepad to start a new digital page, and make sure that the Page icon on the LCD display shows an empty page. Note: You can repair superimposed pages with the Untangle function (see section 4.9).
? The G-Note 5000 has recorded only part of all notes.
- The batteries in the G-Note 5000 may have run out of power during a note taking session. Please replace the batteries (see section 1.5 for instructions).
- Please check if the battery cover is properly closed in note taking mode.
- You may have used a paper pad thicker than the maximum 15mm thickness. This will cause the digital pen tip to move outside of the reading height range of the G-Note 5000. Please check if the pen icon on the LCD display is either white or black (see also section 3.2) in note taking mode to assure a proper reading height distance.
- After you have switched on the device, it may take a second or two for the page icon - or - to appear on the LCD display. Please give the G-Note 5000 the chance to properly start up.
- You may have set the auto-suspend timer to too short a period of idle time (see 3.6.4.). Please increase the auto suspend time.
Lengthened or disturbed digital ink strokes occur
Do not use two pens at the same time, or place one pen on the paper pad while writing with the other one.
? The Page counter has not yet reached 99, but the memory is full.
Although the G-Note 5000 theoretically has the ability to manage up to 99 workbooks of 199 digital pages each, in practice such ability is limited to the maximum storage capacity of the built-in flash memory. The G-Note 5000 has a storage capacity of 32MB, which equals about 511 digital pages.
Glossary
G-Note file - A proprietary file format used to store digitized pen movements in the flash memory of a G-Note digital note recorder. The source file can generate captured objects as a series of digital pages. The file extension is .dnf or .dnt
Flash memory - A solid-state, nonvolatile, rewrites memory that functions like a combination of RAM and hard disk. Flash memory is durable, operates at low voltages, and retains data when power is off.
Pen tablet - A pen tablet (or graphics tablet) is a computer peripheral device that allows for a relatively simple method of inputting freehand notes, graphics or art into a computer in real time.
Technical specifications
Digital notepad specifications
| Technology | Electromagnetic digitizer |
| Dimensions | 281(L)x 180(W) x 12(H) mm |
| Weight | 358g (not including batteries) |
| Paper size | 150 x 210mm DIN A5 |
| Thickness paper pad | Max. 15 mm / about 150 sheets |
| Storage medium | Built-in with 32MB flash memory |
| Power Source | Alkaline batteries AAA 1.4V x 4 |
| Battery Life | 100 ± 20 hours (continuous use) |
| Work Current | 3V / 20mA ± 5mA |
| Power consumption | 60mW ± 15mW |
| Power saving | Auto suspend after 15 min. idle time (configurable) |
| Interface | USB 1.1 |
Digital ink pen specifications
| Dimensions | 140(L) x 10mm Ø |
| Weight | 12g including battery |
| Power source | One 1.4V button cell battery (PR48) |
| Battery Life | About 1000 hours (continuous use) |
| Ink cartridge | 67.1(L) x 2.3mm Ø |
File formats
| Proprietary | DNT; DNF |
| Mainstream | JPG; BMP; PDF |
| Operating system | Windows 2000 or XP |
| CPU | Pentium III 500MHz or equivalent or higher |
| RAM | 128MB or more recommended |
| Interface | Available USB port; CD-ROM drive |
| Hard disk space | Min. 32MB |