
PHOTOSMART 420 - Printer COMPAQ - Free user manual and instructions
Find the device manual for free PHOTOSMART 420 COMPAQ in PDF.


| Product type | Portable photo printer with built-in camera (GoGo Photo Studio) |
| Brand and model | COMPAQ PHOTOSMART 420 (HP Photosmart 420 series) |
| Print technology | HP Vivera thermal inkjet |
| Supported paper sizes | Photo 10x15 cm, 10x30 cm panoramic, A6 cards, L-size, index, Hagaki (from computer) |
| Paper tray capacity | Up to 20 sheets (10 for panoramic) |
| Connectivity | USB 2.0, PictBridge (front port), Bluetooth (via optional adapter), video (TV) |
| Power | Power adapter 100-240 V, 50/60 Hz; optional internal HP Photosmart battery (approx. 75 prints) |
| Power consumption | Printing 12.3 W (US), standby 6.29 W, off 4.65 W |
| Dimensions (approx.) | Approximately 25 x 15 x 10 cm (closed, with tray) |
| Weight | Approximately 1.5 kg (without battery) |
| Supported image file formats | JPEG Baseline, Motion JPEG AVI/Quicktime, MPEG-1 (video not printable) |
| Compatible ink cartridges | HP Tri-color (7 or 14 ml), HP Photo Gray; references vary by region (#95, #97, #343, #344, etc.) |
| Main functions | Printing without computer from docked camera, red-eye correction, zoom/crop, borderless prints, passport photos, transfer to PC, printing via PictBridge/Bluetooth |
| Maintenance and cleaning | External cleaning with damp cloth; cleaning cartridge contacts; automatic cleaning via menu; print test |
| Safety | Do not expose to moisture; unplug before cleaning; use a grounded outlet; do not open the device (no user-serviceable parts) |
| Spare parts and repairability | HP ink cartridges; optional internal battery; Bluetooth adapter; carrying case; repair by HP authorized center |
| General information | Original manual in French available; HP support at www.hp.com/support; regulatory model number VCVRA-0501; manufactured by Hewlett-Packard |
Frequently Asked Questions - PHOTOSMART 420 COMPAQ
User questions about PHOTOSMART 420 COMPAQ
0 question about this device. Answer the ones you know or ask your own.
Ask a new question about this device
Download the instructions for your Printer in PDF format for free! Find your manual PHOTOSMART 420 - COMPAQ and take your electronic device back in hand. On this page are published all the documents necessary for the use of your device. PHOTOSMART 420 by COMPAQ.
USER MANUAL PHOTOSMART 420 COMPAQ
Printer User's Manual
Support for the following countries/regions is available at http://hp.com/support/Austria/Bulgaria, Central America & The Caribbean, Denmark, Spain, France, Germany, Ireland, Italy, Luxembourg, Netherlands, Norway, Portugal, Thailand, Sweden, Switzerland, and the United Kingdom.
Copyrights and Trademarks
Copyright 2005 Hewlett-Packard Development Company, L.P.
The information contained herein is subject to change without notice. Reproduction, adaptation or translation without prior written permission is prohibited, except as allowed under the copyright laws.
Notice
The only warranties for HP products and services are set forth in the express warranty statements accompanying such products and services. Nothing herein should be construed as constituting an additional warranty. HP shall not be liable for technical or editorial errors or omissions contained herein.
The Hewlett-Packard Development Company, L.P. shall not be liable for incidental or consequential damages in connection with, or arising out of the furnishing, performance, or use of this document and the program material which it describes.
Trademarks
HP, the HP logo, and Photosmart are property of Hewlett-Packard Development Company, L.P.
The Secure Digital logo is a trademark of the SD Association.
Microsoft and Windows are registered trademarks of Microsoft Corporation.
Mac, the Mac logo, and Macintosh are registered trademarks of Apple Computer, Inc.
The Bluetooth word mark and logos are owned by the Bluetooth SIG, Inc. and any use of such marks by Hewlett-Packard Company is under license.
PictBridge and the PictBridge logo are trademarks of the Camera & Imaging Products Association (CIPA).
Other brands and their products are trademarks or registered trademarks of their respective holders.
The embedded software in the printer is based in part on the work of the Independent JPEG Group.
The copyrights to certain photos within this document are retained by the original owners.
Regulatory Model Identification Number VCVRA-0501
For regulatory identification purposes, your product is assigned a Regulatory Model Number. The Regulatory Model Number for your product is VCVRA-0501. This regulatory number should not be confused with the marketing name (HP Photosmart 420 series GoGo Photo Studio) or product number (Q6366A).
Safety Information
Always follow basic safety precautions when using this product to reduce risk of injury from fire or electric shock.

Warning To prevent fire or shock hazard, do not expose this product to rain or any type of moisture.
- Read and understand the setup instructions that came in the box with the printer.
Use only a grounded electrical outlet when connecting the unit to a power source. If you do not know whether the outlet is grounded, check with a qualified electrician. - Observe all warnings and instructions marked on the product.
Unplug this product from wall outlets before cleaning. - Do not install or use this product near water or when you are wet.
Install the product securely on a stable surface.
Use only the listed power adapter.
Install the product in a protected location where no one can step on or trip over the power cord, and where the power cord will not be damaged.
If the product does not operate normally, see the troubleshooting information in the onscreen Printer Help.
There are no operator serviceable parts inside. Refer servicing to qualified service personnel.
Use in a well-ventilated area.
Environmental Statements
Hewlett-Packard Company is committed to providing quality products in an environmentally sound manner.
Protecting the Environment
This printer has been designed with several attributes to minimize impact on our environment. For more information, go to HP's Commitment to the Environment website at www.hp.com/hpinfo/globalcitizenship/environment/.
Ozone Production
This product generates no appreciable ozone gas (O3) .
Paper Use
This product is suited for the use of recycled paper according to DIN 19309.
Plastics
Plastic parts over 24 grams (0.88 ounces) are marked according to international standards that enhance the ability to identify plastics for recycling purposes at the end of the printer life.
Material Safety Data sheets
Material Safety Data Sheets (MSDS) can be obtained from the HP website at www.hp.com/go/msds.Customers without Internet access should contact Customer Care.
Recycling Program
HP offers an increasing number of product return and recycling programs in many countries, and partners with some of the largest electronics recycling centers throughout the world. HP conserves resources by reselling some of its most popular products.
This HP product contains lead in the solder, which may require special handling at the end of its life.
Disposal of Waste Equipment by Users in Private Households in the European Union
This symbol on the product or on its packaging indicates that this product must not be disposed of with your other household waste. Instead, it is your responsibility to dispose of your waste equipment by handing it over to a designated collection point for the recycling of waste electrical and electronic equipment. The separate collection and recycling of your waste equipment at the time of disposal will help to conserve natural resources and ensure that it is recycled in a manner that protects human health and the environment. For more information about where you can drop off your waste equipment for recycling, please contact your local city office, your household waste disposal service or the shop where you purchased the product.
For more information regarding return and recycling of HP products generally, please visit: www.hp.com/ hpinfo/globalcitizenship/environment/ recycle/index.html.
Contents
1 Welcome 3
Finding More Information 4
Printer Parts 5
Available Accessories 11
Battery Information 12
GoGo Photo Studio Menus 13
2 Getting Ready to Print 17
Loading Paper 17
Choosing the Best Paper for the Job 17
Loading Your Paper 18
Inserting Print Cartridges 19
Connecting the Camera 21
3 Printing Basics 23
Printing from the Docked Camera 23
Viewing Images to Print 23
Viewing images 23
Viewing images on a TV 23
Improving the Quality of Your Images 24
Printing Images 24
Printing from Other Devices 25
Computer 26
About HP Image Zone and HP Instant Share 26
Transferring to a Computer 26
PictBridge-certified Camera 27
Printing from a PictBridge-certified Camera 27
Bluetooth Wireless Devices 27
Making the Bluetooth Connection 27
Printing from a Bluetooth Device 27
4 Maintaining and transporting the printer 29
Cleaning and Maintaining the Printer 29
Cleaning the Outside of the Printer 29
Cleaning the Print Cartridge 29
Cleaning the Print Cartridge Contacts 30
Printing a Test Page 30
Aligning the Print Cartridge 30
Updating the HP Photosmart Software 31
Storing the HP Photosmart GoGo Photo Studio and Print Cartridges 32
Storing the HP Photosmart GoGo Photo Studio 32
Storing the Print Cartridges 32
Maintaining the Quality of Photo Paper 33
Storing Photo Paper 33
Handling Photo Paper 33
Transporting the HP Photosmart GoGo Photo Studio 33
5 Troubleshooting 35
Printer Hardware Problems 35
Printing Problems 40
Bluetooth Printing Problems 44
Error Messages 44
6 Specifications 47
System Requirements 47
Printer Specifications 47
7 HP Customer Care 51
HP Customer Care by phone 51
Placing a call 52
Return to HP Repair Service (North America Only) 52
Additional Warranty Options 52
Index 53
1 Welcome
Thank you for purchasing an HP Photosmart 420 series GoGo Photo Studio! The HP Photosmart GoGo Photo Studio is an innovative pairing of camera and printer in one easy-to-use device. The HP Photosmart 420 series uses HP Real Life technologies, such as red eye removal, to make it easy for you to get better prints with or without a computer.

Note In this manual references to the printer mean the part of the GoGo Photo Studio other than the camera.
This manual explains how to print from the HP Photosmart GoGo Photo Studio without connecting it to a computer. To learn how to print from your computer, install the HP Photosmart software and view the onscreen HP Photosmart Printer Help on your computer. For more information on installing the software, see the setup instructions that came in the box with the HP Photosmart GoGo Photo Studio.
Among other things, you'll learn how to:
Create beautiful borderless prints at the touch of a button. See Printing Images.
Improve the quality of your images with HP Real Life technologies such as automatic red-eye removal. See Improving the Quality of Your Images.
Finding More Information
Your new HP Photosmart 420 series GoGo Photo Studio comes with the following documentation:
- Quick Start or Setup Guide: The HP Photosmart 420 series GoGo Photo Studio comes with setup instructions that explain how to set up the HP Photosmart GoGo Photo Studio and install the HP Photosmart software. The Quick Start also includes basic camera operation. The name of the document varies by country/ region.
HP Photosmart 420 series GoGo Photo Studio Printer User's Manual: The Printer User's Manual is the book you are reading. This manual describes the basic features of the HP Photosmart GoGo Photo Studio, explains how to use it without connecting it to a computer, and contains hardware troubleshooting information. In some countries/regions the User's Manual is provided in online format on the HP Photosmart User's Manual CD.
HP Photosmart Printer Help: The onscreen HP Photosmart Printer Help describes how to use the HP Photosmart GoGo Photo Studio with a computer and contains software troubleshooting information.
HP Photosmart 420 series GoGo Photo Studio Camera User's Manual: This documentation explains how to use the HP Photosmart GoGo Photo Studio camera to take pictures and includes troubleshooting and maintenance information. In some countries/regions the camera documentation is provided only in online format on the HP Photosmart User's Manual CD. In those countries/ regions the Quick Start includes basic printed instructions for both the camera and the printer components.
After you have installed the HP Photosmart software on your computer, you can view the onscreen Printer Help on your computer:
- Windows PC: From the Start menu, select Programs (in Windows XP, select All Programs) > HP > HP Photosmart 420 series > Photosmart Help.
- Macintosh: Select Help > Mac Help in the Finder, then select Library > HP Photosmart Printer Help for Macintosh.
Printer Parts
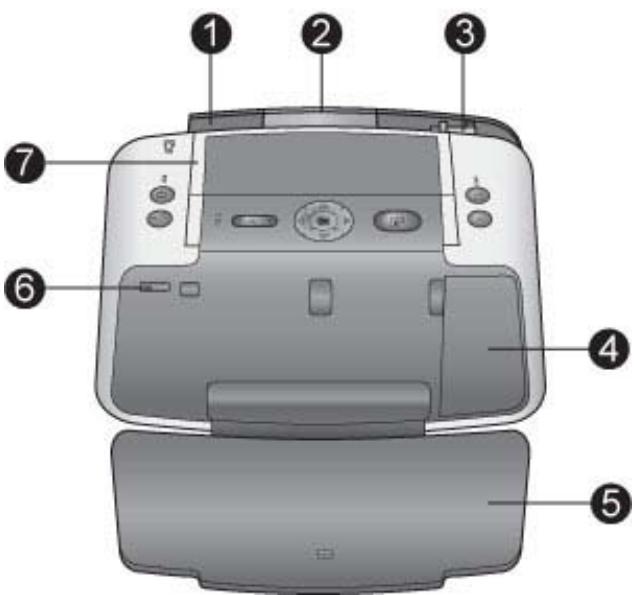
This section contains information only on the printer component of the HP Photosmart 420 series GoGo Photo Studio. For information on the camera, see the Camera User's Manual.
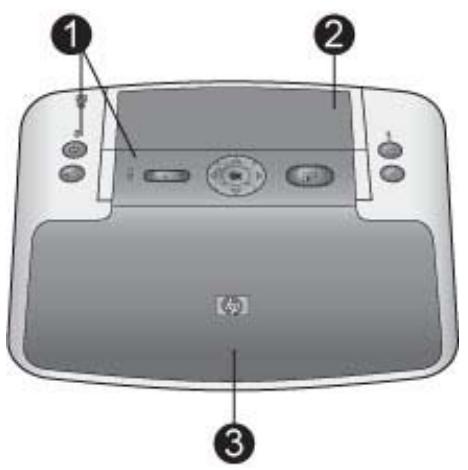
Front View (Closed)
| 1 | Control panel: Control the basic functions of the printer from here. |
| 2 | Camera dock cover: Open this to dock the camera on the printer. |
| 3 | Output tray: Open this to print or to connect a PictBridge-certified digital camera or the optional HP Bluetooth wireless printer adapter to the camera port on the front of the printer. It should also be open if you want to use the remote control with the printer. |
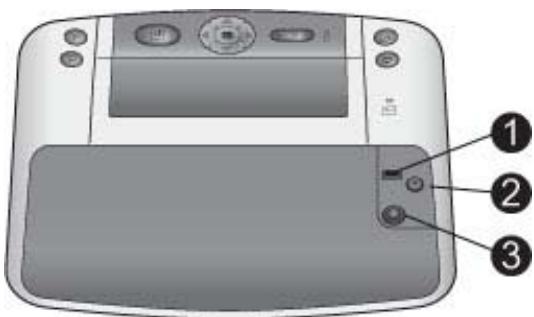
Front View (Open)
| 1 | In tray: Load paper here. |
| 2 | In tray extender: Pull out to support paper. |
| 3 | Paper-width guide: Move to the width of the current paper to position the paper properly. |
| 4 | Print cartridge door: Open to insert or remove a print cartridge. |
| 5 | Output tray (open): The printer deposits prints here. |
| 6 | Camera port: Connect either a PictBridge-certified digital camera to this port or the optional HP Bluetooth wireless printer adapter. |
| 7 | Handle: Extend to carry the printer. |
Rear of Printer
| 1 | USB port: Connect the printer to a computer using the supplied USB cable here. |
| 2 | Video port: Connect the video cable here to use the printer with a television to view images. |
| 3 | Power cord connection: Connect the power cord here. |
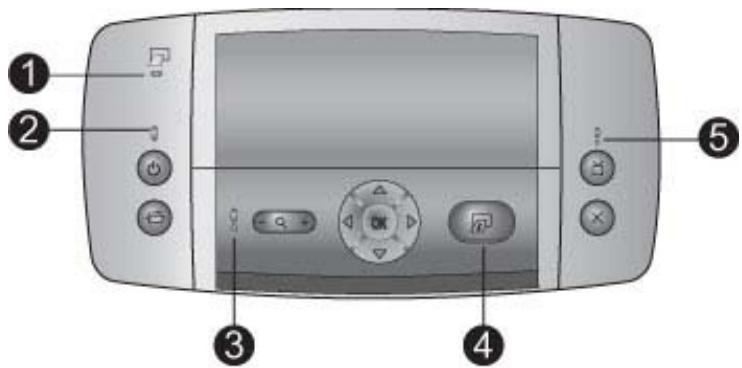
Indicator Lights
| 1 | Printer battery light: Solid green if the optional battery is installed and fully charged, flashing if the battery is charging. |
| 2 | On light: Solid green if the printer is on, flashing if the printer is turning on or off. |
| 3 | Status light: Flashing red if there is an error or if some user action is required. An error message on the camera Image Display describes the problem. |
| 4 | Print light: Solid green if the printer is ready to print, pulsing green if the printer is busy printing. |
| 5 | Video status light: Solid green if you are viewing images on a connected television monitor. |
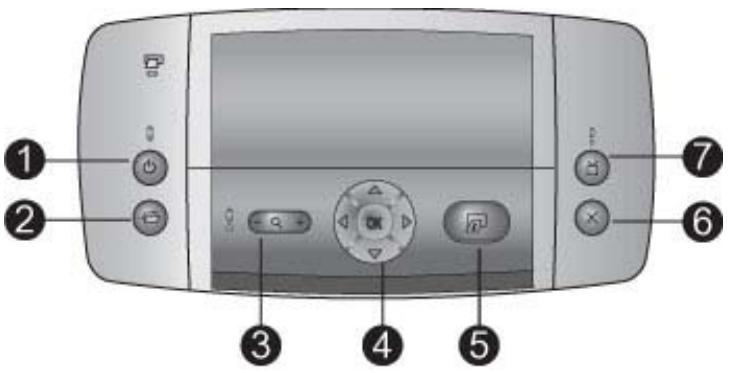
Control Panel
| 1 | On: Press to turn the printer on or off. |
| 2 | Save: Press to transfer images from the docked camera to a connected computer. |
| 3 | Zoom: Press Zoom + to enter Zoom mode. Each subsequent press increases the zoom level. Pressing Zoom + when viewing thumbnails displays the current image at full size. Pressing Zoom - when viewing a zoomed image decreases the zoom level. Pressing Zoom - when viewing a image at the full size lets you view several images at the same time as thumbnails. |
| 4 | Navigation buttons: Use the arrows to scroll through images or navigate the menus. Press OK to open/close a menu or to select a menu option. |
| 5 | Print: Press to print the current image. Each additional press prints the same image again. |
| 6 | Cancel: Press to stop a print action. |
| 7 | Video: Press to toggle between viewing images on an attached television monitor or on the camera Image Display. The printer must be connected to a television by using the supplied video cable. |
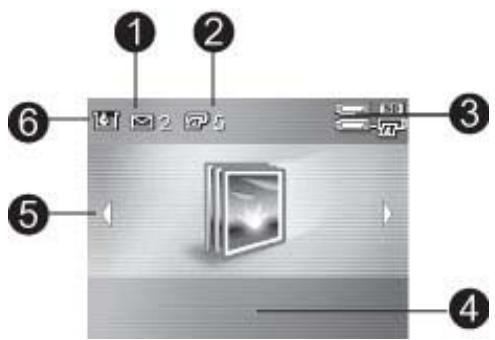
Total Images Summary Screen
| 1 | HP Instant Share status: Displays the number of images (if any) selected for distribution using HP Instant Share. For more information, see the Camera User's Manual. |
| 2 | DPOF print status: Displays the number of images already selected on the camera for DPOF printing. |
| 3 | Battery indicator: Displays the charge levels of the camera batteries (top) and optional HP Photosmart Internal Battery (bottom), if installed. |
| 4 | Messaging area: Displays printer messages. |
| 5 | Navigation arrows: These arrows indicate there are other images you can browse through by pressing or on the printer control panel. |
| 6 | Ink-level indicator: Displays the ink level of the print cartridge. |
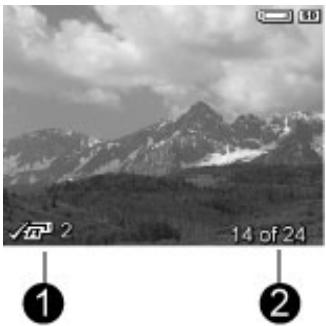
Print Images Screen
| 1 | Print box: Displays a check mark and number of copies of the current image being printed. |
| 2 | Index number: Displays index number of current image and total number of images on the camera. |
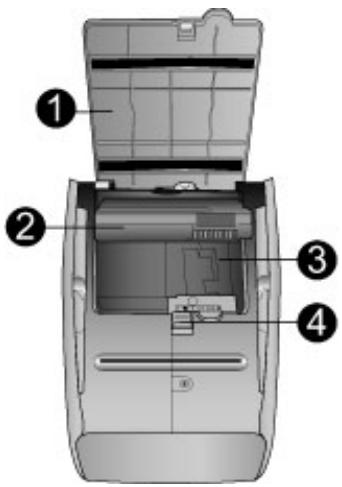
Internal Battery Compartment
| 1 | Cover of the battery compartment: Open this cover on the bottom of the printer to insert the optional HP Photosmart Internal Battery. |
| 2 | HP Photosmart Internal Battery: A fully-charged battery has sufficient charge to print approximately 75 images. You must purchase the battery separately. |
| 3 | Internal battery compartment: Insert the optional HP Photosmart Internal Battery here. |
| 4 | Battery compartment button: Slide to release the compartment cover. |
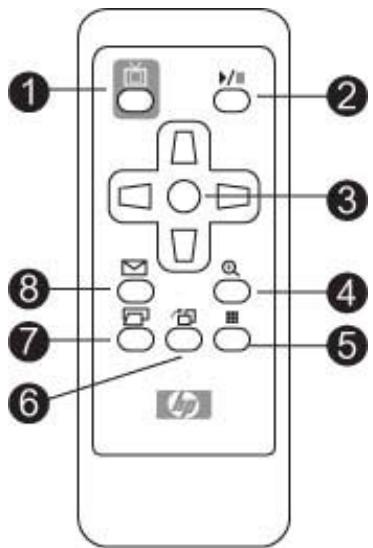
Remote Control
| 1 | Video: Press to toggle between viewing images on an attached television monitor or on the camera Image Display. |
| 2 | Play/Pause /I: Press to toggle between viewing images in a slide show or one at a time. |
| 3 | Navigation buttons: Use the arrows to scroll through images or navigate the menus. Press OK to open/close a menu or to select a menu option. |
| 4 | Zoom + : Press to enter Zoom mode. Each subsequent press increases the zoom level. Pressing Zoom + when viewing thumbnails displays the current image at full size. |
| 5 | Zoom - : Press Zoom - when viewing a zoomed image to decrease the zoom level. Press Zoom - when viewing a image at the full size to view images as thumbnails. |
| 6 | Rotate : Press to rotate the current image. Disabled if the current image is a video clip. |
| 7 | Print : Press to print the current image. Each additional press prints the same image again. |
| 8 | HP Instant Share : Press to open up the Share Menu on the camera. For more information, see the Camera User's Manual. |
Available Accessories
There are several accessories available for the HP Photosmart 420 series that enhance its portability for printing anywhere, anytime. The appearance of the accessories may vary from what is shown.
For camera accessories, see the Camera User's Manual.
| Accessory Name | Description |
| HP Photosmart Internal Battery | The HP Photosmart Internal Battery lets you take the printer with you wherever you go. |
| HP Photosmart Carrying Case for Compact Printers | The lightweight, durable HP Photosmart Carrying Case for Compact Printers holds and protects everything needed for hassle-free printing on the go. |
| HP Bluetooth wireless printer adapter | The HP Bluetooth wireless printer adapter plugs into the camera port on the front of the HP Photosmart GoGo Photo Studio and lets you use Bluetooth wireless technology for printing. |
Battery Information
The HP Photosmart 420 series GoGo Photo Studio comes with batteries for the camera and for the remote control. The optional HP Photosmart Internal Battery is also available for the printer as a separate purchase. Both the printer battery light on the control panel and the camera Image Display indicate the status of an installed HP Photosmart Internal Battery, as follows:
GoGo Photo Studio connected to AC power
- The printer battery light is on if the battery is fully charged, flashing if the battery is charging
- The camera Image Display shows a battery icon with plug if the battery is fully charged and a battery animation if the battery is charging
GoGo Photo Studio running on battery
The printer battery light is off.
The camera Image Display shows nothing if the battery is fully charged.
- The camera Image Display shows icons for Low, Very Low, and Empty. Messages also appear on the camera Image Display.
For information on the camera batteries, see the Camera User's Manual (in the box or in online format on the HP Photosmart User's Manual CD, depending on the country/region).
The HP Photosmart GoGo Photo Studio remote control is intended primarily for operating the printer when you view images on a connected television. This remote uses a supplied CR2025 battery that you need to install.
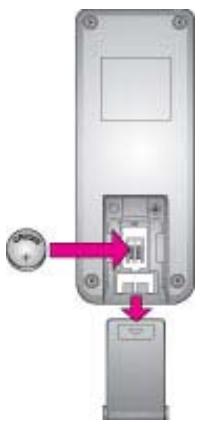
To install the remote battery:
- Remove the battery compartment cover from the back of the remote.
- Insert the supplied battery as shown with the + side up.
- Slide the cover back into place.
GoGo Photo Studio Meals
The GoGo Photo Studio menus contain many features for viewing and printing images, obtaining help, and more. The menus, when accessed, appear on the screen overlaying the current image. You can access the menus of the GoGo Photo Studio through the tabbed interface at the top of the camera Image Display. When the camera is not in the camera dock, the menus have different options. For more information, see the Camera User's Manual.
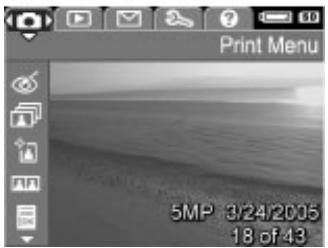
The GoGo Photo Studio Menu Tabs
| 1 | Print Menu |
| 2 | Playback Menu |
| 3 | Share Menu |
| 4 | Setup Menu |
| 5 | Help Menu |

Tip The GoGo Photo Studio menus contain many useful commands and options, but common functions, such as printing, are usually available with a single button press on the printer control panel.
To use the GoGo Photo Studio menus:
- Insert the camera in the camera dock on top of the printer. For more information see Connecting the Camera.
- Press OK on the printer control panel to access the menus. The Print Menu is displayed initially.
To Navigate the Menus:
- Press or on the printer to navigate through the menus (which appear as tabs across the top of the camera Image Display). Press or to access the options under each menu. Menu options that are not accessible are dimmed.
Press OK to select an option. - To change to a different menu, press until the current menu's tab is selected, then press → or → to navigate through the menu tabs.
- To exit the menus, select EXIT in the current menu and then press OK. You can also press until the current menu tab is selected and then press OK.
The Menu
Print Menu
- Remove Red Eyes: Select to remove red eyes from the current image. If this menu option is disabled, the option is not possible with the current image.
Print All: Select to display the Print All options. Select Full Size and press OK to print all the images in the camera, one borderless image per page. You can also select 2 Photos per Page, 4 Photos per Page, or Print Index
to print the images using one of these alternate layouts. Select Help and press OK to access help with this feature.
- Print New: Select to display the Print New options. Select Full Size and press OK to print new images in the camera taken since the last time the camera was docked, one print per page. Select 2 Photos per Page, 4 Photos per Page, or Print Index to print the images using one of these alternate layouts. Select Help and press OK to access help with this feature.
- Passport Photo: Select to display the Passport Photo options. Select 2 × 2 inches, 35 × 45 mm , 25.4 × 36.4 mm , 36.4 × 50.8 mm , or 45 × 55 mm as a passport photo size, then press OK. For more information, see To print passport photos:. Select Help and press OK to access help with this feature. This menu option is disabled if you are not currently viewing images.
- Print test page: Select to print a test page containing information about the printer that can help in troubleshooting problems. For more information, see Printing a Test Page.
- Clean cartridge: Select to clean the print cartridge. For more information, see Cleaning the Print Cartridge.
- Align cartridge: Select to align the print cartridge. For more information, see Aligning the Print Cartridge.
-
EXIT: Select and press OK to exit the current menu.
-
Playback Menu: For more information, see the Camera User's Manual.
-
Delete: Press to display various deletion options. You can delete the current image or all images from the camera. This option also lets you format the internal memory or memory card (if installed).
- Remove Red Eyes: Select to remove red eyes from the current image. If this menu option is disabled, the option is not possible with the current image.
- Rotate: Select to rotate the current image. This menu option is disabled if you are not viewing images or the current image is a video clip.
Record Audio: Disabled when the camera is in the camera dock. For more information, see the Camera User's Manual. -
EXIT: Select and press OK to exit the current menu.
-
Share Menu: Select to access the HP Instant Share features available on the camera. For more information, see the Camera User's Manual.
-
Print 1 copy: Disabled when the camera is in the camera dock. For more information, see the Camera User's Manual.
- Print 2 copies: Disabled when the camera is in the camera dock. For more information, see the Camera User's Manual.
HP Instant Share Setup: Select to set up HP Instant Share on the camera. For more information, see the Camera User's Manual. -
EXIT: Select and press OK to exit the current menu.
-
Setup Menu: For more information, see the Camera User's Manual.
Display Brightness: Select Low, Medium, or High to change the screen display contrast to suit current viewing conditions. You can extend the battery life of the camera by setting this to Low.
- Camera Sounds: Select to turn camera sounds On or Off. These are sounds the camera makes when you take a picture, turn the camera on, or press a button.
Live View Setup: Select to turn the Live View option for the camera to Live View On or Live View Off. This determines whether the camera displays a live image or not when you first turn the camera on. Live View is functional only when the camera is undocked.
- Date/Time: Select to change the date and time on the camera.
- USB Configuration: Select to set the camera to appear as a Digital Camera or as a Disk Drive when directly connected to a computer through a USB cable. When the camera is in the camera dock it always appears as a digital camera and cannot be written to from the computer.
TV Configuration: Select to change the video signal sent to an attached television to either NTSC or to PAL. The camera is set to send either an NTSC or a PAL video signal according to the language and region you selected when you set up the camera. The NTSC format is used primarily in North America and parts of South America, Japan, Korea, and Taiwan. The PAL format is used primarily in Europe, Uruguay, Paraguay, Argentina, and parts of Asia. If your television accepts a video signal different than the typical setting for your region, change the setting here.
- Language (displayed as flags icon): Select to change the language setting.
- Move Images to Card: Select to move images from the camera's internal memory to the memory card inserted in the camera. When you install a memory card in the camera, all new images are stored only on the card, and any images stored in the camera's internal memory are not visible until you take the card out. If you want to transfer all images in your camera to the PC, first move the images from the camera's internal memory to the memory card by using this option. This menu option is disabled if there are no images in the internal memory or if no card is in the camera.
- EXIT: Select and press OK to exit the current menu.
Help Menu: For additional help with the camera, see the Camera User's Manual.
Top Ten Printing Tips: Select to read the top ten printing tips.
- Printer Accessories: Select to read about accessories available for the printer.
- Printer Control Panel: Select to read about using the printer control panel.
- Print Cartridge: Select to read about using print cartridges.
- Loading Paper: Select to read about loading paper.
- Clearing Paper Jams: Select to read about removing a paper jam.
- PictBridge cameras: Select to read about using PictBridge cameras with the printer.
- Connecting to a TV: Select to read about connecting the printer to a TV.
- Saving Images: Select to read about saving images to a connected computer.
- Printer Battery: Select to read about using the optional HP Photosmart Internal Battery with the printer.
- Traveling with the printer: Select to read tips about taking the printer on the road.
- Getting assistance: Select to read how to obtain help with the printer.
- EXIT: Select and press OK to exit the current menu.
2 Getting Ready to Print
Before you can begin printing, there are some easy procedures you need to become familiar with:
- Loading paper (see Loading Paper)
- Inserting print cartridges (see Inserting Print Cartridges)
- Connecting the camera (see Connecting the Camera)
You must load paper, insert a print cartridge, and connect a camera with images in its internal memory or on its memory card before you can print.
Loading Paper
Learn how to choose the right paper for your print job and how to load it into the In tray for printing.
Choosing the Best Paper for the Job
For a list of available HP-designed inkjet paper, or to purchase supplies, go to:
www.hpshopping.com (U.S.)
www.hpshopping.ca (Canada)
www.hp.com/eur/hpoptions (Europe)
www.hp.com (All other regions/countries)
To get the best results from the printer, choose from these high-quality HP photo papers.
| To Print | Use This Paper |
| High-quality, long-lasting prints and enlargements, passport photos, and photos to be laminated | HP Premium Plus photo paper |
| Medium-to-high-resolution images from scanners and digital cameras | HP Premium photo paper |
| Casual and business prints | HP Photo paper HP Everyday photo paper |
To keep your paper in good condition for printing:
- Store unused paper in its original package.
- Keep the paper flat in a cool, dry place. If the corners curl, place the paper in a plastic bag and gently bend it in the opposite direction until it lies flat.
- Hold photo paper by the edges to avoid smears.
Loading Your Paper
Paper loading tips:
- You can print on photo paper, index cards, or L-size cards.
Before loading paper, slide out the paper-width guide to make room for the paper. - Load only one type and size of paper at a time. Do not mix paper types or sizes in the In tray.
- Do not load more than 10 sheets of 10 × 30 cm( 4 × 12inches) photo paper for panoramic printing (possible only when printing from a computer). Loading more than ten sheets can cause paper feed problems.
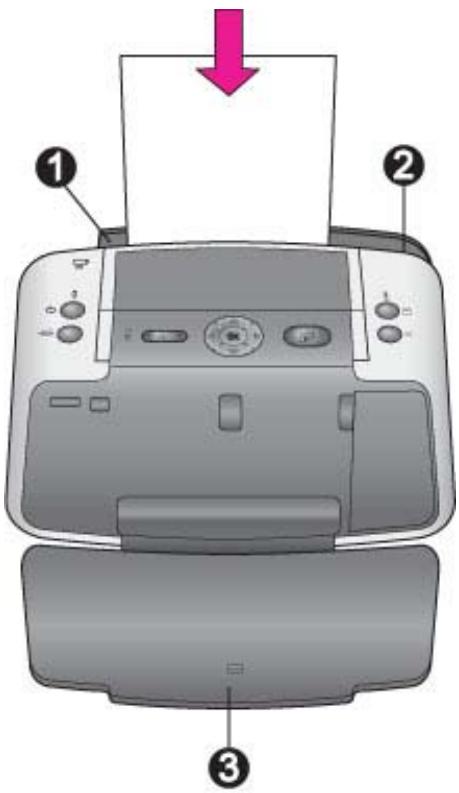
| 1 | In tray |
| 2 | Paper-width guide |
| 3 | Output tray |
To load paper:
- Open the Output tray. The In tray opens automatically.
- Load up to 20 sheets of paper with the print side or glossy side facing towards the front of the printer. If you are using tabbed paper, insert it so the tabbed end feeds in last.
- Adjust the paper-width guide to fit close to the edge of the paper without bending the paper.
Inserting Print Cartridges
Your HP Photosmart 420 series GoGo Photo Studio can print in color and black-and-white. HP provides different types of print cartridges so you can choose the best cartridge for your project. The cartridge number varies by country/region. Choose the correct cartridge number for your country/region.

Note The cartridge numbers you can use with this printer appear on the back cover of the printed Printer User's Manual. If you have already used the printer several times, you can also find the cartridge numbers in the HP Photosmart software. Windows users: Right-click the HP Digital Imaging Monitor icon on the far right of the Windows taskbar and select Launch/Show HP Solution Center. Click Settings and select Print Settings > Printer Toolbox. Click the Estimated Ink Levels tab and then click Print Cartridge Information. Macintosh users: Click HP Image Zone in the Dock. Choose Maintain Printer from the Settings pop-up menu. Click Utilities, and then choose Supplies from the pop-up menu.
HP Vivera Inks deliver true-to-life print quality and exceptional fade resistance resulting in vivid colors that last. HP Vivera Inks are specially-formulated and scientifically tested for quality, purity and fade resistance.
For optimum printing results, HP recommends using only genuine HP print cartridges. Genuine HP print cartridges are designed and tested with HP printers to help you easily produce great results, time after time.
Use the Best Print Cartridge
| To print... | Insert one of these print cartridges in the cartridge cradle |
| Full-color prints | HP Tri-color (7 ml) HP Tri-color (14 ml) |
| Black and white prints | HP Gray Photo |
| Sepia or antique prints | HP Tri-color (7 ml) HP Tri-color (14 ml) |
| Text and colored line drawings | HP Tri-color (7 ml) HP Tri-color (14 ml) |

Caution Check that you are using the correct print cartridge. HP cannot guarantee the quality or reliability of non-HP ink. Printer service or repairs required as a result of printer failure or damage attributable to the use of non-HP ink will not be covered under warranty.
For best print quality, HP recommends that you install all retail print cartridges before the date stamped on the box.

Remove the Pink Tape:


Do Not Touch Here
Prepare the printer and cartridge:
- Make sure the power is on and you have removed the cardboard from inside the printer.
- Open the print cartridge access door of the printer.
- Remove the bright pink tape from the cartridge.
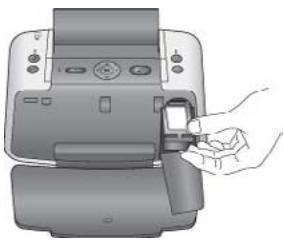
Insert the cartridge:
- If you are replacing a cartridge, push down and pull outward on the cartridge in the cradle to remove it.
- Hold the replacement cartridge with the label on top. Slide the cartridge at a slight upward angle into the cradle so the copper-colored contacts go in first. Push the cartridge until it snaps into place.
- Close the print cartridge access door.
The camera Image Display shows an icon with the approximate ink level for the installed cartridge (100–66%, 65–33%, or 32–0%). No ink-level icon appears if the cartridge is not a genuine HP cartridge.
Each time you install or replace a print cartridge, a message appears on the camera. Image Display asking you to load plain paper so the printer can align the cartridge. This ensures high-quality prints.
Align the cartridge:
- Load paper in the In tray and press OK.
- Follow the onscreen instructions to align the cartridge.
See Aligning the Print Cartridge.
Whenever you remove a print cartridge from the printer, store it in a print cartridge protector. The cartridge protector keeps the ink from drying out. Storing the cartridge improperly can cause the cartridge to malfunction.
In some countries/regions the cartridge protector is not included with the printer, but comes with the HP Gray Photo cartridge that can be purchased separately. In other countries/regions, the protector is included with the printer.
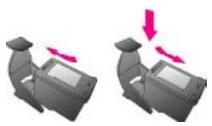
Store the cartridge when it is not in the printer:
To insert a cartridge into the cartridge protector, slide the cartridge into the protector at a slight angle and snap it securely into place.
Connecting the Camera
To print images you have taken with the camera, you need to dock the camera on the printer.

Note You can also connect a PictBridge-certified camera to the camera port on the front of the printer (using the USB cable that came with the PictBridge-certified camera) and print images from it, but you cannot have the HP Photosmart 420 series GoGo Photo Studio camera in the camera dock and a second PictBridge camera connected to the camera port at the same time.
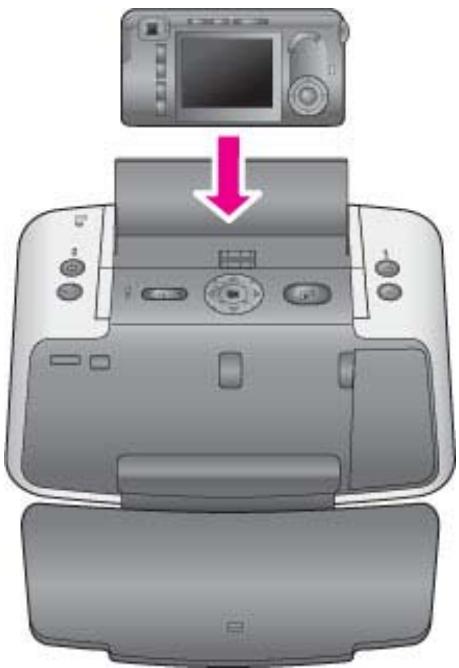
Dock the camera on the printer:
- Open the camera dock cover, if necessary.
- Hold the camera so the camera Image Display faces you and the bottom of the camera is down.
- Make sure the camera is turned off.
- Press the camera into the dock so that the connector tab in the camera dock plugs into the connector slot on the bottom of the camera.
- In most cases, docking the camera turns on both the printer and the camera. If it does not, press the On button on the printer control panel.

Note While the camera is docked, the camera Image Display dims after eight minutes of inactivity. The camera Image Display turns back on if a print job is sent from a connected computer or device with Bluetooth wireless technology, or if you press any button on the HP PhotosmartGoGo Photo Studio. After ten idle minutes, the camera Image Display turns off completely. Press the On button on the printer control panel to wake the display.
3 Printing Basics
The HP Photosmart 420 series GoGo Photo Studio lets you produce amazing prints without even going near a computer. After setting up the printer using the setup instructions that came in the box, you are just a few steps away from printing your images. This section describes:
- Printing from the Docked Camera
- Printing from Other Devices

Note In the following instructions, always use the buttons on the printer control panel, unless instructed otherwise. Also note that most camera buttons are disabled when the camera is in the camera dock. The only exception is the camera ON/OFF switch which turns off only the camera.
Printing from the Docked Camera
Printing images directly from the docked camera is the easiest and fastest way to turn your digital images into outstanding prints. This section describes:
Viewing Images to Print
Improving the Quality of Your Images
- Printing Images
Viewing Images to Print
You can browse and print from the camera Image Display or on a television monitor (after connecting the printer to the monitor with the supplied video cable).
Viewing images
You select the images you want to print by using either the printer control panel or the remote control that came in the box. Make sure the camera has images on its internal memory or on an optional memory card and is in the camera dock.
To view images one at a time:
→ Browse the images on the camera by pressing or on the printer control panel.
To view images as thumbnails:
- View images as thumbnails by pressing Zoom - on the printer control panel.
- Browse the thumbnails by pressing the arrow buttons on the printer control panel. The current image is highlighted.
-
You can now either:
-
Press OK to exit the thumbnail view and view the selected image at full size.
Press Print to print the highlighted image.
Viewing images on a TV
You can attach the HP Photosmart 420 series to a television monitor to view and select the images that you want to print.
To view images on a television
- Connect the printer to the television monitor by using the supplied video cable.
- Turn the television monitor on and change the television setting to receive input from the HP Photosmart GoGo Photo Studio. For more information, see the user manual that came with the television.
- Press the Video button on the printer control panel.
- Press the arrow buttons on the printer or on the remote to browse the images. To view images in an automatic slide show, press Play/Pause on the remote. Press Play/Pause again to return to viewing images one at a time. For more information on the remote, see Remote Control.
Improving the Quality of Your Images
The HP Photosmart 420 series GoGo Photo Studio provides a variety of preferences and HP Real Life technologies that can improve the quality of your images. The settings, with the exception of Remove Red Eyes, do not change your original image. They only affect printing.
To remove red eyes from images:
- While viewing images, press OK.
- Select Remove Red Eyes in the Print Menu, then press OK. You can also select Remove Red Eyes in the Playback Menu. Follow the prompts on the camera Image Display to View Changes, Save Changes, or Cancel.
To zoom and crop an image
- While viewing an image at normal size, press Zoom +. You can press Zoom + multiple times to increase the zoom level. A crop box shows the portion of the image that will print. A warning is displayed if the print quality will likely not be acceptable at the current zoom level. In this case the crop box changes from green to yellow to alert you. Press Zoom - to decrease the zoom level of a zoomed image or press OK to return quickly to the normal view.
- Press the arrow buttons to move the crop box around the zoomed image, as needed.

Note If you want to print multiple copies of a zoomed image, press Print as many times as desired while the image is still zoomed. If the image reverts to normal size, you must zoom it again to print at the zoomed view.
Printing Images
This section describes some of the most common printing tasks. Make sure you have loaded photo paper, inserted a print cartridge, and placed the camera in the camera dock before you try to print.
To print the current image:
- Press or to browse to the image you want to print.
- Press Print once for each copy of the current image you want to print. Press Cancel to cancel the current print job.
To print only new images:

Note New images are images taken since the last time the camera was docked.
- Press OK to display the Print Menu.
- Press to select Print New, then press OK.
- Press to select a page layout, then press OK.
To print all images:
- Press OK to display the Print Menu.
- Press to select Print All, then press OK.
- Press to select a page layout, then press OK.
To print passport photos:
- Press or to navigate to the image you want to print as a passport photo.
- Press OK to display the Print Menu.
- Press to select Passport Photo, then press OK.
-
Press to select one of the following passport photo sizes:
-
2x2inches
-
35 × 45 mm
25.4 x 36.4 mm
36.4 x 50.8 mm
45x55mm -
Press OK. The current image is displayed with a crop box showing the portion of the image that will be used when printing.
- Press the arrow buttons to move the crop box around the image, as needed. The crop box shows the portion of the image that will print. Press the Zoom buttons to increase or decrease the zoom level.
- Press Print. The current image is printed as many times as will fit on one sheet of the photo paper loaded in the printer.
Printing from Other Devices
Use the printer with other devices and to share images with friends and family. You can print from:
Computers (see Computer)
- PictBridge-certified digital cameras (see PictBridge-certified Camera)
Devices with Bluetooth wireless technology (see Bluetooth Wireless Devices)
Computer
You will need to transfer your images to the computer before you can use them with the HP Photosmart software that lets you print from a computer. For more information, see Transferring to a Computer.
For information on installing the HP Photosmart software, see the setup instructions that came in the box with the printer. The HP Photosmart software includes the interface that appears whenever you print from a computer.
Be sure to download the latest software update every couple of months to ensure you have the latest features and improvements. For more information, see Updating the HP Photosmart Software.

Note The onscreen HP Photosmart Printer Help provides more information on the many print settings available when you print from a computer. To learn how to access the onscreen help, see Finding More Information.
About HP Image Zone and HP Instant Share
The HP Image Zone lets you:
- Use your images for creative projects, such as scrapbooking albums, greeting cards, and iron-on transfers
- Organize your images in albums and search through them by keyword and dates (Windows only)
- Edit and enhance your images by adding text or doing color correction
- Share your images online through HP Instant Share with family and friends
For more information on the HP Image Zone, explore the onscreen HP Photosmart Printer Help.
Use HP Instant Share to share images with friends and relatives using e-mail, online albums, or an online photo finishing service. The printer must be connected through a USB cable to a computer with Internet access and have all the HP software installed. If you try to use HP Instant Share and do not have all the required software installed or configured, a message prompts you through the required steps. For more information on HP Instant Share, see the Camera User's Manual.
Transferring to a Computer
You can transfer images to a computer from the HP Photosmart 420 series if you have set up a USB connection between the two devices and have installed the HP Photosmart software. For more information, see the setup instructions that came in the box. You'll need to transfer the images to your computer in order to use them in image editing software, such as the HP Image Zone.
To transfer images to a computer:
- Turn off the camera if it is on.
- Dock the camera on top of the printer.
- Press Save.
- Follow the prompts on the computer.
PictBridge-certified Camera
You can print images by connecting a PictBridge-certified digital camera directly to the camera port of the printer with a USB cable. When you print from a digital camera, the printer uses the settings that you selected on the camera. For more information, see the documentation that came with the camera.
Printing from a PictBridge-certified Camera
Using a PictBridge-certified camera with the printer is easy and fast.

Note Make sure the GoGo Photo Studio camera is not docked before connecting a second PictBridge-certified camera to the camera port. You can only have one camera connected at a time.
To print using a PictBridge-certified camera:
- Turn on the PictBridge-certified digital camera and select the images you want to print.
- Load photo paper in the printer.
- Make sure the camera is in PictBridge mode, then connect it to the camera port on the front of the printer using the USB cable that came with the PictBridge-certified camera.
Once the printer recognizes the PictBridge-certified camera, the selected images print automatically.
Bluetooth Wireless Devices
You can also print from devices with Bluetooth wireless technology such as digital cameras, PDAs, laptops, and mobile phones. For more information, see the onscreen HP Photosmart Printer Help and the documentation that came with the device with Bluetooth wireless technology.
Making the Bluetooth Connection
To use Bluetooth connectivity, all devices must have the necessary hardware and software installed. In addition, an HP Bluetooth wireless printer adapter must be connected to the camera port on the front of the printer. The adapter is available separately. For more information, see the documentation that came with the adapter.
Printing from a Bluetooth Device
The basic procedure for printing from any device with Bluetooth wireless technology is the same:
To print from a Bluetooth device
- Have the device search for available Bluetooth printers.
- Select the printer when it appears on the device.
- Print.
Check the documentation that came with the device for detailed instructions.
4 Maintaining and transporting the printer
The HP Photosmart 420 series GoGo Photo Studio requires very little maintenance. Follow the guidelines in this chapter to extend the life span of the printer and printing supplies, and to ensure that your prints are always of the highest quality.
For information on maintaining the HP Photosmart 420 series camera, see the Camera User's Manual.
Cleaning and Maintaining the Printer
Keep the printer and print cartridges clean and well maintained using the simple procedures in this section.
Cleaning the Outside of the Printer
- Turn off the printer, then disconnect the power cord from the back of the printer.
- If you installed the optional HP Photosmart Internal Battery in the printer, remove it, then replace the battery compartment cover.
- Wipe the outside of the printer with a soft cloth that has been lightly moistened with water.

Caution 1 Do not use any type of cleaning solution. Household cleaners and detergents may damage the printer's finish.
Caution 2 Do not clean the interior of the printer. Keep all fluids away from the interior.
Cleaning the Print Cartridge
If you notice white lines or single-color streaks on your prints, the print cartridge may need to be cleaned. Do not clean the cartridge more often than necessary, since cleaning uses up ink.
- Make sure the camera is in the camera dock.
- Press OK to display the menu tabs.
- Select Clean cartridge, then press OK.
- Following the directions on the camera Image Display, load paper so the printer can print a test page after cleaning the cartridge. Use plain paper or index cards to conserve photo paper.
- Press OK to begin cleaning the print cartridge.
-
When the printer finishes cleaning the cartridge and prints a test page, check the test page and select from the following options:
-
If the test page has white streaks or missing colors, the print cartridge needs to be cleaned again. Select Yes on the camera Image Display, then press OK.
- If the print quality of the test page looks good, select Cancel on the camera Image Display, then press OK.
You can clean the cartridge up to three times. Each successive cleaning is more thorough and uses more ink.
If you complete all three levels of cleaning using this procedure and you still notice white streaks or missing colors on the test page, you may need to clean the print cartridge copper-colored contacts. For more information, see Cleaning the Print Cartridge Contacts.

Note If the cartridge or printer has been recently dropped, you may also see white streaks or missing colors in your prints. This problem is temporary and clears up within 24 hours.
Cleaning the Print Cartridge Contacts
If you use the printer in a dusty environment, debris may accumulate on the copper-colored contacts and cause printing problems.
To clean the print cartridge contacts:
- Gather the following items to clean the contacts:
Distilled water (tap water may contain contaminants that can damage the print cartridge)
Clean, dry lint-free material that will not stick to the print cartridge
- Open the print cartridge door.
- Remove the print cartridge and place it on a piece of paper with the ink nozzle plate facing up. Be careful not to touch the copper-colored contacts or the ink nozzle plate with your fingers.

Caution Do not leave the print cartridge outside the printer for more than 30 minutes. Ink nozzles exposed to the air longer than this may dry out and cause printing problems.
- Lightly moisten a cotton swab with distilled water and squeeze any excess water from the swab.
- Gently wipe the copper-colored contacts with the cotton swab.

Caution Do not touch the ink nozzle. Touching the ink nozzle will result in clogs, ink failure, and bad electrical connections.
- Repeat steps 4-5 until no ink residue or dust appears on a clean swab.
- Insert the print cartridge in the printer, then close the print cartridge door.
Printing a Test Page
You can print a test page that contains useful information about the print cartridge, serial number, and other aspects of the HP Photosmart GoGo Photo Studio.
- Make sure the camera is in the camera dock.
- Load paper in the In tray. Use plain paper or index cards to conserve photo paper.
- Press OK to display the menus.
- Select Print Test Page, then press OK.
Aligning the Print Cartridge
The first time you install a print cartridge in the printer, the printer aligns it automatically. However, if colors in printouts are misaligned, or if the alignment page
does not print correctly when you installed a new print cartridge, use the following procedure to align the print cartridge.
- Press OK to display the menu tabs.
- Select Align cartridge, then press OK.
- A message appears on the camera Image Display reminding you to load plain paper. Load paper so the printer can print a calibration page. Use plain paper or index cards to conserve photo paper.
- Press OK to begin aligning the print cartridge.
When the printer finishes aligning the cartridge, it prints an alignment page to confirm that the alignment was successful.
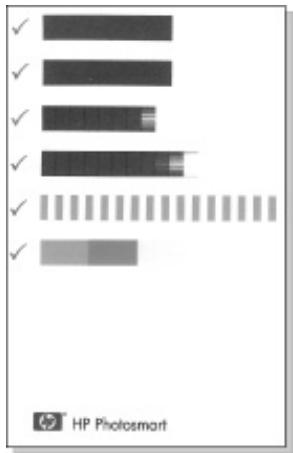
- The check marks verify that the print cartridge is installed correctly and functioning properly.
- If an "x" appears to the left of any of the bars, align the print cartridge again.
If the "x" still appears, replace the print cartridge.
Updating the HP Photosmart Software
Download the latest software update periodically to ensure you have the latest features and improvements. You can download HP Photosmart software updates by going to www.hp.com/support or by using HP Software Update.

Note The software update that you download from the HP website does not update the HP Image Zone software.
To download the software (Windows):

Note Make sure you are connected to the Internet before you use HP Software Update.
-
From the Windows Start menu, select Programs (in Windows XP, select All Programs) > Hewlett-Packard > HP Software Update. The HP Software Update window opens.
-
Click Check Now. HP Software Update searches the HP website for software updates. If the computer does not have the most recent version of the HP Photosmart software installed, a software update appears in the HP Software Update window.

Note If the computer has the most recent version of the HP Photosmart software installed, the following message appears in the HP Software Update window: "No updates are available for your system at this time."
- If a software update is available, click the checkbox next to the software update to select it.
- Click Install.
- Follow the onscreen instructions to complete the installation.
To download the software (Macintosh):

Note Make sure you are connected to the Internet before you use HP Photosmart Updater.
- Start HP Image Zone.
- Click the Applications tab, then click HP Software Update.
- Follow the onscreen instructions to check for software updates. If you are behind a firewall, you need to enter the proxy server information in the updater.
Storing the HP Photosmart GoGo Photo Studio and Print Cartridges
Protect the HP Photosmart GoGo Photo Studio and print cartridges by storing them properly when you are not using them.
Storing the HP Photosmart GoGo Photo Studio
The HP Photosmart GoGo Photo Studio is built to withstand long or short periods of inactivity.
- Close the In and Output tray doors when the printer is not in use.
- Store the printer indoors out of direct sunlight in a place without temperature extremes.
- If the printer and print cartridge have not been used for one month or more, clean the print cartridge before printing. For more information, see Cleaning the Print Cartridge.
- If you are storing the printer for a long period of time and the optional HP Photosmart Internal Battery is installed, remove the battery from the printer.
Storing the Print Cartridges
When you store or transport the printer, always leave the active print cartridge inside the printer. The printer stores the print cartridge in a protective cap during the power-down cycle.

Caution Make sure the printer completes its power-down cycle before you unplug the power cord or remove the internal battery. This allows the printer to store the print cartridge properly.
Follow these tips to help maintain HP print cartridges and ensure consistent print quality:
- When you remove a print cartridge from the printer, store it in a print cartridge protector to prevent the ink from drying out.
In some countries/regions the cartridge protector is not included with the printer, but comes with the HP Gray Photo cartridge that can be purchased separately. In other countries/regions, the protector is included with the printer.
- Keep all unused print cartridges in their original sealed packages until they are needed. Store print cartridges at room temperature (15–35 degrees C or 59–95 degrees F).
- Do not remove the plastic tape covering the ink nozzles until you are ready to install the print cartridge in the printer. If the plastic tape has been removed from the print cartridge, do not attempt to reattach it. Reattaching the tape damages the print cartridge.
Maintaining the Quality of Photo Paper
For best results with photo paper, follow the guidelines in this section.
Storing Photo Paper
- Store the photo paper in its original packaging or in a resealable plastic bag.
- Store the packaged photo paper on a flat, cool, and dry surface.
- Return unused photo paper to the plastic bag. Paper left in the printer or exposed to the elements may curl.
Handling Photo Paper
Always hold photo paper by the edges to avoid fingerprints.
- If the photo paper has curled edges, place it in its plastic storage bag and gently bend it in the opposite direction of the curl until the paper lies flat.
Transporting the HP Photosmart GoGo Photo Studio
It's easy to transport and set up the HP Photosmart GoGo Photo Studio almost anywhere. Take it with you on vacations and to family gatherings and social events to instantly print and share images with family and friends.
To make it even easier to print on the go, you can purchase these accessories:
HP Photosmart Internal Battery: Power the printer with a rechargeable battery so you can print anywhere.
HP Photosmart Carrying Case for compact photo printers: Carry the printer and printing supplies together in this convenient travel case.
To transport the HP Photosmart GoGo Photo Studio:
-
Turn off the printer.
-
Remove the camera from the camera dock and close the camera dock door.
- Remove all paper from the In and Output trays, close the Output tray, and then close the In tray.

Note Make sure the printer completes its power-down cycle before you unplug the power cord. This allows the printer to store the print cartridge properly.
- Unplug the power cord.
- If the printer is connected to a computer, disconnect the USB cable from the computer.
- Always carry the printer upright.

Note Do not remove the print cartridge when transporting the printer.

Tip The HP Photosmart GoGo Photo Studio has a convenient built-in handle you can use to make the printer easier to carry. Extend the handle by lifting it up from above the camera dock door. Do not shake or swing the printer while carrying it by the handle.
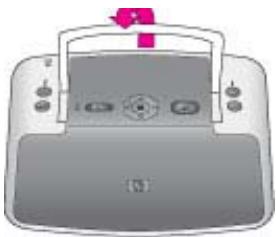
Extending the handle
Make sure to bring the following items with you:
Paper
Power cord
The HP Photosmart 420 series GoGo Photo Studio digital camera
- Extra print cartridges (if you plan to print a lot)
- Optional printer accessories you plan to use, such as the battery or HP Bluetooth wireless printer adapter
- If you are going to connect the printer to a computer, bring the USB cable and HP Photosmart software CD

Note If you do not take the documentation with you, be sure to write down the correct pen numbers for the country/region you plan to visit or purchase enough print cartridges before you go.
5 Troubleshooting
The HP Photosmart 420 series GoGo Photo Studio is designed to be reliable and easy to use. This section answers frequently asked questions about using the printer and printing without a computer. It contains information about the following topics:
- Printer Hardware Problems
- Printing Problems
- Bluetooth Printing Problems
- Error Messages
For troubleshooting information about using the HP Photosmart software and printing from a computer, see the onscreen HP Photosmart Printer Help. For information about viewing the onscreen Printer Help, see Finding More Information.
For information about troubleshooting issues involving the HP Photosmart 420 series camera, see the Camera User's Manual.
Printer Hardware Problems
Before contacting HP Customer Care, read this section for troubleshooting tips or go to the online support services at www.hp.com/support.

Note If you want to connect the printer to a computer, HP recommends using a USB cable of less than 3 meters (10 feet) in length to minimize injected noise due to potentially high electromagnetic fields. The supplied USB cable meets this recommendation.
The Status light is flashing red.
Cause The printer requires attention. Try the following solutions.
Solution
- Check the camera Image Display for instructions. If you have a digital camera connected to the printer camera port or the bundled camera in the camera port, check the camera screen for instructions. If the printer is connected to a computer, check the computer monitor for instructions.
- Turn off the printer.
If the optional HP Photosmart Internal Battery is not installed in the printer, unplug the printer power cord. Wait about 10 seconds, then plug the power cord back in. Turn on the printer.
If the optional HP Photosmart Internal Battery is installed in the printer, unplug the printer power cord if it is plugged in. Open the battery compartment cover and remove the battery. Wait about 10 seconds, then reinstall the battery. If desired, plug in the power cord. Turn on the printer.
The On light flashed briefly after I turned the printer off.
Solution This is a normal part of the power-down process. It does not indicate a problem with the printer.
The Status light is flashing red.
Cause An error has occurred.
Solution
- Check the camera Image Display for instructions. If you have a digital camera connected to the printer or the bundled camera in the camera dock, check the camera screen for instructions. If the printer is connected to a computer, check the computer monitor for instructions.
- Turn off the printer. If the optional HP Photosmart Internal Battery is not installed in the printer, unplug the printer power cord. Wait about 10 seconds, then plug the power cord back in. Turn on the printer. If the optional HP Photosmart Internal Battery is installed in the printer, unplug the printer power cord if it is plugged in. Open the battery compartment cover and remove the battery. Wait about 10 seconds, then reinstall the battery. If desired, plug in the power cord. Turn on the printer.
- If the Status light continues to flash, go to www.hp.com/support or contact HP Customer Care.
The buttons on the control panel do not respond.
Cause A printer error has occurred. Wait for about a minute to see if the printer resets. If it does not, try the following solutions.
Solution
Undock and redock the camera. This can often correct the problem.
- Turn off the printer.
If the optional HP Photosmart Internal Battery is not installed in the printer, unplug the printer power cord. Wait about 10 seconds, then plug the power cord back in. Turn on the printer.
If the optional HP Photosmart Internal Battery is installed in the printer, unplug the printer power cord if it is plugged in. Open the battery compartment cover and remove the battery. Wait about 10 seconds, then reinstall the battery. If desired, plug in the power cord. Turn on the printer.
- If the printer does not reset, and the control panel buttons still do not respond, go to www.hp.com/support or contact HP Customer Care.
The Save button on the control panel does not respond
Cause If iPhoto has been set as the default image transfer application and is open on your computer, the Save button on the printer control panel will not work.
The printer does not find and display the images on the camera memory card or internal memory.
Solution
- Turn off the printer.
If the optional HP Photosmart Internal Battery is not installed in the printer, unplug the printer power cord. Wait about 10 seconds, then plug the power cord back in. Turn on the printer.
If the optional HP Photosmart Internal Battery is installed in the printer, unplug the printer power cord if it is plugged in. Open the battery compartment cover and remove the battery. Wait about 10 seconds, then reinstall the battery. If desired, plug in the power cord. Turn on the printer.
-
The memory card may contain file types the printer cannot read directly from the memory card. This is only an issue when using a PictBridge-certified camera with the camera port on the front of the printer.
-
Save the images to a computer, then print them from the computer. For more information, see the documentation that came with the camera and the onscreen HP Photosmart Printer Help.
-
The next time you take pictures, set the digital camera to save them in a file format the printer can read directly from the memory card. For a list of supported file formats, see Printer Specifications. For instructions on setting the digital camera to save images in specific file formats, see the documentation that came with the camera.
-
The image filenames have changed from the original filenames assigned to them by the camera. Make sure the filenames comply with the standard file naming convention and structure used by the camera.
When the printer is connected to a Macintosh computer, iPhoto and Image Capture display 0 image files in the camera
Solution Close iPhoto or Image Capture, then press Save on the printer control panel. An updated count of image files in the camera will appear in the application that is launched on your computer.
Not all the images on my camera were transferred to my computer when I pressed Save.
Cause The missing images are stored in the camera's internal memory. Only images on the camera's memory card are transferred when you press Save on the printer control panel.
Solution Move the images from the camera's internal memory to the camera's memory card. To do this, press OK to access the menu tabs. Navigate to the Setup Menu, select Move Images to Card, then press OK.
You can also remove the memory card and then redock the camera. This forces the HP Photosmart GoGo Photo Studio to read the internal memory of the camera.
The printer is plugged in, but it will not turn on.
Solution
The printer may have drawn too much power.
If the optional HP Photosmart Internal Battery is not installed in the printer, unplug the printer power cord. Wait about 10 seconds, then plug the power cord back in. Turn on the printer.
If the optional HP Photosmart Internal Battery is installed in the printer, unplug the printer power cord if it is plugged in. Open the battery compartment cover and remove the battery. Wait about 10 seconds, then reinstall the battery. If desired, plug in the power cord. Turn on the printer.
- The printer may be plugged into a power strip that is turned off. Turn on the power strip, then turn on the printer.
- The printer may be plugged into an incompatible power source. If you are traveling abroad, make certain the power source in the country you are visiting complies with the power requirements and power cord of the printer.
The optional HP Photosmart Internal Battery is installed in the printer, but the printer will not turn on using battery power.
Solution
- The battery may need to be charged. Plug in the printer power cord to charge the battery. The printer battery light flashes green to indicate that the battery is charging.
- If the optional HP Photosmart Internal Battery is installed in the printer, unplug the printer power cord if it is plugged in. Open the battery compartment cover and remove the battery. Wait about 10 seconds, then reinstall the battery. If desired, plug in the power cord. Turn on the printer.
The optional HP Photosmart Internal Battery is installed in the printer, but it will not charge.
Solution
- Unplug the printer power cord if it is plugged in. Open the battery compartment cover and remove the battery. Wait about 10 seconds, then reinstall the battery. If desired, plug in the power cord. Turn on the printer.
For more information on how to install the battery, see the documentation that came with the battery.
- Check that the printer power cord is securely connected to both the printer and the power source. When the printer is turned off, the printer battery light on the control panel flashes green to indicate that the battery is charging.
- Turn on the printer. The printer battery light flashes on the control panel to indicate that the battery is charging.
- An empty battery should fully charge in approximately four hours when the printer is not in use. If the battery still does not charge, replace it.
The printer makes noises when I turn it on, or starts making noises on its own after it has been sitting unused for a while.
Solution The printer may make noises after long periods of inactivity (approximately 2 weeks), or when its power supply has been interrupted and then restored. This is normal operation—the printer is performing an automatic maintenance procedure to ensure that it produces the best quality output.
The remote does not work.
Cause
The battery in the remote may be drained.
The Output tray is closed.
Solution
Purchase a new CR2025 battery and replace the old battery with it.
- Open the Output tray. The infrared sensor is on the front of the printer. The remote cannot communicate with the printer if the Output tray or anything else covers the sensor.
- Aim directly at the infrared sensor on the front of the printer. Move closer, if necessary.
- Remove anything that might be covering the sensor or obstructing the line of sight between it and the remote.
The camera buttons are not working.
Solution You are pushing buttons on the camera after it is placed in the camera dock. Most camera buttons are disabled when the camera is in the camera dock. Use the buttons on the control panel instead.
The printer does not recognize the PictBridge camera connected to the camera port.
Cause The HP Photosmart 420 series GoGo Photo Studio camera was already in the camera dock when you connected the PictBridge camera to the camera
port. The printer only recognizes one camera at a time. Or the PictBridge camera connected to the camera port was not on.
Solution Disconnect both cameras, then connect the PictBridge camera to the camera port using the USB cable that came with the camera. If only the PictBridge camera is connected to the camera port, make sure it is turned on.
Nothing is displayed on the television.
Cause
Video cable is not connected.
- Television/video input is not selected.
The HP Photosmart GoGo Photo Studio is not switched to video mode.
Solution
- Make sure the supplied video cable is firmly connected to both the printer and television.
- Make sure the television is set to receive input from the printer. For more information, see the user manual that came with the television.
- Press the Video button on the printer control panel or remote control. The video status light should be on.
The camera batteries will not charge.
Solution
- The supplied camera batteries are not rechargeable. You can buy rechargeable batteries and replace the supplied batteries with them. For more information, see the Camera User's Manual.
- The camera is not securely in the camera dock on top of the printer. Make sure the camera is docked properly.
- Make sure the power cord is connected to the printer and to an active AC power outlet.
- The HP Photosmart GoGo Photo Studio is running off the optional HP Photosmart Internal Battery. Rechargeable camera batteries will not charge unless the printer is connected to an AC power outlet with the power cord.
Printing Problems
Before contacting HP Customer Care, read this section for troubleshooting tips or go to the online support services at www.hp.com/support.
Paper does not feed into the printer correctly.
Solution
- Make sure that the paper-width guide fits close to the edge of the paper without bending the paper.
- There may be too much paper loaded in the In tray. Remove some paper and try printing again.
- If sheets of photo paper stick together, try loading one sheet at a time.
- If you are using the printer in an extremely high- or low- humidity environment, insert the paper as far as it will go into the In tray, and load one sheet of photo paper at a time.
- If you are using photo paper that is curled, place the paper in a plastic bag and gently bend it in the opposite direction of the curl until the paper lies flat. If the problem persists, use paper that is not curled. For information about proper storage and handling of photo paper, see Maintaining the Quality of Photo Paper.
- The paper may be too thin or too thick. Try using HP-designed photo paper. For more information, see Choosing the Best Paper for the Job.
- If you are using 10 × 30 cm (4 x 12 inches) photo paper for panoramic printing, do not load more than ten sheets in the In tray. Loading more than 10 sheets of this type of paper can cause paper feed problems.
The image printed at an angle or is off-center.
Solution
- The paper may not be loaded correctly. Reload the paper, making sure that the paper is correctly oriented in the In tray and that the paper-width guide fits close to the edge of the paper. For paper-loading instructions, see Loading Paper.
- The print cartridge may need to be aligned. For more information, see Aligning the Print Cartridge.
No page came out of the printer.
Solution
- The printer may need attention. Read the camera Image Display for instructions.
-
The power may be off or there may be a loose connection. Make sure that the power is on and the power cord is securely connected. If you are using battery power, make sure the battery is correctly installed and charged properly.
-
You may not have any paper in the In tray. Check that paper is loaded correctly in the In tray. For paper-loading instructions, see Loading Paper.
- The paper may have jammed while printing. See the following section for instructions on clearing a paper jam.
The paper jammed while printing.
Solution Check the camera Image Display for instructions. To clear a paper jam, try the following solutions.
- If the paper came part way through the front of the printer, gently pull the paper towards you to remove it.
-
If the paper did not come part way through the front of the printer, try removing it from the back of the printer:
-
Remove the paper from the In tray, then pull down on the In tray to open it fully to a horizontal position.
Gently pull the jammed paper to remove it from the back of the printer. -
Lift the In tray up until it snaps back into paper-loading position.
-
If you cannot grasp the edge of the jammed paper to remove it, try the following:
Turn off the printer.
- If the optional HP Photosmart Internal Battery is not installed in the printer, unplug the printer power cord. Wait about 10 seconds, then plug the power cord back in.
- If the optional HP Photosmart Internal Battery is installed in the printer, unplug the printer power cord, if it is plugged in. Open the battery compartment cover and remove the battery. Wait about 10 seconds, then reinstall the battery. If desired, plug in the power cord.
- Turn on the printer. The printer checks for paper in the paper path and will automatically eject the jammed paper.
Press OK to continue.

Tip If you experience paper jams while printing, try loading one sheet of photo paper at a time. Insert the paper as far as it will go into the In tray.
A blank page came out of the printer.
Solution
- Check the ink-level icon on the camera Image Display. If the print cartridge is out of ink, replace it. For more information, see Inserting Print Cartridges.
- You may have begun printing and then cancelled the process. If you cancelled the process before the image started printing, the printer may have already loaded paper in preparation for printing. The next time you print, the printer will eject the blank page before starting the new printing project.
The printer ejects the paper when preparing to print.
Solution Direct sunlight could be interfering with the operation of the automatic paper sensor. Move the printer out of direct sunlight. The printer also ejects paper if it detects that the paper has already been printed on.
Print quality is poor.
Solution
- The print cartridge may be running out of ink. Check the ink-level icon on the camera Image Display, and replace the cartridge if necessary. For more information, see Insert the cartridge:.
- You may have selected a low-resolution setting on the digital camera when you took the picture. For better results in the future, set the digital camera to a higher resolution.
- Make sure you are using the right type of photo paper for the project. Use HP-designed photo paper for best results. For more information, see Choosing the Best Paper for the Job.
- You may be printing on the wrong side of the paper. Make sure the paper is loaded with the side to be printed facing toward the front of the printer.
- The print cartridge may need to be cleaned. For more information, see Cleaning the Print Cartridge.
- The print cartridge may need to be aligned. For more information, see Aligning the Print Cartridge.
The images I marked for printing in the digital camera do not print.
Solution Some PictBridge-certified digital cameras let you mark images for printing both in the camera's internal memory and on the memory card (DPOF). If you mark images in the internal memory, and then move images from the camera's internal memory to the memory card, the marks may not transfer. Mark images for printing after you transfer them from a digital camera's internal memory to the memory card. This is not true of the HP Photosmart GoGo Photo Studio camera.
Make sure you select Yes when you first dock the camera and are prompted about printing marked images.
Some commands in the menus are dimmed.
Solution
- You are trying to print a video clip. Video clip printing is not supported. Try printing another image.
There are no images on the camera. Take some pictures and then try printing - The current image was captured on a different camera and then copied into the HP Photosmart 420 series GoGo Photo Studio camera internal memory
or memory card. The print and red eyes removal options are disabled for these images.
Bluetooth Printing Problems
Before contacting HP Customer Care, read this section for troubleshooting tips or go to the online support services at www.hp.com/support. Be sure to also read the documentation that came with your HP Bluetooth wireless printer adapter and your device with Bluetooth wireless technology.
My Bluetooth device cannot find the printer.
Solution
- Make sure the HP Bluetooth wireless printer adapter is plugged into the camera port on the front of the printer. The light on the adapter flashes when the adapter is ready to receive data.
- You may be too far from the printer. Move the device with Bluetooth wireless technology closer to the printer. The maximum recommended distance between the device with Bluetooth wireless technology and the printer is 10 meters (30 feet).
No page came out of the printer.
Solution The printer may not recognize the type of file sent by the device with Bluetooth wireless technology. For a list of the file formats that the printer supports, see Printer Specifications.
Print quality is poor.
Solution The image you printed may be low resolution. For better results in the future, set the device to a higher resolution, if possible. Be aware that pictures taken with VGA-resolution cameras, such as those found in wireless phones, may not have high enough resolution to produce a high-quality print.
The image printed with borders.
Solution The printing application installed on your device with Bluetooth wireless technology may not support borderless printing. Contact the vendor of the device, or go to their support website to obtain the latest updates for the printing application.
Error Messages
Before contacting HP Customer Care, read this section for troubleshooting tips or go to the online support services at www.hp.com/support.
The following error messages may appear on the camera Image Display when the camera is docked on top of the printer. Follow the instructions to resolve the problem.
Error message: Open output door or clear paper jam, then press OK.
Solution To clear a paper jam, try the following:
- If the paper came part way through the front of the printer, gently pull the paper towards you to remove it.
-
If the paper did not come part way through the front of the printer, try removing it from the back of the printer:
-
Remove the paper from the In tray, then pull down on the In tray to open it fully to a horizontal position.
Gently pull the jammed paper to remove it from the back of the printer. -
Lift the In tray up until it snaps back into paper-loading position.
-
If you cannot grasp the edge of the jammed paper to remove it, try the following:
Turn off the printer.
- If the optional HP Photosmart Internal Battery is not installed in the printer, unplug the printer power cord. Wait about 10 seconds, then plug the power cord back in.
- If the optional HP Photosmart Internal Battery is installed in the printer, unplug the printer power cord, if it is plugged in. Open the battery compartment cover and remove the battery. Wait about 10 seconds, then reinstall the battery. If desired, plug in the power cord.
- Turn on the printer. The printer checks for paper in the paper path and will automatically eject the jammed paper.
- Press OK to continue.
Error message: Print cartridge is not compatible. Use appropriate cartridge.
Solution Replace the print cartridge with one that is compatible with the printer. For more information, see Inserting Print Cartridges.
Error message: Already connected to a camera.
Solution You are attempting to connect a camera to the camera port while the GoGo Photo Studio camera is in the camera dock, or you are trying to dock the camera when a second PictBridge-certified camera is already connected through the camera port. Only one camera can be connected at a time. To connect a different camera, first remove any camera connected or docked already.
Error message: Check computer connection.
Solution You have done something that requires the GoGo Photo Studio to be connected to a computer. Make sure the printer is connected to the printer with a USB cable.
6 Specifications
This section lists the minimum system requirements for installing the HP Photosmart software, and provides selected printer specifications.
For a complete list of specifications for the HP Photosmart GoGo Photo Studio camera, see the Camera User's Manual (in the box or in online format on the HP Photosmart User's Manual CD, depending on the country/region).
System Requirements
| Component | Windows PC Minimum | Macintosh Minimum |
| Operating System | Microsoft Windows 98, 2000 Professional, Me, XP Home, and XP Professional | Mac OS X 10.2.3 through 10.3.x |
| Processor | Intel® Pentium® II (or equivalent) or higher | G3 or greater |
| RAM | 64 MB (128 MB recommended) | 128 MB |
| Free Disk Space | 500 MB | 150 MB |
| Video Display | 800 x 600, 16-bit or higher | 800 x 600, 16-bit or higher |
| CD-ROM Drive | 4x | 4x |
| Browser | Microsoft Internet Explorer 5.5 or later | — |
Printer Specifications
| Category | Specifications |
| Connectivity | USB 2.0 full-speed PictBridge: Using the front camera port Bluetooth: Microsoft Windows XP Home and XP Professional |
| Image File Formats | JPEG Baseline |
| Margins | Top 0.0 mm (0.0 inch); Bottom 0.0 mm (0.0 inch); Left/right 0.0 mm (0.0 inch) |
| Media Sizes | Photo paper 10 x 15 cm (4 x 6 inch) |
| Photo paper with tab 10 x 15 cm with 1.25 cm tab (4 x 6 inches with 0.5 inch tab) | |
| Index cards 10 x 15 cm (4 x 6 inches) | |
| A6 cards 105 x 148 mm (4.1 x 5.8 inches) | |
| L-size cards 90 x 127 mm (3.5 x 5 inches) | |
| L-size cards with tab 90 x 127 mm with 12.5 mm tab (3.5 x 5 inches with 0.5 inch tab) | |
| Photo paper 10 x 30 cm (4 x 12 inches) | |
| The following media sizes are supported only when printing from a computer: Hagaki, 101 x 203 mm (4 x 8 inches), 10 x 30 cm (4 x 12 inches) | |
| Media Types | Paper (photo) |
| Cards (index, A6, L-size) | |
| Environmental Specifications | Maximum during operation: 5-40 C (41-104 F), 5-90% RH |
| Recommended during operation: 15-35 C (59-95 F), 20-80% RH | |
| Paper Tray | One 10 x 15 cm (4 x 6 inches) photo paper tray |
| Paper Tray Capacity | 20 sheets, maximum thickness 292 μm (11.5 mil) per sheet |
| 10 sheets of 10 x 30 cm (4 x 12 inches) photo paper for panoramic printing (when printing from a computer only) | |
| Power Consumption | U.S. |
| Printing: 12.3 W | |
| Idle: 6.29 W | |
| Off: 4.65 W | |
| International | |
| Printing: 11.4 W | |
| Idle: 5.67 W | |
| Off: 4.08 W | |
| Power Supply Model Number | HP Part # 0957-2121 (North America), 100-240 Vac (±10%) 50/60 Hz (±3 Hz) |
| HP Part # 0957-2120 (Rest of world), 100-240 Vac (±10%) 50/60 Hz (±3 Hz) | |
| Print Cartridge | HP Tri-color (7 ml) |
| HP Tri-color (14 ml) HP Gray Photo Note The cartridge numbers you can use with this printer appear on the back cover of the printed Printer User's Manual. If you have already printed several times, you can also find the cartridge numbers in the HP Photosmart software. For more information, see Inserting Print Cartridges. | |
| USB 2.0 Full-speed Support | Microsoft Windows 98, 2000 Professional, Me, XP Home, and XP Professional Mac OS X 10.2.3 through 10.3.x HP recommends that the USB cable be less than 3 meters (10 feet) in length |
| Video File Formats | Motion JPEG AVI Motion JPEG Quicktime MPEG-1 |
7 HP Customer Care

Note The name of HP support services may vary by country/region.
If you have a problem, follow these steps:
- Check the documentation that came with the printer. For more information, see Finding More Information.
-
If you are unable to solve the problem using the information in the documentation, visit www.hp.com/support to do the following:
-
Access online support pages
- Send HP an e-mail message for answers to your questions
- Connect with an HP technician by using online chat
- Check for software updates
Support options and availability vary by product, country/region, and language.
- Contact your local point of purchase. If the printer or camera has a hardware failure, you will be asked to bring the device to where you purchased it. Service is free during the limited warranty period. After the warranty period, you will be quoted a service charge.
- If you are unable to solve the problem using the onscreen Help or HP websites, call HP Customer Care using the number for your country/region.
HP Customer Care by phone
While the HP Photosmart GoGo Photo Studio is under warranty, you can obtain free phone support. For more information, see the warranty statement that came in the box, or go to www.hp.com/support to check the duration of your free support.
After the free phone support period, you can obtain help from HP at an additional cost. Contact your HP dealer or call the support phone number for your country/region for support options.
To receive HP support by phone, call the appropriate support phone number for your location. Standard phone company charges apply.
Western Europe: Customers in Austria, Belgium, Denmark, Spain, France, Germany, Ireland, Italy, Netherlands, Norway, Portugal, Finland, Sweden, Switzerland, and the United Kingdom should go to www.hp.com/support to access phone support numbers in their country/region.
North America: Call 1-800-474-6836 (1-800 HP invent). U.S. phone support is available in both English and Spanish languages 24 hours a day, 7 days a week (days and hours of support may change without notice). This service is free during the warranty period. A fee may apply outside the warranty period.
Other countries/regions: See the list of support telephone numbers inside the front cover of this manual.
Placing a call
Call HP Customer Care while you are near the computer and printer. Be prepared to provide the following information:
- Printer model number (located on the front of the printer).
- Printer serial number (located on the bottom of the printer).
- Camera model number (located on the front of the camera)
- Camera serial number (located on the bottom of the camera)
Computer operating system. -
Version of printer driver:
-
Windows PC: To see the printer driver version, right-click the HP Digital Imaging Monitor icon the Windows taskbar and select About.
-
Macintosh: To see the printer driver version, use the Print dialog box.
-
Messages displayed on the camera Image Display or on the computer monitor.
-
Answers to the following questions:
-
Has the situation you are calling about happened before? Can you recreate the situation?
- Did you install any new hardware or software on your computer around the time that the situation occurred?
Return to HP Repair Service (North America Only)
HP will arrange to have your product picked up and delivered to an HP Central Repair Center. We pay for the round-trip shipping and handling. This service is free for the duration of the hardware warranty period. This service is available in North America only.
Additional Warranty Options
Extended service plans are available for the printer at additional costs. Go to www.hp.com/support, select your country/region and language, then explore the services and warranty area for information about the extended service plans.
Index
A
accessories 11,33
aligning print cartridges 30
alignment page 30
B
batteries
compartment 10
model 12
black-and-white prints 19
Bluetooth
printing 27
troubleshooting 44
wireless printer adapter 12
buttons 8
C
cameras
images do not print 43
port 5
carrying case
model 12
transporting
HP Photosmart GoGo
Photo Studio 33
cartridges. See print cartridges
cleaning
print cartridge contacts 30
print cartridges 29
primer 29
computer
printing from 3
system requirements 47
control panel 8
cropping an image 24
Customer Care 51
D
digital cameras. See cameras
docking the camera 21
documentation
guides 4
onscreen Printer Help 4
setup instructions 4
documentation, printer 3
E
error messages 44
F
file formats, supported 47
G
GoGo Photo Studio
menu 13
H
help. See troubleshooting
help, onscreen 3
HP Photosmart GoGo Photo
Studio
accessories 33
storing 32
transporting 33
using handle 33
HP Photosmart software
updating 31
HP Real Life technologies 24
HP Software Update 31
1
images
cropping 24
improving quality 24
removing red eye 24
transferring to a computer 26
viewing for print 23
viewing in slide show 24
viewing on a TV 24
zooming 24
zooming and cropping 24
ink cartridges. See print
cartridges
ink level, checking 30
L
lights 7
loading paper 18
M
menu, GoGo Photo Studio 13
0
onscreen Help 3
P
paper
buying and choosing 17
loading 18
maintaining 17,33
specifications 47
trays 5
troubleshooting 41
paper jams 16,42,45
passport photos 24
print cartridges
aligning 30
choosing 19
cleaning 29
cleaning contacts 30
storing 32
testing 30
primer
accessories 11
cleaning 29
documentation 3,4
error messages 44
parts 5
specifications 47
printing
all images 24
basics 23
borderless prints 24
from a computer 26
from Bluetooth wireless
devices 27
from computer 3
from other devices 25
from PictBridge-certified
camera 27
help 16
new images 24
passport photos 15,24
test page 30
prints
print cartridges, choosing 19
Q
quality
images 24
photo paper 33
printing test page 30
troubleshooting 43
R
red eyes removal 24
remote control 11, 39
S
slide show 24
specifications 47
storing
HP Photosmart GoGo
Photo Studio 32
photo paper 33
print cartridges 32
system requirements 47
T
test page 30
transporting HP Photosmart
GoGo Photo Studio 33
transporting printer 11
trays,paper 5
troubleshooting
Bluetooth 44
Customer Care 51
error messages 44
flashing lights 35
paper problems 41
quality problems 43
U
USB
port 5
specifications 47
Z
zooming an image 24
Regulatory notices
Hewlett-Packard Company
This device complies with part 15 of the FCC Rules. Operation is subject to the following two conditions:
This device may not cause harmful interference, and
This device must accept any interference received, including interference that may cause undesired operation.
Pursuant to Part 15.21 of the FCC Rules, any changes or modifications to this equipment not expressly approved by Hewlett-Packard Company may cause harmful interference, and void your authority to operate this equipment. Use of a shielded data cable is required to comply with the Class B limits of Part 15 of the FCC Rules.
For further information, contact: Hewlett-Packard Company, Manager of Corporate Product Regulations, 3000 Hanover Street, Palo Alto, CA 94304, (650) 857-1501.
Note
This equipment has been tested and found to comply with the limits for a Class B digital device, pursuant to part 15 of the FCC rules. These limits are designed to provide reasonable protection against harmful interference in a residential installation. This equipment generates, uses, and can radiate radio frequency energy and, if not installed and used in accordance with the instructions, can cause harmful interference to radio communications. However, there is no guarantee that interference will not occur in a particular installation. If this equipment does cause harmful interference to radio or television reception, which can be determined by turning the equipment off and on, the user is encouraged to try to correct the interference by one or more of the following measures:
Reorient or relocate the receiving antenna.
- Increase the separation between the equipment and the receiver.
- Connect the equipment into an outlet on a circuit different from that to which the receiver is connected.
- Consult the dealer or an experienced radio/TV technician for help.
LED indicator statement
The display LEDs meet the requirements of EN 60825-1.
A
Print cartridge selection numbers
| Tri-color | North America, Latin America, Asia Pacific | #95 or #97 |
| Tri-color | Western Europe | #343 or #344 |
| Tri-color | Eastern Europe, Russia, Middle East, Africa, Japan | #135 or #134 |
| Tri-color | China, India | #855 or #857 |
| Gray | Worldwide | #100 |

PictBridge

Bluetooth


Printed in the U.S.A. 06/05 v1.0.0 Printed on recycled paper
© 2005 Hewlett-Packard Development Company, L.P.
www.hp.com/support
- Copyrights and Trademarks
- Notice
- Trademarks
- Regulatory Model Identification Number VCVRA-0501
- Safety Information
- Environmental Statements
- Protecting the Environment
- Ozone Production
- Paper Use
- Plastics
- Material Safety Data sheets
- Recycling Program
- Contents
- Welcome
- Finding More Information
- Printer Parts
- Front View (Closed)
- Front View (Open)
- Rear of Printer
- Indicator Lights
- Control Panel
- Total Images Summary Screen
- Print Images Screen
- Internal Battery Compartment
- Remote Control
- Available Accessories
- Battery Information
- GoGo Photo Studio connected to AC power
- GoGo Photo Studio running on battery
- To install the remote battery:
- GoGo Photo Studio Meals
- The GoGo Photo Studio Menu Tabs
- To use the GoGo Photo Studio menus:
- To Navigate the Menus:
- The Menu
- Print Menu
- Getting Ready to Print
- Loading Paper
- Choosing the Best Paper for the Job
- Loading Your Paper
- To load paper:
- Inserting Print Cartridges
- Remove the Pink Tape:
- Do Not Touch Here
- Prepare the printer and cartridge:
- Insert the cartridge:
- Align the cartridge:
- Store the cartridge when it is not in the printer:
- Connecting the Camera
- Dock the camera on the printer:
- Printing Basics
- Printing from the Docked Camera
- Viewing Images to Print
- Viewing images
- To view images one at a time:
- To view images as thumbnails:
- Viewing images on a TV
- To view images on a television
- Improving the Quality of Your Images
- To remove red eyes from images:
- To zoom and crop an image
- Printing Images
- To print the current image:
- To print only new images:
- To print all images:
- To print passport photos:
- Printing from Other Devices
- Computer
- About HP Image Zone and HP Instant Share
- Transferring to a Computer
- To transfer images to a computer:
- PictBridge-certified Camera
- Printing from a PictBridge-certified Camera
- To print using a PictBridge-certified camera:
- Bluetooth Wireless Devices
- Making the Bluetooth Connection
- Printing from a Bluetooth Device
- To print from a Bluetooth device
- Maintaining and transporting the printer
- Cleaning and Maintaining the Printer
- Cleaning the Outside of the Printer
- Cleaning the Print Cartridge
- Cleaning the Print Cartridge Contacts
- To clean the print cartridge contacts:
- Printing a Test Page
- Aligning the Print Cartridge
- Updating the HP Photosmart Software
- To download the software (Windows):
- To download the software (Macintosh):
- Storing the HP Photosmart GoGo Photo Studio and Print Cartridges
- Storing the HP Photosmart GoGo Photo Studio
- Storing the Print Cartridges
- Maintaining the Quality of Photo Paper
- Storing Photo Paper
- Handling Photo Paper
- Transporting the HP Photosmart GoGo Photo Studio
- To transport the HP Photosmart GoGo Photo Studio:
- Extending the handle
- Troubleshooting
- Printer Hardware Problems
- The Status light is flashing red.
- Solution
- The On light flashed briefly after I turned the printer off.
- The buttons on the control panel do not respond.
- The Save button on the control panel does not respond
- The printer does not find and display the images on the camera memory card or internal memory.
- When the printer is connected to a Macintosh computer, iPhoto and Image Capture display 0 image files in the camera
- Not all the images on my camera were transferred to my computer when I pressed Save.
- The printer is plugged in, but it will not turn on.
- The optional HP Photosmart Internal Battery is installed in the printer, but the printer will not turn on using battery power.
- The optional HP Photosmart Internal Battery is installed in the printer, but it will not charge.
- The printer makes noises when I turn it on, or starts making noises on its own after it has been sitting unused for a while.
- The remote does not work.
- Cause
- The camera buttons are not working.
- The printer does not recognize the PictBridge camera connected to the camera port.
- Nothing is displayed on the television.
- The camera batteries will not charge.
- Printing Problems
- Paper does not feed into the printer correctly.
- The image printed at an angle or is off-center.
- No page came out of the printer.
- The paper jammed while printing.
- A blank page came out of the printer.
- The printer ejects the paper when preparing to print.
- Print quality is poor.
- The images I marked for printing in the digital camera do not print.
- Some commands in the menus are dimmed.
- Bluetooth Printing Problems
- My Bluetooth device cannot find the printer.
- The image printed with borders.
- Error Messages
- Error message: Open output door or clear paper jam, then press OK.
- Error message: Print cartridge is not compatible. Use appropriate cartridge.
- Error message: Already connected to a camera.
- Error message: Check computer connection.
- Specifications
- HP Customer Care
- HP Customer Care by phone
- Placing a call
- Return to HP Repair Service (North America Only)
- Additional Warranty Options
- Index
- A
- B
- C
- D
- E
- F
- G
- H
- 1
- L
- M
- 0
- P
- Q
- R
- S
- T
- U
- Z
- Regulatory notices
- Hewlett-Packard Company
- Note
- LED indicator statement
Brand : COMPAQ
Model : PHOTOSMART 420
Category : Printer