
E20 - Monitor COMPAQ - Free user manual and instructions
Find the device manual for free E20 COMPAQ in PDF.


| Product Type | Thermal Inkjet Printer |
| Brand | COMPAQ |
| Model | E20 |
| Dimensions (W x H x D) | 406 x 102 x 362 mm |
| Weight | 5.3 kg |
| Power Supply | 120 V / 60 Hz (United States, Canada) |
| Maximum Power Consumption | 14 W printing, 4.5 W standby, 2 W off |
| Print Resolution | Black: 600 x 300 dpi, Color: 300 x 300 dpi |
| Print Speed | Black: 2.2 ppm, Color: 1.1 ppm |
| Supported Paper Sizes | US Letter (216 x 279 mm), A4 (210 x 297 mm) |
| Input Tray Capacity | 100 sheets |
| Output Tray Capacity | 50 sheets |
| Interfaces | USB, Parallel Centronics (IEEE 1284) |
| Ink Cartridges | Black (C6634A #34), Tri-color (C6635A #35) |
| Maximum Monthly Duty Cycle | 1000 pages |
| Operating Temperature | 5°C to 40°C |
| Operating Humidity | 10% to 80% non-condensing |
| Limited Warranty | 1 year for printer, 90 days for cartridges |
| Maintenance and Cleaning | Clean the ink nozzles with a lint-free cloth and distilled water |
| Replacement Parts | Replacement ink cartridges (C6634A, C6635A) |
| Certifications | ENERGY STAR, FCC Class B, VCCI |
Frequently Asked Questions - E20 COMPAQ
User questions about E20 COMPAQ
0 question about this device. Answer the ones you know or ask your own.
Ask a new question about this device
Download the instructions for your Monitor in PDF format for free! Find your manual E20 - COMPAQ and take your electronic device back in hand. On this page are published all the documents necessary for the use of your device. E20 by COMPAQ.
USER MANUAL E20 COMPAQ
Edition 1 August 2000
Copyright Hewlett-Packard Company 2000
Notice
The information contained in this document is subject to change without notice.
Hewlett-Packard makes no warranty of any kind with regard to this material, including, but not limited to, the implied warranties of merchantability and fitness for a particular purpose.
Hewlett-Packard will not be liable for errors contained herein or for incidental or consequential damages in connection with the furnishing, performance, or use of this material.
No part of this document may be photocopied, reproduced, or translated to another language without the prior written consent of Hewlett-Packard Company.
Terms and Conventions
The following terms and word conventions are used in this User's Guide.
Terms
The HP e-printer e20 printer may be referred to as HP e-printer.
The Internet terminal provided by the interactive television service provider is also referred to as the set top box.
Cautions
A Caution indicates possible damage to the HP e-printer or to other equipment.
For example:
Caution! Do not touch the print cartridge ink nozzles or copper contacts. Touching these parts will result in clogs, ink failure, and bad electrical connections.
hp e- printer e20
Contents
Getting Started 1
What's in the Box 1
Connecting the Printer 2
Installing the Print Cartridges. 2
Removing and Replacing Print Cartridges 3
Inserting Paper and Printing a Test Page. 4
Registering the Printer 5
Printing 6
Printing Information from the Internet 6
Buttons and Lights 6
What to Do if. 7
Solving a Problem. 8
Clearing Paper Jams 8
Page Does Not Print. 9
The Resume Light Continues to Blink. 10
A Blank Page Tests 10
Meaningless Characters Print 10
The Print Quality is Poor 11
HP Customer Care. 12
HP Customer Care OnLine 12
HP Customer Care User Forums. 12
HP Customer Care by Email 12
HP Customer Care Audio Tips (U.S. Only) 12
HP Customer Care by Phone. 13
After the Free Phone Support Period. 13
Printer Specifications 14
Regulatory 15
Limited Warranty Statement 15
Energy Consumption 17
Index 18
Legal Information. Inside Back Cover
What's in the Box
Contents
The box contains the following items:
HP e-printere20
HP e-printer e20 User's Guide
Universal Serial Bus (USB) printer cable (If your interactive television service provider uses a parallel cable connection, the parallel cable must be purchased separately.)
Power cord
- Black print cartridge (C6634A #34)
- Tri-Color print cartridge (C6635A #35)
If anything is missing from the box, talk to your HP dealer or call HP Customer Care Support. See "HP Customer Care" for more information.
What You Need
You must have an account with an interactive television service provider. It provides the Internet terminal (set top box) that allows you to access the Internet.
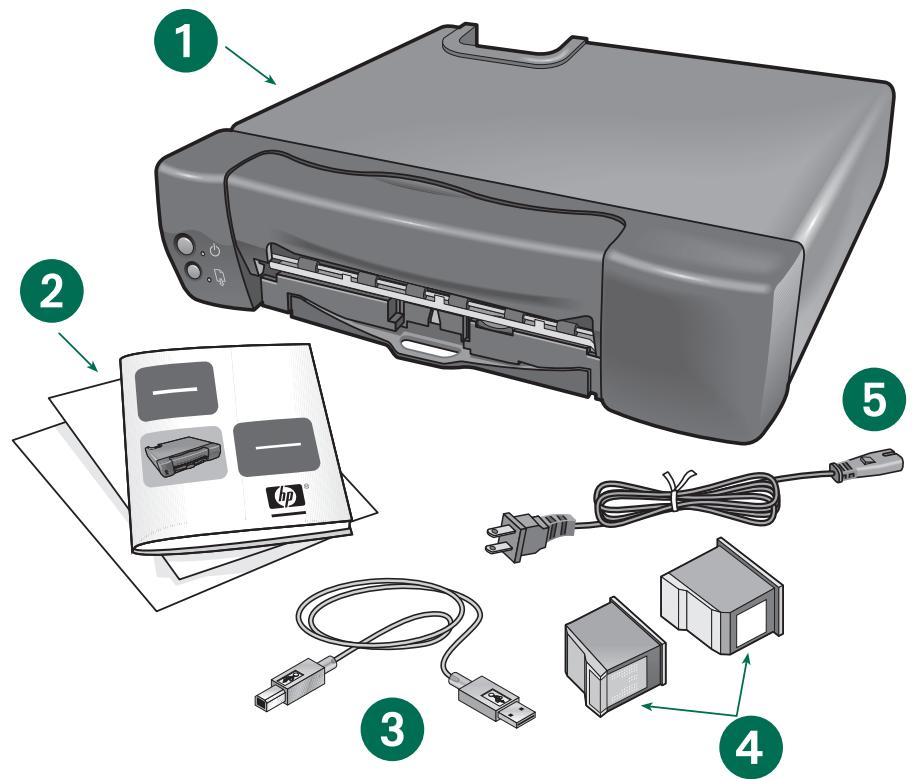
1. HP e-printer 2. Hp e-printer User's Guide 3. USB printer cable 4. Print cartridges 5. Power cord
Connecting the Printer
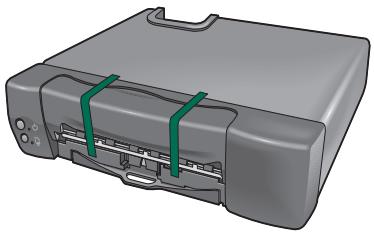
- Remove the packing material and tape from the HP e-printer.
- Using either a USB cable or a parallel cable, connect the HP e-printer to the set top box.
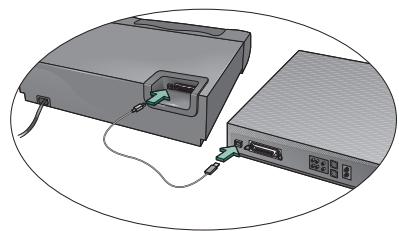
USB cable
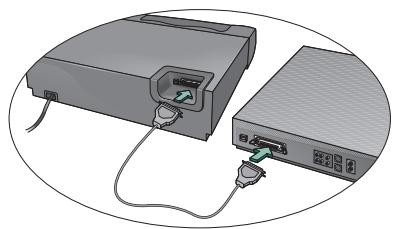
Parallel cable
- Plug the HP e-printer power cord into a wall outlet.
Installing the Print Cartridges
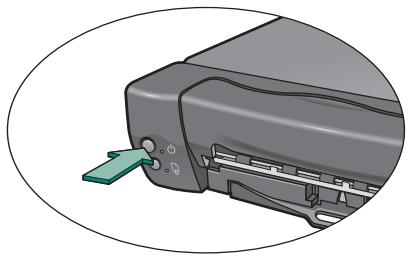
- Press the Power button to turn on the printer.
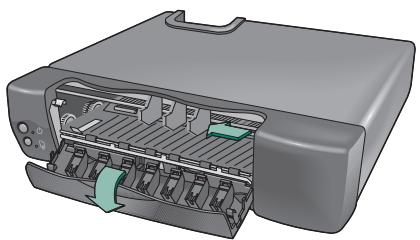
- Open the front cover of the printer. The print cartridge cradle moves to the center of the printer.
- Carefully remove the vinyl tape from the black print cartridge.
Caution! Do not touch the ink nozzles or the copper contacts when you are removing the vinyl tape.
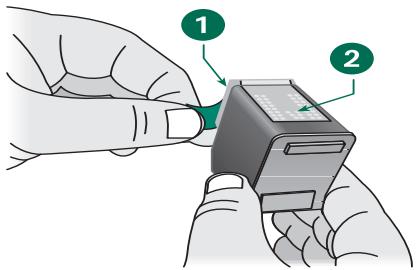
- Ink nozzles (under vinyl tape)
-
Copper contacts
-
Insert the black print cartridge in the left side of the cradle.
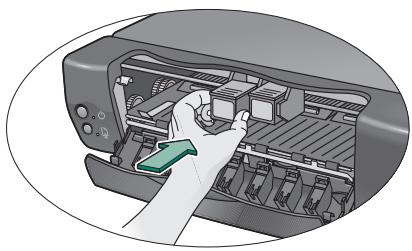
- Push the print cartridge up to snap it into position.
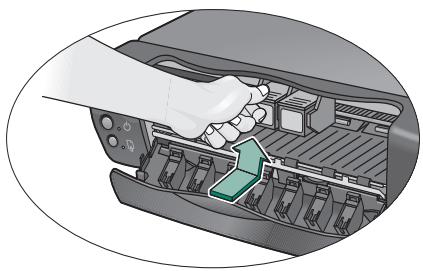
- Repeat steps 3 through 5 to insert the tri-color print cartridge in the right side of the cradle.
Caution! The printer will not operate unless both print cartridges are properly installed.
- Close the front cover of the printer. The Resume light continues to blink for a few seconds and then stops. The print cartridge cradle returns to the right side of the printer.
If the Resume light continues to blink, see "Solving a Problem" for help.
Removing and Replacing Print Cartridges
- Open the front cover of the printer. The print cartridge cradle moves to the center of the printer.
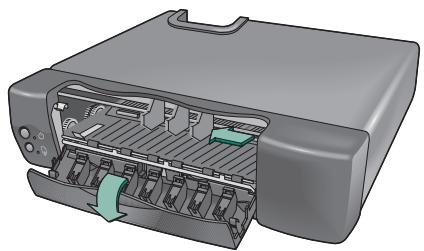
- Push down the wire lever to release the printer cartridge from the cradle.
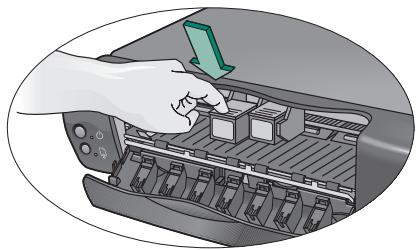
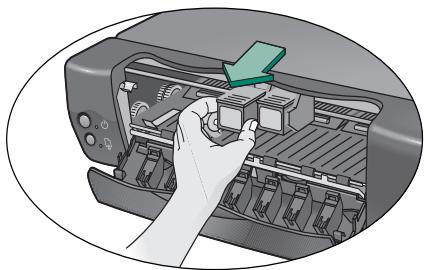
- Follow steps 3 through 6 in "Installing the Print Cartridges" to install new print cartridges.
Inserting Paper and Printing a Test Page
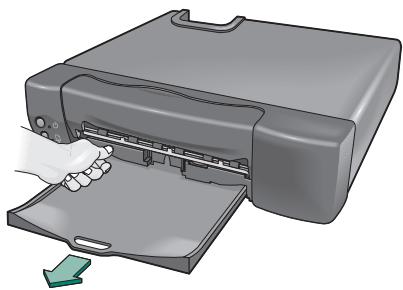
- Pull out the In tray and insert a stack of paper.
In tray capacity: 100 sheets
- Out tray capacity: 50 sheets
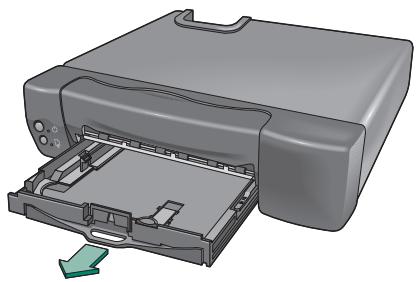
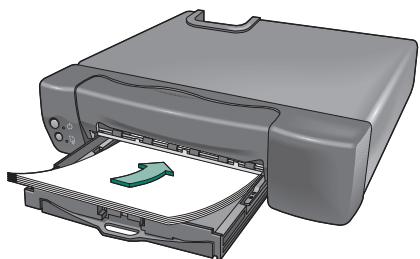
- Adjust the paper length and width guides so that they fit snugly against the edges of the paper.
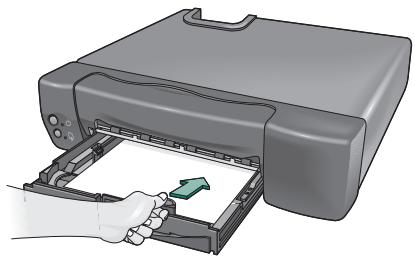
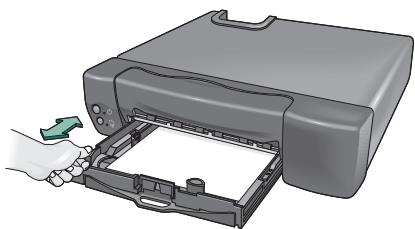
- Push in the tray. Pull out the Out tray until it is fully extended to catch the paper as it is printed.
- Press and hold down the Power button.
- Press the Resume button once, then release the Power button.
A test page prints, verifying that the printer is set up correctly.
If the Test Page Does Not Print
- Verify that the print cartridges are correctly installed.
- Verify that the printer is connected to the power source and turned on.
- Repeat steps 4 and 5 in "Inserting Paper and Printing a Test Page."
If the test page does not print, see "HP Customer Care" for help.
Registering the Printer
It is important to register your printer to receive these benefits:
- Faster expert technical support
- Early notice of product and software upgrades
- Exclusive online tips and tricks
Register your printer by going to the following Website:
www.interactive.hp.com/hho/
Select the Registration & Profiling option and follow the onscreen instructions to register your printer.
If the set top box does not allow you to browse the Internet, access the Website using a computer or other Web access tool.
Note You will need the printer's 10 character serial number located on the back of the printer. Write your printer's serial number here for future reference:
Printing Information from the Internet
Follow the instructions provided with the set top box to print screens or Website content.
Buttons and Lights
There are two buttons and two lights on the front of the printer. The buttons are used to control the printer. The lights indicate if the printer is operating correctly or if it needs maintenance. See the instructions following the graphic for what to do if the lights are on, blinking, or off.
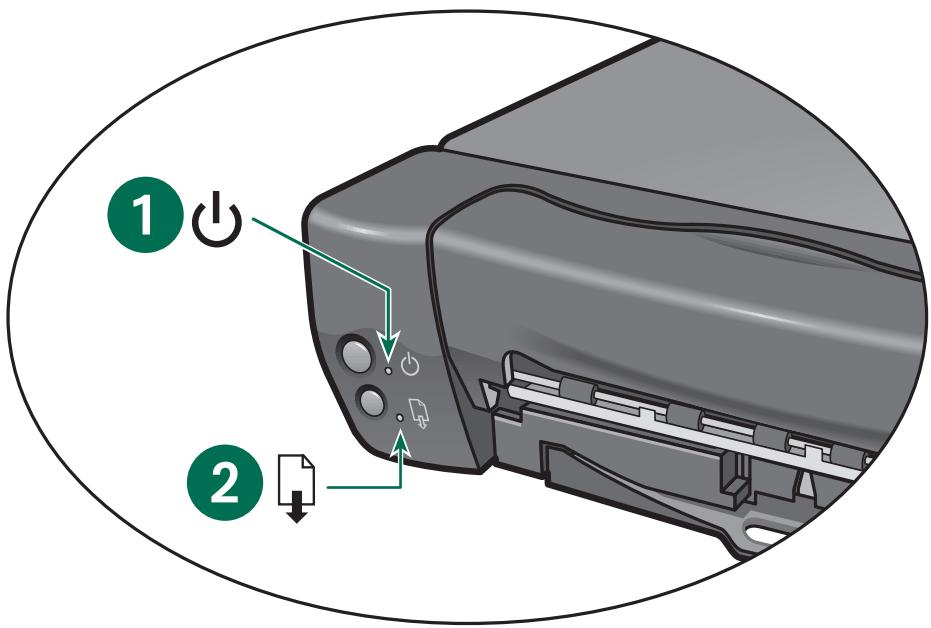
1. Power light 2. Resume light
What to Do if...
Power light is off
Resume light is off
Press the Power button to turn on the printer.
Power light is on
Resume light is off
Send a document to the printer. The printer is in the ready-to-print state.
Power light is blinking
Resume light is off
No action is needed. This indicates that either the computer is sending a document to the printer or the printer is currently printing another document.
Power light is on
Resume light is blinking
If you recently installed a print cartridge, verify that:
- the vinyl tape has been removed from the cartridge
- the cartridge is securely inserted into the cradle
- the arrow on the print cartridge is aligned with the dots on the top of the print cartridge cradle.
If the Power light remains on and the Resume light continues to blink, try these solutions:
- Close the front cover of the printer if it is open.
- Verify that the In tray contains paper and that the paper is correctly placed in the tray.
- Press the Resume button to clear the error condition. Look at your television screen for any error messages or corrective action instructions.
Power light is blinking
Resume light is blinking
- Press the Power button to turn off the printer. Follow the instructions provided with your set top box to cancel any documents waiting to print.
-
Press the Power button to turn on the printer. If the problem is not corrected:
-
press the Power button to turn the printer off.
- unplug the printer.
- plug the printer back in and press the Power button to turn it on.
Clearing Paper Jams
When a paper jam occurs, the Power and Resume lights alternately blink. Follow these instructions to clear a paper jam:
- Turn off the printer.
- Gently remove the jammed paper. If the paper cannot be removed, then go to step 3.
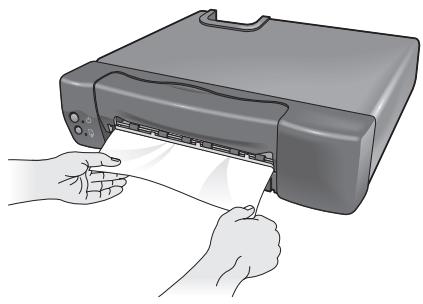
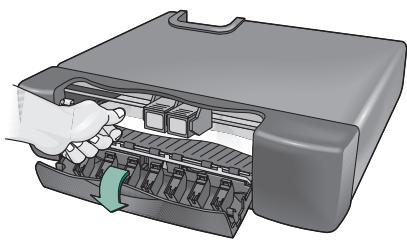
- Open the front cover and gently remove the jammed paper.
If the paper cannot be removed, then go to step 4.
- Pull out the Out tray until it is fully extended, then pull out the In tray.
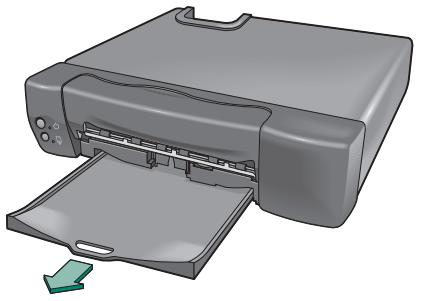
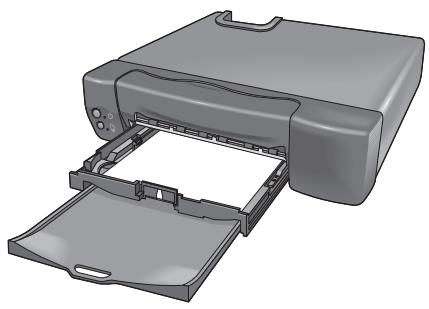
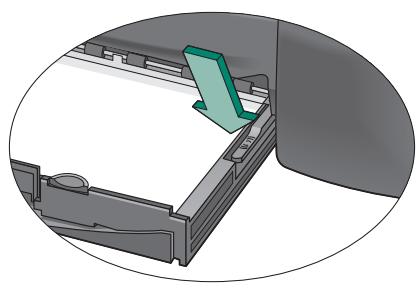
- Press the lever on the right side of the paper tray pan to remove both the In and Out trays from the printer.
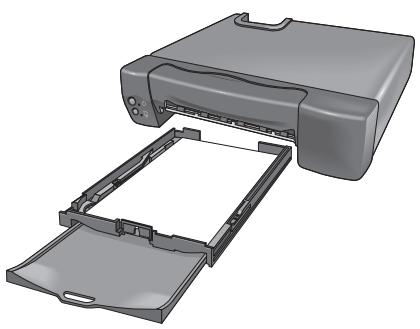
- Lift the printer to inspect the open portion on the bottom of the printer. Remove any jammed paper from the opening.
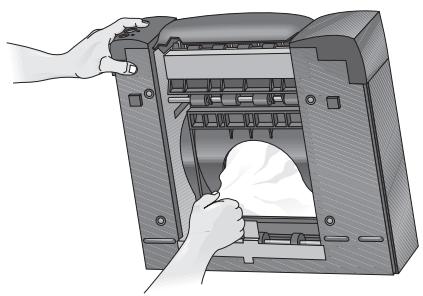
- Replace the paper trays and press the Power button to turn on the printer.
- Press the Resume button to continue printing or follow the instructions provided with your set top box to cancel the print job.
Page Does Not Print
Try these solutions:
- Be patient. Complex documents, such as color photographs, take time to print. If the light is blinking, the printer is processing information.
- Power. Verify that the printer is on (the Power light on the front of the printer should be lit) and that all connections are secure.
- Cover. Verify that the front cover of the printer is closed.
- Paper. Verify that the paper is inserted correctly in the In tray.
- Print cartridges. Verify that the print cartridge cradle contains properly installed cartridges which have the correct HP part number.
- Printer not responding. Verify that the cable connections are secure. HP strongly recommends using an IEEE 1284 compliant cable when using a parallel cable.
The Resume Light Continues to Blink
If the Resume light continues to blink and the print cartridge cradle does not move to the right side of the printer, try these solutions:
- Remove and reinstall the print cartridges. Verify that the print cartridges are in the print cartridge cradle before you push them forward into position.
- Verify that no obstruction prevents the print cartridge cradle from moving freely on the rod.
- Verify that the vinyl tape has been removed from each of the print cartridges.
If the problem persists, see "HP Customer Care" for help.
A Blank Page Prints
Try these solutions:
- Tape. Verify that the vinyl tape has been removed from each of the print cartridges.
- Ink. Replace the cartridges if they are empty.
Meaningless Characters Print
If meaningless characters are printing on the page, the HP e-printer may have lost connection with the Internet.
- Verify that all cables are securely attached.
- Turn off the HP e-printer.
- Follow the instructions provided with your set top box to cancel the print job.
- Press the Power button to turn on the printer.
If the problem persists, see "HP Customer Care" for help.
The Print Quality is Poor
Try these solutions:
- Printer placement. HP recommends that you place your printer on a solid, sturdy surface—such as a small table or a shelf in an entertainment center. If you place your printer directly on top of your TV, the heat from the TV may cause the print cartridge ink to evaporate.
-
Print size. Most text, like email and small text on Web pages, prints very well. As the text gets larger, it is converted to a graphic image which may be slightly fuzzy when printed.
-
Printing images or text from an Internet terminal on an HP e-printer. Text and colors may look different than they appear on the screen when printed. When you print from an Interactive television, some images are automatically reformatted to give the best possible printout of the Web page.
- Ink. If ink is smeared or streaked, clean the nozzle plate and ink nozzles with a clean, lint-free cloth or cotton swab and distilled water.
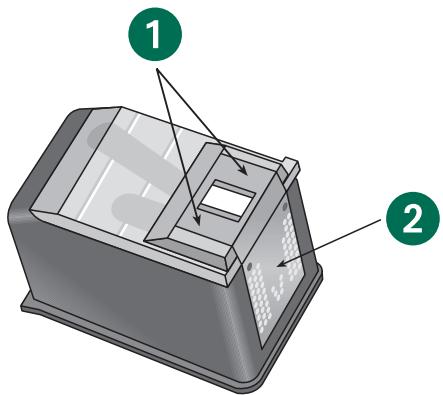
- Nozzle plate surrounding ink nozzles
- Copper contacts
HP printers set the standard for quality and reliability, so you have made an excellent choice. If you need help, HP's award-winning Customer Care service and support is ready to provide expert advice on using your HP printer. They also can answer specific questions about any problems you may be having. Whether online or by phone, you will quickly find the support you need.
HP Customer Care Online
Click your way to a quick solution. HP Customer Care OnLine is a great place to go for information about HP printers. Get instant access to everything from helpful printing tips to the latest product and software updates—24 hours a day, seven days a week, at no cost to you.
Obtain information about the HP e-printer at the following Website:
http://www.hp.com/go/support
Use either:
- the set top box if it offers Web browsing
- other Web access tools
HP Customer Care User Forums
Check out HP's online user forums. They are friendly and informative. Review existing messages left by other HP users to find the answers you need. You also can post your questions, then check back later for ideas and suggestions from knowledgeable users and system operators.
HP Customer Care by Email
If you have email access, contact HP via email and receive a personal reply from an HP Customer Care service technician. Responses are normally provided within 24 hours of receipt (excluding holidays). This is a great option for your non-urgent questions. To send an email, go to:
http://contactexternal.hp.com/support/ static
HP Customer Care Audio Tips (U.S. Only)
Call our toll-free, automated support line at (877) 283-4684 for fast and simple solutions to commonly asked HP printer questions.
HP Customer Care by Phone
Telephone support is provided to you free of charge within one year from the date of your purchase. Long-distance charges may apply if you are calling long distance. Before placing a call for help, confirm that:
- You have read the installation and troubleshooting tips in this guide
- You have checked HP Customer Care OnLine for product help
- You have called HP Customer Care Audio Tips (only in the U.S.), or our toll-free automated support line at (877) 283-4684
If you cannot solve the problem using the above resources, then call an HP service technician at (208) 344-4131 while you're in front of your HP e-printer. Before you call, locate the following information on the label attached to the back of the printer:
The HP e-printer serial number
The HP e-printer part number
After the Free Phone Support Period
After the one year of free phone support, you can continue to get help from HP for a fee. Prices are subject to change without notice. However, HP Customer Care OnLine help is always available at no cost.
For calls in the United States that may last under 10 minutes, call (900) 555-1500. The cost is US 2.50 per minute and will not exceed US 25.
For calls that may last longer than 10 minutes, or calls from Canada, dial (800) 999-1148. The cost is US$25 per call, charged to VISA or MasterCard.
- If your HP e-printer is covered under the Limited Warranty period, and needs to be replaced or the print cartridge is defective, you will not be charged for phone support service. Limited Warranty information is printed at the end of this guide. However, regular long-distance charges may apply.
Printer Specifications
Product Number
C7801A
Print Quality
Black: 600 × 300 dpi
Color: 300 × 300 dpi
Print Speed
Black: 2.2 pages per minute
Color: 1.1 pages per minute
Compatibility
For a complete, up-to-date list of supported Internet terminals, go to:
http://www.hp.com/go/tvprint
Media Sizes
US letter 8.5 × 11 in. (216 × 279 ~mm)
A4 210 × 297 mm
Recommended Media Weight
Paper: 16 to 36 lb (60 to 135g / m^2
Media Handling (Built-In Feeders)
In tray capacity: up to 100 sheets
Out tray capacity: up to 50 sheets
Reliability
20,000 hours MTBF 1000 pages per month maximum
Print Method
Plain paper drop-on-demand thermal inkjet printing
I/O Interface
Centronics parallel, IEEE 1284 compliant with 1284-B receptacle (cable not included)
USB (cable included)
Dimensions
16.0 in (406 mm) W × 4 in (102 mm)
H x 14.25 in (362 mm) D
Weight
11.6 lb (5.3 kg)
Power Requirements
Power modules: U.S.A., Canada
120V/60Hz
Power Consumption
2 watts maximum when off
4.5 watts maximum non-printing
14 watts maximum when printing
Operating Environment
Maximum operating temperature:
41 F (5 C) to 104 F (40 C)
Humidity:
10—80 percent RH non-condensing
Recommended operating conditions for best print quality:
59 F (15 C) to 95 F (35 C),
20-80 percent RH non-condensing
Storage temperature:
-40 F (-40 C) to 140 F (60 C)
Declared noise emissions in accordance with ISO 9296:
Sound Power: (1B = 10dB) Normal
mode: 6.3dB
Sound Pressure: (bystander positions)
Normal mode: 50dB
Replaceable Parts
Print cartridges:
Black C6634A #34
Color C6635A #35
Limited Warranty Statement
HP Product Duration of Limited Warranty
Software 90 days Ink cartridges 90 days Printer 1 year
A. Extent of Limited Warranty
- Hewlett-Packard (HP) warrants to the end-user customer that the HP products specified above will be free from defects in materials and workmanship for the duration specified above, which duration begins on the date of purchase by the customer. Customer is responsible for maintaining proof of date of purchase.
- For software products, HP's limited warranty applies only to a failure to execute programming instructions. HP does not warrant that the operation of any product will be uninterrupted or error free.
- HP's limited warranty covers only those defects which arise as a result of normal use of the product, and do not apply to any:
a. Improper or inadequate maintenance or modification;
b. Software, interfacing, media, parts, or supplies not provided or supported by HP; or
c. Operation outside the product specifications.
-
For HP printer products, the use of a nonHP ink cartridge or a refilled ink cartridge does not affect either the warranty to the customer or any HP support contract with the customer. However, if printer failure or damage is attributable to the use of a non-HP or refilled ink cartridge, HP will charge its standard time and materials charges to service the printer for the particular failure or damage.
-
If HP receives, during the applicable warranty period, notice of a defect in any software, media, or ink cartridge covered by HP's warranty, HP shall replace the defective product. If HP receives notice of a defect in any hardware product covered by HP's warranty during the applicable warranty period, HP shall either repair or replace the defective product at HP's option.
- If HP is unable to repair or replace, as applicable, a defective product covered by HP's warranty, HP shall, within a reasonable time after being notified of the defect, refund the purchase price of the product.
- HP shall have no obligation to repair, replace, or refund until the customer returns the defective product to HP.
- Any replacement product may be either new or like-new, provided that it has functionality at least equal to that of the product being replaced.
- HP's limited warranty is valid in any country where the covered HP product is distributed by HP except for the Middle-East, Africa, Argentina, Brazil, Mexico, Venezuela, and France's "Departments D'Outre-Mer"; for those excepted areas, the warranty is valid only in the country of purchase. Contracts for additional warranty services, such as on-site service, may be available from any authorized HP service facility where the product is distributed by HP or by an authorized importer.
B. Limitations of Warranty
- TO THE EXTENT ALLOWED BY LOCAL LAW, NEITHER HP NOR ITS THIRD PARTY SUPPLIERS MAKE ANY OTHER WARRANTY OR CONDITION OF ANY KIND, WHETHER EXPRESS OR IMPLIED, WITH RESPECT TO THE HP PRODUCTS, AND SPECIFICALLY DISCLAIM FROM THE IMPLIED WARRANTY OR CONDITIONS OF MERCHANTABILITY, SATISFACTORY QUALITY, AND FITNESS FOR A PARTICULAR PURPOSE.
C. Limitations of Liability
- To the extent allowed by local law, the remedies provided in this Warranty Statement are the customer's sole and exclusive remedies.
- TO THE EXTENT ALLOWED BY LOCAL LAW, EXCEPT FOR THE OBLIGATIONS SPECIFICALLY SET FORTH IN THIS WARRANTY STATEMENT, IN NO EVENT WILL HP OR ITS THIRD PARTY SUPPLIERS BE LIABLE FOR DIRECT, INDIRECT, SPECIAL, INCIDENTAL, OR CONSEQUENTIAL DAMAGES, WHETHER BASED ON CONTRACT, TORT, OR ANY OTHER LEGAL THEORY AND WHETHER ADVISED OF THE POSSIBILITY OF SUCH DAMAGES.
D. Local Law
- This Warranty Statement gives the customer specific legal rights. The customer may also have other rights which vary from state to state in the United States, from province to province in Canada, and from country to country elsewhere in the world.
- To the extent that this Warranty Statement is inconsistent with local law, this Warranty Statement shall be deemed modified to be consistent with such local law. Under such local law, certain disclaimers and limitations of this Warranty Statement may not apply to the customer. For example, some states in the United States, as well as some governments outside the United States (including provinces in Canada), may:
a. Preclude the disclaimers and limitations in this Warranty Statement from limiting the statutory rights of a consumer (e.g., the United Kingdom);
b. Otherwise restrict the ability of a manufacturer to enforce such disclaimers or limitations; or
c. Grant the customer additional warranty rights, specify the duration of implied warranties which the manufacturer cannot disclaim, or not allow limitations on the duration of implied warranties.
- FOR CONSUMER TRANSACTIONS IN AUSTRALIA AND NEW ZEALAND, THE TERMS IN THIS WARRANTY STATEMENT, EXCEPT TO THE EXTENT LAWFULLY PERMITTED, DO NOT EXCLUDE, RESTRICT, OR MODIFY, AND ARE IN ADDITION TO, THE MANDATORY STATUTORY RIGHTS APPLICABLE TO THE SALE OF HP PRODUCTS TO SUCH CUSTOMERS.
HP Year 2000 Warranty
Subject to all of the terms and limitations of the HP Limited Warranty Statement stated above, HP warrants that this HP Product will be able to accurately process date data (including, but not limited to, calculating, comparing, and sequencing) from, into, and between the twentieth and twenty-first centuries, and the years 1999 and 2000, including leap year calculations, when used in accordance with the Product documentation provided by HP (including any instructions for installing patches or upgrades), provided that all other products (e.g. hardware, software, firmware) used in combination with such HP Product(s) properly exchange date data with it. The duration of the Year 2000 warranty extends through January 31, 2001.
Energy Consumption
This printer was designed with energy conservation in mind. This printer averages 4 watts in stand-by mode. Not only does this save natural resources, but it also saves money without affecting the high performance of the printer.
This product qualifies for the ENERGY STAR Program (U.S. and Japan). ENERGY STAR is a voluntary program established to encourage the development of energy-efficient office products.

ENERGY STAR is a US registered service mark of the US EPA. As an ENERGY STAR partner, Hewlett-Packard Company has determined that this product meets ENERGY STAR Guidelines for energy efficiency.
Energy Consumption in Off-Mode
When the printer is off, a minimal amount of energy is still being consumed. Energy consumption can be prevented by turning the printer power off, then disconnecting the end of the printer power cord from the electrical source.
A
accessing the Internet 1
arrow
print cartridge 7
B
black print cartridge 1
blank pages are printing 10
button
Power 4, 9
Resume 4, 9
C
cable connections 9
cancel printing 7
capacity 8
cleaning ink nozzles 11
clearing paper jams 8
color photographs 9
communication
lost connection with Internet 10
meaningless characters are printing 10
connecting the printer 2
contents
primer box 1
copper contacts 2
copyright ii
cradle 2,3
does not move to the right 10
customer care service 12
D
distilled water
use to clean ink nozzles 11
E
error messages 7
F
front cover 2, 3, 7, 8, 9
G
graphic image 11
H
HP 12
1
I/O interface 14
images
reformatted 11
In tray 7,8
capacity 4
paper correctly loaded 7
ink 10
nozzles 11
smeared 11
streaked 11
ink nozzles 2
cleaning 11
instructions
set top box 9, 10
interactive television
printing images 11
printout 11
interactive television service provider
account
Internet terminal 1
Internet
accessing 1
lost connection 10
Internet terminal 1
L
lever
paper tray 9
lights
blinking 6
off 6
on 6
Power 7
Resume 7, 10
M
meaningless characters print 10
media handling 14
media sizes 14
media weight
recommended 14
N
notice ii
0
operating environment 14
Out tray 8
capacity 4
extended 8
P
packing material 2
page does not print 9
paper
correctly loaded 7
inserting 4, 9
paper guides
length 4
width 4
paper jam 8, 9
paper tray capacity 4
paper tray lever 9
paper trays
removing 9
parallel cable 1, 2
IEEE 12849
photographs
color 9
poor print quality 11
Power button 4, 9
power consumption 14
power cord 2
Power light 7
blinking 7
off 7
on 7
power outlet 2
power requirements 14
power source 5
test page 5
print cartridge
arrow 7
inserting 3
releasing 3
removing 3
replacing 3
print cartridge cradle 2, 3
moves freely 10
moves to the center 3
moves to the right 2, 10
print cartridge cradles 9
print cartridges
empty 10
installation 5
installing 3
part numbers 14
replacing 10
print history ii
print method 14
print quality 14
poor 11
print size 11
print speed 14
primer
busy7
cable connections 9
connected to power source 5
connecting 2
front cover 2,3,7,8,9
processing information 9
registering 5
removing paper trays 9
weight 14
printer will not operate 3
printing
blank pages 10
cancel 7, 10
from Internet terminal 11
from the Internet 6
images 11
meaningless characters 10
page does not print 9
screens 6
test page 4
text 11
Website content 6
product number 14
R
recommended media weight 14
regulatory notices 25
releasing the print cartridge 3
removing a paper jam 9
removing paper trays 9
removing print cartridges 3
removing vinyl tape 2, 10
replaceable parts 14
replacing print cartridges 3, 10
Resume button 4, 9
Resume light 3, 7
blinking 7
continues to blink 10
off 7
S
set top box 1, 2, 7, 9, 10
instructions 6
support
customer care 12
symbols ii
T
tape 10
television screen 7
test page does not print 5
tri-color print cartridge 1
turning on the printer 2
U
USB printer cable 1, 2
user's guide 1
V
vinyl tape 10
removing 2, 10
W
wall outlet 2
warnings icon ii
warranty
statement 15
Web pages 11
weight
primer 14
Legal Information
Regulatory Notices
Hewlett-Packard Company
This device complies with part 15 of the FCC Rules. Operation is subject to the following two conditions:
- This device may not cause harmful interference, and
- This device must accept any interference received, including interference that may cause undesired operation.
Pursuant to Part 15.21 of the FCC Rules, any changes or modifications to this equipment not expressly approved by Hewlett-Packard Company may cause harmful interference, and void your authority to operate this equipment. Use of a shielded data cable is required to comply with the Class B limits of Part 15 of the FCC Rules.
For further information, contact:
Hewlett-Packard Company
Manager of Corporate Product Regulations
3000 Hanover Street
Palo Alto, Ca 94304
(415) 857-1501
Note
This equipment has been tested and found to comply with the limits for a Class B digital device, pursuant to part 15 of the FCC rules. These limits are designed to provide reasonable protection against harmful interference in a residential installation. This equipment generates, uses, and can radiate radio frequency energy and, if not installed and used in accordance with the instructions, can cause harmful interference to radio communications. However, there is no guarantee that interference will not occur in a particular installation. If this equipment does cause harmful interference to radio or television reception, which can be determined by turning the equipment off and on, the user is encouraged to try to correct the interference by one or more of the following measures:
Reorient or relocate the receiving antenna.
- Increase the separation between the equipment and the receiver.
- Connect the equipment into an outlet on a circuit different from that to which the receiver is connected.
- Consult the dealer or an experienced radio/TV technician for help.
LED Indicator Statement
The display LEDs meet the requirements of EN 60825-1.
Printed in Singapore 10/00

- Notice
- Terms and Conventions
- Terms
- Cautions
- hp e- printer e20
- Contents
- Getting Started 1
- Printing 6
- Solving a Problem. 8
- HP Customer Care. 12
- Regulatory 15
- Index 18
- What's in the Box
- What You Need
- Connecting the Printer
- Installing the Print Cartridges
- Removing and Replacing Print Cartridges
- Inserting Paper and Printing a Test Page
- If the Test Page Does Not Print
- Registering the Printer
- Printing Information from the Internet
- Buttons and Lights
- What to Do if...
- Power light is off
- Resume light is off
- Power light is on
- Power light is blinking
- Resume light is blinking
- Clearing Paper Jams
- Page Does Not Print
- The Resume Light Continues to Blink
- A Blank Page Prints
- Meaningless Characters Print
- The Print Quality is Poor
- HP Customer Care Online
- HP Customer Care User Forums
- HP Customer Care by Email
- HP Customer Care Audio Tips (U.S. Only)
- HP Customer Care by Phone
- After the Free Phone Support Period
- Printer Specifications
- Product Number
- Print Quality
- Print Speed
- Compatibility
- Media Sizes
- Recommended Media Weight
- Media Handling (Built-In Feeders)
- Reliability
- Print Method
- I/O Interface
- Dimensions
- Weight
- Power Requirements
- Power Consumption
- Operating Environment
- Replaceable Parts
- Limited Warranty Statement
- HP Product Duration of Limited Warranty
- Extent of Limited Warranty
- Limitations of Warranty
- Limitations of Liability
- Local Law
- HP Year 2000 Warranty
- Energy Consumption
- Energy Consumption in Off-Mode
- A
- B
- C
- D
- E
- F
- G
- H
- 1
- L
- M
- N
- 0
- P
- R
- S
- T
- U
- V
- W
- Legal Information
- Regulatory Notices
- Hewlett-Packard Company
- Note
- LED Indicator Statement
Brand : COMPAQ
Model : E20
Category : Monitor