
EZ-GUIDE 500 LIGHTBAR - Agricultural guidance system TRIMBLE - Free user manual and instructions
Find the device manual for free EZ-GUIDE 500 LIGHTBAR TRIMBLE in PDF.
| Product Type | Agricultural Guidance Lightbar |
| Brand | Trimble |
| Model | EZ-Guide 500 Lightbar |
| Dimensions (approx.) | 30 x 5 x 3 cm |
| Weight (approx.) | 0.5 kg |
| Power supply | 12 V DC (via vehicle connection) |
| Main functions | Guidance via lightbar, coverage display, autopilot integration, advanced driving parameter configuration |
| Screen | Integrated display with icons and info text |
| Guidance LEDs | 3 green LEDs in center for on-line guidance, side LEDs for deviation |
| Function buttons | OK, Up, Down, Back (ESC) buttons, function buttons identified by icons |
| Configuration | Advanced mode accessible via configuration menu |
| Autopilot integration | Compatible with AgGPS Autopilot system for automatic steering |
| Connection | Port for NavController II cable, optional NMEA output |
| Engagement indicators | LEDs and icons indicating status (ready, engaged, not possible) |
| Warnings | Full-screen messages or message bar for limits and faults |
| Maintenance and cleaning | Clean with a soft dry cloth. Avoid liquids. |
| Spare parts and repairability | Parts available from Trimble. Repair by a professional. |
| General information | Agricultural use. Works with GPS. Full manual available on notice-facile.com. |
Frequently Asked Questions - EZ-GUIDE 500 LIGHTBAR TRIMBLE
User questions about EZ-GUIDE 500 LIGHTBAR TRIMBLE
0 question about this device. Answer the ones you know or ask your own.
Ask a new question about this device
Download the instructions for your Agricultural guidance system in PDF format for free! Find your manual EZ-GUIDE 500 LIGHTBAR - TRIMBLE and take your electronic device back in hand. On this page are published all the documents necessary for the use of your device. EZ-GUIDE 500 LIGHTBAR by TRIMBLE.
USER MANUAL EZ-GUIDE 500 LIGHTBAR TRIMBLE
EZ-Guide® 500 Lightbar with the
AgGPS® Autopilot™ System Quick Reference Card
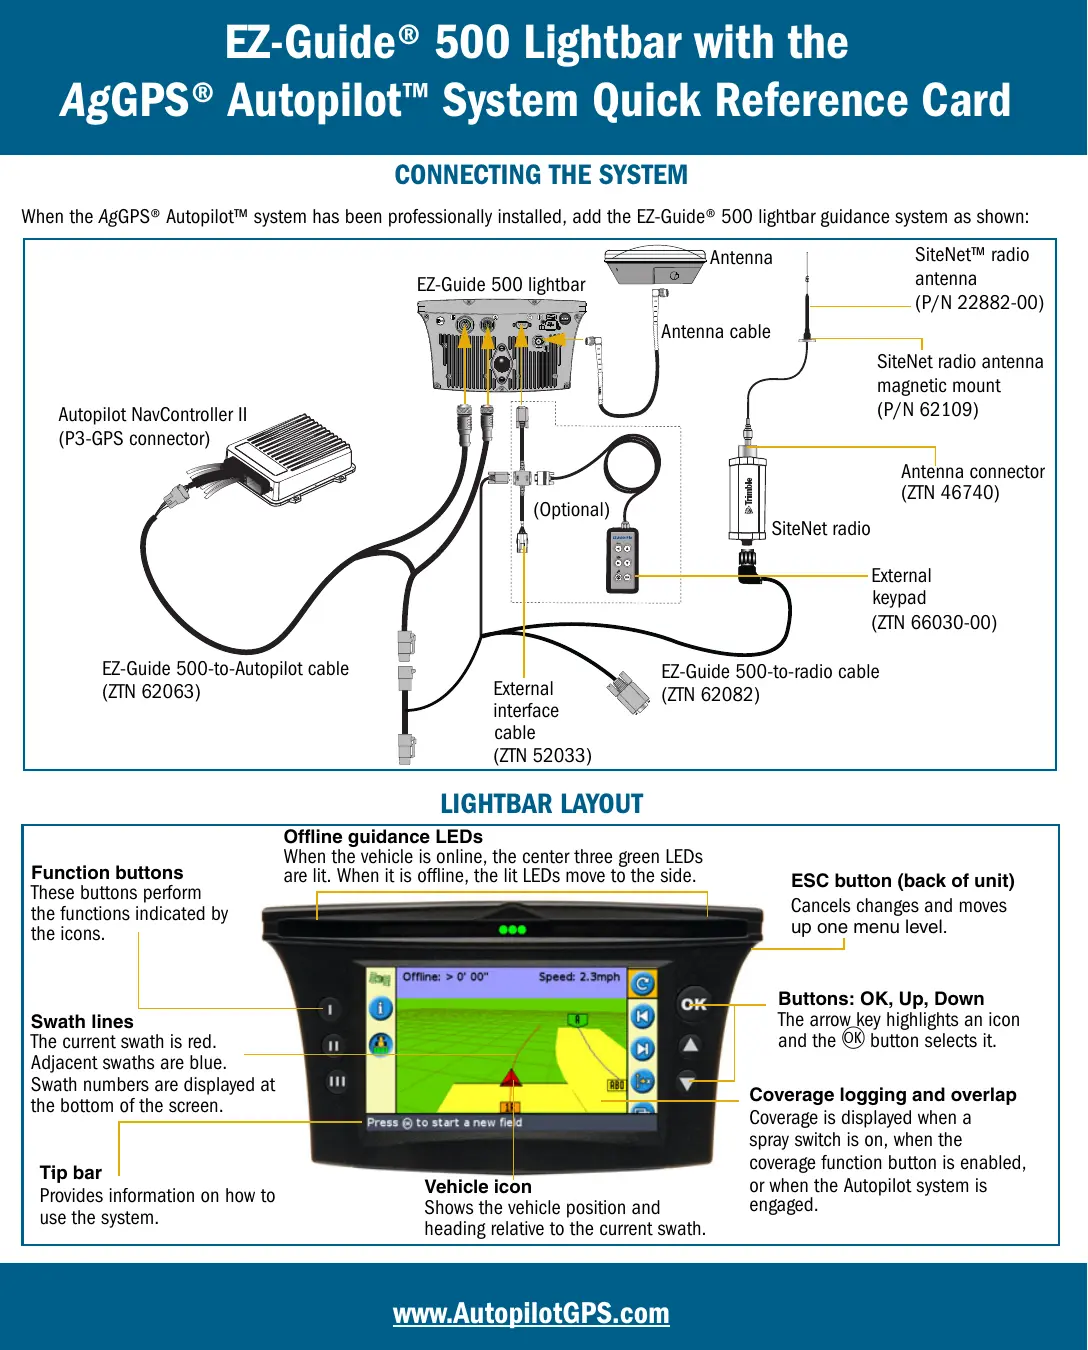
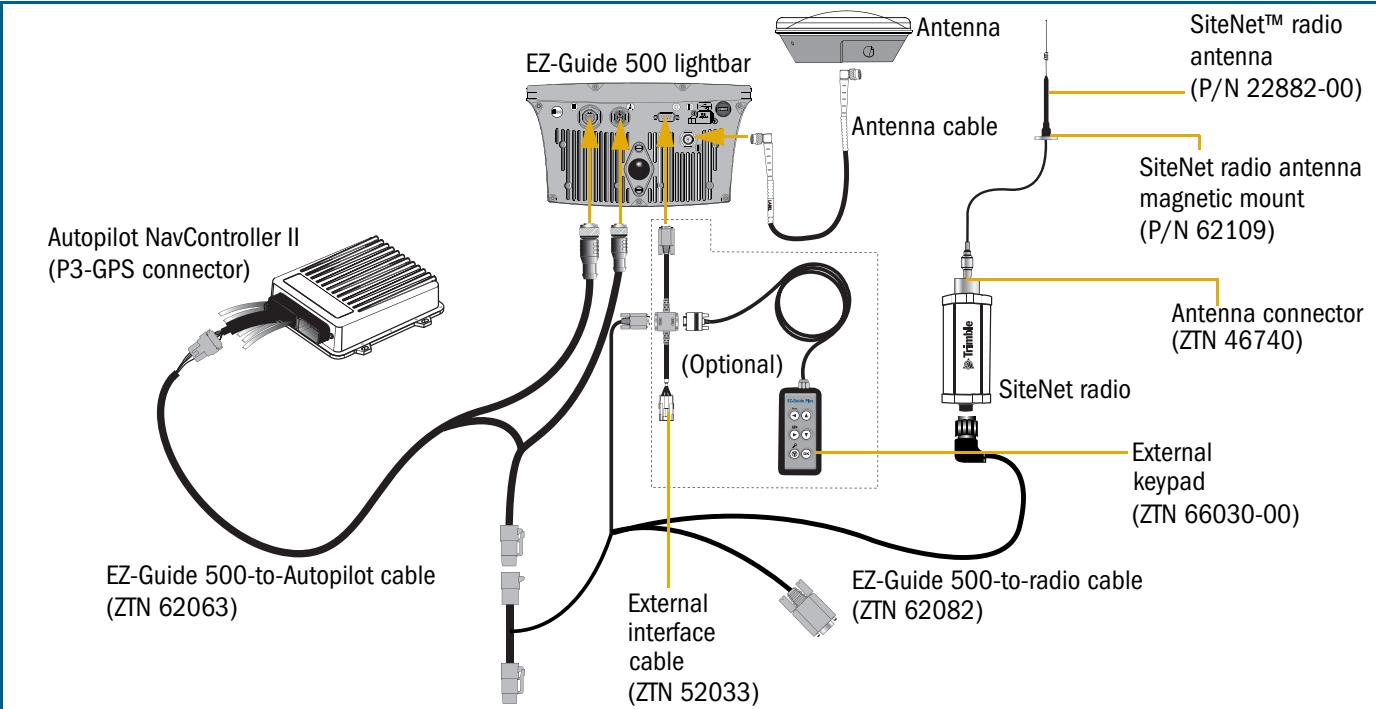
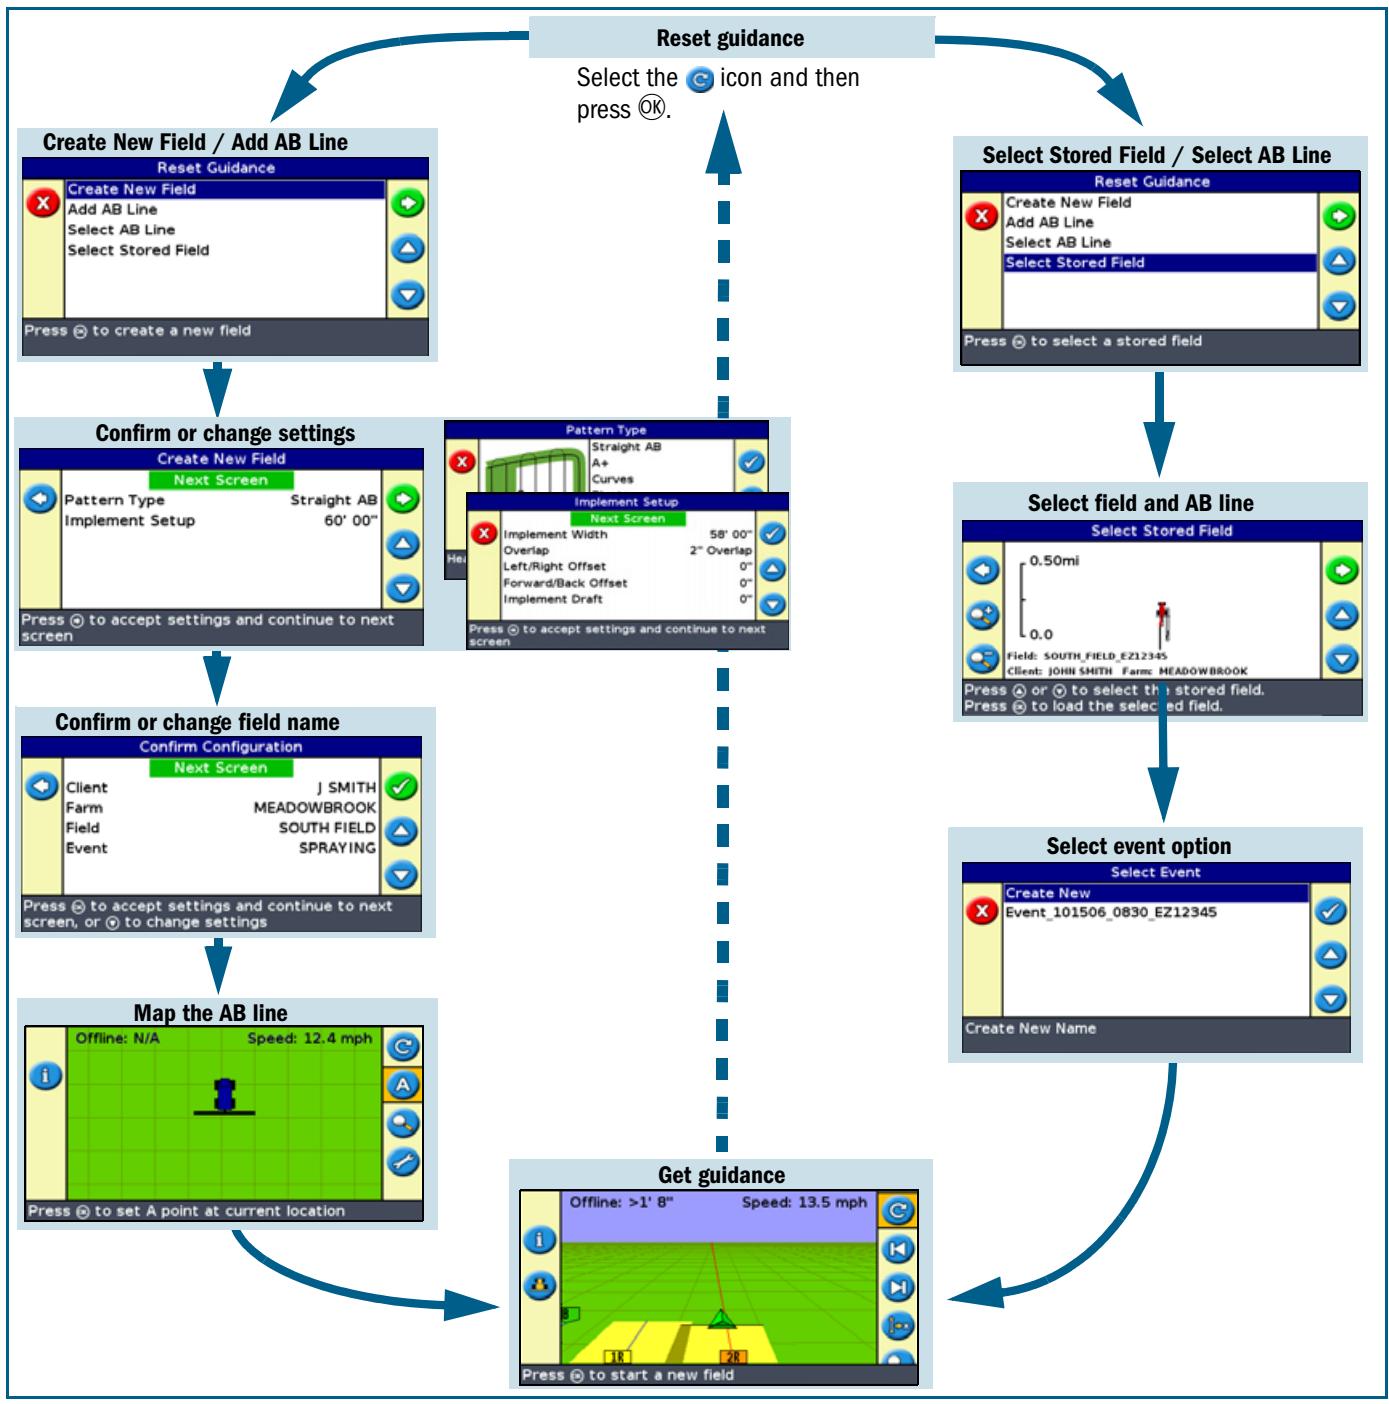
CONNECTING THE SYSTEM
When the AgGPS® Autopilot™ system has been professionally installed, add the EZ-Guide® 500 lightbar guidance system as shown:
LIGHTBAR LAYOUT
Function buttons
These buttons perform the functions indicated by the icons.
Swath lines
The current swath is red.
Adjacent swaths are blue.
Swath numbers are displayed at the bottom of the screen.
Tip bar
Provides information on how to use the system.
Offline guidance LEDs
When the vehicle is online, the center three green LEDs are lit. When it is offline, the lit LEDs move to the side.
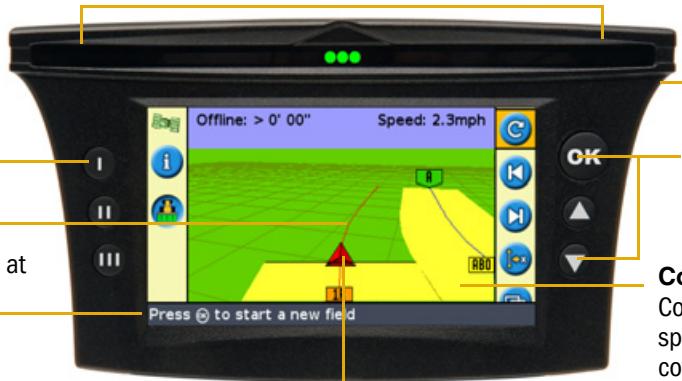
Vehicle icon
Shows the vehicle position and heading relative to the current swath.
ESC button (back of unit)
Cancel changes and moves up one menu level.
Buttons: OK, Up, Down
The arrow key highlights an icon and the OK button selects it.
Coverage logging and overlap
Coverage is displayed when a spray switch is on, when the coverage function button is enabled, or when the Autopilot system is engaged.
EZ-Guide® 500 Lightbar with the
AgGPS® Autopilot™ System Quick Reference Card
CONFIGURATION
Vehicle configuration
To configure the vehicle for use with the AgGPS Autopilot system, connect a laptop that is running the AgGPS Autopilot Toolbox II software to the Laptop connector on the NavController II. For more information, refer to the AgGPS Autopilot Toolbox II Software User Guide.
Lightbar configuration
- Change the lightbar to Advanced mode:
a. From the main guidance screen, press one or more times until you select the icon and then press OK. The Configuration screen appears:
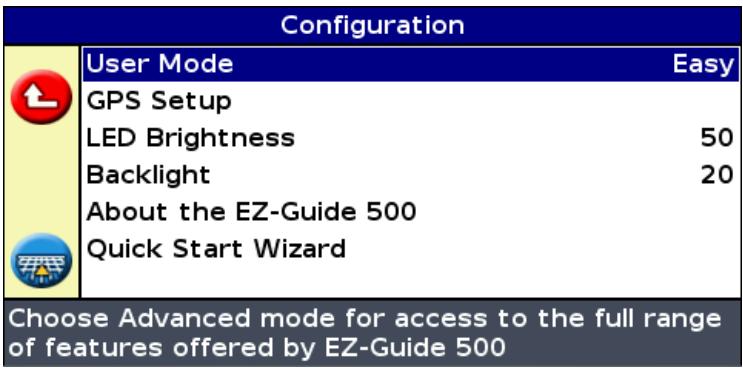
b. Select User Mode and then press OK. The User Mode screen appears.
c. Select Advanced and then press OK.
- Select Configuration / Auto Steer. A warning message appears.
- Press OK. The Auto Steer screen appears:
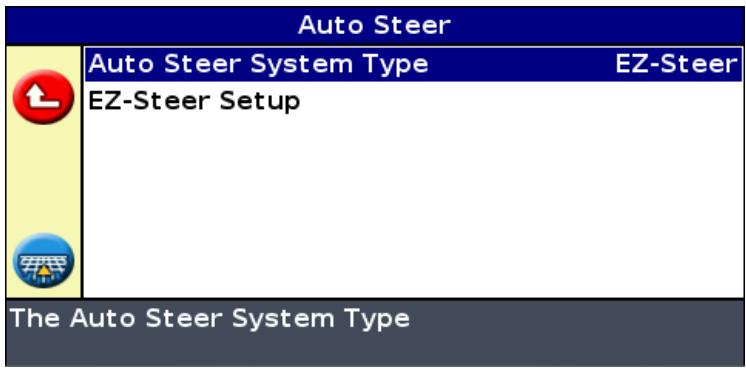
- Set the Auto Steer System Type option to Autopilot.
EZ-Guide® 500 Lightbar with the
AgGPS® Autopilot™ System Quick Reference Card
Once you set the Nav Controller Type, the Auto Steer screen re-appears. The EZ-Steer Setup menu changes to the Autopilot Configuration menu.
Auto Steer

Auto Steer System Type
Autopilot
Autopilot Configuration

The Auto Steer System Type
After you enable the Autopilot system, configure the Autopilot system settings.
AgGPS Autopilot system settings
Autopilot Configuration

Online Aggressiveness
100%
Operator Alert Timeout
15min
End of Row Warning Distance
32' 10"
NMEA Output

Download Custom Configuration File
Upload Custom Configuration File
Change the steering Online Aggressiveness setting
Item
Description
| Online Aggressiveness | This setting controls how aggressively the vehicle steers to remain on the guidance line. |
| Operator Alert Timeout | To verify the presence of the operator, a warning appears periodically. The warning requires you to acknowledge it to remain in normal automatic mode. This setting controls the frequency of the warning. The Operator Alert Timeout cannot be disabled. |
| End of Row Warning Distance | This warning appears when you are at the specified distance from the end of the current row. To make the warning appear earlier, increase the End of Row distance. This can be helpful if the operator is likely to be distracted (for example, by monitoring other equipment during operation). |
| NMEA Output | You can enable or disable NMEA message output from the Autopilot controller laptop port. If NMEA messages are enabled, you can configure which formats are output and the baud rate. Note — Ensure that the baud rate you select is the same as that of the device that is receiving the messages. |
| Download / Upload Custom Configuration File | You can save or restore a custom system configuration file from the Autopilot controller. To download a file, you are required to enter a name for the file. |
EZ-Guide® 500 Lightbar with the
AgGPS® Autopilot™ System Quick Reference Card
ADVANCED MODE APPLICATION USE
EZ-Guide® 500 Lightbar with the
AgGPS® Autopilot™ System Quick Reference Card
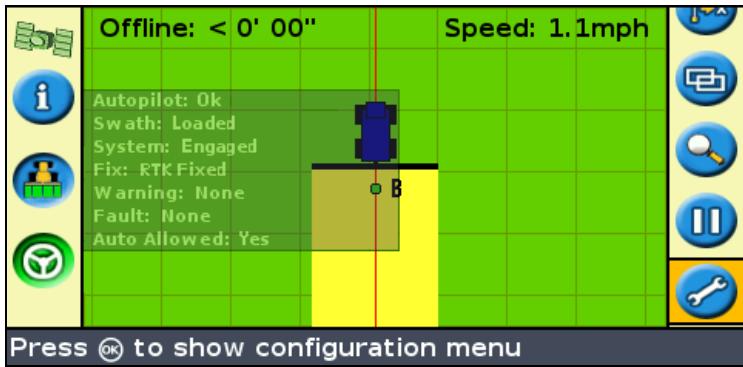
ENGAGING
To engage the EZ-Guide 500 system with the AgGPS Autopilot system, you must have a line defined and the vehicle must be within the engage limits of the system.
Do one of the following:
- Press the engage button on the main guidance screen.
- Press the engage button on the optional remote control.
- Press the optional remote engage foot pedal.
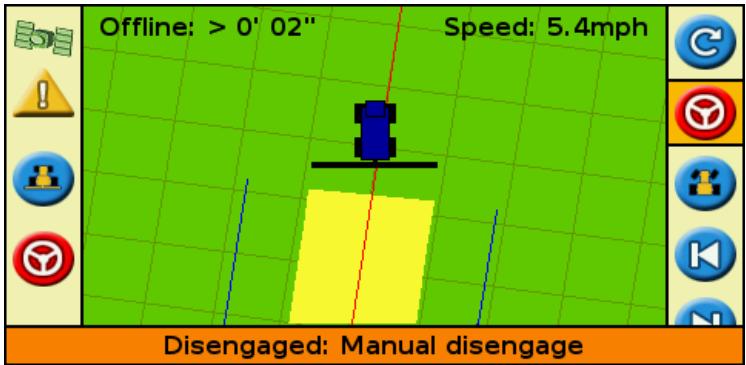
DISENGAGING
The system automatically disengages when:
The vehicle is outside the engage limits
GPS positions are lost
- The Minimum Fix Quality setting is set to a high accuracy correction method (for the AgGPS Autopilot system, this is usually RTK Fixed) and the system receives low accuracy positions (for example, no corrections). This setting is accessed at Configuration / System / GPS / GPS Limits / Minimum Fix Quality.
To manually disengage the system, do one of the following:
- Press the engage button on the main guidance screen.
- Press the engage button on the optional remote control.
Turn the steering wheel.
| GPS Limits | |
| Minimum Elevation | 8° |
| Minimum SNR | 38.0 |
| Minimum Satellites | 5 |
| Maximum HDOP | 3.0 |
| Minimum Fix Quality | RTK Fixed |
| Set the minimum elevation angle at which GPS satellites will be used | |
Engage status indicators
| Engage status | Engage button color | Vehicle icon color | LED indication |
| Ready to engage | 1 solid LED at each end | ||
| Engaged | 2 solid LEDs at each end | ||
| Cannot engage | No end LEDs illuminated |
When the system disengages, the three LEDs at each end of the lightbar flash for 10 seconds.
EZ-Guide® 500 Lightbar with the
AgGPS® Autopilot™ System Quick Reference Card
ADDITIONAL INFORMATION
Status screens
When you enable the AgGPS Autopilot system, the status screens that are available change:
| This EZ-Steer® menu … | Becomes … |
| Terrain Compensation Status | None (menu disappears) |
| EZ-Steer Status | Autopilot Status |
| Fault History / EZ-Steer Fault History | Fault History / Autopilot Fault History |
Information tab
When the Autopilot system is enabled, an additional Information tab is available. It shows the current status of the Autopilot system.
System warnings
Warning messages appear on the lightbar screen when the following conditions occur:
the Automated system limits are reached
- a fault has occurred
There are two types of warning, full-screen and message bar:
To clear a full-screen warning, press the OK button.
- To clear a message bar warning, press the top function button (to the left of the screen).
© 2007. Trimble Navigation Limited. All rights reserved. Trimble, the Globe and Triangle logo, AgGPS, EZ-Guide, and EZ-Steer are trademarks of Trimble Navigation Limited, registered in the United States and in other countries. Autopilot and SiteNet are trademarks of Trimble Navigation Limited. Version 1.00, Rev B. (April 2007).
P/N 66026-80-ENG
