
NORMA - Wood stove WANDERS - Free user manual and instructions
Find the device manual for free NORMA WANDERS in PDF.
| Product type | Gas stove |
| Brand | WANDERS |
| Model | NORMA |
| Nominal power output | 5.3 kW |
| Gas type | Natural gas (G20/G25) or Propane (I3P) |
| Supply pressure | 20-25 mbar (natural gas) / 30-50 mbar (propane) |
| Consumption | 0.194 to 0.656 m³/h depending on gas |
| Connection | Concentric flue Ø 80/150 mm |
| Ignition | Manual pilot light ignition |
| Control | Remote control with timer (4 time slots) |
| Safety | Thermocouple, child safety lock, automatic shut-off after 2 hours without signal |
| Decorative materials | Ceramic logs (natural gas) or pebbles (natural gas and propane) |
| Glass | Removable ceramic glass |
| Power supply | Batteries: receiver uses 4 LR6/AA or 1 9V battery, remote control uses 1 9V battery |
| Maintenance | Exterior cleaning with a damp cloth, annual service by an authorized installer |
| Warranty | 1 year (parts only) |
| Dimensions (approximate) | Built-in: L 600 x D 500 x H 500 mm (estimate) |
| Weight (approximate) | 50 kg (estimate) |
Frequently Asked Questions - NORMA WANDERS
User questions about NORMA WANDERS
0 question about this device. Answer the ones you know or ask your own.
Ask a new question about this device
Download the instructions for your Wood stove in PDF format for free! Find your manual NORMA - WANDERS and take your electronic device back in hand. On this page are published all the documents necessary for the use of your device. NORMA by WANDERS.
USER MANUAL NORMA WANDERS
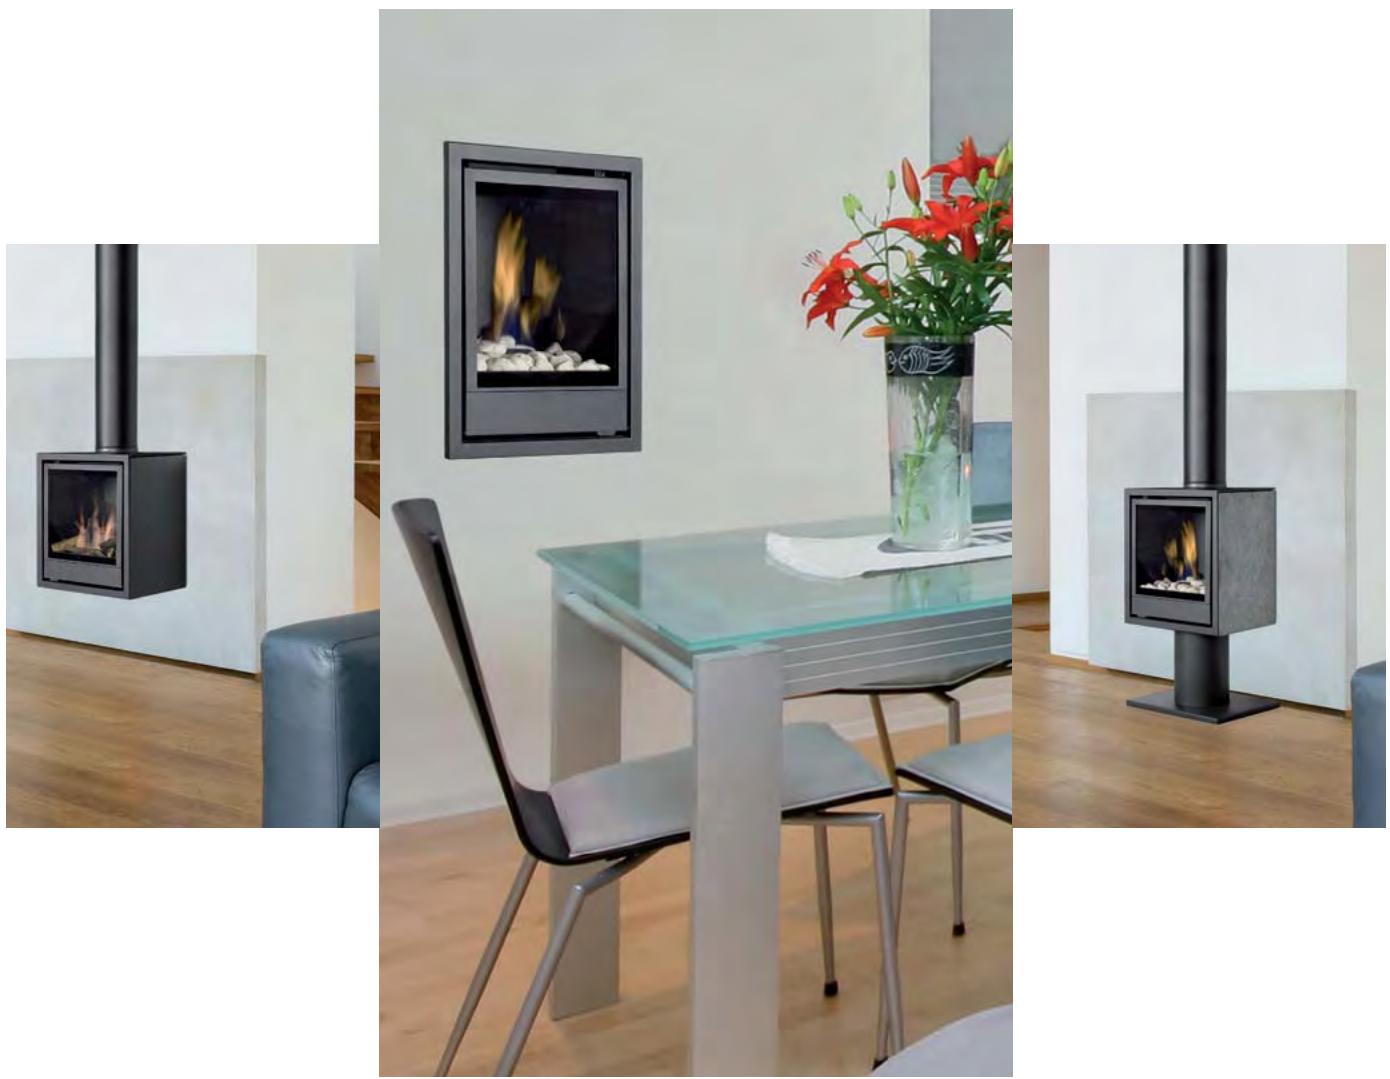
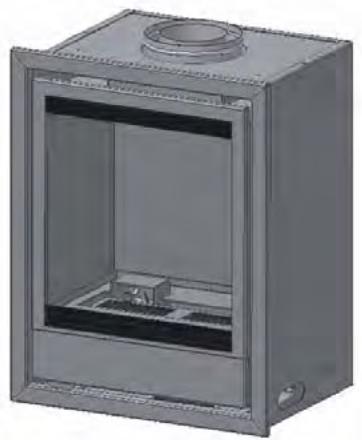
Norma / Norma Wall / Norma Free
NL Handleiding en installmentevoorschriften Norma 2
GB Users guide and installation manual for the Norma 15
FR Mode d'emploi et instructions d'installation le Norma 29
D Gebrauchsanweisung und Montage Vorschriften Norma 44
Geachte klant,
User's Guide and Installation Manual Norma / Norma Wall / Norma Free Gas

Dear Client,
Congratulations on your new WANDERS gas fireplace. It will be a comfortable source of heat to enjoy for many years on end.
Your gas hearth is fitted with a so-called closed system double-walled flue. The flue gases are directly discharged through the inner flue. The outer pipe extracts fresh air which produces beautiful and evenly burning flames. In principle, your gas unit can be installed in all kinds of spaces, even in rooms without any ventilation or with mechanical ventilation.
When designing this fireplace we took particular care of the ease of use, the safety and the design. Your gas unit is developed and produced at our own factory in Netterden (the Netherlands) and is for the greater part handmade. Only the best materials are used for the construction and comply with current international standards. This will guarantee that your hearth has a long life.
The first part of this user's guide gives you tips and directions about how to use your gas fireplace correctly and safely. The second part of the manual contains the installation instructions and the technical specifications of the gas unit. They are of particular importance to the installer.
We advise you to read this manual thoroughly before using your new gas fireplace and to keep the manual in a handy place. Your installer may need the manual for the yearly maintenance of your fireplace.
We wish you much warmth with your new fireplace!
The WANDERS team
Table of contents
Installation 18
Lighting the hearth for the first time 18
Ready for use 18
Batteries 19
Setting the remote control handset 19
Placing the ceramic lumber set (only for natural gas) 20
Placing the ceramic pebbles (natural gas and propane) 21
Maintenance 21
Safety 21
Possible error messages 22
Guarantee 22
Installation instructions 23
Technical drawings 59
Installation
It is common practice for the dealer where you purchased your gas unit to take also care of installing it and connecting it to the mains. If this is not the case, please ensure that the installation is done by a certified installer. Connecting gas devices by unqualified persons is prohibited, in which case we cannot give any guarantee that your gas hearth is functioning properly.
Ready for use
After connecting your Wanders gas unit to the mains and making the necessary adjustments, the hearth is ready for use. The pilot flame must be ignited manually.
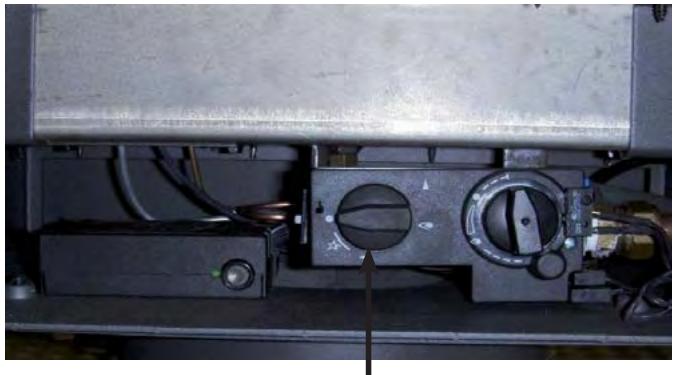
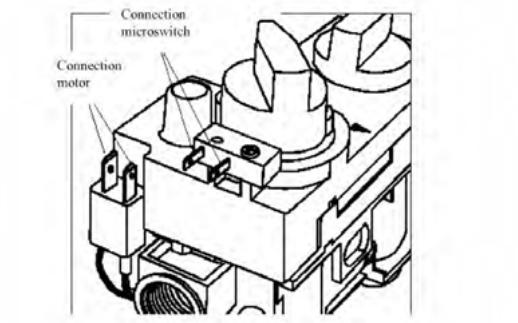
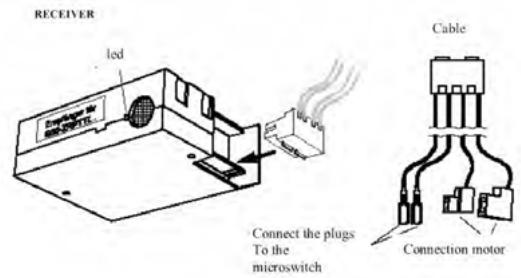
Receiver and gas governor (A)
Lighting the pilot flame manually
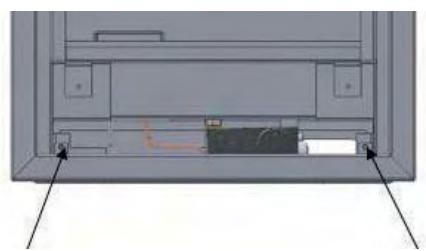
Open the flap at the bottom of the hearth. Check whether the gas tap is turned on. You will see the control buttons of the hearth in the middle behind the flap.
- Turn the ignition knob (A) clockwise until it stops, then press the knob and wait a few seconds.
- While keeping the knob pressed, turn the knob to the left until you hear a click.
- Look through the glass pane to see whether the pilot flame at the left of the hearth is burning. If the pilot flame is not ignited, repeat steps 2 and 3.
- If the pilot flame is burning, keep the ignition knob pressed for some time. When you release the knob after 30 seconds, the pilot flame must stay alight. If it doesn't, wait for 5 minutes before trying to light the pilot flame again.
- If the pilot flame stays alight, turn the knob anticlockwise till the symbol of the large flame. Now you can close the flap and regulate the height of the flames with the remote handset.
Child-proof safety lock
If you turn the ignition knob to the symbol of the small flame, the remote control is put out of action while the pilot flame will stay alight.
Arranging the height of the flames
Point the remote control handset towards the gas unit. The hearth will burn higher when pressing the button. The hearth will burn slower when pressing the button. When you keep pressing the the hearth will switch to the pilot flame position. You can also put the hearth on the pilot flame position manually by turning the ignition knob (A) clockwise until the minimum is reached.
When you press both buttons, you will see the 'transmit' signal top left on the display. The hearth has reached its highest or lowest position when the LED of the receiver starts blinking.
Switching off the pilot flame
The pilot flame is switched off manually. Open the flap, gently press the ignition knob (A) and then turn it clockwise.
Lighting the hearth for the first time
When you light your gas unit for the first time, the hearth must 'anneal'. The unit has a heat resistant lacquer which must still burn in. Though this may give an unpleasant smell, it is otherwise harmless. It is advisable to turn onto high for about three hours while airing the room well.
Discolouration of walls, ceilings and grates
After lighting your heath the walls, ceilings and grates may show some discolouration. This is caused by the dust particles that burn in the convection cover. This is a natural process for which WANDERS can not be held responsible. To minimize the discolouring we refer to the advice given for atmospheric hearths. Your installer can give you more information about this.
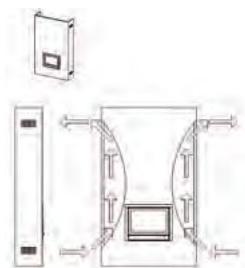
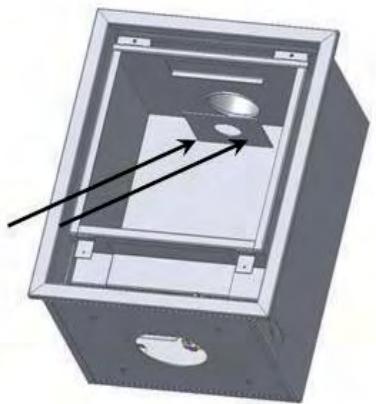
Some deposit may form on the ceramic glass of the door of the hearth. You can easily remove this deposit with a damp cloth and if necessary some cleansing agent for ceramic rings when the glass has cooled down. You can open the door of the hearth by turning the screw clockwise at the bottom. You can use a coin for this.

Photograph: Remove ornamental frame
- Unscrew the two cross-slotted screws and lift the glass pane.
- PLEASE NOTE: Be sure not to touch the cleaned glass with your fingers when you replace the pane. Finger marks burn in the glass.
Avoid finger marks
Avoid leaving any finger marks on the glass after closing the door. Finger marks leave stains that burn in the glass and can not be removed later.
When you light your fireplace for the first time, the unit calculates how much time is needed to reach the preset temperature. Your hearth will now select the most efficient way to heat the room.
Ensure that the logs are not placed in front of the pilot flame. The gas must be able to stream freely to the main burner. The main burner is located underneath the log set. See page 20 for placing the log set properly.
It is advisable to keep the pilot flame burning in heating seasons to prevent condensation and possible calcification on the inside of the door.
Newly-built house or recently renovated?
It is advisable to wait six weeks before lighting the hearth in a newly-built house that has recently been delivered, or a space or room that has recently been drastically renovated. The walls and ceilings still contain gases, softeners and moist from plasterwork or paint. The warm air-streams may discolour the dust particles in the space which may stick to walls and ceilings. When the moist in the walls and ceilings warm up, this may also cause yellowish stains.
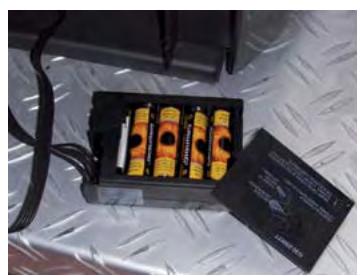
Batteries
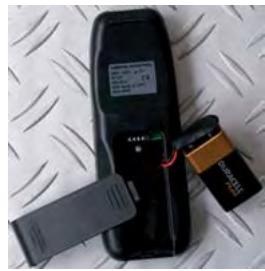
Your gas hearth is delivered with batteries in the receiver. It is advisable to place new batteries in the receiver and the remote handset when installing your gas unit. The receiver in the hearth works on 4 batteries of 1.5V (type LR6 or AA) or 1× 9V alkaline. The remote handset is powered by a 9V alkaline block battery. The batteries will last for about one year.
When are the batteries due for replacement?
- The batteries of the receiver are due for replacement if you see that the engine works with increased difficulty.
- The battery of the remote control handset is due for replacement when the display shows BATT in the top right hand corner.
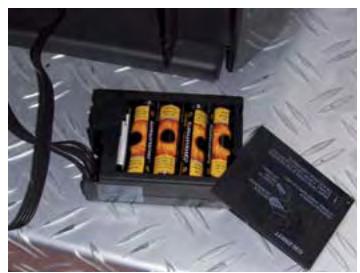
Replacing the batteries of the receiver
Replacing the batteries in the remote control
Setting the remote control handset
Setting the remote control of your gas unit is simple. Once you have done it you can operate your hearth in less than no time. Your remote can even preset four time schedules for the desired temperatures.
It is advisable to switch off your hearth when you preset the remote to avoid accidentally changing the temperature of your unit.
If your Norma hearth has not received a signal from the remote control for two hours, the unit switches automatically back to the pilot flame setting. The pilot flame will burn continuously.
If you switch off the pilot light after lighting your hearth, you must wait at least five minutes before lighting the hearth again.
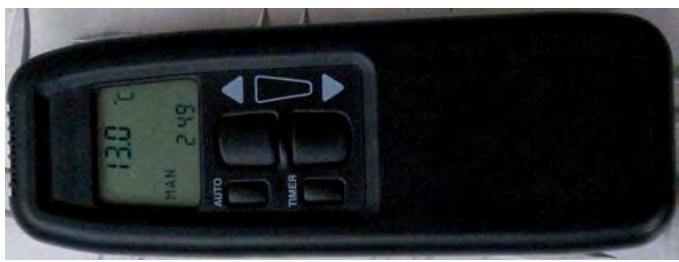
remote control
Setting the time and the date
After placing the batteries, or by pressing the buttons AUTO and TIMER simultaneously, the display will start flashing. With the button you select the hour. With the
button you set the minutes. Wait for a few seconds, or press the TIMER button to save the preset time.
Setting in Fahrenheit or Celsius
The display starts blinking after placing the batteries, or after simultaneously pressing the buttons AUTO and TIMER. When the display is still blinking, you can switch from Fahrenheit / 12-hour indication to Celsius / 24-hour indication. The indication will switch when pressing the AUTO button. The display will switch automatically to manual operation after some time
Setting the desired temperature
Press and hold the AUTO button until the TEMP indication blinks. You can set a higher temperature with the button and a lower temperature with the button. Then wait a few seconds, or press the AUTO button to switch to the automatic modus.
Checking the set temperature
Briefly press the AUTO button. The display briefly shows the preset temperature and then displays the room temperature.
TIMER
You can preset a total of four time-settings. When you link up all four time-settings, you can be sure of a comfortable room temperature at all times.
Press and hold the TIMER button until the indication P1<> blinks. With the ▲ and ▼ buttons you can set respectively the hours and the minutes. By briefly pressing the TIMER button you can browse through the timer programme P1<>, P1<>, P2<> and P2<> Here is an example of a possible presetting.
P1<>>-temp: 07:30 - 08:30 the preset temperature
P1<@>-temp: 08:30 - 17:00 off
P2<-temp: 17:00 - 23:00 the preset temperature
P2
The TIMER function works only when the pilot flame is on. If the TIMER mode is switched on, the temperature control will be the same as in the AUTO position. You can switch off the TIMER mode with the and buttons. The remote control will automatically switch to the MAN function.
MAN
When the display shows the MAN position you can manually turn the hearth higher and lower by using the big buttons. When you press and hold the button the hearth will go to its lowest position: the pilot flame. When you keep these buttons pressed, you will see the 'transmit' symbol top left in the display. You will know when the hearth has reached its highest or lowest position when the LED of the receiver starts blinking.
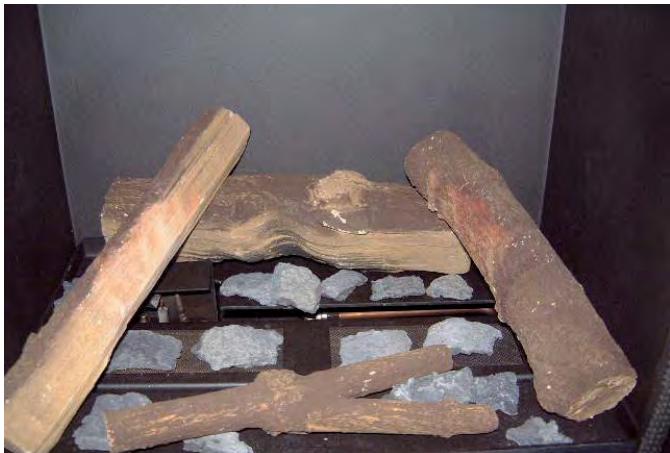
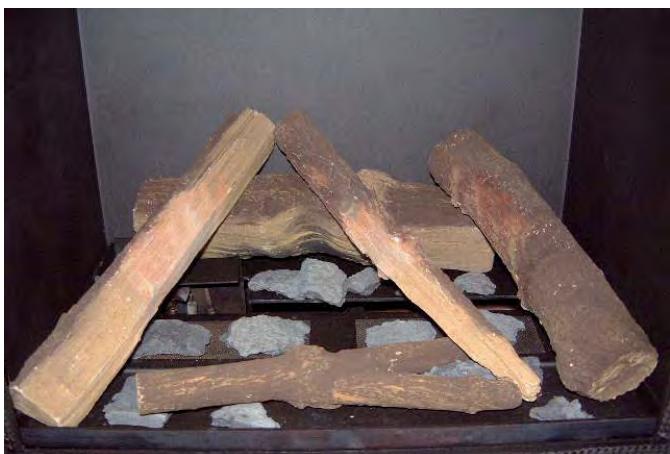
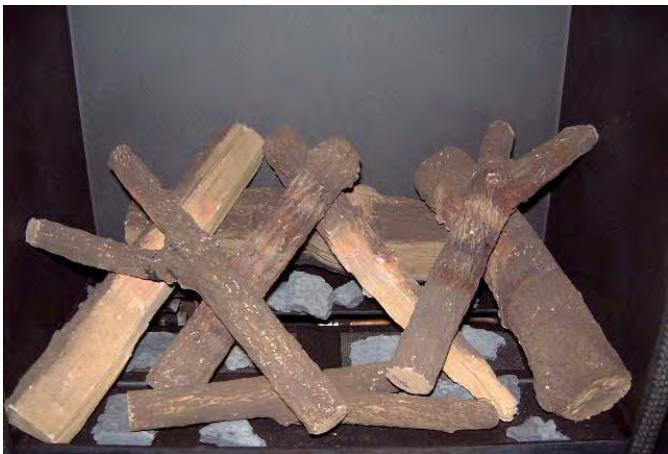
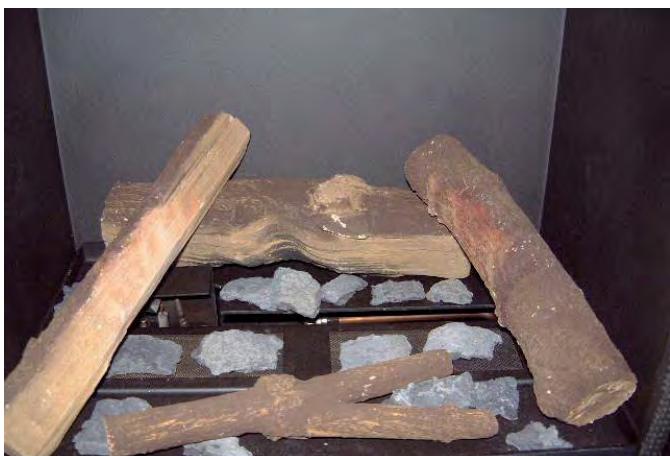
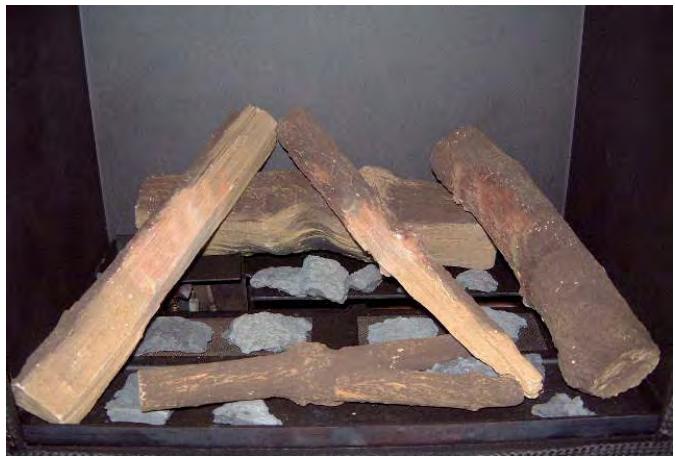
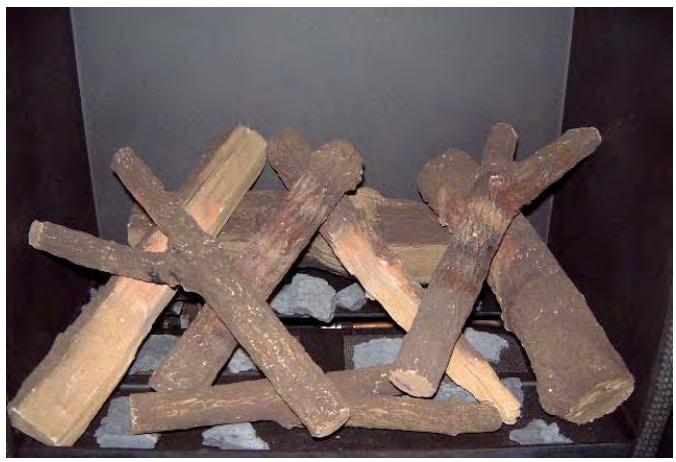
Placing the ceramic lumber set (only for natural gas)
- How to open the door is explained on page 18
- Place some pieces of ceramic bark exactly as shown in the illustrations. Start with four pieces of bark on the burner but do not block the outflow passage of the pilot.
- Place the ceramic logs exactly as shown in the illustrations. This will give regular flames and prevents
soot build-up.
- Place the rest of the bark in the empty spaces around the logs. Do not place them on the burner.
- PLEASE NOTE: Be sure not to touch the cleaned glass with your fingers when you replace the pane. Finger marks burn in the glass.
- Do not forget to replace the door correctly and close it before lighting the hearth.
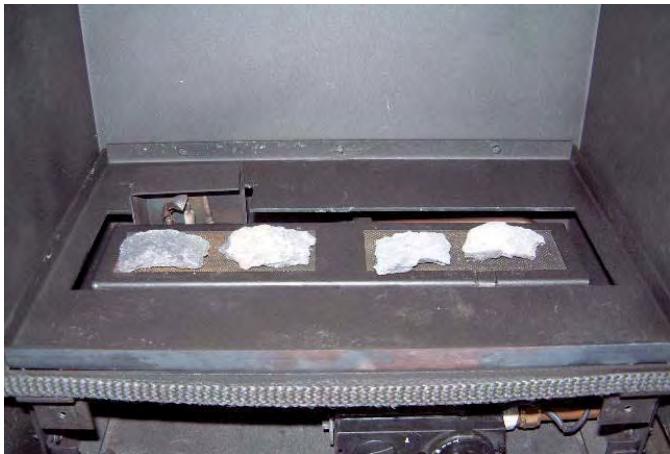
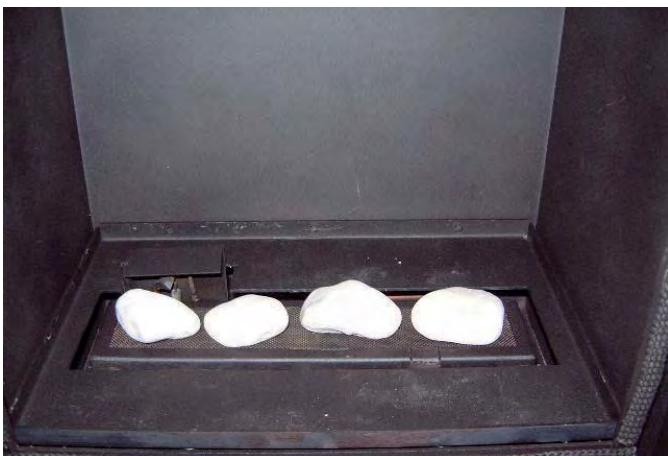
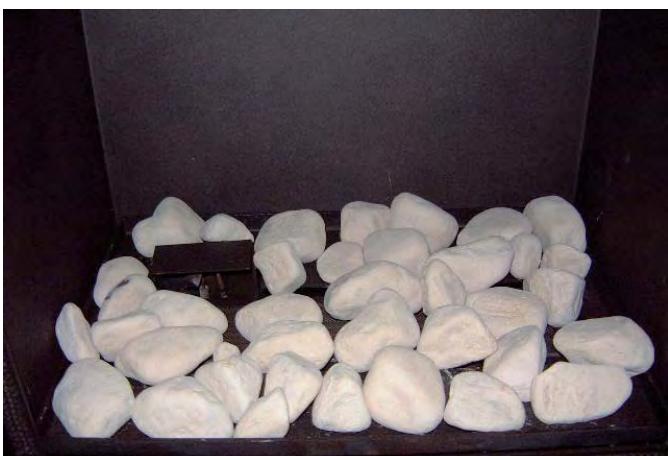
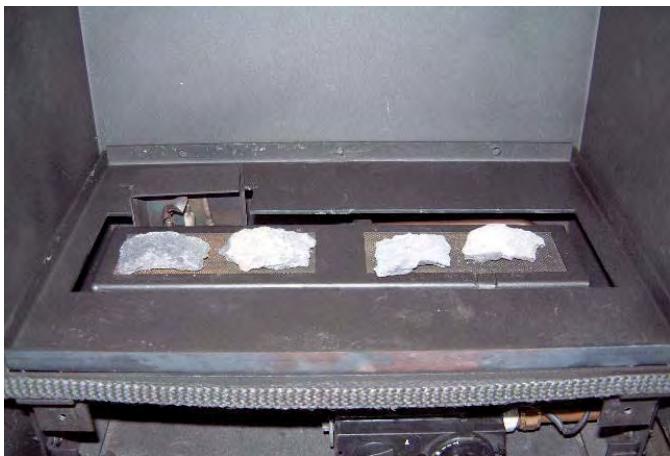
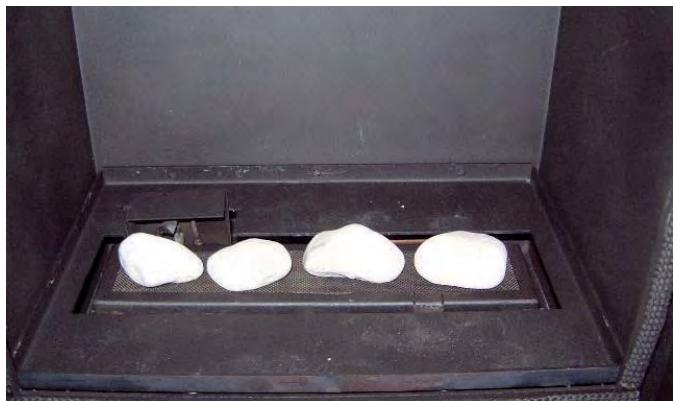
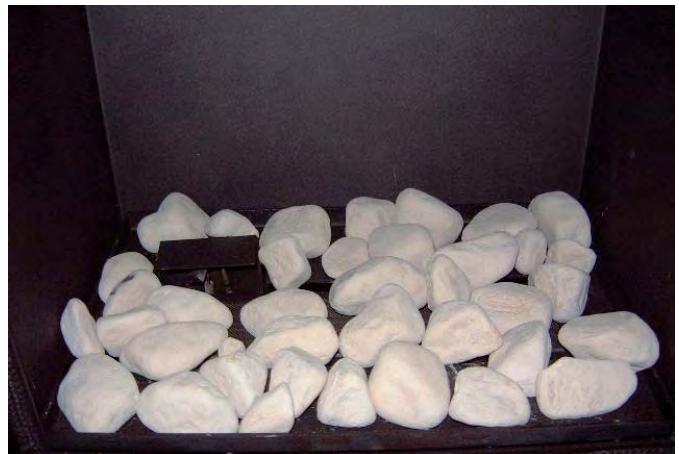
Placing the ceramic pebbles (natural gas and propane)
- Explanation of how to open the door of the fire place is given on page 18.
- First put four stones on the burner (see illustration).
- Make sure that the outflow passage in front of the burner is not blocked.
- Then fill up the rest of the bottom with the stones (see the illustration).
- Make sure that the outflow passage in front of the burner is not blocked.
- PLEASE NOTE: Be sure not to touch the cleaned glass with your fingers when you replace the pane. Finger marks burn in the glass.
- Do not forget to replace the door correctly and close it before lighting the hearth.
Make sure there is no log or stone in front of the pilot as this may prevent the main burner from ignition whereby unburnt gas may accumulate in the stove. If this happens, you must extinguish the pilot and notify your installer.
You must not add extra ceramic (wood) logs or any other material to the log set. The usage of grains is prohibited (LPG). The stove may not work properly and become damaged beyond repair. Ceramic log sets may be replaced only by the same kind of WANDERS logs.
Maintenance
Small maintenance
You can clean the outside of the hearth with a damp cloth that doesn't give off fluff. Only clean the outside when the hearth is cold. If some coffee is spilled on the unit when it is burning, turn the hearth off immediately. When the hearth has cooled off completely, you can remove any stains with a damp cloth
Do not use any aggressive cleansing agents or abrasives and do not use stove polish.
Annual maintenance
Your gas hearth needs to be checked and maintained by a certified installer at least once a year. He will check and, if necessary, clean the following components:
- The air-tightness of the exhaust pipes for gas and fumes and the pipes for supplying combustion air.
- The proper functioning of the gas governor, the thermocouple interrupter (a safety measure against unexpected outflow of gas) and the ignition of the main burner.
- The entire pipe system, including the exterior wall or roof duct and the external terminal.
- Inspection of possible wear and tear of the sealing of the doors and glass panes.
- The following components will be cleaned: the main burner, the pilot light, the flue tube and the supply of combustion air. Any dust collected in the hearth can be removed with a vacuum cleaner.
Safety
A WANDERS source of heat is more than just a stove in your room; the flue and the roof duct are also part of the heating system. Only when your gas hearth is installed with the concentric flue designed by WANDERS can we guarantee that your hearth is burning safely.
Every gas hearth by WANDERS is installed with a thermocouple interrupter. This will prevent unexpected gas flow if the pilot light has gone out.
Here are some recommendations for safely using your gas hearth:
- Only use your gas hearth when the door is properly closed. When the door is open, or the glass damaged, you must not use the fireplace.
- Prevent small children or the infirm from getting too close to a burning stove and do not leave them alone in the room when the fireplace is ignited. You could use a fire-screen.
- Turn the ignition knob all the way to the symbol of the small flame to deactivate the remote control while the pilot flame stays on. This is to ensure that nobody can accidentally change the temperature of your hearth.
- Never allow children to play with the remote handset.
- Do not pour or put any combustible liquids and materials on the log set, as it may damage the unit beyond repair.
- The gas hearth must never be built in the wall. The distance from the hearth to the rear wall must be at least 10 centimetres, and to the sides at least 20 centimetres.
- Do not place any combustible materials, such as curtains, close to the fireplace. A minimum distance of 1.5 meters is required.
- The fireplace must be repaired with original parts only, and by a certified installer.
- If for any reason the pilot light goes out, you must wait 5 minutes before igniting the hearth again.
Possible error messages
If your hearth does not function as planned please contact your gas hearth dealer or a certified installer. If the pilot light does not ignite, you can take the following steps.
- Check whether the gas supply is open. If you cannot find the gas supply please contact your installer.
- There may be some air in the pilot feed line. Wait for 5 minutes and light the hearth again. If this does not help please contact a certified installer.
Guarantee
WANDERS Metaalwerken B.V. in Netterden, the Netherlands, gives a one-year guarantee after the purchase date, provided that the fireplace is properly installed and used in accordance with the instructions in the manual.
The guarantee includes all defects which can be reduced to flaws in material and construction, in which case you will receive the new parts free of charge. Labour costs or other expenses are not covered by the guarantee. You can send defect parts (carriage paid) to WANDERS
Metaalproducten B.V., Amtweg 4, 7077 AL in Netterden [The Netherlands].
The guarantee does not include: failure due to improper use; non-compliance with the installation and operating instructions; installation by a non-certified installer; negligence of the apparatus and converting the fireplace to be fired with another kind of gas.

Wanders can not be held responsible for any cracks in stuccoed walls or discolouration of walls, ceilings and/ or grates after burning the fireplace. Discolouration is caused by the burning of dust particles in the convection cover. To reduce the chance of cracks in stucco and to minimize discolouration we refer to the advice given for decorative hearths. Your installer can give you more information.
Any complaints will be dealt with after the sales firm, the installer or the gas company filed a complaint and sent a copy of the purchase receipt with purchase date. Any repairs do not entitle you to extend the guarantee term. All consequential damages or loss are excluded.
Installation instructions
General instructions 23
Placing of the concentric channel system 24
Installation 25
Completing the installation 26
Technical data for kind of gas and consumption 28
General instructions
Your gas hearth must only be installed by a certified installer and only in combination with the WANDERS concentric pipe system. Only then will the hearth be approved according to the European CE standards for gas appliances. We will not give any guarantees if the gas hearth is fitted and/or installed in an incomplete or improper manner. The pipe system consists of an inner pipe with a diameter of 100 millimetres and an outer pipe with a diameter of 150 millimetres.
The appliance may only be installed and fitted by a certified installer in accordance with current universal gas piping regulations and according to the installation instructions mentioned below. Furthermore, the national and local rules and regulations on placing and using closed gas appliances shall be applicable. Only certified installers are authorized to change the preset values (in line with the regulations) or make any other adjustments.
Before installing the appliance, the installer must check whether the information on the type tag of the fireplace corresponds with the gas type and gas pressure to which the appliance is connected. If it does not match, it is not allowed to connect the gas unit.
Placing
The gas hearth must not be built into the wall. The distance from the hearth to the rear wall must be at least 10cm . The gas hearth must be placed on a floor that is solid enough to hold it.
The gas hearth can be placed in a crack-free and/or mechanically ventilated home without difficulty. There is no need for extra ventilation for combustion, or for a smoke and fire vent. Waste gases are discharged by natural draught via the inner pipe into the open. The oxygen needed for burning the fire is supplied from the space between the pipes. This is the reason that no
insulation must be placed between the inner and the outer pipe.
Insulation
Due to the high temperatures of the exterior walls (up to approximately 150^ or 300^ ) it is prohibited to have any combustible materials close to the channel system. The entire concentric pipe system should be encased (heat resistant) from the place where it is out of sight up to the outlet in the exterior wall. Ventilate the encased concentric pipe system by placing a grid near the floor and the ceiling on every floor. Use universal wall clips with a diameter of 150mm for anchoring the concentric pipe system.
If an existing chimney is used, first make sure whether the chimney is sufficiently insulated and with sufficient diameter to accommodate the concentric pipe system. If the chimney was previously used as a wood-burning or coal-fired stove, the chimney must first be professionally cleaned. You must use special WANDERS connecting sets for connecting a gas hearth to an existing chimney.
Gas connection
- Use a feed pipe with an approved G3/8" stop cock with coupling.
- De-aerate the supply pipe before fitting and fastening the appliance.
- Avoid all tension on the operating valve and pipes to avoid gas leakage.
- Check if the connection is gastight.
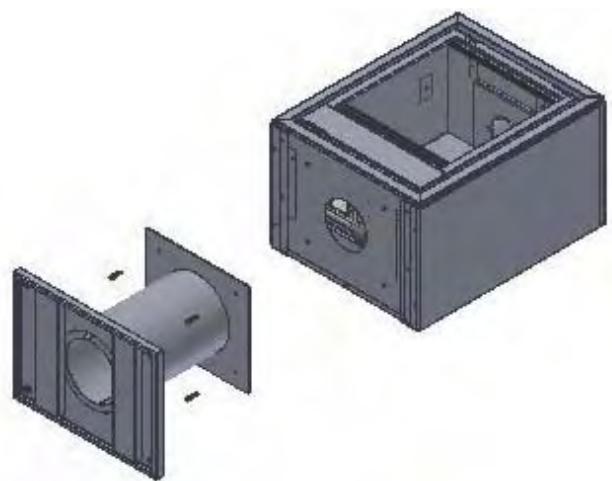
Placing of the concentric channel system
The concentric channel system consists of three parts: the channels itself, the transit through the roof or through a wall and the outflow.
Instructions for placing the outflow
The outflow of the pipe system can be placed on top of the roof or against the side wall of the house.
Roof outlet
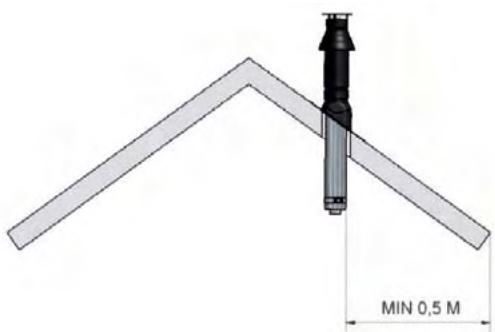
When placing the outflow on top of the roof, make sure that there is a distance of at least 50~cm between the outflow and the edges of the roof, with the exception of a possible existing ridge. You must also take the place of the outflow into account in relation to the existing ventilation openings, movable windows and combustion air supply provisions. Please consult the national and local requirements.
Wall outlet
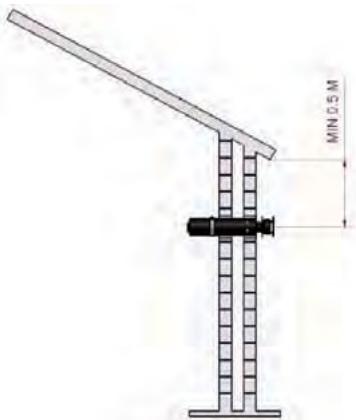
When placing the outflow into the side wall, make sure that there is distance of at least 50~cm between the outflow and the corners of the building, eaves, gutters, balconies and etceteras. You need not have this distance when the outflow runs through to at least the front of the overhanging part.
You must also take the place of the outflow into account in relation to the existing ventilation openings, movable windows and combustion air supply provisions. Please consult the national and local requirements.
Placing possibilities of the pipe system
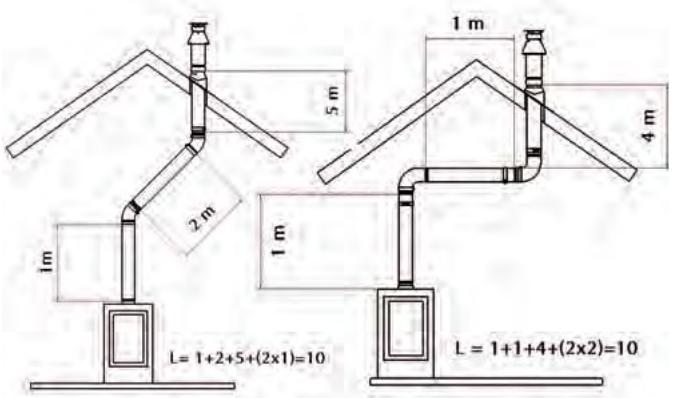
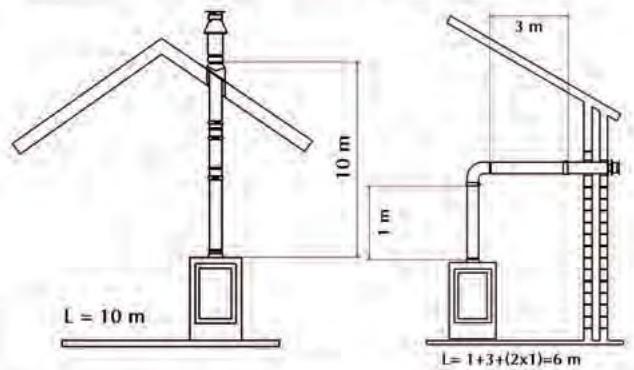
The total length of the pipe system must never be more than 10 metres excluding the passage through the wall and the outflow. A 90^ square angle counts as a length of 2 metres. A 45^ turn counts as a length of 1 metre.
For the combined flue tube and combustion air supply you must apply one of the following placing possibilities of the WANDERS concentric pipe systems: with wall duct, with roof duct or with roof duct with bend.
Placing possibilities of the pipe system
Make your choice from the installation possibilities shown above. Place the first meter of the concentric pipe on the counterpart on the appliance. You will know that you placed it properly if you can see the blue rubber seal ring when looking from above. Keep a distance of at least 5cm between the inner side of the concentric pipe and the wall or the ceiling.
Pay special attention to proper installing when, due to circumstances, a part of the double-walled pipe system must be built in.
Exterior wall duct
- Always allow one metre vertical before passing through the outer wall.
- Determine the location of the gas unit and the exterior wall duct.
- Make an opening of 155 mm for the wall duct.
- Connect the wall duct with a curve to the mouth of the appliance. Push them firmly together and place the clip bindings. The blue rubber ring ensures sufficient
sealing of the discharge system of the waste gas.
- If the appliance is placed more than 1 metre from the wall, place the vertical one-metre pipe first on the appliance, then place the curved part, then the exterior wall duct, and then make them gastight.
Outflow on top of the roof
You can place the outflow anywhere on the roof, if necessary with a bend to the ridge of the roof. The roof duct is supplied with a universally adjustable roof tile for a tilted roof, or with an adhesive plate for a flat roof.
- Determine the location of the gas unit and the outflow to the roof.
- Make an opening of 155 mm for the roof duct.
- Connect the pipes vertically to the mouth of the appliance. Push them firmly together and place the clip bindings.
- Determine the length of the pipes needed and make sure that the transfer tile or the universal roof tile is well fitted to the roof.
- Saw the outer pipe off to measure, and connect the concentric pipes to the roof duct.
First install the pipe system, and then place the gas unit
You may also fit the concentric pipe system before placing the gas unit, but then you must the connection to the gas unit with a pipe that can be shifted.
Installation
Norma (insert)
WANDERS recommends to add extra air inlets with all built-in stoves.
To install the insert model one needs to remove the 4 attached strips on each corner.
- Unscrew the three screws which hold the strip
- Remove the strips
- Place the screws back in their initial position
Norma Wall
Let a piece of gas pipe ( 12 ~mm) come from the wall. Attach the provided flexible tube to the gas pipe. Then mount the suspension bracket and the hearth as shown in the illustration below. Please read the rest of this chapter for making the connection to the gas pipe. The technical illustration of the suspension bracket is given on page 61.
Norma Free
Let a piece of gas pipe ( 12mm) come from the wall. Attach the provided flexible tube to the gas pipe. Then fit the base to the hearth with the 4 screw bolts and push the whole unit towards the gas tube. Please read the rest of this chapter for making the connection to the gas pipe.
Connecting the gas to the gas unit
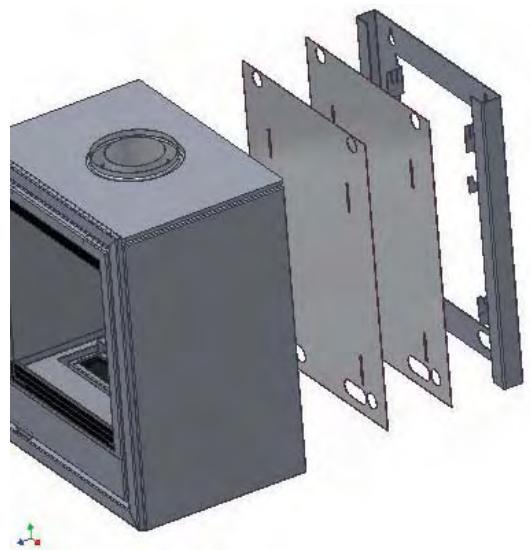
Remove the glass as described on page 18. Take off the decorative strip by removing the 2 visible screws. Now you can reach the gas unit for making the connection.
Placing a pipe closer
For natural gas:
With 1 metre vertical and wall duct of 0.70mm
With 1 metre vertical and 1,2 or 3 metres vertical: no pipe closer
With a roof duct without bend you must place:
A pipe closer of 050mm from 2 to 4 metres
- A pipe closer of 0.40 ~mm from 5 to 10 metres Place the pipe closer by screwing it on the inside below the mouth of the pipe. See the illustration.
For propane
With a wall duct: no pipe closer
With a roof duct without bend you must place:
A pipe closer of 050mm from 2 to 4 metres
A pipe closer of 40~mm from 5 to 10 metres
Place the pipe closer by screwing it on the inside below the mouth of the pipe. See the illustration.
Completing the installation
The concentric system is now fitted and the hearth is installed. To complete the installation, the following must be carried out:
Opening the door
The gas fireplace must be ignited only when the door is closed. The door is locked for safety reasons. You can open the door by turning the screw clockwise. Once the door is open you can place the ceramic lumber set.

Photograph: Remove ornamental frame
- Unscrew the two cross-slotted screws and lift the glass pane.
- PLEASE NOTE: Be sure not to touch the cleaned glass
with your fingers when you replace the pane. Finger marks burn in the glass.
Placing the ceramic lumber set (only for natural gas)
- How to open the door is explained on page 18
- Place some pieces of ceramic bark exactly as shown in the illustrations. Start with four pieces of bark on the burner but do not block the outflow passage of the pilot.
- Place the ceramic logs exactly as shown in the illustrations. This will give regular flames and prevents soot build-up.
- Place the rest of the bark in the empty spaces around the logs. Do not place them on the burner.
- PLEASE NOTE: Be sure not to touch the cleaned glass with your fingers when you replace the pane. Finger marks burn in the glass.
- Do not forget to replace the door correctly and close it before lighting the hearth.
Placing the ceramic pebbles (natural gas and propane)
- Explanation of how to open the door of the fire place is given on page 18.
- First put four stones on the burner (see illustration).
- Make sure that the outflow passage in front of the burner is not blocked.
- Then fill up the rest of the bottom with the stones (see the illustration).
- Make sure that the outflow passage in front of the burner is not blocked.
- PLEASE NOTE: Be sure not to touch the cleaned glass with your fingers when you replace the pane. Finger marks burn in the glass.
- Do not forget to replace the door correctly and close it before lighting the hearth.
Make sure there is no log or stone in front of the pilot as this may prevent the main burner from ignition whereby unburnt gas may accumulate in the stove. If this happens, you must extinguish the pilot and notify your installer.
You must not add extra ceramic (wood) logs or any other material to the log set. The usage of grains is prohibited (LPG). The stove may not work properly and become damaged beyond repair. Ceramic log sets may be replaced only by the same kind of WANDERS logs.
Batteries
Your gas hearth is delivered with batteries in the receiver. It is advisable to place new batteries in the receiver and the remote handset when installing your gas unit. The receiver in the hearth works on 4 batteries of 1.5V (type LR6 or AA) or 1× 9V alkaline. The remote handset is powered by a 9V alkaline block battery. The batteries will last for about one year.
When are the batteries due for replacement?
- The batteries of the receiver are due for replacement if you see that the engine works with increased difficulty.
- The battery of the remote control handset is due for replacement when the display shows BATT in the top right hand corner.
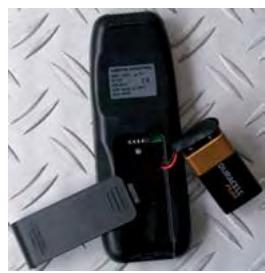
Replacing the batteries of the receiver Replacing the batteries in the remote control
Technical data for kind of gas and consumption
| A | B | C | D | E | F | G | H |
| NL | G25 I2L | 25mb | 5,3kw | 21mb | 2,1 | 1,4 | 0,656 |
| NL | I3P | 30 | 4,9 | 20 | 1,4 | 1,1 | 0,194 |
| BE | G20/G25 I2E+ | 20/25mb | 5,3kw | 11,5mb | 2,1 | 1,4 | 0,557 |
| BE | I3P | 37 | 4,9 | 20 | 1,4 | 1,1 | 0,194 |
| FR | G20/G25 I2E+ | 20/25mb | 5,3kw | 11,5mb | 2,1 | 1,4 | 0,557 |
| FR | I3P | 37 | 4,9 | 20 | 1,4 | 1,1 | 0,194 |
| IT | G20 I2H | 20mb | 5,3kw | 11,5mb | 2,1 | 1,4 | 0,557 |
| IT | I3P | 37 | 4,9 | 20 | 1,4 | 1,1 | 0,194 |
| DE | G20/G25 I2ELL | 20mb | 5,3kw | 11,5mb | 2,1 | 1,4 | 0,557 |
| DE | I3P | 50 | 4,9 | 20 | 1,4 | 1,1 | 0,194 |
| AT | G20 I2H | 20mb | 5,3kw | 11,5mb | 2,1 | 1,4 | 0,557 |
| AT | I3P | 50 | 4,9 | 20 | 1,4 | 1,1 | 0,194 |
| GB | G20 I2H | 20mb | 5,3kw | 11,5mb | 2,1 | 1,4 | 0,557 |
| GB | I3P | 37 | 4,9 | 20 | 1,4 | 1,1 | 0,194 |
| PT | G20 I2H | 20mb | 5,3kw | 11,5mb | 2,1 | 1,4 | 0,557 |
| PT | I3P | 37 | 4,9 | 20 | 1,4 | 1,1 | 0,194 |
| ES | G20 I2H | 20mb | 5,3kw | 11,5mb | 2,1 | 1,4 | 0,557 |
| ES | I3P | 37 | 4,9 | 20 | 1,4 | 1,1 | 0,194 |
| DK | G20 I2H | 20mb | 5,3kw | 11,5mb | 2,1 | 1,4 | 0,557 |
| DK | I3P | 30 | 4,9 | 20 | 1,4 | 1,1 | 0,194 |
| LU | G20/G25 I2ELL | 20mb | 5,3kw | 11,5mb | 2,1 | 1,4 | 0,557 |
| LU | I3P | 37 | 4,9 | 20 | 1,4 | 1,1 | 0,194 |
| IE | G20 I2H | 20mb | 5,3kw | 11,5mb | 2,1 | 1,4 | 0,557 |
| IE | I3P | 37 | 4,9 | 20 | 1,4 | 1,1 | 0,194 |
| SE | G20 I2H | 20mb | 5,3kw | 11,5mb | 2,1 | 1,4 | 0,557 |
| SE | I3P | 30 | 4,9 | 20 | 1,4 | 1,1 | 0,194 |
| NO | G20 I2H | 20mb | 5,3kw | 11,5mb | 2,1 | 1,4 | 0,557 |
| NO | I3P | 30 | 4,9 | 20 | 1,4 | 1,1 | 0,194 |
A: Land / Country / Pays / Land
B: Gastype / Gastype / Type de gas / Gasart
C:Voordruk/Prepressure/Prepression/Vordruck
D: Belasting o.w. / Nom. Press. OW / Nom. Pression OW / Nom. Belastung
E: Branderdruk / Burner pressure / Pressi on brule on / Brennerdruck
F: Inspluter / Injector / Buse / Einspritzer
G: Kleinstand inspuiher / Low stand injector / Buse petit feu / Klein Stand Einspritzer
H: Verbruik / Consumption / Consommation / Verbrauch
FR
Netterden, The Netherlands
EC TYPE EXAMINATION CERTIFICATE
Kiwa Gastec Certification hereby declares that the Independent gas-fired convection heaters,
Types Norma, Normafree and Normawall
meet the essential requirements as described in the Directive on appliances burning gaseous fuels (90/396/EEC) and in the Directive on efficiency requirements (92/42/EEC).
PIN
:0063BT3093
Report number
:178093
Appliance types
: C11/C31
Appliance categories
: I2H,I2E + ,I2E,I2LL,I2L,I3P,I_3B / P
The products mentioned above, have been tested to the Appliance categories specified and may be sold in the following countries:
Albania
Denmark
Iceland
Poland
Austria
Estonia
Italy
Portugal
Bosnia-Herzegovina
Spain
Lithuania
Romania
Belgium
Finland
Luxembourg
Sweden
Bulgaria
France
Latvia
Slovenia
Belarus
United Kingdom
Moldavia
Slovakia
Switzerland
Greece
Macedonia
Turkey
Cyprus
Croatia
Malta
Ukraine
Czech Republic
Hungary
the Netherlands
Serbia
Germany
Ireland
Norway
Montenegro
GASTEC
Kiwa Gastec Certification
Wilmersdorf 50
P.O.Box 137
7300 AC APELDOORN
The Netherlands
Phone + 31 55 5393 355
www.1kiwa.com

PROOUCS RvA C 009
Number
Date
E 8370
17 March 2008
Ir. M.L.D. van Rij, Division Manager.
0063
Type of appliance / Geräte Typ
Type de l'appareil / Tipo di apparecchio
Aparelho modelo / Type apparaat
Serial number / Seriennummer
Nr. de série /Numero di matricola
Série no / Seriennummer
Date of purchase / Kaufdatum
Date de l'achat / Data di acquisto
Data da aquisicao / Aankoop datum
Name / Name / Nom / Nome / Nome / Naam
- Norma / Norma Wall / Norma Free
- Table of contents
- Installation
- Ready for use
- Lighting the pilot flame manually
- Child-proof safety lock
- Arranging the height of the flames
- Switching off the pilot flame
- Lighting the hearth for the first time
- Discolouration of walls, ceilings and grates
- Avoid finger marks
- Newly-built house or recently renovated?
- Batteries
- When are the batteries due for replacement?
- Setting the remote control handset
- Setting the time and the date
- Setting in Fahrenheit or Celsius
- Setting the desired temperature
- Checking the set temperature
- TIMER
- MAN
- Placing the ceramic lumber set (only for natural gas)
- Placing the ceramic pebbles (natural gas and propane)
- Maintenance
- Small maintenance
- Annual maintenance
- Safety
- Possible error messages
- Guarantee
- Installation instructions
- General instructions
- Placing
- Insulation
- Gas connection
- Placing of the concentric channel system
- Instructions for placing the outflow
- Placing possibilities of the pipe system
- Exterior wall duct
- Outflow on top of the roof
- First install the pipe system, and then place the gas unit
- Norma (insert)
- Norma Wall
- Norma Free
- Connecting the gas to the gas unit
- Placing a pipe closer
- For natural gas:
- For propane
- Completing the installation
- Opening the door
- Technical data for kind of gas and consumption
- FR
- EC TYPE EXAMINATION CERTIFICATE
- Types Norma, Normafree and Normawall
- GASTEC
Brand : WANDERS
Model : NORMA
Category : Wood stove