
MP-300 - Portable music player TEAC - Free user manual and instructions
Find the device manual for free MP-300 TEAC in PDF.


| Product type | Portable MP3/WMA music player |
| Brand | TEAC |
| Model | MP-300 |
| Dimensions | 64 x 35 x 12 mm |
| Weight | 35 g |
| Display | OLED 65k colors |
| Internal memory | 256 MB / 512 MB / 1 GB (flash) |
| Connectivity | USB 2.0 |
| Supported audio formats | MP3 (MPEG1/2/2.5 Layer 3), WMA |
| Equalizer | 5 modes: Normal, Rock, Jazz, Classic, Pop |
| Playback modes | Normal, Repeat One, Repeat All, Shuffle, Shuffle All |
| A-B function | A-B repeat |
| FM radio | 87.5 - 108 MHz, stores up to 20 stations |
| Voice recording | Built-in microphone, ADPCM/PCM formats |
| FM recording | Yes, via R/A-B button |
| Line-In recording | Yes, via Line-In jack |
| Power | Built-in rechargeable lithium-ion battery |
| Battery life | Up to 8 hours of playback |
| Charging | Via USB or AC charger (included) |
| Lyrics display | ID3 support with lyrics (requires preparation) |
| Sleep function | Adjustable sleep screen (5/10/30/60 sec) |
| Firmware update | Yes |
| Supported operating systems | Windows 2000/XP/ME (driverless), Windows 98 (driver required) |
| Operating temperature | 0°C to 40°C |
| Included accessories | Earphones, USB cable, Line-In cable, charger, wrist strap, case, installation CD |
Frequently Asked Questions - MP-300 TEAC
User questions about MP-300 TEAC
0 question about this device. Answer the ones you know or ask your own.
Ask a new question about this device
Download the instructions for your Portable music player in PDF format for free! Find your manual MP-300 - TEAC and take your electronic device back in hand. On this page are published all the documents necessary for the use of your device. MP-300 by TEAC.
USER MANUAL MP-300 TEAC
To ensure the smooth handling of your warranty please write the serial number of your device into the box. In the case of warranty you are expected to send it together with a copy of your invoice to your nearest TEAC sales representative.
Disposing of the Product
Your device should no be placed in municipal waste. Please check local regulations for disposal of electronic products.
- Changes in specifications and features may be made without notice or obligation.
Copyright © 2005-2006, TEAC Europe GmbH. All rights reserved. Edition: January 2006 - Company and product names provided herein are trademarks of their respective companies.
Contents
FEATURES 4
CONTENT OF PACKAGE 4
IMPORTANT INFORMATIONS 5
INTRODUCTION OF CONTROLS 6
SYMBOLS ON SCREEN 7
INSTALLATION 7
Power Switch 7
Driver Software 8
Connecting to a PC 8
Disconnecting 9
Manual Installation of Driver Software 10
BASIC OPERATION 12
12
Switching On and Off 12
Charging 12
Playback 13
Previous/Next 13
Volume 13
Fast Forward/Reverse (FF&RW) 13
Language 13
Equalizer 13
Playback Mode 13
A-B Repeat Function 13
Voice Recording 14
Copying Files to MP-300 15
Folder Function 15
Deleting Files 16
FM Tuner 16
LINE-IN Recording 18
Edit ID3 Tags 18
Auto Power Off Time Setting 19
ScreenSaver 20
Memory Information 20
PictureBrowse 20
User-Customized ON/OFF LOGO 21
Preparing Pictures 21
UPGRADING THE FIRMWARE 23
FORMATTING THE MEMORY 25
DEINSTALLING DRIVER SOFTWARE 26
TROUBLESHOOTING 27
SPECIFICATION 28
WARRANTY 29
The TEAC MP-300 is one of the most powerful MP3 players on the market.
FEATURES
- Playback of MP3/WMA files
- 65k COLOR OLED display
- Screen saver
- Big screen with picture display
USB 2.0
FMtuner
FM digital recording
Line-In receptacle
High-Quality digital recording
No drivers for Win2000/XP/ME
256MB/512MB/1GB portable USB data storage
A-B Repeat playback. - Equalizer: 5 modes: Normal, Rock, Jazz, Classic, Pop
- ID3 tag support with file name lyrics display (edit in advance needed)
- Low power consumption
Built-in rechargeable lithium-ion battery - Firmware upgradeable
- Menu based operation
CONTENT OF PACKAGE
- MP3 player MP-300
- User's Manual (on CD) + Basic Operation
- USB cable
- Earphone
- Neck strap
- Carrying case
- Installation CD
Line in cable - Charging adapter
IMPORTANT INFORMATIONS
- If the unit is not used for a longer period of time please turn it off with the ON/OFF switch. Please charge the unit at least once within a month, in order that the battery won't be discharged.
- Do not use the unit in places that are extremely hot, cold, dusty, or humid.
- Avoid the unit being dropped.
-
Recharge the battery in the following cases:
-
The battery display shows empty.
- The keys will not operate normal.
-
The unit does not operate under normal conditions.
-
We do not assume any liability arising out of improper operation or incidental damages.
Important information:
In both power on and power off state, the player may be charged by the connection to PC via the USB line.
Important information:
Please read and retain all the operating instructions before operating the unit, we do not assume any liability arising out of improper operation or incidental damages.
INTRODUCTION OF CONTROLS
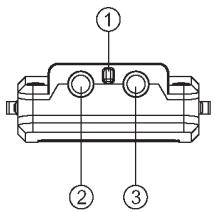
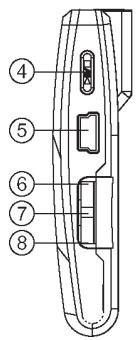
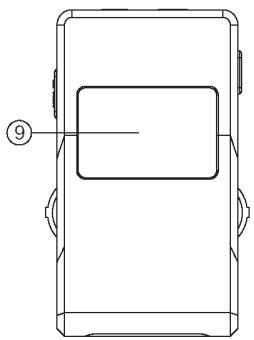
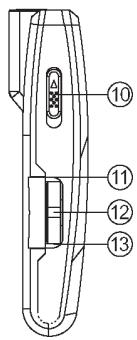
- Neck strap slot
- LINE-IN input jack
3 Earphone jack - Play/pause/stop
- USB jack
- Volume + (V+)
-
Recording R/A-B repeat
-
Volume - (V-)
- OLED display
- POWER ON/OFF
- Previous, RW
- MENU
- Next, FF
SYMBOLS ON SCREEN
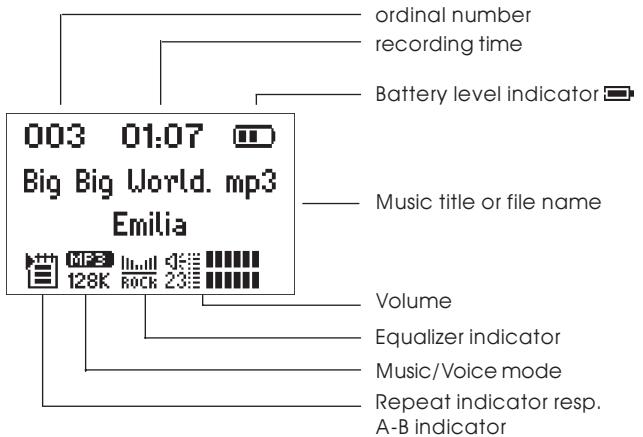
Repeat modes: ①, ②, and ③
Equalizer: ILOI ILOI ILOI ILOI ILOI ILOI ILOI ILOI ILOI ILOI ILOI ILOI ILOI ILOI ILOI ILOI ILOI ILOI ILOI ILOI ILOI ILOI ILOI ILOI ILOI ILOI ILOI ILOI ILOI ILOI ILOI ILOI ILOI ILOI
USB mode
INSTALLATION
Power Switch
Move the power switch to the ON position to turn on the player; and move to the opposite direction to turn it off.
Note: It's unnecessary to employ the power switch unless the player will not be used for a longer period of time or it works abnormally. Please keep the switch in the ON position in normal operation.
Driver Software
Windows98
Under Windows98 drivers have to be installed. Do not connect the unit to your computer before the installation of the driver is finished. Insert the provided CD into your CDROM drive or download the driver from our web site. Double click on SETUPXE and follow the instructions on the screen. Connect the MP-300 and the PC with the provided USB cable after finishing the installation.
Windows 2000/XP/ME
There is no need for a driver installation under Windows 2000/ XP/ME. Under Windows 2000 service pack 3 has to be installed. When connecting the unit for the first time the New Hardware assistant is run. The MP-300 is recognized automatically and the respective drivers are activated.
Connecting to a PC
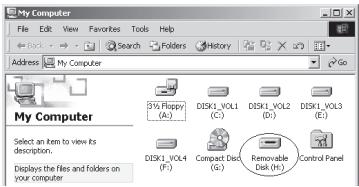
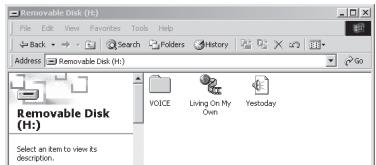
The MP3 player is connected to a PC with the provided USB cable. You will see a mass storage device with removable media symbol in My Computer after the unit has been recognized by the operating system. The player's display shows

Ready
Disconnecting
Prior to disconnect the unit has to be detached at the operating system. Otherwise data losses may occur. Proceed as follows:
- Double click on the symbol Remove Hardware or Eject in the right lower corner of the task bar. (XP: Remove Hardware Safely"). See also the respective pictures:
Unplug or Eject Hardware

5:39PM
- Click on Stop resp. OK in the pop up window.
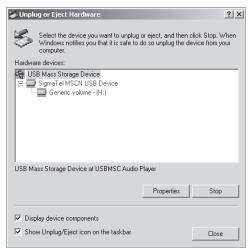
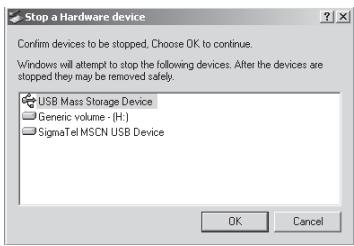
- Click on OK.
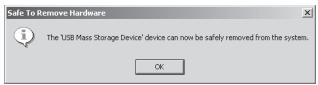
After carrying out the above steps the unit can be disconnected.
Note: The driver software may be not compatible to other MP3 products. If problems occur try to install the driver manually or call our hotline.
Manual Installation of Driver Software
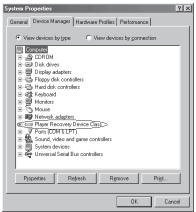
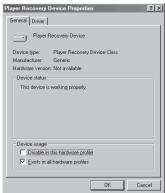
- Windows 2000/XP: Click with the right mouse button on My Computer>Properties>Device Manager. Double click on Player Recovery Device Class.
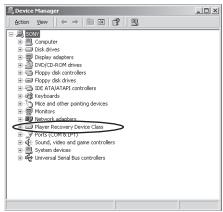
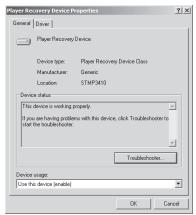
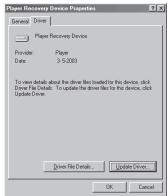
Now click on Driver>Update Driver.
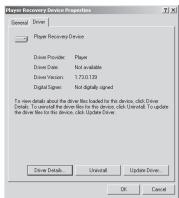
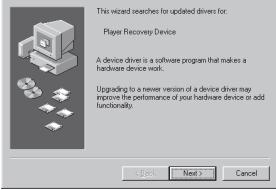
Click on Next in any of the following windows.
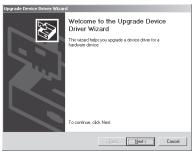
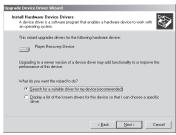
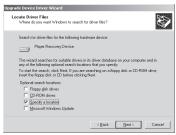
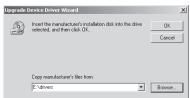
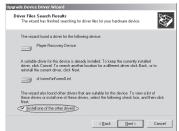
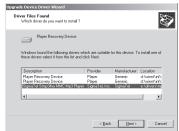
- Windows 98: After connecting the player to the PC use the right mouse button to click on My Computer>Properties>Device Manager. Please check if the entry of the player is shown with an exclamation mark or a question mark.
Double click on the symbol of the MP-300 (Player Recovery Device Class).
Now click on Driver>Upgrade Driver. Click on Next in any of the following windows and on Finish to finish driver installation.
Update Device Driver Wizard
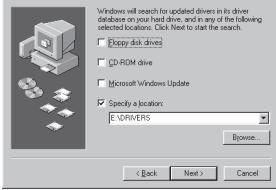
Update Device Driver Wizard
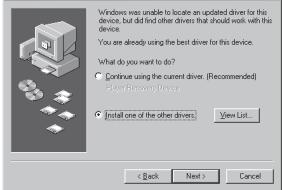
Update Device Drives Wizard
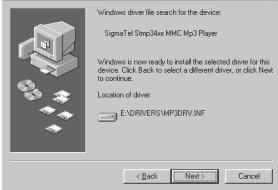
Update Device Driver Wizard
Now the driver is installed.
BASIC OPERATION
#
The unit is completely controlled by menus. The main menu and its sub menus are invoked with the key MENU. Main menu and its sub menus are left by invoking the option Exit. All menus are navigated with the keys FF and RW. To select an option MENU has to be pressed.
Switching On and Off
Use to switch on. The unit is set to music mode after switching on. To switch off is pressed for more than 5 seconds until the message "Continue Holding To Power Off" and an activity bar is shown and the unit is switched off.
Charging
If the battery level icon on the LCD becomes , please charge the player. Two charging modes are provided as follows:
- In both power on and power off state, the player may be charged by the connection to PC via the USB line.
- In addition, it may also be charged via the provided charger.
Note:
If the battery is discharged, and the player is unable to turn on, it needs to be charged immediately.
If the battery is discharged, the LCD will display "Battery Shortage Power OFF", and the MP player will turn off automatically.
The charging process should be finished within 8 hours;
Note: It's advised to charge the player after power off, with a charging period of 4 hours.
Playback
Short pressing of starts and pauses playback. A little bit longer pressing stops playback.
Previous/Next
Short pressing of RW moves to previous files, FF to the next.
Volume
If V+ is pressed volume increases while longer pressing V- reduces it.
Fast Forward/Reverse (FF&RW)
Long press FF key to achieve fast forward function, the playing time of current track will increase quickly. Long press RW key to achieve fast rewind function, the playing time of current track will decrease quickly.
Language
Select Settings in the main menu and then Language. Select with FF and RW between English, German and French.
Equalizer
Select Settings in the main menu and then EQ. Navigate with FF and RW through Normal rock Jazz Classic and Pop
Playback Mode
Select Settings in the main menu and then PlaySequence. Navigate with FF and RW through Normal, Repeat One, Repeat All, Shuffle, and Shuffle All.
A-B Repeat Function
During playback you press R/A-B to mark the beginning of the range to be repeated. The symbol is shown. The end of the range is marked by pressing R/A-B again. Now the symbol is shown and the marked section is permanently repeated. Press
R/A-B key to cancel the set A-B repeat and start to play from the canceling position.
Voice Recording
Quick Start
In music mode press R/A-B (about 2 sec) until l is displayed. Voice recording starts immediately after releasing the key. Recording format is mono ADPCM 8kHz . Pressing MENU stops recording.
Under voice mode the display shows WAV. In voice mode WAV files are used. There is no support for ID3 tags (displaying lyrics information).
Menu Controlled
Select Record in the main menu while in music or voice mode. The sub menu includes the options Source, MO/ST (Mono/Stereo), Encode, sRate, Record and Cancel. FF and RW are used to navigate through the options and with the MENU button the selection is confirmed.
Source allows to select the audio source (MIC = microphone, LineIn for all other audio devices). MO/ST allows to toggle between Mono and Stereo. Use Encode to set the formats IM ADPCM (4 Bit), MS ADPCM (4 Bit) or PCM (16 Bit). sRate is used to set the sample rate to 8KHz/11KHz/16KHz/22KHz/32KHz. Pressing MENU with selecting Record starts recording while Cancel stops the whole process.
Select MIC and then select Record with MENU. The unit starts recording immediately. Pressing MENU stops recording.
Recording can be stopped and resumed at any time by pressing R/A-B (symbol).
If recording with the integrated microphone Vxxx.WAV files are stored in the directory VOICE.
Copying Files to MP-300
Seen from PCs side the MP-300 is a normal mass storage device. File transfer therefore is possible in the common way in Windows Explorer.
Important
Do not disconnect the unit while files are copied. Otherwise this may cause losses of data. You will find more details in section "Trouble Shooting".
The unit can only be disconnected if the screen shows
Ready Blinking messages like Read or Wnnc indicate there is a file transfer in progress.
Folder Function
In addition to the default folders of the player (VOICE used for voice recording, LINE-IN for recordings over line in, and FM used for recording of radio programs) further folders can be created while downloading music files from the PC.
To move to the folder directory of the player you have to press MENU longer than 2 seconds. After the key is released you will see the root directory "a:/" respectively the directory you left when you used the function last time.
Use FF and RW to navigate through the folder.
Folders can be opened by a short push on
Press MENU to move into the directory level above.
The file in question is selected with /■.
Deleting Files
In the Folder function select the file, you want to delete. Press R/A-B button. The LCD will display "Delete File?", the song name and the confirmation letters YES and NO. Press FF key or RW key to switch the confirmation letters circularly. Select YES and press MENU key to delete the current track (Message: File deleted!).
FM Tuner
FM receiving
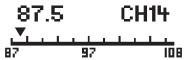
Select FM Tuner by FF or RW button in the main menu and press MENU button to confirm.
27Radio

Auto-searching
Searching for the next station: press MENU button to enter searching mode, press and hold FF button to start searching from low
frequencies to higher frequencies.
Auto-searching: press MENU and R/A-B button at same time, the unit begin to search stations and store them automatically. At most the unit can store 20 stations.
27Autoscan

Stop searching: under auto-searching
status, shortly press R/A-B button, the unit will stop searching automatically.
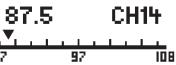
Note: Before searching or if no station was stored, the station will be defaulted at 87.5 MHz.
Manual searching
Press MENU button to enter searching mode, each time you press FF or RW button the frequency will increase or decrease by 0.1 MHz.
Storing
Under searching status, press MENU key to shift to storing mode (Save), press FF or RW button to select the channel
27 save

87.5

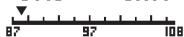
number, then press R/A-B button to confirm the storing and return to FM receiving.If you press MENU button, the unit will return to current channel and won't save the channel that has been found out.
Note: By those operations above, the files can only be stored temporarily. If you shut off the power directly, the file will be lost. So if you want to keep it, you must press and hold button, until the unit is powered off normally.
Previous/Next station
Under FM receiving status, press RW button to skip to the previous station, and press FF to skip to the next station.
Forced mono
When the FM stereophonic effect sounds not very good, press button to achieve forced mono function, which could lower the interference, press button again, it return to stereo effect.
Volume adjustment
Under FM playing, press V+ or V- button to increase or decrease the volume. The indicator on the LCD will change accordingly.
Quit FM Mode
Press and hold MENU button to quit FM mode.
Recording of FM Transmissions
If a transmission should be recorded from the internal FM radio the R/A-B button has to be pressed (about 2 seconds) until 0 is displayed. Recording starts immediately after releasing the key. Pressing MENU stops recording.
Recording can be stopped and resumed at any time by pressing R/A-B (symbol).
If FM recording Fxxx.WAV files are stored in the directory FM.
LINE-IN Recording
Connect LINE-IN with an external audio device (i.e. cassette recorder, CD player etc.). Select Record in the main menu. The sub menu includes the options Source, MO/ST (Mono/Stereo), Encode, sRate, Record and Cancel. FF and RW are used to navigate through the options and with the MENU button the selection is confirmed.
Source allows to select the audio source (MIC = microphone, LineIn for all other audio devices). MO/ST allows to toggle between Mono and Stereo. Use Encode to set the formats IM ADPCM (4 Bit), MS ADPCM (4 Bit) or PCM (16 Bit). sRate is used to set the sample rate to 8KHz/11KHz/16KHz/22KHz/32KHz. Pressing MENU with selecting Record starts recording while Cancel stops the whole process.
Select LineIn, start the external audio device and select Record on the MP-300 with MENU. The unit starts recording immediately. Pressing R/A-B stops recording.
If line in recording Lxxx.WAV files are stored.
Note:
Check the recording volume for example with an earphone.
Edit ID3 Tags
-
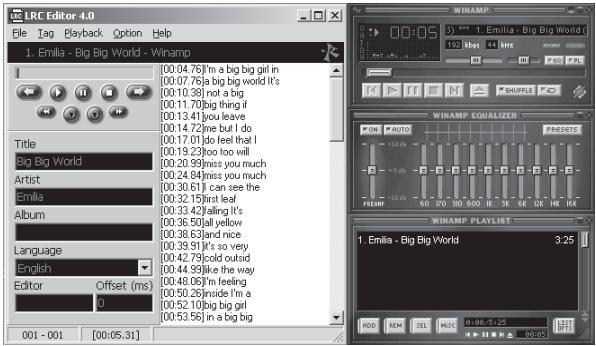
Open Winamp, load the MP3 file you want to edit and then open the LRC editor. You can key in the informations to the LRC editor's text frame or click Document/open and move the edited text to the editor, as follows:
-
While the respective music title is reproduced, please click add tag. Note that the time tag will appear before the textual information.
- Fill in file name, singer and name of the album.
- Finally, click Save As in File in LRC to save the edited ID3 tag.
Note:
Name the ID3 tag with the name of the respective MP3 file and copy both files to the unit. Then the according informations will be displayed on the screen while playing a song.
Note:
- The length of an ID3 tag shall not exceed 16 single-character (i.e. English or number characters) or 8 double-character (i.e. Chinese characters).
- Characters as follows are not allowed to be used in title and singer information: \ / : * ? " < > | [ ]
- The ID3 tag information of each song cannot exceed 1.4 Kbytes. Otherwise the exceeding characters are truncated.
Auto Power Off Time Setting
Select Settings in main menu and then AutoPowerOff. Navigate with FF and RW through the switch off options. Settable are time intervals of (inactivity), 1 Min, 2 Min, 5 Min, and 10 Min to switch off the unit. Confirm with MENU.
ScreenSaver
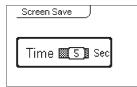
Select Settings in main menu and then Screen Save. Navigate with FF and RW through the Screen Protection options:
You can select (deactivate), 5 Sec, 10 Sec, 30
Sec and 60 Sec. until the screen saver is activated. Navigate with FF and RW and confirm with MENU.
Note:
If screen protection mode is activated, it might also save the power and increase the service life of battery, in addition to protect the screen. It's recommended.
Memory Information
Select About in main menu. The screen shows the total (IntTotal) and the free (IntRemain) available memory capacity. Press any key to return to main menu.
Picture Browse
Picture Browse function
Select Picture in main menu. Press FF key or RW key to select the picture to be viewed. In browsing, press MENU key to return to the main menu.
Picture Deletion
Select Picture in main menu. Press FF key or RW key to select the picture to be deleted. Short press R/A-B key, at the time, the LCD will display "Delete File?", press / key to delete the file.
Picture Browse Setup
Select Settings in main menu and then Pic Browser. You can select (no slide show, pictures have to be browsed manually), 2 Sec, 5 Sec, and 10 Sec. Navigate with FF and RW and confirm with MENU.
Note:
The picture has to be saved into the IMAGES menu, otherwise, it would be unable to browse them.
User-Customized ON/OFF LOGO
The ON/OFF LOGO of the player may be customized by the user, copy the picture into the root directory: the IMAGES folder, and change the file name of ON LOGO picture into STARTLOGO and change the file name of OFF LOGO picture into ENDLOGO.
Note: If no LOGO picture is copied into the IMAGES folder, the system will default the ON/OFF LOGO.
Preparing Pictures
This unit only supports pictures with 96 x 64 pixels x 24 bit RGB BMP format, any pictures which do not match the size cannot be displayed. So pictures must be resized before put into the unit.
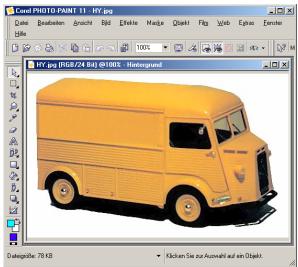
Run Corel Photo-Paint, Photoshop, or ACDsee etc. to open the picture you like to resize.
Please view the Corel Photo Paint example
Loading the picture
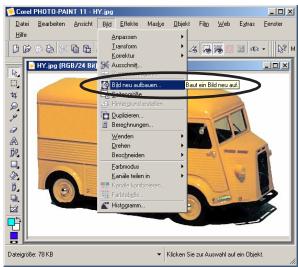
Set the new picture size
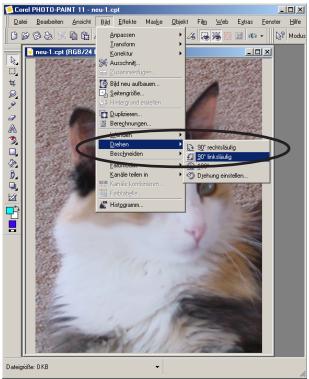
Rotate the picture into landscape orientation if necessary.
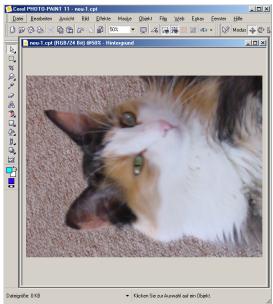
Set the new width of the picture to 96 pixels. The height must not exceed 64 pixels.
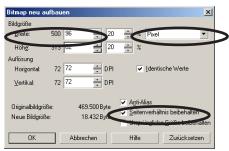
Set the measurement unit to pixel.
Keep the width/height relation (aspect ratio).
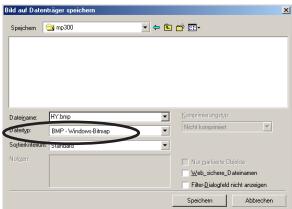
It is mandatory to save the edited picture in BMP format.
Copy the resized picture into the IMAGES folder of the player. Then the picture can be displayed.
UPGRADING THE FIRMWARE
Normally it is not necessary to upgrade the firmware. It should be carried out if the unit cannot be operated without problems.
Important:
Upgrading firmware may result in formatting of the memory. Please backup any data stored on the player to your PC before a firmware upgrade is performed.
Proceed as in the following:
- Set the POWER button of the player to OFF.
- Prior the player is connected to the PC the key has to be pressed and hold.
- Connect the USB cable and set the POWER button of the player to ON. In My Computer a mass storage device is shown.
Very important: Press and hold the key during the whole upgrade process.
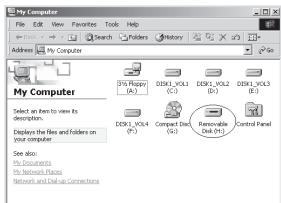
- Further proceeding: Start>Programs>SigmaTel MSCN Audio Player>SigmaTel MSCN Firmware Download.
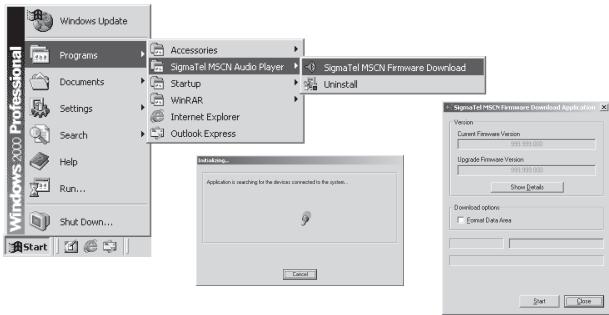
After closing the windows the upgrade window is opened.
Note
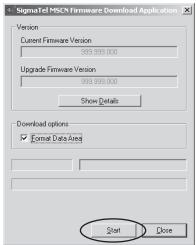
If the flash memory shall be formatted while upgrading firmware Format Data Area has to be selected. Click on Yes in the window.
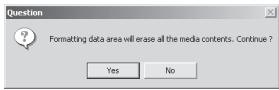
- Click on Start and start the upgrading software as shown in the following.
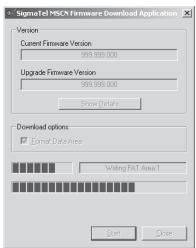
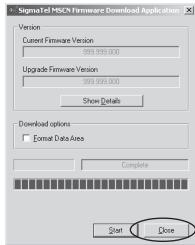
- After upgrading click on Close.
- After finishing the upgrade, release the key, savely remove the player, and disconnect the USB cable.
FORMATTING THE MEMORY
- Press /■ after connecting the player to the PC.
- Click with the right mouse button on My Computer and select Formating.
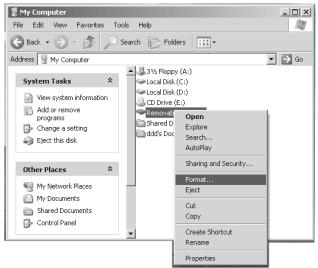
- The Formatting windows opens.
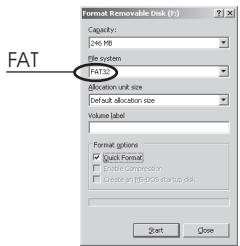
- Click on Start followed by OK. Formatting of the flash memory is started.
- After formatting click on OK.
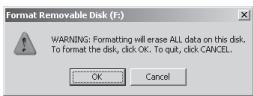
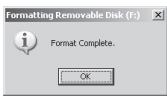
DEINSTALLING DRIVER SOFTWARE
- Disconnect the unit from the PC.
- Click on Start>Programs>SigmaTei MScN Audio Player>Uninstall or use Control Panel>Explorer>Software. Now the following window appears.
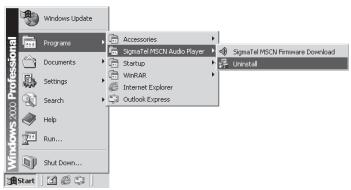
- Click on Cancel if the driver should not be deinstalled.
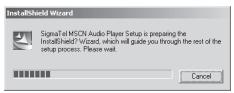
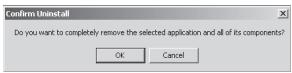
- Click on OK to start the deinstallation process. Follow the instructions on the screen.
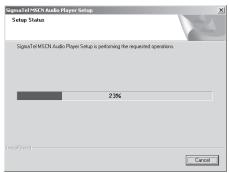
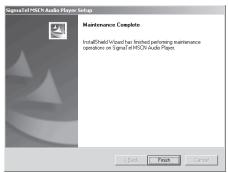
- Click on Finish to finish the deinstallation.
TROUBLE SHOOTING
Why can't some MP3 files be played?
MP3 Standard only includes: the songs in layer 3 of MPEG1, layer 3 of MPEG2 and layer 3 of MPEG2.5. Otherwise, songs won't be played in the player except they are transformed by the corresponding software.
Why doesn't the memory size displayed under the operation system match the figure on the tab?
The software in the MP3 player takes up a small portion of the memory, which coincides with the corresponding standards.
More about WAV format
This unit supports WAV files of IMA ADPCM format only. If you want to store WAV files of other format in this player, please set up a new folder and store the WAV files in it. Don't put the WAV files of other format into the root directory of the player or the folder VOICE. Otherwise the player may shut down when playing such WAV files.
What causes the MP3 player running slowly?
Using or deleting files frequently over a long time will generate fragments in the flash memory like fragmentation of a hard disk. Fragmentation slows down the operating speed of the player.
What if the driver program of the MP3 player has been damaged?
Normally this is caused by improper operation. For details, please refer to the Upgrade/Renew Software part.
What if the MP3 player works abnormally, i.e, shutting down?
When abnormal situation occurred due to improper operation, push the POWER ON switch to OFF and then toward ON. The restart of the unit will return it to normal operation.
What if after a long non-use period the player cannot be turned on?
To enlarge the life of the built-in battery, when the battery level is too low or in some abnormal situation (shut off), the lithium battery will be protected, so it cannot be turned on. You need to connect the MP3 player to a computer or the charger. It can be used after recharging.
SPECIFICATION
Flash memory: 256MB/512MB/1GB
Interface: USB2.0
Max recording time: 16/32/64Hr
Up to 8 hours playing time
Dimensions: 64mm x 35mm x 12mm
Weight: 35g
Power source: Built-in rechargeable lithium-ion
battery
Memory medium: built-in flash memory
File formats supported: MP3 (Layer 3 of MPEG1, MPEG2,
MPEG2.5), WMA
Microphone: built-in capacitor microphone
Input: LINE IN
Output: double-channelearphone,
impedance above 8 ohm.
Range of FM frequencies: 87.5 - 108 MHz
Operating temperature: 0^ - 40^
Owner's name
Serial No.
MP-300
Owner's name
Address
Date of purchase
Dealer's address
Warranty Period
This warranty may be enforced only by the original retail purchaser.
What We Will Pay For
We will pay amortized insurance charge as described in
How You Can Get Warranty Service
1. If your unit needs service during the warranty period, please contact the local authorized distributor for more information. This will enable to locate such a distributor, please contact your TEAC facility at the address indicated below.
2. After identifying the nearest authorized service station for this product the product or any parts be
with a copy of this warranty certificate and a copy of your sales receipt, showing the date of purchase. Please ensure to fill out the warranty certificate correctly (do not forget the serial number of the
product). "EAEC reserves the right to refuse the guarantee service if the documents are missing or incomplete in the understanding of this terms.
If the necessary repairs are covered by the warranty, and you have sent the project or parts it to the nearest authorized service station, the return freight and insurance charges will be prepaid.
RMA form)!
Limitations of Liability and Exclusion of Implied Warranties
Unless considered unenforceable or unlawfull under the applicable national law:
1. TEAC's liability for any defective product is limited to repair or replacement of the product; at TEAC's option and the option of authorized service stations, authorized dealers and their authorized service stations shall be responsible for any damage to the vehicle caused by the use of the vehicle.
liable for any damage to any other properties independent of their virtual or real nature especially there is no liability for any damage to any kind of software and/or any kind of databases caused by TEAC
products. Furthermore TEAC is not liable for damages arising out of loss of use, loss of revenue or profits, or any other damages, whether incidental, consequential, or otherwise.
2. All implied warranties or conditions, including but not limited to warranties or conditions of merchantability and fitness for a particular purpose, hereby are excluded.
These warranty terms do not affect any statutory rights of consumers which were granted by the respective national laws.
TEAC Europe GmbH, hereininafter called TEAC, warrants this product against any defect in material and workmanship for two (2) years from the date of purchase by the original retail purchaser. According to the following terms this TEAC product will be repaired without charge of labor and materials by the authorized TEAC service stations, by the authorized TEAC dealers and/or their authorized service stations. TEAC, the authorized TEAC service stations, the authorized TEAC dealers and/or their authorized service stations, shall not manufacture or repair the product but shall be repaired or replaced as a whole or partially. The TEAC dependancies, the authorized TEAC service stations, the authorized TEAC dealers and/or their authorized service stations will also honour this warranty in the other EC and EFTA member states based on the terms in this warranty conditions.
What is Covered and What is Not Covered.
Except as specified below, this warranty covers any defects in materials and workmanship of this product. The following are not covered by the warranty: 1. Damage to or deterioration of the external cabinet.
2. Any unit that has been altered or on which the serial number has been defaced, modified, or removed.
3. Damage, deterioration or malfunction resulting from:
(b) failure to follow instructions supplied with the product;
(c) any shipment of the product. Any damage arising from transportation is the liability of the freight
company. Any damage arising from transportation and any implicit and explicit risks are the liability of the freight company. This is expressly not a liability of TEAC; (d) repair or attempted repair by anyone not authorized by TEAC to repair this product; (e) causes other than product defects, including lack of technical skill, competence or experience of the user. Especially damages which may arise of incidental use respectively by improper ventilation.
(f) damages caused by improper or incorrect installation of software,
(g) periodic check-ups,
(h) maintenance respectively repair of parts due to normal wear and tear,
(i) adoptions or adjustments to the published IFRS order to conform to the different National Technical provisions of the country other than the one for which the product was originally designed and manufactured.
Aeae aee eae aeae aee aee aee aee aee aee aee aee aee aee aee aee aee aee aee aee aee aee aee aee aee aee aee aee aee aee aee aee aee aee aee aee aee aee aee aee aee aee aee aee aee aee aee aee aee aee aee aee aee aee aae
Hqnnnne
cdSD
e e
- Disposing of the Product
- Contents
- FEATURES
- CONTENT OF PACKAGE
- IMPORTANT INFORMATIONS
- Important information:
- INTRODUCTION OF CONTROLS
- SYMBOLS ON SCREEN
- INSTALLATION
- Power Switch
- Driver Software
- Windows98
- Windows 2000/XP/ME
- Connecting to a PC
- Disconnecting
- Manual Installation of Driver Software
- BASIC OPERATION
- #
- Switching On and Off
- Charging
- Note:
- Playback
- Previous/Next
- Volume
- Fast Forward/Reverse (FF&RW)
- Language
- Equalizer
- Playback Mode
- A-B Repeat Function
- Voice Recording
- Quick Start
- Menu Controlled
- Copying Files to MP-300
- Important
- Folder Function
- Deleting Files
- FM Tuner
- FM receiving
- Auto-searching
- Manual searching
- Storing
- Previous/Next station
- Forced mono
- Volume adjustment
- Quit FM Mode
- Recording of FM Transmissions
- LINE-IN Recording
- Edit ID3 Tags
- Auto Power Off Time Setting
- ScreenSaver
- Memory Information
- Picture Browse
- Picture Browse function
- Picture Deletion
- Picture Browse Setup
- User-Customized ON/OFF LOGO
- Preparing Pictures
- Please view the Corel Photo Paint example
- Loading the picture
- Set the new picture size
- UPGRADING THE FIRMWARE
- Important:
- Note
- FORMATTING THE MEMORY
- DEINSTALLING DRIVER SOFTWARE
- TROUBLE SHOOTING
- More about WAV format
- What if after a long non-use period the player cannot be turned on?
- SPECIFICATION
- Owner's name
- MP-300
- Address
- Dealer's address
- Warranty Period
- This warranty may be enforced only by the original retail purchaser.
- What We Will Pay For
- We will pay amortized insurance charge as described in
- How You Can Get Warranty Service
- If your unit needs service during the warranty period, please contact the local authorized distributor for more information. This will enable to locate such a distributor, please contact your TEAC facility at the address indicated below.
- After identifying the nearest authorized service station for this product the product or any parts be
- with a copy of this warranty certificate and a copy of your sales receipt, showing the date of purchase. Please ensure to fill out the warranty certificate correctly (do not forget the serial number of the
- product). "EAEC reserves the right to refuse the guarantee service if the documents are missing or incomplete in the understanding of this terms.
- If the necessary repairs are covered by the warranty, and you have sent the project or parts it to the nearest authorized service station, the return freight and insurance charges will be prepaid.
- RMA form)!
- Limitations of Liability and Exclusion of Implied Warranties
- Unless considered unenforceable or unlawfull under the applicable national law:
- TEAC's liability for any defective product is limited to repair or replacement of the product; at TEAC's option and the option of authorized service stations, authorized dealers and their authorized service stations shall be responsible for any damage to the vehicle caused by the use of the vehicle.
- liable for any damage to any other properties independent of their virtual or real nature especially there is no liability for any damage to any kind of software and/or any kind of databases caused by TEAC
- products. Furthermore TEAC is not liable for damages arising out of loss of use, loss of revenue or profits, or any other damages, whether incidental, consequential, or otherwise.
- All implied warranties or conditions, including but not limited to warranties or conditions of merchantability and fitness for a particular purpose, hereby are excluded.
- These warranty terms do not affect any statutory rights of consumers which were granted by the respective national laws.
- Hqnnnne
Brand : TEAC
Model : MP-300
Category : Portable music player