
MAP METERMILE MARKER - Watch SEIKO - Free user manual and instructions
Find the device manual for free MAP METERMILE MARKER SEIKO in PDF.
User questions about MAP METERMILE MARKER SEIKO
0 question about this device. Answer the ones you know or ask your own.
Ask a new question about this device
Download the instructions for your Watch in PDF format for free! Find your manual MAP METERMILE MARKER - SEIKO and take your electronic device back in hand. On this page are published all the documents necessary for the use of your device. MAP METERMILE MARKER by SEIKO.
USER MANUAL MAP METERMILE MARKER SEIKO
You are now the proud owner of a SEIKO Watch with the "Map meter/Mile Marker Function and Rotating Compass Bezel". For best results, please read the instructions in this booklet carefully before using your SEIKO Watch. Please keep this manual handy for ready reference.
The map meter/mile marker function measures the real distance of a route on a map by tracing the route with the wheel that drives the dial ring.
- Models with the map meter function have a dial ring with a 1:50000-map meter scale with kilometer readout.
- Models with the mile marker function have a dial ring with a 1:62500-mile marker scale with mile readout.


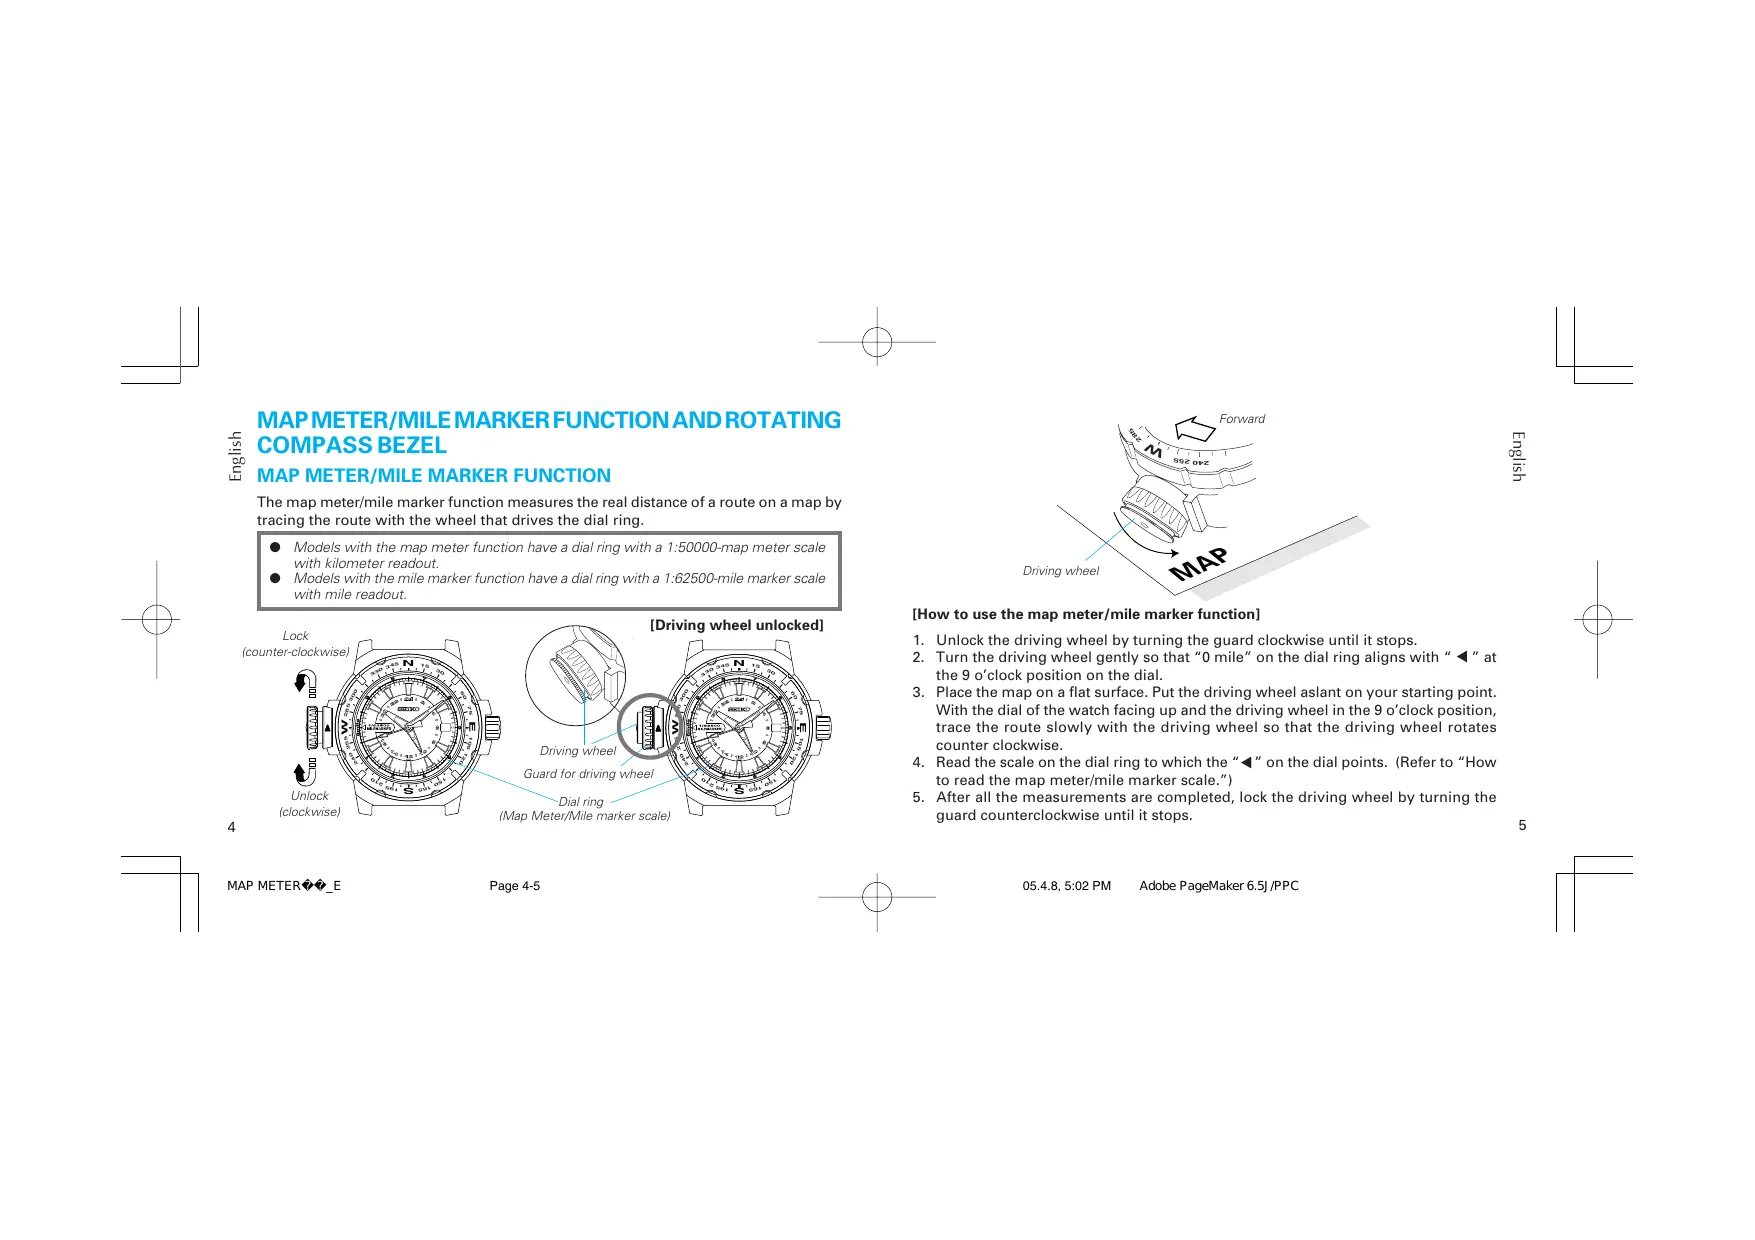
[How to use the map meter/mile marker function]
- Unlock the driving wheel by turning the guard clockwise until it stops.
- Turn the driving wheel gently so that "0 mile" on the dial ring aligns with "▲" at the 9 o'clock position on the dial.
- Place the map on a flat surface. Put the driving wheel aslant on your starting point. With the dial of the watch facing up and the driving wheel in the 9 o'clock position, trace the route slowly with the driving wheel so that the driving wheel rotates counterclockwise.
- Read the scale on the dial ring to which the "▲" on the dial points. (Refer to "How to read the map meter/mile marker scale.")
- After all the measurements are completed, lock the driving wheel by turning the guard counterclockwise until it stops.
[How to read the map meter scale (For a model with the map meter function)]
![SEIKO MAP METERMILE MARKER - [How to read the map meter scale (For a model with the map meter function)] - 1](/content/2025/01/173216/images/c6cdf2ba96aa42503031af00b092979dbfc7dac118d6da870c6d76c61f67143e.jpg)
![SEIKO MAP METERMILE MARKER - [How to read the map meter scale (For a model with the map meter function)] - 2](/content/2025/01/173216/images/7aaaa4c3d7816baa490c2f73fee50ee3cdc8099f46fe85ef093e15712a69c7cf.jpg)
This watch is designed to measure the real distance by using a map of a scale 1/50,000 with kilometer readout.
- When using a map on a scale of 1/50,000: The figure on the scale indicated by "▲" on the dial corresponds to the real distance of the route traced by the driving wheel.
Ex.) If " " points to "2" on the map meter scale, the real distance of the route traced is "2 km."
- When using a map on a scale other than the above:
Divide the scale of the map by the scale of the watch (50,000). Multiply this by the distance indicated by " " on the map meter scale.
Ex.1) If the map used is drawn on a scale of 1/20,000 and “ ” points to “2” on the map marker scale, the real distance of the route traced is:
$$ (2 0, 0 0 0 / 5 0, 0 0 0) \times 2 = 0. 8 \mathrm {k m} $$
Ex.2) If the map used is drawn on a scale of 1/150,000 and “ ” points to “6” on the map marker scale, the real distance of the route traced is:
$$ (1 5 0, 0 0 0 / 5 0, 0 0 0) \times 6 = 1 8 k m $$
[How to read the mile marker scale (For a model with the mile marker function)]
![SEIKO MAP METERMILE MARKER - [How to read the mile marker scale (For a model with the mile marker function)] - 1](/content/2025/01/173216/images/5eb6fab1fdf7259060b63ec1e935b3bb933ee9510f29c0c17021094ac2437fc6.jpg)
This watch is designed to measure the real distance by using a map of a scale 1/62,500 with mile readout.
- When using a map on a scale of 1/62,500:
The figure on the scale indicated by " " on the dial corresponds to the real distance of the route traced by the driving wheel.
Ex.) If "4" points to "2" on the mile marker scale, the real distance of the route traced is "2 miles."
- When using a map on a scale other than the above:
Divide the scale of the map by the scale of the watch (62,500). Multiply this by the distance indicated by " " on the mile marker scale.
Ex.1) If the map used is drawn on a scale of 1/24,000 and "▲" points to "2" on the mile marker scale, the real distance of the route traced is:
$$ (2 4, 0 0 0 / 6 2, 5 0 0) \times 2 = 0. 7 7 \text {m i l e s} $$
Ex.2) If the map used is drawn on a scale of 1/150,000 and "▲" points to "6" on the mile marker scale, the real distance of the route traced is:
$$ (1 5 0, 0 0 0 / 6 2, 5 0 0) \times 6 = 1 4. 4 \text {m i l e s} $$
PRECAUTIONS ON USING THE WATCH WITH THE MAP METER/MILE MARKER FUNCTION
- When measuring the distance, trace the route on the map slowly and securely with the driving wheel, taking care not to apply undue force onto the driving wheel. However, if you press the driving wheel down onto the map too lightly, the wheel may slip off from the route.
- Do not use the map meter/mile marker function in sandy or dusty places.
- Your watch is designed to withstand up to 20 bar, however, do not use the map meter/mile marker function in water, as this may damage the driving wheel. When wearing the watch in water, therefore, make sure that the driving wheel is securely locked.
- In order to prevent putting a burden on the stem, keep the driving wheel locked while wearing the watch in normal use.
- The accuracy of indication of distance obtained by the map meter/mile marker function may be affected by the conditions where the measurement is made. Therefore, the indication should only be used as an approximate guide.
- When handling the watch, exercise caution with the serrated edge of the driving wheel, which is sharp and could potentially cause injuries. In order to prevent potential injury from the serrated edge of the driving wheel, keep the driving wheel locked while wearing the watch during normal use.
ROTATING COMPASS BEZEL
(using the 24-hour hand to indicate directions)
How to use the compass bezel

[In the Northern Hemisphere]
- Set "N" on the rotating compass bezel to the 12 o'clock position. The direction marks on the bezel are set as follows;
3 o'clock position: E (East)
6 o'clock position: S (South)
9 o'clock position: W (West) - While keeping the dial level, point the 24-hour hand in the direction of the sun. The direction marks indicate the corresponding directions.
![SEIKO MAP METERMILE MARKER - [In the Northern Hemisphere] - 1](/content/2025/01/173216/images/11b66de0b8c9026d51c25cb9a214e645213260a98e69551b6a205bfd27418e0e.jpg)
[In the Southern Hemisphere]
- Set "N" on the rotating compass bezel to the 24-hour hand.
- While keeping the dial level, point the 12 o'clock position in the direction of the sun. The direction marks indicate the corresponding directions.
PRECAUTIONS ON USING THE COMPASS BEZEL
- Please use the compass in places where the sun is visible or its location is known.
- Before using the compass, it is necessary to set the 24-hour hand to the current time of your area.
- The compass is so designed to provide only a rough indication of directions, and should not be used where accuracy is critical.
- If daylight saving time (summer time) is in effect in your area, be sure to set your watch one hour behind the current time before using the rotating compass bezel.