
H021 - Watch SEIKO - Free user manual and instructions
Find the device manual for free H021 SEIKO in PDF.

User questions about H021 SEIKO
0 question about this device. Answer the ones you know or ask your own.
Ask a new question about this device
Download the instructions for your Watch in PDF format for free! Find your manual H021 - SEIKO and take your electronic device back in hand. On this page are published all the documents necessary for the use of your device. H021 by SEIKO.
USER MANUAL H021 SEIKO
INSTRUCTIONS (P. 35)
You are now the proud owner of a SEIKO Duo-Display Watch Cal. H021/H022. For best results, please read the instructions in this booklet carefully before using your SEIKO Duo-Display Watch. Please keep this manual handy for ready reference.
Time & date of 28 cities
Time difference display
Automatic daylight saving time adjustment
Time transfer function

WORLD TIME ALARM
2-channel alarm that rings on a world time basis

STOPWATCH
Measures up to 100 hours in 1/1000 second increments.
Split time measurement

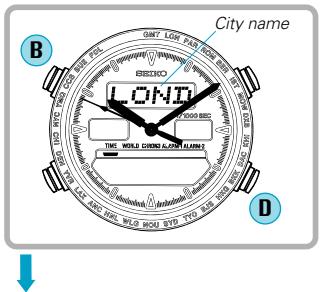
SCROLL WINDOW
- Scroll display of city names

BATTERY LIFE INDICATOR
Battery Change Scroll Display

TACHYMETER
For models with tachymeter scale
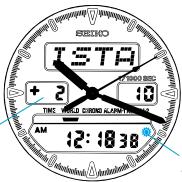
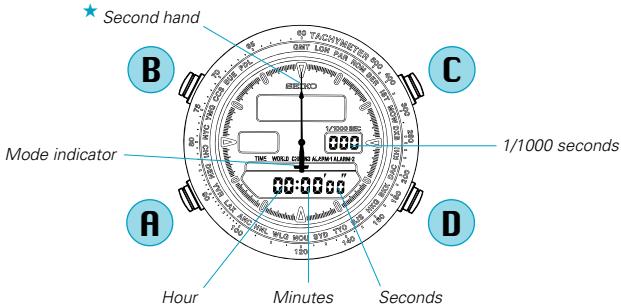
There are four buttons as indicated in the illustration below. [TIME/CALENDAR mode]
![SEIKO H021 - There are four buttons as indicated in the illustration below. [TIME/CALENDAR mode] - 1](/content/2025/01/173132/images/6f8ac1718ede21001bd3ee9c05b255643ccdac24bf055c64da1895b5fcf1f98b.jpg)
Cal. H021
Cal. H022
![SEIKO H021 - There are four buttons as indicated in the illustration below. [TIME/CALENDAR mode] - 2](/content/2025/01/173132/images/5be034ad0ffc56bda5433828275d887220e22916e249c184594f372c54b135b0.jpg)
: City name scrolls from right to left in TIME/CALENDAR SETTING display and WORLD TIME, ALARM-1 and ALARM-2 modes.
* In the following pages, Cal. H021 is used to illustrate the operating instructions. The method of operation, however, is the same for both Cal. H021 and Cal.H022.
BEFORE USING THE WATCH FOR THE FIRST TIME AND AFTER CHANGING THE BATTERY:
In TIME/CALENDAR mode
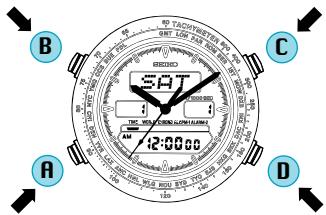
Press and hold the four buttons at the same time for 2 to 3 seconds.

Second hand stops on the spot.
"12:00 oo AM" is shown and "SAT", "1" and "1" are shown when the buttons are released.

Set the analogue time and digital time/ calendar. (See "TIMECALENDAR SETTING" on page 9)
- Selected cities in TIME/CALENDAR, WORLD TIME, ALARM-1 and ALARM-2 modes are all reset to "GREENWICH" by pressing the four buttons.
MODE CHANGE

Press repeatedly to select the desired mode.


: When the confirmation sound is switched on, a beep sounds with each press of Button A. As a reference aide, the pitch is different when TIMECALENDAR mode appears.
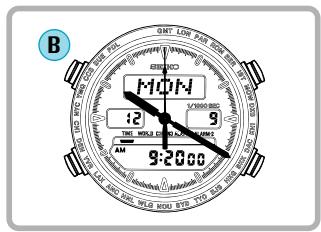
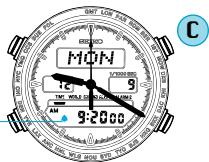
TIME/CALENDAR MODE
The calendar adjusts automatically for odd and even months including February of leap years from the year 1994 up to 2043.

Press to show TIME/CALENDAR mode.
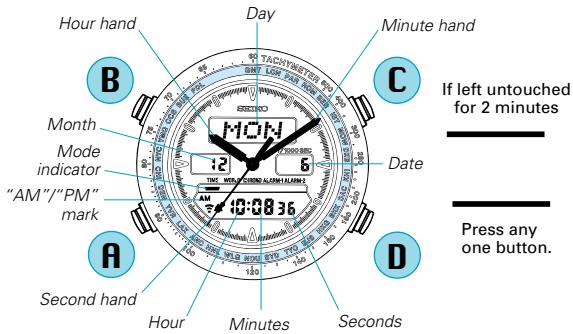

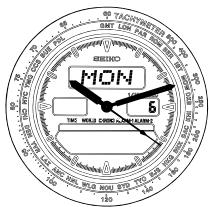
[Day & date display]

With each press, Second hand alternately indicates the current second and the city selected for TIME/CALENDAR mode.
TIME/CALENDAR SETTING
- Set the digital time first before setting the analogue time, as the hands are governed by the digital time.
- Once the time/calendar of your area is set in TIME/CALENDAR mode, those of the 28 cities covered in WORLD TIME mode will be set automatically.

Press for 2 to 3 seconds to show TIME/CALENDAR SETTING display.

- Name of the city scrolls and Second hand automatically moves and stops.

Press to select the city representing your area.
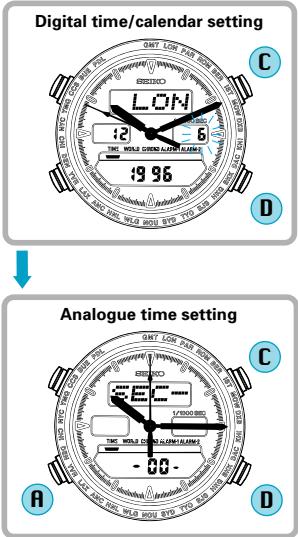
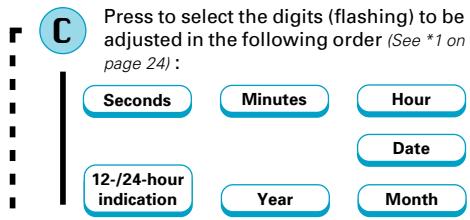
Press to reset seconds to "00", set the flashing digits and choose between 12- and 24-hour indications. (See *2 on page 24)
Press to show "SEC-SET".
D Press to reset Second hand to the 12 o'clock position.
Press to show "HOUR-SET".


OR

Press repeatedly to set Hour and Minute hands to the digital time.
(See *3 on page 24)

Press to return TOME/CALENDAR mode. (See *4 on page 24)
ENGAGEMENT/DISENGAGEMENT OF HOURLY TIME SIGNAL AND TURNOING ON/OFF OF SOUND FOR BUTTON OPERATION CONFIRMATION

With each press in TIME/CALENDAR mode, the hourly time signal and sound for button operation confirmation are alternately switched on and off. (See *5 on page 24)
Hourly time signal mark (displayed when hourly time signal and confirmation sound are switched on)
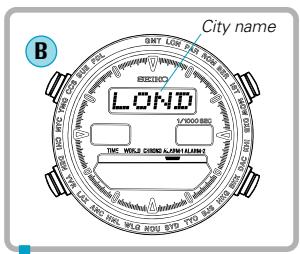
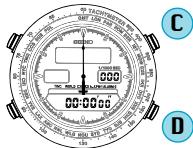
WORLD TIME MODE
Digital display
: Time and date of any of 28 cities in different time zones throughout the world and time difference between the selected city and your area
Analogue display : Time of your area (= time of the city selected in TIME/CALENDAR mode)

Press to show WORLD TIME mode.

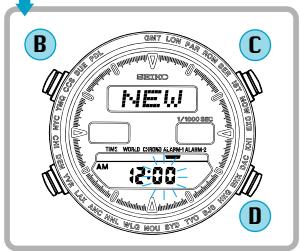
TIME TRANSFER FUNCTION [A convenient way of using WORLD TIME mode]
- The time displayed in TIME/CALENDAR mode can easily be replaced with that of any city in WORLD TIME mode.
- This allows you to display the time of the city you are visiting in TIME/CALENDAR mode, freeing you from resetting the hands as you move from place to place.
![SEIKO H021 - TIME TRANSFER FUNCTION [A convenient way of using WORLD TIME mode] - 1](/content/2025/01/173132/images/5951a4eb4fe171dfb09141f9857562a2c6a1d37542d121fcaa9a3eb37e6d7be8.jpg)
Press repeatedly to set City hand to the city on the bezel/dial whose time corresponds to the place you are visiting.
![SEIKO H021 - TIME TRANSFER FUNCTION [A convenient way of using WORLD TIME mode] - 2](/content/2025/01/173132/images/d274dceb607a53d8b06a191817d80a4f6344eb3203cd7dd84148e8225bf71671.jpg)
Press for 2 seconds.
Ex.: Time of New York is transferred to TIME/CALENDAR mode:
![SEIKO H021 - TIME TRANSFER FUNCTION [A convenient way of using WORLD TIME mode] - 3](/content/2025/01/173132/images/c1bd35a7f51aba9bb89da11dadd185d985b88fd75b27790acaa112b126dafd3c.jpg)
In WORLD TIME mode
![SEIKO H021 - TIME TRANSFER FUNCTION [A convenient way of using WORLD TIME mode] - 4](/content/2025/01/173132/images/a81daf2ce60d0ef8ae1dc34d4f791aa054c0ea09ba1ba8c180335d3a8e071990.jpg)
In TIME/CALENDAR mode
![SEIKO H021 - TIME TRANSFER FUNCTION [A convenient way of using WORLD TIME mode] - 5](/content/2025/01/173132/images/b42cc1db98eedf8de13f9a1b504e85c4bf55d0732d7c7e87321bb8d5c160e076.jpg)
AUTOMATIC DAYLIGHT SAVING TIME (SUMMER TIME) ADJUSTMENT FUNCTION
The watch has the data on daylight saving time (summer time) for each city and automatically shows the daylight saving time during the period given below. (See *6 on page 24)
Daylight saving time mark
Time difference is calculated inclusive of the daylight saving time.
| Name of city or area | Starts | Ends |
| London, Paris, Rome, Berlin, Azores | 2:00 a.m. on the last Sunday in March | 2:00 a.m. on the last Sunday in October |
| Moscow, Istanbul | 2:00 a.m. on the last Sunday in March | 2:00 a.m. on the last Sunday in September |
| Anchorage, Los Angeles, Vancouver, Denver, Chicago, New York, Montreal | 2:00 a.m. on the first Sunday in April | 2:00 a.m. on the last Sunday in October |
| Sydney, Buenos Aires | 2:00 a.m. on the last Sunday in October | 2:00 a.m. on the first Sunday in March |
| Wellington | 2:00 a.m. on the first Sunday in October | 2:00 a.m. on the third Sunday in March |
Caution:
- If the daylight saving time is shown for a city, do not set the time of the city between 1:00 a.m. and 2:00 a.m. on the last day of the daylight saving time period.
- When finding the time of a city other than the 28 cities included in the watch, check if the daylight saving time (summer time) is in effect in that city. Use of the daylight saving time (summer time) differs from city to city even in the same time zone.
TIME DIFFERENCES
GMT = Greenwich Mean Time
| GMT ± (hours) | Marking on the bezel/dial | Name of city or area | GMT ± (hours) | Marking on the bezel/dial | Name of city or area |
| 0 | GMT | Greenwich | +10 | SYD | Sydney* |
| 0 | LON | London* | +11 | NOU | Nouméa |
| + 1 | PAR | Paris* | +12 | WLG | Wellington* |
| + 1 | ROM | Rome* | -10 | HNL | Honolulu |
| + 1 | BER | Berlin* | -9 | ANC | Anchorage* |
| + 2 | IST | Istanbul* | -8 | LAX | Los Angeles* |
| + 3 | MOW | Moscow* | -8 | YVR | Vancouver* |
| + 4 | DXB | Dubai | -7 | DEN | Denver* |
| + 5 | KHI | Karachi | -6 | CHI | Chicago* |
| + 6 | DAC | Dacca | -5 | NYC | New York* |
| + 7 | BKK | Bangkok | -5 | YMQ | Montreal* |
| + 8 | HKG | Hong Kong | -4 | CCS | Caracas |
| + 8 | BJS | Beijing | -3 | BUE | Buenos Aires |
| + 9 | TYO | Tokyo | -1 | PDL | Azores* |
- The cities marked with “*” use daylight saving time (summer time).
- See *7 on page 25.
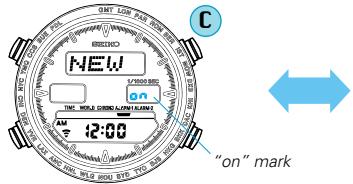
ALARM MODE [ALARM-1/ALARM-2]
Each of the two regular alarms can be set to ring on the basis of the time of a desired city in WORLD TIME mode. They can be set to ring once a day.
They can be engaged and disengaged independently of each other.
![SEIKO H021 - ALARM MODE [ALARM-1/ALARM-2] - 1](/content/2025/01/173132/images/2a27fc6ee5ae48de528e7826023a6d3dc20ed591d7d9b7e2ad8d1b4e9526d91c.jpg)
![SEIKO H021 - ALARM MODE [ALARM-1/ALARM-2] - 2](/content/2025/01/173132/images/b7daec1764e02c88cab3163223fc2fac812c5c3012cad57bc9d9cbde8c92b95e.jpg)
Press to show ALARM-1 or ALARM-2 mode.
ALARM TIME SETTING
Press for 2 to 3 seconds to show ALARM SETTING display. *Name of the city scrolls while the other displays become blank.
Press to select the digits (flashing) to be adjusted or show the scrolling city name in the following order: City Hour Minutes
Press to select the city for which you wish to set the alarm, or to set the flashing digits. (See 8 on page 25)
Press to return to ALARM mode. (See 9 on page 25)
- "on" and the alarm mark are displayed and the alarm is automatically engaged.
ALARM ENGAGEMENT/DISENGAGEMENT

Press to show ALARM-1 or ALARM-2 mode.

With each press, alarm is alternately engaged and disengaged.
[Alarm engaged]
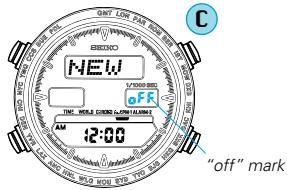
[Alarm disengaged]
- Alarms ring at the designated time for 20 seconds.
To stop them manually, press any one of the four buttons. - See *10 on page 25.
STOPWATCH MODE
- Stopwatch measures up to 100 hours in 1/1000 second increments. (See *11 on page 25)

Press to show STOPWATCH mode.
: Second hand indicates the elapsed seconds for the first 60 seconds and stays at the "0" position thereafter. (Hour and Minute hands indicate the current time)
STOPWATCH OPERATION
- Before using the stopwatch, be sure to reset the digits to "00:00'00"000".

1 Standard measurement
2 Accumulated elapsed time measurement

* Restart and stop of stopwatch can be repeated by pressing Button C.
3 Split time measurement

* Measurement and release of split time can be repeated by pressing Button D.
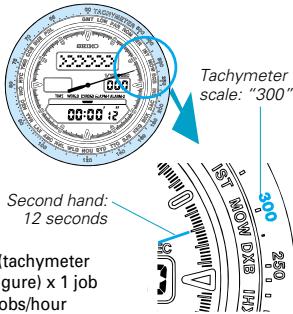
HOW TO USE THE TACHYMETER
(for models with tachymeter scale on the dial)
To measure the hourly average speed of a vehicle
1 Use the stopwatch to determine how many seconds it takes to go 1km or 1 mile.
Tachymeter scale indicated by Second hand gives the average speed per hour.
Ex. 1
Tachymeter scale:"80"

Second hand: 45 seconds
"80" (tachymeter scale figure) x 1 (km or mile) = 80 km/h or mph
- Tachymeter scale can be used only when the time required is less than 60 seconds. If necessary, shorten the measuring distance.
Ex. 2: If the measuring distance is extended to 2km or miles or shortened to 0.5km or miles and Second hand indicates "80" on tachymeter scale:
"80" (tachymeter scale figure) × 2 (km or mile) = 160km / h or mph
^ 80^ (tachymeter scale figure) × 0.5 (km or mile) = 40km / h or mph
To measure the hourly rate of operation
Use the stopwatch to measure the time required to complete 1 job.
Tachymeter scale indicated by Second hand gives the average number of jobs accomplished per hour.
Ex. 2: If 15 jobs are completed in 12 seconds:
300" (tachymeter scale figure) x 15 jobs
= 4500 jobs/hour
Ex. 1
NOTES ON OPERATING THE WATCH
1 The day of the week is automatically set once the year, month and date are set.
- When the time is set in the 24-hour indication, the world time and alarm time will also be displayed in the 24-hour indication.
2 - The digits except seconds and "12H"/"24H" move quickly if Button D is kept pressed.
- When the seconds read any number from "30" to "59" and Button D is pressed, 1 minute is added.
- When setting the hour digits in the 12-hour indication, check that the AM/PM mark is properly set. In the 24-hour indication, there is no mark.
3 The hands move counterclockwise by pressing Button A and clockwise by pressing Button D. They move quickly if the respective buttons are kept pressed.
4 If the watch is left untouched in TIME/CALENDAR SETTING display with the digits flashing, it will automatically return to TIME/CALENDAR mode in 2 to 3 minutes.
5 The hourly time signal will not ring while the alarm is ringing.
6 Daylight saving time is a system adopted by some countries to make the best use of daylight during a certain period in summer. Under this system the time is advanced an hour.
- The data on daylight saving time built into the watch's memory was collected as of February 1995, and use of daylight saving time may change when so decided by the countries concerned. In that case, therefore, the watch may not show daylight saving time properly.
*7 The time differences and use of daylight saving time may change in some areas or countries when they are so decided by the countries concerned. In that case, therefore, the watch may not show time differences/daylight saving time properly.
*8 - The digits move quickly if Button D is kept pressed.
- When the time in TIME/CALENDAR mode is set in the 24-hour indication, the alarm time will also be displayed in the 24-hour indication.
- When setting the hour digits in the 12-hour indication, check that the AM/PM mark is correctly set.
*9 If the watch is left untouched in ALARM SETTING display with the digits flashing, it will automatically return to ALARM mode in 2 to 3 minutes.
*10 - The alarm mark is displayed if either of the alarms is engaged.
- Alarm test: Press and hold Buttons C and D at the same time in TIME/CALENDAR mode.
*11 Remarks on stopwatch function:
- After 100 hours have been measured, the stopwatch will automatically be reset to "0:00'00'000".
-
Even while the stopwatch is counting, the display can be changed from STOPWATCH to another by pressing Button A.
-
The mode indicator for STOPWATCH mode flashes to indicate that the stopwatch is counting. After the stopwatch is used, however, be sure to stop it by pressing Button C as this will help to preserve the battery life.
-
When the hourly time signal mark is displayed, a beep sounds with each press of the buttons.

When all the segments light up ☆☆
If Buttons C and D are pressed at the same time in TIME/CALENDAR SETTING display, all the segments of the display will light up as shown at right.
This is not a malfunction.
Press any one of the four buttons to return to TIME/CALENDAR mode.
BATTERY LIFE INDICATOR
-
When the words "BATTERY CHANGE" scroll in the scroll window, replace the battery with a new one as soon as possible. Otherwise, the watch will stop operating in 2 to 3 days. We suggest that you have the battery replaced by a SEIKO DEALER.
-
Even after the "BATTERY CHANGE" message appears, time accuracy is not affected.

BATTERY CHANGE

The miniature battery which powers your watch should last approximately 2 years. However, because the battery is inserted at the factory to check the function and performance of the watch, its actual life once in your possession may be less than the specified period. When the battery expires, be sure to replace it as soon as possible to prevent any malfunction. For battery replacement, we recommend that you contact an AUTHORIZED SEIKO DEALER and request SEIKO SR1130W battery.
- The battery life may be less than 2 years if:
the alarm is used more than 20 seconds a day,
- the stopwatch is used for more than 3 minutes a day,
city selection is made more than 5 times a day,
the confirmation sound is used more than 10 times a day, and/or
the time transfer function is used more than once a day.

WARNING
- Do not remove the battery from the watch.
- If it is necessary to take out the battery, keep it out of the reach of children. If a child swallows it, consult a doctor immediately.
- Never short-circuit, tamper with or heat the battery, and never expose it to fire. The battery may burst, become very hot or catch fire.

CAUTION
- The battery is not rechargeable. Never attempt to recharge it, as this may cause battery leakage or damage to the battery.
TO PRESERVE THE QUALITY OF YOUR WATCH
WATER RESISTANCE
| Indication on case back | Condition of use Degree of water resistance* | Accidental contact with water such as rain and splashes | Swimming, yachting and taking a shower | Taking a bath and shallow diving | Scuba diving** and saturation diving |
| No indication | Non-water resistant | No | No | No | No |
| WATER RESISTANT | 3 bar | Yes | No | No | No |
| WATER RESISTANT 5 BAR | 5 bar | Yes | Yes | No | No |
| WATER RESISTANT 10/15/20 BAR | 10/15/20 bar | Yes | Yes | Yes | No |
Non-water resistant

- If the watch becomes wet, have it checked by an AUTHORIZED SEIKO DEALER or SERVICE CENTER.
Water resistant 5/10/15/20 bar

- Do not operate the buttons when the watch is wet or in water. If used in sea water, rinse the watch in fresh water and dry it completely.
- When taking a shower with a water resistant 5 bar watch, or taking a bath with a water resistant
10, 15 or 20 bar watch, be sure to observe the following:
- Do not operate the buttons when the watch is wet with soapy water or shampoo.
-
If the watch is left in warm water, a slight time loss or gain may be caused. This condition, however, will be corrected when the watch returns to normal temperature.
-
Pressure in bar is a test pressure and should not be considered as corresponding to actual diving depth since swimming movement tends to increase the pressure at a given depth. Care should also be taken on diving into water.
** We recommend that you wear a SEIKO Diver's Watch for scuba diving.
TEMPERATURES

Your watch works with stable accuracy within a temperature range of 5^ and 35^ (41°F and 95°F).
Temperatures over 60^ (140^) or below -10^(+14^) may cause a slight time loss or gain or battery leakage or shorten the battery life.
However, the above conditions will be corrected when the watch returns to normal temperature.
SHOCKS & VIBRATION

Be careful not to drop your watch or hit it against hard surfaces.
CARE OF CASE AND BRACELET

To prevent possible rusting of the case and bracelet, wipe them periodically with a soft dry cloth.
Magnetism

The analogue unit of your watch will be adversely affected by strong magnetism, though the digital unit will not be affected. Keep the
watch away from close contact with magnetic objects.
CHEMICALS

Be careful not to expose the watch to solvents, mercury, cosmetic spray, detergents, adhesives or paints. Otherwise,
the case, bracelet, etc. may become discolored, deteriorated or damaged.
PERIODIC CHECK

It is recommended that the watch be checked once every 2 to 3 years. Have your watch checked by an AUTHORIZED
SEIKO DEALER or SERVICE CENTER to ensure that the case, buttons, gasket and crystal seal remain intact.
PRECAUTION REGARDING CASE BACK PROTECTIVE FILM

If your watch has a protective film and/or a sticker on the case back, be sure to peel them off before using your watch.
STATIC ELECTRICITY

The IC (Integrated Circuit) used in your watch will be affected by static electricity which may disturb the display. Keep the watch away
from close contact with objects such as TV screens which emit strong static electricity.
LIQUID CRYSTAL PANEL

The normal life expectancy for a liquid crystal panel is approximately 7 years. After that it may decrease in contrast,
becoming difficult to read. Please contact your AUTHORIZED SEIKO DEALER or SERVICE CENTER if you wish to have a new panel fitted (guaranteed one year).
SPECIFICATIONS
1 Frequency of crystal oscillator
2 Loss/gain (monthly rate)
32,768 Hz (Hz = Hertz ... Cycles per second)
Less than 15 seconds at normal temperature range (5^ 35^) 41^ 95^
-10^ +60^ ( 14^ 140^ )
Desirable temperature range of use.
0^ +50^ 32^ 122^)
4 Driving system
Step motor, 2 pieces
5 Analogue display system
Three hands (hour, minute and second hands)
Time
6 Digital display system
TIME/CALENDAR mode
Year (only in TIME/CALENDAR SETTING display), month, date, day of the week, hour, minutes and seconds
"AM"/"PM" in the 12-hour indication
Mode indicator
(Alarm mark, hourly time signal mark and daylight saving time mark)
WORLD TIME mode
City, date, hour, minutes, seconds and time difference
"AM"/"PM" in the 12-hour indication
Mode indicator
(Alarm mark, hourly time signal mark and daylight saving time mark)
ALARM mode
Alarm time (hour and minutes) and city
"AM"/"PM" in the 12-hour indication
Mode indicator and "on"/"off"
(Alarm mark and hourly time signal mark)
STOPWATCH mode
Hour, minutes, seconds and 1/1000 seconds Mode indicator
(Alarm mark, hourly time signal mark and daylight saving time mark)
7 Digital display medium
Nematic Liquid Crystal, FEM (Field Effect Mode)
8 Battery
SEIKO SR1130W, 1 piece
9 Battery life indicator
"BATTERY CHANGE" scrolls in the scroll window when the battery life nears its end.
10 IC (Integrated Circuit)
C-MOS-LSI, 1 piece
- The specifications are subject to change without prior notice for product improvement.