
Tablet SGPT12 Series - SONY - Free user manual and instructions
Find the device manual for free Tablet SGPT12 Series SONY in PDF.


User questions about Tablet SGPT12 Series SONY
0 question about this device. Answer the ones you know or ask your own.
Ask a new question about this device
Download the instructions for your in PDF format for free! Find your manual Tablet SGPT12 Series - SONY and take your electronic device back in hand. On this page are published all the documents necessary for the use of your device. Tablet SGPT12 Series by SONY.
USER MANUAL Tablet SGPT12 Series SONY
Sony Tablet Help guide SGPT12 Series
- Read This First
• Turning On Your Tablet Device
• Shutting Down Your Tablet Device
• Turning the Screen On/Off (Sleep Mode)
• Notes on Using the AC Adapter
- Charging the Battery
• Notes on Using the Battery
• How to Use the Touch Screen
• Notes on the Screen
• Handling the Touch Screen
• Starting Wi-Fi Communications
• Notes on Using the Wi-Fi Function
• About the Bluetooth(R) Function
• Communicating with Another Bluetooth(R) Device
- Stopping Bluetooth(R) Communications
• Notes on Using the Bluetooth(R) Function
• About Bluetooth(R) Security
• About the GPS Function
• Enabling the Location Information
• Disabling the Location Information
- Inserting/Removing an SD Memory Card
• Notes on Using SD Memory Cards
• Notes on SD Memory Cards
- Connecting a USB Device
• Notes on Connecting Your Tablet Device and a Computer with a USB Cable
• Using the Tablet Device with the Cradle
• Adjusting the Cradle Angle
• Parts and Controls (Tablet Device)
• Parts and Controls (Cradle)
- Checking the Supplied Items
• Caring for Your Tablet Device
• Online Support Websites
• Notes on Holding Your Tablet Device
- Resetting Your Tablet Device
- Attaching the Strap to Your Tablet Device
- About Sample Data
• Reducing Battery Consumption
• Notes on Using Voice Communications Apps
• Notes on Geomagnetic Sensor
• Using the Built-in Camera
• Notes on the Built-in Camera
- Checking the Android Version
- Updating Android to the Latest Version
- Enjoying Full-scale Games
- Enjoying Video Content
- Enjoying Music Content
- Enjoying Digital Books
• Viewing Apps Recommended by Sony
- Searching for Apps
- Enjoying Video, Music or Photo Content on Other Devices
- Operating Various AV Devices on Your Tablet Device
• Sharing Exciting Experiences via Social Network
• About the Home Screen
- Adding Apps or Widgets to the Home Screen
- Favorites
• Application Launcher and Widgets
• About the Notification Panel
- Rotating the Screen
- Quick Search
- Locking the Screen
• Displaying Recent Apps
- Entering Text
• Using the On-screen Keyboard
• Cutting and Pasting Text
- Google Account
- Changing the Settings
- Before Use
- List of Apps
- Browser
- Camera
- Calculator
- Calendar
• People
- Desk clock
- Music player
- Video player
• What You Can Do Over the Home Network
- About DLNA
• Preparing the Home Network
- Playing Back Content Stored on Another Device (Server)
- Playing Content on other Devices by Sending (Throwing) it
- File transfer
- Remote control
• Social Feed Reader - Registering a Twitter or Facebook account
- Switching the Posts (Article) Displayed
- Reading and Writing the Post (Article)
• Searching for Posts (Articles) or Friends - Select App
- Gallery
- Video Unlimited
- Music Unlimited
- Personal Space
- Reader
- MediaRemote
- Ustream
Zinio
• Evernote - HD Games
- Foursquare
- Crackle
- chumby for Sony Tablet S
- About Backup
- Wi-Fi checker
• Copying Data on a Computer to Your Tablet Device
• Supported Formats
• Using Media Go - About PS Store
• Using a Controller of the PlayStation(R)3 System - Playing Back Music Content on Multiple Devices (PARTY STREAMING)
- Registration
- Trademarks
- Specifications
• Support for PlayStation(R) in general - The tablet device does not turn on.
- The tablet device starts up slowly.
• The battery does not charge.
• The charge indicator does not light. - Battery consumption increases.
• The charge indicator blinks. - Heat builds up in the tablet device and the AC adapter while the tablet device is in use or being charged.
• The screen is dark. - There is a point that is not displayed properly on the screen.
• A Bluetooth(R) device was not found. - Your tablet device gets slow/is not performing as expected.
- Your tablet device does not work.
• To reset your tablet device.
• The sound from the speaker is distorted.
- The screen brightness is not stable.
- The screen brightness cannot be adjusted.
• Automatic adjustment of the screen brightness does not work as expected.
- The screen disappears/darkens unexpectedly.
- The touch screen does not work as expected.
• The date and time are reset.
• To erase the tap sound (operation sound).
- The screen does not rotate when you turn your tablet device.
• To turn off screen rotation.
- To deactivate the lock function/to use your tablet device without locking the screen.
- The sound from the built-in speaker is interrupted when the screen is rotated.
• A headset cannot be used.
- The file cannot be displayed/be played back.
- The video is interrupted/is jumpy/is not synchronized with the audio.
- Your tablet device cannot receive GPS signals or takes a long time for the positioning.
- The results of GPS positioning may be different from the actual location.
- The photos and movies taken with the camera are blurry.
- You cannot send (Throw) content to another device and play it back with the DLNA app.
- Your tablet device cannot learn with the Remote control app.
- Some applications are not displayed in the selected language.
• Some applications cannot be uninstalled.
- A website for mobile phones or smartphones is displayed.
- Your tablet device cannot connect to a Wi-Fi network.
Read This First
Congratulations on your purchase of a Sony tablet device.
This help guide explains how to operate your tablet device and apps. Before you start using your tablet device, read the supplied Important Information (safety instructions).
Charging the battery
The battery charge level may be low when you purchase your tablet device. Charge the battery before you start using your tablet device [Details].
About software update
When you update the software, be sure to install the latest version of each app. Otherwise some apps may not start.
Related Topic
Online Support Websites
Google Account
Turning On Your Tablet Device
Note
- Before turning on, see “Notes on Using the AC Adapter” [Details].
- Connect your tablet device to an AC outlet (wall socket) [Details].
- Press and hold the power button for three seconds.
Your tablet device will turn on. When you turn on your tablet device for the first time, see “Before Use” [Details].
Related Topic
Shutting Down Your Tablet Device
Turning the Screen On/Off (Sleep Mode)
Notes on Using the AC Adapter
Charging the Battery
Notes on Using the Battery
Reducing Battery Consumption
Shutting Down Your Tablet Device
Note
- Before shutting down your tablet device, see "Notes on Using the AC Adapter" [Details].
- Press and hold the power button until a list appears.
- Tap [OK].
The tablet device will automatically turn off in a few seconds.
Note
- To avoid losing unsaved data or causing your tablet device to malfunction, be sure to shut down your tablet device properly as described above.
- If you cannot shut down your tablet device as described above, press and hold the power button for about 10 seconds to force it to shut down.
- If you cannot force your tablet device to shut down, press the reset button (hole) [Details].
Related Topic
Turning On Your Tablet Device
Turning the Screen On/Off (Sleep Mode)
Notes on Using the AC Adapter
Charging the Battery
Notes on Using the Battery
Reducing Battery Consumption
Turning the Screen On/Off (Sleep Mode)
You can turn off the screen (sleep mode) when you are not using your tablet device.
- Press the power button.
The screen goes to sleep. To deactivate sleep mode and turn on the screen, press the power button again.
Hint
- You can set the time until the screen automatically goes to sleep when the tablet device has not been operated for a given amount of time. Tap [■■■ Apps & Widgets] - [■■ Settings] - [Display] - [Sleep], and select the desired time interval before going to sleep.
- You can also make settings to lock the screen when it is turned on after deactivating sleep [Details].
Related Topic
Turning On Your Tablet Device
Shutting Down Your Tablet Device
Notes on Using the AC Adapter
Charging the Battery
Notes on Using the Battery
Reducing Battery Consumption
Notes on Using the AC Adapter
- Use the AC adapter supplied with your tablet device or a genuine Sony AC adapter. Do not use any other AC adapter as it may cause malfunctions.
- Do not connect the AC adapter to a power conversion device such as a travel power converter. Doing so may cause overheating or a malfunction.
- If the AC adapter cable becomes damaged or broken, do not use it.
- Use the AC adapter supplied with your tablet device when using a designated Sony cradle (SGPDS1, sold separately) for your tablet device.
Related Topic
Turning On Your Tablet Device
Shutting Down Your Tablet Device
Turning the Screen On/Off (Sleep Mode)
Charging the Battery
Notes on Using the Battery
Reducing Battery Consumption
Charging the Battery
The battery is charged when your tablet device is plugged in. The charging time will vary depending on your usage.
- Plug the AC power cord (mains lead) into the AC adapter.
- Plug the AC power cord (mains lead) into an AC outlet (wall socket).
- Turn over your tablet device, and then plug the AC adapter into the tablet device charge connector in the direction shown below.
The charge indicator is lit according to the battery charging condition of your tablet device.

Hint
- Using the designated Sony cradle (SGPDS1, sold separately) for your tablet device allows you to charge the battery easier.
On the charge indicator
The charge indicator lights up in different colors, depending on the remaining battery level.
Red: The battery needs to be charged.
Yellow (orange): Insufficiently charged.
Green: Sufficiently charged.
Note
- The charge indicator blinks in red when the remaining battery is getting low during operation.
Related Topic
Turning On Your Tablet Device
Shutting Down Your Tablet Device
Turning the Screen On/Off (Sleep Mode)
Notes on Using the AC Adapter
Notes on Using the Battery
Notes on Using the Battery
About the battery
- For your safety, use only the supplied AC power cord (mains lead) for battery charging.
- Depending on the ambient temperature or how to use your tablet device, the battery may not be charged, or it may take a long time to charge the battery.
- Do not charge the battery near fire or in direct sunlight.
- The tablet device is not fully charged when shipped.
- Heat builds up in the battery while it is in use or being charged. This is normal and is not cause of concern. If your tablet device or the AC adapter becomes abnormally hot, shut down your tablet device and unplug the AC power cord (mains lead) from the AC adapter.
About battery discharge
- After charging, the battery gradually loses its charge even if it is not used. If it is left unused for a long time, the battery charge may be depleted. We recommend recharging the battery before use.
- If you do not use your tablet device for an extended period of time, fully charge the battery every six months.
About battery life
- Battery life varies depending on usage, settings, and temperatures.
About battery deterioration
- Battery capacity gradually declines through repeated recharging and discharging. As a result, the battery life may become short or the battery may not perform optimally even when fully charged.
Related Topic
Turning On Your Tablet Device
Shutting Down Your Tablet Device
Turning the Screen On/Off (Sleep Mode)
Notes on Using the AC Adapter
Charging the Battery
Reducing Battery Consumption
How to Use the Touch Screen
Tap
Selects an icon or option.
Tapping twice quickly allows you to zoom in or out images or other screen items.

Tap & hold
Opens an option menu.

Drag
Moves an item or scrolls a page slowly.

Flick
Scrolls a page quickly.

Pinch
Zooms in or out.

Related Topic
Notes on the Screen
Handling the Touch Screen
Notes on the Screen
Notes on handling the touch screen and LCD screen are explained here.
Notes on the touch screen
- Your tablet device uses a capacitive touch screen. Tap the screen directly with your fingertip. Do not scratch it or tap it with sharp objects such as a needle, pen, or fingernails. You cannot operate the touch screen with a stylus.
- If you tap the touch screen with gloved fingers, the touch screen may operate incorrectly or may not operate at all.
- Do not operate your tablet device with objects on the touch screen.
- If the touch screen is touched by objects other than your fingertip, it may not react correctly.
- Do not put the touch screen close to other electrical devices. Electrostatic discharges can make the touch screen malfunction.
- If there are water droplets on the touch screen, or if you touch it with wet fingertips, the touch screen may not react correctly.
- Do not put the touch screen close to water. The touch screen may malfunction in humid conditions or when exposed to water.
- The touch screen may not react correctly due to noise from the AC power cord (mains lead) during charging the battery. Disconnect the AC power cord (mains lead), and operate your tablet device on the battery only.
Notes on the LCD screen
- Do not leave the LCD screen facing the sun. Be sure to block direct sunlight when using your tablet device near a window.
- Using your tablet device in low temperature conditions may produce a residual image on the LCD screen. This does not indicate a malfunction. The screen will return to normal when the tablet device returns to normal temperature.
- The LCD screen becomes warm during operation. This is normal and does not indicate a malfunction.
- The LCD screen is manufactured using high-precision technology. You may, however, see tiny black points and/or bright points (red, blue, or green) on the LCD screen. This is a normal result of the manufacturing process and does not indicate a malfunction.
- The LCD screen is made of glass. If the glass is damaged (crack, etc.), do not touch the touch screen nor try to repair it by yourself. Handle the LCD screen carefully as it is vulnerable to dropping or mechanical shock. We cannot guarantee any damages caused by customers due to wrong handling.
Related Topic
How to Use the Touch Screen
Handling the Touch Screen
Handling the Touch Screen
- Use a soft, dry or slightly moistened cloth to wipe the surface of the touch screen. Rubbing the surface hard with a dry cloth may damage the screen.
- Do not use chemicals or detergents.
Related Topic
How to Use the Touch Screen
Notes on the Screen
Starting Wi-Fi Communications
You first need to establish Wi-Fi communications between your tablet device and the Wi-Fi router. Make sure the Wi-Fi router is set up. See the operating instructions supplied with your Wi-Fi router for more information such as how to set up your Wi-Fi router. After confirming your Wi-Fi router settings, follow the steps below to turn on Wi-Fi on your tablet device.
- Tap [■■■ Apps & Widgets] - [■■ Settings] - [Wi-Fi].
- Slide the [Wi-Fi] switch to the [ON] position.
Note
- To reduce battery consumption, turn off Wi-Fi when not in use.
- The Wi-Fi antenna is built in to your tablet device. If you cover the antenna with your hands or other objects while connecting to the Internet using the Wi-Fi function, the communications quality may deteriorate [Details].
To stop Wi-Fi communications
- Slide the [Wi-Fi] switch to the [OFF] position after step 1 in the above procedures to turn off Wi-Fi on your tablet device.
To find networks in range of your device
- Tap [■ Apps & Widgets] - [■ Settings] - [Wi-Fi].
- Slide the [Wi-Fi] switch to the [ON] position to turn on Wi-Fi.
A list of the networks found within range is displayed.
Hint
- To check the MAC address of your tablet device or other Wi-Fi details, tap ☐ (Option menu) - [Advanced].
-
If a list of the networks is not displayed, tap [Scan] at the top right of the screen.
-
Tap a desired network.
- When needed, enter a password or make settings.
Hint
- When you are in range and Wi-Fi is turned on, your tablet device will automatically reconnect to available networks that it has connected to before.
- In the [Wi-Fi disconnect policy] menu displayed by tapping [::: Apps & Widgets] - [= Settings] - [Wi-Fi] -
(Option menu) - [Advanced] - [Wi-Fi disconnect policy], you can choose whether to keep the Wi-Fi connection active or not when applications such as Music player app during playback are running while the screen of your tablet device is turned off (sleep mode). If no application is running while in sleep mode, the Wi-Fi connection will be disabled regardless of the selection chosen in [Wi-Fi disconnect policy].
Notes on Using the Wi-Fi Function
Wi-Fi checker
Notes on Using the Wi-Fi Function
- Use of Wi-Fi products may be restricted by local regulations in some countries or regions.
- Wi-Fi devices work on the 2.4 GHz band, which is used by a variety of devices. Wi-Fi devices use technology to minimize radio interference from other devices that use the same band. However, radio interference may still cause slower data transfer speeds, reduce communications range or cause communications failure.
- If both the Bluetooth function and the 2.4 GHz Wi-Fi function of your tablet device are enabled, interference may occur and cause slower data transfer speeds or other problems.
- To communicate via Wi-Fi while traveling, you may need to contract with a Wi-Fi connection service provider.
- Data transfer speed and communications range may vary depending on the following conditions:
Distance between devices
Presence of obstacles between devices
Device configuration
Signal conditions
Surrounding environment (wall material, etc.)
Software in use
- Communications may be cut off depending on signal conditions.
- The data transfer rate specified in the specification is the theoretical maximum, and may not reflect actual data transfer rate.
- Actual data transfer speed may not be as fast as the speed displayed on your tablet device.
- Communications is not available between the 2.4 GHz and 5 GHz Wi-Fi frequency bands.
- The data transfer rate for IEEE 802.11g and IEEE 802.11n (2.4 GHz) devices may be affected by interference when used with IEEE 802.11b products. Also, products using IEEE 802.11g and IEEE 802.11n automatically lower the transfer rate to maintain compatibility with IEEE 802.11b products.
- When the data transfer speed is not as fast as expected, changing the wireless channel on the access point may increase the speed.
Related Topic
Starting Wi-Fi Communications
Wi-Fi checker
About the Bluetooth(R) Function
You can establish wireless communications between your tablet device and other Bluetooth devices such as a computer, mobile phone, headset, Bluetooth headphone or wireless keyboard. You can transfer data between these devices without cables at a range of up to 33 feet / 10 meters in an open area. One Bluetooth device can connect with up to seven devices via wireless network to exchange data.
When a device requires connection to another device, it sends out an inquiry to neighboring Bluetooth devices. If any device responds to the inquiry, the two devices can connect with each other.
Related Topic
Communicating with Another Bluetooth(R) Device
Stopping Bluetooth(R) Communications
Notes on Using the Bluetooth(R) Function
About Bluetooth(R) Security
Communicating with Another Bluetooth(R) Device
You can connect Bluetooth devices to your tablet device. Depending on the device, the procedure to establish connection may vary. Refer to the operating instructions of the Bluetooth device. For details on Bluetooth communication, see “About the Bluetooth(R) Function” [Details].
To turn on the Bluetooth feature
- Tap [::: Apps & Widgets] - [Settings] - [Bluetooth].
- Slide the [Bluetooth] switch to the [ON] position.
Note
- To reduce battery consumption, turn off Bluetooth when not in use.
- The Bluetooth antenna is built in to your tablet device. If you cover the antenna with your hands or other objects while using the Bluetooth function, the communications quality may deteriorate [Details].
To make your tablet device discoverable
You can allow a Bluetooth device to discover your tablet device when Bluetooth is turned on.
- Tap [■: Apps & Widgets] - [■ Settings] - [Bluetooth].
- Slide the [Bluetooth] switch to the [ON] position.
- Tap the model name of your tablet device.
To pair with another Bluetooth device
To connect with a new Bluetooth device, you need to pair with it when Bluetooth is turned on. You only need to do this once for your tablet device and the new Bluetooth device to connect again. Just turn on the device the next time.
- Make sure the Bluetooth device you are pairing with is in discoverable mode.
Note
• Refer to the operating instructions supplied with the Bluetooth devices for details.
- Tap [■: Apps & Widgets] - [■ Settings] - [Bluetooth].
- Slide the [Bluetooth] switch to the [ON] position.
- Tap [SEARCH FOR DEVICES] at the top right of the screen.
The [AVAILABLE DEVICES] list is displayed.
- Tap the name of a device to connect with.
- Tap [Pair], or enter the device passkey (e.g. 0000) if necessary to connect to the Bluetooth device. When a connection is established with the device, the Bluetooth indicator appears in a status bar at the bottom right of the screen on your tablet device.
To reconnect devices
To reconnect your tablet device with the paired device, tap the device name in the [PAIRED DEVICES] list.
Related Topic
About the Bluetooth(R) Function
Stopping Bluetooth(R) Communications
Notes on Using the Bluetooth(R) Function
About Bluetooth(R) Security
Stopping Bluetooth(R) Communications
From your tablet device, you can unpair the Bluetooth devices it is paired with.
- Tap 📁 next to the name of the device you want to unpair your tablet device from in the [PAIRED DEVICES] list that .
- Tap [Unpair].
Hint
- To reduce battery consumption, turn off Bluetooth when not in use.
Related Topic
About the Bluetooth(R) Function
Communicating with Another Bluetooth(R) Device
Notes on Using the Bluetooth(R) Function
About Bluetooth(R) Security
Notes on Using the Bluetooth(R) Function
- Use of Bluetooth function may be restricted by local regulations in some countries or regions. - The Bluetooth function may not work with some devices, depending on the manufacturer or the software version employed by the manufacturer. Check the system requirements of the Bluetooth device before purchasing.
For information on Bluetooth devices supported by Sony tablet devices, visit the support website. Some Bluetooth devices require authentication (pairing) before establishing a connection with another device. Perform the authentication process before connecting to such a device.
- Bluetooth devices work on the 2.4 GHz band, which is used by a variety of devices. Bluetooth devices use technology to minimize radio interference from other devices that use the same band. However, radio interference may still cause slower data transfer speeds, reduce communications range or cause communications failure.
- Data transfer speed and communications range may vary depending on the following conditions:
Distance between communicating devices
Presence of obstacles between devices
Surrounding environment that includes presence of walls and materials of such walls
Device configuration
Software in use
Signal conditions
- Communications may be cut off depending on signal conditions.
- Interference may occur if both the Bluetooth function and the 2.4 GHz Wi-Fi function are enabled. That will result in slower data transfer speeds or other problems.
- Large files may occasionally be corrupted during continuous transfer due to limitations of the Bluetooth standard and ambient electromagnetic interference.
- Connecting multiple Bluetooth devices to your tablet device may cause channel congestion, resulting in poor device performance. This is normal with Bluetooth technology and does not indicate a malfunction.
- Video and audio may not be synchronized if you play videos on your tablet device with audio output from a connected Bluetooth device. This is a frequent occurrence with Bluetooth technology and does not indicate a malfunction.
- All Bluetooth devices must be certified through procedures stipulated by Bluetooth SIG to ensure that they comply with the Bluetooth standard. Even if the Bluetooth standard is complied with, individual device performance, specifications, and operation procedures can vary.
- Output sound may not be switched between a Bluetooth audio device and the built-in speaker when you connect or disconnect the device while an app such as game is running. If that occurs, exit the app and restart the device. Or switch the sound before starting the app.
- Sound of apps such as games may be delayed when heard from Bluetooth audio devices connected to your tablet device. If that occurs, output sound from the built-in speaker or connect an audio device to the headphone jack of your tablet device to hear the sound.
- If you turn off a Bluetooth audio device connected to your tablet device while an app such as a game is running, the app may no-longer work properly. If that occurs, exit the app and restart your tablet device.
- To exchange files with Bluetooth devices, you need to download applications other than those that are pre-installed.
About the Bluetooth(R) Function
Communicating with Another Bluetooth(R) Device
Stopping Bluetooth(R) Communications
About Bluetooth(R) Security
About Bluetooth(R) Security
Bluetooth wireless technology has an authentication function that allows you to determine with whom you choose to communicate. With the authentication function, you can prevent any anonymous Bluetooth devices from accessing your tablet device. The first time two Bluetooth devices communicate, a common passkey (a password required for authentication) should be determined for both devices to be registered. Once a device is registered, there is no need to re-enter the passkey.
Your tablet device will be detected by other Bluetooth devices, only when it is set to allow detection by other Bluetooth devices. You can set the time to accept the detection, or whether or not to allow reception after both devices are connected.
Related Topic
About the Bluetooth(R) Function
Communicating with Another Bluetooth(R) Device
Stopping Bluetooth(R) Communications
Notes on Using the Bluetooth(R) Function
About the GPS Function
The GPS (Global Positioning System) function provides location information by receiving signals from GPS satellites. You can see the location where you are, where you are going, or directions to a destination on Google Maps with your tablet device by using the GPS function.
Note
- When other electronic devices are near your tablet device, electromagnetic waves or magnetic interference from those may prevent your tablet device from providing accurate location information. Keep electronic devices away from your tablet device.
- When your tablet device is in an area with poor reception of GPS signals, you may encounter positioning errors. To receive more accurate information, avoid using your tablet device in the following locations.
Inside buildings or vehicles
In tunnels or underground
Under elevated tracks
Between tall buildings
In dense trees
In valleys
- The GPS antenna is built in to your tablet device. If you cover the antenna with your hands or other objects while using the GPS function, the positioning accuracy may deteriorate [Details].
Related Topic
Enabling the Location Information
Disabling the Location Information
Notes on Geomagnetic Sensor
Enabling the Location Information
You can set whether to receive location information via GPS satellites or wireless networks.
-
Tap [■■■ Apps & Widgets] - [■■ Settings] - [Location services].
-
To enable reception of location information via wireless networks, tap [Google's location service]. To enable reception of location information via GPS satellites, tap [GPS satellites]. A check mark is put in the box for that setting.
Note
- Move your tablet device as little as possible in an area with a clear view of the sky until the present location is displayed by the GPS function. The present location can be displayed quicker when stationary than while moving. If the present location is not displayed or if the wrong location is displayed, move to an area with a clear view of the sky.
Related Topic
About the GPS Function
Disabling the Location Information
Disabling the Location Information
- Tap [■■■ Apps & Widgets] - [■■ Settings] - [Location services].
- Tap [Google's location service] or [GPS satellites], whichever is selected, to deactivate that method. The check mark is removed from the box for that setting.
Related Topic
About the GPS Function
Enabling the Location Information
Inserting/Removing an SD Memory Card
Your tablet device is equipped with an SD memory card slot. You can use this slot to transfer data to and from digital cameras, camcorders, music players, and other audio/video devices.
The SD memory card slot on your tablet device can accommodate the following memory cards:
SD memory card
SDHC memory card
To insert an SD memory card
- Open the cover of the SD memory card slot.
- Locate the SD memory card slot.
- Hold the SD memory card with the contacts facing down and the arrow pointing toward the SD memory card slot.

- Carefully slide the SD memory card into the slot until it clicks into place.
Note
- Be careful not to insert an SD memory card at the wrong orientation. If you force it into the slot upside down, the slot may be damaged. For details, refer to the manual of the SD memory card.
To remove an SD memory card
- Make sure files are not being transferred.
- Locate the SD memory card slot.
- Push in the SD memory card all the way and release.
The SD memory card ejects.
- Hold the SD memory card by the both sides, and pull it out of the slot.
Related Topic
Notes on Using SD Memory Cards
Notes on SD Memory Cards
File transfer
Notes on Using SD Memory Cards
- Keep away from children. SD memory cards are harmful if swallowed.
- Do not touch the contacts with fingers or metal objects.
- SD memory cards contain delicate electronic components. Do not subject them to excessive force, bend or drop them.
- Do not disassemble or modify.
- Avoid moisture.
- Do not use or store in the following locations:
Places with high temperature, such as inside an enclosed car in the sunshine
Places exposed to direct sunlight
Humid or corrosive environments
Excessively dusty places
- Be sure to use SD memory cards that are compliant with the standards supported by your tablet device. A wrong-size card may become jammed in the slot, causing damage to your tablet device.
- You cannot write data to an SD memory card that is write-protected.
- It is recommended that you make a backup copy of important data.
- To avoid losing stored data, keep SD memory cards away from static electricity or electrical noise that may interfere with the card.
- When carrying SD memory cards, be sure to put them in their case to avoid static electricity damage.
- Before using an SD memory card with a device other than a tablet device, such as a digital camera or a portable audio player, format (initialize) the SD memory card using that device.
Some devices may not support the file format for tablet devices and show you a message that recommends you to format the card. If you encounter such a message, copy data from the card to your tablet device (or to other devices via the network) and format the card using the device other than the tablet. Note that formatting a card will delete all current data contained in it. For more details, refer to the manual of the device you are using.
- Do not insert foreign objects into the SD memory card slot.
- The SD memory card slot can be used for reading/writing supported cards only, and it cannot be used for other purposes.
Related Topic
Inserting/Removing an SD Memory Card
Notes on SD Memory Cards
File transfer
Notes on SD Memory Cards
SD memory cards (up to 2 GB) and SDHC memory cards (up to 32 GB) available as of September 2011 have been tested and found compatible with your tablet device. However, this does not guarantee that all SD memory cards or SDHC memory cards will be compatible with your tablet device.
Related Topic
Inserting/Removing an SD Memory Card
Notes on Using SD Memory Cards
File transfer
Connecting a USB Device
Your tablet device is equipped with a USB Micro-A/B connector. You can use that to connect your tablet device to a computer or a USB device via USB.
- Connect a USB device to your tablet device using a designated USB adapter cable SGPUC1 (sold separately) and a commercially available Micro-USB cable.

Hint
- To connect to your computer, use a commercially available Micro-USB cable.
- Charging the battery via USB is not supported when your tablet device is connected to a computer or a charger.
- The power supply capacity is 500 mA when your tablet device is connected to a USB device.
Related Topic
Notes on Connecting Your Tablet Device and a Computer with a USB Cable
Copying Data on a Computer to Your Tablet Device
File transfer
Notes on Connecting Your Tablet Device and a Computer with a USB Cable
- Do not turn off your tablet device while reading and writing data via USB.
- Do not unplug the USB cable from your tablet device while reading and writing data via USB. Doing so may cause loss of your data.
- Use a commercially available Micro-USB cable to connect your tablet device and a computer.
Related Topic
Connecting a USB Device
Copying Data on a Computer to Your Tablet Device
Parts and Controls (Tablet Device)
Front

- Microphone
- IR data port
- Ambient light sensor
- Touch screen
- Front camera lens
Side

- Notification LED
- ⏻ (Power) button
- Charge indicator [Details]
- VOL + / - (Volume) buttons
The VOL + button has a tactile dot to help you operate your tablet device easier. -
Reset button (hole)
-
Built-in speaker (R)
Rear

- Rear camera lens
- 📋 (Headphone) jack
- USB Micro-A/B connector
- SD memory card slot
- Built-in speaker (L)
- Strap hole
- Charge connector
Related Topic
Parts and Controls (Cradle)
Attaching the Strap to Your Tablet Device
About the Home Screen
Parts and Controls (Cradle)

- Power cord connector
- Charge connector (inside the upper slot)
Related Topic
Parts and Controls (Tablet Device)
Attaching the Strap to Your Tablet Device
Checking the Supplied Items
- AC adapter
• AC power cord (mains lead) - Strap
- Quick Start Guide
- Important Information
Caring for Your Tablet Device
Tablet device
- Make sure you close any connector covers and keep them secure.
- Clean the cabinet with a soft, dry or slightly moistened cloth with a mild detergent solution. Do not use a detergent solution for cleaning the touch screen. Do not use an abrasive pad, scouring powder, or solvent such as alcohol or benzine, as these may damage the finish of your tablet device.
- If your tablet device is exposed to moisture such as rain or extreme humidity, wipe your tablet device with a soft dry cloth, but do not dry with an oven or dryer.
Built-in camera
- Clean the lens protection cover of the built-in camera with a blower brush or a soft brush. If the cover is extremely dirty, wipe it off with a soft dry cloth. Do not rub the cover, as it is sensitive to pressure.
Related Topic
Notes on Holding Your Tablet Device
Online Support Websites
If you need more information about your tablet device,
• For customers in the U.S.:
For SGPT111USS:
see http://esupport.sony.com/model/SGPT111USS/US
For SGPT112USS:
see http://esupport.sony.com/model/SGPT112USS/US
• For customers in Canada:
For SGPT111CAS:
see http://esupport.sony.com/model/SGPT111CAS/CA
For SGPT112CAS:
see http://esupport.sony.com/model/SGPT112CAS/CA
- For customers in Latin America (except Brazil):
see http://www.sony.com/la/tabletsupport
• For customers in Brazil:
see http://esupport.sony.com/model/SGPT111BRS/BR/
Notes on Holding Your Tablet Device
- In landscape orientation, hold your tablet device so the front camera lens is at the upper side.
- In portrait orientation, hold your tablet device so the front camera lens is at the left side. Be careful not to hold the ambient light sensor.
- Some apps may not support screen rotation. Some apps may rotate the screen in reverse.
- Be careful not to hold or cover the antenna shown in the figure below while using the Wi-Fi, Bluetooth, or GPS functions.
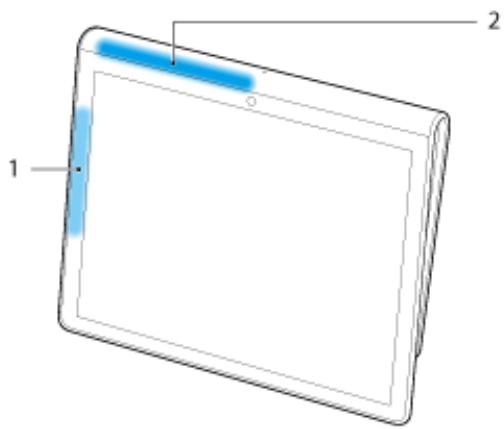
- Wi-Fi / Bluetooth
- GPS
Related Topic
Caring for Your Tablet Device
Resetting Your Tablet Device
If your tablet device is not performing as expected, and you cannot force-quit your tablet device by pressing and holding the power button for about 10 seconds, insert a pin or other slim object into the reset button (hole). You will be able to force your tablet device to shut down.
Note
- Pressing the reset button (hole) will not revert settings to factory default.
- If you press the reset button (hole) and turn off your tablet device, unsaved data will be lost.
Attaching the Strap to Your Tablet Device
Attach the strap to your tablet device in the order shown by the numbers in the figure below.

Note
- When placing your tablet device in the cradle while the strap attached, make sure the strap does not get caught between the tablet device and the cradle.
- Do not apply excessive strain to the strap. Do not swing around your tablet device by holding the strap. Doing so may cause the tablet device to malfunction, injure nearby people and objects.
Related Topic
Parts and Controls (Tablet Device)
About Sample Data
Sample data is installed on your tablet device at the factory for a trial of music, videos, photos, or books. Once you delete the sample data, you cannot restore it. Please note that Sony will not provide replacement sample data if deleted.
Reducing Battery Consumption
Using your tablet device as described below will reduce battery consumption.
- Reduce the screen brightness (Tap [ ]: Apps & Widgets] - [ ]: Settings] - [Display] - [Brightness]).
- Disconnect the USB devices.
- Set a short period of inactivity for turning off the screen (sleep mode) automatically (Tap [■■■ Apps & Widgets] - [■■ Settings] - [Display] - [Sleep]).
- Press the power button lightly to turn the screen off (sleep mode) when you will not be using your tablet device.
- Shut down your tablet device when you do not use it for a long time [Details].
- Turn off each feature when you do not use Wi-Fi, Bluetooth, or GPS.
Related Topic
Turning On Your Tablet Device
Shutting Down Your Tablet Device
Turning the Screen On/Off (Sleep Mode)
Notes on Using the AC Adapter
Charging the Battery
Notes on Using the Battery
Notes on Using Voice Communications Apps
- When you use voice communications apps such as those for Internet telephone or voice chat in the following cases, both parties cannot talk simultaneously. Speak alternately.
A headphone without microphone function is connected to the headphone jack.
Nothing is connected to the headphone jack.
You can talk simultaneously when a headset is connected to the headphone jack.
Notes on Geomagnetic Sensor
Direction may not be measured correctly due to effects of the surrounding environment.
Using the Built-in Camera
You can take photos and record videos using the built-in camera on your tablet device [Details].
Related Topic
Notes on the Built-in Camera
Camera
Notes on the Built-in Camera
- Do not touch the lenses of the built-in camera. If the lenses become soiled or scratched, image quality may be affected.
- Do not let direct sunlight enter the lenses of the built-in camera regardless of power state of your tablet device. Doing so may cause the camera to malfunction.
Related Topic
Using the Built-in Camera
Camera
Checking the Android Version
You can confirm the version of Android running on your tablet device.
- Tap [Apps & Widgets] - [Settings] - [About tablet].
You can check the version of Android running on your tablet device in [Android version].
Related Topic
Updating Android to the Latest Version
Updating Android to the Latest Version
Update your tablet device to the latest version of Android.
Note
- Once updating is done, you cannot return your tablet device to an older version of Android. Updating requires the remaining battery level to be at 50 % or greater and use of the AC adapter. Your tablet device may no longer turn on if the battery is depleted while updating.
- The data stored on the internal storage (memory space in your tablet device) will not be erased by updating.
- There must be enough free space on the internal storage to download the update files when updating.
- Some applications may not be compatible with the updated version of Android, and they may no longer run after updating.
- Be sure to check the Android version each application is compatible with before updating.
-
Updating may take longer if you connect to the Internet using the wireless WAN (3G) function. In addition, large data charges may be incurred depending on the service you subscribe to.
-
[■ Apps & Widgets] - [■ Settings] - [About tablet].
- Tap [System update].
The screen to start updating is displayed when an update is available. Start updating by following the instructions on the screen.
Related Topic
Checking the Android Version
Enjoying Full-scale Games
As it is a PlayStation(TM)Certified device, your tablet device allows you to enjoy titles such as classic first-generation PlayStation games while maintaining game play quality. You can purchase PlayStation games from the PlayStation(R)Store.
Game titles from a variety of companies all over the world in addition to Sony can also be downloaded from Android Market. You can enjoy full-scale games on the large screen characteristic of tablet devices.
Related Topic
Support for PlayStation(R) in general
Enjoying Video Content

Video Unlimited
Various content such releases from major Hollywood studios or popular TV programs can be delivered to your tablet device with high quality video 1 . Since you can select to rent or purchase 2 content, you can acquire content without worrying about late fees or monthly membership fees. The content you rent or purchase is downloaded directly to your tablet device via the Internet *3 , allowing you to enjoy that content anytime as you like.
Video Unlimited is a video service available on Sony Entertainment Network.
*1 TV programs may not be provided in some countries/regions.
*2 Some content may be limited to just rental or purchase.
*3 A Wi-Fi Internet connection is required to download content.
Note
- This app or service may not be available in some countries/regions.
Support information
http://www.sonyentertainmentnetwork.com/support
Related Topic
Video Unlimited
Video player
Supported Formats
Enjoying Music Content

Music Unlimited
Listen to the music you want, when you want it. Upload your personal library for access anytime, anywhere or discover new favorites with automatic recommendations based on your unique listening habits.
Music Unlimited is a music service available on Sony Entertainment Network.
Note
- This app or service may not be available in some countries/regions.
Related Topic
Music Unlimited
Enjoying Digital Books

Reader
Carry your favorite digital books on your tablet device. Your tablet device is an ideal tool for bookmarking, highlighting, adjusting the font size, and on-the-go reading. Bookmarking and highlighting can be synchronized with other compatible devices. And you can purchase eBooks easily on-line from the Reader(TM) Store.
Note
- Reader(TM) Store may not be available in some countries/regions.
Related Topic
Reader
Viewing Apps Recommended by Sony

Select App
Convenient and fun apps you can use with your tablet device are introduced in an easy-to-understand manner. That way, you can search for and acquire various apps easily.
Related Topic
Select App
Searching for Apps

Market
Apps such as convenient tools and games can be downloaded to your tablet device from Android Market provided by Google.
Tap [■■■ Apps & Widgets] at the top right of the Home screen, followed by [■■■ Market] on the displayed application launcher.
You can also use Android Market from your computer.
http://market.android.com
This site displays Android Market and allows you to manage apps you downloaded from Android Market and installed on your tablet device.
Enjoying Video, Music or Photo Content on Other Devices

DLNA
If you connect your tablet device to a Wi-Fi network at home (home network), you can enjoy videos, music or photos by linking other devices as follows.
Note
- For details on the playable format on the playback device, refer to the operating instructions supplied with the playback device.
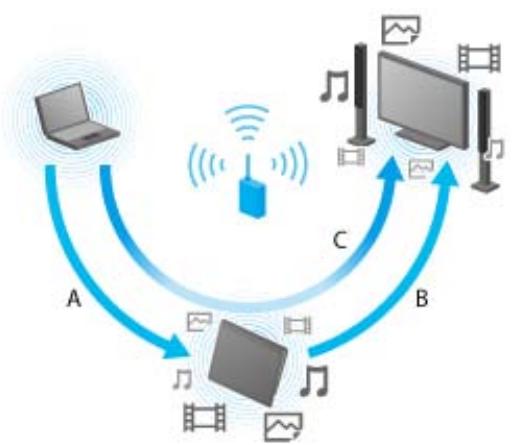
A: Playing back content stored on another device (server)
You can play back on your tablet device content stored on a server such as a computer or audio device.
B: Sending content stored on your tablet device to another device (playback device) and playing it back (Throwing playback)
You can send content stored on your tablet to another device such as a TV and play it back on that device.
C: Sending (Throwing) content stored on one device (server) to another device ( playback device) and playing it back
Using your tablet device, you can send content stored on a server such as a computer or audio device to another device such as a TV for playback on that device.

A: Sending music content stored on your tablet device to other devices (playback devices) and playing it back (Throwing playback)
You can send music content stored on your tablet device and play back the content at the same time via your home network on devices with a PARTY STREAMING function.
B: Sending (Throwing) music content stored on one device (server) to other devices (playback devices) and playing it back
You can send music content stored on the home network and play back the content at the same time via your home network on devices with a PARTY STREAMING function.
Related Topic
What You Can Do Over the Home Network
About DLNA
Preparing the Home Network
Playing Back Content Stored on Another Device (Server)
Playing Content on other Devices by Sending (Throwing) it
Playing Back Music Content on Multiple Devices (PARTY STREAMING)
Operating Various AV Devices on Your Tablet Device

Remote control
You can control AV devices in your home using the infrared remote control feature equipped on your tablet device. Easy registration or learning of remote control signals allows you to register remote controls to your tablet device so the single tablet device can substitute multiple remotes.
Frequently used operations such as changing the volume or channels can be performed by intuitive gesture.

MediaRemote
MediaRemote is a Wi-Fi remote control app that can be used with devices such as Sony BRAVIA TVs and Blu-ray Disc players. Enabling more than just conventional remote control operations, MediaRemote has various functions such as keyboard entry and content information display, allowing you to use and enjoy Sony devices easier.
Related Topic
Remote control
MediaRemote
Sharing Exciting Experiences via Social Network

Social Feed Reader
You can manage and browse multiple network services like Twitter or Facebook all with Social Feed Reader. Day-to-day operations such as posting, replying, clicking the “Like” button or retweeting can be performed with the same ease of use. Also enjoy communicating more than ever with a screen display just right for viewing videos and photos.
Related Topic
Social Feed Reader
Registering a Twitter or Facebook account
Switching the Posts (Article) Displayed
Reading and Writing the Post (Article)
Searching for Posts (Articles) or Friends
About the Home Screen
App shortcuts, status bars, widgets, and more are displayed on the Home screen. The Home screen consists of five pages, and you can flick left/right to scroll the pages.

A: Quick search box/Quick launcher
- Quick search box
Tap the box to easily search with Google [Details]. - Quick launcher
Tap icons in the Quick launcher to start apps. Since the Quick launcher is displayed on every page of the Home screen, registering apps you often use gives you quick access to them.
Hint
- Tap and hold icons to sort them in the Quick launcher or move them in and out of the Quick launcher.
B: Favorites/Apps & Widgets
- Favorites
Tap this to start Favorites [Details]. - Apps & Widgets
Tap this to display the app list and the widget list [Details].
C: Widget
You can choose your favorite widgets from the widget list and place them on the Home screen [Details].
D: Basic operation buttons
• (Back): Tap this to return to the previous screen.
• (Home): Tap this to display the Home screen.
- (Recent Apps): Tap this to display the apps used recently [Details].
E: Small Apps
You can start an app also available as a Small Apps, even while another app is already in use. To start another app, tap ☐ to display the Small Apps launcher and select the desired app. To set a shortcut, tap 📋 on the Small Apps launcher and select an app.
F: Digital clock
Tap this to display the notification panel [Details].
Related Topic
Adding Apps or Widgets to the Home Screen
Favorites
Application Launcher and Widgets
About the Notification Panel
Rotating the Screen
Quick Search
Locking the Screen
Displaying Recent Apps
Adding Apps or Widgets to the Home Screen
Adding apps icons or widgets to the Home screen allows you to start apps easily.
- On the page of the Home screen where you want to place apps icons or widgets, tap [■■■ Apps & Widgets] at the top right of the screen.
- Select the item you want to add to the Home screen from [APPS] or [WIDGETS].
- Tap and hold the icon of the app or widget, drop it when the Home screen is displayed. The icon or widget is added to the page which you drop the icon or widget onto.
To organize icons with folders
You can use folders to organize icons on the Home screen.
- Tap and hold an icon, and then drag it on top of another icon. The two icons are then combined.
- Tap the combined icon, and then tap [Unnamed Folder].
- Enter a new folder name. The folder is shown with the new folder name.
Hint
- You can add an icon to a folder by dragging and dropping the icon onto the folder.
- To remove an icon from a folder, tap to open the folder, and then drag the icon out of the folder. When all icons are removed from the folder, the folder is deleted automatically.
To delete an icon from the Home screen
Tap and hold the icon and drag and drop it to ✗ (Remove).
Related Topic
About the Home Screen
Favorites
Application Launcher and Widgets
About the Notification Panel
Rotating the Screen
Quick Search
Locking the Screen
Displaying Recent Apps
Favorites
In Favorites, thumbnails for websites you frequently visit, and content such as videos, photos, music, books, or games you have registered as favorites are displayed. As you can see all registered content items at once, you can start the desired content with one tap, without starting/ending apps repeatedly.
- Tap [ ] Favorites] on the Home Screen.
Favorites is displayed.
- Tap your favorite content displayed on the right side of the Favorites screen.
Detailed information is displayed on the left side of the screen.
- Tap the content to use.
The corresponding app starts to play back the content.
Hint
- Tapping the content selected in step 2 again allows you to start playback of the content.
Customizing the displayed items
- In Favorites, tap 📋 at the top right of the screen.
-
Customize as follows.
-
To add items:
Select the desired item from the list on the left side of the screen, and tap it. - To delete an item:
Tap ✗ on the thumbnail on the right side of the screen. Or select the item to delete from the list on left side of the screen, and tap it.
- To move an item:
Drag and drop the thumbnail on the right side of the screen.
- When you finished customizing, tap √ at the top right of the screen.
Related Topic
About the Home Screen
Adding Apps or Widgets to the Home Screen
Application Launcher and Widgets
About the Notification Panel
Rotating the Screen
Quick Search
Locking the Screen
Displaying Recent Apps
Application Launcher and Widgets
When you tap [■■■ Apps & Widgets] on the Home screen, the application launcher or the list of widgets is displayed.
The application launcher displays the icons of all available apps, allowing you to tap those to start an app. The list of widgets displays mini-applications that you can place on the Home screen. If an app is supplied with a widget, place the widget on the Home screen so that you can operate the app from the Home screen easily.
Switching between the application launcher and the list of widgets
- Tap the [APPS] or [WIDGETS] at the top left of the screen.
Hint
- If there are multiple pages in the application launcher, flick left to display other pages. The list of widgets is displayed after the application launcher.
Sorting the application icons and widgets
- Tap ↓ at the top right of the screen and select a sorting method.
[A to Z]: Sort by name.
[Newest first] : Sort by date of update.
Uninstalling an application
- In the application launcher, tap and hold the icon of the app you want to uninstall.
- Drag and drop the icon to [ Uninstall].
Displaying the app information
- Tap and hold the icon of the app you want to check information of.
- Drag and drop the icon to [i App info].
Hint
- If the Market app is installed, 🔒 is displayed to the left of 🔒. You can start the Market app by tapping 🔒.
Related Topic
About the Home Screen
Adding Apps or Widgets to the Home Screen
Favorites
About the Notification Panel
Rotating the Screen
Quick Search
Locking the Screen
Displaying Recent Apps
About the Notification Panel
The notification panel is displayed when you tap the digital clock on the bottom right of the screen. Tap the icon on the notification panel or the panel itself to check the status or messages. When you tap the digital clock while displaying the notification panel, the control panel appears. You can control the following items on the control panel.
• Airplane mode: Turns on/off the airplane mode.
• Wi-Fi: Displays the Wi-Fi setting screen.
- Auto-rotate screen: Locks the screen so it does not rotate automatically.
- Luminance: Adjusts the screen luminance.
- Notifications: Turns on/off the notifications.
- Settings: Displays the setting screen.
Related Topic
About the Home Screen
Adding Apps or Widgets to the Home Screen
Favorites
Application Launcher and Widgets
Rotating the Screen
Quick Search
Locking the Screen
Displaying Recent Apps
Rotating the Screen
The screen rotates when you turn your tablet device sideways shown below.

Note
- Depending on the application, the screen may rotate regardless of the direction of your tablet device.
- Some apps may not support screen rotation. Some apps may rotate the screen in reverse.
Setting the screen to not rotate
- Tap [Apps & Widgets] - [Settings] - [Display] - [Auto-rotate screen] in that order to remove the check mark.
To set the screen to rotate again
Tap [Auto-rotate screen] again to add a check mark.
Related Topic
About the Home Screen
Adding Apps or Widgets to the Home Screen
Favorites
Application Launcher and Widgets
About the Notification Panel
Quick Search
Locking the Screen
Displaying Recent Apps
Quick Search
The quick search box appears on the top left of the Home screen. You can search easily by text or voice using quick search.
To search by text
Tap the box, enter keywords, and then tap ←.
Hint
- After tapping ←, the app selection screen that shows the search result will be displayed.
To search by voice
Tap 🖱️ and speak keywords when prompted.
Related Topic
About the Home Screen
Adding Apps or Widgets to the Home Screen
Favorites
Application Launcher and Widgets
About the Notification Panel
Rotating the Screen
Locking the Screen
Displaying Recent Apps
Locking the Screen
You can lock the screen of your tablet device to prevent accidental touching of the screen from activating operations. If you activate the lock function, the screen is locked when the screen is turned off. You can also select how to deactivate locking.
To configure the lock function
- Tap [■: Apps & Widgets] - [■: Settings] - [Security] - [Screen lock] in that order.
- Tap the desired setting.
- Follow the on-screen instructions.
Related Topic
About the Home Screen
Adding Apps or Widgets to the Home Screen
Favorites
Application Launcher and Widgets
About the Notification Panel
Rotating the Screen
Quick Search
Displaying Recent Apps
Displaying Recent Apps
When you tap 📄 (Recent Apps) on the bottom left of the screen, recent apps are displayed in the order that they were used.
Related Topic
About the Home Screen
Adding Apps or Widgets to the Home Screen
Favorites
Application Launcher and Widgets
About the Notification Panel
Rotating the Screen
Quick Search
Locking the Screen
Entering Text
When you want to enter texts, tap the text area to display the on-screen keyboard [Details].
Related Topic
Using the On-screen Keyboard
Cutting and Pasting Text
Using the On-screen Keyboard
The on-screen keyboard changes each time you tap the two keys below the left-side [Tab] key.
- A numerical keyboard can also be displayed. Tap [Apps & Widgets] - [Settings] - [Language & input] in that order. Then tap next to [Standard keyboard] followed by [Number keys] to add a check mark.
To set the input language
Tap [■■■ Apps & Widgets] - [■■ Settings] - [■A Language & input] in that order. Then tap ■■ next to [Standard keyboard] followed by [Input languages], and then put a check mark on the languages to use.
To switch the input language
If you have selected multiple languages to use for input, you can switch the input language by tapping the language switching key at the bottom left of the on-screen keyboard. You can also select a language by tapping and holding the language switching key.
Related Topic
Entering Text
Cutting and Pasting Text
Cutting and Pasting Text
To cut or copy text
- Tap and hold the text to cut or copy.
The selected text is highlighted. - Tap [COPY] or [CUT].
Note
- You cannot cut or copy text while entering.
Hint
- If you drag and drop the cursor that appears in step 1, you can change the range of text selected.
To paste text
- Tap and hold the location to paste the text, and then tap [PASTE].
Hint
- If you drag and drop the cursor that appears in step 1, you can change the location to paste the text.
Related Topic
Entering Text
Using the On-screen Keyboard
Google Account
You are required to sign up for a Google account to use services provided by Google, such as Gmail, Calendar, and Android Market. Those services are provided free of charge. Using the Google account, you can sync apps, such as Gmail, Calendar, and People, on your tablet device with those of their respective Google services.
Using your current Google account
You can use the Google account you have already have with a computer or smartphone. Input your account name and password in the log in screen displayed for Google service apps.
Note
- Make sure that your tablet device is connected to the Internet when you sign up for a new Google account or log-in.
Signing up for a new Google account on your tablet device
You can sign up for a Google account when you use your tablet device for the first time or start a Google service app for the first time.
Hint
- You do not have to sign up for another Google account when you have already have one for your computer, etc.
- You can sign up for a Google account by tapping [Apps & Widgets] - [Settings] - [Accounts & sync] - [ADD ACCOUNT] (at the top right of the screen) - [Google] in that order.
- You can also sign up for a Google account by accessing Google (https://www.google.com/accounts/) directly.
Related Topic
Before Use
Changing the Settings
Various settings of your tablet device can be changed in the settings menu.
- Tap [Apps & Widgets] - [Settings] and the desired items.
- Tap the individual menu items to change settings.
The menu items are as follows:
- Wireless & networks
Wi-Fi
Bluetooth
Data usage
More... (settings of Airplane mode, VPN, etc.)
- DEVICE
Sound
Display
Storage
Battery
Apps
- PERSONAL
Accounts & sync
Location services
Security
Language & input
Backup & reset
- SYSTEM
Cradle
Date & time
Accessibility
About tablet
Note
- Display may be distorted with some apps if you set [Font size] to [Large] or [Huge] in [Display]. If that occurs, set [Font size] to [Normal].
Before Use
When you use your tablet device for the first time, you can connect your tablet device to the Internet and sign in to your Google account.
Hint
- You may connect your tablet device to the Internet and sign in to your Google account later.
- After turning on your tablet device, select a language.
- Connect your tablet device to the Internet via Wi-Fi [Details].
- Follow the displayed instructions to sign in to your Google account.
Related Topic
Google Account
List of Apps
When you first purchase your tablet device, the following apps are preinstalled on it. You can start each app by tapping its icon.
Hint
- When (Option menu) appears at the top right of the screen, you can tap it to display the option menu.

Calendar
Manage your schedule and synchronizing the schedule with Google Calendar [Details]

Browser
Browse Internet websites [Details]

Camera
Shoot photos or movies [Details]

People
Manage contacts for your friends or colleagues [Details]

Desk clock
Display the current time [Details]

Send or receive PC e-mail messages [Details]

Video player
Play back movie files [Details]

Music player
Play back music files [Details]
Browse photos or play them back as a slide show [Details]

File transfer
Transfer files between the internal memory and an SD memory card [Details]

Remote control
Use your tablet device as a remote control [Details]

DLNA
Exchange videos, music, and photos with other devices via the home network and play them back [Details]

Social Feed Reader
Access Social Networking Services such as Twitter or Facebook [Details]

Wi-Fi checker
Check the Wi-Fi connection of your tablet device [Details]

Reader *1
Purchase and browse eBooks content [Details]

Help guide
Display this Help guide via the network

Select App
Access websites that introduce Sony-recommended apps [Details]

Registration *1
Register your tablet device with Sony [Details]

Video Unlimited *1
Access Sony's premium video delivery service [Details]
Access Sony's cloud music delivery service [Details]

Personal Space *1
Access the website for Sony's online imaging service [Details]

PS Store *1
You can purchase and download PlayStation games from the PlayStation(R)Store [Details].

Crash Bandicoot(R) *1
Play this classic game for the first generation PlayStation (Controller of the PlayStation(R)3 system supported)

Pinball Heroes
Play this pinball game (Controller of the PlayStation(R)3 system supported)

MediaRemote
Control Sony devices supporting the MediaRemote app via the Wi-Fi network [Details]

Settings
Change various settings of your tablet device [Details]

Music
Play back music

Calculator
Make basic calculations [Details]

Gmail
Send or receive Gmail

Google Search
Make Google searches [Details]
Play back movie files you have rented from Android Market

Maps
Find your location and search destinations/routes (Google Maps)

Places
Use this information service for shops and places

Navigation
Use this Internet-aided GPS navigation system that includes a voice guidance function

Latitude
Check a friend's current position on a map

Talk
Chat by text/voice and make video calls (Google Talk)

Market
Download or purchase new apps

YouTube
Use the YouTube video-sharing website

Books *1
Search and preview a wide range of books from libraries and publishers all over the world

Downloads
Use the download manager to display or manage Internet content downloads

Foursquare *1
Share with friends and acquaintances information on shops and places you visit, or get money-saving information [Details].
View full-length and full-size Hollywood movies and TV programs [Details].

chumby for Sony Tablet S *1
Enjoy the content of more than 1,500 apps including those for news and weather, all from a single app [Details].

Ustream *1
Stream live video using the built-in camera, and communicate with viewers [Details].

Zinio *1
Use this app for the world largest bookstore application to enjoy the world top magazines as eBooks [Details].

Evernote *1
Store memos, photos and voice messages on the cloud, and browse them from your computer and tablet device at any time [Details].

HD Games
Download high quality games to your Android tablet from the Top HD Games at Gameloft's online store [Details].
You can compose, send and receive e-mail messages in the same format as used on computers. You can register multiple e-mail accounts. Your contacts list registered in the People app can be used to add the recipient address when composing a new e-mail message. You can also search or sort received e-mail messages.
If using Microsoft Exchange Server, you can send and receive e-mails by connecting to Microsoft Exchange Server.
Note
- Ask your network administrator, etc. about how to connect to Microsoft Exchange Server.
- Tap to start the Email app.
Before setting an account: The screen to set an account is displayed.
After an account has been set: The e-mail list screen is displayed. Tap the desired e-mail to display it.
Hint
- If you cannot find the icon to start the app, look for it in the application launcher displayed by tapping [Apps & Widgets] at the top right of the Home screen.
Setting an e-mail account
- Start the Email app.
The screen to set an account is displayed. - Input your e-mail address and password, and tap [Next].
- Following the instructions on the screen, set the e-mail account.
When setting is complete, the e-mail list screen is displayed.
To change settings
Tap : (Option menu) - [Settings] - (the e-mail account to be changed) - (the item to be changed) in that order.
To add an e-mail account
Tap ☐ (Option menu) - [Settings] followed by [ADD ACCOUNT], then proceed to step 3.
To remove an e-mail account
Tap ☐ (Option menu) - [Settings] - (the e-mail account to be removed) - [Remove account] in that order.
Composing/Sending an e-mail
- On the e-mail list screen, tap 📋 at the top right of the screen.
The e-mail composing screen is displayed. -
Input the recipient's e-mail address at [To].
-
Input the subject at [Subject].
- Input the message at [Compose email].
- Tap [SEND].
The e-mail you composed is sent.
Hint
- Tapping 🖱️ in step 2 allows you to input the address from those in the People app.
- Tapping ☐ in step 3 allows you to attach a file to your e-mail.
- Tapping [Save draft] while composing allows you to save the draft.
Receiving e-mails
- On the e-mail list screen, tap ☑ at the top right of the screen. New e-mails are displayed in the inbox. Tap on the e-mails to open them.
Hint
- You can set for each account the number of received e-mails to be put in a folder by tapping ☐ (Option menu) - [Settings] - [Messages per folder] on the e-mail list screen.
To reply to an e-mail
Display the e-mail you want to reply to, tap ← (Reply) or ← (Reply to all), compose your message, and tap [SEND].
To forward an e-mail
Display the e-mail you want to forward, tap → (Forward), compose your forwarding message, and tap [SEND].
Deleting an e-mail
- Tap the e-mail you want to delete on the e-mail list screen.
The selected e-mail is displayed. - Tap 📋 at the top right of the screen, followed by [OK].
The e-mail is deleted.
Sorting e-mails
- Tap ☐ (Option menu) - [Show sort buttons] on the e-mail list screen The sort buttons are displayed.
- Tap the button of the desired sorting item among the items displayed. The e-mails are sorted according to the selected sorting item.
Searching for an e-mail
- Tap 🔒 at the top right of the screen on the e-mail list screen.
The search box is displayed. - Input a keyword, and then tap the ← key.
Hint
- The search covers the subject, sender, and e-mail body of all the e-mails saved on the server.
- The results are displayed 10 at a time from the latest e-mails. To search for older e-mails, tap [Load more messages].
Making changes to multiple e-mails
You can select multiple e-mails to move them to another folder or delete them together.
- On the e-mail list screen or on an e-mail screen, tap the check box of the desired e-mail to put a check in. The e-mails having a check mark are selected.
- When finished selecting e-mails, make changes to them such as moving them to another folder or deleting them.
Browser
The Browser app lets you access and browse websites on the Internet. You can display/switch between multiple websites by using tabs.
- Tap www to start the Browser app.
Hint
- If you cannot find the icon to start the app, look for it in the application launcher displayed by tapping [Apps & Widgets] at the top right of the Home screen.
- Certain websites may not be displayed, because the browser does not support the photo/movie format or plug-in.
- You can launch the browser as a Small Apps. In this case, the following functions are not supported.
Playing back flash content
Browsing websites by using tabs
Bookmarks and access histories
Browsing Websites
- Tap the address bar on the browser. The on-screen keyboard is displayed
- Input the address (URL) of the desired website, and tap the ← key.
Note
- If the content does not appear correctly, tap [Settings] followed by [Advanced] in the ☐ (Option menu), then tap [Enable Quick view] to remove the check.
Hint
- You can search the Internet by inputting a keyword or phrase instead of the address (URL) in step 2.
- If the address bar is not displayed at the top of the screen, tap the tab.
- To add a tab, tap + at the right end of the tabs list.
- To delete a tab, tap × at the right end inside the tab.
- If the website is displayed differently from when browsed on a computer, tap ☐ (Option menu) at the top right of the screen and put a check mark in [Request desktop site] in the menu. Then you can browse the website as on a computer.
You can set desktop or mobile site for each tab.
To view/delete the access history
To view the websites you accessed previously, tap 🙏 followed by [HISTORY] at the top left of the screen.
To delete the history, tap ✗ after displaying the history.
The bookmark function allows you to record addresses (URLs) of websites you visit frequently to allow you to access those sites quickly. You can also make shortcuts on the Home screen for addresses (URLs).
To add a bookmark for an address (URL)
Tap ☆ at the right of the address bar to check the detailed information, and then tap [OK].
To make a shortcut on the Home screen for an address (URL)
Tap ☆ at the right of the address bar, select [Home screen] as the destination, and then tap [OK].
To access a website from its bookmark
Tap 🙏 to call up the list of registered bookmarks. Tap the desired website from the list.
Camera
You can shoot photos and movies using the built-in front and rear cameras. Various shooting settings such as image size are also available. Location information also can be added to photos.
- Tap to start the Camera app.
Hint
- If you cannot find the icon to start the app, look for it in the application launcher displayed by tapping [Apps & Widgets] at the top right of the Home screen.
- In order to add location information to the photos, GPS must be enabled or your tablet device must be connected to the network when you take photos.
- You can view the photos and movies you recorded from Gallery app also.
Shooting Photos/Movies
- Start the Camera app.
Tap or at the right side of the screen to select photo or movie. - Aim the camera to your subject, and tap 📄 or 🙏.
For photos: A photo is shot.
For movies: Movie recording starts. Tapping 📄 again stops recording.
Hint
- The rear camera is equipped with an auto-focus function. After you tap 📄, a photo is shot when the subject comes into focus.
- You can switch between the front camera and the rear camera by tapping FRONT or BACK at the top right of the screen.
Shooting Panoramic Photos
-
Start the Camera app. Tap 📋 at the right side of the screen.
-
Point the camera at the edge of the your subject, and tap
Panoramic photo recording starts. Pan or tilt the camera to the end, and tap again to stop recording.
Hint
- When you hold your tablet device sideways, you can shoot landscape panoramic photos. When you hold your tablet device upright, you can shoot portrait panoramic photos.
Finishing the Camera app
Tap ↩ displayed on the status bar at the bottom left of the screen. If the status bar is not displayed, tap the bottom left of the screen once.
Note
• Copyright and portrait rights
The recorded images and sounds on your tablet device may be copyrighted. Unauthorized use of such materials other than for personal use may violate copyright laws. Using or modifying images or names of other people without their permission may violate portrait rights. You should thus take into account copyright and portrait rights when putting recorded images on Internet websites. Some performances, shows and displays may restrict recordings for even personal use. Unauthorized recording of such materials may be contrary to copyright laws.
Related Topic
Using the Built-in Camera
Notes on the Built-in Camera
Calculator
You can use your tablet device as a calculator. In addition to four arithmetic operation of addition, subtraction, multiplication and division, trigonometric function, exponent function, logarithm, etc. are available.
- Tap to start the Calculator app.
Hint
- If you cannot find the icon to start the app, look for it in the application launcher displayed by tapping [Apps & Widgets] at the top right of the Home screen.
Calendar
You can manage your schedule on your tablet device. By registering your Google account, you can sync your Google Calendar and your schedule data, making your schedule even more handy.
If using Microsoft Exchange Server, you can manage your schedule by connecting to Microsoft Exchange Server.
Note
- Ask your network administrator, etc. about how to connect to Microsoft Exchange Server.
- Tap to start the Calendar app.
The calendar is displayed.
Tapping the icons at the top of the screen allows you to do the following operations.

Add schedules

Set a date to be displayed

Search for a schedule

Make detailed settings of the Calendar app
[TODAY]: Display today's schedule
[MONTH]: Display the calendar by month
[WEEK]: Display the calendar by week
[DAY]: Display the schedule for one day
[AGENDA]: Display the list of scheduled items
Hint
- If you cannot find the icon to start the app, look for it in the application launcher displayed by tapping [Apps & Widgets] at the top right of the Home screen.
- You can change the month or date and time by flicking up/down/right/left on the schedule or mini-calendar.
Adding a schedule
- Tap and hold the date and time you want to add a schedule for, and then tap [New event]. Or, tap
- Input the starting date and time and details of the schedule, and then tap [√ DONE] at the top right of the screen.
Hint
- You can have your tablet device notify you when close to the scheduled date and time.
Changing a schedule
- Tap the schedule you want to change.
- Tap 📋, input the item to be changed, and then tap [√ DONE] at the top right of the screen.
Deleting a schedule
- Tap the schedule you want to delete.
- Tap followed by [OK].
Note
- When you share the schedule on Google Calendar, choose the people with whom you share it very carefully to prevent your schedule from being disclosed to undesired users.
- If your calendar is not synced with Google Calendar automatically, tap [ ] Settings] followed by [Accounts & sync], and check whether the switch at the top right of the screen is set to [ON].
- If your calendar is set to sync with Google Calendar automatically and you change the schedule on a computer or other devices, your tablet device will connect with Google Calendar automatically. This may cause unexpected communications charge.
People
You can register names, phone numbers, addresses, etc. as frequently used contacts. By registering your Google account, you can sync People with Gmail contacts, making them even more handy.
If using Microsoft Exchange Server, you can manage your contacts by connecting to Microsoft Exchange Server.
Note
- Ask your network administrator, etc. about how to connect to Microsoft Exchange Server.
- Tap to start the People app.
Hint
- If you cannot find the icon to start the app, look for it in the application launcher displayed by tapping [Apps & Widgets] at the top right of the Home screen.
Registering contacts
- Start the People app.
- Tap [ALL] at the top left of the screen.
- Tap
- Input the data, and tap [√ DONE]. The contact is registered.
Hint
- The contact can also be registered by tapping (Back) at the bottom left of the Home screen in step 3. When you tap [ × DISCARD], the data you are editing is discarded.
To edit contacts
Tap the contact you want to edit, and then tap 📋 at the top right of the displayed screen.
To delete contacts
Tap the contact you want to delete, and then tap ☐ (Option menu) - [Delete].
To switch the display of the contacts
Tap ☐ (Option menu) - [Contacts to display] - (the account), you can switch the contacts list of each account. You can also specify all accounts or multiple accounts.
Registering groups
- Start the People app.
- Tap [GROUPS] at the top left of the screen, and then tap 📄. If you have multiple accounts, tap the account you want to register with.
-
Input the group's name, and then type the person's name you want to be included.
-
Tap [√ DONE].
The group is registered.
Joining contacts
You can join the contact of a person who has two or more e-mail address, etc. and has been registered to separate contacts.
- Start People app.
- Tap [ALL] at the top left of the screen.
-
Tap one of his/her contacts, and then tap at the top right of the displayed screen.
-
Tap : (Option menu) - [Join].
-
Tap the contact you wish to join with.
The contact selected in step 5 is joined with the contact selected in step 3. The contact name after joining the contacts will be that of the contact selected in step 3.
Note
- If your contacts are not synced with Google contacts automatically, tap [ ] Settings] followed by [Accounts & sync], and check that the switch at the top right of the screen is set to [ON].
Desk clock
The clock is easy-to-see even from a distance and has a background that changes according to the time. You can use your tablet device as a desk clock by placing it on a designated Sony cradle (SGPDS1, sold separately) for your tablet device.
- Tap 🏠 to start the Desk clock app.
The digital clock is displayed.
Tapping the icons allows you to do the following operations.

Set the alarm

Start the Gallery app and slide show

Play back music

Return to the Home screen
Hint
- If you cannot find the icon to start the app, look for it in the application launcher displayed by tapping

Apps & Widgets] at the top right of the Home screen.
- The time set for the alarm is displayed on the screen.
- Tap anywhere on the screen to can change the screen brightness between two levels.
Music player
The Music player app allows you to play back music content stored on your tablet device, an SD memory card or the home network. You can also send ([Throw]) music content to another DLNA certified device and play it back on that device.
The detailed information of the current album or song can be searched or displayed, and you can add cover art or lyrics to the content. Applying 12 TONE ANALYSIS to the music content gives you more ways to enjoy that content. You can also adjust sound processing settings for playback by means such as the equalizer.
- Tap 🎧 to start the Music player app.
The browsing screen appears.
Hint
- If you cannot find the icon to start the app, look for it in the application launcher displayed by tapping [Apps & Widgets] at the top right of the Home screen.
Playing back music content on your tablet device
- Tap list items, folders, or albums to select the album, song, or playlist that you want to play back. Playback starts.
Hint
- A playback icon is displayed at the bottom right of the screen during playback.
- If you flick left or right the cover art on the playback screen displayed by tapping the cover art on the top left of the browsing screen, information on the content currently playing and a song list are displayed.
- If you remove the headphones during playback, playback is paused automatically to prevent sudden loud sound from being emitted from the tablet device.
Changing the display
Tap the list on the left side of the browsing screen.
- [Cover art view]: Displays the cover art of all albums.
- [♥] SensMe(TM) channels]: Categorizes the music content into channels according to the music type automatically. You can select the channel according to the time of the day or your mood.
- [Library]: Displays the music content by song, album, artist, etc.
Playing back music content on other devices by sending (Throwing) it from your tablet device
Using your tablet device, you can send music content to another DLNA certified device via the home network and play back the music content on that device [Details].
Note
- If you display another screen by means such as tapping , while you are controlling another device
( playback device) using your tablet device, return to the control screen via the notification panel.
Hint
- While you are sending content to another device, you can play back other content on your tablet device.
Searching for related information
You can easily search for information related to the currently playing music content.
- Tap the cover art at the top left of the browsing screen.
The playback screen is displayed. - Flick the cover art left twice.
- Tap the song title, artist name or album name that you want to search for.
- Select and tap from the list displayed the app that you want to use for the search.
The search starts using the selected app.
Adding cover art to an album or a song
You can add a photo or image you want to use as cover art to an album or a song.
- Tap the cover art at the top left of the browsing screen.
The playback screen is displayed. - Tap the option menu.
- Tap [Add cover art].
- Follow the on-screen instructions to specify the photo or image to use as cover art.
Note
- You cannot add cover art to the content stored on an SD memory card.
Hint
- When adding cover art to an album, tapping and holding the album in the album list or the cover art view allows you to proceed to step 3.
To delete cover art
In step 3, tap [Delete cover art].
Adding lyrics to a song
You can add or edit song lyrics in plain text. Your tablet device supports .lrc and .txt file formats.
- Tap the cover art at the top left of the browsing screen.
The playback screen is displayed. - Tap the option menu.
- Tap [Add lyrics].
- Follow the on-screen instructions to input or select the lyrics.
To delete lyrics
In step 3, tap [Delete lyrics].
Analyzing music content
When you start SensMe(TM) channels or the visualizer, notification will tell you if songs have not been analyzed. That notification can be turned off from the settings of 12 TONE ANALYSIS.
Note
- The information on 12 TONE ANALYSIS stored in the SD memory card will be erased once the SD memory card is removed from your tablet device. If that happens, you will need to analyze the music content again.
Hint
- Songs are analyzed using Sony 12 TONE ANALYSIS technology. The results of the analysis are applied to the SensMe(TM) channels, and the visualizer will move graphics according to the beat of the song.
Related Topic
Enjoying Music Content
Supported Formats
About Sample Data
Playing Back Music Content on Multiple Devices (PARTY STREAMING)
Video player
The Video player app allows you to play back video content stored on your tablet device, an SD memory card or the home network. You can also send ([Throw]) video content to another DLNA certified device and play it back on that device. Scene searches can also be performed.
Detailed information of the current video content can also be displayed, and you can even delete the video content.
- Tap to start the Video player app.
Hint
- If you cannot find the icon to start the app, look for it in the application launcher displayed by tapping
Apps & Widgets] at the top right of the Home screen. - You can copy video files to your tablet device by methods such as the following:
Connect your tablet device to a computer via a Micro-USB cable to drag and drop video files.
Purchase or rent the video files from Video Unlimited *1 .

*1 Video Unlimited is a video service available on Sony Entertainment Network.
Playing back video content on your tablet device
- Tap folders or thumbnails to select the video content you want to play back.
Playback then starts, and the playback screen appears.
Hint
- You can play back video content purchased on Video Unlimited *1 .
- Using the option menu on the playback screen, you can switch subtitles and sounds. You can also perform actions such as zooming in or out.
- Tapping ▶ (fast-forward) will play back the video content at about 1.5 times faster. You can adjust the playback speed to 10 times, 30 times, or 100 times (max) faster by tapping it further.
- If you remove the headphones during playback, playback is paused automatically to prevent sudden loud sound from being emitted from the tablet device.
*1 Video Unlimited is a video service available on Sony Entertainment Network.
Playing back video content on other devices by sending (Throwing) it from your tablet device
Using your tablet device, you can send video content to another DLNA certified device via the home network and play back the video content on that device [Details].
Note
- If you display another screen by means such as tapping 🔒, while you are controlling another device
( playback device) using your tablet device, return to the control screen via the notification panel. - You cannot send to and play back on another device (playback device) video content purchased on Video
Unlimited *1 .
Hint
- While you are sending content to another device, you can play back other content on your tablet device.
*1 Video Unlimited is a video service available on Sony Entertainment Network.
Displaying detailed information about video content
- On the playback screen, tap the option menu.
- Tap [Details].
Detailed information of the current video content is displayed.
Hint
- On the video list screen, tap and hold the video content that you want to display information for, and then proceed to step 2.
- When you tap the video title on the detailed information screen, you can search for information related to the currently playing video content.
Deleting video content
- On the playback screen, tap the option menu.
- Tap [Delete].
The video content is deleted.
Hint
- On the video list screen, tap and hold the video content that you want to delete, and then proceed to step 2.
Searching scenes
You can search for scenes in the video content that is currently playing back.
- On the playback screen, tap
The scene search screen is displayed.
- Flick the screen left/right to select the scene that you want to start, and then tap the scene. Playback starts from the scene that you select.
Hint
- When you tap the button at the center of the screen, you can change the length of scenes.
Related Topic
Enjoying Video Content
Supported Formats
About Sample Data
What You Can Do Over the Home Network
You can do things like those shown below by connecting your tablet device to the Wi-Fi network in your home (home network).
Playing back content stored on another device (server)
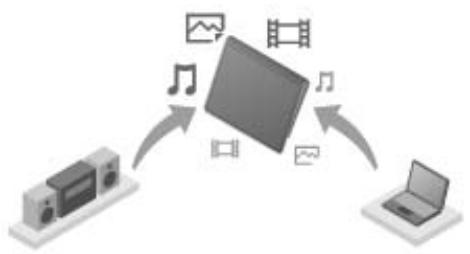
If you connect your tablet device to a DLNA certified server (such as a computer) [Details], you can play back on the tablet device video, photo, music, or other content stored on the media server.
Sending (Throwing) content to another device and playing it back

You can send video, photo or music content stored on your tablet device to another device (playback device) and play back the content on that device.
Hint
- Using your tablet device, you can also send content stored on a server via the home network to another device ( playback device) and play it back on that device.
Sending (Throwing) music content to other devices and playing it back (PARTY STREAMING)

You can send (Throw) music content stored on your tablet device or the home network and play back the content at the same time via your home network on devices with a PARTY STREAMING function.
Related Topic
Enjoying Video, Music or Photo Content on Other Devices
About DLNA
Preparing the Home Network
Playing Back Content Stored on Another Device (Server)
Playing Content on other Devices by Sending (Throwing) it
Playing Back Music Content on Multiple Devices (PARTY STREAMING)
About DLNA
You must connect DLNA certified devices to your home network to play back on your tablet device content stored on another device (server) or play back on other device ( playback device) content stored on your tablet device.

Devices that can act as a server
DLNA certified computer, DLNA certified audio device, etc.
Devices that can act as a playback device
DLNA certified TV, DLNA certified computer, etc.
Hint
- DLNA is an abbreviation for Digital Living Network Alliance. The word DLNA indicates the organization, which is developing guidelines for transferring digital content such as music or images via the home network, and the embodying system itself.
Related Topic
Enjoying Video, Music or Photo Content on Other Devices
What You Can Do Over the Home Network
Preparing the Home Network
Playing Back Content Stored on Another Device (Server)
Playing Content on other Devices by Sending (Throwing) it
Playing Back Music Content on Multiple Devices (PARTY STREAMING)
Preparing the Home Network
Connect the DLNA certified devices to the home network by the following procedure.
Example: When you use a computer as a server and a TV as a playback device
- Connect to the Wi-Fi network the computer that will act as a server.
For details on DLNA settings, see the operating instructions supplied with the computer. - Connect to the Wi-Fi network the TV that will act as a playback device and to which content is sent.
For details on DLNA settings, see the operating instructions supplied with the playback device. - Connect your tablet device to the Wi-Fi network [Details].
Note
- Depending on the server or playback device, you may need to register your tablet device or the playback device with the server. Otherwise, the content list of the server or content sent to the playback device will not be displayed, causing an error on the playback device. For details, see the operating instructions supplied with the devices.
Related Topic
Enjoying Video, Music or Photo Content on Other Devices
What You Can Do Over the Home Network
About DLNA
Playing Back Content Stored on Another Device (Server)
Playing Content on other Devices by Sending (Throwing) it
Playing Back Music Content on Multiple Devices (PARTY STREAMING)
Playing Back Content Stored on Another Device (Server)
You can play back on your tablet device content such as videos, photos or music stored on the server [Details].
Your favorite folders and content can also be bookmarked.
You must make preparations in advance to use the home network [Details].
- Tap to start the DLNA app.
When you start the DLNA app for the first time:
A screen appears to explain what you can do and to describe the preparations needed.
If you have used the DLNA app before:
Servers are automatically searched for and the server list is displayed at the top of the screen.
- Tap the icon of the server holding the content you want to play back.
- Tap a list item, folder, etc. to select the content that you want to play back.
An app that supports the content launches and playback starts.
Note
- Your tablet device cannot play back some content.
- If you remove the headphones during playback, playback is paused automatically to prevent sudden loud sound from being emitted from the tablet device.
Hint
- If you cannot find the icon to start the app, look for it in the application launcher displayed by tapping [Apps & Widgets] at the top right of the Home screen.
- The folders selected to reach the current folder are listed in order under the server list. You can return to previous folders by tapping items in the list.
- If the server cannot be found in step 2, refresh the server list from the option menu at the top right of the screen.
- Bookmarked content and folders appear at the top of the screen with the server list. Tap bookmarks in step 2 to select their content. If the bookmarked content is not displayed, tap ➤ next to the server icons to display the content.
To bookmark folders or content
Tap ✻ displayed at the right of each folder or content item that you want to bookmark.
To delete a bookmark
Tap and hold the bookmark that you want to delete from the bookmark list at the top of the screen, and then select [Delete bookmark].
Related Topic
Enjoying Video, Music or Photo Content on Other Devices
What You Can Do Over the Home Network
About DLNA
Preparing the Home Network
Playing Content on other Devices by Sending (Throwing) it
Playing Content on other Devices by Sending (Throwing) it
Video, photo or music content which can be played back on your tablet device is sent to another device ( playback device [Details]) via the home network and played back on that device. You can use this function with the Video player (video), Gallery (photo), Music player (music) and DLNA apps.
You must make preparations in advance to use the home network [Details].
-
Tap the content you want to send to and play back. The content starts to be played back.
-
Tap [↑] (Throw).
-
Tap the icon of the device that you want to send the content to from the icon list of playback devices. Playback starts on the selected playback device. You can control playback using your tablet device.
Note
- Some content may not be played back on other devices (playback devices).
- If you display another screen by means such as tapping 📋, while you are controlling another device (playback device) using your tablet device, return to the control screen via the notification panel.
- Content purchased at Video Unlimited*1 or copyright-protected content cannot be sent (Thrown) to and played back on another device (playback device). To play back on another device, connect your tablet device to a computer with a USB cable to transfer the content using Media Go.
Hint
- You can also select and play back content stored on another device (server) using the DLNA app ([Details]) and proceed to step 2.
- When you tap and hold a content of the Gallery app, you can proceed to step 2.
- When you tap [Throw] in the menu displayed by tapping and holding the content list in the DLNA, Video player or Music player app you can also proceed to step 3 without playback.
- While you are sending content to another device, you can play back other content on your tablet device.
*1 Video Unlimited is a video service available on Sony Entertainment Network.
Related Topic
Enjoying Video, Music or Photo Content on Other Devices
What You Can Do Over the Home Network
About DLNA
Preparing the Home Network
Playing Back Content Stored on Another Device (Server)
Using Media Go
File transfer
The File transfer app enables you to transfer data between the internal memory of the tablet device and an SD memory card as well as between the internal memory of the tablet device and recording media connected to the USB Micro-A/B connector.
To transfer data between the internal memory of the tablet device and an SD memory card
- Insert an SD memory card into the SD memory card slot.
- Tap ← to start the File transfer app.
-
Tap the file or folder you want to transfer, and add a check.
-
Tapping the recording media icon switches between the screens for importing and exporting.
-
To move to a folder, tap the icon of the folder in the list. To display detailed information about the folder, tap and hold the icon of the folder.
-
To select a destination folder, tap 📋 in [Import to] or [Export to].
If you do not select a folder, the file is transferred to the [transferred] folder on the media.
- Tap ← or →.
File transfer starts.
Note
- Do not remove the media during data transfer.
To transfer data between the internal memory of the tablet device and a recording media connected to the USB Micro-A/B connector
- Connect recording media to the USB Micro-A/B connector.
The confirmation screen appears.
- Tap [File transfer].
The File transfer app starts. The procedures after this step are same as those for step 3 above.
Related Topic
Inserting/Removing an SD Memory Card
Notes on Using SD Memory Cards
Notes on SD Memory Cards
Connecting a USB Device
Remote control
The Remote control app enables you to use your tablet device as a remote control by registering it as the remote control of various AV devices.
You can use the “gesture” remote control feature operated by gestures such as flicking or sliding as well as the “full” remote control feature operated by tapping.
- Tap to start the Remote control app.
Hint
- If you cannot find the icon to start the app, look for it in the application launcher displayed by tapping [Apps & Widgets] at the top right of the Home screen.
Registering the remote control by setting the category and manufacturer of the device
The remote control is usually registered as follows.
- Start the Remote control app.
- Tap [+ Register device] or [Register device].
- Tap [Easy registration].
- Register your tablet device as a remote control following the on-screen instructions.
Execute [Remote control test] if needed.
When you finished setting, the device list screen is displayed. Your tablet device can then be used as the remote.
Hint
- If you cannot find the category or manufacturer, allow your tablet device to learn the remote control signal then register it.
- Two or more devices may be displayed depending on the category or manufacturer. In this case, test the remote control operation with every “Type” displayed and select the one that works correctly.
To register as a remote control for another device
Tap [+] Register device] on the device list screen.
Learning the remote control signal and registering it
If you cannot find the category or manufacturer of the device at [Easy registration], register the remote control as follows.
- Start Remote control app.
- Tap [+] Register device] or [Register device].
-
Tap [Learn from a remote control].
-
Select the category.
A remote control is displayed on the screen.
-
Tap the button you want to assign the signal to.
-
When the menu screen is displayed, tap [Learn remote commands].
-
Bring the remote control to be registered close to the IR data port of your tablet device, tap [Start], and press the button to be learned on the remote control.
When the button is registered, the screen returns to display the remote control.
Hint
• To learn more button, repeat steps 4 to 7.
Using your tablet device as a remote control
Following two kinds of remote control are available.
- “Full” remote control You can operate the device by tapping the buttons, just like an ordinary IR remote control.
- “Gesture” remote control This gives a new feel to remote control operations. The device reacts when it senses movement of your fingers such as tapping and flicking on the touch screen, no matter where on the screen you touch. That way, you can operate the device instinctively, without looking at the screen of your tablet device.
- On the device list screen, tap the icon of the device that you want to control.
The remote control screen is displayed, and you can control the device by tapping the screen. When you tap the button on the top right of the remote control screen, you can switch between “gesture” and “full” remote control.
Hint
- The icon of the device appears at the top left of the remote control screen. By tapping buttons at the left and right of the icon, you can switch the device to be controlled.
Related Topic
Operating Various AV Devices on Your Tablet Device
Social Feed Reader
The Social Feed Reader app enables you to access SNS (Social Networking Services) such as Twitter or Facebook. Posts (articles) on multiple services are displayed together on the same screen. You can also filter posts by various conditions such as only posts with videos or photos attached.
- Tap to start the Social Feed Reader app.
Before registering accounts: The screen to register to the account is displayed.
After registering accounts: The post list screen is displayed.
Hint
- If you cannot find the icon to start the app, look for it in the application launcher displayed by tapping [Apps & Widgets] at the top right of the Home screen.
Related Topic
Sharing Exciting Experiences via Social Network
Registering a Twitter or Facebook account
Switching the Posts (Article) Displayed
Reading and Writing the Post (Article)
Searching for Posts (Articles) or Friends
Registering a Twitter or Facebook account
You can register a Twitter or Facebook account with the Social Feed Reader app. You need to acquire a Twitter or Facebook account beforehand.
- Tap to start the Social Feed Reader app.
The account setup screen is displayed.
- Tap the service to register from the service list displayed on the right of the screen.
- Authenticate the account on the service authentication page displayed automatically.
The registered account is displayed on the left of the screen.
- Tap [OK].
The post list screen for the registered account is displayed.
Note
- If the post list screen is displayed in step 1, tap [Accounts] on the option menu.
Hint
- With the Social Feed Reader, you can register one Facebook account and multiple Twitter accounts.
To add an account
Tap [Accounts] on the option menu of the post list screen to display the account setup screen, and then proceed to step 2.
To delete an account
Tap [Accounts] on the option menu of the post list screen to display the account setup screen, and then tap ☑ at the right of the account you want to delete.
Related Topic
Sharing Exciting Experiences via Social Network
Social Feed Reader
Switching the Posts (Article) Displayed
Reading and Writing the Post (Article)
Searching for Posts (Articles) or Friends
Switching the Posts (Article) Displayed
The Social Feed Reader app allows you to set filters for the posts (articles) to be displayed. The filtered sets of posts are called “streams,” and multiple streams can be registered in Social Feed Reader. The registered streams are displayed as tabs at the top left of the screen. You can easily switch between streams such as all posts by friends, posts by close friends, replies and messages to you.
- Tap to start the Social Feed Reader app.
The post list screen is displayed.
Note
- If the account setting screen is displayed, register an SNS account [Details].
Registering filters for displaying posts
- Tap the [+] tab at the top of the post list screen.
The [Create new stream] screen is displayed.
-
Input a name for the stream, then tap [Add filter] and input filter.
-
When finished, tap [Add].
You can register multiple filters.
To add more filters, tap [Add filter].
- When finished inputting filters, tap [OK].
The registered stream is displayed at the top of the post list screen as a tab.
To change the name of a stream or filters for displaying posts
Tap the tab of the stream you want to change on the post list screen, then tap [Stream settings for tab] in the option menu.
To delete a stream
Tap the tab of the stream you want to delete on the post list screen, then tap [Delete tab] on the option menu.
Note
- You cannot delete [All friends] and [Search] tabs.
- You can change the name of the stream made from [Save search results as stream tab] on the option menu for search results, but not the filters.
Displaying the stream
Tap the desired stream tab on the post list screen. Posts meeting the registered filter conditions are displayed with the newest posts first.
Note
- When you select friends as stream filters for displaying posts, their posts will be displayed on the post list only
when they have made posts recently.
Hint
- Tapping followed by [Show only videos and pictures] at the top right of the screen will show only streams that includes posts with videos or photos attached.
Related Topic
Sharing Exciting Experiences via Social Network
Social Feed Reader
Registering a Twitter or Facebook account
Reading and Writing the Post (Article)
Searching for Posts (Articles) or Friends
Reading and Writing the Post (Article)
The Social Feed Reader app allows you to display all together posts (articles) on multiple services such as Twitter and Facebook. You can also write the same post on multiple services simultaneously.
- Tap to start the Social Feed Reader app.
The post list screen is displayed.
Note
- If the account setting screen is displayed, register an SNS account [Details].
Reading posts
Posts made by the people you follow on Twitter or your Facebook friends will be displayed on the post list screen in the order that they were written.
Hint
- Tapping ⏻ below the post will display the rest of article. Tap ⏽ to hide it.
- Tapping the thumbnail at the right of the post allows you to access linked websites or photos or to search for posts using hashtags.
To import new posts
Tap [Refresh] on the option menu of the post list screen.
To reply to or comment on the posts
Tap the post on the post list screen, and then tap the appropriate icon for your intended operation.
To look at the profile of the person who wrote a post
Tap the post on the post list screen, and then tap
Writing posts
- Tap 📋 at the top right of the post list screen.
- Tap the service you want to write a post to, and add a check.
- Write a post.
- When you are finished, tap [Send].
The post is placed on the selected service.
Hint
- You can post the same article to multiple services simultaneously.
- You can attach photos and videos or shorten links (URLs). Tap [Attach] or [Shorten URL] at the bottom of the screen in step 3.
Related Topic
Sharing Exciting Experiences via Social Network
Social Feed Reader
Registering a Twitter or Facebook account
Switching the Posts (Article) Displayed
Searching for Posts (Articles) or Friends
Searching for Posts (Articles) or Friends
The Social Feed Reader app allows you to search for posts (articles) or friends who have signed up for the services.
- Tap to start the Social Feed Reader app.
The post list screen is displayed.
Note
- If the account setting screen is displayed, register an SNS account [Details].
- Tap the [Search] tab at the top of the post list screen.
The search screen is displayed.
-
Tap the account to search with.
-
Tap Q, and select either of the following.
To search for a post: [Search posts]
To search for a friend: [Search people]
- Input keywords, and tap ▶.
The search result is displayed.
Hint
- To search in all accounts simultaneously, select [All accounts] in step 3.
- Tap the search result for a post to check replies, comments, and profiles. To return to the search result, tap the [Search] tab.
- Tap the search result for a friend to check the person's profile. To return to the search result, tap the [Search] tab.
- To return to the post list screen, tap a stream tab ([All friends], etc.) at the top left of the screen.
- You can save the search result for a post as a tab. Select [Save search results as stream tab] on the option menu.
Related Topic
Sharing Exciting Experiences via Social Network
Social Feed Reader
Registering a Twitter or Facebook account
Switching the Posts (Article) Displayed
Reading and Writing the Post (Article)
Select App
Select App allows you to access a website that introduces a select range of apps appropriate for use with your tablet device.
- Tap 📄 to show Select App website.
The browser starts and displays the website.
Note
- Your tablet device must be made so it can access Android Market via your Google account before downloading from Android Market.
• Charges apply for some apps. - A large volume of data is transferred when downloading and updating apps.
Hint
- If you cannot find the icon to start the app, look for it in the application launcher displayed by tapping [Apps & Widgets] at the top right of the Home screen.
Related Topic
Viewing Apps Recommended by Sony
Gallery
The Gallery app allows you to show or play back photos or videos in your tablet device or Picasa web albums. You can send photos to another DLNA certified device and play them back on that device, and you can also easily post photos to network services to share them.
Detailed information of photos or videos can be displayed, and you can sort or filter photos or videos. You can also edit photos and add a variety of effects.
- Tap to start the Gallery app.
Hint
- If you cannot find the icon to start the app, look for it in the application launcher displayed by tapping [Apps & Widgets] at the top right of the Home screen.
Playing back photos or videos on your tablet device
- Tap albums or thumbnails to select the photos or videos you want to play back. The selected photos or videos are played back on the playback screen.
Hint
- You can play back photos or videos stored in Picasa web albums. If you set to sync with Picasa web albums available with the Google account that you set with the Settings app, the Picasa web albums appear in your album list.
- Using the menu at the top right of the screen, you can sort photos or videos by details such as time or place they were taken.
- By tapping and holding thumbnails in succession, you can select multiple photos or videos.
- You can control playback on the playback screen.
To expand display area of photos
Tap ☐ at the top right of the photo playback screen. To cancel expansion, tap ☐.
To display photos full-screen
Tap [Fill display area] from the option menu of the photo playback screen. To cancel full-screen view, tap [Fit to display area].
To display shooting location
Tap 📄 or 📃 with the display area not expanded. If the photo has information on where it was shot, a map appears with the location indicated on the map. To return to the thumbnails, tap 🌐.
Hint
- You can shoot photos that include location information using the built-in cameras.
Using your tablet device, you can send photos to another DLNA certified device via the home network and play back the photos on that device [Details].
Note
- If you display another screen by means such as tapping ☐, while you are controlling another device (playback device) using your tablet device, return to the control screen via the notification panel.
Hint
- While you are sending content to another device, you can play back other content on your tablet device.
Sharing photos or videos
- Tap and hold the album or thumbnail for photos you want to share, and then tap 📋.
- Tap on the name of the service you want to use to share photos or videos.
- Post the photos or videos following the on-screen instructions.
Hint
- When you tap and hold thumbnails in succession, you can select multiple photos or videos.
Playing back photos automatically (slide show)
- Select albums or thumbnails for photos you want to play back as a slide show, and then the tap 🖼️ Slide show playback starts.
Editing photos
- On the playback screen, tap ☐ (Option menu) - [Edit].
- Tap the edit icon at the bottom of the screen. You can add various effects to your photos.
- When finished editing, tap [SAVE].
Related Topic
Supported Formats
About Sample Data
Video Unlimited
Video Unlimited brings you a new world of entertainment on Sony's Internet-enabled devices. Now you can download your favorite videos to your tablet device and watch them anytime, anywhere.
Note
- This app or service may not be available in some countries/regions.
- Internet usage fees may apply to use of this service. You are responsible for all applicable Internet fees. Contact the carrier you have a subscription with for more information.
- You can browse the content without signing in, however please make sure that you have a registered account to purchase and download the content.
- Your tablet device must be connected to a network using Wi-Fi to use the preview feature.
- Your tablet device must be connected to a network using Wi-Fi to download the content you have purchased. Content you have purchased can be downloaded from [Download List].
- To download content, your current location must be the same as the country/region for your account.
- Check that there is enough free space to download the content.
Support information
http://www.sonyentertainmentnetwork.com/support
Trademarks
- The Sony Entertainment Network logo and “Sony Entertainment Network” are trademarks of Sony Corporation.
Related Topic
Enjoying Video Content
Music Unlimited
- Music on Demand – Listen to any song you want, when you want it
- Millions of songs, from the latest hits to classic favorites
• Radio Channels that span Genres, Moods, and Eras
• No Ads and Unlimited Skips - Ability to sync and play from your personal collection
- Access from a variety of devices
Note
- This app or service may not be available in some countries/regions.
Support information
http://www.sonyentertainmentnetwork.com/support
Trademarks
- The Sony Entertainment Network logo and “Sony Entertainment Network” are trademarks of Sony Corporation.
Related Topic
Enjoying Music Content
Personal Space
Easy private sharing of photos and videos with friends & family for free!
Just choose from your tablet's Gallery or shoot something new with the built-in camera.
No more troublesome email attachments, resizing, or manual encoding.
Sharing Groups let your you and your friends and family view an ongoing feed of shared content from the web, smartphones, and other connected devices.
For more information visit http://personalspace.sony.net
Note
- This app or service may not be available in some countries/regions.
- Personal Space provides 1 gigabyte of storage free of charge.
Support information
• U.S.A.
http://esupport.sony.com/US/perl/support-info.pl?info_id=587
- Canada (French)
http://esupport.sony.com/CA/perl/support-info.pl?info_id=614
- Canada (English)
http://esupport.sony.com/CA/perl/support-info.pl?info_id=587
Trademarks
• Personal Space is a trademark of Sony Corporation.
Reader
Carry your favorite digital books on your tablet device. The intuitive design is ideal for on-the-go reading, allowing you to bookmark, highlight and adjust font size as you read. You can even sync these items with other compatible devices. Purchasing content is made easy from the online Reader(TM) Store. In countries where you cannot purchase from the Reader(TM) Store, you can still enjoy books of your tablet device by installing them from a memory card (books without copy-protection only).
• Bookmarking and highlighting
- Adjustable font sizes
- Intuitive navigation
• Synching with other compatible devices
Note
- This app or service may not be available in some countries/regions.
- For customers in the U.S. and Canada only
You must create a Reader(TM) Store account in order to purchase and read digital publication. If you already have an Adobe ID, you need to use same user ID and password to create a Reader(TM) Store account.
Support information
For customers in the U.S. and Canada only
http://ebookstore.sony.com/help
Trademarks
- Sony Electronics Inc., Sony and the Sony logo are trademarks of Sony Corporation.
- All other trademarks are the property of their respective owners. All rights reserved.
Related Topic
Enjoying Digital Books
MediaRemote
You can use MediaRemote with the supported Sony devices. MediaRemote allows you to control those devices as a remote control and view information on inserted discs.
(To confirm the supported devices, see Sony web site.)
Note
- Be careful of home network security when you enter items such as personal information.
Preparing MediaRemote
- Connect the Sony device to your home network.
For details on connection, see the operating instructions supplied with the device and Wi-Fi router. - Connect your tablet device to the same home network that the Sony device is connected.
- Register your tablet device on the Sony device.
For details on settings, see the operating instructions supplied with the device.
See the help for MediaRemote to find out how to use MediaRemote.
Related Topic
Operating Various AV Devices on Your Tablet Device
Ustream
Ustream powers live video that enables anyone to watch and interact with a global audience. With Ustream for Android, broadcast at a moment's notice and never miss a beat on your favorite shows! Watch live events, RSVP for upcoming events, catch up on recent broadcasts, and share with your social networks on the go.
- Broadcast and interact with your audience through chat and poll
- Watch live events and participate through chat
- Discover the hottest Ustream content under “Featured”
- Follow your favorite shows by joining Ustream Crowds and tracking events you're attending
- Share with your social networks when you broadcast and discover content
Note
- This app or service may not be available in some countries/regions.
Support information
http://www.ustream.tv/support-center/mobile
Zinio
Zinio is the world's premier high fidelity mobile reading experience, with the best magazines from around the world, in pure digital form. Zinio lets you read and share articles from top titles, buy digital subscriptions or single issues, and manage your library on multiple devices. Read what you like!
Note
- This app or service may not be available in some countries/regions.
Support information
http://www.zinio.com/help/index.jsp
Evernote
Evernote turns your tablet device into an extension of your brain. This award-winning app lets you remember and recall anything that happens in your life. From notes to ideas to snapshots to recordings, put everything into Evernote and watch as it all instantly synchronizes from your tablet device to the Web to your PC.
Note
- This app or service may not be available in some countries/regions.
Support information
http://www.evernote.com/about/contact/support/
HD Games
Download high quality games to your tablet device from the Top HD Games at Gameloft's online store. Choose from hit titles such as Asphalt 6, Real Football 2011, and N.O.V.A. 2 - Near Orbit Vanguard Alliance.
Support information
support@gameloft.com
• U.S.A.
1-800-910-3186, 1-800-913-6828, 1-800-961-6744 (09:00-18:00 Monday-Friday)
• Canada
1-800-910-3186, 1-800-913-6828, 1-800-961-6744 (09:00-18:00 Monday-Friday)
• Mexico
1-800-681-9573, 1-800-681-9272 (09:00-18:00 Monday-Friday)
- Chile
2-570-8607 (09:00-18:00 Monday-Friday)
• Colombia
1-800-710-2071 (09:00-18:00 Monday-Friday)
• Panama
e-mail support only
- Argentina
0800-222-1416 (09:00-18:00 Monday-Friday)
- Brazil
55-2139560516, 0800-885-5607 (09:00-18:00 Monday-Friday)
Foursquare
Foursquare helps you explore the world around you. Keep up with friends, get insider tips, and unlock discounts and rewards.
While on the go, you can easily tell friends where you are, share pictures, get their comments (“I’m right around the corner, I’ll stop by to say hello”), and get insider tips (“order the Lobster Ravioli; it’s the best dish by far.”).
Tons of places offer discounts and freebies to Foursquare users, and you earn points and badges for doing the things you love. Have fun exploring!
Support information
http://support.foursquare.com/home
Crackle
Watch full-length uncut Hollywood movies & TV shows on your tablet device.
250 movies and over 1,000 TV episodes are available on your tablet device, all on demand.
Note
- This app or service may not be available in some countries/regions.
Support information
http://www.crackle.com/support/help.aspx
android@crackle.com
chumby for Sony Tablet S
chumby streams your online photo albums, social updates, weather and more.
chumby provides you with over 1500 free apps you can personalize to play in your own channels. Lean back and let chumby entertain you, or tap the screen to interact. Insert your tablet device into a designated Sony cradle (SGPDS1, sold separately) to automatically launch chumby for Sony Tablet S, or select the chumby icon in the application launcher.
Note
- This app or service may not be available in some countries/regions.
Support information
http://www.chumby.com/pages/help_support
liveperson-cs@chumby.com
About Backup
You should copy the data in your tablet device and store it on another storage device (backup). Various data, such as recorded images, downloaded music and video content, will be accumulated in your tablet device as you use it. If unexpected problems occur with your tablet device, that data may be damaged or lost. As a preventive measure in case of such accidents, you should make frequent backups so you will be able to restore your precious data.
Note
- Some data cannot be copied on your tablet device.
- Some settings and applications may not have any backup method. Make written notes and keep them in a safe place.
Data you can make backup
You can copy and store the following data with your tablet device for backup.
• Music/movie/eBook files without copyright protection
- Pictures/wallpapers
That data is stored in the following folders.
• Music files: \Music
- Wallpaper files: \Pictures
- Movie files: \Movie
• Picture files: \DCIM
- eBook files: \Reader
Backing up data (copying)
Use the File transfer app to store the data on a commercially available SD memory card.
- Tap [::: Apps & Widgets] followed by ← to start the File transfer app.
- Insert the SD memory card to your tablet device.
- Select the file/folder you want to copy from your tablet device.
- Tap ←.
A folder called “\transferred” is created on the SD memory card, and the data is copied to that folder.
Note
- Since video content purchased at Video Unlimited *1 is copyrighted, you cannot back it up by the above mentioned method. Copy it on a computer using the computer software “Media Go.” Go here to learn more about Media Go application. http://mediago.sony.com/enu/introduction/
*1 Video Unlimited is a video service available on Sony Entertainment Network.
Wi-Fi checker
The Wi-Fi checker app enables you to check the Wi-Fi connection of your tablet device when a connection problem occurs.
-
Tap 📋 to start the Wi-Fi checker app.
-
Tap [Test] at the top right of the screen to start checking the connection. Items are checked in succession, and assumed causes and remedies are displayed.
Hint
- If you cannot find the icon to start the app, look for it in the application launcher displayed by tapping [Apps & Widgets] at the top right of the Home screen.
- If you tap [SETTINGS] at the top right of the screen, you can display the settings screen for the Wi-Fi connection. Use ↔ to return to the Wi-Fi checker app. If you tap to display the Home screen, the settings screen appears when you start the Wi-Fi checker app the next time.
Related Topic
Starting Wi-Fi Communications
Notes on Using the Wi-Fi Function
Copying Data on a Computer to Your Tablet Device
If you connect a computer to your tablet device using a commercially available Micro-USB cable ([Details]), you can copy data on the computer to your tablet device. The copied data can then be played back on your tablet device.

Note
- Do not remove the Micro-USB cable during copying data. That may cause the data to be damaged.
- The copied data is stored in the internal memory. You cannot change the destination to store the data.
- Only copied data in supported file formats can be played back on your tablet device.
Related Topic
Connecting a USB Device
Notes on Connecting Your Tablet Device and a Computer with a USB Cable
Supported Formats
playable formats vary depending on the app or content used.
Note
- Some files may not be playable on your tablet device.
Video
| Format/Codec | Profile | Maximum resolution | Maximum bit rate (Mbps) |  Gallery Gallery |  Video player Video player |
| Extension | |||||
| H.263 | Profile0 | 704 × 576(4CIF) | 4 | .mp4.3gp | - |
| H.264 / AVC | Baseline Profile | 1920 × 1080 | 10 | .mp4.m4v.3gp | .mp4.m4v.3gp |
| MPEG-4 | Simple Profile / Advanced Simple Profile | 1920 × 1080 | 10 | .mp4.3gp | .mp4.m4v.3gp |
| WMV | Simple Profile / Main Profile | 1920 × 1080 | 10 | - | .wmv |
Music
| Format/ Codec | Sampling rate (kHz) | Maximum bit rate (kbps) | Music | Music player |
| Extension | ||||
| AAC | Up to 48 | 320 | .m4a.mp4.3gp | .m4a.mp4.3gp |
| MP3 | Up to 48 | 320 | .mp3 | .mp3 |
| WAV | 44.1 | - | .wav | .wav |
| WMA | 44.1 | 320 | - | .wma |
| WMA Pro | 44.1 | 192 | - | .wma |
| FLAC | Up to 48 | - | .flac | - |
| MIDI | - | - | .mid.xmf | - |
| Vorbis | Up to 48 | 256 | .ogg | - |
| Format/Codec | Maximum resolution (pixels) |  Gallery Gallery |
| Extension | ||
| JPEG | 6048 × 4032 | .jpg |
| GIF | 2000 × 2000 | .gif |
| PNG | 2000 × 2000 | .png |
| BMP | 2000 × 2000 | .bmp |
| WBMP | 2000 × 2000 | .wbmp |
| WEBP | 2000 × 2000 | .webp |
Related Topic
Gallery
Music player
Video player
Using Media Go
Media Go is computer software that supports content management and transfer between your tablet device and computer. By installing Media Go in your computer, you can transfer music, photos, and videos to your tablet device.
Note
- For details on how to use Media Go, refer to the help in the main menu of Media Go.
Installing Media Go on your computer
- Access http://www.sony.com/mediago/Tablet from your computer and download Media Go.
- Double-click the downloaded file.
- Install Media Go by following the instructions on the screen.
If you are prompted to install additional software component during installation, download and install it as instructed.
Transferring content to your tablet device using Media Go
- Connect your computer to your tablet device with a commercially available Micro-USB cable [Details].
- Start Media Go by selecting it from the start menu of your computer.
You can now transfer content between your tablet device and computer.
Note
- If [Sony Tablet] is not displayed on the left of the Media Go screen, this means that your tablet device is not recognized by the computer. Check whether or not the device driver is installed correctly.
- For details on using Media Go on the computer, refer to http://www.sony.com/mediago/Tablet
Related Topic
Connecting a USB Device
Notes on Connecting Your Tablet Device and a Computer with a USB Cable
Gallery
Music player
Video player
About PS Store
PlayStation(R)Store is an online store provided by Sony Computer Entertainment Inc. You can purchase items such as PlayStation(R) games for PlayStation(TM)Certified terminals.
Note
- This app or service may not be available in some countries/regions.
- Your PSN or SEN sign-in ID is required to purchase PlayStation(R) games from PlayStation(R)Store.
- Connect your tablet device to a Wi-Fi network when downloading purchased content.
- Make sure there is enough free space on your tablet device before you download the purchased content.
Related Topic
Enjoying Full-scale Games
Support for PlayStation(R) in general
Using a Controller of the PlayStation(R)3 System
You can connect a controller of the PlayStation(R)3 system to your tablet device by wired or wireless connection. Play games pre-installed on your tablet device and games downloaded from PlayStation(R)Store using a DUALSHOCK(R)3 or SIXAXIS wireless controller made by Sony Computer Entertainment Inc.
Using a controller of the PlayStation(R)3 system with a wired connection
- Turn on your tablet device.
- Connect a controller to the USB Micro-A/B connector of your tablet device using a designated USB adapter cable SGPUC1 (sold separately) and a commercially available USB cable.
The icon 📄 (charging the controller) and a message are displayed at the bottom right of the Home screen of your tablet device.

- Commercially available USB cable
- USB adapter cable SGPUC1 (sold separately)
Note
- Only one controller of the PlayStation(R)3 system can be connected to your tablet device.
Hint
- The battery of the controller is charged while the controller is connected to your tablet device using a USB cable. The controller will continue to be charged while connected to your tablet device using the USB cable, even if the screen turns off. We recommend that you connect the tablet device to an AC adapter while charging the controller.
Using a controller of the PlayStation(R)3 system with a wireless connection
You can establish a wireless connection between your tablet device and a controller of the PlayStation(R)3 system using the Bluetooth(R) function. When connecting the controller to your tablet device for the first time, you need to pair the controller with your tablet device.
- Turn on your tablet device.
-
Tap [■■ Apps & Widgets] - [■ Settings] - [Bluetooth] in that order, and then slide the [Bluetooth] switch to the [ON] position.
-
Connect a controller to the USB Micro-A/B connector of your tablet device using a designated USB adapter cable SGPUC1 (sold separately) and a commercially available USB cable.
The icon 📋 (charging the controller) is displayed at the bottom right of the Home screen of your tablet device.
- Disconnect the controller from your tablet device.
Paring will be completed.
The controller icon displayed at the bottom right of the Home screen changes to the icon that shows the battery charge level of the controller.
• : The battery has plenty of charge.
• : The battery has started losing its charge.
• : The battery charge level is low.
• : The battery has no charge. Charge the controller.
Note
- Only one controller of the PlayStation(R)3 system can be connected to your tablet device.
- To connect the controller to your tablet device using the Bluetooth function, the controller's battery must be charged.
- When paring your tablet device and the controller, you must connect them with a wired connection.
- Unlike other Bluetooth devices, the controller will not appear on the paired devices list of the tablet device [Details].
- When a paired controller is used with PlayStation(R)3 or another tablet device, it is un-paired from the original tablet device is cleared.
- While using a controller of the PlayStation(R)3 system with a wireless connection, you cannot use Bluetooth devices that support A2DP (Advanced Audio Distribution Profile) such as a Bluetooth equipped headphone. If you use both devices at the same time, the sound may be interrupted.
Hint
- When you connect the controller to your tablet device and then tap 📄 - [The controller of the PlayStation(R)3 system is connected] at the bottom right of the Home screen, the “About the controller of the PS3(TM) system” screen appears. You can make the Bluetooth connection between the controller and your tablet device by following the on-screen instructions.
- You only need to pair once for your tablet device and the controller to connect again. Just press the PS button of the controller the next time.
Displaying the user guide
When you tap 📄 - [The controller of the PlayStation(R)3 system is connected] at the bottom right of the Home screen, the user guide appears.
Turning off the controller of the PlayStation(R)3 system
When you connect a controller to your tablet device by a wired connection, shut down your tablet device first [Details].
When you connect a controller to your tablet device by a wireless connection, perform one of the following procedures.
- Display the user guide, and then tap [Off].
- Turn off the screen (sleep mode) of your tablet device [Details].
Note
- You cannot turn off the controller from the controller itself.
Hint
- You can reconnect the controller with your tablet device by pressing the PS button of the controller.
Related Topic
Enjoying Full-scale Games
Support for PlayStation(R) in general
Playing Back Music Content on Multiple Devices (PARTY STREAMING)
You can send (Throw) music content stored on your tablet device or the home network and play back the content at the same time via your home network on the devices with a PARTY STREAMING function. While using the PARTY STREAMING function, one of the devices to which the music content is sent from your tablet device automatically becomes the “host” of PARTY playback, and the other devices are regarded as “guests.” You can use this function with Music player (music) and DLNA apps.
You must make preparations in advance to use the home network [Details].

You can enjoy the PARTY STREAMING function with other devices that have this PARTY STREAMING logo (shown below).

PARTY
STREAMING
Playing back music content using the PARTY STREAMING function
- Make sure the devices on your home network that support the PARTY STREAMING function are turned on and are in the status that allows them to join a PARTY.
- Tap 🎧 to start the Music player app.
- Tap the music content you want to send and play back.
- Tap [↑] (Throw).
- Tap [ON] to use the PARTY STREAMING function.
The devices that support the PARTY STREAMING function are displayed with a check mark on the upper left side.
If there are any devices on which you do not want to play back the music content, tap the images of that devices. The check mark will be removed.

6. Tap [Start].
Playback using the PARTY STREAMING function starts on the selected devices. You can control playback using your tablet device.
Hint
- You can also select to play back content stored on another device (server) using the DLNA app ([Details]) and proceed to step 5.
- When you tap [Throw] in the menu displayed by tapping and holding the content list in the DLNA or Music player app, you can also proceed to step 5 without playback.
Changing the devices that play back using the PARTY STREAMING function
- Tap [Change] on the playback screen.
- To join/leave a PARTY, tap the device image to add/remove the check mark. To turn off the PARTY STREAMING function, tap [OFF].
Closing a PARTY
- Tap [Disconnect] on the playback screen.
Hint
- A PARTY closes by turning off the PARTY host device or by changing the music content that is playing back on the PARTY host device by another device on the home network.
Adjusting the volume of the devices that are participating in a PARTY
On playback screen, you can adjust the volume of all the devices that are participating in a PARTY.

1. Muting button
Tap this to turn off the volume.
- Master Volume control bar
Drag the point on the bar and release it at the desired volume.
The volume is adjusted while maintaining volume balance among the devices.
- Volume setting button
Tap this to adjust the volume of devices individually on the following screen.

- Master Volume control bar
Drag the point on the bar and release it at the desired volume.
The volume is adjusted while maintaining volume balance among the devices.
- Each device volume control bar
Drag the point on the bar and release it at the desired volume to adjust each device volume.
Related Topic
Enjoying Video, Music or Photo Content on Other Devices
What You Can Do Over the Home Network
About DLNA
Preparing the Home Network
Playing Back Content Stored on Another Device (Server)
Registration
The Registration app allows you to register your tablet device with Sony. Registering your tablet device allows us to maintain a record of your purchase in case of loss or theft and to inform you of important product updates and promotions. It will also help us design products that meet your specific needs.
- Tap to start the Registration app.
- Read the End User License Agreement, and tap [Accept] to continue if you accept the agreement. Otherwise, tap [Decline] to exit the app.
- Enter your personal information. Only the fields with * are required. All other information is optional.
- By default, "Yes, I would like to receive information from Sony Electronics on products, services and special offers that may be of interest to me." is checked. If you prefer not to receive future information from Sony Electronics, tap and uncheck the checkbox.
- Tap [Submit] to submit your registration information to Sony.
Note
- This app or service may not be available in some countries/regions.
- If you would like to read additional information regarding Sony's privacy policy, please tap on [Privacy Policy].
Trademarks
- “Sony Tablet” is a trademark of Sony Corporation.
- “Clear Phase” and “xLOUD” are trademarks of Sony Corporation.
- DLNA(R), the DLNA Logo and DLNA CERTIFIED(R) are trademarks, service marks, or certification marks of the Digital Living Network Alliance.
- Personal Space is a trademark of Sony Corporation.
- Reader and the Reader logo are trademarks of Sony.
- “Select App” is a trademark of Sony Corporation.
- “12 TONE ANALYSIS” and its logo are trademarks of Sony Corporation.
- “Sony Entertainment Network logo” and “Sony Entertainment Network” are trademarks of Sony Corporation.
- “SensMe” and its logo are trademarks or registered trademarks of Sony Ericsson Mobile Communications AB.
- “PlayStation” is a registered trademark or a trademark of Sony Computer Entertainment Inc.
- Pinball Heroes is a trademark of Sony Computer Entertainment America LLC. (C)2009, 2011 Sony Computer Entertainment America LLC.
- Crash Bandicoot and related characters (TM) & (C) Universal Interactive Studios, Inc. Licensed by Universal Studios Licensing, Inc. (C)1996 Universal Interactive Studios, Inc. Source Code; (C)1996 Naughty Dog, Inc. All rights reserved.
- Google, the stylized Google logo, Android, the stylized Android logo, Android Market, the stylized Android Market logo, Gmail, Google Calendar, Google Checkout, Google Latitude, Google Maps, Google Talk, Picasa, and YouTube are trademarks of Google Inc.
- Adobe Flash Player Copyright(C) 1996-2011 Adobe Systems Incorporated. All rights reserved. Adobe and Flash are either registered trademarks or trademarks of Adobe Systems Incorporated in the United States and/or other countries.
- THIS PRODUCT IS LICENSED UNDER THE AVC PATENT PORTFOLIO LICENSE FOR THE PERSONAL AND NON-COMMERCIAL USE OF A CONSUMER TO
(i) ENCODE VIDEO IN COMPLIANCE WITH THE AVC STANDARD ("AVC VIDEO") AND/OR
(ii) DECODE AVC VIDEO THAT WAS ENCODED BY A CONSUMER ENGAGED IN A PERSONAL AND NON-COMMERCIAL ACTIVITY AND/OR WAS OBTAINED FROM A
VIDEO PROVIDER LICENSED TO PROVIDE AVC VIDEO. NO LICENSE IS GRANTED OR SHALL BE IMPLIED FOR ANY OTHER USE. ADDITIONAL INFORMATION MAY BE OBTAINED FROM MPEG LA, L.L.C. SEE HTTP://MPEGLA.COM - Bluetooth is a trademark or a registered trademark of Bluetooth SIG Inc. and any use of such mark by Sony is under license.
- (C) 2011 chumby industries, inc. chumby, the chumby octopus logo and the chumby eyes (stylized) are registered trademarks of chumby industries, inc. All rights reserved.
- “Crackle” and the Crackle logo are trademarks of Crackle, Inc.
• Evernote and the Evernote elephant logo are the trademarks of Evernote Corporation.
• Facebook, the Facebook logo, and the F logo are trademarks or registered trademarks of Facebook, Inc. - Foursquare is the registered trademark of Foursquare Labs, Inc.
- (C) 2011 Gameloft. All rights reserved. Gameloft and the Gameloft logo are trademarks of Gameloft in the U.S. and/or other countries.
- iWnn (C) OMRON SOFTWARE Co., Ltd. 2008-2011 All Reserved.
- This software is based in part on the work of the Independent JPEG Group.
- MPEG Layer-3 audio coding technology and patents licensed from Fraunhofer IIS and Thomson.
• THIS PRODUCT IS LICENSED UNDER THE MPEG4 PATENT PORTFOLIO LICENSE FOR THE
PERSONAL AND NON-COMMERCIAL USE OF A CONSUMER TO
(i) ENCODE VIDEO IN COMPLIANCE WITH THE MPEG4 STANDARD ("MPEG4 VIDEO") AND/OR
(ii) DECODE MPEG4 VIDEO THAT WAS ENCODED BY A CONSUMER ENGAGED IN A PERSONAL AND NON-COMMERCIAL ACTIVITY AND/OR WAS OBTAINED FROM A
VIDEO PROVIDER LICENSED TO PROVIDE MPEG4 VIDEO. NO LICENSE IS GRANTED OR SHALL BE IMPLIED FOR ANY OTHER USE. ADDITIONAL INFORMATION MAY BE OBTAINED FROM MPEG LA, L.L.C. SEE HTTP://MPEGLA.COM
- NVIDIA and Tegra (TM) 2 are a registered trademark or trademark of NVIDIA Corporation in the USA and other countries.
- SD, SDHC, microSD and microSDHC Logos are trademarks of SD-3C, LLC.
- TinyURL is a trademark or registered trademark of TinyURL, LLC.
- Twitpic is a trademark or registered trademark of Twitpic, Inc.
- The Twitter name, logo, Twitter T, Tweet, and Twitter bird are trademarks of Twitter, Inc. in the United States and other countries.
- THIS PRODUCT IS LICENSED UNDER THE VC-1 PATENT PORTFOLIO LICENSE FOR THE PERSONAL AND NON-COMMERCIAL USE OF A CONSUMER TO
(i) ENCODE VIDEO IN COMPLIANCE WITH THE VC-1 STANDARD ("VC-1 VIDEO") AND/OR
(ii) DECODE VC-1 VIDEO THAT WAS ENCODED BY A CONSUMER ENGAGED IN A PERSONAL AND NON-COMMERCIAL ACTIVITY AND/OR WAS OBTAINED FROM A VIDEO PROVIDER LICENSED TO PROVIDE VC-1 VIDEO.
NO LICENSE IS GRANTED OR SHALL BE IMPLIED FOR ANY OTHER USE. ADDITIONAL INFORMATION MAY BE OBTAINED FROM MPEG LA, L.L.C. SEE HTTP://WWW.MPEGLA.COM
- Wi-Fi, the Wi-Fi CERTIFIED logo, WPA, WPA2 and Wi-Fi Protected Setup are trademarks or registered trademarks of Wi-Fi Alliance.
- Windows Media is either a registered trademark or trademark of Microsoft Corporation in the United States and/or other countries.
- Yfrog is a trademark or registered trademark of ImageShack Corp.
• (C) 2001-2011 Zinio LLC. - San Francisco - New York - London - Barcelona - Taipei - All rights reserved. - Microsoft, Outlook, Exchange and ActiveSync are registered trademarks or trademarks of Microsoft Corporation in the United States and/or other countries.
"Microsoft Exchange ActiveSync" in the Implementation user interface where appropriate "Microsoft(R)
Exchange ActiveSync(R)” for any printed material (including packaging, literature, marketing materials and advertising)
All other names of systems, products, and services are trademarks or registered trademarks of their respective owners. In this manual, the (TM) or (R) marks are not specified.
Support for PlayStation(R) in general
U.S.A./Canada/Brazil
http://us.playstation.com/support/
Mexico/Latin America (Chile, Colombia, Panama, Argentina)
http://mx.playstation.com/soporte/
Japan
http://www.jp.playstation.com/support/
United Kingdom
http://uk.playstation.com/support/
Germany
http://de.playstation.com/support/
Spain
http://es.playstation.com/support/
France
http://fr.playstation.com/support/
Italy
http://it.playstation.com/support/
Russia
http://ru.playstation.com/support/
Sweden
http://se.playstation.com/support/
Netherlands
http://nl.playstation.com/support/
Belgium
http://be.playstation.com/support/
Norway
http://no.playstation.com/support/
Austria
http://at.playstation.com/support/
Switzerland
http://ch.playstation.com/support/
Portugal
http://pt.playstation.com/support/
Turkey
http://tr.playstation.com/support/
Poland
http://pl.playstation.com/support/
India
http://in.playstation.com/support/
Taiwan
http://asia.playstation.com/tw/cht/support/
Hong Kong
http://asia.playstation.com/hk/en/support/
Singapore
http://asia.playstation.com/sg/en/support/
Australia
http://au.playstation.com/support/
New Zealand
http://nz.playstation.com/support/
United Arab Emirates/Middle East (Saudi Arabia)
http://ae.playstation.com/support/
Indonesia
http://asia.playstation.com/id/en/support/
Thailand
http://asia.playstation.com/th/en/support/
Malaysia
http://asia.playstation.com/my/en/support/
Related Topic
Enjoying Full-scale Games
The tablet device does not turn on.
The battery may be extremely low on power.
- Connect your tablet device to an AC outlet (wall socket), and charge the battery.
Your tablet device may be turned off completely.
- Press and hold the power button for three seconds to turn on your tablet device.
When your tablet device is using power supplied from the outlet, make sure you have connected the tablet device and the AC adapter, the AC adapter and the AC power cord (mains lead), and the AC power cord (mains lead) and an AC outlet (wall socket) securely.
- When your tablet device is sitting in the cradle (sold separately), make sure you have connected the tablet device and the cradle, the cradle and the AC adapter, the AC adapter and the AC power cord (mains lead), and the AC power cord (mains lead) and an AC outlet (wall socket) securely.
If you have not turned off your tablet device properly, the controller that controls the power supply may stop due to a failure of the program. Press and hold the power button for about 10 seconds, or press the reset button to force the tablet device to turn off, and then turn on the tablet device again [Details].
The tablet device starts up slowly.
When you boot your tablet device from the power off state, it may take some time to boot up.
The battery does not charge.
Make sure you have connected your tablet device and the AC adapter, the AC adapter and the AC power cord (mains lead), and the AC power cord (mains lead) and an AC outlet (wall socket) securely.
If the temperature of the tablet device rises while using applications, connecting to the Internet, sending/receiving an e-mail, using the built-in camera, playing back videos/music, etc., the battery may not be charged. In this case, shut down the running applications. The battery will begin to charge when the tablet device returns to normal temperature.
Charging the battery via a USB port is not supported when your tablet device is connected to a computer or a battery charger.
The charge indicator does not light.
Make sure you have connected your tablet device and the AC adapter, the AC adapter and the AC power cord (mains lead), and the AC power cord (mains lead) and an AC outlet (wall socket) securely.
Battery consumption increases.
Battery deterioration may occur.
- Contact the service/support center named in the warranty to replace the battery.
The charge indicator blinks.
The charge indicator blinks slowly (every 1 second) when the remaining battery level is 15% or less. Plug in your tablet device and charge the battery [Details].
- The charge indicator does not blink while your tablet device is turning off, even though the remaining battery level is 15% or less.
When the charge indicator blinks fast (every 0.5 seconds), your tablet device may be in need of repair. Stop using the tablet device and contact the service/support center named in the warranty.
Heat builds up in the tablet device and the AC adapter while the tablet device is in use or being charged.
Heat builds up in the tablet device and the AC adapter while the tablet device is in use or being charged. This is normal and should not affect the performance of your tablet device.
The tablet device can be shut down for safety when overheated. In this case, use the tablet device in a cool area after the tablet device cools down.
If your tablet device becomes abnormally hot, it may be in need of repair. Turn off your tablet device, unplug the AC power cord (mains lead) from the AC adapter, and stop using the tablet device. Contact the service/support center named in the warranty.
The screen is dark.
Make sure the screen brightness of your tablet device is not set at the lowest level.
Make sure the remaining battery level is sufficient.
Be careful not to cover the ambient light sensor.
Outdoors on a clear day, you may feel the screen is dark.
If you have the automatic brightness setting enabled, the brightness of the screen is adjusted automatically according to the surrounding brightness.
- Tap [■■■ Apps & Widgets] - [■■■ Settings] - [Display] - [Brightness] - [Automatic brightness] in that order to remove the check mark.
There is a point that is not displayed properly on the screen.
You may see tiny black points on the LCD screen on rare occasions. This does not indicate a malfunction [Details].
A Bluetooth(R) device was not found.
Make sure the Bluetooth function of your tablet device is turned on.
- Tap [■■■ Apps & Widgets] - [■■■ Settings] - [Bluetooth] in that order, and then slide the [Bluetooth] switch to the [ON] position.
Make sure the Bluetooth device you are pairing with is turned on.
When you tap [■■■ Apps & Widgets] - [■■■ Settings] - [Bluetooth], and then tap [SEARCH FOR DEVICES] at the top right of the screen, a Bluetooth device may not be found immediately because of the number of devices around your tablet device, the distance, the environment, radio wave propagation.
- Bring the Bluetooth device you are pairing with as close to your tablet device as possible, and try again.
Make sure the Bluetooth device your are pairing with is in discoverable mode. - The Bluetooth function of the commercially available Bluetooth device you are pairing with should be turned on and the device should be in discoverable mode.
- When you disconnect a Bluetooth device you have connected to your tablet device once and connect it again, connect the device after deleting registration by both the Bluetooth device and the tablet device.
Your tablet device gets slow/is not performing as expected.
Your tablet device may slow down when you use it in a hot or cold environment. Use the tablet device in a place with as suitable a temperature as possible.
Your tablet device may perform better if you turn off the tablet device, and then turn it on again when the tablet device gets slow or is not performing as expected.
When your tablet device is not performing as expected, the data storage area of the tablet device may be full.
- Uninstall any unnecessary applications.
Your tablet device does not work.
Press and hold the power button for about 10 seconds to force it to turn off, and then turn it on again [Details].
If you cannot force your tablet device to turn off, insert a pin or other slim object into the reset button hole [Details].
Contact the service/support center named in the warranty when the symptom does not go away.
To reset your tablet device.
Tap [■ Apps & Widgets] - [■ Settings] - [Backup & reset] - [Factory data reset], and then tap [Reset tablet] at the bottom of the menu on the right.
- All data in the data storage area is deleted, including the Google account information, the system data and settings, and any application data you have downloaded.
- User data such as music, photos, and eBooks transferred from an SD memory card or a device that connects via USB is not deleted.
- To delete all user data such as music, photos, and eBooks, tap [Erase USB storage] to put a check in the check box, and then tap [Reset tablet].
- It is recommended that you make a backup copy of important data because the user data cannot be restored after being deleted.
- The tablet device restarts automatically.
The sound from the speaker is distorted.
Adjust the playback volume.
Make sure the tablet device is sufficiently charged.
If the sound effects are turned off, the sound might improve.
- Select [Off] for [Equalizer] and remove the check mark from [Dynamic normalizer] or [xLOUD(TM)] on the setting menu when you use the [Music player] app.
- Remove the check mark from [Dynamic normalizer] or [xLOUD(TM)] on the setting menu when you use the [Video player] app.
The screen brightness is not stable.
When you set automatic adjustment of the screen brightness, the screen brightness is adjusted automatically according to the surrounding brightness.
- Tap [■■ Apps & Widgets] - [■ Settings] - [Display] - [Brightness] - [Automatic brightness] in that order to remove the check mark.
The screen brightness cannot be adjusted.
When you set automatic adjustment of the screen brightness, you cannot adjust the screen brightness manually.
- Tap [■ Apps & Widgets] - [■ Settings] - [Display] - [Brightness] - [Automatic brightness] in that order to remove the check mark.
Automatic adjustment of the screen brightness does not work as expected.
When you set automatic adjustment of the screen brightness, the screen gets brighter once, but it will not darken. This does not indicate a malfunction. Brightness returns to normal when you press the power button to turn off your tablet device (sleep mode), and press the power button to turn on your tablet device again.
The screen disappears/darkens unexpectedly.
The screen goes to sleep automatically after a certain period of time to reduce battery consumption.
- The screen turns on again when you push the power button.
- When you want to change the time before the screen goes to sleep, tap [● Apps & Widgets] - [● Settings] - [Display] - [Sleep] in that order to set the time.
- If you set the time to a longer interval before going to sleep, the battery will be consumed faster.
The touch screen does not work as expected.
Make sure you know how to use the touch screen [Details].
If the touch screen is damaged (scratched, etc.), contact the service/support center named in the warranty.
If the touch screen does not work, turn off your tablet device, and then turn it on again.
- If you cannot turn off your tablet device, press and hold the power button for about 10 seconds to force it to turn off, and then turn it on again [Details].
- If you cannot force your tablet device to turn off, insert a pin or other slim object into the reset button hole [Details].
The date and time are reset.
When the remaining battery power is extremely low, the date and time might be reset.
- Charge the battery, and then set the date and time again.
To erase the tap sound (operation sound).
Tap [::: Apps & Widgets] - [Settings] - [Sound] - [Touch sounds] in that order to remove the check mark.
Press and hold the VOL - (Volume) button of your tablet device until the volume indicator displayed on the screen minimizes and the icon reverses.
The screen does not rotate when you turn your tablet device.
Some applications may not support screen rotation. This does not indicate a malfunction.
To turn off screen rotation.
Tap [■ Apps & Widgets] - [■ Settings] - [Display] - [Auto-rotate screen] in that order to remove the check mark.
To deactivate the lock function/to use your tablet device without locking the screen.
Tap [■ Apps & Widgets] - [■ Settings] - [Security] - [Screen lock] in that order, then tap [None] to deactivate the lock function.
The sound from the built-in speaker is interrupted when the screen is rotated.
The sound may be interrupted when the screen is rotated while using the built-in speaker. This does not indicate a malfunction.
A headset cannot be used.
Use the tested Sony MDR-EX38IP headset.
- When the MDR-EX38IP headset is connected to your tablet device, the following functions cannot be used.
Skipping to the next song
Skipping to the previous song
Adjusting the volume (+/-)
Voice over
Making a call
Terminating a call
The file cannot be displayed/be played back.
The data may be damaged.
Make sure the file format form of the data corresponds to that of your tablet device.
Make sure the file is suitable for the playback format of the application.
If the file cannot be displayed when you use the [Music player] app or the [Video player] app, execute [Update database] on the setting menu.
The video is interrupted/is jumpy/is not synchronized with the audio.
Make sure the file is suitable for the playback format of the application.
Turn off your tablet device, and then turn it on again.
The data may be damaged.
Make sure that other apps are not doing processor intensive tasks in the background.
Your tablet device cannot receive GPS signals or takes a long time for the positioning.
Move to an area with good reception of GPS signals, and with a clear view of the sky [Details].
The results of GPS positioning may be different from the actual location.
Move to an area with good reception of GPS signals, and with a clear view of the sky [Details].
The photos and movies taken with the camera are blurry.
Make sure any fog or dirt are removed from the lens or the cover of the camera.
You cannot send (Throw) content to another device and play it back with the DLNA app.
Certain content may not be played back on other devices.
Your tablet device cannot learn with the Remote control app.
Your tablet device may not be able to learn some remote control operations depending on the remote control. This does not indicate a malfunction.
Some applications are not displayed in the selected language.
Some applications do not accommodate the language selected in the language settings of your tablet device, and are displayed in a different language.
Some applications cannot be uninstalled.
Some applications cannot be uninstalled (deleted). This does not indicate a malfunction of the tablet device or a bug in the application.
A website for mobile phones or smartphones is displayed.
Some websites may be displayed with the mobile phones or smartphones layout.
Your tablet device cannot connect to a Wi-Fi network.
Make sure the Wi-Fi function is turned on.
- Tap [■ Apps & Widgets] - [■ Settings] - [Wi-Fi] in that order, and then slide the [Wi-Fi] switch to the [ON] position.
Make sure there are no obstacles blocking the signal between devices, and the distance between devices is not too far [Details].
A connection may be made available by changing the channel settings of your access point.
Make sure the [Network SSID] and the [Security] of your access point are set correctly.
- SONY TABLET HELP GUIDE SGPT12 SERIES
- READ THIS FIRST
- CHARGING THE BATTERY
- ABOUT SOFTWARE UPDATE
- RELATED TOPIC
- TURNING ON YOUR TABLET DEVICE
- NOTE
- SHUTTING DOWN YOUR TABLET DEVICE
- TURNING THE SCREEN ON/OFF (SLEEP MODE)
- HINT
- NOTES ON USING THE AC ADAPTER
- ON THE CHARGE INDICATOR
- NOTES ON USING THE BATTERY
- ABOUT THE BATTERY
- ABOUT BATTERY DISCHARGE
- ABOUT BATTERY LIFE
- ABOUT BATTERY DETERIORATION
- HOW TO USE THE TOUCH SCREEN
- TAP
- TAP & HOLD
- DRAG
- FLICK
- PINCH
- NOTES ON THE SCREEN
- NOTES ON THE TOUCH SCREEN
- NOTES ON THE LCD SCREEN
- HANDLING THE TOUCH SCREEN
- STARTING WI-FI COMMUNICATIONS
- TO STOP WI-FI COMMUNICATIONS
- TO FIND NETWORKS IN RANGE OF YOUR DEVICE
- NOTES ON USING THE WI-FI FUNCTION
- ABOUT THE BLUETOOTH(R) FUNCTION
- COMMUNICATING WITH ANOTHER BLUETOOTH(R) DEVICE
- TO TURN ON THE BLUETOOTH FEATURE
- TO MAKE YOUR TABLET DEVICE DISCOVERABLE
- TO PAIR WITH ANOTHER BLUETOOTH DEVICE
- TO RECONNECT DEVICES
- STOPPING BLUETOOTH(R) COMMUNICATIONS
- NOTES ON USING THE BLUETOOTH(R) FUNCTION
- ABOUT BLUETOOTH(R) SECURITY
- ABOUT THE GPS FUNCTION
- ENABLING THE LOCATION INFORMATION
- DISABLING THE LOCATION INFORMATION
- INSERTING/REMOVING AN SD MEMORY CARD
- TO INSERT AN SD MEMORY CARD
- TO REMOVE AN SD MEMORY CARD
- NOTES ON USING SD MEMORY CARDS
- NOTES ON SD MEMORY CARDS
- CONNECTING A USB DEVICE
- NOTES ON CONNECTING YOUR TABLET DEVICE AND A COMPUTER WITH A USB CABLE
- PARTS AND CONTROLS (TABLET DEVICE)
- REAR
- PARTS AND CONTROLS (CRADLE)
- CHECKING THE SUPPLIED ITEMS
- CARING FOR YOUR TABLET DEVICE
- TABLET DEVICE
- BUILT-IN CAMERA
- ONLINE SUPPORT WEBSITES
- NOTES ON HOLDING YOUR TABLET DEVICE
- RESETTING YOUR TABLET DEVICE
- ATTACHING THE STRAP TO YOUR TABLET DEVICE
- ABOUT SAMPLE DATA
- REDUCING BATTERY CONSUMPTION
- NOTES ON USING VOICE COMMUNICATIONS APPS
- NOTES ON GEOMAGNETIC SENSOR
- USING THE BUILT-IN CAMERA
- NOTES ON THE BUILT-IN CAMERA
- CHECKING THE ANDROID VERSION
- UPDATING ANDROID TO THE LATEST VERSION
- ENJOYING FULL-SCALE GAMES
- ENJOYING VIDEO CONTENT
- VIDEO UNLIMITED
- SUPPORT INFORMATION
- ENJOYING MUSIC CONTENT
- MUSIC UNLIMITED
- ENJOYING DIGITAL BOOKS
- READER
- VIEWING APPS RECOMMENDED BY SONY
- SELECT APP
- SEARCHING FOR APPS
- MARKET
- ENJOYING VIDEO, MUSIC OR PHOTO CONTENT ON OTHER DEVICES
- DLNA
- OPERATING VARIOUS AV DEVICES ON YOUR TABLET DEVICE
- REMOTE CONTROL
- MEDIAREMOTE
- SHARING EXCITING EXPERIENCES VIA SOCIAL NETWORK
- SOCIAL FEED READER
- ABOUT THE HOME SCREEN
- A: QUICK SEARCH BOX/QUICK LAUNCHER
- B: FAVORITES/APPS & WIDGETS
- C: WIDGET
- D: BASIC OPERATION BUTTONS
- E: SMALL APPS
- F: DIGITAL CLOCK
- ADDING APPS OR WIDGETS TO THE HOME SCREEN
- TO ORGANIZE ICONS WITH FOLDERS
- TO DELETE AN ICON FROM THE HOME SCREEN
- FAVORITES
- CUSTOMIZING THE DISPLAYED ITEMS
- APPLICATION LAUNCHER AND WIDGETS
- SWITCHING BETWEEN THE APPLICATION LAUNCHER AND THE LIST OF WIDGETS
- SORTING THE APPLICATION ICONS AND WIDGETS
- UNINSTALLING AN APPLICATION
- DISPLAYING THE APP INFORMATION
- ABOUT THE NOTIFICATION PANEL
- ROTATING THE SCREEN
- SETTING THE SCREEN TO NOT ROTATE
- TO SET THE SCREEN TO ROTATE AGAIN
- QUICK SEARCH
- TO SEARCH BY TEXT
- TO SEARCH BY VOICE
- LOCKING THE SCREEN
- TO CONFIGURE THE LOCK FUNCTION
- DISPLAYING RECENT APPS
- ENTERING TEXT
- USING THE ON-SCREEN KEYBOARD
- TO SET THE INPUT LANGUAGE
- TO SWITCH THE INPUT LANGUAGE
- CUTTING AND PASTING TEXT
- TO CUT OR COPY TEXT
- TO PASTE TEXT
- GOOGLE ACCOUNT
- USING YOUR CURRENT GOOGLE ACCOUNT
- SIGNING UP FOR A NEW GOOGLE ACCOUNT ON YOUR TABLET DEVICE
- CHANGING THE SETTINGS
- BEFORE USE
- LIST OF APPS
- CALENDAR
- BROWSER
- CAMERA
- PEOPLE
- DESK CLOCK
- VIDEO PLAYER
- MUSIC PLAYER
- FILE TRANSFER
- WI-FI CHECKER
- HELP GUIDE
- REGISTRATION
- PERSONAL SPACE
- PS STORE
- CRASH BANDICOOT(R)
- PINBALL HEROES
- SETTINGS
- MUSIC
- CALCULATOR
- GMAIL
- GOOGLE SEARCH
- MAPS
- PLACES
- NAVIGATION
- LATITUDE
- TALK
- YOUTUBE
- BOOKS
- DOWNLOADS
- FOURSQUARE
- CHUMBY FOR SONY TABLET S
- USTREAM
- ZINIO
- EVERNOTE
- HD GAMES
- SETTING AN E-MAIL ACCOUNT
- TO CHANGE SETTINGS
- TO ADD AN E-MAIL ACCOUNT
- TO REMOVE AN E-MAIL ACCOUNT
- COMPOSING/SENDING AN E-MAIL
- RECEIVING E-MAILS
- TO REPLY TO AN E-MAIL
- TO FORWARD AN E-MAIL
- DELETING AN E-MAIL
- SORTING E-MAILS
- SEARCHING FOR AN E-MAIL
- MAKING CHANGES TO MULTIPLE E-MAILS
- BROWSING WEBSITES
- TO VIEW/DELETE THE ACCESS HISTORY
- TO ADD A BOOKMARK FOR AN ADDRESS (URL)
- TO MAKE A SHORTCUT ON THE HOME SCREEN FOR AN ADDRESS (URL)
- TO ACCESS A WEBSITE FROM ITS BOOKMARK
- SHOOTING PHOTOS/MOVIES
- SHOOTING PANORAMIC PHOTOS
- FINISHING THE CAMERA APP
- COPYRIGHT AND PORTRAIT RIGHTS
- ADDING A SCHEDULE
- CHANGING A SCHEDULE
- DELETING A SCHEDULE
- REGISTERING CONTACTS
- TO EDIT CONTACTS
- TO DELETE CONTACTS
- TO SWITCH THE DISPLAY OF THE CONTACTS
- REGISTERING GROUPS
- JOINING CONTACTS
- PLAYING BACK MUSIC CONTENT ON YOUR TABLET DEVICE
- CHANGING THE DISPLAY
- PLAYING BACK MUSIC CONTENT ON OTHER DEVICES BY SENDING (THROWING) IT FROM YOUR TABLET DEVICE
- SEARCHING FOR RELATED INFORMATION
- ADDING COVER ART TO AN ALBUM OR A SONG
- TO DELETE COVER ART
- ADDING LYRICS TO A SONG
- TO DELETE LYRICS
- ANALYZING MUSIC CONTENT
- PLAYING BACK VIDEO CONTENT ON YOUR TABLET DEVICE
- PLAYING BACK VIDEO CONTENT ON OTHER DEVICES BY SENDING (THROWING) IT FROM YOUR TABLET DEVICE
- DISPLAYING DETAILED INFORMATION ABOUT VIDEO CONTENT
- DELETING VIDEO CONTENT
- SEARCHING SCENES
- WHAT YOU CAN DO OVER THE HOME NETWORK
- ABOUT DLNA
- DEVICES THAT CAN ACT AS A SERVER
- DEVICES THAT CAN ACT AS A PLAYBACK DEVICE
- PREPARING THE HOME NETWORK
- EXAMPLE: WHEN YOU USE A COMPUTER AS A SERVER AND A TV AS A PLAYBACK DEVICE
- PLAYING BACK CONTENT STORED ON ANOTHER DEVICE (SERVER)
- TO BOOKMARK FOLDERS OR CONTENT
- TO DELETE A BOOKMARK
- PLAYING CONTENT ON OTHER DEVICES BY SENDING (THROWING) IT
- TO TRANSFER DATA BETWEEN THE INTERNAL MEMORY OF THE TABLET DEVICE AND AN SD MEMORY CARD
- TO TRANSFER DATA BETWEEN THE INTERNAL MEMORY OF THE TABLET DEVICE AND A RECORDING MEDIA CONNECTED TO THE USB MICRO-A/B CONNECTOR
- REGISTERING THE REMOTE CONTROL BY SETTING THE CATEGORY AND MANUFACTURER OF THE DEVICE
- TO REGISTER AS A REMOTE CONTROL FOR ANOTHER DEVICE
- LEARNING THE REMOTE CONTROL SIGNAL AND REGISTERING IT
- USING YOUR TABLET DEVICE AS A REMOTE CONTROL
- REGISTERING A TWITTER OR FACEBOOK ACCOUNT
- TO ADD AN ACCOUNT
- TO DELETE AN ACCOUNT
- SWITCHING THE POSTS (ARTICLE) DISPLAYED
- REGISTERING FILTERS FOR DISPLAYING POSTS
- TO CHANGE THE NAME OF A STREAM OR FILTERS FOR DISPLAYING POSTS
- TO DELETE A STREAM
- DISPLAYING THE STREAM
- READING AND WRITING THE POST (ARTICLE)
- READING POSTS
- TO IMPORT NEW POSTS
- TO REPLY TO OR COMMENT ON THE POSTS
- TO LOOK AT THE PROFILE OF THE PERSON WHO WROTE A POST
- WRITING POSTS
- SEARCHING FOR POSTS (ARTICLES) OR FRIENDS
- GALLERY
- PLAYING BACK PHOTOS OR VIDEOS ON YOUR TABLET DEVICE
- TO EXPAND DISPLAY AREA OF PHOTOS
- TO DISPLAY PHOTOS FULL-SCREEN
- TO DISPLAY SHOOTING LOCATION
- SHARING PHOTOS OR VIDEOS
- PLAYING BACK PHOTOS AUTOMATICALLY (SLIDE SHOW)
- EDITING PHOTOS
- TRADEMARKS
- PREPARING MEDIAREMOTE
- CRACKLE
- ABOUT BACKUP
- DATA YOU CAN MAKE BACKUP
- BACKING UP DATA (COPYING)
- COPYING DATA ON A COMPUTER TO YOUR TABLET DEVICE
- SUPPORTED FORMATS
- USING MEDIA GO
- INSTALLING MEDIA GO ON YOUR COMPUTER
- TRANSFERRING CONTENT TO YOUR TABLET DEVICE USING MEDIA GO
- ABOUT PS STORE
- USING A CONTROLLER OF THE PLAYSTATION(R)3 SYSTEM
- USING A CONTROLLER OF THE PLAYSTATION(R)3 SYSTEM WITH A WIRED CONNECTION
- USING A CONTROLLER OF THE PLAYSTATION(R)3 SYSTEM WITH A WIRELESS CONNECTION
- DISPLAYING THE USER GUIDE
- TURNING OFF THE CONTROLLER OF THE PLAYSTATION(R)3 SYSTEM
- PLAYING BACK MUSIC CONTENT ON MULTIPLE DEVICES (PARTY STREAMING)
- PARTY
- STREAMING
- PLAYING BACK MUSIC CONTENT USING THE PARTY STREAMING FUNCTION
- TAP [START]
- CHANGING THE DEVICES THAT PLAY BACK USING THE PARTY STREAMING FUNCTION
- CLOSING A PARTY
- ADJUSTING THE VOLUME OF THE DEVICES THAT ARE PARTICIPATING IN A PARTY
- MUTING BUTTON
- SUPPORT FOR PLAYSTATION(R) IN GENERAL
- NORWAY
- AUSTRIA
- SWITZERLAND
- PORTUGAL
- TURKEY
- POLAND
- INDIA
- TAIWAN
- HONG KONG
- SINGAPORE
- AUSTRALIA
- NEW ZEALAND
- UNITED ARAB EMIRATES/MIDDLE EAST (SAUDI ARABIA)
- INDONESIA
- THAILAND
- MALAYSIA
- THE TABLET DEVICE DOES NOT TURN ON
- THE TABLET DEVICE STARTS UP SLOWLY
- THE BATTERY DOES NOT CHARGE
- THE CHARGE INDICATOR DOES NOT LIGHT
- BATTERY CONSUMPTION INCREASES
- THE CHARGE INDICATOR BLINKS
- HEAT BUILDS UP IN THE TABLET DEVICE AND THE AC ADAPTER WHILE THE TABLET DEVICE IS IN USE OR BEING CHARGED
- THE SCREEN IS DARK
- THERE IS A POINT THAT IS NOT DISPLAYED PROPERLY ON THE SCREEN
- A BLUETOOTH(R) DEVICE WAS NOT FOUND
- YOUR TABLET DEVICE GETS SLOW/IS NOT PERFORMING AS EXPECTED
- YOUR TABLET DEVICE DOES NOT WORK
- TO RESET YOUR TABLET DEVICE
- THE SOUND FROM THE SPEAKER IS DISTORTED
- THE SCREEN BRIGHTNESS IS NOT STABLE
- THE SCREEN BRIGHTNESS CANNOT BE ADJUSTED
- AUTOMATIC ADJUSTMENT OF THE SCREEN BRIGHTNESS DOES NOT WORK AS EXPECTED
- THE SCREEN DISAPPEARS/DARKENS UNEXPECTEDLY
- THE TOUCH SCREEN DOES NOT WORK AS EXPECTED
- THE DATE AND TIME ARE RESET
- TO ERASE THE TAP SOUND (OPERATION SOUND)
- THE SCREEN DOES NOT ROTATE WHEN YOU TURN YOUR TABLET DEVICE
- TO TURN OFF SCREEN ROTATION
- TO DEACTIVATE THE LOCK FUNCTION/TO USE YOUR TABLET DEVICE WITHOUT LOCKING THE SCREEN
- THE SOUND FROM THE BUILT-IN SPEAKER IS INTERRUPTED WHEN THE SCREEN IS ROTATED
- A HEADSET CANNOT BE USED
- THE FILE CANNOT BE DISPLAYED/BE PLAYED BACK
- THE VIDEO IS INTERRUPTED/IS JUMPY/IS NOT SYNCHRONIZED WITH THE AUDIO
- YOUR TABLET DEVICE CANNOT RECEIVE GPS SIGNALS OR TAKES A LONG TIME FOR THE POSITIONING
- THE RESULTS OF GPS POSITIONING MAY BE DIFFERENT FROM THE ACTUAL LOCATION
- THE PHOTOS AND MOVIES TAKEN WITH THE CAMERA ARE BLURRY
- YOU CANNOT SEND (THROW) CONTENT TO ANOTHER DEVICE AND PLAY IT BACK WITH THE DLNA APP
- YOUR TABLET DEVICE CANNOT LEARN WITH THE REMOTE CONTROL APP
- SOME APPLICATIONS ARE NOT DISPLAYED IN THE SELECTED LANGUAGE
- SOME APPLICATIONS CANNOT BE UNINSTALLED
- A WEBSITE FOR MOBILE PHONES OR SMARTPHONES IS DISPLAYED
- YOUR TABLET DEVICE CANNOT CONNECT TO A WI-FI NETWORK
Brand : SONY
Model : Tablet SGPT12 Series