
VK230714 - Steamer GAGGENAU - Free user manual and instructions
Find the device manual for free VK230714 GAGGENAU in PDF.
| Product type | Steam cooker |
| Brand | GAGGENAU |
| Model | VK230714 |
| Power supply | 1800 W, 120 V, 60 Hz |
| Dimensions (W x D x H) | 288 x 490 x 190 / 260 mm |
| Cooking pan capacity | Up to 4 liters (water to the foaming rim) |
| Materials | Stainless steel pan, glass lid |
| Main functions | Pressureless steam cooking, simmering, keep warm, regeneration, blanching, juice extraction, sterilization |
| Included accessories | Perforated insert, non-perforated insert, special handle, glass lid |
| Safety | Child lock, automatic safety shut-off after 4 hours, overheating protection (limiter) |
| Cleaning | Cooking pan hand wash, inserts and lid dishwasher safe, descaling recommended |
| Temperature setting | In steps of 10°F between 100°F and 200°F, steam level (210°F) |
| Timer | 1 to 90 minutes |
| Drainage | Drain via valve, permanent installation or optional drainage kit AG 060-000 |
| Certifications | NEMA 6-15P compliant |
Frequently Asked Questions - VK230714 GAGGENAU
User questions about VK230714 GAGGENAU
0 question about this device. Answer the ones you know or ask your own.
Ask a new question about this device
Download the instructions for your Steamer in PDF format for free! Find your manual VK230714 - GAGGENAU and take your electronic device back in hand. On this page are published all the documents necessary for the use of your device. VK230714 by GAGGENAU.
USER MANUAL VK230714 GAGGENAU
Operation and assembly instructions
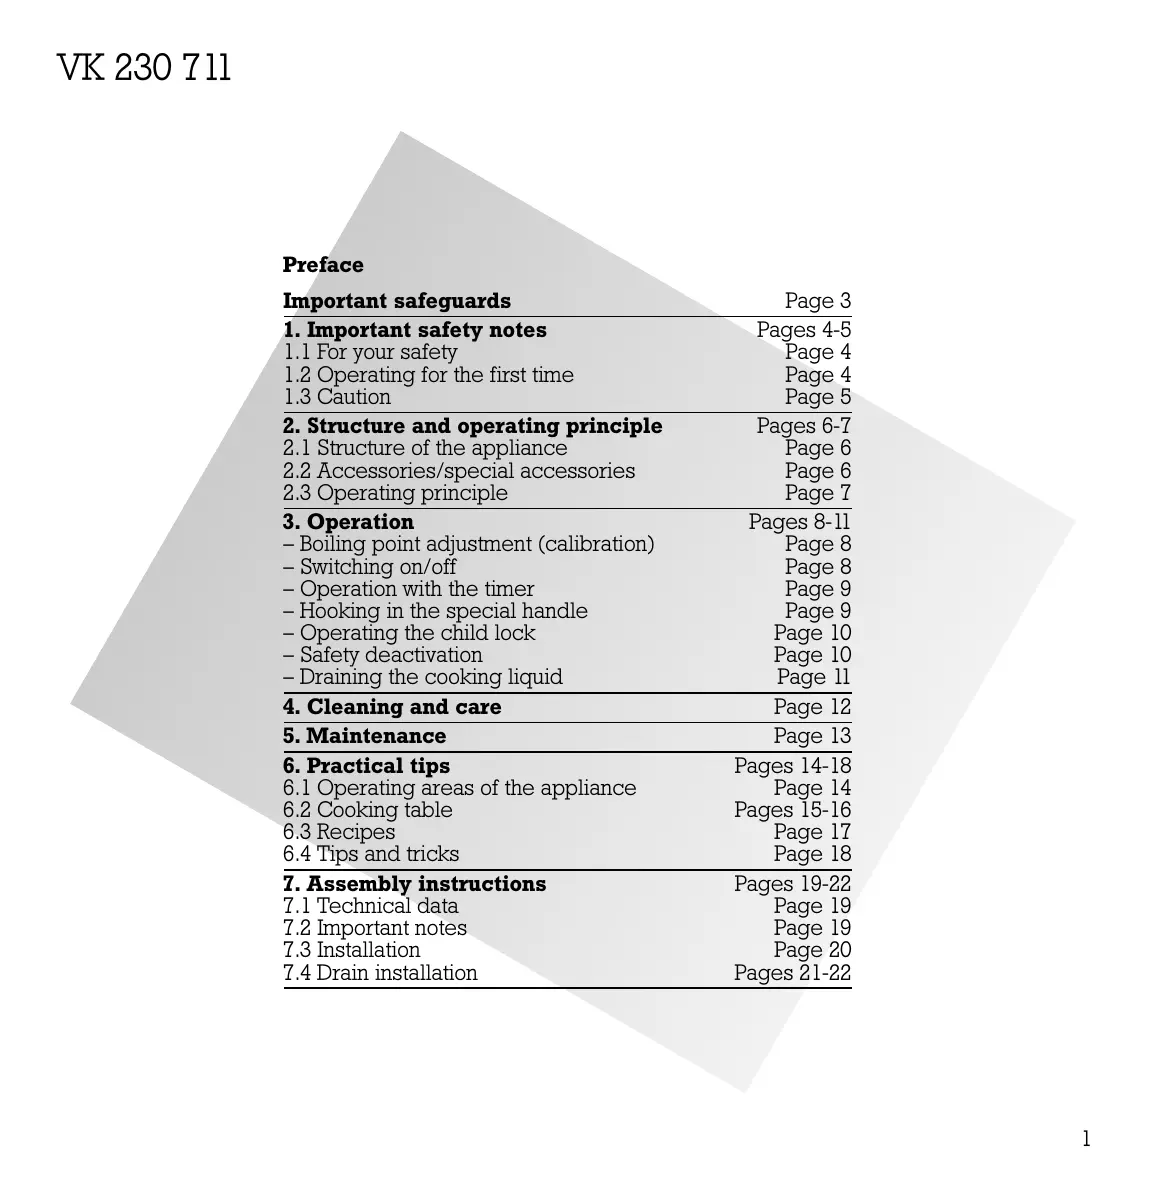
VK 230 711
Cooker and steam cooker

Preface
| Important safeguards | Page 3 |
| 1. Important safety notes | Pages 4-5 |
| 1.1 For your safety | Page 4 |
| 1.2 Operating for the first time | Page 4 |
| 1.3 Caution | Page 5 |
| 2. Structure and operating principle | Pages 6-7 |
| 2.1 Structure of the appliance | Page 6 |
| 2.2 Accessories/special accessories | Page 6 |
| 2.3 Operating principle | Page 7 |
| 3. Operation | Pages 8-11 |
| - Boiling point adjustment (calibration) | Page 8 |
| - Switching on/off | Page 8 |
| - Operation with the timer | Page 9 |
| - Hooking in the special handle | Page 9 |
| - Operating the child lock | Page 10 |
| - Safety deactivation | Page 10 |
| - Draining the cooking liquid | Page 11 |
| 4. Cleaning and care | Page 12 |
| 5. Maintenance | Page 13 |
| 6. Practical tips | Pages 14-18 |
| 6.1 Operating areas of the appliance | Page 14 |
| 6.2 Cooking table | Pages 15-16 |
| 6.3 Recipes | Page 17 |
| 6.4 Tips and tricks | Page 18 |
| 7. Assembly instructions | Pages 19-22 |
| 7.1 Technical data | Page 19 |
| 7.2 Important notes | Page 19 |
| 7.3 Installation | Page 20 |
| 7.4 Drain installation | Pages 21-22 |
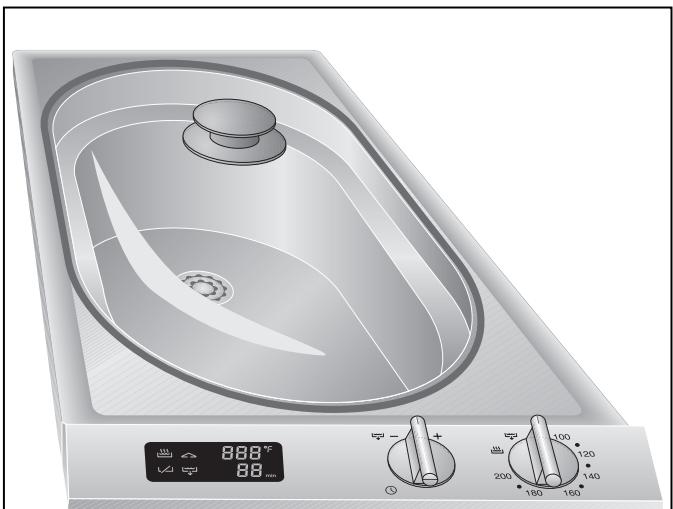
Fig. 1
Cooking with your new cooker and steam cooker will be even more fun than before.
The appliance offers you the following advantages:
- Pressureless cooking
Automatic shutdown - Thanks to the novel installation method implemented, installation is child's play!
To ensure that you will be able to use this appliance in all its diversity, read through the operating and assembly instructions conscientiously before operating it for the first time. The instructions contain important notes on use, installation and maintenance of the appliance.
On the following page you will find important notes on safety and operation. These will serve to ensure your personal safety and the lasting value of your appliance.
You will find notes on Page 3 that you ought to observe before operating the appliance for the first time.
The chapters entitled "Structure and operating principle" and "Operation" will tell you all the things your steam cooker is capable of doing and how the appliance is operated.
The chapter entitled "Cleaning and care" will make sure that your appliance will stay operable and beautiful for a long time.
Consult the "Practical tips" if you cannot set the function you require. Please contact Gaggenau after-sales service if these tips are not enough.
And now we wish you lots of fun cooking.
- Read all instructions.
- Do not touch hot surfaces. Use handles or knobs.
- To protect against electrical shock do not immerse cord or plug in water or liquid.
- Close supervision is necessary when any appliance is used by or near children. When children become old enough to operate the appliance, it is the legal responsibility of the parents or legal guardians to ensure that they are instructed in safe practices by qualified persons.
- Unplug from outlet when not in use and before cleaning. Allow to cool before putting on or taking off parts.
- Do not operate any appliance with a damaged cord or plug or after the appliance malfunctions or has been damaged in any manner. Return appliance to the nearest authorized service facility for examination, repair, or adjustment.
- The use of accessory attachments not recommended by the appliance manufacturer may cause injuries.
- Do not use outdoors.
- Do not let cord hang over edge of table or counter, or touch hot surfaces.
- Do not place on or near a hot gas or electric burner, or in a heated oven.
-
Extreme caution must be used when moving an appliance containing hot oil or other hot liquids.
-
Always attach plug to appliance first, then plug cord into the wall outlet. To disconnect, turn any control to "OFF". Then remove plug from wall outlet.
- Do not use appliance for other than intended use.
- Save these instructions.
1.1 For your safety
Do not operate the appliance if it is damaged.
The appliance must only be connected by an authorised specialist, paying attention to the relevant regulations of the power supply companies and the regional construction regulations.
Also observe the assembly instructions!
Please note that connecting cables must not come into contact with hot cooking surfaces when connecting electrical appliances next to the steam cooker.
The user is responsible for expert use and the perfect condition of the appliance.
Only ever operate the appliance under supervision.
The appliance must not be operated empty!
Caution: fire risk! Do not store any combustible objects in your appliance. When operating the appliance, only ever leave the inner parts inside the cooking compartment that you actually need.
Caution! The appliance gets hot during operation. Keep children away!
Do not clean the appliance with a steam cleaning apparatus or with water pressure because this poses a risk of short-circuits.
Isolate the appliance from the mains during every maintenance operation. To do this, remove the mains plug or actuate the corresponding fuse.
Repairs must be carried out by authorised specialists, thus ensuring electrical safety.
No warranty claims can be lodged in the event of damage caused by failure to observe these instructions.
Technical modifications reserved.
1.2 Operating for the first time
Before operating the appliance for the first time, please pay attention to the following notes:
- The appliance must be installed and connected by a specialist before it is operated for the first time.
- Conscientiously read through the operating and assembly instructions before operating the appliance for the first time.
- Remove the packaging from the appliance and dispose of it properly. Pay attention to the fact that there are accessories in the packaging. Keep packaging elements out of the reach of children!
- Remove all removable interior parts before operating the appliance for the first time.
- Thoroughly clean the appliance before using it for the first time (see chapter entitled "Cleaning and care").
- Before operating the appliance for the first time, check that the mains connection is in proper working order.
- The rating plate for this appliance is included with the instructions on a separate sheet. Store the rating plate in the same location as your operating and assembly instructions!
Boiling point adjustment (calibration):
The boiling point of water depends on your location in relation to sea level. When operating for the first time, the appliance calibrates itself automatically. During calibration you might notice more steam than usual. Your appliance can be used as normal to prepare food while it is calibrating.
1.3 Caution
- The appliance is intended solely for use in the household and must not be put to any other uses.
- Use the appliance to prepare meals only. It must not be used to heat up the room in which it is installed.
- The appliance is suitable for use with water only. The appliance must not be used for deep frying.
- Do not store any combustible items in your appliance. During operation, only ever leave the items you need inside the appliance.
- Only ever use the intended cooking inserts.
- Caution! Risk of burns!
Use the special handle to remove and insert the cooking inserts. - The (Heating) symbol in the control panel goes off as soon as the set temperature has been reached.
- Return the "Temperature" knob to "0" after cooking.
- Clean the appliance in regular intervals. The appliance should be cleaned after each operation.
- A built-in temperature protection facility prevents overheating of the appliance. The appliance must not be operated empty (cooking liquid only, no oil etc!). If the appliance is operated empty, it will switch off automatically and the (Limiter) symbol will appear in the display.
-
The appliance has a safety deactivation. Heating up of the appliance is switched off after 4 hours if it is not operated by way of the "Temperature" control knob during this time. Dashes are shown on the display.
-
The cooking tub may be filled with water as maximum up to the foaming edge and as minimum down to the bottom marking.
- Make sure that the steam outlet opening is not covered up during operation.
- Caution! When hot, the glass cover must not be placed on a wet and cold worktop or cooled under cold running water. It might otherwise crack. Replace the glass cover immediately if it is damaged. If glass splinters should enter into the cooking basin as the result of a damaged glass cover, bear in mind that the foodstuffs prepared in it are no longer suitable for consumption. The cover must always be fitted well on the appliance.
- Do not place items on the glass cover.
- You should observe extreme caution when draining hot water without a fixed water connection. Risk of burns! Use a temperature-resistant receptacle with an adequate capacity (e.g. a 10 l bucket). Use the drain installation set (see installation note).
- The door(s) of the base cabinet must be locked if you do not have a permanent drain connection and there are small children in your household. This reduces the risk of burns.
- If you have a permanent water drain connection, pay attention to the applicable regulations.
- If malfunctions should occur, you should first check whether the child lock is activated (see Page 10). Check the household fuses. If the problem has nothing to do with the power supply, please contact your specialist dealer or your responsible Gaggenau customer service.
2. Structure and operating principle
2.1 Structure of the appliance
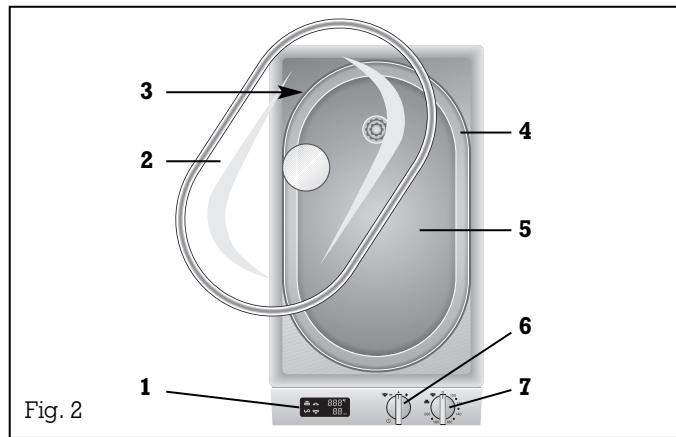
1 Display
2 Glass cover
3 Steam outlet opening
4 Splash edge
5 Cooking basin
6 "Timer" knob (adjustment range 1-90 minutes) and "Drain" function
7 "Temperature" knob with "Steam cooking level" and "Drain" functions
Panel:
Display offering the following possibilities:
Heating symbol
Display of the set temperature
Display of the set short time (in minutes)
Limiter symbol
Steam cooking level symbol
Drain valve open symbol
2.2 Accessories/special accessories
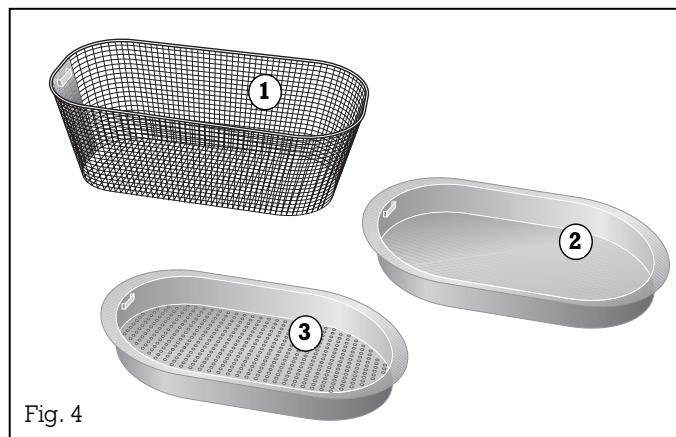
As standard, the appliance comes with the following accessories (Fig. 4):
glass cover with button handle
- unperforated cooking insert (GE 020-010)
- perforated cooking insert (GE 020-020)
- handle for the cooking inserts
You can order the following special accessories:
- VD 201-010: cover
- VV 200-000: connection trim for combination with other appliances
- FK 023-000: noodle basket (1)
- GE 020-010: unperforated cooking insert (2)
- GE 020-020: perforated cooking insert (3)
- AG 060-000: drain installation set for draining water into a receptacle
2.3 Operating principle
Tips when using for the first time
Thoroughly clean the appliance and accessories with mild soap detergent before using them for the first time. This will eliminate any 'newness' smells and soiling. Fill the cooking basin up to the boil-over rim with clean water. Replace the glass lid and operate the appliance at the steam cooking level for 30 minutes. During this time the appliance calibrates itself automatically. During calibration you might notice more steam than usual. Drain the water.
The boiling point of water depends on your location in relation to sea level. When operating for the first time, the appliance calibrates itself automatically to the correct setting.
Should you move to a different area, the appliance has to be re-calibrated. Fill the cooking basin up to the boil-over rim with water and replace the glass lid. Turn the "Temperature" control knob three times from the position 200^ to the steam cooking level and finally leave it on the steam cooking level. The appliance then calibrates itself automatically. This will take about 10 minutes. Do not take off the glass lid during the calibration process.
In the steam cooker you can cook, steam cook and blanch.
Steam cooking consists of cooking in a steam flow. The temperature range is between 180^ and 210^ . The steam transmits the heat. Suitable foodstuffs are vegetables, potatoes, fish and yeast dumplings.
The steam seals the food that is being cooked and prevents a loss of nutrients in the foodstuffs.
Cooked food retains its shape, its colour and its typical aroma. Foodstuffs are not browned in the steam cooker.
The appliance offers you the possibility of steam cooking without pressure using one or two cooking inserts. When you use the perforated cooking insert, the steam is able to reach the food on all sides. This ensures uniform cooking even of large quantities of food.
You can also set the cooking liquid temperature in 10^ stages between 100 and 200^ . This precise adjustment of the water temperature allows you, for example, to melt chocolate icing, poach meat or boil pasta.
Only add salt and stock cubes to the hot water. The cooking basin is to a great extent corrosion proof, however, in certain cases, for example salt, can cause damage to the material.
The appliance is suitable for use with water or cooking liquid only. Do not use the appliance for deep frying.
3. Operation

Caution! The appliance heats up and gets hot!
Caution! Never operate the steam cooker without liquid.
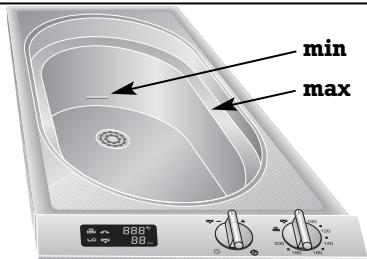
Fig. 5

Fig. 6
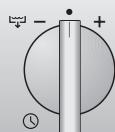
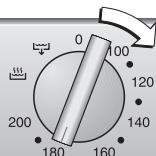
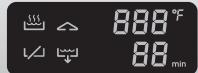
Fig. 7

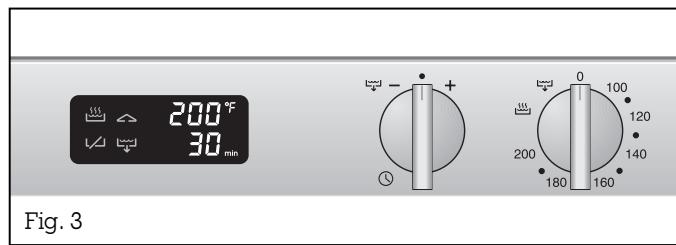
Switching on
- Fill the cooking basin with water or another cooking liquid. (Refer to the cooking table and recipe book for quantity information.) The cooking basin may be filled with water as maximum up to the foaming edge and as minimum down to the bottom marking (Fig. 5).
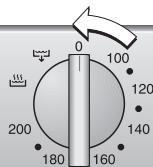
- Turn the "Temperature" knob to the temperature you require or to the steam cooking level (Fig. 6).
- The symbol (steam level) or the temperature you have set appears on the display (temperature range 100 - 200^ ).
While the appliance is heating up, the (Heating) symbol will appear on the display.
Switching off
Turn the "Temperature" knob back to position 0 (Fig. 7).

Caution! The "Temperature" knob (right-hand knob) must not be set to the "Drain" position.
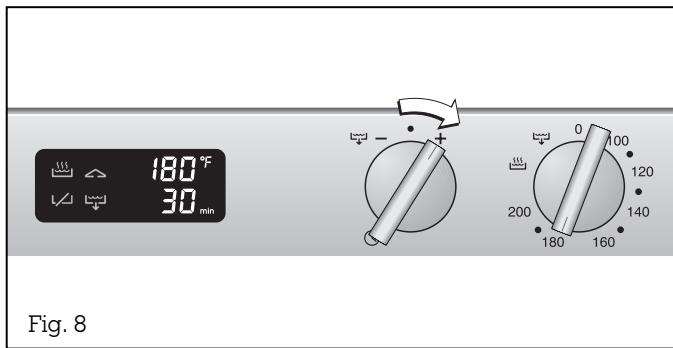
Operation with the timer:
- Turn the "Temperature" knob to the temperature you require or to the steam cooking level before setting the timer, otherwise the timer will run without switching off the appliance.
- Turn the "Timer" knob to the + or - setting until the time you require appears on the display (Fig. 8). The set time elapses as soon as the control knob is again in the zero position. After the set time, the appliance switches off automatically and an audible signal is sounded.
If you switch off the appliance earlier, the timer will continue to run without the switch-off function. An audible signal sounds after the time has elapsed. The automatic signal goes off as soon as you turn a control knob.
Note: you can use the timer even when the appliance is switched off.
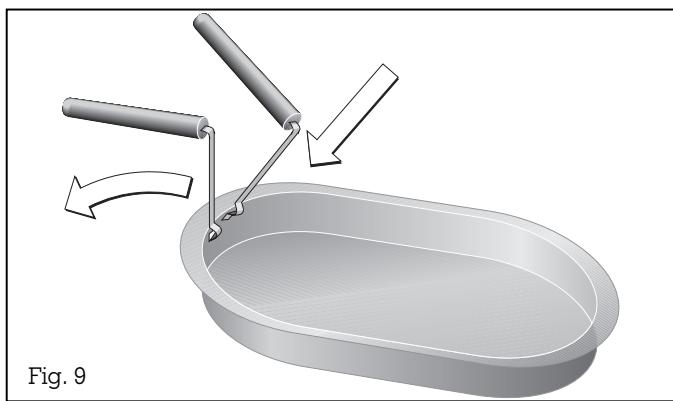
Hooking the special handle into the cooking inserts:
The cooking inserts can only be inserted in and removed from the steam cooker by using the included special handle. The special handle is not suitable for turning round the cooking inserts, e.g. to pour out the contents.
Note: By using the special handle to remove or insert the cooking inserts, you will protect your hands against burns while cooking.
Proceed as follows:
- Slide the special handle into the recess provided for this purpose.
- Tilt back the stirrup.
-Lift the handle up (see Fig. 9).
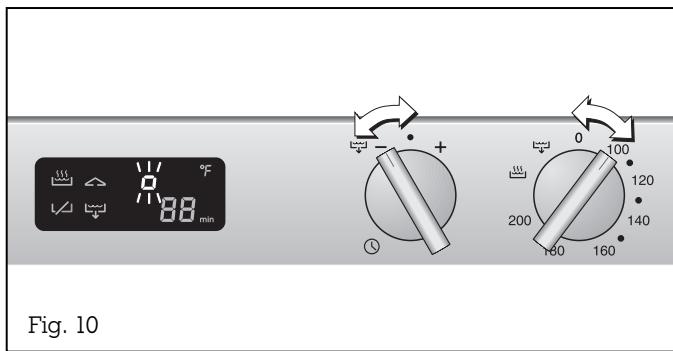
Operating the child lock
Activating the child lock
- Turn the "Timer" control knob to the left to the minus position. Hold the knob in this position.
- Turn the "Temperature" control knob to any temperature on the right.
- Turn the "Temperature" control knob back to the 0 position.
- Turn the "Timer" knob back to the 0 position. The symbol (child lock) appears on the display (Fig. 10). You can now turn the "Temperature" control knob to any position without the appliance heating up.

Deactivating the child lock
- Turn the "Timer" control knob to the left to the minus position and hold the knob in this position.
- Turn the "Temperature" control knob to any temperature on the right.
- Turn the "Timer" control knob to the 0 position.
- Turn the "Temperature" control knob to the 0 position. The "child lock" symbol on the display goes off (Fig. 11).
The appliance is now operable again.
Safety deactivation
For your protection, the appliance has a safety deactivation. Every heating operation is switched off after four hours if the appliance is not operated during this time. Flashing dashes appear on the display. Turn the "Temperature" control knob to the 0 position. You can then operate the appliance in the way to which you are accustomed.

Caution!
Allow the water or the cooking liquid to cool down before draining it. This avoids steaming in the base cabinet and scalding. Pay attention to regular descending if the water is highly limey. Otherwise, discoloration and heat buildups may be the result.
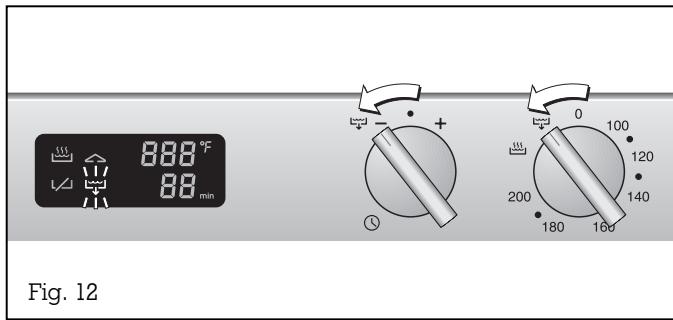
Draining the cooking liquid from the cooking basin:
Proceed as follows:
- If you do not have a permanently fitted water connection, place a vessel (e.g. a 10 l bucket) under the drain valve of the additionally installed drain installation set AG 060-000.
- Turn the "Temperature" control knob to the left to the (Drain valve) position.
- Turn the "Timer" control knob to the left to the position and hold the knob in this position (Fig. 12).
- An audible signal is sounded. The symbol (Drain valve) flashes on the display after a few seconds. The drain valve is opened.
- The (Drain valve) symbol lights up permanently in the display when the drain valve is open.
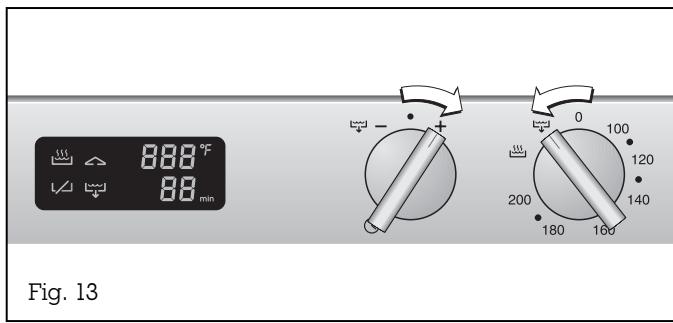
Closing the drain valve:
- Turn the "Temperature" control knob to the left to the (Drain valve) position.
- Turn the "Timer" control knob to the right to the + position and hold the knob in this position (Fig. 13).
- An audible signal is sounded. The symbol (Drain valve) flashes on the display after a few seconds. The drain valve is closed.
- The symbol (Drain valve) goes off as soon as the drain valve has been closed.
Note: the (Drain valve) symbol flashes on the display if the drain valve is not completely open or closed.
If you do not have a permanently installed drainage connection, place a temperature-resistant receptacle of a corresponding size (at least 10 l) under the drain valve and install the drain installation set AG 060-000.
4. Cleaning and care
Do no use any abrasive and caustic cleaning agents. Use plastic pot cleaners or a soft dishwashing brush and normal detergent. Do not use any abrasive sponges either.
Clean the appliance and accessories thoroughly before using them for the first time. Carry out boiling point adjustment. Fill the cooking basin up to the foaming edge and operate the appliance at the steam cooking level for 30 minutes to remove any 'newness' smells. Drain the water.
Clean the cooking basin with a mild detergent solution. The cooking basin should not be treated with stainless steel care agents because, in most cases, these are not neutral as far as foodstuffs are concerned.
You can clean the glass cover and the cooking inserts in a dishwasher.
The control panel must only be cleaned with a soft cloth. Do not use any commercially available stainless steel cleaners as these may be aggressive to the printed markings.
Clean control components, glass surfaces and operator controls with a moist cloth and gentle rinsing detergent and wipe them dry with a soft dry cloth.
Clean the appliance after every use:
- Empty and clean the steam cooker after every use. Soiling, salt and lime deposits can cause corrosion.
- Remove the leftovers strainer. Clean the cooking inserts and the leftovers strainer in a dishwasher or with mild soap solution. The handle for the cooking inserts must only be cleaned by hand.
- Rub the cooking basin dry with a cloth and reinsert the leftovers strainer.
-
The glass cover should not be fitted while the cooking basin is still moist.
-
If a white coating should form in the cooking basin owing to very limy water, wipe out the basin with a water and vinegar mixture or a descaling agent that is not harmful to foodstuffs and then rinse it well with clear water.
- Polish the cooking basin with a soft cloth and a drop of cooking oil.
After cleaning and drying, you can store the cleaned cooking inserts and the handle in the cooking tub. Turn over the glass cover to make sure that the appliance cover (special accessory) will lie properly on the recess.

Warning! The appliance must be disconnected from the power supply during all repair work.
If the appliance does not function correctly, check the fuses first.
If the power supply is functioning correctly, but your appliance still does not work, please contact your Gaggenau dealer who will provide you with the address and telephone number of your nearest manufacturer's authorized service agent or contact Gaggenau USA on 877.4GAGGENAU. Specify the appliance type (see rating plate).
Repairs may only be carried out by authorised technicians, in order to guarantee the safety of the appliance.
Unauthorized tampering with the appliance will invalidate any warranty claims.
Only ever use original spare parts.
What to do if ...
| ... the appliance does not heat up and ☐ appears on the display? | The child lock has been activated. Switch off the child lock. |
| ... the appliance switches off and dashes flash on the display? | Safety deactivation. Switch off the appliance. Then you can operate it again normally. |
| ... an error code (for example F1, F2, F3) appears on the display? | Call your local Gaggenau after-sales service. |
| ... the ↘ (limiter) symbol appears on the display? | No liquid in the cooking basin. Switch off the appliance. Fill the cooking basin with water up to the max marking. Leave appliance to cool down fully. If the ↘ (limiter) symbol does not go off after switching back on again although the appliance has fully cooled, please call your local Gaggenau customer service agency. |
The solution!
6.1 Operating areas of the appliance
Cooking in steam
- Fill the steam cooker to the bottom marking.
- Place the cooking insert with the food inside it in the appliance.
- Turn the "Temperature" knob to steam cooking level.
- Fit the glass cover.
You can highlight the taste of meals by replacing the water with a liquid that matches the food (vegetable soup, fish stock or meat stock).
Keeping warm
- Fill the steam cooker to the bottom marking.
- Place the cooking insert with the food inside it in the appliance.
- Turn the "Temperature" control knob to the temperature level you require.
- Fit the glass cover.
In this way, you can keep foodstuffs gently and tastily warm over a prolonged time period without them drying out.
Regenerating
Meals that have already been prepared can be regenerated (reheated) in the steam cooker.
- Fill the steam cooker to the bottom marking.
- Place your prepared meal in the corresponding cooking insert and turn the "Temperature" control knob to the steam cooking level setting. Fit the glass cover. Switch back to the required temperature (180-200°F) as soon as the "Heating" symbol has gone off.
Cooking
- Fill the cooking basin with water or another cooking liquid (no oil!) up to the foaming edge.
- Turn the "Temperature" control knob to a temperature between 100 and 200^ .
- You are advised to fit the glass cover. Use the noodle basket (accessory FK 023-000)
Extracting juice
- Fill the steam cooker to the bottom marking.
- Place fruit in the perforated insert
- Place the unperforated insert in the appliance and then the perforated insert over it.
- Steam until no more juice is extracted.
Sterilising
- Fill the steam cooker to the bottom marking.
- Place jars in the perforated insert in such a way that they do not touch each other.
- Turn the "Temperature" control knob to the steam cooking level setting.
- Switch off the appliance as soon as bubbles start to rise in the jar.
- Do not remove the jars from the appliance until they have cooled down fully.
Blanching
- Fill the steam cooker to the bottom marking.
- Preheat the appliance in the steaming setting.
- Place the vegetables in the unperforated insert.
- After 1-2 minutes, place the vegetables in icy water to cool them down fast. Allow the vegetables to drip dry fully.
6.2 Cooking table
Steaming / Cooking
Setting: steam cooking
| Foodstuff | Water (cups) | Cooking insert selection | Food quantity | Preparation | Cooking times* (minutes) |
| Meat | |||||
| Meatballs | 4 | perforated | 500 g | 15 - 20 | |
| Fillet of beef | 4 | unperforated | 400 g | place herbs, e.g. 1/2 teasp. thyme in the cooking basin | 15 - 20 |
| Chicken breast, filled | 4 | unperforated Base buttered | 500 g | 20 - 25 | |
| Turkey breast | 4 | unperforated Base buttered | 300 g | over vegetable stock | 15 |
| Smoked pork | 4 | unperforated | 1 kg | 60 | |
| Boiled beef | 4 | unperforated | 1 kg | with soup vegetables | 85 - 90 |
| Fish | |||||
| Salmon fillet | 4 | perforated | 600 g | 10 | |
| Truite bleu | 4 | perforated | 2 trouts | vegetable stock with vinegar | 8 - 10 |
| Trout in stock | 4 | unperforated | 2 pieces | 10 - 15 | |
| Cod cutlets steamed in wine | 4 | unperforated | 2 cod cutlets | possibly in a vegetable bed over water and wine | 20 |
| Ocean perch fillet | 4 | unperforated | 3 fillets | 10 - 12 | |
| Pike fillet | 4 | unperforated | 1 kg + 2 cups water and ingredients | 15 - 20 | |
| Mussels | 4 | perforated, unperforated | in the perforated insert with juice | 10 - 15 | |
| Vegetables | |||||
| Cauliflower | 4 | perforated | 1 head | in roses | 20 - 30 |
| Cauliflower and carrots | 4 | unperforated perforated | 1 kg 1 kg | in roses sliced | 35 - 40 |
| Broccoli | 4 | perforated | 1 head | in roses | 8 - 12 |
| Green beans | 4 | perforated | 800 - 1000 g | 20 - 25 | |
| Kohlrabi | 4 | perforated | 800 g | sliced | 30 - 35 |
| Carrots | 4 | perforated | 1 kg | sliced | 20 - 25 |
| Jacket potatoes | 4 | perforated | 1 kg | 35 - 40 | |
| Boiled potatoes | 4 | perforated | 1 kg | halve | 20 - 25 |
| Boiled potatoes and cauliflower | 4 | perforated unperforated | 1 kg 1 kg | halve in roses | 25 - 30 |
| Asparagus spears | 4 | perforated, unperfor. | 2 kg | whole | 25 - 40 |
| Courgettes, aubergine | 4 | unperforated | 500 g | sliced | 5 - 8 |
| Spinach | 4 | unperforated | 250 g | 4 | |
| Fennel | 4 | perforated | 4 pieces | whole | 30 - 40 |
| Side dishes | |||||
| Rice, untreated | 4 | unperforated | 250 g 2 cups water | 40 - 45 | |
| Parboiled-rice | 4 | unperforated | 250 g 2 cups water | 20 | |
| Pasta | 16 | Noodle basket | 500 g | according to manufacturer's specifications | |
| Swabian noodles, noodles (fresh) | 16 | Noodle basket | 500 g | 2 - 5 | |
| Cooked-egg garnish | 4 | unperforated Base buttered | 4 cups | 10 - 15 | |
| Desserts | |||||
| Pudding in bain-marie tin | 4 | perforated | quantity for 6 cups tin | according to recipe | |
| Stewed fruit | 4 | unperforated | 1 kg, 1 cup water | 10 - 20 | |
| Yeast dumplings | 4 | unperforated | 8 dumplings, 1/2 cup milk, butter and sugar | 15 - 20 | |
| Rice pudding | 4 | unperforated | 250 g, 3 cups milk | 25 - 30 | |
| * Note: the cooking times specified here are rough guide values only. You are advised to always preheat the steam cooker. If the appliance is not preheated, cooking times are prolonged by around 5 minutes. | |||||
Cooking table
Simmering
Setting: temperature level
| Foodstuff | Water (cups) | Cooking insert selection | Food quantity | Temperature | Cooking times* (minutes) |
| Sausages | 16 | without | 4 - 8 pairs | 160 - 180°F | 10 - 20 |
| Meat dumplings | 16 (e.g. stock) | without | depending on the size | 190 - 200°F | 20 - 30 |
| Dumplings / pasta | 16 | without | 4 - 6 | 190 - 200°F | 20 - 30 |
| Mulled wine | - | without | min. 4 cups | 170 - 190°F | - |
| * Note: the cooking times specified here are rough guide values only. | |||||
6.3 Recipes
Halibut cutlets with bunched carrots
(completemenuwithtwosteamcookinginserts)
For 4 persons:
Ingredients
500 g bunched carrots
4 halibut cutlets (app. 200 g each)
1 lemon
Pepper
1/2 bunch parsley
1/2 bunch basil or dill
30 g butter
100 ml vegetable stock
Salt
Preparation
Fill the appliance to the bottom marking with water. Preheat to the steam cooking level.
Cut the leaves off the carrots down to 2 ~cm . Wash and peel the carrots. Steam cook the carrots whole for 12 minutes in the perforated cooking insert.
In the meantime, briefly rinse the fish cutlets and dry them well. Season them with pepper and lemon juice and place them in the unperforated cooking insert. Place the halibut over the carrots and steam everything once again for 12 minutes.
During this time, wash the herbs, dab them dry and chop them finely. Melt the butter in a large pan. Take the carrots out of the steam cooker and keep the fish warm in the steam cooker at 150^ . Toss the carrots in the butter.
Sprinkle the chopped herbs over them. Pour on the vegetable stock and season the carrots with salt and pepper. Salt the halibut cutlets and serve them with the seasoned carrots.
Chicken breast wrapped in leek
For 4 persons:
Ingredients
4 chicken breasts (app. 120 g each)
2 teaspoons of horseradish (from a jar)
1 leek (app. 200 g) 400 g carrots
1 liter of chicken stock 1/2 bunch parsley
1 tablespoon crème fraîche l onion
A few drops of lemon juice Salt
1 teaspoon mustard Pepper
Preparation
Rinse the meat, dab it dry and cut it lengthwise in half. Rub on horseradish all-round.
Rinse the leek well and cut it lengthwise in half.
Strip off the leaves singly and cut them lengthwise into strips of about 2 cm width.
Boil the stock in a pan and simmer the leek strips in it for 2 minutes, lift them out and allow them to cool.
Peel the carrots, rinse them and cut them lengthwise into thin strips using a peeler.
Peel the onion and cut it into fine cubes. Rinse the parsley, pick off the leaves and chop half of it.
Mix the carrots with the onion and the parsley leaves and pour the mixture into the strainer. Place two halves of chicken breast each on one another, wrapping the leek strips around the chicken breasts in the middle. Then place this on the carrots and lightly salt and pepper it all.
Place the strainer on the stock. Bring the stock back to the boil and, with the lid in place, steam the poultry and the vegetables in medium heat for 25 - 30 minutes.
Remove the strainer from the pot, but keep the lid on. Measure 150ml of the stock and pour it into a pan. Stir it with mustard and crème fraîche and vigorously bring it to the boil. Season the sauce with salt, pepper and lemon juice and mix in the chopped parsley. Serve with mashed potato or dark white French bread.
6.4 Tips and tricks
- The steam cooker may be used with max. two cooking inserts at the same time.
- When steaming with two cooking inserts, you can either place the inserts simultaneously in the cooking basin or you can insert them during the cooking process. When using this method, please make sure that you insert the food with the longer cooking time first. Make sure you insert the perforated insert under the unperforated insert. Do not insert the other cooking insert until the time remaining for the second item you intend to cook has been reached. In this way, you can make sure that meals that require different cooking times will be ready at the same time.
- Food cooked in steam has a more intensive taste than food cooked by conventional means. Therefore, you can largely dispense with the need for additional spicing. This means that the appliance is also suitable for diets.
Nutrients, vitamins and minerals are retained, as well as taste, shape and colour. Prepare the food without fat! - If possible, always fit the cover. The steam condenses on the cover and drips back onto the food. Steam and energy losses are prevented/avoided by a well sealing cover.
- Cooked food does not come into contact with the boiling water. Therefore, it is enveloped completely by the steam and is not drained of its goodness by water.
- Cooking in steam is an energy-saving means of preparing food.
- Always preheat the steam cooker! This shortens the cooking time and loss of nutrients from foodstuffs are minimised.
If the (Limiter) symbol appears on the display, this may be due to the following reasons:
- Running dry:
- The appliance is being operated without water.
- There is no more water in the appliance.
- Heat build-up:
- Scale deposits may cause overheating as the result of a heat build-up.
Important:
- Turn the "Temperature" control knob to the 0 position.
- Pour cooking liquid into the cooking basin.
- Allow the appliance to cool down fully before operating it again.
If the (limiter) symbol does not go off after switching back on again although the appliance has fully cooled, please call your local Gaggenau customer service agency.
7.1 Technical data
Total connected load: 1800 W
AC 120V / 60Hz
Dimensions: 288 × 490 × 190 / 260 ~mm
11^5 / 16 × 19^6 / 16 × 7^1 / 2 / 10^1 / 4
Pay attention to the data on the rating plate. The appliance can be connected with a plug or it can be connected permanently.
7.2 Important notes
The installing technician is responsible for the correct functioning of the appliance at the time of installation. He must instruct the user on how to operate the appliance correctly on the basis of the Operating Instructions, and the user must be instructed on how to disconnect the appliance in an emergency.
The appliance must only be connected by an authorised specialist, paying attention to the relevant regulations of the power supply companies and the regional construction regulations.
The minimum distance from the trough base to the nearest heat-sensitive parts is 10 mm ( 1332 ) .
The distance between the side and wooden built-in furniture must be at least 200 mm ( 7^7 / 8^7 ).
During installation, pay attention to a minimum clearance of 35mm (1^3 / 8^n) from the wall trim or 50mm(2^ ) from the wall (measured from the end of the appliance cutout).
Note: do not install the appliance directly next to a deep fryer!
Possible damage, caused by failure to observe these instructions cannot be recognised.
If damaged, the mains cable must be replaced by a special mains connecting cable. The mains connecting cable must only be connected by the manufacturer or the manufacturer's authorised after-sales service.
The mains connecting cable must at least correspond to the type SJTO 3x16 AWG 105^ .
A suction extractor must be installed if suspended cupboards are installed over the steam cooker because the steam might otherwise damage built-in furniture.
Technical modifications reserved.
The steam cooker may be installed in kitchen combinations made of wood or similar combustible materials without taking additional measures.
Pay attention to the "Important notes" (chapter 1).
Electrical connection
The appliance must only be connected by an authorised electrician, paying attention to all relevant regulations.
Plug has to be conform with NEMA
CONFIGURATIONS FOR PLUGS AND
RECEPTACLES.
Plug must be rated not less than type 6-15 P (2-pole 3-wire grounding).
Only a qualified electrician should install this appliance.
You are advised to install an earthed socket for 10 or a junction box about 70~cm ( 27^1/2 ) above the floor space behind the appliance so that it is also accessible after installation of the appliance.
7.3 Installation
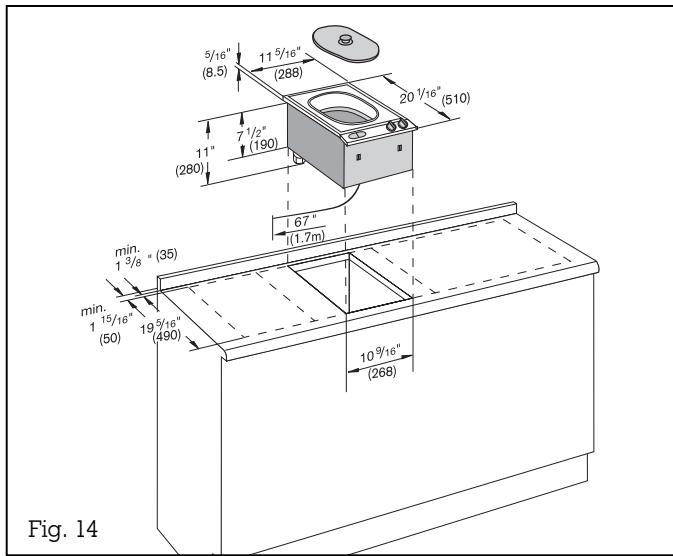
- Produce the recess for one or several Vario appliances in the worktop. Proceed as shown in the installation sketch and the dimension table. The dimension table contains the space requirement for the connecting strip between the appliances.
Important: the angle between the cut surface and the worktop must amount to 90^ . (Fig. 14)
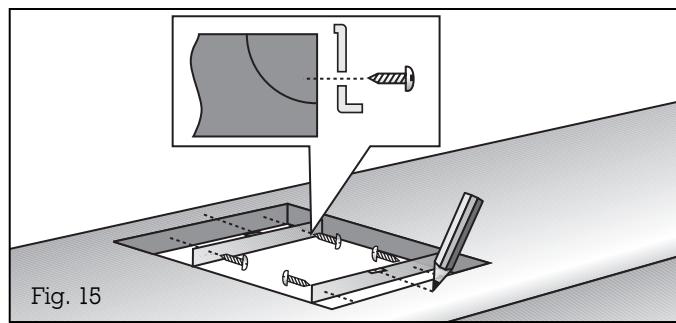
- Mark the centre of the recess exactly. Secure the securing rails on both sides in the recess. Make sure that the lugs of the securing rails lie on the worktop and that the centre marking on the securing rails is precisely flush with the centre marking on the worktop (Fig. 15).
Secure the cover on the appliance before assembly. See assembly instructions VD 201-010.
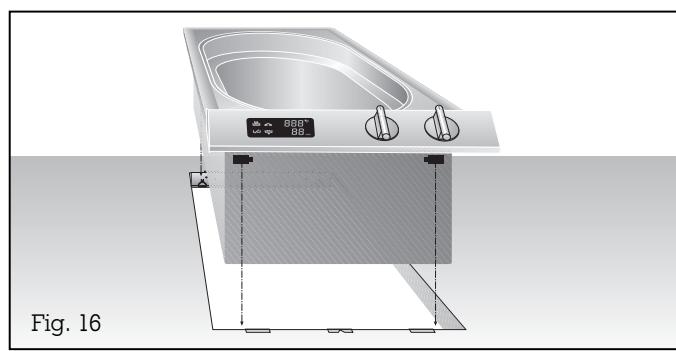
- Lower the appliance into the worktop. Make sure that the engaging lugs on the appliance lie exactly on the clamping springs. Press the appliance firmly into the worktop. The engaging lugs on the appliance "snap" into the clamping springs (Fig. 16).
Note: When installing the appliance in granite or marble worktops, have the holes produced by a specialist or stick on the securing rails with a temperature-resistant 2-component adhesive (metal on stone).
Note: Several appliances can also be installed in individual recesses, as long as a minimum clearance of 40mm ( 1^9/16 ) is kept to between the appliances.
7.4 Drain installation
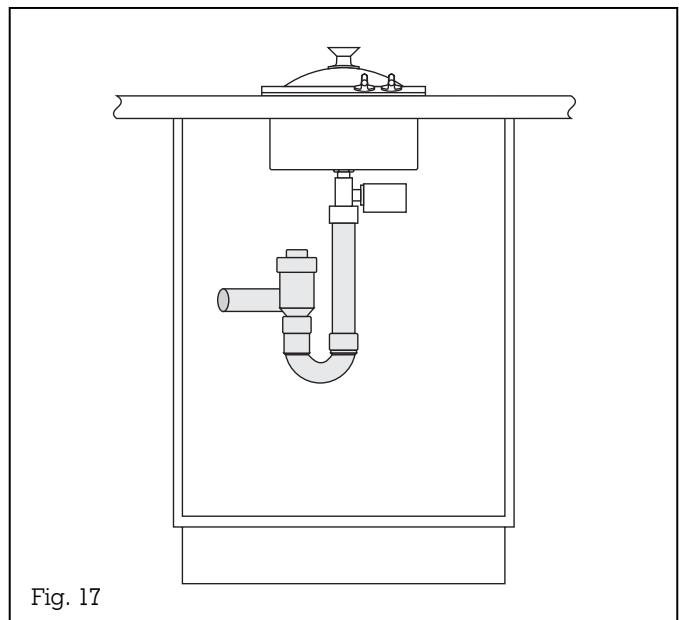
A permanent drain connection is recommended. This requires a drain connection in the base cabinet. It can be connected permanently (Fig. 17) or with a free fall (Fig. 18).
Please install a non-return valve if required by local codes.
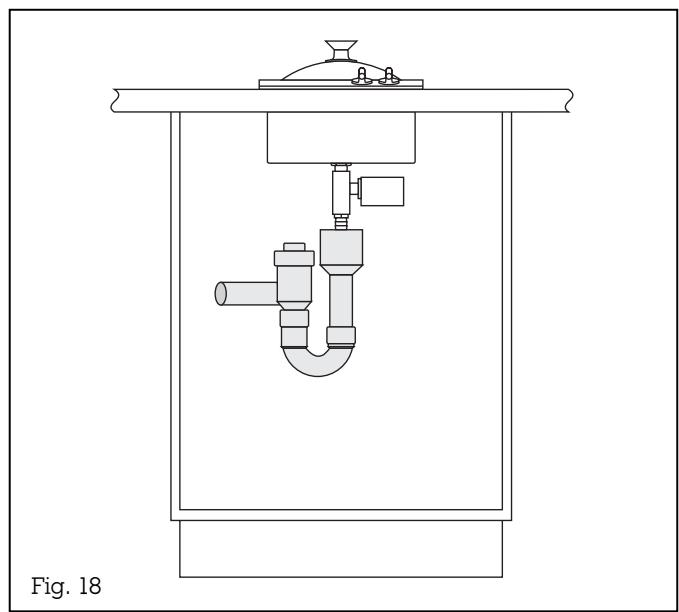
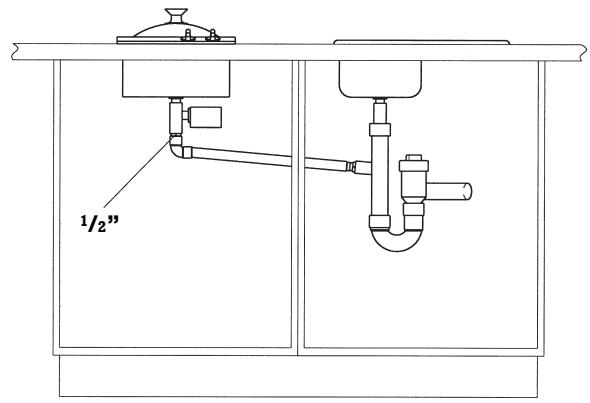
Fig. 19
If the water connection is located in a neighbouring base cabinet, connection can be established with a connecting pipe or hose (Fig. 19). A non-return valve must be installed. During installation, pay attention to a constant downward flow of the connecting pipe.
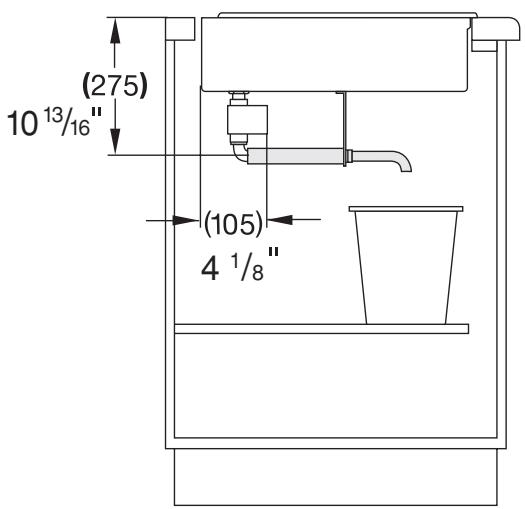
Fig. 20
If no drain connection is available, the drain installation set (AG 060-000) allows you to drain the cooking liquid into a suitable receptacle (e.g. a 10 l bucket) (Fig. 20).
GAGGENAU
GAGGENAU HAUSGERÄTE GMBH
CARL-WERY-STR. 34·81739 MUNCHEN
GERMANY
(089) 45 90-03
FAX (089) 45 90-23 47
GAGGENAU
5551 McFADDEN AVENUE HUNTINGTON BEACH, CA 92649 USA 877.4GAGGENAU www.gaggenau-usa.com
- VK 230 711
- Preface
- Cooking with your new cooker and steam cooker will be even more fun than before.
- For your safety
- Also observe the assembly instructions!
- Operating for the first time
- Boiling point adjustment (calibration):
- Caution
- - Do not place items on the glass cover.
- Structure and operating principle
- Structure of the appliance
- Panel:
- Accessories/special accessories
- Operating principle
- Tips when using for the first time
- Operation
- Switching on
- Switching off
- Operation with the timer:
- Hooking the special handle into the cooking inserts:
- Proceed as follows:
- Operating the child lock
- Activating the child lock
- Deactivating the child lock
- Safety deactivation
- Caution!
- Draining the cooking liquid from the cooking basin:
- Closing the drain valve:
- Cleaning and care
- Clean the appliance after every use:
- Warning! The appliance must be disconnected from the power supply during all repair work.
- What to do if ...
- The solution!
- Operating areas of the appliance
- Cooking in steam
- Keeping warm
- Regenerating
- Cooking
- Extracting juice
- Sterilising
- Blanching
- Recipes
- Halibut cutlets with bunched carrots
- Preparation
- Chicken breast wrapped in leek
- Tips and tricks
- Important:
- Technical data
- Important notes
- The mains connecting cable must at least correspond to the type SJTO 3x16 AWG 105°C .
- Technical modifications reserved.
- Electrical connection
- Installation
- Drain installation
- GAGGENAU
Brand : GAGGENAU
Model : VK230714
Category : Steamer