
SP212214 - Hob GAGGENAU - Free user manual and instructions
Find the device manual for free SP212214 GAGGENAU in PDF.
| Product type | Cooktop with integrated control console |
| Brand | GAGGENAU |
| Model | SP212214 |
| Electrical supply | 230/400 V 3N, 50/60 Hz, 7600 W |
| SuperQuick cooking zones | 4 zones: 14 cm (1200 W), 18 cm (1800 W), 17 cm (1500 W) + roasting zone 17x265 mm (2400 W), 14 cm (1000 W) + 21 cm zone (2200 W) |
| Automatic quick cook function | Yes, on the two front zones |
| Combination function | Yes, for rear right (oval) and front right (large round) zones |
| Residual heat indicator | By red dot for each zone |
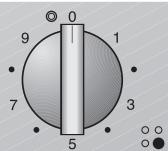
| Cooking levels | 9 levels (1 to 9), plus position 0 |
| Cleaning | Soft cloth and mild soapy solution; use Gaggenau cleaner ref. 098690 for the ceramic glass |
| Safety | Do not use if damaged; disconnect before maintenance; repair by authorized specialist |
| Installation | Must be installed by an authorized specialist; comply with local regulations |
| Spare parts | Available from Gaggenau after-sales service |
| Heat class | Y |
| Cutout dimensions (console) | According to the diagram in the manual (not provided) |
Frequently Asked Questions - SP212214 GAGGENAU
User questions about SP212214 GAGGENAU
0 question about this device. Answer the ones you know or ask your own.
Ask a new question about this device
Download the instructions for your Hob in PDF format for free! Find your manual SP212214 - GAGGENAU and take your electronic device back in hand. On this page are published all the documents necessary for the use of your device. SP212214 by GAGGENAU.
USER MANUAL SP212214 GAGGENAU
Operating and assembly instructions
SP 212-…
Built-in control console

Preface
1. Important notes
1.1 For your safety Page 3
1.2 Operating for the first time
1.3 About use
2. Structure and operating principle
3. Operation Pages 6-8
3.1 Switching on/off
3.2 Operating with the combination function Page 7
3.3 Working with automatic quick boil
4. Cleaning and maintenance Page 9
5. Assembly instructions Pages 10-12
5.1 Important notes on installation
5.2 Installation
5.3 Removal Page 12
With your new control console, cooking will be even more fun than before.
To ensure that you will be able to use this appliance in all its diversity, read through the operating and assembly instructions conscientiously before operating it for the first time. The instructions contain important notes on use, installation and maintenance of the appliance.
You will find notes on Page 4 that you ought to observe before operating the appliance for the first time.
The chapters entitled "Structure and operating principle" and "Operation" will tell you all the things your oven is capable of doing and how it is operated.
The chapter entitled "Cleaning and care" will make sure that your appliance will stay operable and beautiful for a long time.
And now we wish you lots of fun cooking.

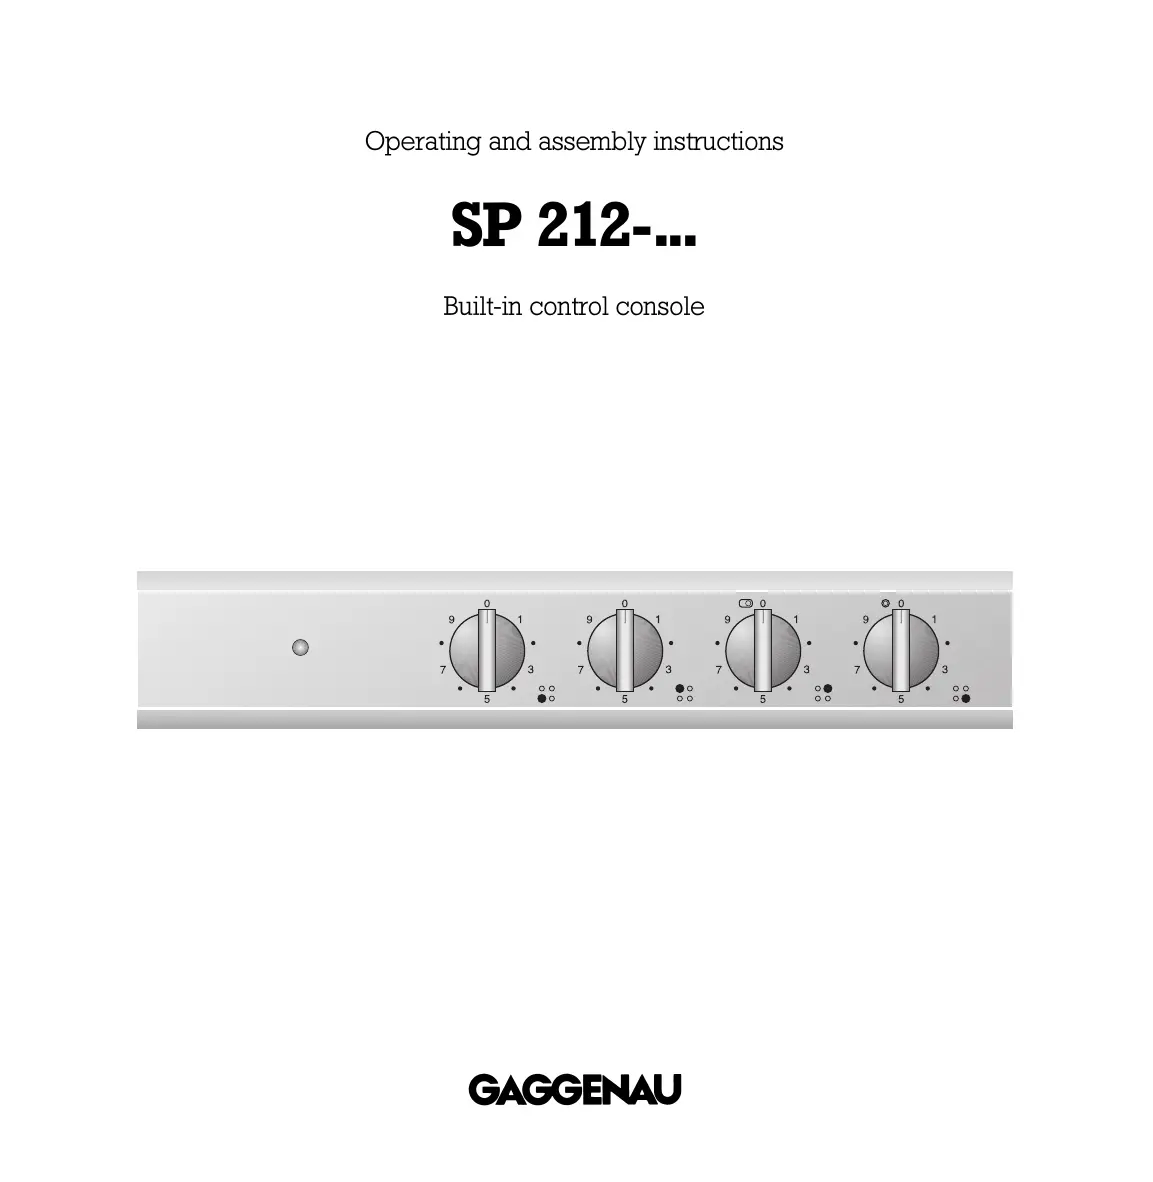
Fig. 1
1.1 For your safety
You must not operate the appliance if it is damaged.
The appliance must only be connected by an authorised specialist, paying attention to the relevant regulations of the power supply companies and the regional construction regulations.
Observe the assembly instructions!
When connecting electrical appliances and devices in the proximity of cooking surfaces and ovens, make sure that connecting cables do not become jammed under the hot oven door or come into contact with hot cooking surfaces.
As the user, you yourself are responsible for maintenance and proper use in the household.
Only ever operate the appliance under supervision.
Observe caution with oils and fats. Overheated oils and fats can easily cause fires.
Important: the appliance heats up during operation. Keep children away.
Do not operate the hotplates without pots and pans placed on them.
Note: to avoid jeopardising the electrical safety of the appliance, it is forbidden to use high-pressure or steam jet cleaning devices.
Isolate the appliance from the mains during every maintenance operation. To do this, remove the mains plug or actuate the corresponding fuses.
Repairs must be carried out by authorised specialists, thus ensuring electrical safety.
No warranty claims can be lodged for any damage resulting from failure to observe these instructions.
Do not store any substances that are sensitive to high temperatures, or which pose a fire hazard (e.g. cleaning agents or spray cans), in drawers or cupboards under the appliance.
Technical modifications reserved.
The built-in control console SP 212 is combined with the glass-ceramic hob CK 216.
1.2 Operating for the first time
Before operating the appliance for the first time, please pay attention to the following notes:
- The appliance must only be connected by an authorised specialist.
- Keep the rating plate (on the enclosed sheet) in the same place as the operating and assembly instructions.
- Read through these instructions attentively before operating your appliance for the first time.
- Remove the packaging from the appliance and dispose of it properly. When unpacking the appliance, make sure you do not damage its seal. Pay attention to the fact that there are accessories in the base of the packaging. Keep packaging elements away from children.
- Tip: If you have a glass insurance, we recommend that you have your new glass-ceramic cooking range included.
- Operation of the appliance must be discontinued immediately if improper use produces cracks, breaks or flaws on the cooking surface, with the result that live parts can come into contact directly or indirectly with seeping liquid or if there is a risk of injury. Remove the mains plug or actuate the corresponding mains fuse. Inform after-sales service!
- Before operating the appliance for the first time, make sure that the mains connection is in proper working order.
1.3 About use
- The appliance is intended solely for use in the household and must not be put to any other uses.
- Use the appliance to prepare meals only. It must not be used to heat up the room in which it is installed.
- Do not use the cooking surface as space to store items.
- Place a cooking vessel on the corresponding hotplate before operating it. Do not remove the cooking vessel until you have switched off the hotplate. The size of pots and pans should correspond to the size of the hotplate. This will save you energy and time.
- Observe caution with oils and fats. Overheated oils and fats can easily cause fires (e.g. when cooking French fries).
- Turn all control knobs to 0 after use.
- In the event of malfunctions, first check your household fuses. If a problem has nothing to do with the power supply, please contact your specialist dealer or your responsible Gaggenau after-sales service.
- Use of aluminium kitchenware or stainless steel kitchenware with aluminium bases may produce mother of pearl-coloured stains on your cooker. These will not have a detrimental effect on functioning of the cooking surface, though.
- The appliance is not suitable for warming up foodstuffs in aluminium foil or in plastic vessels.
- The glass-ceramic cooker additionally features an individual residual heat display. The residual heat display indicates that, after switching off, a cooking zone has still not cooled down to such an extent that it can be safely touched. It lights up in the residual heat display panel as a red dot for each cooking zone.
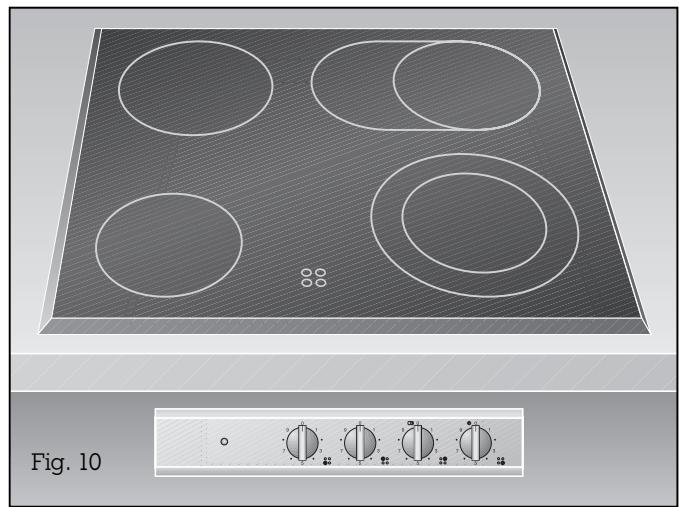
2. Structure and operating principle
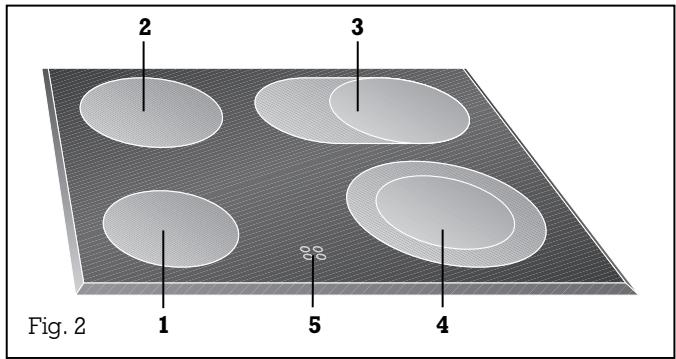
Structure of the CK 216
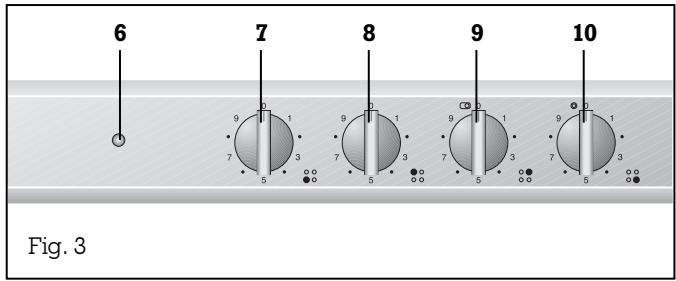
Structure of the SP 212
1 SuperQuick cooking zone 140mm (1200W)
2 SuperQuick cooking zone 180mm (1800W)
3 SuperQuick cooking zone 170mm (1500W) with connection to the roasting zone 170mm x 265mm (2400W)
4 SuperQuick cooking zone 140 mm (1000W) with connection to 210mm (2200W)
5 Residual heat display panel
6 Pilot lamp
7 Control knob for front left cooking zone (with automatic quick boil)
8 Control knob for rear left cooking zone
9 Control knob for rear right cooking zone (with combination)
10 Control knob for front right cooking zone (with combination and automatic quick boil)
The glass-ceramic cooker features SuperQuick cooking zones. These cooking zones possess good heat distribution properties and light up red while they are heating up.
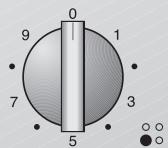
3.1 Switching on / off
Switching on
Switching off
Individual residual heat display
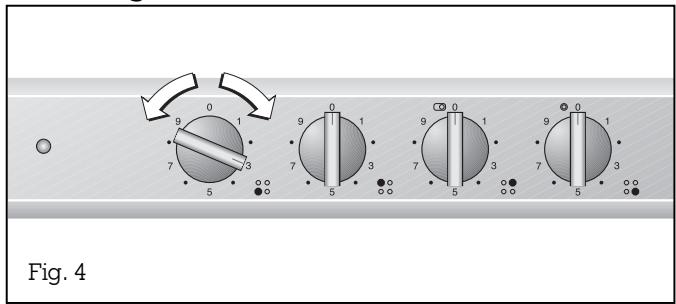
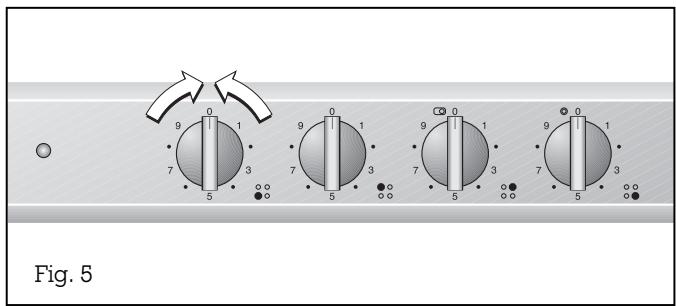
Switching on cooking zones without the combination feature:
Turn the corresponding control knob to the left or right to the required cooking level (1-9).
Switching on cooking zones with the combination feature:
Turn the corresponding control knob to the required cooking level (1-9) on the right.
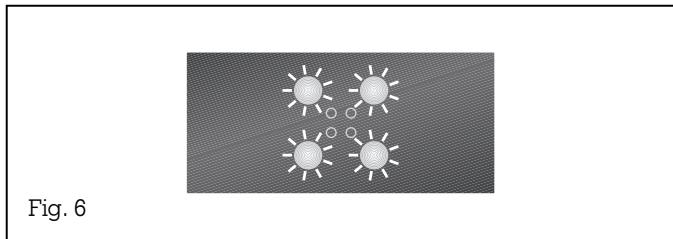
Note: a few seconds after switching on, the individual residual heat display indicating the chosen cooking zone lights up in the residual heat display panel.
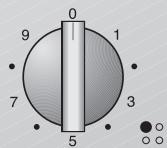
Switching off:
Turn the control knob to the 0 position on the left or right.
Note: the control knobs for cooking zones with the combination function cannot be switched from the combination position directly to the 0 position.
The glass-ceramic cooker additionally features an individual residual heat display. It lights up in the residual heat display panel as a red dot for each cooking zone. The display of the residual heat indicates that, after switching off, a cooking zone has still not cooled down to such an extent that it can be safely touched.
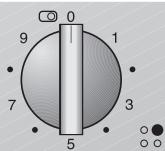
3.2 Operating with the combination function
Cooking zone 3 (rear right) has a combination function to turn the round cooking zone into an oval cooking zone, which is suitable for heating oval roasters.
Cooking zone 4 (front right) has a combination function to turn the small round cooking zone into a large round cooking zone.
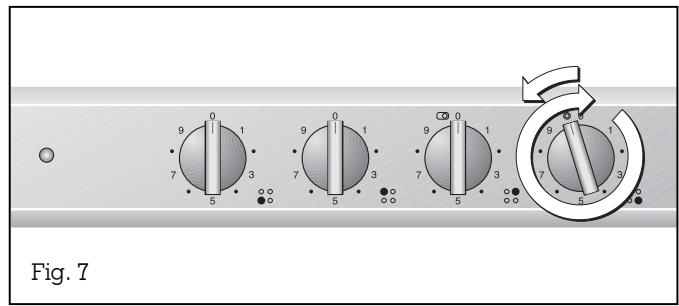
Switching on the combination function:
Turn the corresponding control knob to the right beyond 9 to the or (Combination) symbol and then to the cooking level you require. (Fig. 7) A few seconds after switching on, the individual residual heat display (red dot) indicating the chosen cooking zone lights up in the residual heat display panel. (Fig. 6)
Switching off:
Turn the corresponding control knob to the left to the 0 position. The combination and the corresponding cooking area are now off.
Note: The control knobs for cooking zones with the combination function cannot be switched from the combination position directly to the 0 position.
The values in the settings table serve only as a guide because heat levels required will depend on the nature and condition of the food and on the size and fillings of pots and pans used. Only switch to the highest cooking level for bringing to the boil and browning. Then always switch back to the lower cooking level.
Settings table
Cooking levels
0 Off
1 Keeping warm
2 Melting, soaking
3 Thawimg, warming
4 Bringing to the boil, simmering
5 Steaming
6 Stewing
7 Baking and gentle frying
8 Frying
9 Deep frying, boiling
3.3 Working with automatic quick boil
| Level Cooking range: | Quick boil times |
| 1 | 1.5 minutes |
| 2 | 2.5 minutes |
| 3 | 4.0 minutes |
| 4 | 5.5 minutes |
| 5 | 8.5 minutes |
| Roasting range: | |
| 6 | 2.5 minutes |
| 7 | 4.0 minutes |
| 8 | 5.5 minutes |
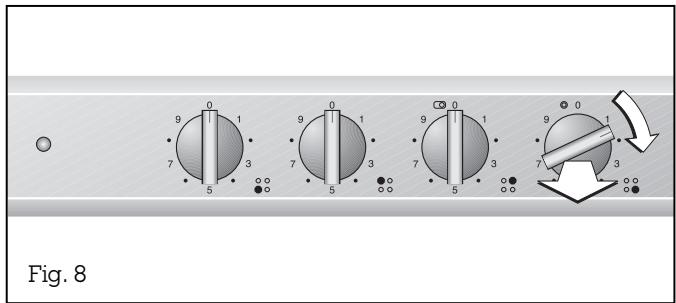
The two front cooking zones can be operated with the automatic quick boil feature. The automatic quick boil function is operated in the positions 1 to 8 by briefly pulling the control knob belonging to the relevant cooking zone.
The automatic quick boil function ensures that the power of the set cooking level is increased for a few minutes. This ensures that the continued cooking or keeping warm temperature of the food is reached faster. The appliance switches automatically to the set keeping warm or continued cooking level after the quick boil time has elapsed.
Activating
Turn the corresponding control knob of the required cooking zone to the left or right to the required cooking level (1-8). You can now activate the automatic quick boil function by briefly pulling the control knob.
The quick boil times are subdivided into a boiling or roasting range:
- In the boiling range, quick boil times are between 1.5 (cooking level 1) and 8.5 minutes (level 5).
- In the roasting range, however, quick boil times are between 2.5 minutes (cooking level 6) and 5.5 minutes (level 8).
You can find the exact quick boil times in the adjacent table.
Note: If you want to use the automatic quick boil function for the cooking zone that features the combination function (front right), you must first switch on combination and then automatic quick boil.
4. Cleaning and Maintenance
The control knobs and the control panel of the control console must only be cleaned using a soft, dry cloth and light soapy solution. Do not use any abrasive or nitro polishing agents for cleaning!
Please refer to the brochure that is enclosed with the glass-ceramic cooker for further notes on cleaning the glass-ceramic cooker.
Clean the cooking surface regularly with the Gaggenau cooker cleaner (nr.: 098690).
Note: to avoid jeopardising the electrical safety of the appliance, it is forbidden to use high-pressure or steam jet cleaning devices.
In the event of malfunction, first check your household fuses. If the power supply is in proper working order, but the appliance is still not functioning, please inform your specialist dealer or your nearest Gaggenau after-sales service. Specify the appliance type (see rating plate).
Repairs must be carried out by authorised specialists, thus ensuring electrical safety. Repairs must only be carried out by authorised specialists, thus ensuring that the appliance remains safe. Improper tampering will render warranty claims null and void.
Isolate the appliance from the mains before all repairs.
5.1 Important notes on installation
The appliance must only be connected by an authorised specialist, paying attention to the relevant regulations of the power supply companies and the regional construction regulations.
The installing technician is responsible for perfect functioning of the appliance at its installation location. The operation principle must be explained to the user with reference to the operating instructions. He must draw the user's attention as to how to isolate the appliance from the mains whenever necessary.
Damages caused by failure to observe these installation instructions cannot be recognised.
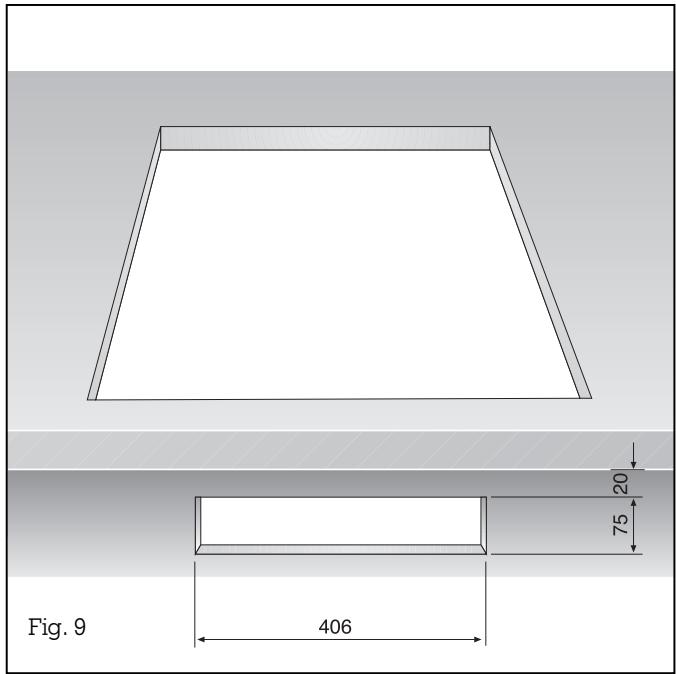
This cooker corresponds to heat class Y and must be installed in a cabinet as detailed in the sketch (Fig. 9).
This appliance may be installed in kitchen combinations made of wood or similar combustible materials without taking additional measures. Pay attention to the "Important notes" (Chapter 1).
Pay attention to the data on the rating plate and connect the PE conductor. Connect the connecting cable to the mains.
When establishing the electrical connections, make sure that connecting leads cannot come into contact with hot parts of the cooking surface.
If all poles of the appliance cannot be isolated from the mains by removing an accessible plug (of a permanent connecting lead), an isolating device with a contact gap of at least 3mm must be installed (e.g. domestic fuse). The installing technician must explain to the user how the appliance can be isolated from the mains whenever required.
Connection to the power mains:
Power rating: 7,6 kW
230 V heating elements
SP 212-104
AC 230/400 V 3N
50/60 Hz
FDxxxx
max. 7600 W
400 V heating elements
SP 212-204
AC 400 V 3N
50 Hz
FDxxxx
max. 7600 W
Technical modifications reserved.
5.2 Installation
The built-in control console SP 212 is combined with the glass-ceramic hob CK 216. The hob is controlled via the control console.
Proceed as follows:
- Unpack the appliance and check it for possible transportation damage.
- Produce the recess for the control console as shown in Figure 9.
- Select a flexible mains connecting lead in accordance with the rate consumption and the connection type (at least type H05VV-F).
- Open the control console by removing the two sheet metal screws at the sides and the two at the rear.
- Detach the connection cover and connect the mains connecting lead as shown in the connection schematic. The PE conductor (green-yellow stranded wire) must be sufficiently longer than the other stranded wires of the mains connecting lead. Secure the connecting lead with the pull relief.
- Secure the connection cover back on the control console.
- Slide the control console into the prepared recess. The side springs of the control console must snap into the recess opening.
- Connect the green-yellow earthing cable of the hob to the screw on the control console that is marked 12 .
- Press the cooking zone connectors firmly into the socket on the control console according to the colour markings.
- After installation, shock hazard protection must be ensured in accordance with the electrical testing regulations (e.g. by means of an intermediate shelf that is detachable in the downward direction).
- Check that the appliance functions properly. Install the glass-ceramic hob as detailed in the assembly instructions for the glass-ceramic hob.
5.3 Removal
- Isolate the appliance from the power mains.
- Remove the cooking zone plugs from the sockets on the rear of the control console.
- Remove the hob's green-yellow earthing cable.
- Press the control console out of the recess on the rear.
- Remove the mains connecting lead from the appliance.
- SP 212-…
- Preface
- Important notes
- Structure and operating principle
- Operation Pages 6-8
- Cleaning and maintenance Page 9
- Assembly instructions Pages 10-12
- With your new control console, cooking will be even more fun than before.
- For your safety
- Observe the assembly instructions!
- Operating for the first time
- About use
- Switching on / off
- Switching on cooking zones without the combination feature:
- Switching on cooking zones with the combination feature:
- Switching off:
- Operating with the combination function
- Switching on the combination function:
- Settings table
- Working with automatic quick boil
- Activating
- Cleaning and Maintenance
- Important notes on installation
- Connection to the power mains:
- Technical modifications reserved.
- Installation
- Proceed as follows:
- Removal
Brand : GAGGENAU
Model : SP212214
Category : Hob