
CBT500WE - Blender CUISINART - Free user manual and instructions
Find the device manual for free CBT500WE CUISINART in PDF.
| Product Type | Blender |
| Brand | Cuisinart |
| Model | CBT500WE |
| Motor Power | 600 W |
| Bowl Capacity | 1.5 L |
| Bowl Material | Thick graduated glass |
| Blade Material | Surgical stainless steel (patented star-shaped) |
| Base Material | Brushed stainless steel |
| Approximate dimensions (L x W x H) | 20 x 20 x 40 cm |
| Approximate weight | 4 kg |
| Power supply voltage | 220-240 V, 50/60 Hz |
| Main functions | Blend/Whisk, Mix/Emulsify, Crush ice, Pulse |
| Timer | 0 to 5 minutes with digital display |
| Speeds | Dedicated buttons with Pulse function |
| Measuring cap | Graduated up to 30 ml, allows adding ingredients while blending |
| Safety | Safety interlocks, automatic shut-off after 5 min, non-slip feet |
| Care and cleaning | Bowl, lid and measuring cap are dishwasher safe (top rack). Motor base cleaned with damp sponge. Blades hand wash with care. |
| Replacement parts | Glass bowl, lid, measuring cap, blade assembly, sealing gasket, locking collar |
| Repairability | Not user-serviceable – refer to a professional |
| Usage | Household use only |
Frequently Asked Questions - CBT500WE CUISINART
User questions about CBT500WE CUISINART
0 question about this device. Answer the ones you know or ask your own.
Ask a new question about this device
Download the instructions for your Blender in PDF format for free! Find your manual CBT500WE - CUISINART and take your electronic device back in hand. On this page are published all the documents necessary for the use of your device. CBT500WE by CUISINART.
USER MANUAL CBT500WE CUISINART
Cuisinart®
natural_image
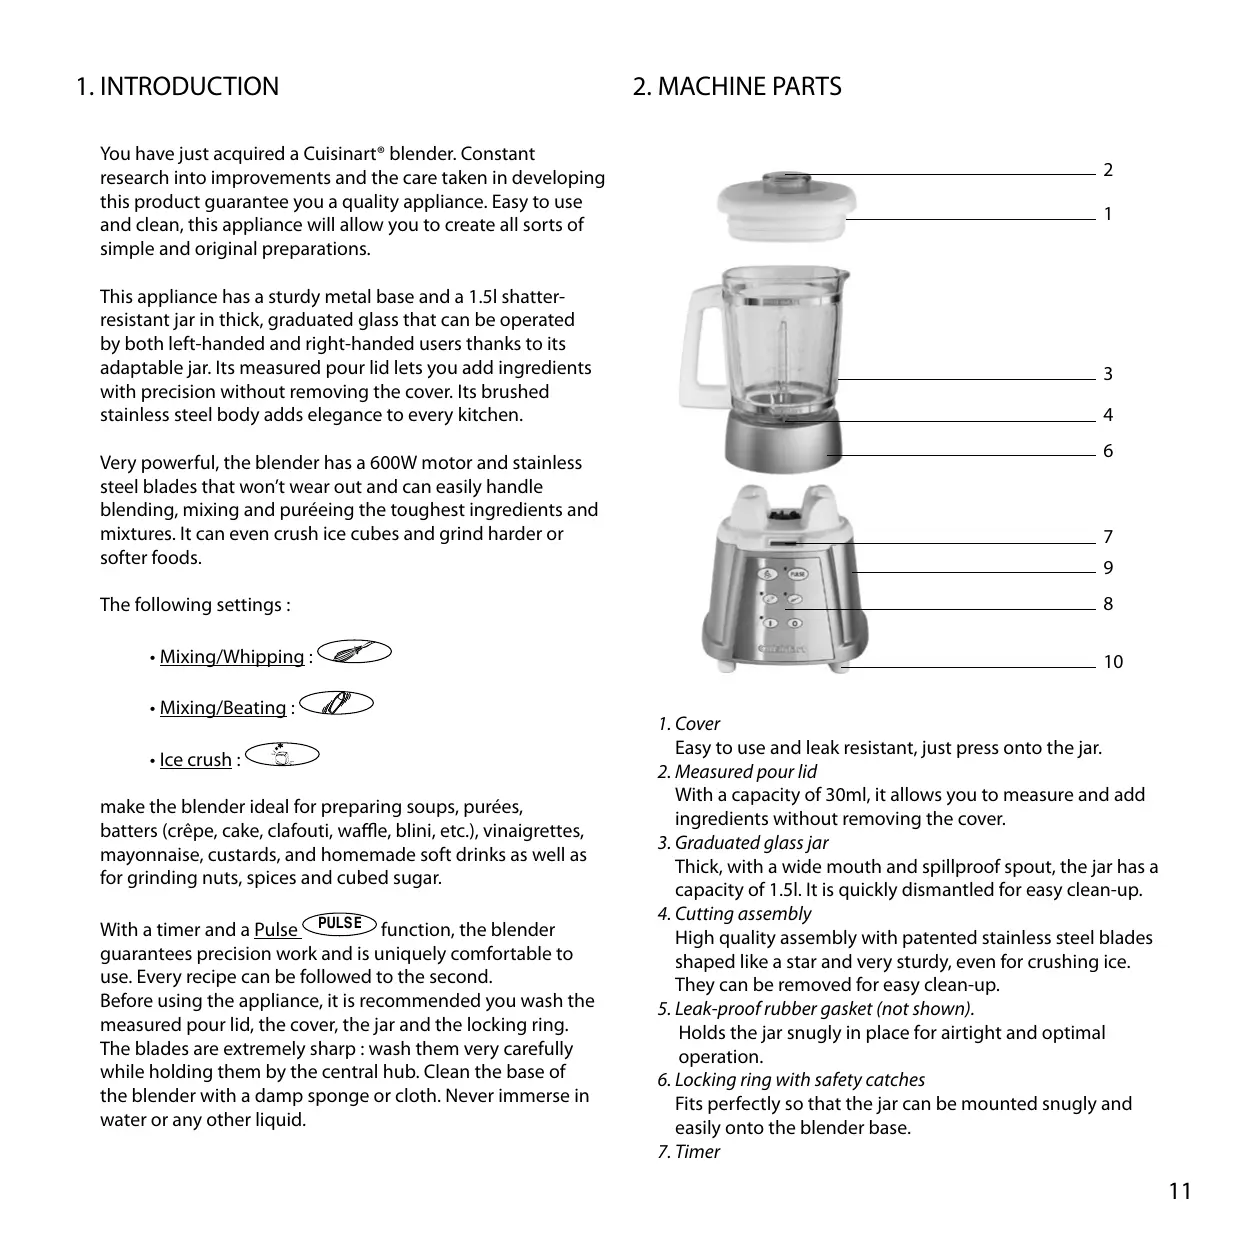
Two modern kitchen blender units shown from different angles (no visible text or labels)BLENDER
SOMMAIRE
- Introduction ...... 11
- Machine parts ..... 11
- Use 12
A. Assembly instructions 12
B. Operation of the blender 13 - Chefs tips and hints 16
- Questions/Answers ..... 16
- Cleaning and storage....17
- Safety instructions. 17
INHALTSVERZEICHNIS
2. CARACTERISTIQUES PRODUIT
2
1
3
4
6
7
9
8
10
- Couvercle
5. QUESTIONS/REPONSES
You have just acquired a Cuisinart® blender. Constant research into improvements and the care taken in developing this product guarantee you a quality appliance. Easy to use and clean, this appliance will allow you to create all sorts of simple and original preparations.
This appliance has a sturdy metal base and a 1.5l shatter-resistant jar in thick, graduated glass that can be operated by both left-handed and right-handed users thanks to its adaptable jar. Its measured pour lid lets you add ingredients with precision without removing the cover. Its brushed stainless steel body adds elegance to every kitchen.
Very powerful, the blender has a 600W motor and stainless steel blades that won't wear out and can easily handle blending, mixing and puréeing the toughest ingredients and mixtures. It can even crush ice cubes and grind harder or softer foods.
The following settings :
- Mixing/Whipping :
- Mixing/Beating :
- Ice crush :
make the blender ideal for preparing soups, purées, batters (crêpe, cake, clafouti, waffle, blini, etc.), vinaigrettes, mayonnaise, custards, and homemade soft drinks as well as for grinding nuts, spices and cubed sugar.
With a timer and a Pulse PULSE function, the blender guarantees precision work and is uniquely comfortable to use. Every recipe can be followed to the second.
Before using the appliance, it is recommended you wash the measured pour lid, the cover, the jar and the locking ring. The blades are extremely sharp: wash them very carefully while holding them by the central hub. Clean the base of the blender with a damp sponge or cloth. Never immerse in water or any other liquid.
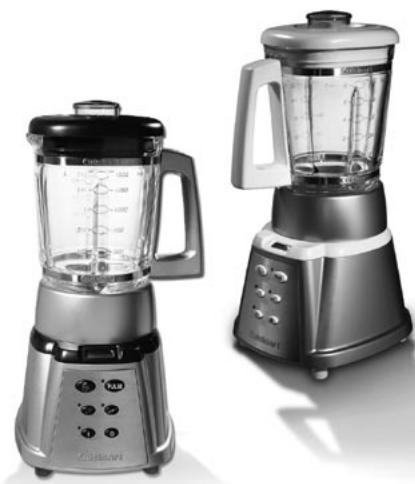
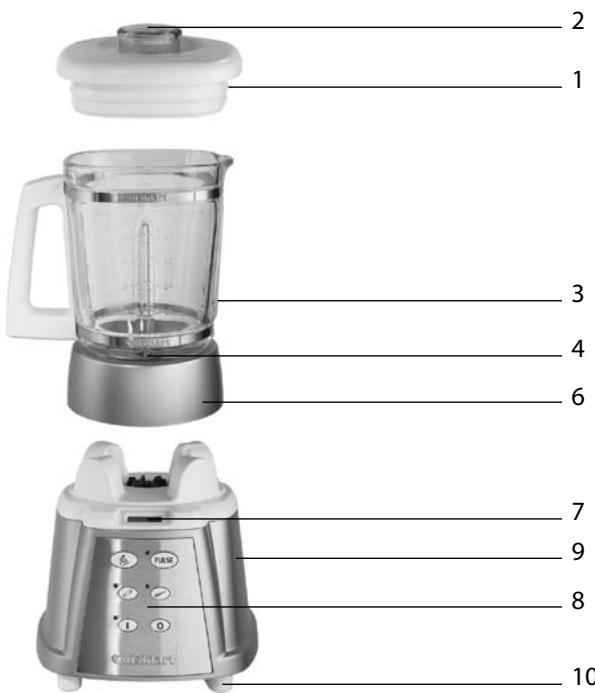
2. MACHINE PARTS
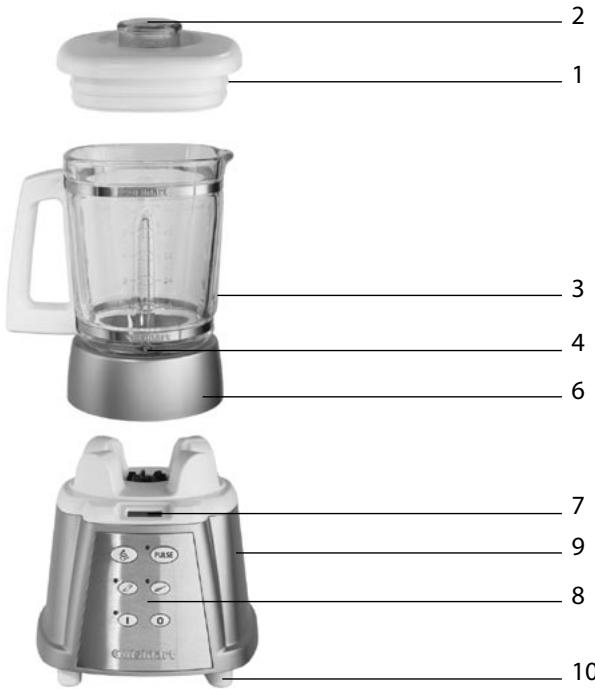
- Cover Easy to use and leak resistant, just press onto the jar.
- Measured pour lid With a capacity of 30ml, it allows you to measure and add ingredients without removing the cover.
- Graduated glass jar Thick, with a wide mouth and spillproof spout, the jar has a capacity of 1.5l. It is quickly dismantled for easy clean-up.
- Cutting assembly High quality assembly with patented stainless steel blades shaped like a star and very sturdy, even for crushing ice. They can be removed for easy clean-up.
- Leak-proof rubber gasket (not shown). Holds the jar snugly in place for airtight and optimal operation.
- Locking ring with safety catches Fits perfectly so that the jar can be mounted snugly and easily onto the blender base.
- Timer
Displays your mixing times from 0 to 5 minutes for perfect results.
- Push-button control :
a. Ice crush button Activates the speeds specially adapted for crushing ice uniformly and for grinding hard foods.
b. Pulse button PULSE Can be used in combination with the or function to give you optimal control over your preparation.
c. Whip and Beat
Choose the 📄 or 📅 setting depending on the recipe. The respective LED lights indicate :
- The button for blending foods and obtaining an even mixture.
- The button for making custards and cake icings and creating cocktails, milk-shakes, quick sorbets, ice cream, chopping herbs, condiments, etc.
-
Motor Base Powerful, sturdy and stable, even when crushing ice.
-
Slip-proof Feet Ensures the appliance does not move while being used and so protects the surface of the counter or table.
3. USE
A. ASSEMBLY INSTRUCTIONS
- Position the jar and the locking ring
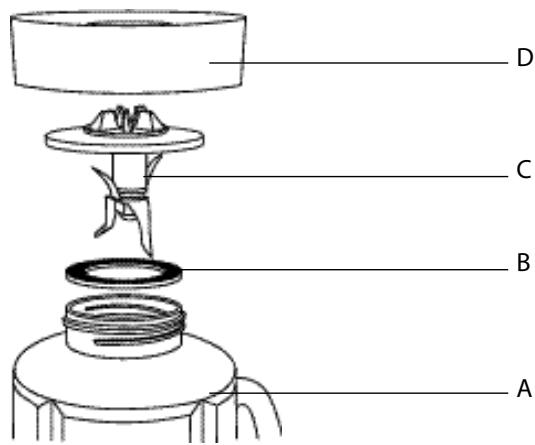
Press the cover without the measured lid into the blender jar (A) and turn it upside down placing it on a flat surface. Position the rubber gasket (B) then insert the blades of the cutting assembly (C) in the opening. Place the locking ring (D) on the jar and screw in place, turning counter-clockwise. Place the blender jar assembly on the motor base so that the jar markings are facing you and the handle is positioned to one side. The safety catches on the locking ring should fit perfectly into the openings in the motor base that are designed for this purpose.
The blades will only work if the safety catches are positioned snugly in the motor base. Then press the cover into the mouth of the jar and screw in the measured pour lid. Plug in the appliance. Always put the cover on before using the blender.
- Dismantling the jar assembly and locking ring When you have finished using the blender, turn it off and unplug it. Remove the blender from the motor base. Lift off the cover and the measure lid, empty the contents. To clean the blender, follow the instructions under point 1 in reverse order.
To turn on the blender, press the ⏻ button. The blender is now in standby and ready to be used. To start one of the functions, press the appropriate button. To change functions, press the desired button.
To use the pulse function, press the I button while in PULSE mode, then press and release the chosen function as often as necessary. To crush ice, while the machine is in I mode, press and release the button as often as necessary.
To stop the functions, push the button of the function in use. The blender returns to 1 mode indicated by the flashing LED light. To turn the machine off, push the 0 button.
2. The Functions
A. Add all the necessary ingredients and put the cover on It is also possible to put the cover on and add ingredients by removing the measured lid and adding the ingredients through the opening. Additional ingredients can also be added through the same opening while blending.
B. Timing preparation The timer displays blending time from 0 to 5 minutes on the digital display counting in seconds from 0. It starts timing as soon as the PULSE and/or or buttons are pushed. The displayed time pauses once these same buttons are pushed and continues when the button is pushed again. The timer resets to 0 when the blender is turned off.
The timer stops automatically after five minutes of use. The timer will beep and its LED display will flash. The machine is still in the 1 mode.
C. Activating a function
Push the 1 button. The red LED light will flash indicating that the blender is on.
D. Choose a function button
Push the 📄 or 📋 button as desired. The blender will start. To change the function, you need only push another button. It is not necessary to turn the motor off.
E. Preparation time
You can get the expected results in just seconds. If food tends to stick to the sides during use, use short, intermittent bursts.
F. Stopping the function
Push the button corresponding to the function in use. The motor will stop. The LED light will start flashing indicating that the appliance is still in 'on' mode. To turn the blender off completely, push the 0 button.
G. Pulse Mode
The pulse function allows you to use short, powerful bursts. To blend with the pulse function, push the button then the PULSE button.
The LED light for the Pulse function will flash. Then push and release the 📄 or 📋 button as desired. Every time you push the I button, the LED lights for each of the mode, the PULSE or the selected setting will flash.
H. Crushing Ice
The Cuisinart® blender has a 600W motor that allows you to crush ice without adding liquids. To guarantee greater control, the function operates intermittently like the PULSE function. Put the ice cubes in the jar, replace the cover and push the I button. The LED light will come on. Now push the button in short bursts until the ice is the desired consistency.
I. Dislodging Food
Use a spatula only when the blender is off and unplugged. Remove the food stuck to the sides of the jar and put them on top of the blades. Never use metal utensils because
these could damage the jar or the blades. Then replace the cover and continue blending if necessary. Never turn the blender on when the spatula is in the jar.
J. When finished blending
Push the 0 button and unplug the appliance. Then lift the jar from the motor base to remove it.
| Ingredients/Recipe | Speed | Symbol | Result |
| Mayonnaise | Mix/whip Pulse |  | Thick and creamy |
| Vinaigrette | Mix/whip |  | Completely blended |
| Purée (not potatoes) | Mix/whip Pulse |  | Thin to thick |
| Soups | Mix/Beat or Mix/whip |   | Desired consistency |
| Nuts (almonds, walnuts, hazelnuts) | Ice crush |  | Coarse to fine |
| Heavy or whipping cream | Mix/whip Pulse |  | Desired consistency |
| Batters | Mix/whip Pulse |  | Smooth (no lumps) |
| Lemon rind | Mix/Beat Pulse |  | Coarse to fine |
| Milk-Shakes | Mix/Beat Pulse |  | Smooth and creamy |
| Baby food | Mix/Beat |  | Smooth and creamy |
| Natural juices (orange, soft drinks) | Mix/whip |  | Smooth and full-bodied |
| Frozen cocktails | Mix/Beat |  | Smooth and full-bodied |
| Ice cream/sorbet | Mix/Beat |  | Smooth and full-bodied |
| Hard cheese | Mix/Beat Pulse |  | Coarse to fine |
| Soft cheese | Mix/whip Pulse |  | Desired consistency |
| Spices | Mix/Beat Pulse |  | Coarse to fine |
| Chopped herbs | Mix/whip Pulse |  | Coarse to fine |
| Ice | Ice crush |  | Coarse to fine |
| Cube sugar | Ice crush |  | Coarse to fine |
4. CHEFS TIPS AND HINTS

- Cut larger foods into 1 to 5 cm cubes before blending them. You will have better results. For greater ease, consider dicing uncooked vegetables into 2 to 3 cm cubes.
- When working very hot liquids into the blender, leave the measured lid loose in the opening of the cover to allow the steam to escape and in this way prevent pressure from building in the jar.
- If you have difficulty mixing cocktails, begin by first adding a little liquid, otherwise the solid ingredients will not blend in.
- To make a smooth mixture, first add the liquid ingredients, then the solid ingredients.
- Use the PULSE button to chop. This will allow the foods to fall back to the bottom of the jar after each burst. Check the texture frequently in order to avoid overchopping. This also applies to crushed ice. To chop herbs, the blender jar and blade must be dry, otherwise they will stick to the sides.
The more herbs you chop, the finer the result. They can be frozen in an airtight container.
- If there are still large pieces of ice after crushing it, stop the machine for two seconds between bursts. Use the same procedure for grinding spices or sugar.
- To use the blender for making mayonnaise, only use the buttons with pulse mode.
-
This appliance is not suitable for mashing potatoes (the mashed potatoes become too rubbery), making heavy dough (bread or brioche) or beating egg whites.
-
QUESTIONS/ANSWERS
| What do I do if : | Answer : |
| My machine doesn’t work? | Make sure the machine is firmly plugged in, put the switch in the ‘I’ position. |
| The food leaks out through the bottom? | Check that the jar and locking ring assembly has been snugly fixed onto the motor base and gasket is properly positioned. |
| Preparation leaks through the cover? | Check that the total amount of liquid does not exceed 1.5l |
| The blade won’t turn? | Cut larger foods into pieces before blending them and use the pulse function for best results. |
| The blade still won’t turn in spite of reducing the quantities in the jar | Turn off and unplug the appliance. The blade was probably not put in properly. Check the blender jar assembly. |
| The motor slows down? | The amount of food exceeds the maximum recommended amount. Remove some and blend in two batches. |
6. CLEANING AND STORAGE
The appliance can be left out on your kitchen counter. Unplug it when it is not being used.
Always unplug the appliance before cleaning. Clean the jar before using it for the first time and after each use to prevent food from drying on it. Do not store food or liquid in the jar. To clean, lift the blender from the motor base. Remove the locking ring by turning counter-clockwise (see section 3.A.2). Wash the blades by hand very carefully. Avoid leaving them in soapy water. Always handle them very carefully. Wash the jar in hot, soapy water, rinse and dry. All the blender parts, except for the motor base, are dishwasher safe. To reassemble the blender jar, insert the blades in the plastic base then the rubber gasket and screw onto the jar (see section 3.A.1) To clean the motor base, use a damp sponge and mild soap. Do not use an abrasive sponge. Never immerse the motor base in water or any other liquid and never put it in the dishwasher.
7. SAFETY INSTRUCTIONS
- Do not immerse the base of the appliance in water or any other liquid.
- Always put the motor base on a level surface that is stable, clean and dry.
- Unplug the appliance after use, before assembling or dismantling, before removing food and before cleaning. Never leave the appliance plugged in and unattended. To unplug, pull on the plug, never on the cord.
- Never put the appliance on or near a source of heat.
- Do not allow the cord to hang over the side of the counter. Store it by coiling it up in the storage area under the base of the appliance. Do not let the cord touch hot surfaces.
- This appliance should not be used by adults or children whose lack of experience, product knowledge or disability might cause a hazard, unless they have been correctly instructed and are adequately supervised.
- Children should always be supervised to ensure that they do not play with this product.
• After each use, clean the blender jar and reassemble completely with the cover and the measured lid. -
Do not place the jar on or remove it from the motor base while the motor is on.
-
Never exceed the jar's maximum capacity of 1.5l of liquid or solid foods.
- Never put your fingers in the blender jar and never touch the blades when the appliance is plugged in.
- Use this appliance following the instruction in this booklet only.
- Do not overload the blender. If the motor stalls, turn off and unplug the appliance. Remove some of the food, then turn the appliance on again.
- Do not use the appliance if it has fallen or if it appears to have been damaged.
- Stop using the appliance immediately if the cord is damaged and have it replaced by a professional.
- Do not repair any part of the machine yourself.
- This appliance complies with the basic requirements of directives 04/108/EEC (electromagnetic compatibility) and 06/95/EEC (safety of domestic electrical appliances) amended by directive 93/68/EEC (CE marking).
- Do not use outdoors.
• This appliance is for household use only.
1. EINLEITUNG
Brand : CUISINART
Model : CBT500WE
Category : Blender