legend 5.2 / 40.2 / 60.2 silverback - Speaker System Audio - Free user manual and instructions
Find the device manual for free legend 5.2 / 40.2 / 60.2 silverback System Audio in PDF.


User questions about legend 5.2 / 40.2 / 60.2 silverback System Audio
0 question about this device. Answer the ones you know or ask your own.
Ask a new question about this device
Download the instructions for your Speaker in PDF format for free! Find your manual legend 5.2 / 40.2 / 60.2 silverback - System Audio and take your electronic device back in hand. On this page are published all the documents necessary for the use of your device. legend 5.2 / 40.2 / 60.2 silverback by System Audio.
USER MANUAL legend 5.2 / 40.2 / 60.2 silverback System Audio
SA legend silverback (5.2, 40.2 & 60.2)
User guide in English
vers. 6.eng

CERTIFIED

Follow the instructions and get the best results with your new active wireless speakers

Welcome
Thank you for choosing SA.
System Audio will delight as many people as possible with the best sound possible.
A set of SA loudspeakers will create a feeling of being close to the artists.
An SA home theatre will place the audience deeper into the action.
To achieve the best results, we recommend you to carefully read this manual before connecting your new SA loudspeakers.
Please check further information on:
www.system- audio.com

Content of the package
SA legend 5.2 silverback:
2 x SA legend 5.2 silverback
2 x front grille
2 x powercords
1 x manual
SA legend 40.2 silverback:
2 x SA legend 40.2 silverback
2 x front grille
2 x powercords
1 x manual
8 x Aluminium pieces (for feet)
16 x screws
8 x rubber feet
8 x spikes
8 x spikes pads
8 x aluminium top
(2 boxes)
SA legend 60.2 silverback:
2 x SA legend 60.2 silverback
2 x front grille
2 x powercords
1 x manual
8 x Aluminium pieces (for feet)
16 x screws
8 x rubber feet
8 x spikes
8 x spikes pads
8 x aluminium top
(2 boxes)
Good to know about your new speakers
Check the serial number
The serial number is on a label on the back of the speaker.
We recommend you to note down the serial number on your invoice and insurance policy.
Please contact your dealer if the serial number is not mentioned on the loudspeakers.
Warranty
System Audio A/S gives a 2 year warranty against manufacturing defects. This warranty does not cover misuse. Repairs and service must be carried out by the dealer or associated service facilities.
Changes in the design will void your warranty.
Run the new loudspeakers at reasonable volume
All SA loudspeakers must be run at a reasonable volume for a certain period. This is because SA uses woofers with a long stroke and therefore, this will be required for a period of several days. The sound quality will gradually increase throughout the period.
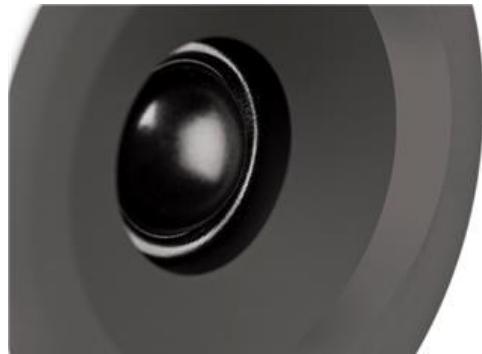
New technology to fill the room with sound
A new feature of SA legend silver-back is the special DXT-lens around the tweeter.
The patented design makes the living-room better filled with sound. The advantages of DXT are obvious. Try to walk around the room and enjoy the music from every corner.

Do like thousands of music lovers
Subscribe to our blog and get all the news, offers and access to articles in order to update your knowledge. www.system-audio.com
Installation - compact loudspeakers There is a wall bracket for SA legend 5.2 silverback see page 4. SA legend 5.2 silverback can also be placed directly in a bookcase. For the best sound quality, ensure free air passage for the reflex port on the back part. Ensure min. 5 cm free space behind the loudspeaker and one on the side of the loudspeaker. SA legend silverback can also be placed on a speaker stand see page 4
Installation - floorstanding speakers SA legend silverback (40.2 & 60.2) are designed to stand on the floor. The speakers must be placed at a distance of 20 – 40 cm in front of a wall. The distance can be increased or reduced, depending on the sound you want. After the period when the speakers must be run at a reasonable low volume, the speakers may be installed on the rubber pads or spikes.
Rubber feet. Rubber feet are used provided the speaker is placed on a surface, for example, a wooden floor. Spikes. We recommend you to use spikes provided the speakers are placed on a soft base, for example, a carpet. It is important to place the speakers vertically and not to move them. Adjust the spikes and counter-nuts in order to ensure that the speakers are placed evenly on all 4 spikes. Tighten the nuts when you are done with the adjustments.
We recommend you to use the rubber pads or spikes only after the appropriate location is found in order to make the installation and set-up easier.
Mounting of feet
Place the speaker with the top down and mount the alu pieces:
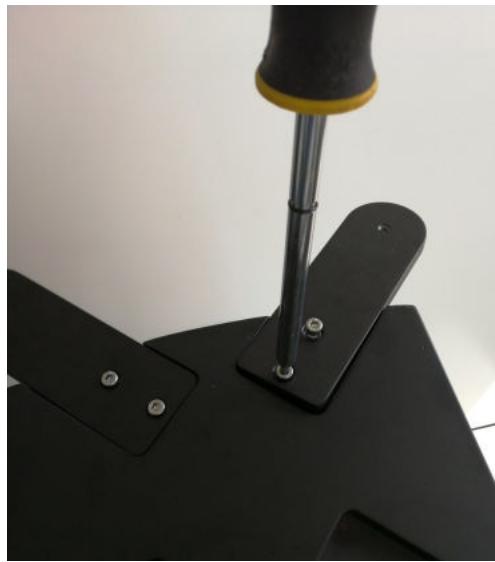
Install rubber feet or spikes like this:

Turn the speaker with the top up, and mount the alu tops on the spikes or rubber feet.

Example of setup
The sound from the loudspeakers is greatly depending on the setup of the loudspeaker.
Here are some general advice.
A
The distance between the loudspeakers and the wall behind them.
Start with a distance of 20 cm from the floorstanding speaker.
The distance has to be the same for both speakers. Try with some music
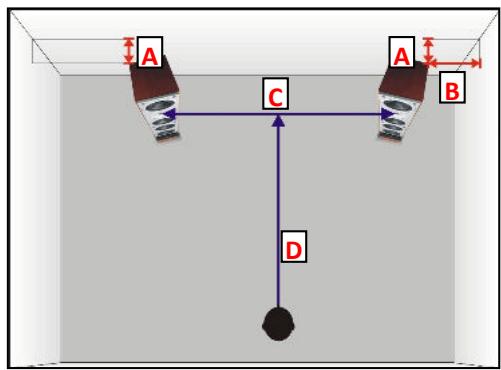
you know and find out what distance gives the best sound in your home.
Greater distance = weaker bass, more precise bass, better precision/impact and greater perspective.
Shorter distance = louder and softer bass, smaller sound perspective.
B
The distance from the side walls to the loudspeakers.
Preferably greater than the distance to the back wall
A short distance to the side walls increases the bass in the same way as A.
C,D
The distance between the loudspeakers and the listening position.
The ideal distance is 2,5 - 3 m. Distances C & D must be the same. The loudspeakers must be placed in a mutual angle of about 15° . This means that you can only see the inside of both loudspeakers.
Operating
Connect the speaker with an analog signal cable or a WiSA transmitter/hub.
(For detailed use with a WiSA transmitter/hub see the user guide of the transmitter/hub)
When connected to a WiSA transmitter/hub. You can change the placement of the speaker by pushing the small connect button on the back of the speaker.
To enter connect mode, press-and-hold button for 2 sec-
onds.
When connected to a transmitter/hub, the wireless LED indicator will light up. To connect to another transmitter/hub press-and-hold button for 2 seconds.
When wireless LED indicator is flashing the speaker is searching for a WiSA transmitter/hub.
To disconnect the speaker from the hub, press the connect button for 2 seconds. The Wireless LED will start to flash.
Button
For connecting speaker to WiSA hub
Sensitivity
Adjustment of analog input.
If sound is distorted = decrease sensitivity 6 dB.
If sound level too weak = increase sensitivity 6dB.

Technical specifications
WiSA receiver
1 analog XLR input
Auto-sense

CERTIFIED
Accessories
W.5
Wall mount with tilt and swivel function.
Fits to
SA legend 5.2 +
10.2 silverback.

Important Safety Instructions
- Read these instructions.
- Keep these instructions.
- Heed all warnings.
- Follow all instructions
- Do not use this apparatus near water.
- Clean only with dry cloth.
- Do not block any ventilation openings. Install in accordance with manufacturer's instructions.
- Do not install near any heat sources such as radiators, heat registers, stoves, or other apparatus (including amplifiers) that produce heat.
- Do not defeat the safety purpose of the polarized or grounding-type plug. A polarized plug has two blades with one wider than the other. A grounding type plug has two blades and a third grounding prong. The wide blade or the third prong are provided for your safety. If the provided plug does not fit into your outlet, consult an electrician for replacement of the obsolete outlet.
- Protect the power cord from being walked on or pinched particularly at plugs, convenience receptacles, and the point where they exit from the apparatus.
- Only use attachments/accessories specified by the manufacturer.
- Use only with the cart, stand, tripod, bracked, or table specified by the manufacturer, or sold with the apparatus. When a cart is used, use caution when
moving the cart/apparatus combination to avoid injury from tip-over.
- Unplug this apparatus during lighting storms or when unused for long periods of time.
- Refer all servicing to qualified service personnel. Servicing is required when the apparatus has been damaged in any way, such as power-supply cold or plug is damaged, liquid has been spilled or object have fallen into the apparatus, the apparatus has been exposed to rain or moisture, does not operate normally, or has been dropped.
- Where the MAINS plug or an appliance coupler is used as the disconnect device, the disconnect device shall remail readili operable.
- A warning that apparatus with class I construction shall be connected to a MAINS socket outlet with a protective earthing connection
WARNING: To reduced the risk of fire or electric shock, do not expose this apparatus to rain or moisture. The apparatus shall not be exposed to dripping or splashing and that no objects filled with liquids, such as vases, shall be placed on the apparatus.
The wireless DSP amplifier connects with Summit WiSA Module on Stereo hub and then Wireless DSP amplifier will play as receiver. The network standby power of wireless DSP amplifier is less than 2W, after 20 mins. There is no general stand-by power consumption for the wireless DSP amplifier.


- SA LEGEND SILVERBACK (5.2, 40.2 & 60.2)
- WELCOME
- CONTENT OF THE PACKAGE
- SA LEGEND 5.2 SILVERBACK
- SA LEGEND 40.2 SILVERBACK
- SA LEGEND 60.2 SILVERBACK
- GOOD TO KNOW ABOUT YOUR NEW SPEAKERS
- CHECK THE SERIAL NUMBER
- WARRANTY
- RUN THE NEW LOUDSPEAKERS AT REASONABLE VOLUME
- NEW TECHNOLOGY TO FILL THE ROOM WITH SOUND
- DO LIKE THOUSANDS OF MUSIC LOVERS
- MOUNTING OF FEET
- EXAMPLE OF SETUP
- A
- B
- C,D
- OPERATING
- BUTTON
- SENSITIVITY
- TECHNICAL SPECIFICATIONS
- ACCESSORIES
- W
- IMPORTANT SAFETY INSTRUCTIONS
Brand : System Audio
Model : legend 5.2 / 40.2 / 60.2 silverback
Category : Speaker