Pick your language and provide your email: we'll send you a specifically translated version.
This manual is not available in your language
User questions about Octatrack Elektron
0 question about this device. Answer the ones you know or ask your own.
Ask a new question about this device
No questions yet. Be the first to ask one.
Download the instructions for your Electronic musical instrument in PDF format for free! Find your manual Octatrack -
Elektron and take your electronic device back in hand. On this page are published all the documents necessary for the use of your device. Octatrack by Elektron.
USER MANUAL Octatrack Elektron
OCTATRACK
DPS-1 DYNAMIC PERFORMANCE SAMPLER
FCC compliance statement
This device complies with part 15 of the FCC rules. Operation is subject to the following two conditions: (1) This device may not cause harmful interference, and (2) this device must accept any interference received, including interference that may cause undesired operation.
NOTE: This equipment has been tested and found to comply with the limits for a Class B digital device, pursuant to Part 15 of the FCC Rules. These limits are designed to provide reasonable protection against harmful interference in a residential installation. This equipment generates, uses and can radiate radio frequency energy and, if not installed and used in accordance with the instructions, may cause harmful interference to radio communications. However, there is no guarantee that interference will not occur in a particular installation. If this equipment does cause harmful interference to radio or television reception, which can be determined by turning the equipment off and on, the user is encouraged to try to correct the interference by one or more of the following measures:
Reorient or relocate the receiving antenna.
Increase the separation between the equipment and receiver.
Connect the equipment into an outlet on a circuit different from that to which the receiver is connected.
Consult the dealer or an experienced radio/TV technician for help.
European Union regulation compliance statement
This product has been tested to comply with the Low Voltage Directive 2006/95/EC and the Electromagnetic Compatibility Directive 2004/108/EC. The product meets the requirements of RoHS 2 Directive 2011/65/EU.
This symbol indicates that your product must be disposed of properly according to local laws and regulations.
The included switched-mode power supply is CEC LEVEL V compliant.
The device contains a non rechargeable lithium perchlorate battery cell that may need to be recycled separately depending on local environmental laws. If the battery needs replacing, please contact Elektron or a local professional technician for servicing.
Legal disclaimer
The information in this document is subject to change without notice and should not be construed as a commitment by Elektron. Elektron assumes no responsibility for any errors that may appear in this document. Elektron may also make improvements and/or changes in the products and programs described in this document at any time without notice. In no event shall Elektron be liable for any special, indirect, or consequential damages or any damages whatsoever resulting from loss of use, data, or profits, whether in an action of contract, negligence, or other action, arising out of or in connection with the use or performance of this information.
IMPORTANT SAFETY AND MAINTENANCE INSTRUCTIONS
Please read these instructions carefully and adhere to the operating advice.
Do not use this unit near water.
Never use aggressive cleaners on the casing or on the LCD screen. Remove dust, dirt and fingerprints with a soft, dry and non-abrasive cloth. More persistent dirt can be removed with a slightly damp cloth using only water. Disconnect all cables while doing this. Only reconnect them when the product is safely dry.
To avoid scratches or damage, never use sharp objects near the casing or the LCD screen. Avoid applying any pressure to the screen itself.
Install in accordance with the manufacturer's instructions. Make sure you place the unit on a stable surface before use. If you mount the unit in a rack, be sure to tighten all four screws in the rack mount holes.
Connect the unit to an easily accessible electrical outlet close to the unit.
When transporting the unit, use accessories recommended by the manufacturer or the original box and padding.
Do not install near any heat sources such as radiators, heat registers, stoves, or any other equipment (including amplifiers) producing heat.
Do not put any protective cover on the unit while the unit is powered on.
Make sure there is sufficient air circulation in the room where the unit is kept.
This product, by itself or in combination with amplifiers, headphones or speakers, is capable of producing sound levels that may cause permanent hearing loss. Do not operate at a high volume level or at a level that is uncomfortable.
Protect the power cord from being walked on or pinched particularly at plugs, convenience receptacles, and the point where they exit from the unit.
Use attachments/accessories specified by the manufacturer.
Unplug this unit during lightning storms or when it is not used for long periods of time.
Refer all servicing to qualified service technicians. Servicing is required when the unit has been damaged in any way, liquid has been spilled or objects have fallen into the unit, the unit has been exposed to rain or moisture, does not operate normally, or has been dropped.
WARNING
To reduce the risk of fire, electrical shock or product damage:
Do not expose the unit to rain, moisture, dripping or splashing and also avoid placing objects filled with liquid, such as vases, on the unit.
Do not expose the unit to direct sunlight, nor use it in ambient temperatures exceeding 40° C as this can lead to malfunction.
Do not open the casing. There are no user repairable or adjustable parts inside. Leave service and repairs to trained service technicians only.
SAFETY INSTRUCTIONS FOR THE POWER ADAPTER
The adapter is not safety grounded and may only be used indoors.
To ensure good ventilation for the adapter, do not place it in tight spaces. To prevent risk of electric shock and fire because of overheating, ensure that curtains and other objects do not prevent adapter ventilation.
Do not expose the power adapter to direct sunlight, nor use it in ambient temperatures exceeding 40°C .
Connect the adapter to an easily accessible electrical outlet close to the unit.
The adapter is in standby mode when the power cord is connected. The primary circuit is always active when the cord is connected to the power outlet. Pull out the cord to completely disconnect the adapter.
• In the EU, only use CE approved power cords.
D.1 TRANSFERRING THE SET 143
D.2 LOADING THE SET....143
D.3 USING THE SOUND PACK....143
D.4 ASSIGNING SCENES....143
D.5 ASSIGNING NEW SAMPLES TO A MACHINE 143
INDEX 144
1. INTRODUCTION
Thank you for choosing the Octatrack DPS-1. The Octatrack is a dynamic performance sampler ideal for real-time sampling, remixing and audio manipulation. It features the improved Elektron step sequencer which makes it easy to bend and process samples in new and unique ways. To make the most of the machine, we would recommend you to carefully read this manual. Tutorial videos, found on the Elektron website, are also available. They cover the basics of the Octatrack and are a great complement to this document.
1.1 CONVENTIONS IN THIS MANUAL
We have used the following conventions throughout the manual:
Key names are written in upper case, bold style and bracketed letters. For instance, the key labeled “Function” on the main panel is called [FUNCTION].
Menu names are written in upper case letters. The PLAYBACK SETUP menu is an example of that.
Parameter names and certain menu options where settings can be made or actions performed are written in bold, upper case letters. For example, HEADPHONES MIX.
Upper case letters are used for parameter setting alternatives, for example, ONE, and certain menu settings, like EXTERNAL.
Messages visible on the screen are written in upper case letters with quotation marks. Like this, “CHOOSE BANK”
Knobs are written in upper case, bold, italic letters. For instance, the knob "Level" is called LEVEL.
LED indicators like the record LED are written like this: .
The following symbols are used throughout the manual:
Important information that you should pay attention to.
A tip that will make it easier for you to interact with the Octatrack.
This symbol is not used, but it shows a nice shrimp.
The first relatively affordable samplers were released in the 1980's and made a huge impact on the music scene of that time. Sonic elements, taken from completely new sources, could suddenly form a vital part of a composition. This resulted in the birth and evolution of several genres, for example hip hop. The concept of the sampler has since then branched off in several directions. Software based samplers are today capable of handling enormously large, multi-sampled, sample libraries. Hardware samplers aren't really suited for those tasks. Instead, they come to their best when conceived as dedicated devices focusing on new and radical approaches to sampling.
When we developed the Machinedrum UW, one of the goals was to allow for a creative use of samples. Once the machine was released it became apparent that especially the RAM machines, which made it possible to record sounds in real-time and instantly play them back, were utilized in ways we originally couldn't even imagine. Users around the world used them to incorporate live sampled shortwave radio sounds in their compositions, make instant remixes of 12" records and to more or less conceive new genres of music. It was obvious that the RAM machine concept harbored a tremendous potential. This was the starting point of the Octatrack. We wanted to create a machine that would regard recorded material not as inflexible sounds, but rather as something highly malleable. This is one of the reasons why the Octatrack exists. The other one is because of the stage. The laptop computer has quickly established itself as a common instrument in live setups. It is a powerful and highly customizable tool, however, the multi functionality is at the same time a disadvantage. When it comes to audio related tasks a laptop is still a jack of all trades but master of none. The Octatrack on the other hand is designed to be a streamlined, reliable and straightforward machine allowing live performers to really add something extra to their sets. It can act as a backing track machine, a second turntable, a source of experimental soundscapes or simply as an instrument encouraging improvisation and fun.
These two reasons converge and form the ultimate raison d'être of the Octatrack: its capability to re-establish sampling as an art form. We hope it will be a trusty companion during your musical endeavours.
2.1 SUGGESTED APPLICATIONS OF THE OCTATRACK
The flexibility of the Octatrack makes it a very powerful device suited to a wide range of tasks. Here a few of them are presented.
2.1.1 LOOPER DEVICE
The Octatrack is ideal for DJ's and live performers. You will be able to quickly sample a turntable or other sound sources present on the stage and instantly play back and affect the recorded loop. Add pre-recorded loops and sounds to samples captured in real-time to take your performance to a completely new level. The real-time timestretch will make sure everything stays in sync.
2.1.2 RADICAL SOUND PROCESSOR
The combined power of the sampling engine, the sequencer and the FX blocks makes the Octatrack a very powerful audio mangler. This functionality is great when working in the studio and wanting to obtain unique sounds and textures.
2.1.3 BACKING TRACK MACHINE
Each of the eight stereo tracks can stream gigabyte-large samples. Despite the large size of the samples they can still be subject to timestep. Change the tempo of the Octatrack and the backing track samples can be timesteped accordingly. On top of this you can treat the samples with the Octatrack effects and sequencer tricks.
2.1.4 LIVE SETUP HUB
The two input pairs combined with the extensive audio routing possibilities allow the Octatrack to function as a mixer. Connect for example a Machinedrum and a Monomachine to the inputs and enjoy a complete live setup with extreme possibilities.
2.1.5 REMIX TOOL
It is easy to change the pitch of different sections of a vocal sample without changing the overall tempo of the sample. Chopping up and rearranging samples and loops is extremely simple thanks to features like the LFO designer and slice points. The Octatrack lets you break down audio content and restructure it in new and interesting ways.
2.1.6 EFFECTS UNIT EXTRAORDINAIRE
Chained FX blocks paired with automated real time sampling can warble and twist incoming audio in ways previously unachievable by a single machine. Two chains, each with 8 simultaneous effects, can be active at the same time.
3. PANEL LAYOUT AND CONNECTORS
3.1 FRONT PANEL
The Octatrack front panel. For a more comprehensive list of key combinations, please see “19. SUMMARY OF KEY PRESS COMBINATIONS” on page 114.
HEADPHONES VOLUME CONTROL sets the volume for the stereo headphones jack.
[AUDIO RECORD] buttons are used for real-time sampling through the external inputs. There is one [AUDIO RECORD] button per audio input pair.
The
[TRACK] buttons. Press a [TRACK] button to move the focus to the corresponding track. Pressing a [TRACK] button + an [AUDIO RECORD] button will record audio to the recorder of the selected track. [FUNCTION] + [TRACK] will mute the selected track. [CUE] + [TRACK] will cue the selected track. The
The LCD graphical interface.
LED, indicating the activity of the Compact Flash card.
LEVEL sets the overall volume level of the active track. [FUNCTION] + LEVEL controls the main output volume.
[TEMPO] key. Brings up the TEMPO menu. The current tempo is always indicated by the flashing speed of the LED. Tapping the BPM is done by holding [FUNCTION] and then repeatedly tapping [TEMPO].
DATA ENTRY knobs. Used to set parameter values. Press the knob when turning to change values in larger increments.
[MIXER] opens up a menu where settings for the in- and outputs can be made. Tracks can also be muted and solo:ed here. Pressing [FUNCTION] + [MIXER] opens the PROJECT menu.
[MIDI] activates the MIDI editing mode. A lit LED indicates the MIDI editing mode is active. When in the RECORD SETUP menu this LED indicates both the signal strength of the internal sample source and the internal source selection for recorder trigs. [FUNCTION] + [MIDI] opens the PARTS menu. When a Pickup machine is used, the button combination performs a number of commands.
[FUNCTION] key. Press and hold it for accessing the secondary function of another key. Secondary functions are often printed in red text on the panel.
Pressing [CUE] + a [TRACK] key will cue the track. The audio of the track will then be routed to the cue outputs. [FUNCTION] + [CUE] will reload the parameter settings of the selected part.
Pressing [PATTERN] + a [TRIG] key selects the active pattern within a bank. The ARRANGER menu is opened by pressing [FUNCTION] + [PATTERN].
[BANK] + a [TRIG] key selects the active bank. Pressing [FUNCTION] + [BANK] opens various context based menus.
[ENTER/YES] key. Used for entering sub-menus and for confirming choices.
[EXIT/NO] key. Used for exiting an active menu and for deselecting options.
The [ARROW] keys. Used for menu navigation. They are called [UP], [DOWN], [LEFT] and [RIGHT]. Pressing [LEFT]/[RIGHT] while no particular menu is open will temporarily nudge the BPM up or down.
[TRACK PARAMETER] keys switches between the TRACK PARAMETER pages of the active track. Pressing [FUNCTION] + a [TRACK PARAMETER] key or quickly double pressing a [TRACK PARAMETER] key will open the SETUP menu of the selected TRACK PARAMETER page. In MIDI SEQUENCER mode the TRACK PARAMETER pages reflect the MIDI functionality of the tracks.
[REC] key. Toggles GRID RECORDING mode on/off. Starts LIVE RECORDING mode if held while pressing [PLAY]. In GRID RECORDING mode, the LED gives a steady light, while in LIVE RECORDING mode it flashes. Pressing [FUNCTION] + [REC] performs a copy command.
[PLAY] key. Starts playback of a pattern or arrangement. Pressing [PLAY] a second time pauses play-back. [FUNCTION] + [PLAY] performs a clear command.
[STOP] key. Stops the playback of a pattern or arrangement. [FUNCTION] + [STOP] performs a paste command.
Copy, clear and paste functions are available in many menus. The implementation is described in "SEQUENCER COPY, PASTE AND CLEAR OPERATIONS" on page 84.
[SCENE A]/[SCENE B] + [TRIG] assigns one of 16 scenes to the A and B scene slots.[SCENE A]/[SCENE B] + a DATA ENTRY knob will assign the chosen parameter value to the scene. [FUNCTION] + [SCENE A]/[SCENE B] mutes the scene.
The crossfader interpolates between the parameter values of scene A and scene B.
[TRIG] keys 1 to 16. They have many uses, for example triggering either the machine of a track or a complete track. Also used for placing trigs while in GRID RECORDING mode. When pressed in combination with the [PATTERN], [BANK] and [SCENE] buttons they select patterns, banks and scenes. Above each [TRIG] key a LED indicates the position of placed trigs.
[PATTERN PAGE] selects the active pattern page when GRID RECORDING mode is active. Above the [PATTERN PAGE] key four LEDs are found. They are used for indicating the pattern page currently being played or edited. If for example 64 steps, or four pattern pages, are used in a pattern, all four LEDs will be lit. For scale lengths up to 16 steps, the <1:4> LED will stay lit and pressing [PATTERN PAGE] will have no effect. [FUNCTION] + [PATTERN PAGE] opens the SCALE SETUP menu where track length and time signature settings are made.
3.2 REAR CONNECTORS
Power on/off switch.
6V DC power in.
Hi Speed USB 2.0 connection.
Compact Flash card reader.
MIDI Thru.
MIDI Out.
MIDI In.
Input C/D.
Input A/B.
Cue out L/R.
Main out L/R.
Headphones output.
Caution! Use only the bundled Elektron power supply with your Octatrack. It can, using an appropriate power cord, be used all over the globe without the need of voltage converters. Using the wrong type of adapter may damage your unit. Damage caused by the use of incorrect power supply is not covered by warranty.
3.3 OCTATRACK ACCESSORIES
3.3.1 RACK MOUNT KIT
The Octatrack can be rack mounted in a standard 19" rack, using the Octatrack rack mount kit which can be ordered separately. When rack mounted, the Octatrack occupies four standard height units plus additional space, usually about 1 HE, which is needed to accommodate cables plugged into the unit.
When assembling the rack mount kit, make sure that you have a Philips screwdriver of the right size. Use the included M3x6mm size screws to secure the rack mount consoles on each side of the Octatrack. Make sure all screws are fastened for secure operation of the unit.
3.3.2 CARRYING BAG AND PROTECTIVE LID
The Elektron Carry Bag ECC-7 accommodates one Octatrack. The protective plastic lid PL-2 is put on top of the Octatrack panel and protects the crossfader and the knobs. Both items are sold separately.
3.4 THE COMPACT FLASH CARD READER
The LED lights up when a Compact Flash card is inserted. A blinking bright green LED light means the card is being read, a red LED light means the card is being written to. Sometimes data cannot be written until [STOP] is pressed. The LED will then remain yellow until so happens.
Eject the Compact Flash card by pressing the button located to the right of the reader. After being pressed the button will protrude a few millimeters. Press it again to eject the Compact Flash card.
3.4.1 COMPACT FLASH CARD SPECIFICATIONS
Cards supporting UDMA and at least 133x (\~20MB/s) for both reads and writes are compatible with the Octatrack. Cards must be FAT16 or FAT32 formatted, preferably FAT32. Up to 64 GB Compact Flash cards are supported.
Never remove the card while data is being read or written to the it. Doing so might corrupt files and data. Only when the LED emits a dimmed green and steady light the card might be removed.
3.5 CONNECTING THE UNIT
Before you start connecting the Octatrack to other units, make sure all units are switched off.
Plug the supplied DC adapter to a power outlet and connect the small plug to the 6 V DC connector of the Octatrack unit.
Connect the main out L/R from the Octatrack to your mixer or amplifier.
If MIDI control is desired, connect MIDI OUT from the Octatrack to the MIDI IN of the device you wish to send data to. Connect the MIDI IN of the Octatrack to the MIDI OUT of the device you wish to receive data from. The MIDI THRU port “echoes” the data arriving at the MIDI IN port, so it can be used for chaining MIDI units together.
Switch on all units.
The USB connection may inject computer noise in the outputs of the Octatrack. Should this occur, use balanced cables or use a battery operated computer. Do not remove the safety grounding of your computer. It is there to protect against electric shocks.
3.6 CARE INSTRUCTIONS
To ensure many years of trouble free operation, please follow the advice below:
Never use any aggressive cleaners on the casing or the LCD overlay. Remove dust, dirt and fingerprints with a soft dry cloth. More persistent dirt can be removed with a slightly damp cloth using only water.
To avoid scratches or damage, never use sharp objects near the display. Also avoid applying any pressure to the display itself.
When transporting the Octatrack, use the box and padding the unit originally shipped with or the Elektron Carry Bag ECC-7.
Make sure you place the unit on a stable surface before use. If you mount the unit in a rack, be sure to tighten all four screws in the rack mount holes.
The memory used for storing patterns and parts is powered by a battery inside the unit. It will hold data at least 6 years before needing replacement. If the battery needs replacement, the “BATTERY LOW” message will appear in the display. Contact Elektron support or your nearest repair center.
Use the power switch to turn off the machine when it is not in use.
4. OVERVIEW OF THE OCTATRACK STRUCTURE
The Octatrack is organized in a hierarchical way. The image below outlines the data structure of the Octatrack.
4.1 SETS
A set is the top level structure of the Octatrack. It can contain a near unlimited amount of projects plus one audio pool. The amount of samples in the audio pool as well as the amount of projects are limited only by the size of the Compact Flash card. The samples in the audio pool are available to all projects of the set. Sets are saved on the Compact Flash card. Since a set can contain many projects, some users might find that one set is all they need. For more information, please see “7. SETS” on page 26.
4.2 AUDIO POOL
Each set contains one audio pool which is stored on the Compact Flash card. The audio pool contains the samples that can be loaded to the Flex and Static sample slot lists of the projects of a set. For more information, please see “7.2.1 ADDING CONTENT TO THE AUDIO POOL” on page 27.
4.3 PROJECTS
For the Octatrack to work as intended, a set needs to be mounted and a project needs to be loaded. A project contains 16 banks, 8 arrangements, 8 track recorders and their recorder buffers, 128 sample slots dedicated to Flex machines, 128 slots dedicated to Static machines, various project specific settings and the BPM setting for all the patterns of the project. A project can therefore be regarded as a collection of compositions.
The samples used to fill the Flex and Static sample slots are fetched from the audio pool of the set. The samples used by a project can also be collected and saved in the project folder. The command COLLECT SAMPLES are used for this and makes a project more or less self contained. For more information, please see “8. PROJECTS” on page 28. For the sake of sample organization it is recommended to only store samples in the audio pool.
4.4 FLEX AND STATIC SAMPLE SLOT LISTS
For samples to be available to Flex and Static machines they first need to be loaded from the audio pool to the Flex or Static sample slot lists. When samples are present in these lists they can be assigned to, and thus processed by, Flex and Static machines assigned to the audio tracks of a pattern. Read how to load audio pool samples to the sample slot lists in the section “8.3 LOADING SAMPLES TO THE SAMPLE SLOTS” on page 29.. Read how to assign samples to a machine in the section “11.3 ASSIGNING FLEX AND STATIC SAMPLES TO MACHINES” on page 57.
4.5 BANKS
Each project hosts 16 banks and each bank hosts 16 patterns and 4 parts. This makes a bank suited for hosting a complete composition as the available patterns and parts allow a large number of song variations. Switching between banks is seamless, meaning playback won't be halted or audio cut off. For more information, please see “10.1 BANKS” on page 53.
4.6 PATTERNS
For each bank 16 patterns are available, meaning 256 patterns are always at hand. A pattern consists of sequencer data like trigs, parameter locks, track lengths and time signatures for the eight audio tracks and the eight MIDI tracks. For more information, please see “12. PATTERNS” on page 65.
4.7 PARTS
4 parts are available to each bank. A part contains machine assignments and their associated samples, track parameter settings, FX assignments as well as 16 scenes. A pattern is always linked to a part. Changing parts will let the new part be controlled by the active pattern. For more information, please see “10.2 PARTS” on page 53.
4.8 SCENES
Scenes are assigned to the scene A and scene B slots. They decide which parameters the crossfader will affect. For more information, please see “10.3 SCENES” on page 54.
4.9 ARRANGEMENTS
Each project contains eight arrangements. They are used to structure the playback of patterns. An arrangement is a great way to form a long sequence out of several patterns. For more information, please see “14. THE ARRANGER” on page 88.
4.10 TRACKS
An Octatrack pattern handles eight audio tracks and eight MIDI tracks. Each audio track can host a machine. With the exception of Neighbor machines, any machine type can be assigned to any of the eight audio tracks. For more information, please see “4.10 TRACKS” on page 17.
4.11 MACHINES
Machines are assigned to the eight audio tracks. Each machine fills a different purpose. Read more about the various machine types in “APPENDIX A: MACHINE REFERENCE” on page 117. How machines are assigned to tracks is covered in “11.2 ASSIGNING MACHINES TO TRACKS” on page 56.
Flex machines process samples. They offer instant control over samples since Flex samples are loaded to the RAM memory of the Octatrack. The samples available to Flex machines are located in the Flex sample slot list, which can host 128 Flex samples.
Static machines process samples. The samples available to Static machines are located in the Static sample slot list, which can host 128 Static samples streamed from the Compact Flash card. A single Static sample can be as big as 2 gigabytes.
Thru machines are used to listen to the inputs of the Octatrack. They can be used to affect incoming audio with filtering and effects.
Neighbor machines listen to the output of the preceding track. They can be used to build powerful effects chains.
Pickup machines are ideal when wanting to use the Octatrack as a looper device.
4.12 HOW INFORMATION IS HANDLED
When working within a project there is no need to save as all changes are automatically cached on card. Changes made to a project will be remembered even after the machine has been switched off. The only time an operation needs to be carried out is before removing the Compact Flash card. The project should then be synced to the card. For more information about this operation, please see page 30.
There exists a SAVE command for projects though. Once you are content with a project it is wise to save it. If you continue your work with the project, but are not satisfied with the results, you can then bring back the project to the previously saved state by performing a project RELOAD command. For more information, please see “8.4.1 PROJECT” on page 31.
Never turn off the Octatrack while the LED is blinking. It indicates data is being written to the Compact Flash card and disrupting this process may corrupt data. Only when the LED emits a dimmed green and steady light the Octatrack might be switched off.
5. THE USER INTERFACE
The center of Octatrack editing is the LCD display. The main interface screen is shown below:
Track icons showing the machine assignments and status of the tracks. The active track is highlighted. Track assignments are abbreviated. "F" = Flex machine, "S" = Static machine, "T" = Thru machine, "N" = Neighbor machine, "P" = Pickup machine, "M" = Master track. Beneath the track assignment symbols the status of the track is shown. A play symbol means the sample of the track is playing, a stop symbol means the track is not playing, a plus sign means the track recorder or the Pickup machine of the track is recording. For Pickup machines, more track icons exist. For a complete list, see "9.3 PICKUP MACHINE SAMPLING" on page 50. If the Octatrack MIDI mode is active, the icons will show the MIDI channels the tracks send data to.
The current tempo displayed with one decimal.
Four boxes showing the playback position. Each box represents a downbeat.
The playback/recording status shown by the standard "record", "play", "pause" and "stop" symbols; □, ▶, ▪, and ■.
Level bar showing the overall volume level of the machine of the active track.
Up to six track parameters. They show what the DATA ENTRY knobs control and also indicate the current parameter values. When two parameters belong to each other in some way, they will have a small "clip" between them as shown below:
Assigned scenes and the current position of the crossfader.
Graphics indicating which MIDI MAP configuration that is selected (if any) for the active track.
Graphics indicating which TRIG mode that is currently active.
Info about which TRACK PARAMETER page is active.
Info box where the name of the active part and the name of the sample assigned to the machine of the track is shown.
The currently active pattern.
5.1 MENUS AND WINDOWS
When a menu or window is opened the function of certain buttons and/or knobs will change. When a window has functions mapped to certain interface controls, icons representing these controls will be visible in the opened window. The icons are:
The [ARROW] buttons
The [TRIG] keys
The [FUNCTION] key
The LEVEL knob
All windows can be closed using the [EXIT/NO] key.
Buttons or knobs not used by an active menu retain their original function. For example, the TEMPO menu makes use of the LEVEL knob, but you can still use the DATA ENTRY knobs to control the parameters of the track in focus.
5.2 PARAMETER EDITING
The DATA ENTRY knobs are used to change the value of the track parameters. The physical location of the knobs on the front panel correspond to the layout of the parameters on the screen. Turn DATA ENTRY knob A to adjust the upper left parameter, turn DATA ENTRY knob B to adjust the middle parameter of the upper row and so on. If one of the slots in the parameter grid is blank, the corresponding DATA ENTRY knob fills no function in that particular menu.
5.2.1 QUICK PARAMETER EDITING
If the DATA ENTRY knob is pressed down while being turned parameters will be adjusted in increments of 7. This makes it much quicker to sweep through a whole parameter range.
5.2.2 PARAMETER VALUE SKIP
Keeping [FUNCTION] pressed while turning a parameter will make the parameter values jump to relevant positions. For parameters ranging from 0 to 127 either 0 or 127 will be selected. For parameters ranging from -64 to 63 the values will jump between -64, 0 and +64. Other alternatives exist as well, the value of the Echo Freeze Delay TIME parameter will for example be doubled for each increment. This is useful when using the effect as a repeater.
You can also randomize the parameter settings on a specific TRACK PARAMETER page on a Synth track. Press [TRACK PARAMETER] key + [YES] to randomize all parameters on that page. Every time you press this key combination, the parameters randomize in a new way.
Press [TRACK PARAMETER] page key + [NO] to reset the TRACK PARAMETER page to the state of its last saved part.
Press and hold a [TRACK PARAMETER] key to see all the parameter settings on the TRACK PARAMETER page.
5.3 QUICK SCROLLING
In menus containing lists, like the file browser or the sample slot lists, quick scrolling is available. Press [FUNCTION] + the [UP] or [DOWN] arrow keys to move the cursor one menu page at a time.
When previewing sounds in the sample slot lists or in the file browser, the quick scroll feature will be temporarily disabled for as long as [FUNCTION] is pressed.
5.4 COPY, CLEAR AND PASTE
Copy, clear and paste commands are available in a lot of contexts. A copy operation is performed by pressing [FUNCTION] + [REC]. A paste operation is performed by pressing [FUNCTION] + [STOP]. A clear operation is performed by pressing [FUNCTION] + [PLAY]. Paste and clear operations can be undone by repeating the button press combination. See the different sections in the manual for more information about where these commands are available.
5.5 THE NAMING MENU
The naming procedure is identical for the various naming menus that exist.
The [LEFT] and [RIGHT] arrow keys are used to navigate between the letters. Turning the LEVEL knob or pressing the [UP] or [DOWN] arrow keys select the letter. Press [FUNCTION] + [EXIT/NO] to quickly erase characters. Another method of erasing characters is to press [CUE] + [EXIT/NO]. The difference compared to using the [FUNCTION] + [EXIT/NO] method is that the naming pop-up menu will not appear.
5.5.1 POP-UP MENU NAMING
While in a NAMING menu it is possible to open a pop up-menu displaying all available letters, symbols and digits. Entering names in the pop up-menu is often a considerably faster naming method. When a NAMING menu is open, press the [FUNCTION] key to access the pop up-menu.
While keeping [FUNCTION] pressed use the [ARROW] keys to navigate to the character you want to insert. Once there, release [FUNCTION] to insert the character.
When naming projects, sets and samples there are two extended pop-up menu pages of characters to choose from. Scroll between the pages by moving the cursor upwards or downwards until the other page is reached.
The number of characters to choose from is slightly more limited when naming parts and arrangements. Only one page of characters exists for these pop-up menus.
Copy, paste and clear commands are available in the naming menus. If you instead of pressing [FUNCTION] press [CUE] when performing the commands, the pop-up menu won't open.
6. QUICK START
This quick start will guide you through some of the basic operations to allow you to start using the Octa-track right away. First connect it as described in section “3.5 CONNECTING THE UNIT” on page 15.
6.1 DEMO MODE
While in this mode the Octatrack will be able to play back a set of 16 demo patterns without needing to have a Compact Flash card inserted. Demo mode is a great way to get acquainted with the basics of the Octatrack. Note that you can not save any changes made to the sounds or patterns while in demo mode.
Make sure no Compact Flash card is inserted. Switch on the Octatrack while keeping the [ENTER/YES] button pressed. The LCD screen will state that demo mode is being entered.
6.1.1 PLAYING THE DEMO PATTERNS
In demo mode 16 demo patterns, ranging from A01 to A16, are available.
Press [PLAY] to listen to pattern A01.
Select pattern A02, which is the second demo pattern, by pressing [PATTERN] + [TRIG] key 2. Pattern A03 is selected by pressing [PATTERN] + [TRIG] key 3 and so on.
Mute tracks by pressing [FUNCTION] + the [TRACK] key of the track you want to mute. Unmute by repeating the procedure.
6.1.2 ADJUSTING PARAMETERS
Each track contains five TRACK PARAMETER pages. Here you find the parameters that affecting the sample of the track. The buttons used to open the pages are located directly below the LCD screen.
Make sure the pattern is still playing.
Press the [TRACK] key of the track whose sample you wish to affect.
To change the pitch of the sample, press the [PLAYBACK] key. The PLAYBACK page will open. The parameter labeled PTCH changes the pitch of the sample. Turn DATA ENTRY knob A to change the parameter value.
Try out the rest of the TRACK PARAMETER menu parameters to experiment with the sound shaping possibilities.
To reload the parameter settings to their original state, press [FUNCTION] + [CUE].
6.1.3 EXPERIMENTING WITH SCENES
Scenes contain locked parameters. The crossfader is used to morph between the locked scene parameters. Scenes are covered in the section "4.8 SCENES" on page 17.
Select any demo pattern. Set the crossfader to its rightmost position. This will fully activate the scene assigned to scene slot B.
Hold [SCENE B] and press a [TRIG] key to assing a new scene to the scene slot. The already assigned scene is indicated by a red LED. Experiment with assigning different scenes to the scene slot and listen to how the sound of the pattern changes.
6.1.4 RECORDING A PATTERN USING GRID RECORDING
Use GRID RECORDING mode to input sample trigs to the sequencer. Sample trigs trig the machines and samples of the tracks. In depth information about this mode is found in section “12.3.1 GRID RECORDING MODE” on page 66.
Press the [REC] key to enter GRID RECORDING mode. The LED will light up, indicating the mode is now active.
Select the track to which you want to input sample trigs by pressing the relevant [TRACK] button.
Press a [TRIG] key to enter a sample trig. Press the same [TRIG] key again to remove the sample trig. If the pattern contains more than 16 steps, use the [PATTERN PAGE] key to switch between the pattern pages.
To edit other tracks, change the active track by pressing the other [TRACK] buttons.
6.1.5 RECORDING A PATTERN USING LIVE RECORDING
The LIVE RECORDING mode allows you to record sample trigs and parameter changes while the sequencer is running. In depth information about this mode is found in section"12.3.2 LIVE RECORDING MODE" on page 66.
To enter this mode, hold [REC] and then press [PLAY]. The LED starts to blink, indicating LIVE RECORDING mode is activated, and the sequencer starts to play.
You can now record sample trigs manually by pressing the last 8 [TRIG] keys. Pressing [TRIG] key 9 will add a sample trig to track 1, [TRIG] key 10 adds a sample trig to track 2 and so on. You will be able to hear all recorded sample trigs the next time the pattern starts over.
6.1.6 PARAMETER LOCKS
A parameter lock allows individual parameter values for a trig. It is one of the most important Octatrack features. For more information, please see “12.5 PARAMETER LOCKS” on page 68.
When in GRID RECORDING mode, hold a [TRIG] key and then tweak a parameter. The LCD screen graphics of the adjusted parameter will become inverted to indicate that the sample trig now is locked to the value you have set. The LED above the sample trig will flash to indicate that a parameter is locked for that step.
To remove all locks for a sample trig, press the [TRIG] key of the locked trig twice. You can also remove single locks. Hold the [TRIG] key while clicking the DATA ENTRY knob corresponding to the locked parameter to do so. The inverted graphics will disappear and the parameter lock is now removed.
6.2 MOUNTING A SET AND LOADING A PROJECT
A set needs to be mounted for the Octatrack to be able to load projects and populate the Flex and Static sample slot lists with samples. The Compact Flash card that came shipped with your Octatrack contains a set called "PRESETS". This set contains a project also named "PRESETS".
If you are using an empty Compact Flash card a set needs to be created and mounted before you can start processing samples. For more information, please see "7. SETS" on page 26.
6.2.1 MOUNTING A SET
Turn on the Octatrack. Make sure you have a Compact Flash card inserted. If you are using a new Compact Flash card an information window stating "NO SET IS MOUNTED! PLEASE MOUNT ONE." may appear. Press [ENTER/YES] and the menu where sets are mounted and created will automatically be opened. Otherwise, proceed to step 2.
Press [FUNCTION] + [MIXER] to open the PROJECT menu. Select PROJECT and press [ENTER/YES] or the [RIGHT] arrow key. Scroll down the list and select CHANGE, located in the SET section.
Press [ENTER/YES] to open the menu where sets are mounted and created. If you are not working within an existing project a window asking "NOT WITHIN A PROJECT. CHANGES MADE WILL BE DISCARDED. CONTINUE?" will appear. Press [ENTER/YES] to proceed with the mounting of the set. Note that any changes you have made will be discarded. If you want to save the changes to a new project, use the SAVE TO NEW command found in the PROJECT menu. Pressing [EXIT/NO] will cancel the set mounting operation.
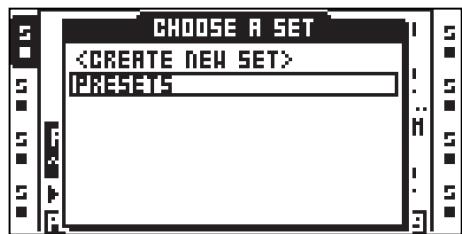
If you are using the Compact Flash card that came with the unit, select "PRESETS" and press [ENTER/YES]. If you are using an empty Compact Flash card a set needs to be created. Select and press [ENTER/YES]. Name the set by using the [ARROW] keys and when done press [ENTER/YES]. Select the set in the list and press [ENTER/YES]. A set has now been mounted.
After a set has been mounted the menu where projects are loaded is automatically opened.
6.2.2 LOADING A PROJECT
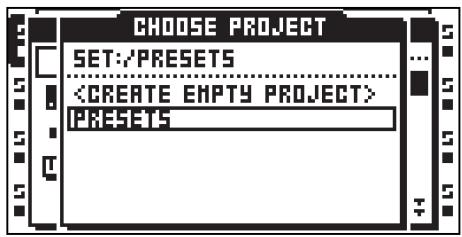
After a set has been mounted a project should be loaded. The Compact Flash card that came shipped with the unit contains one project, named "PRESETS". This project contains 16 demo patterns. If an empty Compact Flash is used the newly created set will not contain any projects and a project should therefore be created. For more information, please see "8. PROJECTS" on page 28.
Press [FUNCTION] + [MIXER] to open the PROJECT menu. Select PROJECT and press [ENTER/YES] or the [RIGHT] arrow key. Select CHANGE, located in the PROJECT section.
Press [ENTER/YES] to open the menu.
If the bundled Compact Flash card is inserted, and the set called "PRESETS" has been mounted, select the project "PRESETS" and press [ENTER/YES]. The project will be loaded. If a new Compact Flash is used select and press [ENTER/YES]. Name the project and press [ENTER/YES]. The newly created project will be loaded.
6.3 LOADING SAMPLES
When a set has been mounted, and a project preferably has been loaded, the samples in the audio pool of the set can be processed by the Flex and Static machines. To do so a Flex or Static machine needs to be assigned to a track and samples need to be loaded to the Flex or Static sample slot lists. Note that if the audio pool of the mounted set doesn't contain any samples it first needs to be filled with content. For more information, please see "4.2 AUDIO POOL" on page 16.
Two main methods of assigning machines and samples exist. This quick start guide covers the one where the PLAYBACK SETUP menu is used. The other method, using the QUICK ASSIGN menu, is covered in sections “11.2.1 ASSIGNING MACHINES IN THE QUICK ASSIGN MENU” on page 56. and “11.3.1 ASSIGNING SAMPLES IN THE QUICK ASSIGN MENU” on page 57.
6.3.1 ASSIGNING A MACHINE TO A TRACK
Select the first track by pressing [TRACK] key 1.
Enter the PLAYBACK SETUP menu by pressing [FUNCTION] and [PLAYBACK]. From here the machine list needs to be accessed. If a sample slot list was opened move to the machine list by pressing the [LEFT] arrow key.
Select the machine you want to assign from the list of machines. Press [ENTER/YES] to assign it to the track. Note that only Flex and Static machines can play samples. Press the [RIGHT] arrow button to enter the sample slot list for the assigned machine.
6.3.2 ASSIGNING A SAMPLE TO A MACHINE
Make sure a set with an audio pool containing samples is mounted. The audio pool belonging to the "PRESETS" set found on the bundled Compact Flash card is full of samples. A project should preferably have been loaded as well.
Select a track containing a Flex or Static machine by pressing the relevant [TRACK] key.
Enter the PLAYBACK SETUP menu by pressing [FUNCTION] and [PLAYBACK]. The sample slot list will be opened. If the machine list is opened, press the [RIGHT] arrow key to enter the sample slot list. The sample currently assigned to the machine is indicated by inverted graphics.
4. If samples already are present in the sample slot list, select a sample and press [ENTER/YES] to assign it to the machine.

5. To load a new sample from the audio pool to an empty sample slot, select the sample slot and press [ENTER/YES]. The file browser listing the content of the audio pool will be opened. If a sample slot already contains a sample, press the [RIGHT] arrow key to access the audio pool without assigning the selected sample slot to the machine.

6. Navigate in the audio pool by using the [UP] and [DOWN] arrow keys. Subfolders in the audio pool are marked with a “(D)”, which is short for directory. Open subfolders by pressing the [RIGHT] arrow key or [ENTER/YES]. Press the [LEFT] arrow keys to move back one step in the folder hierarchy. Localize the sample that should be loaded to the sample slot. Press [ENTER/YES] to load the sample to the sample slot list.


Press [FUNCTION] + [ENTER/YES] to preview samples from the main outputs. Press [CUE] + [ENTER/YES] to preview from the cue outputs.
7. SETS
A set is the top layer of the Octatrack hierarchy. Sets are completely self contained. Sets contain:
- An amount of projects only limited by the size of the Compact Flash card.
- An audio pool, where the samples shared by the projects of the set are stored.
A set needs to be mounted in order for the Octatrack to be able to load a project belonging to the set. A mounted set and a loaded project is required for the Octatrack to work as intended. For more information, please see “8. PROJECTS” on page 28.
When booting, the Octatrack automatically mounts the previously mounted set and loads the previous project, but sometimes that might not be possible, for instance when a freshly formatted Compact Flash card has been inserted or when switching cards to a card containing other sets. Sets then have to be manually mounted.
If Compact Flash cards are changed a window stating “WRONG COMPACT FLASH CARD INSERTED. CONTINUE?” will appear. This is a prompt indicating a new Compact Flash card has been inserted. Press [ENTER/YES] to continue. If you decide to proceed a window stating “NO SET IS MOUNTED! PLEASE MOUNT ONE.” will appear. Pressing [ENTER/YES] will automatically open the menu where sets can be created and mounted. If the inserted card contains sets, mount one of them. If the card doesn’t contain any sets, create and mount one.
If the Octatrack boots with a set, but no project is active, a window stating "YOU ARE NOT WORKING IN ANY PROJECT. USE THE SAVE AS NEW COMMAND TO KEEP ANY CHANGES!" will appear. Press [ENTER/YES] to make the prompt disappear. Since no project is active, any changes made while in this state will be discarded when mounting another set or loading another project. Use the SAVE TO NEW command found in the PROJECT menu to save any changes to a new project. Otherwise, just create or load a new project.

Back up your sets to a computer. Should you lose your Compact Flash card it is easy to transfer the sets from the computer to a new card.
Sets are stored as folders in the root directory of the Compact Flash card. This can be seen when for example connecting the Octatrack to a computer via USB and browsing the content of the Compact Flash card with the computer. Read more on how to connect the Octatrack to a computer in the section “8.5 SYSTEM” on page 32.
7.1 CREATING AND MOUNTING A SET
Sets are created and mounted in the PROJECT menu.
1. Press [FUNCTION] + [MIXER] to open this menu. Select PROJECT and press the right [ARROW] key or [ENTER/YES] to access the sub-menu options. Then select CHANGE, located in the SET section.

2. Press [ENTER/YES]. The active project will automatically be synced to the Compact Flash card, storing all settings and assignments, before the menu where sets are changed is opened.

If no project is active a prompt asking “NOT WITHIN A PROJECT. CHANGES MADE WILL BE DISCARDED. CONTINUE?” will appear. Press [ENTER/YES] to continue with the change sets procedure. Note that this will discard any settings and assignments already made. If you don’t want to lose any information, press [EXIT/NO] to cancel the operation. Then save all settings to a new project by using the SAVE TO NEW command before changing sets.
Once CHANGE has been selected and [ENTER/YES] been pressed a list of available sets stored on the Compact Flash card will appear.

3. The currently active set is indicated by inverted graphics. To mount another set, select one from the list of sets found in the menu. Mount it by pressing [ENTER/YES]. Once the set has been mounted, the menu where projects are loaded and created will automatically be opened.
4. Create a new set by selecting and pressing [ENTER/YES]. A naming menu will appear where the new set can be named.

After a set has been mounted a project should preferably be loaded or, if the set doesn't contain any projects, created and then loaded.
7.2 AUDIO POOL
All the samples of a set are collected in the audio pool. These samples are used to fill the Flex and Static sample slots of the projects of the set. When a set is created, an audio pool is automatically created as well.
The content of an audio pool is exclusive to a set. If you want to use the same sample in two sets, the sample needs to be copied to both audio pools.
7.2.1 ADDING CONTENT TO THE AUDIO POOL
To add content to the audio pool the Octatrack should preferably be connected to a computer.
1. Connect the Octatrack to a computer using a USB cable.
2. Open the PROJECT menu, select SYSTEM and then USB DISK MODE. Press [ENTER/YES] to make the Compact Flash card appear as a mass storage device in the computer. Read more about the USB DISK MODE in the section "8.5 SYSTEM" on page 32.
3. Using the computer, locate the set folder whose audio pool you want to add audio content to. Inside the set folder a folder called AUDIO is located. This is the audio pool of the set. All audio material in this folder will be accessible by the projects of the set.
4. To add content to the audio pool of the set, simply drag and drop audio files or folders containing audio files to the AUDIO folder. When done the Octatrack should be unmounted from the computer.

When loading samples to the Flex and Static sample slots, the file browser of the Octa-track is used to browse the Compact Flash card. For more information, please see "8.3.3 FILE BROWSER" on page 30.

After opening a set folder, the AUDIO folder and the saved projects of the set are visible. Although audio files can be placed in the project folders it is for convenience sake recommended to put audio files only in the AUDIO folder.
Folders and sub-folders in the audio pool should contain a maximum of 1024 files or sub-folders.
7.2.2 AUDIO FILE COMPATIBILITY
Both Flex and Static machines can handle 16 or 24 bit/44.1 kHz wav/aiff files, either in mono or stereo.
8. PROJECTS
Each set can contain an amount of projects only limited by the size of the Compact Flash card. A project contains:
• 16 banks.
- 8 arrangements.
• 128 Flex sample slots and their associated Flex samples.
• 128 Static sample slots and their associated Static samples.
• 8 track recorders and their recorder buffers.
• A BPM setting controlling the tempo of the patterns.
• PROJECT menu settings.
Projects can be regarded as a collection of compositions. A project could for example contain your whole live set or a certain amount of songs you are working on. One project at a time can be loaded. For the Octa-track to work as intended, a project should always be active, i.e. loaded.
All changes made to an active project are automatically cached on card. This means you can work on a project, switch off the Octatrack, switch it on and start working exactly from where you left off. It is possible to save a project by performing a project SAVE command though. This is only necessary if you want to be able to revert the project to a specific state. In general, performing a project SAVE command is recommended once you are content with a project. This way you can keep on experimenting with the project, but, if needed, always go back to the saved state by performing a RELOAD command. Read more how about how to save and reload a project in section “8.4.1 PROJECT” on page 31.
When not working within a project, for example after mounting a set containing no projects, it is still possible to assign machines, effects and make parameter and pattern settings. The Octatrack will remember the settings of the active bank even after being switched off, but will discard them if a new set is mounted or another project is loaded. Should you want to save the changes as a new project, use the SAVE TO NEW command, found in the PROJECT menu. If the Octatrack boot and sense that no project is active a prompt appears saying "YOU ARE NOT WORKING IN ANY PROJECT. USE THE SAVE AS NEW COMMAND TO KEEP ANY CHANGES!"

Before ejecting the Compact Flash card the active project should always be synced to the card, by using the SYNC TO CARD operation. Otherwise changes will be lost. For more information, please see “8.4.1 PROJECT” on page 31.
8.1 PROJECTS AND RAM MEMORY
The total amount of RAM memory available to a project is 85,5 MB. This memory is shared between the track recorders and the samples loaded to the Flex sample slots. By default the Flex sample slots can be filled with 64 MB of samples while the reserved track recorder memory ensures that each track recorder always can sample 2.7 MB of stereo audio. But you can change the allocation of reserved track recorder memory and Flex RAM memory. Track recorder memory can be increased at the cost Flex RAM memory. The opposite also applies, meaning Flex RAM memory can be increased at the cost of track recorder memory. The track recorders can also use Flex RAM when sampling. Read more on how to allocate RAM memory in section “8.6.5 MEMORY” on page 38.
8.2 LOADING AND CREATING A PROJECT
Before loading a project, a set needs to be mounted. Read more about how to create and mount sets in section “7.1 CREATING AND MOUNTING A SET” on page 26.
1. Projects are loaded in the PROJECT menu. Press [FUNCTION] + [MIXER] to open this menu. Select PROJECT and press the right [ARROW] key or [ENTER/YES] to access the sub-menu options. Then select CHANGE, located in the PROJECT section.

2. Press [ENTER/YES] to open a list of the projects available to the set. Below the header of the menu the name of the active set is visible. The currently active project is indicated by inverted graphics.

3. To load a new project, select one from the list and load it by pressing [ENTER/YES]. The currently active project will automatically be synced to card, meaning all settings and assignments will be saved to the card, before the new project is loaded.
4. Create a new, empty, project by selecting and pressing [ENTER/YES]. A naming menu will appear where the new project can be named.

It is possible to rename and delete projects while in the CHANGE menu. Press [FUNCTION] + [BANK] to open a menu where rename and delete options are present.
8.3 LOADING SAMPLES TO THE SAMPLE SLOTS
For the Flex and Static machines to be able to play back audio, samples need to be loaded to the Flex and Static sample slots lists of the project. Samples loaded to the 128 Flex sample slots are called Flex samples. They are only available to Flex machines. Samples loaded to the 128 Static sample slots are called Static samples. They are only available to Static machines. The samples in the sample slot lists are accessible by all Flex and Static machines of the project. Read more how to assign the samples of the sample slot lists to Flex and Static machines in section “11.3 ASSIGNING FLEX AND STATIC SAMPLES TO MACHINES” on page 57.
To load samples to the sample slots the audio pool must contain samples. Read more about how to fill the audio pool with content in the section “4.2 AUDIO POOL” on page 16.
8.3.1 LOADING FROM THE QUICK ASSIGN MENU
1. The quickest method to load samples to the sample slots is to quickly double press a [TRACK] button. The QUICK ASSIGN menu for that track will appear. The Flex sample slot list will be displayed if the active track contained a Flex machine. The Static sample slot list will be displayed if the active track contained a Static machine. If the track contained any other machine type the machine list will appear. If so, open the Flex sample slot list by moving the cursor to FLEX and press the [RIGHT] arrow key. Open the Static sample slot list by moving the cursor to STATIC and pressing the [RIGHT] arrow key.

2. Select an empty sample slot position and press [ENTER/YES]. The file browser, covered in the section "FILE BROWSER" on page 28, will be opened. It reflects the content of the audio pool of the mounted set.
3. Locate the sample you wish to load and press [ENTER/YES]. Both the Flex and Static sample slot lists can be entered and samples loaded without the machine of the track being changed.
If you want to replace a sample already loaded to a sample slot position, but don't want to assign the sample to the Flex or Static machine of the track, press the [RIGHT] arrow key to open the file browser.
It is possible to load samples to the recorder buffers, just as if they were Flex sample slots. The recorder buffers, which contain any audio captured by the track recorders, are found in the Flex sample slot list, located above Flex sample slot position 1. The length of the sample is restricted by the reserved memory of the buffer. If the loaded sample is longer than allowed by the buffer it will be truncated. Mono samples will also be converted to stereo.

It is possible to copy, paste and clear sample slots while in the QUICK ASSIGN menu. Copying a sample slot will copy all its attributes, slices and trim settings.
Select a sample in the Flex/Static sample slot list and press [FUNCTION] + [BANK] to edit it in the audio editor.
Selecting a sample in the Flex or Static sample slot list and pressing [FUNCTION] + [LEFT]/[RIGHT] will load the next or previous sample from the directory the original sample resided in.
At the top of the Flex sample slot list the amount of RAM memory available to the project is shown. If Flex samples are present in the list their BPM and size in MB are also displayed.
Samples can be previewed in the sample slot lists. Select a sample and press [FUNCTION] + [ENTER/YES] to do so. This will preview the sample from the main outputs. Press [CUE] + [ENTER/YES] to preview from the cue outputs. When previewing the quick scroll feature will be temporarily disabled for as long as [FUNCTION] is pressed.
A blinking star next to a file name indicates the sample has been edited in the EDIT menu found in the audio editor, but not yet been saved.
8.3.2 LOADING FROM THE PLAYBACK SETUP MENU
The PLAYBACK SETUP menu can also be used when loading samples to sample slots.
1. Press [FUNCTION] + [PLAYBACK] to open the PLAYBACK SETUP menu and access the Flex and Static sample slot lists. If the machine list appears, select the machine type whose sample list you want to access and press the [RIGHT] arrow key.

2. Load a sample by selecting a sample slot and pressing [ENTER/YES]. The file browser reflecting the content of the audio pool of the active set will be opened. Locate the sample you wish to load and press [ENTER/YES] to load it.
If you want to replace a sample already loaded to a sample slot position, but don't want to assign the sample to the Flex or Static machine of the track, press the [RIGHT] arrow key to open the file browser.

Select a sample in the Flex/Static sample slot list and press [FUNCTION] + [BANK] to edit it in the audio editor.
Selecting a sample in the PLAYBACK SETUP sample list and pressing [FUNCTION] + [LEFT]/[RIGHT] will load the next or previous sample from the directory the original sample resided in.
Samples can be previewed in the sample slot lists. Select a sample and press [FUNCTION] + [ENTER/YES] to do so. This will preview the sample from the main outputs. Press [CUE] + [ENTER/YES] to preview from the cue outputs. When previewing the quick scroll feature will be temporarily disabled for as long as [FUNCTION] is pressed.
8.3.3 FILE BROWSER
The file browser is used when locating samples that should be loaded to the Flex and Static sample slots. It is a representation of the audio pool of the set.

Folders are indicated by a “(D)”. Open folders by selecting them and pressing the [RIGHT] arrow key or [ENTER/YES]. If an opened folder contains more files or folders than the menu list can show, two arrows pointing downwards will be visible in the lower right part of the screen. Scroll down in the folder by pressing the [DOWN] arrow key. A sample is loaded by selecting it and either pressing [ENTER/YES] or the [RIGHT] arrow key. However, the file browser is not closed until [ENTER/YES] is released. This makes it possible to keep holding [ENTER/YES] and use the [UP]/[DOWN] arrow keys to instantly load the next or previous file in the directory without having to re-open the file browser for each file. This mode of assignment is handy to use when the sequencer is running and you want to try out how different sample assignments will affect sound and feel of the pattern.
At the top of the menu the folder path is visible. To go back one step in the folder hierarchy, press the [LEFT] arrow button. If the file browser was opened from a Flex sample slot list, the bottom of the LCD screen will show how much RAM memory that is available to the project. The size of the samples are indicated in MB to the right of the sample names.
When the cursor is moved over a sample, the smiley symbol at the bottom of the screen will show a happy face if the sample is ready to be loaded without any problems. If the file is too big to be loaded, or if the file is incompatible with the Octatrack audio engine, the smiley will look sad. Samples with an unsupported sample rate, like 48 kHz, will make the smiley look indifferent, indicating the sample will be played back albeit at the wrong speed. To the right of the smiley the sample rate, bit depth and number of channels of the selected sample is shown.
When opening the file browser from a Flex/Static slot already containing a sample, that sample will be indicated by inverted graphics.

Audio files can be previewed in the file browser. Select the file and press [FUNCTION] + [ENTER/YES] to do so. This will preview the file from the main outputs. Press [CUE] + [ENTER/YES] to preview from the cue outputs. Previewing samples temporarily disables the page scrolling function, initiated by pressing [FUNCTION] +[UP]/[DOWN], for as long as [FUNCTION] is held. When previewing, the sample will be affected by the track effects of the active track. It is possible though to preview samples in a dry fashion. The preview behavior setting is found in the PERSONALIZE menu. For more information, please see "8.5.4 PERSONALIZE" on page 33.

At the root of the audio pool file structure several folders might be found. The AUDIO folder contains the audio pool. Any other folders most likely represent any saved projects of the set. If audio files, as recommended, only have been put in the AUDIO folder the project folders will appear as empty when exploring them using the file browser.
8.4 THE PROJECT MENU
In the PROJECT menu various project related settings can be made. Press [FUNCTION] + [MIXER] to open the menu. Four main menus are located to the left. To access their sub-menus and setting options, select a main menu and press either [ENTER/YES] or the [RIGHT] arrow key. At the top of the menu the names of the currently active set and project are visible.

8.4.1 PROJECT
Here commands relating to sets and projects are found. Scroll down in the settings list on the right hand side by using the [DOWN] arrow key. Select a command by pressing [ENTER/YES].

CHANGE changes the active project to a new one. When selecting this command and pressing [ENTER/YES] a list of all projects of the set will appear. Locate the project you want to load and once found, load it by pressing [ENTER/YES]. Selecting and pressing [ENTER/YES] will create a new project. A naming menu will then appear.
It is possible to rename and delete projects while in the CHANGE menu. Press [FUNCTION] + [BANK] to open a menu where rename and delete options are present.
SAVE saves the project. As all changes to a project are automatically cached on card, saving a project and then reloading it is the only way to return to a specific project state. In general you should save a project once you are satisfied with it. When performing a SAVE command the project will be synced to card as well.
RELOAD reloads the project to the state it was saved in.
SYNC TO CARD is a recommended operation before ejecting the Compact Flash card as it will sync the cache to the card. Removing the card without first card syncing the project might result in data losses. If a project has been saved using the project SAVE command, information about the saved state will be written to the card as well.

Removing the card without first card syncing the project might result in data losses.
SAVE TO NEW saves a copy of the active project under a new name. After selecting this option a naming window will appear. If the currently mounted set contains no projects it is advised to save the current settings and sample assignments to a new project.
EXPORT TO SET allows the currently active project to be exported to a different set. All samples located in the Flex and Static sample slot lists of the active project will be copied to the destination set. Samples located in the project folder will be copied to the new project folder and samples located in the audio pool will be copied to the audio pool of the destination set. Note that the active project will be saved, just as if a project SAVE command had been performed, prior to being exported to the new set. It is possible to export a project to a new, empty set which can be created in the export process. This will create a set containing only the exported project together with an audio pool stripped of unnecessary samples. To make sure the audio pool of the new set only contains samples actually being used by the project, the PURGE SAMPLES command can be used on the project prior to export.
SET CHANGE will change sets. For more information, please see "7. SETS" on page 26.
COLLECT SAMPLES copies samples that are used by the currently active project into the project directory, which will effectively disconnect the project from the audio pool.
PURGE SAMPLES will remove all unused samples from the project. Note that samples are only removed from the Flex and Static sample slot lists of the project; the actual samples will not be deleted from the audio pool.
SAVE CURRENT BANK works like the save project command, but on a per bank basis. The command will save the settings and assignments of the currently active bank.
RELOAD CURRENT BANK works like the reload project command, but on a per bank basis. The command will revert the currently active bank to the previously saved state.
8.5 SYSTEM
In this menu the USB connection is activated, OS updates performed, date and time set and personal settings made. It also contains a file manager for basic file editing tasks.

8.5.1 USB DISK MODE
Enables the USB connection. Connect the Octatrack to a computer using a USB cable, select USB DISK MODE and press [ENTER/YES] to make the Compact Flash card appear as an external mass storage device to the computer. When the Octatrack is connected to a computer via USB audio pools can be
filled with content. For more information, please see “7.2.1 ADDING CONTENT TO THE AUDIO POOL” on page 27.

Unmount the Octatrack from your computer operating system once you want to exit USB DISK MODE.

Use the USB connection to back up sets to a computer hard disk.
8.5.2 OS UPGRADE
Download the Octatrack OS file from the Elektron website. Connect the Octatrack to a computer using a USB cable, select USB DISK MODE and press [ENTER/YES] to make the Octatrack's Compact Flash card appear as an external mass storage device in the computer. Then place the OS file with the file extension .bin in the root (the top level of the file structure and not inside any folder) of the Compact Flash card. Unmount the Octatrack from your computer operating system to exit USB DISK mode, select OS UPGRADE and then press [ENTER/YES]. A prompt will appear asking if you want to continue with the OS upgrade. Press [ENTER/YES] to upgrade the OS. Press [EXIT/NO] to cancel the operation.

- You can also use the MIDI UPGRADE option in the STARTUP menu to upgrade the Octa-track OS. For more information, please see “18.3 MIDI UPGRADE” on page 113.
- The active project will automatically be synced to the Compact Flash card before the OS is upgraded.
8.5.3 DATE/TIME
Here the date and time of the built-in clock are set.

Navigate between the date and time settings using the [LEFT] and [RIGHT] arrow keys. Use the [UP] and [DOWN] arrow keys to adjust the settings. Press [ENTER/YES] to confirm.
8.5.4 PERSONALIZE
Here you can customize the behavior of the Octatrack. Open the menu by selecting it and pressing [ENTER/YES]. Activate and deactivate settings by pressing [ENTER/YES]. It is also possible to use the [LEFT]/[RIGHT] arrow keys for this.

QUANTIZE LIVE REC will when checked quantize notes input while in LIVE RECORDING mode to full sequencer steps. When this option is unchecked notes will be quantized according to the micro timing resolution, which is 1/384 steps.
PREVIEW WITHOUT FX will when unchecked preview samples through the track effects of the active track. If checked, track effects will not affect the previewed sample.
MUTE FOCUSES TRACK will when checked make a track active when being muted through pressing [FUNCTION] + [TRACK].
CUE FOCUSES TRACK will when checked make a track active when it is being cued by pressing [CUE] + [TRACK].
CUE MUTES TRACK will when checked combine the cue and mute functions. When a track is being cued it will at the same time automatically be muted.
DISABLE FUNCTION + ENCODER will when checked disable all functions that normally occur when [FUNCTION] is held and an encoder turned.
DISABLE YES/NO ARM will when checked disable the one shot trig arming and disarming when simply pressing [ENTER/YES] or [EXIT/NO]. Note that when this arm/disarm functionality is disabled, the same functionality can be achieved by pressing [FUNCTION] + [ENTER/YES] or [FUNCTION] + [EXIT/NO]. Read more about one shot trigs in section "12.4.5 ONE SHOT TRIGS" on page 67.
DIS. STOP-STOP ARM will when checked disable one shot trig arming when double pressing [STOP] while the sequencer is stopped.
DIS. PAGE AUTOCOPY will when checked no longer auto copy existing trigs when extending the length of a track or pattern. Read more about how to change pattern and track length in section "12.15 SCALE SETUP" on page 79.
DEFAULT TRIG MODE selects the default track triggering mode when creating new projects. Read more about the modes in the section “12.11 PATTERN SETTINGS MENU” on page 76.
DEFAULT REC MODE selects the default trig mode for the track recorders when creating new projects. For more information, please see "9.1 RECORDING EDIT AND SETUP MENUS" on page 46.
SAVE SAMPLES TO offers two settings.
- AUDIO POOL will when saving recorded audio or saving samples in the audio editor save the data to the audio pool of the set.
- PROJECT DIRECTORY will when saving recorded audio or saving samples in the audio editor save the data to the project folder.
SHORT SAMPLE NAME controls how samples will be abbreviated when loaded to the Flex and Static sample slot lists.
- BEG+END will combine the five first characters of the file name with the five last characters. This is the default option.
- BEG ONLY will show the first ten characters of the sample name.
- END ONLY will show the last ten characters of the sample name.
RECORD QUICK MODE will when activated alleviate the need to press a [TRACK] key in combination with the [AUDIO RECORD] keys to initiate manual sampling. Instead, pressing the [AUDIO RECORD] keys will directly initiate manual sampling for the track recorder of the active track, making one handed sampling operation possible. This quick mode of sampling works a bit different when sampling internal sources. Pressing [MIDI] will only initiate sampling when the RECORDING SETUP menus are active and GRID RECORDNING mode is not active. If these menus are not active, MIDI mode will be accessed when the button is pressed. Read more about manual sampling in the section "9.2.1 MANUAL SAMPLING" on page 48.
EXT LEN GRID-REC will when checked include note length data when using an external MIDI device to record to a MIDI track in GRID RECORDING mode.
8.5.5 CARD TOOLS
Offers tools for managing the Compact Flash card. The card can be formatted and files copied, erased, renamed etc.

FILE MANAGER is where files on the Compact Flash card are handled. It exists as an alternative to handling files and folders with a computer. When entering the FILE MANAGER mode, sequencer playback will be stopped and the project synced to card.

Navigate in the file manager using the [ARROW] keys. At the top of the screen a folder path is visible.
Two workspaces are available, acting as user-definable short cuts to different locations on the Compact Flash card. To assign a location to workspace 1, navigate to the location you want to assign the workspace to and press [TRACK] keys 1-4. The same procedure applies for assigning a location workspace 2, but [TRACK] keys 5-8 are used instead. Once workspaces have been assigned, jump to workspace 1 by pressing [TRACK] keys 1-4 and to workspace 2 by pressing [TRACK] keys 5-8.
The files belonging to the project are located in the folder with the same name as the project. Each file of the project exists in two variants, one with the file extension .strd and one with the extension .work. Files with the extension .strd are the files that previously have been saved by performing a project SAVE command. The files with the .work extension contain the active project.
At the bottom of the screen the available commands are listed. The commands are chosen with the [TRACK PARAMETER] keys. Press [FUNCTION] to gain access to more commands.
MK DIR will create a folder. The NAMING menu will appear where the folder can be named.
RENAME will rename a file or folder. The NAMING menu will appear where the file or folder can be renamed.
DELETE will delete a file or folder.
COPY will copy a file or folder.
PASTE will paste a copied file or folder.
CUT is accessed when holding [FUNCTION]. Will cut a selected file or folder.

Be very careful when working within the file manager. If the wrong files are accidentally deleted or renamed, projects can be ruined.

By copying a bank file to another project you can create a project featuring your favorite banks. Note that only sequencer data, parts, scenes and parameter settings will be copied when copying a bank file. No samples will be copied and the machines assigned to the tracks will refer to the same Flex and Static sample slot positions as before. Hence you might need to load the samples used by the copied bank to empty Flex and Static sample slots of the new project and assign these sample slots to the correct machines of the tracks.
FORMAT CARD formats the card. Once selected and [ENTER/YES] is pressed a prompt will appear, asking if the operation should proceed. Press [ENTER/YES] to format the card. Note that all information on the card will be lost and any partitions gone.
8.5.6 STATUS
This is the menu where information relating to the OS, battery and Compact Flash card is found.

8.6 CONTROL
This is where various track and sequencer settings can be modified.

8.6.1 AUDIO
Controls the behavior of the outputs and selects whether track 8 should be used as a master track or not. Activate and deactivate settings by pressing [ENTER/YES]

TRACK 8 offers two settings. Only one setting can be activated at a time.
- MASTER will when active turn track 8 into a master track. The track effects of track 8 will then affect all the other tracks as well as any audio coming from the external inputs.
• NORMAL will make track 8 function like all the other tracks.

AMP SETUP, LFO MAIN/SETUP and EFFECT 1 and EFFECT 2 MAIN/SETUP are the only TRACK PARAMETER pages available to a master track.
CUE CFG offers settings which can make the cue outputs function as an assignable pair of outputs. Two settings are available. Only one setting can be activated at a time. Read more about the cue outputs in section "11.6 MAIN AND CUE OUTPUTS ROUTING" on page 64.
- NORMAL will make the cue outputs function normally, meaning a track will be routed to the cue outputs when [CUE] + [TRACK] is pressed.
- STUDIO will disable the normal cue functionality. Audio tracks can now be routed to the cue outputs as if they were a standard pair of assignable outputs. Each audio track gets two independent LEV settings, one for the main outs and one for the cue outs. Adjust the LEV setting for the main outputs by turning the LEVEL knob. Adjust the LEV setting for the cue outputs by pressing [CUE] and turning the LEVEL knob. Muting a track while STUDIO mode is enabled will mute the sound from both the main and cue outputs.
8.6.2 INPUT
Controls the noise gates and the delay compensation of the audio inputs.

NOISE GATE AB sets the dB level of the noise gate for input pair AB. The threshold is set with the LEVEL knob. Any signal below the threshold will be cut. An -INF setting deactivates the noise gate.
NOISE GATE CD sets the dB level of the noise gate for input pair CD. The threshold is set with the LEVEL knob. Any signal below the threshold will be cut. An -INF setting deactivates the noise gate.
DELAY COMPENSATE will when activated introduce a very short delay to the audio signal listened to via the DIR setting. If for example an audio signal is listened to through both the DIR input and a Thru machine/Pickup machine, both signals will then be in sync. If DELAY COMPENSATE would have been deactivated in the above scenario, the delay caused by the internal processing would make the audio
signal routed to the Thru/Pickup machine play a few milliseconds later than the DIR signal. The combined DIR and Thru/Pickup signal would then exhibit a slightly phased sound.
8.6.3 SEQUENCER
Here the default behavior of the sequencer is set.

CHAIN AFTER controls when chained patterns will start to play. The default mode is PAT.LEN. When a pattern is playing and a new pattern is selected, the pattern currently playing will play to its end before the new pattern starts playing. If PER TRACK scale mode is active and a very long, or infinite, master length setting is used it might be more convenient to initiate a new pattern after the active pattern has played a certain amount of steps. Set the amount of steps using the LEVEL knob. This setting affects all patterns in a project, but can be overridden on a per pattern basis in the PATTERN SETTINGS menu. There the USE PRJ SET setting can be unchecked, allowing for a unique chaining behavior for the chosen pattern. Read more about the PER TRACK mode and the master length setting in section "12.15 SCALE SETUP" on page 79. Read more about the PATTERN SETTINGS menu in section "12.11 PATTERN SETTINGS MENU" on page 76.
SILENCE TRACKS will, when checked, silence all tracks when changing to a pattern linked to a different part. The samples of the tracks will then enter their release phase as set in the AMP menu. When unchecked, samples from the previous pattern/part will continue to play until trigs occur on the tracks of the new pattern. Activate and deactivate this setting by pressing [ENTER/YES]. This setting affects all pattern in the project, but can be overridden on a per track basis. For more information, please see “12.11 PATTERN SETTINGS MENU” on page 76.
LFO AUTO CHANGE will when checked make all LFOs automatically restart with any new LFO settings activated when changing to a pattern containing another part. If unchecked, the settings of the LFOs of the previous pattern/part will not be changed until trigs occur on the tracks of the new pattern. Activate and deactivate this setting by pressing [ENTER/YES].
8.6.4 MIDI SEQUENCER
Contains the CC direct connect setting.

CC DIRECT CONNECT is activated/deactivated by pressing [ENTER/YES]. Two settings exist.
- ON will, when the Octatrack MIDI mode is activated, route MIDI CC messages straight to the MIDI output port. When MIDI mode is enabled and LIVE RECORDING mode is active, specified CCs in the CTRL 1 and CTRL 2 SETUP pages can also be recorded by the sequencer. Other CCs will not be recorded by the Octatrack, but still routed to the MIDI output port.
- OFF makes the auto channel listen to MIDI CC messages according to the MIDI MODE MAPPINGS table found in “APPENDIX C: MIDI CONTROL REFERENCE” on page 137. MIDI CCs 36-45 sent on the auto channel will be remapped according to the CC messages specified in the CTRL 1 and CTRL 2 SETUP pages.

Messages received on the MIDI channel of the active MIDI track always behave as if CC DIRECT CONNECT is activated.

CC DIRECT CONNECT is useful when for example connecting the MIDI IN and OUT of an external synthesizer to the MIDI OUT and IN of the Octatrack. When CC DIRECT CONNECT is enabled, and the synth is set to local off, turning a knob on the synthesizer will affect that particular synth parameter, given the knob sends a CC message and sends it to the auto channel or the MIDI channel of the active MIDI track. If the CC value of the knob also has been mapped to a CTRL 1/CTRL 2 SETUP menu parameter, it is possible for knob changes made on the external synthesizer to be recorded by the Octatrack when in LIVE RECORDING mode. This behavior also applies to parameter locks. Hold down a [TRIG] key, turn the synth knob and the synth parameter will be locked accordingly.
For a tutorial on how the Octatrack can be set up with external MIDI devices when CC DIRECT CONNECT is activated, please see “16.5 OCTATRACK AS A MIDI CONTROL CENTER” on page 103.
8.6.5 MEMORY
Contains settings related to sample bit depth and the track recorder memory distribution. Use the LEVEL knob or the [LEFT]/[RIGHT] arrow keys to change the settings.

The total amount of RAM memory available to a project is 85,5 MB. This memory is shared by Flex RAM, which is used when loading Flex samples, and track recorder memory, which is used when sampling. In this menu the distribution of Flex RAM and track recorder memory can be set. To the right a bar is shown visualizing the memory distribution. The dotted area in the top represents occupied Flex memory, the white area in the middle represents free RAM and the black area in the bottom represents reserved track recorder memory.
Changes made does not come into effect until exiting the menu. When doing so, a prompt will appear asking you to confirm the changes. This is because the recorder buffers are cleared when changes are made and confirmed.
FLEX FORMAT controls what bit depth samples will be in when loaded to the Flex sample slot list. Samples loaded to the Static slot list are unaffected by this setting. Two settings exist.
- 24-BIT will retain the bit depth of 24-bit samples when they are loaded. 16-bit samples will still be in 16-bit.
- 16-BIT will convert 24-bit samples to 16-bit samples when loaded, meaning samples will occupy less Flex RAM memory at the cost of reduced bit depth. If a sample is saved when this setting is active, it will be saved as a 16 bit sample no matter the original bit depth. If a 24-bit sample is saved a prompt will appear informing it will be saved as a 16-bit sample.
DYNAMIC RECORDERS offers two settings.
- NO forces the track recorders to use only the track recorder memory, which by default is 16 seconds of sampling time per track recorder. It is possible to increase or decrease the available track recorder memory by using the RESERVE RECORDINGS and the RESERVE LENGTH settings.
- YES makes it possible for track recorders to exceed the track recorder memory and utilize any free Flex RAM memory.
RECORDER FORMAT selects in what bit depth the track recorders will sample. 24-bit and 16-bit settings are available.
RESERVE RECORDINGS chooses which track recorders that can be assigned a certain amount of dedicated sample time. This setting in combination with the RESERVE LENGTH setting basically decides the size of the track recorder memory.
\- R1...R1-R8 selects the track recorders that will be affected by the RESERVE LENGTH setting. Track recorders outside the selected track recorder range will not have any track recorder memory allocated, making it impossible for them to sample unless DYNAMIC RECORDERS is set to YES. These track recorders will then use the Flex RAM memory when sampling.
\- NONE will add all track recorder memory to the Flex RAM memory, making the total amount of available RAM, which is 85.5 MB, consist of only Flex RAM. As no track recorder memory will be available to the track recorders, sampling will be not be possible unless DYNAMIC RECORDERS is set to YES. The track recorders will then utilize the available Flex RAM memory when sampling. When NONE is selected the RESERVE LENGTH setting will have no effect at all.
RESERVE LENGTH makes it possible to reserve sample time to the track recorders chosen by the RESERVE RECORDINGS setting. These track recorders will always be able to sample the amount of seconds set here. When selecting the reserved sample time, the equivalent in sequencer steps based on the current Octatrack BPM, as well as the amount of RAM the reserved time will occupy, is shown in the upper left corner of the LCD screen. The black bar in the lower right corner of the LCD will also change according to size of the reserved track recorder memory. The more track recorders affected and the more sampling time reserved, the less Flex RAM will become available for Flex samples. This works the other way around as well. Less reserved sampling time means more Flex RAM will be available. If DYNAMIC RECORDERS is set to YES and the reserved sampling time is exceeded when sampling, the track recorders will start using the available Flex RAM memory.

By reserving a large amount of RAM memory to a track recorder, internal sampling of complete Octatrack songs are possible.
8.6.6 METRONOME
Configures the Octatrack metronome. A click track is very useful when for example inputting sample trigs or note trigs while in LIVE RECORDING mode. Note that the metronome will only sound when the sequencer is running. The metronome can quickly be toggled on/off by pressing [CUE] + [TEMPO]. Use the LEVEL knob or the [LEFT]/[RIGHT] arrow keys to change the settings of this menu.

ACTIVE activates/deactivates the metronome.
TIME SIG. NUMER controls the note measure of the time signature of the metronome.
TIME SIG. DENOM controls the beat measure of the time signature of the metronome.
PREROLL controls for how many bars the metronome will sound before the sequencer starts playing. This setting only affects the start of the sequencer when LIVE RECORDING mode is initiated.
CUE VOLUME controls the metronome volume sent to the cue outputs.
MAIN VOLUME controls the metronome volume sent to the main outputs.
TONAL will when active give the click track a tonal character. When deactivated the click track will be constituted of short atonal impulses.
PITCH sets the pitch of the tonal click track. This setting is not available when TONAL is deactivated.
8.7 MIDI
Here MIDI related settings are made.

8.7.1 CONTROL
Sets how the Octatrack handles certain MIDI messages.

AUDIO CC IN controls whether the audio tracks react to incoming MIDI CCs or not. Enable or disable by pressing [ENTER/YES]. When disabled no CCs will affect the audio tracks.
AUDIO CC OUT sets in what way the knobs used for audio tracks will transmit MIDI CCs. This setting contains three options. Select between the options by pressing the [LEFT] or [RIGHT] arrow keys or by pressing [ENTER/YES].
- INT will make the knobs affect only internal parameters. They will not send out any MIDI CCs.
- EXT makes the knobs send out MIDI CCs but stops them from affecting internal parameters. This option essentially makes the knobs work in a local off mode.
- INT+EXT makes the knobs control both internal parameters and send out MIDI CC data.
AUDIO NOTE IN controls how incoming MIDI notes affect the audio tracks. Select between the options by pressing the [LEFT] or [RIGHT] arrow keys or by pressing [YES]. The tracks respond to MIDI sent on the track's trig channel and the auto channel. For more information, please see "8.7.3 CHANNELS" on page 41.
- OFF No incoming MIDI notes affect the tracks, meaning tracks or machines can't be triggered externally.
- STANDARD Incoming MIDI notes affect the tracks according to the STANDARD note mapping. This is the default setting. For more information, please see “C.1 STANDARD NOTE MAPPING” on page 137.
- FOLLOW TM Incoming MIDI notes affect the audio tracks according to the chosen TRIG mode's note mapping. For more information, please see “12.7 TRIG MODES” on page 69. “APPENDIX C: MIDI CONTROL REFERENCE” on page 137.
- MAP/TRACK Incoming MIDI notes affect the tracks according to the chosen trig mode's note mapping. Every audio track can use a separate NOTE MAPPING mode. For more information, please see “12.8 MIDI NOTE MAPPING FOR AUDIO TRACKS” on page 71.
AUDIO NOTE OUT sets what MIDI information the [TRIG] keys transmit. This setting contains three options. Select between the options by pressing the [LEFT] or [RIGHT] arrow keys or by pressing [ENTER/YES].
- INT will make [TRIG] key presses affect only internal machines or tracks. [TRIG] keys will not send out any MIDI notes, unless pressed when being on a MIDI track.
- EXT will make [TRIG] key presses send out MIDI notes. No internal machines or tracks will be triggered. This option essentially makes the [TRIG] keys function in a local off mode fashion.
- INT+EXT makes [TRIG] key presses trig internal machines and tracks. MIDI notes will at the same time be sent out.
8.7.2 SYNC
Here the Octatrack can be set to transmit and respond to sequencer related MIDI messages. Open the menu by selecting it and pressing [ENTER/YES]. Move between the menu options by using the [ARROW] keys. Activate and deactivate settings by pressing [ENTER/YES].

TRANSPORT SEND will when active make the Octatrack send out system realtime messages like play, stop, continue and song position pointer.
TRANSPORT RECEIVE will when active make the Octatrack respond to system realtime messages like play, stop, continue and song position pointer
CLOCK SEND will when active make the Octatrack transmit MIDI clock.
CLOCK RECEIVE will when active make the Octatrack respond to MIDI clock sent from external devices.
PROG CH SEND will when checked send out program change MIDI messages when the active pattern on the Octatrack changes. Which channel the messages are sent on is controlled by the setting below.
CHANNEL sets which channel the Octatrack should send program change messages on. The LEVEL knob is used to change this setting. If AUTO is chosen the first MIDI channel used by the audio tracks, and not used by any of the MIDI tracks, will be used. If CHANNEL is set to a specific MIDI channel, that channel will be used to transmit program change messages.
PROG CH RECEIVE will when checked make the Octatrack listen and react to incoming program change messages that changes the pattern on the Octatrack. Which channel the messages will be received on is controlled by the setting below.
CHANNEL sets which channel the Octatrack will receive program change messages on. If set to AUTO any channel specified in the CHANNELS menu will be used. For more information, please see "8.7.3 CHANNELS" on page 41. If CHANNEL is set to a specific MIDI channel, that channel will be used to receive program change messages.

- Program change messages are ignored by the Octatrack if received on the AUTO CHANNEL if the device is in MIDI mode. However, the program change messages are sent through the device but are remapped to the channel set in the NOTE SETUP menu of the active MIDI track. Please see “15.4.2 NOTE SETUP” on page 93.
- If both CLOCK RECEIVE and TRANSPORT RECEIVE are activated, the Octatrack will wait for MIDI clock after receiving start or continue messages for 16 seconds before considering external sync lost. This, for example, allows for preroll in sequencers not starting clock until preroll is completed. If only TRANSPORT RECEIVE is enabled the machine will start as soon as possible after receiving start or continue.
8.7.3 CHANNELS
This where the MIDI channel configuration of the audio tracks is done. Navigate in the menu with the [LEFT] and [RIGHT] arrow keys. Change MIDI channels by using the [UP] and [DOWN] arrow keys or the LEVEL knob.

AUTO CHANNEL is the MIDI channel giving access to the currently active track. MIDI CC messages sent to the auto channel can in LIVE RECORDING mode be recorded to the active track. When in MIDI mode and CC DIRECT CONNECT is enabled, CC messages sent to the auto channel will be sent straight to the MIDI output port. CC messages specified in the CTRL 1 and CTRL 2 SETUP menus can also be recorded while in LIVE RECORDING mode. If CC DIRECT CONNECT is disabled the Octatrack MIDI tracks will react to incoming CCs according to the MIDI MODE MAPPINGS table found in “APPENDIX C: MIDI CONTROL REFERENCE” on page 137.
Pitch information for the audio tracks can be recorded in a chromatic fashion by sending MIDI note data to the auto channel. This is another way of controlling samples chromatically instead of using CHROMATIC mode. For more info about this, please see the NOTE MAPPINGS table found in "APPENDIX C: MIDI CONTROL REFERENCE" on page 137. Read about the CHROMATIC mode in section "12.7.2 CHROMATIC" on page 70. TRIG CHANNEL sets which MIDI channels the audio tracks respond and send data to. If for example MIDI channel 1 is assigned to track 1, the track can be externally controlled according to the mappings found in "APPENDIX C: MIDI CONTROL REFERENCE" on page 137. The track can at the same time, when active, send out MIDI data on MIDI channel 1. This occurs when the DATA ENTRY knobs are adjusted and when [TRIG] keys are pressed. An OFF setting means the audio track will not respond to, nor send out, any MIDI data.

To avoid unwanted MIDI conflicts when controlling external instruments with the Octatrack MIDI sequencer, the MIDI channels assigned to the audio tracks should preferably not be the same as those assigned to the MIDI tracks. Read more about this matter in section "15.2 HOW MIDI IS ROUTED" on page 91.

Parameter locks and scene locks can be entered via the auto channel. This is done by holding down a [TRIG] key or a [SCENE] key and sending the corresponding CC message. MIDI CC mappings are covered in “APPENDIX C: MIDI CONTROL REFERENCE” on page 137.
8.7.4 TURBO STATUS
Allows Turbo mode negotiation between Elektron gear. Connecting the Octatrack to other Turbo protocol compatible gear, like the Machinedrum and the Monomachine, makes it possible to increase the normal MIDI bandwidth by up to 10x. This increases the accuracy of MIDI clock signals as well as the timing of CC messages. Note that Octatrack MIDI IN/OUT must be connected to the MIDI OUT/IN of the turbo protocol compatible device for the Turbo mode negotiation to function.

CURRENT SPEED shows the current multiplier of the MIDI transfer rate. When the Octatrack is not connected to a MIDI device using Turbo protocol compatible software, the speed will be x 1.0.
NEGOTIATE selects the multiplier of the MIDI transfer rate that should be used. The [LEFT]/[RIGHT] arrow keys are used. Press [ENTER/YES] to start the negotiation.
8.8 MIXER MENU
In the MIXER menu settings for the headphones output and inputs AB and CD are made. The LEVEL knob is used to change settings. While this menu is active, tracks can also be muted and soloed by pressing the [TRIG] keys. The MIXER menu settings are common for all banks and patterns of a project.

MIX determines what will be heard from the headphones output. If the indicator is set to the leftmost position, the headphones output will be a mirror of the main outputs. If set to the rightmost position only audio from cued tracks will be routed to the headphones output.
MAIN/CUE OUT sets the final output level of the main and cue outputs respectively. A zero setting will neither gain nor attenuate the signal. A +63 setting will boost the signal by 12 dB.
AB/CD DIR offers parameters that will make the Octatrack act like a very basic mixer. It simply routes audio coming from the A/B and C/D inputs to the main outputs. An AB/CD DIR setting of 0 will not send any incoming audio to the main outputs. When AB/CD DIR is set to 127 the level of incoming audio sent to the main outputs will neither be increased nor attenuated.
The DIR parameters don't affect the volume of incoming audio when sampling. Even if they are set to 0 sampling is therefore possible. AB/CD DIR are however affected by AB/CD GAIN settings.

The DIR mode of input is handy when you perform live and don't have any Octatrack tracks to spare. Depending on the size of your setup a dedicated mixer might not be necessary at all.
DIR sound won't be affected by any of the dual FX blocks, but will be affected by the master track effects if a master track is used. Use Thru machines for affecting incoming audio with the FX blocks.
When not in the MIXER menu the MAIN parameter can be adjusted by pressing [FUNCTION] while turning the LEVEL knob.
AB/CD GAIN can attenuate or gain the audio signal coming from inputs AB/CD. A -64 setting will mute audio altogether, a setting of 0 will neither gain nor attenuate the signal and a setting of +63 will boost the signal by 12 dB. These settings affect the volume of incoming audio when sampling, when setting AB/CD DIR levels and when using THRU machines.
MUTE offers a visualization of the mute and solo status of the tracks. When the MIXER menu is open the [TRIG] keys can be used to mute and solo both audio and MIDI tracks. [TRIG] keys 1-8 affect the audio tracks and [TRIG] keys 9-16 affect the MIDI tracks.
To mute a track, simply press the corresponding [TRIG] key. An unlit LED and a line instead of a square in the track mute section indicate a muted track. A lit red LED and an outlined square in the track mute section means a track is audible. While holding [FUNCTION] and pressing the [TRIG] keys, the mute changes will be held until [FUNCTION] is released. A track that is currently muted but will be unmut-ed when [FUNCTION] is released is displayed as a “+” sign. A track that is currently not muted but will be muted when [FUNCTION] is released is displayed as an “X” sign.
It is possible to solo tracks by pressing [CUE] + the [TRIG] keys corresponding to the tracks you want to solo. A solo'ed track is indicated by a green LED and the letter "S". Unsolo a track by repeating the button combination. Tracks that will be audible once all tracks are unsolo'ed are indicated by half bright red LEDs and dotted squares. The LEDs of tracks muted before the solo operation will be unlit. When exiting the solo mode these tracks will stay muted. Muted tracks being solo'ed will revert to their muted status once solo mode is exited.
If a track is cued, muting it prevents it from being sent to the main outputs. The track will however still be audible from the cue outputs. A cued track being solo'ed will be audible from the main and cue outputs.

If track 8 has been turned into a master track it won't be affected by mutes.
Cue audio output is not available on the master track.
If Neighbor machines are used the track or tracks preceding the last Neighbor machine can not be muted. To mute the chain, mute the last Neighbor machine.

It is possible to mute a track without entering the MIXER menu. Just press [FUNCTION] + the [TRACK] key corresponding to the track you want to mute. Track solo'ing is only possible in the MIXER menu though.
The
Other manuals Elektron
Discover other manuals and user guides for the brand Elektron
💬 Hi! I'm your manual assistant. I know your Elektron Octatrack.
How can I help you? (use, settings, error codes, maintenance, explaining a step from the manual, etc.)💡 Examples :
• How do I use it ?
• Error code E3 ?
• How do I clean it ?