88RLB - Audio Preamplifier AMS Neve - Free user manual and instructions
Find the device manual for free 88RLB AMS Neve in PDF.


User questions about 88RLB AMS Neve
0 question about this device. Answer the ones you know or ask your own.
Ask a new question about this device
Download the instructions for your Audio Preamplifier in PDF format for free! Find your manual 88RLB - AMS Neve and take your electronic device back in hand. On this page are published all the documents necessary for the use of your device. 88RLB by AMS Neve.
USER MANUAL 88RLB AMS Neve
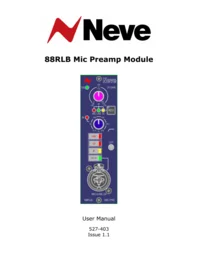
88RLB Mic Preamp Module

User Manual
527-403
Issue 1.1
For your own safety and the protection of others, please observe the following safety instructions:
- Read these instructions.
- Keep these instructions.
- Follow all instructions.
- Only use attachments/accessories specified by the manufacturer.
• Heed all safety warnings. - Do not use near water.
- Clean only with a dry cloth.
- Do not install near heat sources.
- Do not block ventilation openings.
• Unplug when unused for long periods of time.
• Refer all servicing to qualified personnel only.
AMS NEVE
AMS Technology Park
Billington Road
Burnley
Lancs
BB11 5UB
England
Phone +44 (0)1282 457011
Fax: +44 (0)1282 417282
Email: info@ams-neve.com
Web: www.ams-neve.com
Support: http://www.ams-neve.com/support
© 2013 AMS Neve Ltd own the copyright of all information and drawings contained in this manual which are not to be copied or reproduced by any means or disclosed in part or whole to any third party without written permission.
As part of our policy of continual product improvement, we reserve the right to alter specifications without notice but with due regard to all current legislation.
Disclaimer: The information in this manual has been carefully checked and is believed to be accurate at the time of publication. However, no responsibility is taken by us for inaccuracies, errors or omissions nor any liability assumed for any loss or damage resulting either directly or indirectly from use of the information contained within it.
Trademarks: All trademarks are the property of their respective owners and are hereby acknowledged.
Table of Contents
Health & Safety Notice....2
88RLB Mic Preamp Module....4
Introduction......4
Housing....4
Installation Instructions....4
Front Panel Controls....5
Input Source Selector and Gain Control knob ....5
*REG (Regenerate) button....5
High Pass filter knob....5
+48V phantom power switch....5
-20 pad switch....5
∅ Phase switch....5
FR I/P Front Input switch....6
**LIFT switch....6
Front combination connector pin details....6
Physical Information....7
Audio Specifications....7
Introduction

When the world's top musicians, composers and engineers get together to record, it's got to be Neve all the way.
Not everyone has room for the world's greatest recording console – the Neve 88RS – but now there's no need to settle for anything other than the absolute best when it comes to capturing the beauty, energy and excitement of your recording...
Introducing the Neve 88RLB – the same sound of greatness, but in the palm of your hand.
The incredible sounding audio technology from Neve's two-ton flagship 88RS console is now available to you in a 500-series format module. With extra features like the REGenerate function, a sweepable high-pass filter, intelligent phantom power control and a DI input, true Neve magic has never been more accessible or convenient.
Neve - no question.
Housing
The 88RLB Mic Preamp module has been designed for use in a compliant 500-series enclosure.
Installation Instructions
▶ Remove the 88RLB module from all packaging.
▶ Switch off the 500-series enclosure and remove mains power.
▶ Locate an empty slot in the 500-series enclosure and remove the 2 fastening screws, one from the top of the enclosure and one from the bottom of the enclosure.
▶ Carefully insert the 88RLB module into the empty slot in the 500-series enclosure, ensuring the rear edge connector on the 88RLB module mates correctly with the edge connector of the 500-series enclosure.
▶ Replace the 2 fastening screws through the top & bottom holes in the 88RLB module and screw into the 500-series enclosure to secure the module into the enclosure.
▶ Apply mains power into the 500-series enclosure and switch on. Connect the microphone, audio source or instrument and select the correct settings.
The module is not designed to be hot-plugged, so please ensure the power to the 500-series enclosure is OFF before inserting or removing a module.
Front Panel Controls

Input Source Selector and Gain Control knob
Push to select MIC (red LED ON), LINE input* (green LED ON) or DI input* (yellow LED ON) - each push cycles around the 3 input sources.
Turn to select the required amount of Gain while in MIC, LINE or DI mode
*REG (Regenerate) button
Press to activate (blue indicator LED ON) - REG function only active when LINE input or DI input sources are selected.
When active, 'REG' passes the audio from the LINE input or DI input through the transformer used in the Microphone input circuit to inject the warm, 'Neve sound'.
Push again to deactivate the REG (blue indicator LED OFF).
High Pass filter knob
Push to activate filter (Red indicator LED ON).
Turn to select the required frequency at which the filter begins to affect the input audio.
Push again to deactivate filter (Red indicator LED OFF).
+48V phantom power switch
Press to activate +48V phantom power feature (red indicator LED ON) - +48V phantom power has intelligent switching and can only be activated when the selected input source is MIC.
Also, if the input mode is changed from MIC, or the Front Input setting is changed, the +48V will switch off automatically if active, to protect connected equipment.
Press again to switch off +48V phantom power, if active (red indicator LED OFF)
-20 pad switch
Press to reduce the level at the input stage by 20dB (red indicator LED ON).
Press again to revert to the normal input level (red indicator LED OFF)
∅ Phase switch
Press to invert the phase of the audio by 180 degrees (yellow indicator LED ON)
Press again to revert to the original phase (yellow indicator LED OFF)

FR I/P Front Input switch
Press to activate the Front Input combi-XLR connector and deactivate the corresponding input connector on the rear of the enclosure (green indicator LED ON).
When the Front Input combi-XLR is active, microphones can be connected by XLR, Line instruments by balanced 1/4 " TRS Jack and instruments directly (DI) with a stereo or mono 1/4 " TRS jack connector**
Press again to deactivate the Front Input combi-XLR and reactivate the corresponding input connector on the rear of the enclosure (green indicator LED OFF)
**LIFT switch
Normal operation; switch in DOWN position.
DI Instrument 'lift' feature is active when switch is in UP position - this lifts the internal screen away from ground when an instrument jack connector is plugged into the Front Inputcombi-XLR connector, to help combat potential ground loops.
Front combination connector pin details
| 1/4'' Jack | XLR | |
| Hot | Tip | 2 |
| Cold | Ring | 3 |
| Ground | Sleeve | 1 |
This socket accepts either an XLR or a 0.25" Jack connector.
The pin-out for the XLR connector is marked on the connector.
Physical Information
| Height mm (inches) | Width mm (inches) | Depth 1 cm (inches) | Weight kg (lbs) |
| 132 (5 1/4 ) | 38 (1 1/2 ) | 145 (5 3/4 ) | 0.5 (1.1) |
1 Excludes clearance for front panel controls and rear connectors.
Audio Specifications
| MIC Input | Transformer balanced and earth free, input impedance > 1.2kohmsGain +20dB to+70dB in 5dB stepsFrequency response: 20Hz-20kHz +/- 0.5dB, @60db gainDistortion 40Hz-20kHz @ 60dB gain, <0.025% @ +20dBu output with 80kHz bandwidthEIN: Better than -126dBu @60dB gain |
| LINE Input | Electronically balanced, input impedance >10kohmsGain Range -20dB to +20dBFrequency response 20Hz-20kHz +/- 0.25dBDistortion 20Hz-20kHz @ unity gain, <0.0025% @ +20dBu output with 80kHz bandwidthNoise <-87dBu 20Hz-20kHz bandwidth @ unity gain |
| DI Output | Electronically balanced, input impedance > 500kohmsGain range 0dB to +50dBFrequency response 20Hz-20kHz +/- 0.25dBDistortion 20Hz-20kHz @ 0dB gain, <0.0025% @ +20dBu output with 80kHz bandwidthNoise< -87dBu 20Hz-20kHz bandwidth @ minimum gain |

- RLB MIC PREAMP MODULE
- FOR YOUR OWN SAFETY AND THE PROTECTION OF OTHERS, PLEASE OBSERVE THE FOLLOWING SAFETY INSTRUCTIONS
- TABLE OF CONTENTS
- HEALTH & SAFETY NOTICE
- INTRODUCTION
- HOUSING
- INSTALLATION INSTRUCTIONS
- FRONT PANEL CONTROLS
- INPUT SOURCE SELECTOR AND GAIN CONTROL KNOB
- REG (REGENERATE) BUTTON
- HIGH PASS FILTER KNOB
- V PHANTOM POWER SWITCH
- PAD SWITCH
- ∅ PHASE SWITCH
- FR I/P FRONT INPUT SWITCH
- LIFT SWITCH
- FRONT COMBINATION CONNECTOR PIN DETAILS
- PHYSICAL INFORMATION
- AUDIO SPECIFICATIONS
Brand : AMS Neve
Model : 88RLB
Category : Audio Preamplifier