1073LB Mic Pre - Professional audio equipment AMS Neve - Free user manual and instructions
Find the device manual for free 1073LB Mic Pre AMS Neve in PDF.
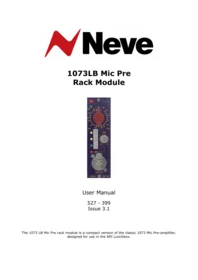


| Product Type | Professional audio equipment - Microphone Preamplifier Module |
| Brand | AMS Neve |
| Model | 1073LB Mic Pre |
| Form Factor | API Lunchbox module (500-series compatible) |
| Dimensions (H x W x D) | 132 x 38 x 145 mm (5 1/4 x 1 1/2 x 5 3/4 inches) |
| Weight | 1.1 kg (2 1/2 lbs) |
| Power Supply | Powered from API Lunchbox backplane; no separate power switch |
| Mic Input | Transformer balanced, switchable impedance 300 Ω or 1200 Ω |
| Mic Gain | -80 dB to -20 dB in 5 dB steps |
| Line Input | Transformer balanced, 4 kΩ bridging impedance |
| Line Gain | -20 dB to +10 dB in 5 dB steps |
| Output | Transformer balanced, max +28 dBu, output impedance 75 Ω @ 1 kHz |
| Frequency Response | ±0.5 dB 20 Hz to 20 kHz, -3 dB @ 40 kHz |
| Distortion | 0.07% from 50 Hz to 10 kHz @ +20 dBu output (80 kHz bandwidth) |
| EIN | Better than -125 dBu @ 60 dB gain |
| Output Noise | -82 dBu at all line gain settings (22 Hz to 22 kHz bandwidth) |
| Phantom Power | +48 V, switchable via Trim control, protected switching, red LED indicator |
| Front Panel Controls | Sig LED, Input Gain, Lo Z, Phase (∅), FR I/P, 48V LED, Trim, Combo connector |
| Special Features | Neve Audio Processing Insert Technology, INS LINK connector, original hand-wound transformers, Class A output stage |
| Safety | Read all instructions, keep for reference, clean only with a dry cloth, do not use near water, do not block ventilation |
| Maintenance & Reparability | Refer all servicing to qualified personnel; fault registration via AMS Neve website with unit serial number |
Frequently Asked Questions - 1073LB Mic Pre AMS Neve
User questions about 1073LB Mic Pre AMS Neve
0 question about this device. Answer the ones you know or ask your own.
Ask a new question about this device
Download the instructions for your Professional audio equipment in PDF format for free! Find your manual 1073LB Mic Pre - AMS Neve and take your electronic device back in hand. On this page are published all the documents necessary for the use of your device. 1073LB Mic Pre by AMS Neve.
USER MANUAL 1073LB Mic Pre AMS Neve

Neve
1073LB Mic Pre Rack Module

User Manual
527 - 399
Issue 3.1
The 1073 LB Mic Pre rack module is a compact version of the classic 1073 Mic Pre-amplifier, designed for use in the API Lunchbox.
For your own safety and the protection of others, please observe the following safety instructions:
- Read these instructions.
- Keep these instructions.
- Follow all instructions.
- Only use attachments/accessories specified by the manufacturer.
• Heed all safety warnings. - Do not use near water.
- Clean only with a dry cloth.
- Do not install near heat sources.
- Do not block ventilation openings.
• Unplug when unused for long periods of time.
• Refer all servicing to qualified personnel only.
AMS NEVE
AMS Technology Park
Billington Road
Burnley
Lancs
BB11 5UB
England
Phone +44 (0)1282 457011
Fax: +44 (0)1282 417282
Email: info@ams-neve.com
Web: www.ams-neve.com
Support: http://www.ams-neve.com/support
The 1073LB module has been designed for use in the API Lunchbox Lunchbox is a trademark of Automated Processes Inc
© 2013 AMS Neve Ltd own the copyright of all information and drawings contained in this manual which are not to be copied or reproduced by any means or disclosed in part or whole to any third party without written permission.
As part of our policy of continual product improvement, we reserve the right to alter specifications without notice but with due regard to all current legislation.
Disclaimer: The information in this manual has been carefully checked and is believed to be accurate at the time of publication. However, no responsibility is taken by us for inaccuracies, errors or omissions nor any liability assumed for any loss or damage resulting either directly or indirectly from use of the information contained within it.
Trademarks: All trademarks are the property of their respective owners and are hereby acknowledged.
Table of Contents
Health & Safety Notice....2
1073LB Mic Pre Module....4
Introduction......4
Housing....4
Installation....4
Power....4
Front Panel Controls....5
Sig led....5
Input Gain....5
Lo Z....5
∅....5
FR I/P....5
48v led....5
Trim....6
Combo Connector....6
Rear of Unit....6
INS LINK....6
Switch Block (Issue 2 units only)....6
Setting the 1073LB Mic Pre to work in Insert mode....7
Part I: Issue One Modules: Internal modification....7
Part I: Issue Two Modules: Switch Settings....8
Part II – The module acting as the Insert....9
Part III - Cabling....9
API Lunchbox Connectors....9
Physical Information....10
Audio Specifications....10
This manual applies to both Issue 1 and Issue 2 versions of the 1073LB Mic Pre module.
If there is a small switch block on the rear of the unit containing two dip-switches just above the backplane connector, it is Issue 2; if there is no switch block, it is Issue 1.
In the unlikely event that 1073LB Mic Pre module should malfunction or develop a fault, then please register the fault details on our website, by clicking the link below.
You will also need to enter the unit's serial number when you do this, so please have this to hand.
http://www.ams-neve.info/crm/fault_report.html
Once the fault details have been registered, one of our technical support team will be in touch via email.
This link should also be used for further operational or technical help, or any general enquiry about the unit.
Introduction

Launched in 1970, the original Neve 1073 module is perhaps the world's most famous and desirable mic pre-amplifier for recording vocals and instruments of all types.
The first choice of countless leading producers & artists, the 1073 delivers the unique Neve sound featured on some of the most famous recordings of the past 40 years.
The big, punchy sound of the 1073 classic, compliments any musical genre – from rock to pop, hip-hop to rap, thrash to classical.
Now it is available for the API Lunchbox.
Crafted in England by Neve engineers, the 1073LB Mic Pre retains the sonic characteristics of the original 1073 classic microphone pre-amplifier by using the same architecture, matching components and original hand-wound transformers.
It delivers it in a modern and portable form-factor that professional producers and engineers demand.
With new features like a fine Trim control, switchable mic input impedance, signal presence led, and intelligent protected switching of the front combination XLR input connector, the 1073LB Mic Pre takes your Lunchbox to the next level.
It also uses Neve's Audio Processing Insert technology, where processing from adjacent modules in the same Lunchbox can be inserted into the 1073LB's pre-output stage, meaning for example, a 1073LB EQ module becomes a true insert, rather than simply forming the end of an audio chain.
Install the 1073LB Mic Pre module into your API Lunchbox rack, connect your microphone or line level signals and inject that legendary Neve sound into your audio.
Housing

The 1073LB Mic Pre has been designed for use in an API Lunchbox unit.
For more information on the API Lunchbox, please refer to:
http://www.apiaudio.com/5006b.html
Installation
When inserting the module, ensure the 15-pin edge-connector mates securely with the backplane connector.
The modules are not designed to be hot-plugged, so always ensure the power is off before inserting or removing a module.
Power
The 1073LB Mic Pre module does not have a separate power switch. Instead, it is switched on and off via the power switch on the Lunchbox housing.
Front Panel Controls

Sig led
A two-colour led gives an indication of the incoming signal level:
• Lights green between -25dB and +26dB.
• Lights red at +26dB or higher.
Input Gain
- Runs from -20dB to +10dB in 5dB steps for the Line input;
- Runs from -20dB to -80dB for the Mic input (with an OFF position between the 50dB and 55dB steps).
If this control is set to a Mic Gain position with phantom power applied and the knob is turned to a Line Gain setting, the phantom power will automatically be switched off.
Phantom power is not available when this control is set to a Line Gain value.
Lo Z
1200 ohm (Hi-Z) or 300 ohm (Lo-Z) input impedance transformer coupled stage.
With this button pressed, the led will light yellow and the low impedance will be applied to the incoming Mic signal.
∅
Phase button, inverts the phase of the signal.
FR I/P
This selects the input signal from the front of the unit to be used (be it Mic or Line) rather than the input on the rear of the Lunchbox unit.
The led will light green when the Front Input is selected.
Selecting (or de-selecting) FR I/P will also turn off the phantom power if it is active at the time.
48v led
Applied to both front & rear Mic inputs, the phantom power is applied by pressing the Trim control.
The +48v led will light red to show when phantom power is in circuit.
Trim
Applied to both Mic and the Line input, the signal is fed into a transformer balanced class A output stage, via a -20dB/+5dB trim pot.
There is a centre detent at 0dB.
Combo Connector
| 1/4'' Jack | XLR | |
| Hot | Tip | 2 |
| Cold | Ring | 3 |
| Ground | Sleeve | 1 |
This socket accepts either an XLR or a 0.25" Jack connector.
The pin-out for the XLR connector is marked on the connector.
Rear of Unit

INS LINK
This is used when a 1073LB Mic Pre module uses an adjacent AMS Neve module as a true audio insert across it (for example, the 1073LB EQ) and both modules are set to work in Insert mode (see next page).
The cable that links the two modules together is supplied with the module you wish to use as the insert.
Switch Block (Issue 2 units only)
If present, these switches are On when in the Up position.
The left switch (Switch 1) should be set to On when the module is to be used in a non-API Lunchbox housing that does not have the same earthing arrangement as the Lunchbox. This is factory-set to Off.
Failure to set this switch correctly will mean the phantom power will not work, plus other operational inconsistencies.
The right-hand switch (Switch 2) sets the Insert or Standalone mode of operation (see page 8). This is factory-set to On, which is the setting for Standalone mode.
Setting the 1073LB Mic Pre to work in Insert mode
This mode is where the 1073LB Mic Pre module utilises an adjacent AMS Neve module (such as the 1073LB EQ) to act as a true audio insert across it.
Setting this up requires three steps:
- Setting the 1073LB Mic Pre module to work in Insert mode
- Setting the Inserted module to act as an Insert
- Fitting a connecting cable between both modules (this cable is supplied with the module acting as the Insert).
Depending on the age of the Mic Pre module, there may be a block of two switches accessible from the rear of the unit, just above the backplane connector.
If this switch block is present, then you have an Issue 2 module - please turn to page 8 and follow the procedure entitled Issue Two Modules : Switch Settings.
If there is no switch block present, you have an Issue 1 module - please follow the procedure outlined below.
Part I: Issue One Modules: Internal modification
▶ Take the 1073 LB Mic Pre module side-plate off (8 screws), and unscrew the top PCB (3 screws, labeled A).

▶ Gently prise the top board off its 20-pin connector (B) taking care not to disturb the ribbon cable fitted under the far left of the board (C).
▶ Hinge this board up and to the left.
Please take care not to disturb either end of the ribbon cable (C) when lifting up the right-hand edge of this board.
▶ With a fine-tip soldering iron set to 350° C, carefully remove the solder on J5 on the bottom board so contact is no longer made across the two pins (J5 is just above the Neve logo and the 20-pin connector).

Shown above, the module set to work in Standalone mode before the modification has been made.
All 1073LB Mic Pre modules leave the factory set to work in Standalone mode.
▶ Gently mate the top board back onto the 20-pin connector (B), and secure the PCB into place with the three screws (A).
▶ Secure the unit side panel back into place.
The module is now set to work in Insert mode.
Part I: Issue Two Modules: Switch Settings

Shown above, the module set to work in insert mode after Switch 2 has been changed from the factory default.
All 1073LB Mic Pre modules leave the factory set to work in Standalone mode.
Switch 1 sets the Earthing status, please see page 6.
▶ Switch 2 should be set to Off for Insert mode.
The module is now set to work in Insert mode.
Part II – The module acting as the Insert
Please refer to the documentation for the module you wish to insert across the Mic Pre on how to set the Insert mode.
Part III - Cabling
▶ Connect the 3-pin cable supplied with the module you wish to insert to the INS LINK connector on the rear of one of the modules.
▶ Secure this module into the Lunchbox, leaving the other end of the cable free.
▶ Plug the link cable into the other module and secure into the Lunchbox in the adjacent slot (the order of modules is not important).
With the modules fitted, the cable loop is designed to fit in the space underneath the Lunchbox backplane (right).


API Lunchbox Connectors

Output
Male XLR.
Input
Female XLR.
Maximum input level of +26dBu.
Power
Standard 3-pin earthed IEC connector.
D-sub connector
Newer models of the Lunchbox also have two 25-pin D-sub connectors, one each for inputs and outputs [Tascam wiring convention].
For more information on the API Lunchbox, please go to: http://www.apiaudio.com/5006b.html
Physical Information
| Height mm (inches) | Width mm (inches) | Depth1cm (inches) | Weight kg (lbs) |
| 132 (5 1/4 ) | 38 (1 1/2 ) | 145 (5 3/4 ) | 1.1 (2 1/2 ) |
1 Excludes clearance for front panel controls and rear connectors.
Audio Specifications
| Mic\ Input 2 | Switchable impedance (300Ω or 1200Ω)Gain -80dB to -20dB in 5dB steps |
| Line\ Input 2 | Impedance 4kΩ bridgingGain -20dB to +10dB in 5dB steps |
| Output 2 | Max Output +28dBuOutput Impedance 75Ω @ 1kHz |
| Distortion | 0.07% from 50Hz to 10kHz @ +20dBu output(80kHz bandwidth) |
| Frequency Response | +/-0.5dB 20Hz to 20kHz, -3dB @ 40 kHz |
| EIN | Better than -125dBu @ 60dB gain |
| Noise | -82dBu at all Line gain settings(22Hz to 22kHz bandwidth) |
2 Transformer balanced and earth free.


- NEVE
- LB MIC PRE RACK MODULE
- FOR YOUR OWN SAFETY AND THE PROTECTION OF OTHERS, PLEASE OBSERVE THE FOLLOWING SAFETY INSTRUCTIONS
- TABLE OF CONTENTS
- HEALTH & SAFETY NOTICE
- LB MIC PRE MODULE
- INTRODUCTION
- HOUSING
- INSTALLATION
- POWER
- FRONT PANEL CONTROLS
- SIG LED
- INPUT GAIN
- LO Z
- ∅
- FR I/P
- V LED
- TRIM
- REAR OF UNIT
- INS LINK
- SWITCH BLOCK (ISSUE 2 UNITS ONLY)
- SETTING THE 1073LB MIC PRE TO WORK IN INSERT MODE
- PART I: ISSUE ONE MODULES: INTERNAL MODIFICATION
- PART II – THE MODULE ACTING AS THE INSERT
- PART III - CABLING
- API LUNCHBOX CONNECTORS
- OUTPUT
- INPUT
- D-SUB CONNECTOR
- PHYSICAL INFORMATION
- AUDIO SPECIFICATIONS
Brand : AMS Neve
Model : 1073LB Mic Pre
Category : Professional audio equipment