Qt 600 - Audio Amplifier Hughes Kettner - Free user manual and instructions
Find the device manual for free Qt 600 Hughes Kettner in PDF.



User questions about Qt 600 Hughes Kettner
0 question about this device. Answer the ones you know or ask your own.
Ask a new question about this device
Download the instructions for your Audio Amplifier in PDF format for free! Find your manual Qt 600 - Hughes Kettner and take your electronic device back in hand. On this page are published all the documents necessary for the use of your device. Qt 600 by Hughes Kettner.
USER MANUAL Qt 600 Hughes Kettner
- Read all of these instructions!
- Save these instructions for later use!
- Follow all warnings and instructions marked on the product!
- Do not use this product near water, i.e. bathtub, sink, swimming pool, wet basement, etc.
- Do not place this product on an unstable cart, stand or table. The product may fall, causing serious damage to the product or to persons!
- Slots and openings in the cabinet and the back or bottom are provided for ventilation; to ensure reliable operation of the product and to protect it from overheating, these openings must not be blocked or covered. This product should not be placed in a built-in installation unless proper ventilation is provided.
- This product should not be placed near a source of heat such as a stove, radiator, or another heat producing amplifier.
- Use only the supplied power supply or power cord. If you are not sure of the type of power available, consult your dealer or local power company.
- Do not allow anything to rest on the power cord. Do not locate this product where persons will walk on the cord.
- Never break off the ground pin on the power supply cord.
- Power supply cords should always be handled carefully. Periodically check cords for cuts or sign of stress, especially at the plug and the point where the cord exits the unit.
- The power supply cord should be unplugged when the unit is to be unused for long periods of time.
- If this product is to be mounted in an equipment rack, rear support should be provided.
- This product should be used only with a cart or stand that is recommended by Hughes & Kettner.
- Never push objects of any kind into this product through cabinet slots as they may touch dangerous voltage points or short out parts that could result in risk of fire or electric shock. Never spill liquid of any kind on the product.
- Do not attempt to service this product yourself, as opening or removing covers may expose you to dangerous voltage points or other risks. Refer all servicing to qualified service personnel.
- Clean only with dry cloth.
- Do not defeat the safety purpose of the polarized or grounding-type plug. A polarized plug has two blades with one wider than the other. A grounding type plug has two blades and a third grounding prong. The wide blade or the third prong are provided for the safety. If the provided plug does not fit into your outlet, consult an electrician for replacement of the obsolete outlet.
- Unplug this product from the wall outlet and refer servicing to qualified service personnel under the following conditions:
- When the power cord or plug is damaged or frayed.
- If liquid has been spilled into the product.
- If the product has been exposed to rain or water.
- If the product does not operate normally when the operating instructions are followed.
- If the product has been dropped or the cabinet has been damaged.
- If the product exhibits a distinct change in performance, indicating a need of service!
- Adjust only these controls that are covered by the operating instructions since improper adjustment of other controls may result in damage and will often require extensive work by a qualified technician to restore the product to normal operation.
- Exposure to extremely high noise levels may cause a permanent hearing loss.
- Individuals vary considerably in susceptibility to noise induced hearing loss, but nearly everyone will lose some hearing if exposed to sufficiently intense noise for a sufficient time. The U.S. Government's Occupational Safety and Health Administration (OSHA) has specified the following permissible noise level exposures:
| Duration Per Day In Hours | Sound LeveldBA, Slow Response |
| 8 | 90 |
| 6 | 92 |
| 4 | 95 |
| 3 | 97 |
| 2 | 100 |
| 11/2 | 102 |
| 1 | 105 |
| 1/2 | 110 |
| 1/4 or less | 115 |
- According to OSHA, any exposure in excess of the above permissible limits could result in some hearing loss.
- Ear plug protectors in the ear canals or over the ears must be worn when operating this amplification system in order to prevent a permanent hearing loss if exposure is in excess of the limits as set forth above. To ensure against potentially dangerous exposure to high sound pressure levels, it is recommended that all persons exposed to equipment capable of producing high sound pressure levels such as this amplification system be protected by hearing protectors while this unit is in operation.
- Fuses: For continued protection against risk of fire. Replace with IEC127 (5 x 20 mm) type and rated fuse for best performance only!.
TO PREVENT THE RISK OF FIRE AND SHOCK HAZARD, DO NOT EXPOSE THIS APPLIANCE TO MOISTURE OR RAIN. DO NOT OPEN CASE; NO USER SERVICE-ABLE PARTS INSIDE. REFER SERVICING TO QUALIFIED SERVICE PERSONNEL.
PLEASE READ BEFORE USE AND KEEP FOR LATER USE!
- The unit has been built by Hughes & Kettner in accordance with IEC 60065 and left the factory in safe working order. To maintain this condition and ensure non-risk operation, the user must follow the advice and warning comments found in the operating instructions. The unit conforms to Protection Class 1 (protectively earthed).
- HUGHES & KETTNER ONLY GUARANTEE THE SAFETY, RELIABILITY AND EFFICIENCY OF THE UNIT IF:
- Assembly, extension, re-adjustment, modifications or repairs are carried out by Hughes & Kettner or by persons authorized to do so.
- The electrical installation of the relevant area complies with the requirements of IEC (ANSI) specifications.
- The unit is used in accordance with the operating instructions.
- The unit is regularly checked and tested for electrical safety by a competent technician.
WARNING:
- If covers are opened or sections of casing are removed, except where this can be done manually, live parts can become exposed.
- If it is necessary to open the unit this must be insulated from all power sources. Please take this into account before carrying out adjustments, maintenance, repairs and before replacing parts.
- The appliance can only be insulated from all power sources if the mains connection is unplugged.
- Adjustment, maintenance and repairs carried out when the unit has been opened and is still live may only be performed by specialist personnel who are authorized by the manufacturer (in accordance with VBG 4) and who are aware of the associated hazards.
- Loudspeaker outputs which have the IEC 417/5036 symbol (Diagram 1, below) can carry voltages which are hazardous if they are made contact with. Before the unit is switched on, the loudspeaker should therefore only be connected using the lead recommended by the manufacturer.
- Where possible, all plugs on connection cables must be screwed or locked onto the casing.
- Replace with IEC127 (5x 20 mm) type and rated fuse for best performance only!
- It is not permitted to use repaired fuses or to short-circuit the fuse holder.
- Never interrupt the protective conductor connection.
- Surfaces which are equipped with the „HOT" mark (Diagram 2, below), rear panels or covers with cooling slits, cooling bodies and their covers, as well as tubes and their covers are purposely designed to dissipate high temperatures and should therefore not be touched.
- High loudspeaker levels can cause permanent hearing damage. You should therefore avoid the direct vicinity of loudspeakers operating at high levels. Wear hearing protection if continuously exposed to high levels.
MAINS CONNECTION:
- The unit is designed for continuous operation.
- The set operating voltage must match the local mains supply voltage.
- Caution: The unit mains switch must be in position OFF before the mains cable is connected.
- The unit is connected to the mains via the supplied power unit or power cable.
- Power unit: Never use a damaged connection lead. Any damage must be rectified by a competent technician.
- Avoid connection to the mains supply in distributor boxes together with several other power consumers.
- The plug socket for the power supply must be positioned near the unit and must be easily accessible.
PLACE OF INSTALLATION:
- The unit should stand only on a clean, horizontal working surface.
- The unit must not be exposed to vibrations during operation.
- Keep away from moisture and dust where possible.
- Do not place the unit near water, baths, wash basins, kitchen sinks, wet areas, swimming pools or damp rooms. Do not place objects containing liquid on the unit - vases, glasses, bottles etc.
- Ensure that the unit is well ventilated.
- Any ventilation openings must never be blocked or covered. The unit must be positioned at least 20 cm away from walls. The unit may only be fitted in a rack if adequate ventilation is ensured and if the manufacturer's installation instructions are followed.
- Keep away from direct sunlight and the immediate vicinity of heating elements and radiant heaters or similar devices.
- If the unit is suddenly moved from a cold to a warm location, condensation can form inside it. This must be taken into account particularly in the case of tube units. Before switching on, wait until the unit has reached room temperature.
- Accessories: Do not place the unit on an unsteady trolley, stand, tripod, base or table. If the unit falls down, it can cause personal injury and itself become damaged. Use the unit only with the trolley, rack stand, tripod or base recommended by the manufacturer or purchased together with the unit. When setting the unit up, all the manufacturer's instructions must be followed and the setup accessories recommended by the manufacturer must be used. Any combination of unit and stand must be moved carefully. A sudden stop, excessive use of force and uneven floors can cause the combination of unit and stand to tip over.
- Additional equipment: Never use additional equipment which has not been recommended by the manufacturer as this can cause accidents.
- To protect the unit during bad weather or when left unattended for prolonged periods, the mains plug should be disconnected. This prevents the unit being damaged by lightning and power surges in the AC mains supply.
Diagram 1
Diagram 2


CONSEILS DE SECURITE IMPORTANTS!
PRIERE DE LIRE AVANT L'EMPLOI ET A CONSERVER POUR UTILISATION ULTERIEURE!
LEAP FOR BASS PLAYERS!
The energy of a low-frequency impulse that you can feel physically, the hot breath of a tube amp, the sound precision of high-end studio gear. In short: perfect sound and feel when you play are the benchmark of Quantum ™ bass amps. The unique combination of classic and innovative technologies makes for a new class of bass amplification that offers discerning working bass players a previously unimaginable degree of musicality, control, and transportability.
Here's wishing you fun and success with your Quantum™ QT600!

TABLE OF CONTENTS
- Preamp 6
1.1 Tube Touch Circuit TM 6
1.2 Active and Passive 6
1.3 Gain 6
1.4 Hot 6
1.5 Mute 6
- Equalizer 6
2.1 Pure Parallel TM technology 6
2.2 Punch 7
2.3 Bass 7
2.4 Bass Shape 7
2.5 Low Mid 7
2.6 Mid Boost 7
2.7 High Mid 7
2.8 Treble 7
2.9 HF Character 7
- Tube Growl 8
3.1 Tube saturation and compression 8
3.2 Tube Growl 8
3.3 Fat 8
- Poweramp 8
4.1 Dynavalve TM technology 8
4.2 Master 9
4.3 Impedance Slector 9
- Additional connections and controls 9
5.1 Fx Loop 9
5.2 Line Out 9
5.3 Di Out 9
5.4 Tuner 9
5.5 Headphones 9
5.6 Footswitch 10
5.7 Speaker Out 10
-
Standard setup / Cable connections ..... 10
-
Service and maintenance ..... 10
-
Troubleshooting ..... 11
-
Technical specifications ..... 11
Appendix: Quantum™ Pro Speaker-Cabinets ..... 12
I. THE PREAMP

1.1 Tube Touch Circuit™
The preamp section plays a pivotal role in the overall design of the QT600: As interface between bass player and instrument on the one hand, and power circuitry on the other, it decisively shapes both the amp's response and the instrument's sonic spectrum. Quantum TM QT600 amps' inputs feature the Tube Touch Circuit TM , resistant to distortion, which guarantees a direct response to the players' touch and prevents dissonant clipping.
1.2 Connections:
Active
Connect bass guitars with active circuitry to this port. (High output level, low impedance)
Passive
Connect bass guitars with passive circuitry to this port. (Low output level, high impedance)
1.3 Gain
The GAIN control determines the input level. But it does more than just adjust the level - in combination with the MASTER control, it makes a wide range of nuances between clean- and overdrive-sounds possible.
1.4 Hot
The HOT indicator provides information about the input level. But it isn't just a classic control aid – the "magic eye" indicates how "hot" the preamp is being driven.
1.5 Mute
Mutes the speaker output as well as the DI-Out, LINE-Out and Headphone -Out. TUNER-Out remains active.
2. EQUALIZER

2.1 Pure Parallel Technology
Pure Parallel EQ is a technology based on the kind of circuitry generally found in high-end studio gear. The signal is distributed to all EQ bands simultaneously rather than being routed through the bands consecutively. The original signal is routed through via a passive circuit, practically circling the complete circuit. The filters for the respective bands arrayed in parallel to this circuit only process the targeted frequencies, which are then added back to the original signal.
The Tchebycheff characteristics of the bass and treble filters make an extremely effectively processed signal possible: neighbouring frequencies in a selected field are processed in the opposite direction, i.e. neighbouring frequencies are lowered when a frequency is boosted, and raised when it is cut. This allows for clearly audible processing without excessive variations is level.
Another special feature is the automatic adaptation of the Q-factor of the LOW-MID and HIGH MID bell filters. Frequencies are boosted in a wider band and cut in a narrower band.

The figure shows the curves of all EQ bands and switchable filters.
Together, these special features make the EQ an easy-to-use sound tool that guarantees a superior base tone and makes sound-sculpting and signal correcting possible with just one control. Extreme musical results that sound “healthy” in any mode are at your fingertips.
The figure shows the sophisticated parallel EQ circuit in comparison to a simple serial circuit. Note the bands' parallel array and the passive circuit that carries the original signal.

The figure shows a sophisticated parallel EQ circuit in comparison to a simple serial circuit. Note the bands' parallel array and the passive circuit that carries the original signal.
2.2 Punch
Pushing the PUNCH button activates a filter in front of the EQ whose curve is shaped like that of a tube amp set up to deliver clean sounds – the result is punchier and more lively sound. The PUNCH filter's frequency response is tweaked to ensure that there is no audible change in overall level.

The figure shows the curve of the pre-filter with the PUNCH button activated
2.3 Bass
Turning this knob up boosts frequencies ranging from 40 to 200 Hz (with a centre frequency of 60 Hz), while scooping mids from 300 to 600 Hz. This emphasizes low-end frequencies. Turning the knob down suppresses the low-end, raises the lower of the two limiting frequency and boosts frequencies at 100 Hz. The overall energy of the bass is maintained even when cutting frequencies.

The figure shows the BASS EQ's curve when boosting (upper curve) and cutting (lower curve) frequencies
2.4 Bass Shape
Turning on the BASS SHAPE knob activates a low cut filter at 80 Hz with an edge steepness of 12dB in the bass band. Energy-consuming sub-bass signals are filtered out, giving the amp and speaker more room to breathe. Boosting to between 80 Hz and 160 Hz shifts a portion of the energy one octave higher, which has a particularly positive effect in problematic stage situations involving bass drums.

The figure shows the filtering curve with BASS SHAPE activated
2.5 Low Mid
Turning this knob up boosts a broad range of frequencies neighbouring the centre frequency of 400 Hz, adding presence and punch to the bass signal. Turning this knob down filters out a narrow range of frequencies around 400 Hz.

The figure shows the LOW MID EQ's curve when boosting (top curve) and cutting (bottom curve) frequencies
2.6 Mid Boost
Activating the MID BOOST knob boosts a broad range of frequencies around 220 Hz. This pre-filtering is excellent for classic soul sounds.

The figure shows the filtering curve with MID-BOOST activated
2.7 High Mid
As with LOW MID, frequencies are boosted in a broad band and cut in a narrow band. The centre frequency is 800 Hz. This frequency range is responsible for the “woody” quality of the signal-boosting results in a pleasant, woody tone.

The figure shows the HIGH MID EQ's curve when boosting (top curve) and cutting (bottom curve) frequencies
2.8 Treble
The TREBLE control has two functions. When the HF CHARACATER button is deactivated, it works just like a classic level control, producing a rather “metallic” sound. The character of the frequency processing is emphasized by dampening frequencies lying above the TREBLE control range’s centre frequency.
When the HF CHARACTER button is activated, it works just like a tube power amp's presence control, producing delicate, soft top-end frequencies while simultaneously rolling off "harsher" sounding frequencies found at the low end of the high frequency range. Pushing the PUNCH button audibly enhances the effect of the TREBLE control.

The figure shows the TREBLE-EQ's curve when boosting (top curve) and cutting (bottom curve) frequencies
2.9 HF Character
Pushing the HF CHARACTER button activates a filter over the EQ whose curve is similar to that of a "soft" tweeter. The effect is particularly prominent in the high-end response of basses with active circuitry. With passive basses (or instruments whose strings are old) this effect may barely be audible because there are few high-range frequencies in the instrument's signal.

The figure shows the pre-filter curve with HF CHARACTER activated
Note:
All special Quantum TM PRO speakers have integrated HF systems. The dual cone (10") or DuraDome TM (15") design yields a homogeneous, wide overtone spectrum without the bundling and phasing errors that typically arise with HF-horns.
- TUBE GROWL

3.1 Tube saturation & compression
Tube Growl is a complex circuit that controls peaks like a tube preamp does, converting the energy of spikes into overtones rather than allowing it to dissipate. Not only the fundamental frequency sounds as though it were generated by a string, but so do the harmonic overtones, i.e. the frequency generated by the half string, third, quarter, and so forth.
The relative levels of harmonic overtones are decisive in shaping tone, so it takes the right mix to yield a warm, punchy sound.
An intelligent compressor controls the tube saturation and prevents excessive distortion. String attack stays up front – there is no masking of attack, no pumping sounds, no sonic side effect. Rather, there is a singing sustain and a punchy sound that's fun to play.

The figure shows the harmonic overtone spectrum generated for a fundamental tone of 500 Hz.
3.2 Tube Growl
The TUBE GROWL knob, which allows you to dial in natural compression and tube effects, is a particularly handy feature. It puts the ability to control the compressor parameters – threshold, ratio, make-up gain, attach and release – as well as tube saturation levels at your fingertips.
3.3 Fat
The FAT indicator provides information about the level of tube saturation. The brighter the “magic eye,” the more powerful the TUBE GROWL effect.
4. POWER AMP
4.1 Dynavalve™ Technology
Dynavalve ™ is a new, patented technology. Just like in classic tube circuitry, the phase-splitter tubes and speaker feedback work together to “force” the power transistors to act just like amp tubes. The dynamics, overtone spectrum, and even the impedance matching to the speakers works exactly like in a tube amp. The result: better tone, more sound pressure, greater punch!

Solid state power amp without speakers connected
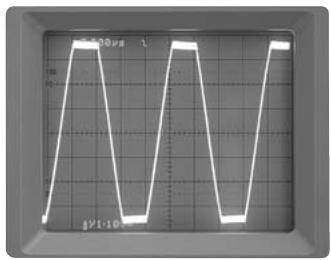
Solid state power amp with speaker connected

Tube power amp without speakers connected

Tube power amp with speaker connected

DynaValve™ power amp without speakers connected

DynaValve™ power amp with speaker connected
4.2 Master
The MASTER knob determines the overall level of the amp.
But it's more than merely a volume knob - in combination with the GAIN control, it makes a wide range of nuances between clean and overdrive-sounds possible.
4.2 Impedance Selector
On the reverse of the QT600 there is a selector switch for matching the QT600 to the impedance (load, resistance, "ohm number") of the connected speakers. The following combinations and settings are possible:

Impedance Selector
5. ADDITIONAL CONNECTIONS
AND CONTROLS
5.1 Fx Loop
The effects loop is a serial circuit, located after the TUBE GROWL knob and before LINE OUT in the signal path. Because the signal from the effects device is patched through serially, the effects balance must be adjusted on the effects device itself. The effects loop is footswitchable (Hughes & Kettner® FS 2).

Fx Loop
Send
Connect this output to the input of the effects device.
Return
Connect the output of the effects device to this input.
5.2 Line Out
This unbalanced line output patches out the preamp signal including effects. Located before the Dynavalve ™ amp in the circuitry, it is independent of the MASTER control setting.
Note:
This output does not patch out the sound of the Dynavalve TM amp and is thus ideal for routing the signal to another amp.
5.3 Di Out
Use this balanced output to connect the QT600 to a mixer or stage speaker. There are two modes to satisfy the needs of professional on-stage use:
To achieve full sound quality, correct impedance matching absolutely must be assured, as mismatching prevents the optimal functioning of the Dynavalve ™ concept. An incorrectly matched impedance leads to incorrect feedback between the amp and speaker, which results in unsatisfactory tone or inadequate volume.
Note:
Speaker cabinets are generally in parallel. To calculate the total resistance of two parallel speakers (R1, R2), multiply the individual resistances, and divide the resulting product by the sum of the individual resistances. The following formula applies:
R = (R1 × R2) / (R1 + R2)
For example, for an 8 ohm and a 16 ohm speaker:
R = (8 × 1 6) / (8 + 1 6)
R = 1 2 8 / 2 4
R = 5. 3 3
Pre-EQ
Set to PRE, the DI-OUT reads off the signal directly after the preamp, making it possible to adjust stage sound and volume independent of the mixer/PA.
Post-EQ
Set to POST, the DI-OUT reads the signal off “at the speaker,” patching the full amp signal including effects and EQ through to the mixer. The signal is thus dependent of the MASTER control setting, and is shaped by the reciprocal action of speakers and amp so decisive in determining the Dynavalve sound.

Ground switch
Activating the GROUND switch isolates the ground of the DI-OUT signal from the ground lift, making it possible to suppress hum should it occur.
5.4 Tuner
Connect a tuner to this output, which is always active. The MUTE button can be pushed for muted tuning.
5.5 Headphones
Connect headphones to this jack. The QT600 speaker output is deactivated when a plug is inserted into this jack.
5.6 Footswitch
Connect the optional two-way footswitch (Hughes & Kettner ® FS-2) to this jack for switching the FX LOOP and PUNCH.
5.7 Speaker Out
Connect speakers to the Speakon jack. Please make sure to wire the cable correctly (1++=+, 1-=-) and to match the impedance of the QT600 to the connected speaker (Chapter 4.2 IMPEDANCE SELECTOR).

Speaker Out
6. STANDARD SETUP /
CABLE CONNECTIONS

7. TROUBLESHOOTING
The amp won't power up when switched on.
- Check the mains cable to see if it is connected properly.
- Check the mains fuse. If it is defective, replace it with another fuse with identical ratings. If the defect recurs, consult your local authorised Quantum™ dealer.
The amp is correctly cabled, but no sound is audible.
- Check to see if the MUTE control is activated.
- Check the setting of the GAIN and MASTER controls.
- Check the effects circuit. An inactive or incorrectly cabled effects device can interrupt the signal.
- Check the headphones output. If headphones are plugged in, the speaker output is muted.
The DI OUT causes humming noises when in use.
- The earthing of the connected equipment is causing a ground loop. Never sever the equipment's safety ground! Instead, set the GROUND switch to LIFT. If this fails to resolve the problem, try plugging both devices into the same power distributor.
- An electrical or magnetic field is generating interference. Use a better quality cord or try to skilfully reposition the cables to minimise interference.
Feedback arises when DI OUT is in use.
- If the PA's sound pressure is extreme enough, it can excite the amp's speaker and cause feedback when DI OUT is in use. Since the speaker's response influences the amp, it could be routing the interference signal to the DI OUT. Solution: Try repositioning the amp or using the LINE OUT instead.
When connecting a mixing console to the DI OUT jack the signal sounds totally distorted over the PA.
- The mixing console's input is not set to line level. Adjust the level accordingly at the mixing console. If this is not possible, either patch the signal to an unbalanced (line) input at the mixing console or use a connecting cable equipped with an integrated balanced voltage divider (available from quality music stores or PA service companies).
The amp's output level is too low.
- A device connected to the effects loop is reducing the signal level. Adjust the signal level using the effects device's input/output control.
The amp doesn't sound the way it usually does.
- Check the impedance matching. Mismatching has a negative effect on the tone quality of the Dynavalve amp.
8. SERVICE AND
MAINTENANCE
Quantum ™ amps do not require service of any kind. There are however a few basic rules that, when followed, are sure to extend the service life of your amp considerably:
- Make sure that all peripheral devices and cables are in a state of good repair!
- Make sure that air circulates freely around your amp's ventilation ducts at all times.
-
Absolutely avoid exposure to mechanical shocks, extreme heat, dust and moisture.
-
Pay particular attention to the specifications of peripheral devices. Never connect devices with high output signal levels (e.g. amps) to your amp's input.
- Prior to plugging in your amp, always check that the AC power source delivers the current the amp is designed to handle. When in doubt about the local rating, ask the venue's sound technician or a stage hand.
- Refrain from "do it yourself" repairs! Even the replacement of internal fuses should be entrusted to an experienced technician.
- Use a soft dry cloth to clean the enclosure's outer surfaces and metal and acrylic glass surfaces. Never use alcohol or other solvents!
- Ensure a correct impedance matching. Never fall below an impedance of 2.7 ohm!
9. TECHNICAL
SPECIFICATIONS
9.1 Security specifications
Mains input voltage:
220 - 230V
117V
100V
Primary fuse
externally accessible
220 - 230V / T3,15A
117V / T6,3A
100V / T6,3A
Power consumption
Max. power consumption [Watt]: 950W
Inrush current
230V, 90°: A
117V, 90°: A
100V, 90°: A
Temperature indications
Surrounding temperature when in use [°C]: 0° - 70°C
Temperature during storage/transport [°C]: -20° - +85°C
9.2 Mechanical specifications
Dimensions
Absolute dimensions incl. all projecting parts WxHxD:
550mm × 195mm × 320mm
Weight
14.5kg
9.3 Electronic/acoustic specifications
Secondary fuses
Anode voltage: 1x 50mAT
Electronics supply: 2x 630mAT
Output stage: 2x 8AT each IEC 5x20mm, 250V type
Inputs
Active: 6.3mm mono jack
Passive: 6.3mm mono jack
FX Return: 6.3mm mono jack
Footswitch connection : 6.3mm stereo jack
Outputs
Tuner Out: 6.3mm mono jack
Headphone out: 6.3mm stereo jack
FX Send: 6.3mm mono jack
Line Out: 6.3mm mono jack
DI Out: XLR male, balanced
Speaker Out: Speakon
Frequency response
Input to Line Out: 35Hz - 20kHz (+0/-3dB)
A new generation of bass cabinets that combines first-rate audio features with drastically reduced weight. The heart of the new Quantum™ PRO cabinets are the Neodym speakers, developed in cooperation with Eminence®. This technology assures a faster, more precise impulse response and thus a more direct and controlled response to the player's touch. In addition, all speakers have integrated HF systems. The dual cone (in 10" speakers) or DuraDome™ design yields a homogenous, wide overtone spectrum without the bundling and phasing errors that typically arise with horns.
With their tough laminated wood, solid steel grilles, Speakon connections and uncompromising processing Quantum ™ PRO cabinets are made for a long, problem-free life in rugged everyday use on-the-road.
| DESCRIPTION | ASSEMBLY | POWER HANDLING | IMPEDANCE | WEIGHT | WIDTH | HEIGHT | DEPTH |
| Watt | Ohm | kg | cm | cm | cm | ||
| QS 210 PRO | 2x10 | 450 | 4/16 | 20.9 | 67 | 41.5 | 40.5 |
| QS 410 PRO | 4x10 | 900 | 8 | 32.2 | 67 | 60 | 40.5 |
| QS 610 PRO | 6x10 | 1350 | 5.3 | 46.7 | 67 | 90.5 | 41.5 |
| QS 810 PRO | 8x10 | 1800 | 4 | 61.8 | 67 | 118 | 41.5 |
| QS 115 PRO | 1x15 | 300 | 8 | 22.5 | 67 | 60 | 40.5 |
| QS 2115 PRO | 2x10+1x15 | 750 | 2.8 | 33.8 | 67 | 75.5 | 40.5 |

UANTUM™
BASS TECHNOLOGY
HERZLICH WILLKOMMEN
ZUM QUANTENSPRUNG
FÜR BASSISTEN!
550mm × 195mm × 320mm
Gewicht
14,5kg
Speaker Out: Speakon
Frequenzgang
Input to Line Out: 35Hz - 20kHz (+0/-3dB)
ANHANG: QUANTUM PRO
SPEAKER CABINETS
1.2 Active e Passive 30
1.3 Gain 30
1.4 Hot 30
1.5 Mute 30
- Equalizer .... 30
2.1 La tecnologia PureParallel™ 30
2.2 Punch 31
2.3 Bass 31
2.4 Bass Shape 31
2.5 Low Mid 31
2.6 Mid Boost 31
2.7 High Mid 31
2.8 Treble 31
2.9 HF Character 31
- Tube Growl 32



- PLEASE READ BEFORE USE AND KEEP FOR LATER USE
- WARNING
- MAINS CONNECTION
- PLACE OF INSTALLATION
- CONSEILS DE SECURITE IMPORTANTS
- PRIERE DE LIRE AVANT L'EMPLOI ET A CONSERVER POUR UTILISATION ULTERIEURE
- LEAP FOR BASS PLAYERS
- TABLE OF CONTENTS
- THE PREAMP
- TUBE TOUCH CIRCUIT™
- CONNECTIONS
- ACTIVE
- PASSIVE
- GAIN
- HOT
- MUTE
- EQUALIZER
- PURE PARALLEL TECHNOLOGY
- PUNCH
- BASS
- BASS SHAPE
- LOW MID
- MID BOOST
- HIGH MID
- TREBLE
- HF CHARACTER
- NOTE
- TUBE SATURATION & COMPRESSION
- TUBE GROWL
- FAT
- POWER AMP
- DYNAVALVE™ TECHNOLOGY
- MASTER
- IMPEDANCE SELECTOR
- ADDITIONAL CONNECTIONS
- AND CONTROLS
- FX LOOP
- SEND
- RETURN
- LINE OUT
- DI OUT
- PRE-EQ
- POST-EQ
- GROUND SWITCH
- TUNER
- HEADPHONES
- FOOTSWITCH
- SPEAKER OUT
- STANDARD SETUP
- CABLE CONNECTIONS
- TROUBLESHOOTING
- SERVICE AND
- MAINTENANCE
- TECHNICAL
- SPECIFICATIONS
- SECURITY SPECIFICATIONS
- MECHANICAL SPECIFICATIONS
- ELECTRONIC/ACOUSTIC SPECIFICATIONS
- UANTUM™
- BASS TECHNOLOGY
- HERZLICH WILLKOMMEN
- ZUM QUANTENSPRUNG
- FÜR BASSISTEN
- ANHANG: QUANTUM PRO
- SPEAKER CABINETS
Brand : Hughes Kettner
Model : Qt 600
Category : Audio Amplifier