MusicNavigator - Audio System T+A - Free user manual and instructions
Find the device manual for free MusicNavigator T+A in PDF.


| Product Type | MusicNavigator App for T+A Audio Systems |
| Compatible Platform | iOS and Android |
| Compatible T+A Devices | HV-Series, R-Series, E-Series, Series 8, CALA |
| Initial Setup | WLAN configuration via access point |
| Device Search | Automatic network detection of compatible T+A devices |
| Source Selection | Favourite and other sources with customizable icons |
| Home Screen | Quick access to source lists and device selection |
| Playback Control | Play, pause, previous/next with swipe gestures |
| UPnP/DLNA Support | Access to music servers, albums and playlists |
| Radio Support | FM, DAB and Internet radio with preset assignment |
| Streaming Services | Tidal, Deezer and Qobuz integration |
| Search Function | Available for streaming and radio sources |
| Playlist Management | Create, edit and delete playlists |
| Filter Function | Filter by song, album or artist per folder |
| Settings Menu | Tone, device and app settings |
| Software Update | Over-the-air via web update and auto restart |
| Database Management | Clear device, media, playlists and settings databases |
| Log Function | Communication log for troubleshooting and support |
| App View Customization | Grid/list view, split screen and app themes |
| Multi-Device Control | Switch between multiple T+A devices |
Frequently Asked Questions - MusicNavigator T+A
User questions about MusicNavigator T+A
0 question about this device. Answer the ones you know or ask your own.
Ask a new question about this device
Download the instructions for your Audio System in PDF format for free! Find your manual MusicNavigator - T+A and take your electronic device back in hand. On this page are published all the documents necessary for the use of your device. MusicNavigator by T+A.
USER MANUAL MusicNavigator T+A
T+A MusicNavigator for iOS and Android
Manual

Content
■ Initial setup
• WLAN setup via access point
• Device selection
- Select favourite source
- Arrange favourite sources
• Selection of individual icons for external sources
Home screen
• Selection of lists of favourite and other sources
• Selection of further T+A devices / Return to initial setup
• Switching the device off and on
■ Status bar
Overview
■ Play screen
Overview
■ Operating the UPnP / DLNA source
- Selecting a music server
• Playback of a track / album
• Create a playlist
• Adding titles to a playlist
• Deleting titles from a playlist / queue - Set filters
Content
■ Operation of FM, DAB and Internet radio sources
- Assign presets
■ Streaming services Tidal / Deezer / qobuz
• Use search function
■ Settings
- The setup menu
- Configuring Music services
- Source settings
• Perform software update - Manage databases
• Use log function - Customitze App view
- Change App theme
Hints
Initial setup
WLAN setup via access point*
- The T+A devices with the new streaming client board support setting up the WLAN connection via an access point. This means that they provide its own WLAN for the duration of the configuration of the WLAN settings. As soon as the configuration is complete, this WLAN is deactivated again. The T+A device restarts and connects to the WLAN configured via the T+A MusicNavigator app.

Initial setup
WLAN setup via access point
- Turn on the T+A device nd open the system configuration menu by pressing the button on the remote control.
- Use the ▼ / ▲ buttons to select the menu point “Network”, then confirm your choice with the OK button.
- Use the ▼ / ▲ buttons to select the menu point „WLAN access point“, then confirm your choice with the OK button.
- The T+A device activates the WLAN access point.


Initial setup
WLAN setup via access point
- The following steps must be performed within approximately 5 minutes.
- Connect the smartphone or Tablet PC on which the T+A MusicNavigator app is installed to the WLAN access point. The network name (SSID) is T+A AP „device name“


Initial setup
WLAN setup via access point
- Start the T+A MusicNavigator-App.
- The app recognizes the access point and starts automatically with the setup wizard.

Initial setup
WLAN setup via access point
• To set up the WLAN, go through the individual steps of the app's setup wizard.
- Select the WLAN network to which you want to connect the T+A device and enter your access data.
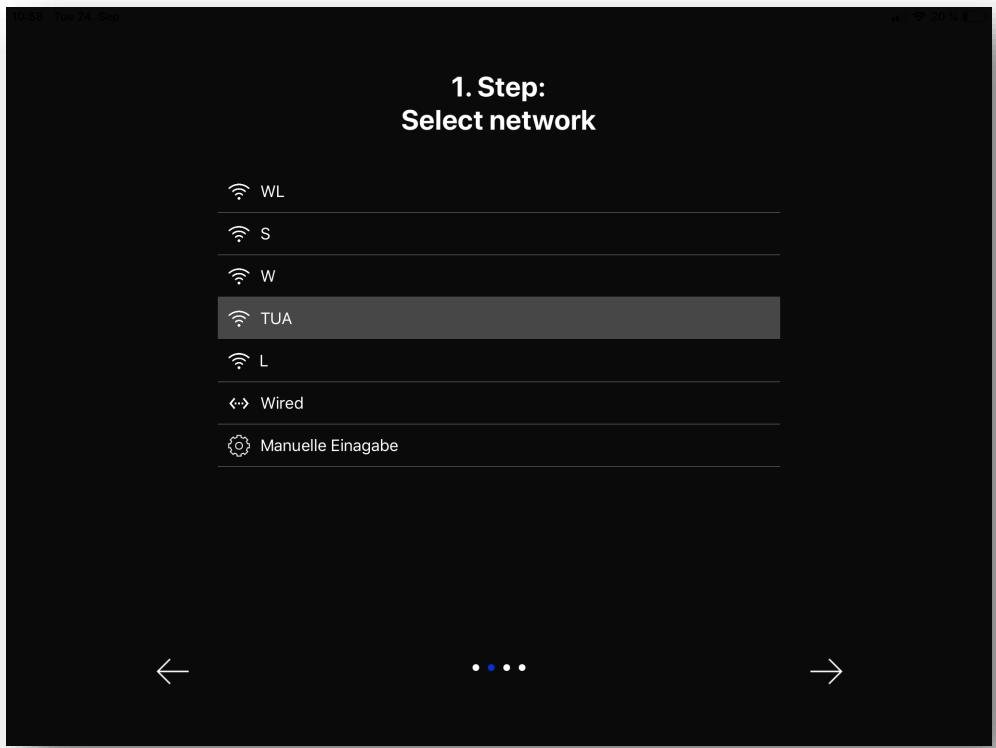

- Quit the app, then connect your phone or tablet to your previously set up wireless LAN.
• After restarting the T+A MusicNavigator app the T+A device will be detected automatically.

• After the initial start, the app searches the network for compatible T+A devices.
Welcome!
The T+A MusicNavigator
searches your network
for a suitable
T+A audio system
1.0.4 / 5
Compatible T+A devices
| HV-Series | MP 3100 HV |
| SD 3100 HV | |
| SDV 3100 HV | |
| R-Series | MP 2500 R |
| MP 2000 R MK II | |
| E-Series | MP 1000 E |
| R 1000 E | |
| Series 8 | MP 8 |
| CALA | CALA CDR |
| CALA SR |
- The devices found can be selected by a swipe* to the left or right and then configured.


* Wiping movement to the left or right
• All sources of your T+A device or system group consisting of PA and MP are displayed.
- By scrolling* up or down, you can browse through the entire sources.
Set up the device
Set up your desired favorite sources.
Unselected sources are displayed under "Other sources". You can edit them later in the device selection.

Buttons

Confirm and complete initial setup

Back

Information on source selection
- Sources that are not frequently used can be deselected by pressing the respective source, which will then be displayed under "Other sources".
- All selected sources are displayed under "Favorite Sources".
Set up the device
Set up your desired favorite sources.
Unselected sources are displayed under "Other sources". You can edit them later in the device selection.


Buttons

Selected source for "Favourite sources"

Greyed out source for "Other sources"
- Your favourite sources can be sorted according to your wishes.
- A long press on a source symbol releases it from the screen and you can insert it anywhere within the source overview*.

* This also applies to the homescreen.
| Buttons | |
| Selected source for "Favourite sources" | |
| Greyed out source for "Other sources" | |
Initial setup
Selection of individual icons for external sources
- The icons of the external analog or digital sources can be changed depending on the connected device.
- Open the additional menu of each external source to select a new icon.

Buttons
Press the additional menu button
Initial setup
Selection of individual icons for external sources
- Various source images are available, from TV sets to tape recorders.


Home screen
Selection of lists of favourite and other sources
- The lists of your “Favourite sources” and your “Other sources” can be opened and closed.


Home screen
Selection of lists of favourite and other sources
- Below the list "Favourite sources" are the "Other sources" list.
- You can access the lists by folding them out or in or by scrolling the Home screen.


Home screen
Selection of further T+A devices / Return to initial setup
- You can switch between operating several T+A devices in your network.
- You can also reach the source setup here.

Buttons

Selecting and configuring
T+A devices in the network
Home screen
Selection of further T+A devices / Return to initial setup
- Select your T+A device and adjust your source selection.

Home screen
Switching the devices off and on
- After successful initial setup and deactivated "energy saving function", your T+A device can also be switched off and on via the app.


Status bar
- The status bar contains accesses to important functions.
- The functions are source dependent.

Play screen
- When you have selected a song, the playscreen opens.

Buttons

Repeat queue

Shuffle

Previous Song (Swipe to the right)

Next Song (Swipe to the left)

Add to Playlist/Presets

Additional menu
Operating the UPnP / DLNA source
Selecting a music server
- Via the additional menu : you can search the network environment again or filter the found servers by names.

Operating the UPnP / DLNA source
Playback of a track / album
- The UPnP/DLNA source provides access to all (music) servers in your network.


Operating the UPnP / DLNA source
Create a playlist
- The additional menu : in the player contains the playlist management.
- You can create a playlist or add a song to an existing playlist.

Operating the UPnP / DLNA source
Adding titles to a playlist
- Add any number of songs from different servers to a playlist.
- In the additional menu, which is displayed next to the songs in the queue, for example, you have several options for actions.
- You can also add songs to a playlist from there.

Operating the UPnP / DLNA source
Adding titles to a playlist
- Within a playlist, the additional menu : contains editing and playback options.


Operating the UPnP / DLNA source
Deleting titles from a playlist / queue
- In a playlist or a queue, you can activate the delete function by swiping to the left on a song title displayed. Either press delete or select other tracks, which will then be deleted together by pressing the the -icon.

Operating the UPnP / DLNA source
Set filters
- In the additional menu: you can activate "filters", which help you to find a song, an album or an artist.
- The filter only applies to the selected folder and does not include any subfolders.


Operation of FM, DAB and Internet Radio source
Assign presets
- You can assign presets in the FM radio, DAB radio and Internet radio sources.
- Select a station.
• To save it as a preset, press the preset button ← in the player.

Operation of FM, DAB and Internet Radio source
Assign presets
- Access of presets via the status bar is only possible if the corresponding source is selected.
- The additional menu : can be used to remove presets that have been set.
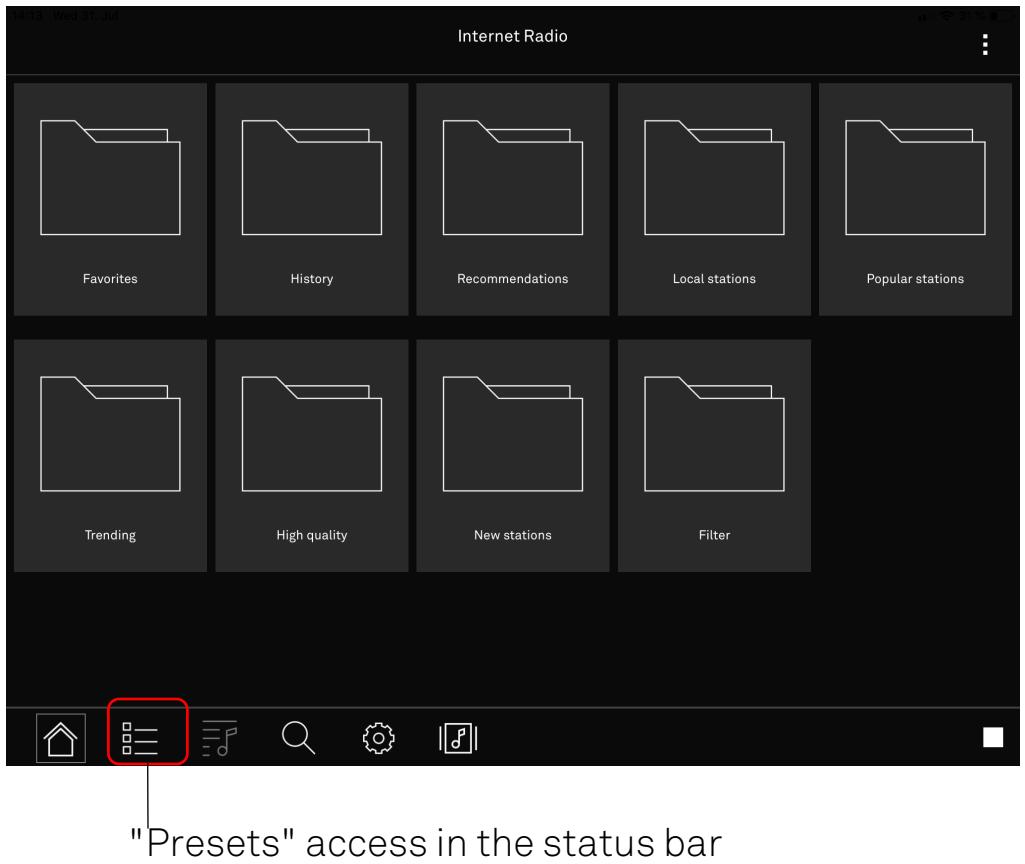

Streaming services Tidal / Deezer / qobuz
Use search function
- In the TIDAL, Deezer, qobuz and Internet radio sources, you can access the search function via the status bar.
- Select the “magnifying glass”-icon 🔒 and set a filter as required.

"Search" access in the status bar

Streaming services Tidal / Deezer / qobuz
Use search function
- Enter your search term.
- The result list varies depending on the filter you have set (All, Playlists, Artists, Albums, Titles).


Settings
The setup menu
- The settings menu is divided into "Tone", "Device" and "App" settings.
- Press the Ⓞ -button again at any time to return to the top menu level.



Settings
Configuring Music services
- Select music services and then the service you want to sign up for.
- Enter your username and password. Confirm with "Store and exit?".
- If you want to remove your login data, select "Remove login & exit?".


Settings
Source settings
• In the source settings, you can change the sources of your T+A device or system group.
• If you select a source, the keyboard opens. Type in a new name for the selected source.
- If the field remains empty, the default name appears after confirmation.


Settings
Perform software update
- Perform a software update by scrolling to the topic "Device", then select "T+A Device info menu".
- Select "Update", then "WEB" and confirm with "install update ?".
- The web update is performed. Your T+A device restarts automatically.


Settings
Manage databases
• Devices database: Deletes information on all T+A devices controlled with this app, including configuration and source settings.
- Delete media database: ____ Deletes information on playback sources (e.g. UPnP server).
- Delete playlists databases: Deletes saved playlists.
- Delete settings database: Deletes the settings made by the app.
(Does not affect the device settings and passwords of streaming services)


• The log function logs the communication between the app, the T+A device and the Internet.
- If the app shows unwanted behavior, sending the log file can help our app developers provide support and, in the next step, improve the app for all users.

Settings
Customize App view
- In the settings menu under "Browser View" you can switch between a grid view "Grid" and a list view.
• The switch can also be made via a gesture*.

* Pinch-gesture

Settings
Customize App view
- You can choose to operate the app in full screen or split screen mode.
- The split screen displays the previous level on the left. This level can be operated at any time.
- By wiping the activated layer to the right, the previous layer becomes active again.


- The App's color scheme lets you customize under AppTheme.


Hints
- If you swipe the current playback up in the status bar, you get access to the volume control.


- In the additional menu of a song, you can use a swipe to the left to call up additional information.

- Pressing and holding a song that is not currently playing allows you to move songs within a queue.
Hints
- A set filter 📋 can also be deactivated by pressing on it 📋 without having to delete it.


- By pressing the arrow symbol ← for a long time, you will always return to the first level of a source.
- If, for example, you are in a settings submenu, press the Home icon 📋 to return to the last selected source.
T+A
T+A elektroakustik GmbH & Co. KG
Planckstraße 9 - 11
D-32052 Herford /Germany
T +49 (0) 52 21 / 7676-0
F +49 (0) 52 21 / 7676-76
info@ta-hifi.com
www.ta-hifi.com


- T+A MUSICNAVIGATOR FOR IOS AND ANDROID
- MANUAL
- CONTENT
- INITIAL SETUP
- HOME SCREEN
- STATUS BAR
- PLAY SCREEN
- OPERATING THE UPNP / DLNA SOURCE
- WLAN SETUP VIA ACCESS POINT
- WELCOME
- SET UP THE DEVICE
- BUTTONS
- SELECTION OF INDIVIDUAL ICONS FOR EXTERNAL SOURCES
- SELECTION OF LISTS OF FAVOURITE AND OTHER SOURCES
- SELECTION OF FURTHER T+A DEVICES / RETURN TO INITIAL SETUP
- SWITCHING THE DEVICES OFF AND ON
- SELECTING A MUSIC SERVER
- PLAYBACK OF A TRACK / ALBUM
- CREATE A PLAYLIST
- ADDING TITLES TO A PLAYLIST
- DELETING TITLES FROM A PLAYLIST / QUEUE
- SET FILTERS
- OPERATION OF FM, DAB AND INTERNET RADIO SOURCE
- ASSIGN PRESETS
- STREAMING SERVICES TIDAL / DEEZER / QOBUZ
- USE SEARCH FUNCTION
- SETTINGS
- THE SETUP MENU
- CONFIGURING MUSIC SERVICES
- SOURCE SETTINGS
- PERFORM SOFTWARE UPDATE
- MANAGE DATABASES
- CUSTOMIZE APP VIEW
- HINTS
- T+A
Brand : T+A
Model : MusicNavigator
Category : Audio System