EBM-900 - E-reader FRANKLIN - Free user manual and instructions
Find the device manual for free EBM-900 FRANKLIN in PDF.
| Product Type | E-book reader / Personal Digital Assistant (PDA) |
| Brand | Franklin |
| Model | EBM-900 |
| Dimensions | 13.15 x 8.6 x 1.7 cm |
| Weight | Approx. 185 g |
| Power Supply | 2 x AAA batteries |
| Memory | 8 MB RAM |
| Display | Touch-sensitive screen with backlight (on select models) |
| Input Methods | Stylus, control pad, handwriting recognition, onscreen keyboard |
| Supported Formats | Franklin Universal Binary (.fub), Mobipocket (.prc, .pdb), MP3, Audiobook (Audible), HTML, TXT |
| Applications Included | Franklin Reader, Mobipocket Reader, Audiobook Player, Music Player, Address Book, Date Book, ToDo Book, Memo Book, Voice Memo, Calculator |
| Connectivity | USB port (cable or cradle), headphone jack (3.5 mm) |
| Expansion | MultiMediaCard (MMC) slot |
| Synchronization | With PC via USB; sync organizer data with Microsoft Outlook |
| Care & Cleaning | Wipe with soft, dry cloth; avoid moisture, extreme temperatures, and harsh chemicals |
| Safety | Do not drop, crush, or apply excessive force; keep away from liquids; use only supplied stylus |
| Minimum PC Requirements | Windows 98 or higher, 50 MB free disk space, USB port, Internet access |
| Warranty | 1 year limited warranty (defects in materials/workmanship) |
Frequently Asked Questions - EBM-900 FRANKLIN
User questions about EBM-900 FRANKLIN
0 question about this device. Answer the ones you know or ask your own.
Ask a new question about this device
Download the instructions for your E-reader in PDF format for free! Find your manual EBM-900 - FRANKLIN and take your electronic device back in hand. On this page are published all the documents necessary for the use of your device. EBM-900 by FRANKLIN.
USER MANUAL EBM-900 FRANKLIN
Electronic Publishers
eBookMan
User's Guide

Disclaimer
This is the eBookMan® User's Guide version 2.1.
All displays pictured are simulated, are not intended to specify included applications or content, and are subject, along with all technical information and specifications, to change without notice.
License Agreement
READ THIS LICENSE AGREEMENT BEFORE USING eBookMan®. YOUR USE OF eBookMan® DEEMS THAT YOU ACCEPT THE TERMS OF THIS LICENSE. IF YOU DO NOT AGREE WITH THESE TERMS, YOU MAY RETURN THIS PACKAGE WITH PURCHASE RECEIPT TO THE DEALER FROM WHICH YOU PURCHASED eBookMan® AND YOUR PURCHASE PRICE WILL BE REFUNDED. eBookMan® means the eBookMan® multimedia content reader, the device itself, and the software product and documentation found in this package. FRANKLIN means Franklin Electronic Publishers, Inc.
Limited Use License
All rights in eBookMan® remain the property of FRANKLIN. Through your purchase, FRANKLIN grants you a personal and nonexclusive license to use this ELECTRONIC PRODUCT. You may not make any copies of eBookMan®'s software or of the data stored therein, whether in electronic or print format. Such copying would be in violation of applicable copyright laws. Further, you may not modify, adapt, disassemble, decompile, translate, create derivative works of, or in any way reverse engineer eBookMan®. You may not export or reexport, directly or indirectly, eBookMan® without compliance with appropriate governmental regulations. eBookMan® contains Franklin's confidential and proprietary information which you agree to take adequate steps to protect from unauthorized disclosure or use. This license is effective until terminated. This license terminates immediately without notice from FRANKLIN if you fail to comply with any provision of this license.
Table of Contents
Welcome! 11
Support 15
About Screen Illustrations 15
Getting Started
1. Getting Started 18
I. Install eBookMan Desktop Manager 18
II. Install Batteries 19
III. Connect eBookMan to a PC 20
IV. Start the Desktop Manager 21
V. Synchronize the OS and Applications 22
VI. Calibrate your eBookMan 25
VII. Set the Date and Time 26
Registering Your eBookMan Device 27
2. eBookMan Desktop Manager 29
Understanding the Views 30
Using the Menu 33
eBookMan Monitor 36
Mobipocket Web Companion 37
Uninstalling the Desktop Manager 37
3. Managing & Synchronizing Content 39
Managing Files in the Desktop Manager 39
Using IntellisyncTM 43
Adding New Content and Applications 48
The eBookMan Device
4.Hardware Features 60
Front Panel 60
Back Panel 62
Cover 63
Product Care 64
Resetting the Device 64
5. The Launcher 67
Using the Launcher Menu 68
Changing eBookMan Settings 70
Opening and Closing Programs 72
Performing a System Restart 73
Using a Password 74
Using Categories 78
Managing Files in eBookMan 81
6.Data Entry 85
Handwriting 85
Onscreen Keyboard 91
Content Applications
7. Franklin Reader 96
Opening and Closing eBooks 96
Understanding Franklin Reader Features 98
Using the Menus 101
Setting Preferences 103
Moving Around 106
Searching within an eBook 108
Using Bookmarks 118
Using Help 120
Search Abbreviations 121
Exiting Franklin Reader 122
8.Mobipocket Reader 123
Opening and Closing Documents 123
Understanding the Library 125
Viewing a Document 128
Using the Menu 130
Changing the Settings 131
Moving around within a Document 132
Searching a Document 133
Using Bookmarks 134
Getting Help 136
Exiting Mobipocket Reader 137
9. Audiobook Player 139
Understanding the Buttons 140
Using the Menu 140
Selecting a Title and Section 141
Listening to an Audiobook 141
Saving Audiobooks to MultiMediaCards 142
Exiting Audiobook Player 143
10. Music Player 145
Understanding the Buttons 145
Using the Menu 146
Selecting a Title 147
Listening to Music 147
Exiting Music Player 148
Organizer Applications
11. Address Book 150
Adding Contacts 151
Understanding the Views 152
Editing Entries 155
Searching for an Entry 158
Deleting Entries 159
Field Limits 159
Using the Menu 160
Synchronizing with Microsoft Outlook 161
Exiting Address Book 161
12. Date Book 163
Adding Appointments 164
Editing Appointments 165
Understanding the Views 172
Field Limits 175
Using the Menu 175
Synchronizing with Microsoft Outlook 177
Exiting Date Book 177
13.ToDo Book 179
Adding Entries 179
Editing Entries 180
Field Limits 183
Using the Menu 184
Synchronizing with Microsoft Outlook 185
ExitingToDo Book 185
14. Memo Book 187
Adding Memos 187
Viewing Memos 188
Editing Memos 189
Using the Menu 189
Synchronizing with Microsoft Outlook 191
Exiting Memo Book 191
Miscellaneous Applications
15. Voice Memo 194
Understanding the Buttons 194
Using the Menu 195
Recording Voice Memos 196
Listening to Voice Memos 197
Exiting Voice Memo 197
- Calculate 199
Understanding the Keys 199
Using the Menu 200
Making Calculations 200
Using Calculator Memory 201
Exiting Calculate 201
Appendix
A. Getting Updates 204
Checking for Updates 204
Updating the eBookMan® Desktop Manager 204
Updating the eBookMan Software 206
B. Serial Port Connection 207
Serial cradle users 207
Serial cable users 208
C. MultiMediaCards 209
Inserting MMCs 209
Backing Up to MMC 210
Restoring from MMC 211
Erasing an MMC 211
D. Glossary 212
E. Troubleshooting 218
Downloading and Installing the Desktop Manager, Operating System, or Applications 218
Sending Files from the Desktop Manager to eBookMan ..221
The Desktop Manager 223
The eBookMan Device 224
F. Legal Information 231
Specifications 231
FCC Notice 231
Copyrights, Trademarks, Legal 232
Limited Warranty, Disclaimer of Warranties and Limited Remedy 233
Limited Warranty (outside U.S.) 234
Index
Index 235
Congratulations on your purchase of eBookMan! eBookMan is a versatile, handheld computing device. Your package includes:
- the eBookMan device with cover and stylus
- a USB cable (ebm-900 only) or USB cradle (ebm-901 and ebm-911)
- two AAA batteries (ebm-911 only)
-
the eBookMan Installation CD:
-
eBookMan® Desktop Manager with Intellisync™, the PC software that transfers applications and content to eBookMan; along with Mobipocket Web Companion, the PC software that publishes and transfers electronic documents to eBookMan
-
eBookMan Operating System (OS) and core applications
- Complete eBookMan® User's Guide in PDF format
-
Interactive product demo
-
Quick Start Guide
- Concise eBookMan® User's Guide
You determine the use for your eBookMan by installing the applications and contents you want. eBookMan can be a library of books, a personal organizer, a music player, a multimedia reader, a recorder for memos, a calculator or even an arcade of games. eBookMan enables you to view thousands of book titles, magazines, and newspapers; listen to audio books and music; and store addresses, phone numbers and other personal information. Just like a larger computer, multiple programs can run at the same time.
To install the Desktop Manager on your PC, your computer must meet the following minimum system requirements:
- IBM-compatible Pentium class PC or higher
256 color VGA monitor - Mouse or other pointing device
- Windows® 98 or higher
- 50 MB free disk space
32 MB RAM (recommended)
Available USB port - Internet access
- Microsoft Internet Explorer® 4.0 (or above) OR Netscape Navigator® 4.02 (or above)

Note:
Out of the box, your eBookMan device contains a tour only. To view the tour, install batteries and turn on the device.

Note:
A serial port is required for Windows® NT users. Serial cradles and cables are sold separately.
Before using eBookMan, follow the instructions in the Quick Start Guide. For more detailed information, see "Chapter 1. Getting Started".
Use the Desktop Manager to transfer content and applications to and from your eBookMan. For more detailed information, see "Chapter 2. eBookMan® Desktop Manager".
Franklin makes these core applications available from the Installation CD and with each OS download:
The Franklin Reader application opens and navigates books formatted as Franklin Universal Binary (.fub) files. Use Franklin Reader to read Bibles, reference material, dictionaries, translators and other books.
The Mobipocket Reader opens and navigates eBooks, eNews and eDocuments. The downloaded files must be sent to the eBookMan device, during which time they are converted for viewing on the Mobipocket Reader.
Should you prefer to listen to a book, you can do so with Audiobook Player. Audible® software powers the audio book listening features of eBookMan. You must download Audible Manager from www.auditble.com to transfer audio books to your eBookMan.
The Music Player application enables you to listen to downloaded music. The Desktop Manager converts MP3 files to an eBookMan music format before moving the files to the device. eBookMan stores personal information in several programs. Address Book organizes contact information, Date Book tracks appointments, ToDo Book lists tasks by priority, and Memo Book enables you to enter notes. Through Intellisync™ for eBookMan, you can synchronize your personal information to Microsoft® Outlook®.
Other applications include Voice Memo and Calculate. Voice Memo lets you record memos, and the calculator (Calculate) enables you to solve math problems.
After you install the OS and core applications, you can download content and other applications that you want to use in your eBookMan. Many companies on the internet provide applications and content that run on eBookMan. For more detailed information, see "Chapter 3. Synchronizing and Managing Contents".
This User's Guide explains how to operate eBookMan and describes all the features of the core applications. It is arranged as follows:
Getting Started
Chapter 1: Getting Started - Describes how to install the Desktop Manager, install batteries, connect your device to a PC, run the Desktop Manager, synchronize the OS and applications, calibrate eBookMan and set the date and time.
Chapter 2: eBookMan® Desktop Manager - Explains how to manage files in the Desktop Manager, how to move individual files to your device, and how to use the Mobipocket Web Companion.
Chapter 3: Synchronizing and Managing Contents - Explains how to manage files in the Desktop Manager and how to synchronize with your device.
The eBookMan Device
Chapter 4: Hardware Features - Describes the hardware features of your device and includes instructions on installing batteries, resetting the unit and caring for your product.
Chapter 5: The Launcher - Details the Launcher features and explains how to use menus, set preferences, use a password, assign categories and manage files.
Chapter 6: Data Entry - Shows how to enter characters in your device using both natural handwriting and the onscreen keyboard.
Content Applications
Chapter 7: Franklin Reader - This chapter describes the Franklin Reader and shows you how to move around in books and use the Menu and Search options.
Chapter 8: Mobipocket Reader - This chapter explains how to use MobiPocket Reader to view eBooks, eNews and eBooks and how to use the Mobi Web Companion.
Chapter 9: Audiobook Player - This chapter illustrates the various features of Audiobook Player and describes how to use the play, stop, fast forward and rewind functions, and how to use the menus.
Chapter 10: Music Player - This chapter highlights the features of Music Player and describes how to play, stop, fast forward, and rewind music files.
Organizer Applications
Chapter 11: Address Book - This chapter explains how to enter and view names, addresses, phone numbers and other contact information in Address Book.
Chapter 12: Date Book - This chapter shows you how to list appointments and the different ways to view the entered data in Date Book. It also explains how to set alarms.
Chapter 13: ToDo Book - This chapter demonstrates how to keep track of tasks with ToDo Book.
Chapter 14: Memo Book - This chapter shows you how to use Memo Book to list your memos.
Miscellaneous Applications
Chapter 15: Voice Memo - This chapter describes features of the program and details how to record and play memos, how to use the menus, and how to control the volume.
Chapter 16: Calculate - This chapter describes Calculate and its functions.
Appendix
A. Getting Updates - Explains how to install the Desktop Manager and update eBookMan software from Franklin's Web site.
B. Serial Port Connection - Provides steps for connecting your eBookMan device to a PC using a serial port.
C. MultiMediaCards - Describes how to install and use MultiMediaCards (MMCs) in your eBookMan device.
D. Troubleshooting - Offers solutions to problems you may encounter while using the Desktop Manager or your eBookMan device.
E. Glossary - Lists and defines terms.
F. Legal Information - Includes specifications, copyright, trademarks, warranties, and FCC notice.
Index
Provides an alphabetical list of entries to help you locate information in the manual.
Support
Most programs come with online Help. This manual describes all the features of the various programs in detail. Should you require further technical support in the United States or Canada, visit web site www.franklin.com/ebookman and follow the link to the support screen or call (609) 386-8997 between 9AM and 5PM EST Monday through Friday. If you require further technical support outside of the United States and Canada, please use the following contact information:
Australia franklin_book@one.net.au
Belgium infotech@franklinse.com
0900 10.388
France infotech@franklinse.com
0825 309 319
Germany & Austria support@franklingmbh.de
498990899116
Luxemburg & Netherlands infotech@franklinse.com
32 70 22.32.32
Mexico fepmexico@compuserve.com
018007105938
Switzerland support@uhu.ch
41 1 2403360
United Kingdom info@franklin-uk.co.uk
08003285618
About Screen Illustrations
Some screen illustrations in this user's guide may vary slightly from what you see on the device. This does not mean your eBookMan is malfunctioning.

GETTING STARTED
1. Getting Started

Note:
For a seamless installation of your Desktop Manager and OS for eBookMan, it is best to access your Internet connection and close all other programs before beginning the process.
AOL users MUST have their connection open.
The following seven step process gets you started using your eBookMan device. You must follow the steps in the order they appear.
I. Install the eBookMan Desktop Manager on your PC.
II. Install batteries in your eBookMan device.
III. Connect your eBookMan device to your PC.
IV. Start the Desktop Manager on your PC.
V. Synchronize the eBookMan Operating System (OS) and core applications with your eBookMan device.
VI. Calibrate your eBookMan device.
VII. Set the date and time on your eBookMan device.
Once you set up your eBookMan device, you must register to receive the free content that comes with your model.
Registration is also necessary if you wish to update the OS and core applications at a later date.
I. Install eBookMan® Desktop Manager
To install the eBookMan® Desktop Manager from the Installation CD, follow these steps.
- Insert the Installation CD into the CD-ROM drive on your PC. The Franklin eBookMan Setup screen appears.

If this screen DOES NOT launch automatically, follow these steps.
From your PC desktop, double-click My Computer, and
- Double-click the CD drive (EbmlInstall).
- Click a flag to select the corresponding language.
Note: You must have Windows for the language you choose.
- Click the Install eBookMan Desktop Manager and Device Drivers button.
Note: You may need to install the USB drivers from the usbdriver directory on the Installation CD.
Note: If you have not used the USB port on your PC, it may be disabled. You must enable the USB port in the BIOS. Consult your computer manufacturer's documentation for details.
- Follow the instructions on the screen to install the program.
- Once installation is finished, click the Exit button to close the Franklin eBookMan Setup screen.
You may be prompted to restart your computer.
II. Install Batteries
Your device requires two AAA batteries. You must insert the batteries before connecting your device to a PC. To install batteries, follow these steps.
- Push the tab on the battery cover, snap the battery cover open and lift it off.
- Insert two AAA batteries following the + / - markings in the battery compartment.
In the upper half of the compartment, the positive (+) end of the battery (the end with the bump) goes against the spring. In the bottom half of the compartment, the negative (-) end of the battery (the flat end) goes against the spring.
- Replace the battery cover.

See also:
For more information on the battery indicator, see "Chapter 5. The Launcher" on page 67.
Your eBookMan powers on, and the tour begins. Tap the introductory sentence in the language you want to view the tour. It ends with a picture of the device with an arrow. The tour appears only after the device is left without battery power for more than five minutes or when a hard reset is performed.
Replacing Batteries
When eBookMan is on, a battery indicator appears in the Status bar of the Launcher. The battery indicator is a graphic that shows the energy left in the batteries. Replace batteries when the battery indicator runs low.
It is best not to wait for the indicator to empty. Should the battery power run too low, the unit will start up when you press On/Off but will then shut off automatically. When this happens, please replace the batteries immediately.
- Turn the device off.
Warning: If you change your batteries when the device is on, your device will reset and you will lose your data.
- Attach the eBookMan protective cover to the device and turn the device over.
Note: When changing batteries, make sure the device is not on a hard surface. If the On/Off button is pressed accidentally, your data will be lost.
- Follow the steps under "Install Batteries."
Warning: To prevent data loss, synchronize often to back up your data, and take no more than one minute to replace the batteries. It is best to replace the batteries as soon as the low battery warning appears. If your unit does not power on or stay on, please replace the batteries.
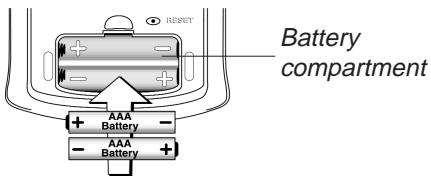
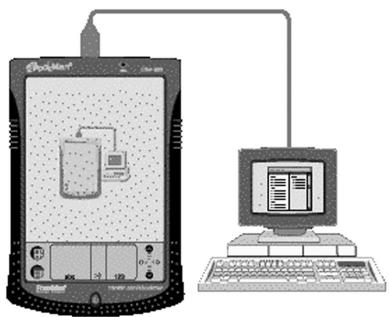
III. Connect eBookMan to a PC
eBookMan has a built in USB port and comes with a cable or cradle to connect it to your desktop or laptop computer. If you do not have a USB port, a USB-to-serial connector can be purchased from www.franklin.com/ebookman/accessories.asp or your local retailer.

See also:
For more information on connecting your device using a serial connector, see "Appendix B. Serial Port Connection" on page 207.
Important: A serial port is required for Windows NT users.
Cable Users
Plug one end of your cable into the USB port on your device and plug the other end into a USB port on your desktop or laptop computer.
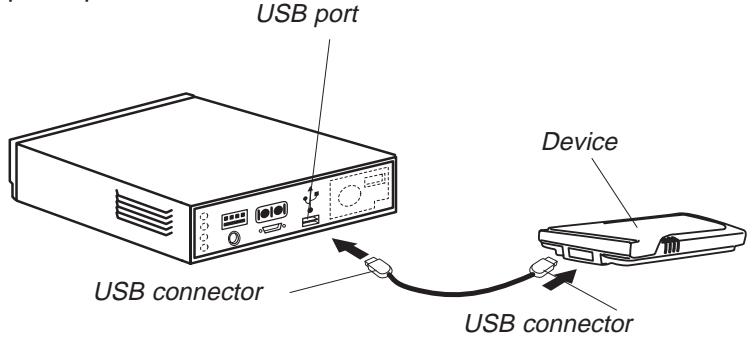
Cradle users
Plug your device into the cradle. Plug the USB connector into a USB port on your computer.
IV. Start the Desktop Manager
- On your PC, double click the desktop shortcut or click Start|Programs|Franklin Electronic Publishers|BookMan Desktop Manager.

You can change the connection configuration at any time from the Desktop Manager. Click Setup | Connection..., and the Connection Configuration dialog box appears.

The Connection configuration dialog box appears. By default, the Communication Method is set to USB - Universal Serial Bus.
- Click the arrow to display the list of connections.
- Select the port you want to highlight it.
You can click Cancel to exit the dialog box without saving changes.
- Click OK to save the changes.
The Connection view appears. For more information about the views and menus in the Desktop Manager, see "Understanding the Views" on page 30.
V. Synchronize the OS and Applications
The Installation CD contains the OS and core applications.
When you run eBookMan Desktop Manager for the first time, it automatically unpacks and synchronizes the OS and core applications.
The following dialog box appears.
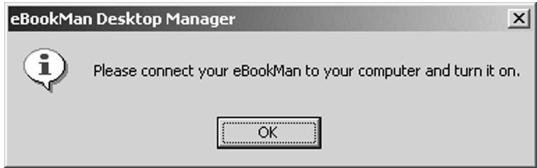
- Verify that your eBookMan device is properly connected and turned on.
- Click OK.
The following dialog box appears.
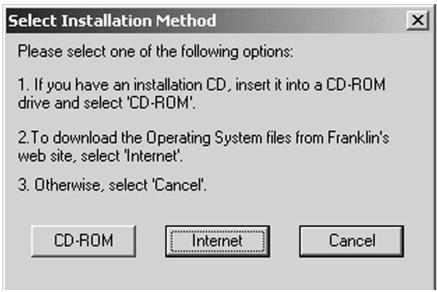
- Click CD-ROM to retrieve files from the Installation CD. The following dialog box appears.

- Click OK to unpack the OS and applications. The Desktop Manager connects to www.franklin.com and authenticates your eBookMan software.
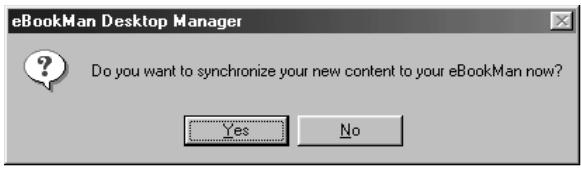
- Click Yes to send the OS and core applications to eBookMan.
If your eBookMan device requires a firmware update, a warning dialog box appears.
If no update is necessary, a status dialog box appears.
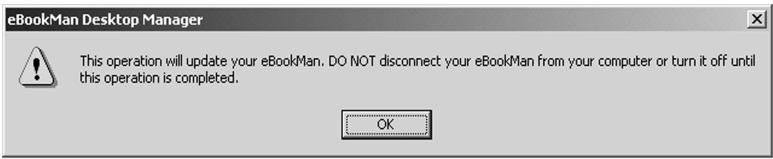
- Click OK. One or more status dialog boxes appear, indicating that files are being sent to eBookMan.
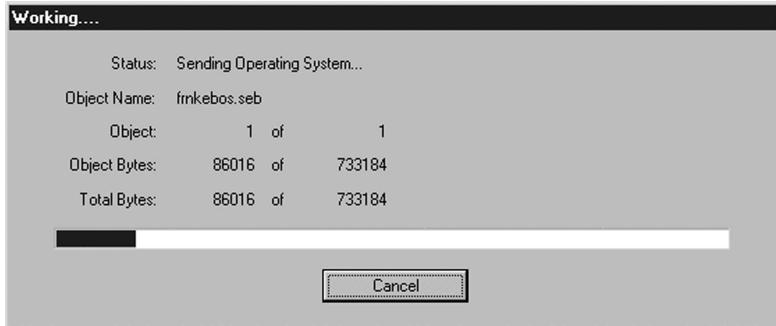
Synchronizing will take approximately 4-6 minutes with a USB connection.
When the process is complete, the following dialog box appears.
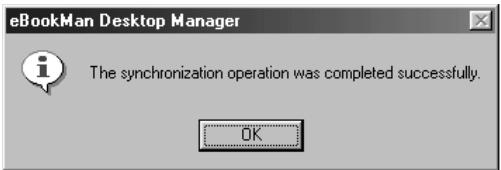
- Click OK to end synchronization.
- Disconnect your eBookMan device from your PC.
What eBookMan is doing . . .
During the synchronization process, you may encounter the following graphics on the eBookMan touch-sensitive screen:

eBookMan is communicating with your PC.

eBookMan is busy.

eBookMan is connected to a PC, the Desktop Manager is running and detects eBookMan.

Synchronization is not complete.

eBookMan is connected to a PC but the Desktop Manager is not running.
VI. Calibrate your eBookMan
After synchronization, follow these steps.
- Disconnect eBookMan from your PC.
The calibration screen appears after a few seconds.
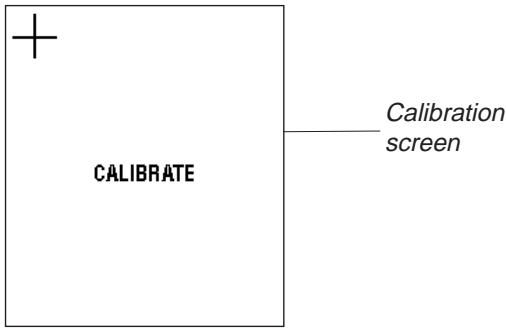
The Calibration screen enables you to set reference points by which eBookMan determines the accuracy and precision of the touch-sensitive screen.
- Using the stylus, tap the intersection of the crosshairs as they appear in each corner of the screen.
When the screen is calibrated, the message, "Please set the date and time" appears on the screen.
- Tap OK.
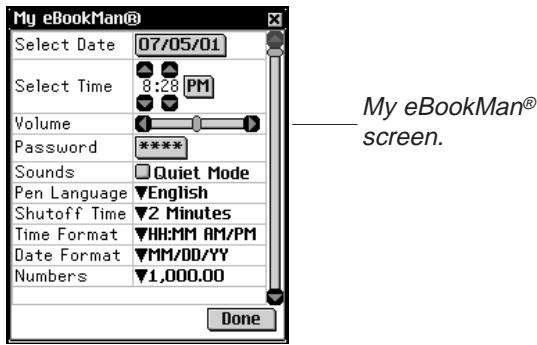
The My eBookMan® screen appears.

Note:
The calibration screen appears each time you perform a hard reset, system restart or pen calibration. For more information about a hard reset, see "Resetting the Device" on page 64. For more information about a system restart, see "Performing a System Restart" on page 73. For more information about pen calibration, see "Using the Launcher Menu" on page 68.

See also:
For more information about My eBookMan, see "Changing eBookMan Settings" on page 70.

Note:
The date and time appear on the Status bar in the Launcher. For details about viewing the date, see "Chapter 5. The Launcher" on page 67.
VII. Set the Date and Time
The OS and organizer applications use the date and time settings to operate properly.
Setting the Date
To set the date, follow these steps.
- From My eBookMan, tap 01/01/01 next to Select Date. The Select Date screen appears.
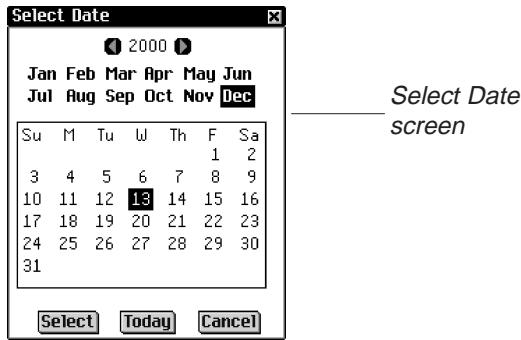
- Tap or to select the year.
- Tap the month and day.
You can tap Cancel to return to My eBookMan® without saving your changes.
- Tap Select to save changes and return to My eBookMan®.
Setting the Time
To set the time, follow these steps.
- From My eBookMan®, tap 📦 and 👠 next to Select Time to change the hour and minute.
- Tap to toggle between AM and PM.
- Tap Done to go to the Launcher.
Registering Your eBookMan Device
The Desktop Manager enables you to register your device through the Internet. You must register to download any free content that comes with your eBookMan. You also can get samples of eBooks, music, and audiobooks. To register from the Desktop Manager, follow these steps.
- Open your Internet connection on your PC.
- Connect eBookMan to your PC.
- Turn on your eBookMan device.
- Start the Desktop Manager.
- Click WebRegister.
- Follow the instructions on the screen to create a Franklin account and download content.

Important!
Always write your password down and keep it in a safe place.
You must enter your password each time you visit your Library of titles and content on Franklin's Web site.

2. eBookMan® Desktop Manager
eBookMan Desktop Manager is the PC software program that transfers applications and content to your eBookMan device.
You must install the Desktop Manager on your PC before using eBookMan. For information about installation, see "Chapter 1. Getting Started" on page 18.
This chapter describes the Desktop Manager views and menus, the eBookMan Monitor and the Mobipocket Web Companion. It also provides instructions for uninstalling the Desktop Manager.
The Desktop Manager consists of a Menu bar, Toolbar, Status bar, and a view that represents your eBookMan and the PC.
Use the Menu bar, Toolbar, and Status Bar as you do in other Windows-based programs.
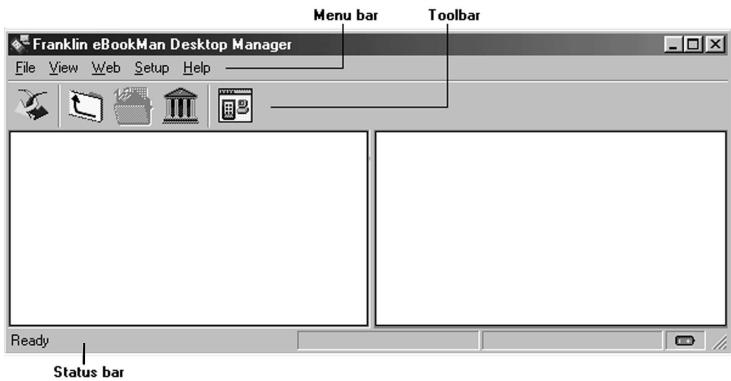
The Toolbar consists of the following:

Moves files from the Contents pane to the Device pane and synchronizes personal information between your organizer programs on the PC and on the eBookMan.

Backs up one folder.

Displays files in the Contents folder.

Displays files from the Library folder in the Contents pane.

Switches from the Connection view to the Contents view.

Switches from the Contents view to the Connection view.

See also:
For more information on synchronizing and managing files using the Desktop Manager, see "Chapter 3. Managing & Synchronizing Content" on page 39.

See also:
For more information about the Contents folder and Library folder, see "Directory Structure" on page 40.

Note:
By default, the Connection View appears after you set the connection configuration.
Understanding the Views
The Desktop Manager uses two views: Connection and Contents.
In the Desktop Manager, click to switch from the Connection View to the Contents View. Click to switch from the Contents View to the Connection View.
Connection View
If the Desktop Manager detects the eBookMan device, the image shows the connection.
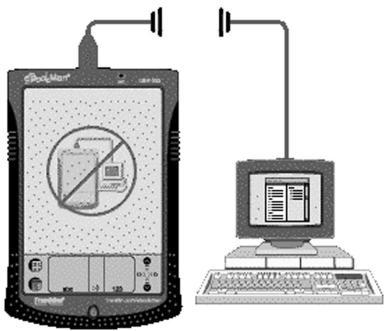
If the Desktop Manager does not detect eBookMan, the image shows that the device is not connected to your PC.
Contents View
The Contents View uses two list panes to organize and display files stored on your PC (Contents pane) and content stored in your eBookMan device (Device pane).
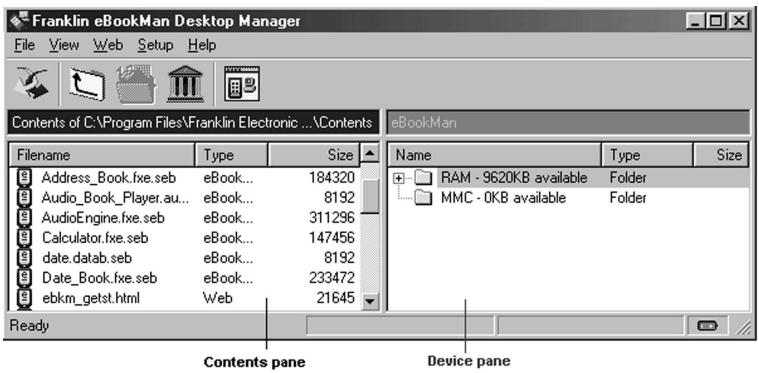
Contents Pane
The Contents pane contains the file structure on your PC.
Similar to Windows Explorer, this pane shows all files and folders in the selected directory. You can right click on a file or folder to access a corresponding context menu.
Folders listed in the Contents pane have the following context menu:
Open Opens a folder. You can also double click on the folder icon or name to open it.
Files listed in the Contents pane have the following context menu items:
Send to Sends content to the device. You can also eBookMan double click on the file name to send it.
Move to Moves the highlighted file from the current Library Folder folder to the Library folder. When you move a file to the Library folder, the file no longer appears in the directory from which it was moved.
Copy to Copies the highlighted file to the Contents
Contents Folder folder. When you copy a file, the original file remains in the current directory.
Unpack Expands a zipped secure eBookMan (.seb) file.

See also:
For a list of all file types and extensions that your eBookMan device recognizes, see "File Types" on page 39.

Note:
All synchronized files appear under the RAM folder in the Device pane. For more information about MMCs, see "Appendix C. MultiMediaCards" on page 209.
Delete Deletes a file from the Desktop Manager. Note that this option removes a file from the program and from your PC. Use caution when deleting files. There is no way to restore them once deleted.
Properties Displays the Properties for File dialog box.
Device Pane
The Device pane shows two folders: RAM and MultiMediaCard (MMC). The RAM folder contains the content files that appear in memory on the connected eBookMan device. The MMC folder contains the content files that appear on the MMC contained in the connected device. By default, content is moved to the RAM folder.
This pane may also contain status messages, for example, "Waiting for eBookMan." You can right click on a file or folder to access a corresponding context menu.
Folders listed in the Device pane have the following context menu:
Properties Displays the Folder Properties dialog box.
Files listed in the Device pane have the following context menu items:
Send to PC Sends a file from the device to your PC.
Send to PC Sends a voice recording from the device to as .WAV file your PC in *.wav format.
Move to MMC Moves a file on the device from RAM to MMC. This option is active only when an MMC is installed in eBookMan.
Move to RAM Moves a file on the device from MMC to RAM. This option is active only when an MMC is installed in eBookMan.
Delete Deletes the existing file from your device. You must confirm the deletion by clicking OK. Click Cancel to exit without deleting.
Properties Displays the properties of the selected file in the Title Properties dialog box.
Managing the Panes
Only one pane is active at a time. The title bar of the active pane is highlighted. To activate the other pane, click anywhere in it. To change the width of the panes, drag the divider. To switch the position of the panes, click the View menu and then select Switch Panes.
Using the Menu
The eBookMan® Desktop Manager uses five menus: File, View, Web, Setup and Help.
File Menu
Use the File menu to open, move and delete files on your PC. You can also move and synchronize content to your eBookMan device, and designate the folder or folders to store eBookMan content, view file properties, and close the program.
Synchronize
Synchronizes all files between the current Contents directory and your eBookMan device. Synchronizes data from an organizer program, such as Microsoft Outlook® with the data in the organizer programs on your eBookMan device. Also synchronizes audiobooks, if AudibleManager® is installed.
Send to eBookMan
Moves a highlighted file from the Contents pane to the Device pane.
Send to PC
Moves a highlighted file from the Device pane to the Contents pane.
Move to Library Folder
Moves a highlighted file to the Library folder. When you move a file to the Library folder, the file no longer appears in the directory from which it was moved.
Copy to Contents Folder
Copies a highlighted file to the Contents folder. The original file remains in the directory from which it was copied.
Unpack Delete
Expands a zipped *.seb file.
Removes a highlighted file or folder. Note that deleting files from this program can remove files from the eBookMan device and the file manager on your PC. Use caution when deleting files.

Note:
The eBookMan ID is also available from the Launcher menu. For more information, see "Using the Launcher Menu" on page 68.
Properties Displays the properties of the highlighted file: name, type, size, publisher, and security.
Open Opens a highlighted folder.
Change to Changes the directory in the Contents pane Contents Folder to the Contents folder.
Change to Changes the directory in the Contents pane Library Folder to the Library folder.
Change Folder Changes the folder displayed in the Contents pane.
Change Sync Changes the folder to which content is downloaded from the internet and from which content is synchronized to eBookMan.
Exit Closes the Desktop Manager.
View Menu
Use the View menu to see information about your device, display the Toolbar, switch the panes, and refresh the information in the current pane.
Device Info Displays the eBookMan Information dialog box.
Toolbar Displays or hides the Toolbar. By default, the Toolbar is displayed.
Switch Panes Switches the Contents and Device panes. The Contents pane is the default left pane and the Device pane is the default right pane.
Refresh Reloads the active pane. The active pane has a highlighted title bar. This option refreshes the display to include the most up-to-date information for the active pane.
Web Menu
The Web menu gives you direct access to the eBookMan page on Franklin's Web site. From this site, you can register your device, browse and purchase titles, and get product support. If your web browser is not set up for automatic Internet connection, you will be prompted to connect to the Internet.
| My Updates | Goes to the page on Franklin's Web site where you can check for and download newer versions of the Desktop Manager and OS and applications. |
| My Download Library | Goes to your eBookMan account at Franklin's Web site. |
| Download OS/ Applications | Automatically downloads the OS and appli-cations from Franklin's Web site if the OS is a later version from the one you have. |
| eBookMan Home Page | Goes to the eBookMan home page at Franklin's Web site. |
| Product Support | Goes to technical support at Franklin's Web site. |
| Purchase Titles | Goes to Franklin's eBookStore. |
| Register | Enables you to register your eBookMan device online at Franklin's Web site. |
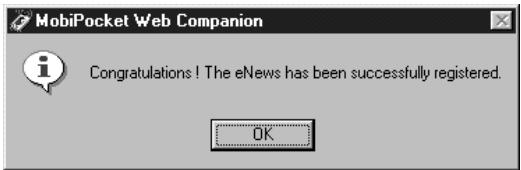
| Mobipocket Web Companion | Opens the Web Companion, which enables you to select eNews to download and convert documents to an electronic format that Mobipocket Reader can display. |
Setup Menu
Use the Setup menu to specify the port that connects your device to a PC and to configure your settings for the synchronization of your organizer data with a PC organizer application.
Connection. . . Displays the Connection configuration dialog box and enables you to designate the port.
Intellisync... Enables you to change settings for synchronizing data between a PC organizer application and the organizer programs on your eBookMan device.
Install... Re-installs the operating system and program files from the eBookMan Installation CD.

Note:
Connect your eBookMan to your PC and turn your device on before selecting Download OS/Applications.

Note:
eBookMan Desktop Manager with IntellisyncTM supports synchronization with Microsoft Outlook. To sync with Microsoft Outlook Express 4.x, Lotus Notes 5.0, Lotus Organizer ^ 念 5.0, or Act! 2000^TM , purchase IntellisyncTM for eBookMan Upgrade at www.franklin.com /ebOOKman.
Help Menu
Use the Help menu to access help and get information about Desktop Manager and Intellisync™ for eBookMan.
Help Topics Displays online help for the Desktop Manager.
About eBookMan Displays version and copyright Desktop Manager information for the Desktop Manager.
About Intellisync Displays version and copyright information for Intellisync™ for eBookMan.
eBookMan Monitor®
eBookMan Monitor® is the part of the Desktop Manager that runs in the system tray on your PC. When the monitor is active,
shows in the system tray. Right-click the icon to access the eBookMan Monitor® menu:
Open eBookMan Opens the Desktop Manager. Desktop
About eBookMan Shows version and copyright information for Monitor eBookMan Monitor®.
Exit Closes eBookMan Monitor
When connected through a USB port, eBookMan Monitor also provides power to eBookMan and changes color. You can use the device while it is connected.
Mobipocket Web Companion
The Mobipocket Web Companion is a PC program that enables you to download, update and synchronize electronic documents to eBookMan. Electronic documents include text files, newspapers, electronic books (eBooks), web pages (.htm and .html), and Palm documents (.pdb and .prc files).
The Web Companion also provides access to Mobipocket's Web site and includes a publishing feature that formats web and Palm documents for the Mobipocket Reader.
The Web Companion is installed on your PC with the Desktop Manager.
Access the Web Companion from the Desktop Manager by clicking Web|Mobipocket Web Companion.
Uninstalling the Desktop Manager
To uninstall the Desktop Manager, follow these steps.
- From your PC, click Start|Settings|Control Panel.
- Double-click Add/Remove Programs. The Add/Remove Programs Properties dialog box appears.
- From the Install/Uninstall tab, click eBookMan Desktop Manager.
- Click the Add/Remove... button.
- Follow the instructions in the Install Wizard to remove the application.
If the files are stored in the Audible, Contents, or Library folders, these folders will be left in the respective subdirectory. You must remove these manually.

See also:
For details about the Web Companion, refer to the online help that comes with the program. For information on how to use the Web Companion, see "Using the Mobipocket Web Companion" on page 51.

3. Managing & Synchronizing Content
This chapter describes using the Desktop Manager to manage content and applications using the directory structure, synchronize personal information between organizer applications on eBookMan and organizer applications on your PC and synchronize new content and applications between your PC and your device.
Managing Files in the Desktop Manager
Use the Desktop Manager to store all content and applications for eBookMan. Some applications can be used without content. For example, you can use the calculator (Calculate) without content. Other applications require content. For example, the Franklin Reader requires eBooks formatted as Franklin Universal Binary (.fub) files. Before you use the Franklin Reader, you must download an eBook and move it to eBookMan.
File Types
eBookMan recognizes most PC files. However, not all file types can be used in your eBookMan device. For example, video clips such as .vgm can only be used with a program that runs .vgm files. Files that are not recognized will not be transferred to eBookMan. File extensions may be in lower- or upper-case characters.
Content is any file that must be associated with an application to open it. Content files include, but are not limited to, the following types:
.htm or .html HyperText Markup Language file
.mp3 Music file
.txt Text file
.fub Franklin Universal Binary; the file extension for Franklin Reader books
A file formatted for handheld devices
.pdb A file formatted for handheld devices

See also:
For definitions of file types, see "Appendix D. Glossary" on page 212.

Important!
Cookies must be enabled in your browser to download content from the Franklin Web site.
To find instructions on enabling cookies, go to an Internet search engine and enter "enable cookies."
Applications are self-contained programs that may require content to run. Application files include the following types:
.seb Secure eBookMan binary; most application and content files downloaded from the Franklin Web site use the *.seb file extension
.fxe Franklin executable
Other file types are generated while using programs in eBookMan. For example, *.bmark files are created when you add bookmarks in the Franklin Reader. These files are synchronized when you click
Directory Structure
By default, eBookMan content is stored in the C:\Program Files\Franklin Electronic Publishers\eBookMan Desktop Manager\DataContents directory.
Note: If you designate a different directory during download, the Data directory and its subdirectories are placed there.
All files are downloaded and stored in the Contents folder. By default, the Data folder is also the place from which all files are synchronized (the sync folder). The Desktop Manager creates three folders under the sync folder: Contents, Audible, and Library.
You can change the location of this folder by clicking
File|Change Sync Folder and specifying a new folder location. Note that when you change the sync folder, the original directories remain. Use this feature to set up multiple eBookMan devices from one PC.
The Contents Folder
Use the Contents folder to synchronize files between your PC and eBookMan by clicking . When you click , the
Desktop Manager compares the files on your eBookMan to files in the Contents folder of the Desktop Manager. If the files on your eBookMan are more recent, the Desktop Manager copies the more recent files from eBookMan to the Contents pane on the PC and then copies the more recent files from the Contents pane on the PC to your eBookMan.
If you save content files in other directories, you must move or copy the file or files to the Contents folder before synchronization.
To copy a file to the Contents folder, locate the file in the Contents pane of the Desktop Manager and do one of the following:
- Right-click on the file name and select Copy to Contents Folder
or
- Highlight the file name and click File|Copy to Contents Folder.
Keep only files that you sync often in the Contents folder. Once files are synchronized, store them to the Library folder.
The Library Folder
Use the Library folder to store, organize, backup, and restore files after you sync them to eBookMan.
You can store and organize files by moving them to the Library folder. To move a file to the Library folder, locate the file in the Contents pane of the Desktop Manager and do one of the following:
- Right-click on the file name and select Move to Library Folder
or
- Highlight the file name and click File|Move to Library Folder.
Note: When you move a file to the Library folder, the file no longer appears in the directory from which it was moved.
You can organize files in the Library folder by creating subdirectories. Consult your Windows documentation for more information on creating and using folders.
Always backup content files and applications by moving them to the Library folder after you synchronize. You also can keep a copy of all files in the Contents folder.
If you lose data or an application becomes corrupt, you can restore the information to eBookMan from the Library folder.

See also:
For more information on removing files from eBookMan, see "Deleting Files" on page 83.
To restore files to eBookMan, follow these steps:
- Move all files from the Library back to the Contents folder.
- Click
The Audible Folder
The Desktop Manager uses the Audible folder to administer tasks from AudibleManager. Do not alter or delete the contents of this folder or its subdirectories.
Note: Audible files are added to and deleted from eBookMan through AudibleManager only.
Deleting Files
To delete a file from eBookMan, you must remove the file from both the eBookMan device and the Desktop Manager.
- From the Desktop Manager, locate the file in the Device pane.
- Right-click on the file you want to delete.
- Click Delete. Click No to cancel the deletion.
- Click Yes at the confirmation dialog box. When you delete a file, a message "File has been deleted" appears.
The file no longer exists on the eBookMan, but the file remains in the Desktop Manager. If you sync by clicking , the file will be copied back to your eBookMan device. To avoid this, you must delete the file from the Contents pane in the same manner.
Note: When you delete a file from the Contents pane, it is removed permanently from that location on your PC. If you mistakenly delete a file from the PC and the file remains on your eBookMan, you can restore the file to your PC by synchronizing.
Using Intellisync™
Intellisync is the program that allows you to import, export or synchronize files between your PC organizer program and your eBookMan organizer programs. Intellisync™ for eBookMan, included on the Installation CD and in the full download, supports MS Outlook® 98 and higher. Intellisync™ for eBookMan Upgrade, which can be purchased separately at Franklin's accessories Web page, supports Microsoft Outlook Express® 4.x, Lotus Notes® 5.0, Lotus Organizer® 5.0, and Act! 2000™.
The PC organizer applications can be synchronized with the following programs located in your eBookMan device:
Address Book
- Date Book
- ToDo Book
Memo Book
Data can be transferred in the following ways:
- Imported from your PC organizer application to the eBookMan.
- Exported from the eBookMan to your PC organizer application.
- Synchronized so that the most up-to-date information is placed in both locations.
To synchronize your organizer, follow these steps.
- Configure your organizer programs.
- Change advanced settings.
- Synchronize your personal information.
Configuring Your Organizer Programs
For your organizer data to be included in a synchronization, the eBookMan organizer programs must first be aligned with your PC organizer application. You must select the eBookMan organizer programs and the PC organizer applications that you want to synchronize. To configure the synchronization settings, follow these steps.
- From the Desktop Manager, click Setup|Intellisync.
You see the Intellisync for eBookMan Sync Options dialog box.
- Click the box next to the eBookMan organizer program you want to synchronize with your PC organizer application.
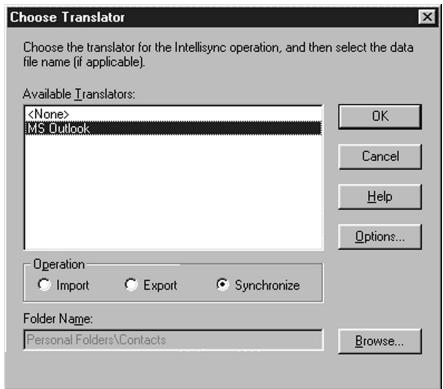
Note: The Choose Translator dialog box appears the first time you select a translator. During subsequent configuration, you must check the box next to the organizer program you want to edit and click the Choose button.
- Click your PC organizer application from the list of available translators.
A PC organizer application file is assigned to the program you are aligning.
- Click the check box next to the operation you want to perform.
Import Imports data from your PC organizer application to the organizer program on eBookMan.
Export
Exports data to your PC organizer application from the organizer program on eBookMan.
Synchronize
Synchronizes data between the organizer program on eBookMan and your PC organizer application.
Click Options to change settings used when exchanging data with your PC organizer application or click Browse to map an alternate file or folder to this application.
Click Cancel to exit without saving any changes.
Click Help for additional information.
- Click OK to accept your changes and return to the Intellisync for eBookMan Sync Options dialog box.
- Repeat this process for each organizer program you want to include in the synchronization.
The eBookMan organizer programs you want to include in the synchronization are now connected to your PC organizer application.
Click the Write to log file check box to create a synchronization log file.
Click Cancel to return to the Desktop Manager without saving your configuration settings.
- Click OK to save your configuration settings.
When you are finished configuring the applications, edit the advanced settings.
Changing Advanced Settings
Each eBookMan organizer program contains advanced settings, such as confirmation, conflict resolution, and field mappings. These include program specific parameters and fields to be mapped for the data exchange.
Note: These setting vary by eBookMan organizer program. Once you have selected a translator for an organizer program, you can change the advanced settings.
- In the Intellisync for eBookMan Sync Options dialog box, click the eBookMan organizer program for which you want to change advanced settings.

Important!
PC organizer applications may have longer fields than eBookMan can accept.
When the data in your PC organizer application fields exceeds the number of characters allowed in the corresponding eBookMan organizer program fields, the portion of the data that exceeds the field limit will not be copied.
If you edit the fields in eBookMan, the eBookMan data will be considered the newer data, and your PC organizer application data WILL BE OVERWRITTEN when you next sync.
If you do not edit those fields in eBookMan, your PC organizer application data WILL NOT BE OVERWRITTEN.
2. Click Advanced.


Note:
If you delete an eBookMan organizer database from your eBookMan device, you must synchronize to replace the database. An import will not successfully replace the data on your device.
You see the Advanced Settings dialog box. This dialog box differs for each eBookMan organizer program.
- Click the tab containing the settings you want to change.
For details about the settings, click Help.
- To edit field mappings, clickField Mapping.
You see a dialog box indicating the file or folder the field names are retrieved from. This is the file or folder assigned to the organizer program when your PC organizer application is selected in the Choose Translator dialog box.
- Click OK to accept this file or folder.
Click Cancel to map fields without refreshing the information from the file or folder.
Click Help for additional information.
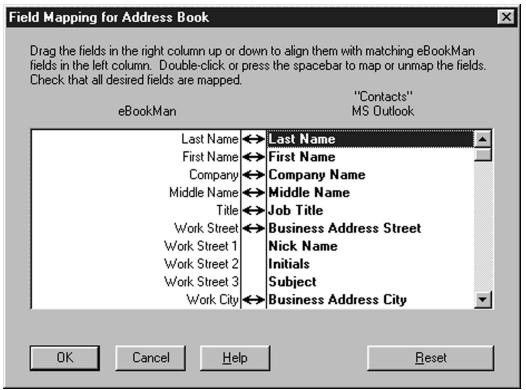
You see the Field Mapping dialog box.
- Map the fields for the organizer program.
Your PC organizer application fields are bold and listed in the right column. Click and drag a field in the right column up or down to align it with a matching eBookMan application field in the left column. Select a field, then double-click or press the space bar to map or unmap the fields. Mapped fields contain a double arrow between the columns. You can also click in the middle column to map or unmap fields. Click Reset to return the field mapping to the default settings.
Click Cancel to exit without saving your changes.
Click Help for additional information.
- Click OK to save your changes.
Repeat this process for each eBookMan organizer program for which you want to change advanced settings.
Special Considerations
All available PC organizer applications contain default field mappings for the synchronization of data with your eBookMan.
There are some field mappings, however, that you are required to map manually.
For accurate synchronization in the Address Book, the following fields must be mapped in the programs below.
- Microsoft Outlook users must map the following fields: Title (eBookMan) Profession (Outlook)
Note: By default, Job Title in Outlook and Birthday in eBookMan are not synchronized. - Lotus Notes 5.0 users must map the following fields: Home Telephone 2 (eBookMan) Home Fax (Lotus Notes 5.0)
- Lotus Organizer 5.0 users must map the following fields: WWW Page (eBookMan) Business URL (Lotus Organizer 5.0)
Work Telephone 2 (eBookMan) Business Assistant (Lotus Organizer 5.0)

Note:
Personal information from an organizer program on your PC is synchronized to eBookMan only after you configure Intellisync.
Synchronizing Personal Information
To synchronize personal information from the Desktop Manager, click or click File|Synchronize.
Note: For proper synchronization, make sure that the eBookMan organizer applications you want are selected.
Adding New Content and Applications
After the initial synchronization, you can add individual files to eBookMan at any time. These files can be either content or applications.
Getting Content and Applications
Many companies on the Internet provide applications and content that run on eBookMan. For applications such as advanced calculators, converters, and games, visit Franklin's Web site at www.franklin.com/estore. You also can search a list of thousands of eBooks, many of which are free, at Franklin's Web site.
Audiobooks can be found at www.audible.com. Other Franklin partner Web sites include, but are not limited to:
www.mobipocket.com
www.awe-struck.net
www.beiks.com
www.fictionwise.com
www.pankhurst.com
www.thewisdomkeeper.com
Any MP3, HTML, text file or PDB (Palm Database) file can be added to eBookMan. To find these file types, use your favorite search engine. Save the file to your PC and then synchronize the file to eBookMan.
Synchronizing Content and Applications
The synchronization process moves files between your eBookMan and the PC. It also moves data between your personal information manager (such as Microsoft Outlook) and organizer programs on eBookMan (such as Date Book).
When you click, the Desktop Manager does the following.
- Compares the files in the Device pane (on eBookMan) and Contents pane (on your PC).
Note: Some files available at www.franklin.com/ebookman are downloaded to the Desktop Manager in a compressed format. During synchronization, zipped files are identified. You will be prompted to unpack each file and synchronize again. To unpack a zipped *.seb file, double-click the file or go to File|Unpack.
If a file in the Device pane shares the same name as a file in the sync folder, the older file is overwritten.
- Uploads unique and changed files from the Device pane (eBookMan).
- Downloads all files from the sync folder on your PC.
- Synchronizes personal information (if Intellisync is configured).
- Synchronizes audio books through AudibleManager® (if audio books are detected and AudibleManager® is set up).
To move individual files, except audio books, between eBookMan and the PC, do one of the following things:
- Drag individual files between the Contents pane to the Device pane.
- Double click a file in the Contents pane.
- Right click a file and click Send to eBookMan (in the Contents pane).
Music Files
The Desktop Manager converts MP3 files to the eBookMan music format and gives you a destination choice (RAM folder or MMC folder, when available) before sending the file to your device. To synchronize individual music files, follow these steps:

Note:
Before synchronizing, always make sure your eBookMan device is connected properly to your PC and turned on.

Note:
The amount of time it takes to synchronize a file or files varies by the type of file, the size of the file, the type of port, and the file destination - RAM or MMC.
- From the Desktop Manager, locate the file in the Contents pane.
- Send the file to eBookMan.
- Click OK.
You see a dialog box that shows the progress of the conversion. You can click Cancel to stop the conversion.
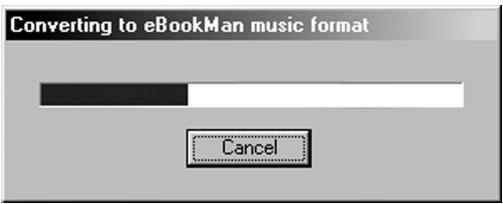
When conversion is complete, a *.seb file with the same name appears in the Contents pane.
If there is no MMC in your eBookMan, you see a message stating that the file was sent to eBookMan.
If the Desktop Manager detects an MMC in your device, the Select Destination dialog box appears.
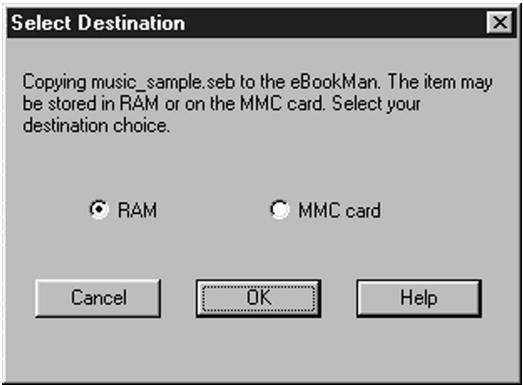
- Click the destination you want.
- Click OK.
You see a dialog box that shows the progress of the synchronization.
Click Cancel to stop the file from being moved to eBookMan.
Audiobooks
Audiobook files are managed through AudibleManager®. You must download this program and purchase titles from
Audible.com® before you can synchronize audiobooks. To download audiobooks, follow these steps.
- Open your browser and go to www.audible.com.
- Follow the "Audiobooks" links to the AudibleManager® and install it on your PC.
Note: The Desktop Manager and eBookMan Monitor must be closed to install or upgrade the AudibleManager® software. The first time you use the AudibleManager® software, you must select eBookMan as your mobile device.
- Follow the instructions to activate eBookMan with Audible®, open an account, and purchase the titles you want.
- Connect your eBookMan to your PC and turn on the device.
- Open eBookMan Desktop Manager.
- Synchronize the content between the PC and your eBookMan.
Using the Mobipocket Web Companion
The Mobipocket Web Companion enables you to automatically update eNews from Mobipocket's Web site. It also enables you to publish documents such as Web pages so that images and links are maintained in the Mobipocket Reader.
Before using the Web Companion for the first time, you must connect your eBookMan device to your PC, start the Desktop Manager and then start Web Companion.
To start the Web Companion, do one of the following:
- From the desktop, click Start|Programs|Franklin Electronic Publishers|Mobipocket Web Companion.
or
- From the Desktop Manager, click Web|Mobipocket Web Companion.
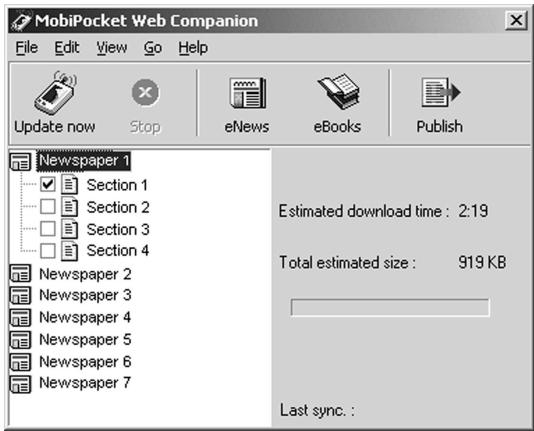
The main window of the Web Companion appears.

See also:
For more information about the eBookMan Monitor, see "eBookMan Monitor" on page 36.

See also:
For details about the Web Companion features, refer to the online help that comes with the program.

Note:
The Web
Companion will periodically update your eNews when you are connected to a local network.
Configure the Web Companion
To configure the Web Companion, follow these steps.
1. Click Edit|Configuration.
You see the Mobipocket Web Companion configuration dialog box.
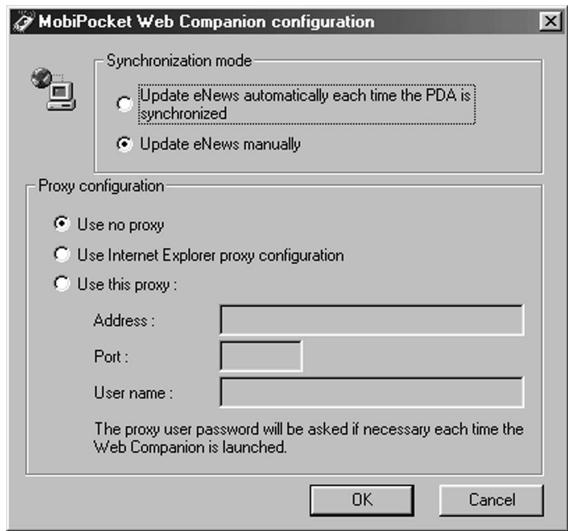
- Click the check box for the synchronization mode you want. The Manual update enables you to control when your eNews is updated. The Web Companion only updates eNews when you click
The Automatic update gets eNews from the Internet whenever you synchronize with your eBookMan device.
- Click the check box for the proxy configuration you want.
The Internet Explorer proxy is the default configuration.
If you are an AOL user, select Use no proxy.
If you access the Internet through a firewall where authentication is required, select Use this proxy and enter the necessary data in the Address, Port and User name fields.
Click Cancel to exit without saving configuration changes.
- Click OK to save the configuration.
Download Electronic Documents
Electronic documents formatted for the Mobipocket Reader are sorted into three categories:
- eBooks which include PRC and Palm DOC files.
- eNews which includes newspaper downloads that are formatted and synchronized using the Web Companion.
A list of default eNewspaper subscriptions are installed with the Web Companion.
- eDocs which include text and HTML files.
eBooks
The Web Companion does not display a list of eBooks. The Web Companion does, however, provide you with easy access to Mobipocket's Web site so you can download eBooks at your convenience. To download eBooks, follow these steps.
1. Click

(eBooks).
Your default browser is launched and you go to Mobipocket's Web page that lists eBooks.
- Browse the page and site to find the eBook you want.
In addition to eBooks from the Mobipocket Web site, any PRC or Palm DOC file can be added to eBookMan as an eBook.

Important!
Write your user name and password down.
You must enter your password each time you subscribe to different Newspapers at the Mobipocket Web site.
- Save the file or files to your computer.
Note: You must save these files to a directory other than the Contents folder (or sync folder) in the eBookMan Desktop Manager directory structure. If you attempt to sync by clicking without first formatting the file, an error message appears.
- Find the file on your PC.
- Right click the file.
You see the context menu.
- Click Send to eBookMan.
The file is formatted for your eBookMan device and saved as a *.seb file in the current sync folder.
Note: Although the file is formatted for your eBookMan, you must synchronize from the Desktop Manager to move the file to your eBookMan.
After you move the files to your eBookMan, these files are displayed in the eBooks category in the Mobipocket Reader.
eNews
To download eNews, follow these steps.
- Subscribe to the eNewspaper you want.
Additional subscriptions are available through the Mobipocket Web site.
a. Click

(eNews).
Your default browser is launched and you go to www.mobipocket.com/en/eNews/.
b. Browse the page and site to find the eNewspaper you want.
c. Click Add News.
You may be prompted to log on to the Web site. If so, enter a user name and password and then click OK.
The file automatically downloads to its proper destination and you see a confirmation dialog box.
d. Click OK.
Your Web browser stays active for you to download and install other eNewspapers.
e. Repeat these steps for each eNewspaper subscription you want.
- Select the sections of the eNewspapers.
a. Click next to an eNewspaper subscription to see the list of available sections.
b. Click the check box next to the sections you want.

c. Repeat this process for every eNewspaper you want to download.
- Click (Update now).
The Web Companion connects to the Internet and downloads the Web pages which are formatted for your eBookMan device and saved as *.seb files in the current sync folder.
Note: Although the files are formatted for your eBookMan, you must synchronize from the Desktop Manager to move the files to your eBookMan.

Important!
To retain the images and links in an HTML file, you must first publish it. See "Using Quick Publish" on the next page to learn how.
After you move the files to your eBookMan, they are displayed in the eNews category in the Mobipocket Reader.
To unsubscribe, click next to an eNewspaper you want and then either click File|Unsubscribe or right-click the eNewspaper and click Unsubscribe from the context menu.
eDocs
In addition to eBooks and eNews, you can download and read other file types. Mobipocket Reader supports text (.txt) and HTML (.html or *.htm) files. To download and format an eDoc, follow these steps.
- Save the file you want onto your PC.
- Find the file on your PC.
- Right click the file.
You see the context menu.
- Click Send to eBookMan.
The file is then formatted for delivery to your eBookMan device and saved as a *.seb file in the current sync folder.
Note: Although the file is formatted for your eBookMan, you must synchronize from the Desktop Manager to move the file to your eBookMan.
After synchronization, these files are displayed in the eDocs category in the Mobipocket Reader.
Move the Electronic Documents to eBookMan
After you download and format Mobipocket Reader content, synchronize the files to your eBookMan one of the following ways:
- In the Desktop Manager, click to synchronize all content.
-
Move individual files to your eBookMan in one of the following ways:
-
Drag individual files between the Contents pane to the Device pane.
- Double click a file in the Contents pane.
- Right click a file and select Send to eBookMan (in the Contents pane)
Using Quick Publish
Some files, such as Web pages, need to be published to maintain their images and links when viewed in Mobipocket Reader. To publish a Web page, do the following:
- Save the page to a folder on your PC.
-
Open Mobipocket Web Companion.
-
Click (Publish).
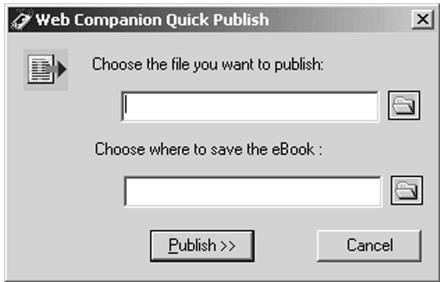
The Web Companion Quick Publish dialog box appears.
- Click the first
The Open dialog box appears.
- Find the file you want to publish and click Open.
- Click the second
The Save As dialog box appears.
- Find the directory you want to save the file in.
- Type a name for your file in the File Name field.
- Click Save.
- Click Publish.
The file is saved with a .prc extension.
You can now find the file in Windows Explorer and right-click it to see the context menu. Click Send to eBookMan. Follow the steps in "Move the Electronic Documents to eBookMan" on the previous page to move your file to your eBookMan device.

THE eBOOKMAN DEVICE
4. Hardware Features
This chapter introduces you to the controls and hardware features on your eBookMan. It also contains tips on caring for the eBookMan device and instructions for resetting it.
Front Panel

Warning!
DO NOT Connect eBookMan to a PC through the Headphone jack. Doing so may cause damage to your eBookMan the device.
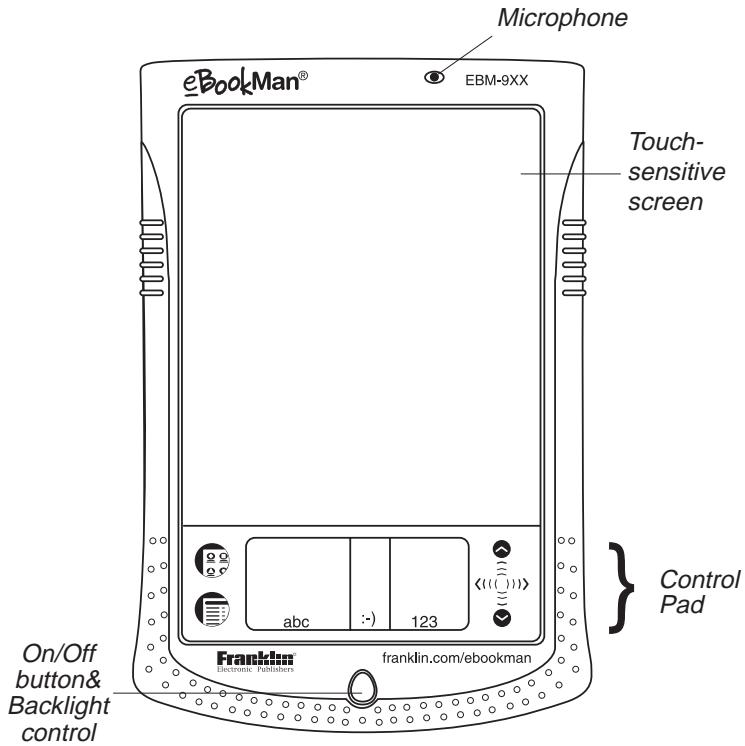
Microphone
Speak into this when recording voice memos.
Touch-sensitive screen
The display area for programs. Touch it with the stylus to make a selection or perform a command.
Control Pad
The area on the device that contains the Handwriting area, the Launcher and Menu icons and the scroll arrows.
On/Off Button & Backlight control
Press once to turn the device on. Press again to turn the device off. You can also control the backlight (in models with backlight screens) with this button. When the device is on, press and hold this button for approximately two seconds to turn on the backlight. Press and hold again to turn the backlight off.
Control Pad
The Control Pad is the area below the touch-sensitive screen where you can tap icons, write characters, or use the scroll area to control eBookMan.
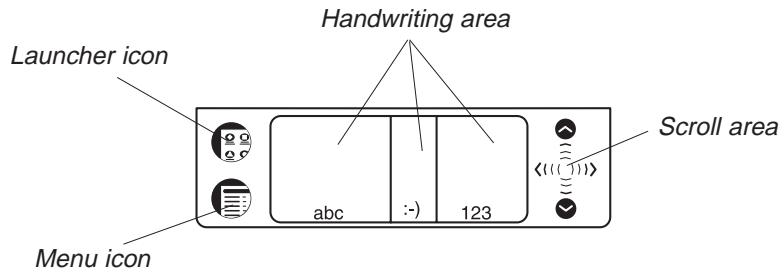
Scroll area
Use the scroll arrows or scroll lines to move up and down on the eBookMan screen.
Handwriting area
Write letters in the Letter input area (abc), punctuation in the Punctuation input area (· -) and numbers in the Number input area (123).
Menu icon
Tap this icon at any time to see the available menus.
Launcher icon
Tap this icon to return to the Launcher screen. Please see "Chapter 5. The Launcher" on page 67 for more information.

Note:
Use the backlight to view the eBookMan screen in dark areas.

Note:
eBookMan Earphones are sold separately at www.franklin.com/ ebookman/ accessories.asp. You can use earphones with a 3.5 mm plug and 8- 35 ohm impedance.

Note:
Use only the stylus made for eBookMan. Do not use a pen point or other tool to touch the screen.
Additional stylus sets can be purchased at www.franklin.com/ebookman/accessories.asp.
Back Panel
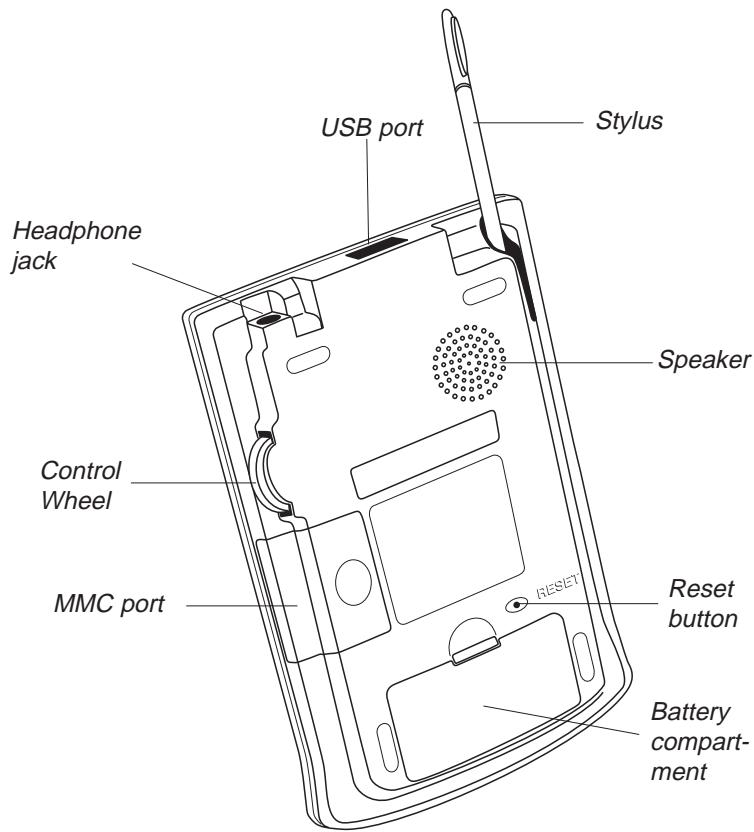
Headphone jack Plug your headphones or earphones in here when listening to audio books, music, or voice memos.
USB port Use this to make the connection with your cradle or cable.
Stylus Slide this tool out of the compartment and use it to touch the screen, tap the Control Pad, and write in the Handwriting area.
Speaker Amplifies sound from eBookMan. Please do not cover this when using the audio programs without headphones.
Reset button Use this button to reset and restart eBookMan. For more information, see "Resetting the Device" on page 64.
Battery compartment
MMC port
The device requires 2 AAA batteries. For more information, see "Install Batteries" on page 19.
Insert MultiMediaCards (MMCs) here. For more information, see "Appendix B. MultiMediaCards" on page 209.
Control Wheel
The circular control in the rear of the eBookMan that functions as an "Enter" key, a scrolling mechanism, or volume setting. In a program, push in the wheel to select the highlighted item. Rock the wheel to scroll one page when reading. Hold the wheel up or down to scroll continuously. Rock it to control the volume when listening. Hold the wheel up or down to change volume continuously.
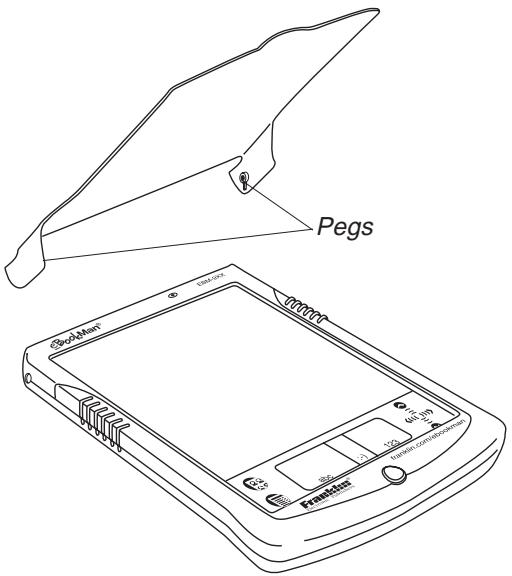
Cover
Your eBookMan comes with a hard plastic cover to protect the screen when the device is not in use. To attach the cover, insert the pegs on the cover into the holes on either side of the device. To detach the cover, gently snap the pegs out of the holes. We recommend that you keep the cover attached when you are not using your eBookMan.

Warning!
Please note that the Control Wheel rocks up and down and does not spin. Please do not force the wheel or you will damage the device.

Note:
Leather carrying cases can be purchased at www.franklin.com/ebookman/accessories.asp or your local retailer.

Important!
Keep a record of your serial number (on the back of the device) and eBookMan ID number (described in "Using the Launcher Menu" on page 68) in case your device is stolen or requires replacement.
Product Care
eBookMan is designed to be light, compact and durable.
However, it is an electronic device and must be treated carefully. Putting unnecessary pressure on it or striking the device against other objects can cause damage.
In order to avoid damage to your eBookMan, please:
- Keep the device covered when you are not using it. This will protect the screen from being broken, scratched or marred in any way.
- Do not drop, crush, bend, or apply excessive force to the device.
- Do not expose eBookMan to moisture, extreme temperatures or other adverse conditions. Avoid storing it in damp, humid or wet places. It is not waterproof.
- Clean the device by wiping with a soft, dry cloth. Do not use harsh chemicals.
- Do not use instruments other than the stylus when touching the screen. Other instruments may scratch or damage the screen.
Resetting the Device
Occasionally, eBookMan may need to be reset to clear memory or repair software problems.
Soft Reset
In most cases a soft reset is sufficient. A soft reset does not affect programs or data. If a program is not performing as it should, you can perform a soft reset using one of the methods described below.
-
Reset from the Launcher menu.
-
Tap to go to the Launcher.
- Tap to see the Launcher menu.
-
Tap Restart system on the Launcher menu.
-
In the Ready for restart screen, tap Restart now.
-
Calibrate your unit and you return to the Launcher.
-
Reset from the back of the unit.
Should you be unable to access the Launcher menu, use the blunt end of a paper clip to gently press the reset button located on the back of the device just above the battery compartment.
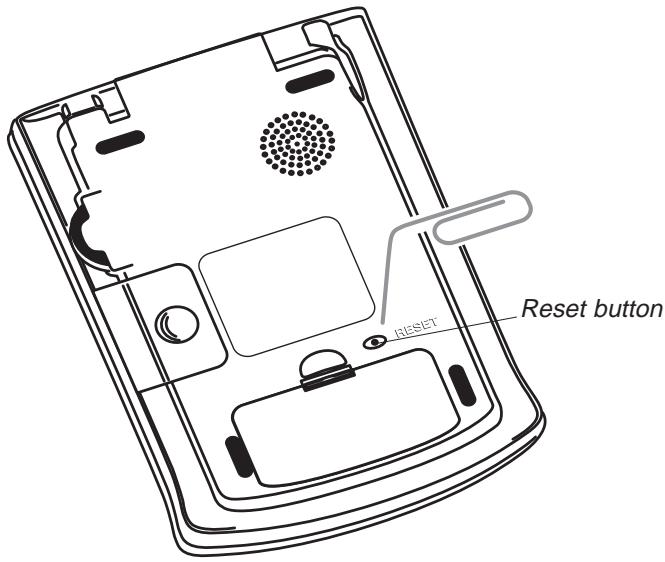
You hear a beep and eBookMan turns on.
Hard Reset
In the rare event that the data on the screen is corrupted, a program is not responding properly, or you forget your password, you will need to perform a hard reset. To do this, hold On/Off and then use a paper clip to press the reset button. Should you do a hard reset, you will need to download the program and content files to your device again. Please read "Synchronize the OS and Applications" on page 22 to learn how to load system files onto your device.

Warning!
After a hard reset, any stored data will be lost. Synchronize your data often so that you always have a copy on your PC.

5. The Launcher
This chapter details the features of the Launcher and provides instructions for performing tasks from the Launcher. After completing the steps in "Chapter 1. Getting Started," the Launcher appears on your eBookMan device.
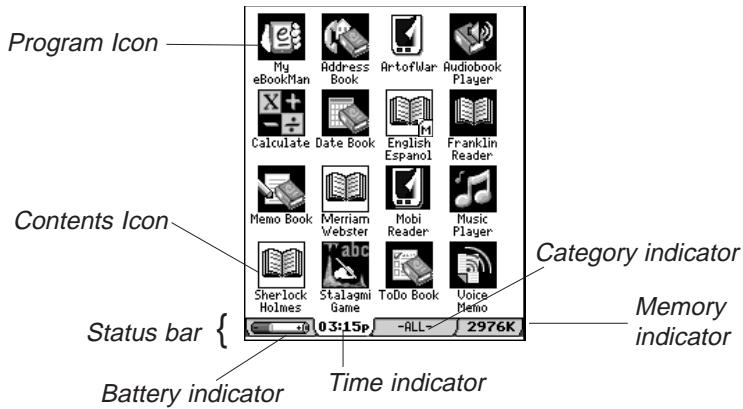
The Launcher is like the desktop on your PC. All programs and some content files, in RAM and in an installed MultiMediaCard (MMC), are represented by icons on the screen. Program icons, such as Date Book and Franklin Reader, appear on a dark background. Content icons, such as music and audio books, appear on a white background. Program and content icons from an MMC have an M on the bottom right corner.
The area located at the bottom of the Launcher is the Status bar. It contains the following items:
Battery indicator Displays a graphic of the energy left in the batteries. Tap the Battery indicator to view the percent of remaining battery life.
Time indicator Displays the time. Tap the Time indicator to view the date. The date appears for approximately five seconds.
Category indicator Displays the current category. Tap the Category indicator to access the Category menu. See "Using Categories" on page 78 for more details.
Memory indicator Displays the amount of memory available in RAM.

Note:
You can view 16 icons at a time in the Launcher. When there are more than 16 icons, a scroll bar appears. Tap the scroll bar to see more icons. You also can use the Control Wheel or the scroll area in the Control Pad to see more icons.

Note:
The Handwriting Guide is also available from most screens that support data entry.

Note:
For more information about MMCs, see "Appendix C. MultiMediaCards" on page 209.
Using the Launcher Menu
There are several options available on the Launcher menu. Tap

to see the following items.
Launcher menu
Handwriting Guide
Restart system
Pen Calibration
Set Contrast
Disable Password
MMC Backup
Launcher Help
Active Programs
File Manager
About
Handwriting Guide Provides a quick, onscreen reference for Natural handwriting input. It shows all the supported letter styles. For more information about Natural handwriting, see "Chapter 6. Data Entry" on page 85.
Restart System Closes programs and files when your eBookMan device is unresponsive.
Pen Calibration Displays the Calibration screen and enables you to re-calibrate your eBookMan device. For details about calibration, see "Calibrate your eBookMan" on page 25.
Set Contrast Enables you to set the contrast on the screen. For more information, see "Setting Contrast" on page 69.
Disable Password Enables you to turn your password off or on. When no password is set, the menu item is greyed and inactive. When you set a password, Disable Password becomes active. Tap this menu item to disable the password temporarily. The menu item becomes Enable Password. To turn your password on again, tap Enable Password. For more information, see "Using a Password" on page 74.
MMC Backup Enables you to copy all files from your eBookMan to an MMC, restore files from an MMC to your eBookMan, or erase content on an MMC.
Launcher Help Displays onscreen help for the Launcher.
Active Programs Enables you to view and manage programs that are open. Programs can be closed quickly from this location to make memory available for other programs. For details, see "Opening and Closing Programs" on page 72.
File Manager Displays the name and size of all program and content files stored in RAM. Also enables you to move files into categories or remove files from your eBookMan device. For more information, see "Managing Files in eBookMan" on page 81.
About Displays the eBookMan ID, the version number of the eBookMan Operating System, the unique identifier of the device, and other information.
Setting Contrast
To set contrast in eBookMan, follow these steps.
- From the Launcher, tap
- Tap Set Contrast. The Set Contrast screen appears.
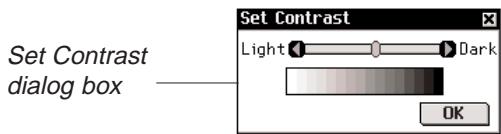
- Use the stylus to drag the slider or tap the arrows to increase or decrease the contrast. You also can rock the Control Wheel up and down to adjust the contrast.
- Tap OK to save your changes and return to the Launcher.

Note:
The eBookMan ID is different from the number on the back of the device (serial number). It is highly recommended that you keep a written record of the numbers.
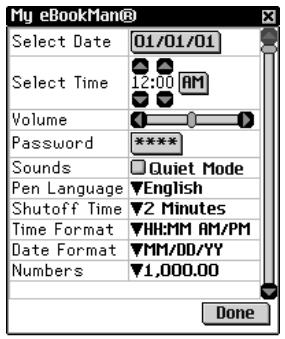
Changing eBookMan Settings
You can set preferences that apply to your eBookMan device and all programs in My eBookMan®. The My eBookMan® icon appears in the top left corner of the Launcher and is displayed in all category views.
Tap to open My eBookMan® and access the settings.
My eBookMan® screens
| Select Date | Shows the date and enables you to change it. Tap 01/01/01 to change the date or view another date. For more information about setting the date, see “Setting the Date” on page 26. |
| Select Time | Shows the time and enables you to change it. Tap the up and down arrows to change the hour and minute. Tap to toggle between AM and PM. For more information about setting the time, see “Setting the Time” on page 26. |
| Volume | Enables you to set the volume for the device. To increase or decrease the volume, drag the slider to the right or left or tap the slider arrows. When listening to music, an audio-book, or voice memo, rock the Control Wheel up or down. |
| Password | Enables you to set the password. Tap to access the Set Password screen. For more information, see “Using a Password” on page 74. |
| Sounds | Enables you to turn the device sounds off. Audiobooks, music files, and the Date Book alarm are not affected by this option. |
| Pen Language | Enables you to activate character recognition for different languages. eBookMan provides Western European character recognition for the following languages: Dutch, French, German, Italian, Portuguese and Spanish. To enable this feature, tap▼ and then tap the language you want to select. Tap Western European to access all the supported characters. |
| Shutoff Time | Enables you to set the time that elapses before the device automatically turns off. By default, the shutoff time is 2 Minutes. Tap▼ to change the shutoff time to 1 Minute or 5 Minutes. |
| Time Format | Enables you to set the format for the time. By default, the time format is HH:MM AM/PM, where HH is the hour and MM is the minute. To change the time format, tap▼ and then tap the format you want. HH:MM is a 24-hour clock with a colon delimiter. HH.MM AM/PM is a 12-hour clock with a period delimiter. HH.MM is a 24-hour clock with a period delimiter. |
| Date Format | Enables you to set the format for the date. By default, the date format is MM/DD/YY, where MM is the month, DD is the date, and YY is the year. To change the date format, tap▼ and then tap the format you want: DD/MM/YY, DD.MM.YY, or YY/MM/DD. |
| Numbers | Enables you to set the format for numbers. By default, the number format is 1,000.00. To change the number format, tap▼ and then tap the format you want: 1.000,00, 1 000.00, or 1 000,00. |

Note:
When running multiple programs at the same time, you can close programs from the Launcher to make memory available for other programs.
Week Starts Enables you to select either Sunday or Monday as the start of the week. By default, the start of the week is Sunday. To change it, tap and then tap Monday.
Double-click Enables you to set the speed at which the screen recognizes taps from your stylus. By default, the setting is Slow. To change the speed, tap and then tap the speed you want: Fast or Medium.
To save your changes and close My eBookMan®, tap Done. The Launcher appears and all changes take effect immediately.
Opening and Closing Programs
To open a program or file, tap its corresponding icon. When a program is running, you can return to the Launcher without closing it by tapping _G^ . Shadows on the right and left sides of the program icon indicate that it is running in the background. Each time you close a program, you return to the Launcher. You can close a program in one of the following ways:
- In most programs and dialog boxes, appears in the top right corner. Tap to exit.
- In most programs, you can exit by using the File menu. From the program, tap 回 then File|Exit.
From the Launcher menu by using Active Programs.
Using Active Programs
- Tap then tap Active Programs.
The Active Programs screen appears. It shows the amount of memory available and lists the publisher and title for each open program.
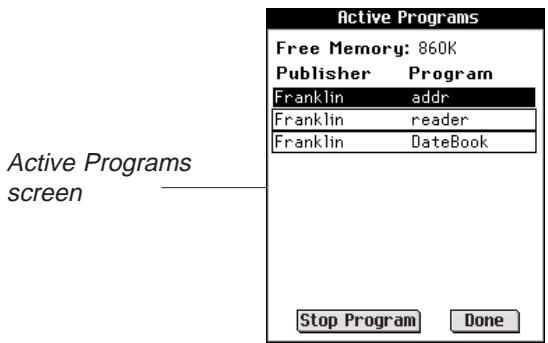
- Tap a program to select it.
- Tap Stop Program.
The program title becomes italicized to indicate it is closing, and the amount of memory available refreshes.
- Tap Done to return to the Launcher.
Performing a System Restart
As with any computer, you may experience a problem with a program and need to restart the device. To do so, follow these steps.
- Tap then tap Restart system.
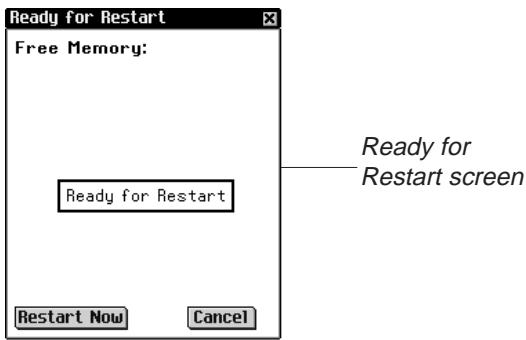
The Ready for Restart screen appears.
- Tap Restart Now to initiate a restart.
The eBookMan device restarts, and the Calibration screen appears.
Note: You can return to the Launcher without restarting the device by tapping Cancel.

Note:
When only one program is open, tap Stop Program to close it and return to the Launcher.

See also:
For other ways to reset eBookMan, see "Resetting the Device" on page 64.

See also:
For more information about the Calibration screen, see "Calibrate your eBookMan" on page 25.

Warning!
After setting a password, you must enter your password each time you turn on the eBookMan device. When an incorrect password is entered, the message Passwords do not match appears for three seconds. Always write your password down and keep it in a safe place.
If you forget your password, follow the instructions in "Forgotten Password" on page 77.
Using a Password
You can protect data stored in your eBookMan device by setting a password. When a password is set, your eBookMan device automatically enables it. You must enter the password each time you turn on eBookMan.
You also can change a password, delete a password or disable a password without deleting it.
Setting a Password
To set a password, follow these steps.
- From the Launcher, tap to open My eBookMan®.
- Tap ***
The Enter password dialog box appears.

- Enter a password using a maximum of eight characters.
You can write any combination of characters or tap to enter characters using the onscreen keyboard.
The password that you enter appears on the screen next to the New prompt.
You can tap Cancel to exit the screen without setting a password.
- Tap OK.
The prompt changes to Retype New.
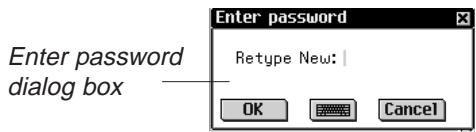
- Re-enter the password exactly as you did the first time.
You can tap Cancel to exit the screen without setting a password. - Tap OK.
The message, "Password has been changed," appears on the screen.

Password has been changed
OK
- Tap OK.
Your password is set and enabled.
The device returns to the My eBookMan® screen.
- Tap Done to return to the Launcher.
Disabling a Password
To disable a password, follow these steps.
1.From the Launcher,tap
2. Tap Disable Password.
The password you set remains and is disabled. You can re-enable the password by tapping 密 and then Enable Password.
Changing a Password
To change an existing password, follow these steps.
- From the Launcher, tap to open My eBookMan®.
- Tap
The Enter password dialog box appears with the Password prompt.
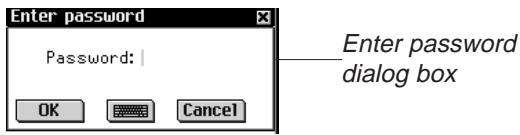
- Enter the old password and tap OK.
The Enter password dialog box appears with the New prompt.
Enter password dialog box

- Enter a new password and tap OK.
The Enter password dialog box appears with the Retype New prompt.
Enter password dialog box
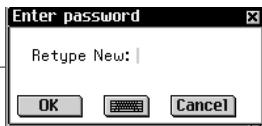
At any of the Enter password dialog boxes, you can tap Cancel to exit the screen without changing a password.
- Re-enter the password exactly as you did in Step 4 and tap OK.
The message, "Password has been changed," appears on the screen.
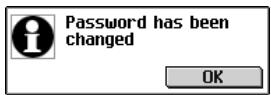
- Tap OK.
Your password is changed, and the device returns to the My eBookMan® screen.
- Tap Done to return to the Launcher.
Deleting a Password
To delete a password, follow these steps.
- From the Launcher, tap to open My eBookMan®.
- Tap ***
You are prompted to enter your password.
- Enter your password and tap OK.
You see the Enter password dialog box with the New prompt. At any of the Enter password dialog boxes, you can tap Cancel to return to My eBookMan® without deleting your password.
- Tap OK without entering any characters.
You see the prompt Retype new. - Tap OK again without entering any characters.
The message, "Password has been changed," appears on the screen.

- Tap OK.
Your password is deleted, and the device returns to the My eBookMan® screen.
- Tap Done to return to the Launcher.
Forgotten Password
Important: If you forget your password and the password is enabled, you will not be able to use your eBookMan.
To attempt recovery after forgetting your password, follow these steps.
- Remove the batteries from eBookMan for about five minutes.
All applications and content, including your password, are deleted from the device.
- If you DID NOT backup the applications and content (including the password) to your PC, transfer the applications and content from your PC to eBookMan by synchronizing from the Desktop Manager.
For more information, see "Chapter 3. Managing & Synchronizing Content" on page 39.
If you DID back up your password-enabled applications and content to your PC, DO NOT synchronize. The content in the Desktop Manager includes the forgotten password. Go to Step 3.
- Follow the instructions in "Appendix A. Getting Updates" on page 204 to download and synchronize the latest copy of the OS and core applications.
You must download and transfer all other applications and content separately. You also must synchronize your personal information from the organizer programs on your PC.

Warning!
If you remove the batteries to erase your password, YOU ALSO LOSE THE OPERATING SYSTEM, PROGRAMS AND DATA.

See also:
You can assign programs and files to a category using the File Manager. See "Categorizing Files" on page 83 for more details.
Using Categories
A category is the name used to group and display icons that appear in the Launcher. As the number of icons that appear in the Launcher increases, use categories to manage the program and content icons that are displayed. The default categories are: -ALL-, CONTENT, PROGRAMS and UNFILED.
You can add, rename,and delete new categories using the Category menu. You cannot delete default categories.
Tap the category indicator to see the Category menu.
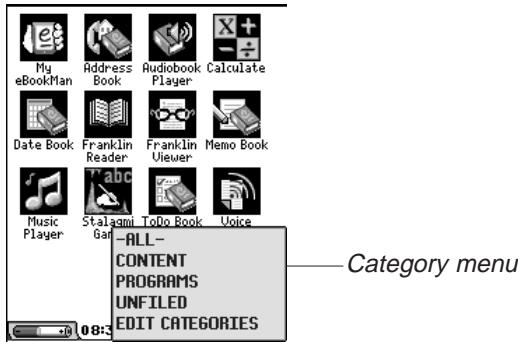
-ALL
Displays all program and content icons in the Launcher. By default, -ALL- categories are displayed in the Launcher. For information, see "Changing the Category View" on page 79.
CONTENT PROGRAMS UNFILED
Displays only content icons in the Launcher. Displays only program icons in the Launcher. Displays only icons that are not filed under a category. For more information on filing icons, see "Managing Files in eBookMan" on page 81.
EDIT CATEGORIES
Displays the Edit Categories screen, which enables you to add, rename, and delete categories.
Changing the Category View
To change the icons that appear in the Launcher, follow these steps.
- From the Launcher, tap the category indicator.
The Category menu appears.
- Tap the category you want.
The icons in the Launcher immediately change to the category you specified, and the active category is displayed in the Category indicator.
The active category is displayed until you change it.
Adding a Category
You can create new categories to customize the Launcher and organize the icons that appear. To add a category, follow these steps.
- From the Launcher, tap the category indicator.
The Category menu appears.
- Tap EDIT CATEGORIES.
The Edit Categories screen appears. This screen lists the categories in alphabetical order.
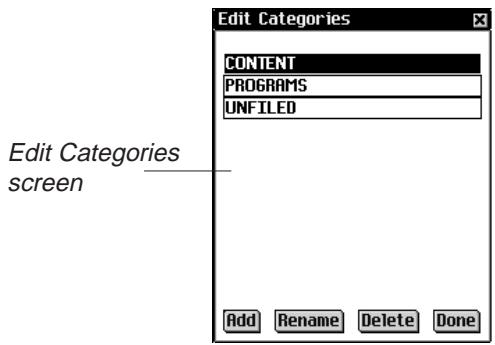
- Tap Add.
The Add Category dialog box appears.
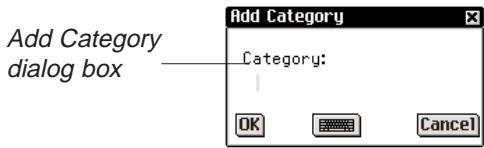
- Enter a name for the new category. For example, write "Music."
Write the name in the Handwriting area or tap to enter the name using the onscreen keyboard. The Edit Categories screen can display a maximum of 20 characters in a name. The category indicator can display a maximum of nine characters in a name.
You can tap Cancel to return to the Edit Categories screen without saving the new category.
- Tap OK to save the category.
The Edit Categories screen appears with the new category name in the list.
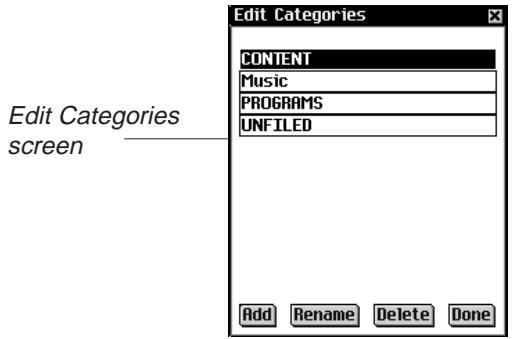
- Tap Done to return to the Launcher.
For information on how to categorize files, see "Managing Files in eBookMan" on page 81.
Renaming a Category
To rename a category, follow these steps.
- From the Launcher, tap the category indicator.
The Category menu appears. - Tap EDIT CATEGORIES.
The Edit Categories screen appears. - Tap the category name you want to change.
- Tap Rename.
The Rename a Category dialog box appears. The current name of the category is displayed and highlighted.
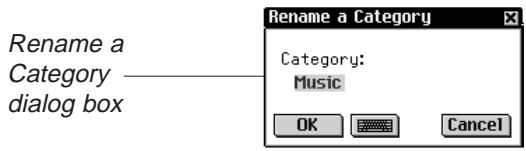
- Enter a new name and tap OK.
Write a new name in the Handwriting area or tap to enter a new name using the onscreen keyboard.
- Tap OK to save your change and return to the Edit Categories screen.
The renamed category is listed.
Tap Cancel to return to the Edit Categories screen without saving your change.
- Tap Done to return to the Launcher.
Deleting a Category
- From the Launcher, tap the category indicator.
Then Category menu appears. - Tap EDIT CATEGORIES.
The Edit Categories screen appears. - Tap the category you want to delete.
Note: You cannot delete default categories. - Tap Delete.
The category is deleted. - Tap Done to return to the Launcher.
Managing Files in eBookMan
A File Manager is available on the Launcher menu. It is a directory that lists the name and size of all files on your eBookMan. From the File Manager, you can view details about a file, associate a file with a category or delete a file from eBookMan.

Note:
To delete a category that contains a program, you must first move or delete all files associated with that program. To delete files, use the File Manager. For more details, see "Managing Files in eBookMan" on this page.
Viewing Details About a File
To find details about a file, follow these steps.
- From the Launcher, tap

- Tap File Manager.
The File Manager screen appears.
File Manager screen
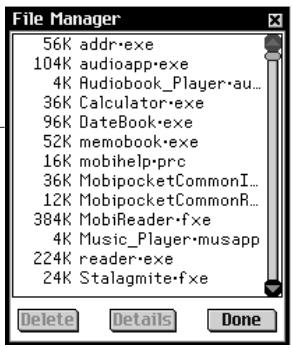
- Tap the file you want.
Use the scroll bar or scroll area to see more files.
- Tap Details.
The File Details screen appears.
File Details screen
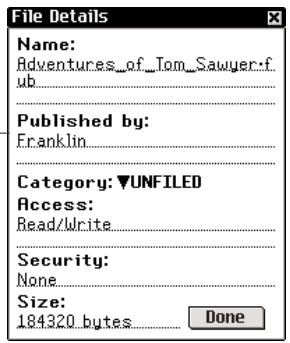
This screen shows the file name, publisher, size, category (where available), access settings and security settings. Except for the Category field, this information is read only.
- Tap Done to exit this screen and return to the File Manager.
- Tap Done again to return to the Launcher.
Categorizing Files
To associate a file with a category, follow these steps.
- Follow the steps 1-4 under "Viewing Details About a File" on page 82.
- Tap next to Category.
The list of categories appears.
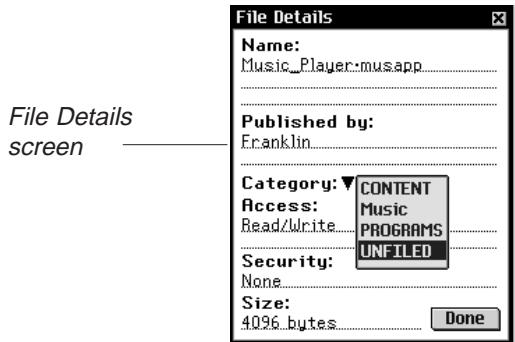
- Tap the category you want.
- Tap Done.
The File Manager screen appears.
- Tap Done again to return to the Launcher.
Deleting Files
You can delete files from eBookMan to increase free memory or remove files that are no longer used. To delete a file, follow these steps.
- From the Launcher, tap
- Tap File Manager.
The File Manager screen appears.
- Tap the file you want.
- Tap Delete.
You can tap Cancel to exit without deleting.
- Tap OK to delete the file.
The file is removed from eBookMan. - Tap Done to return to the Launcher.

Note:
Files represented by icons are categorized when downloaded to eBookMan. Programs are categorized under PROGRAMS, and content is filed under CONTENT.

Note:
You can only categorize files represented by icons.

Note:
Audible® files are added to and deleted from eBookMan through AuditibleManager only.

6. Data Entry
This chapter explains how to enter data using natural handwriting, identifies acceptable characters and provides useful handwriting tips. It also describes the onscreen keyboard and all the options it offers.
eBookMan gives you the choice of writing your data or tapping it on an onscreen keyboard.
Handwriting
Natural handwriting is the recognition system that eBookMan uses to allow data entry through writing. It makes character input simple, accurate and fast by supporting more than one way to write most characters. All writing must be entered in the appropriate section of the Handwriting area, located at the center of the Control Pad.
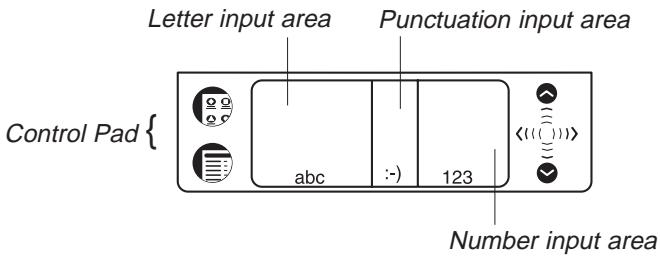
The Handwriting area is divided into the Letter input area, Number input area and Punctuation input area. Write letters in the Letter input area (abc), punctuation in the Punctuation input area (· -) , and numbers in the Number input area (123).
Handwriting Guide
The Handwriting Guide shows the acceptable stroke or strokes for each character. You can write each character in any of the ways shown. The natural handwriting system recognizes these variations.

Note:
Natural handwriting uses
simpliciWrite® by
ART (Advanced Recognition Technologies, Inc.).
To use the Handwriting Guide, follow these steps.
- From the Launcher, tap
- Tap Handwriting Guide.
You see the first screen of the Handwriting Guide.
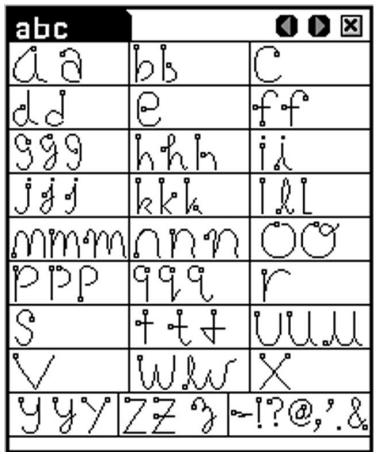
Letter and punctuation strokes recognized in the Letter input area (abc).
- Tap the arrows at the top right corner to scroll through each screen of the Handwriting Guide.
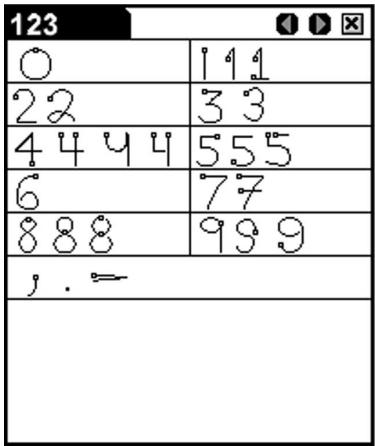
Number and punctuation strokes recognized in the Number input area (123).
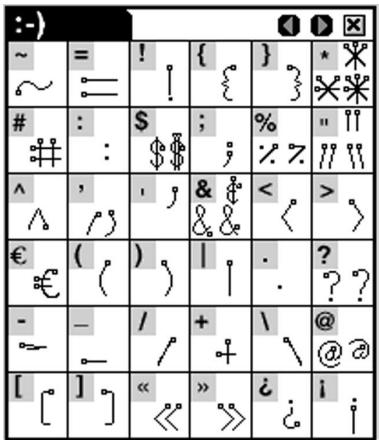
Punctuation strokes recognized in the Punctuation input area ()


Function strokes recognized in the Letter, Number, or Punctuation input areas.
Accented character strokes recognized in the Letter input area (abc).

Important!
Before you can write an accented character, you must select the appropriate Pen Language in My eBookMan®. For more information, see "Changing eBookMan Settings" on page 70.
- Tap to exit the Handwriting Guide and return to the Launcher.
Entering Data With Natural Handwriting
Entering data with natural handwriting takes some practice. Follow these steps to enter a sentence in the Memo Book.
- Remove your stylus from the back of your eBookMan.
- From the Launcher, tap an icon for a program that allows data entry. For example, tap
- Locate a field where you can enter data. For example, tap New to go to the Edit screen.
A blinking cursor appears in all fields where you can enter data. If the blinking cursor does not appear, the field is not active. The field must be active before you can enter data.
- Place the pointed end of the stylus at the bottom, center of the Letter input area and draw a line straight up to shift the first letter to a capital.
A single dot appears in the cursor to indicate shift.

Note:
When you write a character that eBookMan does not recognize, you hear a beep.
-
In the center of the Letter input area, write the letter "a".
-
Start the stroke where indicated by the point and draw it as it appears in the Handwriting Guide. For example, to
draw an "a" start here

and write the character left to right.
- Lift the stylus, and the character appears in the data entry field.
Always write in lower case, as displayed in the Handwriting Guide. If you want upper case letters to display, write the stroke for shift or caps lock before writing the letters you want to capitalize. For more information about functions, see "Writing Functions" on page 89.
Natural handwriting also recognizes simple strokes for backspace, carriage return and space, as well as shift and cap lock.
- Write the stroke for a space.
Place the pointed end of the stylus in the center, left side of the Letter input area and draw a line straight to the right.
A space appears in the data entry field.
- Write the letters for the word you want. For example, write "walk."
When you complete the strokes, the characters you entered appear in the data entry field. The Handwriting area does not change. Always write each character in the center of the appropriate Handwriting area.
If the character is composed of more than one stroke, you see interim results on the screen. For example, when you write "k," an "l" may show on the screen before the "k" appears.
- Write the stroke for a space.
- Write the next words you want. For example, write "in the park".
- Write the stroke for a period.
Practicing Natural Handwriting
For more handwriting practice, use Stalagmite.
1.From the Launcher,tap
2. Tap Help for more information on how to play.
Writing Punctuation
Follow these guidelines when entering punctuation:
Period Write in the lower part of the appropriate input area.
Comma Write in the lower part of the appropriate input area.
Apostrophe Write in the upper part of the appropriate input area.
Writing Functions
Simple strokes make it easy to write functions, such as backspace, space, tab, shift and caps lock. The following table gives details about the functions.
| Stroke | Function |
| → | Deletes the previous character (like the backspace key). |
| ← | Inserts a space (like the spacebar). |
| | | | Inserts a line break (like the enter key). |
| | | | Enables you to write the next letter in upper case (like the shift key). |
| | | | | Switches to upper case (like the caps lock key).When you want to return to lower case, draw the shift key gesture (as above). |

Note:
To ensure that you finished writing, eBookMan pauses approximately two seconds before displaying the character written in the Punctuation input area.

Note:
Functions work in all input areas.

Note:
When you draw the shift or caps lock stroke in a program, switch to another program and then return to the first program, the function is remembered and restored.
Deleting Characters
Delete characters in the data entry field by writing the back function. To delete one character, place the cursor to the right of the character you want to delete and write the back function in the Letter input area. To delete consecutive characters,do the following:
- Drag the stylus over the characters to highlight them.
- Write the back function in the Letter input area.
Writing Accented Characters
Natural handwriting supports accented character recognition for Dutch, French, German, Italian, Portuguese and Spanish. To enable accented characters, you must first select the Pen Language you want in My eBookMan®.
- From the Launcher, tap to open My eBookMan®.
- Tap next to Pen Language.
- Tap the language you want.
Tap Western European to access all accented characters.
Note: The following special characters can only be written in the Punctuation input area:
French << >> Spanish i
- Tap Done to return to the Launcher.
Accented characters written in the Letter input area now appear in the data entry field.
The following table lists the accented characters available for each language.
| Language | Characters |
| Dutch | àáááééééíííóóöúüūnç |
| French | àáçééééííôeùüû « » |
| German | äöüß |
| Italian | àéíòù |
| Portuguese | ááçéééíóóoüú |
| Spanish | áéíñóújì |
Hints For Successful Handwriting
- Keep eBookMan vertically oriented to avoid writing slanted characters.
- Write characters as they appear in the Handwriting Guide.
Always write in lower case. - Write the characters large and in the appropriate input area.
- For an initial capital letter, write the shift function. A single dot appears in the cursor to indicate a shift. Write the letter you want.
- For a series of capital letters, write the caps lock function. Double dots appear in the cursor to indicate caps lock. Write the letters you want. Repeat the shift function to return to lower case.
Onscreen Keyboard
The onscreen keyboard offers an alternative way to enter data in your eBookMan. It supports all letter, number, punctuation and accented characters that natural handwriting supports. The keyboard is available in most programs in every screen where you can enter data.
Using the Onscreen Keyboard
To use the onscreen keyboard, follow these steps.
- From any data entry screen, draw a line straight up and out of the Handwriting area.
The default keyboard appears. It contains the characters available on a standard English typewriter.
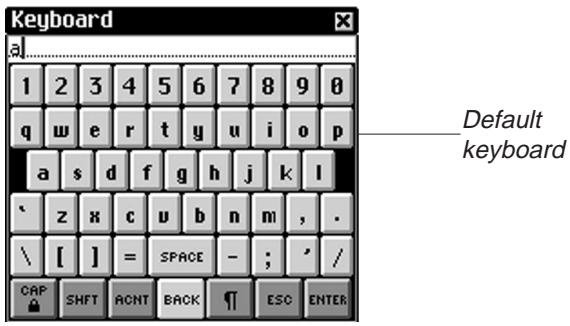

Note:
To access the keyboard in some data entry screens, you can tap and then either tap Edit|Keyboard or write the Menu shortcut k.
If the character you want to enter does not appear on the default keyboard, use the Cap, Shift, Accent, or Shift/Accent option to find it.
- Tap cap to access the Caps lock keyboard.
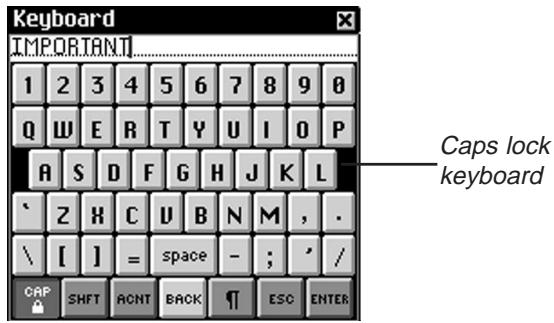
The Caps lock keyboard contains capital letters, punctuation, and special characters. Tap cap again to return to the Default keyboard.
- Tap shift to access the Shifted keyboard.
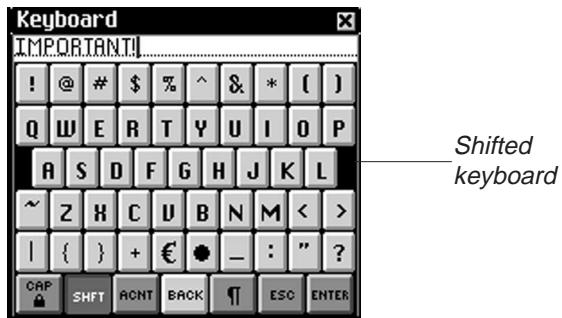
The Shifted keyboard contains capital letters, punctuation, and special characters. Tap shift again to return to the Default keyboard.
- Tap acnt to access the Accent keyboard.
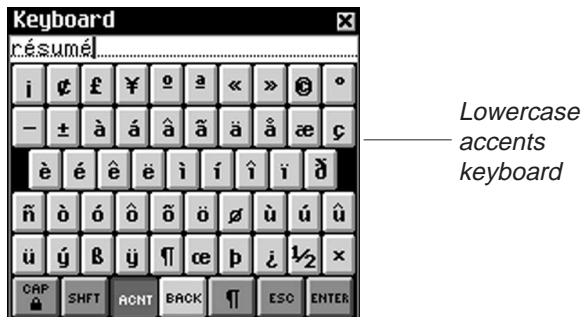
The Accent keyboard contains lowercase accented letters, punctuation, and special characters. Tap acnt again to return to the Default keyboard.
- Tap shft + acnt to access the Shifted Accent keyboard.

The Shifted Accent keyboard contains uppercase accented letters, punctuation, and special characters. Tap shft + acnt again to return to the Default keyboard.
- Tap the characters you want.
The data you enter appears in the line above the keys.
To delete a single character to the left of the cursor, tap back.
To delete a single character in the middle of a word, tap in the line to the right of the character you want to delete, and then tap back.
To delete more than one character, drag your stylus across the characters you want to delete to highlight them. When you tap in your new data, the old characters are overwritten.
Tap to enter a line break.
- Tap enter to save your text and exit the keyboard.
Tap esc to exit the keyboard without saving.

CONTENT
APPLICATIONS
7. Franklin Reader
eBookMan includes Franklin Reader, a program that lets you read electronic books (eBooks). It also lets you search for words or phrases, mark text, and add notes to eBooks.
This chapter describes how to:
open and close eBooks
set preferences
- move through an eBook
- find specific information within an eBook
use bookmarks
- get help
exit Franklin Reader
Before using this program, you must download and install eBooks formatted for the Franklin Reader. General reference material (such as the Merriam-Webster® Dictionary), medical reference books (such as The Medical Letter® Handbook of Adverse Drug Interactions), Bibles (such as the Holy Bible, King James Version), and novels (such as David Copperfield by Charles Dickens) in Franklin Reader format are available at www.franklin.com/estore.
Note: When you register your eBookMan, you can select free eBooks and samples. To access these files from the eBookMan Desktop Manager, click Web|My eBookMan Library. For more information, see "Registering your eBookMan Device" on page 27.
Opening and Closing eBooks
Open eBooks from Franklin Reader or from the Launcher. To open an eBook from Franklin Reader, follow these steps.
- Tap to open Franklin Reader.
The screen that appears varies based on available content and whether or not eBooks were opened previously.
- If no eBooks are available, the message "No books loaded" appears.
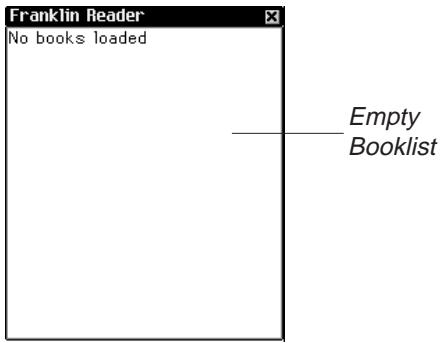
You must download and install Franklin eBooks in your eBookMan to use Franklin Reader. Tap to exit.
- If eBooks are available and no eBooks have been opened, you see the Booklist. The Booklist is an alphabetical list of Franklin eBooks that are installed in your eBookMan.
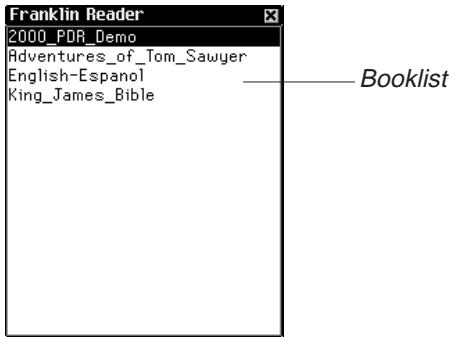
Note: If an eBook had been opened previously, Franklin Reader displays the last viewed screen of the eBook.
To exit the Booklist, tap .
- Tap the eBook you want to open.
The default Home screen for the eBook you selected appears.
The Home screen is the initial screen for an eBook. In most eBooks, the Home screen is designated as Outline, Index, or Search.

See also
For more information about the screens, see "Understanding Franklin Reader Features."

See also
For information on how to change the Home screen for an eBook, see "Setting Preferences" on page 103.
To open an eBook from the Launcher, tap the Content icon for the eBook. The default Home screen or the last viewed screen appears.
Note: Not all eBooks have Content icons associated with them.
- Tap to close Franklin Reader.
The next time you open Franklin Reader, the book you last viewed appears.
Understanding Franklin Reader Features
Most Franklin Reader screens consist of a title bar, tool bar and a view that represents eBook content.

Title Bar
The title bar displays the name of the eBook, the title of your current location within an eBook or the Outline Location within an eBook.
Names of eBooks can be abbreviated in the Booklist and in the title bar. Names of section titles are often abbreviated as you move through the Outline or in text. To see the full name of an eBook or the full title of the current location within and eBook, follow these steps.
- Tap the name in the title bar.

The Adventures Of Tom Sawyer
OK
The full name is displayed in a dialog box.
2. Tap OK to exit.
When viewing text or searching for a word, you can find the Outline Location within an eBook by tapping the title bar. For example, you may read text in a Bible that displays the verse and number but not the book. To display the Outline Location, tap the title bar.
Tool Bar
The tool bar displays icons that enable you to move around in an eBook and access other locations in Franklin Reader. The icons that appear on the tool bar vary by location within the program and by available features within an eBook. The following icons are available.
(Booklist) Returns to the Booklist from any screen.
(Home) Returns to the Home screen for the selected eBook.
(Outline) Goes to the top level of the Outline.
Q (Search) Goes to the Search screen. After a search, goes to the Search Results screen. From the Search Results screen, returns to the Search screen with the previous query word or words displayed. At the Search screen, clears the selected item or items or query word or words.
(Forward) Moves forward to a previously visited location.
(Back) Moves back to a previously visited location.
(Next) Goes to the next match when viewing text after a search.
(Previous) Goes to the previous match when viewing text after a search.
(List) After a search, goes to the Selection List.
(Exit) Closes Franklin Reader and returns to the Launcher.

See also
For an example of the Outline Location, see instructions for using the search screen on page 109.

Note:
Icons for functions that are not available appear grayed-out on the tool bar.

See also
For more information about the Search screen, see "Searching an eBook" on page 104.

Note:
A section is an item that is listed on the top level of the Outline.

See also
For more information, see "Searching within an eBook" on page 108.
The Views
Franklin Reader uses five views to represent the content of an eBook: List, Text, Sub-text, Search, and Bookmark.
List View
The List view displays chapters, sections or headings of an eBook. The content of a list varies. For example, a list in a novel may contain the titles of the chapters. A list in a dictionary may contain headwords, and a list in a medical reference may contain sections of drug types. The most common lists include the Outline and Index, which are similar to the Table of Contents and Index in a printed book. Other lists include, but are not limited to, the Booklist and Bookmark List.
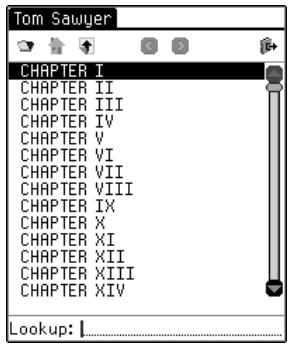
List example: Outline of Tom Sawyer
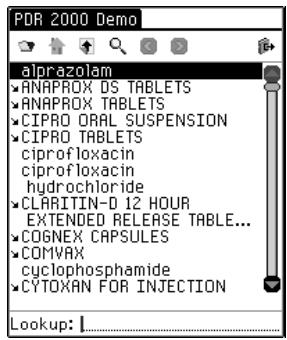
List example: Outline of Physician's Desk Reference (PDR) 2000 Demo
Many lists are short and easy to navigate. When a list does not fit on one screen, a scroll bar appears.
The diagonal arrow to the left of a list item indicates another list below, similar to a sub-menu. Tap the list item to go to the sub-list. Tap the arrow to bypass all sub-lists and go directly to the corresponding text.
Search View
Enables the user to enter and search for a word or phrase within an eBook. Also displays the results of a search. To access the Search screen, tap .
Text View
The Text view displays the main text of an eBook. Read, scroll, highlight text, and add bookmarks from text. To change the way text is displayed in Franklin Reader, see “Setting Preferences.”
Sub-text View
The Sub-text view displays additional text such as context-sensitive help, bibliographic entries, footnotes, and tables. Most sub-text is accessed by tapping a special marker or by using a menu item.
Bookmark View
The Bookmark view provides a way to enter, view, edit and remove bookmarks.
Using the Menu
Franklin Reader includes four menus: Move, Edit, Options and Go To. To access a menu, follow these steps.
- Tap on the Control Pad to see the available menus. Some menu items have a character in the right column. These are Menu shortcuts.
- Tap the name of the menu you want.
- Tap the menu item you want or write the Menu shortcut in the Handwriting area.
Move Menu
Use the Move menu to move between different locations in an eBook.
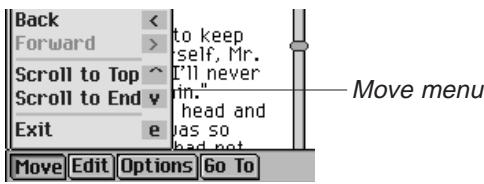
Back (<)
Forward (>)
Moves back to the previously visited location.
Moves forward to the previously visited location.

Note:
The available menus and menu options vary from eBook to eBook and by location in an eBook.

Important!
Before using the Cut, Copy and Paste functions, you must select text. To select text, drag the stylus over the text you want.
Scroll to Top (^) Moves to the top of the current list or section.
Scroll to End (v) Moves to the bottom of the current list or section.
Exit (e)
Closes Franklin Reader.
Edit Menu
Use the Edit menu to cut, copy and paste text, access the onscreen keyboard, and add bookmarks.
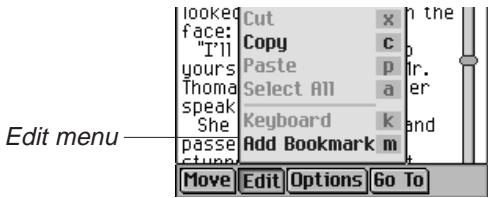
Cut (x) Removes selected text. The text is stored on the clipboard to copy to another location.
Copy (c) Copies selected text to the clipboard.
Paste (p) Pastes copied or cut text from the clipboard.
Select All (a) Highlights all available text at current location to select it.
Keyboard (k) Displays the onscreen keyboard.
Add Enables you to add a bookmark at the current location in text.
Options Menu
Use the Options menu to set your user preferences, learn more about the program and the eBook you are reading, view Reader Functions, and get help for the program.
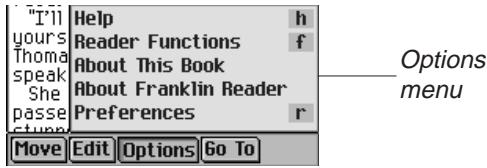
Help (h) Shows context-sensitive help.
Reader Displays a guide to the menus.
Functions (f)
About This Book Displays copyright information for the current eBook.
About Franklin Displays the version number and copyright information for Franklin Reader.
Preferences (r) Enables you to set preferences in Franklin Reader Reader and the current eBook.
Go To Menu
Use the Go To menu to access the top level of the Outline or Index, go to the Search screen, and view search results, the Bookmark List and the Booklist.
TheBookmark List is the list of bookmarks that you have inserted in the eBook you are currently viewing.
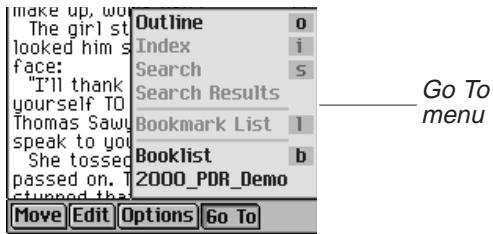
Outline (o) Goes to the top level of the Outline.
Index (i) Goes to the top level of the Index, when available.
Search (s) Goes to the Search screen, when available.
Search Results Goes to the Search Results screen, when available.
Bookmark List (I) Displays the list of Bookmarks for the current eBook.
Booklist (b) Goes to the Franklin Reader Booklist.
[eBook name] Displays the name of most recent eBooks that were opened and are still available.
Setting Preferences
You can set your preferences for Franklin Reader and the eBook you are currently viewing. The options on the Preferences screen may vary by eBook.
To set preferences, do the following.
- From any screen within an eBook, tap and then either tap Options|Preferences or write Menu shortcut r.
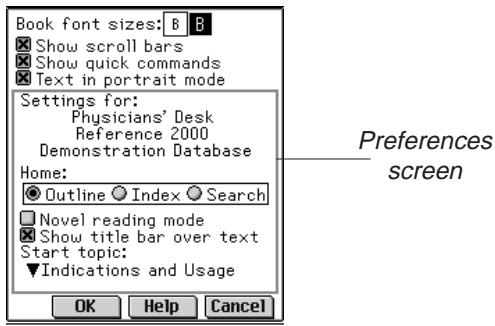
- Change the settings you want.
You can tap Help to get information about the settings.
- Tap OK to save your changes.
Tap Cancel to exit without changing the defaults.
Franklin Reader Settings
You can set features that change the appearance of all eBooks in the Franklin Reader, such as font size and display.
Book font sizes
By default, the large font (B) is highlighted. Tap the small B to change to a smaller font. The smaller font lets you view more text on the screen.
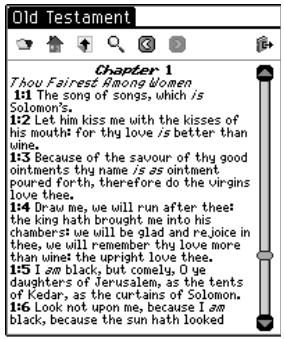
Small font size

Large font size with no scroll bars
Show scroll bars When checked, this option shows scroll bars.
Tap the check box next to the scroll bar option to deselect it.
Show quick commands
Tap the check box next to the Quick
Commands option to deselect it.
Note: Most books do not have Quick Commands.
Text in portrait mode
This option lets you select the viewing orientation: portrait or landscape. By default, this option is checked.
Text in Landscape mode
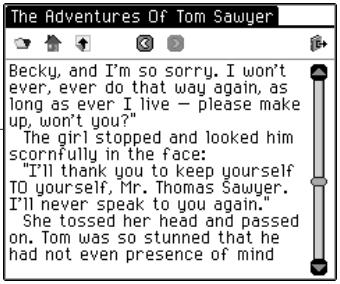
Note: Landscape orientation applies only to the text views in an eBook. All other screens remain in portrait mode.
eBook Settings
Depending on the eBook, you can select the default Home screen, display the title bar over text, and select a start topic.
Home
Tap the button next to Outline, Index or Search to select it as the Home screen of the current eBook.
Novel reading mode
Tap the check box next to this option to format an eBook with margins and justification. The text appears more like a printed eBook. By default, this option is not checked.
Show title bar over text
The default is to show the title bar over text. Tap the check box to deselect it.

See also
For information on how to move through an eBook using Quick Commands, see "Quick Commands".
Start topic
Tap the down arrow to see the list of topics that you can set as the starting point for viewing text. This option is not available in every eBook.
Moving Around
You can read an eBook just as you would a printed book or use an eBook as a reference. Rather than flipping pages, moving around in an eBook involves tapping icons and using the menus associated with Franklin Reader. It also involves tapping through lists, scrolling through text, and tapping Special Markers or hyperlinks associated with the content of the eBook.
To move through an eBook, follow these steps.
-
Move to the list you want. For example, move to the Outline. Go to the Outline in one of the following ways:
-
Tap
- Tap and then either tap Go ToOutline or write Menu shortcut o to go to the top level of the Outline.
-
If the Home screen is the Outline, tap
-
Tap the list item (chapter or section) you want.
If the list is longer than one screen, use the scroll bar, scroll area on the Control Pad, or Control Wheel to view the rest of the list.
Text may appear directly under the list item. If text does not appear, continue to tap through the list until you get to the text you want.
- In text, move by line or screen.
Use the scroll bar on the screen, the scroll area in the Control Pad, or the Control Wheel to move by line or by screen.
- Tap and to return to the text that you already viewed.
If the text you see is the result of a search, tap or to move to the next or previous match.
Special Markers
When reading and moving through text, you may see Special Markers - images of blocked text. Special markers indicate that more information is available. The following are some examples of Special Markers:
H, H Footnote
FIG Graphic or figure
EIE Bibliographic entry
Unavailable section of text
RF Unavailable graphic illustration
Table reference
Cross reference
自 Bookmark
Pronounces the headword, highlighted word, or entry.
To view the information associated with a special marker, follow these steps.
- Tap the marker to view its information in sub-text.
If the information takes up more than on screen, use the scroll bar to view more text. - When done, tap OK or OK to return to the text you were reading.
Quick Commands
When reading and moving through text, you may see Quick Commands - a row of buttons at the bottom of text. Quick Commands act as hyperlinks that jump to a related section of the text. They most commonly appear in medical references.
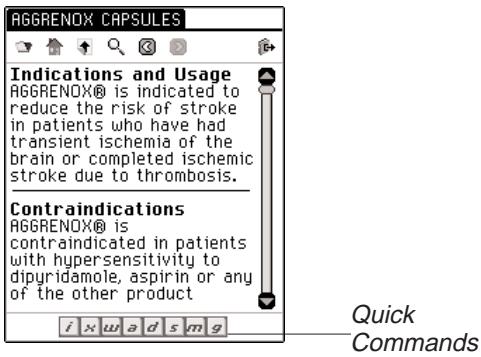
To use a Quick Command, tap or write the letter to go directly to that section of text. When using Quick Commands, please note the following:
- Quick Commands only work in Text view.
- When Quick Commands are not displayed, you can write these letters to go to the indicated section.
Searching within an eBook
Franklin Reader enables you to search for words or phrases within an eBook. The search method varies by location in the program and in the eBook. The basic search methods include Lookup, Quick Search and the Search screen.
Lookup
The Lookup feature provides a quick way to find items in a list. It is used best when you know the list item (for example, headword, chapter or section) you want. To use the Lookup feature, follow these steps.
- Go to a list in an eBook.
For example, tap to go to the Outline.
- Write the characters of the list item one at a time in the Handwriting area or tap them on the onscreen keyboard.
The characters you enter appear in the Lookup field at the bottom of the screen.
The highlight automatically moves to the first list item starting with those characters.

Note:
Capitalization and punctuation are not necessary for Lookup.
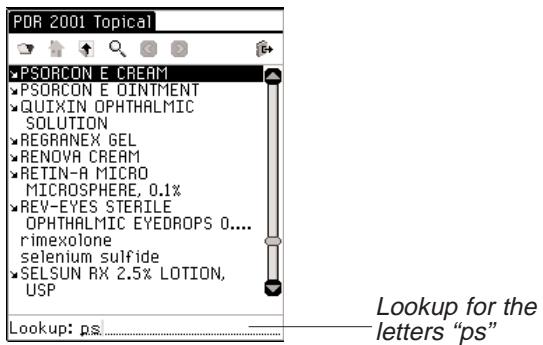
If you enter a series of letters, the program searches for them in sequence. When it encounters a letter for which there is no match, it highlights the first list item with the last matched letters.
When you delete characters, the Lookup backs up to the previous match.
- Tap the item you want to select it.
Note: The Lookup feature is available in List view only.
Quick Search
You can search for a word in more than one eBook by using Quick Search.
- In text, highlight the word or words you want by dragging the stylus over them.
- Tap the highlighted word or words.
The Select Book to Search screen appears.
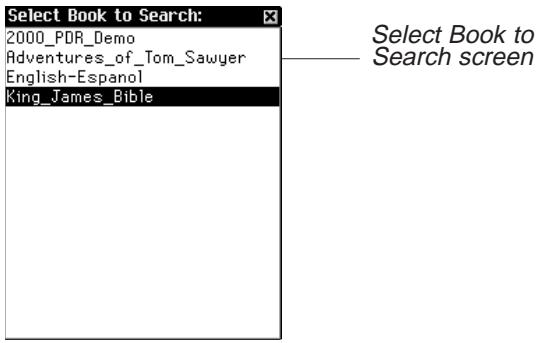
- Tap the eBook where you want to find the word or words.
The eBook opens and the word or words are searched. The search results are the same as if you had performed a word search in that eBook.
The Search Screen
The Search screen lets you find words or phrases in text.
Note: The Search screen is not available in all eBooks. In some eBooks, the Search screen uses a Selection List and enables you to find words in the list.

See also
For more information about searching the Selection List, see "Searching from a List" on page 113.

Note:
In some eBooks, you can restrict searches to specific parts of the eBook by writing section, book or language abbreviations. These abbreviations and the eBooks they apply to are listed in "Search Abbreviations" on page 121.
The Search screen also can be used to correct spelling. To use the Search screen to find words or phrases in text, follow these steps.
- Go to the Search screen.
Access the Search screen from any location within Franklin Reader in one of the following ways:
- Tap Q.
- Tap and then either tap Go To|Search or write Menu shortcut s.
For example, tap in Sherlock Holmes.
The Search screens appear.
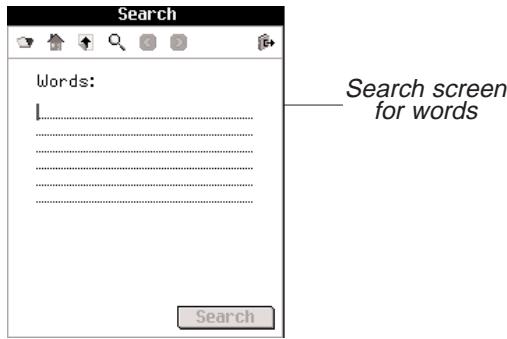
- Enter up to six words by using the Handwriting area or the onscreen keyboard.
For example, enter "Moriarty."
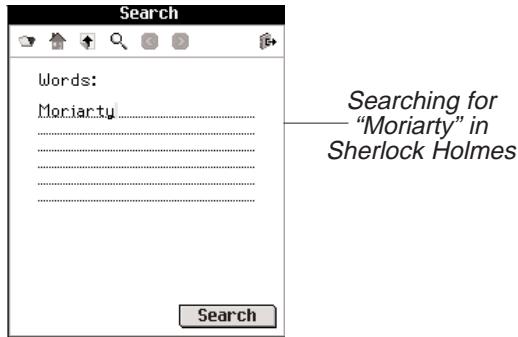
You also can paste text that was previously copied to the clipboard.
- Tap Search to initiate the search.
The search results appear.
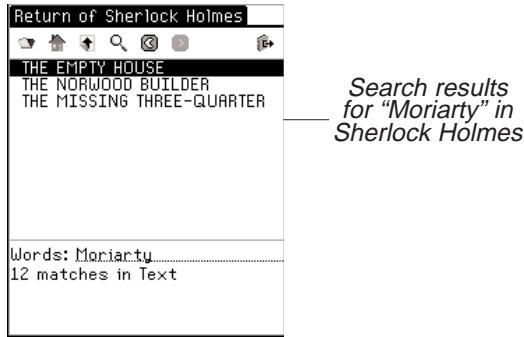
If you enter words that cannot be found, you see a dialog box indicating "No candidates found."

Enter a new search request and try again.
- Tap the list item in which you want to find the word or phrase. For example, tap "THE EMPTY HOUSE."
Text where the match was found appears, and a dotted box appears around the match.
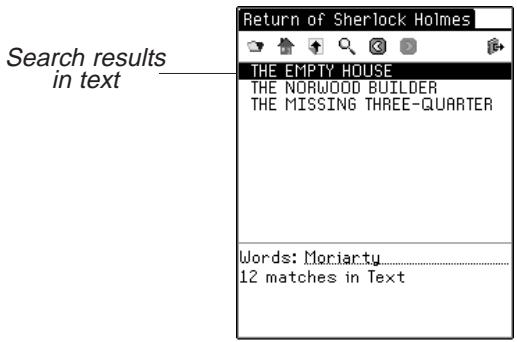
- Tap or to move to the next or previous match.
Tap the title bar to see the Outline Location of the current match within the eBook.

See also:
For details about the categories of results, see "Search Results" on page 114.
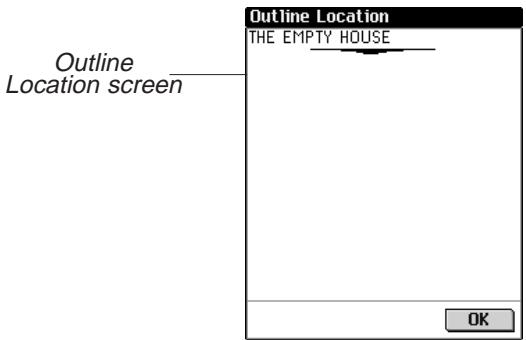
- Tap OK to exit the Outline Location.
Spell Correction
If any word you enter in the Search screen is misspelled, a list of corrections appears.
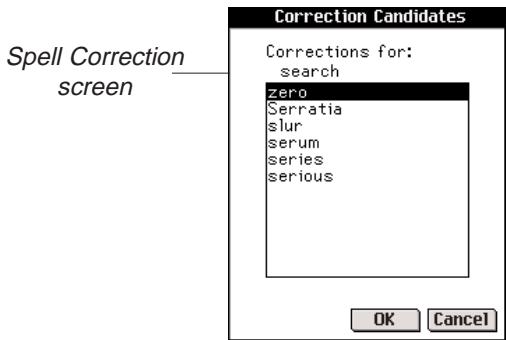
If the list of corrected spellings includes the word you intended, tap it and then tap OK to continue the search using the correction.
To go back to the Search screen and enter a different word, tap Cancel.
Word Match
If you are not sure how to spell a word, enter ? to stand for a single letter or * to stand for zero, one or more letters. For example, if you are not sure whether the word is spelled "receipt" or "recieve", write rec??pt and tap Search. All words matching this pattern are displayed.
To see all the words that begin with "hypo", write * and tap Search.

A list of possible matches is displayed. Tap the word you want and then tap OK to search using that word. To go back to the Search screen and change the request, tap Cancel.
Searching from a List
In some eBooks, the Search screen shows a list of items from which you can search. Use this feature to find information about two or more items.
To perform a search from this screen, follow these steps.
- Go to the Search screen.
Access the Search screen from any location within Franklin Reader in one of the following ways:
- Tap Q.
- Tap and then either tap Go ToSearch or write Menu shortcut s.
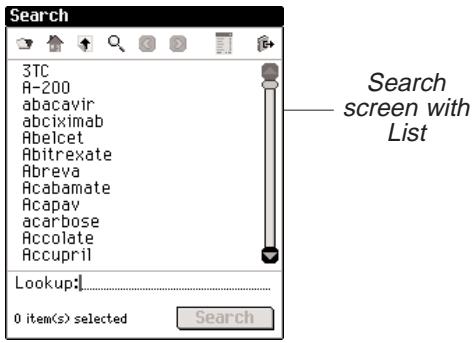
- Tap an item to select it.
A check mark appears to the left of the item. To deselect an item, tap it again.
You can select up to 30 items from the provided list.
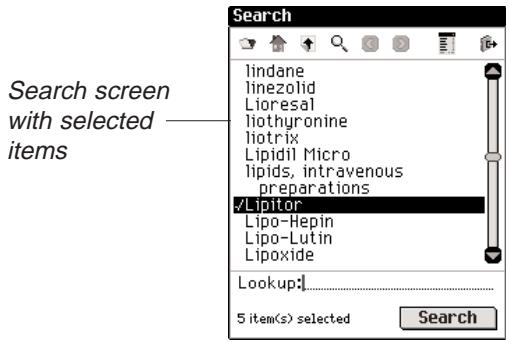
- Tap to see the Selection List, a complete list of selected items.
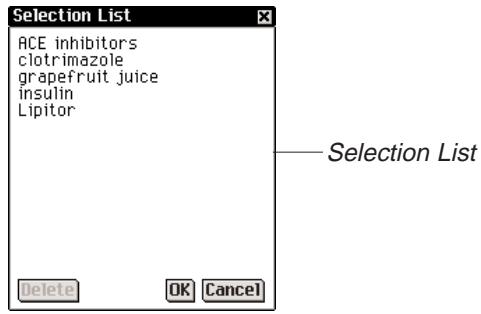

Note:
Not all of the categories described are available in every eBook. Every search request will not return matches in every category available to that eBook. In some instances, you may need to tap More to see a particular category.
To delete an item, tap it and then tap Delete.
Use the scroll bar, when available, to view all selected items.
- Tap OK to return to the Search screen.
- Tap Search to initiate the search.
Search Results
Because search results are based on the content and structure of an eBook, they vary widely. Search results are assigned categories to help you easily determine the part of an eBook in which your words were matched - a chapter title, definition, text or index.
Results may be found in more than one category. If the More button appears on the Search Results screen, it indicates that more search matches are available in a different category. Tap More to see them.
Search results can occur in the following categories:
A. Entries using other forms
These matches occur when other forms of the word or words you entered match a compound word or phrase. Other forms include inflections and root words.
B. Headwords
These matches occur when the word or words you entered exactly match a headword. Inflections and root words may be considered exact matches.
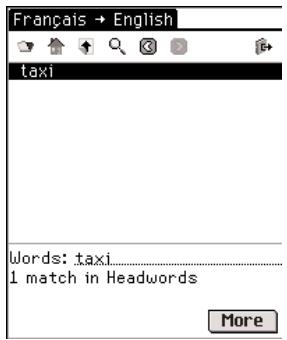
Headwords in translator
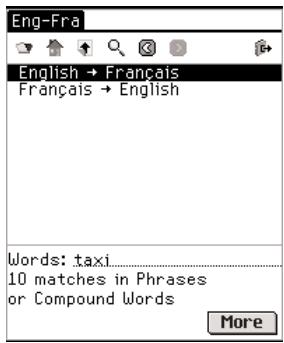
Phrases or Compound Words in translator
C. Phrases or Compound Words
These matches occur when the word or words you entered match part of a compound word or phrase.
D. Text
These matches occur when the word or words you entered match within a single verse or paragraph of text or match inflections or run-ons within a definition. You must tap through the Outline until you enter text to see the matching words. Your search word or words will be boxed.
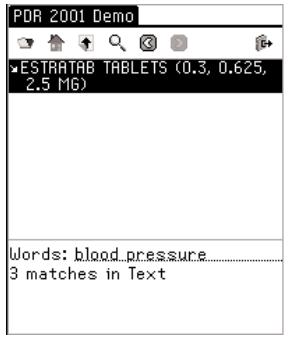
Text in PDR 2001 Demo
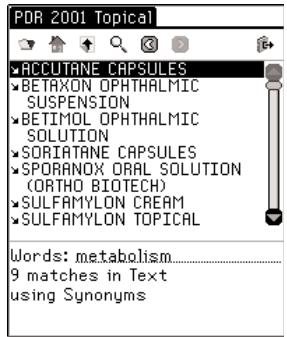
Text using Synonyms in PDR 2001 Topical
E. Text using Synonyms
Synonyms are words of similar meaning and usage. This category returns matches just like "Text" except that it uses synonyms for the word or words you entered.
F. Titles
These matches occur when the word or words you entered all match part of an Outline title (for example, a monograph name, chapter title, section title, index title, headword or phrase). Inflections and root words are considered matches.
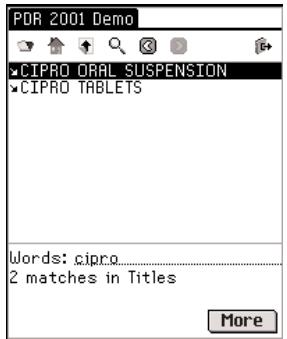
Titles in PDR 2001 Demo
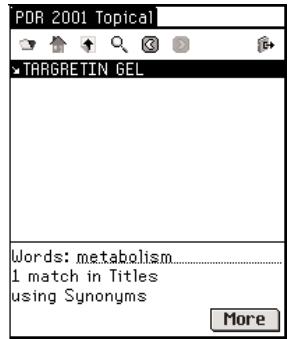
Titles using Synonyms in PDR 2001 Topical
G. Titles using Synonyms
Synonyms are words of similar meaning and usage. This category returns matches just like "Titles" except that it uses synonyms for the word or words you entered.
H. Titles & Text
These matches occur when some of the words you entered match in an Outline and some match in text. You must enter the text to see these matches. This category also returns matches if the words you entered occur in different titles along a single Outline path. You must tap through the Outline until you enter text to see the matching words.
I. Titles & Text using Synonyms
Synonyms are words of similar meaning and usage. This category returns matches just like "Text & Titles" except that it uses synonyms for the word or words you entered.
J. Words, Phrases, or Compound Words
These matches occur during a restricted search when the word or words you entered match all of a headword and part of a compound word or phrase.
K. Pairs of Words
These matches occur when a pair of items you selected at the Search screen match part of an Outline title. In some medical books, if you search for brand names, the generic name or drug group may be substituted.
L. Single Words
These matches occur when a single item you selected at the Search screen matches part of an Outline title. In some medical books, if you search for brand names, the generic name or drug group may be substituted.
Matches may be returned in the following categories depending on the type of eBook you are reading.
Dictionary-B,D,F
Holy Bible - D, E, F, G, H, I
Medical Reference - D, E, F, G, H, I, K, L
- Translator - A, B, C, J

Note:
During synchronization, bookmarks are saved to your PC.

Note:
appears at the location in text where you placed a bookmark. It is considered a special marker.
Using Bookmarks
You can enter a bookmark in any location in text. In the Bookmark Edit screen, you can either paste text that was previously cut or copied, or you can enter a note. You can enter up to 50 bookmarks in each eBook.
Adding Bookmarks
To add a bookmark, follow these steps.
- From any text view, bring up the Bookmark Edit screen by tapping and then either tapping Edit|Add Bookmark or writing Menu shortcut m.
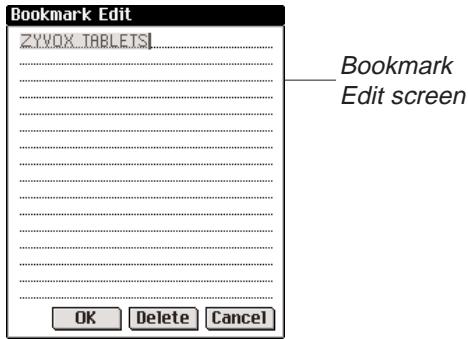
The title of the current section of text appears highlighted in a new bookmark.
- Use the Handwriting area or the onscreen keyboard to enter text.
You can write over the existing title or add text following the title by first tapping after the title to remove the highlight and then writing your text.
You also can paste any text from the clipboard into the bookmark.
You can enter up to 100 characters.
- Tap OK to add the bookmark.
You can exit without adding a bookmark by tapping Cancel. You must confirm the cancellation. To confirm, tap Yes. To exit without cancelling, tap No.
When you enter a bookmark, 自 appears in text.
Viewing an EnteredBookmark
You can view the text of an existing bookmark or a list of all bookmarks. To view or edit a bookmark, follow these steps.
Note: If you are already at the location in text where you entered the bookmark, begin at Step 3.
- Tap and then either tap Go To|Bookmark List or write Menu shortcut I to see a list of all bookmarks.
The list is organized from newest to oldest, with the most recent addition at the top.
- Tap the title of a bookmark to go to its location in text.
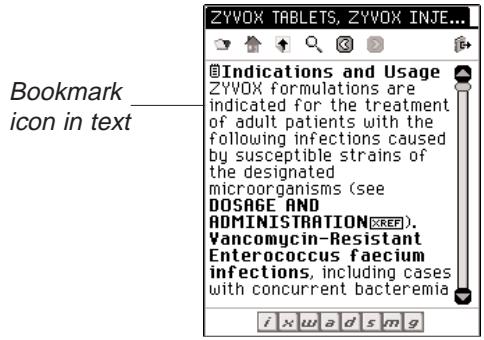
You see theBookmark Edit screen.
3.From textview,tap自
4. Enter or revise the text you want.
5. Tap OK to save your changes.
Tap Cancel to exit without saving the changes.
You can also remove an entered bookmark by tapping Delete. You must confirm the delete. To confirm, tap Yes. To exit without deleting, tap No.

Note:
When the bookmark fills more than one screen, a scroll bar appears. Tap on the up and down arrows or the scroll bar to move and view the entire text.
Using Help
Your Franklin Reader comes with context-sensitive help and a guide to Reader Functions. You can view Reader Functions from any location. Tap l and then either tap Options|Reader Functions or write Menu shortcut f to read the guide.
You can read the help in any location. Tap and then either tap Options|Help or write Menu shortcut h to read the help.
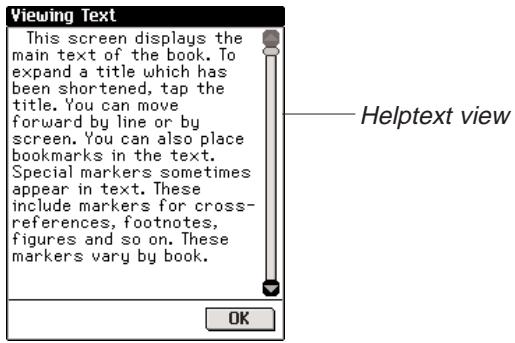
To move up and down by screen in the Reader Functions and help screens, use the up and down arrows or the scroll bar. Tap OK to return to your previous location.
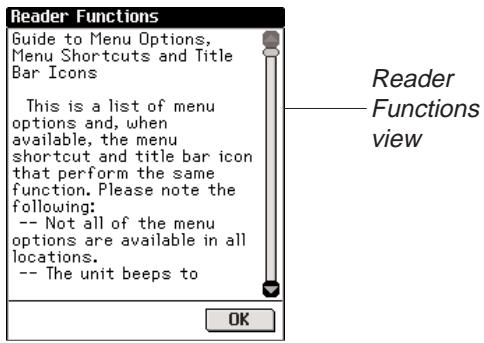
Tap OK to exit the help screen and return to your previous location.
Search Abbreviations
The following abbreviations are available in Bible references and translators.
Bible ebook Abbreviations
Add these testament or book abbreviations at the beginning of your search request to narrow your search parameters to only that testament or book.
The Old Testament (ot):
Genesis . Gen Ecclesiastes .Ecc
Exodus....Ex Song of Solomon.....Sol
Leviticus....Lev Isaiah.....Isa
Numbers....Num Jeremiah...Jer
Deuteronomy....Deut Lamentations ..Lam
Joshua ...Josh Ezekiel...Ezek
Judges ... Daniel
Ruth....Ruth Hosea.Hos
1 Samuel 1Sam Joel.
2 Samuel .2Sam Amos .Amos
1 Kings. 1Ki Obadiah.. .Obad
2 Kings... 2Ki Jonah Jon
1 Chronicles...1Chr Micah..Mic
2 Chronicles. 2Chr Nahum. Nah
Ezra . . . . . . . . . . . . . . . . . . . . . . . . . . . . . . . . . . . . . . . . . . . . . . . . . . . . . . . . . . . . . . . . . . . . . . . . . . . . . . . . . . . . . . Habakkuk. ..Hab
Nehemiah . . . . . . . . . . . . . . . . . . . . . . . . . . . . . . . . . . . . . . . . . . . . . . . . . . . Zeph
Esther Est Haggai .Hag
Job . Job Zechariah. Zech
Psalms . . . . . . . . . . . . . . . . . . . . . . . . . . . . . . . . . . . . . . . . . . . . . . . . . . . . . . . . . . . . . . . . . . . . . . . . . . . . . . . . . . . . ..
Proverbs.......Prov
The New Testament (nt): Galatians .Gal
Matthew: Mt Ephesians..Eph
Mark ... Mk ... Philiappians ...
John 1 Thessalonians....1Thes
Acts 2 Thessalonians...2Thes
Romans.....Rom 1 Timothy ....1Tim
1 Corinthians. 1Cor 2 Timothy 2Tim
2 Corinthians. 2Cor Titus .Titus
Philemon...Phm
2 John . 2Jn
Hebrews . . . . . . . . . . . . . . . . . . . . . . . . . . . . . . . . . . . . . . . . . . . .
3 John 3Jn
James..Jas
Jude . . . . . .Jude
1 Peter. 1Pet
Revelation.......Rev
2 Peter. 2Pet
1 John 1Jn
Translator Language Abbreviations
Add these language abbreviations at the beginning of your search request to narrow your search parameters to only that language.
English............Eng
Italian. ..Ita
Dutch .Ned
Portuguese...Prt
French.Fra
Spanish........Espan
German. . . . . . . . . . . . . . . . . . . . . . . . . . . . . . . . . . . . . . . . . . . . . . . . . . . . .
Swedish.Sve
Exiting Franklin Reader
You can either close Franklin Reader and return to the Launcher, or you can return to the Launcher and leave the program running in the background.
-
Tap to return to the Launcher without closing the program.
-
Tap , then either tap File|Exit or write Menu shortcut e to close the program.
You can also tap at the top right corner of the screen.
8. Mobipocket Reader
eBookMan includes the Mobipocket Reader, a program that lets you read, search, and bookmark electronic books (eBooks), electronic newspaper articles (eNewspapers) and other electronic documents (eDocuments). This chapter describes how to open and close content, use the Library, view content, change settings, use bookmarks, search a document, get online help and exit Mobipocket Reader.
Before using this program, you must download, convert and install documents formatted for the Mobipocket Reader.
Opening and Closing Documents
You can open documents from Mobipocket Reader or from the Launcher. To open a document from the Launcher, tap its icon. To open a document from Mobipocket Reader, follow these steps.
1. Tap to open Mobipocket Reader.
The screen that appears varies based on available content and whether or not documents were opened previously.
- If no documents are available, you go to the Library screen.
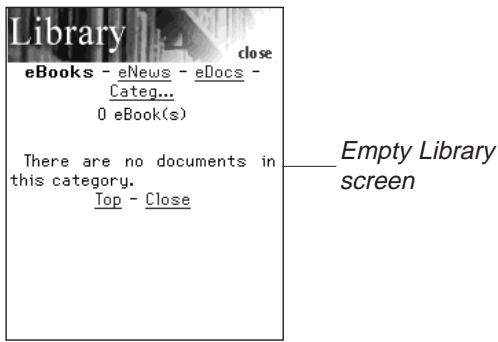
- If electronic documents are available and no documents have been opened, you see the Library screen.

Note:
By default, the Mobipocket Reader opens to the last-viewed screen. You can change the default at the Settings screen. For more information, please see "Changing the Settings" on page 131.
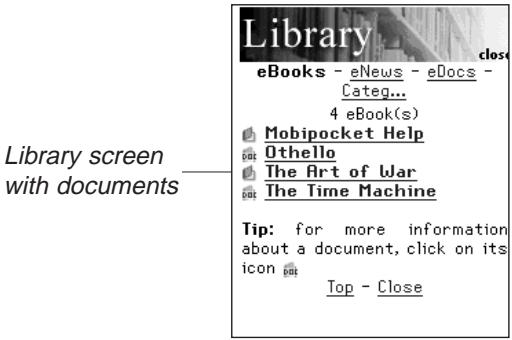
The Library contains the list of eBooks, eNews and eDocs that you have downloaded into your eBookMan. The documents are categorized by type. You can also create your own categories and assign documents to those categories.
- If a document had been opened previously, Mobipocket Reader displays the last viewed screen of the document.
To exit the Library and return to the previously open document, tap Close.
- Tap the category you want.
- Tap a document to open it.

The first time you open a document, you see page 1. Upon subsequent readings, the document opens where you left it the last time you were reading.
- Tap and then tap Exit to close Mobipocket Reader and return to the Launcher.
Tap to go to the Library and select another document.
Understanding the Library
The Library in Mobipocket Reader is the place you go to open a different document or manage your documents. The Library consists of a header, a list of file types, a list of documents, a tip, and footer.
From a document, access the Library by tapping or by tapping and then Library.
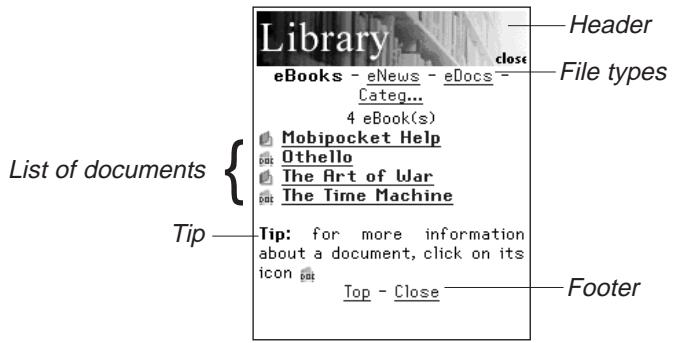
Header
The Header indicates that you are in the Library. You can tap this area of the screen to close the Library and return to the previously open document.
File Types
There are three default file types in the Library: eBooks, eNews and eBooks.
- eBooks lists all electronic book formats such as .prc, palm pilot doc files and so forth.
- eNews lists all .enews documents. These documents are formatted and synchronized using the Mobipocket Web Companion (version 4 and above).
- eDocs lists all documents (.txt or .html files). This includes .html and .txt files produced with the Quick Publish function of the Web Companion or those saved directly into the Contents directory of the eBookMan Desktop Manager.

See also:
For more information about the Quick Publish function of the Web Companion, see "Using Quick Publish" on page 57.

Note:
You can assign a document to a category only from the Book Details dialog box.
Tap eBooks, eNews or eDocs to see the available documents in these file types.
You see a list of available documents in the current file category. The active file type appears bolded and has no underline.
There is also a Categories option that enables you to file your documents by category.
Categories
1. Tap Categ.
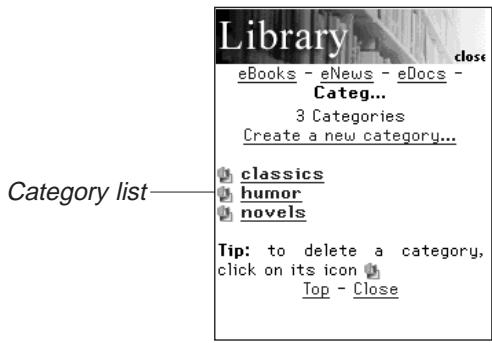
You see a list of previously created categories, if any.
- To see the list of documents assigned to a particular category, tap the category.
Tap a document, to open it.
Tap Close to exit the Library and return to the document you were previously viewing.
Tap Back or Categ to return to the list of categories.
- Tap Create a new category to add a category.
You see the Create Category dialog box.
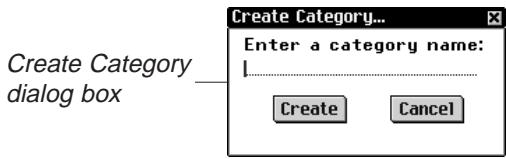
- Tap on the line to activate the data entry mode.
The cursor begins to blink.
- Write the name of your category using the Handwriting area.
- Tap Create to accept the new category.
Tap to exit without saving the category.
- Tap to delete a category.
You must confirm the deletion. Tap OK to confirm. Tap Cancel to exit the dialog box without deleting the category.
List of Documents
Each file type and category name contains of a list of documents.
The list of documents consists of three parts: the number indicator, the document title and an icon.
The number indicates the number of documents in the current folder. The document title or category name is underlined, indicating that it is a hyperlink. Tap the title to open the document. Tap the icon to access the Book Details dialog box and view the size of the document, assign the document to a category or delete the document.
Book Details
- To see a document's details, tap its icon ( 品 and for eBooks and eBooks; for eNews). You see the Book Details dialog box.
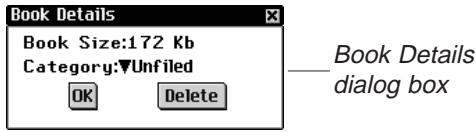
- Tap next to Category to see the drop-down list.
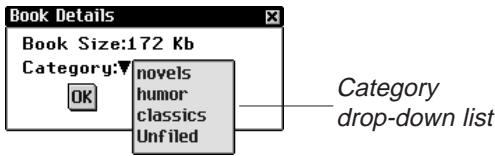
Previously created categories appear as options on this list.
- Tap the category you want the title assigned to.
-
Tap OK.
-
Tap Delete to remove the document from your eBookMan device. You must confirm the deletion. Tap OK to confirm. Tap Cancel to exit the dialog box without deleting the document.

Note:
Any files assigned to a deleted category revert to being unassigned.

Note:
When you delete the last-visited document from eBookMan, Mobipocket Reader automatically opens to the Library the next time you open Mobipocket Reader.
Tips
For each Library screen, a tip is displayed near the bottom of the screen. This tip is a reminder about the status of the screen ("There are no documents in this category.") or a helpful hint about learning more about a particular document ("For more information about a document, click on its icon.")
Footer
The very bottom of each Library screen contains additional hyperlinks.
Top Returns to the top of the current list of documents. If you have more documents than can fit on one screen, move down to see the other items. Then tap Top to return to the top of the list.
Back Returns to your previous location.
Close Closes the Library and returns to the previously open document, if any. If there is no previously open document or that document has since been removed from your eBookMan device, this link does not go anywhere.
Viewing a Document
The Text view is where you read the content of a document.
Text view consists of a tool bar, document text and a progress bar.
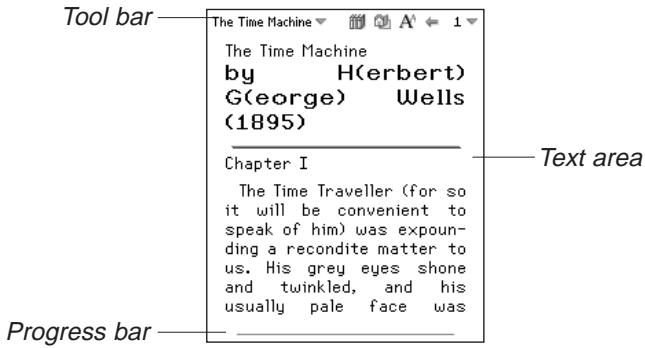
Tool Bar
The tool bar displays the title of the document and the current page number with accompanying menus.
Tap or next to the document title to access the main menu. Tap next to the page number to access the page menu. Tap the menu item you want.
The tool bar also displays icons that enable you to move around in a document and access other locations in Mobipocket Reader. The following icons are available.

Goes to the table of contents, if any, or to the first page if there is no table of contents.

Returns to your previous location.

Cycles through the available font sizes.

Goes to the Library.
Text Area
The Text area of the screen contains the text of the document. This area can include a title page, graphics, table of contents and hyperlinks.
You can adjust the display of the text by changing your settings. For more information, please see "Changing the Settings" on page 131.
Another way to change the display of text, is to switch to full-screen view. Press the Control Wheel to toggle to full-screen view, which removes the tool bar across the top of the screen and the progress bar at the bottom. Press the Control Wheel again to re-display the tool bar and progress bar.
Progress Bar
The progress bar indicates your location in the text of a document. As you move through the document, a highlight moves across the bar. You can tap anywhere on the progress bar to move to a different location within a document.
If you have saved any bookmarks, a small notch is placed on the progress bar indicating the location of the bookmark in a document. «« and «» appear to the left and right of the bar when a document has bookmarks. Tap «« and «» to move to the previous or next bookmark position.
Using the Menu
There are two menus in Mobipocket Reader, a main menu and a page menu. Tap or tap next to the document title to see the main menu. Tap next to the page number to see the page menu. To select a menu item, open the menu you want, then tap the menu item you want.
Main Menu
Use the main menu to change settings, search a document, view the bookmark list, go to the Library, view information about Mobipocket Reader and exit the program.
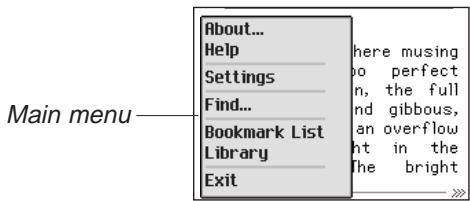
About Displays the version number and copyright information of Mobipocket Reader. Your Personal ID or PID is displayed here. The PID uniquely identifies the Mobipocket Reader on your eBookMan. You are required to enter this number when purchasing eBooks, to secure the transaction.
Help Displays online help.
Settings Enables you to set the font size, display margins, open the Library each time you open Mobipocket Reader and use full justification for text.
Find Goes to the Find in text dialog box.
Bookmark List Displays the list of entered bookmarks for the current book.
Library
Exit
Goes to the Library.
Exits Mobipocket Reader.
Page Menu
Use the page menu to go to the first page, go to any page you want or add a bookmark. In addition, this menu may contain several other items which are part of the guide specified by the Open eBook standard.
These could include the Biography of the author, the Foreward, a Table of Contents, and eBook Info. eBook Info displays specific information about the current eBook, for example, the author, title and date.
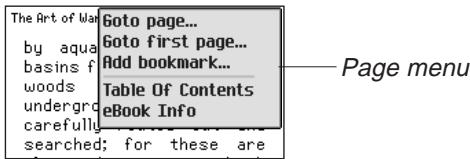
Go to page
Goes to the Go to page dialog box. Tap on the line to activate the data entry mode. Use the Handwriting area to enter a number within the range listed. Tap OK. Tap Cancel to exit without moving.
Go to first page Add bookmark
Goes to the first page of the document.
Adds a bookmark to the current page with a short description label.
Changing the Settings
The Settings dialog box allows you to adjust the display options of Mobipocket Reader. You can change the font size, display margins, choose to go to the Library when you open the
Reader, or change the text justification. To change the settings, tap and then tap Settings. You see the Settings dialog box.
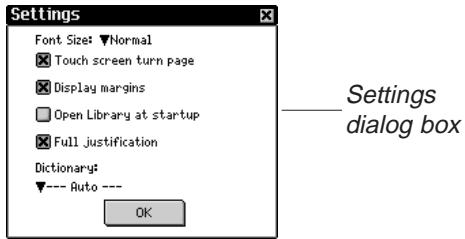

Note:
Tap an empty check box (□) to activate a setting (×).
| Font Size | Sets the font size of all documents opened by Mobipocket Reader. Tap to see the drop-down list. Tap the size you want: Small, Normal or Large. You can also change the font size by tapping A while reading a document. |
| Touch screen turn page | Tap the check box to enable turning pages by tapping the sides of the touch screen. Unchecked, tapping the sides of the touch screen has no effect. |
| Display margins | Tap the check box to place a small margin on the left and right side of the screen for less dense text presentation. Unchecked, the text will fill the entire screen. |
| Open Library at startup | Tap the check box to display the Library each time you open Mobipocket Reader. Unchecked, the Reader opens the last document you were reading, at the location you stopped. |
| Full justification | Tap the check box to present the text of a document aligned with the left and right sides of the screen. Unchecked, the format defaults to left-aligned text. |
| Dictionary: | Select the preferred dictionary for instant lookup. |
Moving around within a Document
Page up and down through the document in the following ways.
- Tap the right side of the screen (when Touch screen turn page is enabled), the down or right arrows on the Control Pad or rock the Control Wheel down to move to the next page.
-
Tap the left side of the screen (when Touch screen turn page is enabled), the up or left arrows on the Control Pad or rock the Control Wheel up to move back a page.
-
As you move through a document, the progress bar at the bottom of the screen indicates your current position in the document. Tap any part of the progress bar to move to another position in the document. Tap to return to your previous location.
- Underlined text indicates a hyperlink. Tap the underlined text to go to the linked section of text. Tap to return to your previous location.
Finding a Definition
You can find a definition for any word in text by tapping on the highlighted word. To highlight a word, drag the stylus over the word. Tap the highlighted word.
The following dialog box appears.
Show this help file
About box
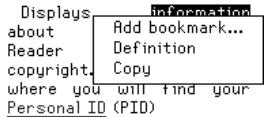
Add bookmark... Adds the word or words to theBookmark List.
Definition
Enables you to search for the definition or translation of the word or words in the designated reference book.
Copy
Copies the highlighted word or words to the clipboard. In copyright books, only the first three words are copied.
Searching a Document
You can find information you want using the Find in text dialog box. The Find in text dialog box enables you to enter a string of characters and search for that string throughout the text of the current document.
- Tap and then tap Find.

Note:
Each search begins at your position in text where you accessed the Find in text dialog box.
You see the Find in text dialog box.
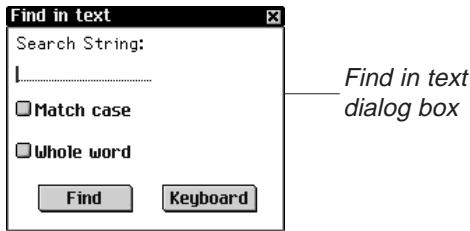

Note:
Bookmarks are assigned to particular pages, so if the font size changes, the bookmark will exist at the same page number in the new font size, not necessarily the same location in text.
- Tap on the line to activate the data entry mode.
The cursor begins to blink.
- Use the Handwriting area or the onscreen keyboard to enter the word or phrase you want to find.
Tap Keyboard to access the onscreen keyboard.
- Tap a check box to restrict your search by either or both of the following parameters.
Match case attempts to find your word or words exactly as you entered them, matching capital and lowercase letters. Leave this unchecked if you want to see matches of your word or words ignoring the case of the letters.
Whole word attempts to find your only the word you entered. Leave this unchecked if you want to see matches of your search word as a part of another word.
- Tap Find to start your search.
Tap to exit without searching.
When a match is found, it appears on the top line of the screen. The Find in text dialog box flashes on the screen. If no matches are found, the Find in text dialog box does not flash and the Find button becomes active again.
- To go to the next match, tap Find again.
To remain at this match and stop searching, tap .
In text, tap to return to your previous location.
Using Bookmarks
You can enter a bookmark in any location in text.
To add a bookmark, follow these steps.
- From any location in text, tap next to the page number, then tap Add bookmark.
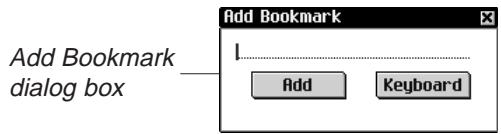
You see the AddBookmark dialog box.
- Use the Handwriting area or the onscreen keyboard to enter a short label describing the bookmark.
Tap Keyboard to access the onscreen keyboard.
- Tap Add to add the bookmark.
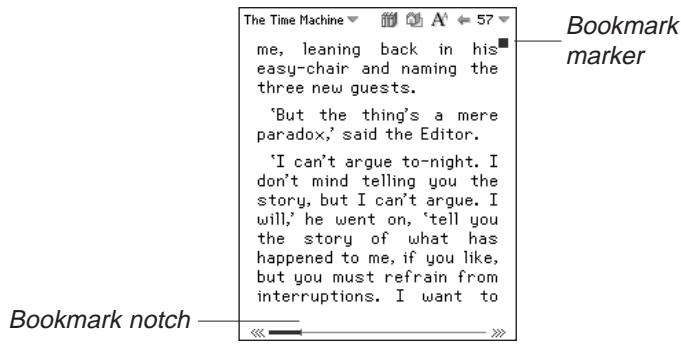
appears at the top right corner of the page where the bookmark was added.
A small notch is placed on the progress bar indicating the location of the bookmark in a document. «» and «» appear to the left and right of the bar when a document has bookmarks. Tap «» and «» to move to the previous or next bookmark position.
- Tap to display the bookmark label.

- Tap OK.
You can view a list of all bookmarks stored for the current document. Each bookmark in the list contains a page number label and the label that was entered when the bookmark was created.
To view or edit the bookmark list, follow these steps.
- Tap and then tapBookmark List.
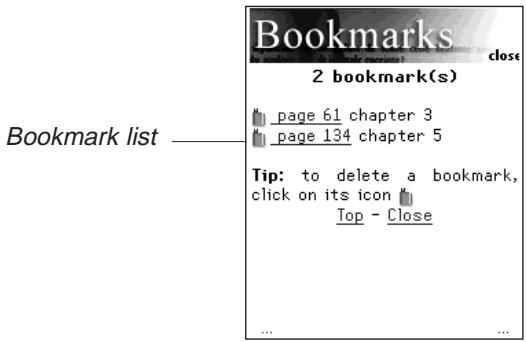
The list is organized by page number. The bookmark label appears next to the page number where the bookmark was added.
If you have more bookmarks than can fit on one screen, three dots appear at the bottom left and right of the screen.
Tap the right side of the screen, the down or right arrows on the Control Pad or rock the Control Wheel down to move to the next page.
Tap the left side of the screen, the up or left arrows on the Control Pad or rock the Control Wheel up to move back a page.
Tap Top to go to the top of the list.
- Tap page # to go to this location in text.
Tap to return to your previous location in text.
- Tap to delete a bookmark.
You must confirm the deletion. Tap OK to confirm. Tap Cancel to exit the dialog box without deleting the bookmark.
- Tap Close to return to your previous location in the document.
Large Tables Display
Where possible, tables that are too large for the screen continue on the following page. If it is not possible, a mode called "Large tables" is activated.
In this mode, icons appear around the table to enable you to navigate the information. Tap the arrows to move the table in the designated direction. Tap the hand to enable dragging.
If several large tables are displayed within the screen, all those which are selected will follow your stylus.
Getting Help
Mobipocket Reader comes with online help. The online help is installed as its own eBook.
To view this help at any time, do the following:
- Tap or tap and then tap Library to go to the Library.
- Tap eBooks if you are not already at the eBooks list.
eBooks list at the Library
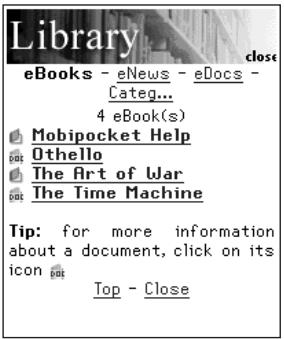
- Tap Mobipocket Help.
Mobipopet Help Table of Contents
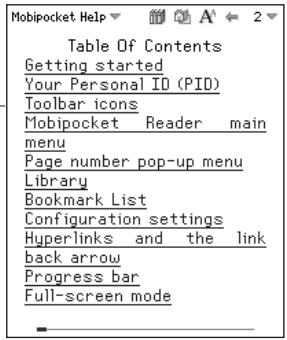
- Tap the section you want to read.
- Tap or tap and then tap Library to return to the Library.
- Tap the title of the document you were previously viewing.
Exiting Mobipocket Reader
You can close Mobipocket Reader and return to the Launcher or you can return to the Launcher and leave Mobipocket Reader running in the background.
- To return to the Launcher without closing Mobipocket Reader, tap
- To close the program, tap and then tap Exit.

9. Audiobook Player
eBookMan includes Audiobook Player, an application that reads audio books, lectures, public radio programs, newspaper articles, and more. With eBookMan, you can listen to your favorite spoken works anywhere, anytime. It's a whole new way to be entertained and informed while on the go or while relaxing. Visit audible.com to see what they have to offer. This chapter describes the Audiobook Player and tells you how to listen to an audiobook.
Before using this program, you must download and install audiobooks, a book recording that is formatted for use in the eBookMan device. eBookMan supports audio format #2 with audio capacity of approximately 5.1 hours for 16 MB of memory.
The World Wide Web's leading source for quality audio downloads of spoken works is www.audible.com. They've compiled a library of more than 12,000 titles that include current best sellers like A Walk in the Woods, Hannibal, and The Brethren, over-the-top comedy from the exclusive RobinWilliams@audible.com, and popular news publications such as The Wall Street Journal, The New York Times, L.A. Times, Forbes, and The Economist. There are a host of categories to choose from at audible.com, including fiction, science, business, speeches, mystery, spirituality and many more. You can download spoken works to your eBookMan through www.audible.com.
To open Audiobook Player, tap at the Launcher.
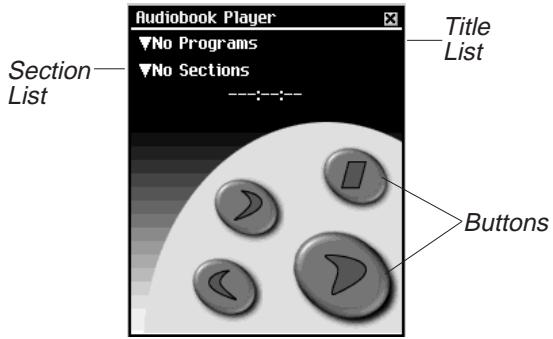
The application uses buttons, menus, and lists to provide functionality. The time elapsed appears in the center of the display.

Note:
eBookMan requires 4 MB of memory for every hour of content stored in Audible format.
Understanding the Buttons
The following buttons perform the audio functions:

Starts playing the selected audio title in the designated section.

During play, pauses the reading.

Stops playing the title.

Fast forwards the title.

Rewinds the title.
Using the Menu
Audiobook Player uses three menus: File, Edit and Control. Some menu items have a character in the right column. These are Menu shortcuts. To select a menu item, tap 且 and then either tap the menu item you want or write the Menu shortcut in the Handwriting area.
To see the menus, tap ⑤ . Tap the menu item or write the Menu shortcut.
File Menu
File menu options provide information about Audiobook Player.
File menu
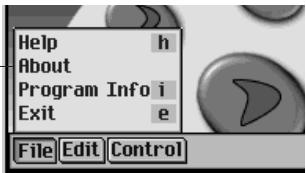
Help (h)
Displays tips for using Audiobook Player.
About
Shows the copyright information for the program.
Program Info (i)
Displays general information about the current title, such as name, author, and size of the file.
Exit (e)
Exits Audiobook Player.
Edit Menu
Use the Edit menu to set preferences.

Preferences (p)
Enables you to select left-hand controls.
Control Menu
Use the Control menu to move through the selected title.
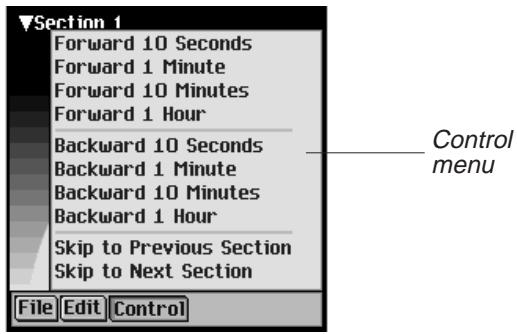
You can jump forward or backward in increments of 10 seconds, one minute, 10 minutes, or one hour. You also can skip to the previous or next section within a title.
Selecting a Title and Section
Audiobook Player uses two drop-down lists to show the available titles and the sections available for the selected title. To access a drop-down list, tap the down arrow.
Use these lists to choose the audio title and section you want to hear.
Listening to an Audiobook
- Tap the top down arrow to see the list of available titles.
- Tap the title you want to hear it.
- Tap the bottom down arrow to see the list of sections available in the current title, where available.

Note:
Not all audiobooks contain sections.
Skip to step 5 if there are no sections in the title you want.
-
Tap the section you want to hear.
-
Tap to begin listening.
You also can press the Control Wheel to start or stop the audiobook. Rock the wheel to adjust the volume.
Use or to fast forward or rewind.
- Tap when done listening.
Saving Audiobooks to MultiMediaCards
If you choose to save your audio books to MultiMediaCards (MMCs), you must "format" each MMC you use. To do this, follow these steps.
- Insert the MMC into your device following the instructions under "Inserting MMCs" on page 209.
- Connect your eBookMan device to the PC and turn the device on.
- Start eBookMan Desktop Manager.
This must be open for Audible Manager to recognize your device.
- Start Audible Manager.
- In the bottom left area, under Franklin eBookMan, select Storage Card.
- Click My Device|Format Franklin eBookMan.
If you have Audible Manager Advanced, click Devices|Erase Franklin eBookMan.
You can now download books to the MMC.
You must do this each time you save audiobooks to a different MMC.
Once you format or erase an MMC in Audible Manager, Audiobook Player in your eBookMan will only recognize audiobooks stored on the most recently formatted MMC.

Important!
Existing content on the MMC will not be erased.
Exiting Audiobook Player
You can either close Audiobook Player and return to the Launcher, or you can return to the Launcher and leave Audiobook Player running in the background.
- Tap to return to the Launcher with Audiobook Player running in the background.
The audiobook stops playing, but Audiobook Player remains open.
- To exit the program, tap and then File|Exit or write Menu shortcut e.
You also can tap to close the program.

10. Music Player
eBookMan includes Music Player, a program that enables you to play music. This chapter describes features of the program and details how to select and play music titles, how to use the menus, and how to control the volume.
Music Player supports MP3 files. When you download an MP3 file into your device, eBookMan® Desktop Manager converts the MP3 format to one recognized by your eBookMan device. For more information about synchronizing music files, see "Chapter 3. Managing and Synchronizing Content."
Tap at the Launcher to open Music Player.
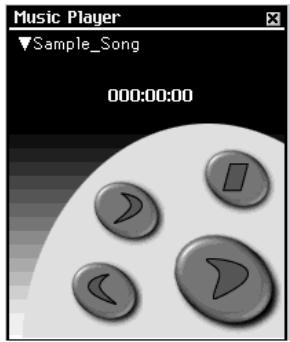
The application uses buttons, menus, and lists to provide functionality. The time elapsed appears on display.
Understanding the Buttons
The following buttons perform the music functions:

Plays the music.

During play, pauses the music.

Stops the music.

Fast forwards the music.

Rewinds the music.

Note:
eBookMan requires approximately 625 K of memory for every minute of music stored in mono format.
It requires 1.25 MB of memory for every minute of music stored in stereo format.

Note:
When the dropdown list is open, use and to quickly step through music titles.
Using the Menu
Music Player uses three menus: File, Edit, and Control. To see the menus, tap 口 . Tap the menu item you want or write the Menu shortcut.
File Menu
Use the File menu to view information about the program and exit the program.
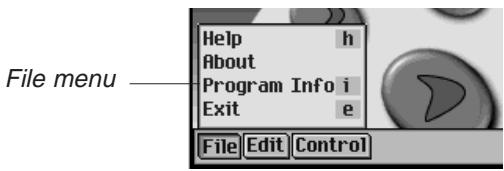
Help (h) Displays tips for using Music Player.
About Shows the copyright information for the program.
Program Info (i) Displays general information about the current title, such as name, author, and size of the file.
Exit (e) Exits Music Player.
Edit Menu
Use the Edit menu to set your preferences for the application.

Preferences (p) Displays the left-handed controls.
The Control Menu
Use the Control menu to set your preferences for the application.
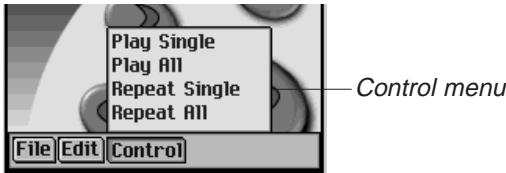
Play Single
Plays the selected music title.
Play All
Plays all music titles in the order listed.
Repeat Single
Plays the selected music title repeatedly.
Repeat All
Plays all music titles in the order listed and repeats the entire list of song.
Selecting a Title
Music Player uses a drop-down list to show the currently loaded music titles. Tap the down arrow to view the list of titles.
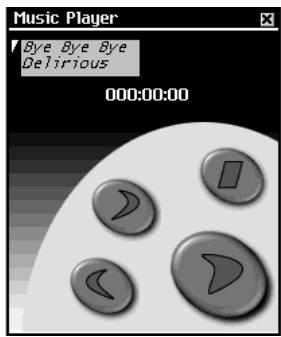
Tap the title you want to select it.
Listening to Music
- Tap the down arrow at the top left of the screen.
The drop-down list of titles appears.
-
Tap the music title you want.
-
Tap

You can press the Control Wheel to start or stop the music.
Rock the wheel to adjust the volume.
Use or to fast forward or rewind.
- Tap D when done listening.
Exiting Music Player
You can either close Music Player and return to the Launcher, or you can return to the Launcher and leave Music Player running in the background.
-
Tap to return to the Launcher with Music Player running in the background. The music stops playing, but Music Player remains open.
-
Tap and then File|Exit or write Menu shortcut e. You can also tap
ORGANIZER APPLICATIONS
11. Address Book
eBookMan includes Address Book, a standard organizer program for storing names, telephone numbers and street and internet addresses. This chapter describes how to add, view, edit, find and remove entries.
Tap at the Launcher to open Address Book. You see the Contacts List (if entries have been made), a New button, and a Search field.
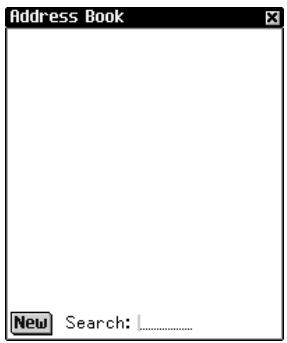
Contacts List with no entries
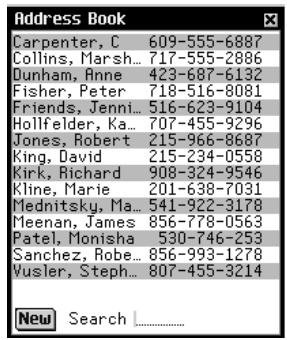
Contacts List with entries
When the List contains more entries than can fit on a single screen, a scroll bar appears.
Tap the up and down arrows on the scroll bar or the scroll lines on the Control Pad to move up or down one line at a time.
Tap in the scroll bar above or below the slider, or tap the scroll arrows in the Control Pad to move up or down one screen at a time.
Names may be shortened to fit in the display column. Tap a contact to see the entire entry.
Adding Contacts
To add a contact, follow these steps.
- Tap New.
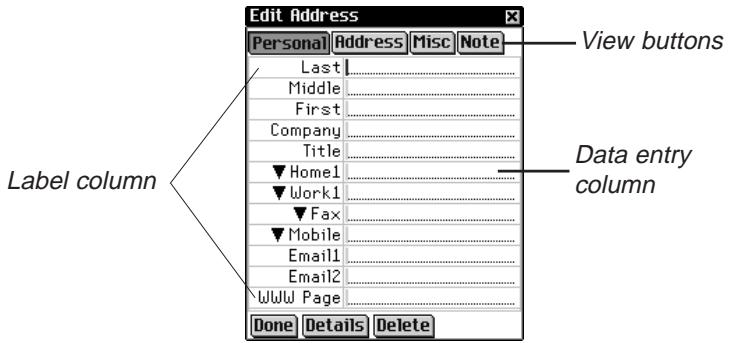
You see the Edit Address screen. It includes four buttons for the available views: Personal, Address, Misc and Note.
Personal is selected as the Personal View is the first view to appear when you tap New. Each view contains data fields for specific information.
There are two columns - Label and Data entry. The Data entry column has a data field for each item in the Label column. A blinking cursor appears in the active field.
There are three buttons at the bottom of the screen: Done, Details, and Delete.
- Tap in the Data entry column next to the label you want.
To see additional labels, tap the button for the view you want and then tap in the data entry column next to the label you want.
When appears next to a label, you can select a different name for that field. Tap to see the drop-down list and tap the name you want. The name appears in the label column.
- Enter your information in every view and field you want.
When you enter more text than will fit on one line, the text wraps to the next line.
Each field has a limit on the number of characters it can hold. For details about the maximum number of characters in any particular field, see "Field Limits" on page 159.

See also:
For details about the different views, see "Understanding the Views" on page 152.

Note:
When you select a different name for a label, it applies only to the current contact.

Note:
You can enter data using the Handwriting area or the onscreen keyboard. To access the onscreen keyboard draw a line up and out of the Letter input area (abc).

Note:
If you do not specify a personal or company name, the entry in the Contacts List will be - Untitled-, and will show the designated phone number or email address.
- In Personal View, tap Details to select the phone number you want displayed in the Contacts List.
Please see "Address Details" on page 156 for more information.
- Tap Done or to save your changes and return to the Contacts List.
The contact you entered appears in alphabetical order in the Contacts List. For more information on how to specify the information you want to appear in the Contacts List, please see "Preferences" on page 157. To exit the Edit Address screen without saving the entry, tap Delete. Tap OK to confirm or tap Cancel to exit the dialog box without deleting the entry.
Understanding the Views
Address Book provides four screens to enter information for each contact. These are: Personal, Address, Misc, and Note.
Personal View
By default, this is the view you see when you access the Edit Address screen. It enables you to see and enter names, phone numbers, job information and internet addresses.
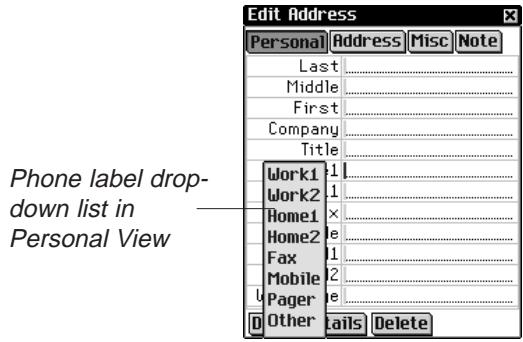
There are four fields for entering phone numbers. You can select a label for each of these fields. Tap to see the dropdown list with these choices: Work1, Work2, Home1, Home2, Fax, Mobile, Pager and Other. Tap a label on the list to select it.
Address View
At this screen, you can enter addresses for work and home.
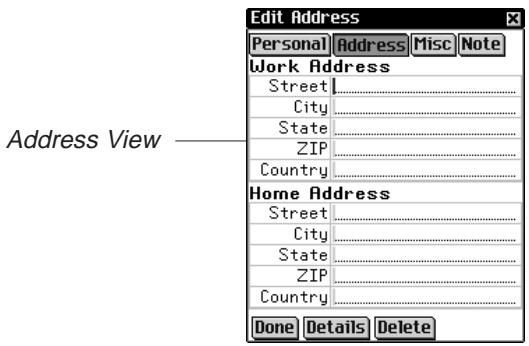
For both the Work Address and Home Address, you can enter the street name, city, state, zip code and country.
Misc View
At this screen, you can enter additional personal information about your contact.
Custom1 through Custom4 are labels you can change
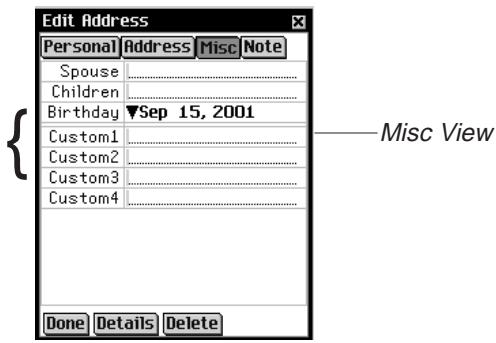
The labels include Spouse, Children, and Birthday. You can also add custom labels. By default, the custom fields are named Custom1, Custom2, Custom3, and Custom4.

See also:
See "Custom Fields" on page 157 for more information on how to name the custom fields.
Setting a Birthday
You can add a contact's birthday in the Misc View. Follow these steps.
- Tap next to Birthday.
You see the Month drop-down list.
- Tap the Month you want to select.
- Tap the day number.
The day number is highlighted.
- Enter the day number.
Write in the Handwriting area or use the onscreen keyboard to enter the day number.
- Tap the first two digits of the year number.
The first two digits of the year number are highlighted.
- Enter a 1 or 2.
When a "1" is entered, "19" automatically appears. When a "2" is entered, "20" automatically appears.
- Tap the last two digits of the year number.
The last two digits of the year number are highlighted.
- Enter the last two digits of the year number.
Note View
At this screen, you can enter additional comments or reminders regarding the current contact.
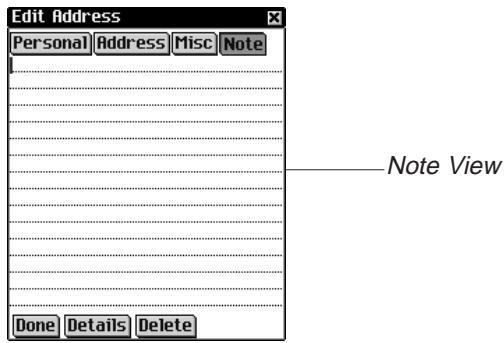
When a note is attached to a contact, 国 appears next to it in the Contacts List.
Editing Entries
To edit an entry, follow these steps.
-
Go to the Edit Address screen from the Contacts List in one of the following ways.
-
Tap the entry you want.

- Hold your stylus down on the entry you want. You see a pop-up menu. Tap Edit.
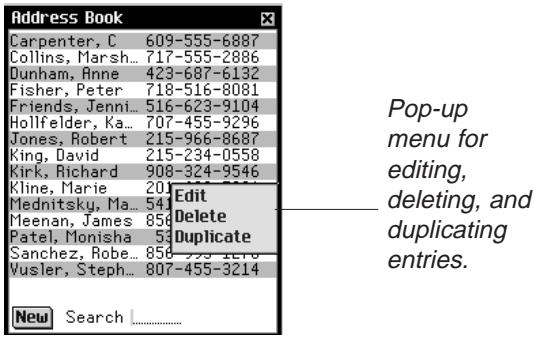
- Tap in the data field you want to change. To find additional fields, check the other views.
- Enter or edit information in any view and field.

Note:
You can create an exact copy of the entry by tapping Duplicate or delete an entry by tapping Delete.
- Tap Done or to save your edits and return to the Contacts List.
To remove the entry, tap Delete. Tap OK to confirm or tap Cancel to exit the dialog box without deleting the entry.
Address Details
Use the Details dialog box to select the phone number or email address you want displayed on the Contacts List.
- From the Edit Address screen, tap Details to access this screen.
You see the Details dialog box.
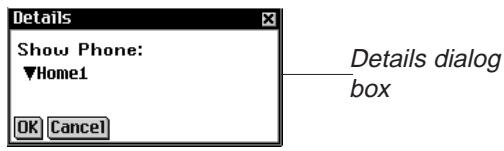
- Tap next to Show Phone to see the drop-down list.
Note: Only phone or email fields with data in them appear as options.
- Tap the label of the phone number or email address you want displayed.
- Tap OK to save your changes and return to the Edit Address screen.
To use the previous or default display option, tap Cancel.
Note: This display option applies only to this specific entry.
Custom Fields
To create a custom field in the Misc view, follow these steps.
- From the Contacts List, tap and then tap File|Custom Fields.
You see the Custom Fields dialog box.
Custom Fields dialog box with edited label
- Tap in the field of the label you want to edit.
- Drag your stylus across the current label to highlight it.
- Enter the label name you want.
Write in the Handwriting area or use the onscreen keyboard to enter your custom label.
- Tap OK to save your changes and return to the Contacts List.
Tap Cancel or to close the Custom Labels dialog box without saving your changes.
Preferences
You can sort the Contacts List by last name, first name or company name. To set your preference, follow these steps.
- From the Contacts List, tap and then either tap File|Preferences or write Menu shortcut p.
- Tap to see the Sort drop-down list.
Preferences dialog box with open drop- down list

Note:
The custom fields you create will apply to all contacts.
- Tap the option you want to select.
Last, First

First Last
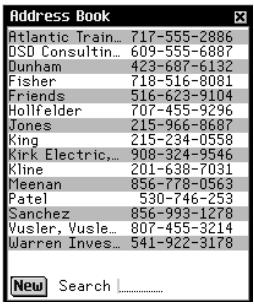
Company, Last
- Tap OK to accept your changes.
Tap Cancel to close the Preferences dialog box without saving your changes.
Searching for an Entry
In the Contacts List, do the following to find an entry.
- Tap on the line next to Search in the Contacts List.
- Use the Handwriting area or onscreen keyboard to enter the first letter or letters of the entry you want.
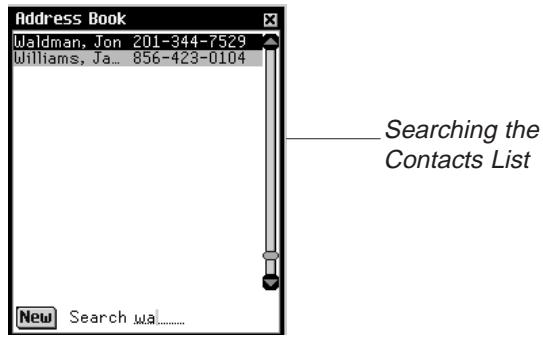
The first entry that matches your letters is highlighted. You can add more letters and the highlight moves to the next matching entry. When you enter a letter for which there is no match, the highlight disappears.
Deleting Entries
You can delete an entry from the Contacts List or from any of the views in the Edit Address screen. To delete an entry, do one of the following:
- In the Contacts List, hold your stylus down on the entry you want to delete. Tap Delete on the pop-up menu. You see a dialog box asking you to confirm the deletion. Tap OK to delete. Tap Cancel to exit without deleting.
- In the Contacts List, tap the entry you want to delete. You see the Edit Address screen. Tap the Delete button at the bottom of the screen. You see a dialog box asking you to confirm the deletion. Tap OK to delete or tap Cancel to exit without deleting.
Field Limits
Each Address Book field has a limit on the number of characters it can hold. The following table lists each field and its respective limit.
| Field Name | Maximum number of characters | Field Name | Maximum number of characters |
| Last | 64 | Work Street | 64 |
| First | 64 | Work City | 64 |
| Company | 64 | Work State | 64 |
| Middle | 64 | Work ZIP | 32 |
| Title | 64 | Work Country | 64 |
| Work1 | Work2 | Home1 | Home2 | Fax | Mobile | Pager | Other | 32 | Home Street | 64 |
| Home City | 64 | ||
| Home State | 64 | ||
| Home ZIP | 32 | ||
| Work1 | Work2 | Home1 | Home2 | Fax | Mobile | Pager | Other | 32 | Home Country | 64 |
| Spouse | 64 | ||
| Children | 64 | ||
| Birthday | 64 | ||
| Work1 | Work2 | Home1 | Home2 | Fax | Mobile | Pager | Other | 32 | Email1 | 64 |
| Email2 | 64 | ||
| WWW Page | 64 | ||
| Custom1 | 64 | ||
| Work1 | Work2 | Home1 | Home2 | Fax | Mobile | Pager | Other | 32 | Custom2 | 64 |
| Custom3 | 64 | ||
| Custom4 | 64 | ||
| Note | 1024 |

See also:
For information on how field limits affect synchronization, see "Changing Advanced Settings" on page 45.
Using the Menu
In addition to the drop-down and pop-up menus described in the different views, there are two Main menus available in Address Book. The File menu is available at the Contacts list and the Edit menu is available in each of the four views when the cursor is blinking.
To select a menu item, first tap 串 , tap either File or Edit and then either tap the menu item you want or write the Menu shortcut in the Handwriting area.
File Menu
Use the File menu to create custom fields, set preferences, view information about Address Book and exit the program.
File Menu
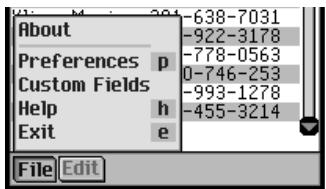
About Displays the version number of Address Book.
Preferences (p) Enables you to select a sort order for the Contacts List.
Custom Fields Enables you to create labels for the custom fields.
Help (h) Displays online help.
Exit (e) Exits Address Book.
Edit Menu
Use the Edit menu to cut, copy and paste text, access the onscreen keyboard, or view the Handwriting Guide. Cut and Copy are activated only when text is selected. To select text, drag your stylus over the text. Paste is available only when there is text saved to the clipboard.
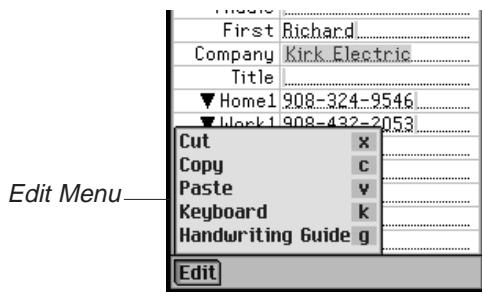
Cut (x) Removes any selected text. A copy is retained on the clipboard.
Copy (c) Places a copy of any selected text on the clipboard.
Paste (v) Places text from the clipboard into the selected location.
Keyboard (k) Displays the onscreen keyboard.
Handwriting Guide (g) Displays the libraries of input characters.
Synchronizing with Microsoft® Outlook
For detailed instructions please see "Using Intellisync" on page 43.
Exiting Address Book
You can close Address Book and return to the Launcher or you can return to the Launcher and leave Address Book running in the background.
- To return to the Launcher without closing Address Book, tap
- To close the program, tap 串 , then tap File|Exit from the Contacts List.
You can also tap at the top right of the Contacts List.

12. Date Book
eBookMan includes Date Book, a standard organizer program for maintaining your schedule. Once you enter appointments, you can view them by day, by week or by month. This chapter describes how to add appointments and edit them. It also shows you how to use the different views and menus and how to move around within the program.
Tap at the Launcher to open Date Book.
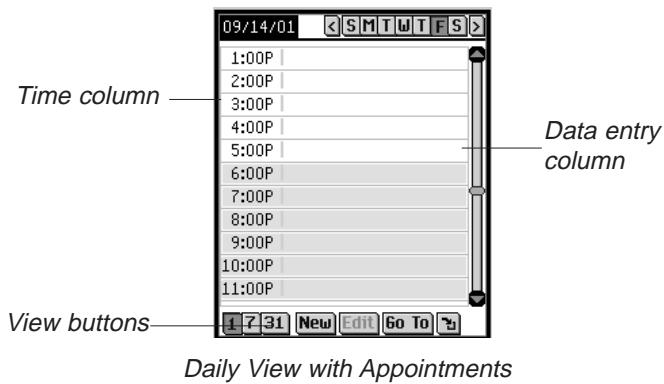
Each time you open Date Book, you see the Daily View for the current day. The current day is set in My eBookMan®.
The data entry fields in Daily View are divided into two columns - the time column on the left and a corresponding data entry column on the right. By default, there are time slots for every hour from 12 midnight (a.m.) to 11 p.m.
A scroll bar appears to the right of the screen. Tap the up and down arrows on the scroll bar to move up or down one line. Tap in the scroll bar above or below the slider to move up or down one screen.

See also:
For details about the views in Date Book, please see "Understanding the Views" on page 172.

See also:
To learn more about the views, see "Understanding the Views" on page 172.

See also:
Please see "Setting the Date", "Repeating Appointments", "Setting Alarms" and "Adding Notes" below to read instructions for these settings.
Adding Appointments
You can add appointments for the default times or you can create custom time slots. To add an appointment, follow these steps.
- Tap Go To.
- Tap the month you want.
- Tap the day you want.
- Tap Select.
You go to the Daily View for that day.
You must be in Daily View to add appointments to your schedule.
- Tap on the line in the data entry column for the time you want.
- Enter your appointment.
You can either write in the Handwriting area or use the onscreen keyboard. To access the onscreen keyboard, draw a line up and out of the Letter input area (abc).
Each field has a limit on the number of characters it can hold. For details about the maximum number of characters in any particular field, see "Field Limits" on page 175.
- Tap the time approximate slot for your appointment to set a start and end time.
You see the Select Time dialog box.
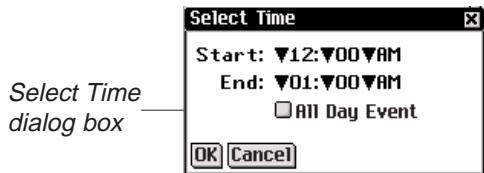
Tap the down arrows and then tap the times you want. To set an all day event, tap the All Day Event check box.
- Tap OK to save your changes.
To exit without saving changes, tap Cancel or X.
Your appointment appears in its sequential place in Daily View.
To add an appointment for a custom time slot, follow these steps.
- Tap New.
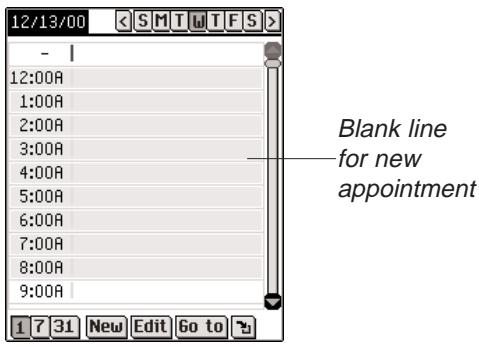
The cursor is active on a blank line in the data entry column at the top of the screen.
- Enter your data.
- Tap in the empty time column.
You see the Select Time dialog box.
The All Day Event check box is active by default.
- Tap the check box to deselect an all day event and set a start and end time for this appointment.
- Tap the down arrows and then tap the times you want.
- Tap OK to save your changes.
To exit the Select Time dialog box without saving your changes, tap Cancel or X.
Your appointment appears in its sequential place in Daily View.
Editing Appointments
You can edit the text of an appointment directly in the data entry column. Tap to place the cursor in the appointment where you want to make your edits, and add or delete text.
Use the Handwriting area or the onscreen keyboard to make your changes. Your edits are automatically saved.
You can also enter the location of an appointment, set an appointment to repeat, set an alarm and attach a note in the Edit dialog box. To make these edits, tap in the data entry column of an appointment to select it, then tap Edit. The Edit dialog box appears.
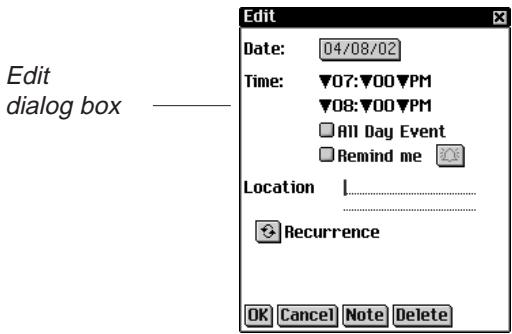

Note:
To change the number for an interval, drag your stylus across the number to highlight it and enter a number.

See Also:
Please see "Setting the Date" on page 171 for more information on how to select a date.
Repeating Appointments
To set an appointment to repeat, do the following.
- Tap
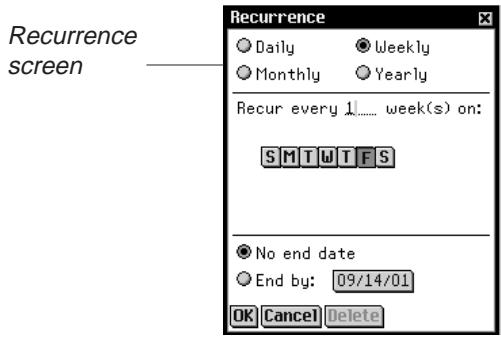
You see the Recurrence screen.
- Tap the check box next to Daily, Monthly, Weekly or Yearly.
- Set an interval for your appointment to automatically repeat.
- Tap a button (SMTWTFS) to select the day for the recurring event.
- Set an end date.
To set the end date, tap the End by check box and tap the
date box.
You see the Select Date screen. Tap the day/month/year and tap Select.
To repeat your appointment indefinitely, tap the No end date check box.
- Tap OK to save your changes and return to the Edit dialog box.
To exit the Recurrence screen without saving any changes, tap Cancel or X.
To delete a previously set recurrence, tap Delete.
At the Daily View, indicates that an appointment repeats. The Recurrence screen varies by interval setting: Daily, Weekly, Monthly, and Yearly.
Daily Recurrence
The Daily setting repeats your appointment based on a set number of days. For example, to repeat an appointment every 5 days, tap the Daily check box and write 5 in the Recur every .. day(s) field.
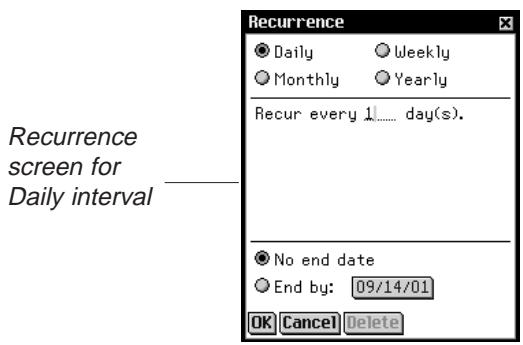
Weekly Recurrence
The Weekly setting repeats your appointment based on a set day of the week. To repeat an appointment every two weeks on Wednesday, tap the Weekly check box, write 2 in the Recur every . . . week(s) on field and tap for Wednesday.
Recurrence screen for Weekly interval
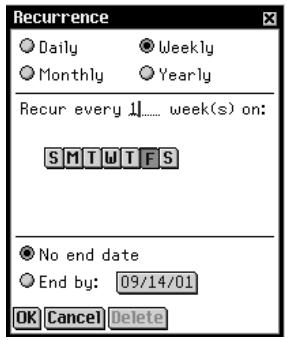
Monthly Recurrence
The Monthly setting repeats your appointment on a monthly basis. To repeat an appointment every third month, tap the Monthly check box, write 3 in the Recur every . . . month(s) on the field and tap the day or date you want. The date setting is derived from the current day.
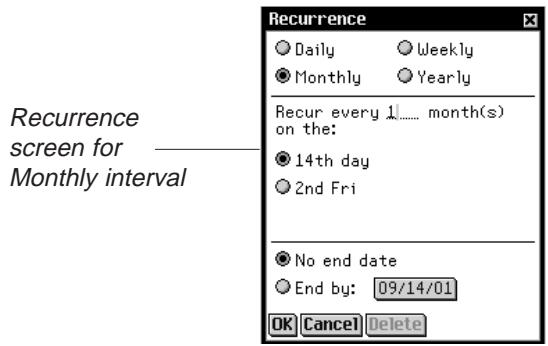

Note:
Appointments can recur through calendar year 2029.
Yearly Recurrence
The Yearly setting repeats your appointment on an annual basis. You can set an appointment to repeat either on the current date every year or the current day. For example, if today is December 13 and the second Wednesday, you can select either the 13th day of December or the second Wednesday in December as the yearly recurrence date. To repeat an appointment every year, tap Yearly, then tap either the current date or day in the Recur every year on the field. The date setting is derived from the current day.
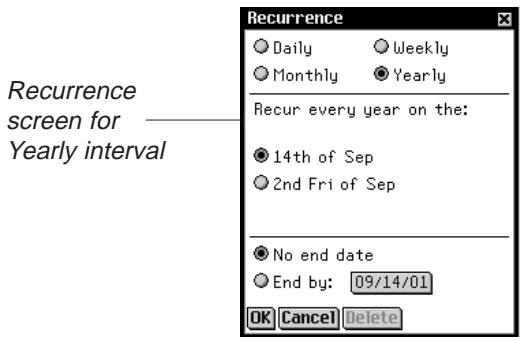
You can set an end date in each of the views. Tap the End by check box and then tap the date button. You go to the Select Date screen. Select your date as explained in "Setting the Date" on page 171. Tap Select to return to the recurrence screen. If you do not wish to set an end date, tap the No end date check box.
Setting Alarms
To set an alarm, follow these steps.
- Tap the Remind Me check box to activate an alarm for your appointment.
- Tap to set the time when you want the alarm to sound. You see the Reminder Settings dialog box.
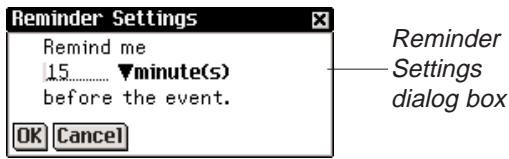
- Tap to see the time drop-down list and tap the item you want to select.

You can set your alarm for minutes, hours, days or weeks before the appointment.

Note:
If you tap the
Remind Me
check box and
don't tap, the
default remind
time is 15 min
utes before the
event.
- Enter the interval number for when you want to be alerted.
- Tap OK to accept your changes and return to the Edit dialog box.
Tap Cancel to return to the Edit dialog box without changing the alarm settings.
At the Daily View, indicates that an alarm has been set for an appointment.
Selecting Alarm sounds
You must be in Daily View to set an alarm sound. Tap OK to exit the Edit dialog box and return to Daily View.
- Tap and then either tap File|Preferences or write Menu shortcut p.
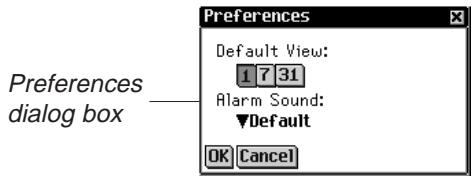
- Tap to see the Alarm Sound drop-down list.
You see a list of the available sounds your alarm can make.
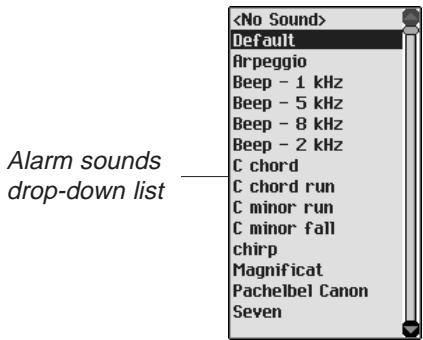
- Tap the sound you want to select.
You hear the sound.
- Tap OK to enter your changes.
Tap Cancel to close the Preferences dialog box without saving your changes.
Adding Notes
To add comments or information to the current appointment, follow these steps.
- Tap Note in the Edit dialog box.
You see the Notes screen.
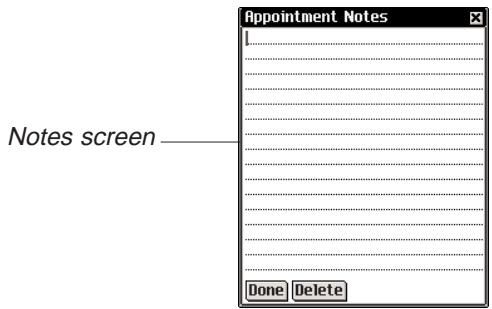
- Enter your note.
You can use the Handwriting area or the onscreen keyboard.
- Tap Done to save the note for the appointment and return to the Edit dialog box.
To delete the note from the appointment, tap Delete.
At the Daily View, 国 indicates that an appointment has a note.
Setting the Date
- From the Edit Appointment dialog box, tap the date box next to Date to set or change the date for this appointment.
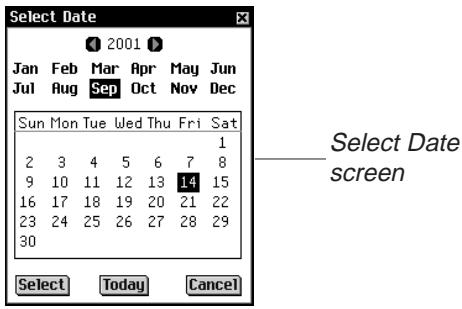
- Tap or to go to a different year.
-
Tap the month you want.
-
Tap the day of the month you want.
To return to the current date from a different location, tap Today.
- To select the date, tap Select.
To exit without selecting a date, tap Cancel.
Understanding the Views
You can choose any of three different views while using your Date Book. Buttons at the bottom of the screen allow you to choose between Daily, Weekly and Monthly views.
To set the default view, tap and then either tap
File|Preferences or write Menu shortcut p. Tap the view you want and tap OK to enter your changes.
Daily View
Daily View displays the schedule for the selected day. It is the first screen you see when you enter Date Book. To return to this view from another screen, tap 1.
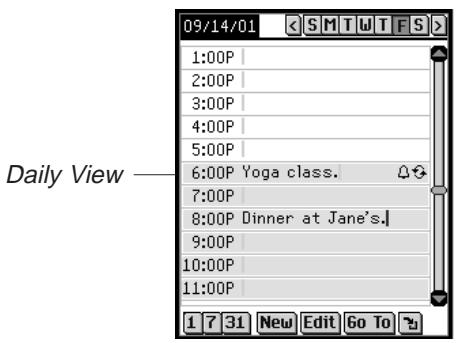
A scroll bar is always displayed to the right of the screen. Tap the up and down arrows on the scroll bar or the scroll lines on the Control Pad to move up or down your schedule one line at a time. Tap in the scroll bar above or below the slider, or tap the scroll arrows in the Control Pad to move up or down one screen at a time.
Buttons representing each day of the week, beginning at Sunday or Monday, are displayed across the top right of the screen.
- Tap the day you want to select. The selected day is shaded.
- Tap × or × to go to the previous or next calendar week.
- Tap to return to the current date from another location.
Weekly View
- Tap to go to the Weekly View.
This view displays the schedule for a single week. If there are no appointments for the week, you see the message "No appointments this week".
The month and year are displayed at the top left of the screen and the number of the calendar week being displayed is at the top right of the screen.
- Tap < or > to go to the previous or next calendar week.
- To return to the current week, tap
You can view your weekly appointments as a list or as a grid.
- Tap at the bottom of the screen to see the week's schedule as a list.
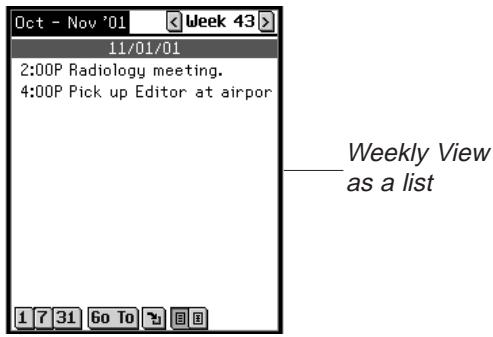
Each day is separated by a dark bar listing the day of the week and date.
If your schedule contains more appointments than can fit on one screen, a scroll bar appears. Tap the up and down arrows on the scroll bar or the scroll lines on the Control Pad to move up or down your schedule a line at a time. Tap in the scroll bar above or below the slider, or tap the scroll arrows in the Control Pad to move up or down one screen at a time.
- Tap at the bottom of the screen to see the week's schedule as a grid.
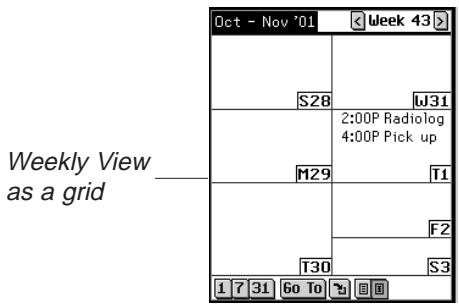
Each day's schedule is listed in it's own box. The day and date is abbreviated in the corner of each box. If you are viewing the week containing the current date, that day is highlighted. Tap the day/date box to go to the Daily View for that day.
Monthly View
- Tap 31 to go to the Monthly View.
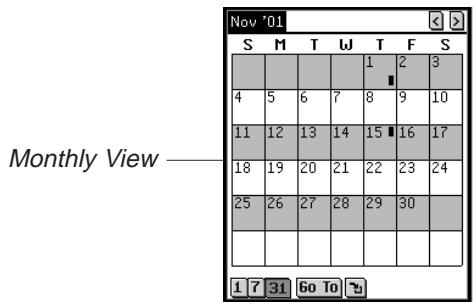
This view displays the schedule for any single month. If you are viewing the month containing the current date, it is highlighted.
Days for which you have entered appointments are marked with a bar. The bar appears to the top right for a.m. appointments and to the bottom right for p.m. appointments.
The month and year are displayed at the top left of the screen.
- Tap < or > to go to the previous or next calendar month.
- To return to the current month, tap
Field Limits
Each Date Book field has a limit on the number of characters it can hold. The following table lists each field and its respective limit.
| Field Name | Maximum number of characters |
| Description | 64 |
| Notes | 1024 |
Using the Menu
There are two menus in Date Book: File and Edit. The File menu is available in the Weekly and Monthly Views and both menus are available in Daily View.
To select a menu item, first tap tap either File or Edit and then either tap the menu item you want or write the Menu shortcut in the Handwriting area.
File Menu
Use the File menu to set preferences, view information about Date Book, read online help, and exit the program.

See also:
For information on how field limits affect synchronization, see "Changing Advanced Settings" on page 45.
File menu
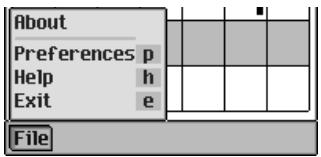
About Displays the version number of Date Book.
Preferences (p) Enables you to select the alarm sound.
Help (h) Displays online help.
Exit (e) Exits Date Book.
Edit Menu
Use the Edit menu to cut, copy and paste text, access the onscreen keyboard and view the Handwriting Guide. Cut and Copy are activated only when text is selected. Drag your stylus over the text you want to cut or copy. Paste is available only when there is text saved to the clipboard.
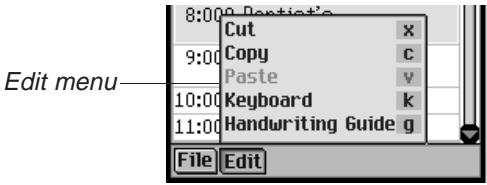
Cut (x) Removes any selected text. A copy is retained on the clipboard.
Copy (c) Places a copy of any selected text on the clipboard.
Paste (v) Places text from the clipboard into the selected location.
Keyboard (k) Displays the onscreen keyboard.
Handwriting Guide (g) Displays the libraries of input characters.
Synchronizing with Microsoft® Outlook
For detailed instructions please see "Using Intellisync™" on page 43.
Exiting Date Book
You can close Date Book and return to the Launcher or you can return to the Launcher and leave Date Book running in the background.
- To return to the Launcher without closing Date Book, tap ( & g 0 & c ) .
- To close the program, tap , then either tap File|Exit or write Menu shortcut e.

13. ToDo Book
eBookMan includes ToDo Book, a standard organizer program for entering your todos and keeping track of them. This chapter describes how to enter, edit and delete todos and how to set priority levels for your tasks.
Tap at the Launcher to open ToDo Book. When you open the program for the first time, you see a screen with three buttons at the bottom: New, Edit, and Show. When entries exist, the ToDo List displays all the entries.
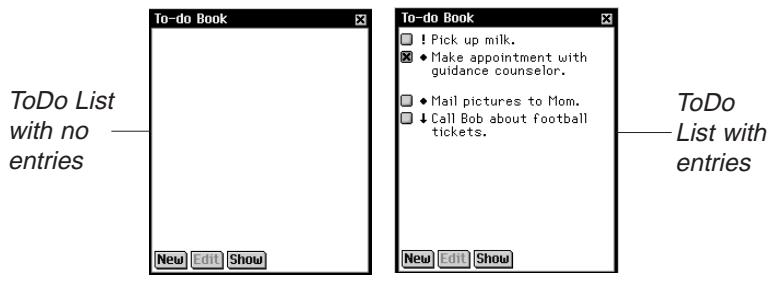
When your ToDo List contains more entries than can fit on one screen, a scroll bar appears. Tap the arrows to move up or down one line. Tap in the scroll bar above or below the slider, use the scroll arrows on the Control Pad or rock the Control Wheel to move up or down one screen.
Adding Entries
To create a new entry, follow these steps.
- Tap New.
Write in the Handwriting area or use the onscreen keyboard to enter your todo.
You can enter a maximum of 10 24 characters.
- Tap the Priority icon to see the pop-up menu of priorities. Tap Low ↓, Normal + or High ↑ to select the one you want.

Note:

completion check box.

low priority icon.

normal priority icon.

high priority icon.
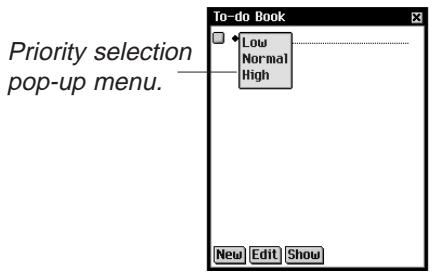
- Tap Edit to add settings.
See "Editing Entries" below for more information.
- Tap OK to exit the Edit dialog box.
- Tap in the empty completion check box to mark your todo as completed .
Editing Entries
You can change the text of a todo right in the去做 List.
Tap to place the cursor in a todo where you want to make your edits, and add or delete text.
Use the Handwriting area or the onscreen keyboard to make your changes. Your edits are automatically saved.
You can select a todo to edit from the ToDo List. Hold your stylus down on the todo you want to edit. You see a pop-up menu with 3 choices: Edit, Delete and Duplicate.
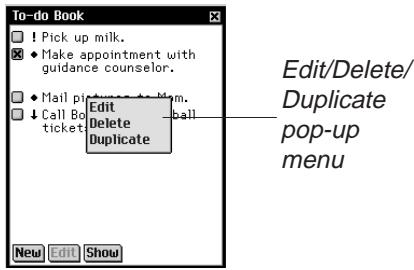
To edit the entry, tap Edit.
You go to the pop-up menu for this todo.
- To delete the todo, tap Delete.
You see a dialog box asking you to confirm the deletion. Tap OK to delete or tap Cancel to exit without deleting.
- To create an exact copy of the todo, tap Duplicate.
Entering Settings
To enter or edit settings for a todo, tap in the line of the todo to select it, then tap Edit.
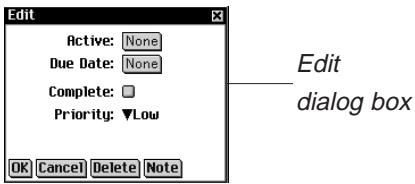
In the Edit dialog box, you can set a priority level, the due date, and the activation date. You can also mark your todo as complete, add a note or delete your todo.
- Tap to see the Priority drop-down list.
The options on this menu are Low , Normal and High!. Tap the priority level you want to set.
- Tap the Due Date box to set a due date.
In the Select Date screen tap the day/month/year you want.
- Tap the Active date box to select an activation date.
In the Select Date screen tap the day/month/year you want.
- Tap Note to add additional comments or information regarding this todo.
You can add up to 1028 characters.
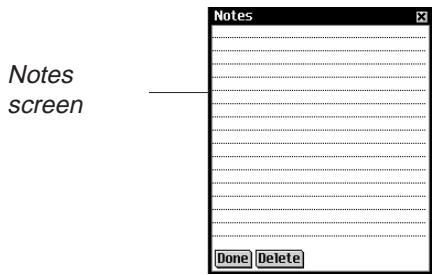
Tap Done to save the note. 国 appears next to the todo on the ToDo List.

See also:
See "Selecting a Date" on page 182 for information on how to select a due date and an activation date.
To delete the note, tap Delete. You see a dialog box asking you to confirm the deletion. Tap OK to delete or tap Cancel to exit without deleting.
- Tap in the empty completion check box to mark your todo as complete .
- Tap OK to save your changes.
Tap Cancel to exit the Edit dialog box without saving your changes or settings.
To delete the todo, tap Delete. You see a dialog box asking you to confirm the deletion. Tap OK to delete or tap Cancel to exit without deleting.
Selecting a Date
When you select the Active or Due Date options in the Edit dialog box, the Select Date screen is displayed.
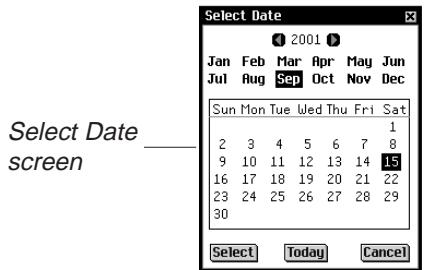
- Tap the Q or D to select the current year.
- Tap the current month and day. To return to the current date from a different location, tap Today.
- Tap Select to save changes. Tap Cancel to exit without saving your changes.
Changing Your ToDo List View
The default view has the completion check box and the priority icon to the right of the todo. To change the display of your todos, do the following:
- Tap Show to change the way you view your todos.

- Tap the check box next to the options you want to see in your ToDo List.
Show Due Dates displays due dates.
- Show Completed Todos displays completed todos in addition to active ones.
-
Show Only Active Todoes displays only those todos that are not yet completed.
-
Tap OK to confirm your changes.
-
Tap Cancel to exit the Show dialog box without saving your changes.
Field Limits
Each ToDo Book field has a limit on the number of characters it can hold. The following table lists each field and its respective limit.
| Field Name | Maximum number of characters |
| Description | 128 |
| Notes | 1024 |

See also:
For information on how field limits affect synchronization, see "Changing Advanced Settings" on page 45.
Using the Menu
There are two menus in ToDo Book: File and Edit. The File menu is available when no todo is selected in the ToDo List. When a todo is selected, both menus are available.
To select a menu item, first tap , tap either File or Edit and then either tap the menu item you want or write the Menu shortcut in the Handwriting area.
File Menu
Use the File menu to delete all completed todos, view information about ToDo Book, read online help and exit the program.
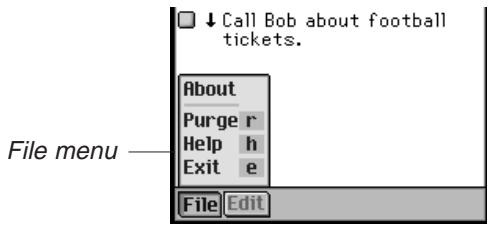
About Displays the version number of ToDo Book.
Purge (r) Enables you to delete all completed todos from your list. You must confirm the deletion by tapping OK. Tap Cancel to exit the Purge confirmation dialog box without deleting todos.
Help (h) Displays online help.
Exit (e) Exits ToDo Book.
Edit Menu
Use the Edit menu to cut, copy and paste text, access the keyboard and view the Handwriting guide. Cut and Copy are activated only when text is selected. Drag your stylus over the text you want to cut or copy. Paste is available only when there is text saved to the clipboard.
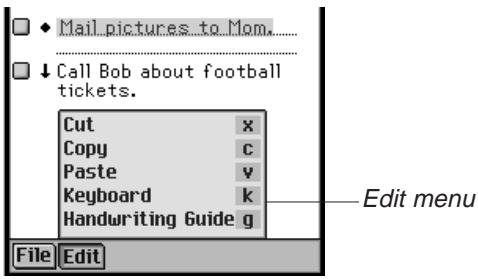
Cut (x) Removes any selected text. A copy is retained on the clipboard.
Copy (c) Places a copy of any selected text on the clipboard.
Paste (v) Places text from the clipboard into the selected location.
Keyboard (k) Displays the onscreen keyboard.
Handwriting Guide (g) Displays the libraries of input characters.
Synchronizing with Microsoft® Outlook
For detailed instructions please see "Using Intellisync™" on page 43.
Exiting ToDo Book
You can close ToDo Book and return to the Launcher or you can return to the Launcher and leave ToDo Book running in the background.
- To return to the Launcher without closing ToDo Book, tap

- To close the program, tap 串 , then tap File|Exit or tap at the top right of the screen.

eBookMan includes Memo Book, a standard organizer program for storing memos. This chapter describes how to add, view and edit memos.
Tap at the Launcher to open Memo Book. When you open the program for the first time, you see an empty screen with a New button at the bottom left and a Sort arrow to the bottom right. When entries exist, the Memo List displays all the entries.

When your Memo List contains more entries than can fit on one screen, a scroll bar appears. Tap the arrows to move up or down one line. Tap in the scroll bar above or below the slider, use the scroll arrows on the Control Pad or rock the Control Wheel to move up or down one screen.
Adding Memos
- To add a memo, tap New.
You see the Edit screen.
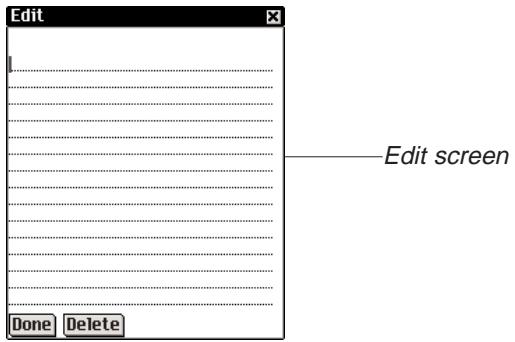
- Enter your memo.
Write in the Handwriting area or use the onscreen keyboard to enter your memo.
You can enter a maximum of 4096 characters.
- Tap Done to enter your memo.
Tap Delete to exit without entering your memo.
Viewing Memos
When you open Memo Book you see the Memo List, a numbered list of the memos you entered in the order that you entered them. The first line of your memo acts as a title and appears in the Memo List. Memos are numbered in the order they are entered. You can change the order to view your memos alphabetically.
Tap to see the Sort drop-down list.
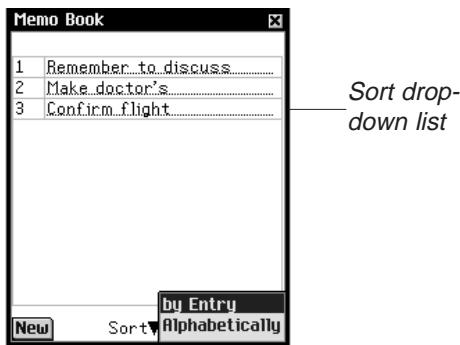
Tap Alphabetically to view your memos in alphabetical order.
Tap by Entry to return to the default view.
To view the whole memo, tap the number of the memo you want.
Editing Memos
You can go to the Edit screen for the memo you want to view or edit.
You can edit the memo text or delete your memo.
- Tap the memo you want to edit.
You see the Edit screen.
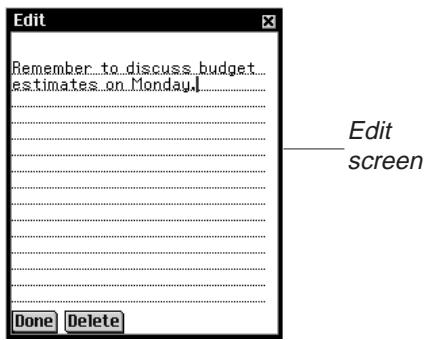
- Tap on a line to place the cursor where you want to make your edits.
- Add or delete text.
- Tap Done to save your changes.
The device returns to the Memo List.
You also can tap Delete to remove your memo. You see a dialog box asking you to confirm the deletion. Tap OK to delete or tap Cancel to exit without deleting.
Using the Menu
There are two menus in Memo Book: File and Edit. The File menu is available in the Memo List and both menus are available in the Edit screen.
To select a menu item, first tap , tap either File or Edit and then either tap the menu item you want or write the Menu shortcut in the Handwriting area.

See also:
For information on how field limits affect synchronization, see "Changing Advanced Settings" on page 45.
File Menu
Use the File menu to view information about Memo Book and exit the program. The File menu is available at the Memo List. Both menus are available at the Edit screen.
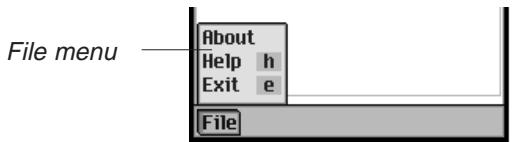
About Displays the version number of Memo Book.
Help (h) Display online help.
Exit (e) Exits Memo Book.
Edit Menu
Use the Edit menu to cut, copy and paste text, access the onscreen keyboard or view the Handwriting Guide. Cut and Copy are activated only when text is selected. Drag your stylus over the text you want to cut or copy or use Select All to highlight the entire text of a memo. Paste is available only when there is text saved to the clipboard.
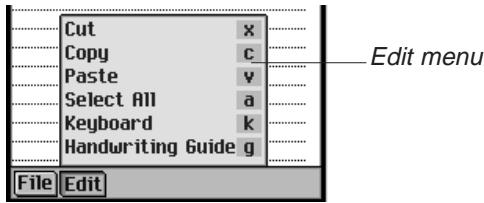
Cut (x) Removes any selected text. A copy is retained on the clipboard.
Copy (c) Places a copy of any selected text on the clipboard.
Paste (v) Places text from the clipboard into the selected location.
Select All (a) Select the entire text of your memo. You can then copy it and paste it in another location.
Keyboard (k) Displays the onscreen keyboard.
Handwriting Guide (g) Displays the libraries of input characters.
Synchronizing with Microsoft® Outlook
For detailed instructions please see "Using Intellisync" on page 43.
Exiting Memo Book
You can close Memo Book and return to the Launcher or you can return to the Launcher and leave Memo Book running in the background.
- To return to the Launcher without closing Memo Book, tap ( & c c & b ) .
- To close the application, tap 口 , and then either then tap File|Exit or tap 口 at the top right of the screen.

MISCELLANEOUS APPLICATIONS
15. Voice Memo
eBookMan includes Voice Memo, a program that enables you to record memos and play them back. This chapter describes features of the program and details how to record and play memos, how to use the menus, and how to control the volume.
Tap

at the Launcher to open Voice Memo.

The application uses buttons, menus, and lists to provide functionality. While recording and playing, the time-elapsed indicator appears on the display.
Understanding the Buttons
The following buttons perform the functions:

Records a memo. This button changes to Stop when you are recording or listening.

Stops the memo from recording or playing.

Plays the memo.

During play, pauses the memo.

Fast forwards the memo.

Rewinds the memo.
Using the Menu
Voice Memo uses three menus: File, Edit, and Control. Tap in the Control Pad. To select an option, you can tap the menu item you want or write the Menu shortcut in the Handwriting area.
The File Menu
Use the File menu to view information about the program and exit the program.
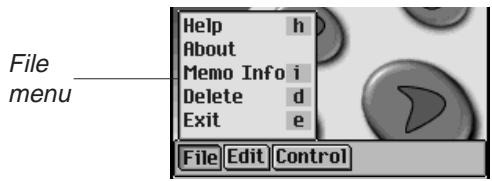
Help (h) Displays tips for using Voice Memo.
About Shows the copyright information for the program.
Memo Info (i) Displays general information about the current title, such as name, author, and size of the file.
Delete Deletes the selected memo.
Exit (e) Exits Voice Memo.
The Edit Menu
Use the Edit menu to set your preferences for the application.

Preferences (p) Enables you to display the left-handed controls and change the prefix name of all new memos that you record.
To change the orientation of the buttons, tap the check box. To change the prefix name for new memos, tap the Name box and then either tap and enter a new name, or write it in the Handwriting area.
Note: By default, "Recording" is the prefix name. The name of the memo is numbered sequentially "Recording #1", "Recording #2," and so forth. When you change the prefix name, only future recordings will have the new name.
Tap Save to keep your selection or Cancel to exit without saving changes.
The Control Menu
Use the Control menu to set your preferences for the application.
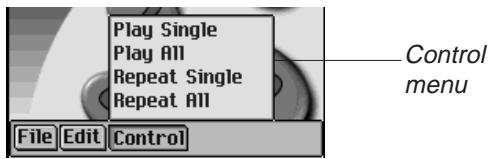
Play Single Plays the selected memo.
Play All Plays all memos in the order listed.
Repeat Single Plays the selected memo repeatedly.
Repeat All Plays all memos in the order listed and repeats the entire list of memos.

Note:
When the drop-down list is open,
use and
to quickly step through recordings.
Recording Voice Memos
- Tap or press the Control Wheel.

shows on the screen.
- Speak into the microphone located at the top right of the device.
The time-elapsed indicator starts to run.
- When done recording, tap or press the Control Wheel.
The recorded memo is automatically added to the drop-down list.
Note: The length and number of memos you can record depends on the memory available in your device. If your device runs out of memory, the recording will stop.
Rock the wheel to adjust the volume.
Listening to Voice Memos
- Tap the down arrow at the top left of the screen.
The drop-down list of memos appears. - Tap the memo you want to hear.
- Tap to listen.

shows on the screen.
You can rock the wheel to adjust the volume.
Use or to fast forward or rewind. Hold the button and release it for the memo to resume playing.
- Tap when done listening.
Exiting Voice Memo
You can either close Voice Memo and return to the Launcher, or you can return to the Launcher and leave Voice Memo running in the background.
- Tap to return to the Launcher with Voice Memo running in the background.
The memo stops playing, but Voice Memo remains open.
- Tap and then File|Exit to close the application and return to the Launcher.
You can also tap

16. Calculate
eBookMan includes a standard calculator with memory features. The display screen holds 10 digits. This chapter describes the calculator keys, menus, how to make calculations, and how to use calculator memory.
Tap at the Launcher to open the program.
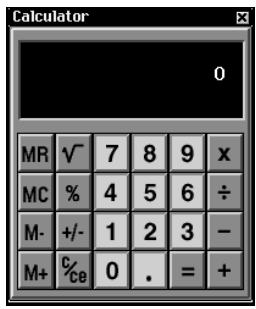
Understanding the Keys
The following keys perform mathematical functions:
X Multiplies
Divides
- Subtracts
+ Adds
Enters a decimal point (if no decimal point appears on the display)
Calculates a function
+Enters a negative or positive
C/CE When first tapped, clears the number displayed. When tapped a second time, clears the equation.
% Calculates a percentage
Calculates the square root of a number
MC Clears the memory
MR Recalls the value stored in memory
M+ Adds the current value to the value stored in memory (but does not display the sum)
M- Subtracts the current value from the value stored in memory (but does not display the difference)
Using the Menu
To access the menu, tap in the Control Pad. The program uses a menu that contains the following items.
Help Displays online help.
About Displays legal information about Calculate.
Exit Closes the program.

Note:
If you want to perform a function using the number in the display, simply tap the function and then = instead of tapping the number again. For example, tap 4 + = to get 8.

Note:
You cannot repeat the calculation of a percentage by pressing = again.
Making Calculations
To make a simple calculation, follow these steps.
- Tap a number. For example, tap 4.
To enter a negative value, tap the number and then tap +/- . - Tap the key for the mathematical function you want. For example, tap +.
A symbol for the function appears on the display. - Tap another number. For example, tap 9.
- Tap =.
The sum, 13, appears on the screen. To clear the program, press C/CE.
To subtract a percentage from a value, follow these steps.
- Tap the total value. For example, tap 300.
- Tap the key for the mathematical function you want. For example, tap -.
- Tap the percent value. For example, tap 5.
- Tap %.
The value that equals a 5% discount from 300, 285, appears on the screen.
Using Calculator Memory
Using memory, you can add or subtract to and from a stored value. Once the memory is set, you can recall the value and use it in different calculations. You also can clear memory.
To use memory, follow these steps.
- Tap a value.
- Tap M+ to add the value displayed on the screen to memory.
When a value is stored in memory, an M appears in the lower left corner of the calculator display.
- Tap M+ again to add to the stored value.
You also can subtract from the value in memory by tapping M-.
- Tap MR to see the actual value in memory.
- Tap MC to clear memory.
Exiting Calculate
You can close the program and return to the launcher or you can return the the Launcher and leave the program running in the background.
- Tap to return to the Launcher leaving Calculate running in the background.
- To close the calculator, tap and then File|Exit or tap

APPENDIX
A. Getting Updates

Note:
Cookies must be enabled in your browser to download content from the Franklin Web site.

Note:
For a seamless installation of your Desktop Manager and OS for eBookMan, it is best to access your Internet connection and close all other programs.
Franklin releases updated versions of the eBookMan software on a regular basis. Check the latest releases often for new features and enhancements to existing features. The upgrades are free.
Checking for Updates
To check for updates to both the Desktop Manager and the eBookMan Operating System and applications, do the following:
- Open your internet connection.
- Connect your eBookMan to your PC.
- Turn your device on.
- Start the Desktop Manager.
- Click WebMy Updates.
You go to Franklin's Web page that has links to the latest Desktop Manager and OS and applications. The version numbers of your currently installed Desktop Manager and the Operating System on your eBookMan are compared to those of the Desktop Manager and OS posted on Franklin's Web site. If the versions on the Web site are newer, "NEW" appears to indicate this.
Updating the eBookMan® Desktop Manager
If the Desktop Manager on Franklin's Web site is newer than your currently installed Desktop Manger, do the following.
- Close your currently installed Desktop Manager if it is open.
- Click the link on Franklin's Web site to download the eBookMan® Desktop Manager.
The eBookMan Download Software page appears in your browser.
Note: It is highly recommended that you print and read the eBookMan Download Software page before you continue.
- On the eBookMan Download Software page, scroll down and, under Step 1, click the button next to the Desktop Manager you want.
You can download the eBookMan® Desktop Manager only or the eBookMan Desktop Manager with Intellisync™, which enables you to synchronize the personal information in your eBookMan to and from Microsoft® Outlook®.
- Click Download.
A Download page appears with links to the Desktop Manager executable from an HTTP server and an FTP server.
- Click the link for the server from which you want to download.
Note: You get the same files from both servers. If you have trouble downloading the files from one server because of a conflict with your PC settings, try the other server.
- Install eBookMan Desktop Manager from the server or save the installation program to your PC.
If you install from the server, the installation process automatically begins.
If you save the executable to your PC, you must locate the file on your PC and double-click it to start the installation process.
- Follow the instructions on the screen to install the Desktop Manager.
Your currently installed Desktop Manager is overwritten.
Note: You may need to restart your Windows system when installation is complete. You will be prompted if this is necessary.
- Start the Desktop Manager.
See "Start the Desktop Manager" on page 21 for details.
Updating the eBookMan Software
You can either check for updates as described in "Checking for Updates" on page 204, or you can have the program do this for you. To get the latest OS and applications, do the following:
- Connect your eBookMan device to your computer and turn it on.
- Open your Internet connection.
- Start the eBookMan Desktop Manager.
- Click WebDownload OS/Applications.
The program automatically compares the version numbers of your currently installed OS and the latest one that is available on Franklin's Web site. If the one on Franklin's Web site is newer, the download begins.
Follow the instructions on the screen to download and synchronize the latest OS and applications.
If you have purchased a serial cradle or cable, please read the following sections to learn how to connect your device to your PC.
Serial cradle users
The USB-to-serial cradle has three connectors:
DB-9 serial connector
Female PS/2 connector
Male PS/2 connector
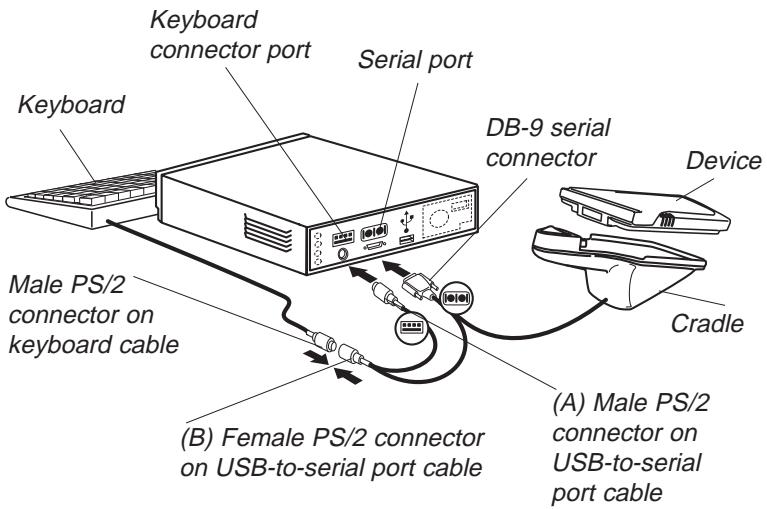
Do the following to connect your device to a serial port on your computer using the USB-to-serial cradle.
- Plug your eBookMan into the USB-to-serial cradle.
- Plug the DB-9 serial connector end into a free serial (COM) port on your desktop computer.
- Disconnect the keyboard from your computer.
- Plug the Male (A) PS/2 connector end into the keyboard connector port on your computer.
- Plug the Female (B) PS/2 connector end into the Male PS/2 connector end of your keyboard cable.

Note:
The USB-to-serial cable and cradle must draw power from the keyboard connector port on your computer to preserve the battery life of your eBookMan. When using a laptop without a mouse, leave the Female (B) PS/2 connector unplugged.
To use a mouse with a laptop, plug the Female (B) PS/2 connector into the Male PS/2 connector on the mouse.
Serial cable users
The USB-to-serial cable has four connectors:
USB connector
DB-9 serial connector
Female PS/2 connector
Male PS/2 connector
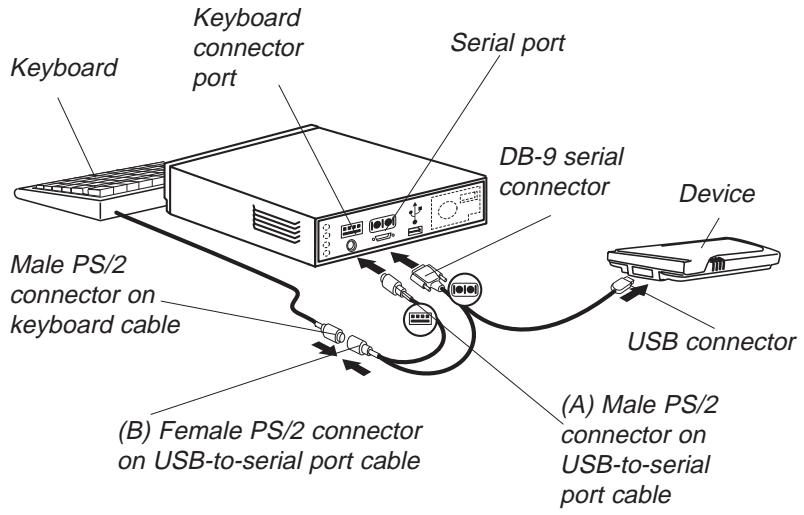
Do the following to connect your device to a serial port on your computer using the USB-to-serial cable.
- Plug the USB connector end of the cable into the USB port on your device.
- Plug the DB-9 serial connector end into a free serial (COM) port on your desktop computer.
- Disconnect the keyboard from your computer.
- Plug the Male (A) PS/2 connector end into the keyboard connector port on your computer.
- Plug the Female (B) PS/2 connector end into the Male PS/2 connector end of your keyboard cable.
C. MultiMediaCards
You can purchase MultiMediaCards (MMCs) with content on them or you can purchase blank ones to either increase the memory in your device or backup your Operating System and applications. These cards are available in memory sizes ranging from 8 MB to 64 MB. Please note that you cannot write to MMCs purchased with content on them.
Note: MMCs are sold separately at www.franklin.com/ ebookman/accessories.asp or your local retailer.
You can put applications and files on an MMC using the Desktop Manager. Just make sure your MMC is inserted in the device before you connect it to your PC. You can also create a complete backup of all the files on your device on an inserted MMC. Just select MMC Backup on the Launcher menu.
Inserting MMCs
- Put your thumb on the MMC port cover and slide it off.
- Slide the MMC into the compartment with the contacts facing up and the label facing down. Push gently until it clicks into place.
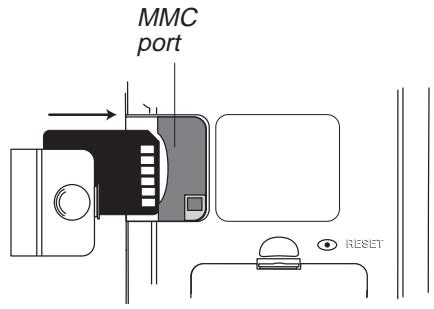
- Snap the cover back on.
To remove an MMC from the port, remove the MMC port cover, put your thumb on the MMC and push it in slightly. You hear a click and the card pops out. Slide it out and snap the cover back on.

Note:
Before storing audiobooks on an MMC, you must first format or erase the card in AudibleManager. Audiobook Player in your eBookMan will only recognize audiobooks stored on the most recently formatted MMC.

Note:
Backup requires substantial battery power. If you attempt to backup to MMC while the battery power is low, the error message "The operation was unsuccessful. Change your batteries or erase the MMC, then try again" appears.

Important!
If there is not enough memory on the MMC to perform a backup, the message "The MMC has insufficient free space to backup your data" appears. Either erase the MMC or use a different MMC.
Backing Up to MMC
To save a backup copy of the eBookMan Operating System, core applications, and information you entered into your eBookMan on an MMC, follow these steps.
- Insert an MMC into your eBookMan following the instructions under "Inserting MMCs" on page 209.
The MMC must be "writable." You can not save to a readily MMC.
- At the Launcher, tap
- Tap MMC Backup.
The MMC Backup dialog box appears.
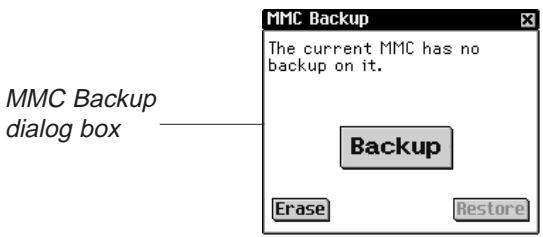
If the MMC is empty, the message "The current MMC has no backup on it" appears.
If the MMC contains a backup, the message “The backup was created on 00/00/00 at 00:00 AM/PM” appears with the actual date and time of the last backup.
- Tap Backup to save all files to MMC.
If a backup already exists, it will be deleted. The message, "This backup replaces the current backup on the MMC." appears. You must tap OK to proceed or tap Cancel to stop the process.
The Backup screen appears.
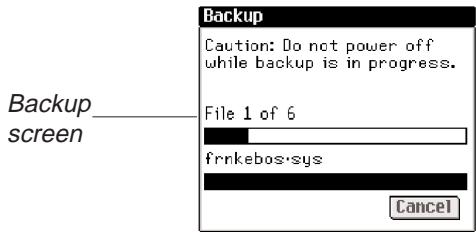
To stop the backup, tap Cancel. If you cancel, a partial backup is saved.
Restoring from MMC
If you overwrite or delete files on your eBookMan that are backed up to MMC, you can restore those files easily. To restore files from MMC, follow these steps.
- Insert an MMC into your eBookMan following the instructions under "Inserting MMCs" on page 209.
- At the Launcher, tap
- Tap MMC Backup.
- Tap Restore.
The message "This will overwrite all data currently in RAM" appears.
Tap Cancel to exit without restoring files from the MMC.
- Tap OK to restore files from the MMC.
The Restore screen appears.
Note: This process takes several minutes. The amount of time varies by the number of files that must be restored.
After the files are restored, you must calibrate the screen to use your eBookMan.
Erasing an MMC
To erase an MMC, follow these steps.
- Insert an MMC into your eBookMan following the instructions under "Inserting MMCs" on page 209.
- At the Launcher, tap
- Tap MMC Backup.
- Tap Erase.
The message "This will delete all data on the MMC.
"Continue?" appears.
Tap Cancel to exit without erasing the MMC.
- Tap OK to erase the MMC.
D. Glossary
| Application | A program that performs a specific task or series of tasks for the user. |
| ART | (Advanced Recognition Technologies, Inc.) A company that creates voice and handwriting recognition for mass-market mobile devices. |
| Audio book | A book recording that is formatted for use in an audio device. eBookMan supports audio format #2 with audio capacity of approximately 5.1 hours for 16 MB of memory. |
| Backlight | Lighting that appears to come from behind the LCD (Liquid Crystal Display) screen, making it easy to see and read text in the dark. |
| BIOS | (Basic input/output system) The built-in software in a computer that controls the display screen, the keyboard, the drives and so on. |
| Calibration | The setting of reference points to determine the accuracy and precision of the touch-sensitive screen. |
| Category | In your eBookMan device, a name used to group applications and content that appears in the Launcher. |
| Content application | eBookMan programs that require content files, e.g. Franklin Reader, Mobipocket Reader, Audiobook Player, and Music Player. |
| Contents pane | In the Desktop Manager, the pane that shows all files and folders in the selected directory. It reflects the file structure on your PC. |
| Control Pad | The area on the device that contains the Handwriting area, the Launcher and Menu icons and the scroll area. |
| Control wheel | The wheel in the rear, left side of the eBookMan that functions as an “Enter” key, a scrolling mechanism, or volume setting. |
| Cookie | Information sent by a Web site and returned by your PC each time that Web site is accessed. In most cases, cookies identify a user who re-visits a particular Web site, making it unnecessary to register during each visit. |
| Core application | A free eBookMan program that is bundled with the operating system. Core applications include Franklin Reader, Franklin Viewer, Audiobook Player, Music Player, Voice Memo, Address Book, Date Book, Memo Book, ToDo Book, and Calculate. |
| Cradle | The piece of equipment designed to hold your eBookMan device and connect to your PC. |
| Crosshair | On your eBookMan screen, the markings (+) used to show reference points during calibration. |
| Desktop Manager | The PC program that works with your eBookMan device and enables you to synchronize files between your PC and your device. |
| Device driver | Drivers are programs on your PC that control devices such as keyboards, printers and so on. Your eBookMan also needs its own driver installed on your PC in order for your PC to recognize it and allow it to communicate with your Desktop Manager. |
| Device pane | In the Desktop Manager, the pane that shows all the files and folders in RAM and any installed MMC on your eBookMan device. |
| Download | (verb) Transferring data from a server to the memory of another computer or device. (noun) The data transferred from a server to the memory of another computer or device. |
| eBook | A “soft” copy or electronic version of a book. eBooks come in several formats and you need a program called a Reader in order to view these books either on your PC or a handheld device. |
| export | A one-way transfer of data from your main system to your other application, for example, from an organizer application in your eBookMan to Microsoft® Outlook® on your PC. |
| field mapping | The linking of equivalent fields in two systems, so that data can be transferred between them during synchronization. Fields that are linked are referred to as mapped fields. |
| FUB | (Franklin Universal Binary) The file type recognized by Franklin Reader. |
| Function | A stroke made in the Handwriting area to perform a specific function - for example, backspace. |
| Handwriting area | The area in the Control Pad in which you write letters, numbers and punctuation. |
| hard reset | To return the device to its original settings. This removes all user entered data. A hard reset of the eBookMan is performed by holding the On/Off button and gently depressing the reset button at the back of the device. It should not be confused with soft reset. |
| import | A one-way transfer of data from another system to your main system, for example from Microsoft® Outlook® on your PC to the organizer applications in your eBookMan. |
| IntellisyncTM | The program on your PC that enables you to transfer data from a PIM such as Microsoft® Outlook® to the organizer applications in your eBookMan device. It is part of the eBookMan® Desktop Manager. |
| Founder | The default screen on your eBookMan device from which all programs and some content files are opened. This includes files both on RAM and any installed MMC (MultiMediaCard). The programs and content files are represented by icons. |
| Letter input area | The section of the Handwriting area that has abc on it. This is the area in which you write letters. |
| MMC | See MultiMediaCard. |
| MP3 | (MPEG audio layer 3) A compressed music file much smaller in size than its counterpart on a CD, and hence easily sent over the Internet. |
| MultiMediaCard | (MMC) An electronic card, similar to a floppy disk for your PC. An MMC with preloaded content is read-only. Blank MMCs are available in different memory sizes and can store up to 64 MB of data. |
| natural handwriting | The way you write. eBookMan has a handwriting recognition system that recognizes several ways of writing letters so you can find one that best suits you. |
| Number input area | The section of the Handwriting area that has 123 on it. This is the area in which you write numbers. |
| Operating system | (OS) The most important program on any computer or handheld device that helps run all other programs and helps the computer recognize peripheral devices such as keyboards and printers. It is necessary for basic functions such as opening other programs, keeping track of files, recognizing input from the keyboard, and so on. It presents a default screen to the user when no program is running. |
| Organizer | A program in which data such as addresses, telephone numbers and memos are stored. |
| OS | See Operating system. |
| PDB | (Palm Database) Files formatted for the Palm Computing Platform that have the extension .pdb. |
| .prc | A file formatted for Palm devices. |
| pen calibration | See Calibration. |
| pen language | The character recognition set you want your eBookMan to use. You can select the language you want in My eBookMan®. |
| PIM | (Personal Information Manager) The term commonly used to describe programs either on your PC or a handheld device in which you store information data such as names, addresses, telephone numbers, schedules and so on. |
| port | The part of a computer through which a peripheral device such as a keyboard or printer is connected. There are several types of ports, the most common being serial, parallel and USB ports. |
| program | An application that is run either on your PC or on your handheld device. For example Microsoft® Outlook® is an organizer application that runs on your PC. Franklin Reader is a program that runs on your eBookMan device. |
| PS/2 connector | (Personal System/2-IBM compatible) The part of a cable that plugs into either a port on your PC or a port on your device. There are male connectors which have one or more pins and female connectors which have a hole in which a male connector can be inserted. |
| Punctuation input | The section of the Handwriting area that has :-) on it. This is the area in which you write punctuation marks. |
| quiet mode | The absence of device sound. eBookMan has various device sounds to indicate different functions. In My eBookMan®, you can select Quiet Mode if you do not wish to hear these sounds. |
| RAM | (Random Access Memory) The main memory in your computer that is available to all programs. Programs on any computer, PC or handheld device, need RAM in order to run. |
| SEB | (secure eBookMan binary) Most content files that you download from Franklin's Web site have this extension. It means that the file has a security lock on it and can be read only by your eBookMan device. |
| serial port | One of the types of connector ports on a computer. It can be used to connect devices such as modems, mice and so on. |
| shutoff time | The amount of time your device stays on if you forget to turn it off. |
| simpliWrite | A copyrighted system of handwriting recognition developed by ART. |
| soft reset | Exits a temporarily problematic program and takes you to the calibration screen. A soft reset of the eBookMan is performed either by gently depressing the reset button at the back of the device or selecting Restart system on the Launcher menu. It should not be confused with hard reset. |
| Status bar | A bar in a program that displays some information about the program. In Desktop Manager, the status bar is at the bottom of the window and tells you what the program is currently doing, such as “Ready” or “Uploading item” and so on. In the Launcher, the status bar is at the bottom of screen and shows remaining battery life, time/date, the current category, and the available free memory. |
| Stylus sync | A pen-like instrument that is used for writing. The informal term for synchronization. |
| synchronization | To bring two or more programs or events to a parallel state. For example, you can synchronize the data in your Microsoft® Outlook® with the data in the organizer applications on your eBookMan device so that the same data is contained in both places. |
| translations | Term used in IntellisyncTM to stand for the organizer application on your PC whose data you want to synchronize with the data in the organizer applications on your eBookMan device. |
| USB | Universal Serial Bus. |
| USB port | One of the types of connector ports on a computer. On your PC it can support multiple peripheral devices such as mice, printers and so on. |
E. Troubleshooting
This section offers solutions to problems you may encounter while:
- downloading and installing eBookMan® Desktop Manager
- synchronizing the operating system (OS) and applications from your PC to your eBookMan
- using the eBookMan® Desktop Manager software
using the eBookMan device
It also provides information about error messages that you may see in the Desktop Manager or on the eBookMan device. Detailed online help is available both in the eBookMan® Desktop Manager and in each application on the eBookMan device. To access Help in the Desktop Manager, click Help in the Menu bar. To access Help from most programs on the device, select File|Help.
For more information, visit Franklin's technical support Web page and check the FAQ (frequently asked questions) database. Just connect to www.franklin.com/
ebookman/support.asp, and click on a flag to choose your language. Customers in the United States or Canada can also send email or even chat with Franklin.
If you need further technical support, see "Support" on page 15 for a list of contacts.
Downloading and Installing the Desktop Manager, Operating System, or Applications
Here are a number of solutions to possible problems with downloading and installing the eBookMan® Desktop Manager.
Problem
Solution
Helpful Hint
When I try to download eBookMan software from the Franklin Web site, my Web browser shows a validation #3 error instead of the Web Sync page.
- Remove and re-connect your eBookMan device to the PC.
- Turn the unit on.
- On your PC, click in the Device Pane of your Desktop Manager, then click View|Refresh.
- Click WebDownload Applications.
Make sure your eBookMan device is properly connected to the PC and turned on before you download eBookMan software from the Franklin Web site.
When I try to download or install the operating system (OS), my eBookMan device freezes and the error message "eBookMan not responding" appears on my computer screen.
- Disconnect your eBookMan from the cradle or cable.
- Using a paper clip, gently press the Reset button located on the back of your eBookMan device.
- Reconnect your device to your PC and turn it on.
- On your Desktop Manager, click to re-send the OS and appli-cations to your eBookMan.
Make sure your eBookMan device is turned on and properly connected to your PC before starting the synchronization process.
The Device pane in my Desktop Manager shows the message "Waiting for an eBookMan. . . ."
Note: This is normal if the Desktop Manager is open and eBookMan is not connected to your PC. If this is not the case, try the following.
- In the Desktop Manager, select Setup|Connection and confirm that the right port is shown in the Connection Configuration dialog box.
- Check that the port you selected is functioning properly.
Make sure your eBookMan device is turned on and properly connected to the PC.
To check whether the port you selected is functioning properly, locate its entry in the Device Manager on your PC. This is generally found under System in the Control Panel. To learn more about the Device Manager, please refer to your PC or Windows manual.
When I try to open the User's Guide in my Web browser from Franklin's Web site, I get a blank screen.
- Your browser may not have the option (plugin) for opening .pdf documents. Right-click on the eBookMan® User's Guide link and select the "Save Target As..." option. In the dialog box, select a location on your PC in which you want your file downloaded and click OK. The User's Guide is downloaded to your PC. You can then double-click the file and view it at any time.
You need the Adobe Acrobat Reader software to view the eBookMan® User's Guide. If it is not already installed on your PC, go to the Adobe Web site (www.adobe.com) and follow the instructions provided to download and install the latest version of Acrobat Reader.
Sending Files from the Desktop Manager to eBookMan
Problem
Solution
Helpful Hint
The PC fails to recognize my eBookMan device.
This may be because the drivers for your USB port are either missing or corrupted. To reinstall the drivers do the following:
- On your PC, click Start|Settings|Control panel|System.
- Click the Device Manager tab. (Windows 2000 users will find the Device Manager under Hardware).
If eBookMan is not listed as a device, click Other Devices for information about the USB port and eBookMan.
- Double-click USB Port/eBookMan.
- Click the Driver tab.
- Click the Update Driver button and follow the instructions in the Update Driver wizard.
Drivers can be found on the Installation CD.
If the installation is successful, appears in the Connection view the next time you open the eBookMan Desktop Manager software.
Install your Desktop Manager BEFORE you connect your eBookMan device to your PC. If you do this, the USB drivers are installed automatically.
Newly downloaded material is not copied over to my eBookMan device during synchronization.
- Make sure your file is in the Contents folder. Only files in the Contents folder are moved over during synchronization.
- Your file may be of a type that is not recognized by eBookMan. Please see "Chapter 3: Managing & Synchronizing Content" on page 39 for information on supported file types.
-
Your file may need to be unpacked. To unpack a file do the following:
-
Locate the downloaded file in the Contents pane.
- Highlight the file and click File|Unpack.
If the file is in your Contents folder, it will be copied over to your eBookMan the next time you synchronize.
If the file is in another folder, you must drag it into the Device pane.
In the Contents folder, if you do not see the eBookMan icon next to the file you are trying to copy to your device, it is either a file that is not recognized by eBookMan or is a file that needs to be unpacked.
The Desktop Manager
Problem
Solution
Helpful Hint
When I try to start the Desktop Manager, an error message appears stating that the maximum available Universal Serial Bus (USB) power has been exceeded.
- Disconnect one or more of the devices attached to your USB port.
- Re-connect your eBookMan device to your PC.
- Restart the Desktop Manager on your PC.
You may encounter this problem if multiple devices are drawing power from a single USB connection.
The eBookMan Device
| Problem | Solution | Helpful Hint |
| I have to tap slightly off-center on the icons in the Launcher to open the application or file. How can I fix the screen? | Your eBookMan screen needs to be re-calibrated. To correct the calibration, do the following: | Re-calibrate your screen whenever it responds poorly to your stylus input. |
| 1. Tap to go to the Launcher screen. | ||
| 2. Tap to view the Launcher menu. | ||
| 3. Tap Pen Calibration. The word “Calibrate” appears on the screen. | ||
| 4. Using the stylus, tap in the center of the crosshairs (+) as they show up on the screen. |
When I press the On/Off button, my eBookMan device beeps but does not turn on. What's happening?
This usually occurs only when the batteries need to be replaced.
- Reinstall 2 AAA batteries paying close attention to the markings in the battery compartment. Press both batteries firmly into place and close the battery door.
Place the negative side of the battery next to the negative terminal marked with a “-”, and the positive side of the battery next to the positive terminal marked with “+”.
I'm having difficulty getting my eBookMan device to understand my handwriting input. Where can I go for help?
You need practice with "natural handwriting."
- Tap and select Handwriting Guide on the menu to see how to write letters, numbers and punctuation marks.
To learn more about using the natural handwriting feature, please refer to "Entering Data With Natural Handwriting" on page 87.
Play the Stalagmite game and you can quickly master Natural Handwriting.
I am having a hard time writing letters. Is there another way to enter data in the eBookMan?
An onscreen keyboard is available for most data entry screens.
- To see the onscreen keyboard, draw a line straight up and out of the Handwriting area.
To learn more about the onscreen keyboard, please refer to "Using the Onscreen Keyboard" on page 91.
How do I make new entries in the eBookMan Address Book? When I tap on the "abc" box, nothing happens.
- Tap New.
The Edit Address screen appears.
- Tap next to the field in which you want to enter data and start writing in the Handwriting area.
I forgot my password for my eBookMan device. What can I do to access my data and content?
If you forget your password, you must perform a hard reset. This will clear the old password, but will also remove the operating system and all your data from the unit. Please follow these steps to perform a hard reset:
- Press and hold the On/Off button while pressing the reset button on the back of the unit with the end of a paper clip.
- Release the On/Off button.
The eBookMan beeps and the Tour screen appears.
- Connect your device to your PC and turn it on.
- Open the eBookMan Desktop Manager and
click

Note: Data from your organizer applications is stored in the Contents folder during a synchronization. Only the data that was in your unit when you last performed a synchronization is transferred to your device.
Keep a written copy of your password in a place where you can find it easily.
Remember: When you perform a hard reset, any data entered after your last synchronization will be lost.
Synchronize often so that your files are always backed up on your PC.
I inserted a MultimediaCard (MMC) into my eBookMan device but I don't see any icon on the Launcher. How do I access the content on the MMC card?
- Check to see if the content is in eBookMan by opening the appropriate content application. The title may not include an icon.
Make sure the MMC card is inserted properly. The gold contacts must be facing up and towards the unit. - Check to see if the gold contacts are dirty. For cleaning information, please refer to the manufacturer's instructions.
If your eBookMan operating system is older than version 1.05 you must perform a soft reset. To perform a soft reset, gently press the reset button on the back panel with the end of a paper clip.
To check the version number of your eBookMan operating system, tap at the Launcher screen and then tap About.
To avoid resetting your unit each time you insert an MMC, it is best to update both your Desktop Manager and your eBookMan operating system. For free updates, go to www.franklin.com/ ebookman, click on the link to eBookMan, then click on What's new. Click on the link to download the latest Desktop Manager. Once the Desktop Manager is installed on your PC, click WebDownload Applications from the Desktop Manager to get the latest version of the operating system.
Why does my MultiMedia Card (MMC) only store music files?
Your Desktop Manger is older than version 1.12 and your eBookMan operating system is older than version 1.05.
An application on my eBookMan device is not responding. What should I do?
There could be a number of reasons why the application may have stopped responding. Try the following.
- Stop the application in File Manager. For details, see "Opening and Closing Programs" on page 72.
- If this does not resolve the problem, tap and then tap Restart System.
If your unit still does not respond, reset your device. For details, see "Resetting the Device" on page 64.
Why are files I remove from my eBookMan device never removed permanently from the unit?
To remove a file permanently, you must delete it both in your device and on the PC. Otherwise, the file will be re-loaded onto your eBookMan device during the next synchronization.
- For more information, see "Deleting Files" on page 42.
If I tap Restart System at the Launcher menu will I lose all my data?
No. When you tap and then tap Restart System at the Launcher, all data in memory is retained.
However, it is recommended that you backup and synchronize your data prior to a restart of any kind.
I see "OK" at the bottom right of the screen, but when I tap the screen or try to write nothing happens.
The indicator at the bottom right of your Launcher screen is the memory indicator. What you're seeing is not "OK" but "Zero K" meaning that your device is out of memory.
- Use the end of a paper clip to gently press the Reset button located on the back of the unit.
It is best to close applications as you finish using them. To see the applications you currently have open, select File Manager on the Launcher menu. You can close applications from the File Manager screen.

F. Legal Information
Specifications
Model: EBM-900
Dimension: 13.15 × 8.6 × 1.7 cm . | Weight: approx. 185 g.
Batteries: 2 X AAA | Memory: 8 MB | ISBN: 1-56712-607-3
Model: EBM-901
Dimension; 13.15 × 8.6 × 1.7 cm . | Weight: approx. 185 g.
Batteries: 2 X AAA | Memory: 8 MB | ISBN: 1-56712-608-1
Model: EBM-911
Dimension; 13.15 × 8.6 × 1.7 cm . | Weight: approx. 185 g.
Batteries: 2 X AAA | Memory: 16 MB | ISBN: 1-56712-609-X
FOR HOME OR OFFICE USE
FCC Notice
NOTE: This equipment has been tested and found to comply with the limits for a Class B digital device, pursuant to Part 15 of the FCC Rules. These limits are designed to provide reasonable protection against harmful interference in a residential installation. This equipment generates, uses and can radiate radio frequency energy and, if not installed and used in accordance with the instructions, may cause harmful interference to radio communications. However, there is no guarantee that interference will not occur in a particular installation. If this equipment does cause harmful interference to radio or television reception, which can be determined by turning the equipment off and on, the user is encouraged to try to correct the interference by one or more of the following measures:
-Reorient or relocate the receiving antenna.
-Increase the separation between the equipment and receiver.
-Connect the equipment into an outlet on a circuit different from that to which the receiver is connected.
-Consult the dealer or an experienced radio/TV technician for help.
NOTE: This unit was tested with shielded cables on the peripheral devices. Shielded cables must be used with the unit to insure compliance.
NOTE: The manufacturer is not responsible for any radio or TV interference caused by unauthorized modifications to this equipment. Such modifications could void the user's authority to operate the equipment.
Copyrights, Trademarks, Legal
© 2002 FRANKLIN ELECTRONIC PUBLISHERS, INC. Burlington, N.J. 08016-4907 U.S.A. All rights reserved.
eBookMan is a registered trademark of Franklin Electronic Publishers, Inc.
Microsoft, Windows, Internet Explorer and Outlook are either registered trademarks or trademarks of Microsoft Corp. in the United States and/or other countries.

simpliWrite is the property of ART, Advanced Recognition
Technologies. Copyright © (1999).

simpliWrite software is licensed by ART, Advanced
Recognition Technologies, Copyright © (2000). ART DISCLAIMS ALL WARRANTIES WITH RESPECT TO THE USE OF SUCH SOFTWARE, INCLUDING, WITHOUT LIMITATION, ANY WARRANTY OF MERCHANTABILITY OR FITNESS FOR A PARTICULAR PURPOSE.
AUDIBLE RE A D Y*
AudibleReady is a trademark of Audible, Inc.
Copyright © 2000 by Audible, Inc. All Rights Reserved
This software is the property of Audible, Inc. Possession and use of this software must conform strictly to the license agreement between Franklin and Audible, Inc., and possession does not convey any rights to disclose, reproduce or permit others to use the software without the specific written authorization of Audible, Inc.

Puma Technology, the Puma Technology logo,
Intellisync, and the Intellisync logo are trademarks Puma Technology, Inc. d/b/a PUMATECH, Inc. that may be registered in some jurisdictions. Copyright © 2000 Puma Technology, Inc. All rights reserved.

is a registered trademark of Iambic Partners.
PDR is a registered trademark of Medical Economics Company, Inc.
Netscape Navigator is a registered trademark of Netscape Communications Corp.
Mobipocket is a registered trademark of mobipocket.com S.A.
All other trademarks and product names are the property of their respective owners.
LIMITED WARRANTY, DISCLAIMER OF WARRANTIES AND LIMITED REMEDY
(A) LIMITED WARRANTY. FRANKLIN WARRANTYS TO THE ORIGINAL END USER THAT FOR A PERIOD OF ONE (1) YEAR FROM THE ORIGINAL DATE OF PURCHASE AS EVIDENDED BY A COPY OF YOUR RECEIPT, YOUR FRANKLIN PRODUCT SHALL BE FREE FROM DEFECTS IN MATERIALS AND WORKMANSHIP. THIS LIMITED WARRANTY DOES NOT INCLUDE DAMAGE DUE TO ACTS OF GOD, ACCIDENT, MISUSE, ABUSE, NEGLIGENCE, MODIFICATION, UNSUITABLE ENVIRONMENT OR IMPROPER MAINTENANCE, NOR TO BATTERIES, CORROSION OF BATTERY CONTACTS NOR ANY OTHER DAMAGE CAUSED BY BATTERIES, NOR TO THE SCREEN GLASS. THE SOLE OBLIGATION AND LIABILITY OF FRANKLIN, AND YOUR EXCLUSIVE REMEDY UNDER THIS LIMITED WARRANTY, WILL BE REPAIR OR REPLACEMENT WITH THE SAME OR AN EQUIVALENT PRODUCT OF THE DEFECTIVE PORTION OF THE PRODUCT, AT THE SOLE OPTION OF FRANKLIN IF IT DETERMINES THAT THE PRODUCT WAS DEFECTIVE AND THE DEFECTS AROSE WITHIN THE DURATION OF THE LIMITED WARRANTY. THIS REMEDY IS YOUR EXCLUSIVE REMEDY FOR BREACH OF THIS WARRANTY. THIS WARRANTY GIVES YOU CERTAIN RIGHTS; YOU MAY ALSO HAVE OTHER LEGISLATED RIGHTS THAT MAY VARY FROM JURISDICTION TO JURISDICTION.
(B) DISCLAIMER OF WARRANTYES AND LIMITATION OF LIABILITY. EXCEPT FOR THE LIMITED WARRANTYES EXPRESSLY RECITED ABOVE, THIS FRANKLIN IS PROVIDED ON AN "AS IS" BASIS, WITHOUT ANY OTHER WARRANTYES OR CONDITIONS, EXPRESS OR IMPLIED, INCLUDING, BUT NOT LIMITED TO, WARRANTYES OF MERCHANTABLE QUALITY, MERCHANTABILITY OR FITNESS FOR A PARTICULAR PURPOSE, OR THOSE ASING BY LAW, STATUTE, USAGE OF TRADE, OR COURSE OF DEALING. THIS WARRANTY APPLIES ONLY TO PRODUCTS MANUFACTURED BY FRANKLIN AND DOES NOT INCLUDE BATTERIES, CORROSION OF BATTERY CONTACTS OR ANY OTHER DAMAGE CAUSED BY BATTERIES. NEITHER FRANKLIN NOR OUR DEALERS OR SUPPLIERS SHALL HAVE ANY LIABILITY TO YOU OR ANY OTHER PERSON OR ENTITY FOR ANY INDIRECT, INCIDENTAL, SPECIAL, OR CONSEQUENTIAL DAMAGES WHATSOEVER, INCLUDING, BUT NOT LIMITED TO, LOSS OF REVENUE OR PROFIT, LOST OR DAMAGED DATA OR OTHER COMMERCIAL OR ECONOMIC LOSS, EVEN IF WE HAVE BEEN ADVISED OF THE POSSIBILITY OF SUCH DAMAGES, OR THEY ARE OTHERWISE FORESEEABLE. WE ARE ALSO NOT RESPONSIBLE FOR CLAIMS BY A THIRD PARTY. OUR MAXIMUM AGGREGATE LIABILITY TO YOU, AND THAT OF OUR DEALERS AND SUPPLIERS, SHALL NOT EXCEED THE AMOUNT PAID BY YOU FOR THE FRANKLIN PRODUCT AS EVIDENCED BY YOUR PURCHASE RECEIPT. YOU ACKNOWLEDGE THAT THIS IS A REASONABLE ALLOCATION OF RISK. SOME STATES/COUNTRIES DO NOT ALLOW THE EXCLUSION OR LIMITATION OF LIABILITY FOR CONSEQUENTIAL OR INCIDENTAL DAMAGES, SO THE ABOVE LIMITATION MAY NOT APPLY TO YOU. IF THE LAWS OF THE RELEVANT JURISDICTION DO NOT PERMIT FULL WAIVER OF IMPLIED WARRANTYES, THEN THE DURATION OF IMPLIED WARRANTYES AND CONDITIONS ARE LIMITED TO THE DURATION OF THE EXPRESS WARRANTY GRANTED HEREIN.
(C) WARRANTY SERVICE: UPON DISCOVERING A DEFECT, YOU MUST CALL FRANKLINS CUSTOMER SERVICE DESK, 1-800-266-5626, TO REQUEST A RETURN MERCHANDISE AUTHORIZATION ("RMA") NUMBER, BEFORE RETURNING THE PRODUCT (TRANSPORTATION CHARGES PREPAID) TO: FRANKLIN ELECTRONIC PUBLISHERS, INC.
ATTN: SERVICE DEPARTMENT
ONE FRANKLIN PLAZA
BURLINGTON, NJ 08016-4907
IF YOU RETURN A FRANKLIN PRODUCT, PLEASE INCLUDE ANOTE WITH THE RMA, YOUR NAME, ADDRESS, TELEPHONE NUMBER, A BRIEF DESCRIPTION OF THE DEFECT AND A COPY OF YOUR SALES RECEIPT AS PROOF OF YOUR ORIGINAL DATE OF PURCHASE. YOU MUST ALSO WRITE THE RMA PROMINENTLY ON THE PACKAGE YOU RETURN THE PRODUCT, OTHERWISE THERE MAY BE A LENGTHY DELAY IN THE PROCESSING OF YOUR RETURN. WE STRONGLY RECOMMEND USING A TRACKABLE FORM OF DELIVERY TO FRANKLIN FOR YOUR RETURN.
Limited Warranty (outside U.S.)
This product, excluding batteries and screen glass, is guaranteed by Franklin for a period of one year from the date of purchase. It will be repaired or replaced with an equivalent product (at Franklin's option) free of charge for any defect due to faulty workmanship or materials.
Products purchased outside the United States that are returned under warranty should be returned to the original vendor with proof of purchase and description of fault. Charges will be made for all repairs unless valid proof of purchase is provided and the product is still within the warranty period.
This warranty explicitly excludes defects due to misuse, accidental damage, or wear and tear. This guarantee does not affect the consumer's statutory rights.
Limited Warranty (E.U. and Switzerland)
This product, excluding batteries and liquid crystal display (LCD), is guaranteed by Franklin for a period of two years from the date of purchase. It will be repaired or replaced with an equivalent product (at Franklin's option) free of charge for any defect due to faulty workmanship or materials.
Products purchased outside the European Union and Switzerland that are returned under warranty should be returned to the original vendor with proof of purchase and description of fault. Charges will be made for all repairs unless valid proof of purchase is provided.
This warranty explicitly excludes defects due to misuse, accidental damage, or wear and tear. This guarantee does not affect the consumer's statutory rights.
Limited Warranty (outside U.S.,the E.U. and Switzerland)
This product, excluding batteries and liquid crystal display (LCD), is guaranteed by Franklin for a period of one year from the date of purchase. It will be repaired or replaced with an equivalent product (at Franklin's option) free of charge for any defect due to faulty workmanship or materials.
Products purchased outside the United States, the European Union and Switzerland that are returned under warranty should be returned to the original vendor with proof of purchase and description of fault. Charges will be made for all repairs unless valid proof of purchase is provided.
This warranty explicitly excludes defects due to misuse, accidental damage, or wear and tear. This guarantee does not affect the consumer's statutory rights.
INDEX
A
Abbreviation 110, 121
Translator language 110
Bible 121
Translator 122
About
Address Book 160
Audiobook Player 140
Calculate 200
eBookMan Desktop Manager 36
Intellisync 36
Memo Book 190
Music Player 146
ToDo Book 184
Voice Memo 195
Accessory
Case 63
Cover 63
Address Book 12, 14, 150-161
Address view 153
Contacts List 150, 157
Custom fields 157
Edit menu 160
Exit 161
Field limits 159
Menu 160
Miscview153
Note view 154
Preferences 157
Search 158
Address View 153
Audible 232
Audible folder 42
Audible.com 51, 139
AudibleManager 33,49,51,83
Audio books 51
Audiobook Player 12, 13, 139-144
Exit 140
Help 140
Preferences 141
Program info 140
Audiobooks 48
B
Back 99
Back panel 62
Backlight 60
Backup 210
Battery 11, 19, 63, 231
Compartment 19, 63
Indicator 67
Replacement 20
Warning 20
BIOS 19
Booklist 97, 99
Bookmark 107, 118, 134
Add 118
Add bookmark 135
Bookmark List 119, 136
Scroll bar 119
View 119
Bookmark View 101
Buttons
Fast forward 140, 145, 194
On/Off 61, 65
Pause 194
Play 140, 145, 194
Record 194
Reset 62
Rewind 140, 145, 194
Start 140
Stop 140, 145, 194
C
Cable 11, 21, 62, 208
Serial 208
Calculate 12, 14, 199-202
Exiting 201
Keys 199
Memory 201
Calibration 25
Caps lock keyboard 92
Category 126
Indicator 67
Change folder 34
Change sync folder 34, 40
Change to contents folder 34
Change to library folder 34
Configuration
Connection 22
Desktop Manager 35
Connection view 30
Contacts list 150, 155
Contents Folder 40
Contents pane 31, 41, 42, 49, 50
Copy to contents folder 31, 41
Delete 32
Move to library folder 31, 41
Open 31
Properties 32
Send to eBookMan 31
Unpack 31
Contents view 31
Control menu 141, 196
Audiobook Player 141
Play all 196
Repeat all 196
Repeat single 196
Control Pad 60, 61, 62, 150
Control Wheel 63
Cookies 40, 204
Copy
Address Book 161
Date Book 176
Memo Book 190
Copy to contents folder 31, 41
Copyright 36, 232
Core applications 12
Cover 11, 63
Cradle 11, 21, 62, 207
Cross reference 107
Custom Fields 153, 157, 160
Cut
Address Book 161
Date Book 176
Memo Book 190
D
Daily View 172
Date 26
Date Book 12, 14, 67, 163-177
Daily View 172
Exit 177
Field limits 175
Menu 175
Monthly View 174
Weekly View 173
Default keyboard 91
Delete 195
Deletion 32, 33, 42, 83
Demo 11
Desktop Manager
Connection View 30
Contents view 31
Start 21
Desktop shortcut 21
Details 156
Device drivers 19
Device info 34
Device pane 31, 32, 49
Delete 32
Move to MMC 32
Move to RAM 32
Properties 32
Send to PC 32
Dimension 231
Directory Structure 40
Disclaimer 3, 233
Screen illustrations 15
E
ebm-900 11
ebm-901 11
ebm-911 11
eBook 53, 96, 124
Closing 96
Opening 96
eBook Settings
Home 105
Novel reading mode 105
Show title bar over text 105
Start topic 106
eBookMan home page 35
eBookMan ID 64, 69
eBookMan Monitor 36, 51
eBookMan Setup 18
eBookMan Desktop Manager 29-38, 204
eBookStore 35
Edit menu 141, 146, 184
AddBookmark 102
Address Book 160
Copy 102, 185
Cut 102, 185
Handwriting guide 185
in Date Book 176
Keyboard 91, 102, 185
Memo Book 190
Paste 102, 185
Preferences 146, 195
Select All 102
eDoc 53, 56, 124
Electronic document 53, 123
Closing 123
Move to eBookMan 56
Opening 123
Publish 57
Viewing 128
eNews53,54,124
subscribe 56
Exit 34, 140, 146, 161, 184, 195
Address Book 160, 161
Audiobook Player 140, 143
Calculate 200, 201
Date Book 176
Desktop Manager 34
Franklin Reader 99, 102, 122
Memo Book 190
Mobipocket Reader 131
Music Player 146, 148
ToDo Book 185
Views 100
Voice Memo 195, 197
F
Field Limits
Address Book 159
Date Book 175
ToDo Book 183
Field mapping 45
Figure 107
Filedeletion32,33,42
File manager 81
File menu 33, 140, 146, 160, 175, 184
About 146, 160, 184, 195
Change folder 34
Change sync folder 34, 40
Change to library folder 34
Copy to contents folder 33, 41
Custom fields 160
Delete 33, 195
Exit 34, 146, 160, 184, 195
Help 146, 160, 184, 195
Memo Book 190
Memo info 195
Move to library folder 33, 41
Open 34
Preferences 160
Program info 146
Properties 34
Purge 184
Send to eBookMan 33
Send to PC 33
Synchronize 33
File types 39, 125
eBook 125
eDoc 125
eNews 125
Footnote 107
Forward 99
Franklin Reader 12, 13, 67, 96-122
Features 98
Icon 96
Lookup 108
Moving Around 106
Preferences 103
Searching 108
Franklin Reader Settings 104
Book font sizes 104
Show quick commands 105
Show scroll bars 105
Text in portrait mode 105
Franklin Viewer†12
Front panel 60
FUB 39
G
Glossary 14, 212
Go To menu
Booklist 103
Bookmark List 103
Index 103
Outline 103
Search 103
Search Results 103
Graphic 107
H
Handwriting area 61, 151
Handwriting guide 68, 161
Address Book 161
Date Book 176
Memo Book 191
Hard reset 65
Hardware features 60
Headphone jack 62
Headwords 115
Help 140, 146, 184, 195, 200
Address Book 160
Audiobook Player 140
Calculate 200
Date Book 176
Franklin Reader 120
in Mobipocket Reader 137
Memo Book 190
Music Player 146
ToDo Book 184
Voice Memo 195
Help menu 36
About eBookMan Desktop Manager 36
About Intellisync 36
Help topics 36
Home 99
HTML 39, 48
1
lambic 232
Icon 67
Content 67
Franklin Reader 96
Program 67
ID number 64
Installation 35, 37, 204
Installation CD 11, 18, 22
Intellisync11,35,43
Advanced Settings 45
Field Mapping 46
ISBN 231
K
Keyboard 91, 151
Keys 199
L
Label
in Address Book 151, 153
Launcher 13, 67-83
Icon 61
Launcher icon 61
Launcher menu 64
File manager 81
Legal information 14
Letter input area 85
Library 125
Category 126
File Types 125
Header 125
Open Library at startup 132
Library folder 33, 41
License agreement 4
Limited warranty 233, 234
List 99
List View 100
Lookup 108
Lowercase accents keyboard 93
M
Main menu
About 130
Bookmark List 130
Exit 131
Find 130
Help 130
Library 131
Settings 130
Mathematical function 199
Memo Book 12, 14
Edit menu 190
Exiting 191
File menu 190
Memo info 195
Memory 67, 139, 199, 231
in Calculate 201
Menu 160
Edit 102, 141, 146, 160, 176, 190, 195
File 140, 146, 160, 175, 184, 190, 195
Go To 103
Help 36
Main 130
Move 101
Options 102
Page 131
Setup 35
View 34
Web 34
Menu bar 29
Menu icon 61
Menu
in Audiobook Player 140
in Calculate 200
in Date Book 175
in Desktop Manager 33
in Franklin Reader 101
in Mobipocket Reader 130
in Music Player 146
inToDo Book 184
in Voice Memo 195
Microphone 60, 196
Voice memo 60
Microsoft® Outlook 33, 161
Misc View 153, 157
MMC 49, 50, 67, 209
MMC port 63
Mobipocket 37, 51, 123
Mobipocket Reader 12, 123-138
Book Details 127
Category 124
Footer 128
Library 123
Moving around 132
Progress Bar 129
Searching a Document 133
Settings 131
Text Area 129
Tips 128
Tool Bar 129
Using Bookmarks 134
Model number 231
Mono format 145
Monthly View 174
Move
to library folder 31, 33, 41
to MMC 32
to RAM 32
Move menu
Back 101
Exit 102
Forward 101
Scroll to End 102
Scroll to Top 102
MP3 39, 48, 49, 145
MultiMediaCard 63, 67
Music 147
Music Player 12, 13, 145-148
My Download Library 35
My eBookMan 25
My Updates 35
N
Natural handwriting 13, 90
Netscape Navigator 232
New Content 48
Next 99
Note View
Address Book 154
Number input area 85
0
On/Off button 61, 65
Onscreen keyboard 13
Address Book 161
Date Book 176
Memo Book 190
Open 31, 34
Operating system 11, 22, 35, 77
Options menu
About Franklin Reader 103
About This Book 103
Help 102
Preferences 103
Reader Functions 102
Organizer program 150
Outline 99, 100
P
Page menu 131
Add bookmark 131
eBook Info 131
Go to first page 131
Go to page 131
Table of Contents 131
Panel
Back 62
Password 27, 54
Deletion 76
Revision 75
Paste
Address Book 161
Date Book 176
Memo Book 190
PDB 39, 48
PDR® 232
Personal view 152
Phone number 152
Play all 196
Play single 196
Port
MMC 63
USB 62
PRC 39
Preferences 103
Address Book 157, 160
Audiobook Player 141
Date Book 170, 176
Music Player 146
Voice Memo 195
Previous 99
Product care 64
Product Support 35
Programinfo140,146
Properties 32, 34
Puma technology 232
Punctuation input area 90
Purchase titles 35
Purge 184
Q
Quick command 105
Quick Commands 107
Quick Publish 57
Quick Search 109
Quick start guide 11
R
RAM 32, 49, 67
Refresh 34
Register 35
Registration 27, 35
Reset
Button 62, 65
Hard reset 65
Soft reset 64
Restart now 65
Restart system 64
S
Screen 60
Scroll arrows 61
Search 99
in Address Book 158
Search Results 114
Searching from a List 113
Spell correction 112
Word match 112
Search Screen 109
Search View 100
SEB 50
Section 141
Select All
Memo Book 190
Select destination 50
Send to eBookMan 33, 49
Send to PC 32, 33
Serial number 64, 69
Setup menu 35
Connection 35
Install 35
Intellisync 35
Shift keyboard 92
simpliWrite® 232
Soft reset 64
Speaker 62
Special characters
French 90
Spanish 90
Special Markers 107
Bibliographic entry 107
Bookmark 107
Cross reference 107
Figure 107
Footnote 107
Graphic 107
Table reference 107
Unavailable graphic illustration 107
Unavailable section of text 107
Spell Correction 112
Status bar 29
Stereo format 145
Stop program button 73
Stylus 11, 25, 62, 64, 155
Sub-text View 101
Support 15
Switch panes 33, 34
Synchronization 33, 118
Audio books 51
Music file 49
OS and applications 22
System requirements 11
T
Table reference 107
Technical support 15
Text View 101
Time 26
Title 141, 147
Title Bar 98
ToDo Book 12, 14, 179-185
Exit 185
Field limits 183
Tool Bar 99
Toolbar 29,34
Touch screen 60
Tour 11, 20
Trademark 232
Troubleshooting 218
TXT 39
U
Uninstall 37
Unpack 31, 33
Updates 204, 206
Uppercase accents keyboard 93
USB
Drivers 19
Port 20, 62
Serial port 14
V
View menu 34
Device info 34
Refresh 34
Switch panes 34
Toolbar 34
Voice Memo 12, 194-198
Buttons 194
Exit 197
Fast forward 194
File menu 195
Listen 197
Play 194
Record 194, 196
Rewind 194
W
Web companion 11, 37, 51
Configure 52
Update 55
Web menu 34
Download OS/Applications 35
eBookMan home page 35
MobiPocket Web Companion 35
My Download Library 35
My Updates 35
Product Support 35
Purchase titles 35
Register 35
Weekly View 173
Weight 231
Western European characters 90
Word Match 112
Z
Zipped *.seb file 33