DM 7000-S - Satellite decoder DREAM MULTIMEDIA - Free user manual and instructions
Find the device manual for free DM 7000-S DREAM MULTIMEDIA in PDF.

User questions about DM 7000-S DREAM MULTIMEDIA
0 question about this device. Answer the ones you know or ask your own.
Ask a new question about this device
Download the instructions for your Satellite decoder in PDF format for free! Find your manual DM 7000-S - DREAM MULTIMEDIA and take your electronic device back in hand. On this page are published all the documents necessary for the use of your device. DM 7000-S by DREAM MULTIMEDIA.
USER MANUAL DM 7000-S DREAM MULTIMEDIA
HDD installation card
Mode d'emploi
Carte de garantie
Linux OS Set-top box with PCMCIA interface for
CA modules, for receiving clear and encoded
ASTRA and EUTELSAT DVB programmes.
Connector for internal hard disk
Compact Flash reader
Graphical display

- Shift/Set-up function
- TV control mode
- Numeric keypad
- Page back
- Mute mode
- Volume +/-
- Channel information
- Direction keys
- Audio menu
- Option keys red, green, yellow, blue
- TV mode
-
Radio mode
-
On / standby
- Dreambox control mode
- Page forwards
- Bouquet selection
- LAME!
- Main menu
- OK (selection)
- VCR menu (video recorder)
- VCR control
- Help menu
- Videotext
FRANÇAIS
8.2.9 Common Inerface
3. Table of Contents
Chapter
-
Remote control 3
-
TV model list 23-32
-
Views 34
2.1 Front view 34
2.2 Rear view 34
-
Contents 35
-
Safety instructions 36
4.1 Periods of non-use 37
4.2 Additional safety notes 37-38
- Getting started 39
5.1 Hifi amplifier 39
5.1.1 Analog 39
5.1.2 Digital 39
5.2 RS 232 serial interface 40
5.3 Ethernet 40
-
Disposal notes 40
-
Important notes on operation 40
-
Main menu 41
8.1 Info menu 42
8.2 Set-up menu 42
8.2.1 Channels 43
8.2.2 Network 43-44
8.2.3 OSD 44
8.2.4 LCD 45
8.2.5 Remote control 45
8.2.6 Video 46
8.2.7 Skin 46
8.2.8 Language 47
8.2.9 Common Interface 47
8.2.10 EPG 48
8.2.11 Timer 48-49
8.2.12 Hard disk 49
-
Infobar 50
-
Channel list 50-51
-
Standby, Power down Dreambox and Reset 51
-
Set up "TV control mode" 52
Notes 53
Warranty card 74
HDD installation card 75
4. Safety instructions
For your protection, please read the safety instructions thoroughly before starting to use your DM 7000. The manufacturer accepts no responsibility for damage which occurs as a result of incorrect handling or from failure to observe the safety instructions.
- The unit must be positioned such that it is sufficiently ventilated.
- The cover of the unit must not be covered, and there must be sufficient distance from other equipment. The ventilation ports of the unit must always remain unobstructed, so that the warm air can be carried away from the interior of the unit.
- Do not place any vases or other containers with fluids in them on the unit. Water must not be allowed to drip or to spray onto the unit.
- No burning objects, such as candles or oil lamps, may be placed on the unit.
- The unit must only be operated in moderate climactic conditions.
- Never open the unit yourself! There is a risk of electric shocks. Should it become necessary to open the unit, this must be carried out by qualified personnel.

- Never introduce foreign metal objects into the slots or the ventilation ports.
- Installation or exchange of a hard disk drive may only be carried out by qualified personnel, or a dealer trained for the purpose.
WARNING!
Conversion or modification of the unit leads to loss of warranty if not carried out by a specialist dealer and certified in writing.
WARNING!
We recommend that the hard disk be installed by the specialised dealer. An incorrect installation of the hard disk results in you losing all of your rights under the guarantee.
4.1 Periods of non-use
- If the unit is not operated for longer periods of time, it should be completely disconnected from the mains power supply.
- The unit should also be disconnected from the mains supply during electrical storms.
4.2 Additional safety precautions
- Connection to the external device (LNB)
Remove the power cable of the DM 7000 from the mains socket before you connect or remove the cable of the LNB. - Connection to the television
Remove the power cable of the DM 7000 from the mains socket before you connect the SCART cable to your television. - The unit must immediately be disconnected from the mains power supply if the power cable or socket show any signs of damage.
- The unit must immediately be disconnected from the mains power supply if it is exposed to dampness or if dampness penetrates it.
- The unit must immediately be disconnected from the mains power supply if substantial external damage is discovered.
Do not expose your Dreambox to direct sunlight, lightning or rain.
Earthing: the LNIB cable must be earthed.
The earthing system must conform to SABS 061.
Cleaning: remove the power cable of the Dreambox from the mains socket before you clean the Dreambox. Use a slightly damp cloth without cleaning agents.
Connect your Dreambox only to sockets which are intended for the purpose.
Do not allow the unit to become overloaded.
General:
Environmental temperature +15^ ... +35^
Atmospheric humidity < 80%
Dimensions (W x D x H): 374 mm x 230 mm x 63 mm
Weight: 1.8kg without HDD
5. General notes
Check that everything has been delivered. You should have received the following:
1 receiver
1 power cable
1 remote control
1 Instruction Manual
1 guarantee card
2 batteries (1.5V microcell)
Optionally available:
2 hard disk installation frames
1 IDE cable
1 power cable for the hard disk
1 infrared keyboard
- Check the battery polarity carefully and install the batteries supplied in the battery compartment of the remote control.
- Before you connect the receiver, please read the safety instructions under point 2.
- Connect the external device (Spiegel, LNB) with an F plug to the LNB input on the receiver.
- Connect the receiver with a Scart cable to your television (Scart socket TV), and to a video recorder or DVD player (Scart socket VCR).
- Plug the mains cable into the receiver and then into a suitable power socket 230V / 50Hz .
5.1 Hifi amplifier
5.1.1 Analog
To connect your Dreambox to a hifi amplifier, please use a suitable phono cable Connect this to the receiver at AUDIO R/L and to a free input (e.g. AUX or CD) on your hifi amplifier.
5.1.2 Digital
If your amplifier has a suitable optical input, connect the DIGITAL AUDIO socket on the receiver to the optical input of the amplifier with an optical cable. Sampling frequencies of 16, 22.05, 24, 32, 44.1 and 48kHz are available. This output also provides the Dolby Digital-Signal (AC3) when this is broadcast.
5.2 RS 232 serial interface
The RS 232 interface is used to update the operating software and for preprogramming with a PC.
5.3 Ethernet
The Ethernet interface can be used to update the operating software and for pre-programming with a PC.
6. Disposal notes
The packaging of the DM 7000 consists exclusively of recyclable materials. Please dispose of these appropriately.
Take care that dead batteries from the remote control and electronic scrap are not disposed of in ordinary rubbish, but are properly disposed of (return to the specialist dealer, or special waste disposal).
7. Important notes on operation
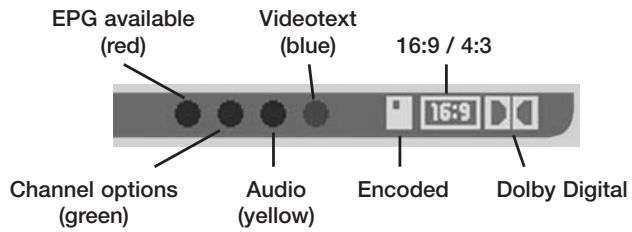
The operation of the Dreambox is greatly simplified with an OSD (On Screen Display). All available options are displayed over 4 coloured dots (red, green, yellow, blue) and can be activated with the remote control.
The options change depending on the menu, and are labelled appropriately in each menu.
You can leave all menus and channel lists with the LAME! key.
8. Main menu

This OSD (On Screen Display) is used to navigate to the individual submenus.

TIMER - mode
Switches to file mode.

SCART - menu
Switches the Scart between video input and output.

TV - mode
Switches to TV mode.

RADIO - mode
Switches to radio mode.

FILE - mode
Switches to file mode.

INFO - menu
Switches to the Info menu.

POWER OFF - mode
Puts the Dreambox into deep standby.

SET-UP - menu
Switches to the Set-up menu.
8.1 Info-menu
Streaminfo:
Streaminfo
Name: ProSieben
Provider: ProSiebenSat.1
Video PID: 00ffh (255d)
Audio PID: 0100h (256d)
PCR PID: 00ffh (255d)
Teletext PID: 0020h (32d)
Video format: 720x576 4:3
Transport Stream ID: 0021h
Original Network ID: 0085h
Service ID: 0382h
Service information (right) 1/3
8.2 Set-up-menu
Setup
[back]
Channels...
Network...
OSD...
LCD...
Remote Control...
Video...
Skin...
Language...
Harddisk...
Common Interface...
Upgrade...
8.2.1 Channels:
This allows you to set up the satellites and the channel search.

The satellite menu allows you to add and edit satellites.
Add a satellite with "new", or edit the selections displayed.
Leave the menu with "close" or with "LAME!"
8.2.2 Network
This shows the set-up for your network.
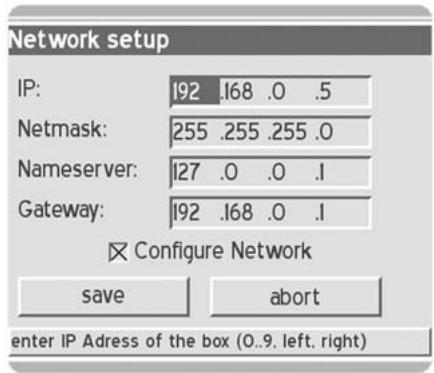
IP: Enter the IP address of your Box here (e.g. 192.168.0.5).
Network mask: (e.g. 255.255.255.0).
Name server: Enter a name server here.
Gateway: Enter the standard gateway here (e.g. 192.168.0.1).
After entering your set-up, save your settings with "save", or „abort".
8.2.3 OSD
This allows you to configure the OSD (On Screen Display).

Transp.: Select the transparency of your OSD.
Brightness: adjust the brightness of your OSD.
Contrast: adjust the contrast of your OSD.
After entering your set-up, save your settings with "save", or „abort".
8.2.4 LCD
This allows you to set up the display of the Dreambox.
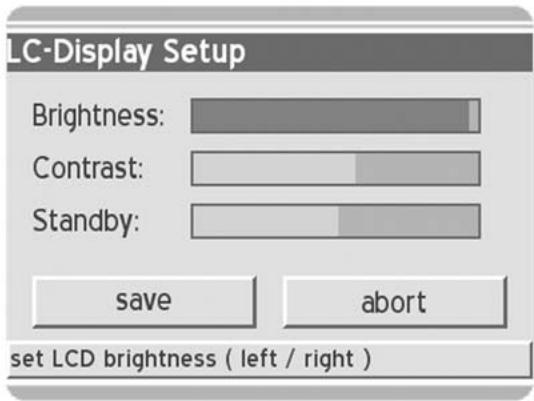
You can adjust brightness, contrast and stand-by brightness.
After entering your set-up, save your settings with "save", or „abort".
8.2.5 Remote control
This allows you to configure your remote control.

You can adjust the repeat rate and the delay rate.
After entering your set-up, save your settings with "save", or „abort".
8.2.6 Video
This allows you to configure your video set-up.
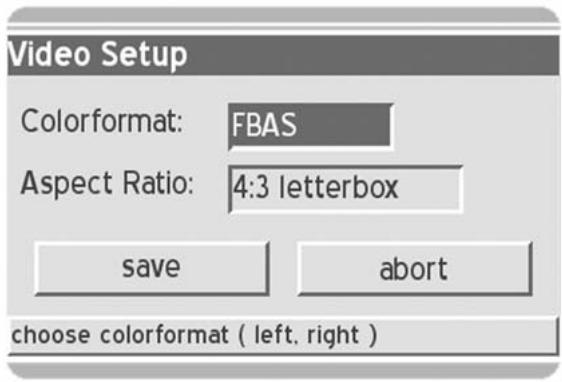
Colour format: Choose between RGB, SVideo and FBAS.
Aspect ratio: Choose between 4:3 letterbox, 4:3 panscan or 16:9 (PIN8).
After entering your set-up, save your settings with "save", or „abort".
8.2.7 Skin
This allows you to choose between different OSD skins.
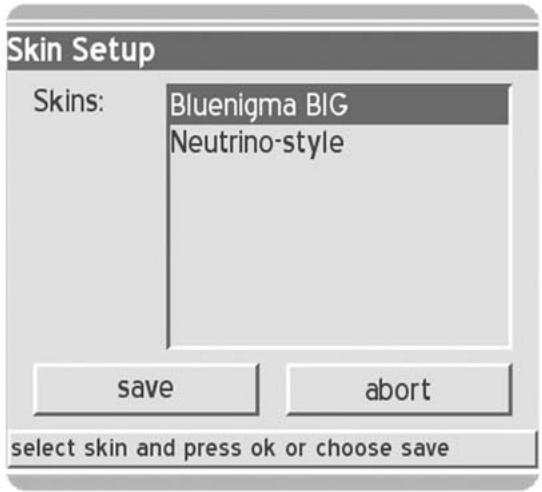
After entering your set-up, save your settings with "save", or „abort".
A new skin becomes active the next time you reboot.
8.2.8 Language
This allows you to choose the language for the OSD.
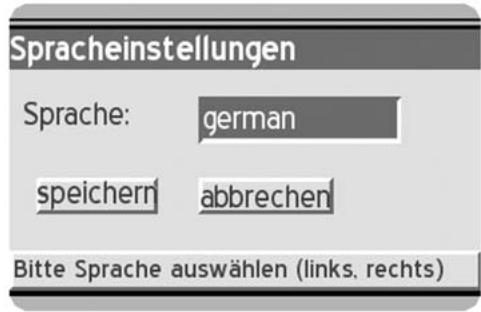
Language: select the language for the OSD.
After entering your set-up, save your settings with "save", or „abort".
A new language becomes active the next time you reboot.
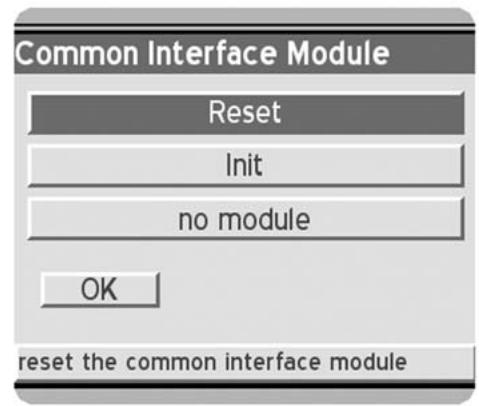
8.2.9 Common Inface
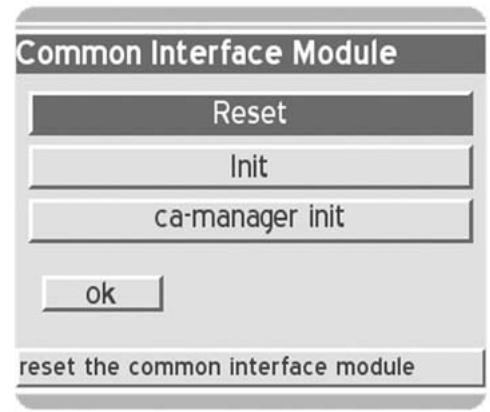
Reset: this allows you to reset the Common Interface.
Init: this allows you to re-initialise the Common Interface.
8.2.10 EPG
EPG-ProSieben
02.11 01:40 Ronin
02.11. 03:36 Bloodsport III
02.11 05.11 Cat City
02.11. 06:34 Pinky & der Brain
02.11. 07:01 Mega Man
02.11 07:30 Ace Venture
02.11. 07:59 Der Magier
02.11. 08:28 Big Guy & Rusty
02.11. 08:55 Superman
02.11. 09:23 Batman & Robin
02.11. 09:50 Extreme Ghostbusters
02.11 10:18 Chris Colorado
02.11. 10:48 Batman of the Future
02.11. 11:16 Antz - Was krabbelt da?
02.11. 12:48 Eine schrecklich nette Familie
The red selection key on the remote control takes you into the EPG lists.
With "OK", you can see further information on programmes.
With the green selection key, you can add a programme to your recording list.
8.2.11 Timer
This allows you to set up your recording list.
Timer list
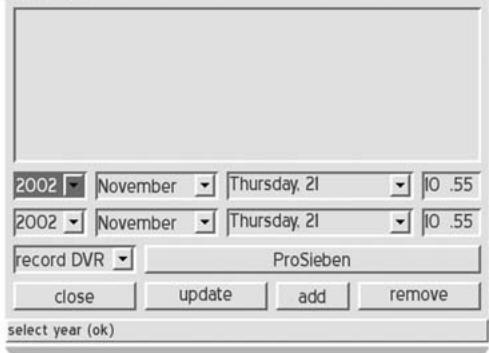
Enter the channels manually with the record options, or edit your recording list. You can also delete recording options from the EPG list here with "remove".
8.2.12 Hard disk
This allows you to configure your installed hard disk.
harddisk setup...
back
MAXTOR 4KO60H3 (master, 60.040 GB)
First select the hard disk found and press "OK" to view information about the disk, or to re-format the disk.
MAXTOR 4K06OH3
model: MAXTOR 4KO6OH3
capacity: 60.040 GB
connected: master
status: in use, 59.928 GB (~1816 minutes) free
close
format
The next menu shows you:
Model: the hard disk found.
Capacity: this displays the capacity of the hard disk connected.
Connected: port master or slave.
Status: this shows the status of your hard disk.
To configure a new hard disk or to delete all data from the disk, please select "format", otherwise select "close".
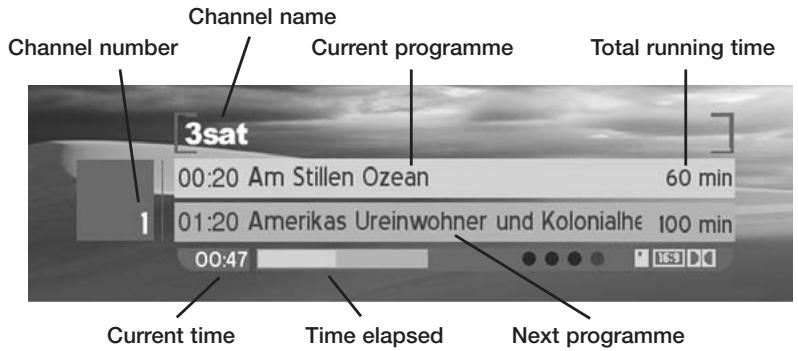
9. Infobar
10. Channel list
TV mode DVB-bouquets (TV) German Free
FRANCISZKANIE
German Free
GlobeCast
IMEDIA
Landmark Travel 0
Maastricht Multime
Motors TV
MTV Networks 8
no name
ORF
PREMIERE
QVC
RTBF
TBS
Tele 2
Teleshopping
1 3sat
2 ARD-Online-Kanal
3 arte
4 Bayerisches FS
5 BR-alpha
6CNBC
7 Das Erste
8EinsExtra
9EinsFestival
0EinsMuXx
1 EuroNews
2 Europort
3 hessen femsehen
4 Kabel 1 Austria
5 Kabel 1 Schweiz
6 KABEL1
17 KiKa
18 MDR FERNSEHEN
19 MHP ARD Online-Kai
20 n-tv
21 N24
22 NDRFemsehen
23 ORB-Femsehen
24 Phoenix
25 ProSieben
26 ProSieben Austria
In the channel list you can select from the different representations of the channel list with the "Dream" key:
- simple channel list
- three-column channel list
- channel list with bouquet list
Select a channel and press "OK".
The yellow selection key allows you to switch between the left and right windows.
With the red selection key, you can enter the channel into your list of favourites, or add it to the playlist.
The blue selection key takes you to the favourites menu.
11. Standby, Power down Dreambox and Reset
To put your Dreambox into standby mode, briefly press the power key on your remote control once.
To put your Dreambox into deep standby, go to the main menu, select the "power down" option, and confirm this with the "OK" key.
All settings are now stored and the Box goes into deep standby, or press the power key on the remote control for 5 seconds.
For a reset, press all 3 buttons on the Dreambox at the same time.
12. Set up "TV control mode"
12. Set up "TV control mode"
A four-digit TV device code is selected from the TV model list in the table in Chapter 13 (pages 23 - 32) and entered.
TV mode -> <
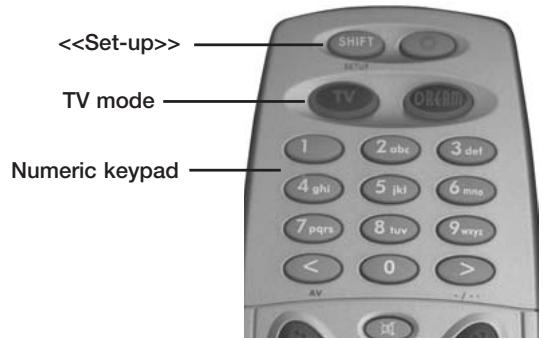
Programming sequence:
- Briefly press the TV key once.
- Press the SHIFT/Set-up key for 3 seconds. The TV key should blink twice.
- Enter the TV code with the numeric keypad on the remote control. Each number input is acknowledged by the TV key blinking once.
After the fourth digit has been input, a valid code is acknowledged by the TV key blinking twice.
- The remote control now automatically leaves programming mode.
- If no code is input for 10 seconds, the remote control automatically leaves programming mode.
3. Sommaire
Chapitre
-
Telecommande 3
-
ListedappareilsTV 23-32
-
Vues 54
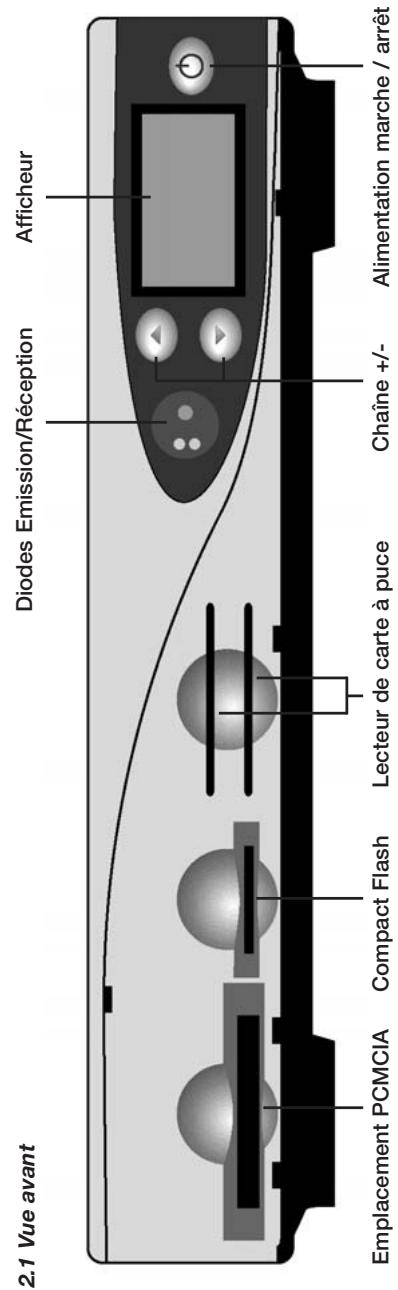
2.1 Vue avant 54
2.2 Vue arrirée 54
8.2.9 Common Interface 67
8.2.10Programme electronique (EPG) 68
8.2.11 Minuterie 68-69
8.2.12 Disque dur 69
Name server: Enter a name server here.
8.2.9 Common Inerface
| Timer list | |||
| 2002 | November | Thursday, 21 | 10.55 |
| 2002 | November | Thursday, 21 | 10.55 |
| record DVR | ProSieben | ||
| close | update | add | remove |
| select year (ok) | |||
In case of complaints or warranty claims, please return the unit to the dealer from whom it was purchased. DO NOT RETURN IT TO DREAM MULTIMEDIA TV GMBH!
If your Dreambox has been equipped with a HDD, it is most important that you include the HDD installation card, filled in and stamped, with the warranty card!
IMPORTANT!
StraBe / Street / Rue:
Straße / Street / Rue:
StraBe / Street / Rue:
Straße / Street / Rue: