
CD-X1500 - Professional CD Player TASCAM - Free user manual and instructions
Find the device manual for free CD-X1500 TASCAM in PDF.
| Product type | Professional CD player |
| Brand | TASCAM |
| Model | CD-X1500 |
| Dimensions (W x H x D) | 482 x 88 x 300 mm (19-inch rack, 1U) |
| Weight | 4.5 kg |
| Power supply | 220-240 V AC, 50/60 Hz |
| Power consumption | 25 W |
| Playable formats | CD-Audio, CD-R, CD-RW |
| Playback functions | Play, pause, stop, next/previous track, search, repeat (1/track/all), program (up to 20 tracks), random play |
| Audio outputs | Analog (stereo RCA) and digital (coaxial optical) |
| Headphone output | 6.35 mm jack with volume control |
| Connectivity | RS-232C port for external control, sync input |
| Display | Backlit LCD screen with function indicators |
| Maintenance and cleaning | Clean the device with a soft, dry cloth. Do not use solvents or abrasive products. |
| Safety | Unplug the device before any maintenance. Do not expose to moisture. |
| Spare parts and repairability | Contact an authorized TASCAM dealer for spare parts and repairs. |
| General information | Class A device (usable in professional environments). CE certified. |
Frequently Asked Questions - CD-X1500 TASCAM
User questions about CD-X1500 TASCAM
0 question about this device. Answer the ones you know or ask your own.
Ask a new question about this device
Download the instructions for your Professional CD Player in PDF format for free! Find your manual CD-X1500 - TASCAM and take your electronic device back in hand. On this page are published all the documents necessary for the use of your device. CD-X1500 by TASCAM.
USER MANUAL CD-X1500 TASCAM
TEAC Professional Division
CD-X1500
DUAL CD PLAYER


OWNER'S MANUAL / MANUAL DEL USUARIO


CAUTION: TO REDUCE THE RISK OF ELECTRIC SHOCK, DO NOT REMOVE COVER (OR BACK). NO USER-SERVICEABLE PARTS INSIDE. REFER SERVICING TO QUALIFIED SERVICE PERSONNEL.

The lightning flash with arrowhead symbol, within an equilateral triangle, is intended to alert the user to the presence of uninsulated “dangerous voltage” within the product’s enclosure that may be of sufficient magnitude to constitute a risk of electric shock to persons.

The exclamation point within an equilateral triangle is intended to alert the user to the presence of important operating and maintenance (servicing) instructions in the literature accompanying the appliance.
This appliance has a serial number located on the bottom. Please record the model number and serial number and retain them for your records.
Model number
Serial number
WARNING: TO PREVENT FIRE OR SHOCK HAZARD, DO NOT EXPOSE THIS APPLIANCE TO RAIN OR MOISTURE.
IMPORTANT (for U.K. Customers)
DO NOT cut off the mains plug from this equipment.
DO NOT cut off the mains plug from this equipment.
If the plug fitted is not suitable for the power points in your home or the cable is too short to reach a power point, then obtain an appropriate safety approved extension lead or consult your dealer.
If nonetheless the mains plug is cut off, remove the fuse and dispose of the plug immediately, to avoid a possible shock hazard by inadvertent connection to the mains supply.
If this product is not provided with a mains plug, or one has to be fitted, then follow the instructions given below:
IMPORTANT: DO NOT make any connection to the larger terminal which is marked with the letter E or by the safety earth symbol c or coloured GREEN or GREEN-and-YELLOW.
The wires in the mains lead on this product are coloured in accordance with the following code:
| BLUE | : NEUTRAL |
| BROWN | : LIVE |
As these colours may not correspond with the coloured markings identifying the terminals in your plug proceed as follows:
The wire which is coloured BLUE must be connected to the terminal which is marked with the letter N or coloured BLACK.
The wire which is coloured BROWN must be connected to the terminal which is marked with the letter L or coloured RED.
When replacing the fuse only a correctly rated approved type should be used and be sure to re-fit the fuse cover.
IF IN DOUBT — CONSULT A COMPETENT ELECTRICIAN.
For U.S.A
TO THE USER
This equipment has been tested and found to comply with the limits for a Class A digital device, pursuant to Part 15 of the FCC Rules. These limits are designed to provide reasonable protection against harmful interference when the equipment is operated in a commercial environment. This equipment generates, uses, and can radiate radio frequency energy and, if not installed and used in accordance with the instruction manual, may cause harmful interference to radio communications.
Operation of this equipment in a residential area is likely to cause harmful interference in which case the user will be required to correct the interference at his own expense.
CAUTION
Changes or modifications to this equipment not expressly approved by TEAC CORPORATION for compliance could void the user's authority to operate this equipment.
For the consumers in Europe WARNING
This is a Class A product. In a domestic environment, this product may cause radio interference in which case the user may be required to take adequate measures.
1 Read these instructions.
2 Keep these instructions.
3 Heed all warnings.
4 Follow all instructions.
5 Do not use this apparatus near water.
6 Clean only with dry cloth.
7 Do not block any ventilation openings. Install in accordance with the manufacturer's instructions.
8 Do not install near any heat sources such as radiators, heat registers, stoves, or other apparatus (including amplifiers) that produce heat.
9 Do not defeat the safety purpose of the polarized or grounding-type plug. A polarized plug has two blades with one wider than the other. A grounding type plug has two blades and a third grounding prong. The wide blade or the third prong are provided for your safety. If the provided plug does not fit into your outlet, consult an electrician for replacement of the obsolete outlet.
10 Protect the power cord from being walked on or pinched particularly at plugs, convenience receptacles, and the point where they exit from the apparatus.
11 Only use attachments/accessories specified by the manufacturer.
12 Use only with the cart, stand, tripod, bracket, or table specified by the manufacturer, or sold with the apparatus. When a cart is used, use caution when moving the cart/apparatus combination to avoid injury from tip-over.

natural_image
Symbolic icon of a person lifting a large object, enclosed in a circle with no text or symbols13 Unplug this apparatus during lightning storms or when unused for long periods of time.
14 Refer all servicing to qualified service personnel. Servicing is required when the apparatus has been damaged in any way, such as power-supply cord or plug is damaged, liquid has been spilled or objects have fallen into the apparatus, the apparatus has been exposed to rain or moisture, does not operate normally, or has been dropped.
- Do not expose this apparatus to drips or splashes.
- Do not place any objects filled with liquids, such as vases, on the apparatus.
- Do not install this apparatus in a confined space such as a book case or similar unit.
- The apparatus draws nominal non-operating power from the AC outlet with its POWER switch in the off position.
SAFETY INFORMATION
This product has been designed and manufactured according to FDA regulations "title 21, CFR, chapter 1, subchapter J, based on the Radiation Control for Health and Safety Act of 1968", and is classified as a class 1 laser product. There is no hazardous invisible laser radiation during operation because invisible laser radiation emitted inside of this product is completely confined in the protective housings.
The label required in this regulation is shown 1.
CAUTION
- DO NOT REMOVE THE PROTECTIVE HOUSING USING A SCREWDRIVER.
- USE OF CONTROLS OR ADJUSTMENTS OR PERFORMANCE OF PROCEDURES OTHER THAN THOSE SPECIFIED HEREIN MAY RESULT IN HAZARDOUS RADIATION EXPOSURE.
- IF THIS PRODUCT DEVELOPS TROUBLE, CONTACT YOUR NEAREST QUALIFIED SERVICE PERSONNEL, AND DO NOT USE THE PRODUCT IN ITS DAMAGED STATE.
Optical pickup: Type : KSS-213C
Manufacturer : SONY Corporation
Laser output : Less than 0.4 mW on the objective lens
Wavelength : 760 - 800nm
- Before you start.... 6
1.1 Environmental conditions ...... 6
1.2 Beware of condensation.... 6
1.3 Handling of discs 6
- Functions and Controls ...... 7
2.1 Main Unit (Front Panel).... 7
2.2 Main Unit (Rear Panel).... 7
2.3 Remote Controller (Top Panel)...... 8
2.4 Remote Controller (Bottom Panel)...... 10
2.5 Remote Controller (LCD) 10
- Playback operation.... 12
3.1 CUE.... 12
To memorize the CUE point ..... 12
Stutter play with CUE key 12
3.2 CUE 1-3 ...... 12
To memorize the CUE 1-3 points ..... 12
Stutter play with CUE 1-3 keys ...... 12
3.3 Flash Start 12
3.4 A-B Looping 13
To store the LOOP points.... 13
Disengage the loop.... 13
Re-looping.... 13
Erasing the LOOP points.... 13
Changing the LOOP end point (B point) .... 13
3.5 Adjusting the tempo .... 14
Tempo range.... 14
Using the TEMPO slider.... 14
Using the TAP key.... 14
3.6 Pitch bending.... 14
3.7 Key original.... 14
- More advanced operation.... 15
4.1 Key control.... 15
4.2 Scratching.... 15
4.3 Brake 15
Set the brake time.... 15
4.4 FILTER.... 15
4.5 Track Memory / Recall ...... 16
Track memory 16
Recall.... 16
4.6 Fader Start.... 17
4.7 Relay Play 17
4.8 Auto Cue 17
4.9 Auto Ready.... 17
4.10 Programmed Play 18
Create the program.... 18
Edit program.... 18
Insert program 18
Delete program.... 19
4.11 Preset menu 19
4.12 Backup memory 20
- Specifications 21
Error Messages.... 21
Demensions ......Back page
1.1 Environmental conditions
The TASCAM CD-X1500 may be used in most areas, but to maintain top performance, and prolong operating life, observe the following environmental conditions:
The nominal temperature should be between 5^ C and 35^ C ( 41^ F and 95^ F).
Relative humidity should be 30 to 90 degrees non-condensing.
Make sure that the drive unit is mounted in a level position for correct operation.
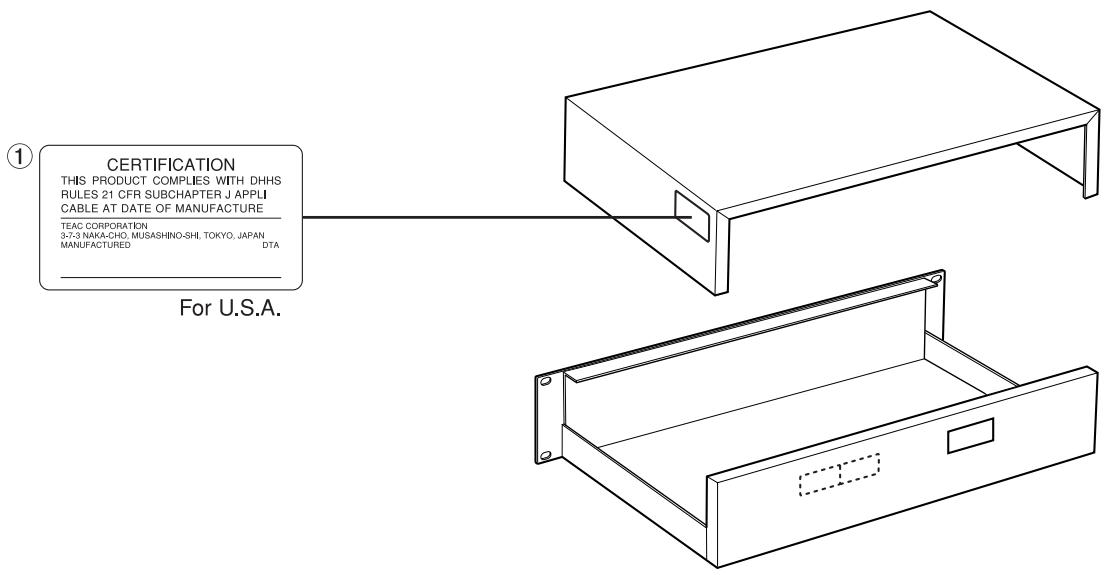
The units should be mounted, using the supplied rack mounting kits. A typical configuration is shown below, but other configurations are possible:
natural_image
Technical line drawing of a mechanical assembly with mounting brackets and wiring (no text or symbols)NOTE
- If the disc trays are more than 5 degrees away from the horizontal, they will not open or close.
- Do not install this apparatus in a confined space such as a book case or similar unit.
1.2 Beware of condensation
If the player (or a compact disc) is moved from a cold to a warm place, or used after a sudden temperature change, there is a danger of condensation; vapor in the air could condense on the internal mechanism, making correct operation impossible. To prevent this, or if this occurs, leave the player for one or two hours with the power turned on, then turn the power off and on again.
1.3 Handling of discs
The unit has been designed specifically for reproduction of discs bearing the COMPACT DISC DIGITAL AUDIO mark. No other discs can be reproduced.
Observe the following:
- Always place the compact discs in the trays with their label facing upward (compact discs can only be played on one side).
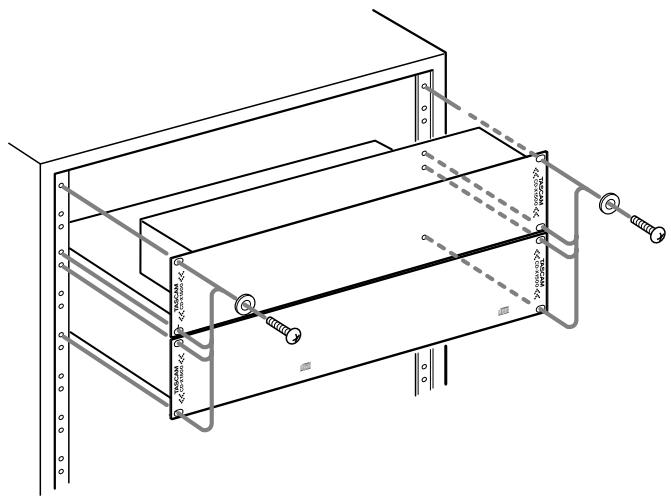
- To remove a disc from its storage case, press down on the center of the case, and lift the disc out, holding it carefully by the edges.
natural_image
Three line drawings showing hands holding a CD or DVD disc with a handle, no text or symbols present.- Finger marks and dust should be carefully wiped off the disc's recorded surface with a soft cloth. Unlike conventional records, the compact disc has no grooves to collect dust and microscopic debris, so gently wiping with a soft cloth should remove most particles.

- Wipe in a straight motion from the inside to the outside of the disc. Small dust particles and light stains will have absolutely no effect on reproduction quality.
- Never use such chemicals as record sprays, anti-static sprays or fluid, benzine or thinner to clean compact discs. Such chemicals will do irreparable damage to the disc's plastic surface.
- Discs should be returned to their cases after use to avoid serious scratches that could cause the laser pickup to "skip".
- Don't expose discs to direct sunlight or high humidity and temperature for extended periods. Long exposure to high temperature can warp the disc.
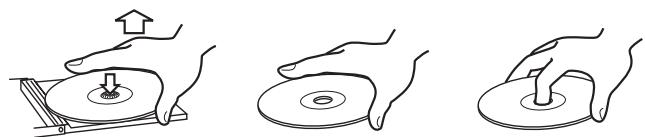
- Only use circular compact discs. Avoid using non-circular promotional, etc. discs.

natural_image
Four-panel diagram showing a heart-shaped object with a cross mark, each paired with a separate abstract shape (no text or symbols)- To keep the laser pickups clean, don't touch them. For the same reason, don't leave the disc trays open unnecessarily.
2-1. Main Unit (Front Panel)
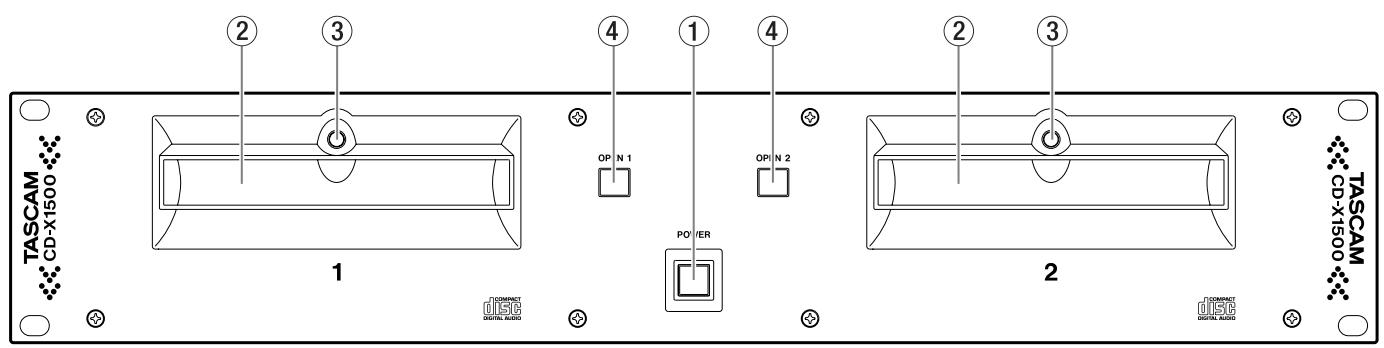
① POWER switch
Turns the power on and off. The tray LEDs light when power is supplied.
When Timer start function is on, playback begins when power is supplied.
② Disc trays
Insert CD into these trays, label side upwards.
③ Tray LEDs
Lights when power is supplied.
④ OPEN keys
Open and close the appropriate tray.
NOTE
- These keys cannot be used when direct mode (Preset menu) is off and disc is being played back.
2-2. Main Unit (Rear Panel)
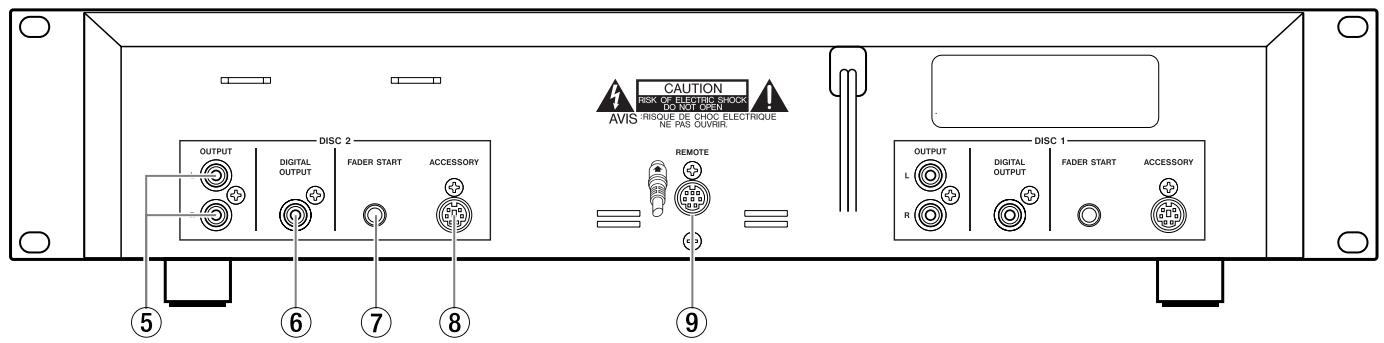
⑤ OUTPUT jacks (RCA)
RCA connectors providing line level output signals, one set each for discs 1 and 2.
⑥ DIGITAL OUTPUT (COAXIAL, S/PDIF)
Coaxial connectors provide digital output signals. These connectors can output the 44.1KHz digital signals constantly even if pitch control is activated.
⑦ FADER START jacks (MINI jack)
CD-X1500 can be controlled using the external Fader start command through these jacks. Connect the mixer which supports the fader start function with appropriate cable as well as audio signal. (TIP: Start, GND: back cue)
⑧ ACCESSORY (MINI DIN 6P)
Connect the optional scratch controller TT-M1.
⑨ REMOTE (MINI DIN 8P)
Use this connector to connect the remote control unit.
WARNING
- DO NOT use any cable with the CD-X1500 except the cable supplied with the unit.
- Connect the cable in the way shown on the illustration on the rear panel of the CD-X1500. If you connect the cable in any other way, you may damage the CD-X1500.
2-3. Remote Controller (Top Panel)
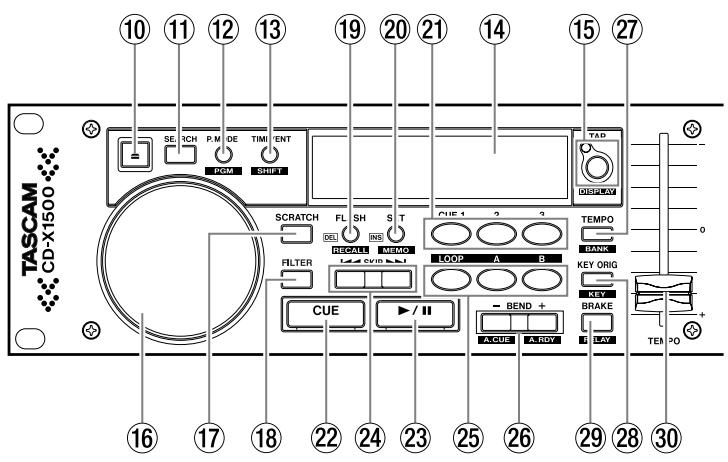
⑩ OPEN key
Opens and closes the appropriate tray.
NOTE
- These keys cannot be used when direct mode (Preset menu) is off and a disc is being played back.
⑪ SEARCH key
Turns on or off the Search function on the Jog wheel. When this key is lit, the Jog wheel acts as a search dial. After 5 seconds without search operation, the unit will exit the search mode automatically.
⑫ P.MODE / PGM key
Selects the play mode, either continuous play (all play), single play (1 track play), or programmed play.
Continuous play: No indication in the LCD
Single play: SINGLE indicator in the LCD will light
Programmed play: PROGRAM indicator in the LCD will light
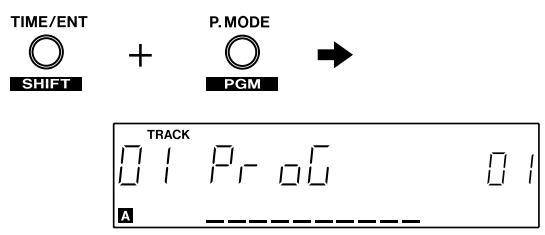
Pressing and holding the TIME/ENTER/SHIFT key while pressing the P.MODE key, enters program edit mode.
⑬ TIME/ENT / SHIFT key
Selects the time display mode, either elapsed, remain, or total remain.
ELAPSED: Elapsed time will show in the numerical portion in display, but no additional indicator will light.
REMAIN: REMAIN indicator in the LCD will light
TOTAL REMAIN: The track number display area shows the number of tracks of inserted disc, however, for 5 seconds in the end of track, the current track number flashes and for 5 seconds in the beginning of the track, the current track number lights.
Another function of this key is the modifier key (SHIFT function). Holding SHIFT while pressing another key performs the following functions;
SHIFT + P.MODE: Program edit
SHIFT + FLASH: Track memory recall
SHIFT + SET: Track memory
SHIFT + TEMPO: Memory bank select
SHIFT + BEND -: Auto cue on/off
SHIFT + BEND +: Auto ready on/off
SHIFT + TAP: Parameter display select
SHIFT + Jog Wheel: Preset
SHIFT + B: Loop end point edit
SHIFT + CUE: Select the CUE key's operation
⑭ LCD
Displays visual feedback for CD-X1500 functions.
⑮ TAP / DISPLAY key
Set the tempo in BPM by tapping this key. When you press this key, the parameter counter mode momentarily changes to TAP BPM display mode. ( page 14)
Pressing and holding the SHIFT key while pressing this key selects the parameter display mode.
TEMPO → KEY → TAP
⑯ Jog Wheel
The following functions can be controlled by the Jog wheel.
- Search
- Pitch Bend
- Scratch
- Brake time
- Key control
- Preset menu
- FILTER
- Program edit
- Track memory number select
⑰ SCRATCH key
Turns the scratch play mode on and off. When scratch play mode is on, this key lights and scratch can be performed by Jog wheel. ( page 15)
⑱ FILTER key
Turns the filter effect (FILTER) on and off. When the filter effect is activated, this key lights. The frequency of the filter can be controlled by Jog wheel. ( page 15)
⑲ FLASH / RECALL / DEL key
Turns the flash start mode on and off. ( page 12) Recalls the track memory data. ( page 16) Deletes the current selected song from the program list. ( page 19)
⑳ SET / MEMO / INS key
Set the cue points with CUE 1-3. ( page 12) Memorizes the track memory data ( page 16) Adds the current selected song to the program list. ( page 18)
②1 CUE 1-3 keys
Depending on the setting, these keys locate to cue points, flash start from cue points (default), or stutter play from cue points. ( page 12)
⑳ CUE key
Locates to the cue point, then pauses.
Stutter play can be performed with this key. (→ page 12)
Selects the CUE key's operation mode. (→ page 12)
⑳ PLAY/PAUSE key
Changes the playback mode between playback and pause.
The light stays on solid in playback mode, and flashes in pause mode.
⑳ Track Skip keys
Use these to perform track searches.
⑳ LOOP, A, and B keys
Sets or erases the loop points, or engages or disengages the loop playing. ( page 14)
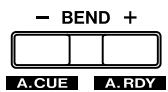
②6 BEND +/ A.RDY, -/A.CUE keys
Use these keys to perform pitch bending. (→ page 14) Turns the AUTO CUE function on and off. (→ page 17) Turns the AUTO READY function on and off. (→ page 17)
⑳ TEMPO / BANK key
Selects the tempo range, either +/-8, 16, 32, 100 or 0%. Selects the track memory bank from A to E. ( page 16)
⑳ KEY ORIG / KEY key
Turns the KEY ORIGINAL function on and off. (→ page 14) Sets the key control value. (→ page 15)
⑲ BRAKE / RELAY key
Turns the brake function on and off and sets the brake time using the Jog wheel. ( page 15) Turns the relay play on and off. ( page 17)
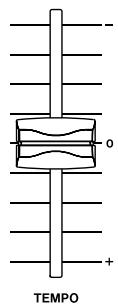
③0 TEMPO slider
Changes the playback tempo.
2-4. Remote Controller (Bottom Panel)
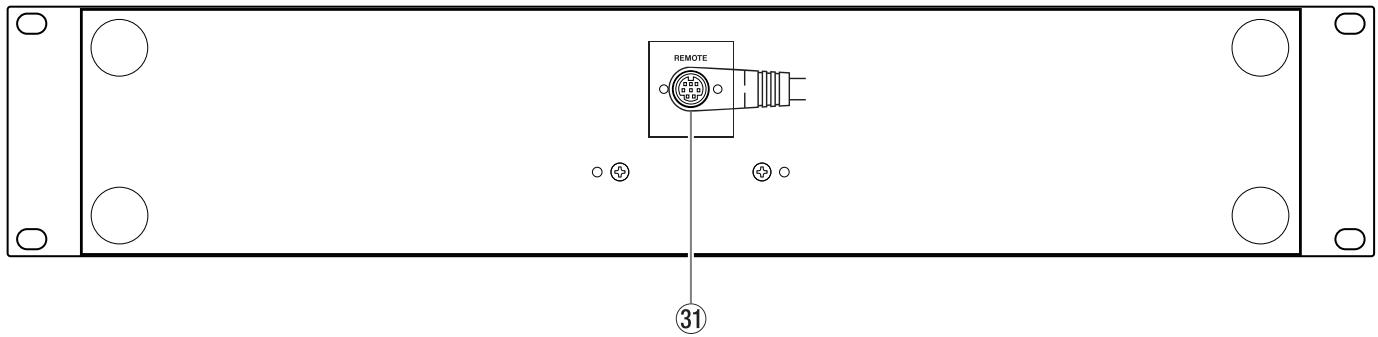
③1 Remote Connector
Connect this to the REMOTE connector on the rear panel of the main unit.
WARNING
- DO NOT use any cable except the cable supplied with the CD-X1500.
- Connect the cable to the CD-X1500 shown on the illustration on the rear panel. If you connect the cable in any other way, you may damage the CD-X1500.
2-5. Remote Controller (LCD)
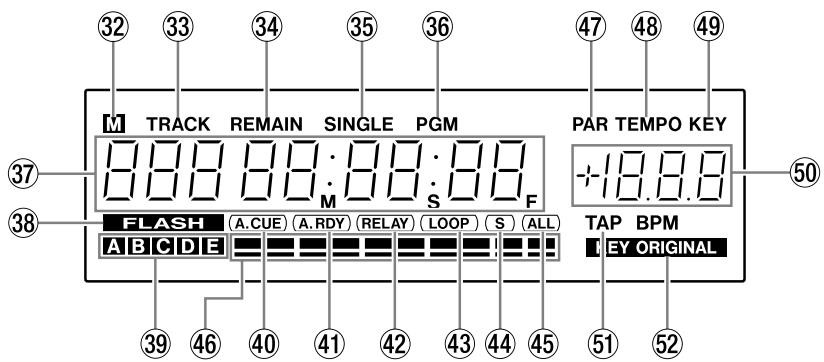
③2 M indicator
If there is track memory data for the current selected track in the current selected memory bank, this indicator lights.
③3 TRACK indicator
③4 REMAIN indicator
When the time mode is set to remain time mode, this indicator lights.
③5 SINGLE indicator
When the play mode is set to single play, this indicator lights.
③6 PGM indicator
When the play mode is set to programmed play, this indicator lights.
③7 Time display
This section is used to show track number, time values or messages.
2. Functions and Controls
③8 FLASH indicator
When flash start is activated, this indicator lights. Flash start is on by default, or the last setting of flash start will be retained. If you set it to OFF then turn the power off, when power is turned back on, flash start will be OFF.
⑲ Memory bank indicators
Lights the current selected memory bank indicator.
④0 A.CUE indicator
Lights when AUTO CUE function is turned on.
④1 A.RDY indicator
Lights when AUTO READY function is activated.
④2 RELAY indicator
Lights when relay play is set to on.
④3 LOOP indicator
Lights when loop play is engaged.
④4 S indicator
Lights when loop mode is set to single loop.
④5 ALL indicator
Lights when loop mode is set to all loop.
④6 Time Address Bar
Shows the current play position relative to the current track.
④7 PAR indicator
When FILTER is activated, this indicator lights and displays the filter parameter.
④8 TEMPO indicator
Lights when parameter display shows the TEMPO value.
④9 KEY indicator
Lights when parameter display shows the key value.
Lights when key value is set to other than 0%.
⑤0 Parameter display
Displays the various parameters.
⑤1 TAP indicator
Lights when parameter display shows the tap value.
⑤2 KEY ORIGINAL indicator
Lights when key original function is activated.
3-1. CUE
The CD-X1500 can memorize the play start point as a cue point. If cue point is memorized, pressing the CUE key locates the unit to the cue point.
To memorize the CUE point
There are two ways to store the cue point.
Pressing and holding the SHIFT key then pressing CUE selects the method for the CUE key's operation.

PLY: Last play start point is stored as the CUE point.
CUE : Pressing the CUE key when unit is paused stores the current point as the cue point.
Stutter play with the CUE key
When the unit is paused at the cue point, the unit will play when this key is pressed, and enter pause mode when CUE is released.
If the PLAY key is pressed during CUE playback, the unit will go into normal play mode.
3-2. CUE 1-3
The CD-X1500 can have another three cue points stored with the CUE 1-3 keys.
To memorize the CUE 1-3 points
- Find the desired point.
- Press the SET key. The parameter display shows SET.
- Press the desired CUE key.

When the CUE key has the stored point, the CUE key lights. The stored cue point cannot be erased but can be overwritten.
NOTE
- When the unit is paused and the FLASH indicator in the LCD lights, pressing the SET key then pressing the CUE 1-3 key starts the unit automatically.
- When the unit is paused and the indicator in the LCD doesn't light, pressing the SET key then pressing the CUE 1-3 key flashes the pressed CUE 1-3 key three times then lights.
- For three seconds after storing the cue point, you cannot store another cue point.
Stutter play with the CUE 1-3 keys
When the unit is paused at the cue 1-3 point, the unit will play when the appropriate CUE 1-3 key is pressed, and enter pause mode when CUE 1-3 is released.
If the PLAY key is pressed during CUE playback, the unit will go into normal play mode.
3-3. Flash Start
The CD-X1500 has a flash start function that can be used with the CUE 1-3 keys.
When the flash start function is activated (when the FLASH indicator in the LCD lights), pressing the CUE 1-3 key enables flash start.

flowchart
graph LR
    A["DEL"] --> B["FLASH"]
    B --> C["RECALL"]
    C --> D["FLASH"]
    D --> E["CUE 1"]
    E --> F["2"]
    F --> G["3"]
NOTE
- When the FLASH indicator in the LCD doesn't light, the unit is back in cue mode. In this mode, pressing the CUE 1-3 key locates the stored cue point then the unit pauses.
3-4. A-B Looping
To store the LOOP points
NOTE
- Loop points can be stored when loop points are not stored on the unit (A and B key don't light). If loop points are already stored, erase these points first, then store the loop points again.
- Both loop start (A) and end (B) points can set to within a track.
-
A-B looping can be performed when the loop mode is set to "A-B" (preset 01). When loop mode is set to "A-B", the "S" and "ALL" indicators in the LCD don't light.
-
Press the A key when playing or pausing. The A key will light and the B key will start flashing.

- Press the B key when playing or pausing. The LOOP, A, and B keys will light. If the loop B point is set when the unit is playing, the CD-X1500 starts loop playback seamlessly. If the loop B point is set when the unit is paused, the CD-X1500 goes to the loop start point then pauses. At this time the LOOP indicator in the LCD lights.

Disengage loop play
When loop play is engaged, pressing the LOOP key disengages loop play. In this case, the unit continues playback and LOOP light goes off, but the loop points are not erased.
When loop play is engaged, locating to the out point of a loop section disengages loop play (i.e. pressing the CUE key, etc...). The LOOP key goes off, but the loop points are not erased.

Re-looping
When loop play is disengaged and loop points are already stored, pressing the LOOP key starts re-loop playback and the LOOP key lights.

Erasing the LOOP points
Pressing the A and B key at the same time erases the loop points. At this time, the A and B keys go off.
If the tray is opened, your loop points are erased.

Changing the LOOP end point (B point)
Pressing the B key when the loop is playing changes the loop end point.

Pressing and holding the SHIFT key then pressing the B key edits the B point using Jog wheel.
Pressing the B key overwrites the new B point and exits the edit mode.
NOTE
- The Loop B point can be moved before the current B point only.

3-5. Adjusting the tempo
Tempo range
The CD-X1500 features +/-8 , 16, 32, 100, and 0% of tempo control range. Pressing the TEMPO key changes the tempo control range. The parameter-display shows the selected tempo/key range momentary. If 0% is selected, the parameter display shows .

Using the TEMPO slider
The TEMPO slider controls the playback tempo. Tempo changes are displayed in the LCD.
Using the TAP key
Pressing the TAP key repeatedly counts the song tempo in BPM manually. Tapped BPM is shown in the LCD parameter display and the TAP LED blinks in tempo. This BPM affects the TEMPO slider moving. If the TEMPO slider is moved, the BPM will be changed automatically.

Pressing and holding the TAP key for more than 1.5 seconds erases the tapped BPM value.
Pressing and holding the TAP key then moving the Jog wheel (within 1.5 seconds) adjusts the BPM manually.

3-6. Pitch Bending
When playing back a disc, pressing the BEND + or – key, or using the Jog wheel can change playback tempo momentary. Pressing the + key or moving the Jog wheel clockwise increases the playback speed and returns to original speed when release this key or stop the Jog wheel moving. Pressing the - key or moving the Jog wheel counterclockwise decreases the playback speed and returns to original speed when release this key or stop the Jog wheel moving.
or

NOTE
- When SEARCH key, SCRATCH key, or FILTER key is not lit, the Jog wheel works for pitch bend function.
The maximum pitch bend range is 16%.
- When Key Original function is activated, playback key is fixed.
3-7. Key Original
When tempo range is set to +/-8 or 16%, pressing the KEY ORIG key turns the key original function on and off. When key original function is turned on, tempo control does not affect the playback key. When the key original function is turned on, KEY ORIGINAL indicator in the LCD lights.
If tempo range is set to +/-32% or 100% , the key original function does not work.
When the key original function is turned on, parameter display shows --- in the KEY mode.

4-1. Key control
The CD-X1500 features up to +/-16% key control. Key control range is determined with tempo range setting.
When tempo and key control range is set to 8%, key value can be set in 0.1% steps. When tempo and key control range is set to 16%, key value can be set in 0.2% steps. When tempo control range is set to 0%, 32%, or 100%, key control function does not work.
Pressing and holding the KEY key then moving the Jog wheel sets the key control value.
Note that the key value shows a total of the value together with any changes made by using the slider.

NOTE
- When the key original function is activated, the key control function does not work.
4-2. Scratching
When SCRATCH key is activated, scratching can be performed with the Jog wheel.

NOTE
- For 3 seconds after the flash start or cuing with CUE 1-3 key, or cuing with CUE key, backward direction of scratching cannot be performed. During SCRATCH key light is off, scratching cannot be performed. Once it lights again, scratching can be performed.
- When SEARCH function is on, the Jog wheel works as the search dial. When filter effect is turned on, scratch function is automatically turned off.
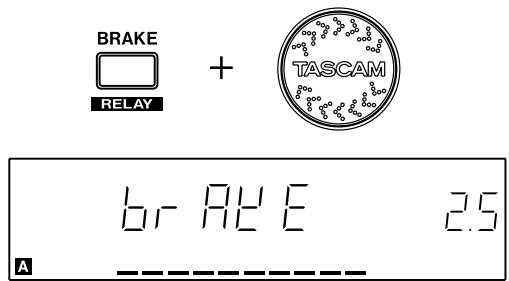
4-3. Brake
Brake function simulates the braking audio just like turning off the analog turntable. Pressing the BRAKE key turns the brake function on and off. When brake function is activated, the BRAKE key lights.

Set the brake time
Pressing and holding the BRAKE key then using the Jog wheel adjusts the brake time. Brake time can be set to 0.1 to 5 seconds in 0.1 sec. steps.
Pressing the PLAY/PAUSE key while unit is playing performs the braking.
Pressing the PLAY/PAUSE key during the braking starts the music again with current tempo.
4-4. FILTER
The CD-X1500 includes a filter effect. Pressing the FILTER key turns the effect on and off. When filter effect is turned on, the FILTER key lights. In this case, using the Jog wheel moves the cut off frequency for the filter.

NOTE
- When search function is turned on, Jog wheel works as the search dial. When scratch function is turned on, FILTER effect is automatically turned off.
4-5. Track Memory / Recall
The CD-X1500 can memorize the various playback settings of current selected track up to 100 tracks of memory in each 5 banks (A to E).
You could use each bank for a different player or use the other bank for a different setting for a track, for example.
Track Memory
- Select the memory bank (A to E) by pressing and holding the SHIFT key then pressing the TEMPO/BANK key.

- Enter the track memory mode by pressing and holding the SHIFT key then pressing the SET/MEMO key.

- LCD shows the lowest empty memory number.
-
Using the Jog wheel to change the memory number if necessary.
-
Press the ENT key. At this time, if there is stored memory in the selected memory number, -5 Ur E- indication is displayed in the LCD. Pressing the ENT key overwrites the data. Pressing any other key cancels the memory operation.

Memory data
- DISC ID
- CUE 1-3 points
- LOOP mode
- Tempo data
• Key Original On/Off - Brake On/Off
- Brake Time
- CUE point
- LOOP A/B points
- Play mode
- Tempo Range
- TAP value
- Brake Time
- Time mode
Recall
- Select the memory bank by pressing and holding the SHIFT key then pressing the TEMPO/BANK key. If there is a track memory data of selected track in the current selected memory bank (A to E), the "M" indicator in the LCD lights.

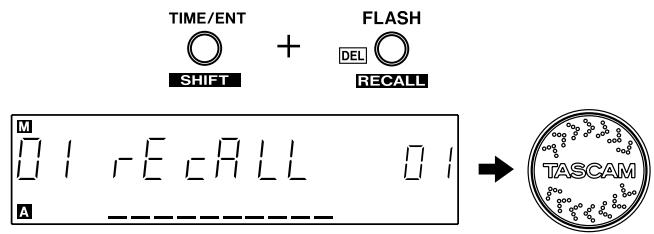
- Enter the recall mode by pressing and holding the SHIFT key then pressing the FLASH/RECALL key. If there is a track memory data for the selected track, its memory number is shown in the LCD.

- When track memory number is shown in the LCD, pressing the ENT key recalls the track memory data.

The CD-X1500 can recall the track (song) from the track memory data.
- Select the memory bank by pressing and holding the SHIFT key then pressing the TEMPO/BANK key.

- Enter the recall mode by pressing and holding the SHIFT key then pressing the FLASH/RECALL key. Using the Jog wheel to select the desired track memory number.
- When track memory number is shown in the LCD, pressing the ENT key recalls the track from the track memory number.

NOTE
- Cue and loop points can be memorized and/or recalled. However, just after the recall operation, seamless start from the cue or loop points cannot be performed because there are no data in the RAM buffer just after the recall operation. Once playing from cue points (CUE 1-3) and/or loop start point for a few second, flash start and/or seamless looping can be performed.
4-6. Fader Start
Connect the FADER START jack on the rear panel of the main unit and fader start jack on the external device which supports the fader start function (i.e. X-9, X-17, X-15, XS-3, etc...) with the fader start cable which is supplied to perform fader start/back cue performance with external device.
Audio signal should be connected to the external device as well.
TIP: Start (low active, more than 50ms)
GND: Back cue (low active, more than 50ms)
4-7. Relay Play
Turning on the Relay play function either left or right unit turns on the relay play function. When relay play is activated, when left unit finishes playback, right unit will start playback and vice versa automatically.
Pressing and holding the SHIFT key then pressing the BRAKE key turns the relay play function on and off. When relay play is turned on, the “RELAY” indicator in the LCD lights.

4-8. Auto Cue
Auto cue function allows the unit to search the beginning of the song and pause there automatically. The detection level is fixed to -54dB. When Auto cue function is turned on, "A.CUE" indicator in the LCD lights.
Pressing and holding the SHIFT key then pressing the BEND - key turns the AUTO CUE function on and off.

4-9. Auto Ready
Auto Ready function allows the unit to pause the beginning of the next track when playback of the current track is finished.
The behavior of Auto Ready function is follows.
Continuous play mode:
Pause the beginning of the next track when playback of the current track is finished.
Single play mode:
Pause the beginning of the current track when playback of the current track is finished.
Program play mode:
Pause the beginning of the next programmed track when playback of the current track is finished.
When Auto Ready function is turned on, “A.RDY” indicator in the LCD lights.
Pressing and holding the SHIFT key then pressing the BEND + key turns the AUTO READY function on and off.

4-10. Programmed Play
The CD-X1500 features up to 30 tracks of program play function. Program itself is maintained even if power is turned off, and if CD is not ejected, program list will be backed up.
NOTE
- If the disc is ejected, program will be erased.
- Once one of the CUE 1-3 key is pressed, programmed play will be cancelled.
Create the program
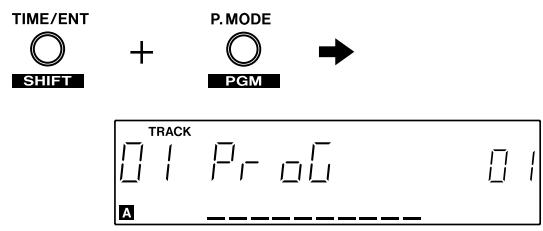
- Enter the program edit mode by pressing and holding the SHIFT key then pressing the P.MODE/PGM key.

- Program number is shown in the parameter display. Select desired track with the track skip keys.
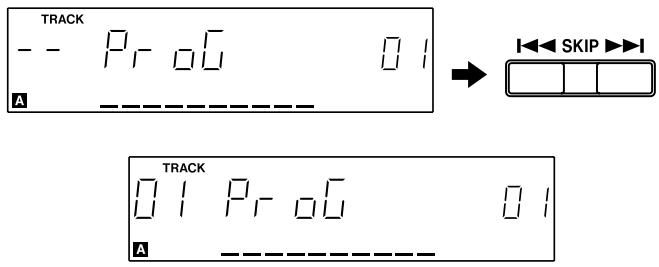
- Go to next program number by pressing the ENT key or using the Jog wheel.

- Repeat 2-3.
- Exit the program edit mode by pressing and holding the SHIFT key then pressing the P.MODE/PGM key.

Edit program
- Enter the program edit mode by pressing and holding the SHIFT key then pressing the P.MODE/PGM key.
- Program number is shown in the parameter display. Select the desired program number with the Jog wheel.

- Select desired track with track skip keys.

- Repeat 2-3.
- Exit the program edit mode by pressing and holding the SHIFT key then pressing the P.MODE/PGM key.

Insert program
- Enter the program edit mode by pressing and holding the SHIFT key then pressing the P.MODE/PGM key.

4. More advanced operation
- Program number is shown in the parameter display. Select desired program number where you want to insert the program with the Jog wheel.

- Press SET/INS key.

- Select desired track with track skip keys.

-
Repeat 2-4.
-
Exit the program edit mode by pressing and holding the SHIFT key then pressing the P.MODE/PGM key.

Delete program
- Enter the program edit mode by pressing and holding the SHIFT key then pressing the P.MODE/PGM key.
- Program number is shown in the parameter display. Select desired program number that you want to delete the program with the Jog wheel.

- Press FLASH/DEL key.

-
Repeat 2-3.
-
Exit the program edit mode by pressing and holding the SHIFT key then pressing the P.MODE/PGM key.

4-11. Preset menu
Pressing and holding the SHIFT key then using the Jog wheel selects the preset menu.

Select the preset menu then press the ENT key, the LCD shows the preset menu and its parameter.

Set the parameter with the Jog wheel.

Pressing the ENT key confirm the new parameter.

Pressing any other key exits the preset operation.
| Preset Number | Item | Parameter (*: default) | Function |
| 01 LOOP | LOOP mode | A-b*, S, ALL | Sets the loop mode.A-b : A-B loop mode.S : Single track loop mode.In this mode, S indicator in the LCD lights.ALL : All loop mode. In this mode, ALL indicator in the LCD lights. |
| 02 E_PLAY | TIMER start | OFF*, ON | Turns the “power on play” on or off |
| 03 direct | DIRECT | OFF*, ON | When direct mode is set to on, disc can be ejected when disc is played, and when insert the disc, playback is started automatically. |
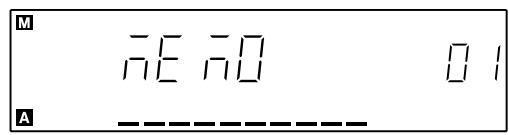
| 04 READ | TOC READ mode | nor *, AUT | Selects the TOC read mode.nor : Uses the previous servo value.AUT : Adjust the servo value every time. |
| 05 RECALL | Memory Auto Recall | nor *, AUT | Selects the track memory recall mode.nor : Recall the track memory data when recall operation is performed.AUT : Recall the track memory data when track is selected. |
| 06 F_PR_E | Factory Preset | -5 Ur-E- | Initialize the preset menu. |
| 07 ALLCLR | Memory All Clear | -5 Ur-E- | Clear the all memorized data. |
4-12. Backup Memory
Each time you turn off the power, the status of the following features are stored into backup memory.
- Time mode
- Play mode
- Flash start on/off
- Brake on/off
- Brake Time
• Key Original on/off - Auto Cue on/off
-
Auto Ready on/off
-
Relay Play on/off
- Tempo Range
- Memory Bank
- Preset Settings
- CUE mode
- Program
- FILTER on/off
| Disc type: | 8cm / 12cm CD | Dimensions (W x H x D mm) | |
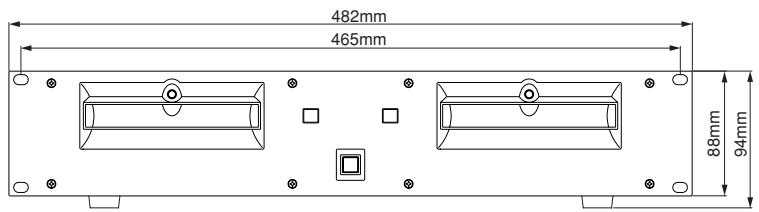
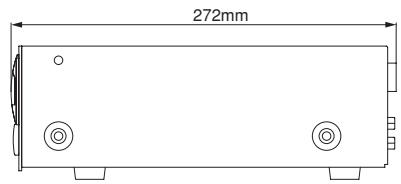
| Number of channels: | 2-channel | Main unit: | 482 x 94 x 272 |
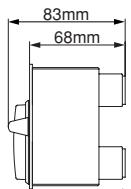
| Resolution: | 16-bit | Remote control unit: | 482 x 88 x 83 |
| Sampling frequency: | 44.1kHz | Weight | |
| Analog output: | RCA pin jack | Main unit: | 5.7kg |
| Output impedance: | <1kohm | Remote control unit: | 1.8kg |
| Maximum output level: | +6dBV | ||
| Digital output: | Coaxial | The following values are applicable when key and tempo values are set to 0. | |
| Format: | IEC60958 Type II | ||
| Voltage requirements | |||
| USA/Canada: | 120V AC, 60Hz | Frequency response: | 20 – 20kHz, +0.5/-1.0dB |
| UK/Europe: | 230V AC, 50Hz | ||
| Australia: | 240V AV, 50Hz | Dynamic range: | >95dB |
| Power consumption: | 27W | S/N ratio: | >95dB |
| Peak inrush current: | 0.9A | Total harmonic distortion: | <0.01% |
| Applicable electromagnetic Environment: | E4 | ||
Error Messages
Err 01 TOC Read error - the disc's Table of Contents cannot be read within 20 seconds - try with another disc or remove and clean the existing disc before replacing it
Err 02 GFS error – GFS signal cannot be detected within five seconds - try with another disc or remove and clean the existing disc before replacing it
Err 03 Focus error - after repeating the attempt eight times to focus, an error still occurs - try with another disc or remove and clean the existing disc before replacing it
Err 04 Sub-Q error - the sub-Q code cannot be detected (twice within five seconds) - try with another disc
Err 05 Loading error - the open or close operation cannot be completed, even after retries, or there is an internal error - make sure that there are no obstructions preventing the tray's operation
Err 06 Sled error - an internal drive error - try turning the power off, waiting a few seconds, and turning it on again
Err 07 Error in communication between decks - try turning the unit off, waiting a few seconds, and turning it on again
Err 10 S-DRAM error - an internal S-DRAM error - try turning the power off, waiting a few seconds, and turning it on again
If any of the numbered error messages occur, try using another disc.
If the errors continue with a number of discs, turn the unit off, wait for a few seconds, and turn it on again.
If the errors still continue or other error occurs, contact your TASCAM distributor for repair.
natural_image
Symbolic icon of a person using a large tool inside a circle (no text or symbols)natural_image
Technical line drawing of a mechanical assembly with bolts and supports (no text or symbols)NOTA
⑧ ACCESSORY (DIN MINI 6P)
⑨ REMOTE (DIN MINI 8P)
⑳ Tecla SET / MEMO / INS
NOTA
TEAC CORPORATION
| Phone: +81-422-52-50823-7-3, Nakacho, Musashino-shi, Tokyo 180-8550, Japan | www.tascam.com |
| TEAC AMERICA, INC.Phone: +1-323-726-03037733 Telegraph Road, Montebello, California 90640 | www.tascam.com |
| TEAC CANADA LTD.Phone: +1905-890-8008 Facsimile: +1905-890-98885939 Wallace Street, Mississauga, Ontario L4Z 1Z8, Canada | www.tascam.com |
| TEAC MEXICO, S.A. De C.VPhone: +52-555-581-5500Campesinos No. 184, Colonia Granjes Esmeralda, Delegaacion Iztapalapa CP 09810, Mexico DF | www.tascam.com |
| TEAC UK LIMITEDPhone: +44-1923-4388805 Marlin House, Croxley Business Park, Watford, Hertfordshire. WD1 8TE, U.K. | www.tascam.co.uk |
| TEAC DEUTSCHLAND GmbHPhone: +49-611-71580Bahnstrasse 12, 65205 Wiesbaden-Erbenheim, Germany | www.tascam.de |
| TEAC FRANCE S. A.Phone: +33-1-42-37-01-0217 Rue Alexis-de-Tocqueville, CE 005 92182 Antony Cedex, France | www.tascam.fr |
| TEAC AUSTRALIA PTY.,LTD. A.B.N. 80 005 408 462Phone: +61-3-9672-2400 Facsimile: +61-3-9672-2249280 William Street, Port Melbourne, Victoria 3000, Australia | www.tascam.com.au |
| TEAC ITALIANA S.p.A.Phone: +39-02-66010500Via C. Cantu 11, 20092 Cinisello Balsamo, Milano, Italy | www.teac.it |
- TEAC Professional Division
- CD-X1500
- DUAL CD PLAYER
- OWNER'S MANUAL / MANUAL DEL USUARIO
- IMPORTANT (for U.K. Customers)
- DO NOT cut off the mains plug from this equipment.
- TO THE USER
- CAUTION
- For the consumers in Europe WARNING
- SAFETY INFORMATION
- Environmental conditions
- NOTE
- Beware of condensation
- Handling of discs
- Observe the following:
- 2-1. Main Unit (Front Panel)
- ① POWER switch
- ② Disc trays
- ③ Tray LEDs
- ④ OPEN keys
- 2-2. Main Unit (Rear Panel)
- ⑤ OUTPUT jacks (RCA)
- ⑥ DIGITAL OUTPUT (COAXIAL, S/PDIF)
- ⑦ FADER START jacks (MINI jack)
- ⑧ ACCESSORY (MINI DIN 6P)
- ⑨ REMOTE (MINI DIN 8P)
- WARNING
- 2-3. Remote Controller (Top Panel)
- ⑩ OPEN key
- ⑪ SEARCH key
- ⑫ P.MODE / PGM key
- ⑬ TIME/ENT / SHIFT key
- 2-4. Remote Controller (Bottom Panel)
- ③1 Remote Connector
- 2-5. Remote Controller (LCD)
- ③2 M indicator
- ③3 TRACK indicator
- ③4 REMAIN indicator
- ③5 SINGLE indicator
- ③6 PGM indicator
- ③7 Time display
- Functions and Controls
- ③8 FLASH indicator
- ⑲ Memory bank indicators
- ④0 A.CUE indicator
- ④1 A.RDY indicator
- ④2 RELAY indicator
- ④3 LOOP indicator
- ④4 S indicator
- ④5 ALL indicator
- ④6 Time Address Bar
- ④7 PAR indicator
- ④8 TEMPO indicator
- ④9 KEY indicator
- ⑤0 Parameter display
- ⑤1 TAP indicator
- ⑤2 KEY ORIGINAL indicator
- 3-1. CUE
- To memorize the CUE point
- Stutter play with the CUE key
- 3-2. CUE 1-3
- To memorize the CUE 1-3 points
- Stutter play with the CUE 1-3 keys
- 3-3. Flash Start
- 3-4. A-B Looping
- To store the LOOP points
- Disengage loop play
- Re-looping
- Erasing the LOOP points
- Changing the LOOP end point (B point)
- 3-5. Adjusting the tempo
- Tempo range
- Using the TEMPO slider
- Using the TAP key
- 3-6. Pitch Bending
- 3-7. Key Original
- 4-1. Key control
- 4-2. Scratching
- 4-3. Brake
- Set the brake time
- 4-4. FILTER
- 4-5. Track Memory / Recall
- Track Memory
- Memory data
- Recall
- 4-6. Fader Start
- 4-7. Relay Play
- 4-8. Auto Cue
- 4-9. Auto Ready
- Continuous play mode:
- Single play mode:
- Program play mode:
- 4-10. Programmed Play
- Create the program
- Edit program
- Insert program
- More advanced operation
- Delete program
- 4-11. Preset menu
- 4-12. Backup Memory
- Error Messages
- NOTA
Brand : TASCAM
Model : CD-X1500
Category : Professional CD Player