
KH 2310 - Hi-Fi System EBENCH - Free user manual and instructions
Find the device manual for free KH 2310 EBENCH in PDF.
| Product type | Hi-Fi System |
| Brand | EBENCH |
| Model | KH 2310 |
| Dimensions (W x H x D) | 400 x 300 x 200 mm |
| Weight | 5 kg |
| Power supply | 230 V ~ 50 Hz |
| Output power | 2 x 20 W RMS |
| Audio sources | CD, FM/AM Tuner, Cassette, Auxiliary |
| Main functions | CD playback, FM/AM radio with presets, Cassette recording and playback, Auxiliary input for external devices |
| Display | Backlit digital display |
| Remote control | Yes, included |
| Maintenance and cleaning | Disconnect before cleaning. Use a soft, dry cloth. Do not use abrasive or liquid products. |
| Safety | Do not open the casing. Keep away from heat sources and moisture. Disconnect during storms or prolonged non-use. |
| Spare parts and repairability | Contact EBENCH customer service for spare parts. Repair by a professional is recommended. |
| General information | Compact Hi-Fi system ideal for home use. Compatible with most audio sources. |
Frequently Asked Questions - KH 2310 EBENCH
User questions about KH 2310 EBENCH
0 question about this device. Answer the ones you know or ask your own.
Ask a new question about this device
Download the instructions for your Hi-Fi System in PDF format for free! Find your manual KH 2310 - EBENCH and take your electronic device back in hand. On this page are published all the documents necessary for the use of your device. KH 2310 by EBENCH.
USER MANUAL KH 2310 EBENCH
Operating and safety instructions

Operating instructions
IMPORTANT SAFETY ADVICE
The following safety advice must be always followed before using electrical equipment:

Please read carefully through the following information concerning safety and proper use. Before reading, fold out the page with the illustrations and make yourself familiar with all the functions of the equipment. Be careful to keep these advice notes and if necessary pass them on to a third party.
Do not operate the equipment if the mains plug, cable or the equipment itself is damaged.
If the equipment is dropped, then it must be checked by an electrician before further use.
Dangerous voltages are present inside the equipment. Never open the housing or insert objects through the ventilation holes.
Do not allow liquids to get into the equipment. In case of emergency, pull out the plug from the socket.
Similarly, if a fault develops during use or before you start to clean the equipment, pull the plug out if the socket.
Do not carry out any modifications or repairs to the equipment yourself. This includes changing the mains cable. Have repairs done to the equipment or the mains cable only by an electrician or at a specialist service centre. Unsatisfactory repairs can lead to considerable danger for the user.
Children frequently underestimate the dangers associated with electrical equipment. Therefore you must never leave children unsupervised in the vicinity of electrical equipment.
In addition, you should never leave the equipment working unattended.
The equipment is not to be used in a damp room (e.g. bathrooms) or rooms where there is a lot of dust.
The heat building up inside the equipment can lead to faults or to it catching fire.
Do subject this equipment to extremes of temperature:
- Avoid direct sunlight and heaters
- Do not cover the ventilation slots
- Leave approx. 10 cm free around the sides
The equipment is not to be used in the direct vicinity of inflammable materials (e.g. curtains, inflammable liquids etc.).
If the equipment is brought into a warm room from the cold (for example after transport) then this can lead to condensation forming on the insides. To protect the equipment from damage, allow at least 2 hours before switching it on.
Equipment connected to the mains during a thunderstorm can be damaged by lightning. Therefore you should pull the plug out of the mains socket during a storm and disconnect the aerial.
To completely disconnect the equipment from the electricity supply, the plug must be removed from the socket. When doing this always pull on the plug itself and never on the cable.
Protect the mains cable from hot surfaces or other sources of damage and do not allow it to become constrained.
Check the mains cable regularly for any damage.
Unwind the mains cable completely before use.
Make sure that the mains cable does not represent a trip hazard.
If you are likely leave the equipment unattended for a long period, pull the plug out of the socket and take out the batteries from the remote control.
The equipment is intended for private and domestic use only.
Note: The Designer Audio Unit is provided with anti-slip rubber feet. The rubber feet may become stuck to or softened by the material used for or used to clean the supporting surface. This cannot be excluded because of the variety of materials in common use.
You should therefore place an anti-slip layer under the feet.
Environmental protection: Never use combinations of new and used batteries. Never dispose of used batteries in the household waste. Take them to an appropriate collection centre.
SETTING UP AND CONNECTING THE EQUIPMENT
You must follow the instructions given when preparing to use the equipment for the first time and only then insert the plug into the socket.
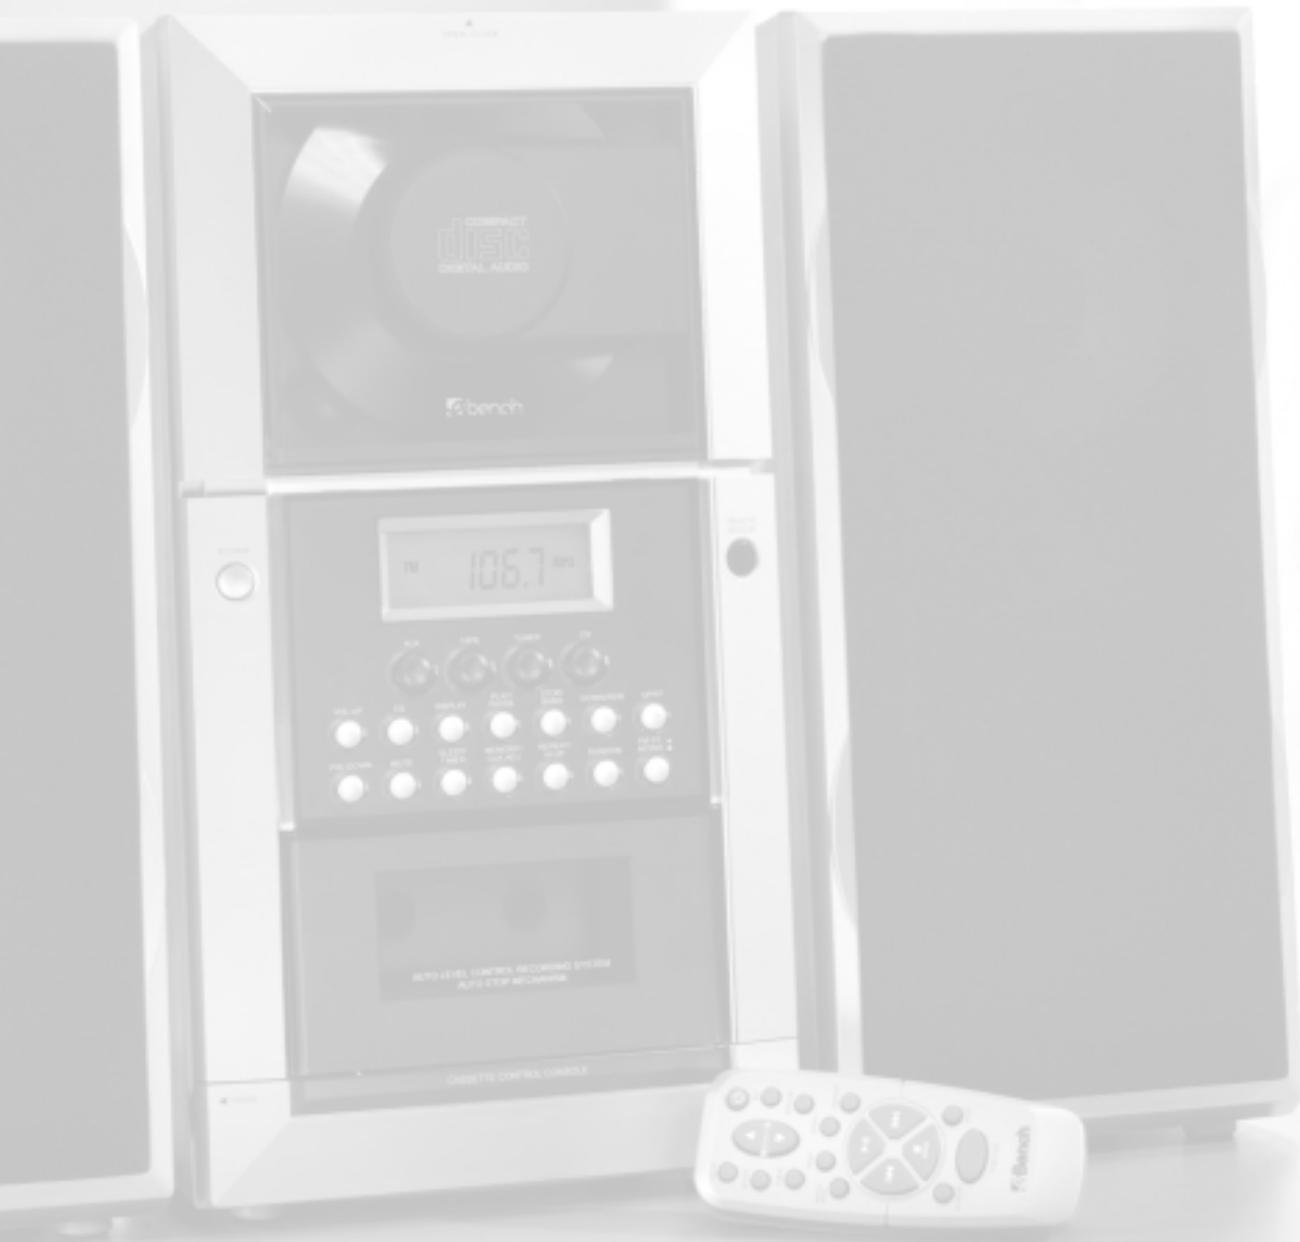
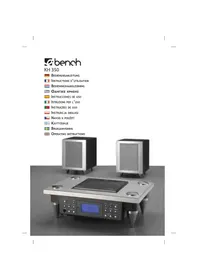
1) Carefully take the Designer Audio Unit and the loudspeakers out of the packaging.
2) Choose a suitable position for your Designer Audio Unit. It should be
... horizontal
... dust-free and dry
... away from heaters and direct sunlight.
3) IMPORTANT: Remove all transport restraints /adhesive tape from the CD and cassette drive compartments!.
Open the CD compartment by pulling the top edge and removing the red transport restraint (then closing the CD compartment again).
4) Connect the two loudspeakers. The loudspeaker connections are appropriately labelled (L=LEFT / R=RIGHT). Tips for setting up the loudspeakers:
□ If possible set up the speakers at head height
-
Do not cover the loudspeakers with curtains or other objects
-
Set up the loudspeakers on the shelf so that the front trim is flush with the front edge of the shelf.
□ You can place rubber pads under the loudspeakers to prevent them from turning.
5) Use cinch connectors to connect an external device such as a turntable.
6) To receive FM radio signals connect a 75 Ohm aerial lead (house or cable) to the aerial connector socket. If these signals are not available, use the supplied wire aerial connected to the middle contact in the aerial connection.
The aerial for medium wave reception is built into the equipment.
7) Now connect the mains plug into a 230 V socket.
8) Insert the batteries (not supplied) into the remote control (2x AAA LR03 1.5 V):
- Open the cover on the back of the remote control
- Insert batteries. Note the correct polarities (see diagram on back of battery compartment)
- Close cover again
WALL MOUNTING
The Designer Audio Unit and the loudspeakers can be mounted on a wall.
Suitable screws and wall mountings are supplied. Place the pieces of equipment vertically on to a suitably strong wall.
The screw holes must be drilled 14 cm apart one under the other.
So that the screws can engage properly into the fastener on the rear of the Designer Audio Unit and loudspeakers,
the screw heads must project no more than approx. 3 mm from the wall face.
OPERATING FEATURES
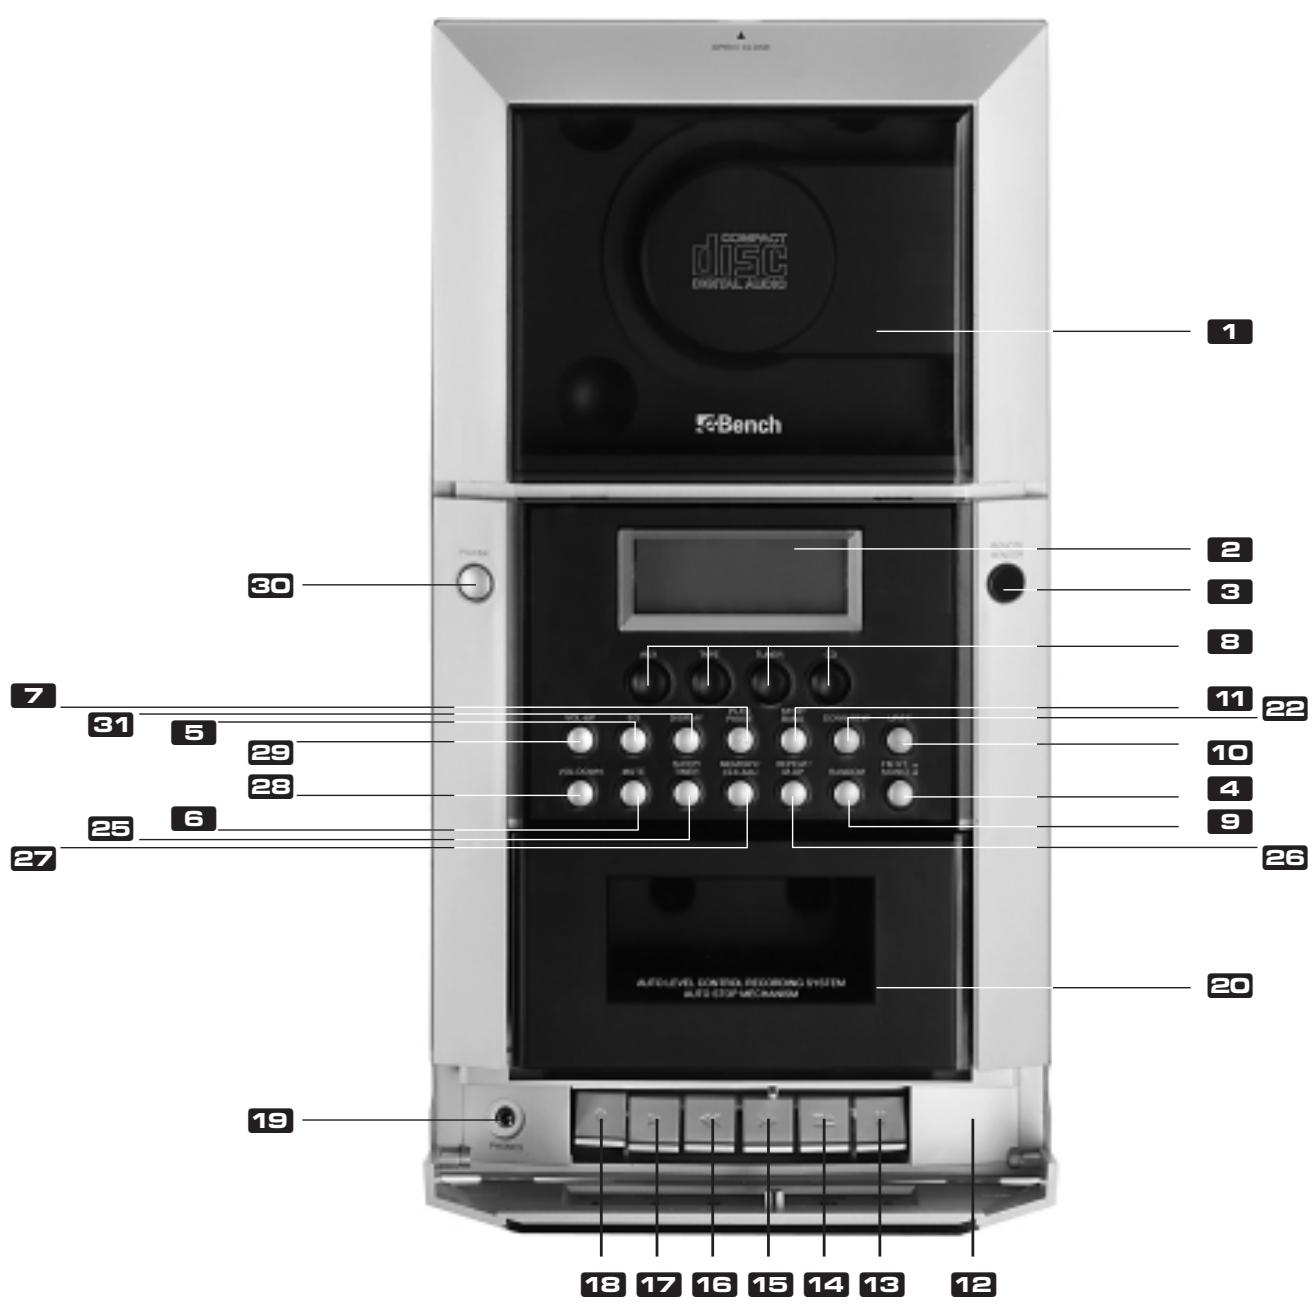
CD compartment
Display
Remote control signal sensor
Mono/stereo button (only on FM radio)
Tone selector
Mute switch
CD play/ pause
Device selector
RANDOM button
8 Up/Forward button (*)
Stop button (CD)/ Band selector (VHF/MW)
Protective cover
Pause button (cassette only)
Stop/ eject button (cassette only)
Fast forward (cassette only)
Rewind (cassette only)
Play button (cassette only)
Record button (cassette only)
Headphones connector
Cassette compartment
SNOOZE button (remote control only)
Down/Reverse button ()
Functions button Aux, CD, Tuner, Tape (remote control only)
INTRO button (remote control only)
SLEEP/TIMER button
M-UP/REPEAT button ()
27 MEMORY/CLK-ADJ button (*)
Reduce volume
Increase volume
ON/OFF(standby)switch
Display / operating indicator
Mains plug
Loudspeaker connections
Cinch connections for external devices (AUX)
Noise reduction system (cassette only)
Aerial connector
Fastening for wall mounted option
The operating features marked with a (^*) have several different functions depending on the device selected (e.g. radio or CD mode).
Please read the appropriate sections.
The operating elements to and are exclusively for the operation of the cassette recorder.
OPERATION
SWITCHING ON AND OFF [ » POWER / STAND-BY « ]
- If the mains plug is inserted, the equipment is in Stand-by mode. The time can be set in Stand-By mode.
- Press the ON/OFF button. The equipment is now in Operating mode. The operating display lights up blue.
- To switch back to Stand-by mode, press the ON/OFF button again.
- For longer periods of absence pull out the plug from the mains socket.
- Press the appropriate button to select a device or change the source: CD = CD player TUNER = radio TAPE = cassette recorder AUX = external device, e.g. record deck
ADJUST VOLUME [ » VOLUME / MUTE « ]
To increase the volume use the button
To reduce the volume use the button
To mute (silence) the loudspeakers and headphones press the mute button
ADJUST TONE [» CLASSIC/ROCK/POP «]
Use the tone selector button to set the tone quality of a track to suit the type of music and increase listening pleasure. The current setting CLASSIC, ROCK or POP is shown in the display - (blank display = neutral tone).
HEADPHONES [» PHONES «]
8-32 Ohm stereo headphones can be connected to the headphones connector with a 3.5mm jack plug. As soon as the headphones are connected the loudspeakers are turned off. Please note that high levels of sound can lead to serious hearing damage.
SETTING THE CLOCK
1) Press the Display button to change to the time operating indicator.
2) Press and hold down the MEMORY/CLK-ADJ button. The 24 hour mode indicator (24 H) flashes.
3) Press the Up/Forward button or the Down/Reverse button to set the clock in 24 hour or 12 hour display.
4) Press the MEMORY/CLK-ADJ button again - the hours indicator flashes.
5) Set the hours using the Up/Forward button or the Down/Reverse button.
6) Press the MEMORY/CLK-ADJ button again - the minutes indicator flashes.
7) Set the minutes using the Up/Forward button or Down/Reverse button.
8) Press the MEMORY/CLK-ADJ button again - the display stops flashing. The clock is now set and starts (the colon flashes).
SETTING THE SWITCH-ON TIME [» TIMER «]
If the Switch-on time feature is enabled then your Designer Audio Unit can wake you at your chosen time.
1) Using the appropriate button select the desired device/ source (CD, TAPE or TUNER).
2) Set up the source, i.e. for TUNER (RADIO) set the desired station, for TAPE (CASSETTE REORDER) insert the tape and wind to the correct place or insert a CD and if required program a track sequence.
3) Press and hold down the TIMER button. The display now shows TIMER.
NOTE: You have five seconds to complete the following steps. Otherwise the process is halted and you must begin again with step 4.
4) Press the Display / operating indicator button twice. The time appears in the Display and TIMER flashes.
5) Press and hold down the MEMORY/CLK-ADJ button. The hours indicator flashes.
6) Set the hours by pressing the Up/Forward button or the Down/Reverse button as appropriate.
7) Press and hold down the MEMORY/CLK-ADJ button. The minutes indicator flashes.
8) Set the minutes by pressing the Up/Forward button or the Down/Reverse button as appropriate.
9) Press the MEMORY/CLK-ADJ button again - the Switch on time is stored.
10) If you wish to be woken to a cassette: Press the Play button.
11) Then switch off the Designer Audio Unit (ON-/OFF-button).
ACTIVATE SLEEP FUNCTION [» SLEEP «]
You can set a time of between 90 and 10 minutes, after which the device switches itself off.
To activate a Switch-off time of 90 minutes, press the SLEEP button once briefly.
- To set a shorter Switch-off time, keep the SLEEP button pressed until the desired time is displayed.
- To switch off the Sleep function, press the SLEEP button repeatedly until the display no longer shows SLEEP.
RADIO
ATTACHING AERIAL
If you use the wire aerial for FM reception:
The wire must be fully wound out
- Determine the best position by trial and error
- Attach the wire aerial to the wall if necessary using a strip of adhesive tape. For MW reception, place the device in the best position for the in-built aerial, again by trial and error.
In an automatic search the frequency is increased or deceased until a station of adequate reception strength is found.
1) Hold down the 8 UP/Forward button or DOWN/Reverse button for about 1 second – the search starts and stops automatically.
2) To start the search again, hold down the 8 UP/Forward button or 7 DOWN/Reverse button again for about 1 second. You can use the manual station search for fine adjustment or when the frequency of the station is known.
1) Press the 8 UP/Forward button or 7 DOWN/Reverse button briefly to increase or decrease the frequency in small steps.
2) Keep the 8 UP/Forward button or 7 DOWN/Reverse button pressed until you are close to the frequency you require.
STORE STATION [» MEMORY «]
The Designer Audio Unit KH 2310/20/30 can store up to 20 stations (10 FM / 10 AM).
1) You set up the desired station by following the instructions relating to "Automatic station search/manual station search" described above.
2) Press the MEMORY/CLK-ADJ button once. Next the station number shows for 5 seconds on the left side of the display. You must carry out the next step within those 5 seconds, otherwise the device switches itself into normal display. If this happens, press the MEMORY/CLK-ADJ button again.
3) Press the M-UP/REPEAT button repeatedly until the required station number (1 to 10) is displayed. Repeat this procedure for all the other stations you require have been stored.
SELECT STORED STATION
Press the M-UP/REPEAT button repeatedly until the required station number (1 to 10) for the stored station is displayed.
CD PLAYER
DANGER! The CD player uses a weak but sharply focussed laser beam to scan the surface of the CD. If the device is used improperly then this light can be dangerous to the eyes - never open the case.
INSERTING A CD
1) To open the CD compartment pull the top edge towards the front.
2) Insert the CD with the playing side facing towards the device. If you have done this correctly, you should be looking at the printed side. The CD must be placed securely on the central pin.
3) Close CD compartment
4) Select the CD player with the device selector button CD. The display shows the total playing time and the number of tracks. NOTE: When you insert a CD, if the display does not show the number of tracks and the total playing time then the CD is possibly the wrong way round or dirty. Clean the CD with a CD cleaning cloth or insert the CD correctly and check the display again.
INTRO FUNCTION [ " INTRO " ]
Activating the Intro function can only be done when the CD has stopped. Press the INTRO button - each title on the inserted CD is played for 10 seconds.
BASIC FEATURES OF THE CD PLAYER
- START PLAY: Press the PLAY/PAUSE button - to start playing.
- INTERRUPT PLAY (PAUSE): Press the PLAY/PAUSE button - to interrupt playing. The duration of play flashes in the display. Press the PLAY/PAUSE button once more - to continue playing.
- STOP PLAY: Press the STOP button - to stop playing.
NEXT TRACK: The 8 UP/Forward button jumps forward one track each time it is pressed. - PREVIOUS TRACK: The 7 DOWN/Reverse button jumps backward one track each time it is pressed.
FORWARD: Keeping the a UP/Forward button pressed goes forward within a track. - REVERSE: Keeping the 7 DOWN/Reverse button pressed goes backward within a track.
The CD compartment can be opened anytime. Play stops automatically. Remove the CD only when movement has stopped completely.
PROGRAMMING A TRACK SEQUENCE [» TRACK MEMORY « ]
Programming a track sequence can only be done when the CD has stopped. You can program up to 20 titles.
1) Insert CD
2) Select the CD player using the device selector button
3) Press the MEMORY/CLK-ADJ button. The display shows TRACK MEMORY.
4) Using the 8 UP/Forward button or 7 DOWN/Reverse button select the number of the track you wish to play first.
5) Press the MEMORY/CLK-ADJ button. The track is now stored in the first programmed position (P-01).
Repeat steps 3) - 5) for up to 20 tracks. You can also program a track several times.
The programmed track sequence is stored until you remove the CD from the CD compartment, choose another function or switch off the equipment.
START PROGRAMMED TRACK SEQUENCE
1) Press the MEMORY/CLK-ADJ button. The display shows TRACK MEMORY and the programmed track.
2) Press the PLAY/PAUSE button - to start playing in the programmed track sequence.
3) Press the STOP button to switch of a programmed track sequence.
REPEAT FUNCTIONS [» REPEAT « ]
To repeat all the tracks on a CD, press the M-UP/REPEAT button. The display shows REPEAT.
- To repeat a single track on a CD, press the M-UP/REPEAT button twice when the desired track is running. The display flashes REPEAT.
- To repeat a programmed track sequence on a CD, press the M-UP/REPEAT button when the programmed track sequence is running. The display shows REPEAT.
- To switch off the repeat functions, press the M-UP/REPEAT button repeatedly until the display no longer shows REPEAT.
PLAY TRACKS IN RANDOM SEQUENCE [ » RANDOM « ]
The RANDOM function selects a random choice of tracks from the inserted CD.
1) Insert CD
2) Select the CD player using the device selector button E.
3) To start playing tracks in a random order press the RANDOM button ②. The display ③ shows RANDOM.
CASSETTE REORDER
INSERT CASSETTE
1) Open the protective flap forwards. Behind it you will find the operating buttons for the cassette recorder (and the headphone connector).
2) Press the button to open the cassette compartment. The cassette compartment opens automatically.
3) Insert the cassette with the tape side facing down. The tape should be tight and without loops.
4) Close the cassette compartment.
5) Select the cassette recorder using the device selector TAPE button
BASIC FEATURES OF THE CASSETTE REORDER
- START PLAY: Press Button to start playing.
- INTERRUPT PLAY (PAUSE): Press button to interrupt playing. Press button once more - to continue playing.
- STOP PLAY: Press the STOP button - to stop playing.
FORWARD: Press button - REWIND: Press button 13.
RECORD CASSETTE
The Designer Audio Unit KH 2310/20/30 is equipped with automatic level control. Changes in the volume or tone selection have no effect on the recording.
1) Insert a cassette and if necessary wind to the correct position from which the recording is to start.
2) Press the (PAUSE) button.
3) Press (RECORD) button 4. Button 2 goes down automatically with it.
4) Press the appropriate button to select a device or the source for the recording.
5) Releasing the (PAUSE) button starts the recording.
6) You end the recording by pressing the button
CLEANING THE RECORDING HEADS
For cleaning the recording heads and tape guidance components use a suitable cleaning cassette.
STATEMENT OF CONFORMITY
We, Kompernaß Handelsgesellschaft mbH, Burgstr. 21, D-44867 Bochum, Germany, hereby declare that this product conforms with the following EC regulations:
Electromagnetic compatibility:
Applicable harmonised standards:
89/336 EEC (EMC Directive)
EN 55013:06.90+A12:08.94+A13:12.96
EN 55020:12.94+A11:12.96
EN 61000-3-2:04.95+A1:1998+A2:1998
EN 61000-3-3:01.95
Model type: KH 2310/20/30
Description: MICRODESIGNERAUDIOUNITWITHVERTICALCDPLAYER
Bochum, 31.07.2003

Hans Komperna
- Managing Director -


bench
www.kompernass.com
- IMPORTANT SAFETY ADVICE
- SETTING UP AND CONNECTING THE EQUIPMENT
- WALL MOUNTING
- OPERATING FEATURES
- OPERATION
- SWITCHING ON AND OFF [ » POWER / STAND-BY « ]
- ADJUST VOLUME [ » VOLUME / MUTE « ]
- ADJUST TONE [» CLASSIC/ROCK/POP «]
- HEADPHONES [» PHONES «]
- SETTING THE CLOCK
- SETTING THE SWITCH-ON TIME [» TIMER «]
- ACTIVATE SLEEP FUNCTION [» SLEEP «]
- RADIO
- ATTACHING AERIAL
- STORE STATION [» MEMORY «]
- SELECT STORED STATION
- CD PLAYER
- INSERTING A CD
- INTRO FUNCTION [ " INTRO " ]
- BASIC FEATURES OF THE CD PLAYER
- PROGRAMMING A TRACK SEQUENCE [» TRACK MEMORY « ]
- START PROGRAMMED TRACK SEQUENCE
- REPEAT FUNCTIONS [» REPEAT « ]
- PLAY TRACKS IN RANDOM SEQUENCE [ » RANDOM « ]
- CASSETTE REORDER
- INSERT CASSETTE
- BASIC FEATURES OF THE CASSETTE REORDER
- RECORD CASSETTE
- CLEANING THE RECORDING HEADS
- STATEMENT OF CONFORMITY
- bench
Brand : EBENCH
Model : KH 2310
Category : Hi-Fi System