
PM4001 - Integrated amplifier MARANTZ - Free user manual and instructions
Find the device manual for free PM4001 MARANTZ in PDF.

| Product Type | Integrated Amplifier |
| Brand | MARANTZ |
| Model | PM4001 |
| Output Power | 50 W per channel into 8 ohms |
| Frequency Response | 20 Hz - 20 kHz |
| Total Harmonic Distortion | < 0.05% |
| Signal-to-Noise Ratio | > 85 dB |
| Input Impedance (Line) | 47 kΩ |
| Input Sensitivity (Line) | 150 mV |
| Inputs | Phono (MM), CD, Tuner, Tape 1, Tape 2 |
| Outputs | Speakers A/B, Pre out, Headphones |
| Dimensions (W x H x D) | 440 x 130 x 300 mm |
| Weight | 8 kg |
| Power Supply | 230 V AC, 50/60 Hz |
| Power Consumption | 200 W |
| Main Functions | Speaker A/B switch, Tone control (bass/treble), Loudness, Balance |
| Maintenance and Cleaning | Clean with a soft, dry cloth. Do not use chemical products. |
| Safety | Do not expose to moisture. Unplug before cleaning. Do not block ventilation openings. |
| Spare Parts and Repairability | Parts available from authorized after-sales service. Device repairable. |
Frequently Asked Questions - PM4001 MARANTZ
User questions about PM4001 MARANTZ
0 question about this device. Answer the ones you know or ask your own.
Ask a new question about this device
Download the instructions for your Integrated amplifier in PDF format for free! Find your manual PM4001 - MARANTZ and take your electronic device back in hand. On this page are published all the documents necessary for the use of your device. PM4001 by MARANTZ.
USER MANUAL PM4001 MARANTZ
Integrated Amplifier
ENGLISH
WARRANTY
For warranty information, contact your local Marantz distributor.
RETAIN YOUR PURCHASE RECEIPT
Your purchase receipt is your permanent record of a valuable purchase. It should be kept in a safe place to be referred to as necessary for insurance purposes or when corresponding with Marantz.
IMPORTANT
When seeking warranty service, it is the responsibility of the consumer to establish proof and date of purchase. Your purchase receipt or invoice is adequate for such proof.
FOR U.K. ONLY
This undertaking is in addition to a consumer's statutory rights and does not affect those rights in any way.
FRANCAIS
GARANTIE
- Do not expose the equipment to rain or moisture.
- Do not remove the cover from the equipment.
- Do not insert anything into the equipment through the ventilation holes.
- Do not handle the mains cord with wet hands.
- Do not cover the ventilation with any items such as tablecloths, newspapers, curtains, etc.
- No naked flame sources, such as lighted candles, should be placed on the equipment.
- When disposing of used batteries, please comply with governmental regulations or environmental public instruction's rules that apply in your country or area.
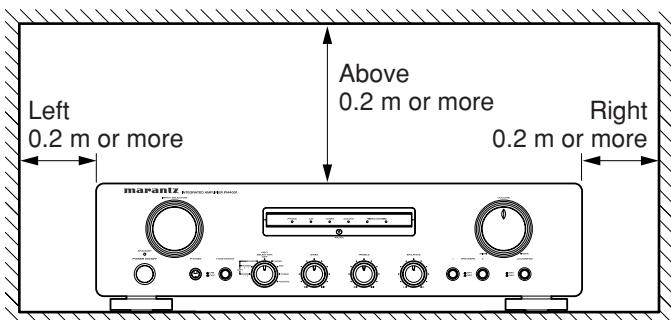
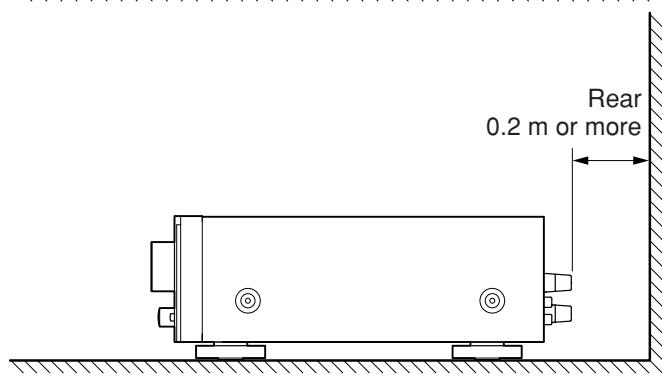
- Make a space of about 0.2 meter around the unit.
- No objects filled with liquids, such as vases, shall be placed on the apparatus.
- When the switch is in the OFF position, the equipment is not completely switched off from MAINS.
Français
AVERTISSEMENTS
NAMES AND FUNCTIONS OF PARTS 4
FRONT PANEL 4
REAR PANEL 5
RC4001PM REMOTE CONTROLLER 5
USING THE REMOTE CONTROL UNIT 6
BASIC OPERATION 7
A NOTE ABOUT RECYCLING

This product's packaging materials are recyclable and can be reused. This product and the accessories packed together are the applicable product to the WEEE directive except batteries.
Please dispose of any materials in accordance with your local recycling regulations.
When discarding the unit, comply with your local rules or regulations.
Batteries should never be thrown away or incinerated but disposed of in accordance with your local regulations concerning chemical wastes.
FEATURES
- New Design for Discrete Amplifier Circuits
- Improved and optimized the circuit design, parts and pattern wiring
- Input buffer Circuit for High S/N ratio and Channel separation
- New aluminum front panel and aluminum cap knob
- Dual Speaker Terminals 1 & 2
Full REC Selector
Active Filter type Tone Control circuit
BEFORE USE
This section must be read before any connection is made to the mains supply.
■ Equipment mains working setting
Your Marantz product has been prepared to comply with the household power and safety requirements that exist in your area.
PM4001 can be powered by 230V AC only.
Copyright
Recording and playback of any material may require consent. For further information refer to the following:
Copyright Act 1956
Dramatic and Musical Performers Act 1958
Performers Protection Acts 1963 and 1972
Any subsequent statutory enactments and orders
■ Do not locate in the following places
To ensure long-lasting use, do not locate the PM4001 where:
- Exposed to direct sunlight.
Near to sources of heat such as heaters. - Highly humid or poorly ventilated.
Dusty. - Subjected to mechanical vibrations.
- On wobbly, inclined or otherwise unstable surfaces
- Radiated heat is blocked such as in cramped audio racks.
To ensure proper heat radiatizN, ensure the below clearance from walls and other equipment.
■ Keep objects off
Keep objects off the PM4001. Blocking the vent can result in accident and damage.
■ Do not touch hot spots during and Immediately after use
During and immediately after use, the PM4001 is hot in areas other than the controls and rear panel connection jacks. Do not touch hot spots and especially the top panel. Contact with hot areas can cause burns.
■ Battery handling
Improper use of dry cell batteries can result in electrolyte leaks, rupture and corrosion. Read the following precautions before use.
- If not planning to use the remote controller for an extended period of 1 month or more, remove the batteries.
- Do not mix old batteries with new batteries.
- Load batteries in the proper direction indicated on the remote controller.
- Do not mix batteries of differing type. Even batteries of the same shape and size can have differing voltages.
- If batteries leak, wipe the case clean of any adhering electrolyte and replace the old batteries with new batteries.
Accessories check
Before use, check the below accessories were included in the package.
Remote control unit (RC4001PM)
Size "AA" batteries x 2

- User Guide
- Registration Card
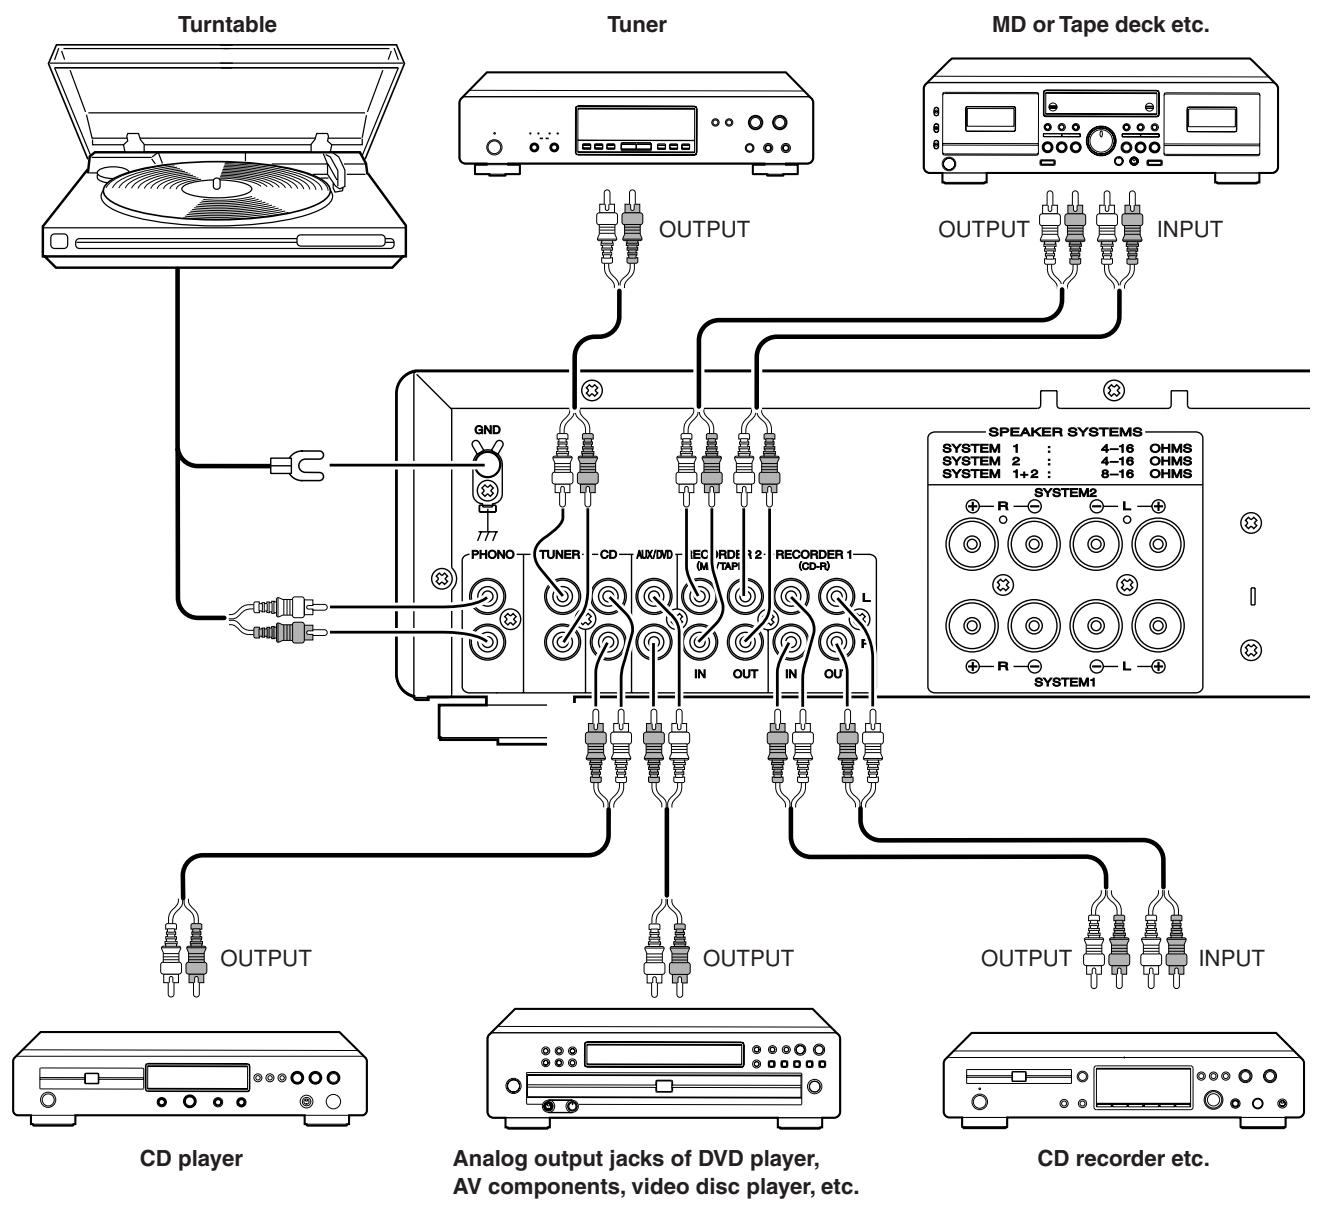
CONNECTIONS
CONNECTION OF TUNER
Connect the output jacks of your stereo tuner to the TUNER jacks of this unit.
CONNECTION OF COMPACT DISC PLAYER
Connect the output jacks of your CD player to the CD jacks of this unit.
CONNECTION OF TURNTABLE
Connect the L (Left) output cord of the turntable to the “L” PHONO jack of this unit, and connect the R (Right) output cord to the “R” PHONO jack. Also be sure to connect the turntable’s grounding wire to the GND jack of this unit. The GND jack does not have to be connected if the turntable is not provided with a grounding wire.
The cartridge of the connected turntable should be of the MM type. To use a turntable with an MC type cartridge, it is required to use a step-up transformer.
CONNECTION OF MD or TAPE DECK etc.
Connect the IN (recording input) jacks of the MD or tape deck to the REORDER 2 OUT jacks of this unit, and connect the OUT (playback output) jacks of the MD or tape deck to the REORDER 2 IN jacks of this unit.
CONNECTION OF CD recorder etc.
Connect the IN (recording input) jacks of the CD recorder to the REORDER 1 OUT jacks of this unit, and connect the OUT (playback output) jacks of the CD recorder to the REORDER 1 IN jacks of this unit.
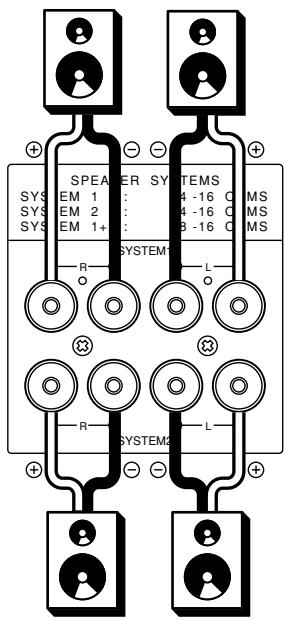
CONNECTION OF SPEAKER SYSTEMS
This unit is equipped with two sets of SPEAKER SYSTEM terminals—SYSTEM 1 terminals and SYSTEM 2 terminals. Usually connect your speaker system to the SYSTEM 1 terminals.
- The speakers in the speaker system should have an impedance between 8 and 16 ohms. If speakers with an impedance of less than 8 ohms are connected, the protection circuitry may be activated during play.
- Connect the Right channel speaker to the R terminals, and the Left channel speaker to the L terminals.
- The output terminals have positive (+: Red) and negative (-: Black) polarity, and each speaker also has the same polarity (+ and -). When connecting the speaker, be sure to connect the terminals with the same polarity (+ with +, - with -).
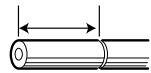
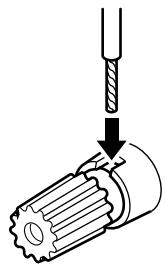
WIRING SPEAKER CABLE
- Be careful not to short circuit in wiring speaker cables.
- Peel off theorting of speaker cable as shown below.
Approx. 1 cm
Cut theorting of cable.

Peel off the edge of cable.

Twist conductors.
- Wiring with speaker cable.

Turn counter-clockwise to loosen.
Insert conductor of cable.
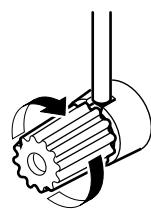
Turn clockwise to tighten.
NAMES AND FUNCTIONS OF PARTS
FRONT PANEL
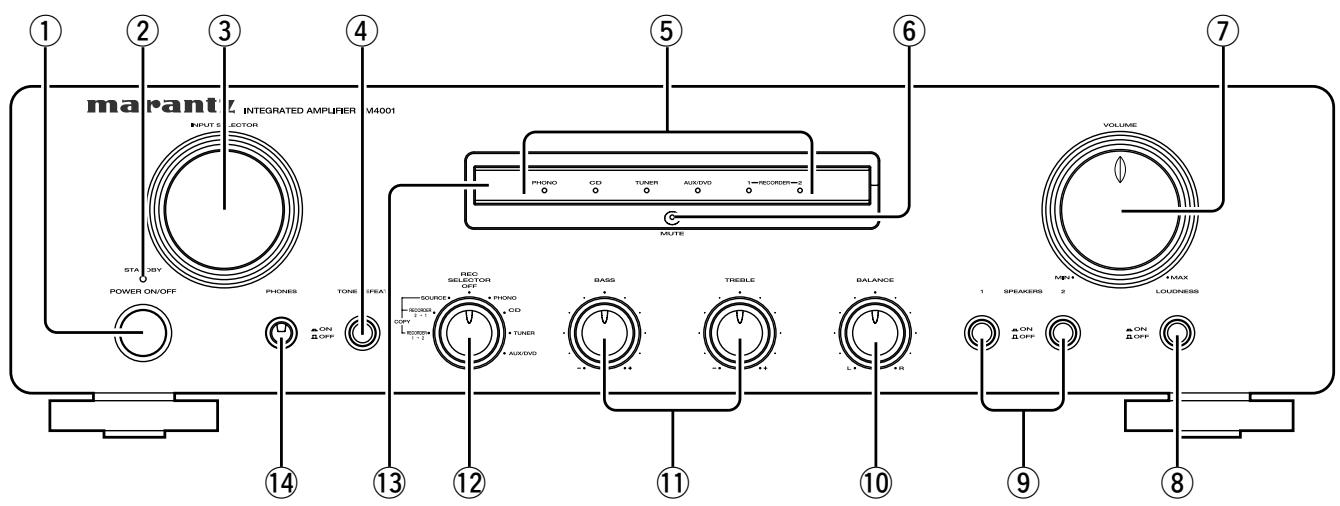
① POWER SWITCH
Pressing once switches the power ON, and pressing again switches it OFF.
If the POWER switch is in the ON position, the power of this unit can be turned ON/OFF by pressing the POWER button on the remote control unit.
② STANDBY INDICATOR
Lights up when the unit is in the standby mode.
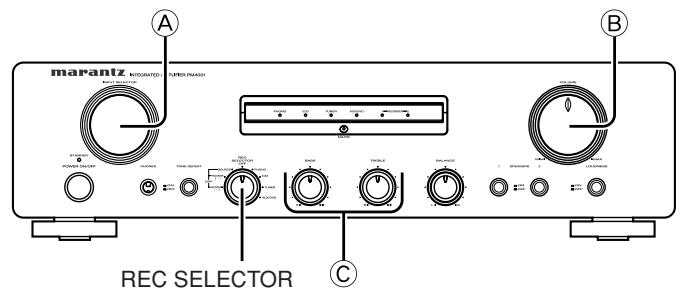
③ INPUT SELECTOR
Selects the program source to be recorded or played from the PHONO, CD, TUNER, AUX/DVD, REORDER 1 (CD-R), and REORDER 2 (MD/TAPE).
(4) TONE DEFEAT SWITCH
- When the switch is not depressed, the audio signals are applied to the tone control circuit and the tone can be adjusted using the tone control knob.
- When the switch is depressed, the audio signals bypass the tone control circuit and the balance control circuit. Then, the tone control knob and the balance control knob do not function.
⑤ FUNCTION INDICATORS
One of the indicators lights up to indicate the input source selected with the INPUT SELECTOR.
(6) MUTING INDICATOR
Light up when the MUTING button in the remote control unit is pressed.
NOTE:
Be sure to check the VOLUME control setting before pressing this switch to cancel muting. If the muting is canceled while the volume setting is high, the speakers could be damaged.
⑦ VOLUME CONTROL
Adjusts the volume level. Turn the knob clockwise to increase the volume.
⑧ LOUDNESS SWITCH
The LOUDNESS switch compensates for human hearing characteristics by boosting the bass and treble response at low volume levels to achieve a more pleasing tonal balance.
⑨ SPEAKERS 1/2 SWITCHES
These switches are used to select the speaker system(s) connected to the SPEAKER SYSTEM 1 / 2 terminals on the rear panel. If both the 1 and 2 switches are pressed to the low positions, two speaker systems can be used at the same time.
When headphones are used for listening, set both switches 1 and 2 to OFF (high positions).
10 BALANCE CONTROL
Turn the knob to correct an unbalanced program source such as stereo broadcast or to vary the output level of the left or right channel. Note that, if the BALANCE control is turned fully in one direction, the sound will not be heard from the speaker on the other side.
(1) BASS AND TREBLE TONE CONTROLS
Adjusts the tone by controlling the levels of two frequency bands. Turn each control toward (+) to enhance the corresponding frequency band, or toward (-) to attenuate it.
TREBLE: Adjusts the high frequency level.
BASS: Adjusts the low frequency level.
REC SELECTOR SWITCH
Selects the tape dubbing mode between tape decks or the signal output at the REC OUT jacks.
⑬ REMOTE SENSOR
The remote sensor receives the infrared commands from the remote control unit. When an infrared signal is received from the remote control unit. The remote control unit must always be pointed directly at the remote sensor.
14 PHONES JACK
Insert the standard phone plug of the headphones into this jack.
REAR PANEL

A PHONO INPUT JACKS
Connect the output jacks of a turntable to these jacks.
GND (GROUND) TERMINAL
Connect the grounding wire from the turntable to this terminal.
TUNER INPUT JACKS
Connect the output jacks of the tuner to these jacks.
CD PLAYER INPUT JACKS
Connect the output jacks of a Compact Disc player to these jacks.
E AUX/DVD INPUT JACKS
These are auxiliary input jacks which can be used to connect the audio outputs of AV components such as DVD players, TV multiplex/stereo audio tuners, VCRs, and laserdisc players.
RECORDER 2 (MD/TAPE) IN/OUT JACKS
Connect the play (output) jacks and record (input) jacks of MD or tape decks to these jacks.
RECORDER 1 (CD-R) IN/OUT JACKS
Connect the play (output) jacks and record (input) jacks of CD Recorder to these jacks.
SPEAKER SYSTEMS 1/2 TERMINALS
Connect your speaker system(s) to these terminals.
① REMOTE CONTROL BUS TERMINALS (REMOTE CONT. BUS)
Another item of audio equipment with a remote control bus terminal can be connected to these terminals by using a special-purpose cable. The bus OUT terminal is used to send signals to another item of equipment. The bus IN terminal is used to receive signals from another item of equipment.
① POWER CORD
Connect to a household power outlet.
RC4001PM REMOTE CONTROLLER
The RC4001PM can be used to control a Marantz AV component equipped with a remote sensor as well as other Marantz components connected to the first component through the Remote Control Bus. The buttons of the RC4001PM are laid out on its control panel according to the functional groups as described below.
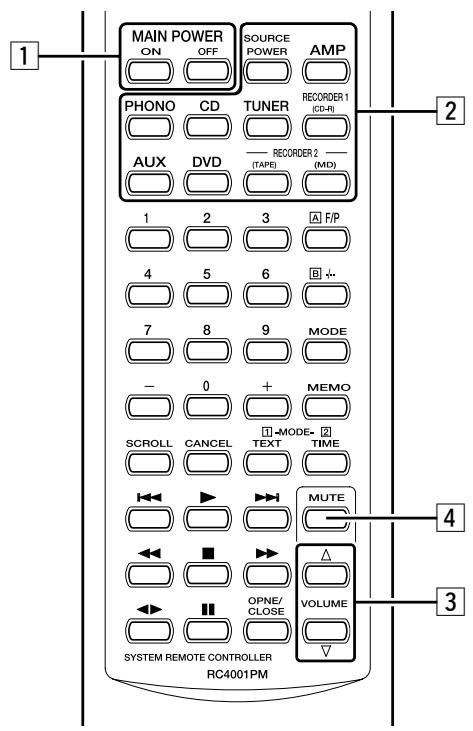
1 POWER ON/OFF buttons
a. MAIN POWER ON button
Turns the PM4001 power on when it is in the standby mode.
b. MAIN POWER OFF button
Sets the PM4001 power to the standby mode when it is set to the power-on mode.
c. SOURCE POWER button
Switching the mode of a CD player, tuner, CD-R or other Marantz component equipped with a power standby function between power-on and standby is enabled by pressing this button after the FUNCTION SELECT button corresponding to the component has been pressed.
When this button is pressed after pressing the TUNER button, the tuner's power is turned on; when it is pressed again, the tuner is set to the standby mode.
When this button is pressed after pressing the AMP button, the PM4001 is switched from the power-on mode to the standby mode or vice versa.
2 FUNCTION SELECT button
PHONO button : When this button is pushed the input of PHONO is selected.
CD button : When this button is pushed the input of CD is selected.
TUNER button : When this button is pushed the input of TUNER is selected.
RECORDER 1
(CD-R) button : When this button is pushed the input of CD-R is selected.
AUX button : When this button is pushed the input of AUX/DVD is selected.
DVD button : When this button is pushed the input of AUX/DVD is selected.
RECORDER 2
(TAPE) button : When this button is pushed the input of MD/TAPE is selected.
(MD) button : When this button is pushed the input of MD/TAPE is selected.
CAUTION:
A pair of input jacks is used as the common input jacks for the MD or TAPE input and another pair is used as the common input jacks for the DVD or AUX input. The reason an independent button is used for each input is that the codes used by the RC4001PM to control the MARANTZ MD recorder, tape deck and DVD recorder are different.
3 VOLUME UP/DOWN button
UP button : VOLUME knob turns when this button is pushed and the volume level is grows.
DOWN button : VOLUME knob turns when this button is pushed and the volume level is falls.
4 MUTE button
When this button is pushed, the sound is not temporarily emitted from the speakers.
When this button is pushed again, MUTE is released.
Moreover, when up/down of the volume is operated by remote control, MUTE is released.
Other buttons are not applied to PM4001.
Please see at the owners manual of other equipment's about the operation of button.
USING THE REMOTE CONTROL UNIT
Remote control
Operate the remote control unit within a distance of approx. 5 m from the infrared signal reception window (remote sensor) on the front of the Amplifier.
Remote control operation may not be possible if the remote control unit's transmitter is not pointing in the direction of the remote sensor or if there is an obstruction between the transmitteote sensor.
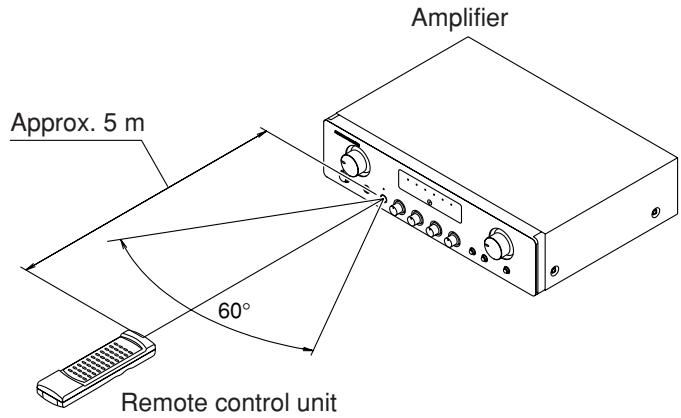
Remote control operating range
■ Loading batteries
Before using the supplied remote control unit for the first time, load the batteries in the remote control unit. The batteries provided are used to verify the operations of the remote control unit only.
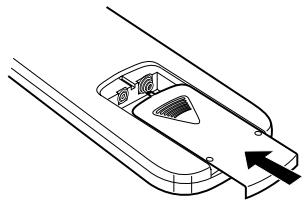
(1) Remove the battery cover.
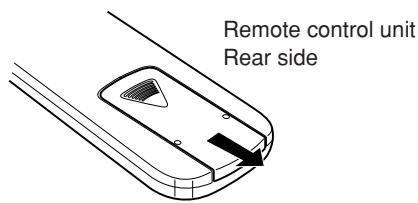
(2) Insert batteries with correct / orientation.
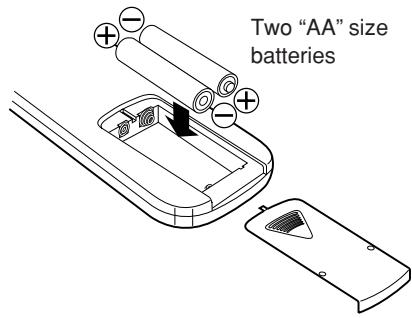
(3) Close the battery cover until it clicks shut.
BASIC OPERATION
Operate each equipment to start play.
TO PLAY AN ANALOG DISC
- Set the INPUT SELECTOR switch ① to PHONO.
- Play a disc on the turntable.
- Adjust the volume with the VOLUME control ② and adjust the tone with the BASS and TREBLE controls ③.
NOTES:
- Set the VOLUME control to the minimum position before placing the stylus on the disc or before replacing the cartridge.
- Do not apply shock or vibration to the turntable during play, as this may cause the stylus to jump and the analog disk to be damaged.
- If the turntable is installed too close to the speakers, the volume may not be able to be increased to a high level due to howling.
- Do not switch the power OFF while the stylus is on the disc surface.
TO LISTENTO FM/AM BROADCASTS
- Set the INPUT SELECTOR switch ① to TUNER.
- Tune in the desired station on the tuner.
- Adjust the volume with the VOLUME control ② and adjust the tone with the BASS and TREBLE controls ③.
TO PLAY A DVD OR COMPACT DISC
- Set the INPUT SELECTOR switch ① to CD.
- Play a CD on the CD player.
- Adjust the volume with the VOLUME control ② and adjust the tone with the BASS and TREBLE controls ③.
TO PLAY A DVD OR COMPONENT CONNECTED TO AUX/DVD JACKS
The component connected to the AUX/DVD jacks on the rear panel can be played as follows.
- Set the INPUT SELECTOR switch ① to AUX/DVD.
- Play the component connected to the selected input.
- Adjust the volume with the VOLUME control ② and adjust the tone with the BASS and TREBLE controls ③.
RECORDER OPERATION
Control used for operating the tape deck.
■ PLAYBACK
- Set the INPUT SELECTOR switch A to RECORDER 1 (CD-R) or RECORDER 2 (MD/TAPE).
- Play a prerecorded disc or tape on the recorder.
- Adjust the volume with the VOLUME control .
- Adjust the tone with the BASS and TREBLE controls ©
RECORDING
The playback sound of a program source component, such as a turntable, a tuner, or a CD player, can be recorded on disc or tape as follows.
- Set the INPUT SELECTOR switch A to the program source to be recorded.
- Play the program source.
- Operate the recorder(s) to record the playback sound on disc(s) or tape(s).
Using REC SELECTOR switch
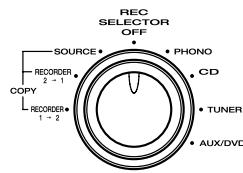
The REC SELECTOR switch is used when copying a recorded disc or tape to another disc or tape, or recording a CD onto a recordable disc or cassette tape.
- When the switch is in the OFF position, the signal is not output at the REC OUT jacks. It is not necessary to output the signal at the REC OUT jacks when the signal is not recorded onto disc or tape. By setting the switch to OFF, the signal path inside the unit can be shortened and crosstalk, etc., can be reduced.
- In the SOURCE position, the signal selected with the INPUT SELECTOR switch can be recorded onto disc/tape.
- In the COPY positions, the REORDER 2 (MD/TAPE) signal can be recorded onto REORDER 1 (CD-R) or vice versa.
- In the COPY position, the program source selected with the INPUT SELECTOR switch can be monitored through the speakers.
TROUBLESHOOTING
In case of trouble or abnormal operation of the unit, check the following before contacting service personnel. What may seem to be a serious malfunction is often the result of a simple operation mistake. If the trouble persists after checking the following, please contact your dealer or nearest Marantz distributor.
- The amplifier does not operate and the indicators do not light.
- Check to see if the power cord is inserted properly into the power outlet.
- The indicators light but the amplifier does not operate.
-
Check to see if the SELECTOR, SPEAKER switches and VOLUME control are properly set.
-
Sound is heard from only one of the speakers.
-
Check to see if the BALANCE control is properly set.
-
Switch the power of the unit to OFF, and change the connections of the left and right speaker cords. If the sound from the same speaker is still not heard, its connection cord or the speaker itself may be defective.
-
Considerable hum noise is heard when the turntable is played.
-
Check to see if the plugs from the turntable are properly connected to the PHONO jacks.
- Connect the grounding wire of the turntable to the GND terminal on the rear panel of this unit. If it has already been connected, try removing it.
- Check to make sure that the phono cartridge is attached securely to the tonearm.
-
Unplug the power cord and plug it in again after inverting the orientation of the blades.
-
Remote control operation is not possible.
-
Is the remote control unit's transmitter pointed correctly at the remote sensor on the front of the Amplifier?
Or, is there an obstruction between the transmitter and the remote sensor? - Are the batteries in the remote control unit exhausted?
- Is there another strong light (from a window, etc.) striking the Amplifier remote sensor?
- Is an RCA cord connected to the "REMOTE CONTROL IN" jack on the Amplifier rear panel?
OTHERS
The section describes the care and maintenance tasks that must be performed to optimize the operation of your Marantz equipment.
■ Cleaning of equipment external surfaces
The exterior finish of your unit will last indefinitely with proper care and cleaning, Never use scouring pads, steel wool, scourging powders or harsh chemical agents (e.g., lye solution), alcohol, thinner, benzine, insecticide or other volatile substances as these wil mar the finish of the equipment. Likewise, never use cloths containing chemical substances. If the equipment get dirty, wipe the external surfaces with a soft, lint-free cloth.
If the equipment becomes heavily soiled:
- dilute some washing up liquid in water, in a ratio of one part detergent to six parts water.
- dip a soft, lint free in the solution and wring the it is damp.
- wipe the equipment with the damp cloth.
- dry the equipment by wiping it with a dry cloth.

Repairs
Only the most competent and qualified service technicians should be allowed to service the factory-trained warranty station personnel have the knowledge and special facilities needed for repair and calibration of this precision equipment. After the warranty period has expired, repairs will be performed for a charge if the equipment can be returned to normal operation.
In the event of difficulty, refer to your dealer or write directly to the nearest location to you that is listed on the Marantz Authorized Service Station list. If writing, please include the model and serial number of the equipment together with a full description of what you think is abnormal about the equipment's behaviour.
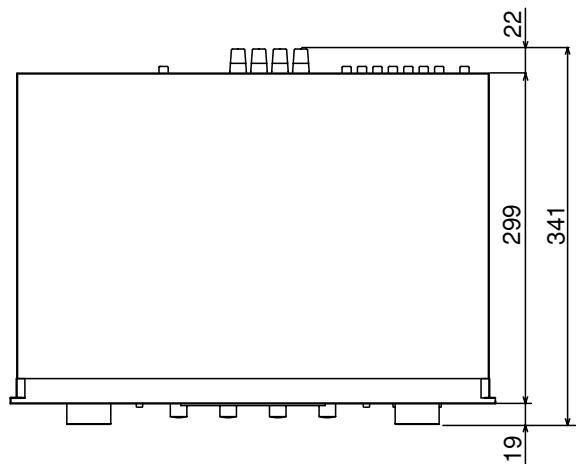
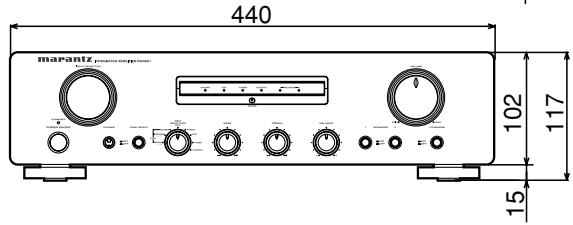
SPECIFICATIONS & DIMENSIONAL DRAWINGS
Power output
RMS 8 Ohms / 4 Ohms (40 Hz - 20 kHz) 40/55 W
DIN 8 Ohms / 4 Ohms 45/60 W
IHF dynamic power
8 Ohms / 4 Ohms 55/80 W
THD at 8 Ohms RMS rated output 0.01%
Intermodulation distortion 0.01%
Damping factor 100
Magnetic cartridge input
Input sensitivity impedance 2.5 mV / 47 k ohms
Accuracy of frequency response to RIAA 0.5 dB
Signal to noise ratio 80 dB
Tuner / CD / AUX/DVD / REORDER 1 / REORDER 2 inputs
Input sensitivity impedance 170 mV / 20 k ohms
Signal to noise ratio 104 dB
Frequency response (-1~dB) 10 Hz - 50 kHz
Tone characteristic (100 Hz and 10 kHz) ±10 dB
Channel separation 70 dB
General
Power Requirements
N, UK version 230 V AC, 50 Hz
Dimensions (MAX) (WxHxD) 440 x 117 x 341 mm
Weight 6.6 kg
Accessories
Remote control unit (RC4001PM) 1
AA type Batteries 2
Registration Card 1
User's Guide 1
Specifications subject to change without prior notice.
www.marantz.com
You can find your nearest authorized distributor or dealer on our website.
U.S.A. Marantz America, Inc. 1100 Maplewood Drive, Itasca, IL 60143, U.S.A.
EUROPE Marantz Europe B.V. P.O.Box 8744,5605 LS Eindhoven, The Netherlands
marantz® is a registered trademark.

- ENGLISH
- WARRANTY
- RETAIN YOUR PURCHASE RECEIPT
- IMPORTANT
- FOR U.K. ONLY
- FRANCAIS
- GARANTIE
- Français
- AVERTISSEMENTS
- A NOTE ABOUT RECYCLING
- FEATURES
- BEFORE USE
- ■ Equipment mains working setting
- Copyright
- ■ Do not locate in the following places
- ■ Keep objects off
- ■ Do not touch hot spots during and Immediately after use
- ■ Battery handling
- Accessories check
- CONNECTIONS
- CONNECTION OF TUNER
- CONNECTION OF COMPACT DISC PLAYER
- CONNECTION OF TURNTABLE
- CONNECTION OF MD or TAPE DECK etc.
- CONNECTION OF CD recorder etc.
- CONNECTION OF SPEAKER SYSTEMS
- WIRING SPEAKER CABLE
- NAMES AND FUNCTIONS OF PARTS
- FRONT PANEL
- ① POWER SWITCH
- ② STANDBY INDICATOR
- ③ INPUT SELECTOR
- TONE DEFEAT SWITCH
- ⑤ FUNCTION INDICATORS
- MUTING INDICATOR
- NOTE:
- ⑦ VOLUME CONTROL
- ⑧ LOUDNESS SWITCH
- ⑨ SPEAKERS 1/2 SWITCHES
- BALANCE CONTROL
- BASS AND TREBLE TONE CONTROLS
- REC SELECTOR SWITCH
- ⑬ REMOTE SENSOR
- PHONES JACK
- REAR PANEL
- A PHONO INPUT JACKS
- GND (GROUND) TERMINAL
- TUNER INPUT JACKS
- CD PLAYER INPUT JACKS
- E AUX/DVD INPUT JACKS
- O RECORDER 2 (MD/TAPE) IN/OUT JACKS
- RECORDER 1 (CD-R) IN/OUT JACKS
- SPEAKER SYSTEMS 1/2 TERMINALS
- ① REMOTE CONTROL BUS TERMINALS (REMOTE CONT. BUS)
- ① POWER CORD
- RC4001PM REMOTE CONTROLLER
- POWER ON/OFF buttons
- a. MAIN POWER ON button
- b. MAIN POWER OFF button
- c. SOURCE POWER button
- FUNCTION SELECT button
- RECORDER 1
- RECORDER 2
- CAUTION:
- VOLUME UP/DOWN button
- MUTE button
- Other buttons are not applied to PM4001.
- USING THE REMOTE CONTROL UNIT
- Remote control
- ■ Loading batteries
- Remove the battery cover.
- Insert batteries with correct / orientation.
- Close the battery cover until it clicks shut.
- BASIC OPERATION
- TO PLAY AN ANALOG DISC
- NOTES:
- TO LISTENTO FM/AM BROADCASTS
- TO PLAY A DVD OR COMPACT DISC
- TO PLAY A DVD OR COMPONENT CONNECTED TO AUX/DVD JACKS
- RECORDER OPERATION
- ■ PLAYBACK
- RECORDING
- Using REC SELECTOR switch
- TROUBLESHOOTING
- OTHERS
- Repairs
- SPECIFICATIONS & DIMENSIONAL DRAWINGS
- Power output
- IHF dynamic power
- Magnetic cartridge input
- Tuner / CD / AUX/DVD / REORDER 1 / REORDER 2 inputs
- General
- Accessories
- www.marantz.com
Brand : MARANTZ
Model : PM4001
Category : Integrated amplifier