
ET8940 - Electric heater SOLAC - Free user manual and instructions
Find the device manual for free ET8940 SOLAC in PDF.

| Product type | Electric radiant heater |
| Brand | SOLAC |
| Model | ET8940 |
| Installation | Wall-mounted (brackets included) or on feet (accessory not included) |
| Operating modes | Comfort, Eco, Frost protection, Weekly programming |
| Display | LCD screen with blue backlight |
| Temperature setting | In increments of 0.5 °C |
| Temperature range – Comfort mode | 5 – 35 °C |
| Temperature range – Eco mode | 5 – 31.5 °C (maximum 3.5 °C below comfort mode) |
| Temperature range – Frost protection mode | 5 – 15 °C |
| Programming | Weekly with 24 time slots per day |
| Key lock | Yes (manual and automatic after 10 min of inactivity) |
| Power supply | Mains, voltage to check (typical 220-240 V) |
| Included accessories | Wall brackets (2 upper, 1 lower), screws and anchors |
| Cleaning and maintenance | Soft damp cloth, vacuum for dust; do not use solvents |
| Safety | Do not cover, do not install under a socket, safety distance, do not use in humid room |
| Repairability | Authorized technical service center only |
| First use | Operate for 2 hours at maximum power to eliminate new smell |
| Warranty | Consult SOLAC after-sales service |
Frequently Asked Questions - ET8940 SOLAC
User questions about ET8940 SOLAC
0 question about this device. Answer the ones you know or ask your own.
Ask a new question about this device
Download the instructions for your Electric heater in PDF format for free! Find your manual ET8940 - SOLAC and take your electronic device back in hand. On this page are published all the documents necessary for the use of your device. ET8940 by SOLAC.
USER MANUAL ET8940 SOLAC
natural_image
Illustration of a solar heating unit with multiple cooling fans and a digital display (no text or symbols)5-11 • ESPAÑOL
12-18 • ENGLISH
19-25 • FRANÇAIS
26-32 • DEUTSCH
33-39 • PORTUGUÊS
40-46 • POLSKI
47-53 • SLOVENČINA
54-60 • ČESKY
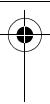
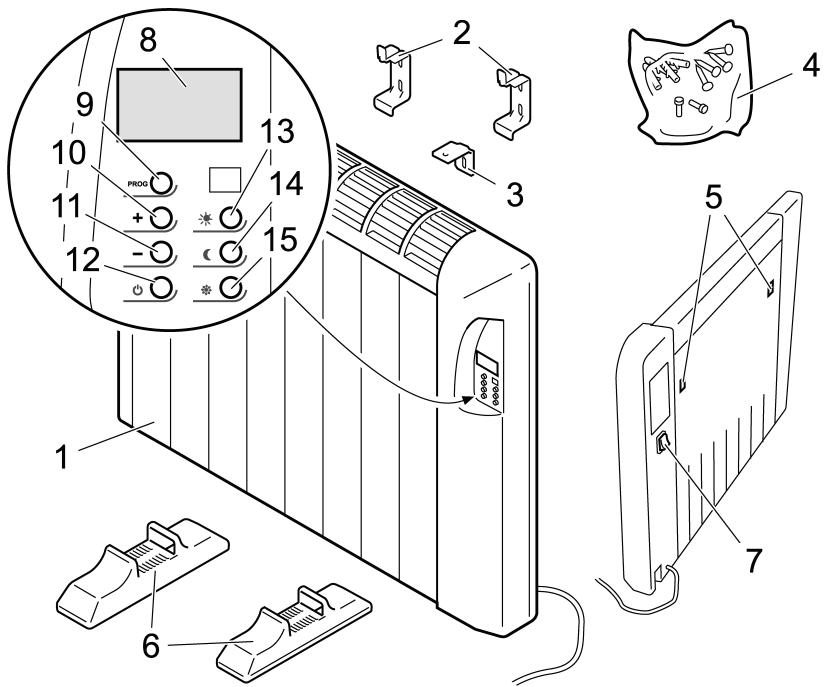
Fig. 1

Fig. 2
natural_image
Line drawing of a heat exchanger with cooling fins and a handle (no text or symbols)Fig. 3
natural_image
Technical illustration of two mechanical clamp components labeled Fig. 5, showing different mounting configurations (no text or symbols present)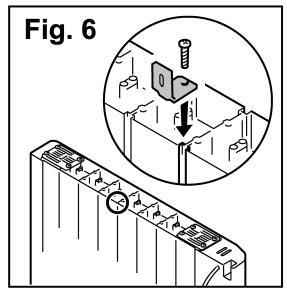

ESPAÑOL
es
1 Atención
- Read these instructions fully before using the appliance.
- This manual is an integral part of the product. Keep it in a safe place for future reference.
- Remove all the elements used for protection during transport or for sales promotions, such as plastic or paper bags, plastic sheets, cardboard and stickers, from the inside or outside of the appliance.
- Children should be supervised to ensure that they do not play with the appliance.
- This appliance is not intended for use by persons (including children) with reduced physical, sensory or mental capabilities, or lack of experience and knowledge, unless they have been given supervision or instructions concerning use of the appliance by a person responsible for their safety.
- Do not modify or repair the appliance in any way. If you detect any anomalies in the cord or any other part of the appliance, do not use it and take it to an authorised service centre.
- Do not use parts or accessories that have not been supplied or recommended by SOLAC.
- Before plugging the appliance into the mains, check that the specified voltage matches your home voltage.
• This appliance is NOT designed for outdoor use. - Place the heater away from flammable materials (glue, curtains, carpets, etc.).

The appliance should never be covered with clothes, containers or any other objects, nor should it be placed under a wardrobe or anything else that could obstruct the hot air flow.

Do not cover the heating appliance in order to prevent it from overheating.

Do not use the heat emitter to dry clothes.
- The place where the heat emitter is installed must be chosen carefully according to the instructions and in compliance with the standards.
- Do not install the appliance under a mains socket.

The appliance should not be installed in places where there is a risk of it being splashed with water, such as from bathtubs, sinks, showers, swimming pools, etc.
- Do not operate the appliance with the cable wound up.
- If the power cable is damaged, do not switch on the appliance. This cable should only be replaced by the Technical Assistance Service in order to prevent any risks.
- The appliance must be installed so that the switches, thermostat and mobile power socket cannot be touched directly or indirectly by a person in the bath or shower.
- To avoid the new smell of the appliance when using it for the first time, switch on the emitter and leave it working for 2 hours at the highest temperature.

Caution! When you wish to dispose of the appliance, NEVER throw it in the rubbish. Instead, take it to your nearest clean point or waste collection point, where it will receive subsequent treatment. You will thus be helping to take care of the environment.
2 Main Components
1 Body of the heater
2 Top wall mounts (2 units)
3 Bottom wall mount
4 Screws + wall plugs for mounting (5 units + 5 units); M5x20 screws for bottom wall mount
5 Heater fastening holes
6 Feet (ACCESSORY - NOT INCLUDED)
Displays and Controls
7 On/Off switch
8 LCD screen
9 PROG programming pushbutton
10 + Pushbutton
11 - Pushbutton
12 Start button
13 Comfort mode button
14 Economy mode button
15 Anti-frost mode button
3 Installation Instructions
Whenever possible, install the heater on a wall beneath a window, but never in a ventilation area.
Always observe the minimum safety distance between walls or obstacles and the heater during installation (fig. 1).
Wall Mounting
1 Place the heater against the wall. Mark the installation position of the heater using two pieces of masking tape. (fig. 2).
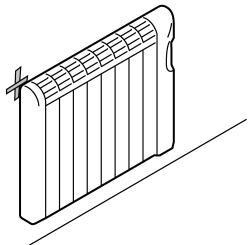
2 Mark the positions of the 4 holes to be drilled for fixing the top mounts (fig. 3).
3 Drill the 4 holes and insert the wall plugs provided (fig. 4).
i Screw hole sizes: 6 mm in diameter x 30 mm in depth
4 Fix the top mounts (2) to the wall using the screws provided (fig. 5).
5 Fix the bottom mount (3) to the heater, screwing the supplied screw (M5x20) through the circular hole.
i Fix the mount (3) on the edge of the central groove (fig. 6).
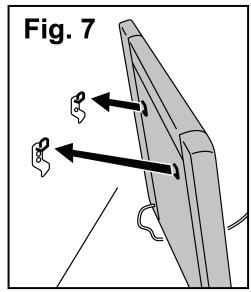
6 Suspend the heater from the top mounts (2). To do so, insert the fastening pins of the top mounts into the fastening holes of the heater (5) (fig. 7).
■ Ensure that the heater is horizontal.
7 With the heater in place, mark the position of the hole to be drilled for fixing the bottom mount.
8 Drill the hole into the wall and insert the supplied wall plug (if necessary, remove the heater so that you can work without obstruction, replacing it when you have finished).
i Screw hole sizes: 6 mm in diameter x 30 mm in depth
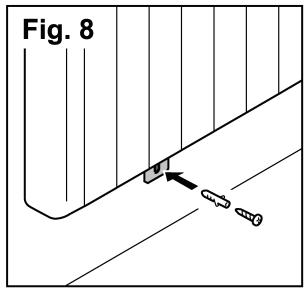
9 Fix the bottom mount (3) to the wall using the screws provided (fig. 8).
To mount on a plastered brick wall, use the screws and wall plugs provided. For other surfaces, consult the specialist salesperson.
Installing the Feet (Accessory - NOT included)
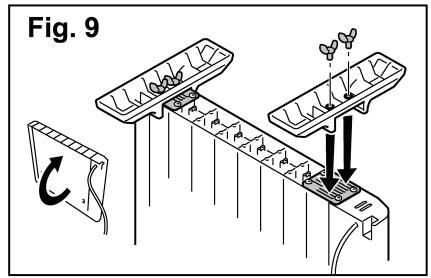
If you would like your heater to be free-standing, instead of wall-mounted (fig. 9):
1 Turn the heater over so that the base faces upwards.
2 Place the feet (6) on the support plates.
The holes on each foot must line up with the holes on the support plate.
3 Attach the wing nuts to secure the feet to the support plates.
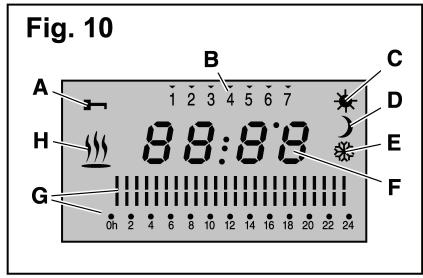
4 LCD Display
Different icons appear in the display, depending on the functions selected (fig. 10):
A Blocked
B Programming (days of the week)
C Comfort mode
D Economy mode
E Anti-frost mode
F Temperature/Time
G Programming (times of day)
H Heater in operation
5 Operating Mode
1 Connect the appliance to the mains.
2 Press the ON/OFF switch to turn the heater on (7).
The LCD display will light up to show a blue background. All of the display's icons will flash and disappear after a few seconds. The screen will display the ambient temperature.
3 Press the start button (12).
When the heater is switched on, the microprocessor reads the internal memory of the appliance and loads the user's last selected mode and temperature.
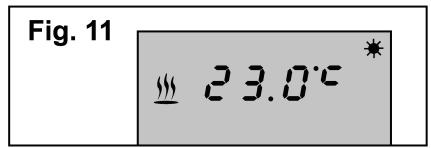
While the appliance is in operation, the ambient temperature and selected operating mode appear in the display (fig. 11).
The (") icon will be displayed while the heater is in operation.
Once the desired temperature is reached, the sensor requires 2 minutes to check the ambient temperature. During this time the heater will continue to operate.
Selecting the Operating Mode
There are four operating modes: Comfort, Economy, Anti-frost and Programming.
1 Press the Comfort button (13) if you want to select the Comfort mode.
The Comfort icon (★) will be displayed.
2 Press the Economy button (14) if you want to select the Economy mode.
The Economy icon (☐) will be displayed.
3 Press the Anti-frost button (15) if you want to select the Anti-frost mode.
The Anti-frost icon (*) will be displayed.
4 Press and hold down the PROG button (9) for two seconds, if you want the heater to operate according to the programmed weekly schedule (fig. 12).
If the user does not reset the heater, it will operate according to the factory default schedule setting.
5 Press the PROG button (9) once to exit this programming mode and return to the last selected mode (comfort, economy or anti-frost).
Setting the Temperature in Comfort, Economy and Anti-Frost Modes
1 Select the required operating mode: comfort, economy or anti-frost using the corresponding button (13), (14) or (15).
2 Press the “+” or “-” button once to display the programmed temperature.
3 Press the “+” or “-” buttons again to increase or decrease the temperature as desired for each mode.
The temperature changes by 0.5^ C every time you press a key.
The degrees centigrade icon will flash while the temperature setting is being changed and will continue to flash until you have completed the temperature selection.
4 After a few seconds without any button being pressed, the selected temperature will automatically be saved.
• Temperature range in comfort mode: 5 - 35° C
- Temperature range in economy mode: 5 – 31.5°C (the maximum temperature for this range must always be 3.5°C below the temperature set for comfort mode).
• Temperature range in anti-frost mode: 5 - 15°C
6 Programming
1 Press the PROG button (9) once to enter the programming mode.
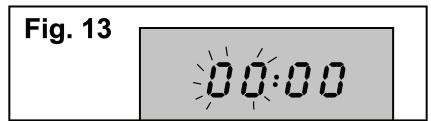
Setting the Clock Time (fig. 13)
To ensure that the heater starts operating at the expected time, the current time must be saved on the clock.
Access the hour setting function. The first two digits will flash.
1 Press “+” and “-” to select the correct hour.
2 Press the PROG button (9) to confirm the hour.
The hour will be saved to memory. Now access the minute setting function.
3 Press "+" and "-" to select the minutes.
4 Press the PROG button (9) to confirm the minutes.
The minutes will be saved to memory. Now access the day setting function.
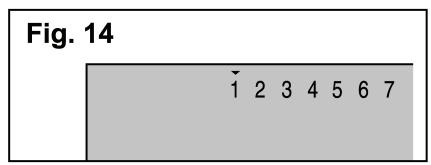
Setting the Day of the Week (fig. 14)
The current day of the week must be saved to memory so that the heater will start to operate on the expected day.
The icon for the 7 days of the week will be displayed, with the first day of the week selected.
1 Press the “+” and “-” buttons to move through the days of the week until you reach the correct number for today. (e.g. Monday=1, Tuesday=2, Wednesday=3, etc.).
2 Press the PROG button (9) to confirm the current day of the week.
The number for the day of the week will be saved to memory.
The time and day of the week must be reset in the event of a power cut.
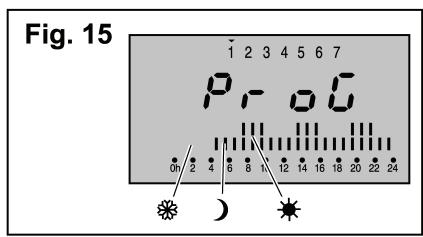
Saving the Operating Schedule to Memory (fig. 15)
If not reset by the user, the heater will operate according to the factory default schedule settings.
i Access the first day of the week for programming.
1 Choose the required operating mode for each time band. To do this: Select the desired time band. Press the button for the desired operating mode: comfort (13), economy (14) or anti-frost (15).
Comfort mode display: Economy mode display: Anti-frost mode display: Blank space
2 Press the “+” button to confirm the selection and then select the next time band.
3 Press the “-” button if you need to return to a previous time band.
The flashing symbol is the one pending confirmation.
You will need to repeat this operation for the 24 hours of the day.
4 Press the PROG button (9) to move on to the next day.
5 Press the PROG button (9) once the programming for the seven days of the week is complete, if you would like to start running the saved operating schedule.
The heater will then start to operate according to the saved schedule. The heater must be left plugged into the mains with the programming mode selected, for the selected programme schedule to run.
Check that the heater starts to operate on the correct day at the correct time. If not, you will need to adjust the day and time.
6 To exit to another operating mode, press the PROG button (9) again.
7 Keypad Lock
The user can prevent changes to the saved programming by locking the control keypad. This function is very useful in public buildings or to prevent children's access.
1 Press the “+” and “-” buttons simultaneously for 3 seconds.
The keypad will be disabled and the screen will show the locked symbol (A).
2 Repeat the same operation to unlock.
The keypad will be activated and the locked symbol will disappear from the screen.
The control panel will automatically lock after ten minutes, if none of its buttons are pressed.
8 Cleaning and maintenance
Make sure the emitter is not connected to the mains, and let its surface cool if you were using it previously.
- Use a damp, soft cloth to clean the emitter. Do not use solvents or abrasive detergents. When necessary, use a vacuum cleaner to remove the dust from the emitter.
FRANÇAIS
fr