
DIMAGE G600 - Digital Camera MINOLTA - Free user manual and instructions
Find the device manual for free DIMAGE G600 MINOLTA in PDF.


| Product type | Compact digital camera |
| Brand | MINOLTA |
| Model | DIMAGE G600 |
| Resolution | 6.0 megapixels |
| Optical zoom | 3x (35mm equivalent 38-114 mm) |
| Digital zoom | 4x |
| LCD screen | 2.0 inch, approx. 115,000 pixels |
| Storage | SD/MMC card, 16 MB internal memory |
| Power supply | 2 AA batteries (Ni-MH recommended) or AC adapter |
| Dimensions (W x H x D) | 94 x 56 x 29 mm |
| Weight (without batteries) | Approx. 200 g |
| Main features | Photo, video, panorama, scene modes (portrait, landscape, sports, night) |
| Maintenance and cleaning | Clean the lens with a soft cloth; protect from moisture and dust |
| Safety | Turn off the camera before changing batteries; use a protective case |
| Spare parts and repairability | Batteries, charger, USB cable, wrist strap available online |
| General information | Manual available for free download at notice-facile.com |
Frequently Asked Questions - DIMAGE G600 MINOLTA
User questions about DIMAGE G600 MINOLTA
0 question about this device. Answer the ones you know or ask your own.
Ask a new question about this device
Download the instructions for your Digital Camera in PDF format for free! Find your manual DIMAGE G600 - MINOLTA and take your electronic device back in hand. On this page are published all the documents necessary for the use of your device. DIMAGE G600 by MINOLTA.
USER MANUAL DIMAGE G600 MINOLTA
E INSTRUCTION MANUAL
Before you begin
Thank you for purchasing this Konica Minolta product. Please take the time to read through this instruction manual so you can enjoy all the features of your new digital camera.
Check the packing list before using this product. If any items are missing, immediately contact your camera dealer.
DiIMAGE G600 digital camera
Lithium-ion battery NP-600
Lithium-ion battery charger BC-600
Neck strap NS-DG130
SD Memory Card
USB cable USB-800
DiIMAGE Viewer CD-ROM
"DiIMAGE Instruction Manuals"-CD-ROM
Quick Reference Guide
International Warranty Certificate
Only use the battery specified in this manual that are manufactured and distributed by Konica Minolta. Beware of counterfeit batteries; the use of these batteries will damage the product and may cause fire.
While reasonable efforts have been made to assure the accuracy of this information, Kona Minolta assumes no liability or responsibility for any errors or omissions of this instruction manual.
Konica Minolta is a trademark of Konica Minolta Holdings, Inc. DiIMAGE is a trademark of Konica Minolta Photo Imaging, Inc. Apple, Macintosh, and Mac OS are registered trademarks of Apple Computer Inc. Microsoft and Windows are registered trademarks of the Microsoft Corporation. The official name of Windows is Microsoft Windows Operating System. Pentium is a registered trademark of the Intel Corporation. Power PC is a trademark of the International Business Machines Corporation. QuickTime is a trademark used under license. Memory Stick is a trademark of Sony Corporation. All other brand and product names are trademarks or registered trademarks of their respective owners.
For proper and safe use
Lithium-ion batteries
This camera operates on a small, but powerful lithium-ion battery. Misuse or abuse of the lithium-ion battery can cause damage or injury through fire, electric shock, or chemical leakage. Read and understand all warnings before using the battery.
DANGER
- Do not short, disassemble, damage, or modify the battery.
- Do not expose the battery to fire or high temperatures over 60^ (140^) .
- Do not expose the battery to water, or moisture. Water can corrode or damage the internal battery safety devices and cause the battery to overheat, ignite, rupture, or leak.
- Do not drop or subject the battery to strong impacts. Impacts can damage the internal battery safety devices and cause the battery to overheat, ignite, rupture, or leak.
- Do not store the battery near or in metallic products.
- Do not use the battery with any other products.
- Only use the specified charger. An inappropriate charger may cause damage or injury through fire or electric shock.
- Do not use a leaking battery. If fluid from the battery enters your eye, immediately rinse the eye with plenty of fresh water and contact a doctor. If fluid from the battery makes contact with your skin or clothing, wash the area thoroughly with water.
- Only charge the battery in an environment with ambient temperatures between 0^ and 40^ ( 32^ and 104^ ). Use the battery only in an environment with ambient temperatures between 0^ and 50^ ( 32^ and 122^ ). Store the battery in an environment with ambient temperatures between 20^ and 35^ ( ?4^ and 95^ ) and a humidity of 45% to 85% RH.
WARNING
- Tape over the lithium-ion battery contacts to avoid short-circuiting during disposal; always follow local regulations for battery disposal.
- If charging is not completed after the specified period elapses, unplug the charger and discontinue charging immediately.
General warnings and cautions
Read and understand the following warnings and cautions for safe use of the digital camera and its accessories.
WARNING
- Only use the battery specified in this manual.
- Only use the specified charger or AC adapter within the voltage range indicated on the unit. An inappropriate adapter or current may cause damage or injury through fire or electric shock.
- Only use the charger power cord in the sales region for which it was designed. An inappropriate current may cause damage or injury through fire or electric shock.
- Do not disassemble the camera or charger. Electric shock may cause injury if a high voltage circuit inside the product is touched.
- Immediately remove the battery or unplug the AC adapter and discontinue use if the camera is dropped or subjected to an impact in which the interior, especially the flash unit, is exposed. The flash has a high voltage circuit which may cause an electric shock resulting in injury. The continued use of a damaged product or part may cause injuries or fire.
- Keep the battery, memory card, or small parts that could be swallowed away from infants. Contact a doctor immediately if an object is swallowed.
- Store this product out of reach of children. Be careful when around children not to harm them with the product or parts.
- Do not fire the flash directly into the eyes. It may damage eyesight.
-
Do not fire the flash at vehicle operators. It may cause a distraction or temporary blindness which may lead to an accident.
-
Do not use the monitor while operating a vehicle or walking. It may result in injury or an accident.
- Do not look directly at the sun or strong light sources through the viewfinder. It may damage your eyesight or cause blindness.
- Do not use these products in a humid environment, or operate them with wet hands. If liquid enters these products, immediately remove the battery or unplug the product, and discontinue use. The continued use of a product exposed to liquids may cause damage or injury through fire or electric shock.
- Do not use these products near inflammable gases or liquids such as gasoline, benzine, or paint thinner. Do not use inflammable products such as alcohol, benzine, or paint thinner to clean these products. The use of inflammable cleaners and solvents may cause an explosion or fire.
- When unplugging the AC adapter or charger, do not pull on the power cord. Hold the plug when removing it from an outlet.
- Do not damage, twist, modify, heat, or place heavy objects on the AC adapter or charger cord. A damaged cord may cause damage or injury through fire or electric shock.
- If these products emits a strange odor, heat, or smoke, discontinue use. Immediately remove the battery taking care not to burn yourself as the battery may become hot with use. The continued use of a damaged product or part may cause injuries or fire.
- Take the product to a Konica Minolta service facility when repairs are required.
- Handling the cord on this product may expose you to lead, a chemical known to the State of California to cause cancer, and birth defects or other reproductive harm. Wash hands after handling.
CAUTION
- Do not use or store these products in a hot or humid environment such as the glove compartment or trunk of a car. It may damage the camera, charger, and battery which may result in burns or injuries caused by heat, fire, explosion, or leaking battery fluid.
- If the battery is leaking, discontinue use of the product.
- The camera, charger, and battery temperature rises with extended periods of use. Care should be taken to avoid burns.
- Burns may result if the memory card or battery is removed immediately after extended periods of use. Turn the camera off and wait for it to cool.
- Do not fire the flash while it is in contact with people or objects. The flash unit discharges a large amount of energy which may cause burns.
- Do not apply pressure to the LCD monitor. A damaged monitor may cause injury, and the liquid from the monitor may cause inflammation. If liquid from the monitor makes contact with skin, wash the area with fresh water. If liquid from the monitor comes in contact with the eyes, immediately rinse the eyes with plenty of water and contact a doctor.
- When using the AC adapter and charger, insert the plug securely into the electrical outlet.
- Do not use electronic transformers or travel adapters with the charger. The use of these devices may cause a fire or damage the product.
- Do not use if the AC adapter or charger cord is damaged.
- Do not cover the AC adapter or charger. A fire may result.
- Do not obstruct access to the AC adapter or charger; this can hinder the unplugging of the units in emergencies.
- Unplug the AC adapter or charger when cleaning or not in use.
The following marks may be found on the product:

This mark on your camera certifies that this camera meets the requirements of the EU (European Union) concerning interference causing equipment regulations. CE stands for Conformité Européenne (European Conformity).
This Class B digital apparatus complies with Canadian ICES-003.
FCC Compliance Statement Declaration on Conformity
Responsible Party: Kona Minolta Photo Imaging U.S.A. Inc.
Address: 725 Darlington Avenue, Mahwah, NJ 07430
Digital Camera: DiIMAGE G600

Tested To Comply With FCC Standards
FOR HOME OR OFFICE USE
This device complies with Part 15 of the FCC Rules. Operation is subject to the following two conditions: (1) This device may not cause harmful interference, and (2) this device must accept any interference received, including interference that may cause undesired operation. Changes or modifications not approved by the party responsible for compliance could void the user's authority to operate the equipment. This equipment has been tested and found to comply with the limits for a Class B digital device, pursuant to Part 15 of the FCC Rules. These limits are designed to provide reasonable protection against harmful interference in a residential installation.
This equipment generates, uses and can radiate radio frequency energy and, if not installed and used in accordance with the instructions, may cause harmful interference to radio communications. However, there is no guarantee that interference will not occur in a particular installation. If this equipment does cause harmful interference to radio or television reception, which can be determined by turning the equipment off and on, the user is encouraged to try to correct the interference by one or more of the following measures:
- Reorient or relocate the receiving antenna.
- Increase the separation between the equipment and the receiver.
- Connect the equipment to an outlet on a circuit different from that to which the receiver is connected.
- Consult the dealer or an experienced radio/TV technician for help.
Do not remove the ferrite cores from the cables.
Table of contents
The getting up and running section covers how to prepare the camera for use. It contains important information about power supplies and memory cards. The basic operation of this camera is covered in the recording - basic operation section between pages 22 and 30, and the playback - basic operation section between pages 32 and 34. Read the data-transfer mode section in its entirety before connecting the camera to a computer or printer.
Many of the features of this camera are controlled with menus. The menu navigation sections concisely describe the menu. Descriptions of the settings immediately follow the navigation sections.
The appendix contains a troubleshooting section to help answer questions about the operation of the camera. Information covering camera care and storage is also provided. Please store this manual in a safe place.
Names of parts 12
Getting up and running 14
Charging the battery. 14
Inserting a battery 15
Battery-condition indicator. 16
Auto power off. 16
AC adapter (sold separately) 17
Installing and removing a memory card. 18
About memory cards. 19
Turning the camera on and off 20
Attaching the strap. 20
Setting the language, date, and time 21
Recording - basic operation 22
Handling the camera 22
LCD monitor display. 22
Using the zoom lens. 23
Camera-shake warning 23
Basic recording operation 24
Focus lock 25
Focus range. 25
Focus signals 26
Special focusing situations 26
Display button - recording mode 27
Flash modes 28
Flash range - Automatic operation 29
Flash signals 29
Focus modes and self-timer 30
31
Playback - basic operation 32
Single-frame playback display 32
Viewing images 33
33
Display button - playback 33
Index playback 34
Enlarged playback 34
Recording - advanced operation. 35
Navigating the recording menu 35
Resolution - image size and compression 36
Movie recording 38
Exposure compensation 39
White balance. 40
AE metering modes 41
Monochrome 42
Digital zoom. 43
Adjusting the monitor 44
Voice recording. 45
Add audio recording. 46
Delete audio recording 47
Slow shutter limit 48
Manual exposure 49
Quality 50
Camera sensitivity - ISO speed 51
Flash compensation 51
Saturation 52
Contrast 52
Sharpness 52
Color 53
An introduction to color. 53
A short guide to photography 54
What is an Ev? 54
Playback - advanced operation 55
Playing back movies and audio 55
Navigating the playback menu. 56
Frame-selection screen 57
Index 57
Copy 58
Delete 60
Adjusting the monitor 61
DPOF 62
Protect 64
Move. 66
Resize 68
Slide show 69
Add audio recording. 69
Setup menu 70
Navigating the setup menu 70
Format 71
Recording menu setup. 72
Date setup 72
Quick View. 73
Self-timer delay 73
Sound 74
Auto power off. 74
File-number reset 75
Memory priority 75
Language 76
Add audio recording setup. 76
Custom setup 77
Custom setup notes 78
Flash modes 78
Macro - focus and self-timer modes 78
AF AE AWB. 78
Continuous-advance focus lock. 80
Reset default 80
Transfer mode 82
Information display setup. 82
Data-transfer mode 83
System requirements 83
Connecting the camera to a computer 84
Connecting to Windows 98 and 98SE .85
Automatic installation 85
Manual installation 86
Memory card folder organization 88
Disconnecting the camera from the computer 90
Windows 98 and 98SE .90
Windows Me, 2000 Professional, and XP .90
Macintosh 91
PictBridge 92
Notes on printing errors 94
QuickTime system requirements 94
Changing the memory card - data-transfer mode 95
Appendix 96
Troubleshooting 96
About the lithium-ion battery charger cord 97
Removing the driver software - Windows 98
Care and storage 99
Camera care 99
Cleaning 99
Storage 99
Memory cards. 100
Batteries 100
Before important events or journeys 100
Operating temperatures and conditions. 101
LCD monitor care 101
Copyright 101
Questions and service 101
Technical specifications 102
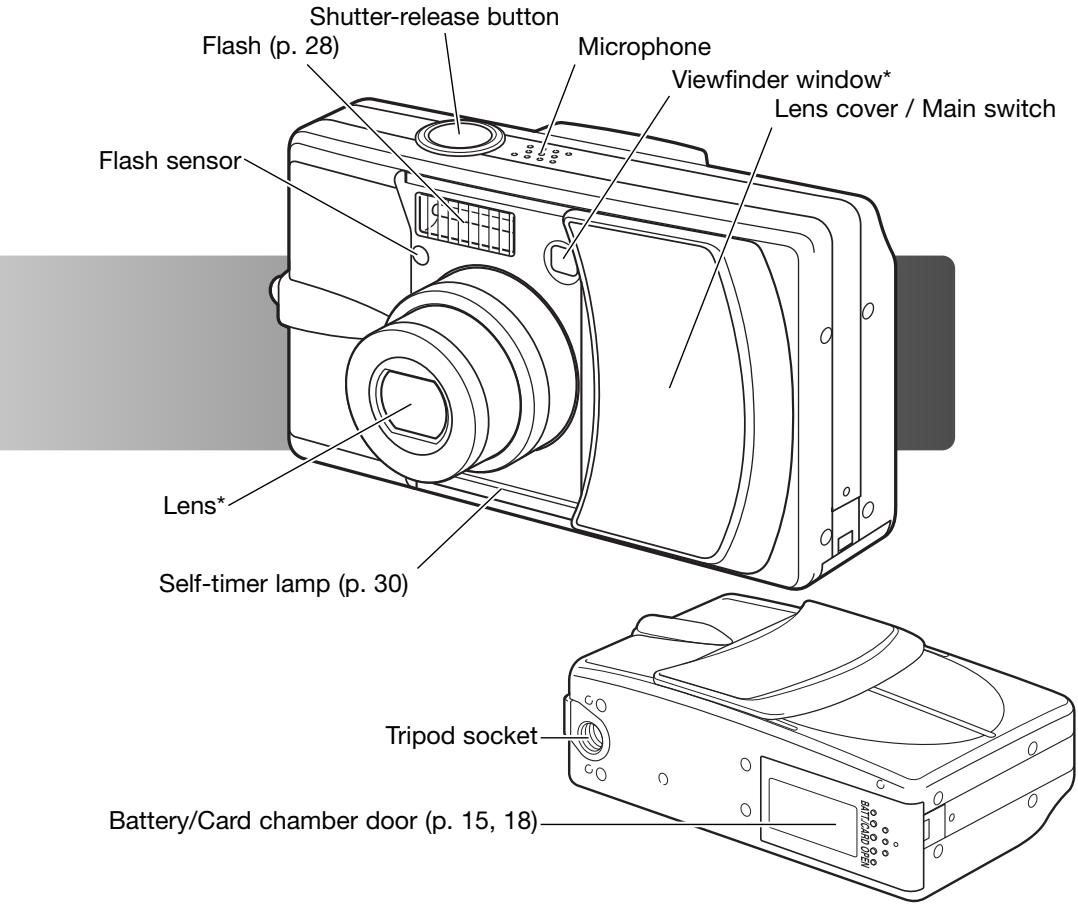
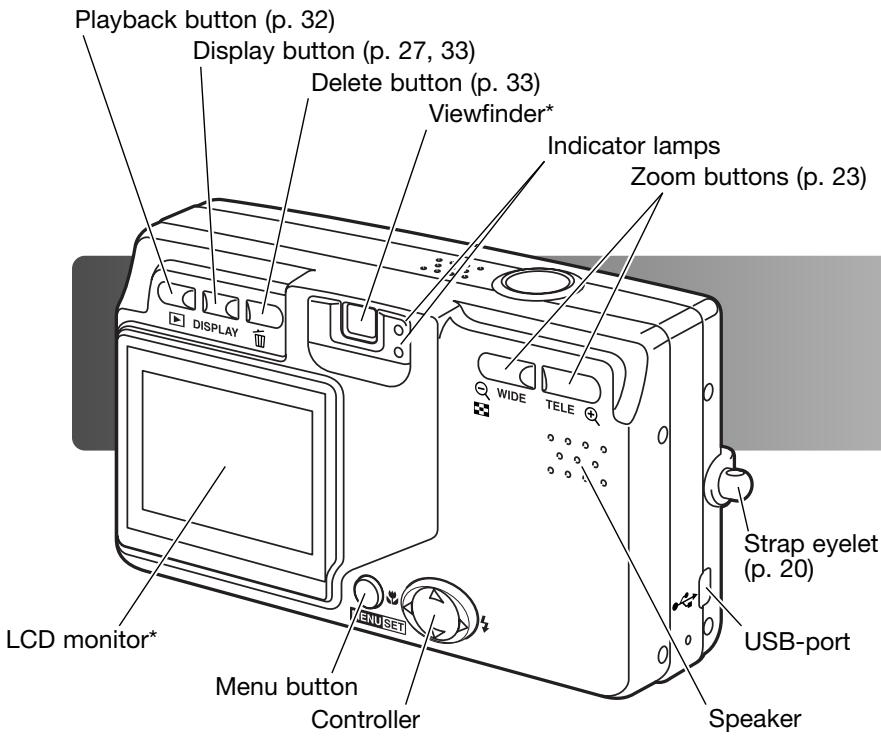
Names of parts
- This camera is a sophisticated optical instrument. Care should be taken to keep these surfaces clean. Please read the care and storage instructions in the back of this manual (p. 99).
Getting up and running
Charging the battery
Before the camera can be used, the lithium-ion battery must be charged. Before charging the battery, read the safety warnings on pages 3 and 4 of this manual. Only recharge the battery with the supplied battery charger. The battery should be recharged before each shooting session. See page 100 for battery care and storage.
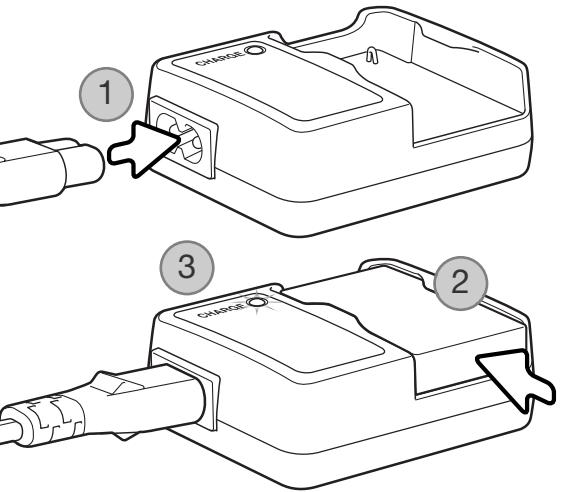
Plug the power cord into the charger unit (1). Plug the other end of the cord into a live household outlet. The included AC cord is designed for the current of the sales region. Only use the cord in the region it was purchased. Faor more on the AC cable, see page 97.
With the contacts down, slide the battery into the charger (2). The indicator lamp (3) is red when the battery is charging. The lamp turns green when the battery has been charged. Charging time is approximately 120 minutes.
When the battery has been charged, remove the it from the charger. Unplug the power cord from the outlet.
Inserting a battery
This digital camera uses one NP-600 lithium-ion battery. Before using the battery, read the safety warnings on pages 3 and 4 of this manual. When replacing the battery, the camera should be turned off.
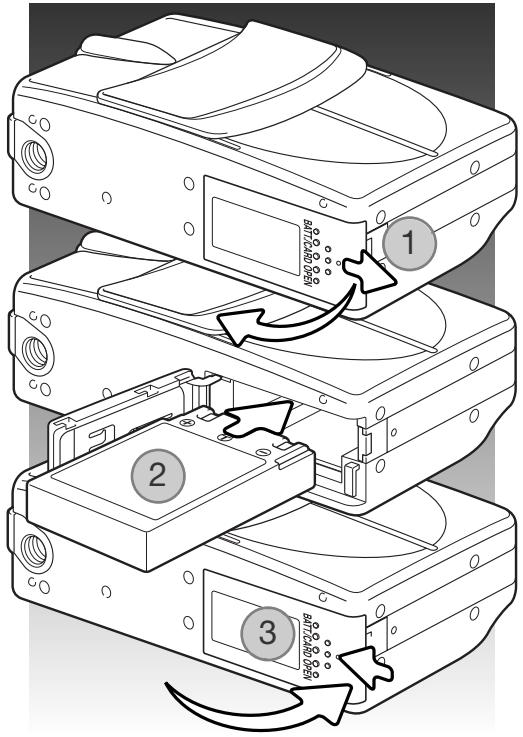
Slide the battery-chamber door toward the side of the camera to release the safety catch (1). Open the door.
Insert the battery (2).
Close the battery-chamber door (3) and slide it toward the camera to engage the safety catch.
After initially installing the battery, the menu language, clock, and calendar need to be set. The camera can also reset if the camera is stored without a battery. See page 21 on how to set up the camera.
Camera notes
After initially inserting a charged battery, do not remove it from the camera for three hours; the camera can be off during this period. The lithium-ion battery is used to charge an internal battery, which protects settings when the camera is turned off.
Battery-condition indicator
This camera is equipped with an automatic battery-condition indicator. It is displayed in the bottom left corner of the LCD monitor when the camera is on.
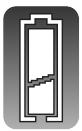
Full-battery indicator - the battery is fully charged.
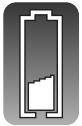
Low-battery indicator - battery power is low. The battery should be recharged as soon as possible.
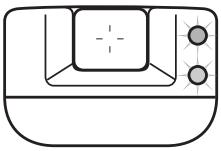
If power is insufficient for camera operation, the both indicator lamps next to the viewfinder blink. The monitor will not turn on. The battery must be recharged.
Auto power off
To conserve battery power, the camera will shut down if an operation is not made within three minutes. To restore power, press the shutter-release button, zoom buttons, or menu button. The length of the auto-power-off period can be changed or the function disabled in the setup menu (p. 70).
AC adapter (sold separately)

Always turn off the camera before changing between power supplies.
The AC adapter allows the camera to be powered from a household outlet. The AC adapter is recommended when the camera is interfaced with a computer or during periods of heavy use. AC adapter model AC-8U is for use in North America, Taiwan and Japan; AC-8GB is for the United Kingdom and Hong Kong; AC-8C is for China; AC-8E is for use in all other areas.
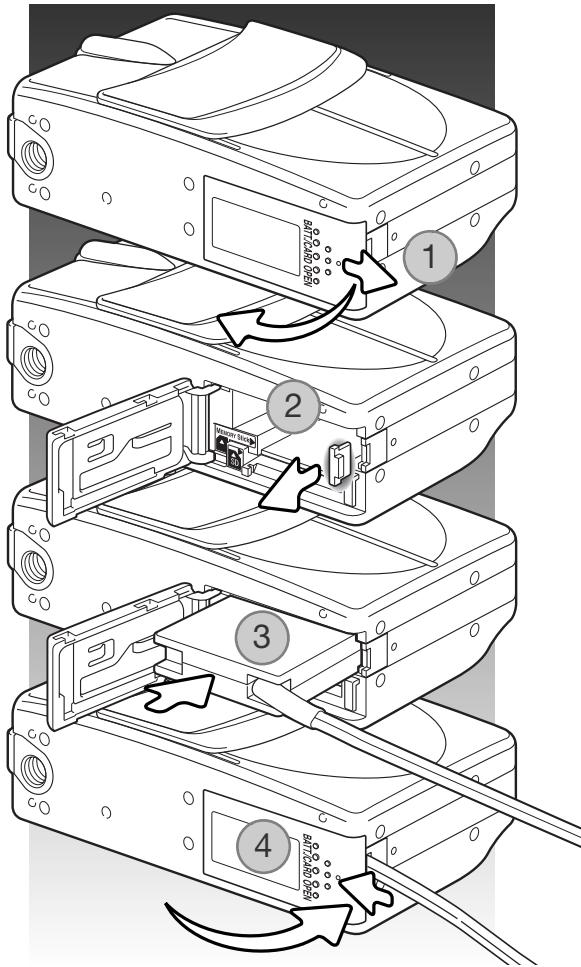
Slide the battery-chamber door toward the side of the camera to release the safety catch (1). Open the door.
Remove the battery and the cable-slot cover (2).
Insert the adapter making sure the cable passes through the slot at the side of the camera (3).
Close the battery-chamber door (4) and slide it toward the camera to engage the safety catch.
Connect the AC adapter cables as described in the adapter's instruction manual. Read all warnings and cautions in the manual before using the AC adapter.
Installing and removing a memory card

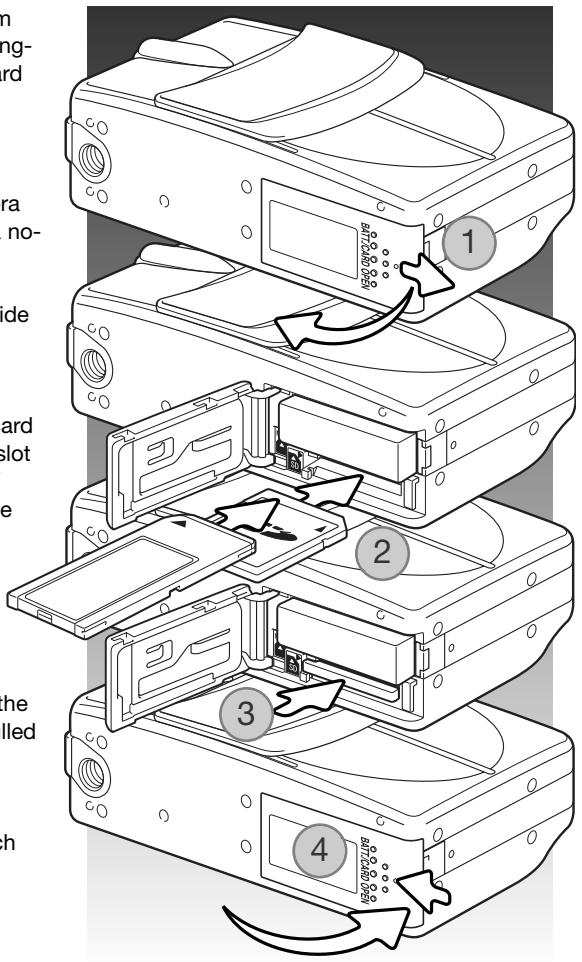
Always turn off the camera and confirm the indicator lamps are out before changing the memory card, otherwise the card may be damaged, and data lost.
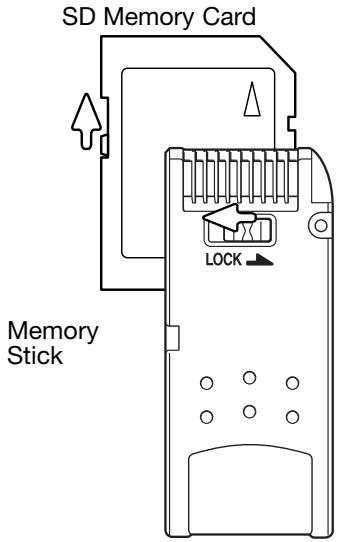
An SD Memory card, MultiMediaCard, or Memory Stick must be inserted for the camera to operate. If a card has not been inserted, a nocard warning appears on the LCD monitor.
Slide the battery-chamber door toward the side of the camera to release the safety catch (1). Open the door.
Insert the memory card all the way into the card slot and then release (2). The Memory Stick slot is next to the battery; the SD Memory Card / MultiMediaCard slot is next to the back of the camera. The card should catch in the slot. Always push the card in straight, never at an angle. Never force the card. If the card does not fit, check that it is oriented correctly.
To eject a memory card, press the card into the slot and release (3). The card can then be pulled out.
Close the battery-chamber door and slide it toward the camera to engage the safety catch (4).
About memory cards
The response time during recording and playback is longer with MultiMediaCards compared with SD Memory Cards. This is not a defect, but rather due to the specifications of the cards. When using large capacity cards, some operations like deletion may take longer.
The SD Memory Cards and Memory Sticks have a write-protect switch to prevent image data from being deleted. However, when the card is protected, images cannot be recorded. If an attempt is made to record or delete an image with the camera, the card-protected message appears and both viewfinder indicator lamps blink. For memory card care and store see page 100.
If the unable-to-read message appears, the inserted card in the camera may need to be formatted. A card used in another camera may also have to be formatted before being used. A card can be formatted in the setup menu (p. 71). When a card is formatted, all the data on the card is permanently erased.
Turning the camera on and off
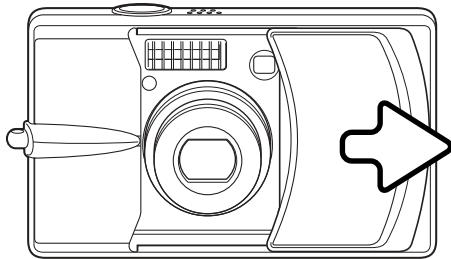
Slide the lens cover in the direction indicated to turn on the camera; the lens extends automatically. Do not touch or hinder the lens while it is extending.
To turn off the camera, push the cover toward the lens; the lens retracts automatically. The cover can be closed when the lens has completely retracted into the body.
Attaching the strap
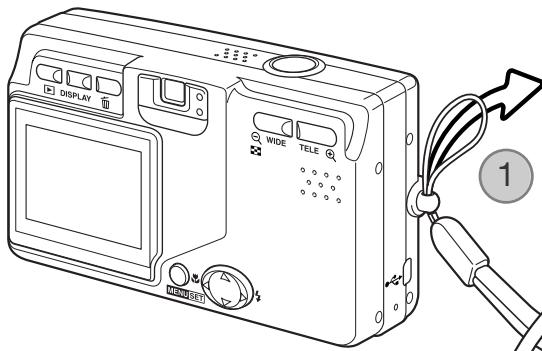
Always keep the strap around your neck in the event that the camera is accidentally dropped.
Pass the small loop of the strap through the strap eyelet on the camera body (1).
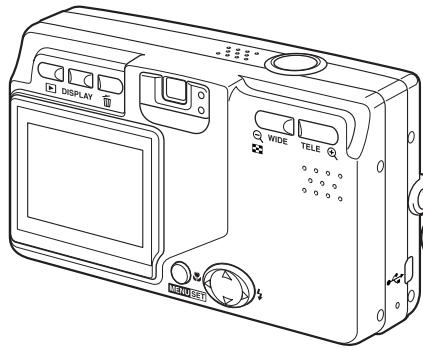
Pass the other end of the strap through the small loop and tighten (2).
2
Setting the language, date, and time
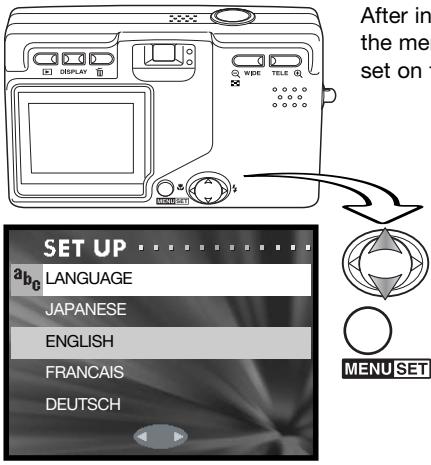
After initially inserting a memory card and charging the battery, the menu language and the camera's clock and calendar must be set on the setup menu.
The four-way keys of the controller move the cursor and change settings. Pressing the menu button sets selections.
Use the up/down keys to select the language.
Press the menu button to continue. A confirmation screen will open.
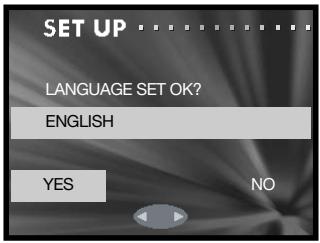
Use the left/right keys to select "Yes." "No" will return to the previous screen.

Press the menu button to continue.
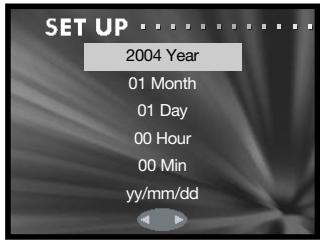

Use the up/down keys to select the option to be changed. Use the left/right keys to change the option. The last option sets the date format among year/month/day, day/month/year, and month/day/year.

Press the menu button to complete the operation.

Recording mode - Basic operation
This section covers basic recording operation. To prepare the camera for use, read pages 14 through 21.
Handling the camera
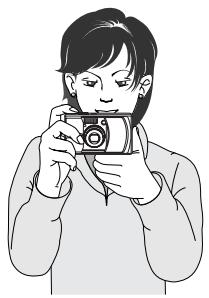
While using the viewfinder or LCD monitor, grip the camera firmly with your right hand while supporting the camera body with your left. Keep your elbows at your side and your feet shoulder-width apart to hold the camera steadily.
Take care not to cover the lens, flash, or flash sensor with your fingers or the strap.
LCD monitor display
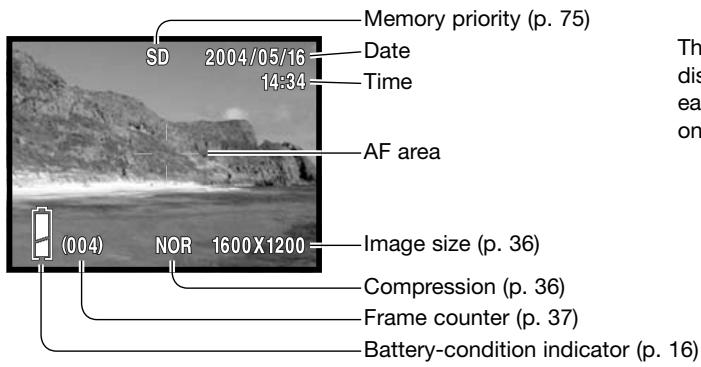
The current date and time are displayed for a few seconds each time the camera is turned on.
Using the zoom lens
This camera is equipped with a 8 - 24mm zoom lens. This is equivalent to a 39 to 117mm lens on a 35mm camera. The lens is operated by the zoom buttons on the back of the camera. The effect of the optical zoom is visible in both the viewfinder and LCD monitor.
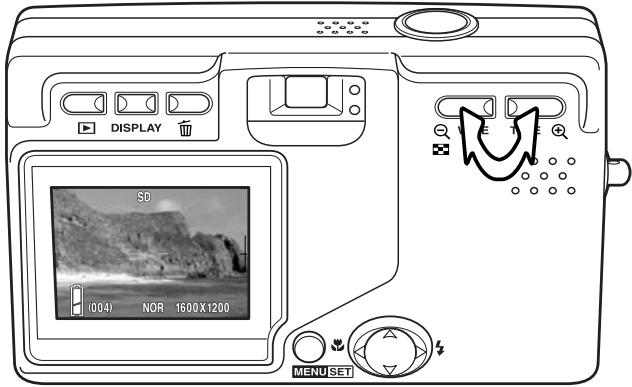
To zoom in on the subject, push the tele zoom button.
To zoom out, push the wide zoom button.
The digital-zoom function can increase the power of the lens. The digital zoom is activated in the recording menu (p. 43).
Camera Notes
Because the optical viewfinder and the lens are slightly separated, the image seen through one is not exactly the same as the other; this is called parallax. Parallax can cause errors in framing when using the viewfinder at close distances. When the subject is closer than 1m (3ft) at the lens' wide-angle position or 3m (9.8ft) at the telephoto position, use the monitor to compose the image.
Camera-shake warning
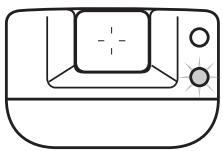
If the shutter speed is below the point where the camera can be hand held safely, the red viewfinder indicator lamp blinks to warn of camera-shake. Camera shake is slight blurring caused by subtle hand motion and is more pronounced at the lens' telephoto position than at the wide-angle position. Although the warning appears, the shutter can be released. If the warning appears, place the camera on a tripod or use the flash. Warning is not used with manual exposure.
Basic recording operation
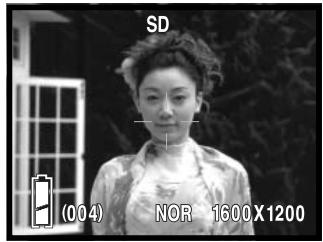
Place the subject within the AF area.
The focus-lock function (p. 25) can be used with off-center subjects. If the subject is closer than 1m (3ft.) at the zoom lens' wide-angle position or 3m (10ft) at the telephoto position, only use the LCD monitor to frame the subject.
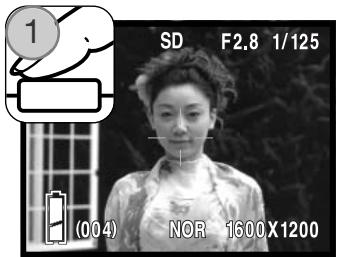
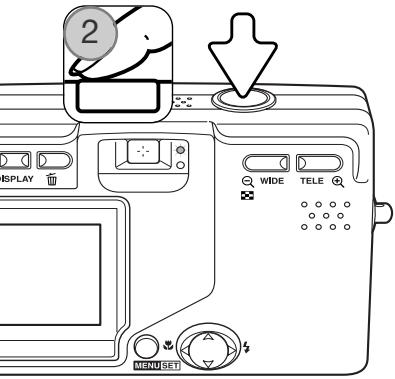
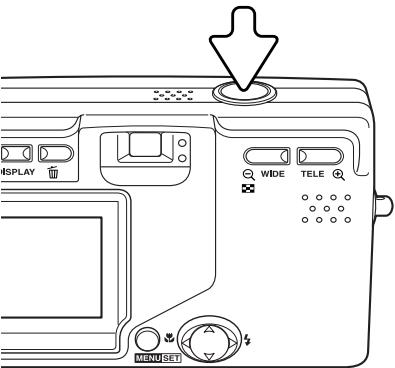
Press the shutter-release button partway down (1) to lock the focus and exposure.
The aperture value (f-number) and shutter speed is displayed at the top right of the monitor when the exposure is locked. The green viewfinder indicator lamp glows when the focus is locked; the red lamp glows if the flash is going to be used. If the green indicator lamp blinks, the camera could not focus, repeat the procedure.
Press the shutter-release button all the way down (2) to take the picture.
After the shutter releases, the green viewfinder indicator lamp blinks and the red lamp glows while image data is being written to the memory card. Never remove a memory card while data is being transferred.
If the shutter-release button is pressed and held, a series of consecutive images is captured. The previous image is displayed between exposures. The rate of capture depends on the image size and other functions used. The flash must recharge between exposures. With 2816 X 1536 size images and continuous-advance focus lock on (p. 80), the maximum rate of capture is 0.7fps.
Focus lock
The focus-lock function is used when you want to compose the image with the subject off-center and outside the AF area. Focus lock may also be used when a special situation prevents the camera from focusing on the subject (p. 26). This function is controlled with the shutter-release button. For information on continuous-advance focus lock, see page 80.
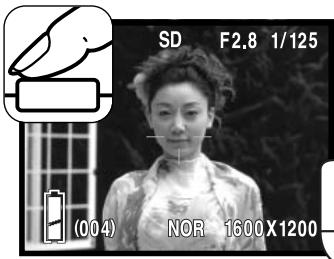
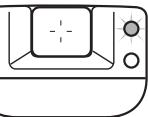
Place the subject within the AF area. Press and hold the shutter-release button partway down and wait for the green viewfinder indicator lamp to glow to indicate the focus is locked. If the green lamp blinks, repeat the procedure.
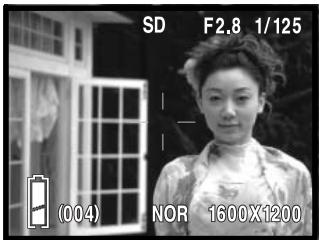
Without lifting your finger from the shutter-release button, recompose the subject within the image area. Press the shutter-release button all the way down to take the picture.
Focus range
The focus range depends on the zoom position. To focus closer than the distances below, use the macro focus mode (p. 30).
Wide-angle position
0.5m - inf. (1.6ft. - inf)
Telephoto position
0.8m - inf. (2.6ft. - inf.)
Focus signals
This digital camera has a quick, accurate autofocusing system. The green indicator lamp next to the viewfinder indicates the focus status. The shutter can be released regardless if the camera can focus on the subject or not.
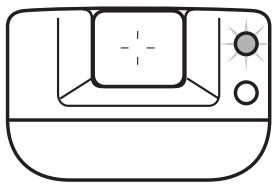
Focus confirmed - the green indicator lamp glows. Focus is locked.
Cannot focus - the green indicator lamp blinks.
Special focusing situations
The camera may not be able to focus in certain situations. In these situations, focus lock (p. 25) or AF lock (p. 79) can be used to focus on another object at the same distance as your main subject, and then the image can be recomposed to take the picture.
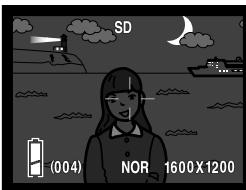
The subject is too dark.
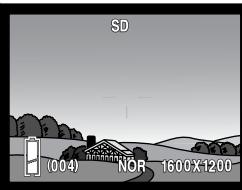
The subject in the AF area is low in contrast.
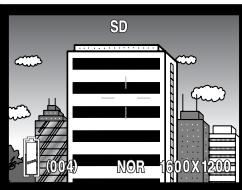
The subject is composed of broad horizontal lines.
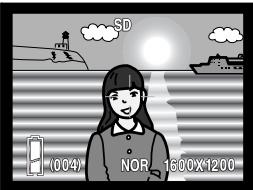
The subject is near a very bright object or area.
Camera Notes
The fixed focus modes can be used when a special focusing situation is preventing the camera from focusing. These modes are activated with custom option in the setup menu (p. 77) and set with the controller (p. 30).
Display button - Recording mode
The display button (1) controls the LCD monitor display. The display cycles to the next format each time the button is pressed: standard display, live image only, and monitor off.
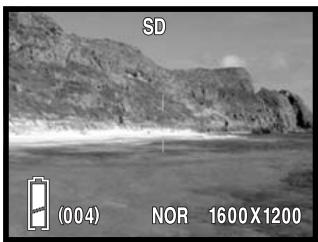
Standard display
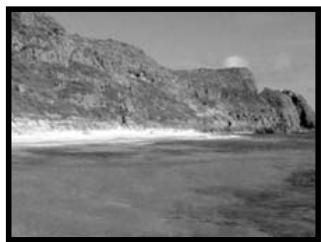
Live image only
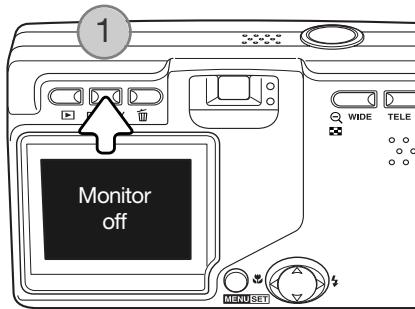
Battery power can be conserved by turning the monitor off and using the viewfinder to take pictures. However, because of parallax, the monitor should be used for subjects closer than 1m (3ft.) at the zoom lens' wide-angle position or 3m (10ft) at the telephoto position.
When changing settings, the monitor turns on automatically. The warnings and other relevant information can appear on the live image only display. The digital zoom is canceled when the monitor is off.
Flash modes
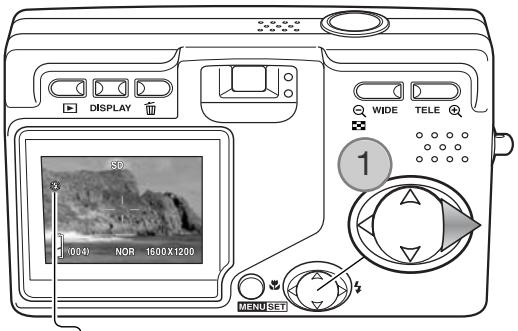
The flash can be used when taking still images. To select the flash mode, press the right key of the controller (1) until the appropriate mode is displayed. The active flash mode is displayed in the top left corner of the LCD monitor.
Autoflash - the flash fires automatically in lowlight conditions.
Red-eye reduction – the flash fires a single burst before the main flash burst to reduce red-eye; an effect caused by light reflected from the retina. Use in low-light conditions when taking photographs of people or animals, the pre-flashes contract the pupils of the subject's eyes. Red-eye reduction is used with fill flash with manual exposure.
Fill flash – the flash fires with each exposure regardless of the amount of ambient light. Fillflash can be used to reduce harsh shadows caused by strong direct light or sunshine.
Night portrait - for flash portraits at night. The camera automatically balances the flash and background exposures. When taking portraits, ask your subject not to move after the flash burst; the shutter may still be open for the background exposure.
Autoflash (No display)
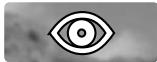
Red-eye reduction
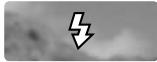
Fill flash
Night portrait
Flash cancel
Fill flash
Flash cancel - the flash will not fire. Use flash cancel when flash photography is prohibited, natural light is desired to illuminate the subject, or the subject is beyond the flash range.
Camera Notes
The slow-sync. option in the recording menu specifies the minimum shutter speed used with a particular flash mode to control camera shake. See page 48 for more information. The custom option in the setup menu (p. 77) allows the available flash modes to be edited.
Flash range - Automatic operation
The camera automatically controls the flash output. For well-exposed images, the subject must be within the flash range. Because of the optical system, the flash range is not the same at the lens' wide-angle position as it is at the telephoto position. The flash range can be changed with camera sensitivity (ISO), see page 51.
Wide-angle position
0.5m - 3.0m (1.6ft. - 9.8ft.)
Telephoto position
0.8m - 1.7m (2.6ft. - 5.6ft.)
Flash signals
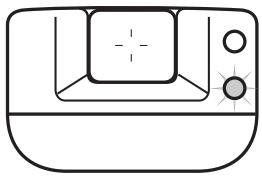
The red indicator lamp next to the viewfinder indicates the status of the flash. When the lamp glows, the flash is charging and will be used in the exposure.
Focus modes and self-timer
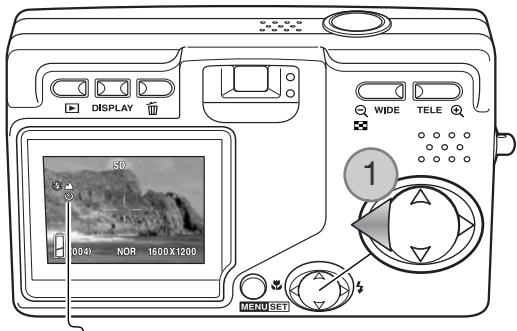
Macro and landscape focus modes as well as a self-timer can be selected by pressing the left key of the controller (1) until the appropriate mode is displayed. The active mode is displayed in the top left corner of the LCD monitor.
Macro - used for close-up photographs. The minimum subject distance changes with the zoom position of the lens.
| Wide-angle position | Telephoto position |
| 6cm (2.4in) – inf. | 50cm (19.7in) – inf. |
If the subject is outside the flash range (p. 51), overexposure may result. To prevent the flash from firing, set the flash mode to flash cancel (p. 28).
Always use the monitor to frame the image. The use of a tripod is recommended. Macro can be used with the self-timer, see below.
| Macro |
| Landscape |
| Self-timer |
| Macro / Self-timer |
| Landscape / Self-timer |
Landscape - focus is optimized for scenic pictures. The use of a tripod is recommended in in twilight or overcast conditions as shutter speeds can be long. The flash is canceled with this focus mode. Landscape can be used with the self-timer.
Shooting Tips
Camera shake is more noticeable with long exposures or close-up pictures. In these situations, place the camera on a tripod and make the exposure with the self-timer to prevent shaking the camera.
Self-timer – for self-portraits. The self-timer delays the release of the shutter for ten seconds.
Set the camera on a tripod and confirm the subject will be within the AF area when the shutter releases; focus is determined just before the exposure. Press the shutter-release button all the way down to start the timer. The self-timer lamp on the front of the camera blinks during the countdown; it flashed quickly just before the picture is taken. The self-timer is canceled after the exposure.
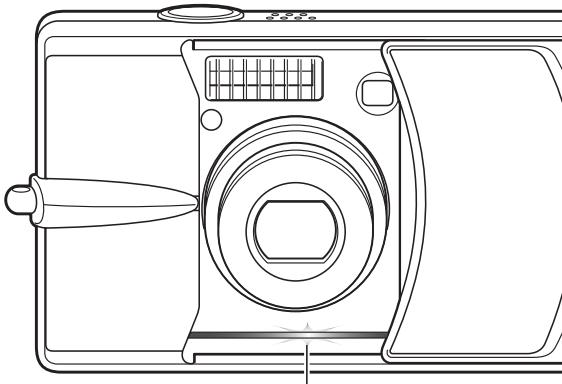
Self-timer lamp
To stop the countdown before the exposure, turn off the camera. The self-timer period can be changed to 3 seconds with the setup menu (p. 73). The self-timer can be used with the macro and landscape focus modes and with movie recording (p. 38).
Camera Notes
The custom option in the setup menu (p. 77) allows the available focus and self-timer modes to be edited. Three fixed focus modes can also be activated: 4m (13ft), 2m (6.6ft), and 1m (3.3ft).
Deleting images
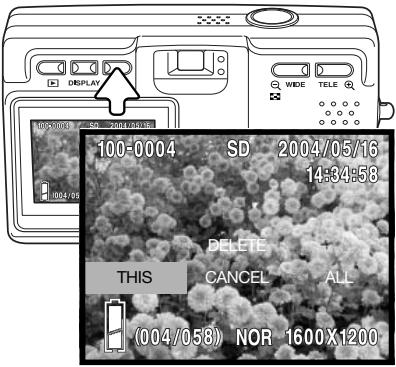
To delete a file, press the delete button. A confirmation screen appears.

Use the left/right keys to highlight the appropriate option. "THIS" deletes the displayed image and "ALL" deletes all images in the memory location at the top of the display. "CANCEL" ends the delete operation.

Press the menu button to complete the operation.
Playback - Basic operation
Images are viewed in the playback mode. This section covers the basic playback operation. The playback mode has additional functions, see page 55.
Press the playback button to view recorded images. Images can be viewed directly from the recording mode or when the lens cover is closed. When the cover is closed, press and hold the playback button for a few seconds until the monitor activates.
To cancel the playback mode, press the playback button. If the lens cover is open, pressing the shutter-release button also cancels the playback mode when a still image is displayed.
Single-frame playback display
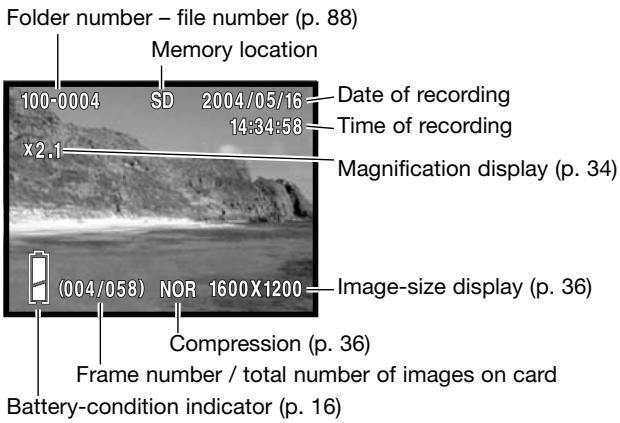
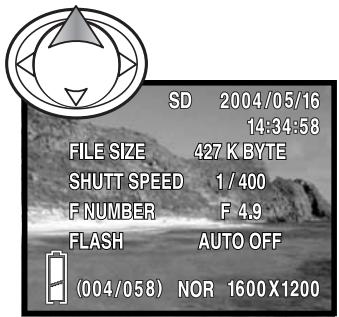
Press the up key of the controller to display image information. Press the up key a second time to hide the information display.
Viewing images
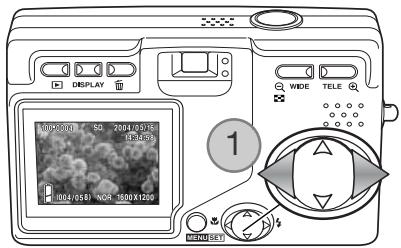
In playback mode, use the left/right keys of the controller (1) to scroll through the images on the memory card.
Deleting images
To delete a displayed file or all files in the memory location indicated at the top of the image, press the delete button. A confirmation screen appears.
Use the left/right keys to highlight the appropriate option. "THIS" deletes the displayed image and "ALL" deletes all images in the memory location at the top of the display. "CANCEL" ends the delete operation.
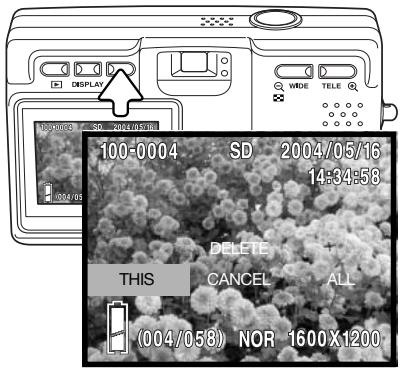

Press the menu button to complete the operation.
Display button - Playback
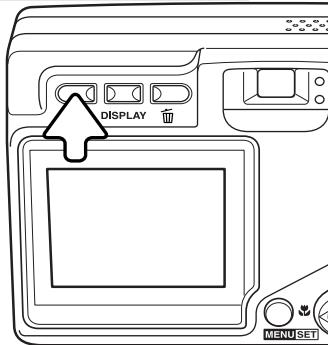
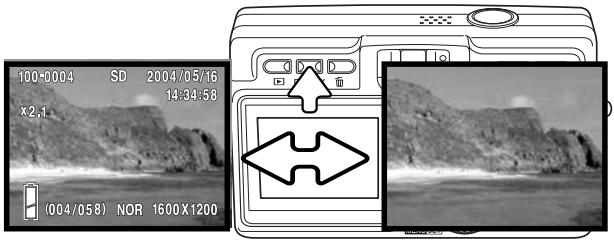
Pressing the display button switches between the standard display and the image-only display. Image information can only be displayed with the standard display.
Index playback
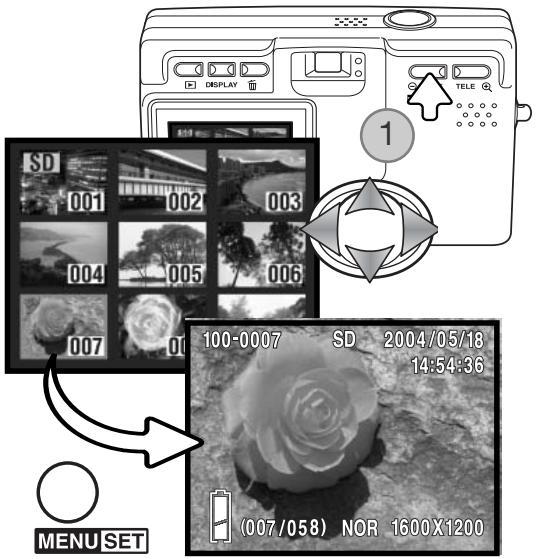
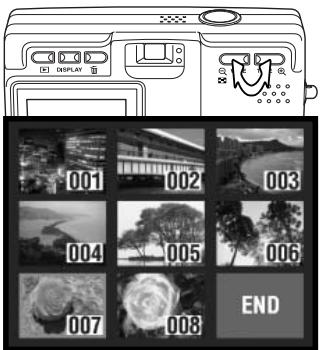
To view the recorded images in a 9-frame index, press the wide-angle zoom button (1). The images are grouped by the memory card which is indicated on the first frame of the group. The frame number of the image is displayed.
The controller moves the red border among the images.
Press the menu button, telephoto zoom button, or shutter-release button to display the framed image in the single-frame playback mode.
Enlarged playback
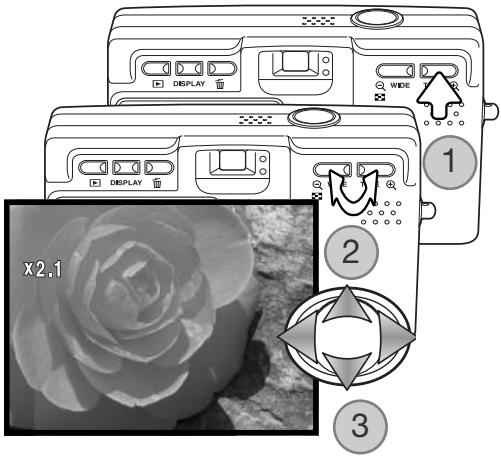
An image can be enlarged; maximum magnification depends on image size. To enlarge the displayed image, press the telephoto zoom button (1).
Use the zoom buttons (2) to enlarge and reduce the image size; the degree of magnification is displayed. The controller (3) scrolls the image.
To cancel the enlarged playback, reduce the image magnification below X1.1 or press the shutter-release button.
Recording - Advanced Operation
Navigating the recording menu
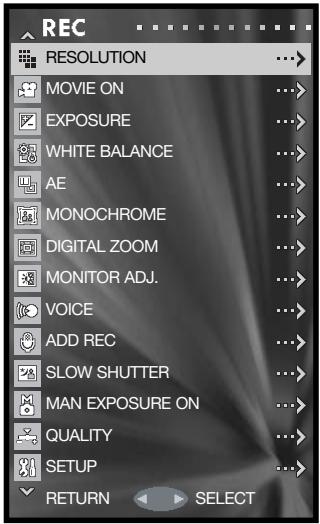
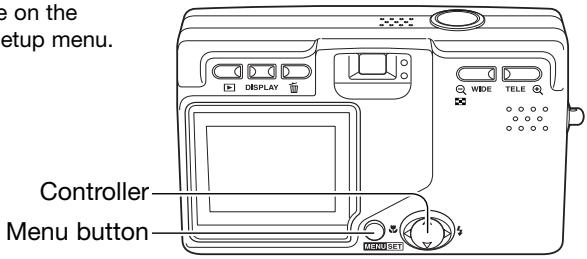
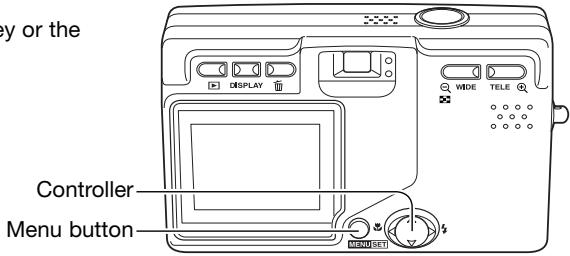
Navigating the menu is simple. The menu button turns the menu on. The controller moves the cursor and changes settings on the menu. Pressing the menu button selects menu options and sets adjustments.

To activate the recording menu, press the menu button.

Use the up/down keys of the controller to scroll through the menu options. Highlight the option whose setting needs to be changed.

With the menu option to be changed highlighted, press the right key to continue; refer to the appropriate section on how to set the function. Pressing the menu button also opens the next screen.
To close the menu, press the left controller key or the shutter-release button. The options available on the recording menu can be simplified with the setup menu. See page 72 for more information.
Resolution - Image size and compression
Image size and the compression rate are set with the resolution option in the recording menu. See navigating the recording menu section on page 35.
Changing image size affects the number of pixels in each image. The greater the image size, the larger the file size. Choose image size based on the final use of the image - smaller images are more suitable for web sites whereas larger sizes produce higher quality prints.
Compression affects the file size and image detail. Normal compression is sufficient for most uses. Fine makes higher quality image, but file sizes are larger.

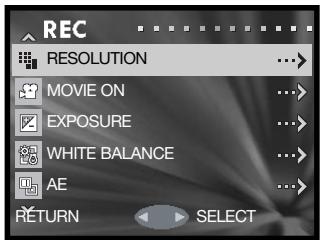
Use the up/down keys of the controller to highlight the resolution option.
Press the right controller key to continue.

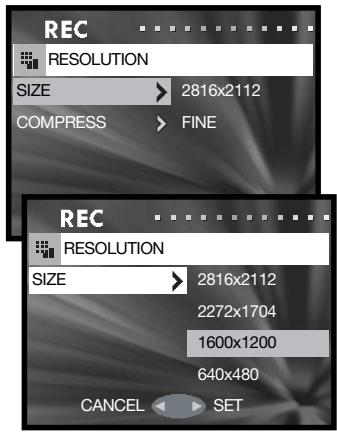
Use the up/down keys to select the size or compression option.

Press the right controller key to display the settings.

Use the up/down keys to select the new setting.
MENUSET
Press the right key or menu button to complete the operation. The left controller key cancels the operation.
The new image size and compression rate is displayed on the live monitor image.
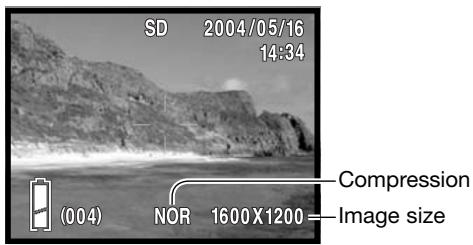
If image resolution is changed, the frame counter displays the approximate number of images that can be recorded at that setting on the installed memory card. The number of images that can be stored on a memory card is determined by the size of the card and the file size of the images, however no more than 999 images can be recorded on one memory card. The actual file size is determined by the scene; some subjects can be compressed further than others.
| Approximate file sizes. | ||||
| Quality | Size | 2816 X 2112 | 2272 X 1704 | 1600 X 1200 |
| Fine | 2500KB | 1600KB | 800KB | |
| Normal | 1500KB | 800KB | 400KB | |
| Approximate number of images that can be stored on a 16MB memory card. | ||||
| Fine | 5 | 8 | 16 | |
| Normal | 8 | 16 | 33 | |
| 133 | ||||
Camera Notes
The frame counter indicates the approximate number of images that can be stored on the memory card at the camera's resolution settings. If the settings are changed, the frame counter adjusts accordingly. Because the counter uses approximate file sizes, the actual image taken may not change the counter or may decrease it by more than one. When the frame counter displays zero, it indicates no more images at the image size and compression settings can be captured. Changing those settings may allow more images to be saved to the card.
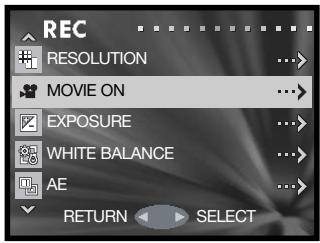
Movie recording
This camera can record up to 30 seconds 320 × 240 of digital video with sound at approximately 180 KB / s . Movie recording is activated with the recording menu, see the navigating the recording menu section on page 35. The digital zoom cannot be used and the monitor cannot be turned off.

Use the up/down keys of the controller to highlight the movie option.

Press the right controller key to continue.
Place the subject in the center of the monitor and press the shutter-release button partway down to lock focus (1). Press the shutter-release button all the way down and release to begin recording.
The camera continues to record until the recording time is used or the shutter-release button is pressed again. The elapsed recording time is displayed on the monitor.
Take care not to cover the microphone while recording. During recording, focus is locked and the optical zoom is disabled. The writing speed of the memory card may prematurely end the recording of a movie clip.
The movie mode is canceled when the camera is turned off, the playback mode is used, or the auto-power-off function activates. This mode can also be canceled by selecting the movie option in the recording menu.
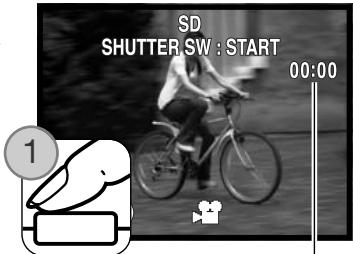
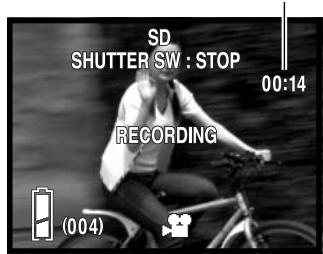
Recording time
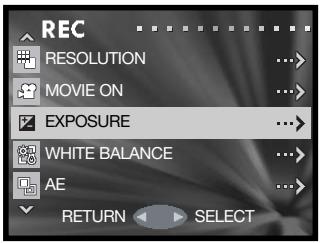
Exposure compensation
The camera exposure can be adjusted to make the final picture lighter or darker by as much as ± 1.5Ev in 0.3 increments. Exposure compensation is set in the recording menu (p. 35). When set to any value other than 0.0, the exposure-compensation value remains in the top left corner of the monitor as a warning.

Use the up/down keys of the controller to highlight the exposure option.

Press the right controller key to continue.

Use the left/right controller keys to adjust the exposure-compensation value. The change in exposure is visible in the monitor image.

Press the menu button to complete the operation.
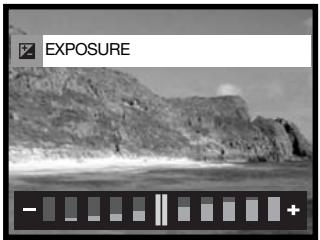
Degree of exposure compensation
Shooting tips
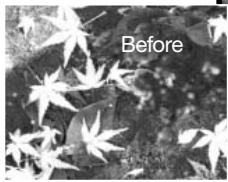
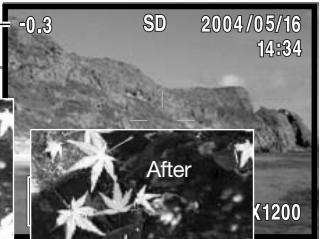
Exposure compensation is used when the camera's exposure meter is deceived by high-key or low-key subjects. In the example, the dark water caused the camera to overexpose the image making it bright and washed-out. By compensating the exposure, detail is brought out in the leaves, and the stones and water appear richer.
White balance
White balance is the camera's ability to make different types of lighting appear neutral. One automatic and four preset white-balance setting are available. White balance is set in the recording menu (p. 35).
The automatic white balance compensates for the color temperature of a scene. Auto white balance is sufficient in most cases.
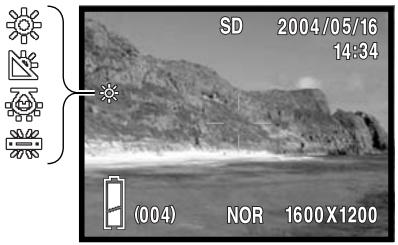
When one of the preset white-balance settings is selected, an indicator is displayed on the monitor; the effect is immediately visible in the live image. To record the ambient light, set the flash mode to flash cancel (p. 28). The built-in flash can be used with preset white-balance, but the white balance is set to the color temperature of the flash.



MENUSED
Use the up/down keys of the controller to highlight the white balance option.
Press the right controller key to continue.
Use the up/down keys to select the new setting.
Press the right key or menu button to complete the operation. The left controller key cancels the operation.
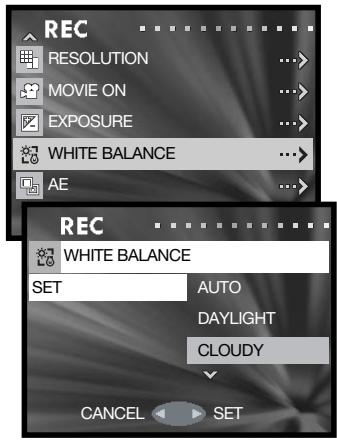
Daylight - for outdoor and sunlit subjects.
Cloudy - for overcast outdoor scenes.
Fluorescent - office ceiling lights.
Tungsten - household incandescent light bulbs.
AE Metering modes
The AE metering mode controls how light is measured. This is set in the recording menu (p. 35).

Use the up/down keys of the controller to highlight the AE option.

Press the right controller key to continue.

Use the up/down keys to select the new setting.
Press the right key or menu button to complete the operation. The left controller key cancels the operation.
MENUSET
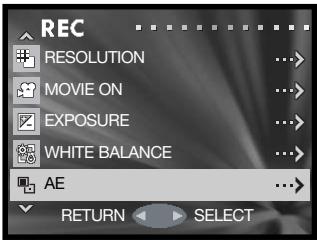
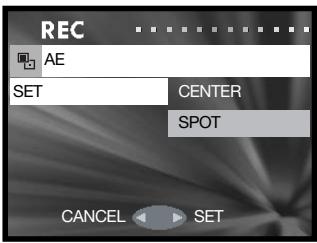
Center-weighted metering: measures luminance over the entire image area with emphasis to the central region. This metering mode gives accurate exposures in almost all situations.
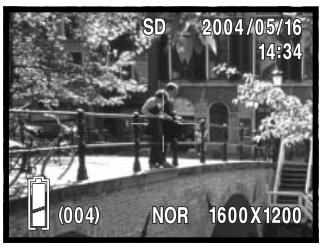
Spot metering: uses the AF area to calculate the exposure. Spot metering allows precise exposure measurements of a particular object without being influenced by extremely bright or dark areas within the scene.
Monochrome
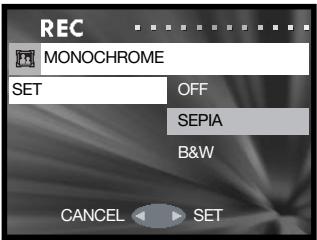
Monochrome creates black and white images. The B&W mode produces neutral monochrome images. Sepia creates warm-tone monochrome images. This mode is set in recording menu (p. 35). The live image on the monitor reflects the selected mode. The monochrome mode has no effect on image file size.

Use the up/down keys of the controller to highlight the monochrome option.
Press the right controller key to continue.

Use the up/down keys to select the new setting.
Press the right key or menu button to complete the operation. The left controller key cancels the operation.

MENUSET
Digital zoom
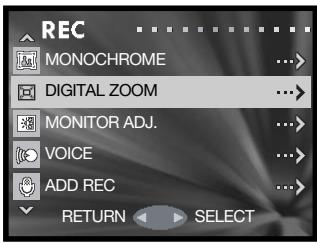
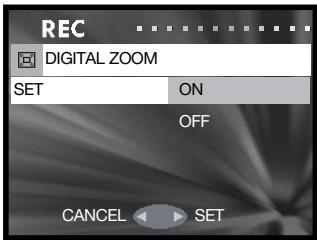
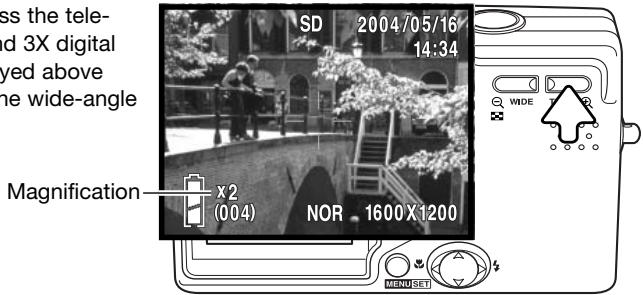
The digital zoom is activated in the recording menu (p. 35). The digital zoom increases the magnification of the greatest telephoto setting of the optical zoom by 2X and 3X. Although the images recorded with the digital zoom are interpolated to the set image size, the quality of the images may not be equal to images taken without the digital zoom; the greater the power of the digital zoom the lower the image quality. The effect of the digital zoom is visible on the LCD monitor only. The digital-zoom function is canceled if the LCD monitor is turned off (p. 27).

Use the up/down keys of the controller to highlight the digital zoom option.

Press the right controller key to continue.

Use the up/down keys to select the new setting.
Press the right key or menu button to complete the operation. The left controller key cancels the operation.
MENUSE1
At the maximum telephoto position, press the telephoto zoom button to engage the 2X and 3X digital zoom. The zoom magnification is displayed above the frame counter. To zoom out, press the wide-angle zoom button.
Adjusting the monitor
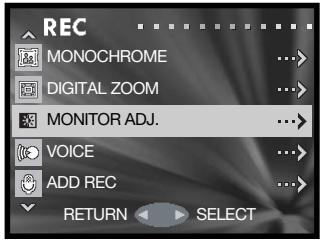
The monitor brightness and color can be adjusted with the recording menu (p. 35) or playback menu (p. 56).

Use the up/down keys of the controller to highlight the monitor adj. option on the recording or playback menu.

Press the right controller key to continue.

Use the up/down keys of the controller to select the brightness (white box), red, green, or blue channel. For more on color, see page 53.

Use the left/right controller keys to adjust the selected channel. The change is visible in the monitor image.

Press the menu button to complete the operation.
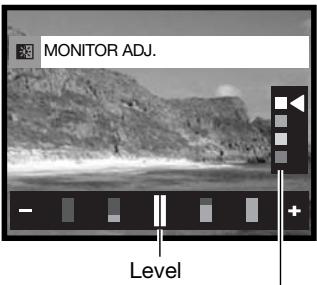
Brightness and color channels
Voice recording
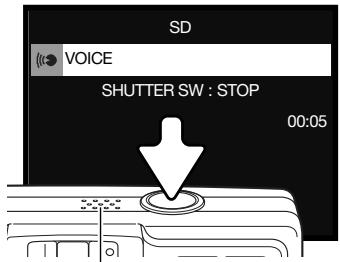
A maximum of 30 seconds of audio can be recorded. Voice recording is activated with the recording menu, see the navigating the recording menu section on page 35.

Use the up/down keys of the controller to highlight the voice option.

Press the right controller key to continue.
Press the shutter-release button to start recording; the recording time is displayed on the monitor. The recording stops when the shutter-release button is pressed again or the recording time has elapsed.
Press the menu button to return to the recording-mode menu. The voice recording mode is canceled when the camera is turned off, the playback mode is used, or the auto-power-off function activates.

Microphone
Recording tips
When making audio recordings, be careful not to touch or cover the microphone. The quality of the recording is proportional to the subject to microphone distance. For best results, hold the camera approximately 20cm (8in) from your mouth.
Add audio recording
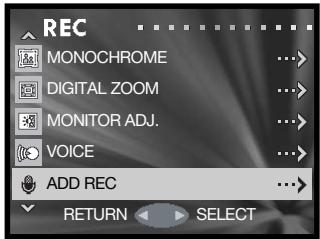
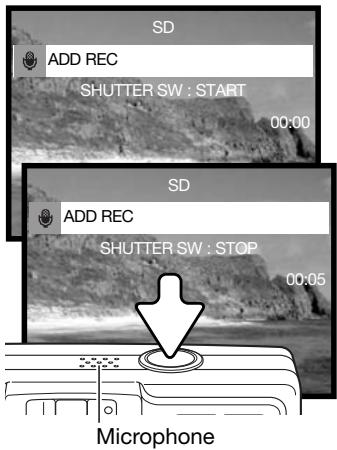
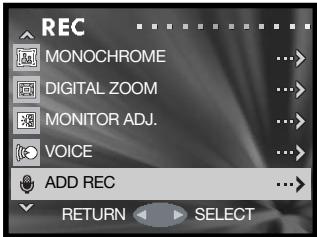
Approximately 30 seconds of audio can be attached to a still image. This function is activated with the recording or playback menu. See the navigating the recording menu or playback menu sections on page 35 or 56.

Use the up/down keys of the controller to highlight the add-rec option on the recording or playback menu.

Press the right controller key to continue.

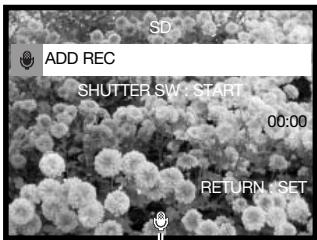
Use the left/right controller keys to display the image to which to add the audio track. If an audio track is already attached or the image is protected, a recording cannot be made. Press the menu button to return to the recording menu.
Press the shutter-release button to start recording; the recording time is displayed on the monitor. The recording will stop when the shutter-release button is pressed again or the recording time has elapsed.
The setup menu allows the add audio recording function to activate automatically each time a still image is recorded. See page 76.
Recording tips
When making audio recordings, be careful not to touch or cover the microphone. The quality of the recording is proportional to the subject to microphone distance. For best results, hold the camera approximately 20cm (8in) from your mouth.
Delete audio recording
An audio track can be deleted from a still image. This function is activated with the recording menu (p. 35) or playback menu (p. 56).

Use the up/down keys of the controller to highlight the add-rec option on the recording or playback menu.

Press the right controller key to continue.

Use the left/right controller keys to display the image from which to delete the audio track. The audio indicator is displayed with images with audio tracks. Press the menu button to return to the recording menu.
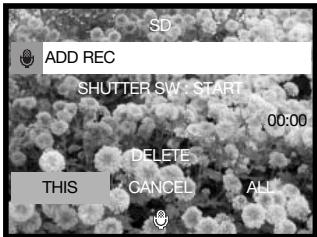
To delete the audio track, press the delete button. A confirmation screen appears.
Use the left/right keys to highlight the appropriate option. "THIS" deletes the audio track from the displayed image and "ALL" deletes all audio tracks attached to all still images in the memory location at the top of the display. "CANCEL" ends the delete operation.

Press the menu button to complete the operation.
Audio indicator
Slow shutter limit
The minimum shutter speed used for automatic exposures can be specified. This function is located on the recording menu, see the navigating the recording menu section on page 35.

Use the up/down keys of the controller to highlight the slow-shutter option.

Press the right controller key to continue.

Use the left/right keys to turn the slow shutter limit on or off. The limit prevents the shutter speed from falling below the specified point.
When off, the minimum shutter speed with autofocus and fill flash is 1/60 second. With flash cancel or night portrait, it is 1/8 second. When on, the limit can be set with the menu.

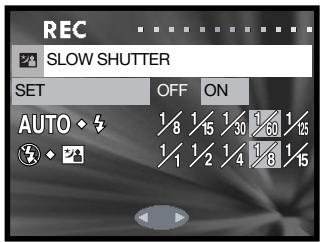

Use the up/down keys to highlight the autofocus/fill flash or flash cancel/night portrait options.

Use the left/right keys to select the slow shutter limit.
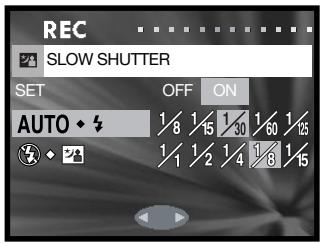

Press the menu button to complete the operation.
Manual exposure
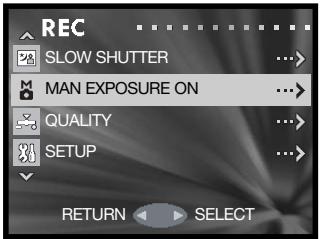
Exposures for still images can be specified by the photographer. The shutter speed range is 15 seconds to 1/1000 second. This function is located on the recording menu, see the navigating the recording menu section on page 35.

Use the up/down keys of the controller to highlight the man-exposure option.

Press the right controller key to continue.

Use the left/right keys to change the shutter speed (1).

Use the down key to change the aperture (2). The apertures available depend on the position of the zoom lens: f/2.8 and f/4.7 (wide angle), f/4.9 and f/ 8.3 (telephoto).
By pressing the shutter-release button partway down, the difference between the set exposure and metered exposure is displayed in Ev (3). If the display turns red, the difference is greater than ± 2.0 Ev. See page 54 for more on Ev.
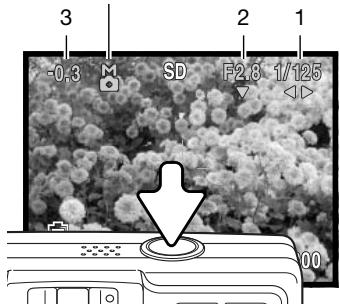
Manual exposure indicator

Press the up key to switch the functions changed with the controller between manual exposure and the flash/focus modes.
When using the auto ISO setting (p. 51), camera sensitivity is set to ISO 50. Autoflash and Night Portrait cannot be used. The use of a tripod is recommended for long exposures. Noise reduction is used automatically with exposures of 1/2 second or longer. To cancel manual exposure, select the man-exposure option in the menu.
Quality
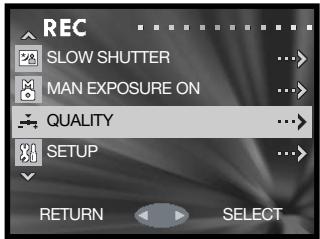
The quality option allows the camera sensitivity and flash compensation to be selected, and the saturation, contrast, sharpness, and color of images to be adjusted. The color settings also affect movies. This option is located on the recording menu, see page 35.

Use the up/down keys of the controller to highlight the quality option.

Press the right controller key to continue.

With the set option highlighted, use the left/right keys to select among off and the two memory registers. The registers allow two groups of settings to be stored.
When off, the ISO speed is set to auto and the other options reset to 0. No changes can be made.

Use the up/down keys to highlight the quality option: ISO speed, flash compensation, saturation, contrast, sharpness, or one of the three color channels.

Use the left/right keys to changed the setting.

Press the menu button to complete the operation. Any changes made are applied to the live image.
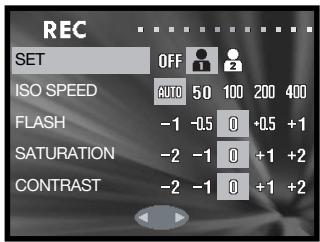

Camera sensitivity - ISO speed
Five camera sensitivity settings can be selected with a still image. The auto setting automatically adjusts the camera sensitivity to the light conditions between ISO 50 and ISO 200. The camera sensitivity can also be specified among ISO 50, 100, 200, and 400. The numerical values are based on an ISO equivalent. As the ISO value doubles, the camera sensitivity doubles. Noise increases with the sensitivity in digital imaging; the ISO setting of 50 has the least noise and 400 has the most.
The flash range changes with camera sensitivity. Because of the optical system, the flash range is not the same at the lens' wide-angle position as it is at the telephoto position.
| ISO speed | Flash range (wide angle) | Flash range (telephoto) |
| AUTO | 0.5m ~ 3.0m (1.6ft ~ 9.8ft) | 0.8m ~ 1.7m (2.6ft ~ 5.6ft) |
| 50 | 0.5m ~ 1.5m (1.6ft ~ 4.9ft) | 0.8m ~ 0.86m (2.6ft ~ 2.8ft) |
| 100 | 0.5m ~ 2.1m (1.6ft ~ 6.9ft) | 0.8m ~ 1.2m (2.6ft ~ 3.9ft) |
| 200 | 0.5m ~ 3.0m (1.6ft ~ 9.8ft) | 0.8m ~ 1.7m (2.6ft ~ 5.6ft) |
| 400 | 0.5m ~ 4.3m (1.6ft ~ 14.1ft) | 0.8m ~ 2.4m (2.6ft ~ 7.9ft) |
Flash compensation
Flash compensation increases or decreases the flash exposure of the built-in flash in reference to the ambient exposure by as much as ± 1 Ev. See page 54 for more on Ev.
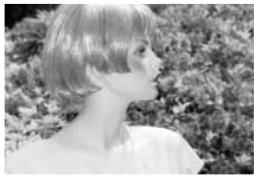
Positive compensation
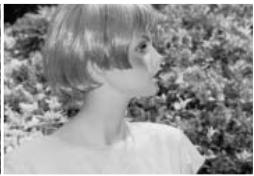
No compensation
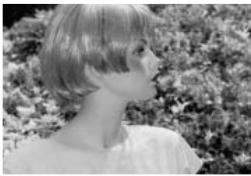
Negative compensation No flash
No flash
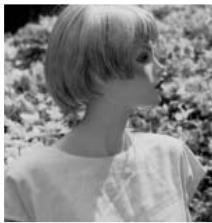
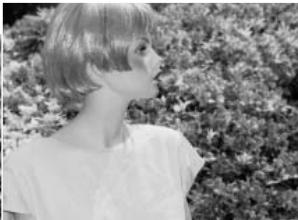
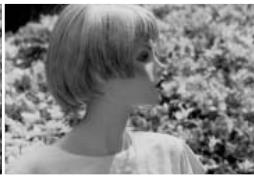
When using fill-flash to reduce harsh shadows caused by direct sunlight, flash compensation changes the ratio between the highlights and shadows. By decreasing the flash output with a negative Ev setting, the shadows receive less light and are deeper. Using a positive Ev setting will soften or eliminate shadows.
Saturation
Saturation controls how vivid the colors of an image are. Saturation can be set in five levels with the quality option in the recording menu (p. 50).
Contrast
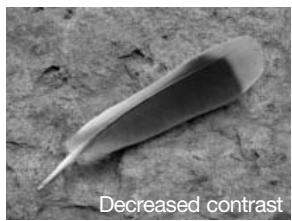
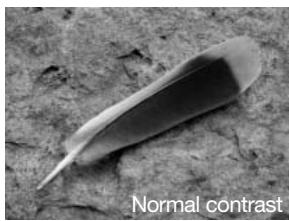
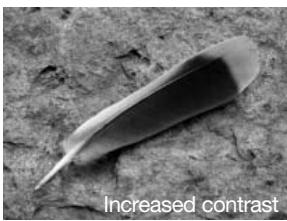
Contrast controls the tonal ratio of an image. Contrast can be set in five levels with the quality option in the recording menu (p. 50).
Sharpness
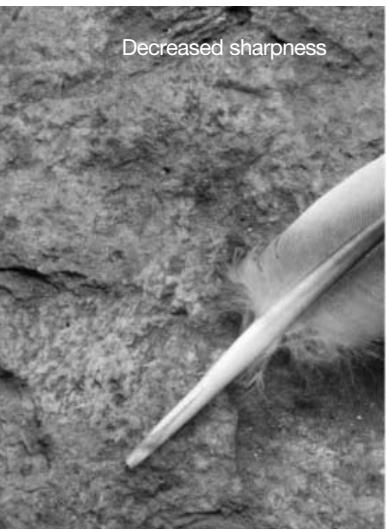
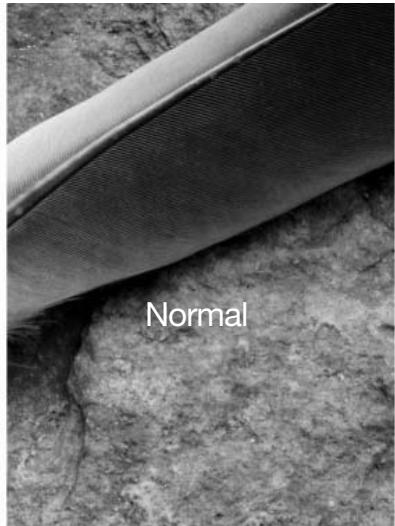
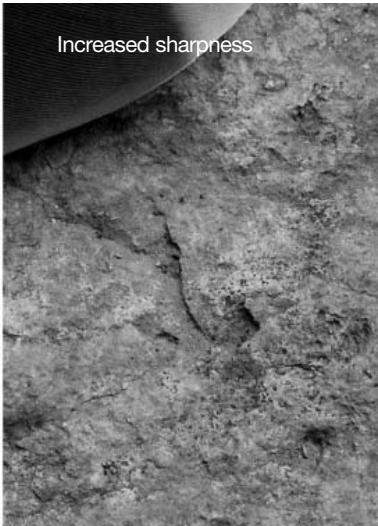
Sharpness accents or softens details in an image in five levels with the quality option in the recording menu (p. 50). Any changes made are applied to the live image, but may be difficult to see. However, when viewed with a computer, the changes are evident.
Color
The red, green, and blue color channels can be adjusted in five levels with the quality option in the recording menu (p. 50). Any changes made are applied to the live image.
An introduction to color
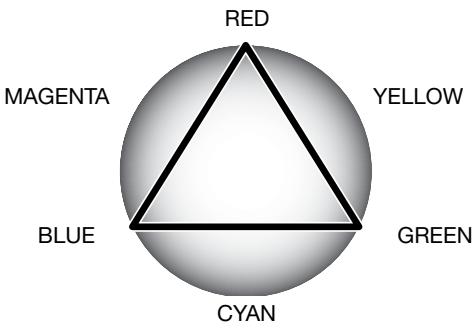
In photography, red, green, and blue are the primary colors. The secondary colors, cyan, magenta, and yellow, are made from combining the primary colors: cyan = blue + green, magenta = blue + red, and yellow = red + green. The primary and secondary colors are grouped in complementary pairs: red and cyan, green and magenta, and blue and yellow.
Knowing the complementary colors is very important in color balancing. If the image has a specific color cast, either subtracting the color or adding its complementary color will create a natural looking image.
Adding or subtracting equal parts of red, green, and blue have no affect on the color balance. However, changing two colors equally has the same affect as the opposite change with one color; +2 green and +2 red is the same as -2 blue. The greatest change in a specific color comes by setting the color channels to their opposite extremes. To make an image as blue as possible, set the color channels to +2 blue, -2 red, and -2 green.
| Increase | Image is too: | Decrease |
| Blue + Green | Red | Red |
| Blue + Red | Green | Green |
| Red + Green | Blue | Blue |
| Red | Cyan | Blue + Green |
| Green | Magenta | Blue + Red |
| Blue | Yellow | Red + Green |
A short guide to photography
Photography can be a rewarding pursuit. It is a broad and disciplined field that can take years to master. But the pleasure in making photographs and the joy of capturing a magical moment cannot be compared. The guide is an introduction to some basic photographic principles.
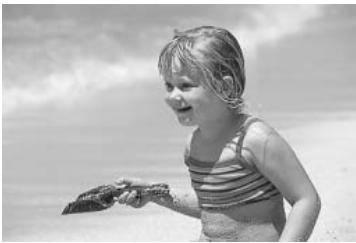
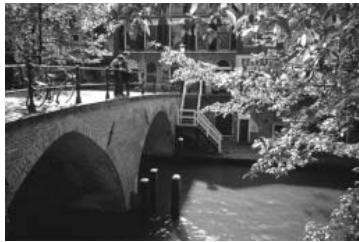
The zoom lens not only affects how large the subject is in the picture, but it also influences the depth of field and perspective. Depth of field is the area between the closest object in focus and the furthest object in focus. As the lens zooms in to the telephoto position, the depth of field becomes shallower, separating the subject from the background. Many portraits are taken with telephoto lenses. Zooming the lens out to the wide-angle position makes both the foreground and background appear sharper. Usually landscape photographs take advantage of the large depth of field of wide-angle lenses.
Wide-angle lenses also create a strong perspective which gives a sense of depth in the image. Telephoto lenses compress the space between the subject and background and create a weak perspective.
What is an Ev?
Ev stands for exposure value. A change of one Ev adjusts the exposure by a factor of two.
| +2.0 Ev | 4X as much light |
| +1.0 Ev | 2X as much light |
| Calculated exposure | |
| -1.0 Ev | 1/2 as much light |
| -2.0 Ev | 1/4 as much light |
Playback - Advanced operation
The basic functions in this mode are described in the basic playback section on pages 32 through 34. This section covers how to playback movie clips and audio tracks as well as the advanced function on the playback menu.
Playing back movies and audio
Movie clips (p. 38) and audio tracks (p. 45, 46) can be played back in the playback mode. The type of file is specified with an indicator in the bottom right corner of the monitor and the playback time in the top right corner.

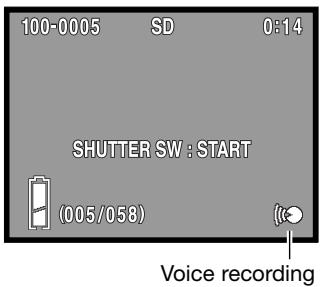
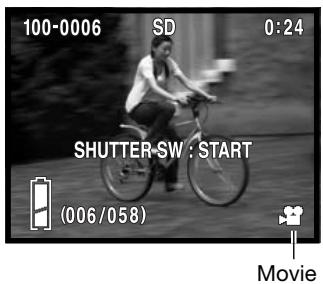
Press the shutter-release button to start the playback of the displayed file.
Playback time is displayed in the top right corner of the image. To cancel the playback, press the shutter-release button.
Navigating the Playback menu
Navigating the menu is simple. The menu button turns the menu on. The controller moves the cursor and changes settings on the menu. Pressing the menu button selects menu options and sets adjustments.

To activate the playback menu, press the menu button.

Use the up/down keys of the controller to scroll through the menu options. Highlight the option whose setting needs to be changed.

With the menu option to be changed highlighted, press the right key to continue; refer to the appropriate section on the how to set the function. Pressing the menu button also opens the next screen.
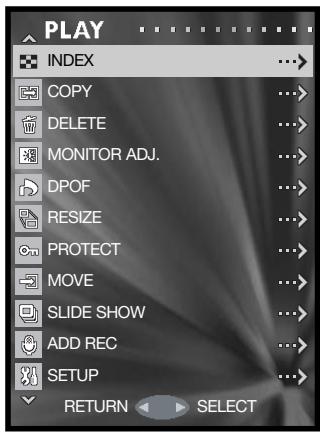
p. 57
p. 58
p. 60
p. 61
p. 62
p. 68
p. 64
p. 66
p. 69
p. 69
p. 70
To close the menu, press the left controller key or the shutter-release button.
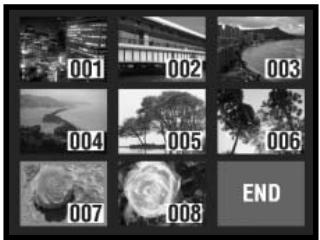
Frame-selection screen
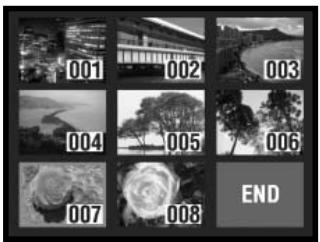
When choosing multiple files is required, the frame selection screen appears.
The following indicators may be displayed:

Movie file
Audio track attached
Voice recording


Use the controller to move the red border around the file to be selected.
Press the menu button to select the file; a yellow border indicates selected files. If the frame is marked with a yellow border, pressing the menu button again clears the border deselecting the image.
Repeat until all required files are selected.


Use the controller to highlight the "END" frame.
Press the menu button to complete the operation or the shutter-release button to cancel it. A confirmation screen opens.
Index
the index playback display can be opened from the playback menu. See page 34 for more on index playback.

Use the up/down keys of the controller to highlight the index option.

Press the right controller key to open the index playback display.

Copy
Files can be copied between memory cards. Two memory cards must be in the camera to select this playback menu option. Before using the copy routine, confirm that the destination card has sufficient free memory.

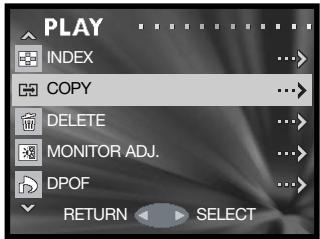
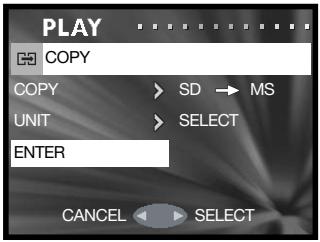
Use the up/down keys of the controller to highlight the copy option.

Press the right controller key to continue.

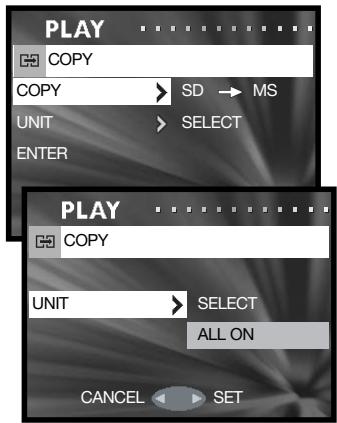
Use the up/down keys to highlight the copy or unit option.

Press the right controller key to display the settings.

Use the up/down keys to highlight the new setting.
Press the right key or menu button to complete the selection.
MENUSET
The copy option specifies the source and destination cards; SD for a SD Memory card or MultiMediaCard, and MS for a Memory Stick. The unit option specifies whether some (SELECT) or all (ALL ON) files are copied.

Use the up/down keys to highlight the enter option.
Press the right key or menu button to complete the operation. The left controller key cancels the copy routine.
If the select unit option was selected, the frame selection screen opens. Select the image(s) to be copied by placing the red frame on the index thumbnail and pressing the menu button; a yellow frame indicates selection. Highlight the "END" frame and press the menu button to continue. See page 57 for more on the frame-selection screen.
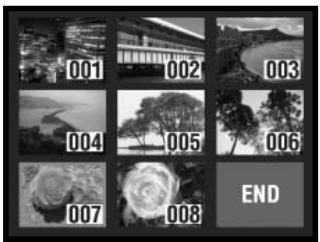

Use the left/right keys to highlight "Yes." "No" cancels the operation.

Press the menu button to complete the operation.
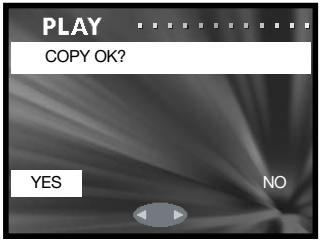
If the destination card runs out of memory when files are being copied, the memory-full message is displayed. Confirm which files were copied and repeat the operation with a new destination card.
Delete

Deleting permanently erases the file. Once deleted, a file cannot be recovered. Care should be taken when deleting images.
Single, multiple, or all files on a specific memory card can be deleted with the playback menu (p. 56). The delete function can only erase unprotected files.

Use the up/down keys of the controller to highlight the delete option.
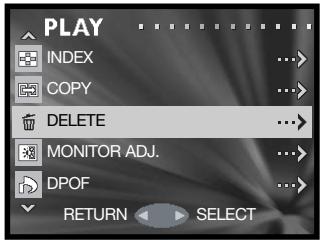

Press the right controller key to continue.

Use the up/down keys to highlight the media or unit option.
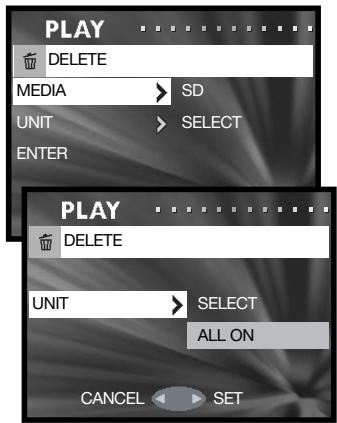

Press the right controller key to display the settings.

Use the up/down keys to highlight the new setting.
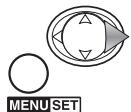
Press the right key or menu button to complete the selection.
The media option specifies the card from which the files are deleted; SD for a SD Memory card or MultiMediaCard, and MS for a Memory Stick. The unit option specifies whether some (SELECT) or all (ALL ON) files are deleted.

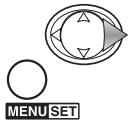
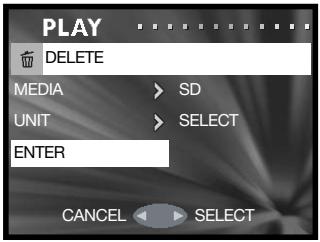
Use the up/down keys to highlight the enter option.
Press the right key or menu button to complete the operation. The left controller key cancels the delete routine.
If the select unit option was selected, the frame selection screen opens. Select the image(s) to be deleted by placing the red frame on the index thumbnail and pressing the menu button; a yellow frame indicates selection. Highlight the "END" frame and press the menu button to continue. See page 57 for more on the frame-selection screen.

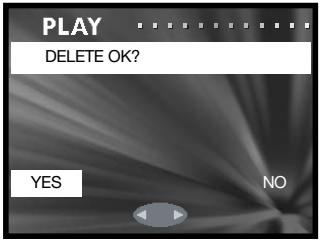
Use the left/right keys to highlight "Yes." "No" cancels the operation.

Press the menu button to complete the operation.
Adjusting the monitor
The monitor brightness and color can be adjusted with the recording menu (p. 35) or playback menu (p. 56). See page 44 on how to adjust the monitor.
DPOF
The DPOF (Digital Print Order Format) allows direct printing of still images from digital cameras. After creating the DPOF file, take the memory card to a photofinishing service or insert it into the memory-card slot of a DPOF compatible printer.

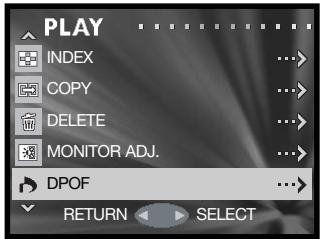
Use the up/down keys of the controller to highlight the DPOF option.

Press the right controller key to continue.

Use the up/down keys to highlight the media, unit, or date option.

Press the right controller key to display the settings.

Use the up/down keys to highlight the new setting.
Press the right key or menu button to complete the selection.
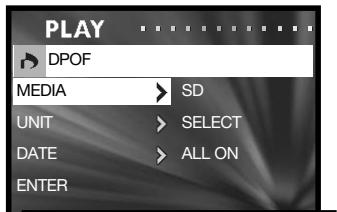
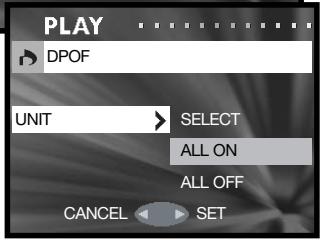
MENUSET
The media option specifies the card from which the files are printed; SD for a SD Memory card or MultiMediaCard, and MS for a Memory Stick. The unit option specifies whether some (SELECT) or all (ALL ON) files are printed, or the DPOF file is canceled (ALL OFF). The date option specifies whether the date and time of recording is printed with each image (ALL ON) or not (ALL OFF).

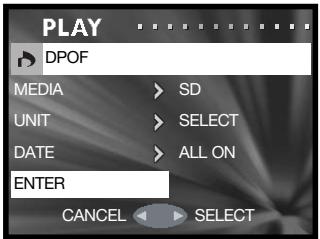
Use the up/down keys to highlight the enter option.
Press the right key or menu button to complete the operation. The left controller key cancels the DPOF routine.
If the select unit option was selected, the frame selection screen opens. Select the image(s) to be printed by placing the red frame on the index thumbnail and pressing the menu button; a yellow frame indicates selection. Use the zoom buttons to select the numbers of copies; the number of copies is displayed in the top left corner of each index frame. Reduce the number of copies to zero to deselect the image.
Highlight the "END" frame and press the menu button to continue. See page 57 for more on the frame-selection screen.

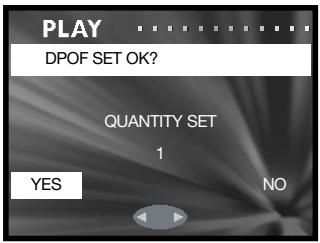
If the number of copies have not been specified on the frame-selection screen, use the up/down keys to select the number of copies of each print.

Use the left/right keys to highlight "Yes." "No" cancels the operation.

Press the menu button to complete the operation.
When using the date option, how and where the date is printed varies with the printer. Not all printers can print the date and time
Protect
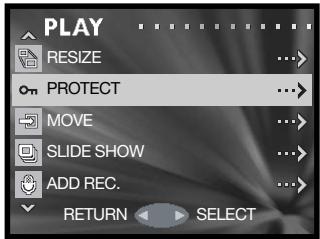
Important files can be protected. A protected file cannot be erased by any of the camera's delete functions. However, the formatting function (p. 71) will erase all files on a memory card whether protected or not.

Use the up/down keys of the controller to highlight the protect option.

Press the right controller key to continue.

Use the up/down keys to highlight the media or unit option.

Press the right controller key to display the settings.

Use the up/down keys to highlight the new setting.
Press the right key or menu button to complete the selection.
MENUSET
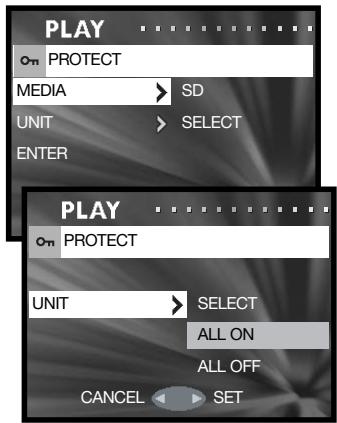
The media option specifies the card on which the files are protected; SD for a SD Memory card or MultiMediaCard, and MS for a Memory Stick. The unit option specifies whether some (SELECT) or all (ALL ON) files are protected; The ALL OFF option cancels the protection on all files.



MENUSET
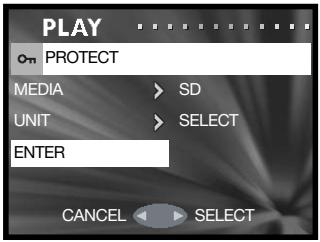
Use the up/down keys to highlight the enter option.
Press the right key or menu button to complete the operation. The left controller key cancels the protect routine.
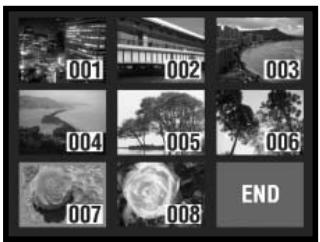
If the select unit option was selected, the frame selection screen opens. Select the image(s) to be protected by placing the red frame on the index thumbnail and pressing the menu button; a yellow frame indicates selection. The image can be unprotected by repeating the operation to remove the yellow border. Highlight the "END" frame and press the menu button to continue. See page 57 for more on the frame-selection screen.


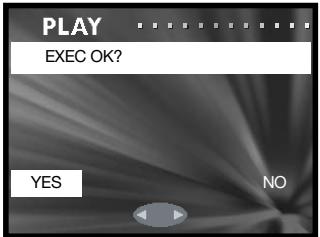
Use the left/right keys to highlight "Yes." "No" cancels the operation.
Press the menu button to complete the operation.
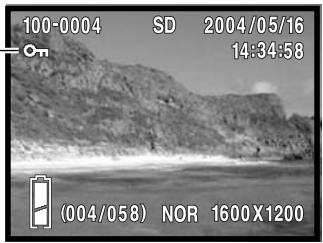
Protected files are displayed with the protect indicator
Move
Unprotected files can be moved from one memory card in the camera to another.

Use the up/down keys of the controller to highlight the move option.
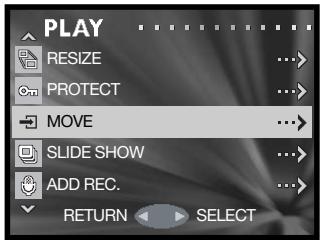

Press the right controller key to continue.

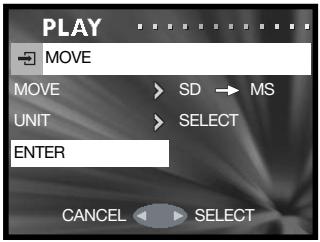
Use the up/down keys to highlight the move or unit option.
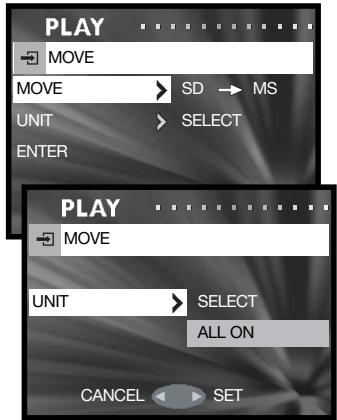

Press the right controller key to display the settings.

Use the up/down keys to highlight the new setting.
Press the right key or menu button to complete the operation.
The move option specifies the source and destination cards; SD for a SD Memory card or MultiMediaCard, and MS for a Memory Stick. The unit option specifies whether some (SELECT) or all (ALL ON) files are moved.

Use the up/down keys to highlight the enter option.
Press the right key or menu button to complete the operation. The left controller key cancels the move routine.
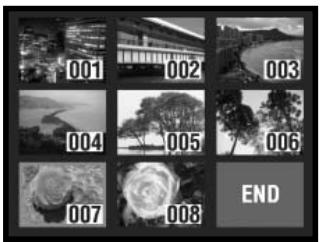
If the select unit option was selected, the frame selection screen opens. Select the image(s) to be moved by placing the red frame on the index thumbnail and pressing the menu button; a yellow frame indicates selection. Highlight the "END" frame and press the menu button to continue. See page 57 for more on the frame-selection screen.

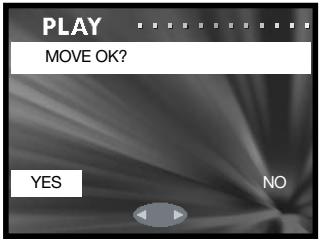
Use the left/right keys to highlight "Yes." "No" cancels the operation.

Press the menu button to complete the operation.
If the destination card runs out of memory when files are being moved, the memory-full message is displayed. Confirm which files were moved and repeat the operation with a new destination card.
The file numbers of the moved files are changed.
Resize
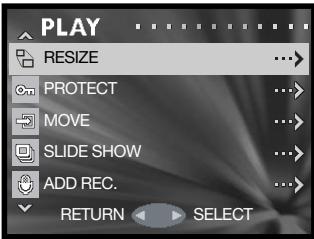
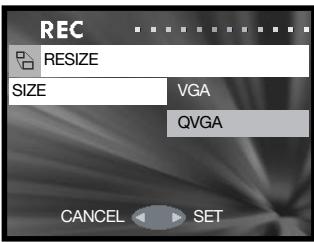
A still image can be resized to a VGA (640 X 480) or QVGA (320 X 240) JPEG copy so that it may be easily transmitted by e-mail. The compression rate for resized images is not displayed when played back. The resize function is on the playback menu (p. 56).

Use the up/down keys of the controller to highlight the resize option.

Press the right controller key to continue.

Use the up/down keys to highlight the size setting.
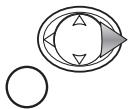
Press the right key or menu button to continue. The left controller key cancels the operation.
MENUSET

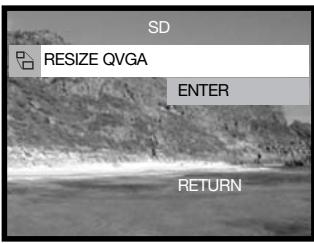
Use the left/right controller keys to select the image to be resized. A resized image cannot be resized again.

Use the up/down keys to highlight the enter option; return cancels the operation.

Press the menu button to complete the operation. The resized image is saved to the same card.
Slide show
Each file on the memory cards are displayed automatically in order for approximately two seconds.

Use the up/down keys of the controller to highlight the slide-show option.

Press the right controller key to begin the slide-show playback.
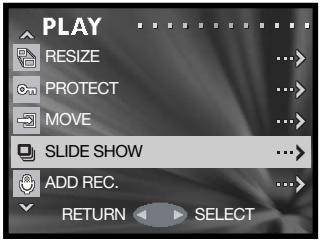

Press the menu button to cancel the slide show.
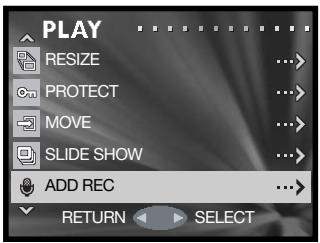
Add audio recording
Approximately 30 seconds of audio can be attached to a still image. This function is activated with the recording or playback menu. See page 46 for instructions on how to use this function.
Setup menu
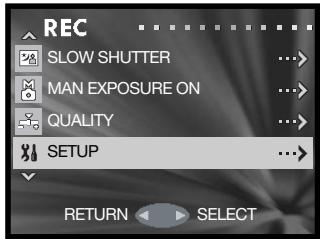
Navigating the setup menu
The setup menu can be opened from either the recording menu or playback menu.

Use the up/down keys of the controller to highlight the setup option.

Press the right controller key to open the menu.
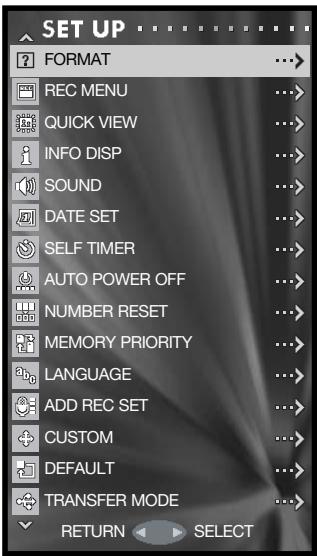
Navigating the menu is simple. The controller moves the cursor and changes settings on the menu. Pressing the menu button selects menu options and sets adjustments.

Use the up/down keys of the controller to scroll through the menu options. Highlight the option whose setting needs to be changed.

With the menu option to be changed highlighted, press the right key to continue; refer to the appropriate section on the how to set the function. Pressing the menu button also opens the next screen.
To return to the recording or playback menu, press the left controller key. To cancel the all menus, press the shutter-release button.
Format

When a memory card is formatted, all data on the card is erased.
The formatting function is used to erase all data on a memory card. Before formatting a memory card, copy the data to a computer or storage device. Protecting images do not prevent them from being deleted when the card is formatted. Always format the memory card using the camera; never use a computer to format a card.
Select the format option from the setup menu (p. 70).

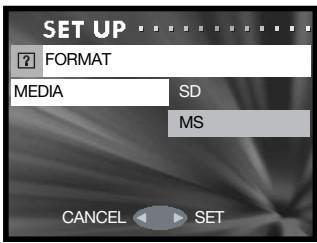
Use the up/down keys to highlight the memory card to be formatted; SD for a SD Memory card or MultiMediaCard, and MS for a Memory Stick.
Press the right key or menu button to begin formatting the selected card. The left controller key cancels the operation.
Use the left/right keys to highlight "Yes." "No" cancels the operation.

Press the menu button to complete the operation.
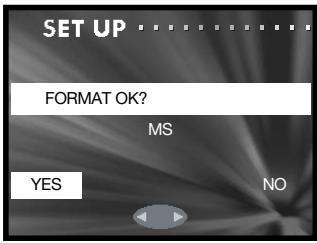
A status bar is displayed and the red viewfinder lamp glows while the card is being formatted. Never remove the card or battery during this period.
Recording menu setup
A basic or detailed recording menu can be selected. Page 35 shows the detailed menu options.
Select the rec menu option from the setup menu (p. 70).



MENUSED
Use the up/down keys to highlight the menu type.
Press the right key or menu button to complete the operation. The left controller key cancels the operation.
The resolution option on the basic recording menu does not allow the compression rate to be changed; normal compression is used for all images. Settings made with other options on the detailed menu are canceled when the basic menu is selected.
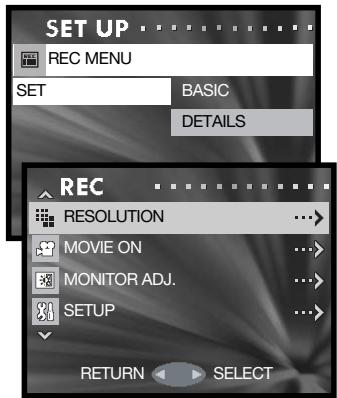
Basic recording menu
Date setup
The camera's clock and calendar can be set. Select the date set option from the setup menu (p. 70).
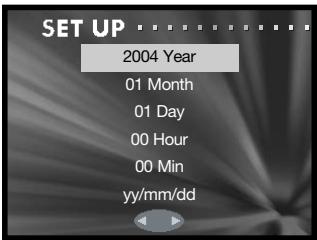



MENUSET
Use the up/down keys to highlight the option to be changed. Use the left/right keys to change the option. The last option sets the date format among year/month/day, day/month/year, and month/day/year.
Press the menu button to complete the operation. Pressing the shutter-release button cancels it.
Quick view
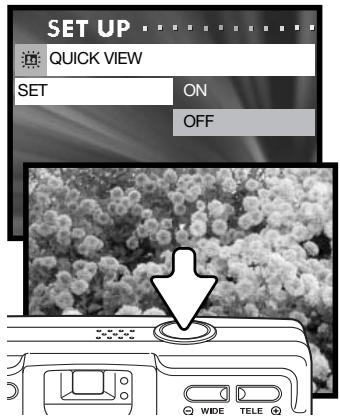
Quick View plays back a still image for approximately three seconds after it has been recorded.
Select the Quick View option from the setup menu (p. 70).


MENUSE1
Use the up/down keys to highlight on or off.
Press the right key or menu button to complete the operation. The left controller key cancels the operation.
Quick View can be canceled before the end of the playback period by pressing the shutter-release button partway down. When using continuous advance (p. 24), Quick View activates after each frame is captured. If the monitor is off, it will activate for the Quick View period.
Self-timer delay
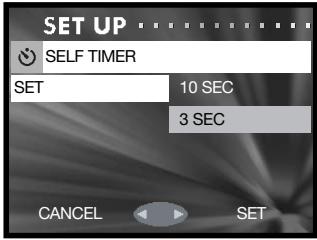
The self-timer delay can be selected between 10 seconds and 3 seconds. The 3-second self-timer mode is not canceled after the exposure. See page 30.
Select the self timer option from the setup menu (p. 70).

MENUSET
Use the up/down keys to highlight the self-timer delay.
Press the right key or menu button to complete the operation. The left controller key cancels the operation.
Sound
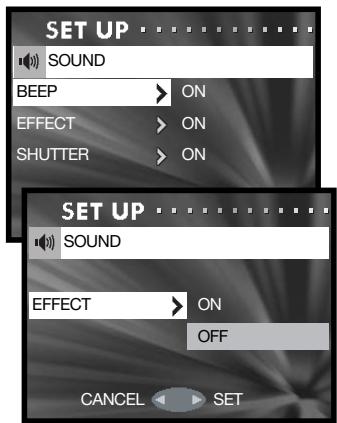
The sounds used in camera operation can be turned on and off. The beep is for the self-timer countdown and warnings. The effect is for the focus signal and when the camera is turn on. The shutter sound is used when a picture is taken.
Select the sound option from the setup menu (p. 70).

Use the up/down keys to highlight the beep, effect, or shutter option.

Press the right controller key to display the settings.

Use the up/down keys to highlight off or on.
Press the right key or menu button to complete the operation.
MENUSET
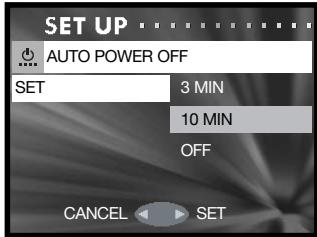
Auto power off
The length of the auto-power-off period can be changed between 3 and 10 minutes or the function can be disabled. For more on auto power off, see page 16. Select the auto-power-off option from the setup menu (p. 70).

Use the up/down keys to highlight the appropriate setting.
Press the right key or menu button to complete the operation. The left controller key cancels the operation.
MENUSET
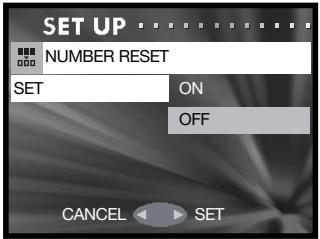
File-number reset
If file-number reset is active and the memory card is changed or all files are deleted, the first file saved is assigned a 0001 file number. If file number reset is off, the first image saved has a number one greater than the last file saved regardless of the number of files on the card. If a new card contains an image with a greater file number, the file number of the saved image will be one greater than the greatest on the card.
Select the number-reset option from the setup menu (p. 70).
Use the up/down keys to highlight on or off.
Press the right key or menu button to complete the operation. The left controller key cancels the operation.
Memory priority
When two memory cards are used in the camera, memory priority specifies to which card recorded images and audio are saved. When the card is full, the second card is then used. When a single card is used, memory priority is set to that card automatically.
Select the memory-priority option from the setup menu (p. 70).
Use the up/down keys to highlight the preferred memory card; SD for a SD Memory card or MultiMediaCard, and MS for a Memory Stick.
Press the right key or menu button to complete the operation. The left controller key cancels the operation.
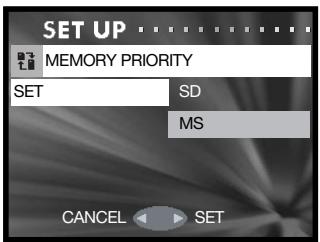
Language
The language used in the menus can be changed. Select the language option from the setup menu (p. 70).

Use the up/down keys to select the language.
Press the right key or menu button to continue. The left controller key cancels the operation.
MENUSED

Use the left/right keys to highlight "Yes." "No" will cancel the operation.

Press the menu button to complete the operation.
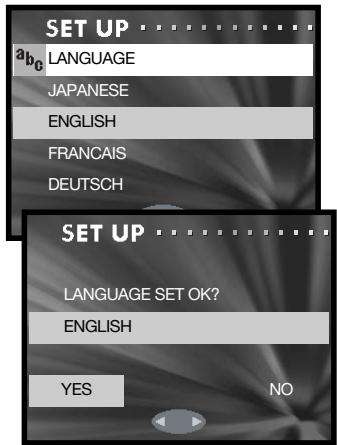
Add audio recording setup
This option specifies if the add audio recording function must be selected from the menu (IF SELECTED) or the function activates automatically each time a still image is recorded (ALWAYS). See page 46 for more information on adding an audio recording.
Select the add rec set option from the setup menu (p. 70).

Use the up/down keys to highlight the appropriate setting.
Press the right key or menu button to complete the operation. The left controller key cancels the operation.
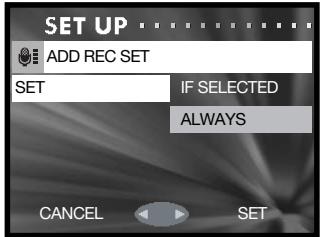
MENUSET
Custom setup
The custom-setup option allows the camera functions to be customized. See the following page for information on custom functions.
Select the custom option from the setup menu (p. 70).


MENUSE1
Use the up/down keys to highlight an option.
Press the right key or menu button to continue. Press the left controller key to return to the setup menu.
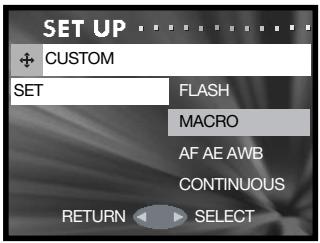
Using the flash, macro, and AF AE AWB setup screens.

MENUSET
Use the up/down keys to highlight the setting.
Press the right key or menu button to turn it on or off. Press the left controller key to return to the previous screen.
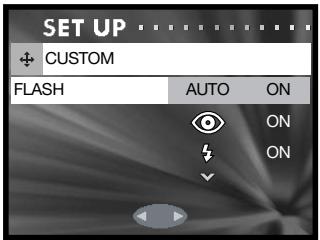
Using the continuous-advance focus-lock setup screen.

MENUSET
Use the up/down keys to highlight on or off.
Press the right key or menu button to complete the operation. The left controller key cancels the operation.
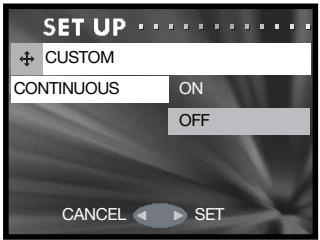
Custom setup notes
To set the custom-setup option, see the previous page.
Flash modes
This custom-setup option edits the flash modes available in the recording mode. One flash mode must be left active. For more on flash modes, see page 28.
Macro - focus and self-timer modes
This custom-setup option edits the focus and self-timer modes available in the recording mode. One mode must be left active.
Three fixed focus modes can be added: 4m (13ft), 2m (6.6ft), and 1m (3.3ft). When selected in the recording mode, the camera focus is locked at the specified distance. For information on the focus and self-timer modes, see page 30.
AF AE AWB
This custom-setup option allows different functions to be assigned to the controller in the recording mode.

Exposure compensation

In the recording mode, press the up controller key to activate exposure compensation.

Use the left/right keys to adjust the exposure-compensation value. The change in exposure is visible in the monitor image.

Press the up key to complete the operation; the controller can be used to change other functions. If set to any other value than 0.0, the degree of compensation is displayed on the monitor. For more on exposure compensation, see page 39.
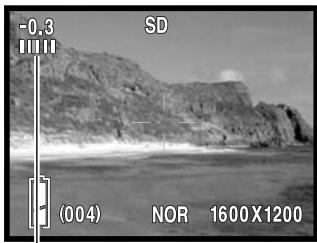
Degree of exposure compensation

In the recording mode, press the down controller key to change the white balance. For more on white balance, see page 40.
AF

AF (autofocus) lock
In the recording mode, press the shutter-release button partway down to focus the camera (1). While continuing to hold the shutter-release button, press the left controller key (2) to lock the focus; the AF lock indicator is displayed at the top of the monitor. The focus remains locked even after the exposure. Repeat the procedure to cancel the AF lock. AF lock is also canceled when the camera is turned off or the menu or zoom button is pressed.
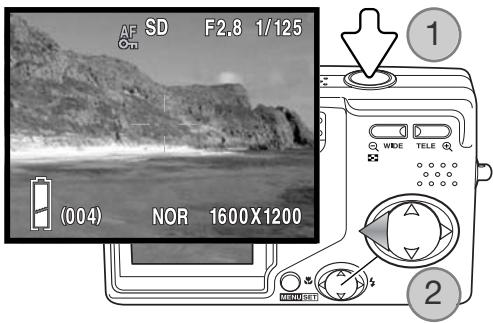
AE On

AE (autoexposure) lock
In the recording mode, press the shutter-release button partway down until the shutter speed and aperture are displayed (1). While continuing to hold the shutter-release button, press the up controller key (2) to lock the exposure; the AE lock indicator is displayed at the top of the monitor. The exposure remains locked even after the picture is taken. Repeat the procedure to cancel the AE lock. AE lock is also canceled when the camera is turned off or the menu or zoom button is pressed.
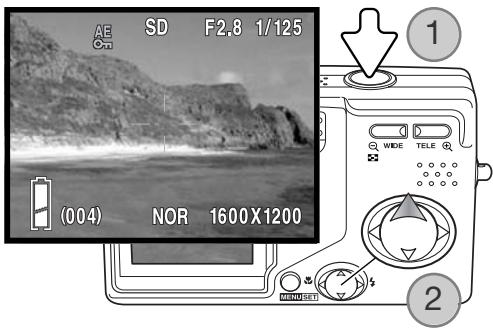
Continuous-advance focus lock
A series of images can be captured by holding down the shutter-release button. This option specifies whether the camera focuses between each frame of the series (OFF), or fixes the focus with the first frame (ON).
Reset default
This function resets the camera to its default settings. Select the default option from the setup menu (p. 70).

Use the left/right keys to select "Yes." "No" cancels the operation

Press the menu button to complete the operation. The following are reset:
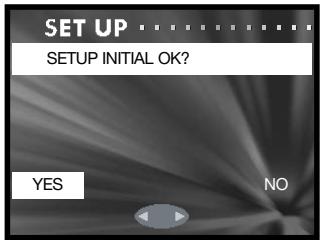
| Recording / Playback mode | ||
| Flash mode | Autoflash | p. 28 |
| Focus mode / Self-timer | Canceled | p. 30 |
| Display mode | Standard display | p. 27 |
| Image size | 2816 X 2112 | p. 36 |
| Compression rate | Normal | p. 36 |
| Movie recording | Canceled | p. 38 |
| Exposure compensation | 0.0 | p. 39 |
| White balance | Auto | p. 40 |
| AE metering mode | Center-weighted metering | p. 41 |
| Monochrome | Off | p. 42 |
| Digital zoom | Off | p. 43 |
| Monitor adjustment | Brightness and color reset | p. 44 |
| Slow shutter limit | Off | p. 48 |
| Slow shutter limit default | Autoflash / Fill flash: 1/60 Flash cancel/Night Portrait: 1/8 | p. 48 |
| Manual exposure | Off | p. 49 |
| Quality | Off | p. 51 |
| Camera sensitivity (ISO) | Auto | p. 51 |
| Flash compensation | 0.0 | p. 51 |
| Saturation | 0 | p. 52 |
| Contrast | 0 | p. 52 |
| Sharpness | 0 | p. 52 |
| Color | Red, green, and blue channels reset to 0. | p. 53 |
| Setup menu | ||
| Recording menu setup | Details | p. 72 |
| Quick View | Off | p. 73 |
| Information display setup | On | p. 82 |
| Beep (Sound) | On | p. 74 |
| Effect (Sound) | On | p. 74 |
| Shutter (Sound) | On | p. 74 |
| Self-timer delay | 10 seconds | p. 73 |
| Auto power off | 3 minutes | p. 74 |
| File-number reset | Off | p. 75 |
| Memory priority | SD | p. 75 |
| Add audio setup | If selected | p. 76 |
| Flash modes (Custom) | All on | p. 78 |
| Focus modes / Self-timer (Custom) | Macro, landscape, self-timer: on. Fixed focus: off. | p. 78 |
| AF AE AWB (Custom) | All off | p. 78 |
| Continuous-adv. focus lock | Off | p. 80 |
| Transfer mode | Data storage | p. 82 |
Transfer mode
The data-transfer mode must be specified depending on whether images are transferred to a computer or printed directly. The data-storage option must be selected to transfer data from the camera to a computer or when using the DiIMAGE Viewer software. The PictBridge option allows images to be printed directly from the camera with a PictBridge compatible printer (p. 92).
Select the transfer-mode option from the setup menu (p. 70).

MENUSET
Use the up/down keys to highlight the appropriate option.
Press the right key or menu button to complete the operation. The left controller key cancels the operation.
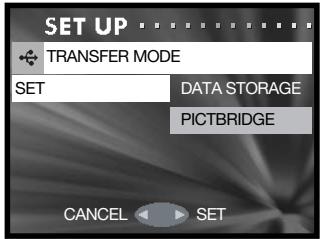
Information display setup
The information displayed on the live image in the recording mode and on the recorded image in the playback mode can be turned off and on. Select the info disp option from the setup menu (p. 70).
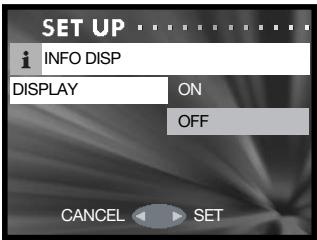

MENUSET
Use the up/down keys to highlight on or off.
Press the right key or menu button to complete the operation. The left controller key cancels the operation.
Data-transfer mode
Read this section carefully before connecting the camera to a computer. Details on using and installing the DiIMAGE Viewer software are found in the supplied software manual. The DiIMAGE manuals do not cover the basic operation of computers or their operating systems; please refer to the manual supplied with your computer.
System requirements
For the camera to be connected directly to the computer and used as a mass-storage device, the computer must be equipped with a USB port as a standard interface. The computer and the operating system must be guaranteed by their manufacturers to support USB interface. The following operating systems are compatible with the camera:
Windows 98, 98SE, Me, 2000 Professional, and XP home and professional editions.
Mac OS 9.0 ~ 9.2.2 and Mac OS X 10.1.3 - 10.1.5, 10.2.1 ~ 10.2.8, 10.3 ~ 10.3.2.
Check the Konica Minolta web site for the latest compatibility information:
North America: http://www.konicaminolta.us/
Europe: http://www.konicaminolta support.com
Users with Windows 98 or 98 second edition will need to install the driver software on the included DiIMAGE Viewer CD-ROM (p. 85). No special driver software is required for other Windows or Macintosh operating systems.
Customers who have bought a previous DiIMAGE digital camera and have installed the Windows 98 driver software must repeat the installation procedure. The updated version of the driver software included on the supplied DiIMAGE Viewer CD-ROM is required for the operation of the DiIMAGE G600 with a computer. The new software will have no affect on the performance of older DiIMAGE cameras.
A remote camera driver is supplied with the Windows edition of the DiIMAGE Viewer. The driver is not compatible with this camera.
Connecting the camera to a computer
A fully charged battery should be used when the camera is connected to a computer. The use of the AC adapter (sold separately) is recommended over the use of the battery. For users with Windows 98 or 98SE, read the section on page 85 on how to install the necessary USB driver before connecting the camera to a computer.
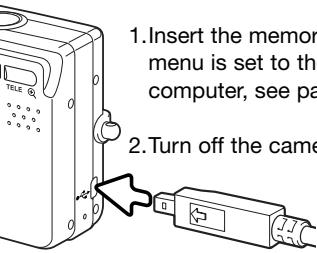
1.Insert the memory card into the camera. Confirm the memory-priority option in the setup menu is set to the card type. To change the memory card while the camera is connected to a computer, see page 95.
2. Turn off the camera.
3.Insert the small plug of the USB cable into the camera. Make sure the plug is firmly attached.
- Attach the other end of the USB cable to the computer's USB port. Make sure the plug is firmly attached. The camera should be connected directly to the computer's USB port. Attaching the camera to a USB hub may prevent the camera from operating properly.
The camera turns on automatically when it is connected to a computer; both viewfinder lamps light to indicate the connection. When using two cards in the camera, if the card to be accessed is full, the camera may automatically switch the memory priority to the empty card. Remove the empty card and confirm memory priority before connecting the camera to a computer.
When the camera is properly connected to the computer, a drive icon, or volume, appears in My Computer or on the desktop. The drive icon can be identified by the camera name and memory card or as a removable disk. When using Windows XP or Mac OS X, a window opens requesting instructions on what to do with the image data; follow the directions in the window. If the computer does not recognize the camera, disconnect the camera and restart the computer. Repeat the connection procedure above.
Connecting to Windows 98 and 98 SE
The driver needs only to be installed once. If the driver cannot be installed automatically, it can be installed manually with the operating system's add-new-hardware wizard; see the instructions on the following page. During installation, if the operating system requests the Windows 98 CD-ROM, insert it into the CD-ROM drive and follow the accompanying instructions on the screen. No special driver software is required for other Windows or Macintosh operating systems.
Automatic Installation
Before connecting the camera to the computer, place the DiIMAGE Viewer CD-ROM in the CD-ROM drive. The DiIMAGE installer menu should automatically activate. To automatically install the Windows 98 USB driver, click on the starting-up-the-USB-device-driver-installer button. A window appears to confirm that the driver should be installed; click "Yes" to continue.

When the driver has been successfully installed, a window appears. Click "OK." Restart the computer and connect the camera (p. 84) to complete the operation.
Starting up the DiIMAGE Viewer installer
Starting up the USB device driver installer
Starting up the DiIMAGE remote camera driver installer
Starting up the QuickTime installer
To access the CD-ROM
Finish
Manual Installation
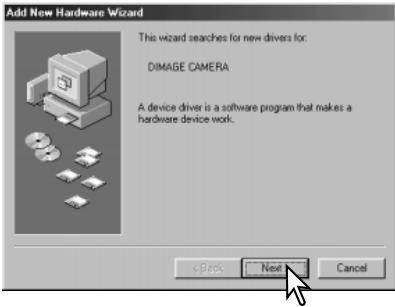
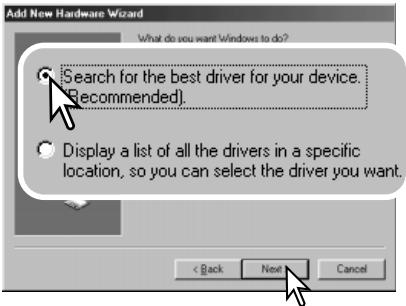
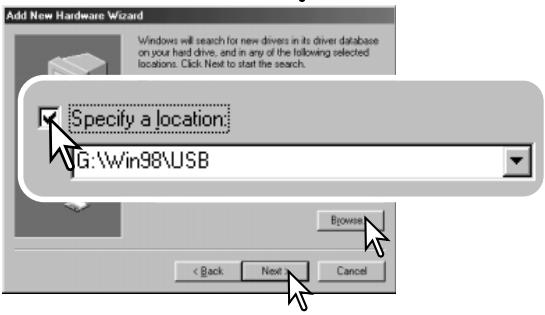
To install the Windows 98 driver manually, follow the instructions in the connecting-the-camera-to-a-computer section on page 84.
When the camera is plugged into the computer, the operating system will detect the new device and the add-new-hardware-wizard window opens. Place the DiIMAGE Viewer CD-ROM in the CD-ROM drive. Click "Next."
Choose the recommended search for a suitable driver. Click "Next."
Choose to specify the location of the driver. The browse window can be used to indicate the driver location. The driver should be located in the CD-ROM drive at :Win98\USB. When the location is shown in the window, click "Next."
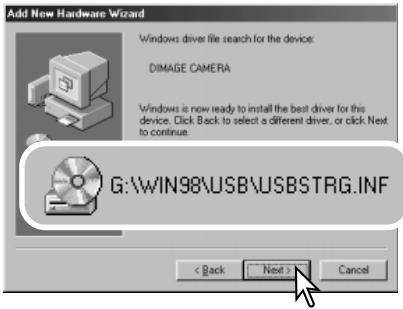
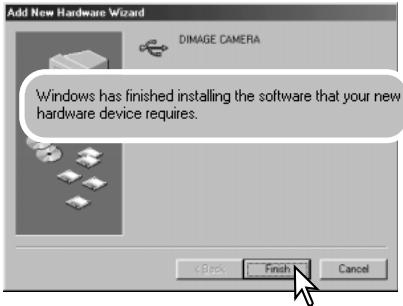
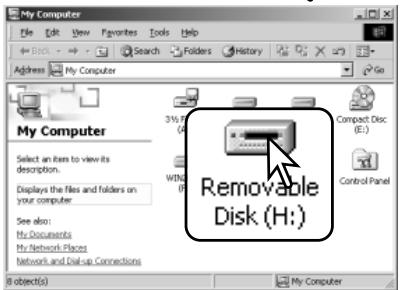
The add new hardware wizard will confirm the location of the driver. The letter designating the CD-ROM drive varies between computers. Click "Next" to install the driver in the system.
One of three drivers may be located: MNLVENUM.inf, USBPDR.inf, or USBSTRG.inf.
The last window confirms the driver has been installed. Click "Finish" to close the add new hardware wizard. Restart the computer.
When the my-computer window is opened, a new removable-disk or G600 drive icon is displayed. Double click on the icon to access the camera's memory card; see page 88.
Memory card folder organization
G600-SD
Once the camera is connected to the computer, image and audio files can be accessed by double clicking on icons. Image folders are located in the DCIM folder. To copy images and audio recordings, simply drag and drop the file icon into a location in the computer.

DCIM

Misc
The misc. folder contains DPOF print files (p. 62).
Files and folders on the memory card can be deleted using the computer. Never format the memory card from the computer; always use the camera to format the card. Only files recorded by the camera should be stored on the memory card.
100KM017

PICT0001.JPG
Still image

PICT0001.WAV
PICT0001's audio file

PICT0004.AVI
Movie clip

PICT0005.WAV
Voice recording
DiIMAGE Viewer Notes
Images and the attached audio file should be stored together in the same folder. This allows the DiIMAGE Viewer to playback the audio recording with the matching image file. Image and audio files can be download automatically into separate folders with Mac OS X.
Image and audio file names begin with "PICT" followed by a four-digit file number and a jpg,avi, or wav extension. Audio files attached to still images have a wav extension and the file number corresponds to their image file. Voice recordings also use the wav extension.
When the file number exceeds 9,999, a new folder is created. The first three digits of the folder name increase by one: e.g. from 100KM017 to 101KM017. "KM" stands for Konica Minolta, and 017 indicates a DiIMAGE G600 camera.
The file number may not correspond to the frame number of the image played back in the camera. As images are deleted in the camera, the frame counter adjusts itself to show the number of images on the card and reassigns the frame numbers accordingly. The serial numbers used with image files do not change when an image is deleted.
Camera Notes
Image files contain exif tag data. This data includes the time and date the image was recorded as well as the camera settings used. This data can be viewed with the camera or the DiIMAGE Viewer software. If a camera image is opened in a photo-retouching application like Adobe Photoshop, and then the image is saved overwriting the original data, the exif tag information is erased. When using software other than the DiIMAGE Viewer, always make a backup copy of the image files to protect the exif tag data.
To view images correctly on your computer, the monitor's color space may need to be adjusted. Refer to your computer manual on how to calibrate the display to the following requirements: sRGB, with a color temperature of 6500K, and a gamma of 2.2. Changes made to the captured image with the camera's contrast and color-saturation controls will affect any color-matching software in use.
Disconnecting the camera from a computer

Never disconnect the camera when data is being transferred between the camera and computer,
Windows 98 / 98 Second Edition
Confirm no files are being copied between the camera and computer. Disconnect the USB cable.
Windows Me, 2000 Professional, and XP
To disconnect the camera, click once on the unplug-or-eject-hardware icon located on the task bar. A small window opens indicating the device to be stopped.
Stop USB Mass Storage Device - Drive(H:)
3:45PM
Click on the small window to stop the device. The safe-to-remove-hardware window opens. Close the window and then disconnect the USB cable.
Safe To Remove Hardware

The 'USB Mass Storage Device' device can now be safely removed from the system.
When more than one external device are connected to the computer, repeat the procedure above except right click on the unplug-or-eject-hardware icon. This opens the unplug-or-eject-hardware window after clicking on the small window indicating the unplug-or-eject-hardware routine.
Unplug or eject hardware
3:43PM
The hardware devices to be stopped is displayed. Highlight the device by clicking on it then click "Stop."
A confirmation screen appears to indicate the devices to be stopped. Clicking "OK" will stop the device.
A third and final screen appears to indicate the camera can be safely disconnected from the computer. Close the window and then disconnect the USB cable.
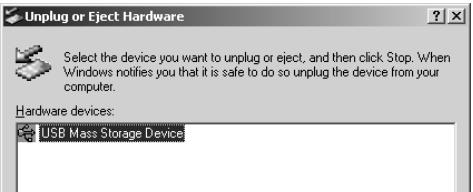
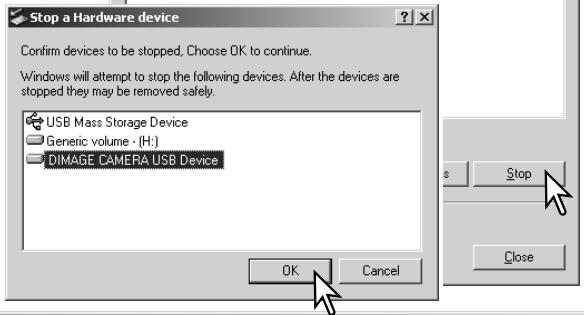
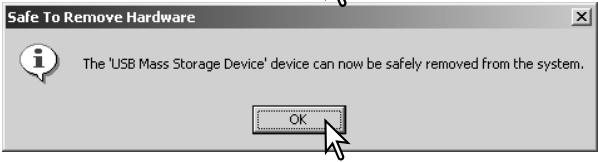

Macintosh
Confirm that no data is being transferred between the camera and computer and then drag the mass-storage device icon and drop it into the trash. Disconnect the USB cable.
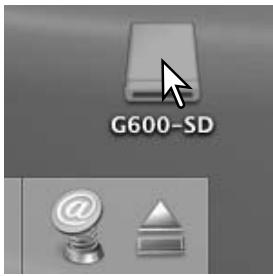
Pictbridge
Confirm the transfer-mode option in the setup menu is set to PictBridge. Connect the camera to a PictBridge compatible printer using the camera's USB cable. The larger plug of the cable is connected to the printer. Insert the smaller plug of the cable into the camera; the camera turns on automatically and starts the PictBridge connection.
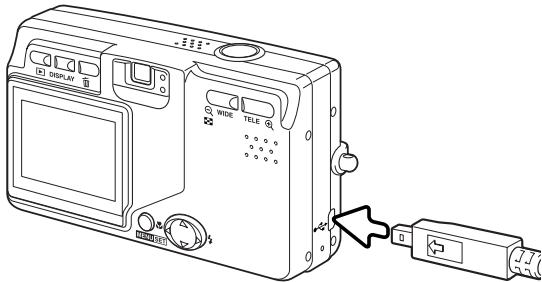
Individual still images can be selected for printing on the PictBridge screen. When two memory cards are in the camera, only the images on the card specified with the memory priority option on the setup menu (p. 75) can be viewed.
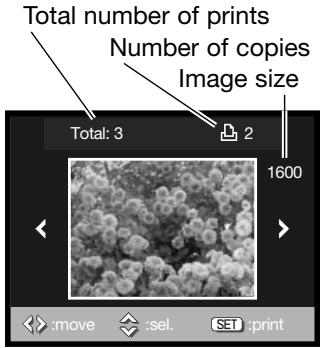

Use the left/right keys of the controller to display the image to be printed.

Press the up key to select the number of copies to be printed. No more than 50 images can be selected. To deselect an image for printing, press the down key until the number of copies reaches zero.

Repeat the previous steps until all the images to be printed are selected. Press the menu button to continue.
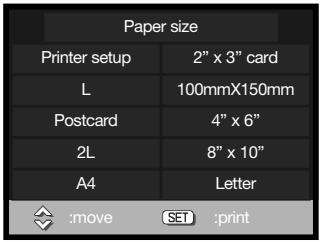

Use the up/down keys of the controller to select the paper size. The options available depend on the printer. The printer-setup option uses the size set with the printer.

Press the menu button to begin printing.
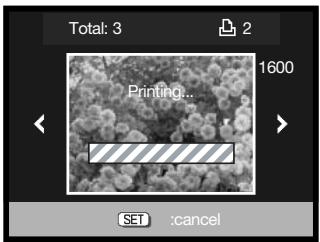

To cancel the print run once it begins, press the menu button.
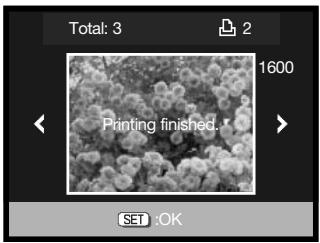

The printing-finished message indicates the end of the print run. Press the menu button to complete the operation. Unplug the camera from the printer.
Printing Notes
The following are the dimensions for postcard, L, and 2L paper sizes in both millimeters and inches for your reference:
| Postcard | 100 X 148mm | 3.9 X 5.9 in. |
| L | 89 X 127mm | 3.5 X 5.0 in. |
| 2L | 127 X 178mm | 5.0 X 7.0 in. |
Notes on printing errors
If a minor problem occurs during printing, such as the paper runs out, follow the procedure recommended for the printer; no action is required for the camera. If a major printer error occurs, press the menu button to end the routine. Refer to the printer manual for the correct procedure for the printer problem. Check the printer settings before starting again and use the PictBridge screen to deselect the images that were printed.
QuickTime system requirements
IBM PC / AT Compatible
Pentium processor-based PC or compatible computer
Windows 98, Me, 2000, or XP.
128MB or more of RAM
To install QuickTime, follow the instructions in the installer. Macintosh users can download the latest version of QuickTime free of charge from the Apple Computer web site: http://www.apple.com.
Changing the memory card - Data-transfer mode

Never remove the card when data is being transferred between the camera and computer – the data or memory card may permanently be damaged.
Windows 98 and 98 Second Edition
- Disconnect the USB cable.
- Change the memory card.
- Reconnect the USB cable to remake the USB connection.
Windows ME, 2000 Professional, and XP
- Stop the USB connection using the unplug-or-eject-hardware routine (p. 90).
- Disconnect the USB cable.
- Change the memory card.
- Reconnect the USB cable to remake the USB connection.
Macintosh
- Stop the USB connection by dragging the drive icon into the trash (p. 91).
- Disconnect the USB cable.
- Change the memory card.
- Reconnect the USB cable to remake the USB connection.
Appendix Troubleshooting
The section covers minor problems with basic camera operation. For major problems or damage, or if a problem continues to reoccur frequently, contact a Konica Minolta service facility.
| Problem | Symptom | Cause | Solution |
| The camera will not work. | Nothing displayed on the monitor. | The battery is dead. | Recharge battery (p. 14). |
| The AC adapter is not connected properly. | Check that the adapter is connected to the camera and a live electrical outlet (p. 17). | ||
| Shutter will not release. | Memory-full warning appears on the monitor. | Memory card is full and unable to store an image at the resolution settings on the camera. | Insert a new memory card (p. 18), delete some images (p. 33), or change the resolution settings (p. 36). |
| No-card warning appears on the monitor. | No memory card in the camera. | Insert a memory card (p. 18). | |
| While using flash, the pictures are too dark. | The subject is beyond the flash range (p. 51). | Move closer to the subject or change the camera sensitivity to a higher setting (p. 50). | |
| Pictures are not sharp. | Green viewfinder indicator lamp blinks. | Subject is too close. | Make sure the subject is within the autofocus range (p. 25) or use the macro focus mode (p. 30). |
| A special situation is preventing the autofocus system from focusing (p. 26). | Use the focus-lock function to focus on an object at the same distance as the subject (p. 25). | ||
| Pictures are taken indoors or in low-light situations without flash. | Slow shutter speeds result in blurred images when the camera is hand-held. | Use a tripod, change the camera sensitivity to a higher setting (p. 50), or use the flash (p. 28). | |
If the camera does not function normally, turn it off, remove and reinsert the battery, or unplug and reconnect the AC adapter. Always turn the camera off otherwise the memory card may be damaged and camera settings reset.
About the Lithium-ion Battery Charger Cord
The included AC cord is designed for the current of the sales region. Only use the cord in the region it was purchased.
| Region | Product code |
| Continental Europe, Singapore, Korea (220V-240V) | APC-150 |
| China (250V) | APC-151 |
| Great Britain, Hong Kong (220V-240V) | APC-160 |
| United States, Canada, Taiwan, Japan (100V-120V) | APC-170 |
Removing the driver software - Windows
1.Insert a memory card in the camera and connect it to the computer with the USB cable. Other devices must not be connected to the computer during this procedure.
2. Right click on the My-computer icon. Select "properties" from the drop-down menu.
Windows XP: from the start menu go to the control panel. Click on the performance and maintenance category. Click "System" to open the system properties window.
- Windows 2000 and XP: select the hardware tab in the properties window and click the device-manager button.
Windows 98 and Me: click the device-manager tab in the properties window. - The driver file will be located in the universal-serial-bus-controller or other-devices location of the device manager. Click on the locations to display the files. The driver should be indicated with the camera name. Under certain conditions, the driver name may not contain the camera name. However, the driver will be indicated by either a question mark or exclamation point.
- Click on the driver to select it.
- Windows 2000 and XP: click on the action button to display the drop-down menu. Select "uninstall." A confirmation screen will appear. Clicking "Yes" will remove the driver from the system.
Windows 98 and Me: click the remove button. A confirmation screen will appear. Clicking "Yes" will remove the driver from the system.
- Disconnect the USB cable and turn off the camera. Restart the computer.
Care and storage
Read this section in its entirety to get the best results from your camera. With proper care, your camera will provide years of service.
Camera care
- Do not subject the camera to shock or impact.
- Turn off the camera when transporting.
- This camera is neither waterproof nor splashproof. Inserting or removing batteries or the memory card, or operating the camera with wet hands may damage the camera.
- When at the beach or near water, take care not to expose the camera to water or sand. Water, sand, dust, or salt can damage the camera.
- Do not leave the camera under direct sunlight. Do not point the lens directly at the sun; the CCD may be damaged.
Cleaning
- If the camera or the outside of the lens is dirty, gently wipe it with a soft, clean, dry cloth. If the camera or lens comes in contact with sand, gently blow away loose particles. Wiping may scratch the surface.
- To clean the lens surface, first blow away any dust or sand, then gently wipe the lens with a cloth or tissue designed for optics. Use lens-cleaning fluid if necessary.
- Never use organic solvents to clean the camera.
- Never touch the lens surface with your fingers.
Storage
- Store in a cool, dry, well-ventilated area away from dust and chemicals. For long periods of disuse, store the camera in an airtight container with a silica-gel drying agent.
- Remove the batteries and memory card from the camera when not in use for extended periods.
- Do not store the camera in an area with naphthalene or mothballs.
- During long periods of storage, operate the camera occasionally. When taking the camera out of storage, check that the camera is functioning properly before using.
Memory cards
SD Memory Cards, MultiMediaCards, and Memory Sticks are manufactured with precision electronic components. The following may cause data loss or damage:
- Improper use of the card.
- Bending, dropping, or subjecting the card to impact.
- Heat, moisture, and direct sunlight.
- Static electrical discharge or electromagnetic fields near the card.
- Removing the card or interrupting the power supply while the camera or a computer is accessing the card (reading, writing, formatting, etc.).
- Touching the electrical contacts of the card with your fingers or metal objects.
- Using the card beyond its life. Purchasing a new card periodically may be necessary.
Konica Minolta has no responsibility for any loss or damage to data. It is recommended that a copy of the card data be made.
Batteries
- Battery performance decreases with temperature. In cold environments, we recommend keeping spare batteries in a warm place, such as the inside of a coat. Batteries can recover their power when they warm up.
- Do not store the battery when it is fully charged.
- When storing the battery for extended periods, recharge it for five minutes every six months. The battery may not be able to be charged if completely exhausted. Store batteries within -20^ to 35^ (-4^ to 95^) .
- A special built-in, long-life battery supplies power to the clock and memory when the camera is turned off. If the camera resets each time it is turned off, the battery is exhausted. It must be replaced at a Konica Minolta service facility.
- Keep battery and camera charger contacts clean. Dirty contacts can prevent charging. If the contacts become dirty, wipe them with a cotton swab.
Before important events and journeys
- Check the camera's operation; take test pictures and purchase spare batteries.
- Konica Minolta has no responsibility for any damage or loss incurred by equipment malfunction.
Operating temperatures and conditions
- This camera has been designed for use in temperatures from 0^ to 50^ ( 32^ to 122^ ).
- Never leave the camera exposed to extreme high temperatures, such as in a car parked in the sun, or to extreme humidity.
- When taking the camera from a cold to a warm environment, place it in a sealed plastic bag to prevent condensation from forming. Allow the camera to come to room temperature before removing it from the bag.
LCD monitor care
- The LCD monitor is manufactured using high-precision technology and more than 99.99% of the pixels operate properly. Less than 0.01% of the monitor pixels are displayed as color or bright points; this is not monitor defect and does not affect the recorded image.
- Do not apply pressure to the surface of the LCD monitor; it may be permanently damaged.
- If fingerprints are on the LCD monitor surface, gently wipe with a soft, clean, dry cloth.
Copyright
- TV program, films, video tapes, photographs, and other materials may be copyrighted. Unauthorized recording or duplication of such material may be contrary to copyright laws. Taking pictures or images of performances, exhibitions, etc., is prohibited without approval and can infringe on copyright. Images protected by copyright can only be used under the provisions within the copyright laws.
Questions and service
- If you have questions about your camera, contact your local camera dealer or write to the Konica Minolta distributor in your area.
- Before shipping your camera for repair, please contact a Konica Minolta service facility.
Technical specifications
Number of effective pixels:
CCD:
Camera sensitivity (ISO):
Aspect ratio:
Lens construction:
Maximum aperture:
Focal length:
Focusing range:
Autofocusing system:
Shutter:
Shutter speed range:
Built-in flash recycling time:
Viewfinder:
Monitor LCD:
Monitor field of view:
A/D conversion:
Recording media:
File formats:
Printing output control:
Menu languages:
Battery:
Battery performance (recording):
6.0 million
1/1.76-type interline complementary-color CCD with a total of 6.4 million pixels.
Automatic and manual ISO50, 100, 200, 400
4:3
7 elements in 6 groups.
f/2.8 - f/4.9
8 - 24 mm (35mm equivalent: 39 - 117 mm)
Wide angle: 0.5 m - inf. (Macro: 6cm - inf.)
Telephoto: 0.8 - inf. (Macro: 50cm - inf.)
Video AF
CCD electronic shutter plus mechanical shutter
1-1/2000s (autoexposure), 15-1/1000s (Manual)
Approximately 6 seconds
Optical real-image zoom viewfinder.
3.8 cm TFT color
Approximately 100%
10 bits
SD Memory Cards, MultiMediaCards,
Memory Stick, Memory Stick Pro
JPEG, motion JPEG (AVI), WAV.
DCF 1.0, DPOF ver. 1.1, and Exif 2.2 compliant.
PictBridge, Exif Print
Japanese, English, German, and French.
Konica Minolta NP-600 lithium-ion battery.
Approximately 160 frames: based on the CIPA standard with NP-600 lithium-ion battery, LCD monitor on, fullsize images (2816 X 2112), normal image compression, no Quick View, no audio, flash used with 50% of the frames.
Battery performance (playback): Approximate continuous playback time: 180 min. with NP-600 lithium-ion battery.
External power source: AC adapter AC-8
Dimensions: 94.0 (W) X 56.0 (H) X 29.5 (D) mm
3.7 (W) X 2.2 (H) X 1.2 (D) in.
Weight: Approximately 195g / 6.9oz
(without battery or recording media)
Operating temperature: 0^ to 50^ (32°F to 122°F)
Operating humidity: 20 - 80% (noncondensing)
Lithium-ion Battery NP-600
Voltage: 3.7V
Weight: 25g / 0.8oz
Dimensions 31.8 (W) X 9.0 (H) X 49.8 (D) mm
1.3 (W) X 0.4 (H) X 2.0 (D) in
Battery Charger BC-600
Input voltage: AC100-240V, 50/60Hz
Weight: 70g / 2oz (without cord or battery)
Dimensions 71.0 (W) X 25.8 (H) X 57.5 (D) mm
2.8 (W) X 1.0 (H) X 2.3 (D) mm
Specifications are based on the latest information available at the time of printing and are subject to change without notice.
Konica Minolta Customer Support: www.konicaminoltasupport.com
Konica Minolta Photoworld: www.konicaminoltaphotoworld.com
Become a member of the Konica Minolta Photo World today. It is free for registered customers of Konica Minolta
© 2004 Konica Minolta Photo Imaging, Inc. under the Berne Convention and the Universal Copyright Convention.
0-43325-53331-0
- Before you begin
- For proper and safe use
- Lithium-ion batteries
- DANGER
- WARNING
- General warnings and cautions
- CAUTION
- Table of contents
- Names of parts
- Getting up and running
- Charging the battery
- Inserting a battery
- Camera notes
- Battery-condition indicator
- Auto power off
- AC adapter (sold separately)
- Installing and removing a memory card
- About memory cards
- Turning the camera on and off
- Attaching the strap
- Setting the language, date, and time
- Recording mode - Basic operation
- Handling the camera
- LCD monitor display
- Using the zoom lens
- Camera-shake warning
- Basic recording operation
- Focus lock
- Focus range
- Focus signals
- Special focusing situations
- Display button - Recording mode
- Flash modes
- Flash range - Automatic operation
- Flash signals
- Focus modes and self-timer
- Shooting Tips
- Deleting images
- Playback - Basic operation
- Single-frame playback display
- Viewing images
- Display button - Playback
- Index playback
- Enlarged playback
- Recording - Advanced Operation
- Navigating the recording menu
- Resolution - Image size and compression
- Movie recording
- Exposure compensation
- White balance
- AE Metering modes
- MENUSET
- Monochrome
- Digital zoom
- MENUSE1
- Adjusting the monitor
- Voice recording
- Recording tips
- Add audio recording
- Delete audio recording
- Slow shutter limit
- Manual exposure
- Quality
- Camera sensitivity - ISO speed
- Flash compensation
- Saturation
- Contrast
- Sharpness
- Color
- An introduction to color
- A short guide to photography
- What is an Ev?
- Playback - Advanced operation
- Playing back movies and audio
- Navigating the Playback menu
- Frame-selection screen
- Index
- Copy
- Delete
- DPOF
- Protect
- Move
- Resize
- Slide show
- Setup menu
- Navigating the setup menu
- Format
- Recording menu setup
- Date setup
- Quick view
- Self-timer delay
- Sound
- File-number reset
- Memory priority
- Language
- Add audio recording setup
- Custom setup
- Custom setup notes
- Macro - focus and self-timer modes
- AF AE AWB
- AF
- AF (autofocus) lock
- AE On
- AE (autoexposure) lock
- Continuous-advance focus lock
- Reset default
- Transfer mode
- Information display setup
- Data-transfer mode
- System requirements
- Connecting the camera to a computer
- Connecting to Windows 98 and 98 SE
- Automatic Installation
- Manual Installation
- Memory card folder organization
- DiIMAGE Viewer Notes
- Disconnecting the camera from a computer
- Windows 98 / 98 Second Edition
- Windows Me, 2000 Professional, and XP
- Safe To Remove Hardware
- Macintosh
- Pictbridge
- Printing Notes
- Notes on printing errors
- QuickTime system requirements
- Changing the memory card - Data-transfer mode
- Windows 98 and 98 Second Edition
- Appendix Troubleshooting
- About the Lithium-ion Battery Charger Cord
- Removing the driver software - Windows
- Care and storage
- Camera care
- Cleaning
- Storage
- Memory cards
- Batteries
- Before important events and journeys
- Operating temperatures and conditions
- LCD monitor care
- Copyright
- Questions and service
- Technical specifications
- Konica Minolta Customer Support: www.konicaminoltasupport.com
- Konica Minolta Photoworld: www.konicaminoltaphotoworld.com
Brand : MINOLTA
Model : DIMAGE G600
Category : Digital Camera