
DIMAGE E201 - Digital Camera MINOLTA - Free user manual and instructions
Find the device manual for free DIMAGE E201 MINOLTA in PDF.


| Product type | Compact digital camera |
| Brand | Minolta |
| Model | DIMAGE E201 |
| Sensor resolution | 2.1 megapixels |
| Optical zoom | 3x |
| Digital zoom | 2x |
| LCD screen | 1.5 inches (approx. 3.8 cm) |
| Dimensions (W x H x D) | 109 x 66 x 37 mm |
| Weight (without batteries) | 180 g |
| Power source | 2 AA batteries (alkaline or Ni-MH rechargeable) |
| Memory support | CompactFlash (CF) Type I card |
| Main functions | Photo and video shooting, built-in flash, automatic and manual modes, self-timer |
| Care and cleaning | Clean the body with a soft dry cloth; clean the lens with a special optical cloth and a blower |
| Safety | Do not expose to moisture; avoid shocks; remove batteries if not used for extended periods |
| Spare parts and repairability | Parts available from authorized service centers; battery and memory card are replaceable |
| General information | Class B device compliant with Canadian standard NMB-003; manual freely downloadable at notice-facile.com |
Frequently Asked Questions - DIMAGE E201 MINOLTA
User questions about DIMAGE E201 MINOLTA
0 question about this device. Answer the ones you know or ask your own.
Ask a new question about this device
Download the instructions for your Digital Camera in PDF format for free! Find your manual DIMAGE E201 - MINOLTA and take your electronic device back in hand. On this page are published all the documents necessary for the use of your device. DIMAGE E201 by MINOLTA.
USER MANUAL DIMAGE E201 MINOLTA
The essentials of imaging
www.minolta.com
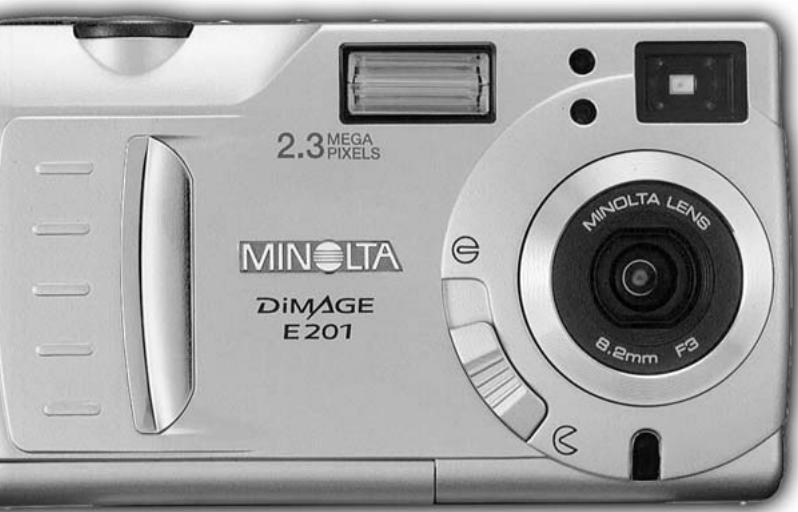
DiMAGE
E201
Thank you for purchasing the Minolta DiMAGE E201. Please take the time to read through this instruction manual so you can enjoy all the features of your new camera.
This manual contains information regarding products introduced before May, 2001. To obtain compatibility information for products released after this date, contact a Minolta Service Facility listed on the back cover of this manual.

Digital Camera: E201

Tested To Comply With FCC Standards
FOR HOME OR OFFICE USE
This mark on your camera certifies that this camera meets the requirements of the EU (European Union) concerning interference causing equipment regulations. CE stands for Conformité Européenne (European Conformity).
This device complies with Part 15 of the FCC Rules. Operation is subject to the following two conditions: (1) This device may not cause harmful interference, and (2) this device must accept any interference received, including interference that may cause undesired operation. Tested by the Minolta Corporation 101 Williams Drive, Ramsey, New Jersey 07446, U.S.A.
This Class B digital apparatus complies with Canadian ICES-003.
Do not remove the ferrite cores from the cables.
Apple, the Apple logo, Macintosh, Power Macintosh, Mac OS, and the Mac OS logo are registered trademarks of Apple Computer Inc. Microsoft and Windows are registered trademarks of the Microsoft Corporation. The official name of Windows® is Microsoft Windows Operating System. Pentium is a registered trademark of the Intel Corporation. Adobe and PhotoDeluxe are registered trademarks of Adobe Systems Inc. QuickTime is a trademark used under license. PowerPC is a trademark of International Business Machines Corporation. All other trademarks are the property of their respective owners.
Check the packing list before using the product. If any parts are missing, contact your local camera dealer or a Minolta Service Facility listed on the back cover of this manual.
1 Minolta DiMAGE E201 Digital Camera
4 AA Alkaline Batteries
1 Camera Strap
1 Camera Case
1 8MB CompactFlash Card
1 Video Cable
1 USB Cable
1 CD-ROM for DiMAGE E201
1 Adobe PhotoDeluxe Home Edition 4.0 CD-ROM (Windows version)
1 Adobe PhotoDeluxe 2.0 CD-ROM (Macintosh version)
1 Instruction Manual
1 Warranty Card
The DiMAGE E201 CD-ROM includes Windows and Macintosh versions of Quick Time 4.1 and the DiMAGE E201 Exif Utility as well as USB drivers for Windows 98, 98SE, ME, and 2000 Professional.
Read and understand all warnings and cautions before using this product.
WARNING
Using batteries improperly can cause them to leak harmful solutions, overheat, or explode which may damage property or cause personal injury. Do not ignore the following warnings.
- Only use the batteries specified in this instruction manual.
- Do not install the batteries with the polarity (+/−) reversed.
- Do not use batteries which show wear or damage.
- Do not expose batteries to fire, high temperatures, water, or moisture.
- Do not attempt to short or disassemble batteries.
- Do not store batteries near or in metallic products.
- Do not mix batteries of different types, brands, ages, or charge levels.
- Do not charge alkaline batteries.
- When recharging rechargeable batteries, only use the recommended charger.
- Do not use leaking batteries. If fluid from the batteries enters your eye, immediately rinse the eye with plenty of fresh water and contact a doctor. If fluid from the batteries makes contact with your skin or clothing, wash the area thoroughly with water.
- Use only the specified AC adaptor within the voltage range indicated on the adaptor unit. An inappropriate adaptor or current may cause damage or injury through fire or electric shock.
- Do not disassemble this product. Electric shock may cause injury if a high voltage circuit inside the product is touched.
- Immediately remove the batteries or unplug the AC adaptor and discontinue use if the camera is dropped or subjected to an impact in which the interior, especially the flash unit, is exposed. The flash has a high voltage circuit which may cause an electric shock resulting in injury. The continued use of a damaged product or part may cause injuries or fire.
- Keep batteries or small parts that could be swallowed away from infants. Contact a doctor immediately if an object is swallowed.
- Store this product out of reach of children. Be careful when around children, not to harm them with the product or parts.
- Do not fire the flash directly into the eyes. It may damage eyesight.
- Do not fire the flash at vehicle operators. It may cause a distraction or temporary blindness which may lead to an accident.
- Do not use the monitor while operating a vehicle or walking. It may result in injury or an accident.
-
Do not look directly at the sun or strong light sources through the viewfinder. It may damage your eyesight or cause blindness.
-
Do not use this product in a humid environment, or operate this product with wet hands. If liquid enters the product, immediately remove the batteries or unplug the AC adaptor and discontinue use. The continued use of a product exposed to liquids may cause damage or injury through fire or electric shock.
- Do not use the product near inflammable gases or liquids such as gasoline, benzine, or paint thinner. Do not use inflammable products such as alcohol, benzine, or paint thinner to clean the product. The use of inflammable cleaners and solvents may cause an explosion or fire.
- When unplugging the AC adaptor, do not pull on the power cord. Hold the adaptor unit when removing it from an outlet.
- Do not damage, twist, modify, heat, or place heavy objects on the AC adaptor cord. A damaged cord may cause damage or injury through fire or electric shock.
- If the product emits a strange odour, heat, or smoke, discontinue use. Immediately remove the batteries taking care not to burn yourself as batteries become hot with use. The continued use of a damaged product or part may cause injuries.
• Take the product to a Minolta Service Facility when repairs are required.
CAUTION
- Do not use or store the product in a hot or humid environment such as the glove compartment or trunk of a car. It may damage the product and batteries which may result in burns or injuries caused by heat, fire, explosion, or leaking battery fluid.
- If batteries are leaking, discontinue use of the product.
- The camera temperature rises with extended periods of use. Care should be taken to avoid burns.
- After prolonged use the batteries and CompactFlash card will become warm, handling this items may result in burns. Please turn the camera off and allow sufficient time for the batteries and CompactFlash card to cool."
- Do not fire the flash while it is in contact with people or objects. The flash unit discharges a large amount of energy which may cause burns.
- Do not apply pressure to the LCD monitor. A damaged monitor may cause injury, and the liquid from the monitor may cause inflammation. If liquid from the monitor makes contact with skin wash the area with fresh water. If liquid from the monitor comes in contact with the eyes, immediately rinse the eyes with plenty of water and contact a doctor.
- When using the AC adaptor, insert the plug securely into the electrical outlet.
- Do not use if the AC adaptor cord is damaged.
- Do not cover the AC adaptor. A fire may result.
- Do not obstruct access to the AC adaptor; this can hinder the unplugging of the unit in emergencies.
- Unplug the AC adaptor when cleaning or when the product is not in use.
Every necessary caution has been taken to ensure the accuracy of the information contained within this instruction manual. Please contact us if you have any questions, find any errors, or notice any missing information.
ABOUT THIS MANUAL
Icons have been placed at the top of the page for quick reference. The icons indicate if the camera is on or off, the mode the camera should be in, and the position of the function dial. Special warnings are placed in dark grey boxes within the text.

The first circular icon indicates that the lens cover should be open. The second shows the camera is in recording mode.

The first circular icon indicates that the lens cover should be closed. The second shows the camera is in playback mode and the LCD monitor needs to be activated with the display/enter button.
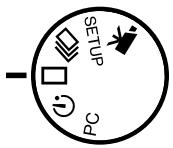
This icon indicates the position of the function dial.
TABLE OF CONTENTS
NAMES OF PARTS
CAMERA BODY 10
VIEWFINDER 12
FUNCTION DIAL 12
DATA PANEL....13
GETTING UP AND RUNNING....14
CONSERVING BATTERY POWER 14
INSERTING THE BATTERIES AND
COMPACTFLASH CARD....15
HANDLING THE CAMERA....15
TURNING ON THE CAMERA 15
TAKING PICTURES (Recording Mode)......16
VIEWING PICTURES (Playback Mode)....17
DELETING IMAGES....18
SETTING UP THE CAMERA....19
CHANGING BATTERIES....20
BATTERY-POWER INDICATORS 21
AUTO POWER OFF 21
USING THE AC ADAPTOR (Sold Separately) 22
ATTACHING THE CAMERA STRAP 22
INSERTING THE COMPACTFLASH CARD....23
REMOVING THE COMPACT FLASH CARD ....24
TAKING PICTURES....25
SETTING THE CAMERA IN RECORDING MODE 26
LCD MONITOR DISPLAY (Recording Mode) 26
CLOSE-UP PHOTOGRAPHY (Macro Mode) 32
EXPOSURE COMPENSATION....34
DIGITAL ZOOM 36
FUNCTION DIAL AND RECORDING MODES ....37
MOVIE MODE....38
MOVIE-MODE DISPLAYS 39
CONTINUOUS-DRIVE MODE....40
SELF-PORTRAITS (Self-timer) 41
IR REMOTE CONTROL (Sold Separately) 42
RECORDING MODE MENU (Controlling the Image)....43
NAVIGATING THE RECORDING-MODE MENU....44
IMAGE QUALITY 46
IMAGE SIZE 47
IMAGE-FILE SIZE......47
WHITE BALANCE 48
SHARPNESS....49
CAMERA SENSITIVITY (ISO)......49
COMPACTFLASH CARD CAPACITY ....50
VIEWING PICTURES (Playback Mode) 51
SINGLE-FRAME PLAYBACK 52
INDEX PLAYBACK ....53
TURNING OFF THE CAMERA IN PLAYBACK MODE....54
ENLARGED PLAYBACK ....54
SLIDE SHOW 56
NAVIGATING THE SLIDE-SHOW MENU....56
MOVIE PLAYBACK....58
VIEWING IMAGES ON A TELEVISION 60
EDITING IMAGES ....61
DISPLAYING IMAGES TO BE DELETED, LOCKED,
OR UNLOCKED 62
DELETING SINGLE IMAGES....62
LOCKING AND UNLOCKING SINGLE IMAGES....63
NAVIGATING THE PLAYBACK MENU....64
DELETE ALL 66
LOCK ALL....66
UNLOCK ALL 66
PRINTING IMAGES....67
PRINTING FORMAT....67
PRINT-ORDER MENU....68
SET ORDER....68
PRINT ALL....69
CANCEL ALL....69
SETUP MODE....71
NAVIGATING THE SETUP MENU....72
LCD MONITOR BRIGHTNESS 74
FORMATTING A COMPACTFLASH CARD....74
SETTING AUTO-POWER-OFF PERIOD....74
SETTING THE DATE AND TIME....74
BEEP 75
SETTING THE VIDEO-OUT SIGNAL....75
RETURNING TO THE DEFAULT SETTINGS....75
CONNECTING TO A COMPUTER....76
SOFTWARE SYSTEM REQUIREMENTS....77
CONNECTING THE CAMERA TO A COMPUTER....78
CONNECTING TO WINDOWS ME 79
CONNECTING TO WINDOWS 2000 PROFESSIONAL....80
CONNECTING TO WINDOWS 98....82
CONNECTING TO A MACINTOSH 83
COMPACTFLASH CARD ORGANISATION 84
DiMAGE E201 EXIF UTILITY 85
DISCONNECTING THE CAMERA FROM THE COMPUTER......86
APPENDIX....88
TROUBLESHOOTING....89
CARE AND STORAGE....92
TECHNICAL SPECIFICATIONS....95
CAMERA BODY
* This camera is a sophisticated optical instrument. Care should be taken to keep these surfaces clean. Please read the care and storage instructions in the back of this manual (p. 92).
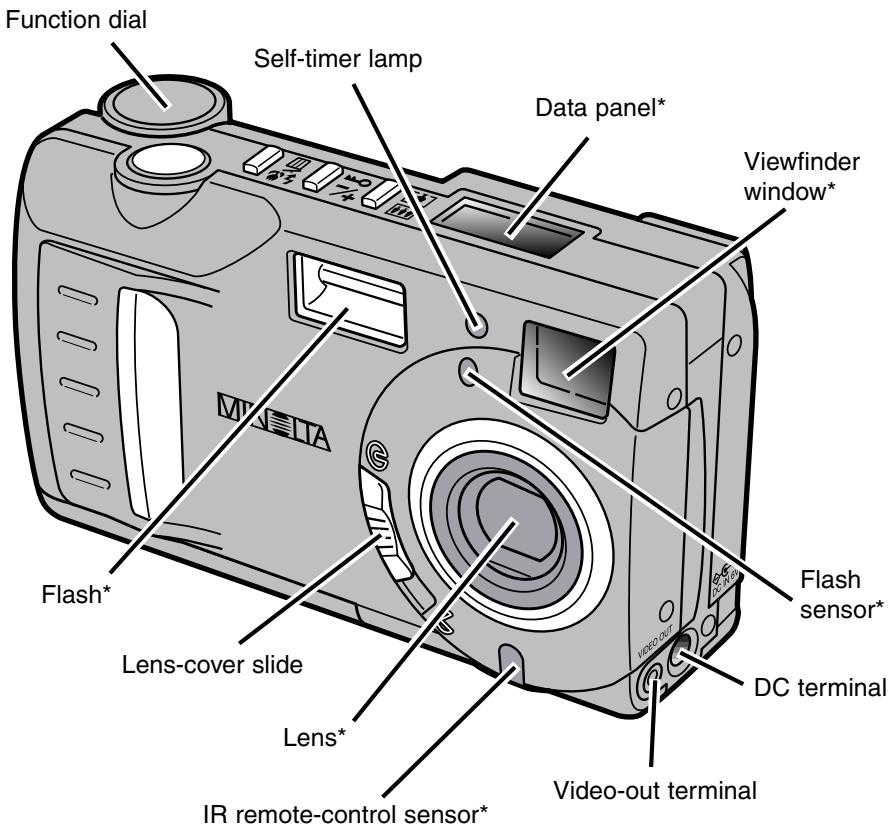
Digital-zoom button
(Digital-zoom recording p. 36)
(Enlarged playback p. 54)
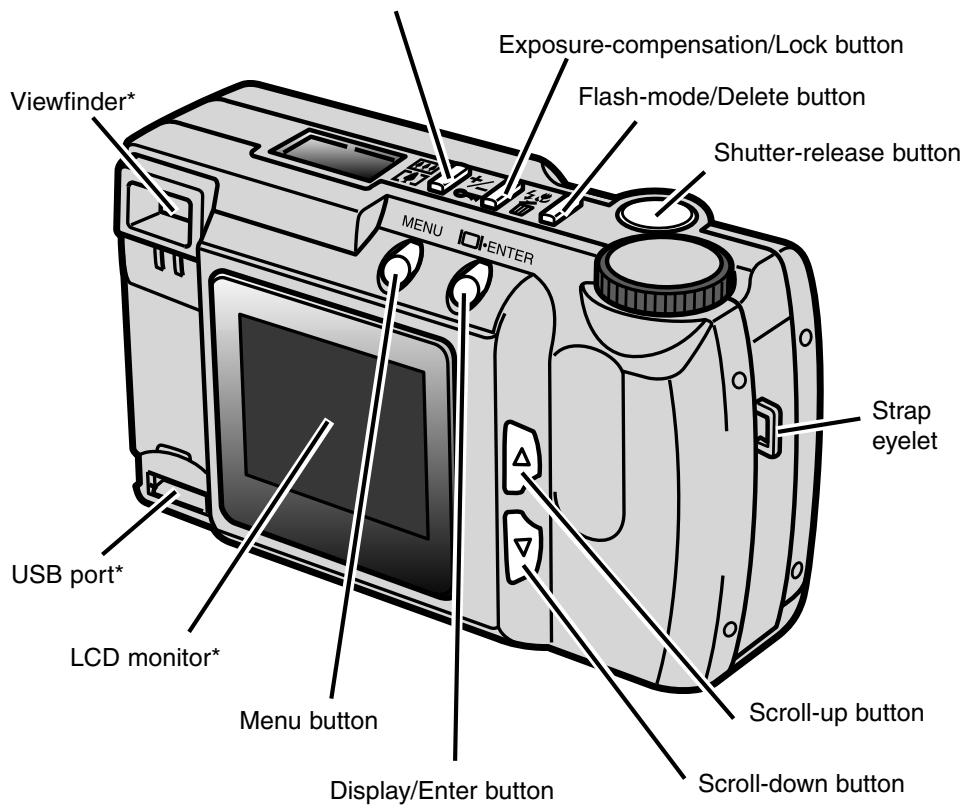
VIEWFINDER
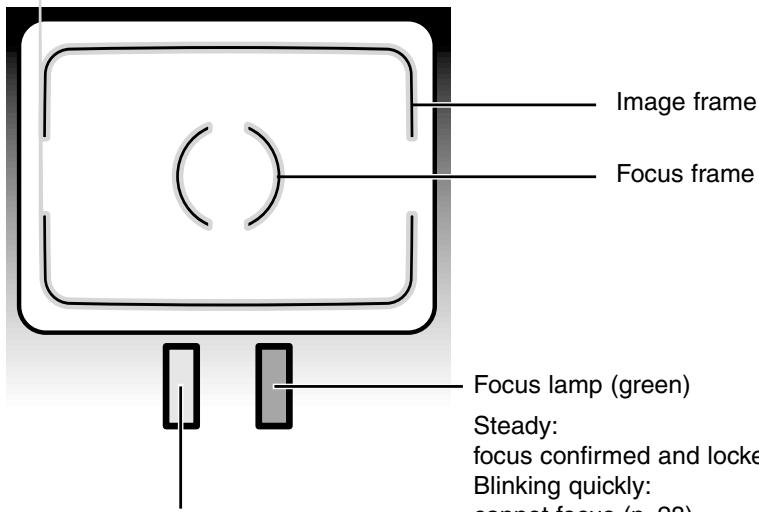
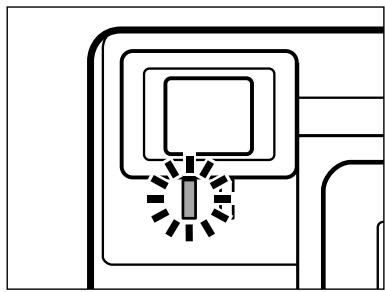
Flash lamp (orange)
Steady: flash charged and ready to fire.
Blinking: flash is charging and the shutter is locked.
Focus lamp (green)
Steady:
focus confirmed and locked.
Blinking quickly:
cannot focus (p. 28).
Blinking slowly:
an image is being transferred between the camera and CompactFlash card or a movie clip is being recorded.
FUNCTION DIAL
- The dial is used for quick and simple access to the camera's major functions.
Movie recording (p. 38)/
Movie playback (p. 58)
Setup mode (p. 71)
Continuous drive (p. 40)/
Index playback (p. 53)
Single-frame advance (p. 27)/
Single-frame playback (p. 52)
Self-timer/Remote control (p. 41)/
Slide show (p. 56)
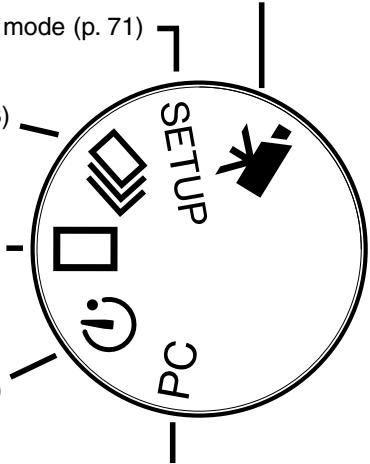
PC mode (p. 76)
The following diagram displays all icons on the panel to aid explanation.
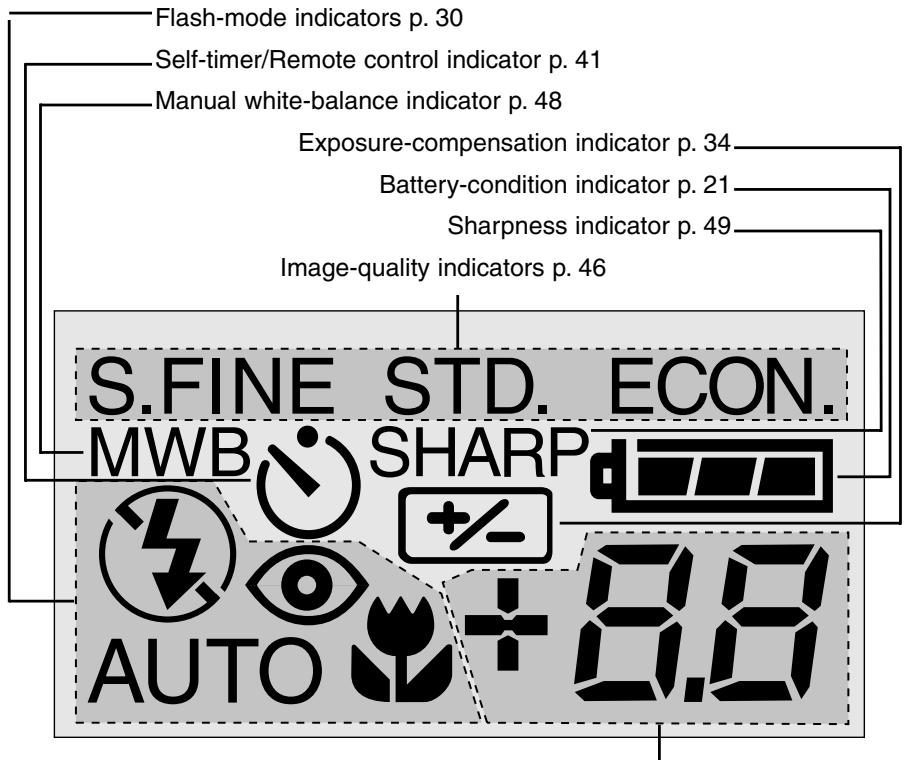
This area of the panel is used for the following:
- Frame counter* p. 50
- Exposure-compensation display p. 34
- No CompactFlash card indicator p. 23
* The frame counter will indicate the approximate number of images that can be stored on the CompactFlash card in the selected image quality or size modes; if a mode is changed, the frame counter will adjust accordingly on the data panel.
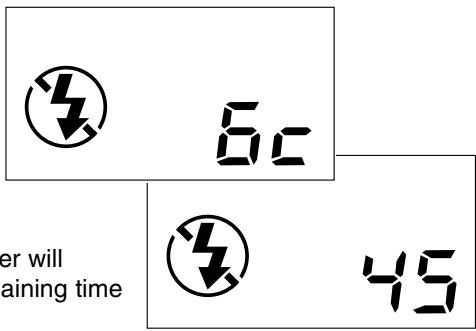
When in the movie-recording mode, the data panel will indicate the number of one-minute movie clips that can be recorded on the CompactFlash card; "c" is used as the abbreviation for clip. When less than one 60-second clip can be stored, the counter will indicate the number of remaining seconds. When recording, the data panel counter will countdown from 60 seconds or from the remaining time when less than one clip can be recorded.
GETTING UP AND RUNNING
This quick reference guide covers the basic operation of the camera so it can be used as soon as possible. However, it is recommended that the entire manual be read to properly operate the camera and achieve the best results.
- Conserving Battery Power
- Inserting the Batteries and CompactFlash Card
- Handling the Camera
- Turning On the Camera
- Taking Pictures
- Viewing Pictures
- Deleting Images
CONSERVING BATTERY POWER
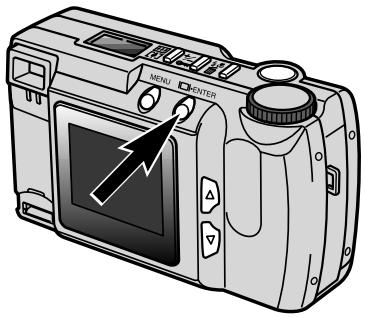
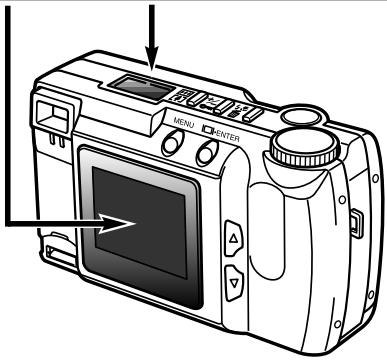
For long periods of use, or when travelling, battery power can be conserved by turning off the LCD monitor and using the viewfinder to take pictures.
Press the display/enter button to turn the monitor off. It can be turned on again by pressing and holding the display/enter button for about one second.
natural_image
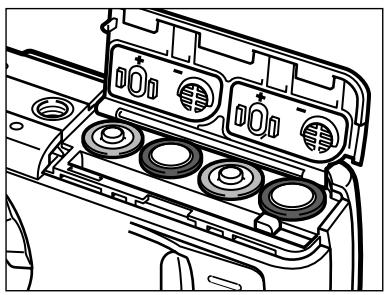
Technical line drawing of a car front bumper with multiple circular components (no text or symbols)1 Open the battery/card chamber door and insert the batteries.
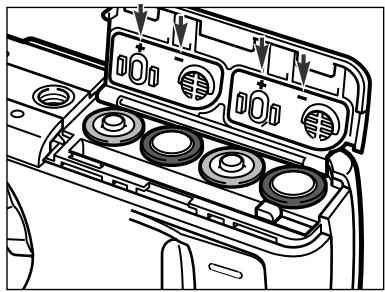
- Take care to match the positive and negative battery terminals with the indicators on the battery/card chamber door.
natural_image
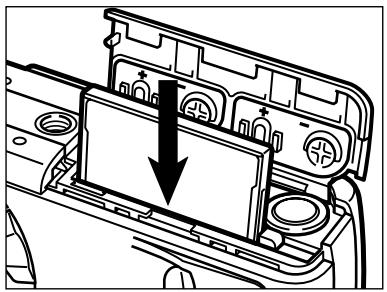
Diagram of a car interior showing a battery pack with an arrow indicating direction (no text or symbols present)2 Insert the CompactFlash card.
- Insert the card so the face is toward the back of the camera.
- Always push the card in straight, never at an angle.
- Never force the card. If the card does not fit, check its orientation.
HANDLING THE CAMERA
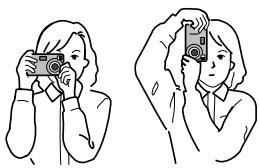
Grip the camera firmly with your right hand while supporting the body with your left hand. Keep your elbows at your side and your feet shoulder-width apart to hold the camera steady. Take care not to cover the lens with your fingers. Keep the camera strap around your wrist in case you drop the camera.
natural_image
Two line drawings of a person holding a camera, one taking the other (no text or symbols)TURNING ON THE CAMERA
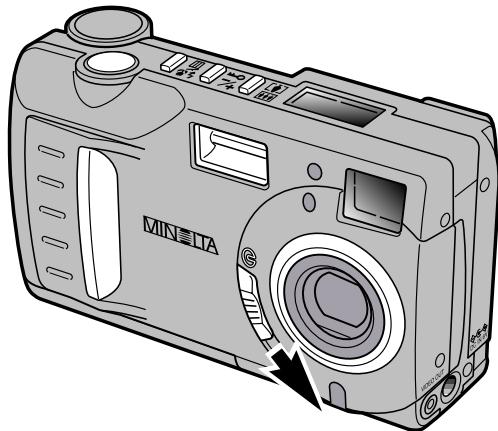
Move the lens cover slide to ⬇ to open the lens cover and turn on the camera.
- The LCD monitor on the back of the camera will automatically activate.
natural_image
Line drawing of a MINELA digital camera with no visible text or symbols on the bodyTAKING PICTURES (Recording Mode)
When the camera has been turned on, it is in recording mode. The viewfinder or LCD monitor can be used to take pictures.
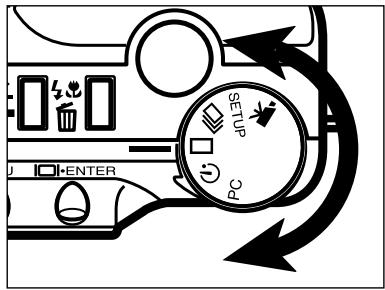
1 Turn the function dial to single-frame advance ( □ ).
natural_image
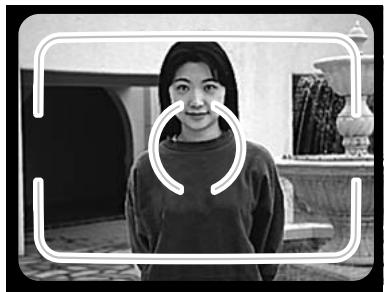
Black-and-white portrait of a woman in front of a fireplace, framed by a decorative border (no text or symbols visible)2 Frame the image either in the viewfinder or on the LCD monitor.
- To ensure correct focus, place the subject in the viewfinder's focus frame or centre the subject on the LCD monitor.
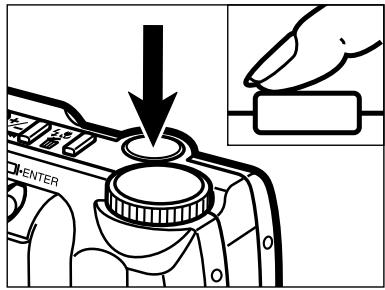
3 Press the shutter-release button partway down.
- The green focus lamp will glow to confirm the subject is in focus.
- The orange flash lamp will glow to indicate the flash is charged and ready.
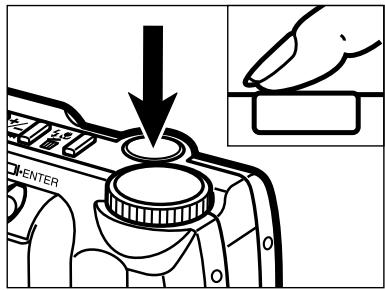
4 Press the shutter-release button all the way down to take the picture.
- If the LCD monitor is on, the captured image will briefly appear after the picture is taken.
- The green focus lamp will blink slowly while the recorded image is being written to the CompactFlash card.
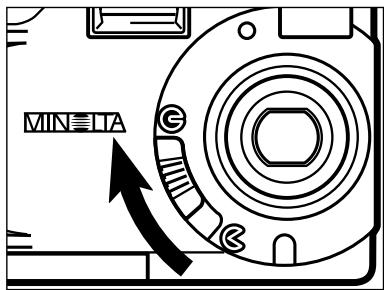
1 Move the lens cover slide to Ⓔ to turn off the camera. The camera must be shut down to play back images.
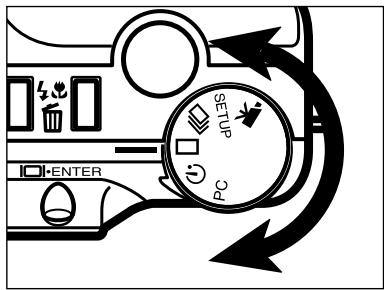
2 Turn the function dial to single-frame playback ( □ ).
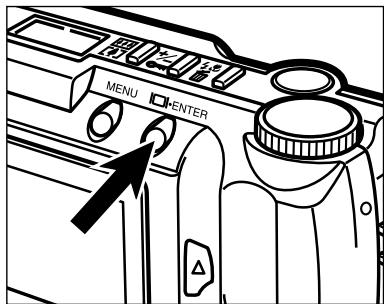
3 Press and hold the display/enter button for about 1 second until the LCD monitor activates. The camera is now in playback mode.
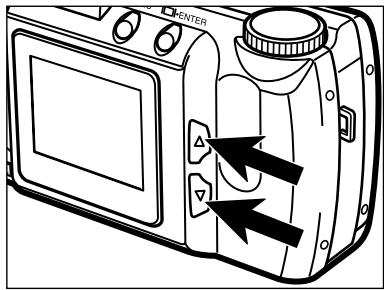
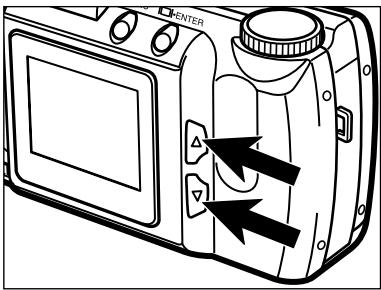
4 Press the scroll ( ▲ ▼ ) buttons to view the images.
1 By following the operations on the previous page, display the image to be deleted on the LCD monitor.
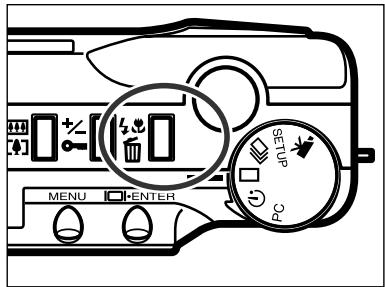
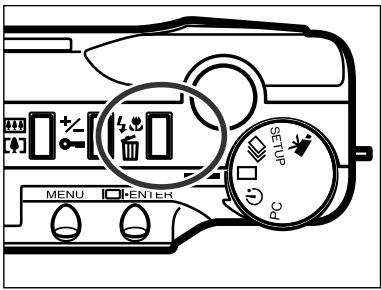
2 Press the flash-mode/delete button.
- A confirmation screen will appear.
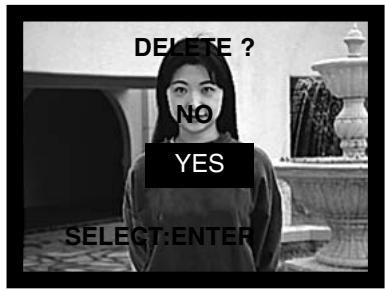
3 Press the scroll ( ▲ ▼ ) buttons to highlight "YES."
- "NO" will cancel the operation.
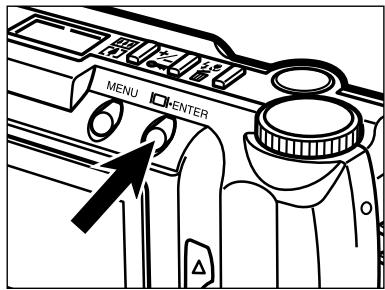
4 Press the display/enter button to delete the image.
- The confirmation screen in step 3 will reappear.
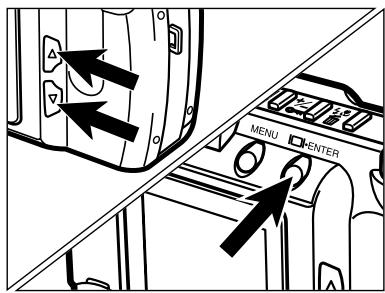
5 To return to the playback mode, press the scroll ( ▲▼ ) buttons to highlight "NO," then press the display/enter button.
SETTING UP THE CAMERA
- Changing Batteries
- Battery-power Indicators
- Auto Power Off
• Using the AC ADAPTOR - Attaching the Camera Strap
- Inserting the CompactFlash Card
- Removing the CompactFlash Card
CHANGING BATTERIES
The Minolta DiMAGE E201 uses four AA-size alkaline batteries or AA Ni-MH rechargeable batteries.
Ni-MH rechargeable batteries are able to power the camera for a longer time than Alkaline batteries. Please ensure you use a suitable charger for Ni-MH. Consult your vendor.
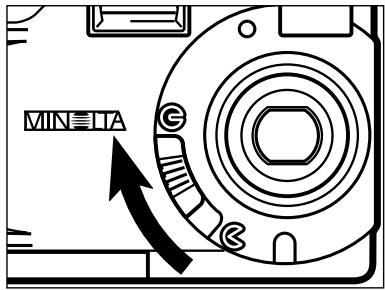
When replacing the batteries, make sure the camera has been turned off by moving the lens cover slide to Ⓔ.
- The CompactFlash card may be damaged if the batteries are removed without properly shutting off the camera.
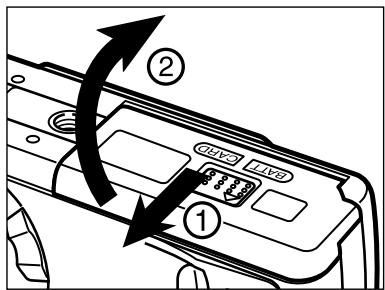
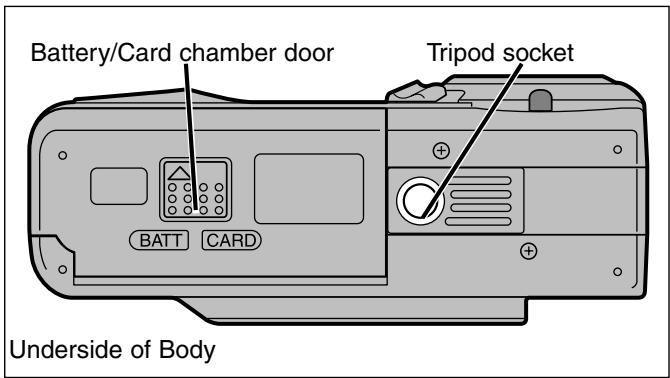
2 Open the battery/card chamber door by sliding it in the direction indicated (1), then open the door (2).
natural_image
Technical line drawing of a car interior showing dashboard, vented seats, and engine compartment (no text or symbols)3 Insert the batteries as indicated by the +/- marks on the back of the battery/card chamber door.
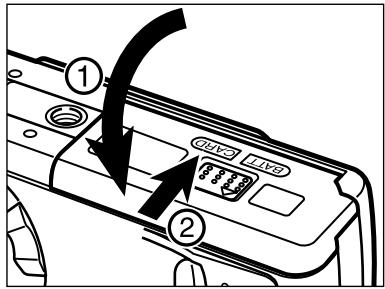
4 Fold the battery/card-chamber door down (1) and slide it slightly toward the front of the camera. Then, while pressing down, slide it back to the rear of the camera (2) until it clicks.
- After replacing the batteries, check that the clock in the camera (date and time) is correct (p. 71 - 74). When the AC adaptor is not used and the battery/card-chamber door remains open for more than 10 minutes, the clock in the camera may be delayed or reset to the default setting. If this happens, set the date and time by following the directions on pages 71 - 74.
BATTERY-POWER INDICATORS
This camera is equipped with an automatic battery-condition indicator. When the camera is on, the battery-condition indicator appears on the data panel on the top of the camera. If the data panel is blank, the batteries may be dead or installed incorrectly.

natural_image
Simple black-and-white battery icon with no text or symbolsFull-Battery icon - the battery is fully charged.

natural_image
Simple black-and-white battery icon with no text or symbolsLow battery icon - the battery is not fully charged, but all functions are operational.

natural_image
Simple black-and-white battery icon with no text or symbolsLow battery icon - battery power is very low, but all functions are operational. The batteries should be replaced as soon as possible.
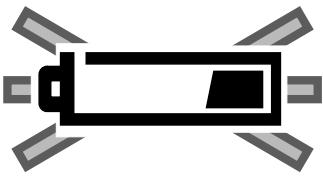
natural_image
Simple black-and-white icon of a battery with four metallic blades (no text or symbols)Blinking low battery icon - power is insufficient for camera operation. The shutter will not release. Replace the batteries immediately. The icon will appear for five seconds before the camera shuts down.
AUTO POWER OFF
To conserve battery power, the camera will shut down if an operation is not made within 3 minutes. To restore power in the recording mode, turn the camera off and on. To restore power in the playback mode, press and hold display/enter button to activate the LCD monitor.
- When using batteries, the length of the auto-power-off period can be changed in the setup mode (p. 71 - 74).
- When using the AC adaptor, the auto-power-off period is set at 30 minutes.
The AC Adaptor allows the camera to be powered from an electrical household outlet. During periods of heavy use, the AC adaptor can conserve battery power. Its use is recommended when the camera is connected to a computer.
Do not change the power supply while the camera is on. Always turn off the camera before changing between battery and AC operation.
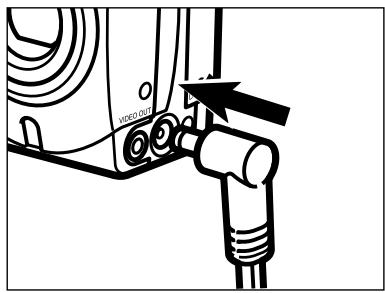
1 Insert the mini plug into the camera's DC terminal.
- The shape of the mini plug can vary with the AC adaptor model.
2 Insert the AC plug into an electrical outlet.
- The camera can now be turned on.
ATTACHING THE CAMERA STRAP
natural_image
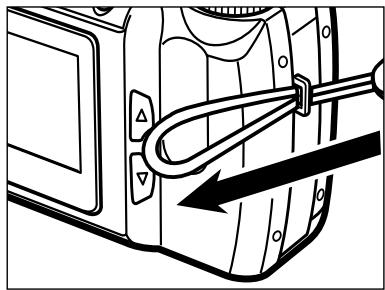
Technical line drawing of a mechanical component with no visible text or symbols1 Insert the smaller loop of the strap through the strap eyelet.
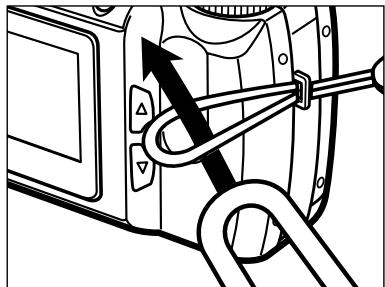
2 Pull the other end of the strap through the small loop and tighten.
INSERTING THE COMPACTFLASH CARD
A CompactFlash card must be inserted for the camera to operate. If a card has not been inserted, "CF" will appear on the data panel and a no-card warning will be displayed on the LCD monitor.
Always turn off the camera before inserting or removing a CompactFlash card otherwise the data on the card could be lost, and the card may be damaged.
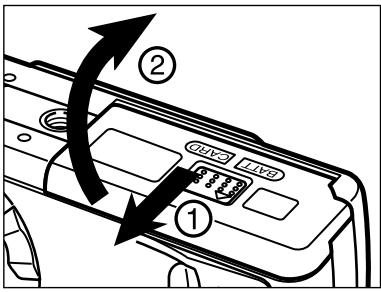
1 Open the battery/card chamber door by sliding it in the direction indicated (1), then open the door (2).
natural_image
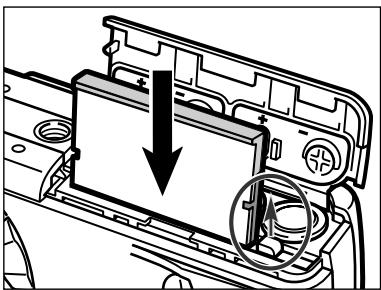
Diagram of a car interior showing a mechanical component with a downward arrow indicating a force or movement (no text or symbols present)2 Insert the CompactFlash card into the card slot until the card-release lever pops out.
- Insert the card so the face is toward the back of the camera. Always push the card in straight, never at an angle. Never force the card. If the card does not fit, check its orientation.
natural_image
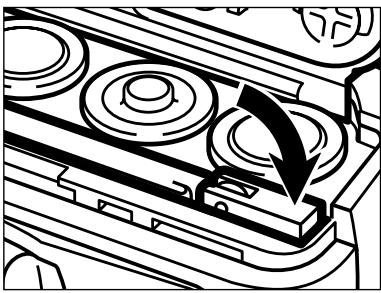
Technical line drawing of a mechanical component with circular features and a black arrow indicating direction (no text or symbols)3 Fold the card-release lever down as shown.
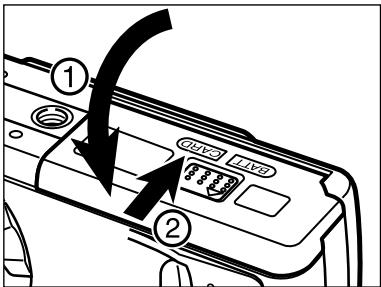
4 Fold the battery/card chamber door down (1) and slide it slightly toward the front of the camera. Then, while pressing down, slide it back to the rear of the camera (2) until it clicks.
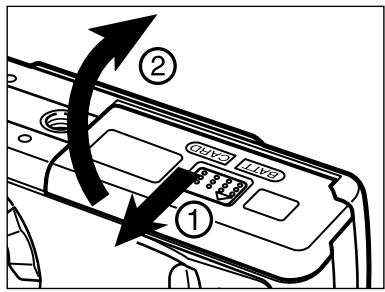
1 Confirm that the camera is off.
2 Open the battery/card chamber door by sliding it in the direction indicated (1), then open the door (2).
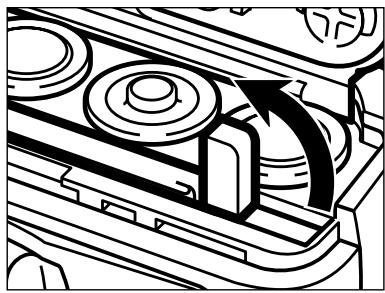
3 Straighten the card-release lever.
natural_image
Mechanical assembly diagram showing a rotating component with directional arrows (no text or symbols)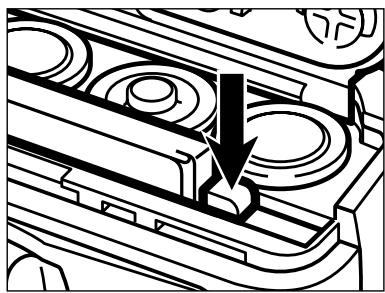
natural_image
Technical diagram of a mechanical component with a downward arrow indicating a process or assembly (no text or symbols present)4 Press the card-release lever to eject the card. Pull the CompactFlash card straight out.
- When the AC adaptor is not used and the battery/card-chamber door remains open for more than 10 minutes, the clock in the camera may be delayed or reset to the default setting. If this happens, set the date and time by following the directions on pages 71 - 74.
Be careful not to open the battery/card chamber door or disconnect the AC adaptor cable while the camera is in use. The CompactFlash card can be damaged if the camera loses power while data is being written to the card (the green focus lamp blinks slowly when an image is being transferred). If this happens, re-format the CompactFlash card after transferring the image data from the card to a personal computer.
TAKING PICTURES
- Setting the Camera in Recording Mode
- LCD Monitor Display
- Basic Recording Operation
- Focus Lock
- Focus Lamp / No Focus Indicator
• Special Focusing Situations - Focus Range
- Flash Modes
- Changing the Flash Mode
- Flash Lamp
- Flash Range
- Close-up Photography (Macro Mode)
- Exposure Compensation
- Digital Zoom
• Function Dial and Recording Modes - Movie Mode
- Movie-mode Displays
• Continuous-advance Mode
• Self-portraits (Self-timer) - IR Remote Control
SETTING THE CAMERA IN RECORDING MODE
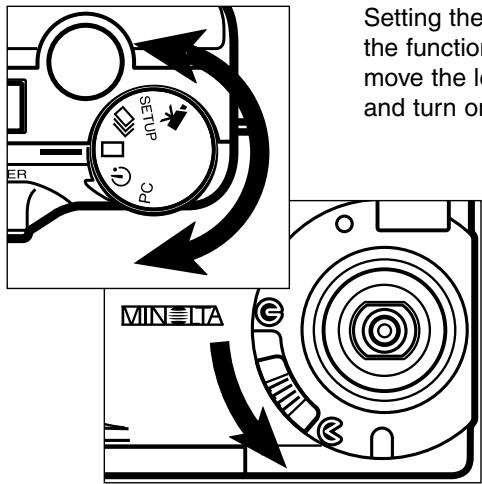
Setting the camera to recording mode is simple. Turn the function dial to single-frame advance (☐), and move the lens cover slide to ⊥ to open the lens cover and turn on the camera.
- The LCD monitor will automatically activate.
- To conserve battery power, the LCD monitor can be turned off using the display/enter button. The display/enter button can be pressed again to reactivate the monitor.
LCD MONITOR DISPLAY (Recording Mode)
Information about camera settings will appear on the LCD monitor for five seconds when the monitor is turned on or when the recording mode is changed. This information will also appear when setting the flash mode, digital zoom, or exposure-compensation value. When the camera is set in the autoflash mode, no flash-mode icon is displayed on the LCD monitor.
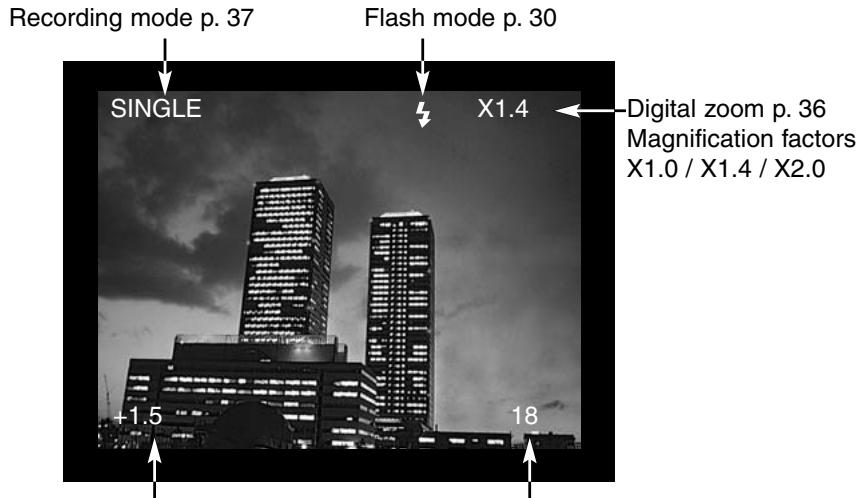
Exposure-compensation value
(From -2.0 to +2.0 in 0.5 increments) p. 34
Frame counter
(The frame counter displays the number of images on the CompactFlash card.)
natural_image
Black-and-white photo of a person standing indoors, no visible text or symbols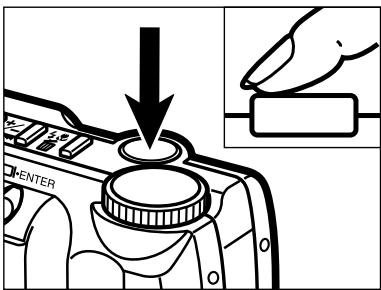
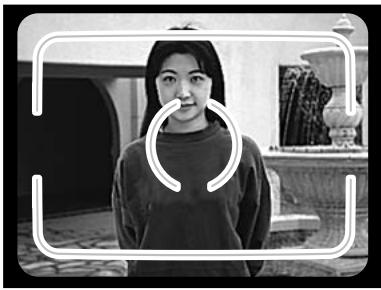
1 Place the subject in the viewfinder's focus frame or centre the subject on the LCD monitor.
- Use focus lock for off-centre subjects (p. 28).
- When holding the camera, make sure your fingers do not cover the lens.
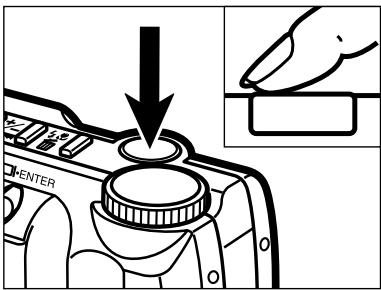
2 Press the shutter-release button partway down to activate the autofocus and exposure systems.
- The green focus lamp will glow to confirm that the subject is in focus. If the camera can not focus on the subject, the green focus lamp will blink. Repeat steps 1 and 2 until the focus lamp glows steadily.
- The orange flash lamp will blink if the flash is charging, and will glow steadily when the flash is charged and ready. While the flash is charging, the shutter will not release.
3 Press the shutter-release button all the way down to take the picture.
- The LCD monitor will briefly display the captured image.
- While the image is being written to the CompactFlash card, the green focus lamp will blink slowly. To prevent the loss of image data, do not remove the CompactFlash card or the AC adaptor from the camera until the image has been saved. The focus lamp will go out when this operation has been completed.
FOCUS LOCK
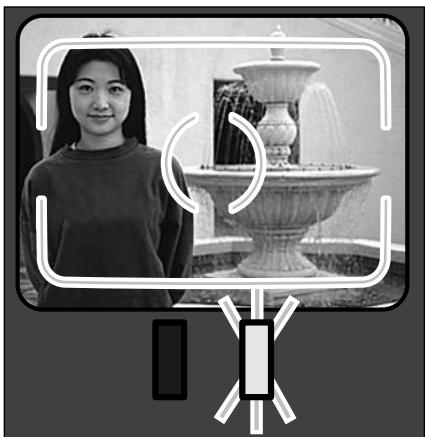
The focus-lock function is used when the subject is off-centre and outside the focus frame. Focus lock may also be used when a special focusing situation prevents the camera from focusing on the subject.
1

natural_image
Black-and-white photo of a person standing indoors with decorative frame and geometric shapes below (no text or symbols)Place the subject within the focus frame or centre the subject on the LCD monitor. Press and hold the shutter-release button partway down. The green focus lamp will glow to indicate that the focus is locked.
2
natural_image
Black-and-white photo of a woman standing in front of a fountain and decorative frame (no visible text or symbols)Without lifting your finger, recom- pose the subject within the image frame. Press the shutter-release button all the way down to take the picture.
FOCUS LAMP/NO FOCUS INDICATOR
natural_image
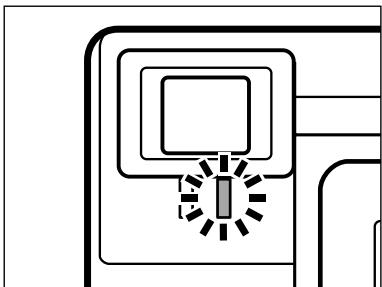
Pure electrical circuit lines without any symbolsThis digital camera has a quick, accurate autofocusing system. When the shutter-release button is pressed partway down, the autofocus system focuses on the subject in the viewfinder's focus frame and will maintain that setting until the shutter button is released. The focus lamp (green) will indicate the focus status when the shutter-release button is pressed partway down.
Focus Lamp Steady:
The camera is focused on the subject and the focus is locked.
Focus Lamp Blinking:
The subject is too close or a special focusing situation is preventing the autofocus system from locking on the subject.
SPECIAL FOCUSING SITUATIONS
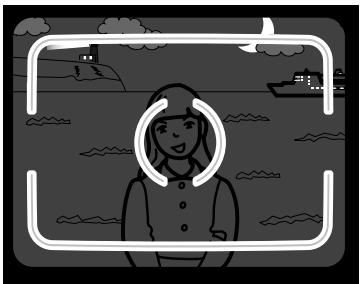
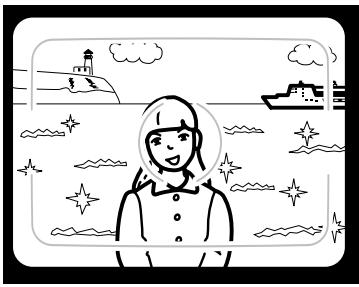
The camera may not be able to focus in certain situations (see below). If the autofocus system cannot focus on a subject, the focus lamp (green) will blink. Use the focus-lock function to focus on another object at the same distance as your main subject, then recompose to take the picture.
natural_image
Illustration of a person in uniform standing at night with ships and a moon in the background (no text or symbols)1 The subject is too dark.
natural_image
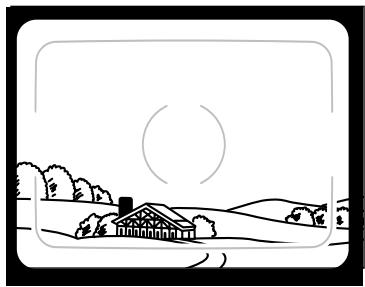
Simple line drawing of a rural landscape with houses, trees, and hills under a full moon (no text or symbols)2 The subject within the focus frame is low in contrast.
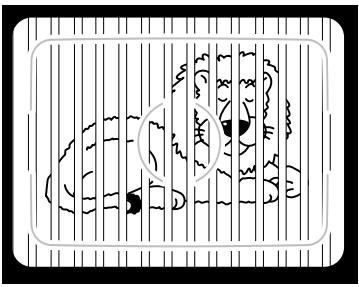
3 Two subjects at different distances overlap in the focus frame.
natural_image
Illustration of a person in a hooded outfit standing in front of a ship and starry seascape (no text or symbols)4 The subject is near a very bright object or area.
FOCUS RANGE
| Normal Focusing Mode | 0.6m -∞ (2 ft. -∞) |
| Macro Focusing Mode p. 32 | 0.3m - 0.6m (1 ft. - 2 ft.) |
The green focus lamp will blink to indicate that the subject is not within the focus range.
FLASH MODES
When the camera is turned on, the flash mode is automatically set to autoflash. Other flash modes can be chosen, but when the camera is turned off, it is reset to the autoflash mode.
| LCD Monitor Display | Data Panel Display | Flash Mode | |
| (No display) |  | AUTOFLASH | The flash will fire automatically when the light level is low. |
 |  | FILL-FLASH | The flash will fire every time a picture is taken, regardless of the lighting conditions. Use fill-flash to reduce harsh shadows on your subject's face caused by direct sunlight or when the subject is backlit. |
 |  | FLASH CANCEL | Use flash cancel when photographing subjects beyond the flash range or when flash photography is prohibited. The use of a tripod is recommended. |
 |  AUTO AUTO | AUTOFLASH WITH RED-EYE REDUC-TION | Use the red-eye reduction feature when photographing people or animals at night or in low-light situations. The flash will fire a few short bursts before the main flash burst. |
 |  | FILL-FLASH WITH RED-EYE REDUC-TION | |
 |  | MACRO MODE | For taking close-up photographs. When in macro mode, flash cancel is automatically set (p. 32). |
flowchart
graph TD
    A["↓"] --> B["AUTO"]
    C["↓"] --> D["AUTO"]
    E["↓"] --> F["AUTO"]
    G["↓"] --> H["AUTO"]
    I["↑"] --> J["↓"]
    K["↑"] --> L["↓"]
    M["↑"] --> N["↓"]
    O["↑"] --> P["↓"]
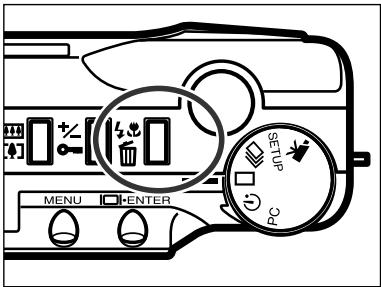
1 In recording mode, press the flash-mode/delete button.
- The current flash mode appears alone on the data panel with no other indicators.
- The flash-mode/delete button does not have to be pressed and held, it simply needs to be pressed once.
- The flash cannot be used or set in the continuous-advance or movie-recording modes.
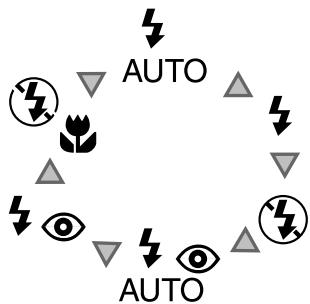
2 Press the scroll ( ▲▼ ) buttons until the desired flash mode is displayed on the data panel or LCD monitor
- Pressing the scroll-up (▲) button will cycle through the flash modes in the order illustrated.
- Pressing the scroll-down (▼) button will cycle through the flash modes in reverse order.
3 To set the flash mode, press the flash-mode/delete button or press the shutter-release button partway down.
- If no operation is made, the displayed flash mode will be automatically set.
natural_image
Pure electrical circuit lines without any symbolsThe orange flash lamp will indicate the flash status when the shutter-release button is pressed partway down.
Steady: flash is charged and ready.
Blinking: flash is charging.
FLASH RANGE
To ensure correct exposure, make sure your subject is positioned within the flash range.
| ISO - Normal setting | 0.6m - 2.5m (2 ft. - 8.2 ft.) |
| ISO - High setting | 0.6m - 5.0m (2 ft. - 16.4 ft.) |
- In photography, ISO is used to indicate the sensitivity of the film. See pages 44 - 49 for details about changing camera sensitivity.
CLOSE-UP PHOTOGRAPHY (Macro Mode)
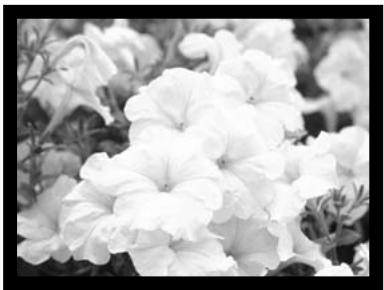
The macro function allows you to get closer to your subject. The minimum focusing distance in the macro mode is 0.3m (1 ft.). The macro mode can be used with the digital zoom (p. 36) to increase the close-up effect. This mode cannot be used in continuous-advance or movie mode.
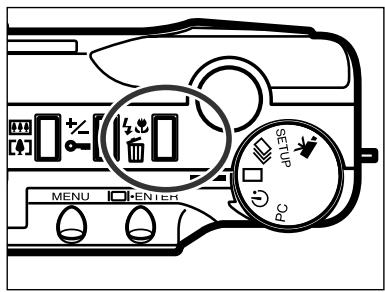
1 In single-frame advance recording mode, press the flash-mode/delete button.
- The current flash mode will appear on the data panel.
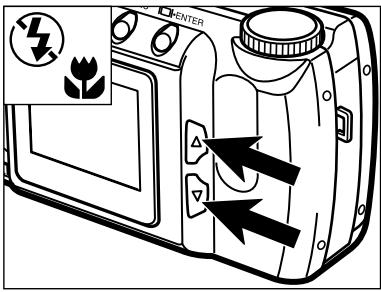
2 Press the scroll ( ▲▼ ) buttons until the macro-mode icon is displayed on the data panel.
- In macro mode, the LCD monitor cannot be turned off.
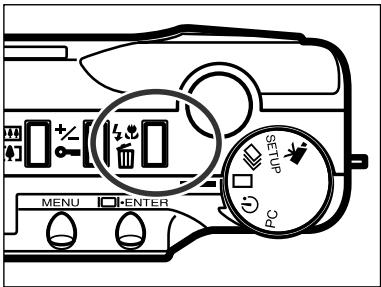
3 Press the flash-mode/delete button or press the shutter-release button partway down to set the macro function.
- The flash will not fire in macro mode.
natural_image
Black and white close-up of delicate white flowers with soft focus background (no text or symbols)4 Use the LCD monitor to compose the picture.
- For best results, steady the camera on a stable surface or use a tripod.
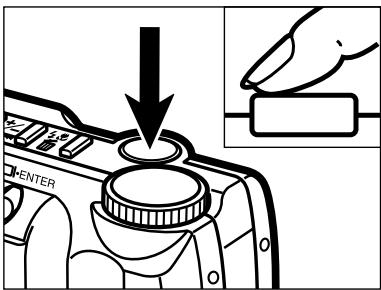
5 Press the shutter-release button partway down to lock the focus.
- If the green focus lamp blinks, check that your subject is within the macro focus range: 0.3m to 0.6m (1 ft. to 2 ft.).
6 Press the shutter-release button all the way down to take the picture.
- After the picture is taken, the macro-mode setting will remain in effect until the camera is reset or turned off.
EXPOSURE COMPENSATION
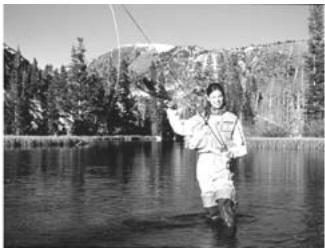
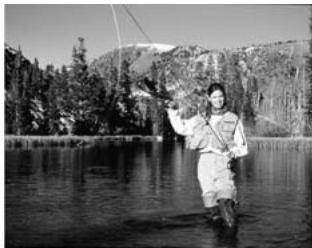
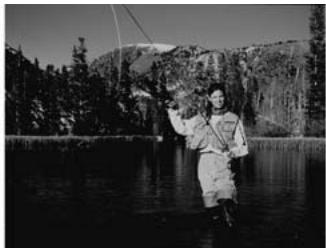
The exposure can be adjusted to make the final image lighter or darker. Exposure can be adjusted as much as ± 2 EVs in 0.5 increments. Exposure compensation must be set before the picture is taken. Exposure compensation can be used in all recording modes.
natural_image
Person fishing in a lake with forested hills in the background (no visible text or symbols)+EV
natural_image
Black-and-white photo of a person wading in a lake with forested hills in the background (no text or symbols visible)Normal
natural_image
Black-and-white photo of a person standing by a lake with mountains in the background (no visible text or symbols)- EV
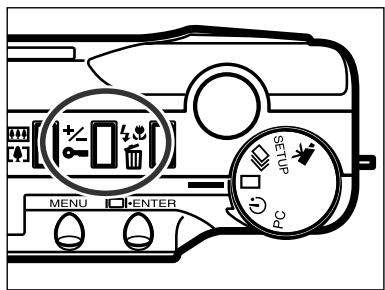
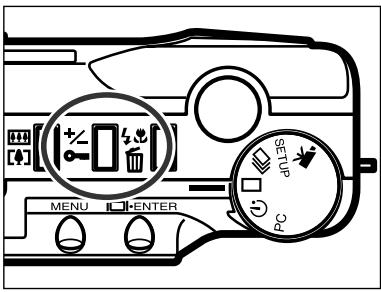
1 In a recording mode, press the exposure-compensation/lock button.
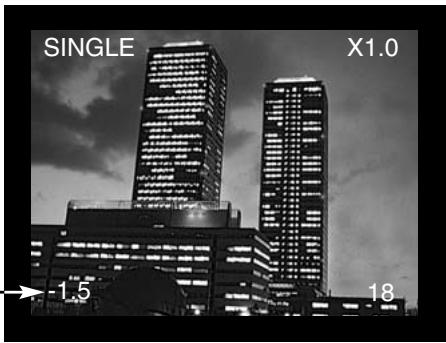
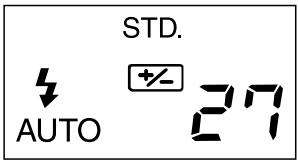
- The current exposure compensation value appears on the data panel and in the lower-left corner of the LCD monitor.
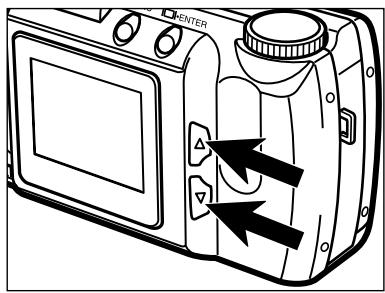
2 Press the scroll ( ▲▼ )buttons to select the exposure-compensation value.
- The exposure can be adjusted by as much as ± 2 EVs in 0.5 increments.
- The change in exposure is visible in the live image on the LCD monitor.
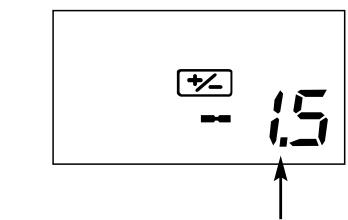
Exposure-compensation value
3 Press the exposure-compensation/lock button or press the shutter-release button partway down to set the exposure adjustment.
- The exposure-compensation indicator (☑) will remain on the data panel as a reminder that the exposure has been adjusted.
- After the picture is taken, the exposure-compensation setting will remain in effect until the camera is turned off or reset to 0.0.
EV stands for exposure value. A change of one EV will adjust the exposure calculated by the camera by a factor of two.
| EV value | Change in exposure | Adjustment in exposure |
| +2.0 | +2 stops | 4X as much light |
| +1.0 | +1 stop | 2X as much light |
| 0.0 | Calculated exposure | |
| -1.0 | -1 stop | 1/2 as much light |
| -2.0 | -2 stops | 1/4 as much light |
Sometimes the camera's exposure meter is deceived by certain conditions. Changing the exposure value can compensate for these situations. For example, a very bright scene, such as a snowy landscape or a white sandy beach, can appear too dark in the captured image. Before taking the picture, adjusting the exposure by +1 or +2 EV will result in an image with normal tones.
natural_image
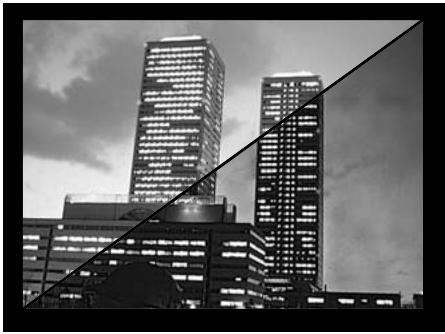
Black-and-white cityscape featuring two tall illuminated skyscrapers against a cloudy sky, with a diagonal line overlay (no text or symbols visible)In the example on the left, the dark scene appears bright and washed-out on the LCD monitor. By decreasing the exposure by -1.5 EV, the richness of the sunset is preserved.
DIGITAL ZOOM
The digital zoom can magnify the picture up to twice the size of a normal image. The increase in magnification can be viewed on the LCD monitor; the viewfinder is unable to display the change in magnification. Always use the LCD monitor to compose your picture. The digital zoom cannot be used in the movie mode.
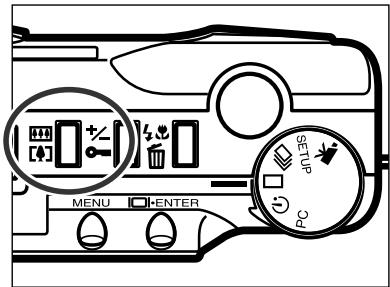
1 In a still-image recording mode, press the digital-zoom button.
- The zoom magnification appears in the upper-right corner of the LCD monitor.
- The digital-zoom feature cannot be used with half-size images (p. 47).
- When the digital-zoom button is pressed, the LCD monitor automatically turns on..

2 Press the scroll ( ▲▼ ) buttons to change the magnification on the LCD monitor.
- As the scroll-up button is pressed, the zoom magnification will increase in the following order: X1.0, X1.4, X2.0.
- After the picture is taken, the digital-zoom setting will remain in effect until the digital-zoom button is pressed again or the camera is turned off.
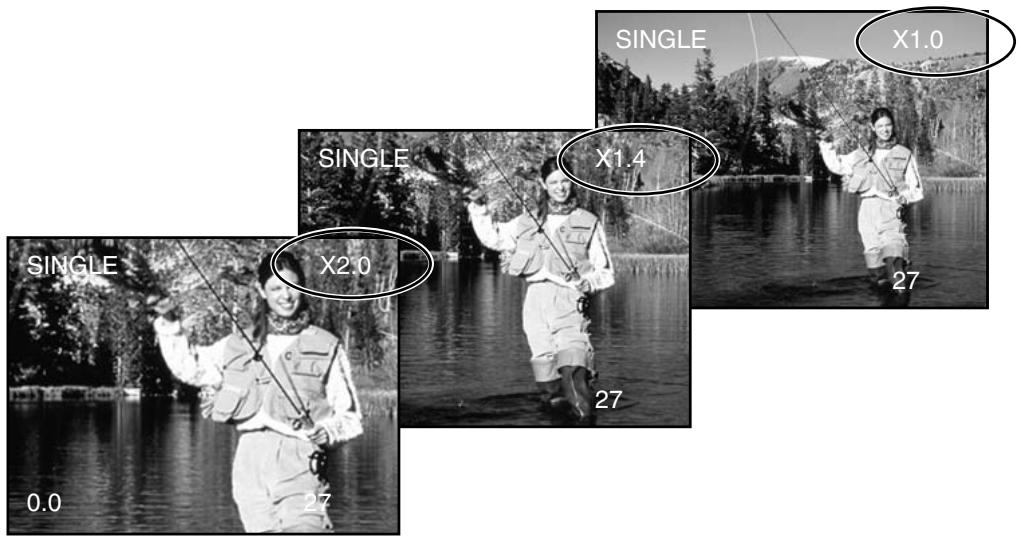
- Images recorded with the digital zoom are trimmed horizontally and vertically and are not interpolated (resized back) to 1796 x 1200 pixels. As a result, as the zoom magnification increases, the file size of the image decreases and the data panel frame counter adjusts accordingly. However, when displayed on the LCD monitor, the images will be enlarged to fit the screen.
| Magnification | Image Size (horizontal X vertical) |
| X1.4 | 1280 X 856 pixels |
| X2.0 | 896 X 600 pixels |
FUNCTION DIAL AND RECORDING MODES
| LCD Monitor Display | Function Dial | Recording Mode | |
| MOVIE |  | Movie Recording | To record moving images of up to 60 seconds (p. 39). |
| CONT. |  | Continuous-Advance | To take multiple images at one time (p. 38). |
| SINGLE |  | Single-frame Advance | To take single images (see basic recording operation p. 27). |
| TIMER |  | Self-timer / Remote Control | To take self-portraits (p. 41) and to take pictures using the optional IR remote control (p. 42). |
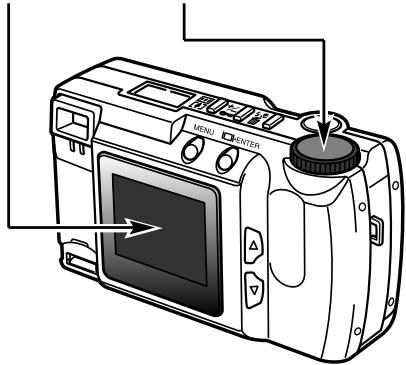
MOVIE MODE
This digital camera can take movie clips of up to 60 seconds in length. In the movie-recording mode, the flash is automatically cancelled, the white balance controls are set to AUTO, and the camera exposure sensitivity is set to normal. Control of over exposure can be made with the exposure-compensation function (p. 34). The digital zoom cannot be used.
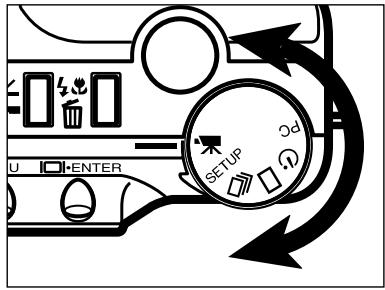
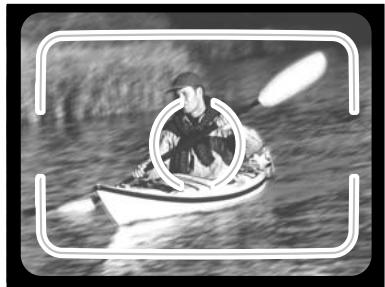
1 Turn the function dial to set the camera in movie mode.
natural_image
Black-and-white photo of a person in a small boat with illuminated windows, viewed through a circular frame (no text or symbols visible)2 Frame the picture as instructed in step 1 and 2 of the basic recording operation section on page 27.
- Exposure for the movie clip is determined when the shutter-release button is pressed partway down before the clip is taken.
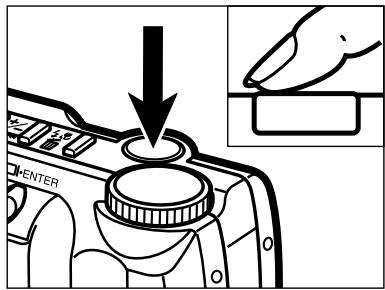
3 Press the shutter-release button all the way down and release to start recording.
- The data panel and LCD monitor will count down the remaining time while recording.
- The green focus lamp will blink to indicate the camera is recording.
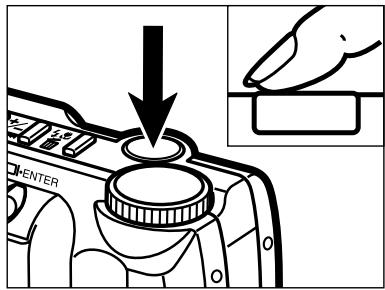
4 Press the shutter-release button to stop recording.
- The camera will continuously record until the shutter-release button is pressed again, or the maximum recording time has been reached.
LCD Monitor
The counter will indicate the number of movie clips on the CompactFlash card when the camera is not recording. When recording, the counter will start counting down from 60 seconds or from the remaining time when less than one clip can be recorded.
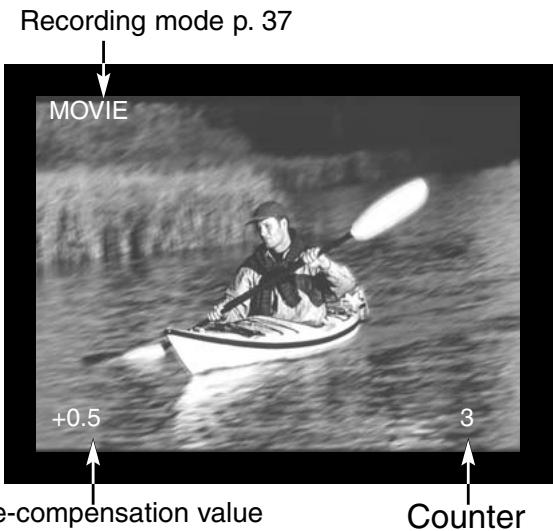
Exposure-compensation value (From -2.0 to +2.0 in 0.5 increments) p. 34
Data Panel
When in the movie-recording mode, the data panel will indicate the number of one minute movie clips that can be recorded on the CompactFlash card; "c" is used for the abbreviation for clip. When less than one 60-second clip can be stored, the counter will indicate the number of remaining seconds that can be recorded.
When recording, the data-panel frame counter will countdown from 60 seconds or from the remaining time when less than one clip can be recorded.
CONTINUOUS-ADVANCE MODE
The camera can continuously take pictures while the shutter-release button is held down. The maximum number of images that can be captured at one time depends on the image quality selected (p. 46). Image size (p. 47) has no effect on the maximum number of images that can be captured. The built-in flash does not operate in the continuous-advance mode.
| Image Quality | Maximum Number of Images |
| S.FINE (Super Fine) | 1 |
| FINE (Fine) | 4 |
| STD. (Standard) | 8 |
| ECON. (Economy) | 12 |
flowchart
graph TD
    A["Input"] --> B["Processing"]
    B --> C["Output"]
    C --> D["SETUP"]
    D --> E["Feedback Loop"]
    E --> A
    style A fill:#f9f,stroke:#333
    style B fill:#ccf,stroke:#333
    style C fill:#cfc,stroke:#333
    style D fill:#fcc,stroke:#333
    style E fill:#ffc,stroke:#333
natural_image
Black-and-white photo of a person standing indoors, framed by a white circular graphic element (no text or symbols)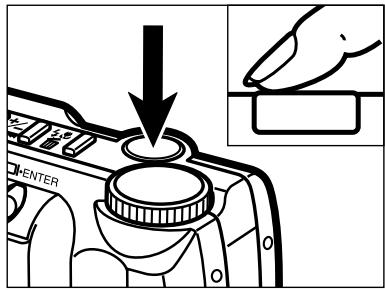
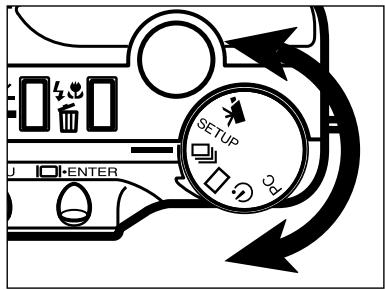
1 Turn the function dial to 📋 to set the camera in continuous-advance mode.
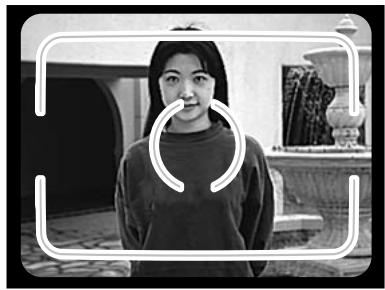
2 Frame the picture as instructed in step 1 and 2 of the basic recording operation section on page 27.
- Focus and exposure for the series are determined when the shutter-release button is pressed partway down before the pictures are taken.
3 Press and hold the shutter-release button all the way down.
- The shutter will continuously fire until the shutter-release button is released, or the maximum number of images has been captured.
SELF-PORTRAITS (Self-timer)
The self-timer will delay the release of the shutter for approximately 10 seconds after the shutter-release button has been pressed. The digital zoom, flash, exposure compensation, and macro mode can be used.
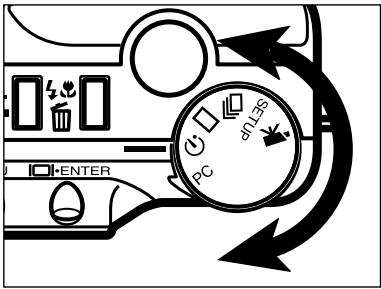
1 Place the camera on a tripod and turn the function dial to ⏻ to set the self-timer.
natural_image
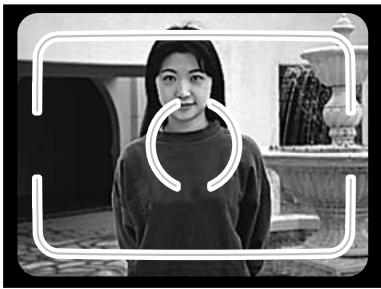
Black-and-white photo of a person standing indoors, framed by a white outline (no text or symbols visible)2 Arrange the camera and subject to compose the picture. Frame the picture as instructed in step 1 and 2 of the basic recording operation section on page 27.
- If the subject is outside the focus frame, use the focus-lock function (p. 28).
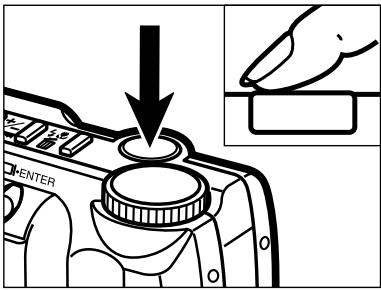
3 Press the shutter-release button all the way down to start the self-timer.
- The self-timer lamp on the front of the camera will blink slowly for eight seconds; it will start to blink rapidly and then glow steadily just before the shutter releases.
- Do not press the shutter-release button while standing in front of the camera. When the shutter button is pressed, focus and exposure for the picture is set.
- To cancel the countdown, turn the function dial to another position. Turning off the camera will also cancel the countdown.
IR REMOTE CONTROL (SOLD SEPARATELY)
The IR Remote Control RC-3 allows remote camera operation up to 5m (16 ft.) away.
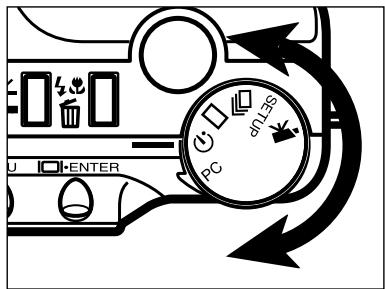
1 Place the camera on a tripod, and turn the function dial to ⚙️ to set the self-timer / remote control mode.
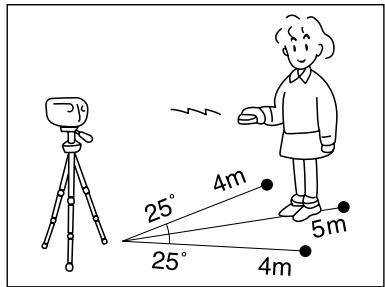
2 Arrange the camera and subject to compose the picture. Frame the subject within the focus frame when setting up the camera.
- Focus lock cannot be used with the IR remote control.
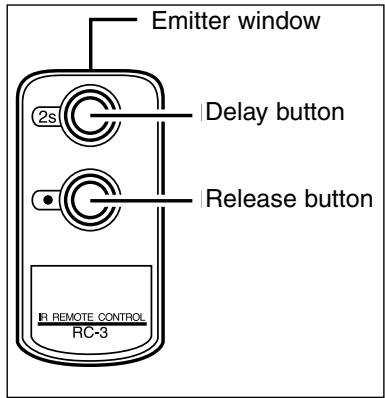
3 While pointing the emitter window of the remote control unit toward the camera, press the release button or the delay button to take the picture.
- When the release button is pressed, the lamp on the front of the camera will blink once before the picture is taken.
- When the delay button is pressed, the lamp on the front of the camera will blink for two seconds before the picture is taken.
- The remote control may not operate with backlit subjects or under fluorescent light.
RECORDING-MODE MENU Controlling the Image
The recording-mode menu can only be used for still-image recording.
- Navigating the Recording-mode Menu
- Image Quality
- Image Size
- Image-file Size
- White Balance
- Sharpness
- Camera Sensitivity (ISO)
- CompactFlash Card Capacity
NAVIGATING THE RECORDING-MODE MENU
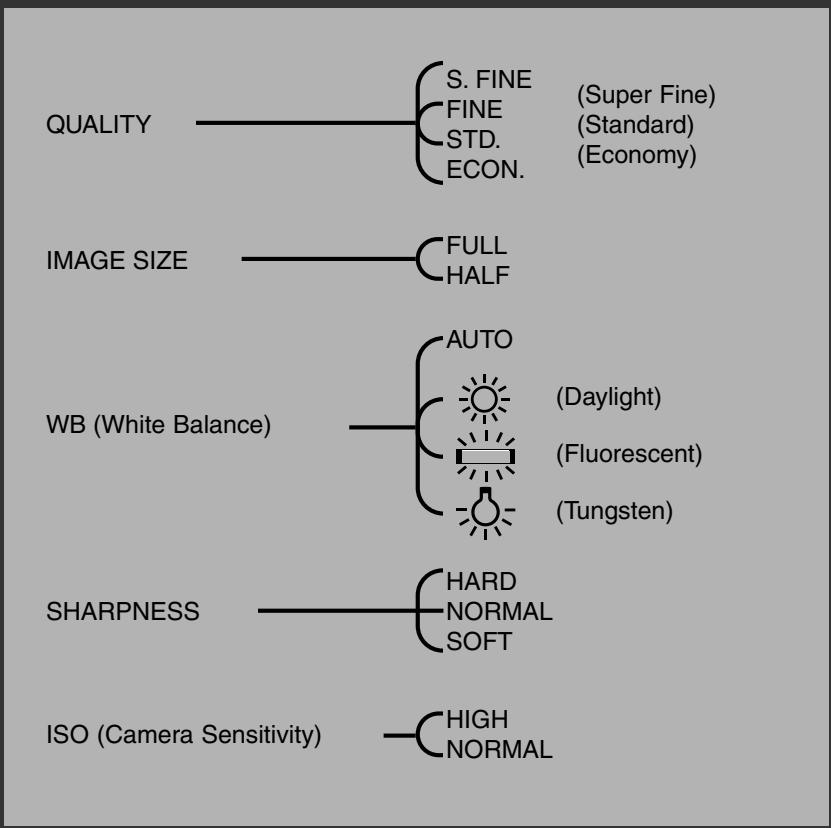
The recording-mode menu allows changes to be made to the camera's default settings to alter image quality, size, colour, and sharpness as well as the camera's sensitivity.
The recording-mode menu cannot be used with movie recording.
Navigating the recording-mode menu is quick and simple. Turn on the camera and set the function dial to a still-image recording mode. Simply highlight the item you want to change and enter it. The desired setting is then highlighted and entered.
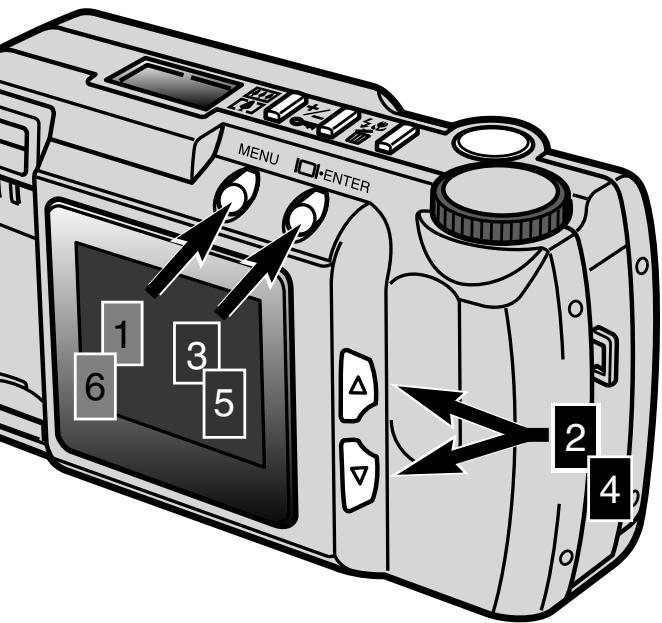
1 Press the menu button to activate the recording-mode menu.
2 Use the scroll buttons to highlight the function to be changed.
3 To select the highlighted function, press the display/enter button.
4 Highlight the desired setting using the scroll buttons.
5 Select the desired setting by pressing the display/enter button.
6 Exit the recording-mode menu by pressing the menu button.
| QUALITY | STD |
| IMAGE SIZE | FULL |
| WB | AUTO |
| SHARPNESS | NORMAL |
| ISO | NORMAL |
Recording-mode Menu
Recording-mode Menu
flowchart
graph TD
    A["QUALITY"] --> B["S. FINE (Super Fine)"]
    A --> C["FINE (Standard)"]
    A --> D["STD. (Economy)"]
    A --> E["STD. ECON."]
    F["IMAGE SIZE"] --> G["FULL HALF"]
    H["WB (White Balance)"] --> I["AUTO (Daylight)"]
    H --> J["Fluorescent (Tungsten)"]
    H --> K["SWITCH (Fluorescent)"]
    L["SHARPNESS"] --> M["HARD NORMAL SOFT"]
    N["ISO (Camera Sensitivity)"] --> O["HIGH NORMAL"]
Image size, white balance, and sharpness reset when the camera is turned off. Image quality and camera sensitivity (ISO) must be reset manually through the recording-mode menu or by the default function in the setup menu (p. 71 - 75).
IMAGE QUALITY
This digital camera has four image-quality modes: super-fine (S.FINE), fine (FINE), standard (STD.), and economy (ECON.). Always select the desired image quality before recording the image.
Image quality controls the rate of image compression and image-file size, but has no effect on the number of pixels in the image. The lower the rate of compression, the higher the image quality and the larger the file size. The super-fine mode will produce the highest quality images and the largest image files; the economy mode will produce the lowest quality images and the smallest files.
The standard image-quality setting is sufficient for normal usage. If high image quality is important, use the super-fine or fine modes. However, if economic use of the CompactFlash card is more important than image quality, use the economy mode. One CompactFlash card can contain images with differing image qualities.
| Image-quality Modes | Rate of Compression |
| Super-fine | 1:1 (No Compression) |
| Fine | 1:5 (Approx.) |
| Standard | 1:13 (Approx.) |
| Economy | 1:26 (Approx.) |
If the image quality is changed, the camera will automatically calculate how many images at the chosen setting can be written to the CompactFlash card. The number of images which may be stored on a particular CompactFlash card is displayed on the frame counter on the data panel.
The image-quality setting will not reset when the camera is turned off. Image quality must be reset manually. The image-quality setting is displayed on the data panel on the top of the camera.

IMAGE SIZE
Two image sizes can be selected: full and half. Always set the desired image size before recording the image. The image size will effect the number of images that can fit on a CompactFlash card; half-size images have smaller file sizes. Although full and half-size images are displayed in the entire LCD-monitor area, half-size images will be smaller when displayed on a computer because of reduced pixel resolution.
| Image Size | Number of Pixels (hor. X vert.) |
| Full | 1796 X 1200 |
| Half | 800 X 600 |
The image-size setting will reset to full size when the camera is turned off. The image-size setting is not indicated on the data panel or LCD monitor. Check the menu to confirm that the camera is set to the desired image size.
IMAGE-FILE SIZE
The file size of the image is determined by image quality and size. Because the image-quality settings rate of compression is dependent on the subject, the actual file size will be determined by the scene; some images will be compressed further than others. The table below is a list of average file sizes.
Approximate File Sizes
| Image Quality Size | Super Fine | Fine | Standard | Economy |
| FULL | 6380KB | 850KB | 330KB | 170KB |
| HALF | 1430KB | 190KB | 70KB | 40KB |
WHITE BALANCE
White Balance is the camera's ability to make different types of lighting appear neutral. The effect is similar to selecting daylight or tungsten film, or using colour compensating filters in conventional photography.
The manual white-balance settings are useful when the scene is dominated by one colour; the interior of a forest is primarily green. While the automatic white balance may over-correct under this condition, the daylight setting will preserve the vibrant greens. The white-balance setting will reset to AUTO when the camera is turned off.
| AUTO | Automatic White-balance | The AUTO setting will detect the type of light and adjust the white balance accordingly. |
 | Daylight | For outdoor and sunlit subjects. |
 | Fluorescent | For fluorescent lighting: office ceiling lights. |
 | Tungsten | For incandescent lighting: household filament light bulbs . |
If the daylight, fluorescent, or tungsten setting is selected, the manual white-balance indicator (MWB) will appear on the data panel. If a manual white-balance setting is selected, set the flash mode to “flash cancel” (p. 31); the flash’s white-balance control will override the manual white-balance setting. When using the manual white balance in low-light conditions, the use of a tripod is recommended or the camera sensitivity can be set to high to reduce camera shake.
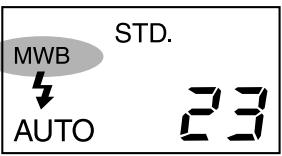
Data Panel Display
SHARPNESS
The sharpness of the images can be altered. This must be set before the image is recorded. Three sharpness options are available: HARD, NORMAL, and SOFT.
HARD: increases the sharpness of the image, accentuating details.
NORMAL: no filter applied.
SOFT: softens the image, smoothing fine detail
If “HARD” or “SOFT” is selected, the sharpness indicator (SHARP) will appear on the data panel. The sharpness setting will be reset to “NORMAL” when the camera is turned off.
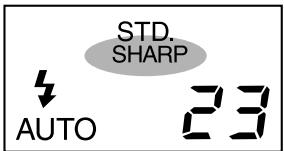
Data Panel Display
CAMERA SENSITIVITY (ISO)
In photography, ISO is used to indicate the sensitivity of the film. The CCD used in this camera has an equivalent sensitivity of ISO 85. By changing this setting, the camera sensitivity can be increased four times to an equivalent of ISO 340. This extends the camera's performance by allowing images to be taken in low-light situations and indoor locations without flash, as well as extending the flash range.
| ISO setting | Film-speed equivalent | Flash range |
| Normal | ISO 85 | 0.6m - 2.5m (2 ft. - 8.2 ft.) |
| High | ISO 340 | 0.6m - 5.0m (2 ft. - 16.4 ft.) |
The ISO setting is not reset when the camera is turned off. It must be reset manually. A change in ISO is not indicated on the data panel or LCD monitor. For optimum results under normal lighting conditions, set the ISO to “NORMAL.”
The number of images that can fit on a CompactFlash card is determined by the size of the card (8MB, 16MB, 32MB, 64MB, etc.) and the file size of the images. The actual file size of the images is determined by the scene; some subjects can be compressed further than others. The table below is a list of the approximate number of average-size images that can fit on an 8MB CompactFlash card.
Approximate Card Capacity using an 8MB CompactFlash Card
| Image Quality Size | Super Fine | Fine | Standard | Economy |
| FULL | 1 | 9 | 24 | 47 |
| HALF | 5 | 41 | 100 | 178 |
- Approximately 40 seconds of digital video can be recorded on an 8MB CompactFlash card.
- One CompactFlash card can have a combination of images of differing quality and size.
- The data panel frame counter will indicate the number of images that can be stored on the compact flash card in the selected image-quality or size modes; if a mode is changed, the frame counter will adjust accordingly.
- The frame counter on the LCD monitor indicates the number of images on the CompactFlash card, not how many more images can be stored.
- The card-full warning will appear on the LCD monitor when no more images at the current camera settings can be taken. It maybe possible to record more images by changing the image-quality or image-size settings.
- The data-panel frame counter cannot exceed 99. When using large capacity CompactFlash cards, or when capturing images with very small file sizes, the number of images that can be captured can exceed 99; the frame counter on the data panel will display +99. The frame counter will continue counting down when the number of images that can be captured falls below 100. The LCD monitor always displays the total number of images on the CompactFlash card.
VIEWING PICTURES Playback Mode
The DiMAGE E201 is in playback mode when the camera has been turned off and the LCD monitor has been activated using the display/enter button.
- Single-frame Playback
- Index Playback
- Turning off the Camera in Playback Mode
- Enlarged Playback
- Slide Show
- Navigating the Slide-Show Menu
- Movie Playback
• Viewing Images on a Television
SINGLE-FRAME PLAYBACK
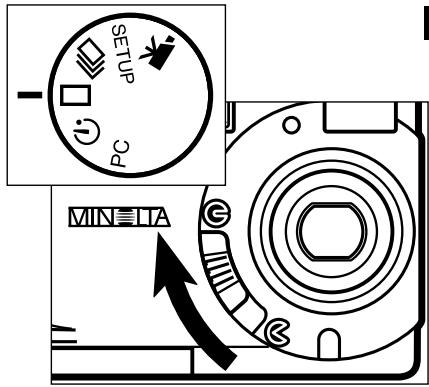
1 Turn the function dial to □ and move the lens cover slide to Ⓔ to turn off the camera and set it in single-frame playback mode.
- The camera must be off for the playback mode to function.
2 Press and hold the display/enter button until the LCD monitor activates.
- The last image recorded will be displayed on the LCD monitor.
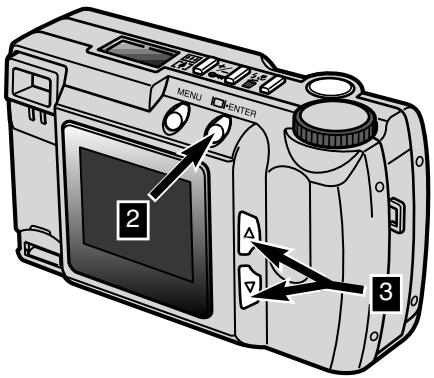
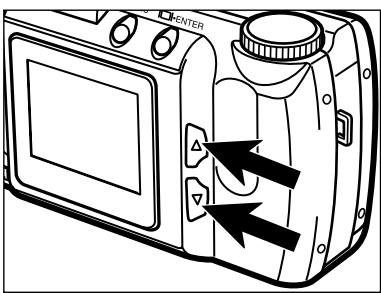
3 Press the scroll ( ▲▼ ) buttons to view the images.
- The scroll-down (▼) button cycles through the images in ascending order, and the scroll-up (▲) button cycles through the images in descending order. When scrolling through the images, the first and last images are consecutive.
Playback-mode indicator
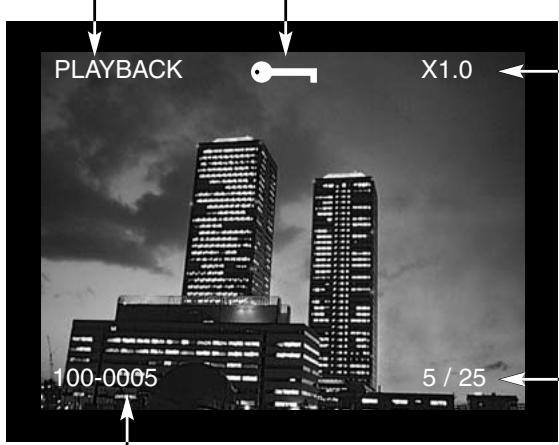
.Enlarged playback p. 54
Magnification factors X1.0 / X2.0 / X3.0

natural_image
Black left-pointing arrow on white background (no text or symbols)Folder number - Image-file number (p. 84)
Frame number / total number of images
INDEX PLAYBACK
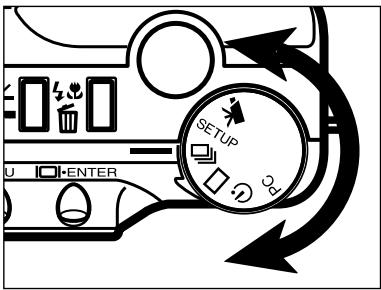
flowchart
graph TD
    A["Device 1"] --> B["Device 2"]
    B --> C["Device 3"]
    C --> D["Device 4"]
    D --> E["Device 5"]
    E --> F["Device 6"]
    F --> G["Device 7"]
    G --> H["Device 8"]
    H --> I["Device 9"]
    I --> J["Device 10"]
    J --> K["Device 11"]
    K --> L["Device 12"]
    L --> M["Device 13"]
    M --> N["Device 14"]
    N --> O["Device 15"]
    O --> P["Device 16"]
    P --> Q["Device 17"]
    Q --> R["Device 18"]
    R --> S["Device 19"]
    S --> T["Device 20"]
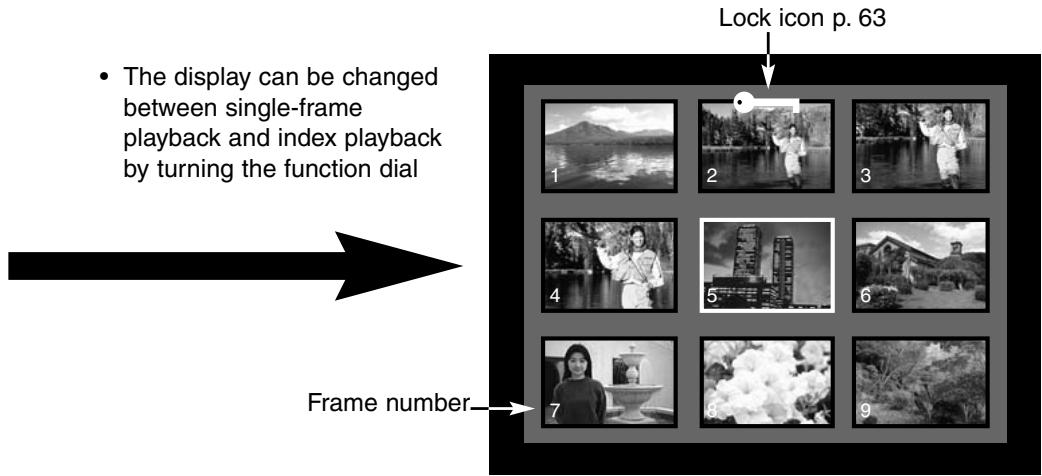
1 While in single-frame playback, turn the function dial to □ to change to the index playback mode.
- In index playback, the monitor displays nine thumbnail images.
- A white border indicates the selected image.
2 Press the scroll ( ▲▼ ) buttons to move the white border.
- Pressing the scroll-down (▼) button moves the border to the next image. Pressing the scroll-up (▲) button moves the border to the previous image.
- When the border reaches the image at the bottom-right, pressing the scroll-down button displays the next five frames so that the next image is positioned at the centre of the nine-image index.
- When the border is on the image at the top-left, pressing the scroll-up button displays the previous five frames so that the next image is positioned at the centre of the nine-image index.
TURNING OFF THE CAMERA IN PLAYBACK MODE
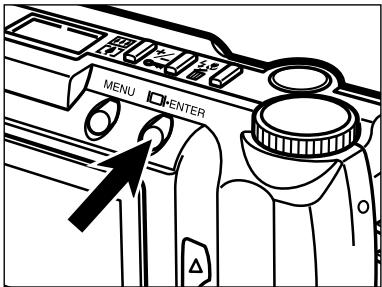
Press the display/enter button to turn off the LCD monitor; all the camera's functions are shut down.
ENLARGED PLAYBACK
In enlarged playback, the image can be magnified on the LCD monitor by up to three times the display size. The enlarged-playback magnification will reset to X1.0 when the camera is turned off.
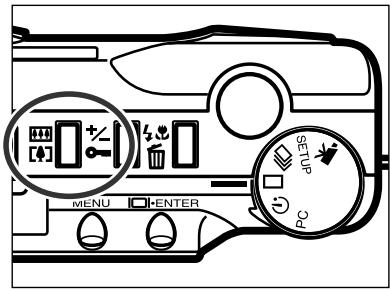
1 In single-frame playback mode, press the digital-zoom button.
- The enlargement magnification of X1.0 will appear in the upper-right corner of the LCD monitor.
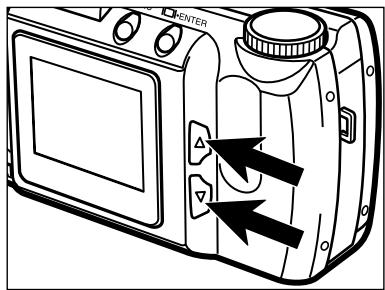
2 Press the scroll ( ▲▼ ) buttons to select the desired magnification setting.
- The change in magnification is instantly visible on the LCD monitor.
- Pressing the digital-zoom button again will reset the playback magnification to X1.0 and exit the enlarged-playback mode.
X1.0
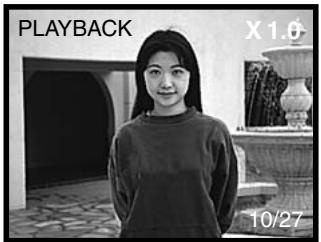
X2.0
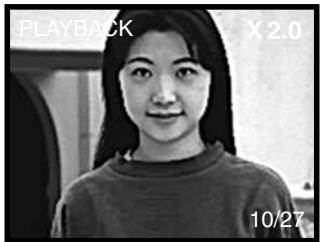
X3.0
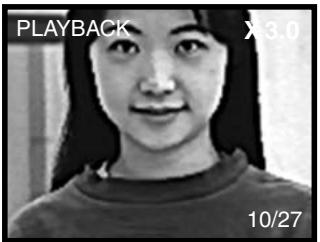
The enlarged-playback mode is limited by the image size and the digital-zoom magnification selected when the image was taken. For example, a full-sized image captured with X2.0 digital zoom magnification cannot be magnified to X3.0 in enlarged-playback mode.
ENLARGED-PLAYBACK MAGNIFICATION
| Image size of the recorded image | Digital zoom magnification selected when the image was taken | ||
| X1.0 | X1.4 | X2.0 | |
| FULL | X1.0/X2.0/X3.0 | X1.0/X2.0/X3.0 | X1.0/X2.0 |
| HALF | X1.0/X2.0 | Cannot enlarge | Cannot enlarge |
SLIDE SHOW
The slide-show mode playsbacks the images on a CompactFlash card automatically. In playback mode, set the function dial to the self-timer setting.
The slide-show menu controls the presentation. It is used to start and end the display as well as change the display interval and direction of the images.
Navigating the slide-show menu is quick and simple. With the camera off, activate the LCD monitor and set the function dial to the self-timer setting. Simply highlight the item you want to change and enter it. The desired setting is then highlighted and entered.
1 Press the menu button to activate the slide-show menu.
2 Use the scroll buttons to highlight the function to be changed.
3 To select the highlighted function, press the display/enter button.
4 Highlight the desired setting using the scroll buttons.
5 Select the desired setting by pressing the display/enter button.
EXIT
START
INTERVAL 3
DIRECTION FORWARD
Slide-show Menu
| Function | Settings | |
| EXIT | (None) | To stop the slide-show display - while the slide show is running, press the menu button to return to the slide-show menu. Highlight “EXIT” and press the display/enter button to cancel the slide show. |
| START | (None) | To begin the slide-show display - highlight “START” on the slide-show menu and press the display/enter button to begin the presentation. |
| INTERVAL | 3 ~ 60 sec. | To control the length of time each image is displayed - the time can be adjusted between three seconds and one minute in one second increments. |
| DIRECTION | FORWARD REVERSE RANDOM | To control the order in which the images are displayed - images can be displayed in ascending numerical order (FORWARD), in descending numerical order (REVERSE), or in a random order. |
- The slide-show display can be cancelled by turning the function dial to another setting.
- The interval and direction settings will be reset to three seconds and forward when the camera is turned off.
- The auto-power-off function is disabled during slide-show playback.
natural_image
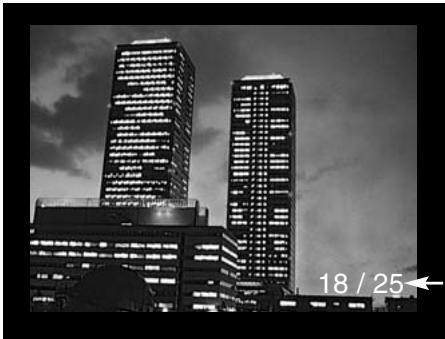
Black-and-white cityscape featuring two tall illuminated skyscrapers against a cloudy sky, with a timestamp '18/25' visible in the corner.Frame number of the displayed image/total number of images
MOVIE PLAYBACK
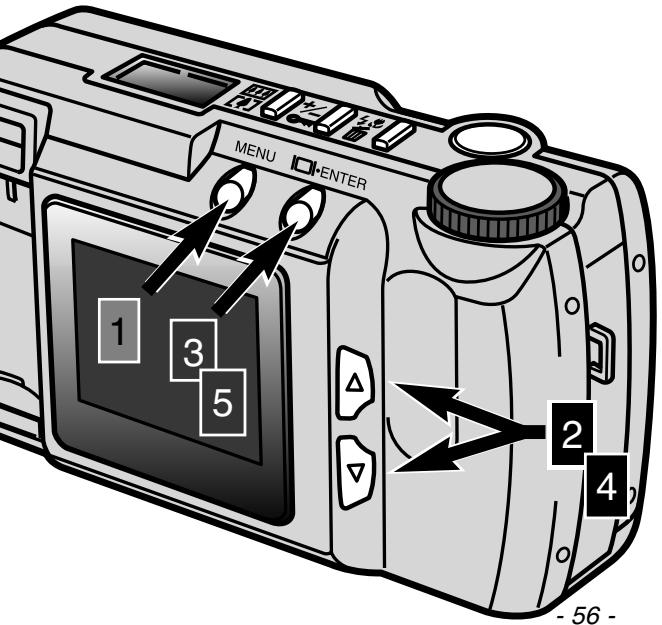
To view movie clips, make sure the camera has been turned off. Turn on the LCD monitor by pressing the display/enter button (1), and set the function dial to the movie playback position (2).
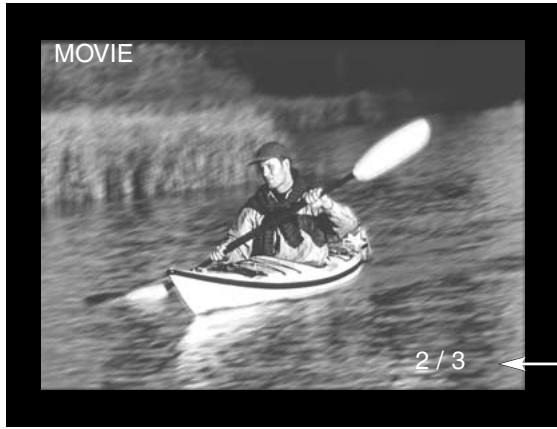
The LCD monitor displays the first frame of each clip. Press the scroll buttons (3) to select a clip. The counter indicates the clip number displayed and the total number of clips on the CompactFlash card.
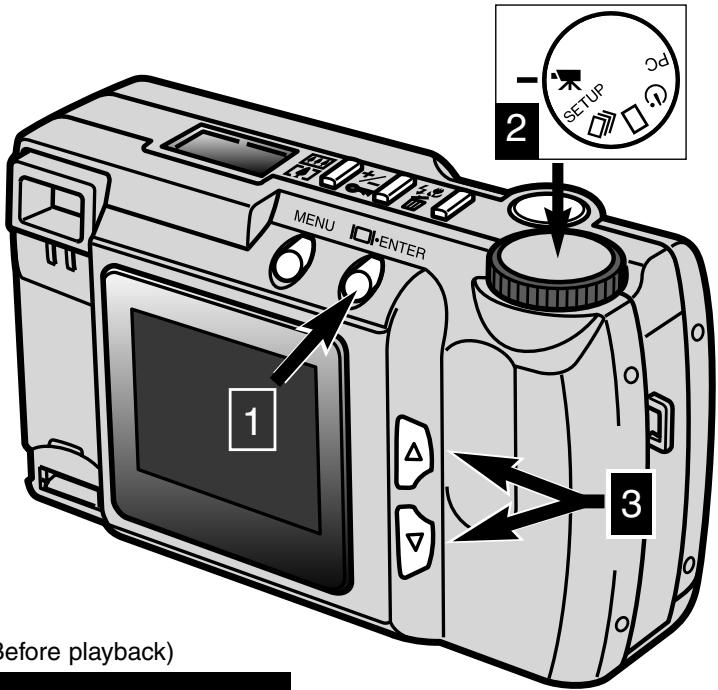
LCD Monitor Display (Before playback)
natural_image
Black-and-white photo of a person kayaking on water with a flagell, labeled 'MOVIE' and '2/3' (no other text or symbols)Clip number/ total number of clips
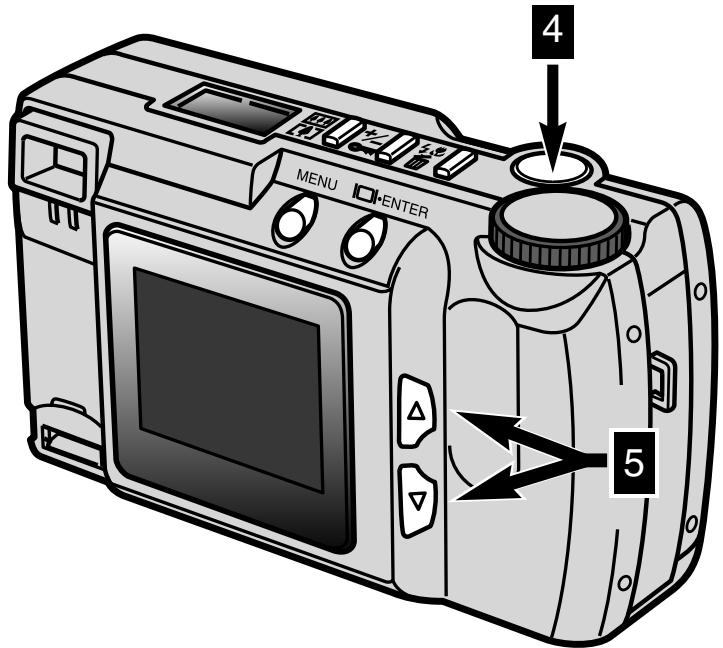
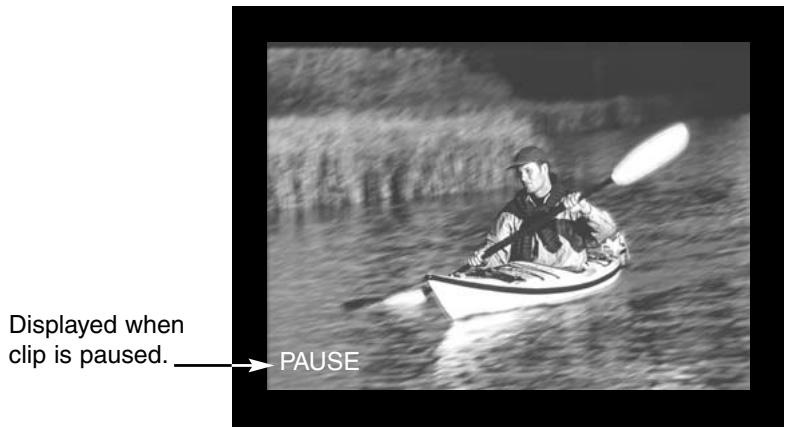
Pressing the shutter release button (4) will start the displayed movie clip. To pause the clip, press the shutter-release button during playback; pressing the shutter-release button again restarts the playback of the clip. When finished, the first frame of the clip will be displayed on the LCD monitor. To cancel the playback of a movie clip, press one of the scroll buttons (5); the first frame of the previous or next clip will be displayed.
LCD Monitor Display (During playback)
VIEWING IMAGES ON A TELEVISION
It is possible to view camera images on your television. The camera has a video out terminal which can be used to connect the camera to a television using the supplied video cable. The camera is compatible with the NTSC and PAL standards. The video-out setting can be checked and set on the setup menu (p. 71 - 75).
1 Turn off the television and the camera.
2 Insert the mini plug end of the video cable into the camera's video-out terminal.
3 Plug the other end of the video cable into the video-input terminal on the television.
4 Turn the television on.
5 Turn the camera's function dial to single-frame playback, index playback, movie playback, or slide show.
6 Press and hold the display/enter button to set the camera in playback mode.
- The camera's LCD monitor will not activate when the camera is attached to a television. Listen for the beep that indicates the playback mode has activated. If the beep has been turned off, use the setup menu to turn it on again (p. 72).
7 Change the television to the video channel. - The camera's playback-mode display will be visible on the television screen.
8 View the images as described in the playback section (p. 52, 53), the slide-show section (p. 56), or the movie-playback section (p. 58).
EDITING IMAGES
Single images can be deleted, locked, or unlocked using the controls on the top of the camera. The playback menu is used for deleting, locking, and unlocking all the images on the CompactFlash card as well as creating DPOF print files.
Editing Images with the Camera Controls
- Displaying Images to be Deleted, Locked, or Unlocked
- Deleting Single Images
- Locking and Unlocking Single Images
Editing Images with the Playback Menu
- Navigating the Playback Menu
- Deleting All
- Lock All
- Unlock All
- Printing Images
- Printing Format
- Print-order Menu
- Set Order
- Print All
- Cancel All

natural_image
Abstract geometric shapes including a camera and three separate squares (no text or symbols)With the camera off and the LCD monitor activated, set the function dial to single-frame or index playback for still photographs, or to movie playback for movie clips In single-frame playback and movie playback, use the scroll buttons to display the image to be deleted, locked, or unlocked. In index playback, use the scroll buttons to highlight with the white boarder the image to be deleted, locked, or unlocked.
DELETING SINGLE IMAGES
An image can be deleted from the CompactFlash card in the camera. However, when deleted, it cannot be recovered; care should be taken when deleting images. Important images can be locked to prevent accidental deletion.
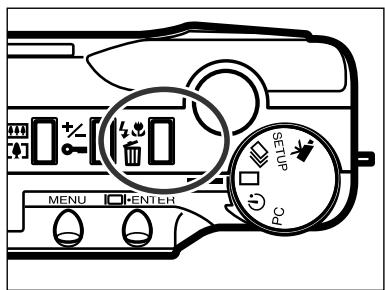
1 With the image or movie clip to be deleted displayed, press the flash-mode/delete button.
• A confirmation screen will appear.
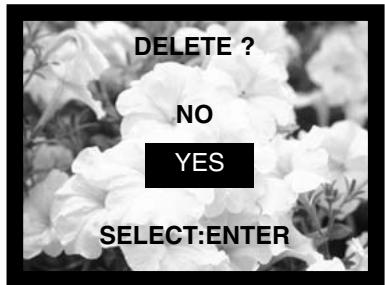
2 Press the scroll ( ▲ ▼ ) buttons to highlight "YES."
- "NO" will cancel the operation.
3 Press the display/enter button to delete the image.
- The confirmation screen in step 2 will reappear. To return to the playback mode, press the scroll buttons to highlight "NO," then press the display/enter button.
- If attempting to delete a locked image, the image-locked message will appear on the LCD monitor to indicate that the image is protected.
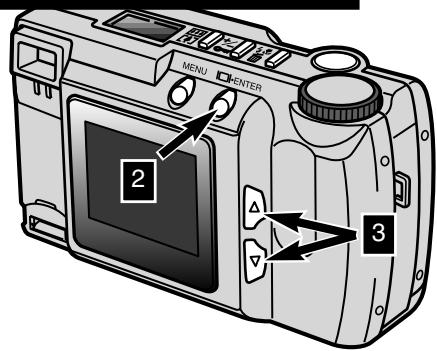
LOCKING AND UNLOCKING SINGLE IMAGES
Important images can be locked to prevent them from being accidentally deleted. The delete function cannot erase locked images from the CompactFlash card.
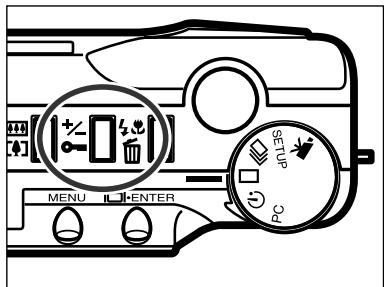
1 With the image or movie clip to be locked displayed, press the exposure-compensation/lock button.
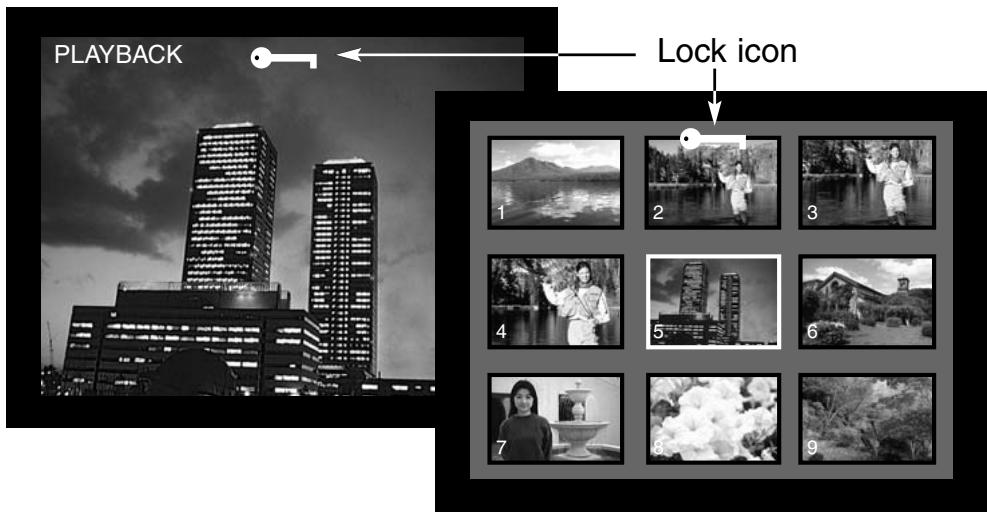
- The lock icon will appear on the LCD monitor confirming the image is protected.
To unlock an image or movie clip, simply repeat the step above by first displaying or highlighting the image to be unlocked. The lock icon will disappear when the exposure-compensation/lock button is pressed.
Locked images will be erased when a CompactFlash card is formatted.
NAVIGATING THE PLAYBACK MENU
The playback menu allows you to delete, lock, and unlock all the images on the CompactFlash card as well as print pictures. The functions effect still images and movie clips separately.
Navigating the playback menu is quick and simple. With the camera off and the LCD monitor on, set the function dial to single-frame or index playback to edit still photographs, or movie playback to edit film clips. Simply highlight the item you want to change and enter it.
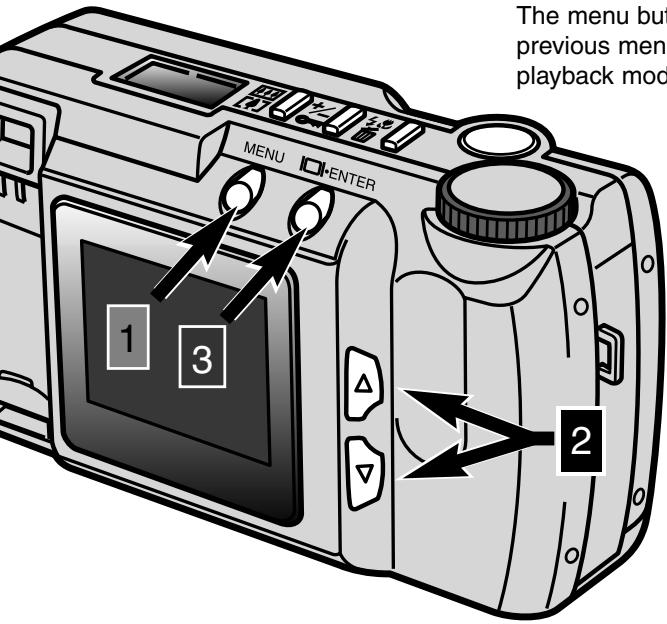
1 Press the menu button to activate the playback menu.
2 Use the scroll buttons to highlight the setting desired.
3 To select the highlighted setting, press the display/enter button.
The menu button (1) is also used to return to previous menus as well as returning to the playback mode from the playback menu.
Movie clips
Playback menu
DELETE ALL
LOCK ALL
UNLOCK ALL

Still images
Playback menu
DELETE ALL
LOCK ALL
UNLOCK ALL
STD


Print-order menu
SET ORDER
PRINT ALL
CANCEL ALL
0 IMAGES
All unprotected images and movie clips can be deleted from the CompactFlash card at one time. However, when deleted, they cannot be recovered; care should be taken when deleting images. Important images and clips can be locked to prevent accidental deletion (p. 63).
flowchart
graph TD
    A["Playback menu"] --> B["DELETE ALL"]
    A --> C["LOCK ALL"]
    A --> D["UNLOCK ALL"]
    B --> E["NO YES"]
    C --> E
    D --> E
    E --> F["Confirmation screen"]
    F --> G["Print selection screen p. 68"]
    G --> H["SET ORDER"]
    G --> I["PRINT ALL"]
    G --> J["CANCEL ALL"]
    H --> K["0* IMAGES"]
    I --> K
    J --> K
    K --> L["NO YES"]
    L --> M["Confirmation screen"]
    M --> N["INDEX STD"]
    N --> O["PRINT"]
    O --> P["Key"]
    P --> Q["Solid line indicates an operation using the display/enter button."]
    P --> R["Dotted line indicates an operation using the menu button."]
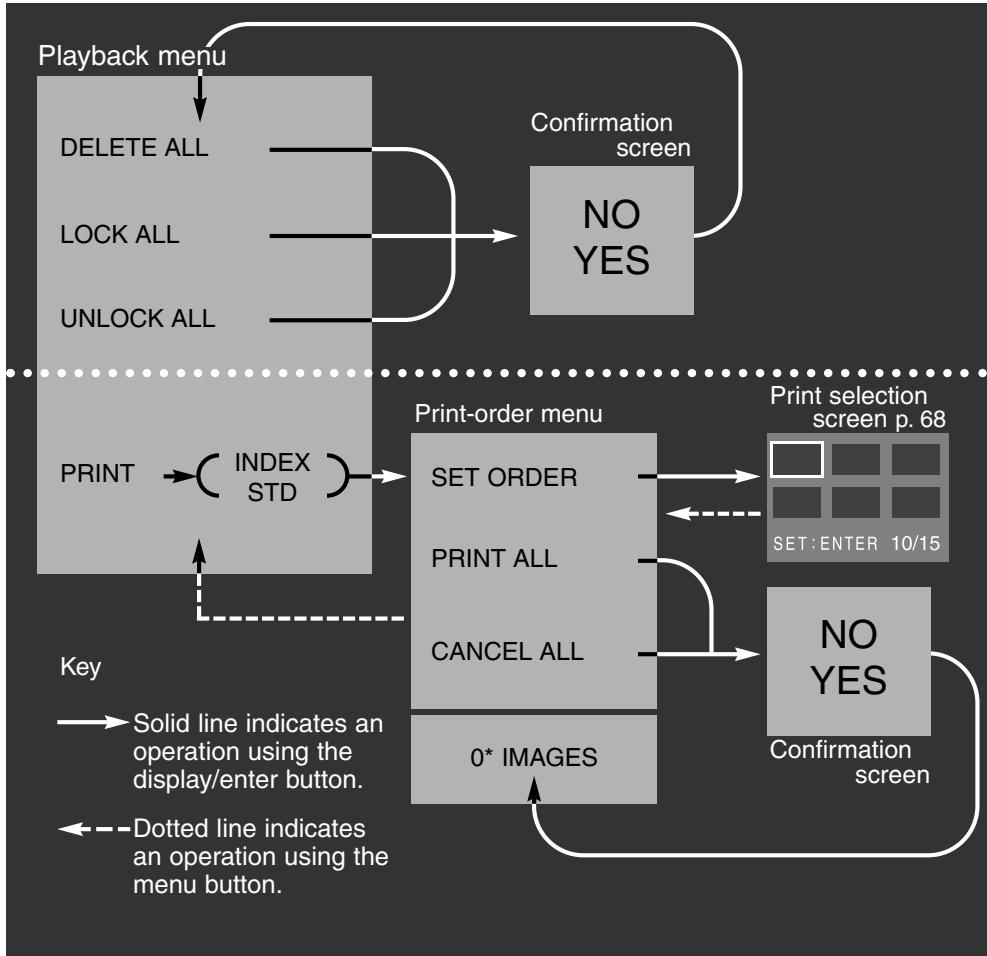
Confirmation screens - selecting "NO" will cancel the operation, selecting "YES" will execute the operation.
* The print-order menu will display the number of images to be printed at the bottom of the screen.
DELETE ALL
The delete-all function will erase all unlocked images from the CompactFlash card. Once deleted the images cannot be recovered. Make sure all important images have been locked before using the delete function. To delete single images, see page 62. When the delete-all function has been selected on the playback menu, a confirmation screen will appear; choosing "NO" will cancel the operation, choosing "YES" will execute the operation. If any of the images have been locked, the some-images-locked message will be displayed; all unlocked images will be erased leaving the remaining locked images on the CompactFlash card.
Still pictures and movie clips cannot be deleted at the same time. To delete still photographs, the function dial must be set to the single-frame or index playback position. To erase movie clips, the function dial must be set to the movie playback position.
LOCK ALL
The lock-all function will protect all images on the CompactFlash card. Once an image has been locked, it cannot be erased using a delete function. However, it will be lost if the CompactFlash card is formatted. Still pictures and movie clips cannot be locked at the same time. To lock still photographs, the function dial must be set to the single-frame or index playback position. To lock movie clips, the function dial must be set to the movie playback position. To lock single images, see page 63.
When the lock-all function has been selected on the playback menu, a confirmation screen will appear; choosing "NO" will cancel the operation, choosing "YES" will execute the operation.
UNLOCK ALL
The unlock-all function will unlock all protected images on the CompactFlash card. Once the images have been unlocked, they can be erased using a delete function. Still pictures and movie clips cannot be unlocked at the same time. To unlock still photographs, the function dial must be set to the single-frame or index playback position. To unlock movie clips, the function dial must be set to the movie playback position. To unlock single images, see page 63.
When the unlock-all function has been selected on the playback menu, a confirmation screen will appear; choosing “NO” will cancel the operation, choosing “YES” will execute the operation.
PRINTING IMAGES
This camera is supported by DPOF™ version 1.1. The DPOF (Digital Print Order Format) was jointly developed by Eastman Kodak Company, Canon Inc., Fuji Photo Film Co., Ltd., and Matsushita Electric Industrial Co., Ltd. for direct printing from digital cameras. This format allows images on the digital camera to be printed by photofinishing print services or computer printers. DPOF enables you to order prints of specific pictures from all the files on the camera's CompactFlash card. DPOF manages which images are to be printed and the printing format.

If the CompactFlash card contains DPOF data from another camera, that DPOF data will be cancelled when the card is used with the E201. The camera cannot create a DPOF file for images taken by another camera.
PRINTING FORMAT
Still images can be printed out. To create a DPOF printing file, the function dial must be set to single-frame or index playback. The playback menu gives two printing formats to choose from: standard and index.
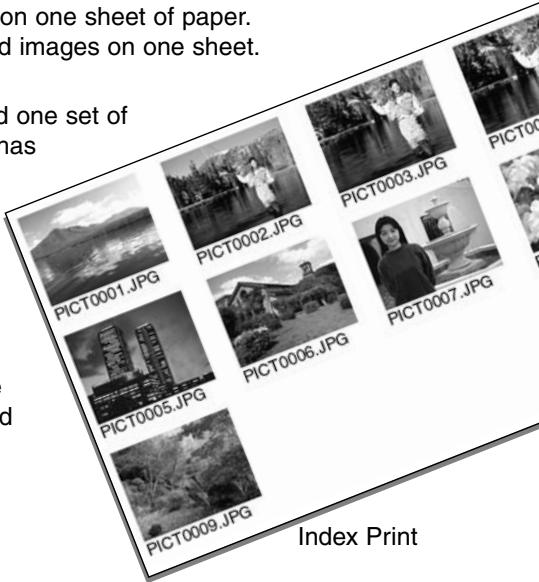
STD (Standard): Prints each selected image on one sheet of paper. INDEX: Prints thumbnails of selected images on one sheet.
When creating a print order, one index print and one set of standard prints can be made. Once the format has been selected on the playback menu, operations made on the print-order menu will only effect the selected format. To get prints from the DPOF file, the CompactFlash card can be taken to a photofinishing service or inserted into the CompactFlash card slot of printers that support DPOF. After the pictures have been printed, the DPOF file will remain on the CompactFlash card and must be cancelled manually.
PRINT-ORDER MENU
Once the printing format has been chosen on the playback menu and entered, the print-order menu will be displayed. The menu sets the images to be printed or cancels the print order.
SET ORDER
The set-order function allows individual selection of images on the CompactFlash card for printing. When the set-order function is highlighted and entered, the print-selection screen is displayed. A white frame will enclose the last image taken. Use the scroll buttons to move the white highlight frame. As the frame reaches the last image displayed, pressing the scroll button once more will display the next three images. A counter on the print selection screen will indicate the frame number of the highlighted image and the total number of images on the CompactFlash card.
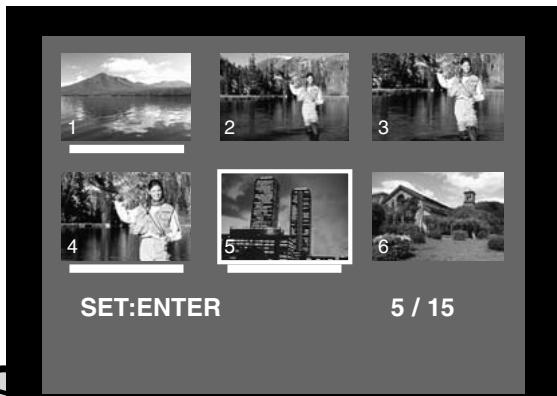
To select an image to be printed, highlight the thumbnail on the screen and press the display/enter button (2); a white bar will appear under the frame to indicate its selection. To deselect an image, highlight it again with the white frame and press the display/enter button; the white bar will disappear. To return to the print-order menu, press the menu button (3); the total number of selected images will be displayed at the bottom of the print-order menu.
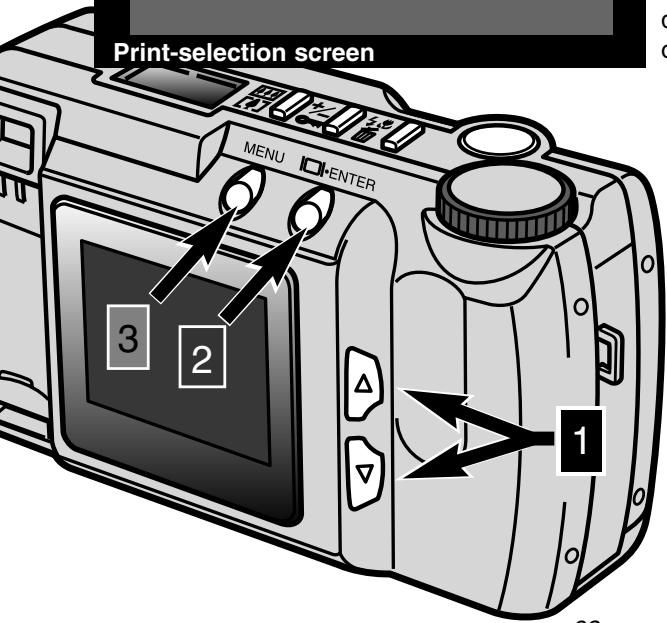
1 Use the scroll buttons to highlight the desired image.
2 To select the highlighted image, press the display/enter button.
3 Press the menu button to return to the print-order menu from the print-selection screen.
PRINT ALL
Choosing the print-all function on the print-order menu will select all the images on the CompactFlash card for printing. When this is selected, a confirmation screen will appear; choosing "NO" will cancel the operation, choosing "YES" will execute the operation. The number of images in the print order will be displayed at the bottom of the print-order menu. To return to the playback menu, press the menu button.
CANCEL ALL
Choosing the cancel-all function on the print-order menu will cancel the DPOF print file. When this is selected, a confirmation screen will appear; choosing "NO" will cancel the operation, choosing "YES" will execute the operation. If the order is cancelled, "0 IMAGES" should be displayed at the bottom of the print-order menu.
The cancel-all function will only cancel the print order for the printing format chosen on the playback menu. If an order for standard prints is made and then cancelled, it will not effect a previously made order for an index print. To cancel the index print, start at the playback menu and choose the index format, then cancel the order on the print-order menu.
To return to the playback menu, press the menu button.
SETUP MODE
The setup mode allows changes to be made in the camera's operation.
- Navigating the Setup Menu
• LCD Monitor Brightness - Formatting a CompactFlash Card
- Setting the Auto-power-off Period
- Setting the Date and Time
- Beep
- Setting the Video-out Signal
- Returning to the Default Settings
NAVIGATING THE SETUP MENU
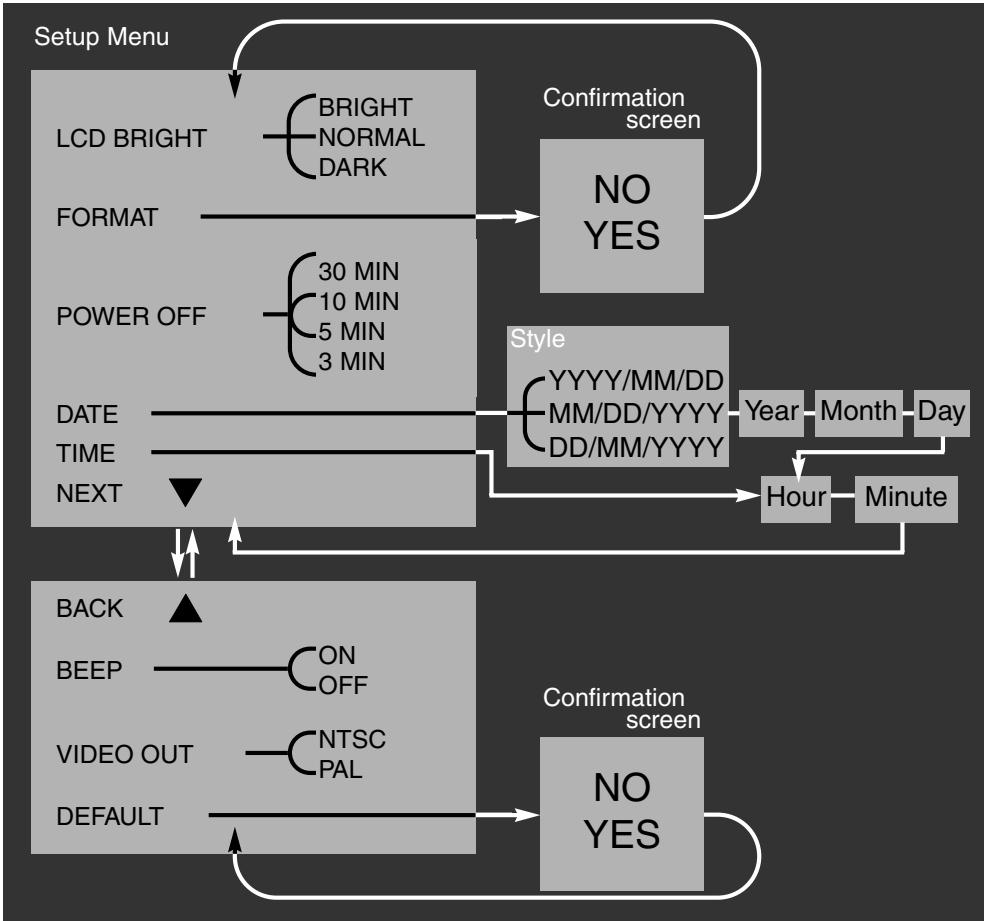
The setup menu allows changes to the camera's default settings to alter monitor brightness, the auto-power-off period, the date and time, and the video-out signal. The setup menu can be used to format a CompactFlash card and reset the camera to its default settings. Any setting made on the setup menu will not be reset when the camera is turned off.
Navigating the setup menu is quick and simple. In the recording or playback mode, set the function dial to the setup position; in the recording mode, the LCD monitor will automatically activate; in the playback mode, the monitor must be activated using the display/enter button. Simply highlight the item you want to change and enter it. The desired setting is then highlighted and entered.
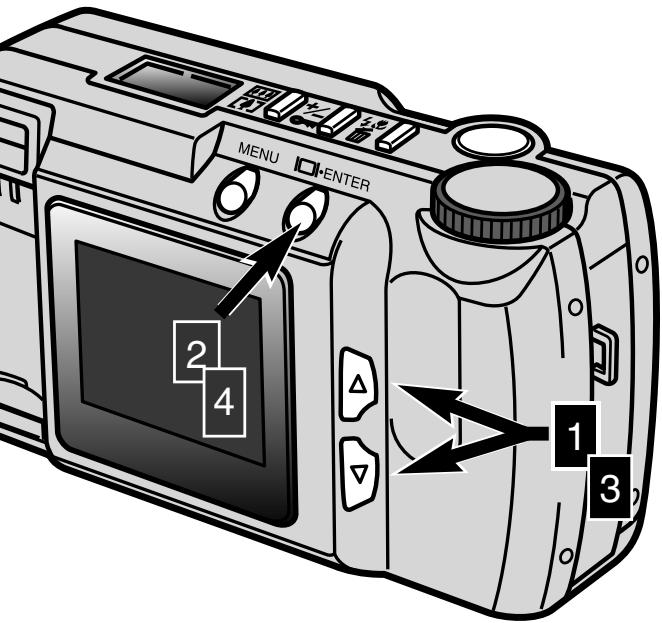
1 Use the scroll buttons to highlight the function to be changed.
2 To select the highlighted function, press the display/enter button.
3 Highlight the desired setting using the scroll buttons.
4 Select the desired setting by pressing the display/enter button.
flowchart
graph TD
    A["Setup Menu"] --> B["LCD BRIGHT"]
    B --> C["BRIGHT NORMAL DARK"]
    C --> D["NO YES"]
    D --> E["Confirmation screen"]
    E --> F["NO YES"]
    F --> G["Style"]
    G --> H["YYYY/MM/DD MM/DD/YYYY DD/MM/YYYY"]
    H --> I["Year"]
    H --> J["Month"]
    H --> K["Day"]
    G --> L["Hour"]
    G --> M["Minute"]
    N["FORMAT"] --> O["30 MIN 10 MIN 5 MIN 3 MIN"]
    P["POWER OFF"] --> Q["30 MIN 10 MIN 5 MIN 3 MIN"]
    R["DATE"] --> S["TIME"]
    T["NEXT"] --> U["BACK"]
    V["BEEP"] --> W["ON OFF"]
    X["VIDEO OUT"] --> Y["NTSC PAL"]
    Z["DEFAULT"] --> AA["NO YES"]
    AA --> AB["Confirmation screen"]
Confirmation screens - selecting "NO" will cancel the operation, selecting "YES" will execute the operation.
Scrolling to the bottom of the first screen or the top of the second will automatically change to the next screen.
LCD MONITOR BRIGHTNESS
The brightness of the LCD monitor display can be adjusted within three levels: bright, normal, and dark. The level chosen will be applied to the recording and playback modes simultaneously. This has no effect on the recorded image. The setting does not reset when the camera is turned off. It must be reset manually.
FORMATTING A COMPACTFLASH CARD
Formatting a CompactFlash card destroys all the data on the card
This function formats CompactFlash cards. The accessory card that comes with the camera is pre-formatted. A CompactFlash card purchased separately may need to be formatted. Always format the CompactFlash card using the camera; never use a computer to format a CompactFlash card.
When formatting a CompactFlash card, any data on the card will be erased permanently. Locking an image will NOT protect it when the card is formatted. When the format function is selected, a confirmation screen will appear; highlighting and entering “NO” will cancel the operation, “YES” will execute the operation.
SETTING AUTO-POWER-OFF PERIOD
To conserve the batteries, the auto-power-off function shuts down the camera after a certain period if an operation has not been made. The length of this period can be changed on the setup menu: 3 minutes, 5 minutes, 10 minutes, or 30 minutes. When using an AC adaptor, the auto-power-off period is set at 30 minutes and cannot be changed.
SETTING THE DATE AND TIME
When the camera captures a still image, it also records the date and time the picture was taken. The camera stores this data as an Exif file that can be read by the DiMAGE E201 Exif Utility software contained in the supplied CD-ROM. Make sure the date and time have been set accurately.
When selecting the date function on the setup menu, the LCD monitor will display the date and time screen. Use the scroll buttons to choose the format in which you wish the date to be displayed: YYYY/MM/DD (year, month, day), MM/DD/YYYY (month, day, year), DD/MM/YYYY (day, month, year). After the format has been selected using the display/enter button, the year, month, day, hour, and minute need to be set. Use the scroll buttons to change each setting and the display/enter button to set the value. After the minute has been set, the setup menu will be displayed.
When selecting the time function on the setup menu, the LCD monitor will display the date and time screen. The time function is a shortcut which bypasses the date format and settings. Use the scroll buttons to change the hour and minute setting and the display/enter button to set the value. After the minute has been set, the setup menu will be displayed
BEEP
The camera has an audio signal which indicates when a button has been pressed. This tone can be turned off or on.
SETTING THE VIDEO-OUT SIGNAL
Camera images can be displayed on a television (p.60). The video-out signal can be changed between NTSC and PAL. North America uses the NTSC standard and Europe uses PAL. To playback images on a television, check which standard is used in your region.
RETURNING TO THE DEFAULT SETTINGS
The default operation returns camera functions to their original settings. When default is selected and entered, a confirmation screen is displayed; highlighting and entering "NO" will cancel the operation, "YES" will execute the operation. The following are reset:
| Default setting | |
| Image quality (p. 46) | Standard (STD.) |
| Image size (p. 47)* | Full |
| White balance (p. 48)* | Auto |
| Sharpness (p. 49)* | Normal |
| Camera sensitivity (ISO) (p. 49) | Normal |
| Interval (Slide Show, p. 57)* | 3 seconds |
| Direction (Slide Show, p. 57)* | Forward |
| LCD monitor brightness (p. 74) | Normal |
| Auto-power-off period (p. 74) | 3 minutes |
| Date format (p. 74) | Regional setting1 |
| Beep (p. 75) | On |
| Video out (p. 75) | Regional setting1 |
* Reset to the default setting when the camera is turned off.
1. The default settings for the North American and Japanese markets are the year/ month/ day format and NTSC. The day/ month/ year format and PAL are the default settings for all other markets.
CONNECTING TO A COMPUTER
Read this section in its entirety before connecting the camera to a computer. If a error is made, the camera, CompactFlash card, or image data could be damaged.
- Software System Requirements
- Connecting the Camera to a Computer
- Connecting to Windows ME
- Connecting to Windows 2000 Professional
- Connecting to Windows 98
- Connecting to a Macintosh
- CompactFlash Card Folder Organisation
• DiMAGE E201 Exif Utility - Disconnecting the Camera from the Computer For Windows 98
For Windows ME
For Windows 2000 Professional
For Macintosh
The camera can act as a mass-storage device. To access images in the camera from a computer, the following requirements must be met:
| IBM PC / AT Compatible | Macintosh |
| Preinstalled Windows 98, 98SE, ME, or 2000 Professional. | Preinstalled Mac OS 9.0 - 9.1 |
| USB port as standard interface | |
DiMAGE E201 EXIF Utility
| IBM PC / AT Compatible | Macintosh |
| Pentium 90MHz or faster | Power Macintosh |
| Windows 98, 98SE, 2000, ME. | Mac OS 9.0 - 9.1 |
| 8MB or more of RAM | 5MB or more of RAM |
| 10MB or more of hard-disk space | 10MB or more of hard-disk space |
| 640X480 monitor with 256 colours | 640X480 monitor with 256 colours |
| CD-ROM drive | CD-ROM drive |
For viewing date, time, and shooting information of still images (p. 85).
Quick Time 4.1
| IBM PC / AT Compatible | Macintosh |
| Pentium-based computer | Power Macintosh |
| Windows 95*, 98, NT 4.0*, 2000. | Mac OS 7.5.5* or later* |
| 16MB or more of RAM | 16MB or more of RAM |
For viewing movie clips. To install Quick Time, follow the instructions in the read-me folder and in the installer. Users with Windows ME can use the operating system's media player to view movie clips.
Adobe PhotoDeluxe
| IBM PC / AT Compatible | Macintosh |
| Pentium II 233MHz or compatible processor | 68040 based computer or Power Macintosh |
| Windows 95*, 98, NT4.0* with service pack 5 | Apple System Software 7.1* or later |
| 32MB of RAM (64MB for Windows NT) | 16MB or more of RAM |
| 100MB or more of hard-disk space | 70MB or more of hard-disk space |
| 800X600 16bit color video display | Monitor with 256 colors |
| CD-ROM drive | CD-ROM drive |
Photofinishing software to view and manipulate images. To install Adobe PhotoDeluxe, follow the instructions in the read-me folder and in the installer.
Adobe reports no compatibility problems for PhotoDeluxe with Windows 2000
Professional or Windows ME. Contact Adobe technical service with any questions regarding PhotoDeluxe at www.adobe.com.
* Direct download from camera to computer is not possible with these OS, therefore a CompactFlash cardreader (parallel port) or card adapter (PCMCIA where fitted) is recommended. This is due to the OS being unable to connect via USB.
Check connectivity please consult the vendor.
CONNECTING THE CAMERA TO A COMPUTER
1
Start up the computer.
- The computer must be turned on before connecting the camera.
2
Insert the CompactFlash card into the camera.
- The CompactFlash card cannot be changed while the camera is on and connected to a computer. Confirm that the correct card is in the camera.
3
Set the function dial to "PC" and turn on the camera.
- The function dial must be set to the PC position before the camera is connected to a computer.
- The PC mode works in both the recording and the playback mode. To turn on the camera open the lens cover (recording mode) or press the display/enter button ( playback mode).
4
Attach the wider plug of the USB cable to the camera.
- Make sure the plug is firmly attached.
- "USB" and the arrow should be faceup.
5
Attach the other end of the USB cable to the computer's rear USB port.
- Make sure the plug is firmly attached.
The camera should be connected directly to the computer's rear USB port. Attaching the camera to a USB hub may prevent the camera from operating properly.
If the computer does not recognise the camera, disconnect the camera and restart the computer. Repeat the connection procedure above.
A fresh set of batteries should be used when the camera is connected to a computer. The use of the AC adaptor (sold separately) is recommended over the use of batteries.
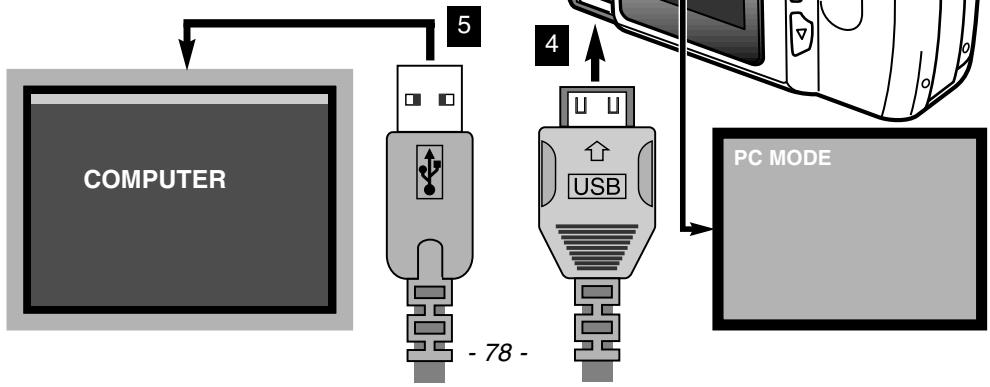
flowchart
graph TD
    A["COMPUTER"] -->|5| B["USB"]
    B -->|4| C["PC MODE"]
    B -->|-78-| D["Computer"]
CONNECTING TO WINDOWS ME
When the camera is plugged into the computer, the operating system will detect the new device and the add-new-hardware-wizard window will open. Place the DiMAGE E201 CD-ROM in the CD-ROM drive. Choose to Specify the location of the driver and then click "Next."
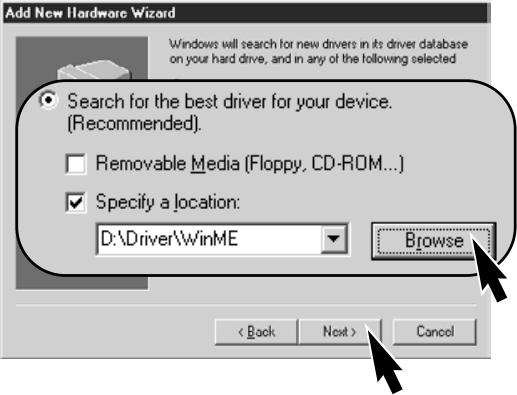
The add new hardware wizard will confirm the location of the driver. Click "Next" to install the driver in the system.
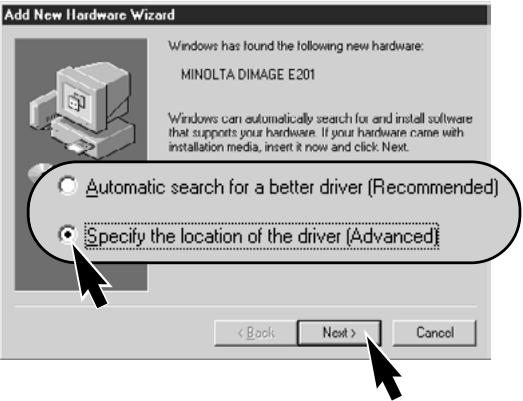
On the next screen, choose again to Specify a driver location. The browse window can be used to find the driver on the CD-ROM. When the driver location is displayed in the window, click "Next."
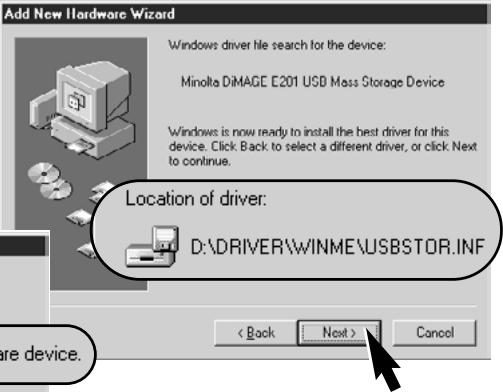
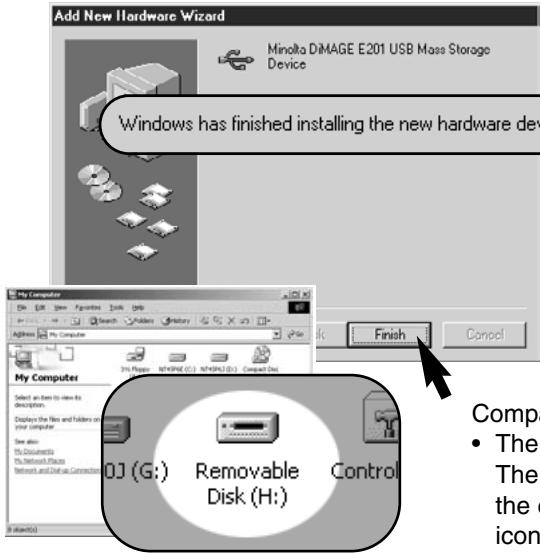
The last window will confirm the driver has been installed. Click "Finish" to close the add new hardware wizard.
When the my-computer window is opened, a new removable-disk icon will be displayed. Double click on the icon to access the camera's
CompactFlash card, see page 84.
- The driver needs only to be installed once. The computer will automatically recognise the camera and display the removable-disk icon the next time they are connected.
CONNECTING TO WINDOWS 2000 PROFESSIONAL
When the camera is plugged into the computer, the operating system will detect the new device and the add-new-hardware-wizard window will open. Place the DiMAGE E201 CD-ROM in the CD-ROM drive. Click "Next."
Found New Hardware Wizard
natural_image
Abstract black-and-white graphic with a white 3D cube icon and geometric shapes (no text or symbols)Welcome to the Found New Hardware Wizard
This wizard helps you install a device driver for a hardware device.
To continue, click Next.
Found New Hardware Wizard
Install Hardware Device Drivers
A device driver is a software program that enables a hardware device to work with an operating system.

This wizard will complete the installation for this device:

MINOLTA DAMAGE E201
A device driver is a software program that makes a hardware device work. Windows needs driver files for your new device. To locate driver files and complete the installation click Next
< Back
Next>
Cancel
What do you want the wizard to do?

Search for a suitable driver for my device (recommended)
isplay a list of the known drivers for this device so that I can
< Back
Next>
Cancel
Choose the recommended Search for a suitable driver. Click "Next."
On the locate-driver-files screen, choose to Specify a location of the driver. Click "Next."
Found New Hardware Wizard
Locate Driver Files
Where do you want Windows to search for driver files?


MINOLTA DIMAGE E201
The wizard searches for suitable drivers in its driver database on your computer and in any of the following optional search locations that you specify.
To start the search, click Next. If you are searching on a floppy disk or CD-ROM drive, insert the floppy disk or CD before clicking Next
Optional search locations:

Floppy disk drives

CD-ROM drives

Specify a location

Microsoft Windows Update
Next>
Cancel
On the next screen, the driver on the CD-ROM should be displayed; the browse window can be used to find the driver. When the driver location is shown in the window, click "OK."
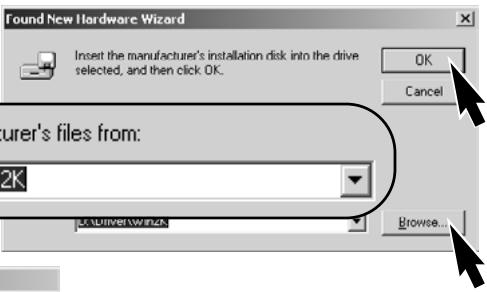
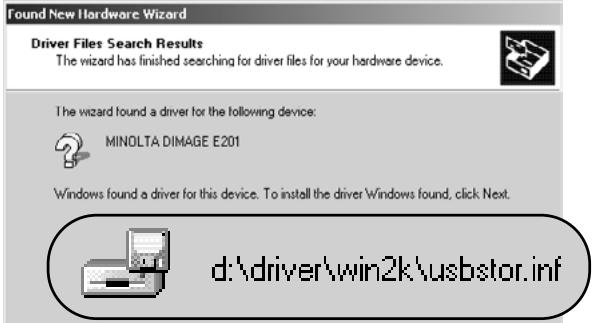
The add new hardware wizard will confirm the location of the driver. Click "Next" to install the driver in the system.
The last window will confirm the driver has been installed. Click "Finish" to close the add new hardware wizard.
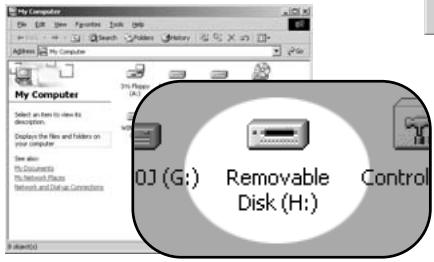
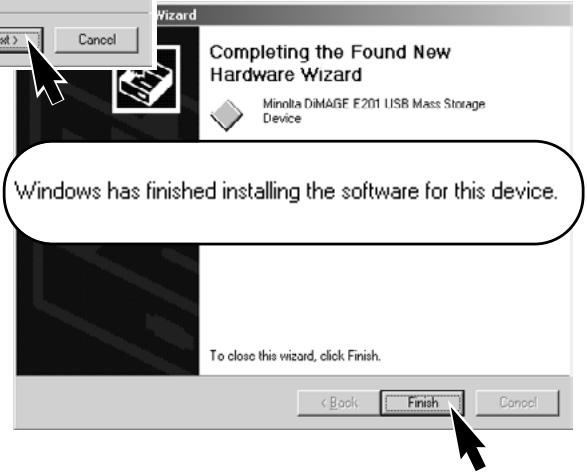
When the my-computer window is opened, a new removable-disk icon will be displayed. Double click on the icon to access the camera's CompactFlash card, see page 84.
The driver needs only to be installed once. The computer will automatically recognise the camera and display the removable-disk icon the next time they are connected.
CONNECTING TO WINDOWS 98
When the camera is plugged into the computer, the operating system will detect the new device and the add-new-hardware-wizard window will open. Place the DiMAGE E201 CD-ROM in the CD-ROM drive. Click "Next."
Add New Hardware Wizard
natural_image
Illustration of a desktop computer with CD and DVD drives (no text or symbols)This wizard searches for new drivers for:
MINOLTA DAMAGE E201
A device driver is a software program that makes a hardware device work.
Add New Hardware Wizard
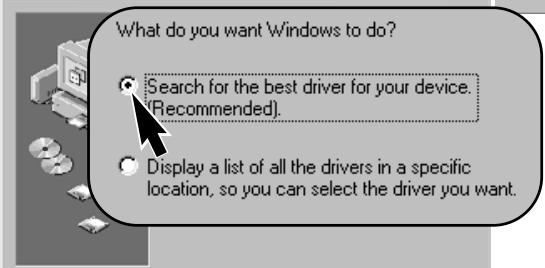
< Back
Next>
Cancel
Choose the recommended Search for best driver for your device. Click "Next."
< Back
Next>
Cancel
On the next screen, choose to Specify a location of the driver. The driver on the CD-ROM should be displayed; the browse window can be used to find the driver. When the driver location is shown in the window, click "Next."
Add New Hardware Wizard
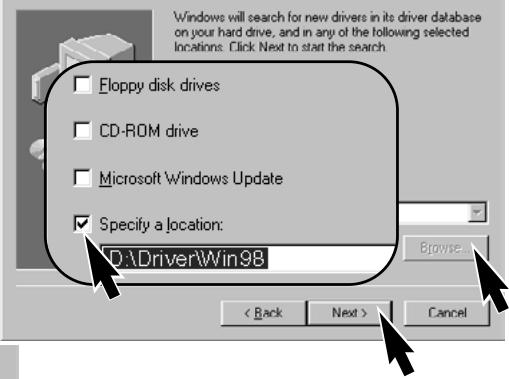
Add New Hardware Wizard
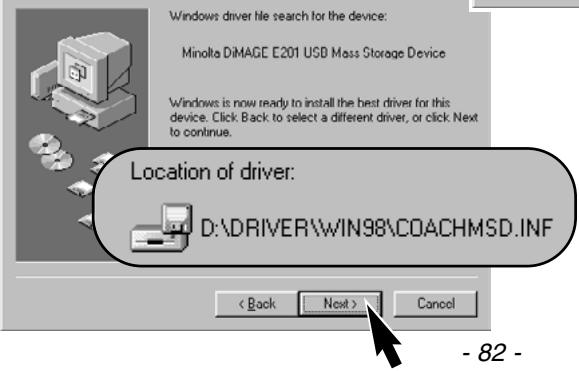
The add new hardware wizard will confirm the location of the driver. Click "Next" to install the driver in the system.
- One of two drivers may be located: Coachmsd.inf or Chiomsd.inf.
The last window will confirm the driver has been installed. Click "Finish" to close the add new hardware wizard.
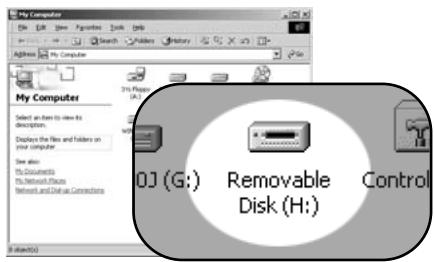
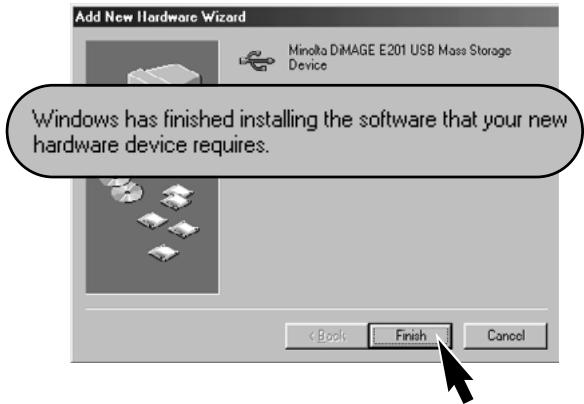
When the my-computer window is opened, a new removable-disk icon will be displayed. Double click on the icon to access the camera's CompactFlash card, see page 84.
The driver needs only to be installed once. The computer will automatically recognise the camera and display the removable-disk icon the next time they are connected.
CONNECTING TO A MACINTOSH
This camera can be used as a mass-storage device with Mac OS 9.0 and 9.1. When the camera is connected to the USB port, an untitled drive icon will automatically appear on the desktop. Double click on the icon to access the camera's CompactFlash card, see page 84
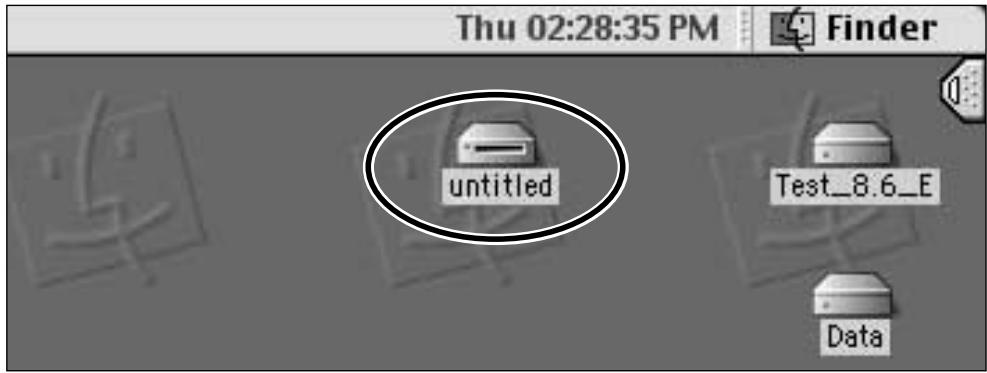
COMPACTFLASH CARD FOLDER ORGANISATION
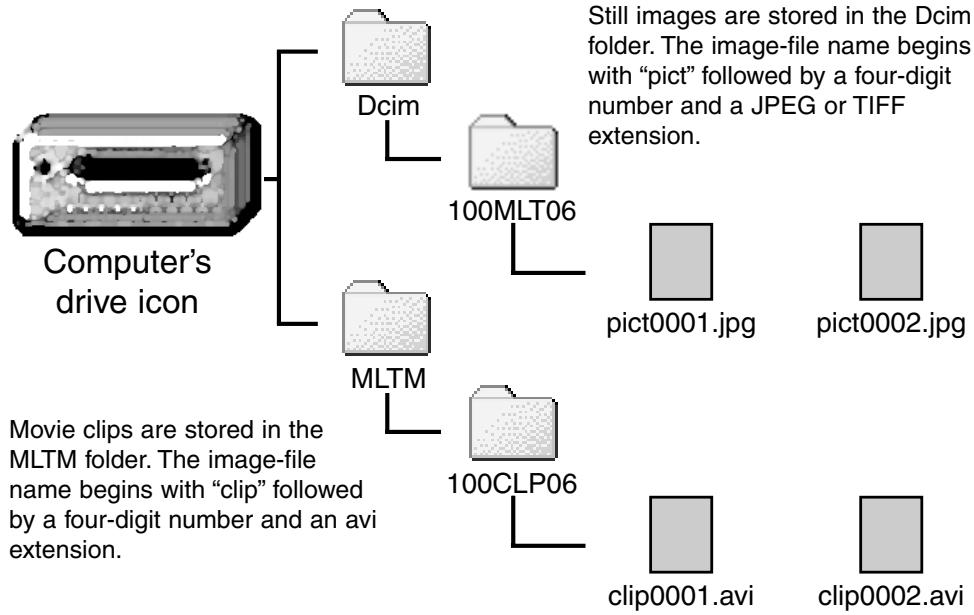
flowchart
graph TD
    A["Computer's drive icon"] --> B["Dcim"]
    A --> C["MLTM"]
    B --> D["100MLT06"]
    C --> E["100CLP06"]
    D --> F["pict0001.jpg"]
    D --> G["pict0002.jpg"]
    E --> H["clip0001.avi"]
    E --> I["clip0002.avi"]
Once the camera is connected to the computer, image files can be accessed by simply double clicking on icons. Copying images can be done by dragging and dropping the image-file icon into a location in the computer.
The index number on the image file may not correspond to the frame number of the image. As images are deleted on the camera, the frame counter will adjust itself to show the number of images on the CompactFlash card and reassign the frame numbers accordingly.
The index numbers on the image files will not change when an image is deleted. When a new image is recorded, it will be assigned a number one greater than the largest index number in the folder.
When the index numbers on the file name exceeds 9,999, a new folder will be created; the folder number will increase by one from 100MLT06 to 101MLT06 or from 100CLP06 to 101CLP06. The "06" in the folder name indicates the images were recorded with a DiMAGE E201 camera; a different Minolta camera will create a folder with a different number.
DiMAGE E201 EXIF UTILITY

E201UtilityE
Installing the DiMAGE E201 Exif Utility software is simple. Drag the software icon from the CD-ROM window and drop it into the location where it will be stored. The software requires no installation routine or procedure.
The Exif Utility allows the viewing of date, time, and shooting information of still images. Double click on the utility icon; an open-file window will appear. Use the look-in box to locate the image-file folder. Click on an image file to highlight it and then click "Open;" the Exif-information window will open.
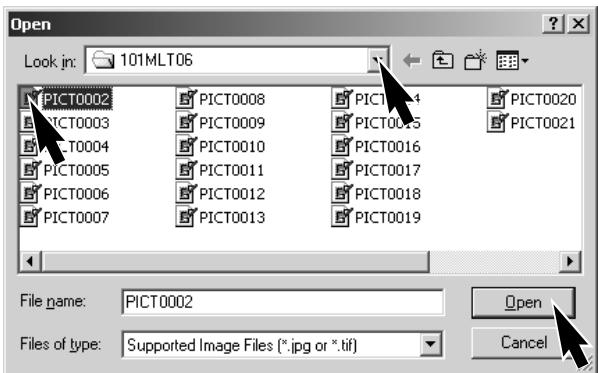
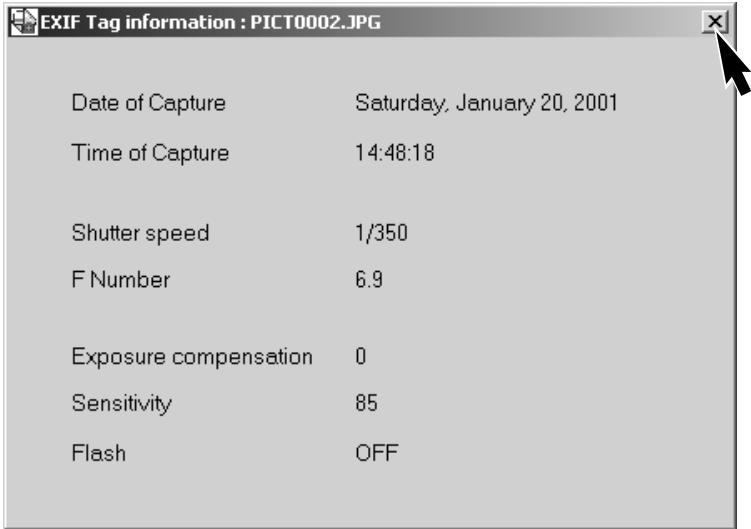
The window will show the date and time of capture, the shutter speed and aperture value used for the exposure, the amount of exposure compensation, the camera sensitivity, and if the flash was used. To close the window, click on the “X.”
DISCONNECTING THE CAMERA FROM THE COMPUTER
Never disconnect the camera when the green focus lamp is lit or blinking - the data or CompactFlash card may be permanently damaged.
For Windows 98
Confirm that the green focus lamp is not lit or blinking and then disconnect the USB cable.
For Windows ME
To disconnect the camera, double click on the unplug-or-eject-hardware icon located on the task bar (Bottom Right Corner of Screen) The unplugor-eject-hardware window will open.
The hardware devices to be stopped will be displayed. Click "Stop."
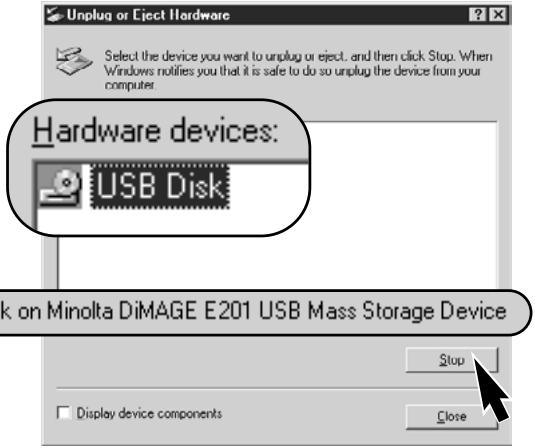
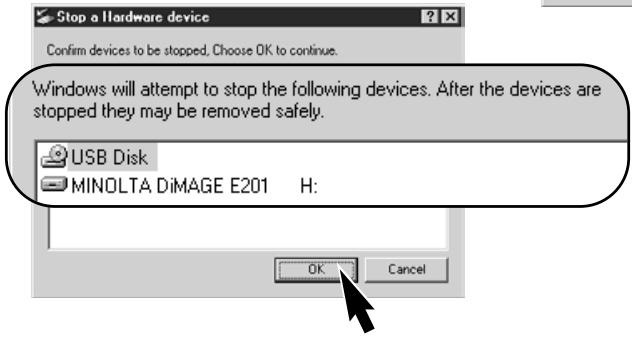
A confirmation screen will appear. Clicking "OK" will stop the device.
Click "OK." The camera can now be safely disconnected from the computer.
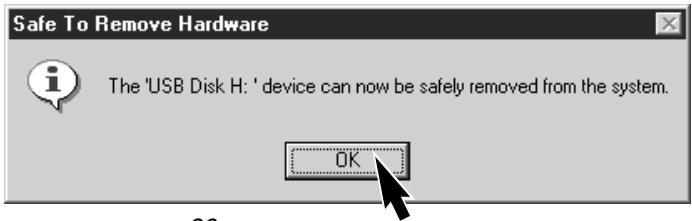
For Windows 2000 Professional
To disconnect the camera, double click on the unplug-or-eject-hardware icon located on the task bar. The unplug-or-eject-hardware window will open.
The hardware devices to be stopped will be displayed. Click "Stop."
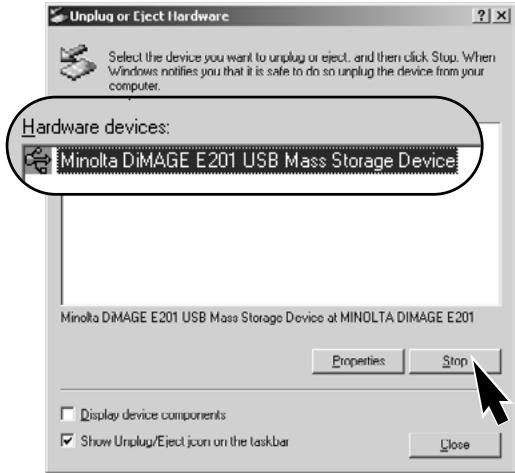
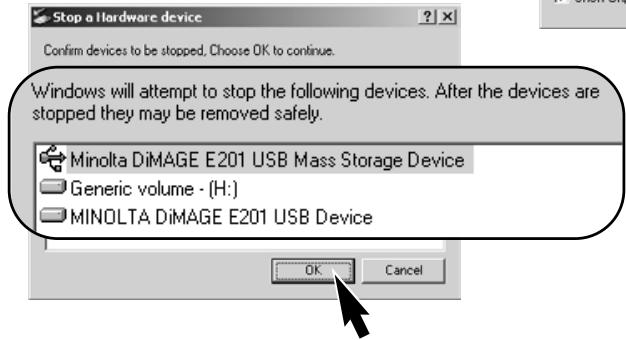
A confirmation screen will appear. Clicking "OK" will stop the device.
Click "OK." The camera can now be safely disconnected from the computer.
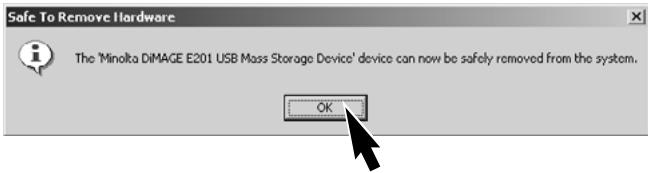
For Macintosh
1 Confirm that the green focus lamp is not lit or blinking and then drag the mass-storage device icon and drop it into the trash.
- The icon will reappear on the desktop.
2 Disconnect the USB cable.
- If the USB cable is disconnected before performing step 1, an alert message will appear. Always complete the first step 1 before disconnecting the USB cable.
Appendix
- Troubleshooting
- Care and Storage
• Technical Specifications
To record images, the camera must be on. Use the lens cover slide to open the lens cover and turn on the camera. The LCD monitor automatically activates; it can be turned off by pressing the display/enter button.
| Problem | Symptom | Cause | Solution |
| The camera will not work. | Nothing displayed on the data panel or the LCD monitor. | The camera is off. | Turn on the camera by moving the lens-cover slide so that the lens is visible (p. 15). |
| Auto-power-off function has shut off the camera | Turn the camera off and then on using the lens-cover slide near the lens (p. 21). | ||
| The batteries are dead. | Replace batteries (p. 20). | ||
| The batteries are inserted incorrectly. | Reinsert the batteries taking care that the negative and positive terminals are orientated as indicated on the inside of the battery chamber door (p. 20). | ||
| The AC adaptor is not connected properly. | Check that the adaptor is connected to the camera and a live electrical outlet (p. 22). | ||
| Shutter will not release. | “CF” displayed on the data panel. “No card” appears on the LCD monitor. | No CompactFlash card in the camera. | Insert a CompactFlash card (p. 23). |
| Zero displayed on the frame counter of the data panel. “Card full” appears on the LCD monitor. | CompactFlash card is full and unable to store an image at the image-quality or image-size setting on the camera. | Insert a new CompactFlash card (p. 23, 24). | |
| Delete some images from the CompactFlash card (p. 62). | |||
| Change the camera's image-quality or image-size setting (p.44 - 47). | |||
| Shutter will not release. | Function dial set to setup or PC. | Camera not in a recording mode. | Set the function dial to the desired recording mode (p. 37). |
| Data panel and LCD monitor is on. Lens cover closed. | Camera is in playback mode. | Turn off LCD monitor and open lens cover to turn on camera. | |
| A long delay before the shut-ter is released. | Function dial set to self-timer. | Set the function dial to the appropriate recording mode. (p. 37). | |
| Pictures are not sharp. | Green focus lamp blinks quickly. | Subject is too close. | Make sure the subject is within the autofocus range (p. 29) or use the macro mode (p. 32). |
| The camera is in macro mode. | Cancel the macro mode setting (p. 32). | ||
| A special situation is pre-venting the autofocus sys-tem from focusing (p. 29) | Use the focus-lock function to focus on an object at the same distance as the sub-ject (p. 28). | ||
| Pictures are taken indoors or in low-light situa-tions without flash. | Slow shutter speeds result in blurred images when the camera is hand-held. | Use a tripod or change the camera sensitivity to high (p. 44 -49) or use the flash (p. 30). | |
| While using flash, the pic-tures are too dark. | The subject is beyond the flash range (p. 32). | Move closer to the subject or change the camera sen-sitivity to high (p. 44-49). | |
| All images are consistently too dark or too light. | [+/-] appears on the data panel. | The exposure compensa-tion has been set to a value other than 0.0. | Reset the exposure com-pensation to 0.0 (p. 34). |
| Cannot change the flash modes. | Function dial set to continuous advance or movie recording. | The flash modes cannot be set in the continuous-advance or movie-record-ing modes. | Set the function dial to sin-gle-frame recording. The flash modes can also be changed when using the self-timer. |
To play images back, the camera must be turned off and the LCD monitor activated. To activate the LCD monitor, press and hold the display/enter button.
| Problem | Symptom | Cause | Solution |
| The LCD monitor will not activate. | Nothing displayed on the data panel. | The batteries are dead. | Replace batteries (p. 15). |
| The batteries are inserted incorrectly. | Reinsert the batteries taking care that the negative and positive terminals are orientated as indicated on the inside of the battery chamber door (p. 20). | ||
| The AC adaptor is not connected properly. | Check that the adaptor is connected to the camera and a live electrical outlet (p. 22). | ||
| The LCD monitor has turned off. | Nothing displayed on the data panel | Auto-power-off function has shut off the camera | Press and hold the display/enter button until the monitor activates (p. 21). |
| Cannot use enlarged play-back with image. | Image was recording with the digital zoom and at half-image size (p. 54). | ||
| Television image has a lot of static and noise. | Camera is set to the wrong video standard. | Set the correct standard for the region on the setup menu (p.72 - 75). | |
| Cannot access the camera from the computer. | Nothing displayed on the data panel or LCD monitor. | Auto-power-off function has shut off the camera | Turn on the camera using the lens-cover slide or display/enter button (p. 21). |
| The image file is corrupt. | The CompactFlash card was removed while the camera was accessing the card. | Never remove a CompactFlash card while the green focus lamp is blinking. |
If the camera does not function normally, turn it off, remove and reinsert the batteries, or unplug and reconnect the AC adaptor. Always turn the camera off using the lens-cover slide (recording mode) or the display/enter button ( playback mode) otherwise the CompactFlash card may be damaged and camera settings reset.
CAMERA CARE
- Do not subject the camera to shock or impact.
- Turn off the camera when transporting.
- This camera is neither waterproof nor splashproof. Inserting or removing batteries or the CompactFlash card, or operating the camera with wet hands may damage the camera.
- When at the beach or near water, take care not to expose the camera to water or sand. Water, sand, dust, or salt can damage the camera.
- Do not leave the camera under direct sunlight. Do not point the lens directly at the sun; the CCD may be damaged.
CLEANING
- If the camera or the outside of the lens is dirty, gently wipe it with a soft, clean, dry cloth. If the camera or lens comes in contact with sand, gently blow away loose particles. Wiping may scratch the surface.
- To clean the lens surface, first blow away any dust or sand, then, if necessary, moisten a lens tissue or soft cloth with lens cleaning fluid and gently wipe the lens.
- Never use organic solvents to clean the camera.
- Never touch the lens surface with your fingers.
OPERATING TEMPERATURES AND CONDITIONS
- This camera has been designed for use in temperatures from 0°C to 40°C (32°F to 104°F).
- Never leave the camera exposed to extreme high temperatures, such as in a car parked in the sun, or to extreme humidity.
- When taking the camera from a cold to a warm environment, place it in a sealed plastic bag to prevent condensation from forming. Allow the camera to come to room temperature before removing it from the bag.
LCD MONITOR CARE
- Although the LCD monitor is manufactured using high precision technology, there may occasionally be a lack of colour or bright points on the LCD monitor.
- Do not apply pressure to the surface of the LCD monitor; it may be permanently damaged.
- In a cold environment, the LCD monitor may become temporarily dark. When the camera warms up, the display will function normally.
- The LCD monitor may be slow to react in low temperatures or may turn dark in a hot environment. When the camera reaches normal operating temperature, the display will function normally.
- If fingerprints are on the LCD monitor surface, gently wipe with a soft, clean, dry cloth.
BATTERIES
- Battery performance decreases with temperature. In cold environments, we recommend keeping spare batteries in a warm place, such as the inside of a coat. Batteries can recover their power when they warm up. As the performance of Ni-MH batteries are less effected by temperature, their use is recommended when shooting in cold environments.
- Remove the batteries when the camera is not in use for an extended period. Leaking battery fluid may damage the battery-chamber.
- Occasionally, when using alkaline batteries, the battery-condition indicator will give a false low-battery-power warning, even though there is enough power capacity. Continue to use the camera; the low-battery indicator will disappear.
- Because batteries heat up with the use of the camera, be careful when removing or replacing them. Turn off the the camera and allow the batteries to cool before handling them.
COMPACTFLASH CARD CARE AND HANDLING
- Read and follow the instruction manual supplied with the CompactFlash card.
- The following may cause data loss or damage.
1 Improper use of the card.
2 Static electrical discharge or electromagnetic fields near the card.
3 Removing the card or interrupting the power supply while the camera or computer is accessing the card (reading, writing, formatting, etc.).
4 The disuse of a card for an extended period.
5 Using the card beyond its life
Minolta has no responsibility for any loss or damage to data.
- It is recommend that a copy of the card data be made in another media such as a ZIP disc, hard disk, CD-ROM, etc.
- When the card is formatted, all recorded data will be deleted. Be sure to make a backup of any important data.
- The storage capability of the CompactFlash card will diminish with extended use. It may be necessary to purchase a new card periodically.
- Keep away from static electricity and electromagnetic fields.
- Do not bend, drop, or subject the card to impact.
- Strong static electrical discharges or physical shock may prevent the card from being able to transfer data.
- Do not touch the electrical contacts of the card with your fingers or metal objects.
- Keep away from heat, moisture, and direct sunlight.
- Keep away from small children.
STORAGE
- Store in a cool, dry, well-ventilated area away from dust and chemicals. For long periods of disuse, store the camera in an airtight container with a silica-gel drying agent.
- Remove the batteries and CompactFlash card from the camera when not in use for extended periods.
- Do not store the camera in an area with naphthalene or mothballs.
- During long periods of storage, operate the camera occasionally. When taking the camera out of storage, check that the camera is functioning properly before using.
BEFORE IMPORTANT EVENTS OR JOURNEYS
- Check the camera's operation; take test pictures and purchase spare batteries.
- Minolta has no responsibility for any damage or loss incurred by equipment malfunction.
COPYRIGHT
- TV program, films, video tapes, photographs, and other materials may be copyrighted. Unauthorised recording or duplication of such material may be contrary to copyright laws. Taking pictures or images of performances, exhibitions, etc. is prohibited without approval and can infringe on copyright. Images protected by copyright can only be used under the provisions within the copyright laws.
QUESTIONS AND SERVICE
- If you have questions about your camera, contact your local camera dealer or write to the Minolta distributor in your area.
- Before shipping your camera for repair, please contact a Minolta Service Facility.
CCD type: 1/1.75 inch-type interline CCD with 2.3 million pixels
Focal length: 8.2mm (equivalent to a 38mm lens in 35mm format)
Lens construction: 5 elements in 4 groups (includes 3 elements with 4 aspheric surfaces)
Aperture: f/3.0
Focusing range: 0.6m to infinity (0.3m to 0.6m in macro mode)
Viewfinder: Reversed Galilean finder
LCD monitor: 46mm 1.8 type colour LCD
Shutter: CCD electronic shutter and mechanical shutter
Shutter speeds: 1/500 - 2 sec.
Focusing method: Video AF system (Focus preset to 2m in movie-recording mode)
AF/AE lock: By pressing the shutter-release button halfway down
Metering: Centre-weighted
Exposure control: Programmed AE
Exposure comp: -2EV to +2EV in 0.5 increments
Flash range: 0.6m to 2.5m (normal ISO setting)
0.6m to 5m (high ISO setting)
Flash modes: Autoflash, fill flash, flash cancel, autoflash with red-eye reduction, fill flash with red-eye reduction
Flash sync: 1/125 sec.
Continuous drive: 1 frame per second (approx.)
Self-timer: 10 seconds (approx.)
Remote control: IR remote control RC-3 (sold separately)
Movie recording: QVGA: 320 X 240 pixels per frame at approximately 15 fps.
White balance: Automatic, manual (preset - daylight, fluorescent, tungsten)
Digital zoom: X1.4 - 1280 X 856 pixels, X2.0 - 896 X 600 pixels
Number of pixels: 1796 X 1200 (full-size image), 800 X 600 (half-size image)
Image file format: Exif 2.1 (JPEG, TIFF) conforms to DFC 1.0 and supports DPOF printing ver. 1.1. Motion JPEG (AVI)
Recording media: Type 1 CompactFlash card
PC interface: USB 1.1 (mass-storage class)
Video output: Two selectable standards: NTSC and PAL
Batteries: Four AA batteries (alkaline or Ni-MH)
External power: 6V DC with specified AC adaptor (sold separately)
Dimensions: 114 (W) X 65 (H) X 45 (D) mm
Weight: 210g (approx.) without batteries or recording media
Specifications are based on the latest information available at the time of printing and are subject to change without notice.
MINOLTA
A Minolta Austria Ges.m.b.H Amalienstr. 59-61, A-1131 Wien, Österreich Tel:01 87868 176 Fax:01 87868 153 http://www.minoltaeurope.com
B Minolta Belgium Branch Prins Boudewijnlaan 1 B-2550 Kontich, België Tel: 03 451 07 00 Fax: 03 458 50 48 http://www.minolta.be en http://www.minolta.nl
CAN Minolta Canada Inc., Head Office 369 Britannia Road East, Mississauga, Ontario L4Z 2H5, Canada Tel.0905 890 66 00 Fax0905 890 71 99 http://www.minolta.com
CH Minolta (Schweiz) AG Riedstr. 6, CH-8953 Dietikon, Schweiz Tel:157 57 11 (sFr 2.15/min) Fax:01 741 33 12 http://www.minolta.ch
- The essentials of imaging
- DiMAGE
- E201
- WARNING
- CAUTION
- ABOUT THIS MANUAL
- TABLE OF CONTENTS
- NAMES OF PARTS
- GETTING UP AND RUNNING....14
- SETTING UP THE CAMERA....19
- TAKING PICTURES....25
- RECORDING MODE MENU (Controlling the Image)....43
- VIEWING PICTURES (Playback Mode) 51
- EDITING IMAGES ....61
- SETUP MODE....71
- CONNECTING TO A COMPUTER....76
- APPENDIX....88
- CAMERA BODY
- VIEWFINDER
- FUNCTION DIAL
- GETTING UP AND RUNNING
- CONSERVING BATTERY POWER
- HANDLING THE CAMERA
- TURNING ON THE CAMERA
- TAKING PICTURES (Recording Mode)
- SETTING UP THE CAMERA
- CHANGING BATTERIES
- BATTERY-POWER INDICATORS
- AUTO POWER OFF
- ATTACHING THE CAMERA STRAP
- INSERTING THE COMPACTFLASH CARD
- Always turn off the camera before inserting or removing a CompactFlash card otherwise the data on the card could be lost, and the card may be damaged.
- TAKING PICTURES
- SETTING THE CAMERA IN RECORDING MODE
- LCD MONITOR DISPLAY (Recording Mode)
- FOCUS LOCK
- FOCUS LAMP/NO FOCUS INDICATOR
- Focus Lamp Steady:
- Focus Lamp Blinking:
- SPECIAL FOCUSING SITUATIONS
- FLASH MODES
- FLASH RANGE
- CLOSE-UP PHOTOGRAPHY (Macro Mode)
- EXPOSURE COMPENSATION
- DIGITAL ZOOM
- MOVIE MODE
- LCD Monitor
- Data Panel
- CONTINUOUS-ADVANCE MODE
- SELF-PORTRAITS (Self-timer)
- IR REMOTE CONTROL (SOLD SEPARATELY)
- RECORDING-MODE MENU Controlling the Image
- NAVIGATING THE RECORDING-MODE MENU
- IMAGE QUALITY
- IMAGE SIZE
- IMAGE-FILE SIZE
- WHITE BALANCE
- SHARPNESS
- CAMERA SENSITIVITY (ISO)
- VIEWING PICTURES Playback Mode
- SINGLE-FRAME PLAYBACK
- INDEX PLAYBACK
- TURNING OFF THE CAMERA IN PLAYBACK MODE
- ENLARGED PLAYBACK
- SLIDE SHOW
- EXIT
- MOVIE PLAYBACK
- VIEWING IMAGES ON A TELEVISION
- EDITING IMAGES
- Editing Images with the Camera Controls
- Editing Images with the Playback Menu
- DELETING SINGLE IMAGES
- LOCKING AND UNLOCKING SINGLE IMAGES
- NAVIGATING THE PLAYBACK MENU
- DELETE ALL
- LOCK ALL
- UNLOCK ALL
- PRINTING IMAGES
- PRINTING FORMAT
- PRINT-ORDER MENU
- SET ORDER
- PRINT ALL
- CANCEL ALL
- SETUP MODE
- NAVIGATING THE SETUP MENU
- LCD MONITOR BRIGHTNESS
- FORMATTING A COMPACTFLASH CARD
- Formatting a CompactFlash card destroys all the data on the card
- SETTING AUTO-POWER-OFF PERIOD
- SETTING THE DATE AND TIME
- BEEP
- SETTING THE VIDEO-OUT SIGNAL
- RETURNING TO THE DEFAULT SETTINGS
- CONNECTING TO A COMPUTER
- CONNECTING THE CAMERA TO A COMPUTER
- 1
- 2
- 3
- 4
- 5
- CONNECTING TO WINDOWS ME
- CONNECTING TO WINDOWS 2000 PROFESSIONAL
- Found New Hardware Wizard
- Install Hardware Device Drivers
- Locate Driver Files
- Optional search locations:
- CONNECTING TO WINDOWS 98
- CONNECTING TO A MACINTOSH
- COMPACTFLASH CARD FOLDER ORGANISATION
- DiMAGE E201 EXIF UTILITY
- E201UtilityE
- DISCONNECTING THE CAMERA FROM THE COMPUTER
- For Windows 98
- For Windows ME
- For Windows 2000 Professional
- For Macintosh
- Appendix
- CAMERA CARE
- CLEANING
- OPERATING TEMPERATURES AND CONDITIONS
- LCD MONITOR CARE
- BATTERIES
- COMPACTFLASH CARD CARE AND HANDLING
- Minolta has no responsibility for any loss or damage to data.
- STORAGE
- BEFORE IMPORTANT EVENTS OR JOURNEYS
- COPYRIGHT
- QUESTIONS AND SERVICE
- MINOLTA
Brand : MINOLTA
Model : DIMAGE E201
Category : Digital Camera