
ProArt Display PA248QFV - Monitor ASUS - Free user manual and instructions
Find the device manual for free ProArt Display PA248QFV ASUS in PDF.


| Product Type | Monitor |
| Brand | ASUS |
| Model | ProArt Display PA248QFV |
| Panel Type | IPS |
| Screen Size | 24.1 inches |
| Resolution | 1920 x 1200 (WUXGA) |
| Aspect Ratio | 16:10 |
| Brightness | 300 cd/m² |
| Contrast Ratio | 1000:1 |
| Viewing Angle | 178° / 178° |
| Color Gamut | 100% sRGB / 100% Rec.709 |
| Refresh Rate | 60 Hz |
| Response Time | 5 ms (GTG) |
| Connectivity | USB-C (DP Alt Mode, 65W PD), DisplayPort 1.2, HDMI 2.0, VGA, 2x USB 3.2 Gen 1, Audio Out |
| Built-in Webcam | 2MP Full HD with dual AI noise-canceling microphones |
| Built-in Speakers | 2W x 2 |
| Ergonomic Stand | Tilt, swivel, pivot, height adjustment |
| VESA Mount | 100 x 100 mm |
| Power Consumption | 19 W (Typical), 0.5 W (Standby) |
| Dimensions (with Stand) | 539.6 x 405.3 x 213.4 mm |
| Weight (with Stand) | 5.9 kg |
| Cleaning & Maintenance | Use a soft, dry microfiber cloth |
| Security | Kensington lock slot |
| Repairability | VESA compatible, detachable stand and cables for easy servicing |
| Additional Features | Calman Verified, factory calibrated, low blue light, flicker-free |
Frequently Asked Questions - ProArt Display PA248QFV ASUS
User questions about ProArt Display PA248QFV ASUS
0 question about this device. Answer the ones you know or ask your own.
Ask a new question about this device
Download the instructions for your Monitor in PDF format for free! Find your manual ProArt Display PA248QFV - ASUS and take your electronic device back in hand. On this page are published all the documents necessary for the use of your device. ProArt Display PA248QFV by ASUS.
USER MANUAL ProArt Display PA248QFV ASUS
First Edition
September 2025
Copyright © 2025 ASUSTeK COMPUTER INC. All Rights Reserved.
No part of this manual, including the products and software described in it, may be reproduced, transmitted, transcribed, stored in a retrieval system, or translated into any language in any form or by any means, except documentation kept by the purchaser for backup purposes, without the express written permission of ASUSTeK COMPUTER INC. ("ASUS").
Product warranty or service will not be extended if: (1) the product is repaired, modified or altered, unless such repair, modification of alteration is authorized in writing by ASUS; or (2) the serial number of the product is defaced or missing.
ASUS PROVIDES THIS MANUAL "AS IS" WITHOUT WARRANTY OF ANY KIND, EITHER EXPRESS OR IMPLIED, INCLUDING BUT NOT LIMITED TO THE IMPLIED WARRANTIES OR CONDITIONS OF MERCHANTABILITY OR FITNESS FOR A PARTICULAR PURPOSE. IN NO EVENT SHALL ASUS, ITS DIRECTORS, OFFICERS, EMPLOYEES OR AGENTS BE LIABLE FOR ANY INDIRECT, SPECIAL, INCIDENTAL, OR CONSEQUENTIAL DAMAGES (INCLUDING DAMAGES FOR LOSS OF PROFITS, LOSS OF BUSINESS, LOSS OF USE OR DATA, INTERRUPTION OF BUSINESS AND THE LIKE), EVEN IF ASUS HAS BEEN ADVISED OF THE POSSIBILITY OF SUCH DAMAGES ARISING FROM ANY DEFECT OR ERROR IN THIS MANUAL OR PRODUCT.
SPECIFICATIONS AND INFORMATION CONTAINED IN THIS MANUAL ARE FURNISHED FOR INFORMATIONAL USE ONLY, AND ARE SUBJECT TO CHANGE AT ANY TIME WITHOUT NOTICE, AND SHOULD NOT BE CONSTRUED AS A COMMITMENT BY ASUS. ASUS ASSUMES NO RESPONSIBILITY OR LIABILITY FOR ANY ERRORS OR INACCURACIES THAT MAY APPEAR IN THIS MANUAL, INCLUDING THE PRODUCTS AND SOFTWARE DESCRIBED IN IT.
Products and corporate names appearing in this manual may or may not be registered trademarks or copyrights of their respective companies, and are used only for identification or explanation and to the owners' benefit, without intent to infringe.
©
Notices
Federal Communications Commission Statement
This device complies with Part 15 of the FCC Rules. Operation is subject to the following two conditions:
- This device may not cause harmful interference, and
- This device must accept any interference received including interference that may cause undesired operation.
This equipment has been tested and found to comply with the limits for a Class B digital device, pursuant to Part 15 of the FCC Rules. These limits are designed to provide reasonable protection against harmful interference in a residential installation. This equipment generates, uses and can radiate radio frequency energy and, if not installed and used in accordance with the instructions, may cause harmful interference to radio communications. However, there is no guarantee that interference will not occur in a particular installation. If this equipment does cause harmful interference to radio or television reception, which can be determined by turning the equipment off and on, the user is encouraged to try to correct the interference by one or more of the following measures:
- Reorient or relocate the receiving antenna.
- Increase the separation between the equipment and receiver.
- Connect the equipment into an outlet on a circuit different from that to which the receiver is connected.
- Consult the dealer or an experienced radio/TV technician for help.

The use of shielded cables for connection of the monitor to the graphics card is required to assure compliance with FCC regulations. Changes or modifications to this unit not expressly approved by the party responsible for compliance could void the user's authority to operate this equipment.
ENERGY STAR complied product

ENERGY STAR is a joint program of the U.S. Environmental Protection Agency and the U.S. Department of Energy helping us all save money and protect the environment through energy efficient products and practices.
All ASUS products with the ENERGY STAR logo comply with the ENERGY STAR standard, and the power management feature is enabled by default. The monitor and computer are automatically set to sleep after 10 and 30 minutes of user inactivity. To wake your computer, click the mouse or press any key on the keyboard. Please visit http://www.energystar.gov/powermanagement for detail information on power management and its benefits to the environment. In addition, please visit http://www.energystar.gov for detail information on the ENERGY STAR joint program.
Canadian Department of Communications Statement
This digital apparatus does not exceed the Class B limits for radio noise emissions from digital apparatus set out in the Radio Interference Regulations of the Canadian Department of Communications.
This class B digital apparatus complies with Canadian ICES-003.
This Class B digital apparatus meets all requirements of the Canadian Interference - Causing Equipment Regulations.
Software Low Blue Light compliance
ASUS requests every model to pass SW LBL when "Image/ Blue Light Filter" is set to MAX.
Please refer to the following to alleviate eye strains:
- Users should take some time away from the display if working for long hours. It is advised to take short breaks (at least 5 mins) after around 1 hour of continuous working at the computer. Taking short and frequent breaks is more effective than a single longer break.
- To minimize eye strain and dryness in your eyes, users should rest the eye periodically by focusing on objects that are far away.
- Eye exercises can help to reduce eye strain. Repeat these exercises often. If eye strain continues please consult a physician. Eye exercise: (1) Repeating look up and down (2) Slowly roll your eyes (3) Move your eyes diagonal.
- High energy blue light may lead to eye strain and AMD (Age-Related Macular Degeneration). Blue light Filter to reduce 70% (max.) harmful blue light to avoiding CVS (Computer Vision Syndrome).
Blue Light Filter set to MAX. It is in compliance with TÜV Rheinland low blue light Software Solution certification.
Flicker-Free technology
The Monitor adopts Flicker-Free technology, which clears the eye visible flicker, brings comfort viewing experience and preventing users suffer from eye strain and fatigue.
TCO certified
A third-party certification according to ISO 14024

Toward sustainable IT products

Say hello
to a more sustainable product
IT products are associated with a wide range of sustainability risks throughout their life cycle. Human rights violations are common in the factories. Harmful substances are used both in products and their manufacture. Products can often have a short lifespan because of poor ergonomics, low quality and when they are not able to be repaired or upgraded.
This product is a better choice. It meets all the criteria in TCO Certified, the world's most comprehensive sustainability certification for IT products. Thank you for making a responsible product choice, that help drive progress towards a more sustainable future!
Criteria in TCO Certified have a life-cycle perspective and balance environmental and social responsibility. Conformity is verified by independent and approved verifiers that specialize in IT products, social responsibility or other sustainability issues. Verification is done both before and after the certificate is issued, covering the entire validity period. The process also includes ensuring that corrective actions are implemented in all cases of factory non-conformities. And last but not least, to make sure that the certification and independent verification is accurate, both TCO Certified and the verifiers are reviewed regularly.
Want to know more?
Read information about TCO Certified, full criteria documents, news and updates at tcocertified.com. On the website you'll also find our Product Finder, which presents a complete, searchable listing of certified products.
Safety information
- Before setting up the monitor, carefully read all the documentation that came with the package.
- To prevent fire or shock hazard, never expose the monitor to rain or moisture.
- Never try to open the monitor cabinet. The dangerous high voltages inside the monitor may result in serious physical injury.
- If the power supply is broken, do not try to fix it by yourself. Contact a qualified service technician or your retailer.
- Before using the product, make sure all cables are correctly connected and the power cables are not damaged. If you detect any damage, contact your dealer immediately.
- Slots and openings on the back or top of the cabinet are provided for ventilation. Do not block these slots. Never place this product near or over a radiator or heat source unless proper ventilation is provided.
- The monitor should be operated only from the type of power source indicated on the label. If you are not sure of the type of power supply to your home, consult your dealer or local power company.
- Use the appropriate power plug which complies with your local power standard.
- Do not overload power strips and extension cords. Overloading can result in fire or electric shock.
- Avoid dust, humidity, and temperature extremes. Do not place the monitor in any area where it may become wet. Place the monitor on a stable surface.
- Unplug the unit during a lightning storm or if it will not be used for a long period of time. This will protect the monitor from damage due to power surges.
- Never push objects or spill liquid of any kind into the slots on the monitor cabinet.
- To ensure satisfactory operation, use the monitor only with UL listed computers which have appropriate configured receptacles marked between 100-240V AC.
- By means of a power cord connected to a socket-outlet with earthing connection.
- If you encounter technical problems with the monitor, contact a qualified service technician or your retailer.
- Adjustment of the volume control as well as the equalizer to other settings than the center position may increase the ear-/headphones output voltage and therefore the sound pressure level.
This symbol of the crossed out wheeled bin indicates that the product (electrical, electronic equipment, and mercury-containing button cell battery) should not be placed in municipal waste. Please check local regulations for disposal of electronic products.
- Before you lift or reposition your monitor, it is better to disconnect the cables and power cord. Follow the correct lifting techniques when positioning the monitor. When lifting or carrying the monitor, grasp the edges of the monitor. Do not lift the display by the stand or the cord.
- Cleaning. Turn your monitor off and unplug the power cord. Clean the monitor surface with a lint-free, non-abrasive cloth. Stubborn stains may be removed with a cloth dampened with water.
- Avoid using a cleaner containing alcohol or acetone. Use a cleaner intended for use with the monitor. Never spray cleaner directly on the screen, as it may drip inside the monitor and cause an electric shock.
The following symptoms are normal with the monitor:
- You may find slightly uneven brightness on the screen depending on the desktop pattern you use.
- When the same image is displayed for hours, an afterimage of the previous screen may remain after switching the image. The screen will recover slowly or you can turn off the Power Switch for hours.
- When the screen becomes black or flashes, or cannot work anymore, contact your dealer or service center to fix it. Do not repair the screen by yourself!
Conventions used in this guide

WARNING: Information to prevent injury to yourself when trying to complete a task.
CAUTION: Information to prevent damage to the components when trying to complete a task.
IMPORTANT: Information that you MUST follow to complete a task.
NOTE: Tips and additional information to aid in completing a task.
Where to find more information
Refer to the following sources for additional information and for product and software updates.
1. ASUS websites
The ASUS websites worldwide provide updated information on ASUS hardware and software products. Refer to http://www.asus.com
2. Optional documentation
Your product package may include optional documentation that may have been added by your dealer. These documents are not part of the standard package.
Takeback Services
ASUS recycling and takeback programs come from our commitment to the highest standards for protecting our environment. We believe in providing solutions for our customers to be able to responsibly recycle our products, batteries and other components as well as the packaging materials.
Please go to http://csr.asus.com/english/Takeback.htm for detail recycling information in different region.
Product information for EU energy label

PA248QFV
1.1 Welcome!
Thank you for purchasing the ASUS ® LCD monitor!
The latest widescreen LCD monitor from ASUS provides a broader, brighter and crystal-clear display, plus a host of features that enhance your viewing experience.
With these features, you can enjoy the convenience and delightful visual experience that the monitor brings to you!
1.2 Package contents
Check your package for the following items:
√ LCD monitor
√ Monitor stand/base
√ Quick start guide
√ Warranty card
√ Power cord
√ HDMI cable (optional)
√ DisplayPort cable (optional)
√ USB B to A cable (optional)
√ Color calibration report

If any of the above items is damaged or missing, contact your retailer immediately.

If you need to replace the power cord or the connection cable(s), please contact ASUS customer service.
1.3 Monitor introduction
1.3.1 Front view

- Light Sensor: This sensor is used to detect the change of ambient light.
-
⏻ Power button/power indicator:
-
Turns the monitor on/off. Press and hold this button for 0.6 seconds will shut down the monitor.
- The color definition of the power indicator is as the below table.
| Status Description | |
| White On | |
| Amber Standby mode | |
| Off Off | |
-
QuickFit Plus button:
-
Press this button to display the OSD menu when the OSD is off.
-
Selects the QuickFit Plus function.
-
→ Input button:
-
Press this button to display the OSD menu when the OSD is off.
- Press this button to select input.
5. Shortcut 2
- Press this button to display the OSD menu when the OSD is off.
- Default: Brightness hotkey
- To change the hotkey function, go to the Shortcut > Shortcut 2 menu.
6. Shortcut 1
- Press this button to display the OSD menu when the OSD is off.
- Default: Energy Saving hotkey
- To change the hotkey function, go to the Shortcut > Shortcut 1 menu.
7. ✗ Exit button:
- Press this button to display the OSD menu when the OSD is off.
- Exits the OSD menu.
8. :≡ Menu (5-way) button:
- Press this button to display the OSD menu when the OSD is off. Press this button again to enter the OSD main menu.
- Enacts the selected OSD menu items.
- Increases/Decreases values or moves your selection up/down/left/right.
- Push the 5-way button down for over 5 seconds to toggle the Key Lock function between on and off.
1.3.2 Back view

- Kensington lock : This port connects a lock-and-cable apparatus for security purpose.
- Power switch : Press the switch to turn on/off power.
- AC-IN port : This port connects the power cord.
- HDMI port : This port is for connection with an HDMI compatible device.
- DisplayPort in : This port is for connection with a DisplayPort compatible device.
- Earphone jack: This port is only available when an HDMI/DisplayPort cable is connected.
- USB Type-B: This port connects the USB Type-B cable.
- USB 3.2 Gen 1 Type-A: These ports are for connection with USB devices, such as USB keyboard/mouse, USB flash drive, etc.
- USB 3.2 Gen 1 Type-A: These ports are for connection with USB devices, such as USB keyboard/mouse, USB flash drive, etc.
1.3.3 QuickFit Plus Function
The QuickFit Plus function contains 4 types of patterns: (1) Safe Area (2) Center Marker (3) Customization (4) Ruler. To activate the patterns, press the 📄 QuickFit Plus button. Use the :≡Menu (5-way) button to select a desired pattern. You can move the button up/down/left/right to change the pattern's position if needed.
Note that only Customization pattern can be adjusted its frame size according to your need, but may have limited range for moving left/right/up/down.
1. Safe Area
Facilitates designers and users to organize content and layout on one page and achieve a consistent look and feel.
The selections are:

1:1 Action Safe

Title Safe 3 X 3
2. Center Marker
Selects the center marker type.
The selections are:

Type 1 Type 2


Type 3
3. Customization
You can decide the frame size by moving the :Menu (5-way) button up/down/left/right. You can press the :Menu (5-way) button for longer than 3 seconds to switch the measurements between millimeter and inch.(*This feature can be enabled through F/W one key update in 2025/Q4. Please check the latest F/W on ASUS Support Site.)

4. Ruler
This pattern presents physical ruler on top and left side. You can press the Menu (5-way) button for longer than 3 seconds to switch the measurements between metric and imperial.( * This feature can be enabled through F/W one key update in 2025/Q4. Please check the latest F/W on ASUS Support Site.)

2.1 Assembling the monitor arm/base
To assemble the monitor base:
- Make sure the triangle marks of VESA cover aligned.
- Attach the arm into the VESA cover.
-
Shut the lock to make the arm and VESA cover assembled.
-
Have the front of the monitor face down on a table, slide the tabs on the arm into the slots on the VESA cover.
-
Press down the arm assembly to snap it into place.
-
Attach the base into the arm, making sure the tab on the arm fits into the groove on the base.
-
Fix the base to the arm by fastening the bundled screw.

We recommend that you cover the table surface with soft cloth to prevent damage to the monitor.


Base screw size: M6 x 16.2 mm.
2.2 Detaching the arm/base (for VESA wall mount)
The detachable arm/base of this monitor is specially designed for VESA wall mount.
To detach the arm/base.
- Have the front of the monitor face down on a table.
- Press the release button, and then detach the arm/base from the monitor.


We recommend that you cover the table surface with soft cloth to prevent damage to the monitor.

- The VESA wall mount kit (100 x 100 mm) is purchased separately.
- Use only with UL/CSA/GS Listed Wall Mount Bracket with minimum weight/load bearing capacity of 5.93 kg (13.08 lb) (Screw size: M4 x 11 mm).
2.3 Adjusting the monitor
- For optimal viewing, we recommend that you look at the full face of the monitor, then adjust the monitor to the angle that is most comfortable for you.
- Hold the stand to prevent the monitor from falling when you change its angle.
- You can adjust the monitor's angle from +23° to -5°, +/- 30° swivel adjustment from either left or right, and it allows +/- 90° pivot adjustment. You can also adjust the monitor's height within +/- 130 mm.

(Tilt)

(Swivel)

(Height adjustment) (Pivot)
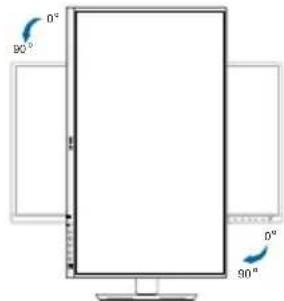

It is normal that the monitor slightly shakes while you adjust the viewing angle.
2.4 Connecting the cables
Connect the cables as the following instructions:
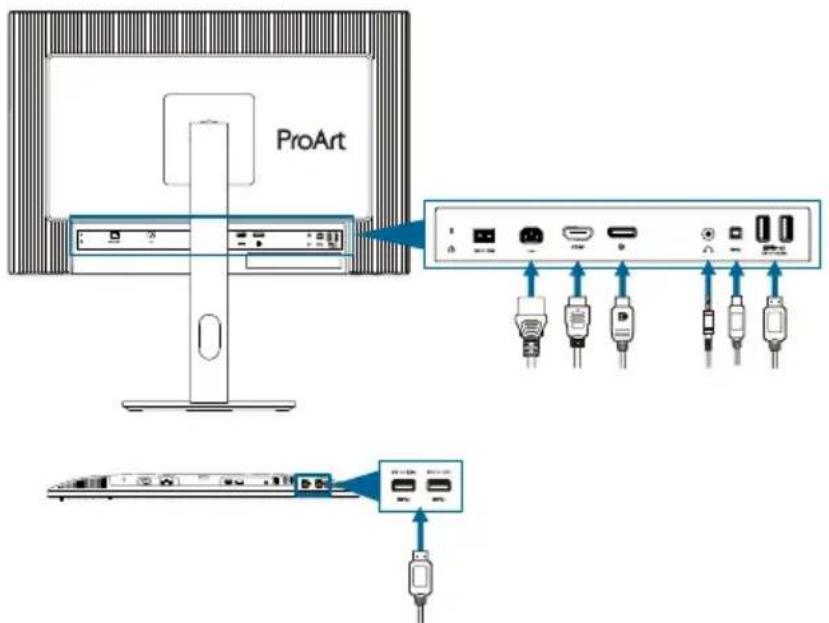
- To connect the power cord: Connect one end of the power cord securely to the monitor's AC input port, the other end to a power outlet.
- To use the HDMI port: Connects the HDMI cable to a source device such as a computer or game console.
- To use the DisplayPort connector: Connects the DisplayPort cable to a source device, such as a computer or game console.
- To use the earphone: connect the end with plug type to the monitor's earphone jack when an HDMI/DisplayPort signal is fed.
- To use the USB Type-B port: This port is for connection with a USB upstream cable. The connection enables the USB ports on the monitor.

When these cables are connected, you can choose the desired signal from the Input item in the OSD menu.

If you need to replace the power cord or the connection cable(s), please contact ASUS customer service.
2.5 Turning on the monitor
Press the power button ⏻ See page 1-2 for the location of the power button. The power indicator ⏻ lights up in white to show that the monitor is ON.
3.1 OSD (On-Screen Display) menu
3.1.1 How to reconfigure


- Press any button to display the OSD menu.
- Press the :≡Menu (5-way) button to enter the OSD main menu.
- Move the :≡ Menu (5-way) button up/down/left/right to navigate through the functions. Highlight the desired function and press the Menu (5-way) button to activate it. If the function selected has a sub-menu, move the :≡ Menu (5-way) button up/down to navigate through the sub-menu functions. Highlight the desired sub-menu function and press the :≡ Menu (5-way) button or move the :≡ Menu (5-way) button to activate it.
- Move the :≡ Menu (5-way) button up/down to change the settings of the selected function.
- To exit and save the OSD menu, press the ✗ button or move the :≡ Menu (5-way) left repeatedly until the OSD menu disappears. To adjust other functions, repeat steps 1-4.
3.1.2 OSD function introduction
1. Preset
This function contains 8 sub-functions you can select for your preference. Each mode has the Reset selection, allowing you to maintain your setting or return to the preset mode.


- Native : Best choice for document editing.

Energy star® cert done in native mode.
- sRGB: Compatible with sRGB color space, sRGB mode is the best choice for document editing.
- BT.709: Compatible with BT.709 color space.
- P3: Compatible with P3 color space.
- DICOM: Compatible with DICOM standard, best choice for medical image checking.
- HDR: High Dynamic Range. Contains three HDR modes (PQ Optimized, PQ Clip, and PQ Basic).
* PQ Optimized: Delivers the optimized HDR performance of this display with as much accuracy as with ST2084 in terms of display luminance capability.
* PQ Clip: Preserves PQ curve till displaying maximum luminance with accuracy. ST2084 code value with higher than display maximum will be mapped to the maximum luminance.
* PQ Basic: Presents HDR performance of general HDR supported displays.
- User Mode 1/User Mode 2: Allows you to make color adjustments in the Advanced Setting.
Below table shows the default configurations for each ProArt Preset mode:
| Preset Native s | RGB BT.709 | P3 DICOM HDR | User Mode 1/User Mode 2 | ||||
| Color Temp. 65 | 00K | Fixed(6500K) | 6500K | 6500K(default) | 6500K | Fixed(6500K) | 6500K |
| Brightness 200 | 80nits 100 n | ts 48nits 200 | 250nits Max | 200 | |||
| Contrast 80 80 | 80 80 80 | Fixed(default) | 80 | ||||
| Sharpness | Enable | Enable | Enable | Enable | Enable | Enable | Enable |
| Saturation | Middle (50) | Disable | Middle (50) | Middle (50) | Middle (50) | Fixed(default) | Middle (50) |
| Hue | Middle (50) | Disable | Middle (50) | Middle (50) | Middle (50) | Fixed(default) | Middle (50) |
| ProArt Pallette/Color | Enable Fixed Enable Enable Enable | Enable(RGB Gain only) | Enable(default) | ||||
| Black Level | Enable | Enable | Enable | Enable | Enable | Enable | Enable |
| Input Range | Enable | Enable | Enable | Enable | Enable | Enable | Enable |
| Gamma | Enable(2.2) | Fixed(2.2) | Enable(2.4) | 2.6(2.2/2.6 only) | Fixed(Off) | Fixed(Off) | Enable(2.2) |
| Light Sync | Enable | Fixed(default) | Enable | Enable | Enable | Fixed(default) | Enable(default) |
| Adaptive Color* | Enable(default) | Fixed(default) | Enable(default) | Enable(default) | Enable(default) | Fixed(default) | Enable(default) |
* This feature can be enabled through F/W one key update in 2025/Q4. Please check the latest F/W on ASUS Support Site.
2. Palette
Set a desired color setting from this menu.


- Brightness: The adjusting range is from 0 to 400.
- Contrast: The adjusting range is from 0 to 100.
- Saturation: The adjusting range is from 0 to 100.
- Hue: Shifts the image color between green and purple.
- Color Temp.: Contains 6 modes including 9300K, 6500K, 5500K, 5000K, DCI-P3 and M Model. When Preset mode P3 is chosen, only 6500K(default), DCI-P3, and M Model are available.
- Gamma: Allows you to set the color mode to 1.8, 2.0, 2.2, 2.4 or 2.6.
- RGB Tuning:
* Gain: The adjusting range is from 0 to 400.
* Offset: The adjusting range is from 0 to 400.
- Black Level: To adjust the initialized 1st signal level of darkest gray level.
* Signal: The adjusting range is from 0 to 100.(*This feature can be enabled through F/W one key update in 2025/Q4. Please check the latest F/W on ASUS Support Site.)
* Backlight: To adjust darkness of backlight.
- Color Reset:
* Current Preset:
Resets the color settings of current color mode to the factory default value.
* All Presets:
Resets the color settings of all color modes to the factory default value.
3. Image
Set the image related setting from this menu.


- Sharpness: The adjusting range is from 0 to 100.
- Trace Free: Adjusts the response time of the monitor.
- Aspect Control: Adjusts the aspect ratio to Full or 1:1 Ratio.
- Input Range: To map signal range with whole black to white presented range of display.
- Blue Light Filter: Adjust the strength of blue light filter.

To activate this function, you need to do the following: disable HDR on your device.

Please refer to the following to alleviate eye strains:
- Users should take some time away from the display if working for long hours. It is advised to take short breaks (at least 5 mins) after around 1 hour of continuous working at the computer. Taking short and frequent breaks is more effective than a single longer break.
- To minimize eye strain and dryness in your eyes, users should rest the eye periodically by focusing on objects that are far away.
- Eye exercises can help to reduce eye strain. Repeat these exercises often. If eye strain continues please consult a physician. Eye exercises:
(1) Repeating look up and down (2) Slowly roll your eyes (3) Move your eyes diagonal. - High energy blue light may lead to eye strain and AMD (Age-Related Macular Degeneration). Blue light Filter to reduce 70% (max.) harmful blue light to avoiding CVS (Computer Vision Syndrome).
4. QuickFit Plus
In this function, you can use different kinds of alignment patterns.
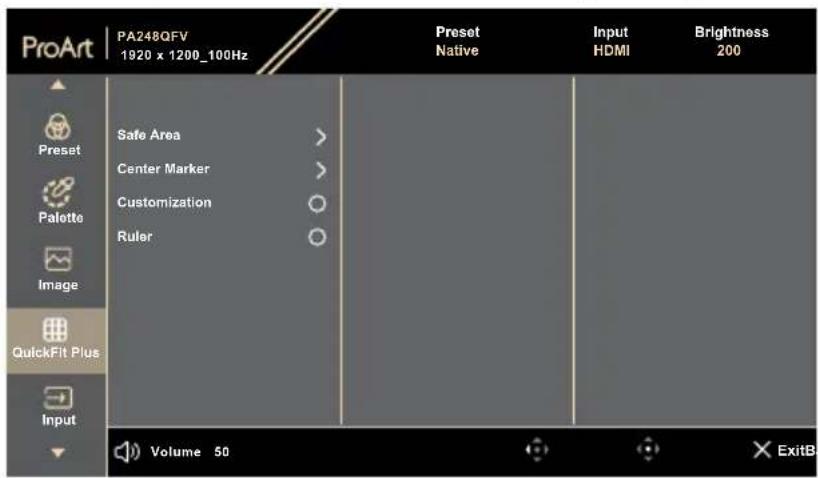

- Safe Area: Facilitates designers and users to organize content and layout on one page and achieve a consistent look and feel. The selections are: 1:1, Action Safe, Title Safe, 3 x 3.
• Center Marker: Adjusts the Type 1, Type 2, Type 3.
- Customization: You can decide the frame size by moving the :≡ Menu (5-way) button up/down/left/right. You can press the :≡Menu (5-way) button for longer than 3 seconds to switch the measurements between millimeter and inch.(*This feature can be enabled through F/W one key update in 2025/Q4. Please check the latest F/W on ASUS Support Site.)
- Ruler: This pattern presents physical ruler on top and left side. You can press the :≡Menu (5-way) button for longer than 3 seconds to switch the measurements between metric and imperial.(*This feature can be enabled through F/W one key update in 2025/Q4. Please check the latest F/W on ASUS Support Site.)
5. Input
In this function, you can select your desired input source.


- Auto Detection: Automatically detects other active signals when current input signal is inactive.

To activate this function, you need to do the following: Set Settings/ Power Saving to Normal Level.
6. Settings
Allows you to adjust the system.


• MediaSync: Turn on VESA MediaSync support.
* MediaSync can only be activated within 48Hz \~ 100Hz.
* For supported GPUs, minimum PC system and driver requirements, please contact the GPU manufactures.
- Dynamic Dimming: Synchronizes with contents while contrast changing to execute backlight dynamic dimming. You can adjust:
* ON/OFF: Turn the function on or off.
• Power Saving: Specifies the power saving setting.
* Normal Level: Allows the USB downstream ports to charge external devices when the monitor enters power saving mode.
* Deep Level: Does not allow all ports to charge external devices and keeps USB signals from being automatically detected when the monitor enters power saving mode.
- OSD Setup:
* Adjusts the OSD Timeout from 10 to 120 seconds.
* Enables or disables the DDC/CI function.
* Adjusts the OSD background from opaque to Transparent.
* Enables or disables the Auto Rotation function.( * This feature can be enabled through F/W one key update in 2025/Q4. Please check the latest F/W on ASUS Support Site.)
- Language: There are 23 languages for your selection, including English, French, German, Italian, Spanish, Dutch, Portuguese, Russian, Czech, Croatian, Polish, Romanian, Hungarian, Turkish, Simplified Chinese, Traditional Chinese, Japanese, Korean, Thai, Indonesian, Persian, Ukrainian, Vietnamese.
- Sound:
* Adjusts Volume from 0 to 100.
* Mute or un-Mute the audio output.
- DisplayPort Stream: Compatibility with graphic card. Select DisplayPort 1.2, DisplayPort 1.4 by graphic card DP version.
- Lock:
* Key: To disable all function keys. Push the 5-way button down for over 5 seconds to cancel the key lock function.
* Preset Setting: To lock all parameters and disable (gray out) ProArt Pallet. (*This feature can be enabled through F/W one key update in 2025/Q4. Please check the latest F/W on ASUS Support Site.)
- Power Indicator: Turns the power LED indicator on/off.
- Light Sync: Adjusts backlight luminance and color temperature according to ambient or internal light conditions.
* Ambient Brightness: Adjust backlight luminance dynamically according to ambient lighting.
* Ambient Color Temperature: Adjust color temperature dynamically according to ambient lighting. (*This feature can be enabled through F/W one key update in 2025/Q4. Please check the latest F/W on ASUS Support Site.)
- ASUS Power Sync: Connects the power on and shutdown control of the monitor and a NUC mini PC connected to it via HDMI port.
* Switches on or off the monitor using the power button in the front bezel also turns on or off the NUC connected to it.
* Switches on or off the NUC connected to also turns on or off the monitor.
• Information: Shows the monitor information.
- All Reset: "Yes" allows you to restore the default settings.
7. Shortcut
Defines the functions for Shortcut 1 and 2 buttons.


- Shortcut 1/Shortcut 2: Selects a function for Shortcut 1 and 2 buttons.

When a certain function is selected or activated, your shortcut key may not support. Available function choices for shortcut: Blue Light Filter, Brightness, ProArt Preset, HDR, Color Temp., Volume, Energy Saving, User Mode 1, User Mode 2.
3.2 Specifications summary
| Panel Type | TFT LCD |
| Panel size | 24.1" (16:10, 61.13 cm) wide screen |
| Max. Resolution | 1920 x 1200 |
| Pixel pitch | 0.270 mm x 0.270 mm |
| Brightness (Typ.) | 350 cd/m2 |
| Brightness (HDR Min.) | 350 cd/m2 |
| Contrast Ratio (Typ.) | 1500:1 |
| Viewing angle (H/V) CR>10 | 178°/178° |
| Display colors | 16.7 Million |
| Response time | 5 ms (GTG) |
| ProArt Preset selection | 8 color preset modes |
| Color temperature selection | 4 color temperatures |
| Analog input | No |
| Digital input | DisplayPort v1.2x1, HDMI 2.0x1 |
| Digital Output | No |
| Earphone jack | Yes |
| Audio input | No |
| Speaker (Built-in) | 2 W x 2 (4ohm) |
| USB 3.2 port | 1x USB 3.2 Type-B4 x downstream USB 3.2 Gen1 Type-A |
| Colors | Black |
| Power LED | White (On)/Amber (Standby) |
| Tilt | +23° ~ -5° |
| Pivot | +90° ~ -90° |
| Swivel | +30° ~ -30° |
| Height Adjustment | 130 mm |
| Kensington lock | Yes |
| AC input voltage | AC: 100-240V~50/60Hz |
| Power consumption | Power On: 11.03 W**(Typ.), Power Standby: ≤ 0.5 W, DC Power Off: ≤ 0.3 W, AC Switch Off: 0 W |
| Temperature (Operating) | 0°C~40°C |
| Temperature (Non-operating) | -20°C~+60°C |
| Dimension (W x H x D) without stand | 531.8 mm x 350.0 mm x 39.7 mm |
| Dimension (W x H x D) with stand | 531.8 mm x 531.3 mm x 190.4 mm (highest)531.8 mm x 401.3 mm x 190.4 mm (lowest)610 mm x 414 mm x 140 mm (package) |
| Weight (Esti.) | 5.4 kg (Net); 3.7 kg (Net, without stand); 7.9 kg (Gross) |
| Multi-languages | 23 languages (English, French, German, Italian, Spanish, Dutch, Portuguese, Russian, Czech, Croatian, Polish, Romanian, Hungarian, Turkish, Simplified Chinese, Traditional Chinese, Japanese, Korean, Thai, Indonesian, Persian, Ukrainian, Vietnamese) |
| Accessories | Quick start guide, warranty card, power cord, HDMI cable (optional), DisplayPort cable (optional), USB B to A cable (optional), color calibration report |
| Compliance and Standards | cTUVus, FCC, ICES-3, EPEAT Gold, CB, CE, ErP, WEEE, EU Energy, TUV-GS, TUV-Ergo, ISO 9241-307, PSE, PSB, UkrSEPRO, Ukraine Energy, CU, CCC, CEL, BSMI, RCM, VCCI, PC recycle, J-MOSS, KC, KCC, KMEPS, Energy Star®, TCO, RoHs, California CEC, Windows 10/11 WHQL, Mac Compliance, TÜV Flicker Free, TÜV Low Blue Light |
*Specifications are subject to change without notice.
**Power consumption of On Mode as defined in Energy Star 8.0 version.
3.3 Outline dimensions

*Unit: mm(inch)
ASUS PA248QFY Outline Dimension
3.4 Troubleshooting (FAQ)
Problem Possible Solution
| Power LED is not ON | Press the button to check if the monitor is in the ON mode.Check if the power cord is properly connected to the monitor and the power outlet.Check if the power switch is ON. |
| The power LED lights amber and there is no screen image | Check if the monitor and the computer are in the ON mode.Make sure the signal cable is properly connected the monitor and the computer.Inspect the signal cable and make sure none of the pins are bent.Connect the computer with another available monitor to check if the computer is properly working. |
| Screen image is too light or dark • Adjust the | Contrast and Brightness settings via OSD. |
| Screen image bounces or a wave pattern is present in the image | Make sure the signal cable is properly connected to the monitor and the computer.Move electrical devices that may cause electrical interference. |
| Screen image has color defects (white does not look white) | Inspect the signal cable and make sure that none of the pins are bent.Perform All Reset via OSD.Adjust the R/G/B color settings or select the Color Temperature via OSD. |
| No sound or sound is low • Ensure that the H | HDMI/DisplayPort/USBType-C cable is properly connected to the monitor and the computer.Adjust the volume settings of both your monitor and HDMI/DisplayPort device.Ensure that the computer sound card driver is properly installed and activated. |
3.5 Supported operating modes
| Resolution Frequency | Horizontal Frequency (KHz) | Vertical Frequency (Hz) | Pixel Clk (MHz) | Full Screen | HDMI_AC OFF |
| 640 x 480 31 | 47(N) 59.94(N) | 25.18 V | |||
| 640 x 480 37 | 75(N) 75.00(N) | 31.5 V | |||
| 800 x 600 37 | 88(P) 60.32(P) | 40 V | |||
| 800 x 600 46 | 87(P) 75.00(P) | 49.5 V | |||
| 1024 x 768 | 48.36(N) 60.00(N) | 65 V | |||
| 1024 x 768 | 60.02(N) 75.00(P) | 78.75 V | |||
| 1280 x 960 | 60.00(P) 60.00(P) | 108 | V | ||
| 1280 x 1024 | 63.98(P) | 60.02(P) 108 | V | ||
| 1280 x 720 | 45.00(P) 60.00(P) | 74.25 V | |||
| 1600 x 1200 | 75.00(P) | 60.00(P) 162 | V | ||
| 1920 x 1080 | 67.5(P) 60.00(P) | 148.5 V | |||
| 1920 x 1200 | 74.04(P) 60.00(N) | 154 | V | ||
| 1920 x 1200 | 122.885(P) | 100(N) | 255.6 V | ||
| 1920 x 1080 | 113.22(P) | 100.00(N) | 235.5 V | ||
| 1920 x 1200 | 93.15(P) 75.00(N) | 193.75 | V | ||
| 1920 x 1080 | 66.59(P) 60.00(N) | 138.5 V | |||
| 1920 x 1080 | 32.81(P) 30.00(N) | 68.25 V | |||
| 1920 x 1080 | 26.20(P) 24.00(N) | 54.5 V | |||
| 1920 x 1080 | 76.5(P) 60.00(P) | 148.5 | V |
"P" / "N" stands for "Positive" / "Negative" polarity of incoming H-sync/V-sync (input timing).
When the monitor is operating in the video mode (ie, not displaying data), the following high definition modes shall be supported in addition to standard definition video.
| Resolution Vertical Frequency (Hz) | |
| 1920 x 1080p | 100Hz |
| 60Hz | |
| 50Hz | |
| 1280 x 720p | 60Hz |
| 1280 x 720p | 50Hz |
| 720 x 576p | 50Hz |
| 720 x 480p | 59.94Hz |
| 640 x 480p | 59.94Hz |
ASUS
- COPYRIGHT © 2025 ASUSTEK COMPUTER INC. ALL RIGHTS RESERVED
- NOTICES
- FEDERAL COMMUNICATIONS COMMISSION STATEMENT
- ENERGY STAR COMPLIED PRODUCT
- CANADIAN DEPARTMENT OF COMMUNICATIONS STATEMENT
- SOFTWARE LOW BLUE LIGHT COMPLIANCE
- FLICKER-FREE TECHNOLOGY
- TCO CERTIFIED
- SAY HELLO
- TO A MORE SUSTAINABLE PRODUCT
- WANT TO KNOW MORE
- SAFETY INFORMATION
- THE FOLLOWING SYMPTOMS ARE NORMAL WITH THE MONITOR
- CONVENTIONS USED IN THIS GUIDE
- WHERE TO FIND MORE INFORMATION
- ASUS WEBSITES
- OPTIONAL DOCUMENTATION
- TAKEBACK SERVICES
- PRODUCT INFORMATION FOR EU ENERGY LABEL
- WELCOME
- PACKAGE CONTENTS
- MONITOR INTRODUCTION
- FRONT VIEW
- SHORTCUT
- ✗ EXIT BUTTON
- ≡ MENU (5-WAY) BUTTON
- BACK VIEW
- QUICKFIT PLUS FUNCTION
- SAFE AREA
- CENTER MARKER
- CUSTOMIZATION
- RULER
- ASSEMBLING THE MONITOR ARM/BASE
- DETACHING THE ARM/BASE (FOR VESA WALL MOUNT)
- ADJUSTING THE MONITOR
- CONNECTING THE CABLES
- TURNING ON THE MONITOR
- OSD (ON-SCREEN DISPLAY) MENU
- HOW TO RECONFIGURE
- OSD FUNCTION INTRODUCTION
- PRESET
- PALETTE
- IMAGE
- QUICKFIT PLUS
- INPUT
- SETTINGS
- SOUND
- LOCK
- SPECIFICATIONS SUMMARY
- OUTLINE DIMENSIONS
- TROUBLESHOOTING (FAQ)
Brand : ASUS
Model : ProArt Display PA248QFV
Category : Monitor