
ROG Strix XG34WCDM - Monitor ASUS - Free user manual and instructions
Find the device manual for free ROG Strix XG34WCDM ASUS in PDF.


| Product Type | 34" OLED Gaming Monitor |
| Brand / Model | ASUS ROG Strix XG34WCDM |
| Panel Type | OLED |
| Screen Size | 34" W (86.4 cm) |
| Native Resolution | 3440 x 1440 |
| Refresh Rate | 240 Hz (supports VRR 48–240 Hz) |
| Response Time | 0.03 ms (GTG) |
| Brightness | 250 nits (Typ.) |
| Contrast Ratio | 1,500,000:1 (Typ.) |
| Viewing Angle | 178°(H) / 178°(V) |
| Display Colors | 1.07 billion |
| Color Gamut | 99% DCI-P3 (Typ.) |
| Video Inputs | 2 x HDMI v2.1, 1 x DisplayPort 1.4, 1 x USB-C (DP Alt Mode, PD 90W) |
| USB Ports | 2 x USB 2.0 Type-A |
| Audio | Earphone jack; audio from HDMI/DP/USB-C |
| Smart Platform | Google TV with built-in WiFi 6E and Bluetooth 5.3 |
| Remote Control | Included (voice control, streaming shortcuts) |
| Ergonomics | Tilt -5°~+20°, Swivel -25°~+25°, Height 110 mm |
| VESA Mount | 100 x 100 mm (bracket sold separately) |
| Dimensions (with stand) | 812 x 545 x 199 mm |
| Weight | 8.8 kg (with stand) / 6.2 kg (without stand) |
| Power Consumption & Input | 41.5 W (Typ.), <0.5 W saving, <0.3 W off; 100–240V, 50/60Hz |
| Safety Features | Kensington lock, anti-tip wall mount, TÜV Rheinland Flicker-Free & Low Blue Light certified |
| Cleaning & Care | Lint-free, non-abrasive cloth; avoid alcohol/acetone |
Frequently Asked Questions - ROG Strix XG34WCDM ASUS
User questions about ROG Strix XG34WCDM ASUS
0 question about this device. Answer the ones you know or ask your own.
Ask a new question about this device
Download the instructions for your Monitor in PDF format for free! Find your manual ROG Strix XG34WCDM - ASUS and take your electronic device back in hand. On this page are published all the documents necessary for the use of your device. ROG Strix XG34WCDM by ASUS.
USER MANUAL ROG Strix XG34WCDM ASUS
ROG SWIFT OLED XG34WCDMTG
USER GUIDE
Table of contents
Notices iii
Safety information......vii
Care & Cleaning....xii
Takeback Services....xiii
1.1 Welcome....1-1
1.2 Package contents.... 1-1
1.3 Assembling the monitor 1-2
1.4.1 Rear of the OLED monitor 1-3
1.5 Monitor introduction 1-4
1.5.1 Using the Controls button 1-4
2.1 Adjusting the monitor 2-1
2.2 Outline dimension 2-2
2.3 Detaching the arm/stand (for VESA wall mount)....2-3
3.1 Remote Control....3-1
3.2 Multi-platform Streamer Plus user guide 3-5
3.3 Shortcut Menu 3-7
3.4 Miracast....3-8
3.5 MultiView....3-8
3.6 CrossShare 3-10
3.7 Letterbox Wallpaper....3-11
3.8 Shop Mode 3-13
3.9 SET-UP THE Monitor (Using the Remote Control) 3-14
3.10 SET-UP THE Monitor (Using the Remote Control) 3-18
4.1 OSD (On-Screen Display) menu....4-1
4.1.1 How to reconfigure....4-1
4.1.2 OSD Function Introduction.... 4-2
4.2 Specifications 4-11
4.3 Troubleshooting (FAQ) 4-12
4.4 Supported Timing List 4-14
Copyright © 2025 ASUSTeK COMPUTER INC. All Rights Reserved.
No part of this manual, including the products and software described in it, may be reproduced, transmitted, transcribed, stored in a retrieval system, or translated into any language in any form or by any means, except documentation kept by the purchaser for backup purposes, without the express written permission of ASUSTeK COMPUTER INC. ("ASUS").
Product warranty or service will not be extended if: (1) the product is repaired, modified or altered, unless such repair, modification of alteration is authorized in writing by ASUS; or (2) the serial number of the product is defaced or missing.
ASUS PROVIDES THIS MANUAL "AS IS" WITHOUT WARRANTY OF ANY KIND, EITHER EXPRESS OR IMPLIED, INCLUDING BUT NOT LIMITED TO THE IMPLIED WARRANTIES OR CONDITIONS OF MERCHANTABILITY OR FITNESS FOR A PARTICULAR PURPOSE. IN NO EVENT SHALL ASUS, ITS DIRECTORS, OFFICERS, EMPLOYEES OR AGENTS BE LIABLE FOR ANY INDIRECT, SPECIAL, INCIDENTAL, OR CONSEQUENTIAL DAMAGES (INCLUDING DAMAGES FOR LOSS OF PROFITS, LOSS OF BUSINESS, LOSS OF USE OR DATA, INTERRUPTION OF BUSINESS AND THE LIKE), EVEN IF ASUS HAS BEEN ADVISED OF THE POSSIBILITY OF SUCH DAMAGES ARISING FROM ANY DEFECT OR ERROR IN THIS MANUAL OR PRODUCT.
SPECIFICATIONS AND INFORMATION CONTAINED IN THIS MANUAL ARE FURNISHED FOR INFORMATIONAL USE ONLY, AND ARE SUBJECT TO CHANGE AT ANY TIME WITHOUT NOTICE, AND SHOULD NOT BE CONSTRUED AS A COMMITMENT BY ASUS. ASUS ASSUMES NO RESPONSIBILITY OR LIABILITY FOR ANY ERRORS OR INACCURACIES THAT MAY APPEAR IN THIS MANUAL, INCLUDING THE PRODUCTS AND SOFTWARE DESCRIBED IN IT.
Products and corporate names appearing in this manual may or may not be registered trademarks or copyrights of their respective companies, and are used only for identification or explanation and to the owners' benefit, without intent to infringe.
Notices
Federal Communications Commission Statement
This device complies with part 15 of the FCC / ISED's licence-exempt RSSs Rules. Operation is subject to the following two conditions:
(1) This device may not cause harmful interference, and
(2) this device must accept any interference received, including interference that may cause undesired operation.
This equipment has been tested and found to comply with the limits for a Class B digital device, pursuant to Part 15 of the FCC Rules. These limits are designed to provide reasonable protection against harmful interference in a residential installation. This equipment generates, uses and can radiate radio frequency energy and, if not installed and used in accordance with the instructions, may cause harmful interference to radio communications. However, there is no guarantee that interference will not occur in a particular installation. If this equipment does cause harmful interference to radio or television reception, which can be determined by turning the equipment off and on, the user is encouraged to try to correct the interference by one or more of the following measures:
- Reorient or relocate the receiving antenna.
- Increase the separation between the equipment and receiver.
- Connect the equipment to an outlet on a circuit different from that to which the receiver is connected.
- Consult the dealer or an experienced radio/TV technician for help.

The use of shielded cables for connection of the monitor to the graphics card is required to assure compliance with FCC regulations. Changes or modifications to this unit not expressly approved by the party responsible for compliance could void the user's authority to operate this equipment.
The device has been evaluated to meet general RF exposure requirement. The device can be used in portable exposure condition without restriction.
Canadian Department of Communications Statement
This digital apparatus does not exceed the Class B limits for radio noise emissions from digital apparatus set out in the Radio Interference Regulations of the Canadian Department of Communications.
This class B digital apparatus complies with Canadian ICES-003.
This Class B digital apparatus meets all requirements of the Canadian Interference -Causing Equipment Regulations.
This device contains licence-exempt transmitter(s)/receiver(s) that comply with Innovation, Science and Economic Development Canada's licence-exempt RSS(s). Operation is subject to the following two conditions:
(1) This device may not cause interference.
(2) This device must accept any interference, including interference that may cause undesired operation of the device.
Any changes or modifications not expressly approved by the party responsible for compliance could void the user's authority to operate the equipment.
RF exposure statement:
The equipment complies with IC Radiation exposure limit set forth for uncontrolled environment. The device has been evaluated to meet general RF exposure requirement. The device can be used in portable exposure condition without restriction.
FCC/ISED/CE-RED Caution:
Any changes or modifications not expressly approved by the party responsible for compliance could void the user's authority to operate this equipment.
This transmitter must not be co-located or operating in conjunction with any other antenna or transmitter.
Operations in the 5GHz products are restricted to indoor usage only.
Declaration of Conformity / UK Declaration of Conformity
This device complies with the requirements set out in the Council Directive on the Approximation of the Laws of the Member States relating to Electromagnetic Compatibility (2014/30/EU), Low-voltage Directive (2014/35/EU), Accessibility reequipments (EU)2019/882, REGULATION (EU) 2024/1781 and RoHS directive (2011/65/EU). This product has been tested and found to comply with the harmonized standards for Information Technology Equipment, these harmonized standards published under Directives of Official Journal of the European Union.
This device complies with the essential requirements of the Radio Equipment Directive (2014/53/EU) or Radio Equipment Regulations 2017(for UK).
The following test methods have been applied in order to prove presumption of conformity with the essential requirements of the Radio Equipment Directive
WEEE Symbol Statement
This symbol on the product or on its packaging indicates that this product must not be disposed of with your other household waste. Instead, it is your responsibility to dispose of your waste equipment by handing it over to a designated collection point for the recycling of waste electrical and electronic equipment. The separate collection and recycling of your waste equipment at the time of disposal will help to conserve natural resources and ensure that it is recycled in a manner that protects human health and the environment. For more information about where you can drop off your waste equipment for recycling, please contact your local city office, your household waste disposal service or the shop where you purchased the product.

The Monitor uses low blue light panel and compliance with TÜV Rheinland Low Blue Light Hardware Solution at factory reset/default setting mode.
TÜV Rheinland Flicker Free Certification. This product to ascertain whether the display produces visible and invisible flicker for the human eye and therefore strains the eyes of users.
Radiation Exposure Statement:
This equipment complies with FCC/ISED/CE-RED/CE radiation exposure limits set forth for an uncontrolled environment.
This equipment should be installed and operated with minimum distance 20cm between the radiator & your body.
Web Content Accessibility Guidelines (WCAG) from the W3C's Web Accessibility Initiative (WAI) helps web designers and developers create sites that better meet the needs of people with disabilities or age-related limitations. WCAG advances accessibility across the full range of web content (text, images, audio, and video) and web applications. WCAG can be precisely tested, is easy to understand and use, and allows web developers flexibility for innovation. WCAG 2.0 has also been approved as
ISO/IEC 40500:2012. https://www.asus.com/content/accessibility-policy/
WCAG specifically addresses barriers to accessing the web experienced by people with visual, auditory, physical, cognitive, and neurological disabilities, and by older web users with accessibility needs. WCAG 2.0 provides characteristics of accessible content:
- Perceivable (for instance, by addressing text alternatives for images, captions for audio, adaptability of presentation, and color contrast)
- Operable (by addressing keyboard access, color contrast, timing of input, seizure avoidance, and navigability)
- Understandable (by addressing readability, predictability, and input assistance)
- Robust (for instance, by addressing compatibility with assistive technologies)
Safety information
- Before setting up the monitor, carefully read all the documentation that came with the package.
- To prevent fire or shock hazard, never expose the monitor to rain or moisture.
- Never try to open the monitor cabinet. The dangerous high voltages inside the monitor may result in serious physical injury.
- If the power supply is broken, do not try to fix it by yourself. Contact a qualified service technician or your retailer.
- Before using the product, make sure all cables are correctly connected and the power cables are not damaged. If you detect any damage, contact your dealer immediately.
- Slots and openings on the back or top of the cabinet are provided for ventilation. Do not block these slots. Never place this product near or over a radiator or heat source unless proper ventilation is provided.
- The monitor should be operated only from the type of power source indicated on the label. If you are not sure of the type of power supply to your home, consult your dealer or local power company.
- Use the appropriate power plug which complies with your local power standard.
- Do not overload power strips and extension cords. Overloading can result in fire or electric shock.
- Avoid dust, humidity, and temperature extremes. Do not place the monitor in any area where it may become wet. Place the monitor on a stable surface.
- Unplug the unit during a lightning storm or if it will not be used for a long period of time. This will protect the monitor from damage due to power surges.
- Never push objects or spill liquid of any kind into the slots on the monitor cabinet.
- To ensure satisfactory operation, use the monitor only with UL listed computers which have appropriate configured receptacles marked between 100 \~ 240V AC.
- The socket-outlet shall be installed near the equipment and shall be easily accessible
- If you encounter technical problems with the monitor, contact a qualified servicer.
- Provide an earthing connection before the mains plug is connected to the mains. And, when disconnecting the earthing connection, be sure to disconnect after pulling out the mains plug from the mains.
- Please confirm the distribution system in building installation shall provide the circuit breaker rated 120/240V, 20A (maximum).
- If provided with a 3-pin attachment plug on the power cord, plug the cord into a grounded (earthed) 3-pin outlet. Do not disable the power cord grounding pin, for example, by attaching a 2-pin adapter. The grounding pin is an important safety feature.
Stability Hazard
- The product may fall, causing serious personal injury or death. To prevent injury, this product must be securely attached to the floor/wall in accordance with the installation instructions.
- A product may fall, causing serious personal injury or death. Many injuries, particularly to children, can be avoided by taking simple precautions such as:
- ALWAYS use cabinets or stands or installation methods recommended by the manufacturer of the product set.
• ALWAYS use furniture that can safely support the product. - ALWAYS ensure the product is not overhanging the edge of the supporting furniture.
- ALWAYS educate children about the dangers of climbing on furniture to reach the product or its controls.
- ALWAYS route cords and cables connected to your product so they cannot be tripped over, pulled or grabbed.
- NEVER place a product in an unstable location.
- NEVER place the product on tall furniture (for example, cupboards or bookcases) without anchoring both the furniture and the product to a suitable support.
- NEVER place the product on cloth or other materials that may be located between the product and supporting furniture.
- NEVER place items that might tempt children to climb, such as toys and remote controls, on the top of the product or furniture on which the product is placed.
- If the existing product is going to be retained and relocated, the same considerations as above should be applied.
ISED 5.925-7.125 GHz Caution Statement:
RLAN devices shall include the following text in the user manual:
- Devices shall not be used for control of or communications with unmanned aircraft systems.
• Devices shall not be used on oil platforms.
- Devices shall not be used on aircraft, except for the low-power indoor access points, indoor subordinate devices, low-power client devices, and very low-power devices operating in the 5925-6425 MHz band, that may be used on large aircraft as defined in the Canadian Aviation Regulations, while flying above 3,048 metres (10,000 feet).
Except for very low-power devices, RLAN devices shall additionally include the following text in the user manual:
• Devices shall not be used on automobiles.
• Devices shall not be used on trains.
• Devices shall not be used on maritime vessels.
The frequency, mode and the maximum transmitted power are listed below:
• 2400-2483.5MHz: < 20 dBm (EIRP)
• 5150-5250MHz: < 23 dBm (EIRP)
• 5250-5350MHz: < 23 dBm (EIRP)
• 5470-5725MHz: < 30 dBm (EIRP)
• 5725-5875MHz: < 13.98 dBm (EIRP)
• 5955-6415MHz: < 23 dBm (EIRP)
The device is restricted to indoor use only when operating in the 5150 to 5350MHz frequency range. (for 5G product only)
| ATBE | BGHRC | YCZDK | |||||
| EEFIF | RDEEL | HUIE | |||||
| ITLVL | TLUMTN | NLPL | |||||
| PTRO | SKSIES | SEUK(N) | |||||
| UK | |||||||
ASUS CONTACT INFORMATION
| ASUSTeK Computer Inc. | ASUS Computer International (America) | ASUS Computer GmbH (Germany and Austria) | |||
| Address | 1F., No. 15,Lide Rd., Beitou Dist.,Taipei City 112, Taiwan | Address | 48720 Kato Rd, Fremont,CA 94538, USA | Address | Harkortstr. 21-23D-40880 Ratingen, Germany |
| Telephone | +1-510-739-3777 | Telephone | +49-1805-010920 | ||
| Telephone | +886-2-2894-3447 Fax | +1-510-608-4555Website | http://usa.asus.com/ | Website | http://www.asus.de/ |
| Fax | +886-2-2894-7798 | Online Contact | http://www.asus.de/sales | ||
| info@asus.com.tw | |||||
| Website | http://www.asus.com.tw/ | ||||
| Technical Support | Technical Support | ||||
| Technical Support | Telephone | +1-812-282-2787 (English Only) | Telephone | +49-1805-010923 | |
| Telephone | +86-21-38429911 | +1-905-370-2787 (French Only) | Support Fax | +49-2102-959911 | |
| Online Support | http://support.asus.com/ | Online Support | http://support.asus.com/ | ||
WARNING
Usage of other than specified head- or earphones can result in hearing loss due to excessive sound pressures.
Excessive sound pressure from earphones and headphones can cause hearing loss. Adjustment of the equalizer to maximum increases the earphones and headphones output voltage and therefore the sound pressure level.
Do not dispose of electrical appliances as unsorted municipal waste, use separate collection facilities.
Contact your local government for information regarding the collection systems available.
If electrical appliances are disposed of in landfills or dumps, hazardous substances can leak into the groundwater and get into the food chain, damaging your health and well-being.
When replacing old appliances with new once, the retailer is legally obligated to take back your old appliance for disposal at least for free of charge.
Restriction on Hazardous Substances statement (India)
This product complies with the “India E-Waste (Management) Rules, 2016” and prohibits use of Lead, Mercury, Hexavalent Chromium, polybrominated biphenyls(PBBs) and polybrominated diphenyl ethers(PBDEs) in concentration exceeding 0.1% by weight in homogenous materials and 0.01% by weight in homogenous materials for cadmium, except of exemptions listed in Schedule 2 of the Rule.

HIGH-DEFINITION MULTIMEDIA INTERFACE
![EA[CE]](/content/2026/08/1626634/images/b800fe7c594e565b3eb4e5bd0a9f996a19dc56c22a5ddeb95d9a16dbdc8b21fa.jpg)
Prevent Tipping
When using the display, fasten the OLED panel to a wall using a cord or chain that can support the weight of the monitor in order to prevent the monitor from falling.
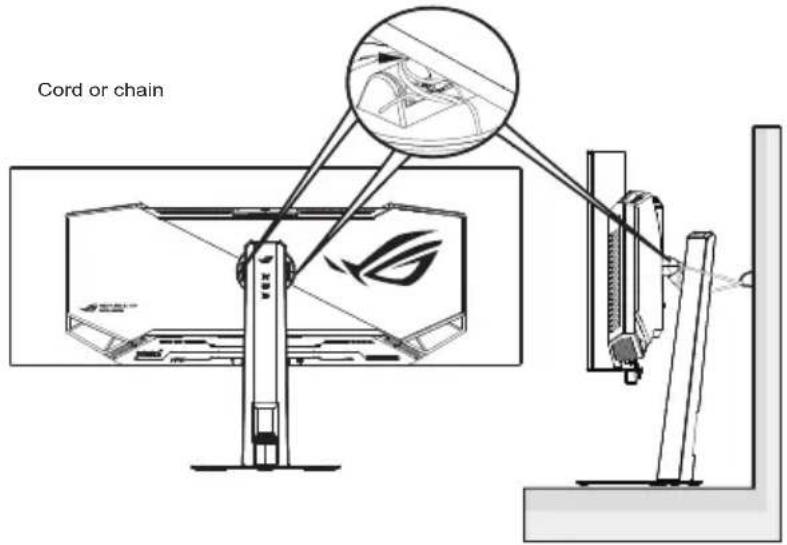

- Display design may differ from those illustrated.
- Installing must be done by a qualified technician, and please contact your supplier for more information.
- For the Models with net weight >=7kg. Please select the suitable way to Prevent Tipping.
- Please use the method above to tie the cord or chain to the stand and then fix it to the wall.
Care & Cleaning
- Before you lift or reposition your monitor, it is better to disconnect the cables and power cord. Follow the correct lifting techniques when positioning the monitor. When lifting or carrying the monitor, grasp the edges of the monitor. Do not lift the display by the stand or the cord.
- Cleaning. Turn your monitor off and unplug the power cord. Clean the monitor surface with a lint-free, non-abrasive cloth. Stubborn stains may be removed with a cloth dampened with mild cleaner.
- Avoid using a cleaner containing alcohol or acetone. Use a cleaner intended for use with the LCD. Never spray cleaner directly on the screen, as it may drip inside the monitor and cause an electric shock.

This symbol of the crossed out wheeled bin indicates that the product (electrical, electronic equipment, and mercury-containing button cell battery) should not be placed in municipal waste. Please check local regulations for disposal of electronic products.
The following symptoms are normal with the monitor:
- The screen may flicker during the initial use due to the nature of the fluorescent light. Turn off the Power Switch and turn it on again to make sure that the flicker disappears.
- You may find slightly uneven brightness on the screen depending on the desktop pattern you use.
- When the same image is displayed for hours, an afterimage of the previous screen may remain after switching the image. The screen will recover slowly or you can turn off the Power Switch for hours.
- When the screen becomes black or flashes, or cannot work anymore, contact your dealer or service center to fix it. Do not repair the screen by yourself!
Conventions used in this guide

WARNING: Information to prevent injury to yourself when trying to complete a task.

CAUTION: Information to prevent damage to the components when trying to complete a task.

IMPORTANT: Information that you MUST follow to complete a task.

NOTE: Tips and additional information to aid in completing a task.
Where to find more information
Refer to the following sources for additional information and for product and software updates.
1. ASUS websites
The ASUS websites worldwide provide updated information on ASUS hardware and software products. Refer to http://www.asus.com
2. Optional documentation
Your product package may include optional documentation that may have been added by your dealer. These documents are not part of the standard package.
3. Protect your eyes with ASUS EYE CARE Monitors
The latest ASUS monitors feature exclusive Blue Light Filter and Flicker free technologies to keep your eyes healthy in today's digital world. Refer to
https://www.asus.com/Microsite/display/eye_care_technology/
4. About Flicker:
https://www.asus.com/Microsite/display/eye_care_technology/
5. About Low Blue Light:
https://www.asus.com/us/support/FAQ/1009742/
Takeback Services
ASUS recycling and takeback programs come from our commitment to the highest standards for protecting our environment. We believe in providing solutions for our customers to be able to responsibly recycle our products, batteries and other components as well as the packaging materials.
Please go to http://csr.asus.com/english/Takeback.htm for detail recycling information in different region.
Product information for EU energy label

1.1 Welcome
Thank you for purchasing the ASUS ® OLED Gaming monitor!
The latest widescreen OLED monitor from ASUS provides a crisper, broader, and brighter display, plus a host of features that enhance your viewing experience.
With these features, you can enjoy the convenience and delightful visual experience that the monitor brings you!
1.2 Package contents
Check your package for the following items:
√ OLED Monitor
√ Monitor Stand
√ Monitor Base
√ Quick Start Guide
√ Warranty Card
√ Cleaning Card
√ Power Cord
√ DP Cable
√ HDMI Cable
√ ROG wall mount kit
√ ROG Sticker
√ ROG Pouch
√ Microfiber Cloth
√ Remote Control
√ Battery

- If any of the above items is damaged or missing, contact your retailer immediately.
1.3 Assembling the monitor
To assemble the monitor:

- While assembling the monitor arm/base, we recommend that you keep the monitor inside its EPS (Expanded Polystyrene) packaging.
- Take out all accessories from the EPS.
- Align and install the stand to its compartment on the rear of the monitor.
-
Align and install the base to the stand. Then fix the base to the stand by fastening the bundled screw.
-
Remove the monitor from the bottom EPS.


- Please do not hold the panel. We recommend hold the monitor stand to pick up monitor.
- Base screw size: M6 x 15 mm
*Adjust the monitor to the angle that is most comfortable for you.
1.4 Connect cables
1.4.1 Rear of the OLED monitor

- AC-IN Port
- Earphone Jack
- USB 2.0 Type-A Port
- HDMI-1 Port
- HDMI-2 Port
- Type-C Port (5V/3A, 9V/3A, 15V/3A, 20V/4.5A) (DP alt mode support)
- DisplayPort
- USB 2.0 Type-A Port
- Kensington Lock
- Home Launcher
1.5 Monitor introduction
1.5.1 Using the Controls button
Use the control button on the back of the monitor to adjust the monitor settings.
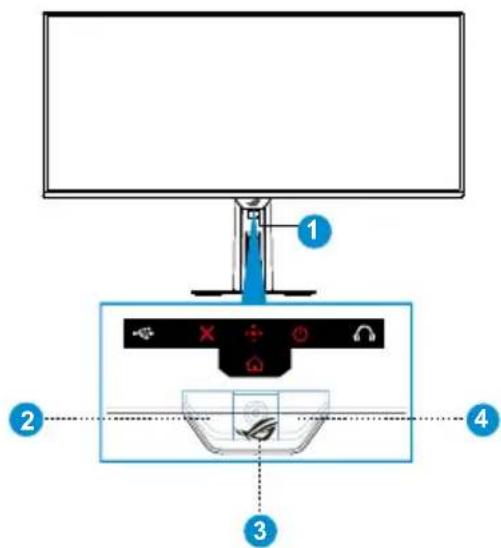
- Power Indicator:
- The color definition of the power indicator is as the below table.
| Status Description | |
| Red ON | |
| Amber | Standby mode |
| Amber flashing | Pixel cleaning |
| OFF OFF | |
- Neo proximity sensor: Measure the distance between the user and monitor.
- Close Button:
- When the OSD menu is ON, press to exit the OSD menu.
- (5-way) Button:
- Press this button to turn on the OSD menu.
- Increases/Decreases values or moves your selection up/down/left/right
- Middle key :
- Under Google TV source: Acts as OK key. - Other sources: Acts as OK key when OSD is shown; short press opens ROG Menu when OSD is not shown.
- When OSD is not displayed, short press the Left Key to enter Display & Sound Setting, and short press the Right Key to enter Monitor Setting.
- Long press up and down key, You can adjust the volume.
- Long press left key, Can call out Shortcut menu.
• Home key:
To open the home menu. Long press to access the Dashboard.
4. Power button:
- Turns the monitor on or off.
2.1 Adjusting the monitor
- Peel off the protective film from the screen using the tear tab.
- For optimal viewing, we recommend that you look at the full face of the monitor, then adjust the monitor to the angle that is most comfortable for you.
- Hold the stand to prevent the monitor from falling when you change its angle.
- Adjust the monitor follow the pictures for the most comfortable viewing for you.


It is normal that the monitor slightly shakes while you adjust the viewing angle.
2.2 Outline dimension
Unit: mm

2.3 Detaching the arm/stand (for VESA wall mount)

- We recommend that you cover the table surface with soft cloth to prevent damage to the monitor.
The detachable stand of this monitor is specially designed for VESA wall mount.
To detach the arm/stand
- Press the release button to detach the stand from the monitor.
- Then remove the stand.
- Install VESA wall mount kit if you need to use VESA wall mount.
- Then install the monitor to the wall mount.


- The VESA wall mount kit (100 x 100 mm) is purchased separately.
- Use only the UL Listed Wall Mount Bracket with minimum weight/load 12 kg (Screw size: M4 x 10 mm).
3.1 Remote Control
Description of the remote control buttons


Component Function
| 1 Power Press to switch power on and off. | |
| 2 Input Source Change the signal input source. | |
| 3 NETFLIX To launch the NETFLIX App. | |
| 4 prime video To launch the Amazon prime video App. | |
| 5 YouTube To launch the YouTube App. | |
| 6 Live TV (Non US) Free TV (USA) | Non US regions Live TV key enter your apps page. Press in the United States Free TV key enter Freeplay app |
| 7 Voice key To turn on the Bluetooth voice function. (Available only when the network connection is normal.) | |
| 8 Settings Enter into Using Monitor settings.. | |
| 9 Profile Goes to the Login or Switch Google Account page. | |
| 10 OK key To confirm a selection or setting. | |
| 11 Arrow/navigation keys | To navigate up, down, left or right. |
Component Function
| 12 Back To switch back to the previous channel you selected.To return to previous menu.To go back to the previous App/Internet page. | |
| 13 HOME To open the Home menu. Long press to access the Dashboard. | |
| 14 ROG | Using ROG OSD menu by HDMI / DP / TypeC input source |
| 15 Channel Press + or - to adjust the Channel level. | |
| 16 Volume Press + or - to adjust the volume level. | |
| 17 Mute To mute the sound or to restore it. | |
Spec : 17mm by 9mm.
A licensee shall not affix labels of different dimensions without obtaining the prior written approval of IMDA.
Complies With IMDA Standards [DA107974]
How to enable Talkback
- press the Settings (gear) button or navigate to the Settings menu.
- In the Quick Settings panel, scroll and select Accessibility.

- From the Accessibility menu, select TalkBack.

- Toggle the switch to On.

- In the confirmation dialog, choose OK to enable.


Why doesn't the extended screen restore after turning off the device with the remote control's power key?
- A short press of the power key puts the device into standby mode, while pressing and holding the power key turns the device off.
The remote control is powered by two 1.5V AAA batteries To install or replace batteries:
-
Press and then slide the cover to open it.
-
Align the batteries according to the (+) and (−) indications inside the battery compartment.
-
Replace the cover.


The incorrect use of batteries can result in leaks or bursting. Be sure to follow these instructions:
- Place "AAA" batteries matching the (+) and (−) signs on each battery to the (+) and (−) signs of the battery compartment.
- Do not mix battery types.
- Do not combine new batteries with used ones. It causes shorter life or leakage of batteries.
- Remove the dead batteries immediately to prevent them from liquid leaking in the battery compartment. Don't touch exposed battery acid, as it can damage your skin.
- If you do not intend to use the remote control for a long period, remove the batteries.
- Disposal of a battery into fire or a hot oven, or mechanically crushing or cutting of a battery, that can result in an explosion
• Leaving a battery in an extremely high temperature surrounding environment or extremely low air pressure that can result in an explosion or the leakage of flammable liquid or gas.

WARNING: Risk of fire or explosion if the battery is replaced by an incorrect type.
3.2 Multi-platform Streamer Plus user guide
- Multi-Platform streamer plus supports live streaming on four streaming platforms. Before using the application, please go to the following website to activate your account for live streaming.
| Streaming platform Web page | |
| YouTube https://www.youtube.com/ | |
| Facebook https://www.facebook.com/ | |
| Twitch https://www.twitch.tv/ | |
| Steam | https://help.steampowered.com/zh-tw/faqs/view/548FBC55-89EB-1BC8 |

- Launch page of Multi-Platform streamer plus is shown.

- Control Menu is shown.

- Confirm network setting
- check your monitor if connected to network.
- Confirm camera setting
- Multi-Platform streamer plus supports at most two cameras output video in the same time. This character teaches you how to check camera and use other function for camera. Use camera 1 button and camera 2 button to check your camera if supported and output graph as expected.
- How to setup cameras
- Enable camera through Control Menu.
- User could move, resize, change the overlay of camera widget through Camera Menu by remote controller, keyboard or mouse.

- Add Multiple Platforms
- Click "STREAMING" Menu.
- User could add different social accounts with cell phone.
![graph TD A["Control Menu"] --> B["User with PlayInfo"] B --> C["User with PlayInfo"] C --> D["User with PlayInfo"] D --> E["User with PlayInfo"] E --> F["User with PlayInfo"] F --> G["User with PlayInfo"] G --> H["User with PlayInfo"]](/content/2026/08/1626634/images/0d07f8ec42696ee9960277bedc67f78332c82a9eaf0f2f8b7181673bc5ba6d9f.jpg)
-
How to start live streaming
-
Click "STREAMING" Menu.
- Choose the platforms for live streaming
- GO LIVE!
![graph TD A["Control Metrics"] --> B["Grooming/Platforms"] B --> C["Software Development Environment"]](/content/2026/08/1626634/images/a3c96045fe56dcc6550a8f0cd3eb5e32450fb9d36e7ac1a598845b132c47ceed.jpg)
3.3 Shortcut Menu
The Shortcut Menu mainly improves operational convenience. Features include Shortcut Menu icons input sources, and favorite apps. Follow the instructions on this page on how to use Shortcut Menuon your Smart Monitor Set.
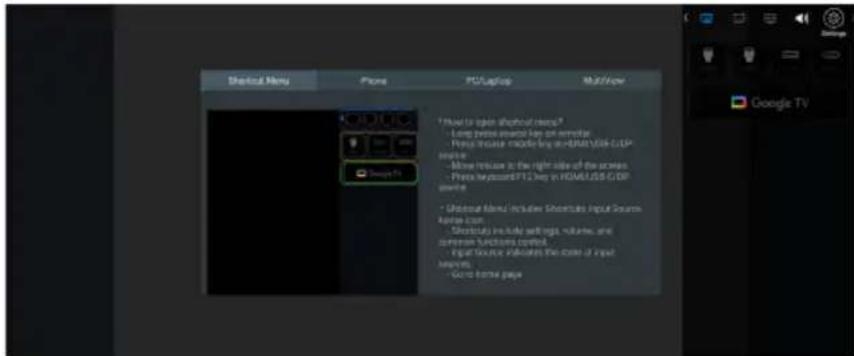
- Shortcut Menu icons includes user guide, and common functions control...etc.
- Input Source indicates the state of input sources.
- Go to Google Launcher.
When the input icon becomes dark, it means that the input source is not connected; conversely, when the signal becomes brighter, it means that there is an input signal source. Users can also click on icons to switch signal sources.
3.4 Miracast
Wireless screen mirroring from a mobile phone:
- Please log into your Google account before using Miracast.
- Miracast can be found in Google launcher.
3.5 MultiView
1. Spec
Supports two wired sources simultaneously
- Main supports HDMI / DP / USB-C.
- Sub supports HDMI / DP / USB-C / Miracast.
- Sub does not support HDR source.
The Main and Sub cannot select the same signal source at the same time.
2. Operation steps
Step 1. Open the Shortcut Menu and select the Multi-View icon to enable Multi-View.

After enabling Multi-View, the Shortcut Menu will change to the following layout (for selecting Main & Sub sources).

Step 2. After selecting the source for Left and Right respectively, click the arrow in the red circle to start Multi-View.

Step 3. Click the arrow to enter split-screen mode directly.
Ex :
Main uses a laptop connected via HDMI, and Sub uses Miracast.

Main uses a laptop connected via HDMI, and Sub uses USB-C.

3.6 CrossShare
How to enter CrossShare Tutorial:
- Click the CrossShare icon and select Tutorial.

- The CrossShare Tutorial will display.

3.7 Letterbox Wallpaper
1. Feature Description
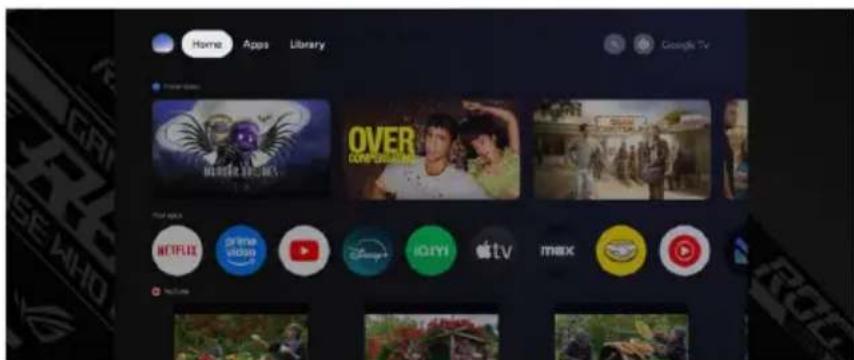
The Letterbox Wallpaper function allows users to set a custom letterbox wallpaper as the default background for the Home Launcher.
2. Operating Steps
2.1 Enable Letterbox Wallpaper
Go to Settings → Monitor → Letterbox Wallpaper and turn it on.
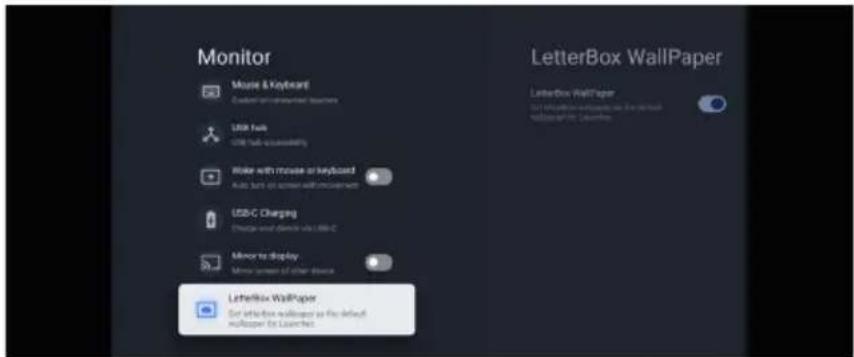
2.2 Wallpaper Display
After enabling, the Home Launcher will display the default Letterbox Wallpaper.
2.3 Change Wallpaper Image
2.3.1 Set a Custom Wallpaper
a. Copy your desired image file to a USB drive.
b. Navigate to Settings → Apps → See all apps → Letterbox Wallpapers → Open.
c. The Letterbox Wallpapers app will automatically detect images stored on the USB drive.
d. Browse and preview available images, select the desired image and tap "Set as wallpaper".

e. The Home Launcher will then display the newly selected wallpaper.
2.3.2 Supported Image Requirements
a. Supported formats: "image/jpeg", "image/png"
b. Recommended image size:
| Image Data type | Maximum resolution recommendation | Attention | |
| JPEG | Baseline 16384 pixels (x16384) | ||
| Progressive 3840x2160 | |||
| PNG 4096 | x4096 The max | imum resolution depends on the size of DRAM | |
2.3.3 Image Scaling Rules
a. The image is scaled proportionally based on the screen height (smaller images are enlarged, larger ones are reduced).
b. The left portion of the image fills the left black area of the screen.
c. The right portion of the image fills the right black area of the screen.
Special Cases:
If an image is too tall and too narrow, scaling it proportionally to fit the screen height may cause insufficient width to cover the letterbox areas.
In this case, the image will be stretched horizontally (non-proportional scaling) to fill the black side areas.
Since this feature is designed specifically to fill the left and right sides of the screen, it is recommended to use images with an aspect ratio close to 21:9 (e.g., 3440×1440) for the best visual result.
3.8 Shop Mode
Shop mode can be found in "Settings -> System -> About -> Environment->Shop"
The Shop mode in a retail environment is a specific setting designed to optimize the display's performance in stores or exhibition spaces. This function helps attract customers' attention and enhance sales performance.

3.9 SET-UP THE Monitor (Using the Remote Control)
Initial Setup
- Press the Power Button at the Top of the Remote.
Note: Monitor Controls on the Monitor are located on the bottom or on the side of the Monitor.

- You will need to Pair the Remote with the Monitor firstly. After the code is successful, you can use the Bluetooth remote control to operate the Monitor.

- Press ▲ / ▼ to select the system language and press OK to confirm the language.

- Press ▲ / ▼ to set up Google Monitor which need to sign in google account for Google service, or basic Monitor which not need to sign in google account.

- Scan setup code to download Google home app on your phone to set up or press ▲ / ▼ to set up on Monitor
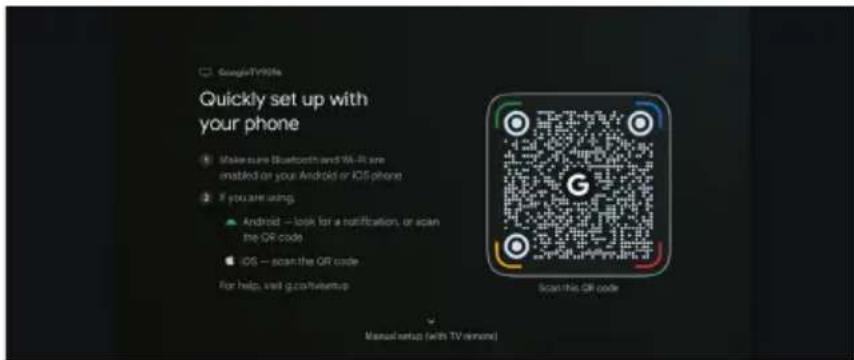
- Press ▲ / ▼ to select the wifi to connect, press OK and enter the password to confirm the connection is successful.

- By accepting the Google Terms of Service to improve the product experience, select "Accept" to accept this condition.

- Once the Set-up is finished, to exit Google Monitor and access another component such as a notebook, press the Input button.

3.10 SET-UP THE Monitor (Using the Remote Control)
Press the "Setting" button (the button with a gear icon) on the remote control --> Picture --> Backlight --> OK --> Use the left and right buttons on the remote control to adjust.


Note:
- Brightness - changes the colours of the pixels on the OLED screen. For example if you turn the Brightness up high, black pixels will change into light grey pixels (adjust the grayscale brightness).
- If you want to adjust the brightness of the screen, it is recommended to adjust the setting of the backlight setting directly.
4.1 OSD (On-Screen Display) menu
4.1.1 How to reconfigure

- Press the ROG button on the Remote control to activate the OSD menu.
- Press the ▼ and ▲ buttons to toggle between options in the menu. As you move from one icon to another, the option name is highlighted.
- To select the highlighted item on the menu press the center key.
- Press the ▼ and ▲ buttons to select the desired parameter.
- Press the center key to enter the slide bar and then use the ▼ or ▲ buttons, according to the indicators on the menu, to make your changes.
- Press the ◀/▶ to move left / right menu.
4.1.2 OSD Function Introduction
1. Gaming
Configure your gaming preferences.

- Variable Refresh Rate: Allow an Adaptive-Sync supported graphics source to dynamically adjust display refresh rate based on typical content frame rates for power efficient, virtually stutter free and low-latency display update.

- Variable Refresh Rate can only be activated within 48Hz\~240Hz for both HDMI and DisplayPort sources.
- The following functions will be disabled when Variable Refresh Rate is turned on:
- ELMB
- ELMB: Check to decrease motion blur and minimize ghosting part when on-screen objects are fast moving. ELMB is enabled if input V frequency is 120Hz.

• To activate ELMB, turn off Variable Refresh Rate function first.
• ELMB works on vertical frequency 120Hz.
• The following functions will be disabled when ELMB is turned on:
- Variable Refresh Rate
- Sniper
- Aspect Control
- Blue Light Filter
- PBP Mode
- HDR Setting
- GamePlus: The GamePlus Function provides a toolkit and creates a better gaming environment for users when playing different types of games. Particularly, Crosshair function is specially designed for new gamers or beginners interested in First Person Shooter (FPS) games.
To active GamePlus:
- Press the ROG key on the remote control or the middle key of the 5-way button to open the ROG Menu, then go to Gaming → GamePlus.
- Activate FPS Counter, Crosshair, Sniper, Timer, Stopwatch or Display Alignment function.
- Move the () button up/down to select and press () to confirm the function needed. Press ✗ to go off, and exit.
- Crosshair/Timer/Stopwatch/FPS Counter is movable by pressing 5-way key.
- GameVisual: This function contains nine sub-functions that you can select for your preference.
- Shadow Boost : Dark color enhancement adjust monitor gamma curve to enrich the dark tones in an image making dark scenes and objects much easier be found.
2. Image
Configure the image settings.

- Brightness: Adjust the brightness level.
- Contrast: Adjust the contrast level.
- HDR Setting: Set the HDR mode to Gaming HDR, Cinema HDR, Console HDR, DisplayHDR 400 True Black, Adjustable HDR, DolbyVision Bright, DolbyVision Dark or DolbyVision Gaming. The HDR brightness can be adjusted when the Brightness Adjustable function is enabled.

- When displaying HDR content, the following functions are not available: GameVisual, Shadow Boost, Brightness, Contrast, Aspect Control, Blue Light Filter, Color Temp., Gamma, Saturation.
- The following functions will be disabled when HDR is turned on:
- ELMB
- Sniper
- GameVisual
- Shadow Boost
- Brightness
- Contrast
- Blue Light Filter
- Display Color Space
- Color Temp.
- Saturation
- Gamma
- HDR PQ curve will be affected when the brightness adjustment is ON under HDR mode.
- Aspect Control: Adjust the aspect ratio to 16:9, Square or 21:9 to enjoy different gaming scenario.

- Select Square to display the picture according to the original aspect ratio of the input source.
- The following functions will be disabled when Aspect Control is turned on:
- ELMB
- Blue Light Filter: Adjust the energy level of blue light emitted from LED backlight.
- OFF: No change.
- Level 1\~4: The higher the level, the less blue light is scattered. When Blue Light Filter is activated, the default settings of Racing Mode will be automatically imported. Between Level 1 to Level 3, the Brightness function is userconfigurable. Level 4 is optimized setting. The Brightness function is not user-configurable.

- When the user adjusts blue light filter bar to maximum level.

Please refer to the following to alleviate eye strains:
- Users should take some time away from the display if working for long hours. It is advised to take short breaks (at least 5 mins) after around 1 hour of continuous working at the computer. Taking short and frequent breaks is more effective than a single longer break.
• To minimize eye strain and dryness in your eyes, users should rest the eye periodically by focusing on objects that are far away.
- Eye exercises can help to reduce eye strain. Repeat these exercises often. If eye strain continues please consult a physician. Eye exercises: (1) Repeating look up and down (2) Slowly roll your eyes (3) Move your eyes diagonal.
- High energy blue light may lead to eye strain and AMD (Age-Related Macular Degeneration). Blue light filter to reduce 70% (max.) harmful blue light to avoiding CVS (Computer Vision Syndrome).
- VividPixel: Enhance the outline of the displayed picture and generates high-quality images on screen.
3. Color
Select the image color you like from this function.

- Display Color Space: Contains three preset color modes sRGB, DCI-P3, and Wide Gamut Mode.
• Color Temp.: Contains seven preset color modes (4000K, 5000K, 6500K, 7500K, 8200K, 9300K, 10000K) and User Mode. - Saturation: The adjusting range is from 0 to 100.
- Gamma: Contains five gamma modes including 1.8, 2.0, 2.2, 2.4, 2.6.

- In the User Mode, colors of R (Red), G (Green), and B (Blue) are user-configurable; the adjusting range is from 0 \~ 100.
4. OLED Care
Configure the screen protection related settings.

- Screen Saver: Enable/Disable the screen saver function. The screen brightness will automatically decrease when there is no change on the screen.
- Pixel Cleaning: It calibrates any issues that may arise on the screen when your monitor has been turned on for a long time. The process will take approximately 6 minutes. This function will automatically activate when the monitor is turn off. Do not unplug the power cord while it is in progress. If you power on the monitor, the Pixel Cleaning will stop operating.
- Pixel Cleaning Reminder: Set a reminder for user to perform the Pixel Cleaning.

The screen may have mura and image sticking due to OLED characteristic during the initial use or re-used after a long time. It is advised to perform Pixel Cleaning while turning on monitor to make sure situation disappear.
- Screen Move: Select the screen movement level to prevent image sticking on the display panel.
- Auto Logo Brightness: Enable this function to allow the system to automatically adjust the logo brightness to correct the potential picture quality issues.

With "Global Dimming Control" enabled, Logo Detection is automatically activated and unavailable for manual deactivation.
- Neo Proximity Sensor: If the function is enabled and the system does not detect the presence of object within 60 cm – 120 cm (depending on your selection) over the present time, the monitor will apply Screen-off.
Screen off time can be set as 5 minute, 10 minutes, or 15 minutes.
- Tailored mode: Allows users to customize the Neo Proximity Sensor detection distance. It is recommended to set the distance within 120cm. After a set period of time, the monitor will apply Screen-off.

- The angle and placement of the monitor sensor might affect the signal detection results.
- Before using the sensor, make sure the sensor window is clean and free of dirt, and ensure that no objects are covering the sensor window.
- OLED Usage Info: Record the number of times the Pixel Cleaning has been performed and displays the Pixel Cleaning interval information.
5. Input Select
Select your desired input source and toggle the Auto Input Detection function between on and off. The monitor input source will not automatically switch when the Auto Input Detection function is disabled.

6. Lighting Effect
Configure the lighting effect for the rear cover and base cover.

- Aura RGB: In this function you can select an Aura RGB light effect for the monitor and change settings for the light effect. Select "OFF" if you want to turn the Aura RGB light effect off.
7. MyFavorite
Assign a function to the shortcut button, save the current system configurations, or restore the system configuration.

- Customized Setting: Load/Save all settings on the monitor.
8. System Setup
Adjusts the system configuration.

• Sound: Configure the sound related settings.
• Volume (Earphone Out): Adjust the volume level.
- Mute: Enable/Disable the mute function.
- Power Indicator: Turn the power LED indicator on/off.
- Power Setting: Use to select Performance Mode or Power Saving Mode.

- Please turn off HDR function before activating the Power saving mode.
- In order to comply with regulatory power consumption standards, the power saving mode is designed to be the most energy-efficient setting. However, this may cause some inconvenience during use. It is recommended to adjust the settings under the Performance mode to better suit your personal preferences.
- OSD Setup: Configure the OSD menu related settings.
- OSD Position: Set the OSD menu position.
- OSD Timeout: Adjust the OSD timeout.
- Transparency: Adjust the OSD background from opaque to transparent.
- ASUS Power Sync: Enables or disables the ASUS Power Sync function. To activate this function, please enable this function of the monitor via HDMI port.
• Information: Display the monitor information.
- All Reset: Selects "Yes" to revert all settings to the factory default mode.
4.2 Specifications
| Model | XG34WCDMTG |
| Panel Size | 34"W (86.4cm) |
| Resolution | 3440 x 1440 (Best resolution) |
| Brightness | 250nits (Typ.) |
| Intrinsic Contrast Ratio (Typ.) | 1.5M:1 |
| Viewing Angle (CR=10) | 178°(V) /178°(H) |
| Display Colors | 1.07B |
| Color Saturation | 99% DCIP3 (Typ.) |
| Response Time | 0.03ms |
| Digital input | HDMI v2.1 x 2 , DisplayPort v1.4 x 1USB Typc-C x 1 |
| Earphone Output | Yes |
| Sound from HDMI/DP/Type-C | Yes |
| Type-C input | Yes (Support DP alt mode and PD 90W)(5V/3A, 9V/3A, 15V/3A, 20V/4.5A) |
| Wifi and BT | Support WiFi6E and BT V5.3 |
| Power ON Consumption | 41.5 W** |
| Chassis Colors | Black |
| Power saving mode | < 0.5W |
| Power off mode | < 0.3W |
| Tilt | -5° ~ +20° |
| Swivel | -25° ~ +25° |
| Height adjustment | 110 mm |
| Phys. Dimension (WxHxD) | 812 x 545 x 199 mm (highest)812 x 435 x 199 mm (lowest) |
| Phys. Dimension without stand(WxHxD) (For VESA Wall Mount) | 812 x 380 x 108 mm |
| Box Dimension (WxHxD) | 930 x 515 x 224 mm |
| Net Weight (Esti.) | 8.8 kg |
| Net Weight (Esti. w/o stand) | 6.2 kg |
| Gross Weight (Esti.) | 11.9 kg |
| Voltage Rating | 100~240V, 50/60Hz, 1.5A |
| Operational temperature | 0~40° |
*Specifications are subject to change without notice.
**Measuring a screen brightness of 200 nits wihout audio/ USB/ Card reader connection.
4.3 Troubleshooting (FAQ)
| Problem Possible Solution | |
| Power LED is not ON | Press the button to check if the monitor is in the ON mode.Check if the power cord is properly connected to the monitor and the power outlet.Check Power Indicator function in main menu OSD. Select “ON” to turn on power LED. |
| The power LED lights amber and there is no screen image | Check if the monitor and the computer are in the ON mode.Make sure the signal cable is properly connected the monitor and the computer.Inspect the signal cable and make sure none of the pins are bent.Connect the computer with another available monitor to check if the computer is properly working. |
| Screen image is too light or dark | Adjust the Contrast and Brightness settings via OSD. |
| Screen image bounces or a wave pattern is present in the image | Make sure the signal cable is properly connected to the monitor and the computer.Move electrical devices that may cause electrical interference. |
| Screen image has color defects (white does not look white) | Inspect the signal cable and make sure that none of the pins are bent.Perform Reset via OSD.Adjust the R/G/B color settings or select the Color Temperature via OSD. |
| No sound or sound is low | Adjust the volume settings of both your monitor and computer.Make sure the computer sound card driver is properly installed and activated.Check the audio source. |
| Certain ROG-exclusive features will not be retained after AC off/on. | Please re-enter the ROG Menu to re-apply your preferred settings. |
| Latency occurs when VRR is enabled under Aspect Control. | When VRR is enabled under Aspect Control, some additional latency may occur. |
| The middle key of the 5-way Button open the ROG Menu | ·Middle Key Function:·When under Google TV source: Functions as the OK key.·When not under Google TV source:·If an OSD is displayed ☐ Functions as the OK key.·If no OSD is displayed ☐ A short press will open the ROG Menu. |
| Logo Detection cannot be turned off and grey out | ·When Global Dimming Control is turned on, Logo Detection will be automatically enabled and locked (greyed out) to ensure proper dimming performance. If you want to adjust Logo Detection manually, please turn off Global Dimming Control first. |
4.4 Supported Timing List
Support Timing
| Timing Resolution HDMI 1.4 HDMI 2.1 DP 1.4 TypeC | |||||
| PC Timing 640x480-60Hz V V V V | |||||
| PC Timing 640x480-75Hz V V V V | |||||
| PC Timing 800x600-60Hz V V V V | |||||
| PC Timing 800x600-75Hz V V V V | |||||
| PC Timing 1024x768-60Hz V V V V | |||||
| PC Timing 1024x768-75Hz V V V V | |||||
| PC Timing 1280x720-60Hz V V V V | |||||
| PC Timing 1280x960-60Hz V V V V | |||||
| PC Timing 1280x1024-60Hz V V V V | |||||
| PC Timing 1600x1200-60Hz V V V V | |||||
| PC Timing 1920x1080-60Hz V V V V | |||||
| Video Timing 640x480P-60Hz V V V V | |||||
| Video Timing 720x480P-60Hz V V V V | |||||
| Video Timing 720x576P-50Hz V V V V | |||||
| Video Timing 1280x720P-50Hz V V V V | |||||
| Video Timing 1280x720P-60Hz V V V V | |||||
| Video Timing 1920x1080P-24Hz V V V V | |||||
| Video Timing 1920x1080P-25Hz V V V V | |||||
| Video Timing 1920x1080P-30Hz V V V V | |||||
| Video Timing 1920x1080P-50Hz V V V V | |||||
| Video Timing 1920x1080P-60Hz V V V V | |||||
| Video Timing | 1920x1080P-100Hz V V V V | ||||
| Video Timing | 1920x1080P-120Hz V V V V | ||||
| Video Timing | 3840x2160P-24Hz | V | V | - | - |
| Video Timing | 3840x2160P-25Hz | V | V | - | - |
| Video Timing | 3840x2160P-30Hz | V | V | - | - |
| Video Timing | 3840x2160P-50Hz | V | V | - | - |
| Video Timing | 3840x2160P-60Hz | V | V | - | - |
16p9 Timing
| Timing Resolution HDMI 1.4 HDMI 2.1 DP 1.4 TypeC | |||||
| Detail Timing | 1920x1080p-240Hz | - | V | V | V |
| Detail Timing | 2560x1440p-120Hz | - | V | V | V |
| Detail Timing | 2560x1440p-144Hz | - | V | V | V |
| Detail Timing | 2560x1440p-165Hz | - | V | V | V |
| Detail Timing | 2560x1440p-240Hz | - | V | V | V |
27" Simulation Timing
| Timing Resolution HDMI 1.4 HDMI 2.1 DP 1.4 TypeC | |||||
| Detail Timing | 2560x1440p-60Hz | - | V | V | V |
| Detail Timing | 2560x1440p-120Hz | - | V | V | V |
| Detail Timing | 2576x1440p-120Hz | - | V | V | V |
| Detail Timing | 2576x1440p-240Hz | - | V | V | V |
24.5" Simulation Timing
| Timing Resolution HDMI 1.4 HDMI 2.1 DP 1.4 TypeC | ||||
| Detail Timing 2344x1320p-120Hz - V V V | ||||
| Detail Timing 2344x1320p-240Hz - V V V | ||||
| Detail Timing 2560x1440p-60Hz - V V V | ||||
| Detail Timing 2560x1440p-120Hz - V V V | ||||
Square Timing
| Timing Resolution HDMI 1.4 HDMI 2.1 DP 1.4 TypeC | ||||
| Detail Timing 1024x768-240Hz - V V V | ||||
| Detail Timing 1152x864-240Hz - V V V | ||||
| Detail Timing 1440x1080-240Hz - V V | - | |||
| Detail Timing 1728x1080-240Hz - V V V | ||||
| Detail Timing 1920x1440-240Hz - | V V V | |||
| Detail Timing 2560x1440-60Hz - | - V V | |||
| Detail Timing 2560x1440-120Hz - | V V V | |||
21:9 Timing
| Timing Resolution HDMI 1.4 HDMI 2.1 DP 1.4 TypeC | ||||
| Detail Timing 1720x1440p-60Hz - V V V | ||||
| Detail Timing 2560x1440p-60Hz V V V V | ||||
| Detail Timing 2560x1440p-120Hz - V V | V | |||
| Detail Timing 2560x1440p-240Hz - V V V | ||||
| Detail Timing 3440x1440p-120Hz - | V V V | |||
| Detail Timing 3440x1440p-240Hz - | V | V | V | |
* The modes not listed in the above tables may not be supported. For optimal resolution, we recommend that you choose a mode listed in the above tables.
A.UKCA RF Output table(The Radio Equipment Regulations 2017)
Model Name: XG34WCDMTG
Module Name: RTL8852CE
| Function Frequency | Maximum Output | Power(EIRP) |
| WiFi | 2412-2472MHz 19.99 dBm | |
| 5180-5240MHz 22.97 dBm | ||
| 5470-5725MHz 22.95 dBm | ||
| 5725-5850MHz 13.98 dBm | ||
| 5925-6425MHz 22.98 dBm | ||
| BT 2402-2480MHz 15.90 dBm | ||
B.CE RED RF Output table(Directive 2014/53/EU)
Model Name: XG34WCDMTG
Module Name: RTL8852CE
| Function Frequency | Maximum Output | Power(EIRP) |
| WiFi | 2412-2472MHz 19.99 dBm | |
| 5180-5240MHz 22.97 dBm | ||
| 5470-5725MHz 22.95 dBm | ||
| 5725-5850MHz 13.98 dBm | ||
| 5925-6425MHz 22.98 dBm | ||
| BT 2402-2480MHz 15.90 dBm | ||

REPUBLIC OF GAMERS
- ROG SWIFT OLED XG34WCDMTG
- TABLE OF CONTENTS
- NOTICES III
- NOTICES
- FEDERAL COMMUNICATIONS COMMISSION STATEMENT
- CANADIAN DEPARTMENT OF COMMUNICATIONS STATEMENT
- FCC/ISED/CE-RED CAUTION
- DECLARATION OF CONFORMITY / UK DECLARATION OF CONFORMITY
- WEEE SYMBOL STATEMENT
- RADIATION EXPOSURE STATEMENT
- SAFETY INFORMATION
- STABILITY HAZARD
- ISED 5.925-7.125 GHZ CAUTION STATEMENT
- WARNING
- RESTRICTION ON HAZARDOUS SUBSTANCES STATEMENT (INDIA)
- PREVENT TIPPING
- CARE & CLEANING
- THE FOLLOWING SYMPTOMS ARE NORMAL WITH THE MONITOR
- CONVENTIONS USED IN THIS GUIDE
- WHERE TO FIND MORE INFORMATION
- ASUS WEBSITES
- OPTIONAL DOCUMENTATION
- PROTECT YOUR EYES WITH ASUS EYE CARE MONITORS
- ABOUT FLICKER
- ABOUT LOW BLUE LIGHT
- TAKEBACK SERVICES
- PRODUCT INFORMATION FOR EU ENERGY LABEL
- WELCOME
- PACKAGE CONTENTS
- ASSEMBLING THE MONITOR
- TO ASSEMBLE THE MONITOR
- CONNECT CABLES
- REAR OF THE OLED MONITOR
- MONITOR INTRODUCTION
- USING THE CONTROLS BUTTON
- POWER BUTTON
- ADJUSTING THE MONITOR
- OUTLINE DIMENSION
- DETACHING THE ARM/STAND (FOR VESA WALL MOUNT)
- TO DETACH THE ARM/STAND
- REMOTE CONTROL
- COMPLIES WITH IMDA STANDARDS [DA107974]
- HOW TO ENABLE TALKBACK
- THE REMOTE CONTROL IS POWERED BY TWO 1.5V AAA BATTERIES TO INSTALL OR REPLACE BATTERIES
- MULTI-PLATFORM STREAMER PLUS USER GUIDE
- SHORTCUT MENU
- MIRACAST
- MULTIVIEW
- SPEC
- OPERATION STEPS
- CROSSSHARE
- LETTERBOX WALLPAPER
- FEATURE DESCRIPTION
- OPERATING STEPS
- ENABLE LETTERBOX WALLPAPER
- WALLPAPER DISPLAY
- CHANGE WALLPAPER IMAGE
- SET A CUSTOM WALLPAPER
- SUPPORTED IMAGE REQUIREMENTS
- IMAGE SCALING RULES
- SPECIAL CASES
- SHOP MODE
- SHOP MODE CAN BE FOUND IN "SETTINGS -> SYSTEM -> ABOUT -> ENVIRONMENT->SHOP
- SET-UP THE MONITOR (USING THE REMOTE CONTROL)
- INITIAL SETUP
- NOTE
- OSD (ON-SCREEN DISPLAY) MENU
- HOW TO RECONFIGURE
- OSD FUNCTION INTRODUCTION
- GAMING
- IMAGE
- COLOR
- OLED CARE
- INPUT SELECT
- LIGHTING EFFECT
- MYFAVORITE
- SYSTEM SETUP
- TROUBLESHOOTING (FAQ)
- SUPPORTED TIMING LIST
- SUPPORT TIMING
- SIMULATION TIMING
- SQUARE TIMING
- TIMING
- A.UKCA RF OUTPUT TABLE(THE RADIO EQUIPMENT REGULATIONS 2017)
- B.CE RED RF OUTPUT TABLE(DIRECTIVE 2014/53/EU)
Brand : ASUS
Model : ROG Strix XG34WCDM
Category : Monitor