Grandheat 2500 Built In - Microwave Oven CECOTEC - Free user manual and instructions
Find the device manual for free Grandheat 2500 Built In CECOTEC in PDF.


| Product type | Built-in microwave oven with grill |
| Brand | Cecotec |
| Model | Grandheat 2500 Built In |
| Capacity | 25 liters |
| Microwave power | 900 W |
| Grill power | 1000 W |
| Total power | 2500 W |
| Dimensions (W × H × D) | 595 × 388 × 350 mm |
| Net weight | 18.5 kg |
| Power supply | 230 V ~ 50 Hz |
| Installation type | Built-in |
| Main functions | Microwave, grill, combination mode, defrost, timer |
| Power levels | 11 adjustable levels |
| Timer | Up to 60 minutes |
| Digital clock | Yes |
| Turntable | Ø 31.5 cm |
| Interior coating | Easy-to-clean enamel |
| Child safety | Available |
| Door lock | Integrated safety system |
| Automatic shut-off | In case of overheating |
| Interior lighting | Yes |
| Spare parts | Available via the official Cecotec service |
| Warranty | 2 years |
Frequently Asked Questions - Grandheat 2500 Built In CECOTEC
User questions about Grandheat 2500 Built In CECOTEC
0 question about this device. Answer the ones you know or ask your own.
Ask a new question about this device
Download the instructions for your Microwave Oven in PDF format for free! Find your manual Grandheat 2500 Built In - CECOTEC and take your electronic device back in hand. On this page are published all the documents necessary for the use of your device. Grandheat 2500 Built In by CECOTEC.
USER MANUAL Grandheat 2500 Built In CECOTEC
GRANDHEAT 2500 BUILT-IN STEEL
Microondas encastrable / Built-in microwave

Safety instructions 9
-
Parts and components 51
-
Before use 51
-
Appliance installation 52
-
Operation 53
-
Tips 57
-
Cleaning and maintenance 58
-
Technical specifications 59
-
Disposal of old electrical and electronic appliances 59
-
Technical support and warranty 59
-
Copyright 60
SOMMAIRE
EN • The coding in this manual is generic and applies to all code variants of the appliance.
These safety instructions are important. Please read them carefully before using the appliance.
Keep this instruction manual for future reference or new users. It is your responsibility to make sure every user is informed about the warnings and precautions stated in this instruction manual.
- Check the appliance and its packaging for damage. Do not operate the appliance if it is not working properly or if the cord or plug are damaged. In case of malfunction or breakdown, please contact the official Cecotec Technical Support Service.
- If the power cord is damaged, it must be replaced by the official Cecotec Technical Support Service or similar qualified personnel to avoid risks.

- Make sure that the mains voltage matches the voltage stated on the rating label of the appliance and that the wall outlet is earthed.
Caution: hot surface. - WARNING: if the door or door seals are damaged, do not operate the appliance until it has been repaired by a qualified person.
- WARNING: it is dangerous for any unqualified person to perform maintenance or repair operations involving the removal of the cover which provides protection against exposure to microwave energy.
- This appliance is exclusively designed for household use. It is not suitable for commercial or industrial use. Do not operate it outdoor.
- WARNING: you should not heat up liquids or other food in sealed or closed containers, as they are likely to explode.
- Only use utensils that are suitable for use in the microwave. Make sure that utensils do not come into contact with the inside walls of the appliance during use.
- Care should be taken when heating up food in plastic or paper containers, as there is a risk of ignition.
- Use this appliance only for the purposes described in this manual. Do not use corrosive chemicals or vapours in this appliance. It is not designed for industrial or laboratory use.
- This appliance is intended for heating up beverages and food. Drying of food or clothing and heating of pillows, shoes, sponges, wet clothes and similar items may involve risk of injury, ignition, or fire.
-
In case of smoke or fire inside the device, keep the door closed, turn the device off, and unplug it from the power supply to extinguish the flames.
-
Heating up beverages may cause them to boil. For this reason, precautions must be taken when handling the container.
- The contents of bottles and jars of baby food should be swirled or shaken, and the temperature should be checked before consumption to avoid burns.
- Eggs in their shell and whole hard-boiled eggs should not be heated in the appliance, since they may explode even after microwave heating has ended.
- This appliance can be used by children aged 8 years and above and people with reduced physical, sensory, or mental capabilities or lack of experience and knowledge if they have been given supervision or instruction concerning the use of the appliance in a safe way and understand the hazards involved. However, the combination mode should not be used by unsupervised children, due to the temperatures generated.
- Children must not play with the appliance. Cleaning and user maintenance should not be carried out by unsupervised children.
- Keep this appliance and its power cable out of reach of children under the age of 8.
- Metal containers must not be used during microwave operation.
- This microwave is intended to be built-in or installed in a piece of furniture. You must leave at least 100 cm of free space on top of the appliance. If the appliance is installed at a distance of more than 900 mm, care must be taken to ensure that the turntable does not shift when removing containers from inside the appliance.
-
The appliance is not intended to be operated by means of external timers or separate remote control systems.
-
Do not operate the microwave when empty.
- Do not place hot or frozen food or cookware on the turntable to prevent breakage.
- After using the microwave, the container used may be very hot. Use gloves to avoid burns and injuries.
- The appliance cannot be cleaned with steam.
- Failure to keep the microwave clean could lead to deterioration of the surface and could adversely affect the shelf life of the device and lead to a dangerous situation.
- This product is a Group 2 Class B ISM equipment. The definition of Group 2 which contains all ISM (Industrial, Scientific and Medical) equipment in which radio-frequency energy is intentionally generated and/or used in the form of electromagnetic radiation for the treatment of material, and spark erosion equipment. Class B equipment is a type of equipment suitable for use in domestic establishments and in establishments directly connected to a low-voltage power supply network supplying buildings used for domestic purposes.
INSTRUCTIONS DE SÉCURITÉ
- Door lock system
- Viewing window
- Turntable ring
- Shaft
- Door opening button
- Control panel
- Magnetron (do not remove the mica panel protecting the magnetron)
- Glass turntable
- Grill
- Grill rack
Control panel
Fig. 2.
- Display
- Power level
- Grill
- Clock
- Multi-sequence cooking
- Defrost
- Weight/Timer
- Delay start
- Stop/Lock
- Menu/Time knob
- Start/Quick start
2. BEFORE USE
- This microwave features a packaging designed to protect it during transport. Take the microwave out of the box and remove all packaging materials. You can keep the original box and other packaging elements in a safe place. This will help you prevent damage to the microwave when transporting it in the future. In case the original packaging is disposed of, make sure all packaging materials are recycled accordingly.
- Make sure all parts and components are included and in good conditions. If there is any piece missing or in bad conditions, contact the official Cecotec Technical Support Service immediately.
- The appliance must be placed on a flat, stable, and dry place and kept away from corrosive materials, heat, and humidity-producing substances or appliances, such as burners or water.
ENGLISH
- The appliance must be placed at least 5 m away from TVs, radios, or antennas.
- The appliance must be placed in such way that the plug is accessible, and the socket must be properly earthed to avoid electric shocks.
- Make sure to close the microwave door for proper operation.
- In case there are any manufacturing remains in the microwave cavity or on the heating elements, leave the microwave open to ensure good ventilation. In such case, it is recommended to heat a glass of water at high power for several times.
Warning
Do not try to remove the mica plate. This component is essential for the appliance to work properly. The mica plate must be clean to ensure its proper operation.
Box content
- Microwave
- Turntable
- Grill rack
- Instruction manual
3. APPLIANCE INSTALLATION
To install the microwave correctly, follow the order of the figures below:
Fig. 3
- Cabinet
- Microwave
- Frame
- Ventilation guide
A 3x25 mm screw (x4)
B 4x8 mm screw (x4)
C 4x10 mm screw (x4)
Fig. 4
1. Ventilation space
Make sure that the cabinet has the correct dimensions.
Fig. 5
Place the microwave upside down and screw on the 4 feet covers.
Fig. 6.
Secure the upper ventilation guide with 4 screws.
Pay attention to the opening at the back.
Fig. 7
Fix the frame using the 4 screws.
Fig. 8
Insert the microwave in the cabinet.
Fig. 9
Make sure that the microwave is installed in the centre of the cabinet.
Fig. 10
Use 4 screws to fix the microwave to the cabinet.
Fig. 11
The microwave is fully installed.
4. OPERATION
Using the microwave
- Once the appliance is plugged in, it will beep once, and the display will "WELCOME" for 2 seconds.
- Press Stop/Cancel, the display will show "1:01".
- During the cooking process, press Stop/Cancel to stop operation, or press twice to cancel.
- During the setting configuration, the microwave will return to Standby mode after 1 minute of inactivity.
- When the cooking programme has finished, the appliance will beep every 2 minutes and the display will show "End".
- Press Stop/Cancel or open the door to stop the beeping.
Setting the time
- The microwave has a 24-hour or 12-hour clock.
- Press the Clock button to set the microwave time.
Example: set the microwave time to 8:30.
- In Standby mode, press the Clock button once to set the time based on a 12-hour system. The display shall alternately show “--SET HOUR--” and “HOUR 12”.
- Turn the Menu/Time knob to select 8 hours. If the appliance is not used within 2 seconds, the appliance shall alternately display “--SET HOUR--” and “HOUR 12”.
ENGLISH
- Press the Clock button once to confirm the time. After 2 seconds, the display will alternately show “--PRESS CLOCK--” and “8:00”.
- Turn the Menu/Time knob to select 30 minutes.
- Press the Clock button once to confirm the settings.
- Press the Clock button during operation: the current time will be shown on the display.
Microwave cooking
- To cook in Microwave mode, simply select the power level by pressing the Power level button repeatedly.
- Turn the Menu/Time knob to set the desired cooking time.
NOTE: the maximum cooking time for this programme is 90 minutes.
-
- Press the Power level button to select the desired power level.
| Press the Power level button | Cooking power level |
| 1 time | 900 W |
| 2 times | 750 W |
| 3 times | 450 W |
| 4 times | 300 W |
| 5 times | 150 W |
| 6 times | 80 W |
Note: check the power level during operation by pressing the power level button.
Quick start
When this programme is selected, the appliance will cook the food in a short time at maximum power (100% microwave power). The maximum cooking time for this programme is 12 minutes.
- Open the door and place the food in the microwave.
- Close the door.
- Press the Quick start button repeatedly to select the desired cooking time. The appliance will automatically start operation.
Defrost by weight
The power level and defrosting time are automatically adjusted according to the weight of the food to be defrosted. The weight range of frozen food is 100-1800 g.
- Press the Defrost by weight button to select the type of food: Meat or chicken.
- Press the Weight/Timer button to enter the weight of the food.
- Press the Start/Quick start button to confirm.
Warning: the microwave will stop halfway through the cooking process to remind you to turn the food over. Then press Start/Quick start to continue cooking.
Timer function
This function allows you to set a cooking programme to be activated at the desired time.
- Press the Weight/Timer button once.
- Turn the Menu/Time knob to enter the cooking time. The maximum cooking time for this programme is 90 minutes.
- Press the Start/Quick start button to confirm.
Note: to cancel the timer, cancel the cooking programme first.
Grill cooking
The maximum cooking time for this programme is 90 minutes.
- In Standby mode, press the Grill button.
- Turn the Menu/Time knob to enter the cooking time.
- Press the Start/Quick start button.
Multi-sequence cooking
A maximum of 3 sequences can be set for a cooking process.
Note: you can only configure the settings for the Microwave and Grill modes.
Example: cooking in Microwave mode and then in Microwave at low power.
- Open the door and place the food in the microwave. Close the door.
- Set the first cooking programme.
- Press the Multi-sequence button.
- Set the second cooking programme.
- Press the Start/Quick start button to start cooking.
Delay start
This function allows you to set a later start time.
Example: it is 09:00 and you want the microwave to start cooking at 11:30.
- Set a cooking programme.
- Press the Delay start button.
- Turn the Menu/Time knob and enter the hour, 11.
- Press the Delay start button to confirm.
- Turn the Menu/Time knob and enter the minutes, 30.
- Press the Start/Quick start button to confirm.
Note: once the configuration is complete, press the Clock button to view the set start time. 7. Press Stop/Lock to cancel.
Child lock
- This function is designed to prevent small children from operating the appliance.
- The child lock indicator light will light up on the display and the microwave will be locked.
ENGLISH
- If the appliance is not used for 1 minute and the door is left open, or when entering Standby mode, this function will be enabled automatically. All buttons will be disabled. The lock indicator light will come on.
- To disable this function, open or close the door. The lock indicator light will switch off.
Default cooking programmes
These programmes have default power and cooking time. When using these programmes, only select the type of food and the weight.
- Open the door and place the food in the microwave. Close the door.
- In Standby mode, turn the Menu/Time knob to select the code for the food to be cooked.
- Press the Weight/Timer button repeatedly until selecting the desired weight or number of servings.
- Press the Start/Quick start button.
Preset programmes
| Code | Food |
| 01 | Reheating drinks (200 ml) |
| 02 | Vegetables (g) |
| 03 | Popcorn (99 g) |
| 04 | Pasta (g) |
| 05 | Reheat (g) |
| 06 | Pizza (g) |
| 07 | Potato (230 g/portion) |
| 08 | Dinner (g) |
| 09 | Beef (g) |
| 10 | Roast pork (g) |
Note:
- Set the weight, and the appliance will automatically set the time.
- For drinks and potatoes, number of servings shall be used instead of weight.
- For veal and pork, the appliance will stop during the process to remind you to turn the food for even cooking.
- The outcome of the Automatic Menu programme will depend on a number of factors, for example the shape and size of the food, the consumer's taste in terms of how well done the food is, or even how the food is arranged in the microwave. If you are not happy with the results, adjust the cooking time to your liking.
5. TIPS
- Placing the food: place the thickest parts of the food towards the edge of the turntable. Try to avoid overlapping food.
- Watch the cooking time: cook for the shortest amount of time at first, and add more minutes if necessary. Excessive heating of food can lead to smoking or burning.
- Cover food while cooking: covering the food you are going to cook avoids spattering and allows for a more even cooking.
- Flip or stir food once during the cooking process.
- Follow the recommended pre-heating time. Pre-heating time specified on the food label must not be exceeded.
- Shell eggs or boiled eggs should not be heated in the microwave, as they may explode even after they have been cooked.
- Lightly pierce foods with tough skins such as potatoes, pumpkins, apples, or chestnuts before cooking.
- It is important to use materials and containers which are suitable and safe for microwave cooking. The table below shows which materials are suitable and which are not:
| Container material | Suitable | Warnings |
| Browning dish | Yes | Follow the manufacturer's instructions. The bottom of the browning dish must be at least 5 mm above the turntable. A misuse may break the turntable. |
| Cookware | Yes | Suitable for microwaves only. Follow the manufacturer's instructions. Do not use cracked or chipped dishes. |
| Glass jars | Yes | Always remove the lid. Use them only to slightly heat food. Most glass jars are not heat resistant and may break. |
| Glassware | Yes | Heat-resistant microwave glassware only. Make sure there is no metallic trim.Do not use cracked or chipped dishes. |
| Microwave cooking bags | Yes | Follow the manufacturer's instructions. Do not close with a metal tie. Make slits to allow steam to escape. |
| Paper towels | Yes | Use to cover food for reheating and absorbing fat. Use with care for short-term cooking/warming only. |
| Baking paper | Yes | Use as a cover to prevent splattering or a wrap for steaming. |
| Plastic | Yes | Microwave-safe only. Follow the manufacturer's instructions. It must be labelled as “microwave safe”. Some plastic containers soften, as the food inside gets hot. Boil-in bags and closed plastic bags should be cut or punctured slightly if indicated on the appliance. |
| Plastic wrap | Yes | Microwave-safe only. Use it to cover food during cooking and retain moisture. Do not allow plastic wrap to touch food. |
| Thermometers | Yes | Microwave-safe only (meat and candy thermometers). |
| Aluminium tray | No | May cause arcing. Move food into a microwave-safe dish or container. |
| Food carton with metal handle | No | May cause arcing. Move food into a microwave-safe dish or container. |
| Metal or metal-trimmed cookware | No | The metal diverts energy away from the food. The metal trim could cause an electric arc. |
| Metal twist ties | No | May cause arcing. Move food into a microwave-safe dish or container. |
| Paper bags | No | May cause a fire in the microwave. |
| Plastic foam | No | Plastic foam may melt or contaminate the liquid inside when exposed to high temperature. |
| Wood | No | Wood may dry out inside the microwave and may split or crack. |
6. CLEANING AND MAINTENANCE
- The appliance, as well as food remains, must be cleaned and removed regularly.
- Unplug the cord from the power supply before cleaning. Do not immerse the appliance in water or any other liquid during cleaning.
- The lack of maintenance and cleaning of the product may cause a deterioration on its surface and affect its lifespan. Keep the inside of the appliance clean.
- Wipe up splashes or spilled liquids with a damp cloth.
- Do not use strong detergents, powder abrasives, or metal brushes to clean the appliance.
- Do not allow the control panel to get wet.
- Do not remove the mica plate cover.
- If steam builds up inside or around the outside of the microwave door, wipe it with a soft cloth. This may occur when the microwave oven is operated under high humidity conditions and is normal.
- The turntable ring assembly and surface of the microwave should be cleaned regularly to avoid excessive noise. Clean the microwave base with a cloth and mild detergent.
- Use a soft, damp cloth to clean the gaskets, door, interior walls, and turntable.
-
When the microwave has been used for a long time, some strong odours may arise from inside. To get rid of them, follow one of the steps below:
-
Place several lemon slices in a cup and heat them at high power for 2 or 3 minutes.
- Place a cup of red tea inside the microwaves and heat it at high power for 2 or 3 minutes.
- Place orange peels inside the microwave and heat them at high power for 1 minute.
7. TECHNICAL SPECIFICATIONS
Model: 01390
Product reference: GrandHeat 2500 Built-In Steel
Microwave power: 900 W
Rated input power: 1400 W (Microwave)
Rated input power: 1000 W (Grill)
Rated voltage: 230-240 V\~
Rated frequency: 50 Hz
Capacity: 25 l
Technical specifications may change without prior notification to improve product quality. Made in China | Designed in Spain
8. DISPOSAL OF OLD ELECTRICAL AND ELECTRONIC APPLIANCES

This symbol indicates that, according to the applicable regulations, the product and/or batteries must be disposed of separately from household waste. When this product reaches the end of its shelf life, you should dispose of the cells/batteries/accumulators and take them to a collection point designated by the local authorities.
Consumers must contact their local authorities or retailer for information concerning the correct disposal of old appliances and/or their batteries.
Compliance with the above guidelines will help protecting the environment.
9. TECHNICAL SUPPORT AND WARRANTY
Cecotec shall be liable to the end user or consumer for any lack of conformity that exists at the time of delivery of the product under the terms, conditions, and deadlines established by the applicable regulations.
It is recommended that repairs be carried out by qualified personnel.
ENGLISH
If at any moment you detect any problem with your product or have any doubt, do not hesitate to contact the official Cecotec Technical Support Service at +34 96 321 07 28.
10. COPYRIGHT
The intellectual property rights over the texts in this manual belong to CECOTEC INNOVACIONES, S.L. All rights reserved. The contents of this publication may not, in whole or in part, be reproduced, stored in a retrieval system, transmitted, or distributed by any means (electronic, mechanical, photocopying, recording or similar) without the prior authorization of CECOTEC INNOVACIONES, S.L.
1. PIÈCES ET COMPOSANTS
Img. 1
3. INSTALLATION DU PRODUIT
3. INSTALLATIE VAN HET APPARAAT
Fig./Img./Abb./Afb./Rys. 1
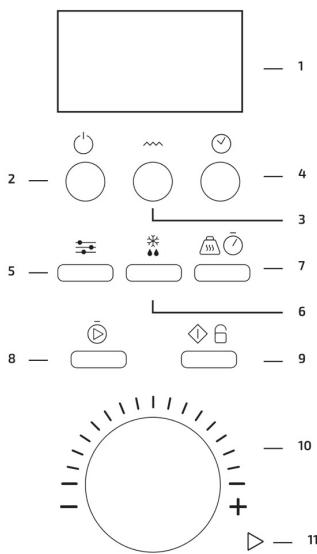
Fig./Img./Abb./Afb./Rys. 2

Fig./Img./Abb./Afb./Rys. 3


Fig./Img./Abb./Afb./Rys. 4

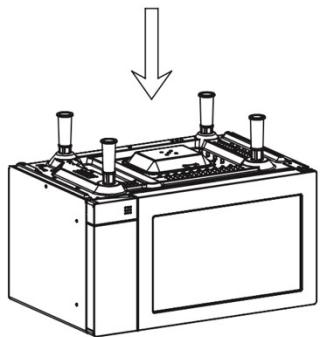
Fig./Img./Abb./Afb./Rys. 5

Fig./Img./Abb./Afb./Rys. 6

Fig./Img./Abb./Afb./Rys. 7

Fig./Img./Abb./Afb./Rys. 8

Fig./Img./Abb./Afb./Rys. 9

Fig./Img./Abb./Afb./ Rys. 10

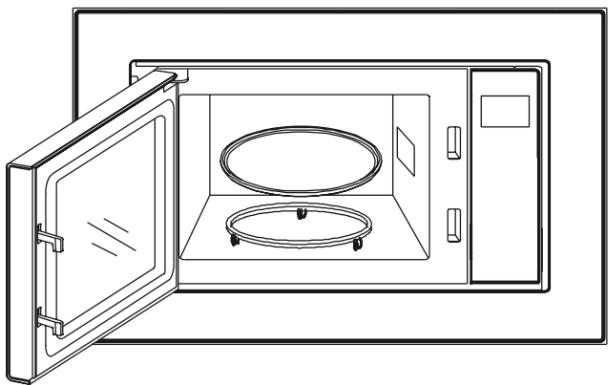
Fig./Img./Abb./Afb./Rys. 11
www.cecotec.es
- SOMMAIRE
- INSTRUCTIONS DE SÉCURITÉ
- CONTROL PANEL
- FIG. 2
- BEFORE USE
- ENGLISH
- WARNING
- BOX CONTENT
- APPLIANCE INSTALLATION
- FIG. 3
- FIG. 4
- VENTILATION SPACE
- FIG. 5
- FIG. 6
- FIG. 7
- FIG. 8
- FIG. 9
- FIG. 10
- FIG. 11
- OPERATION
- USING THE MICROWAVE
- SETTING THE TIME
- MICROWAVE COOKING
- QUICK START
- DEFROST BY WEIGHT
- TIMER FUNCTION
- GRILL COOKING
- MULTI-SEQUENCE COOKING
- DELAY START
- CHILD LOCK
- DEFAULT COOKING PROGRAMMES
- NOTE
- TIPS
- CLEANING AND MAINTENANCE
- TECHNICAL SPECIFICATIONS
- DISPOSAL OF OLD ELECTRICAL AND ELECTRONIC APPLIANCES
- TECHNICAL SUPPORT AND WARRANTY
- COPYRIGHT
- PIÈCES ET COMPOSANTS
- IMG. 1
- INSTALLATION DU PRODUIT
- INSTALLATIE VAN HET APPARAAT
Brand : CECOTEC
Model : Grandheat 2500 Built In
Category : Microwave Oven