
UMI - Wi-Fi Router LINKSYS - Free user manual and instructions
Find the device manual for free UMI LINKSYS in PDF.

| Product type | Wi-Fi Router |
| Brand | LINKSYS |
| Model | UMI |
| Dimensions (L x W x H) | 200 x 150 x 30 mm |
| Weight | 300 g |
| Power supply | 12 V DC, 1 A power adapter |
| Wi-Fi standard | 802.11 b/g/n |
| Ports | 4 LAN 10/100/1000 ports, 1 WAN port |
| Antennas | 2 internal antennas |
| Main functions | Wireless router, NAT firewall, DHCP, VPN client |
| Wireless security | WEP, WPA, WPA2 |
| Maintenance and cleaning | Clean with a soft dry cloth, do not use chemicals |
| Electrical safety | Grounding required, do not open the case |
| Spare parts and repairability | Power adapter, Ethernet cable (available online) |
| General information | Compliant with European directives 1999/5/EC, 2006/95/EC, 2004/108/EC |
| Operating temperature | 0 °C to 40 °C |
| Operating humidity | 10% to 85% non-condensing |
Frequently Asked Questions - UMI LINKSYS
User questions about UMI LINKSYS
0 question about this device. Answer the ones you know or ask your own.
Ask a new question about this device
Download the instructions for your Wi-Fi Router in PDF format for free! Find your manual UMI - LINKSYS and take your electronic device back in hand. On this page are published all the documents necessary for the use of your device. UMI by LINKSYS.
USER MANUAL UMI LINKSYS
Welcome to Cisco umi telepresence
guide
Intellectual property notice
© 2010 Cisco and/or its affiliates. All rights reserved. Cisco, umi, and the Cisco and umi logos are trademarks or registered trademarks of Cisco Systems, Inc. and/or its affiliates in the U.S. and certain other countries. HDMI, the HDMI logo, and High-Definition Multimedia Interface are trademarks or registered trademarks of HDMI Licensing LLC in the United States and other countries. All other trademarks mentioned in this document are property of their respective owners.
Contents
Chapter 1 Create your account online
7 Before you begin
7 Enter your account information
9 Choose your billing method
9 Enter your billing information
10 Write down your activation code and umi number
11 Validate your email address
Chapter 2 Connect the camera and the console
13 Tune the room
14 Check box contents
15 Connect the camera cables
16 Mount the camera
19 Connect the camera to the umi console
19 Connect the umi console to your TV
21 Connect to the Internet: Ethernet cable
22 Connect to an outlet
Chapter 3 Complete TV setup
23 – Tools for working with umi on your TV screen
28 Select your language
28 Set up your network connection
29 Enter your activation code
30 Check speaker, microphone, and camera settings
31 Adjust the camera
32 Take a profile photo
32 Check for software updates
Chapter 4 Calls
35 Make a umi call
37 End a umi call
37 Leave a video message
38 Answer a umi call
38 Ignore a umi call
39 Options during a umi call
Chapter 5 Contacts
41 Create a new contact
43 Send a friend request
44 Add a number you dialed to Contacts
44 Respond to a friend request
45 Edit a contact
46 Delete a contact
Chapter 6 Messages
47 View your messages
48 Call back the sender
49 Add the sender to your contacts
50 Block a sender
50 Forward a video from your message list
51 Delete a message
Chapter 7 My videos
53 Record a video
54 View your videos
55 Send a video
56 Delete a video
Chapter 8 Settings
57 Profile settings
62 Privacy settings
64 Console settings
Chapter 9 Ümi Connect website
69 Log in to the website
70 Check your messages
74 Manage your videos
78 – Work with your umi call history
81 Manage your contacts
85 Edit your account settings
89 Edit your notification settings
92 Edit your display settings
93 Edit your privacy settings
Chapter 10 Advanced topics
97 Alternate ways to mount the camera
100 – Alternate ways to connect the console to your TV service
103 Tips for using umi with Google video chat
Chapter 11 Troubleshooting
105 Cable connections
106 Call quality (audio/video)
106 Care and maintenance
107 Google video chat
108 My videos
108 Router connections
109 Settings
109 Ümi Connect website
Chapter 12 Glossary
Chapter 13 Specifications
Legal and compliance information

1 Create your account online
To begin setup, you need to create a umi account on the web. This includes your account login and billing information. After you set up the account, you can return to the umi Connect website at any time to access website features.
Highlights
- Get your account up and running in just a few minutes
- Choose the service plan that works best for you
- Obtain your home umi number to give out to family and friends
Table of contents
Before you begin 7
Enter your account information 7
Choose your billing method – 9
Enter your billing information – 9
Write down your activation code and umi number 10
Validate your email address 11
Before you begin
Please see Specifications to make sure you have the system requirements need to set up and use the umi system.
Enter your account information
To sign up for an account, you enter information about yourself, including an email address and password that you will use to log in to the umi Connect website in the future. You also enter the address where the umi console is being used.
- On your computer, open a web browser and go to www.umiconnect.com.
- If a security warning appears, click Yes.
- Click Sign up.
CISCO
umi
umi Connect
Welcome to Umi Connect. Here you can manage your umi account, view umi video messages, or share umi videos with friends and family. To get started, new umi customers will need to create an account and activate a service plan.
Sign up

Get to know umi telepresence

Click the link below to discover how umi telepresence creates new and unique ways for you to be together with friends and family. Explore umi
Explore umi umi Support
Log in to umi Connect
Email or umi number
Password
Log in
□ Remember me
Forgot your password?
4. Enter or select the information in the fields.
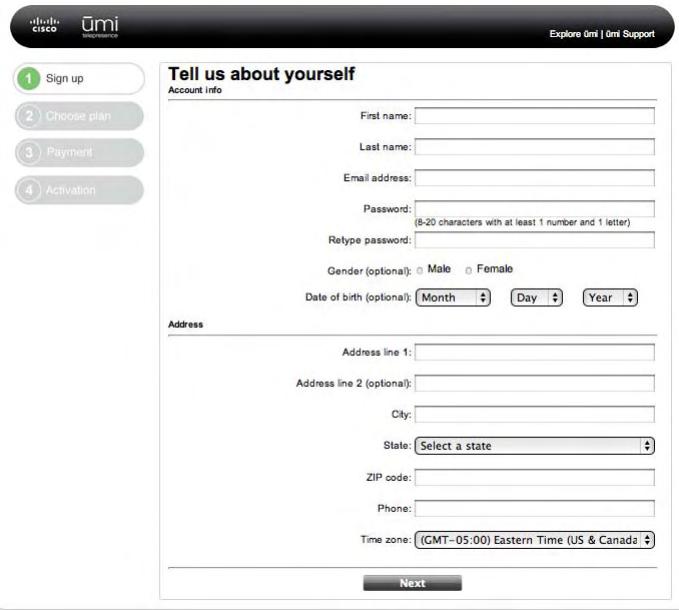
Here are some tips:
- Be sure to enter a working email address. It will be used to send you notifications of messages and missed umi calls.
- Be sure to remember the email address and password you enter. You'll use them to log in when you come back to the umi Connect website.
- Your password must contain at least eight characters, including at least one letter and one number. It can also include the following symbols/special characters: @# % *() + = ? ;:/! , · -_ |.
5. Click Next.
Choose your billing method
You have two billing choices for your umi service plan: to pay for a full year in advance, or to pay on a monthly basis. Paying for a year in advance provides a discount on the per-month cost.
- For the billing option you want, click Select.
- Click Next.
Enter your billing information
The credit card you enter here is charged for the full year, or automatically at the beginning of each month, depending on which billing method you chose.
- Enter or select the information in the fields.
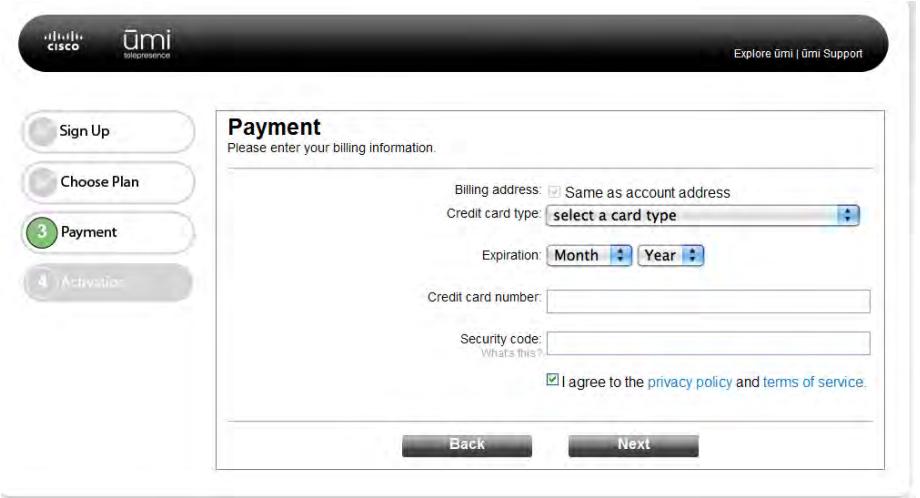
Here are some tips:
If your billing address is the same as the account address you entered on the first screen, check the box. If the billing address is different, enter it after you click Next.
- Be sure to read the privacy policy and terms of service before checking the box.
- Click Next.
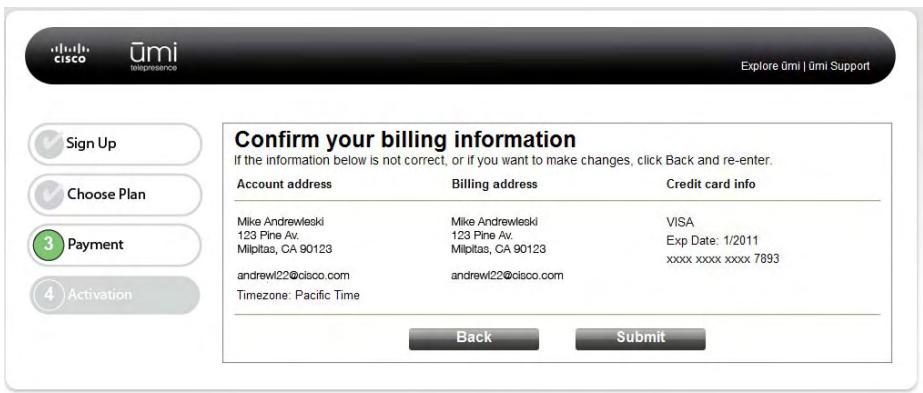
-
If needed, enter your billing address, and then click Next.
-
Review your billing information. If you need to make any changes, click Back. If the information is correct, click Submit.
Write down your activation code and umi number
The Congratulations! screen shows your activation code and home umi number. Make sure to write them down.
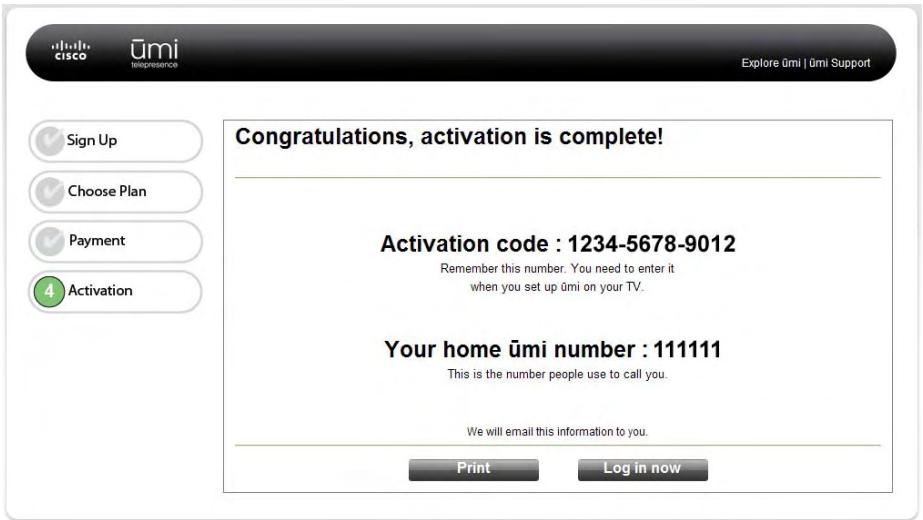
- You need your activation code during TV setup.
- Your home umi number is the number other members use to call you.

To find your home umi number in the future, go to settings > my settings > profile. The number appears in the upper-right corner of the screen.
Validate your email address
After you complete web setup, you will receive an email from Cisco containing your activation code and home umi number. This email also contains a link for you to click to validate the email address you entered when you created your account online.
Before you move on to the other parts of setup, be sure to click the link to validate your address. Your email address must be validated for you to access the full range of umi features online, such as email notifications of missed umi calls.
2 Connect the camera and the console
After you set up your account online, you need to set up the cable connections between the umi camera, the console, and your TV. Be sure to follow these steps in order.
Highlights
- Choose from a variety of configurations to use ümi with your home entertainment system
- Position the camera to capture exactly the part of the room you want others to see
- Make a cabled or wireless connection to your home broadband network
Table of contents
Tune the room 13
Check box contents 14
Connect the camera cables 15
Mount the camera 16
Connect the camera to the ümi console 19
Connect the umi console to your TV £ 19
Connect to the Internet: Ethernet cable 21
Connect to an outlet 22
Tune the room
The arrangement of your TV room, including the way you position the umi console and camera, can help enhance your experience using umi. Before you begin connecting cables, follow these tips to ensure excellent video and audio quality.
Video
A larger TV promotes the "life-size" experience of connecting to friends and family with umi.
- As a general rule of thumb, if your TV is centered across from your sofa, this encourages good eye contact when you are talking to someone.
- For best picture quality, try to keep the lighting level in the room consistent. Soft lighting produces a better picture than halogens.
Windows facing the camera or behind the sofa can cause TV glare and reflection, and may need to be blocked with drapes or blinds.
- Ideally, do not place any lights or lamps where they are in direct view of the camera. The camera will dim to compensate for the bright light, so you may appear dark to the people on the other end of the umi call.
Audio
- When you're using umi, the quieter the room, the better the sound quality.
- Because the microphone can pick up sound in all directions, you can speak in a normal conversation tone—just as if you were in the same room as the people you are talking to.
Check box contents
Before connecting umi cables and components, check the box. It should contain all of the following. If anything is missing, please contact Cisco customer service at (877) 425-4864.
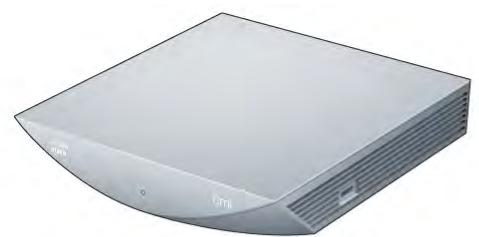
Console
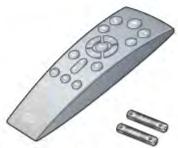
Remote and AAA batteries
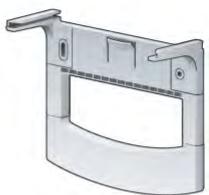
Camera bracket
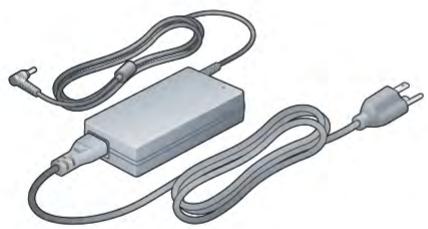
Power cord
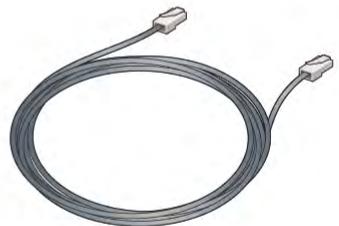
Ethernet cable
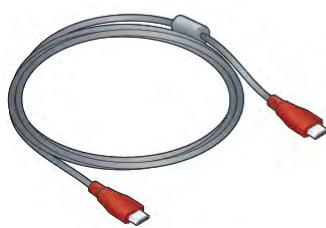
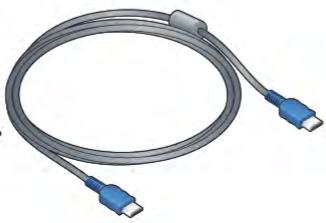
Two HDMI cables
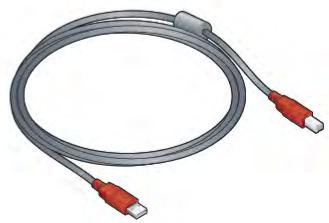
USB cable
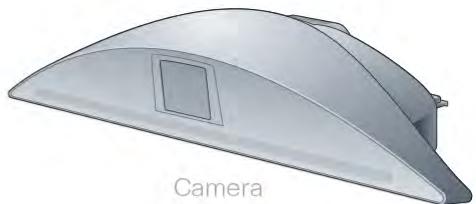
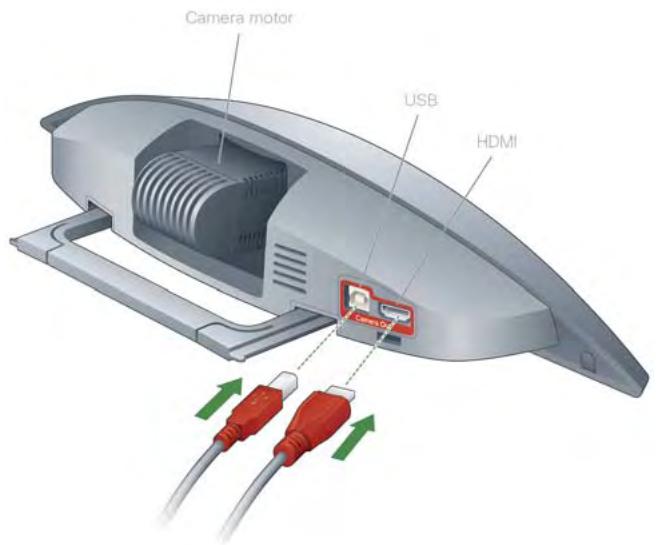
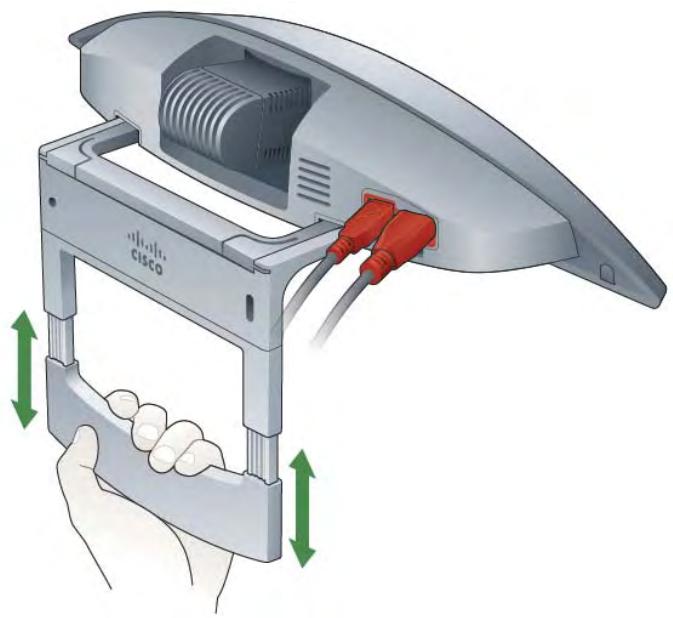
Connect the camera cables
- Insert the USB cable into the USB Camera Out port on the back of the camera.
- Insert the red HDMI cable into the HDMI Camera Out port on the back of the camera.

Do not press on or move the camera motor.
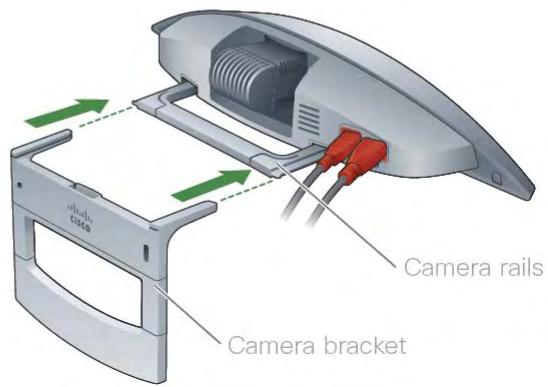
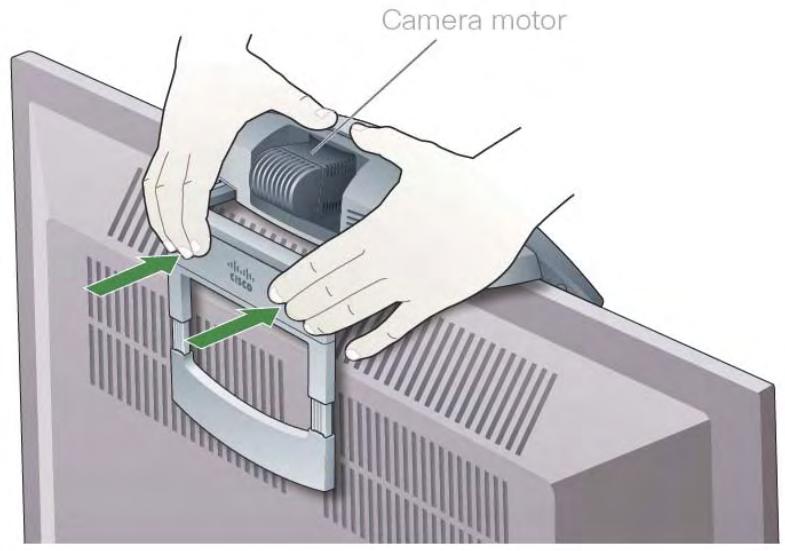
Mount the camera
Follow these instructions to mount your camera on top of your TV.
If your TV is too thick to securely support mounting the camera on top, or if you need a different camera placement (such as wall mounting) for any other reason, see Alternate ways to mount the camera.
-
Align the camera rails with the camera bracket and carefully slide the bracket onto the camera, as follows:
-
For thinner TVs (up to 2.75 inches thick), slide the bracket so the CISCO logo faces in, towards the back of the TV.
- For thicker TVs (2.75 inches thick or greater), slide the bracket so the CISCO logo faces out, away from the back of the TV.

Up to 2.75 inches thick

2.75 inches thick or greater
- Adjust the length of the bracket up or down to increase stability.
- Squeeze the bracket firmly so that it rests snugly against the back of the TV.

Do not press on or move the camera motor.
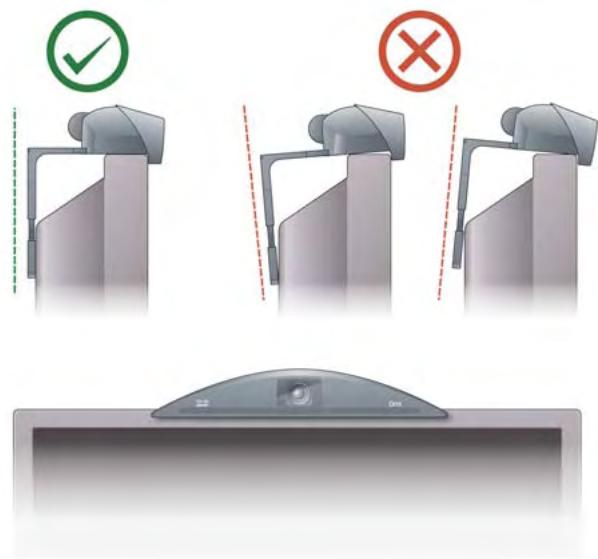
- To ensure the camera is placed correctly, check the following:
The camera sits flat against the top of the TV.
- The front lip of the camera overlaps and hangs flush against the front of the TV.
- The camera bracket extends down the back of the TV parallel to the TV screen. The bracket should not hang tilted either toward or away from the TV.

FOR USERS WHOSE TV HANGS ON A WALL MOUNT: Your TV wall mount is rated for a maximum number of pounds/kilograms. If you are planning to mount the umi camera on top of your TV, make sure that the combined weight of the camera and the TV does not exceed the maximum rating for the wall mount. If you are not sure of your TV wall mount's rating, contact the manufacturer. Note that the umi camera weighs 2.27 lbs./1.03 kg.
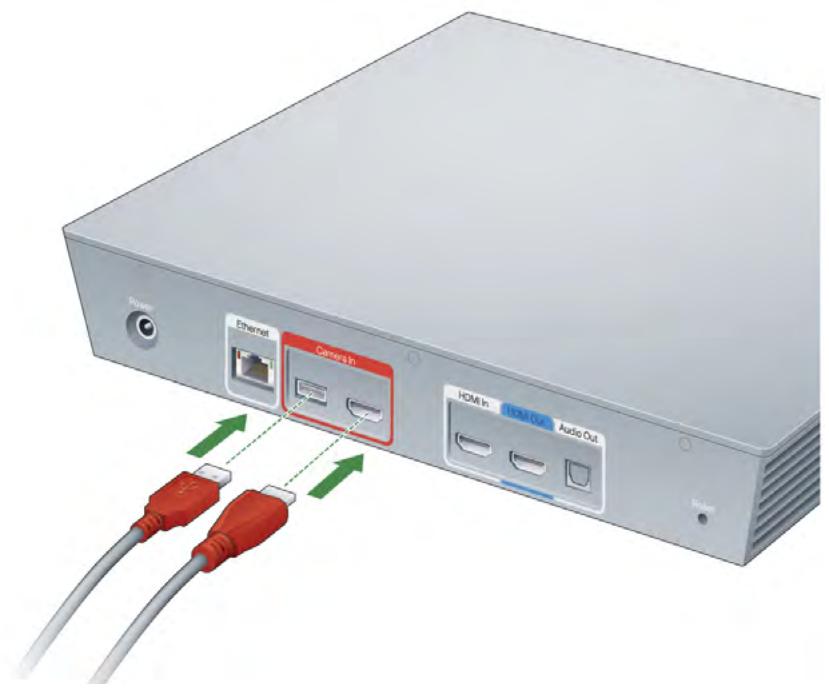
Connect the camera to the umi console
- Insert the HDMI cable from the camera into the red HDMI port labeled Camera In on the back of the umi console.
- Insert the USB cable from the camera into the red USB port labeled Camera In on the back of the umi console.
- Place the umi console in a well-ventilated location. We recommend leaving a space of at least 1.5 inches (38mm) between the console and other components of your home entertainment system.
Connect the umi console to your TV
-
Insert either end of the blue HDMI cable into any available HDMI port on your TV.
-
Insert the other end of the cable into the blue HDMI Out port on the back of the umi console.
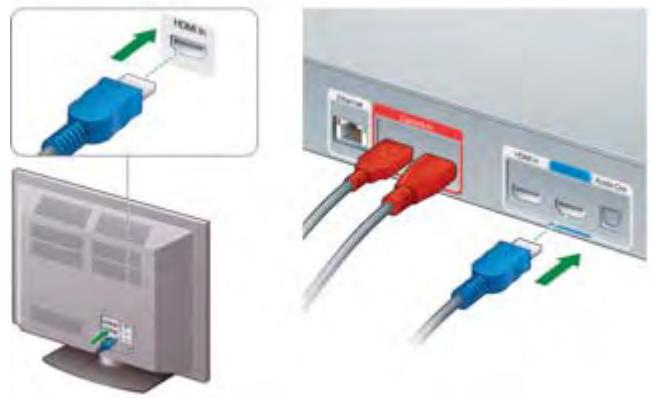
With this basic setup, when you want to use umi, you'll use your TV remote to switch to the HDMI input for the umi console (for example, HDMI2).
To watch TV, you switch the source back to the HDMI input for your TV service (for example, HDMI1).
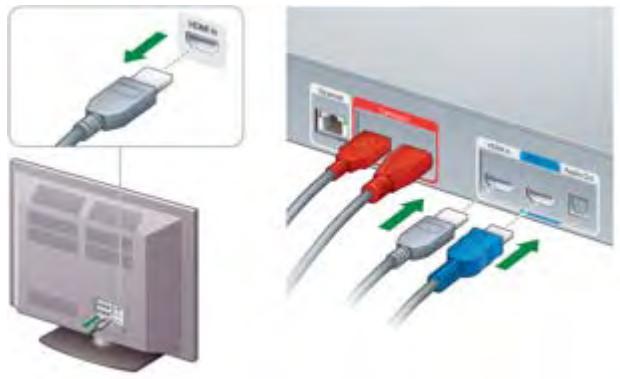
Alternatively, you can use umi and watch TV at the same time, without needing to switch TV input sources. If you want to do this, follow these connection steps instead:

This connection method is sometimes called "pass-through mode."
- On your TV, disconnect the HDMI cable that connects your set top box to your TV. If you have more than one HDMI cable connected to your TV, make sure to disconnect the one from your set top box.
- Insert the cable you just disconnected into the gray HDMI In port on the back of the umi console. The umi console should now be connected to your set top box.
- Insert either end of the blue HDMI cable into any available HDMI port on your TV.
- Insert the other end of the cable into the blue HDMI Out port on the back of the umi console.
If you have a different setup for your TV and other home entertainment system components, see Alternate ways to connect the console to your TV service.
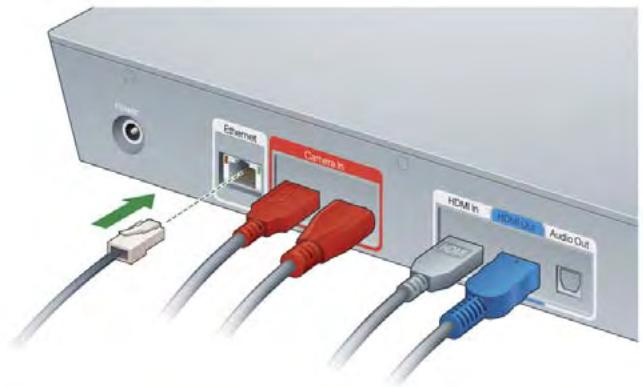
Connect to the Internet: Ethernet cable
There are two ways to connect umi to the Internet: over a wireless network, or using an Ethernet cable. If you'd prefer to connect to the Internet wirelessly, skip to Connect to an outlet. You will connect to your wireless network during TV setup.
You need a cable long enough to reach from your TV to your router or Internet connection jack. You may need to purchase a cable longer than the one that came in the umi box.
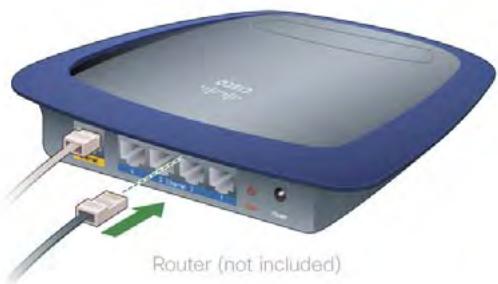
- Insert the Ethernet cable into the Ethernet port on the back of the umi console.
- Insert the other end of the cable into any available port on your router or Internet connection jack.
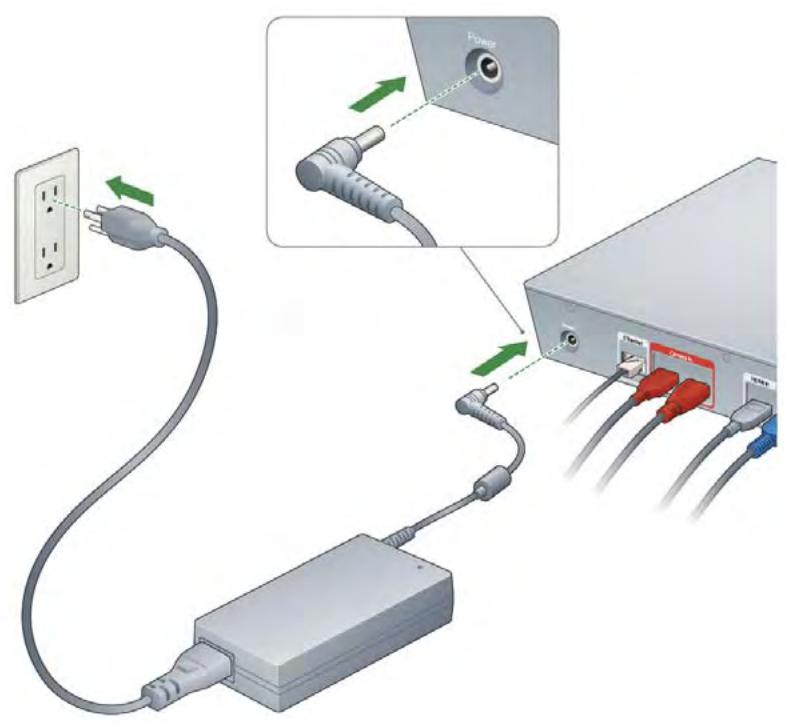
Connect to an outlet
- Make sure you have securely connected all the cables between the camera, the umi console, and your TV.
- Insert the power cord into the Power jack on the back of the umi console.
- Plug the power cord into a working outlet.
- Turn on your TV and make sure the volume (from the TV or other speakers) is set to a comfortable level.

When you plug in the cord, it may take a few minutes for the Welcome screen to appear on your TV as ümi prepares for setup.
3 Complete TV setup
In the last part of setup, you use your remote to make selections on your TV screen. Options include everything from language selection to taking a profile photo to fine-tuning your microphone, speaker, and camera settings to ensure the best umi experience. Key tools you use when working with umi on your TV screen are the remote, the onscreen clover, the onscreen keyboard, and the onscreen keypad.
Highlights
- Learn about the key tools for using umi with your TV: the remote and the onscreen clover
Complete a check of the microphone, speakers, and camera to ensure the best umi experience - Take a profile photo for a personal touch when other members add you as a contact
Table of contents
Tools for working with umi on your TV screen 23
Select your language 28
Set up your network connection 28
Enter your activation code 29
Check speaker, microphone, and camera settings 30
Adjust the camera 31
Take a profile photo 32
Check for software updates 32
Tools for working with umi on your TV screen
For almost everything you do with umi, you use two tools: the remote and the onscreen clover. When you need to enter letters or numbers, you also make use of the onscreen keyboard and keypad.
Install the remote batteries
- Remove the battery cover on the back of the remote by pressing the tab near the bottom.
- Insert the batteries. Be sure to match the + and - ends of each battery with the graphic shown in the battery compartment.
- Replace the battery cover.
Get to know your remote
Here is a quick reference guide to umi remote buttons.
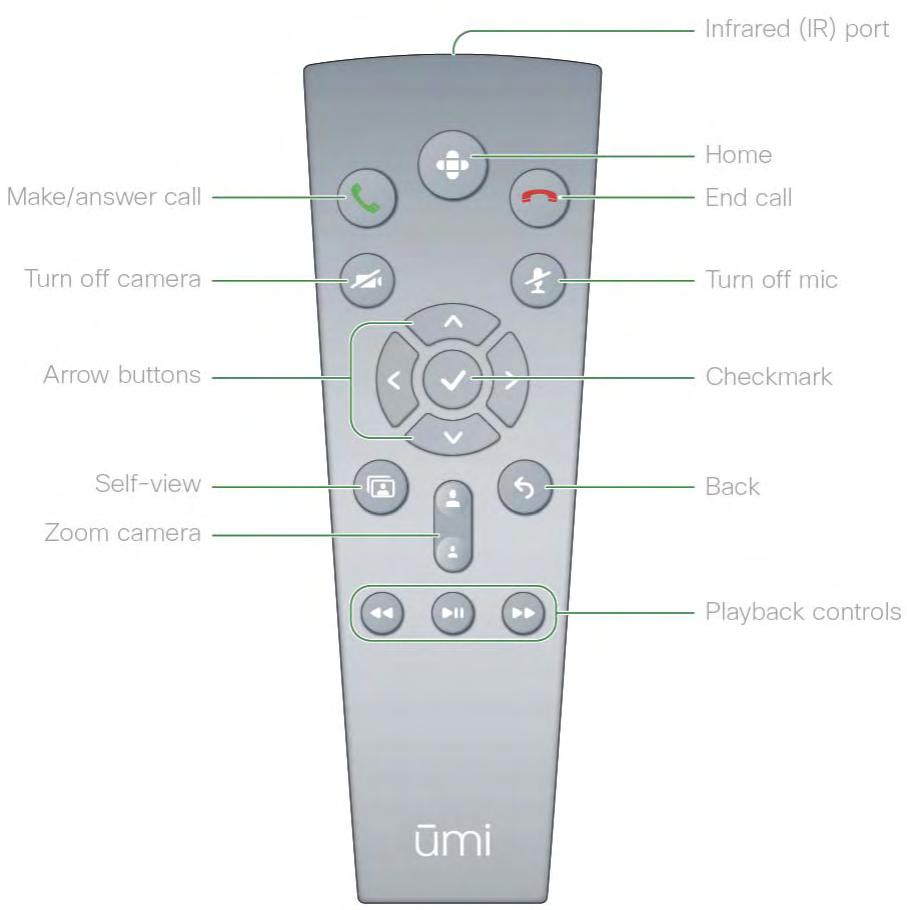
- Infrared (IR) port: When you press a button on the remote, the IR port sends the information to the IR port on the camera.

Be sure to point the IR port on the remote at the camera, not at the console or your TV.
Home: Press to display the onscreen clover if it isn't displayed. The clover is your home base for accessing all umi features on your TV (see Get to know the clover).
Make/answer call : Press to answer an incoming umi call or to dial an outgoing umi call.
End call: Press to ignore an incoming umi call or to end an active umi call.
- Turn off camera: See Turn the camera on/off for details.
Turn off mic : See Turn the microphone on/off for details.
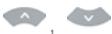
- Arrow buttons , Press to navigate the clover and menu (see Get to know the clover), make selections on the onscreen keyboard and keypad (see Use the onscreen keyboard and Use the onscreen keypad), and adjust the camera (see Adjust the camera).
Checkmark: Press to select the currently highlighted item.
Self-view: See Hide/show self-view for details.
Back:Press to return to the previous screen.
- Zoom camera : Press to show more or less of the room when adjusting the camera (see Adjust the camera).
- Playback controls: Press to play, pause, rewind, and fast forward through a video you recorded or a video message you received (see View your videos and View your messages).
Get to know the clover
The clover you see onscreen is your home base for accessing all umi features on your TV.
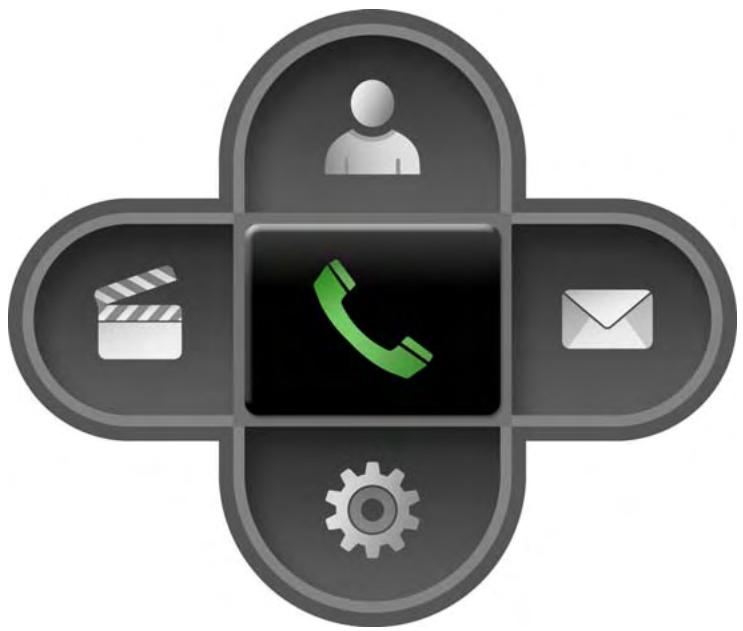
: Add, view, and connect to your contacts.
: Record and send videos.
:Makeumicalls.
D : View video messages sent to you.
: Customize your profile information, console and privacy settings, and more.
Press , and on the remote to move among the five clover feature icons. Press to open the highlighted feature.
When you select one of the five main features, the clover presents a menu of options for that feature. Menus can appear in clover form or as a long bar. Here are some examples:

umi messages
When a menu is displayed, press
on the remote to move among the options.
Press to select the highlighted option.
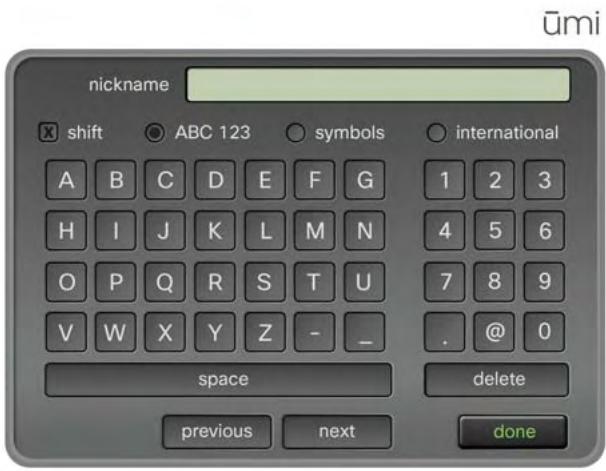
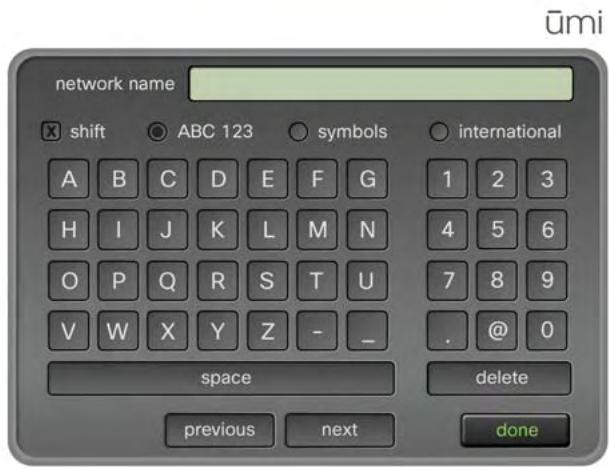
Use the onscreen keyboard
When you need to enter text, symbols, or numbers onscreen, the onscreen keyboard is displayed. For example, you use the keyboard to enter contact information (see Create a new contact) or wireless network settings (see Set up your network connection).
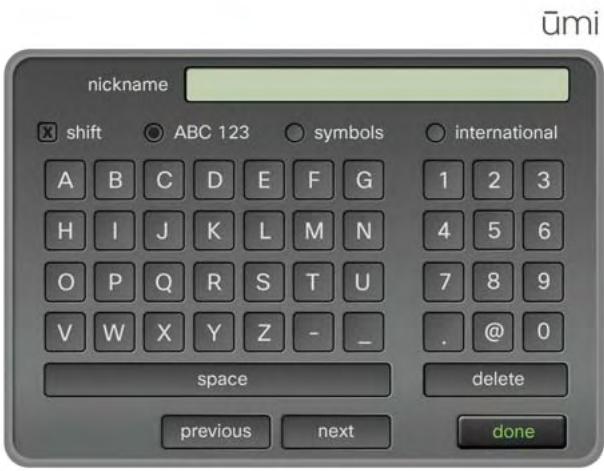
Here are tips on using the onscreen keyboard:
- To access the onscreen keyboard from most screens, you need to select edit next to the field where you want to enter text (see, for example, Create a new contact).
Press , , , and on the remote to navigate the onscreen keyboard and highlight a key.
Press to select the key.
To switch keyboard layouts, navigate to and select ABC 123, symbols, or international
To delete the last character you entered: Select delete. - When you have finished entering the text: Select done.
Use the onscreen keypad
The onscreen keyboard is similar to the onscreen keyboard, except it appears when you need to enter numbers only—for example, when you need to enter your activation code or dial a umi number.
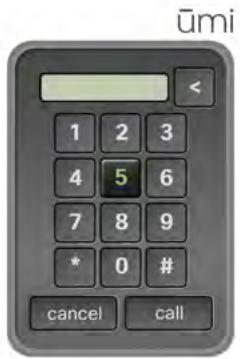
Here are tips on using the onscreen keypad:
Press , , , and on the remote to navigate the onscreen keypad and highlight a key.
Press to select the key.
- To delete the last number you entered: Select or delete, depending on which option is displayed on the keypad.
Select your language
The language you select here will be used for all onscreen TV text, both during setup and when you use umi. You can change the display language at any time (see Change your language).
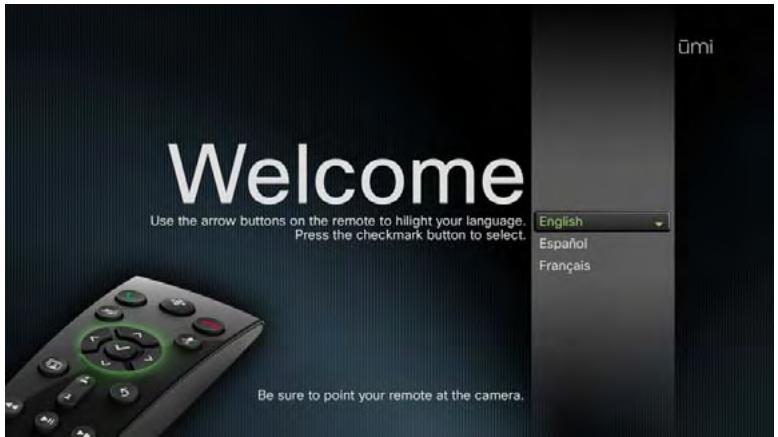
- Press or on the remote to highlight your language.
- Press on the remote to select the language.
Set up your network connection
During this part of setup, you select whether to use umi with a cabled (Ethernet) connection, or to make a wireless connection to your broadband network. If you choose to make a wireless connection, you select or enter the name of the network you want to use.
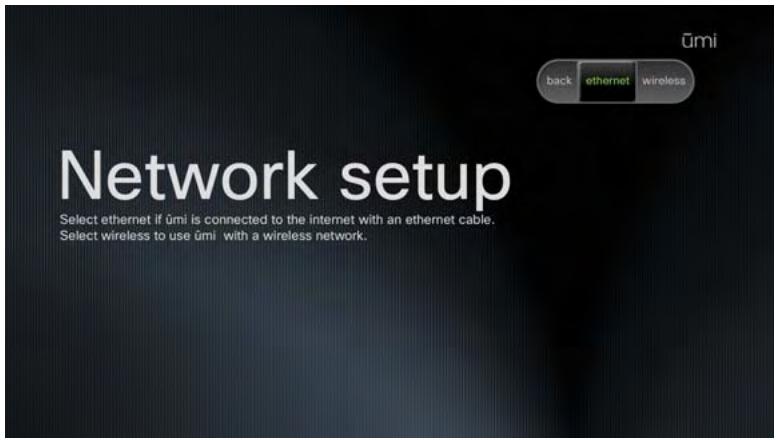
- Do one of the following:
If you connect to the Internet using an Ethernet cable: Select ethernet. If you have connected umi to your router or Internet jack using the cable, you're done with network setup.
If you connect to the Internet wirelessly: Select wireless. Continue with step 2.

Make sure your router is set to broadcast your network name (SSID). Otherwise, umi cannot detect the network.
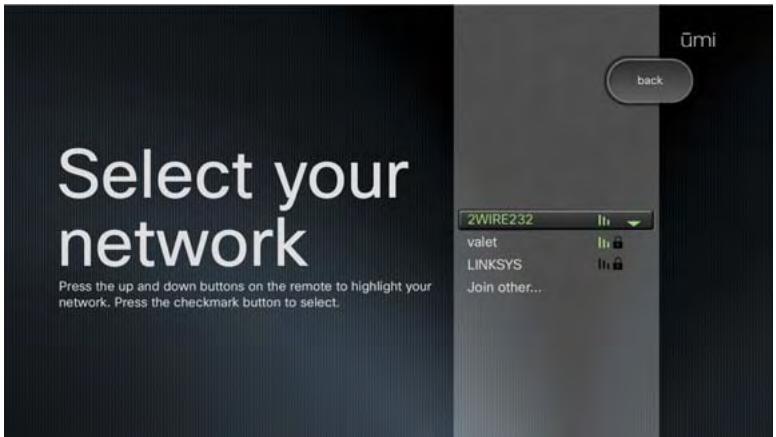
- Press or on the remote to highlight your network.
- Press on the remote to select the network.
- If your network requires a password (network key), use the onscreen keyboard to enter the password (see Use the onscreen keyboard).

Check with the company that provides your network if you do not know the network name or password.
Enter your activation code
You received this code when you signed up for service at www.umiconnect.com. Go to the website if you don't have or know your code.

If you signed up for umi service through your broadband service provider, you obtained your activation code from that provider.
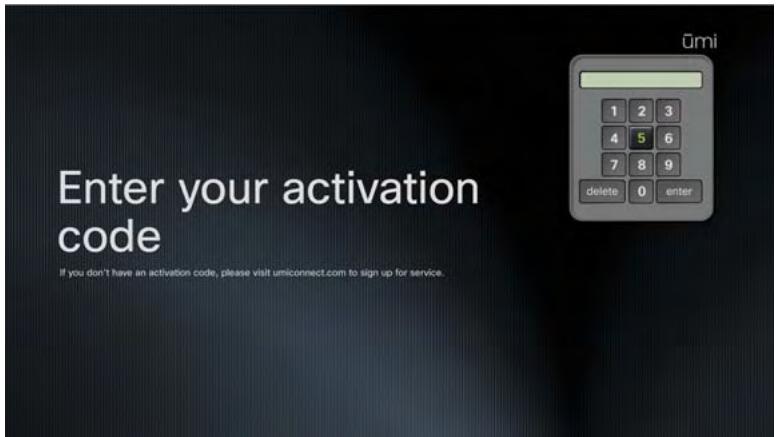
Enter your activation code by doing the following:
- Use the onscreen keypad to enter your activation code (see Use the onscreen keypad).
- When you have finished entering the activation code, select enter.
Check speaker, microphone, and camera settings
During the next part of setup, umi checks your speaker, microphone, and camera settings to ensure the best experience.
The camera check here is different from the camera adjustment you do in the next step of setup. In this step, umi automatically checks and adjusts camera settings to work best in your room. In the next step, you manually position the camera lens to capture the part of the room you want other people to see.
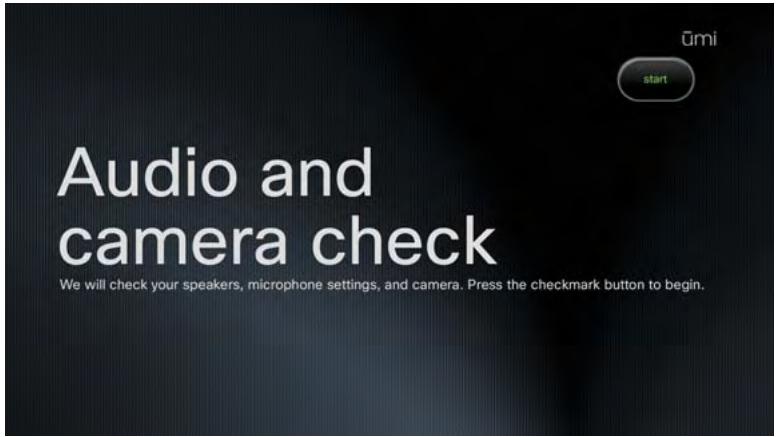
- Make sure your system volume (from the TV or other speakers) is set to a comfortable level.
- Select start. This part of setup takes place automatically, so you don't need to do anything.
- When the check is complete, select continue.
Adjust the camera
In this part of setup, you adjust your camera to capture the area of the room you want people to see when you are on a umi call with them. You can skip this step and adjust your camera later (see Adjust the camera in the Calls chapter).
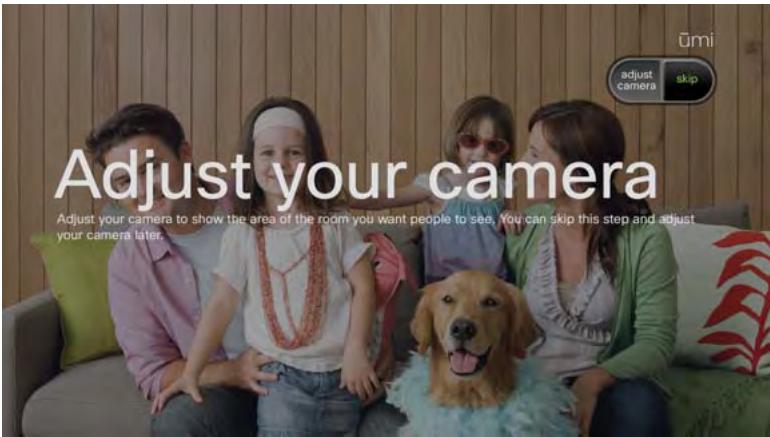
- Select adjust camera
- Press & & & & and 出 on the remote to pan and tilt the camera. Press to capture more or less of the room.
- Your TV screen shows the area that will be captured by the camera. When it looks correct, press l .
Take a profile photo
Take a photo that your family and friends will see when they select your contact information to call you. You can skip this step and take a profile photo later (see Change or delete your profile photo).
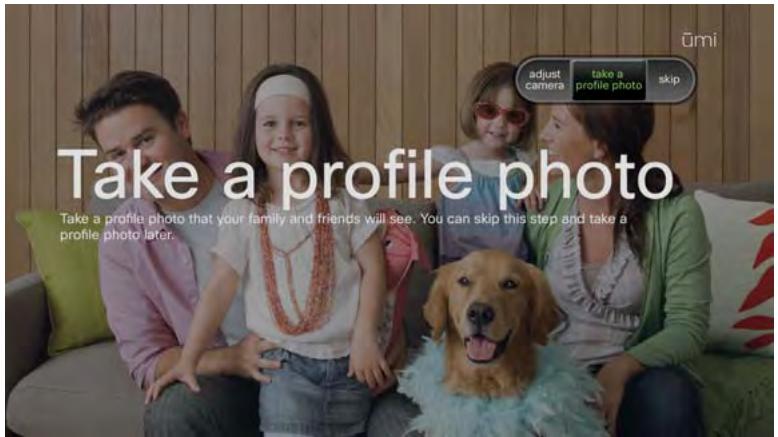
- Select take a profile photo.
- The umi camera takes your profile photo and displays it onscreen. If you're happy with the photo, select use photo. To retake the photo, select retake photo. You can adjust the camera before you retake the photo (see Adjust the camera).
Check for software updates
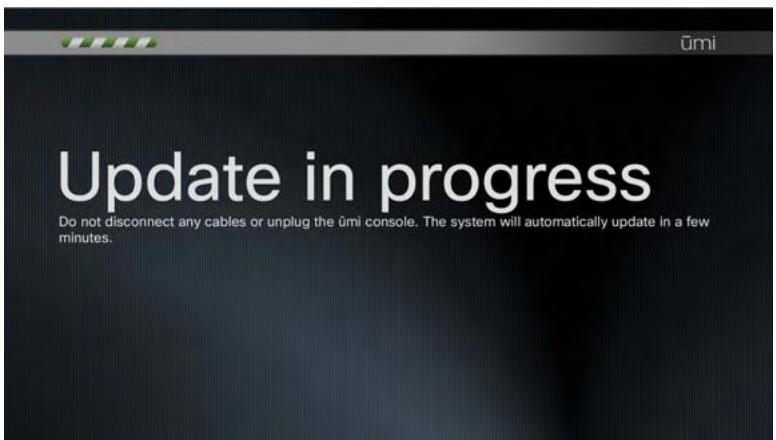
After setup is complete, the umi system checks to see if a system software update is available. If an update is available, the system reboots to install the update. During the reboot process, the startup screen appears one or more times. This process may take up to 15 minutes.
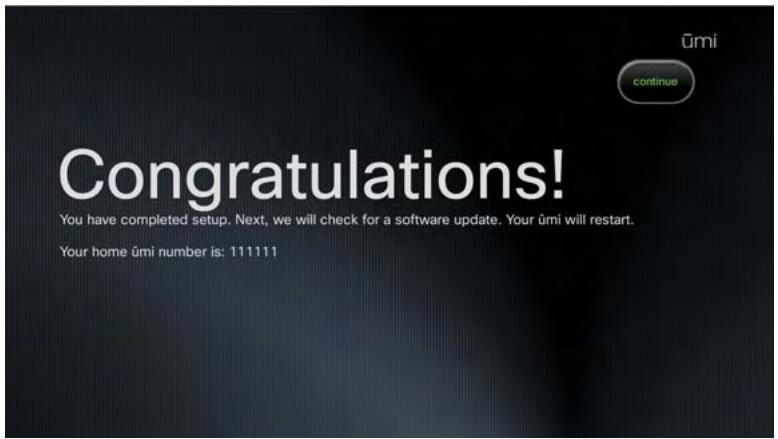
- When the Congratulations! screen appears, click continue. This starts the process of checking for an update. You don't have to do anything during the update, but be sure to leave your TV and umi console on.
The Congratulations! screen displays your home umi number. To find the number in the future, go to settings > my settings > profile. The number appears in the upper-right corner of the screen.
- If an update was installed, the onscreen clover appears after installation has finished.

4 Calls
The umi call experience takes communication to a whole new level. You can easily make and receive umi calls with fellow umi members and enjoy the video conversation on the big screen, from the comfort of your TV room sofa. Camera and microphone settings make sure you are in control of the umi calling experience at all times.
Highlights
- Easily call ümi contacts, other ümi numbers, or your Google video chat contacts
- Leave a video message so you can make a personal connection even when someone doesn't answer your umi call
- Turn the camera and microphone on and off during a umi call to ensure the communication experience you want
Table of contents
Make a umicall 35
End a umi call 37
Leave a video message 37
Answer a umi call 38
Ignore a umi call 38
Options during a umi call 39
Make a umi call
Who do you want to call: a umi contact, a member who isn't in your contacts list, or a Google video chat contact who doesn't use umi? You can do all three easily, so you can stay in touch with all the important people in your life.
Make a umi call to a contact
A few button presses on the remote is all it takes to call your closest friends and family members.
- On the clover, select 口 口 or
- Press or on the remote to highlight the contact you want.
- Press or on the remote to call the contact.
Dial a umi number
For umi members who are not on your contacts list, dial their umi number directly to call them.
- On the clover, select
- Select dial by number.
- Use the onscreen keypad to enter the number (see Use the onscreen keypad).
- Select call or press on the remote.
Dial a Google video chat contact
To keep in touch with your wider circle, even those who are not umi members, you can call people who are in your Google video chat contacts. The other caller communicates with you using a webcam.
To use umi to make calls with a Google video chat contact, note the following:.
- You must have your own Google video chat account. You will need to enter your Google video chat ID and password either on your TV or on the umi Connect website (see Edit your Google video chat account information). When you enter your Google video chat ID, you must enter a full email address, including everything following the @ symbol.
- You must then enter or import any Google video chat contacts you want to call into your umi contacts list (see Add a contact or Import Google video chat contacts).
After you enter or import a Google video chat contact, the simplest way to call that contact is to follow the steps in Make a umi call to a contact. Simply select the Google video chat contact you want to call. If the contact entry contains both a umi number and a Google video chat ID, when you select the contact, you are asked to select which method you want to use to call the contact.
You cannot make umi calls between your home umi system and the Google video chat ID you enter here. So, for example, if you are traveling and want to call your home umi number using Google video chat, you cannot do so using the ID you enter here. Instead, you can create a second Google video chat account, enter the ID for that account as a contact in your first Google video chat account, and then add your ID from the first account as a contact in the second account. This enables you to use the second account to call your home umi.
Alternately, you can call a Google video chat contact by dialing his or her Google video chat ID directly. To do so, follow these steps:
- On the clover, select
- Press or on the remote to highlight the contact you want.
- Press on the remote to select the contact.
- Select video chat ID.

- If you have not already entered your Google video chat ID and password, a prompt appears. Use the onscreen keyboard to enter the information (see Use the onscreen keyboard). Be sure to enter a full email address for your Google video chat ID. When finished, select log in.
- Use the onscreen keyboard to enter the Google video chat ID you want to call (see Use the onscreen keyboard).
- Select done.
End a umi call
Do one of the following:
On the clover, select end call.
- On the remote, press .
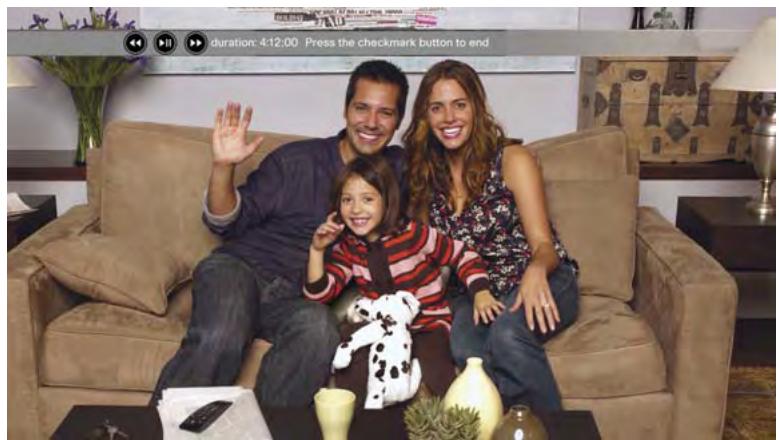
Leave a video message
If the person you want to reach isn't available, you can still make an "in person" connection by leaving a video message.

To leave a video message, you must be calling a umi number. You cannot leave a message if you call a Google video chat ID.
- If the person you are calling does not answer, his or her greeting plays.
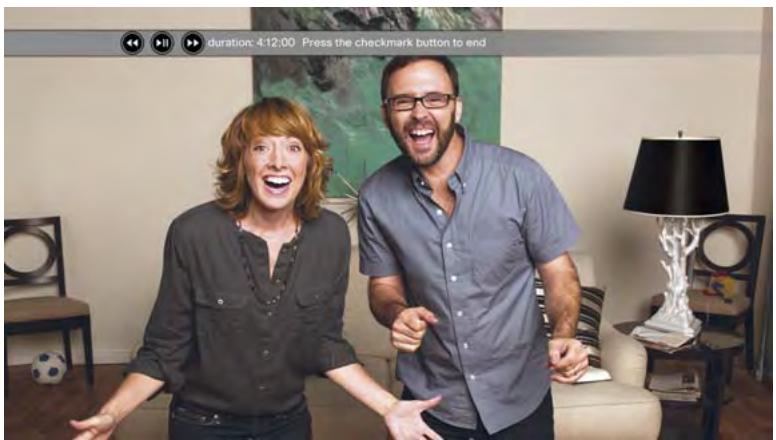
- After the three-second onscreen countdown ends, begin recording your message.
-
When you have finished your message, select stop recording
-
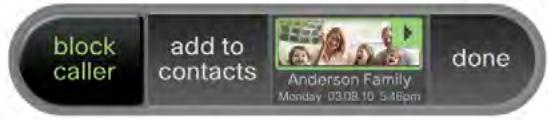
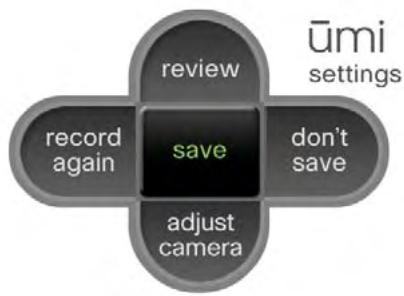
On the clover, select one of the following:
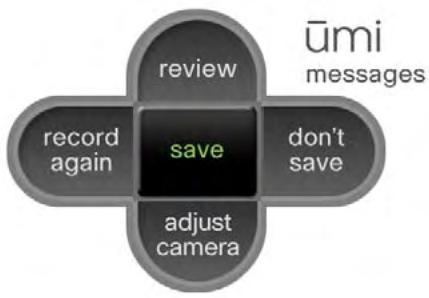
■ review: See and hear your message before sending.
■ record again: If you are unhappy with the message, select this option and repeat steps 2 and 3.
- adjust camera: Before recording your message again, you can adjust the camera to change the area shown in the message (see Adjust the camera).
- don't save: If you don't want to send a message after all, select this option to cancel video message recording completely.
save: Select this option when you are happy with your message.

If you see the person's video greeting but don't want to leave a message, press OK or on the remote while the greeting is playing to end the call.
Answer a umi call
When a umi call comes in, you hear the camera ring. This happens whether your TV is turned on or not.
To answer the umi call, do the following:
- If the TV is off, turn on the TV.
- If you have umi set up to watch TV and use umi separately, switch the TV source to the HDMI input for umi. (If you have umi set up to watch TV and use umi at the same time, you can skip this step.)
- On the remote, press or
Ignore a umi call
If you don't answer an incoming umi call, the caller hears your greeting and has the option to leave a video message. You can also choose to ignore an incoming umi call and send it directly to your greeting.
By default, umi plays a system greeting when you don't answer or ignore a umi call. You can also record a personal video greeting (see Record or delete your personal video greeting).
When you see a umi call coming in, do one of the following:
- On the clover, select ignore.
On the remote, press
Options during a umi call
When you first set up umi, you set a default position for the camera (see Adjust the camera in the TV setup chapter). When you're on a umi call, you can adjust the camera on the fly to change what you are showing to the other callers. You can also manage your privacy during a umi call by turning the camera and the microphone on or off.
When you're on a umi call, the light on the umi camera glows green.
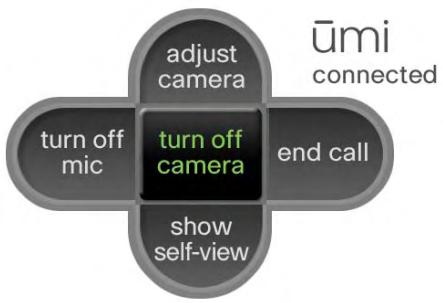
Turn the camera on/off
At any point during a umi call, you can turn the camera off so that the other caller can't see you.
Do one of the following:
- On the clover, select turn off camera or turn on camera
- On the remote, press. Press again to turn the camera back on.
When the camera is off, an icon appears on your TV screen. If self-view is displayed, the icon appears at the bottom of the self-view window. If self-view hidden, the icon appears below the clover.
Adjust the camera
During a umi call, you can adjust the camera to change the area of the room that the other callers can see.
- On the clover, select adjust camera.
- Press & & & & , and _ on the remote on the remote to pan and tilt the camera. Press to capture more or less of the room.
- Your TV screen shows the area that will be captured by the camera. When it looks correct, press l .
Hide/show self-view
The self-view window lets you see how you appear to the other caller, so you can move around or adjust the camera as needed. If you want more of the screen available to see the other caller, you can hide the self-view window.
Do one of the following:
- On the clover, select show self-view or hide self-view.
- On the remote, press to show the self-view window. Press again to hide the self-view window.
Turn the microphone on/off
If you want to speak privately to someone in your room without the other caller hearing, you can turn the microphone off.
Do one of the following:
- On the clover, select turn off mic or turn on mic.
- On the remote, press 12 . Press again to turn the microphone back on.
When the microphone is off, an icon appears on your TV screen. If self-view is displayed, the icon appears at the bottom of the self-view window. If self-view hidden, the icon appears below the clover.
5 Contacts
Friends, family, coworkers—you can easily manage the important members of your umi calling circle by adding them as contacts. You can request to be added to another member's contact list, and receive requests from callers. It is also easy to edit and delete contacts.
Highlights
- Easily create new contacts either on your TV or on the web
- Add a number you dialed to your contacts
- Respond to friend requests to add incoming callers as contacts
Table of contents
Create a new contact 41
Send a friend request 43
Add a number you dialed to Contacts 44
Respond to a friend request 44
Edit a contact 45
Delete a contact 46
Create a new contact
Use the onscreen keyboard to create a new contact on your TV (see Use the onscreen keyboard). When you're not at your TV, you can create new contacts at the umi Connect website (see Add a contact). Contacts you create in either location appear automatically in the other.
- On the clover, select
- Select new contact.
-
To move among fields, do one of the following:
-
On the new contact screen, press or on the remote to move among fields. The field with the word edit to the right is the currently active field. Press to select the field and enter information.
- If the onscreen keyboard is open, select previous or next to move to the next field in either direction.
- Use the onscreen keyboard to enter information in the field (see Use the onscreen keyboard). Here are some tips:
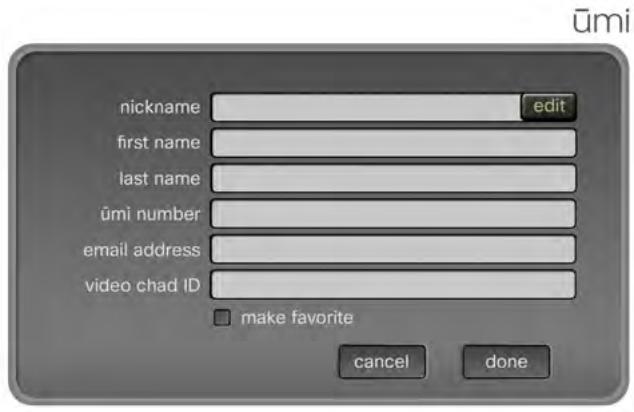
- The nickname you enter is the name that appears onscreen when you make a umi call to or receive a umi call from the contact.
If you enter an email address for a contact, when you send the contact a video, the person receives the video both through umi and through an email link (see Send a video and Share a video).
If you want to call a Google video chat contact using his or her chat ID, enter the video chat ID in the video chat ID field. See Dial a Google video chat contact for more information. - Check the make favorite box to designate the contact as a favorite. When you open your call list, favorites appear at the top of the list.
You can also add Google video chat contacts by importing them on the umi Connect website (see Import Google video chat contacts).
- When you have finished entering information in a field, select done.

To create a valid contact, you must enter information in at least one of the following fields: nickname, first name, or last name.
- When you have finished entering all the information for the contact, select done on the new contact screen.
Send a friend request
The umi privacy options allow a member to choose to receive umi calls from contacts only (see Set permissions for incoming umi calls). If you call someone who has chosen this option, and you are not on that person's contact list, umi automatically sends the person a friend request. If the person accepts the request, you are added to his or her contacts list and can call him or her in the future.
- Dial the person's umi number (see Dial a umi number).
- If the person accepts umi calls from his or her contacts only, a screen appears notifying you that umi has sent a friend request.
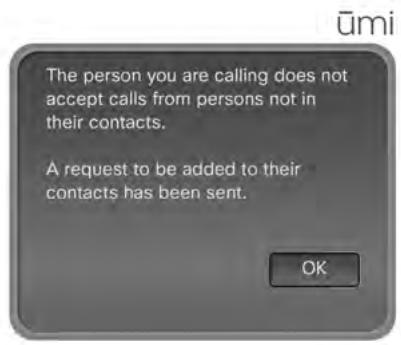
- Select OK to close the notification.

You do not receive a notification if someone accepts your friend request.
Add a number you dialed to Contacts
If you call someone who is not a contact, and umi sends a friend request to that person (see Send a friend request), you have the option to add that number to your contacts list.
- Dial the person's umi number (see Dial a umi number). If that person accepts umi calls from contacts only, and you are not a contact, umi sends a friend request.
- After the friend request is sent, a notification appears. Select add to contacts on the notification screen.
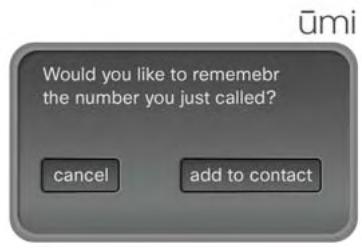
- Enter the contact information (see Create a new contact).
Respond to a friend request
The umi privacy options allow you to choose to receive umi calls from contacts only (see Set permissions for incoming umi calls). If you choose this option and someone calls you who is not in your contacts list, umi automatically sends you a friend request from that person. If you accept the request, the person is added to your contacts list and can call you in the future.
- On the clover, select . A dot appears on the icon to indicate that you have a friend request.
- Pending friend requests are listed at the top of your contacts list and are indicated by a + on the list entry. Do one of the following:
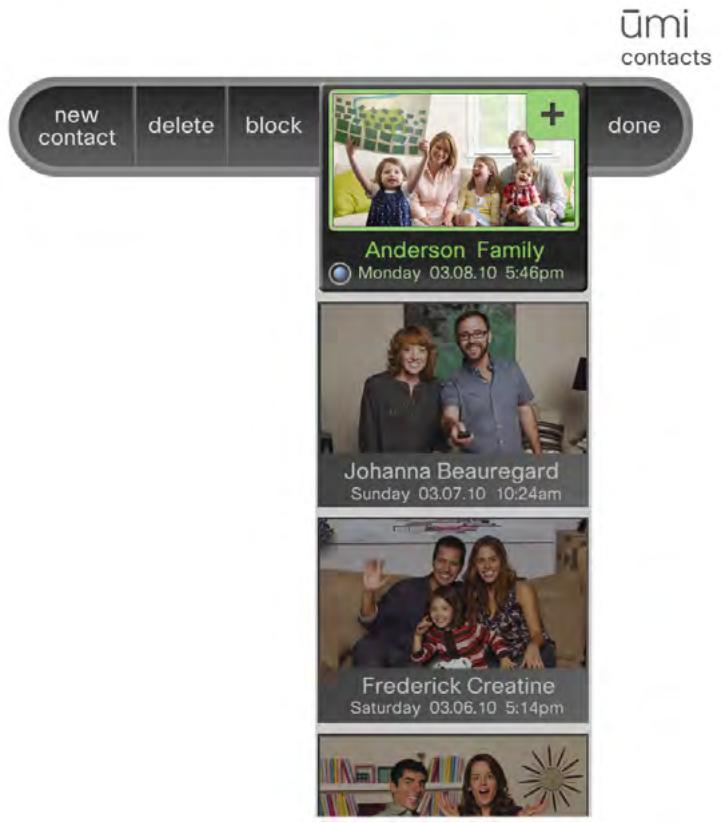
- To accept the request: Select the entry displaying the request. If you accept a friend request, the person does not receive a notification. You can call the person to let him or her know.
- To deny the request: Select block. This adds the sender to your blocked list. You cannot receive umi calls, messages, or videos from this person unless you remove him or her from your blocked list (see Edit your blocked list). To protect your privacy, the person you are blocking does not receive any type of notification.
Edit a contact
You can edit a contact's information either on your TV or on the umi Connect website (see Edit a contact in the umi Connect website chapter). If you edit a contact in one location, the updated information appears in the other location.
- On the clover, select
- Press or on the remote to highlight the contact you want.
- Select edit.
- Edit the information in the contact entry fields. See Create a new contact for information on moving among fields, and see Use the onscreen keyboard for details on entering information using the onscreen keyboard.
Delete a contact
You can delete a contact either on your TV or on the umi Connect website (see Delete a contact in the umi Connect website chapter). If you delete a contact in one location, the contact is deleted in the other location automatically.
- On the clover, select
- Press or on the remote to highlight the contact you want.
- Select delete.
- Select delete contact to confirm.
6 Messages
You never have to worry about missing umi calls, because callers can leave a personalized video message. What's more, other umi members can send you videos directly--for example, mom and dad can send a video of the kids to the grandparents. In addition to viewing messages, you can manage them in multiple ways, including calling back the sender, adding the sender to contacts, and forwarding videos sent to you.
Highlights
View messages on your TV screen or on your computer when you're on the go
- Add a caller as a contact directly from his or her message
- Maintain your privacy by blocking message senders
Table of contents
View your messages 47
Call back the sender 48
Add the sender to your contacts 49
Block a sender 50
Forward a video from your message list 50
Delete a message 51
View your messages
You can view messages either on your TV or on the umi Connect website (see View a message in the umi Connect website chapter). You can view two types of messages: video messages left when someone called you but you were unavailable, and videos sent directly from another member (for example, parents sending a video of the kids to their grandparents). Both items appear in the Messages section on your TV and on the umi Connect website.
- On the clover, select . A blue dot on the icon indicates that you have new messages.
When you have messages waiting, the light on the camera glows blue.
- Messages are listed by date and time sent, with the most recent at the top. Each message entry shows the sender. Press or on the remote to highlight the message you want. If you have multiple messages from the same sender, each one is listed separately.
-
Press to play the message.
-
While the message is playing, do any of the following:
-
To fast-forward through the message: Press ⑥ on the remote.
To rewind the message: Press on the remote.
To quit the message: Press OK on the remote. -
When you have finished viewing the message, select done.
Call back the sender
You can call back the sender of either type of message: a message left because you missed a umi call, or a video sent to you directly.
- On the clover, select .
- Messages are listed by date and time sent, with the most recent at the top. Each message entry shows the sender. Press or on the remote to highlight the message you want. If you have multiple messages from the same sender, each one is listed separately.

3. Select call back.
You can also call back the sender by highlighting the message and pressing on the remote.
Add the sender to your contacts
When you receive a message from a caller who is not in your contacts list, you can add the sender to contacts directly from the message.
- On the clover, select .
- Messages are listed by date and time sent, with the most recent at the top. Each message entry shows the sender. Press or on the remote to highlight the message you want. If you have multiple messages from the same sender, each one is listed separately.
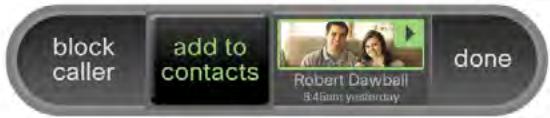
- Select options.
- Select add to contacts.
ūmi
messages
block caller
add to contacts
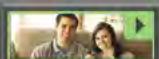
Robert Dawbell 3 January yesterday
done
- Enter the contact information (see Create a new contact).
Block a sender
If you do not want to receive umi calls, messages, or videos from a sender, you can block the sender to prevent future communication from this person.

If you block a sender, you can unblock the person later (see Edit your blocked list).
- On the clover, select D
- Messages are listed by date and time sent, with the most recent at the top. Each message entry shows the sender. Press or on the remote to highlight the message you want. If you have multiple messages from the same sender, each one is listed separately.
- Select options
- Select block caller. To protect your privacy, the person you are blocking does not receive any type of notification.
ūmi
messages
- Select block caller again to confirm.
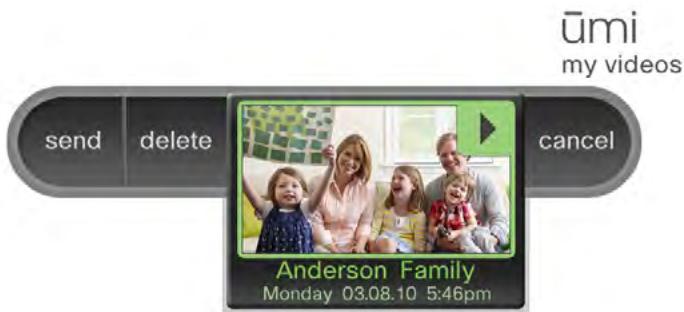
Forward a video from your message list
If someone sends you a video directly, you can forward the video from your message list to any of your umi contacts. You cannot forward messages left if someone tried to call you but you were not able to take the umi call.
- On the clover, select .
- Videos are listed by date and time sent, with the most recent at the top. Each video entry shows the sender. Press or on the remote to highlight the videos you want. If you have multiple videos from the same sender, each one is listed separately.
- Select forward. Your contacts list opens.
- Press or on the remote to highlight the contact you want.
- Press on the remote to select the contact.
- (Optional) Repeat steps 4 and 5 to select other recipients for the message.
- Select send message
Delete a message
You can delete a message either on your TV or on the umi Connect website (see Delete a message in the umi Connect website chapter). If you delete a message in one location, the message is deleted in the other location automatically.
- On the clover, select
- Messages are listed by date and time sent, with the most recent at the top. Each message entry shows the sender. Press or on the remote to highlight the message you want. If you have multiple messages from the same sender, each one is listed separately.
- Select delete.
- Select delete message to confirm.
7 My videos
In profile settings, you can record a personal video greeting that callers see if they try to call you but you can't take the umi call (see Record or delete your personal video greeting). You can also use the umi camera to record videos anytime you want, and share those videos with other umi members.
Capture the kids on camera for the grandparents, or record a special message for a friend's birthday.
Highlights
- Record, review, and re-record videos to capture the experience exactly as you want
View videos you recorded on your TV screen, or view them on your computer when you're on the go
Share videos with friends and family
Table of contents
Record a video 53
View your videos 54
Send a video 55
Delete a video 56
Record a video
During video recording, it's easy to review your video and re-record if needed, so you can create exactly the video you want.
- On the clover, select
- Select record video.
- After the three-second onscreen countdown ends, begin recording your message.
-
When you have finished your message, select stop recording
-
On the clover, select one of the following:
■ review: See and hear your video before saving or discarding it.
■ record again: If you are unhappy with the video, select this option and repeat steps 3 and 4.
- adjust camera: Before recording your video again, you can adjust the camera to change the area shown in the video (see Adjust the camera).
- don't save: If you don't want to save the video at all, select this option to cancel video recording completely.
save: Select this option when you are happy with your video. Then select done.
View your videos
After you use umi to record a video (see Record a video), you can view your videos either on your TV or on the umi Connect website (see View a video in the umi Connect website chapter).
Videos you record are different from video messages other users leave for you or send to you directly. For information on viewing videos and messages sent to you, see View your messages.
- On the clover, select
- Select my videos.
- Press or on the remote to highlight the video you want.
-
Press to play the video.
-
While the video is playing, do any of the following:
-
To fast-forward through the message: Press ⑥ on the remote.
To rewind the message: Press on the remote.
To quit the video: Press OK on the remote. -
When you have finished viewing the video, select done.
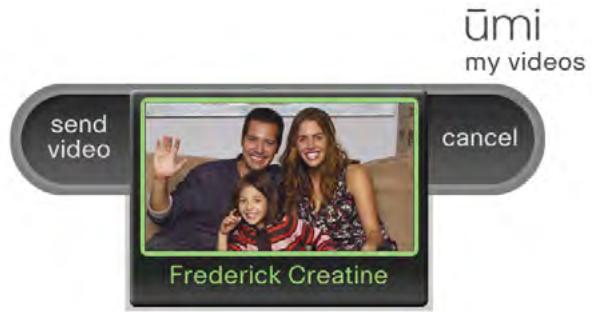
Send a video
You can send a video to any of your umi contacts. You can send the same video to multiple contacts at the same time.
You can also share a video from the umi Connect website (see Share a video in the umi Connect website chapter). If you use the website, you have the option to share the video with one or more umi contacts, send the video via email, or upload the video to Facebook or YouTube.
If you send a video to someone who accepts umi calls from contacts only, and you are not on the person's contacts list, the video is not sent.
- On the clover, select
- Select my videos.
- Press or on the remote to highlight the video you want.
- Select send. Your contact list opens.
- Press or on the remote to highlight the contact you want.
- Press on the remote to select the contact.
- (Optional) Repeat steps 5 and 6 to select other recipients for the video.
- Select send video.
Delete a video
You can delete a video either on your TV or on the umi Connect website (see Delete a video in the umi Connect website chapter). If you delete a video in one location, the video is deleted in the other location automatically.
- On the clover, select
- Select my videos.
- Press or on the remote to highlight the video you want.
- Select delete.
- Select delete to confirm.
8 Settings
Customize umi settings to create the umi experience that works best for you. Settings are grouped into three broad categories: profile, which includes your profile photo and personal video greeting; privacy, which enables you to control access to the console and who can call you; and console, which includes functional items such as network settings.
Highlights
- Update your profile photo and video greeting any time you are ready for a change
Use privacy settings to help ensure the umi experience you want - Access console settings to update network and other device-related information
Table of contents
Profile settings 57
Privacy settings 62
Console settings 64
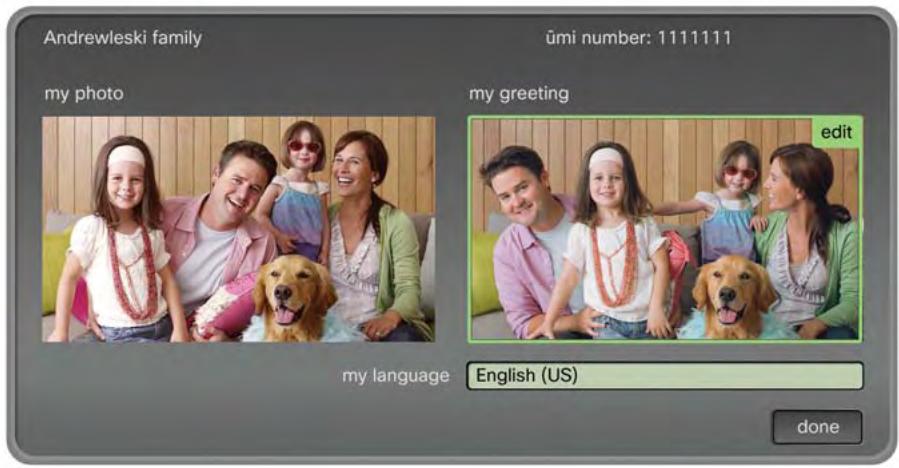
Profile settings
Your profile settings include the umi items that pertain directly to you: your profile photo, your personal video greeting, and your language. It takes only a few remote button presses to update any of these options.
Change or delete your profile photo
Don't like your profile photo, or just ready for a new one? It's easy to update your photo. When you do so, your photo is automatically updated in your family and friends' contact lists.

Follow these steps if you skipped taking a profile photo during setup, and now want to create one.
- On the clover, select
- Select my settings.
- Select profile.
4. Select my photo
umi
my settings

5. Do one of the following:
ūmi
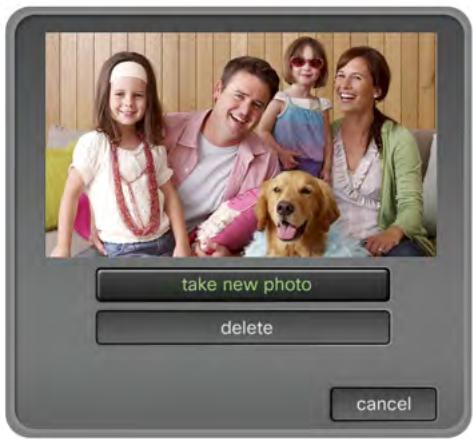
To take a new photo: Select take new photo. Continue with step 6.
To delete your current photo without taking a new one: Select delete.
To keep your current photo: Select cancel.
- (Optional) To adjust the camera to capture a different area of the room, select adjust camera (see Adjust the camera).
-
Select take photo.
-
The photo is displayed on the screen. Do one of the following:.
To save the photo: Select save
To retake the photo: Select retake photo and repeat steps 6 and 7.
- On the profile settings screen, select done.
Record or delete your personal video greeting
You can record a personalized video greeting that plays if someone calls you and you can't take the umi call. During video recording, you have the chance to review, adjust the camera, and record again—so you can create exactly the message you want others to see.
Also follow these steps if you want to replace your current video greeting with a new one.
- On the clover, select
- Select my settings.
- Select profile.
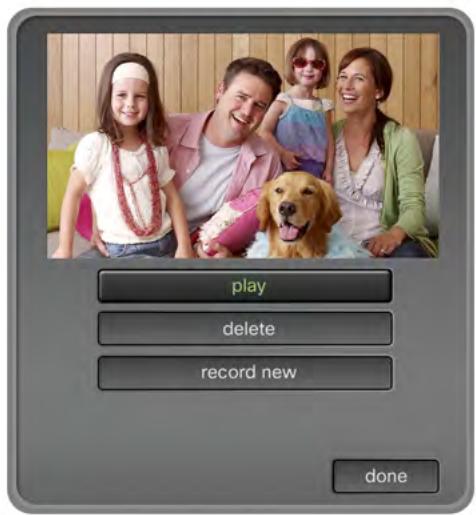
- Select my greeting
umi
- Do one of the following:
umi
To play your current greeting: Select play.
To delete your current greeting without recording a new one: Select delete
To record a new greeting: Select record new and continue with step 6.
To keep your current greeting: Select done.
- After the three-second onscreen countdown ends, begin recording your message.
- When you have finished your message, select stop recording.
- On the clover, select one of the following:
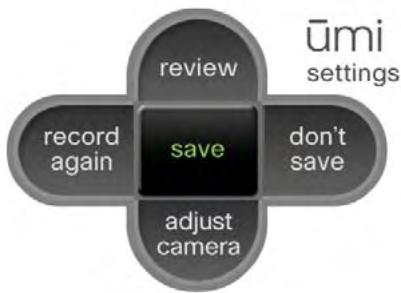
■ review: See and hear your greeting before saving.
■ record again: If you are unhappy with the greeting, select this option and repeat steps 6 and 7.
- adjust camera: Before recording your greeting again, you can adjust the camera to change the area shown in the greeting (see Adjust the camera).
-
don't save: If you don't want to record a new greeting after all, select this option to cancel greeting recording completely.
save: Select this option when you are happy with your greeting. -
On the profile settings screen, select done.
Change your language
The language you select here is used for all onscreen text. You can also change your onscreen display language on the umi Connect website (see Edit your display settings in the umi Connect website chapter).
- On the clover, select
- Select my settings.
- Select profile.
- Select my language
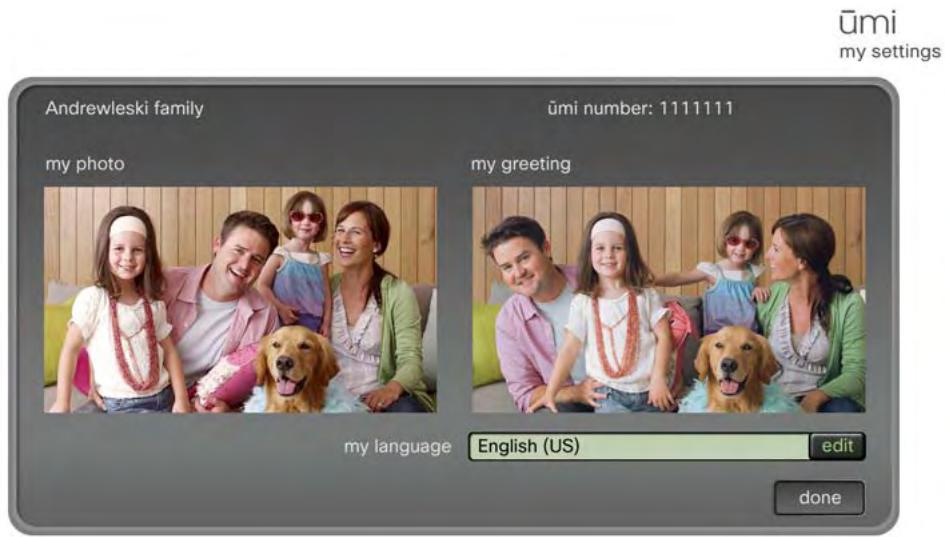
- Press or on the remote to highlight the language you want.
- Press to select the language.
- On the profile settings screen, select done.
Privacy settings
Privacy settings let you customize the umi experience to connect how and with whom you choose. You can limit incoming umi calls to contacts, set a system lock code so no one can access your home umi without your permission, and block people to prevent communication from them.
Set permissions for incoming ümi calls
You can choose to accept incoming umi calls from anyone, or from people on your contacts list only. If you accept umi calls from contacts only and someone who is not a contact tries to call you, you receive a friend request asking if you want to add the person as a contact (see Respond to a friend request).
You can also set permissions for incoming umi calls on the umi Connect website (see Set permissions for incoming umi calls in the umi Connect website chapter).
- On the clover, select
- Select my settings
- Select privacy
- Select allow incoming calls from anyone or only allow incoming calls from my contacts.
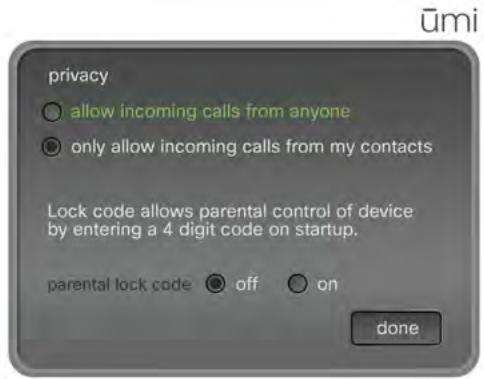
- Select done.
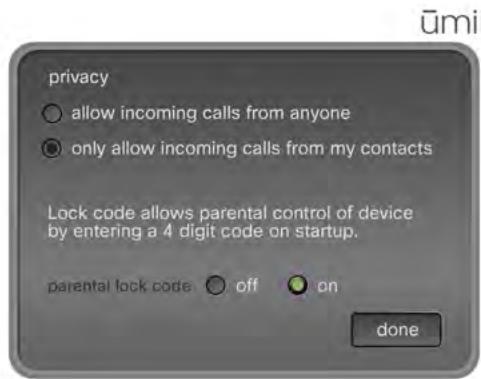
Turn parental lock code on/off
If you turn parental lock code on, the umi system locks when you're not using it. To unlock the system, you must enter a four-digit code to use umi.
You can also turn parental lock code on and off on the umi Connect website (see Turn parental lock code on/off in the umi Connect website chapter).
- On the clover, select
- Select my settings.
- Select privacy
- Next to parental lock code, select on.
- Use the onscreen keypad to enter a four-digit lock code of your own choosing (see Use the onscreen keypad).
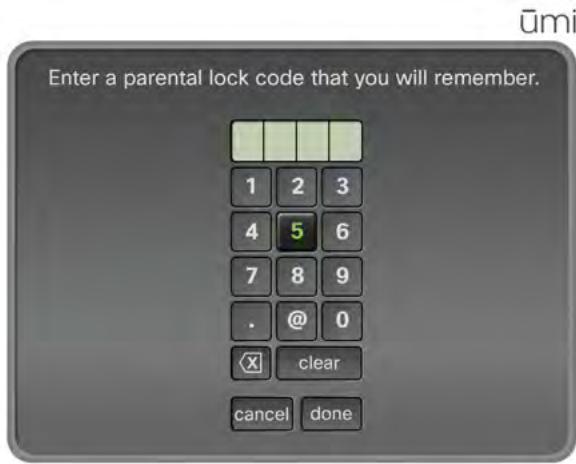
- Select done on the parental lock code screen, and then select done on the privacy settings screen.
Console settings
Use console settings to update your network settings if you make any changes to your network. Console settings also let you recheck the camera and microphone and synchronize contacts, messages, and videos between your TV and the web.
Change your network settings: Ethernet connection
If you connect umi to your broadband network using an Ethernet cable, update the settings here if you make any changes to the network—for example, if you change the network IP address. Also use these settings if you switch from a wireless network connection to an Ethernet cable connection.
- On the clover, select
- Select console settings
- Select network.
- Select change settings.
- Select use ethernet.
-
Do one of the following:
-
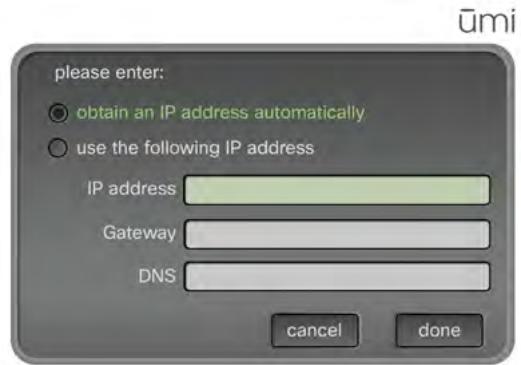
To have umi detect your IP address automatically, select obtain an IP address automatically.
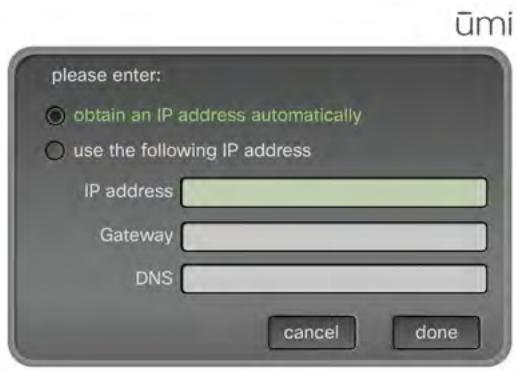
- To use a specific IP address, select use the following IP address. Use the onscreen keyboard to enter your IP address, gateway, and DNS server name (see Use the onscreen keyboard). When finished, select done.
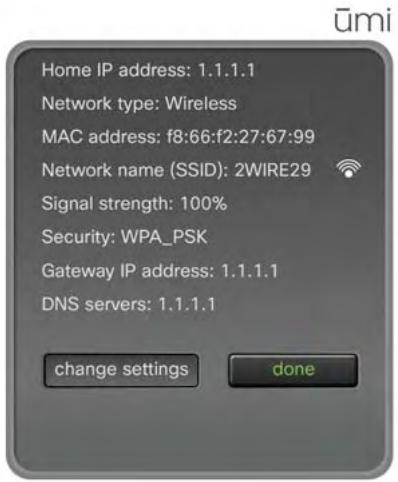
Change your network settings: Wireless network connection
If you connect umi to your broadband network wirelessly, update the settings here if you make any changes to the network-for example, if you change the network name. Also use these settings if you switch from an Ethernet cable network connection to a wireless network connection.
- On the clover, select
- Select console settings
- Select network.
- Select change settings.
- Select choose wifi.

Make sure your router is set to broadcast your network name (SSID). Otherwise, umi cannot detect the network
-
Press or on the remote to highlight your network.
-
Press to select your network.
- If the following screen appears, use the onscreen keyboard to enter your network name (SSID) and, if required, your wireless password (see Use the onscreen keyboard). When finished, select done.
- If the following screen appears, use the onscreen keyboard to enter your IP address, gateway, and DNS server name (see Use the onscreen keyboard). When finished, select done.
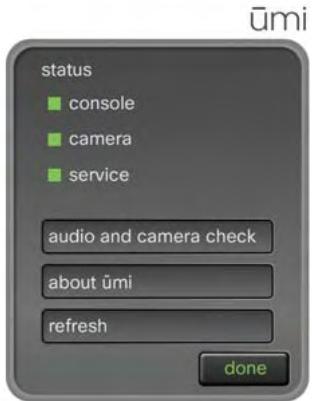
Recheck speaker, microphone, and camera settings
If you move the camera after initial setup—for example, if you take it off the top of your TV and place it on a table or wall—you should recheck the camera, microphone, and speaker settings to ensure the best umi experience. You should also recheck these settings if you change TVs or switch your system setup to run your TV service through the umi console so you can use umi and watch TV at the same time.
- Make sure your system volume (from the TV or other speakers) is set to a comfortable level.
- On the clover, select
- Select console settings
- Select general.
- Select audio and camera check.
- Select run check. The check takes place automatically, so you don't need to do anything.
Synchronize contacts, messages, and videos between your TV and the web
If you notice that your umi contacts, messages, and/or videos on your TV do not match those on the umi Connect website, you can refresh web settings to bring the items in sync in both locations.
- On the clover, select
- Select console settings
- Select general
- Select refresh.
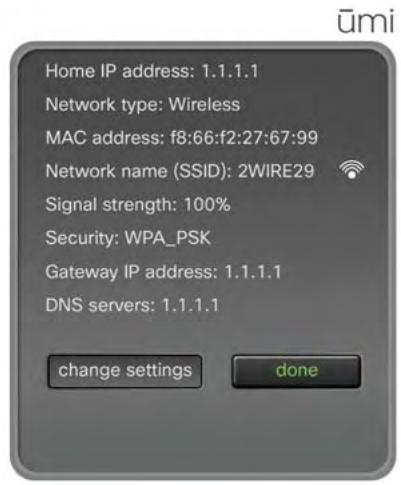
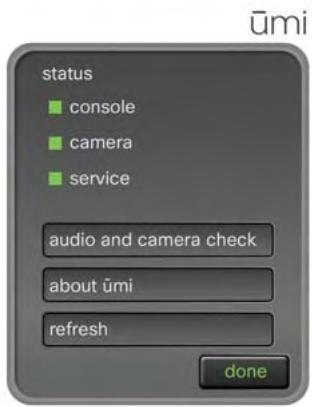
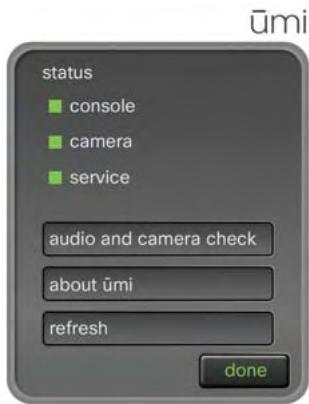
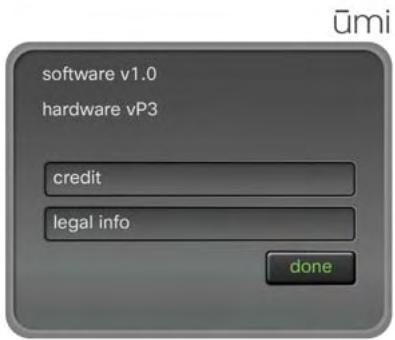
View system information
You can see the current hardware version, software version, and serial number for your console, as well as other information about your system. This information may be useful if you need to contact customer service.
- On the clover, select
- Select console settings.
- Select general. The top of the general settings screen shows the status for your console, camera, and umi service. A green box indicates that the item is working normally. If you see a red box, contact customer service for information.
- Select about umi. Select credits or legal info to view more detailed information.
- Select done.
9 umi Connect website
When you're not at your TV, the umi Connect website lets you access many umi features from your computer. You can check messages, manage contacts, change account settings, and more.
Highlights
- Check umi messages, record and share videos, and more when you are away from your TV
- Add contacts on the web and have them appear automatically in contacts on your TV
- Use web-only features such as downloading videos to your computer, uploading videos to Facebook or YouTube, and importing your Google video chat contacts
Table of contents
Log in to the website 69
Check your messages 70
Manage your videos 74
Work with your umi call history 78
Manage your contacts 81
Edit your account settings 85
Edit your notification settings 89
Edit your display settings 92
Edit your privacy settings 93
Log in to the website
To use any of the features of the umi Connect website, you first need to log in.

If you have not yet set up a umi account on the web, see Create your account online for instructions.
- Go to www.umiconnect.com.
CISCO
umi
umi Connect
Welcome to Umi Connect. Here you can manage your umi account, view umi video messages, or share umi videos with friends and family. To get started, new umi customers will need to create an account and activate a service plan.
Sign up
Get to know umi telepresence
Click the link below to discover how umi telepresence creates new and unique ways for you to be together with friends and family.
Explore umi
Explore umi umi Support
Log in to umi Connect
Email or umi number
Password
Log in
□ Remember me
Forgot your password?
- On the right navigation panel, enter the email address and password you entered during online account setup. You can enter your home umi number instead of the email address.
- If you do not want to enter your login information each time you visit the website, check the Remember me box.
- Click Log in.
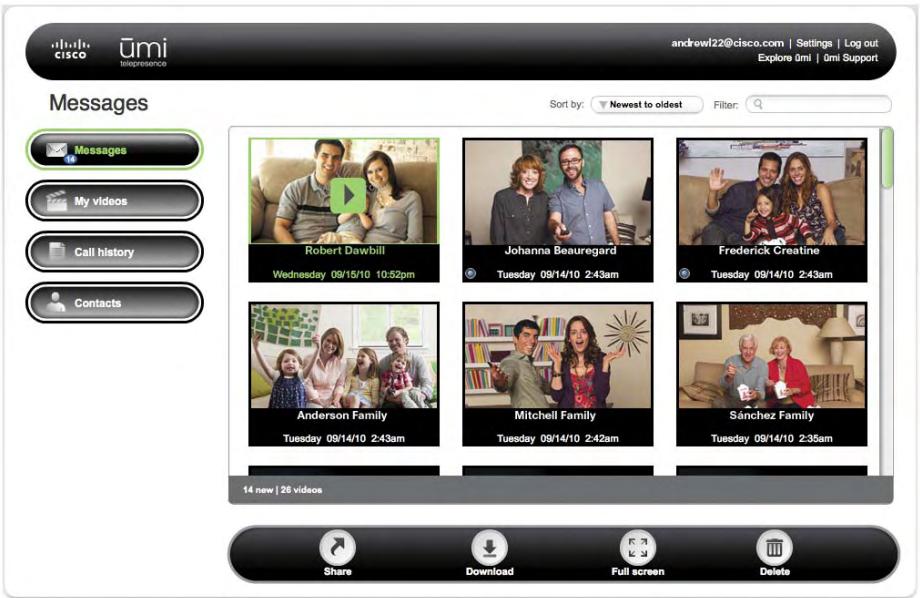
Check your messages
You can view messages either on the umi Connect website or on your TV (see View your messages in the Messages chapter). You can view two types of messages: video messages left when someone called you but you were unavailable, and videos sent directly from another member (for example, a video your sister made of her kids). Both items appear in the Messages section on your TV and on the umi Connect website.
Sort the message display
You can sort your messages from newest to oldest, or oldest to newest.
- Log in to the umi Connect website (see Log in to the website).
- On the left navigation panel, click Messages.
- In the Sort by box at the top of the screen select the Newest to oldest or Oldest to newest.
Filter the message display
You can enter a search term, and then display only messages that contain that term in the title or description.
- Log in to the umi Connect website (see Log in to the website).
- On the left navigation panel, click Messages

- In the Filter box at the top of the screen, enter the search term you want to filter by.
- Press Enter on your computer keyboard.
To return to the full message list, delete the search term you entered in the Filter box, and press Enter on your computer keyboard.
View a message
- Log in to the umi Connect website (see Log in to the website).
- On the left navigation panel, click Messages.
- If you have more messages than can fit one on screen, scroll down to see more messages.
- Click the message you want to view to highlight it.
- Click on the message you want to play.
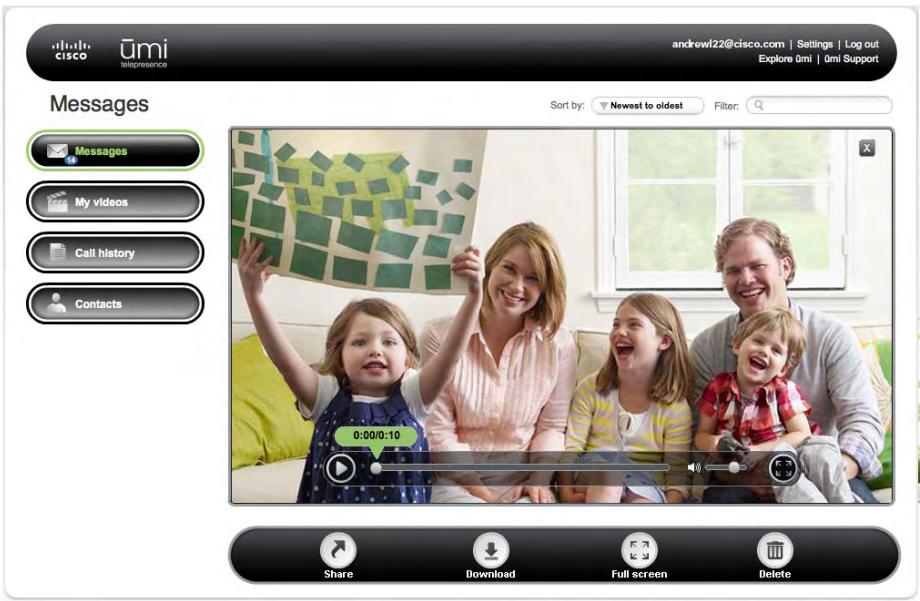
-
During playback, do any of the following:
-
To pause playback: Click
- To resume playback: Click
- To move forward or backward through the message: Drag the playback slider right or left.
- To adjust the volume: Drag the volume slider right or left.
- To view the message full-screen: Click Full screen
To quit the video and return to the message list: Click X in the upper-right corner of the video screen.
Share a video from your message list
If someone sends you a video directly, you can send the video from your message list to a umi number, an email address, or an online account such as Facebook or YouTube. You cannot share a video message left if someone tried to call you but you were not able to take the umi call.
- Log in to the umi Connect website (see Log in to the website).
- On the left navigation panel, click Messages
- Click the message you want to share to highlight it.
- Click Share
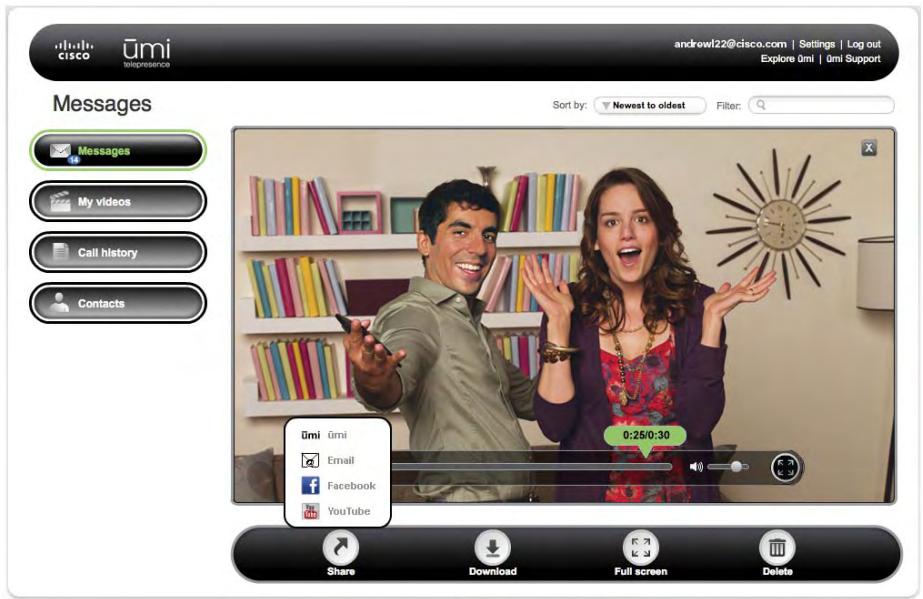
- Select the option you want to use to share the message:
To send to a umi number: Click umi umi. Enter the recipient's umi number, and click Send.
To send via email: Click Email. Enter the recipient's email address, a subject, and a message. Click Send.
- To upload to Facebook or YouTube: Click Facebook or YouTube. Log in to your account, and follow the onscreen instructions to upload the file.
Download a video from your message list
If someone sends you a video directly, you can download the video from your message list to your computer. You cannot download a video message left if someone tried to call you but you were not able to take the umi call.
- Log in to the umi Connect website (see Log in to the website).
- On the left navigation panel, click Messages.
- Click the message you want to download to highlight it.
- Click Download
- Browse to the location where you want to save the file.
- (Optional) Enter a new name for the file.
- Click Save.
Delete a message
You can delete a message either on the umi Connect website or on your TV (see Delete a message in the Messages chapter). If you delete a message in one location, the message is deleted in the other location automatically.
- Log in to the umi Connect website (see Log in to the website).
- On the left navigation panel, click Messages.
- Click the message you want to delete to highlight it.
- Click Delete
- Click Yes to confirm the deletion.
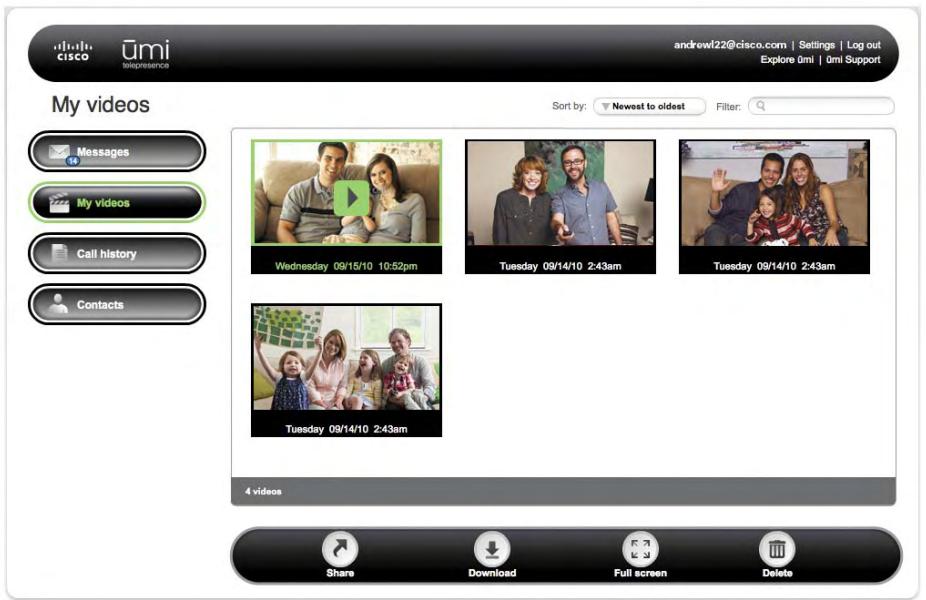
Manage your videos
You can view videos you record either on the umi Connect website or on your TV (see View your videos in the My Videos chapter).
Videos you record are different from video messages other users leave for you or send to you directly. For information on viewing videos and messages sent to you, see View your messages.
Sort the video display
You can sort your videos from newest to oldest, or oldest to newest.
- Log in to the umi Connect website (see Log in to the website).
2. On the left navigation panel, click My videos.
- In the Sort by box at the top of the screen, select Newest to oldest or Oldest to newest.
Filter the video display
You can enter a search term, and then display only videos that contain that term in the title or description.
- Log in to the umi Connect website (see Log in to the website).
- On the left navigation panel, click My videos
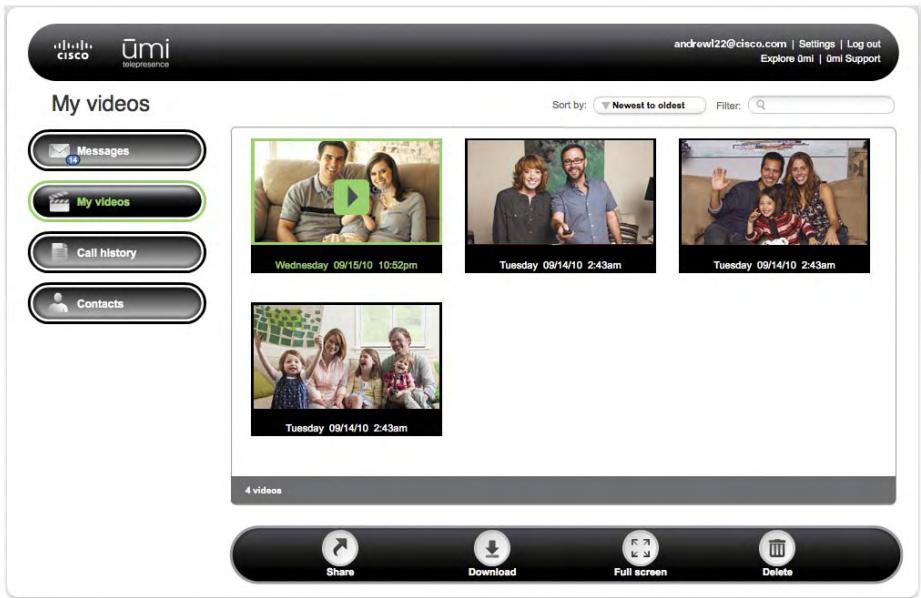
- In the Filter box at the top of the screen, enter the search term you want to filter by.
- Press Enter on your computer keyboard.
To return to the full video list, delete the search term you entered in the Filter box, and press Enter on your computer keyboard.
View a video
- Log in to the umi Connect website (see Log in to the website).
- On the left navigation panel, click My videos.
- If you have more videos than can fit one on screen, scroll down to see more videos.
- Click the video you want to view to highlight it.
- Click on the video you want to view.

-
During playback, do any of the following:
-
To pause playback: Click
To resume playback: Click - To move forward or backward through the video: Drag the playback slider right or left.
- To adjust the volume: Drag the volume slider right or left.
To view the video full-screen: Click Full screen - To quit the video and return to the video list: Click in the upper-right corner of the video screen.
Share a video
You can send any of your videos to a umi number, an email address, or an online account such as Facebook or YouTube. You can also share a video from your TV (see Send a video in the Videos chapter).
- Log in to the umi Connect website (see Log in to the website).
- On the left navigation panel, click My videos.
- Click the video you want to share to highlight it.
- Click Share
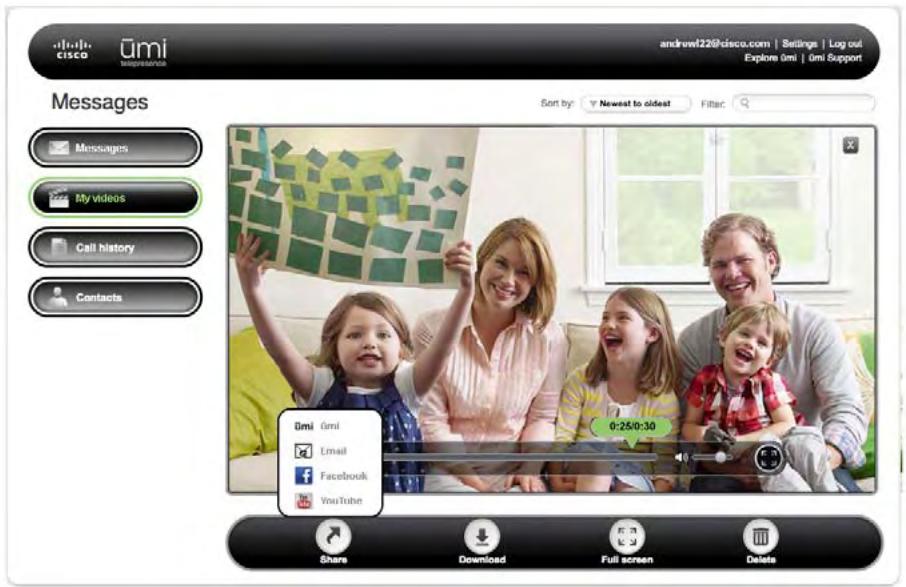
- Select the option you want to use to share the video:
To send to a umi number: Click umi umi. Enter the recipient's umi number, and click Send.
- To send via email: Click Email. Enter the recipient's email address, a subject, and a message. Click Send.
- To upload to Facebook or YouTube: Click Facebook or YouTube. Log in to your account, and follow the onscreen instructions to upload the file.
Download a video
You can download any video you recorded to your computer.
- Log in to the umi Connect website (see Log in to the website).
- On the left navigation panel, click My videos.
-
Click the video you want to download to highlight it.
-
Click Download

- Browse to the location where you want to save the video file.
- (Optional) Enter a new name for the file.
- Click Save.
Delete a video
You can delete a video either on the umi Connect website or on your TV (see View your videos in the My Videos chapter). If you delete a video in one location, the video is deleted in the other location automatically.
- Log in to the umi Connect website (see Log in to the website).
- On the left navigation panel, click My videos.
- Click the video you want to delete to highlight it.
- Click Delete
- Click Yes to confirm the deletion.
Work with your umi call history
Your umi call history is more than just a place to view incoming and outgoing umi calls. You can also add contacts and block callers directly from your umi call history.
View your umi calls
Your umi call history displays the type of umi call (incoming, outgoing, or missed); the umi call date and time; and the contact name and photo, if available.
- Log in to the umi Connect website (see Log in to the website).
- On the left navigation panel, click Call history.
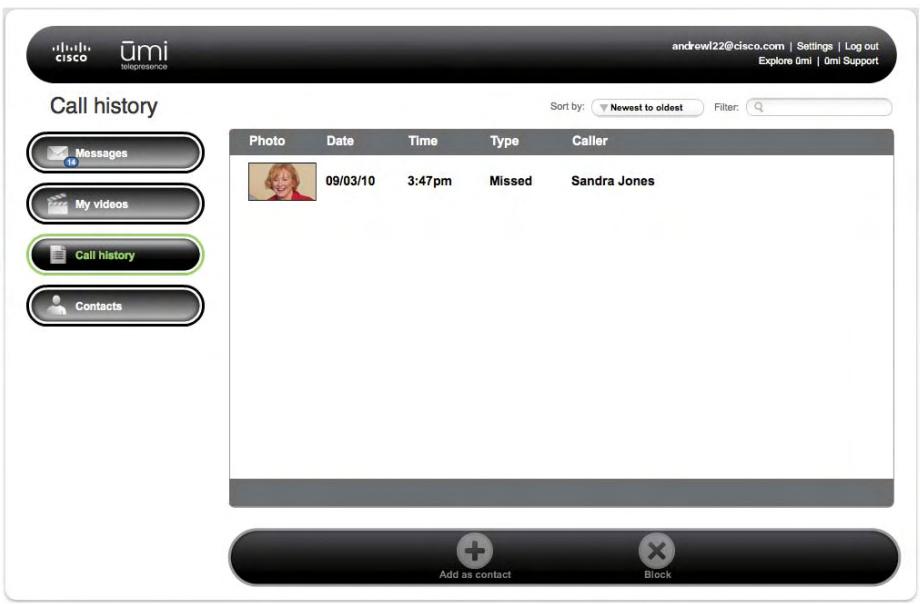
If someone calls you and leaves a video message, that call does not appear in your umi call history.
Sort the umi call history display
You can sort your umi call history entries from newest to oldest, or oldest to newest. You can also sort by call type (incoming, outgoing, missed) or by contact name.
- Log in to the umi Connect website (see Log in to the website).
- On the left navigation panel, click Call history.
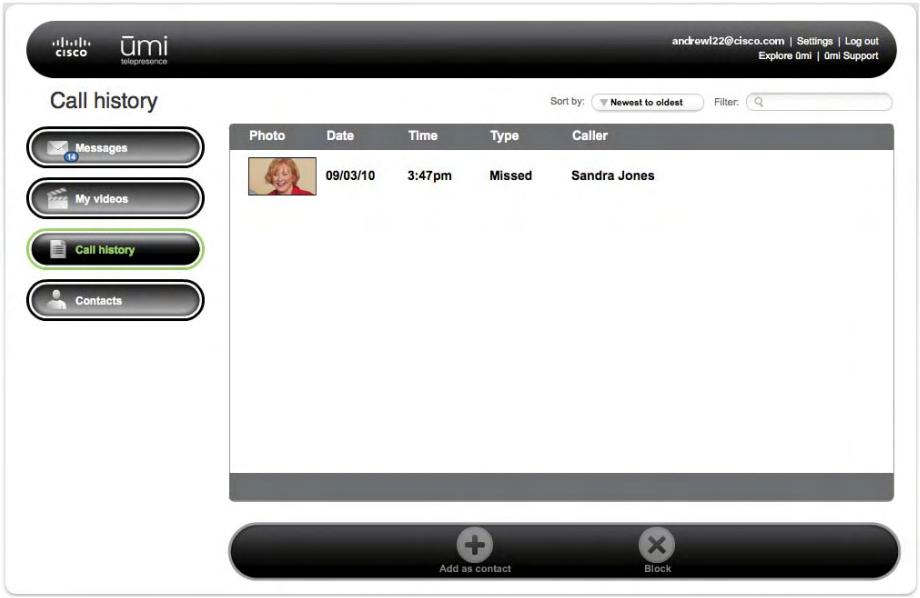
- In the Sort by box at the top of the screen, select Newest to oldest, Oldest to newest, Type, or Contact.
Filter the umi call history display
You can enter a search term, and then display only umi call history entries that contain that term.
- Log in to the umi Connect website (see Log in to the website).
- On the left navigation panel, click Call history.
- In the Filter box at the top of the screen, enter the search term you want to filter by.
- Press Enter on your computer keyboard.
To return to the full umi call history list, delete the search term you entered in the Filter box, and press Enter on your computer keyboard.
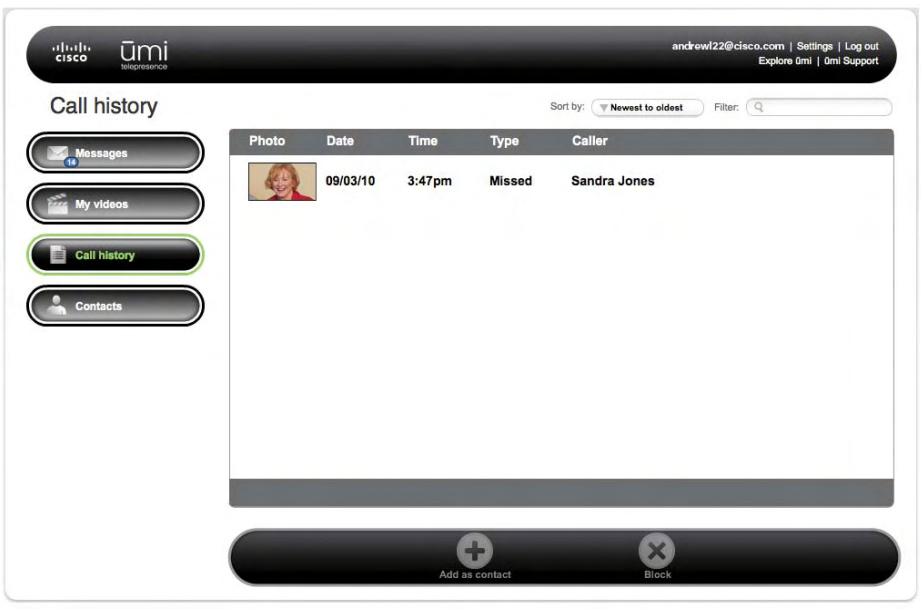
Add a contact from your umi call history
If you add a contact from your umi call history, it appears automatically in your contacts list on your TV.
- Log in to the umi Connect website (see Log in to the website).
-
On the left navigation panel, click Call history.
-
If you have more umi call history items than can fit one on screen, scroll down to see more items.
- Click the umi call history item you want to add to highlight it.
- Click Add as contact
- Click Yes to confirm.
- Enter the contact information (see Add a contact).
Block someone in your umi call history
If you do not want to receive umi calls, messages, or videos from someone who appears in your umi call history list, you can block the person to prevent future communication.
If you block someone in your umi call history list, you can unblock the person later (see Edit your blocked list).
- Log in to the umi Connect website (see Log in to the website).
- On the left navigation panel, click Call history.
- Click any umi call history item to or from the person you want to block to highlight it.
- Click Block
- Click Yes to confirm. To protect your privacy, the person you are blocking does not receive any type of notification.
Manage your contacts
You can view, add, edit, and delete contacts on the umi Connect website. You can also import contacts from video chat accounts such as Google video chat. Any changes you make here appear in your contacts list on your TV.
View a contact
-
Log in to the umi Connect website (see Log in to the website).
-
On the left navigation panel, click Contacts.
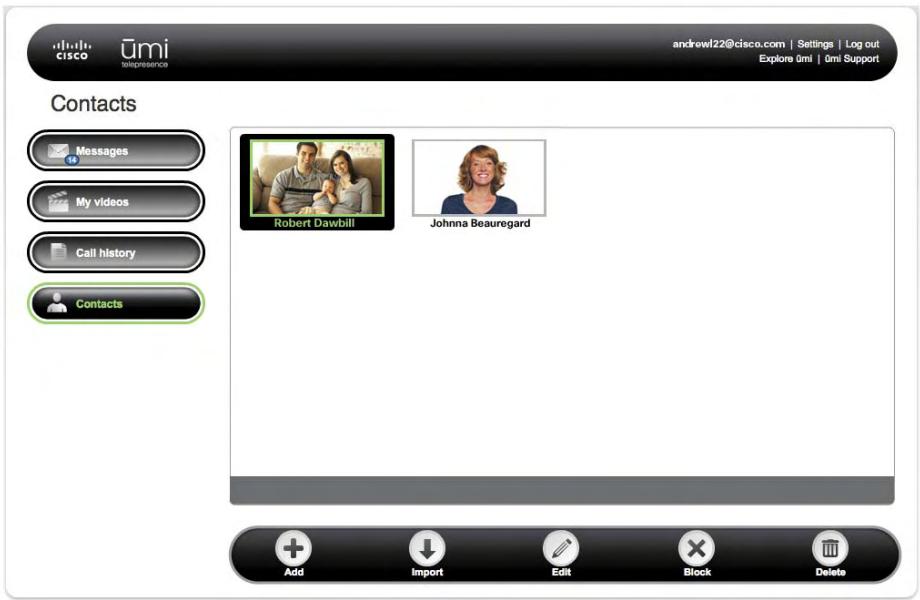
- Contacts are listed alphabetically. If you have more contacts than can fit one on screen, scroll down to see more contacts.
- Double-click the contact you want to view.
Add a contact
You can create new contacts on the umi Connect website or on your TV (see Create a new contact in the Contacts chapter). Contacts you create in either location appear automatically in the other.
- Log in to the umi Connect website (see Log in to the website).
- On the left navigation panel, click Contacts.
-
Click Add
-
Enter the contact information.
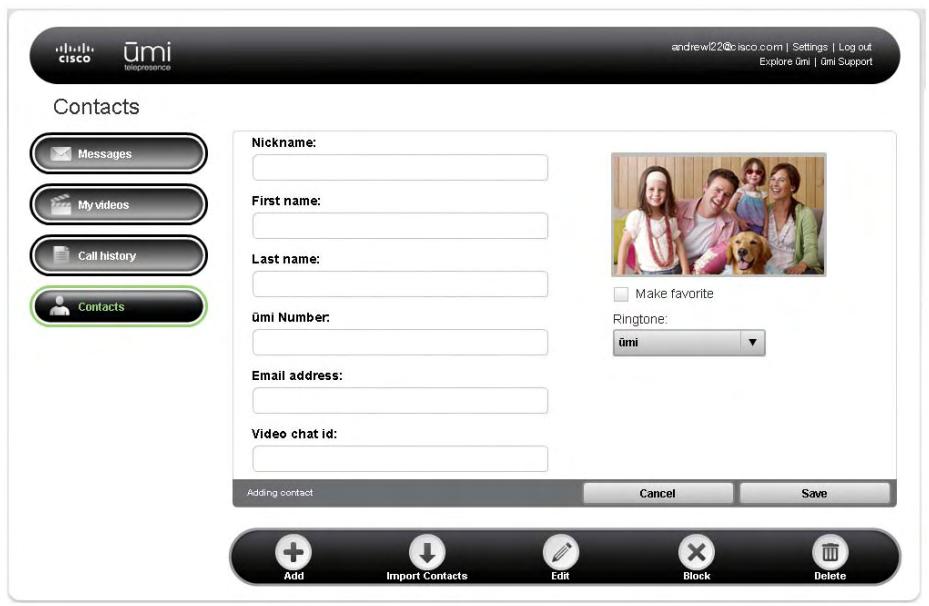
Here are some tips:
- The nickname you enter is the name that appears onscreen when you make a umi call to or receive a umi call from the contact.
If you enter an email address for a contact, when you send the contact a video, the person receives the video both through umi and through an email link (see Send a video and Share a video). - Check the Make favorite box to designate the contact as a favorite. When you open your call list, favorites appear at the top of the list.
- Use the Ringtone list to select a custom ringtone for incoming umi calls from this contact. This does not affect your default ringtone.
Import Google video chat contacts
If you have contacts in Google video chat account, you can import the contacts directly to your contacts list. Contacts you import appear in the contacts list on your TV automatically.
- Log in to the umi Connect website (see Log in to the website).
- On the left navigation panel, click Contacts.
-
Click Import
-
If prompted, enter your Google video chat ID and password. Click Log In.
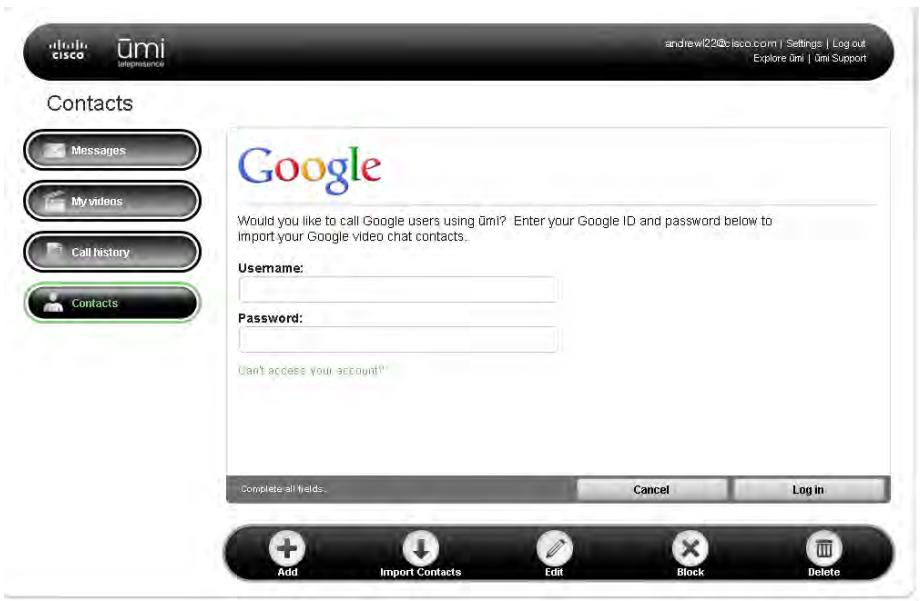
- Select the Google video chat contacts you want to import, and then click Import.
You cannot make umi calls between your home umi system and the Google video chat ID you enter here. So, for example, if you are traveling and want to call your home umi number using Google video chat, you cannot do so using the ID you enter here. Instead, you can create a second Google video chat account, enter the ID for that account as a contact in your first Google video chat account, and then add your ID from the first account as a contact in the second account. This enables you to use the second account to call your home umi.
Edit a contact
You can edit a contact's information either on the umi Connect website or on your TV (see Edit a contact in the Contacts chapter). If you edit a contact in one location, the updated information appears in the other location automatically.
- Log in to the umi Connect website (see Log in to the website).
- On the left navigation panel, click Contacts.
- Click the contact you want to edit to highlight it.
- Click Edit
- Edit the contact information. See Add a contact for tips on entering information.
Block a contact
If you do not want to receive umi calls, messages, or videos from someone who appears in your contacts list, you can block the person to prevent future communication.

If you block someone in your contacts list, you can unblock the person later (see Edit your blocked list).
- Log in to the umi Connect website (see Log in to the website).
- On the left navigation panel, click Contacts.
- Click the contact you want to block to highlight it.
- Click Block
- Click Yes to confirm. To protect your privacy, the person you are blocking does not receive any type of notification.
Delete a contact
You can delete a contact's information either on the umi Connect website or on your TV (see Edit a contact in the Contacts chapter). If you delete a contact in one location, the contact is deleted in the other location automatically.
- Log in to the umi Connect website (see Log in to the website).
- On the left navigation panel, click Contacts.
- Click the contact you want to delete to highlight it.
- Click Delete
- Click Yes to confirm the deletion.
Edit your account settings
When you created a umi account online, you entered account information including your name, address, email address and password, and billing information. You also selected a service plan. If you change any of this information, use the Accounts tab in the Settings section of the umi Connect website to enter the updated account details.
Edit your account information
Under Your account information, enter any changes to the name, address, email address, or password associated with your account.
- Log in to the umi Connect website (see Log in to the website).
- Click Settings at the top of the screen.
- Click the Account tab.
- Under Your account information, do either of the following:
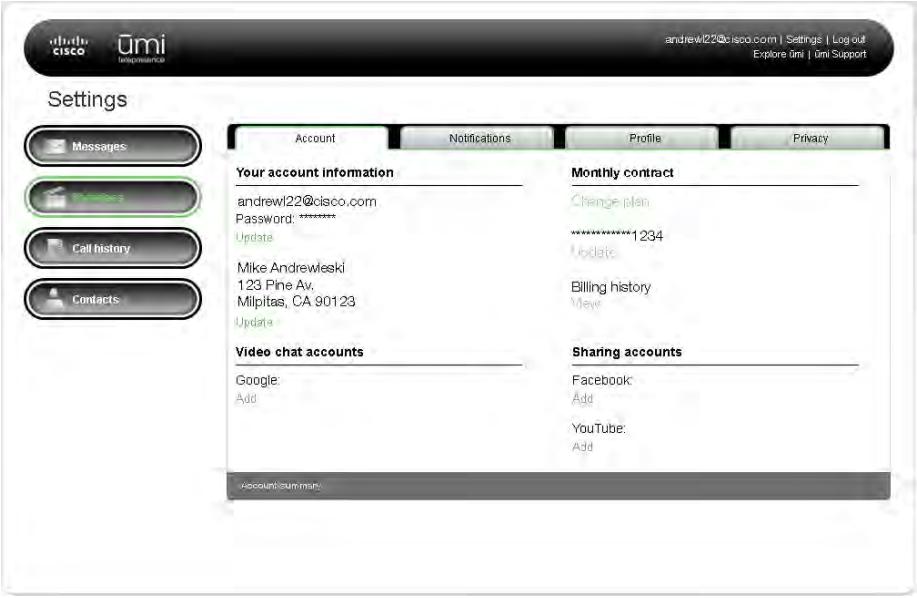
- To change your account username or password: Under the existing username and password, click Update. Enter the new information and click Save.
- To change the name or address associated with your account: Under the existing name and address, click Update. Enter the new information and click Save.

The address you enter here is the address where the umi console is located.
Edit your billing information
Under Billing, enter any changes to the credit card associated with your account, or choose a different payment method for your umi service plan.

If you purchased umi service from your broadband service provider, you should make any billing changes on the service provider's website, not on the umi Connect website.
- Log in to the umi Connect website (see Log in to the website).
- Click Settings at the top of the screen.
- Click the Account tab.
- Under Billing, do either of the following:
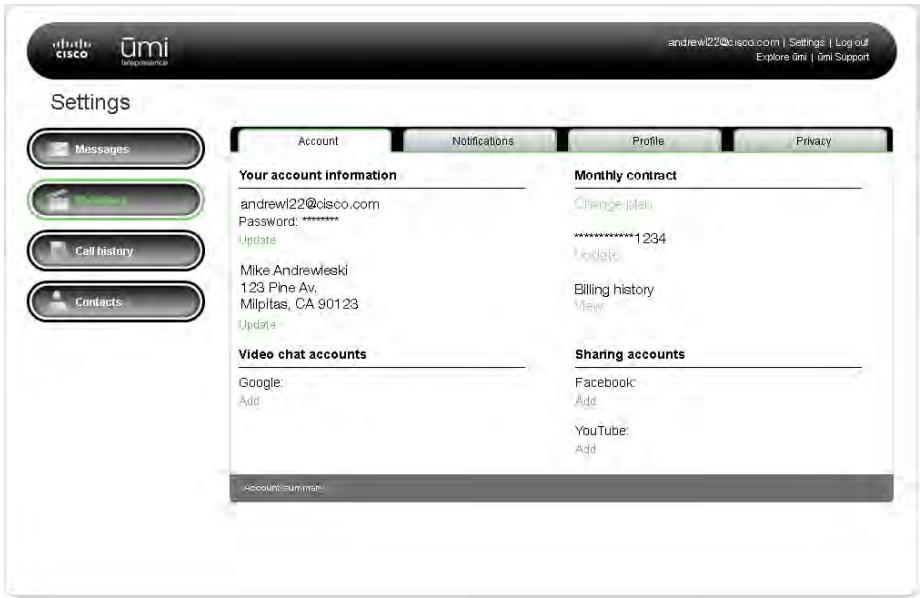
- To change your payment method: Under the existing plan, click Change plan. Select whether to pay for service on a monthly basis or to pay for a year of service in advance, and click Save.
To edit your credit card information: Under the existing credit card name, click Update. Enter the new information and click Save. - To view your billing history: Under Billing history, click View.
Edit your Google video chat account information
If you want to use umi to make and receive umi calls with people who are not umi members but who have a Google video chat account, you must also have an account with Google video chat. You enter your Google video chat ID and password when you import Google video chat contacts (see Import Google video chat contacts).
If you need to edit your Google video chat account ID or password, follow these steps.
- Log in to the umi Connect website (see Log in to the website).
- Click Settings at the top of the screen.
- Click the Account tab.
4. Under Video chat accounts, click Add.
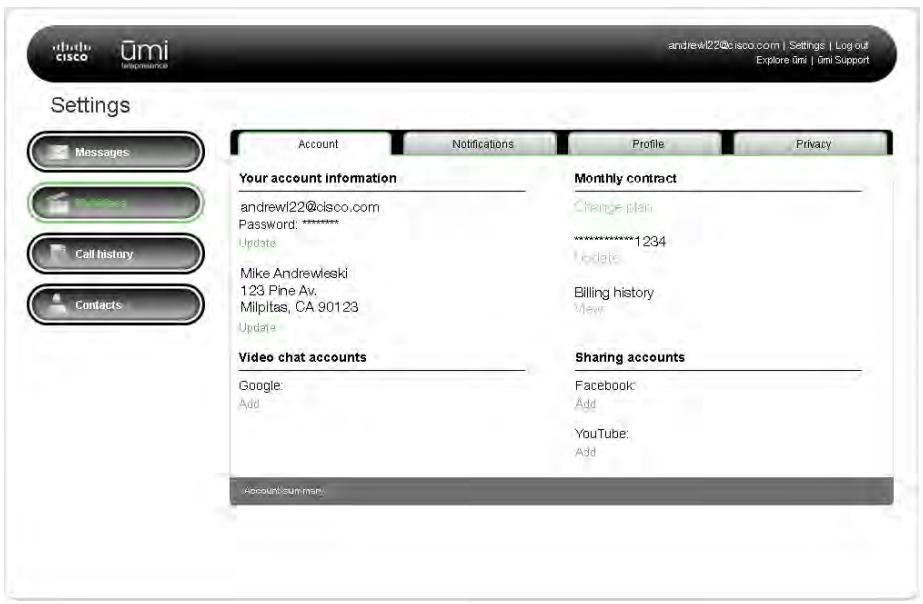
5. Enter your new Google video chat ID or password and click Log in.
Edit your Facebook or YouTube login information
The first time you upload a video to Facebook or YouTube (see Share a video), you are prompted to enter your Facebook or YouTube username and password. Anytime you upload a video after that, umi uses the information you entered to log in to Facebook or YouTube automatically. If you change your Facebook or YouTube username or password, enter the new information here so that umi can log you in correctly.
- Log in to the umi Connect website (see Log in to the website).
- Click Settings at the top of the screen.
-
Click the Account tab.
-
Under Sharing accounts, under Facebook or YouTube, click Add.
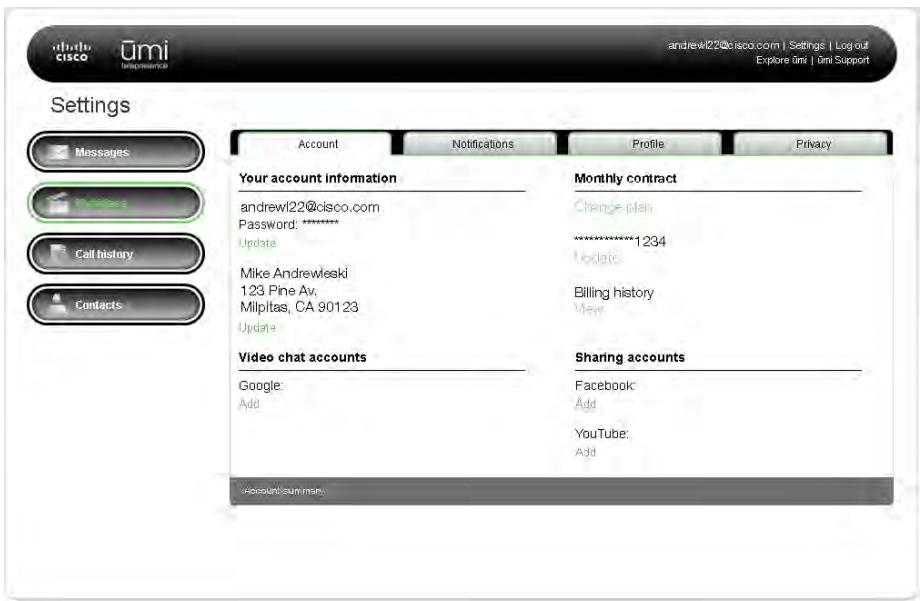
- Enter your new username and password and click Log in.
Edit your notification settings
Use the Notifications tab in the Settings section of the umi Connect website to customize when and how you receive notifications from umi.
Edit your notification types
Under Notify me, select or change when you want to receive notifications.
-
Log in to the umi Connect website (see Log in to the website).
-
Click Settings at the top of the screen.
- Click the Notifications tab.
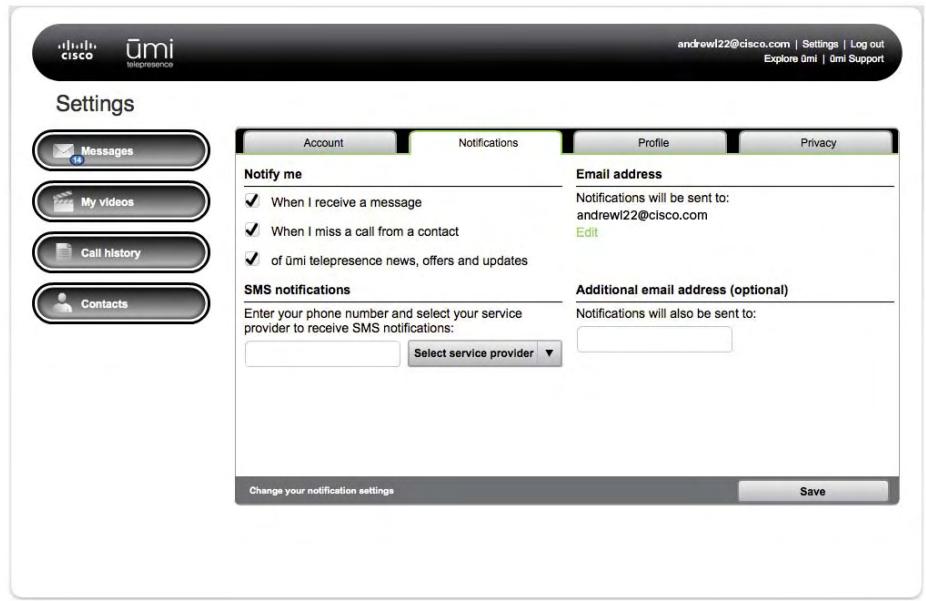
- Under Notify me, check the box next to each option for when you want to be notified: when someone sends you a message, when you miss a umi call from a contact, or when a umi offer or service update is available. You can select one, two, or all three options.
- Click Save.
Edit your SMS notification settings
You can receive umi notifications by text message, email message, or both. If you want to receive text message notifications, enter your mobile phone number here.
- Log in to the umi Connect website (see Log in to the website).
-
Click Settings at the top of the screen.
-
Click the Notifications tab.
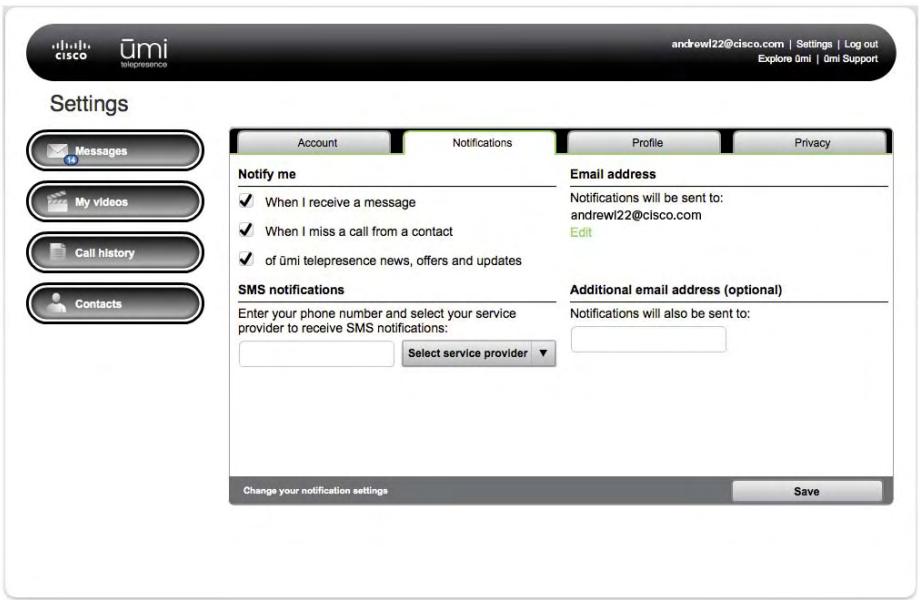
- Under SMS settings, enter the number where you want notifications sent.
- Click Select service provider, and then select the phone service provider for the number you entered.
- Click Save
Edit your email notification settings
By default, you always receive notifications at the email address you entered when you created your account. This is considered your primary email address. You can enter a different email address as your primary email address, and also enter a second address where you want to receive notifications.
- Log in to the umi Connect website (see Log in to the website).
- Click Settings at the top of the screen.
- Click the Notifications tab.
4. Do either of the following:

- To change the primary email address where you receive notifications: Under Email address, click Edit. Enter the new address and click Save.
- To add a second email address where you want to receive notifications: Under Additional email address (optional), enter the address.
5. Click Save.
Edit your display settings
You can change the language used for all text displayed when you use umi on your TV. You can also choose the time format and date format you want displayed on your TV screen, as well as your time zone.
You can also change the onscreen TV language on your TV (see Change your language in the Settings chapter).
- Log in to the umi Connect website (see Log in to the website).
- Click Settings at the top of the screen.
- Click the Profile tab.
4. Do any of the following:
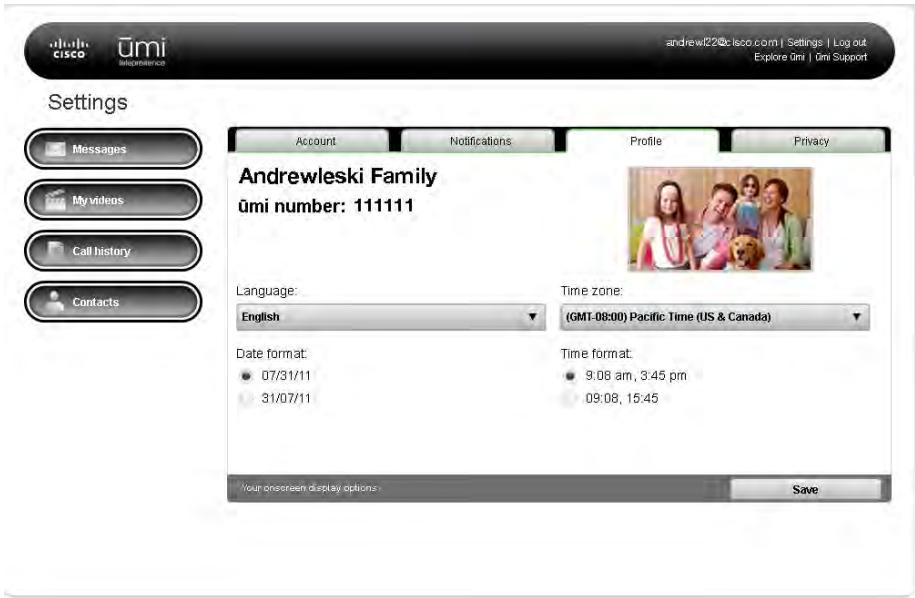
To change the display language: Under Language, select the language you want.
- To change the date display format: Under Date format, select the format you want.
To change the time zone: Under Time zone, select the time zone you want.
To change the time display format: Under Time format, select the format you want.
5. Click Save.
Edit your privacy settings
Privacy settings let you customize the umi experience to connect how and with whom you choose. You can limit incoming umi calls to contacts, set a system lock code so no one can access your home umi without your permission, and block people to prevent communication from them.
Set permissions for incoming ümi calls
You can choose to accept incoming umi calls from anyone, or from people on your contacts list only. If you accept umi calls from contacts only and someone who is not a contact tries to call you, you receive a friend request asking if you want to add the person as a contact (see Respond to a friend request).
You can also set permissions for incoming ümi calls on your TV (see Set permissions for incoming ümi calls in the Settings chapter).
- Log in to the umi Connect website (see Log in to the website).
- Click Settings at the top of the screen.
- Click the Privacy tab.
- Under Incoming calls and messages, select one of the following:
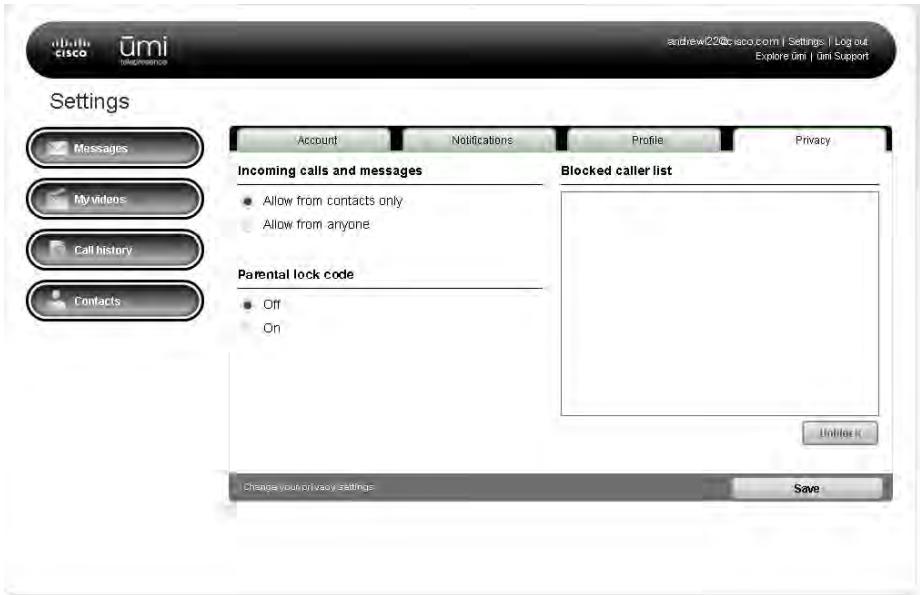
- Allow from contacts only: You can receive umi calls from contacts only. If someone not on your contacts list tries to call you, you receive a request asking you to add them as a contact (see Respond to a friend request).
- Allow from anyone: This lets you receive umi calls from callers whether or not they are on your contacts list.
5. Click Save.
To change your lock code, under PIN number, enter a new 4-digit code. Click Save.
Turn parental lock code on/off
If you turn parental lock code on, the umi system locks when you're not using it. To unlock the system, you must enter a four-digit code to use umi.
You can also turn parental lock code on or off on your TV (see Turn parental lock code on/off in the Settings chapter).
- Log in to the umi Connect website (see Log in to the website).
-
Click Settings at the top of the screen.
-
Click the Privacy tab.
- Under Parental lock code, select On or Off.
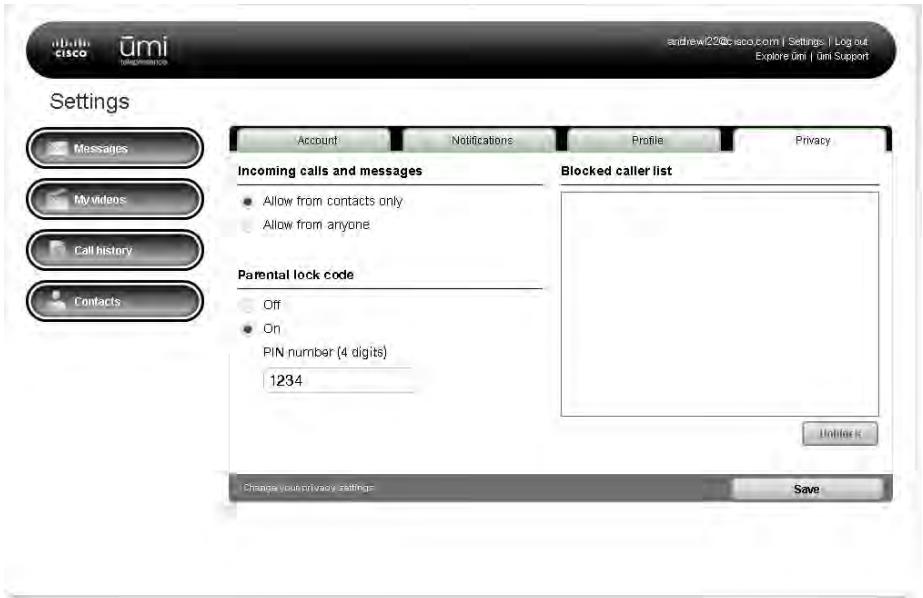
- If you turn parental lock code on, enter a four-digit lock code.
- Click Save.
Edit your blocked list
You can edit your blocked list to remove people you no longer want to block.
- Log in to the umi Connect website (see Log in to the website).
- Click Settings at the top of the screen.
-
Click the Privacy tab.
-
Under Blocked caller list, check the box next to any contact you want to unblock.

- Click Unblock.
- Click Save.
10 Advanced topics
With umi, you can customize your setup to work best with your room and home entertainment system. You have options for mounting the camera and connecting the console to your TV service and other components.
Highlights
- Set up the room to enjoy the best umi experience
- Place the camera on a table or mount it on a wall
- Connect the console to your cable set top box, AV receiver, DVR, Blu-Ray player, and other home entertainment system components
Table of contents
Alternate ways to mount the camera 97
Alternate ways to connect the console to your TV service £ 100
Tips for using umi with Google video chat 103
Alternate ways to mount the camera
If your TV size, shape, or placement does not allow you to mount the camera on top of the TV (see Mount the camera), you can place the camera on a table, or mount it on a wall.
Place the camera on a table
You can simply place the camera on any table or flat surface near your TV, as long as it is close enough to connect the camera, console, and TV cables.

If you use your TV's speakers and the speakers are on the front of the TV, you need to place the camera far enough from the TV so that the speaker audio does not interfere with the camera microphone. Otherwise, you will not be able to hear umi calls correctly.
After placing the camera, continue setup with Connect the camera to the umi console.
Mount the camera on a wall
If you can't place the camera on top of your TV-for example, your TV hangs on a wall-you can mount the camera on a wall above, next to, or below the TV.
- Fully extend the camera mount.

- Pull the tab forward. At the same time, push on the curve of the rail with your other thumb. This causes one half of the mount to slide out—use both thumbs to push and separate the two halves.
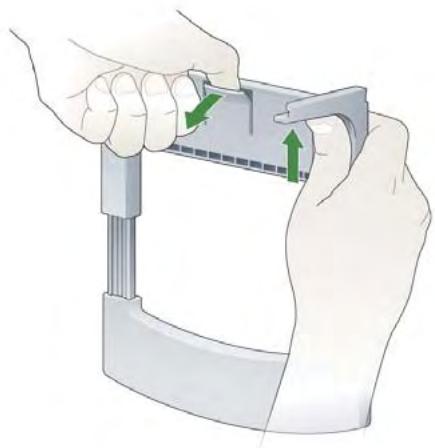
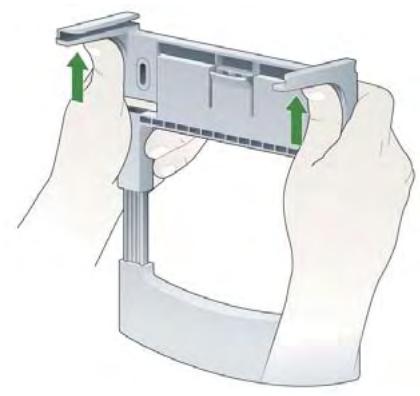
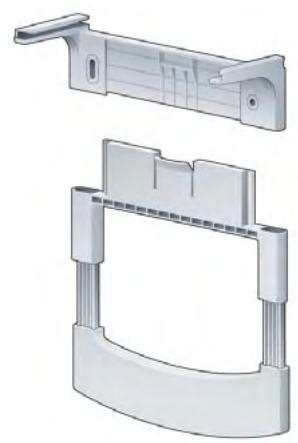
-
Attach the upper portion of the bracket to the wall in the desired location. Note the following:
-
Position the bracket so that the bracket rails are on the bottom, as shown below.
- Be sure to use the correct screws and anchors (sold separately) for your wall type.
- You must use anchors to ensure the camera is secured to the wall. We recommend metal anchors to guarantee the most secure mount.
- Use a level to make sure the bracket is level before you tighten the screws.
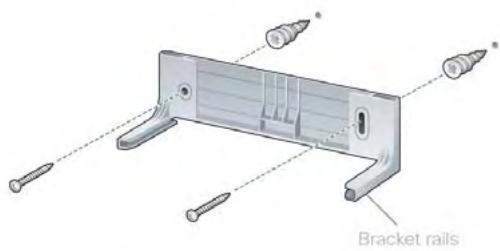
- Slide the camera onto the bracket rails.
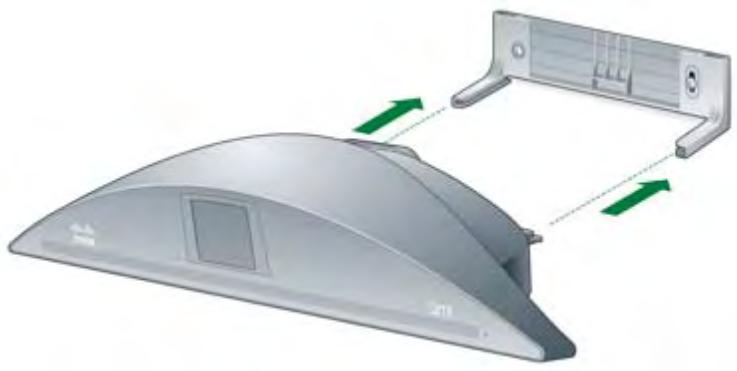
Alternate ways to connect the console to your TV service
Depending on your home entertainment system setup, you have several options for connecting to your TV. If the standard setup does not work with your system (see Connect the console to your TV), choose the option below that best fits your situation.
I want to use umi with my AV receiver, and I want to hear the sound through external speakers

This setup method works if you want to watch TV and use umi at the same time, without switching HDMI inputs.
Starting with your TV service set top box, be sure to connect the umi console, receiver, and TV in this order:
set top box umi console receiver TV
Note the following:
- Make sure your receiver is connected directly to your TV. If you connect your receiver to the console and then the console to the TV, you will not be able to hear umi call audio through your speakers.
- Make sure your TV speakers are off. On your receiver, select your set top box as the input. This ensures that you can see umi call video on your TV, and hear the audio through your external speakers.
If you have other devices such as a Blu-ray player or game controller, connect them to your receiver as you would normally.
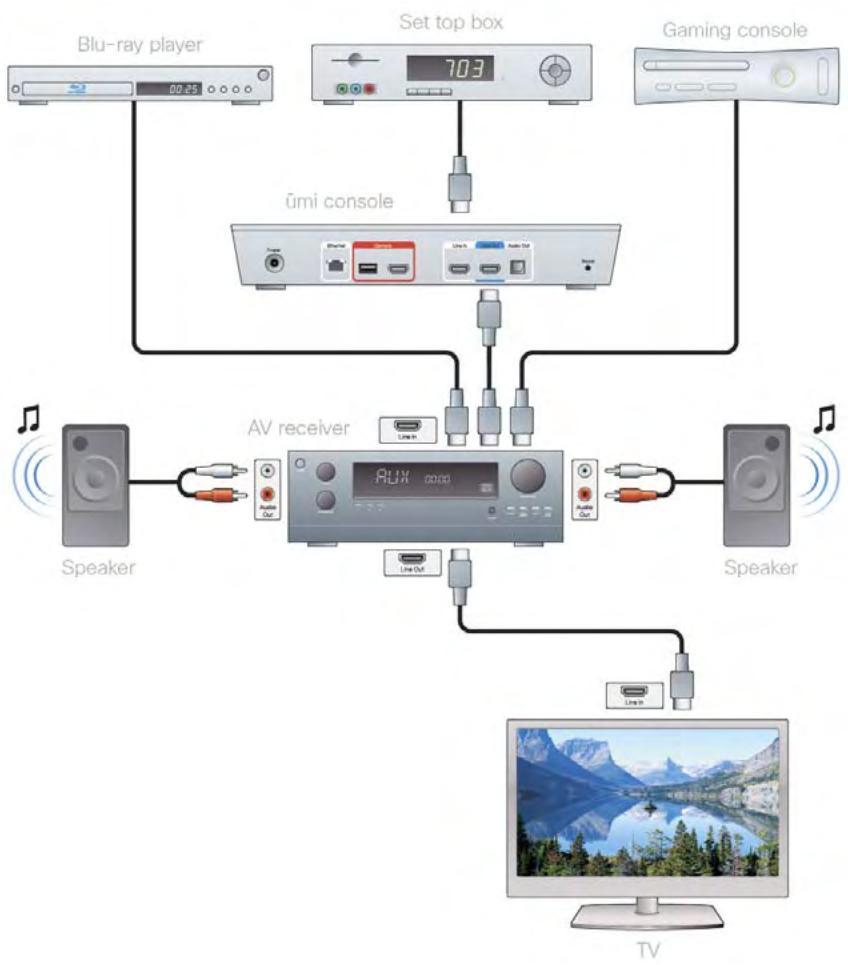
I want to use umi with my AV receiver and hear the sound through external speakers, but there’s no available HDMI input on the receiver

This setup method works if you want to watch TV and use umi at the same time, without switching HDMI inputs. For setups where you switch HDMI inputs to watch TV or use umi, follow the diagram shown below, but connect your set top box directly to your TV—not to the umi console.
Starting with your TV service set top box, be sure to connect the umi console, receiver, and TV in this order:
set top box umi console receiver (for audio)
TV (for video)
Note the following:
- Connect the umi console to your TV directly using the HDMI cable. Insert the cable into the HDMI Out port on your console, and into any available HDMI port on your TV.
- Connect the umi console to your receiver using an optical cable (sold separately). Insert the cable into the Audio Out port on your console, and into the optical port on your receiver.
- To view umi call video, you need to switch your TV to the HDMI source connected to your console.
To correctly hear umi call audio, you need to switch the audio source on your receiver to your console. Make sure your TV speakers are off.
If you have other devices such as a Blu-ray player or game controller, connect them to your receiver as you would normally.
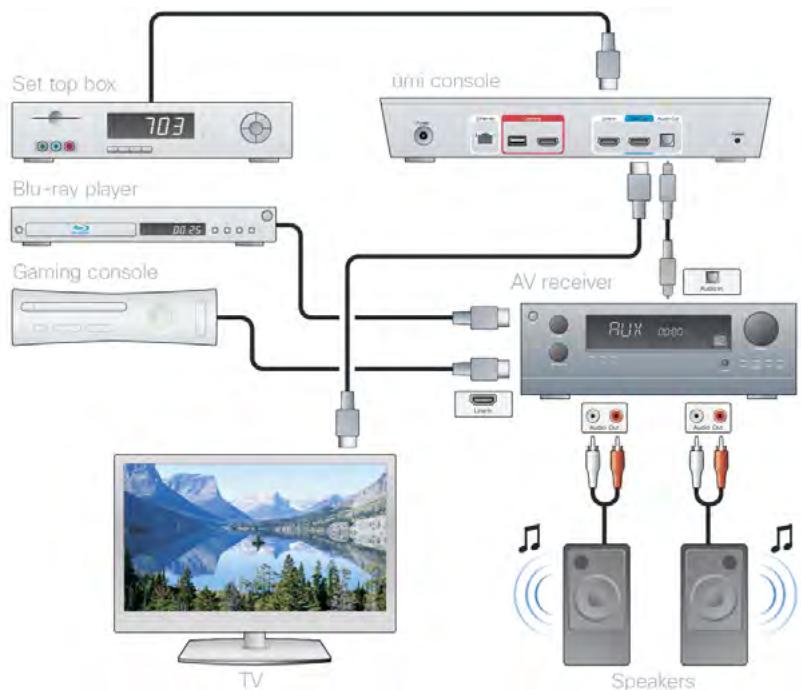
Tips for using umi with Google video chat
If you want to use umi to make calls to and receive calls from Google video chat contacts, keep the following tips in mind:
- You need to follow certain steps before you can make umi calls with Google video chat contacts (see Dial a Google video chat contact).
If you change your Google video chat account or update your account settings, you need to enter the new account information in umi (see Edit your Google video chat account information). - If you want to call your home umi number from Google video chat (for example, when you are traveling), you need to set up a second Google video chat account (see I am traveling out of town and am trying to use my Google video chat account to call my home umi. Why can't I make the call?).
To make a umi call to a Google video chat contact, the contact must be logged in to his or her Google video chat account.
If a Google video chat contact is calling you and want to take the call using umi, you must be logged out of Google video chat on your computer. Then the umi camera will ring when the call comes in. - Likewise, if you want to take a Google video chat call on your computer, you must be logged into your Google video chat account.
- To add a new Google video chat contact to umi, you must first add the contact in Google on your computer, and then import the contact into your umi contacts (see Import Google video chat contacts).
If you delete a Google video chat contact from umi, this does not delete the entry from your Google video chat contacts (see Delete a contact in the Contacts chapter or Delete a contact in the umi Connect website chapter). - If you block a Google video chat contact with umi, this blocks all communication with this contact through umi only. It does not block communication with the contact through Google video chat on the web (see Block a contact).
1 1 Troubleshooting
This chapter contains troubleshooting tips for some of the more commonly asked questions. If your issue isn't included here, please visit umisupport.com for assistance.
Table of contents
Cable connections 105
Call quality (audio/video) 106
Care and maintenance 106
Google video chat 107
My videos 108
Router connections 108
Settings 109
ūmi Connect website 109
Cable connections
The HDMI ports on our TV are all being used. Can we use an HDMI splitter to connect the console to the TV?
Instead of using a splitter, we recommend the following:
- Find the HDMI cable that goes from your TV service (set top box or other TV service component) into your TV.
- Disconnect that cable from your TV.
- Insert that cable into the HDMI In port on the back of the ümi console.
- Take the blue HDMI cable that came in the umi box and insert one end of the cable into the HDMI Out port on the back of the umi console.
- Insert the other end of the blue HDMI cable into the free HDMI port on your TV.
You can now use umi and watch TV at the same time.
The Ethernet cable isn't long enough to reach my router. What should I do?
You can purchase a longer Ethernet cable at an office supply or electronics store.
Call quality (audio/video)
I am hearing high-pitched feedback when I'm on a umi call. What should I do?
Try the following steps in sequence. You can stop when the problem is resolved.:
- Re-check the speaker and microphone settings (see Recheck speaker, microphone, and camera settings). Be sure your TV or external speakers are set at a comfortable listening level before running the check.
Try reducing your TV or speaker volume. The feedback may happen on certain TV models when the volume level is set high. - If reducing the volume does not eliminate the feedback, try moving the umi camera further away from your TV speakers and repeating the audio and camera check from Settings (see Recheck speaker, microphone, and camera settings). For example, try placing the camera on a table or surface to the side or in front of the TV so that the microphone on the camera is further away from the TV speakers.
- Finally, try connecting the console to a your home theater speakers through an AV receiver, using the optical audio port on the console (see I want to use umi with my AV receiver and hear the sound through external speakers, but there's no available HDMI input on the receiver).
Why does the quality of my umi calls seem to vary among calls occasionally?
Call quality can vary depending on the available network bandwidth, on both your network and the network of the other person on the call. During a umi call, the umi system automatically adapts to network conditions to ensure the best call quality.
Care and maintenance
How do I clean the console and the camera?
Use standard alcohol wipes for electronics equipment to clean the exterior of both the console and the chemical. Avoid harsh solvents or chemicals. Do not try to open any umi system component.
Google video chat
I am trying to call my Google video chat friend, but the call doesn't go through. What do I do?
First, make sure you have followed the requirements you need to make umi calls with Google video chat contacts. See Dial a Google video chat contact for details.
Then, for you to make a umi call to a Google video chat contact, the contact must be logged in to his or her Google video chat account.
My Google video chat friend is calling me, but umi doesn't ring. What do I do?
First, make sure you have followed the requirements you need to make umi calls with Google video chat contacts. See Dial a Google video chat contact for details.
Then, if a Google video chat contact is calling you and want to take the call using umi, you must be logged out of Google video chat on your computer. Then the umi camera will ring when the call comes in.
I am traveling out of town and am trying to use my Google video chat account to call my home umi. Why can't I make the call?
You cannot make umi calls between your home umi system and the Google video chat ID you enter for your umi account. So, for example, if you are traveling and want to call your home umi number using Google video chat on your computer, you cannot call the Google video chat ID you used to log in to Google video chat on your computer. Instead, you can create a second Google video chat account (such as umihome@gmail.com) that is different from the account you use on your computer (such as myname@gmail.com).
Then, log in to the first account (mname@gmail.com) on your computer, and add the second account (umihome@gmail.com) as a contact.
Finally, on your TV or on the umi Connect website, create a new contact, and enter the first account (mname@gmail.com) as the Google ID for that contact. When prompted to log in to Google, use the login information for the second account (umihome@gmail.com).
Note that the restriction on calling your home umi number from the Google video chat ID associated with your umi account is based on the Google video chat service.
My videos
Why am I unable to record a new video?
Your limit for recorded videos is 100 minutes. If you are at that limit, you need to delete one or more existing videos before you can record a new one (see Delete a video in the My videos chapter or Delete a video in the umi Connect website chapter).
Router connections
I connected umi to my new router using an Ethernet cable, but I can't connect to the Internet. What should I do?
Disconnect the umi console from the router, and see if you can access the Internet using the router. If so, connect the umi console to the router and try accessing the Internet again. If you cannot access the Internet using the router, please contact the router manufacturer for support—the Cisco umi team does not provide support for router issues.
I connected umi to an enterprise router from my company, but my umi calls have poor video quality. What should I do?
You cannot connect the umi console to the Internet directly through an enterprise router. Instead, you should use a standard router, and connect both the umi console and the enterprise router as shown in the following diagram:
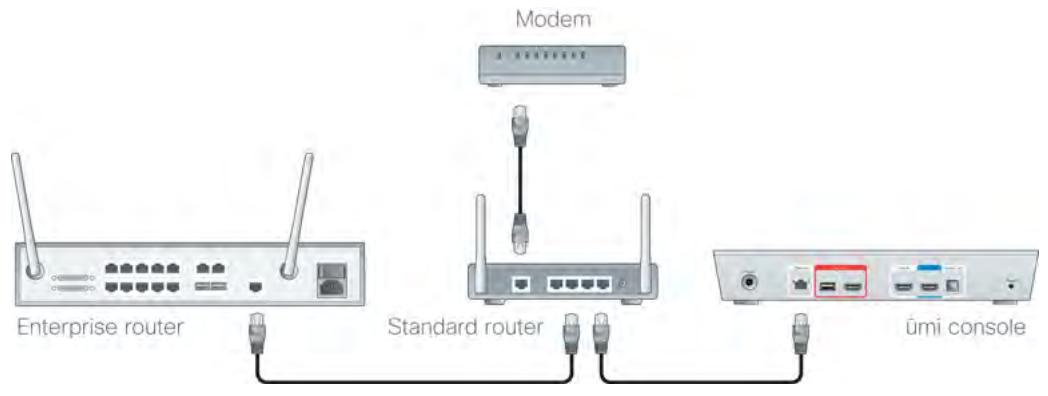
Settings
I forgot my four-digit parental lock code. What should I do?
Log in to www.umiconnect.com, click Settings, and then click the Privacy tab. Your parental lock code is displayed under PIN number.
I need to enter my IP address, gateway, and DNS. Where do I find this information?
This information is available through your router. Contact your router manufacturer for instructions on how to locate these settings.
ūmi Connect website
I forgot my umi Connect website password. What should I do?
Go to the website and click Forgot your password? on the login screen. After you enter the information requested, your will receive a password reset email. Click the link in the email to enter a new password.
12 Glossary
activation code
A code you receive when you create a umi account on the umi Connect website. You enter your activation code when you set up umi on your TV. See Create your account online.
block
To mark a person as someone from whom you do not want to receive umi calls, messages, or videos. When you block a person, that person cannot communicate with you through umi. You can unblock any person that you block. See Block a sender, Block someone in your umi call history, and Edit your blocked list.
Checkmark

A button on the remote. Press to select the item that is highlighted on your TV screen. See Get to know your remote.
clover
A menu that appears on your TV screen. The clover is your home base for accessing all umi features on your TV. The clover includes five options: Calls Contacts My videos Messages and Settings See Get to know the clover.
console
Along with the camera, the main component of the umi system. You connect the console to the camera and to your TV. See Connect the camera to the umi console and Connect the umi console to your TV.
favorite
A contact that appears at the top of your contacts list. If you have more than one favorite, they appear at the top of the list in alphabetical order, before the rest of your contacts. You designate a contact as a favorite when you create or edit the contact. See Create a new contact or Edit a contact.
friend request
A request to be added to another umi member's contact list. See Send a friend request or Respond to a friend request.
Home
A button on the remote. Press to display the clover if it is not displayed. See Get to know your remote.
member
A person who has a umi account and service plan.
menu
A grouping of options that appears for a feature when you select one of the five clover icons. Menu can appear in clover form or as a long bar. See Get to know the clover.
Messages
The umi TV feature and the section of the umi Connect website that contains messages sent to you both video messages left when someone called you but you were unavailable, and videos sent directly from another member. This is different from My videos, which contains videos you record. See Messages and the Check your messages section of the umi Connect website chapter.
My videos
The umi TV feature and the section of the umi Connect website that contains videos you recorded. This is different from Messages, which contains videos and messages sent to you. See My videos and the Manage your videos section of the umi Connect website chapter.
ⁿurname
The name you enter for a contact that appears when you display the contact's entry. This can be the same as or different from the contact's actual name. You enter a nickname when you create or edit a contact. See Create a new contact or Edit a contact.
profile photo
The photo other umi members see when you call them or when they look up your contact. You can take a profile photo during initial TV setup, and can retake the photo at any time. See Take a profile photo or Change or delete your profile photo.
self-view
A small window on your TV screen that lets you see how you appear to the person you are on a umi call with, so you can move around or adjust the camera as needed. If you want more of the screen available to see the other caller, you can hide the self-view window. See Hide/show self-view.
set top box
The component of your home entertainment system that connects your TV service (such as your cable) to your TV. See Connect the umi console to your TV.
system lock
A privacy setting you can turn on that requires a person to enter a four-digit code to use umi. See Turn parental lock code on/off.
umi Connect
The website where you sign up for a umi account, and where you can check umi messages, manage contacts, record and share videos, and more when you are away from your TV. The address for the umi Connect website is www.umiconnect.com. See umi Connect website.
umi number
The number other umi members use to call you. You receive your home umi number when you create a umi account on the umi Connect website.
video chat account
An account with an online video chat service such as Google video chat. If you have a Google video chat account, you can make umi calls to your Google video chat contacts. The other person communicates with you through a webcam. See Edit your Google video chat account information.
video greeting
The greeting other umi members see and hear when they call you but you are unable to answer the umi call. After viewing your greeting, the caller can leave a video message. See Record or delete your personal video greeting.
www.umiconnect.com
The web address of the umi Connect website.
13 Specifications
| Specification | Description |
| Video resolution | Full HD 1080p video calling (1920 x1080 pixels) and 720p recording at 30 frames per secondDynamic resolution scaling based on available bandwidth (1080p, 720p, and 480p supported) |
| Camera | Optical zoomMulti-glass lensAuto focus, auto exposure, and auto white balanceMotorized aim: pan, tilt, and zoomMotorized shutter for privacy control |
| Microphone/speaker | Built-in microphone array with software beamformingEmbedded speaker for incoming call ringing |
| TV compatibility | Compatible with high-definition widescreen TVs capable of 1080p or 720p with available HDMI port |
| Networking | Wi-Fi (802.11 b/g/n)10/100 Ethernet (RJ-45) |
| Video inputs and outputs | HDMI Out: umi console to TVHDMI In: media pass-through supported with select cable set top boxes and Blu-Ray equipment |
| Audio output | Digital audio over HDMI or optical audio |
| Infrared | Built-in infrared (IR) receiver for umi remote |
| What's in the box | ūmi cameraūmi consoleūmi remote (AAA batteries included)Multi-purpose camera bracket for TV and wall mount1 console-to-TV HDMI cable (approx. 5 ft./1.5m)2 camera-toConsole cables (HDMI and USB, approx. 5 ft./1.5m)1 Ethernet cable (5 ft./1.5m)AC adapter (10 ft./3m)Let's Get Started guide |
| Warranty | Limited 1-year warranty on parts and labor |
| Minimum system requirements | ■ umi service plan ■ HDTV with available HDMI port ■ High-speed broadband network* ■ Internet-capable PC (512 MB RAM, 1GHz) or MAC (Intel Core Duo 1.33GHz or PowerPC G3 500MHz) with a minimum of 128MB of graphics memory for Flash Player 10.x browser plug-in ■ Browser supported by www.umiconnect.com, which includes Internet Explorer 7 or greater, Firefox 3 or greater, and Safari 3.2 or greater |
| Environmental requirements | ■ Operating temperature: 32° to 104° F (0° to 40° C) ■ Storage temperature: -40° to 185° F (-40° to 85° C) ■ Relative humidity: 5% to 90% noncondensing |
*Full 1080p HD video calling requires a minimum of 3.5Mbps upload and download speed. 720p video requires a minimum of 1.5Mbps upload and download speed. Performance will vary based on sustainable broadband connection speed between umi calling parties.
1.4 Legal and compliance information
Limited warranty
FOR CONSUMERS WHO ARE COVERED BY CONSUMER PROTECTION LAWS OR REGULATIONS IN THEIR COUNTRY OF PURCHASE OR, IF DIFFERENT, THEIR COUNTRY OF RESIDENCE, THE BENEFITS CONFERRED BY THIS WARRANTY ARE IN ADDITION TO ALL RIGHTS AND REMEDIES CONVEYED BY SUCH CONSUMER PROTECTION LAWS AND REGULATIONS. THIS WARRANTY DOES NOT EXCLUDE, LIMIT OR Suspend ANY RIGHTS OF CONSUMERS ARISING OUT OF NONCONFORMITY WITH A SALES CONTRACT. SOME COUNTRIES, STATES AND PROVINCES DO NOT ALLOW THE EXCLUSION OR LIMITATION OF INCIDENTAL OR CONSEQUENTIAL DAMAGES OR ALLOW LIMITATIONS ON HOW LONG AN IMPLIED WARRANTY OR CONDITION MAY LAST, SO THE LIMITATIONS OR EXCLUSIONS DESCRIBED BELOW MAY NOT APPLY TO YOU. THIS WARRANTY GIVES YOU SPECIFIC LEGAL RIGHTS, AND YOU MAY ALSO HAVE OTHER RIGHTS THAT VARY BY COUNTRY, STATE OR PROVINCE. THIS LIMITED WARRANTY IS GOVERNED BY AND CONSTRUED UNDER THE LAWS OF THE COUNTRY IN WHICH THE PRODUCT PURCHASE TOOK PLACE.
This warranty is provided to you by Cisco Systems, Inc. and/or its affiliated entities ("Cisco"). Cisco warrants the hardware in this Cisco product against defects in materials and workmanship under normal use for the Warranty Period, which begins on the date of purchase by the original end-user purchaser and lasts for the period specified below:
Twelve (12) months for new product
- Ninety (90) days for refurbished product
Your exclusive remedy and Cisco's entire liability under this limited warranty will be for Cisco, at its option, to (a) repair the product with new or refurbished parts, (b) replace the product with a reasonably available equivalent new or refurbished Cisco product, or (c) refund the actual purchase price of the product less any rebates and discounts, or (d) pay the cost of repair of the product. Any repaired or replacement products will be warranted for the remainder of the original Warranty Period or thirty (30) days, whichever is longer. All products and parts that are replaced become the property of Cisco.
Exclusions and limitations
This limited warranty does not apply if: (a) the product assembly seal has been removed or damaged, (b) the product has been altered or modified, except by Cisco, (c) the product damage was caused by use with non-Cisco products, (d) the product has not been installed, operated, repaired, or maintained in accordance with instructions supplied by Cisco, (e) the product has been subjected to abnormal physical or electrical stress, misuse, negligence, or accident, (f) a repair has been attempted by anyone other than a facility authorized by Cisco to repair the Product, (g) the serial number on the Product has been altered, defaced, or removed, or (h) the product is supplied or licensed for beta, evaluation, testing or demonstration purposes for which Cisco does not charge a purchase price or license fee.
TO THE MAXIMUM EXTENT PERMITTED BY APPLICABLE LAW, ALL SOFTWARE AND SERVICES PROVIDED BY CISCO WITH THE PRODUCT, ARE PROVIDED "AS IS" WITHOUT WARRANTY OF ANY KIND. Without limiting the foregoing, Cisco does not warrant that the operation of the product, software or services will be uninterrupted or error free, and your use of the product and any related services is at your own risk. Cisco will have no responsibility for any harm to any device, any loss of data, or any other harm that results from your access to or use of the product or any related services. Also, due to the continual development of new techniques for intruding upon and attacking networks, Cisco does not warrant that the product, software or services, or any equipment, system or network on which the product, software or services are used will be free of vulnerability to intrusion or attack. The product may include or be bundled with third party software or service offerings. This limited warranty shall not apply to such third party software or service offerings. This limited warranty does not guarantee any continued availability of a third party's service for which this product's use or operation may require.
TO THE EXTENT NOT PROHIBITED BY APPLICABLE LAW, ALL IMPLIED WARRANTYES AND CONDITIONS OF MERCHANTABILITY, SATISFACTORY QUALITY OR FITNESS FOR A PARTICULAR PURPOSE ARE LIMITED TO THE DURATION OF THE WARRANTY PERIOD. ALL OTHER EXPRESS OR IMPLIED CONDITIONS, REPRESENTATIONS AND WARRANTYES, INCLUDING BUT NOT LIMITED TO ANY IMPLIED WARRANTY OF NON-INFRINGEMENT, ARE DISCLAIMED.
TO THE EXTENT NOT PROHIBITED BY APPLICABLE LAW, IN NO EVENT WILL CISCO BE LIABLE FOR ANY LOST OR DAMAGED DATA (INCLUDING, WITHOUT LIMITATION, ANY DATA ERASED BY CISCO IN CONNECTION WITH THE REPAIR OR REPLACEMENT OF A PRODUCT), REVENUE OR PROFIT, LOSS OF THE ABILITY TO USE ANY THIRD PARTY PRODUCTS, SOFTWARE OR SERVICES, OR FOR SPECIAL, INDIRECT, CONSEQUENTIAL, INCIDENTAL OR PUNITIVE DAMAGES, REGARDLESS
OF THE THEORY OF LIABILITY (INCLUDING NEGLIGENCE), ARISING OUT OF OR RELATED TO THE USE OF OR INABILITY TO USE THE PRODUCT, SOFTWARE OR ANY SERVICES PROVIDED IN RESPECT OF SUCH PRODUCT, SOFTWARE OR SERVICE, EVEN IF CISCO HAS BEEN ADVISED OF THE POSSIBILITY OF SUCH DAMAGES. TO THE EXTENT NOT PROHIBITED BY APPLICABLE LAW, IN NO EVENT WILL CISCO'S LIABILITY EXCEED THE AMOUNT PAID BY YOU FOR THE PRODUCT. The foregoing limitations will apply even if any warranty or remedy provided under this limited warranty fails of its essential purpose.
No Cisco employee, agent or reseller is authorized to make any verbal or written modification, extension or addition to this warranty, and Cisco expressly disclaims any such change to this warranty. If any portion of this limited warranty is found to be void or unenforceable, its remaining provisions shall remain in full force and effect.
Obtaining warranty service
If you have a question about your product or experience a problem with it, please go to umisupport.com where you will find a variety of online support tools and information to assist you with your product. If the product proves defective during the Warranty Period, then return the product to the point of sale when possible or a location designated by Cisco Technical Support. Otherwise, contact Cisco Technical Support (or, if you purchased your product from a service provider, contact the service provider) for instructions on how to obtain warranty service. The telephone number for Cisco Technical Support in your area can be found by clicking the "Contact Us" link on the home page of umisupport.com. Have your product serial number and proof of purchase on hand when calling. A DATED PROOF OF ORIGINAL PURCHASE IS REQUIRED TO PROCESS WARRANTY CLAIMS. If you are requested to return your product, you will be given a Return Materials Authorization (RMA) number. You are responsible for properly packaging and shipping your product at your own cost and risk, and you are responsible for all shipping and handling charges, in addition to any applicable customs duties, VAT or other associated taxes or charges when returning your product. You must include the RMA number and a copy of your dated proof of original purchase when returning your product. Products received without a RMA number and dated proof of original purchase will be rejected. Do not include any other items with the product you are returning. If you purchased your product within the European Union, Norway, or Switzerland, you must return such product to Cisco's designated central exchange center within the European Union.
Defective product covered by this limited warranty will be repaired or replaced and returned to you without charge. Cisco does not ship replacement products to locations outside the country from which the original product was purchased. Repairs or replacements not covered under this limited warranty will be subject to charge at Cisco's then-current rates.
Technical support
This limited warranty is neither a service nor a support contract. Information about Cisco's current technical support offerings and policies (including any fees for support services) can be found at umisupport.com. Telephone support may not be available where you live.
Please direct all inquiries to:
Cisco
P.O.Box 18558
Irvine, CA 92623
U.S.A.
Regulatory and Safety Information for the Cisco umi Telepresence
Caution
Only use the Cisco-specified power supply with this product.
Translated safety warnings
Statement 331-Power Supply Installation Warning

Warning
The power supply must be placed indoors. Statement 331
Attention
Read the installation instructions before connecting the system to the power source. Statement 1004
Attention
The plug-socket combination must be accessible at all times, because it serves as the main disconnecting device. Statement 1019
Attention
Statement 1024-Ground Conductor

Warning
This equipment must be grounded. Never defeat the ground conductor or operate the equipment in the absence of a suitably installed ground conductor. Contact the appropriate electrical inspection authority or an electrician if you are uncertain that suitable grounding is available. Statement 1024
Attention
This product requires short-circuit (overcurrent) protection, to be provided as part of the building installation. Install only in accordance with national and local wiring regulations. Statement 1045
Attention
IMPORTANT SAFETY INSTRUCTIONS
This warning symbol means danger. You are in a situation that could cause bodily injury. Before you work on any equipment, be aware of the hazards involved with electrical circuitry and be familiar with standard practices for preventing accidents. Use the statement number provided at the end of each warning to locate its translation in the translated safety warnings that accompanied this device. Statement 1071
SAVE THESE INSTRUCTIONS
Attention
IMPORTANT INFORMATIONSESECURITE
Statement 1074-Comply with Local and National Electrical Codes
Warning
Installation of the equipment must comply with local and national electrical codes. Statement 1074
Attention
Statement 287-Declaration of Conformity to R&TTE Directive 1999/5/EC for the European Community, Switzerland, Norway, Iceland and Liechtenstein
English:
This equipment is in compliance with the essential requirements and other relevant provisions of Directive 1999/ 5/EC.
Espanol:
Statement 2002-EMC Directive 2004/108/EC
English:
This equipment complies with the essential requirements and other provisions of Directives 2006/95/EC and 2004/108/EC. For more information, please refer to the Declaration of Conformity.
Espanol:
Statement 2019-FCC Declaration of Conformity Information (for USA only)
Product: Cisco umi telepresence
This equipment has been tested and found to comply with the limits for a Class B digital device, pursuant to Part 15 of the FCC Rules. These limits are designed to provide reasonable protection against harmful interference in a residential installation. This equipment generates, uses and can radiate radio frequency energy and, if not installed and used in accordance with the instructions, may cause harmful interference to radio communications. However, there is no guarantee that interference will not occur in a particular installation. If this equipment does cause harmful interference to radio or television reception, which can be determined by turning the equipment off and on, the user is encouraged to try to correct the interference by one or more of the following measures:
- Reorient or relocate the receiving antenna.
- Increase the separation between the equipment and receiver.
- Connect the equipment into an outlet on a circuit different from that to which the receiver is connected.
- Consult the dealer or an experienced radio/TV technician for help.
Note: Equipment must be installed and operated using the relevant manuals and only installed with the correct cables and connectors. Cisco Systems Inc. is not responsible for any radio or television interference caused by unauthorized changes or modifications to this equipment. Unauthorized changes or modifications could void the users authority to operate the equipment.
This device complies with Part 15 of the FCC rules. Operation is subject to the following two conditions: (1) this device may not cause harmful interference, and (2) this device must accept any interference received, including interference that may cause undesired operation.
Responsible party:
Cisco Systems Inc.
170 West Tasman Drive
San Jose, CA 95134
USA
+408 526-7208
Regulatory standards compliance
This section includes all regulatory, safety, EMC (Class A or Class B), telecom, and NEBS standards.
The Cisco umi telepresence is in compliance with national and international standards as described in Table 1.
Regulatory standards compliance: Safety & EMC
| Specification | Description |
| Regulatory Compliance (Mandatory) | Products with the CE Marking indicate compliance with the 1999/5/EC directive, which includes the safety and EMC standards listed. |
| Safety (Mandatory) | UL 60950-1CAN/CSA-C22.2 No. 60950-1EN 60950-1IEC 60950-1AS/NZS 60950-1 |
| EMC - Emissions (Mandatory) | 47CFR Part 15 Class B AS/NZS CISPR22 Class B CISPR22 Class B EN55022 Class B ICES003 Class B VCCI Class B CNS13438 Class B KN22 Class B EN61000-3-2 EN61000-3-3 |
| EMC - Immunity (Mandatory) | EN55024 EN300386 CISPR24 KN24 |
Regulatory standards compliance: Radio
| Specification | Description |
| Radio (Mandatory) | FCC Part 15.247 (CFR 47) |
| FCC OET 65C (01-01) | |
| EN301489-17 | |
| EN301489-1 | |
| RSS-102 | |
| RSS-210 | |
| EN300328 | |
| IDA TS SRD | |
| HKTA 1039 | |
| ARIB STD - T66 | |
| ARIB STED - T70, T71 | |
| ANSI C95.1 (91) | |
| AS/NZS 4268 | |
| EN50360 | |
| EN50385 |
Listed/Certified safety and stability testing for this product was performed on a Sharp LC-52D85UN display.
EMC class B notices and warnings
This section includes the EMC Class B warnings for the Cisco umi telepresence.
Statement 2018-Class B Notice for FCC
Modifying the equipment without Cisco's authorization may result in the equipment no longer complying with FCC requirements for Class B digital devices. In that event, your right to use the equipment may be limited by FCC regulations, and you may be required to correct any interference to radio or television communications at your own expense.
This equipment has been tested and found to comply with the limits for a Class B digital device, pursuant to Part 15 of the FCC Rules. These limits are designed to provide reasonable protection against harmful interference in a residential installation. This equipment generates, uses and can radiate radio frequency energy and, if not installed and used in accordance with the instructions, may cause harmful interference to radio communications. However, there is no guarantee that interference will not occur in a particular installation. If this equipment does cause harmful interference to radio or television reception, which can be
determined by turning the equipment off and on, the user is encouraged to try to correct the interference by one or more of the following measures:
- Reorient or relocate the receiving antenna.
- Increase the separation between the equipment and receiver.
- Connect the equipment into an outlet on a circuit different from that to which the receiver is connected.
- Consult the dealer or an experienced radio/TV technician for help.
Statement 2022-Class B Notice for Canada
This Class B digital apparatus complies with Canadian ICES-003.
- guide
- Contents
- Chapter 1 Create your account online
- Chapter 2 Connect the camera and the console
- Chapter 3 Complete TV setup
- Chapter 4 Calls
- Chapter 5 Contacts
- Chapter 6 Messages
- Chapter 7 My videos
- Chapter 8 Settings
- Chapter 9 Ümi Connect website
- Chapter 10 Advanced topics
- Chapter 11 Troubleshooting
- Chapter 12 Glossary
- Chapter 13 Specifications
- Create your account online
- Highlights
- Table of contents
- Before you begin
- Enter your account information
- umi Connect
- Get to know umi telepresence
- Log in to umi Connect
- Enter or select the information in the fields.
- Click Next.
- Choose your billing method
- Enter your billing information
- Validate your email address
- Connect the camera and the console
- Tune the room
- Video
- Audio
- Check box contents
- Connect the camera cables
- Mount the camera
- Connect the camera to the umi console
- Connect the umi console to your TV
- Connect to the Internet: Ethernet cable
- Connect to an outlet
- Complete TV setup
- Tools for working with umi on your TV screen
- Install the remote batteries
- Get to know your remote
- Get to know the clover
- Use the onscreen keyboard
- Use the onscreen keypad
- Select your language
- Set up your network connection
- Enter your activation code
- Check speaker, microphone, and camera settings
- Adjust the camera
- Take a profile photo
- Check for software updates
- Calls
- Make a umi call
- Make a umi call to a contact
- Dial a umi number
- Dial a Google video chat contact
- End a umi call
- Leave a video message
- Answer a umi call
- Ignore a umi call
- Options during a umi call
- Turn the camera on/off
- Hide/show self-view
- Turn the microphone on/off
- Contacts
- Create a new contact
- Send a friend request
- Add a number you dialed to Contacts
- Respond to a friend request
- Edit a contact
- Delete a contact
- Messages
- View your messages
- Call back the sender
- Select call back.
- Add the sender to your contacts
- ūmi
- messages
- Block a sender
- Forward a video from your message list
- Delete a message
- My videos
- Record a video
- View your videos
- Send a video
- Delete a video
- Settings
- Profile settings
- Change or delete your profile photo
- Select my photo
- Do one of the following:
- Record or delete your personal video greeting
- Change your language
- Privacy settings
- Set permissions for incoming ümi calls
- Turn parental lock code on/off
- Console settings
- Change your network settings: Ethernet connection
- Change your network settings: Wireless network connection
- umi Connect website
- Log in to the website
- Check your messages
- Sort the message display
- Filter the message display
- View a message
- Share a video from your message list
- Download a video from your message list
- Manage your videos
- Sort the video display
- On the left navigation panel, click My videos.
- View a video
- Share a video
- Download a video
- Work with your umi call history
- View your umi calls
- Sort the umi call history display
- Filter the umi call history display
- Add a contact from your umi call history
- Block someone in your umi call history
- Manage your contacts
- View a contact
- Add a contact
- Import Google video chat contacts
- Block a contact
- Edit your account settings
- Edit your account information
- Edit your billing information
- Edit your Google video chat account information
- Under Video chat accounts, click Add.
- Enter your new Google video chat ID or password and click Log in.
- Edit your Facebook or YouTube login information
- Edit your notification settings
- Edit your notification types
- Edit your SMS notification settings
- Edit your email notification settings
- Do either of the following:
- Click Save.
- Edit your display settings
- Do any of the following:
- Edit your privacy settings
- Edit your blocked list
- Advanced topics
- Alternate ways to mount the camera
- Place the camera on a table
- Mount the camera on a wall
- Alternate ways to connect the console to your TV service
- Tips for using umi with Google video chat
- 1 Troubleshooting
- Cable connections
- Call quality (audio/video)
- Care and maintenance
- Google video chat
- My videos
- Router connections
- Settings
- ūmi Connect website
- Glossary
- activation code
- block
- Checkmark
- clover
- console
- favorite
- friend request
- Home
- member
- menu
- ⁿurname
- profile photo
- self-view
- set top box
- system lock
- umi number
- video chat account
- video greeting
- www.umiconnect.com
- Specifications
- Legal and compliance information
- Limited warranty
- Exclusions and limitations
- Obtaining warranty service
- Technical support
- Translated safety warnings
- IMPORTANT SAFETY INSTRUCTIONS
- Attention
- IMPORTANT INFORMATIONSESECURITE
- Statement 1074-Comply with Local and National Electrical Codes
- Warning
- Statement 287-Declaration of Conformity to R&TTE Directive 1999/5/EC for the European Community, Switzerland, Norway, Iceland and Liechtenstein
- English:
- Espanol:
- Statement 2002-EMC Directive 2004/108/EC
- Statement 2019-FCC Declaration of Conformity Information (for USA only)
- Regulatory standards compliance
- Regulatory standards compliance: Safety & EMC
- EMC class B notices and warnings
- Statement 2018-Class B Notice for FCC
- Statement 2022-Class B Notice for Canada
Brand : LINKSYS
Model : UMI
Category : Wi-Fi Router