URC 7781 - Télécommande universelle ONEFORALL - Free user manual and instructions
Find the device manual for free URC 7781 ONEFORALL in PDF.
Download the instructions for your Télécommande universelle in PDF format for free! Find your manual URC 7781 - ONEFORALL and take your electronic device back in hand. On this page are published all the documents necessary for the use of your device. URC 7781 by ONEFORALL.
USER MANUAL URC 7781 ONEFORALL
English UNIVERSAL ELECTRONICS INC./ONE FOR ALL warrants to the original purchaser that this product will be free from defects in materials and workmanship under normal and correct use for a period of one (1) year from the date of original purchase. This product will be replaced free of charge if it has been proven to be defective within the one (1) year warranty period. This warranty does not cover cartons, carrying cases, batteries, broken or marred cabinets or any other item used in connection with the product. Any further obligation than listed above is excluded. To obtain warranty service during the warranty period, please call us at the number mentioned on the Customer Service page. Please notice that we need your purchase receipt so that we may establish your eligibility for service. If you have bought this product for purposes which are not related to your trade, business or profession, please remind that you may have legal rights under your national legislation governing the sale of consumer goods. This guarantee does not affect those rights.
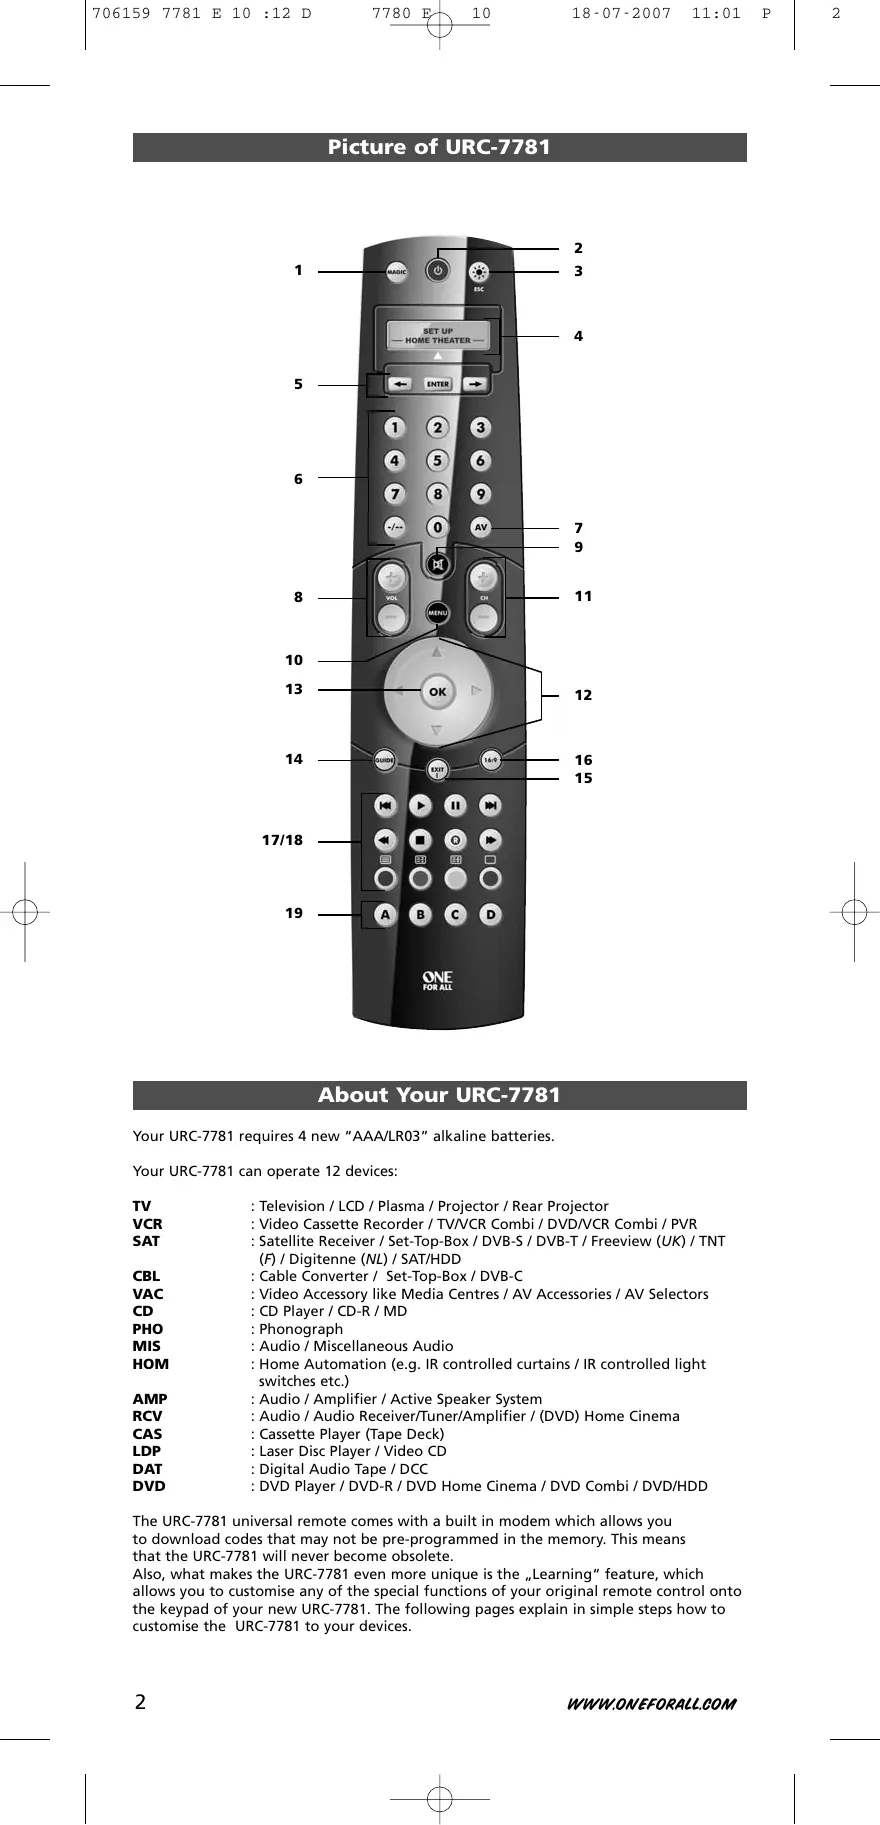
Your URC-7781 requires 4 new “AAA/LR03” alkaline batteries. Your URC-7781 can operate 12 devices: TV VCR SAT CBL VAC CD PHO MIS HOM AMP RCV CAS LDP DAT DVD
: Television / LCD / Plasma / Projector / Rear Projector
: Video Cassette Recorder / TV/VCR Combi / DVD/VCR Combi / PVR : Satellite Receiver / Set-Top-Box / DVB-S / DVB-T / Freeview (UK) / TNT (F) / Digitenne (NL) / SAT/HDD : Cable Converter / Set-Top-Box / DVB-C : Video Accessory like Media Centres / AV Accessories / AV Selectors : CD Player / CD-R / MD : Phonograph : Audio / Miscellaneous Audio : Home Automation (e.g. IR controlled curtains / IR controlled light switches etc.) : Audio / Amplifier / Active Speaker System : Audio / Audio Receiver/Tuner/Amplifier / (DVD) Home Cinema : Cassette Player (Tape Deck) : Laser Disc Player / Video CD : Digital Audio Tape / DCC
: DVD Player / DVD-R / DVD Home Cinema / DVD Combi / DVD/HDD The URC-7781 universal remote comes with a built in modem which allows you to download codes that may not be pre-programmed in the memory. This means that the URC-7781 will never become obsolete.
Also, what makes the URC-7781 even more unique is the „Learning“ feature, which allows you to customise any of the special functions of your original remote control onto the keypad of your new URC-7781. The following pages explain in simple steps how to customise the URC-7781 to your devices.
WWW.ONEFORALL.COM Pagina 2
See picture of URC-7781 remote on page 2. 1
The MAGIC key is used to set up your URC-7781.
The POWER key operates the same function it did on your original remote control. When pressing MAGIC then POWER you will obtain the Sleep function. When you press and hold down the MAGIC key the LED underneath the POWER key will light up twice and you will enter programming mode.
The LIGHT key lights up the LCD screen and keypad of the URC-7781. This key will also allow you to return (escape) to the previous screen within programming mode. If you want to exit programming mode and return to user mode simply press and hold down the LIGHT key.
The URC-7781 can be simply programmed following the indications on the LCD screen. During set-up the URC-7781 will list the 12 possible device groups. The currently active device is shown in the middle of the screen – indicated by: .
: (T) - Television / LCD / Plasma / Projector / Rear Projector
: (V) - Video Cassette Recorder / TV/VCR Combi / DVD/VCR Combi / PVR : (S) - Satellite Receiver / Set-Top-Box / DVB-S / DVB-T / Freeview (UK) / TNT (F) / Digitenne (NL) / SAT/HDD : (C) - Cable Converter / Set-Top-Box / DVB-C : (N) - Video Accessory like Media Centres / AV Accessories / AV Selectors : (D) - CD Player / CD-R / MD : (P) - Phonograph : (M)- Audio / Miscellaneous Audio : (H) - Home Automation (e.g. IR controlled curtains / IR controlled light switches etc.) : (A) - Audio / Amplifier / Active Speaker System : (R) - Audio / Audio Receiver/Tuner/Amplifier / (DVD) Home Cinema : (K) - Cassette Player (Tape Deck) : (L) - Laser Disc Player / Video CD : (J) - Digital Audio Tape / DCC
: (Y) - DVD Player / DVD-R / DVD Home Cinema / DVD Combi / DVD/HDD CBL VAC CD PHO MIS HOM AMP RCV CAS LDP DAT DVD The type of code is indicated in brackets e.g. (T). When setting up your device a device code will be displayed as e.g. T0556.
T - indicates the device type (TV code) 0556 – indicates a four-digit-code found under Philips. It is also possible to rename/change a device label using a max of 4 characters (see page 15). 5
Left / ENTER / Right
These keys allow you to scroll through and confirm your choices in the remote’s “Programming menu”. When changing the device label you can scroll through the “alphabet“, “digits” and “special symbols” (. _ ^<) pressing the ENTER key to select the desired letter, digit or symbol.
Number Keys (0-9, -/- -, AV)
The Number keys (0-9, -/—, AV) provide functions just like your original remote, such as direct access to channel selection. If your original remote uses one/two digit input switching (-/— symbol), this function can be obtained by pressing the -/— key. If your original remote has a 10 key, this function can also be found under the -/— key. If your original remote has a 20 key, this function can be found under the AV key. In Audio (RCV, AMP, MIS) mode the Number keys may provide source (input) selection.
In TV mode you will obtain the AV / Input function. In VCR mode you will obtain the “AV” function, if available on your original remote. In Audio (RCV, AMP, MIS) mode you will obtain the input/source function. In DVD mode you will obtain the “TV/DVD” function, if available on your original remote. In SAT mode you will obtain the “TV/SAT” or “TV/DTV” function, if available on your original remote.
These keys operate the same function it did on your original remote control. In TV mode these keys provide you the Brightness +/- when pressing MAGIC then CH+/-. In Audio (RCV, AMP, MIS) mode these keys will provide PRESET Up/Down.
The Mute key operates the same function it did on your original remote control. WW W.ONEFORA LL.COM
The MENU key controls the same function as it did on your original remote.
These keys operate the same function it did on your original remote control. In TV mode these keys provide you the Color +/- when pressing MAGIC then VOL+/-.
If available on your original remote, these keys will allow you to navigate through the menu mode of your device.
OK The OK key will confirm your choice in menu operation of your device.
In TV and/or SAT mode you will obtain the “Guide” or “Previous Program” function, if available on your original remote. In VCR mode you will obtain the “TV/VCR” or “Eject” function, if available on your original remote. In AMP, RCV or MIS mode you will obtain the “Tune Down” function, if available on your original remote. In CD mode you will obtain the “Eject” or “Open/Close” function, if available on your original remote.
In all modes you will obtain the “Menu Exit” function, if available on your original remote. In SAT menu mode you may obtain the “back” key to go to the previous menu screen.
In TV mode this key provides you the (16:9) wide screen view function, if available on your original remote. In SAT mode you will obtain the “Favorite” or “Info” function, if available on your original remote. In DVD mode you will obtain “Zoom” or “Random”. In VCR mode you will obtain “SP/LP”. In AMP, RCV or MIS mode you will obtain “Tune Up”.
These keys operate the transport functions (PLAY, FF, REW etc.) of your device. To prevent accidental recording, the RECORD key must be pressed twice to start recording.
The transport keys (REW, STOP, REC, FF) are used to operate the main Teletext functions. The symbols below the keys are for Teletext. The text keys are used to access the Teletext functions of your device. Of course, your device must have Teletext capability. TEXT ON: Puts the device (TV and/or SAT) in the Teletext mode. HOLD/STOP: Stops changing pages. EXPAND: Shows the top half of the Teletext page in larger letters. By pressing again, you can see the bottom half of the Teletext page enlarged. To return to regular Teletext viewing, press the EXPAND key again, or press the TEXT ON key, depending on your television. TEXT OFF: Switches the device (TV and/or SAT) back to regular viewing mode. On some devices, this may be done by pressing the TEXT ON key several times.
In TV mode when in text mode, the keys marked red, green, yellow and blue, allow you to access the Fastext functions of your television. If on your original remote control these keys are used for Menu navigation, the URC-7781 Fastext keys may operate in the same way.
Custom keys (A, B, C, D)
The Custom Keys are spare keys which give you the possibility to customise the URC-7781 remote using the learning and Key Magic® features (page 11 and 25). These keys can also be used to program Macros (see page 18).
WWW. ONEFORALL.COM Pagina 4
Installing the Batteries
Your URC-7781 requires 4 new “AAA/LR03” alkaline batteries. 1
Remove the battery cover from the back of your URC-7781.
Match the batteries to the + and - marks inside the battery case, then insert the batteries.
Press the battery cover back in place.
Do not use rechargeable batteries. Upon changing the batteries, your set-up codes and advanced programming will be retained.
Setting the Language, Day and Time
After inserting the batteries... will appear on the screen. Press ENTER to confirm.
Set the language to ENGLISH,
GERMAN (DEUTSCH) or FRENCH (FRANÇAIS) using the ARROW keys.
LANGUAGE SET LANGUAGE ENGLISH ENTER Press ENTER to confirm the language of your choice (e.g. ENGLISH).
The LED underneath the POWER Key will light up twice. From now on all programming features will be displayed in the selected language.
“SET DAY” will appear on the screen.
Press ENTER to confirm.
SET DAY Select the corresponding day using the ARROW keys and confirm by pressing ENTER. The LED underneath the POWER key will light up twice.
“SET TIME” will appear on the screen.
Press “ENTER” to confirm.
SET TIME Enter the corresponding time using the number keys and confirm by pressing “ENTER”. The LED underneath the POWER key will light up twice.
“ADD DEVICE” will appear on the screen.
ADD DEVICE Please continue on page 6 to set up the URC-7781 to control your devices.
Note: After the remote has been completely setup, to change the Language, Day or Time again you need to enter programming mode. To do so press and hold MAGIC until “INITIAL SETUP” appears on the screen. Next press ENTER, and “DEVICE” will appear on the screen. Next use the ARROW keys to scroll to “LANGUAGE” or “DAY/TIME” depending on what you require to change.
Setting up the URC-7781
How to set up the URC-7781 to control your devices —> When setting up the URC-7781 for the first time please follow steps 1 – 6. —> If already in User Mode you need to follow steps a and b then 1 - 6.
Press and hold down MAGIC for about
3 sec. and... will appear on the screen.
INITIAL SETUP Press ENTER twice... will appear on the screen.
ADD DEVICE Example: To set up the URC-7781 for your Television:
Find the code for your device in the Code list (page 301 - 315). Codes are listed by device type and brand name. The most popular code is listed first. Make sure your device is switched on (not on standby).
If your brand is not listed at all, the URC-7781 gives you the possibility to scan through all the codes contained in the memory for your specific device (in that case, as explained in see step 4, use the ARROW Left / Right keys instead of the digits).
ENTER The display will read...
ADD DEVICE Select the device you wish to set up using the ARROW left/right keys and confirm pressing ENTER. Now you will see CODE SET UP. Press ENTER again.
ADD DEVICE PHO TV VCR ENTER
Simply use the number keys to enter the first four-digit device code corresponding to your brand listed in the code list (pages 301 - 315). The LED underneath the POWER key will light up twice.
Aim the URC-7781 at your device and press POWER.
—> IF your device switches OFF, switch your device back ON (e.g. press CH+ to switch ON your TV) and try all the remote’s functions to ensure they are working properly.
—> IF some functions do not work properly or if your device does not respond at all, please try the next four-digit device code listed under your brand (pages 301 - 315). SEARCH METHOD: Each time you press the ARROW Left of Right key, this will display the previous or next code in the memory and send POWER of that code. -
Do not use the digits to test if the code works as this will change the current code.
If your device does not respond to the URC-7781 after you have tried all the codes (page 301 - 315) listed for your brand………or…….if your brand is not listed at all…….simply press the “ARROW right” key to scroll to the next code contained in the memory (for your specific device).
ENTER As soon as all the remote’s functions are working properly press ENTER to store this code.
Make sure to write down your code on page 8 for easy future reference.
WWW. ONEFORALL.COM Pagina 6
Setting up the URC-7781
Use the LIGHT (ESC) key to return to the previous screen.
Press and hold down the LIGHT (ESC) key to exit programming mode and return to the user mode. If your device’s original remote control does not have a POWER key, press PLAY instead of POWER when setting up your device. Remember to select the corresponding device mode before operating your device.
For your convenience it is possible to rename the Device Label (max 4 characters) see page 15.
TV VCR Corresponding Devices
Device type indicator
Television / LCD / Plasma / Projector / Rear Projector
T Video Cassette Recorder / TV/VCR Combi / DVD/VCR V Combi / PVR SAT Satellite Receiver / Set-Top-Box / DVB-S / DVB-T /
S Freeview (UK) / TNT (F) / Digitenne (NL) / SAT/HDD CBL Video Accessory like Media Centres / AV Accessories /
CD CD Player / CD-R / MD D PHO Phonograph
P MIS Audio / Miscellaneous Audio
M Home Automation (e.g. IR controlled curtains /
H HOM IR controlled light switches etc.)
AMP Audio / Amplifier / Active Speaker System
A RCV Audio / Audio Receiver/Tuner/Amplifier / (DVD)
CAS Cassette Player (Tape Deck)
K LDP Laser Disc Player / Video CD L DAT DVD Player / DVD-R / DVD Home Cinema / DVD Y DVD Combi / DVD/HDD The URC-7781 will display a code as e.g. T0556.
T = Device Type Indicator 0556 = 4-digit-code
- Use the LIGHT key to return to the previous screen.
- Press and hold down the LIGHT key to return to user mode.
View the current code
Once you have Set-Up your URC-7781, you can view your SET-UP CODE for future reference. Example: To view the code saved for your TV:
Press and hold down MAGIC for about
3 sec. and... will appear on the screen.
ENTER INITIAL SETUP Press ENTER twice... will appear on the screen.
ADD DEVICE Press the ARROW Left key twice... will appear on the screen.
VIEW CODE Press ENTER and the code for your current device will be displayed. Press the ARROW LEFT/RIGHT keys to view the codes of your other devices. Please write down your codes in the boxes below.
Quick Code Reference
To prevent having a device programmed that you are not using anymore it is possible to replace this e.g. if you just bought a new TV and DVD player/recorder to replace your old TV and Video Recorder it is not necessary to have your old TV and Video Recorder still programmed on your URC-7781. 1
Press and hold down MAGIC for about
3 sec. and... will appear on the screen.
ENTER INITIAL SETUP Press ENTER twice... will appear on the screen.
ADD DEVICE Press ARROW Right... will appear on the screen.
REPLACE DEVICE Press ENTER... will appear on the screen.
DEV TO REPLACE PHO TV VCR Select the “Device you wish replace” using the ARROW left/right keys.
ENTER ENTER Press ENTER... will appear on the screen.
REPLACE WITH PHO TV VCR Select the “Device you wish to replace it with” using the ARROW left/right keys and confirm pressing
ENTER. Now you will see “CODE SETUP”. Press ENTER.
From here enter the codes corresponding to “device type” and “brand “ of your device as explained on page 6.
WWW. ONEFORALL.COM Pagina 8
Changing the Device Code
The following example explains how to replace the old device code with a new device code without having to ADD a new device. Example: You just bought a new TV for your living room. This TV may be using a different code than your current TV in your living room. Just follow the next steps to change the current programmed device code. Note: When changing the device code, all settings of the currently setup device (Key Magic, Learning) will be retained.
Press and hold down MAGIC for about
3 sec. and... will appear on the screen.
Press ENTER twice... will appear on the screen.
Press RIGHT ARROW key twice... will appear on the screen. x2
ENTER Press ENTER... will appear on the screen.
Select the mode for which you want to change the setup code using the ARROW left/right keys and confirm pressing ENTER.
… will appear on the screen. Press ENTER to confirm. Next go to page 6 and follow the instructions from step 4 onwards.
WW W.ONEFORA LL.COM INITIAL SETUP ADD DEVICE Move a device
Once you programmed several devices it is possible to determine the order of appearance of the device labels. Example: If you programmed a Television, DVD-player, Video Recorder and Satellite Receiver the sequence of appearance may be TV, DVD, VCR, SAT. You may want to change the order of appearance into TV, VCR, DVD, SAT. 1
Press and hold down MAGIC for about 3 sec. and... will appear on the screen.
ENTER Press ENTER twice... will appear on the screen.
Press ARROW Right three times... will appear on the screen.
Press ENTER... will appear on the screen.
INITIAL SETUP ADD DEVICE MOVE DEVICE DEV TO MOVE DVD VCR SAT Select the Device you wish to move to a different location using the ARROW left/right keys and confirm pressing ENTER.
… will appear on the screen. Use the ARROW left/right keys to move the corresponding device and confirm pressing ENTER.
MOVE TO TV VCR DVD The LED underneath the POWER key will light up twice and you will return to MOVE DEVICE.
To delete a certain device please follow the next steps. 1
Press and hold down MAGIC for about
3 sec. and... will appear on the screen.
Press ENTER twice... will appear on the screen.
Press ARROW Left key once... will appear on the screen.
ENTER Press ENTER... will appear on the screen.
Select the Device you wish to delete using the ARROW left/right keys and confirm pressing ENTER.
INITIAL SETUP ADD DEVICE DELETE DEVICE TV T0556
DELETE DEVICE The LED underneath the POWER key will light up twice and you will return to DELETE DEVICE.
Result: The selected device has been deleted.
WWW. ONEFORALL.COM Pagina 10
The Learning Feature
The URC-7781 comes with a complete library of pre-programmed codes. After you have set up the URC-7781 for your device, you may find that there are one or more keys that you had on your original remote, which do not have a place on the URC-7781 keypad. As a convenience, the URC-7781 offers a special Learning feature that allows you to copy any function from your original remote control onto the keypad of the URC-7781. Before you start: Make sure your original remote control is working correctly. Make sure neither your URC-7781, nor your original remote control is pointing at your device.
Example: To copy the “mono/stereo” function from your original TV remote onto the A-key of your URC-7781. 1
Place both remote controls (the URC-7781 and your original) on a flat surface. Make sure the ends which you normally point at your device are facing each other. Keep the remotes at a distance of 2 to 5 cm.
Press and hold down MAGIC for about
3 sec. and... will appear on the screen.
Press ARROW Right... will appear on the screen.
Press ENTER 4 times… will appear on the screen.
Use the ARROW keys to scroll to the device mode in which you want to place the learned function (e.g. TV).
Press the key (on the URC-7781 remote) where you want to place the learned function (Example: A key). The LED underneath the POWER key will flash rapidly and... will appear on the screen.
INITIAL SETUP ADVANCED SETUP Press the key (on your original remote) that you want to copy on the URC-7781.
(Example: “mono/stereo” key). The LED underneath the POWER key will light up twice to confirm that the function mono/stereo has been learned successfully onto the A key.
NOTE: If you want to copy other functions within the same mode, simply repeat steps 5 and 6 pressing the next key you want to copy by learning.
NOTE: If you want to copy other functions in a different device mode, in step 4 select a different device mode by using the ARROW Left / Right keys and continue with steps 5 and 6. NOTE: If the display reads LEARNING FAILED, press ENTER to start from “ADD LEARNING” and press ENTER to continue with step 4. NOTE: If the display reads MEMORY FULL you need to prioritise the functions you want and delete the functions with the lowest priority
Press LIGHT once to go back to ADD LEARNING….or…. press and hold LIGHT to exit programming mode.
- Use the LIGHT key to return to the previous screen.
- Press and hold down the LIGHT key to return to user mode.
The Learning Feature
Learning is mode specific. To access your learned function, you need to scroll to the appropriate device first.
A learned function can be assigned to any key except the ENTER, LIGHT (ESC), ARROW Left/Right keys and the MAGIC key. If no key is pressed, the URC-7781 will stay for 30 seconds in programming mode. After step 5 you have 15 seconds to press the corresponding key on your original remote. If you learn a function on another key than the „custom keys“, the original URC-7781 function automatically becomes shifted. You can press MAGIC then the key to access it (this excludes the POWER, Channel and Volume keys and Digits – Press MAGIC twice and then the digit to access it). If a Shifted Learned function is placed on the Power, Channel and Volume keys then Sleep and Colour/Brightness will be sacrificed. The Learning feature is mode specific. Therefore you can place one learned function per mode on the same key. The URC-7781 can learn approximately 50 functions (depending on the original remote). You can replace a learned function by placing another learned function on top or by using “Delete Learning from One Key”, “Delete Learning from One Mode”, “Delete Learning from All Modes”. Learning should not be done in direct sunlight or under incandescent lights. Make sure you are using new batteries before following the learning instructions. Upon changing the batteries, your learned functions will be retained. It’s not possible to program functions by learning in the Home Theatre mode. However, if a key has been programmed in the original device mode with learning then this function will be carried over to the Home Theatre mode.
You can also learn a function on a key of the URC-7781 without sacrificing the original URC-7781 function. The „custom keys“ are an ideal location for this. A Shifted Learning function can also be put on almost any other key except for the following: MAGIC key, ARROW Left / Right, Enter and LIGHT (ESC). To install a Shifted Learning function, simply follow steps 1-7 on the previous page. During step 5, press MAGIC once before you press the key where you are placing the learned function. To access the shifted function, press MAGIC and then the key you have learned on. To access the shifted function on a digit key press MAGIC twice and then the corresponding digit.
WWW.ONEFORALL.COM Pagina 12
The Learning Feature
Delete Learning It is possible to….. - delete a learned function from a specific key within a specific device mode. - delete all learned functions within a specific mode. - delete all learned functions within all device modes. Example: to delete the copied mono/stereo function from the A key in the TV mode: 1
Press and hold down MAGIC for about 3 sec. and... will appear on the screen.
Press ARROW Right... will appear on the screen.
ADVANCED SETUP Press ENTER twice... will appear on the screen.
ADD FUNCTION Press ARROW Right.. will appear on the screen.
ENTER Press ENTER... will appear on the screen.
ENTER Press ENTER... will appear on the screen.
DELETE LEARNING FROM ONE KEY
ENTER Press ENTER... will appear on the screen.
Select the corresponding device mode (Example: TV mode) in which you want to delete the learned function by using the
ARROW left / right keys and press the key * you wish to delete (Example: A key). The LED will blink twice and the screen will go back to “DELETE LEARNING”.
If there is another key which you wish to delete, repeat steps 6 - 8.
Result: The original function on the A key in TV mode will now be present.
* To delete a Shifted Learned feature, press MAGIC before you press the learned key to be deleted.
Select the corresponding
SELECT MODE &KEY device mode in which you want RCV TV to delete all learned functions by using the ARROW left / right keys and press ENTER. The LED underneath the POWER key will light up twice and the screen will go back to ”DELETE LEARNING”. All the learned functions have now been cleared from the selected device mode.
ENTER DELETE LEARNING FROM ONE MODE Press ENTER. The LED underneath the
POWER key will light up twice and the screen will go back to ”DELETE LEARNING”. All the learned functions have now been cleared from all device modes.
- Use the LIGHT key to return to the previous screen.
- Press and hold down the LIGHT key to return to user mode.
The Operational Reset will erase all learned functions across all modes and some other programmed functions like Language, Volume Lock, Key Magic, Timed Macro, Key Macro, Home Theatre and Device Labels.
Press and hold down MAGIC for about 3 sec. and... will appear on the screen.
Press ARROW Right ... will appear on the screen.
ADVANCED SETUP Press ENTER once... will appear on the screen.
FUNCTION Press ARROW Left... will appear on the screen.
ENTER Press ENTER... will appear on the screen.
The LED underneath the POWER key will light up 4 times... will appear on the screen.
INITIAL SETUP RESET All your devices are still setup, but all features like Language, Volume Lock, Key Magic,
Timed Macro, Key Macro, Home Theatre and Device Label have either been reset to default or cleared. To only clear Learning and Key Magic use the feature “Delete Learning and Key Magic” as described on page 27.
Colour, Brightness and Sleep Depending on the functions of your original remote control, the URC-7781 may operate following functions of your television and sleep for devices that have this function on the original remote. Colour (+) = Press and release MAGIC then hold Volume (+) Colour (-) = Press and release MAGIC then hold Volume (-) Brightness (+) = Press and release MAGIC then hold Channel (+) Brightness (-) = Press and release MAGIC then hold Channel (-) Sleep ON/OFF = Press MAGIC then POWER repeatedly until the sleeptimer reaches the desired amount of minutes (or disappears from your device screen). Note: depending on your original remote you may operate this function in a different way.
WWW. ONEFORALL.COM Pagina 14
Changing the Device label It is possible to change the label of the devices you have setup using a maximum of 4 characters (or digits) for each label. 1
Press and hold down MAGIC for about 3 sec. and... will appear on the screen.
Press ARROW Right... will appear on the screen.
ADVANCED SETUP Press ENTER... will appear on the screen.
INITIAL SETUP Press ‘ARROW Left’ twice... will appear on the screen.
DEVICE LABEL Press ENTER... will appear on the screen.
Select the corresponding device mode of which you want to change the label using ARROW left / right and confirm pressing ENTER.
SELECT MODE RCV TV You will see…
NEW LABEL The first character of RCV TV the selected device label will start to blink. Use the ARROW LEFT/RIGHT keys to change the label to a max. of 4 characters and press ENTER to store each selected character. After entering the fourth character the display will return to ”CHANGE DEVICE LABEL”.
It is also possible to choose one of the symbols:
e.g. TV 1 (blank space between two characters/digits)
To return to the previous character and reset the previous character to A.
To store a label of less than 4 characters e.g. when you want to label the device as “T”.
DEVICE LABEL Select the corresponding device
SELECT MODE label you wish to reset by using RCV TV ARROW left / right and press ENTER. You will see the selected device label change back to the default label. The LED underneath the POWER key will light up twice and the display will return to “RESET DEVICE LABEL”.
Press ENTER. The LED underneath the POWER key will light up twice. All device labels will now be reset to the original label and the display will return to ”DEVICE LABEL”.
Volume Lock Set Volume Lock Example: It is possible to lock the volume to be from one particular mode e.g. TV. Doing this will result in the fact that independent in what mode you are the volume +/and Mute keys will always send the volume from the TV mode. 1
Press and hold down MAGIC for about
3 sec. and... will appear on the screen.
INITIAL SETUP Press ENTER... will appear on the screen.
DEVICE Press ”ARROW Right” twice... will appear on the screen.
ENTER Press ENTER twice... will appear on the screen.
Use the ARROW left/right keys to select the device (e.g. TV) you want to lock the volume to.
RCV TV VCR UL L: Lock,
UL: Unlock, SRC: Source
Press ENTER to select the displayed device as the SRC (source).
The LED underneath the POWER key will light up twice and the display will return to „VOLUME LOCK“.
Result: In the example above the TV mode will be the volume SRC (Source) for all other installed devices. In any device mode pressing volume +/- or mute this will give the volume functions of the TV mode.
Remove Device from Volume Lock
Example: If you want you can remove 1 device from the Volume Lock, so that it will not send the volume of the SRC any longer but its own volume. 1
Press and hold down MAGIC for about 3 sec. and... will appear on the screen.
INITIAL SETUP Press ENTER... will appear on the screen.
DEVICE Press ”ARROW Right” twice... will appear on the screen.
Press ENTER... will appear on the screen.
SET VOLUME LOCK Press ARROW Right... will appear on the screen.
ENTER REMOVE DEVICE FROM VOLUME LOCK Press ENTER... will appear on the screen.
Use the ARROW left / right keys to select the device (e.g. TV) you want to remove from the volume lock.
REMOVE VOL LOCK RCV TV VCR Press ENTER to remove the displayed device from the volume lock.
The LED underneath the POWER key will light up 4 times. The display will return to „VOLUME LOCK“.
Result: the device you selected will now send its own volume +/-, mute (instead of the volume from the SRC device).
WWW. ONEFORALL.COM Pagina 16
Add Device To Volume Lock Example: It is possible to add a device to the installed volume lock (SRC). You may want to do this for devices you added after installing the volume lock, or if you removed a device from the volume lock. 1
Press and hold down MAGIC for about 3 sec. and... will appear on the screen.
INITIAL SETUP Press ENTER... will appear on the screen.
DEVICE Press ”ARROW Right” twice... will appear on the screen.
Press ENTER... will appear on the screen.
SET VOLUME LOCK Press ”ARROW Right” twice... will appear on the screen.
ADD DEVICE TO VOLUME LOCK
ENTER Press ENTER... will appear on the screen.
ADD TO VOL LOCK RCV TV VCR Select the device (e.g. TV) you want to add to the volume lock using the ARROW Left / Right keys.
ENTER Press ENTER to add the displayed device to the volume lock. The
LED underneath the POWER key will light up twice and the display will return to VOLUME LOCK.
Result: The selected device will now send the volume +/-, mute of the SRC device.
Reset All Volume Controls
Example: You can reset all volume controls back to their original setting, so that all devices will send their own volume again.
Press and hold down MAGIC for about 3 sec. and... will appear on the screen.
INITIAL SETUP Press ENTER... will appear on the screen.
DEVICE Press ”ARROW Right” twice... will appear on the screen.
ENTER Press ENTER... will appear on the screen.
SET VOLUME LOCK Press ARROW Left... will appear on the screen.
RESET ALL VOLUME CONTROLS Press ENTER to reset all volume controls.
The LED underneath the POWER key will light up four times and the display will return to VOLUME LOCK.
Result: All devices will now send their own volume +/-, mute again.
Macros (Sequence of commands) Add Timed Macro The Macro feature allows you to define a sequence of commands that have to be executed at a certain time. You can program 3 types of timed macros: - once timed macro - daily timed macro - weekly timed macro Example: To RECORD a football match using the URC-7781 with your video recorder. 1
Press and hold down MAGIC for about 3 sec. and... will appear on the screen.
Press ARROW Right... will appear on the screen.
ADVANCED SETUP Press ENTER... will appear on the screen.
FUNCTION Press ARROW Right... will appear on the screen.
MACRO Press ENTER twice... will appear on the screen.
ADD TIMED MACRO Press ENTER... will appear on the screen.
It is also possible to set the macro to DAILY or WEEKLY. Use the ARROW keys to do so.
ENTER Press ENTER... will appear on the screen.
SEL MACRO DAY TUE WED THU Select the corresponding day when you want to execute the Macro using the ARROW keys.
ENTER Press ENTER... will appear on the screen.
Set the corresponding time when you want the macro to execute (to start the RECORDING) using the number keys.
ENTER PROG SEQ & ENTER Press ENTER...
TV VCR RCV will appear on the screen. You now have to record key strokes in the device modes as you would do when recording from the Video Recorder manually.
Select the corresponding device key (using the ARROW keys).
In our example scroll to VCR mode. 10
Press the corresponding key(s) you want to be sent in the timed macro (in our exemple, press RECORD twice). x2
ENTER Press ENTER to save the macro... will appear on the screen.
ADD TIMED MACRO Result: you have programmed a macro to start recording today Wednesday at 20:45.
Now you need to program another macro to stop the recording on Wednesday at e.g. 22:35 so the signal that the URC-7781 will send to your video recorder at 22:35 will be STOP. Note: Make sure to place the URC-7781 pointed towards the video recorder and make sure that there is a clean line of sight.
It is also possible to set the macro daily…
(the step SEL MACRO DAY will be skipped)
It is also possible to set the macro weekly…
WEEKLY TIMED MACRO WWW. ONEFORALL.COM Pagina 18
Macros (Sequence of commands) Notes: The amount of keystrokes in a timed macro and the number of timed macros is limited by the available memory space. A ”ONCE TIMED MACRO” will only be executed once. After executing this macro it will automatically be erased from the remote’s memory. A ”DAILY TIMED MACRO” will be executed every day at the same time until its removed from the remote’s memory. A ”WEEKLY TIMED MACRO” will be executed every week on the same day and same time until the macro is removed from the remote’s memory. To indicate that a Timed Macro has been programmed, the display will show a * at the left from the time in user mode. If you include the record function in the timed macro, you have to press the record key twice.
Example: To delete the Timed Macro from page 18: 1
Press and hold down MAGIC for about 3 sec. and... will appear on the screen.
Press ARROW Right... will appear on the screen.
ADVANCED SETUP Press ENTER... will appear on the screen.
FUNCTION Press ARROW Right... will appear on the screen.
MACRO Press ENTER... will appear on the screen.
ADD MACRO Press ARROW Right... will appear on the screen.
DELETE MACRO DELETE TIMED MACRO
ENTER Press ENTER... will appear on the screen.
ENTER Press ENTER...
DEL TIMED MACRO You will now see the Timed Macros O WED 20:45 you programmed displayed on the screen. Next to O, D, or W you will see the macro day (in case of a once or weekly timed macro) displayed. Next to it the macro time will be displayed on the screen. You may use the ARROW LEFT / RIGHT keys to scroll through the programmed Timed Macros. O : Once Timed Macro D : Daily Timed Macro W : Weekly Timed Macro
ENTER Press ENTER to delete the displayed timed macro. The LED underneath the POWER key will light up twice and…will appear on the screen.
ENTER If you want to delete another Timed
Macro press ENTER... will appear on the screen.
ENTER Press ENTER to delete this timed macro.
The LED underneath the POWER key will light up twice and…will appear on the screen.
DELETE TIMED MACRO DELETE TIMED MACRO Result: the Timed Macros programmed from page 18 have been deleted.
Macro (Sequence of commands) Add Key Macro You can program your URC-7781 to issue a sequence of commands at the press of one button. For example, you may want to switch OFF your TV, VCR and Satellite by only pressing one key. Any sequence of commands you regularly use can be reduced to one key stroke for your convenience. A key macro can contain up to 15 keystrokes in the sequence. We recommend to program a macro on any of the Custom keys (A, B, C, D) as the macro will overwrite the original function on a key. The original function on the key will be pushed to the shifted level and will only be available by pressing MAGIC and the corresponding key. Example: To set up the Macro to switch off your Television, Video Recorder and Satellite Receiver on the key labelled A on your URC-7781: 1
Press and hold down MAGIC for about 3 sec. and... will appear on the screen.
Press ARROW Right... will appear on the screen.
ADVANCED SETUP Press ENTER... will appear on the screen.
FUNCTION Press ARROW Right... will appear on the screen.
MACRO Press ENTER twice... will appear on the screen.
ADD TIMED MACRO Press ARROW Right... will appear on the screen.
ADD KEY MACRO Press ENTER... will appear on the screen.
Next press the key on which you want to set the macro (e.g. A key).
Now… will appear on the screen. Now press the keys from the modes using the
ARROW left / right keys as you would do when manually switching off your TV, VCR and SAT. Select TV mode by using the ARROW Left/Right keys, then press POWER, then select VCR, then press POWER, then press SAT, then press POWER.
ENTER Press ENTER to store the Macro.
The LED underneath the POWER key will light up twice and the display will return to ADD KEY MACRO.
PROG SEQ & ENTER VCR TV SAT ADD KEY MACRO Result: Whenever you press the A key, the URC-7781 will switch OFF your TV, VCR and
WWW. ONEFORALL.COM Pagina 20
Macro (Sequence of commands) Shifted Macro It is also possible to program a Shifted Macro on any key, except for the following keys: MAGIC, LIGHT (ESC), ARROW LEFT, ARROW RIGHT, ENTER and the number keys. If for example, you want to program a shifted Macro on the MUTE key, simply press the MAGIC and the Mute in step 7 on page 20.
Each KEY MACRO can consist of a maximum of 15 key strokes. Make sure that you program a Macro on a spare key that you don’t use in any mode. Once you program a Macro on a specific key, the sequence will work regardless of the mode you are using. To avoid accidental recordings with the URC-7781, you must press the Record key twice to begin recording. Because of this, we do not recommend to assign a Macro or Shifted Macro to the Record key. If you had to hold down a key for a few seconds on the original remote control to get a function, this function may not work in a macro on your URC-7781 remote. If you program a Macro on a key, the original function will become shifted (excluding POWER, CH+/- and VOL+/- keys). Press MAGIC then the key to access it. If you place a Macro shifted on a digit key, access the original function by pressing MAGIC twice and then the digit key. If a Shifted Macro is placed on the Power, Channel and Volume keys then Sleep and Colour/Brightness will be sacrificed. You cannot set the macro on the ARROW Left/Right, ENTER, MAGIC, and LIGHT (ESC) keys. If you include the record function in a Key Macro then you have to press the record key twice.
Example: To delete the Key Macro on the A key from page 20. 1
Press and hold down MAGIC for about 3 sec. and... will appear on the screen.
Press ARROW Right... will appear on the screen.
ADVANCED SETUP Press ENTER... will appear on the screen.
FUNCTION Press ARROW Right... will appear on the screen.
MACRO Press ENTER... will appear on the screen.
ADD MACRO Press ARROW Right... will appear on the screen.
DELETE MACRO Press ENTER... will appear on the screen.
DELETE TIMED MACRO Press ARROW Right... will appear on the screen.
Press ENTER... will appear on the screen.
Press the A key (corresponding the Macro key you want to erase the Key Macro from). The LED underneath the POWER key will light up twice. You will see “DELETE KEY MACRO” on the screen again.
Result: the Key Macro on the A key programmed from page 20 has been deleted.
Home Theatre Setup The Home Theatre feature allows you to combine key groups of several modes on the URC-7781 in one single mode. Example: You want to configure the functions of your Television and Home Cinema Set (programmed on TV and RCV) onto the URC-7781 keypad as shown in the table below. This allows you mainly to control the TV functions and functions from the Home Cinema Set without having to select the corresponding device mode.
VOLUME RCV Menu, up, down, left, right, OK, Exit
(skip-back, play, pause, skip-forward, rewind, stop, record, fast-forward
(red, green yellow, blue)
A, B, C, D RCV To set up or add the Home Theatre mode:
Press and hold down MAGIC for about 3 sec. and... will appear on the screen.
Press ARROW Right... will appear on the screen.
ADVANCED SETUP Press ENTER... will appear on the screen.
Press ”ARROW Right” twice... will appear on the screen.
INITIAL SETUP HOME THEATRE
Press ENTER twice... will appear on the screen.
HT POWER DVD HTNA RCV Select TV mode using the ARROW Left / right key
(corresponding to the example above).
ENTER Press ENTER... will appear on the screen.
HT DIGITS DVD HTNA RCV Select TV mode using the ARROW Left / right key
(corresponding to the example above).
ENTER Press ENTER... will appear on the screen.
HT CHANNEL DVD HTNA RCV Select TV mode using the ARROW Left / right key
(corresponding to the example above).
WWW. ONEFORALL.COM Pagina 22
Home Theatre Setup 8
ENTER Press ENTER... will appear on the screen.
Select RCV mode using the ARROW Left /
Right key (corresponding to the example above). etc……………. After selecting the device for the last keygroup (A, B ,C, D) the LED underneath the POWER key will light up twice and the display will return to “HOME THEATRE”.
Result: In Home Theatre mode the URC-7781 keypad in configured according to the table above.
During Home Theatre setup you will see a device called HTNA. By selecting this fictious device for a group of keys, then these keys will not sent IR in the Home
Theatre mode. When pressing keys in Home Theatre mode you will see the mode from which IR is sent, displayed. Home Theatre mode can be moved by using the Move Device feature. Home Theatre mode can be renamed by using the Device Label Feature. Key Magic functions and learned functions are carried over to Home Theatre mode. It’s not possible to learn to or program Key Magic functions in Home Theatre mode. Key Macros will not be available in Home Theatre mode. If a group of functions keys has been assigned to a device which gets deleted, then as a consequence this function group will not send IR in the Home Theatre any longer (this group is automatically assigned to HTNA).
To delete the Home Theatre Mode feature: 1
Press and hold down MAGIC for about 3 sec. and... will appear on the screen.
Press ARROW Right... will appear on the screen.
ADVANCED SETUP Press ENTER... will appear on the screen.
INITIAL SETUP Press ”ARROW Right” twice... will appear on the screen.
HOME THEATRE Press ENTER... will appear on the screen.
SET UP HOME THEATRE Press ARROW Right... will appear on the screen.
Press ENTER to delete the Home Theatre mode.
The LED underneath the POWER key will light up twice and the display will return to...
ENTER The Home Theatre mode will no longer be present on the URC-7781. You can add the
Home Theatre mode back by following the Home Theatre mode set up on page 22.
Code Upgrade Technology Your URC-7781 remote contains a unique feature, which allows new codes to be added simply by holding it to your telephone. In a matter of seconds, our magnetic coupling technology quickly and reliably transfers information to the URC-7781 remote without complex plugs, adapters or attachments. This means, as you buy new products in the future, the URC-7781 remote will never become obsolete.
(Upgrade your URC-7781 remote…via your PC) 1. 2. 3. 4. 5. 6.
Visit our website “www.oneforall.com”.
Select your region. Select “Product support”. Select “Universal Remote Controls”. Select the ONE FOR ALL remote you want to upgrade: URC-7781. Select ‘Internet Download’. Now you have entered our special Online Download section. From this point just follow the instructions on the screen for easy upgrade of your remote.
(Upgrade your URC-7781 remote…via your phone) Alternatively ring our consumer help-line and one of our customer service representatives will assist you through the entire process of upgrading your URC-7781 Remote. To ensure the process goes smoothly, here are a few steps to follow: 1.
Write down the brand name(s) and model number(s) of your device(s) (see the table provided on the Consumer Service page) before you call.
Ring our consumer help-line and explain which device(s) you would like to add to your URC-7781 Remote.
After our customer service agent records the brand name(s) and model number(s) of your device(s), he/she will lead you through the set up procedure and then will ask you to hold the URC-7781 Remote to the speaker portion of your telephone (see diagram below). In doing this, the information needed for your device is transferred through the telephone on your
URC-7781 remote in a matter of seconds. IMPORTANT: cordless telephones, speaker telephones and mobile telephones are not recommended.
After your URC-7781 remote has been upgraded by telephone, stay on the line. Our customer service agent will ensure that your URC-7781 remote is working properly with your device(s) and will answer any other questions you may have.
WWW.ONEFORALL.COM Pagina 24
Key Magic® Key Magic is an exclusive One For all feature. The design of the URC-7781 ensures that many functions of your original remote control can be operated - even those that do not have their own key on the URC-7781 keypad. Frequently used functions can be assigned to a key of your choice using the Key Magic feature of your URC-7781. In order to program a certain function with Key Magic you need to know the corresponding 5-digit function code. As the function codes vary with different types of devices, they cannot be found in the manual. You can request your function codes through our consumer service help-line or by letter, fax or e-mail. All we need to know is the 4-digit set-up code your device is working with and how the function was labelled on your original remote control. You can also visit our website (www.oneforall.com) to find an answer to your questions. Once you obtain(ed) your function code(s) from customer service, programming the code is easy (eg. programming the 16:9 function on the A key). 1
Press and hold down MAGIC for about 3 sec. and... will appear on the screen.
Press ARROW Right... will appear on the screen.
ADVANCED SETUP Press ENTER twice... will appear on the screen.
ADD LEARNING Press ARROW Right... will appear on the screen.
ENTER Press ENTER... will appear on the screen.
Select the corresponding device mode using the ARROW keys in our exemple the 16:9 function is a TV function, so select the TV mode.
KM SOURCE DVD TV RCV
Press the MAGIC key once.
Enter the 5-digit function code (e.g. 00234)
(provided by customer service).
The screen will change to…
KM DESTINATION The mode in which the function will be DVD TV RCV assigned is TV so leave the device mode unchanged. Press the key (e.g. A key) to which the function will be assigned. The 16:9 function has now been programmed on the A key in the TV mode. The LED underneath the POWER key will light up twice and you will return to KM SOURCE to program a next function. To return to user mode press and hold LIGHT (ESC).
EXTENDED FUNCTION REFERENCE
(first entry is an example):
DEVICE SET-UP CODE FUNCTION FUNCTION CODE TV T0556
To access the function you have programmed, go to the corresponding device mode first.
Key Magic can be assigned to any key EXCEPT the ARROW LEFT / RIGHT, ENTER, LIGHT (ESC) keys and the MAGIC key. Please note all the extended function codes you obtain from customer service above for easy future reference. It’s not possible to program Key Magic functions in the Home Theatre Mode. However, if a key has been programmed in the original device mode with Key Magic then this function will be carried over to the Home Theatre Mode. WW W.ONEFORA LL.COM
Delete Key Magic It is possible to….. - delete a Key Magic function from a specific key within a specific device mode. - delete all Key Magic functions within a specific device mode. - delete all Key Magic functions within all device modes. Example: to delete the programmed Key Magic function (16:9) from the A Key in the TV mode 1
Press and hold down MAGIC for about 3 sec. and... will appear on the screen.
Press ARROW Right... will appear on the screen.
ADVANCED SETUP Press ENTER twice... will appear on the screen.
ADD FUNCTION Press ARROW Right... will appear on the screen.
DELETE FUNCTION Press ENTER... will appear on the screen.
DELETE LEARNING Press ARROW Right... will appear on the screen.
Press ENTER... will appear on the screen.
Press ENTER... will appear on the screen.
Select the device mode (e.g. the TV mode) from which you want to delete the Key Magic function by using the ARROW LEFT/RIGHT keys and press the key you wish to delete (example: A key). The
LED underneath the POWER key will blink twice and the screen will go back to “DELETE KEY MAGIC”.
If there is another Key Magic function which you wish to delete, repeat steps 6 - 9.
Result: The original function on the “A” key in the TV mode of the URC-7781 will now be present.
To delete a Shifted Key Magic function, press MAGIC before you press the key to be deleted in step 9.
Press ENTER Select the corresponding
SELECT MODE device mode from which RCV TV you want to delete all Key Magic functions by using the ARROW LEFT/RIGHT keys and press ENTER. The LED underneath the POWER key will light up twice and the screen will go back to DELETE KEY MAGIC. All Key Magic functions from the selected mode are now cleared.
ENTER Press ENTER The LED underneath the POWER key will light up twice and the display will go back to “DELETE KEY MAGIC”. All
Key Magic functions from all modes are now cleared.
Use the LIGHT key to return to the previous screen.
Press and hold down the LIGHT key to return to user mode.
WWW. ONEFORALL.COM Pagina 26
Delete Learning and Key Magic IF……. after some programming using both “Key Magic” and “Learning” you should not remember if you learned or used Key Magic to obtain a specific function or if you just would like to delete all functions obtained by Learning and Key Magic on one key, within one device mode, or within all device modes you can use the following feature. It is possible to….. delete a Learning & Key Magic function from a specific key within a specific device mode. delete all Learning & Key Magic functions within a specific mode. delete all Learning & Key Magic functions within all device modes. Example: to clear the A key in the TV mode from a Learned or Key Magic function:
Simply follow steps 1 – 5 as shown on page 26... will appear on the screen.
DELETE LEARNING Use the ARROW left key to scroll to… will appear on the screen.
Press ENTER... will appear on the screen.
Press ENTER... will appear on the screen.
Select the corresponding device mode (e.g. TV mode) by using the ARROW left/right keys and press the key from which you want to delete the Key Magic / Learned function* (Example:
A key). The LED underneath the Power key will blink twice and the screen will go back to “DELETE LEARN & KEY MAGIC”.
If there is another key which you wish to delete, repeat steps 2 - 5.
Result: The original function on the A key in the TV mode of the URC-7781 will now be present.
To delete a Shifted Learned or Key Magic feature, press MAGIC before you press the key to be deleted in step 5.
PRESS ENTER Select the corresponding
SELECT MODE device mode using ARROW RCV TV left/right keys and press ENTER. The LED underneath the POWER key will light up twice and the screen will go back to DELETE LEARN & KEY MAGIC. All Key Magic and Learned functions from the selected device mode are cleared.
ENTER To delete all Key Magic and Learned functions within all device modes press ENTER. The LED underneath the POWER key will light up twice and the screen will go back to DELETE LEARN & KEY MAGIC. All Key Magic and Learned functions from all device modes are cleared.
Use the LIGHT key to return to the previous screen.
Press and hold down the LIGHT key to return to user mode.
Your brand is not listed in the code section?
Just use the ARROW Left/Right keys to scroll through the codes contained in the memory (see
Step 5 on page 6 - SEARCH METHOD).
The URC-7781 does not operate your device(s)?
A) Try all the codes listed for your brand see pages
301 - 315. B) Just use the ARROW Left/Right keys to scroll through the codes contained in the memory (see Step 5 on page 6 - SEARCH METHOD).
The URC-7781 is not performing commands properly?
You may be using the wrong code. Try repeating the Direct Set-Up using another code listed under your brand or start the search method over again to locate the proper code.
Problems changing channels?
Enter the programme number exactly as you would on your original remote.
Video not recording?
As a safety feature on your URC-7781, you must press the Record key twice.
The URC-7781 does not respond after pressing a key?
Make sure you are using new batteries and are aiming the URC-7781 at your device.
The LED does not blink when you press a key?
Replace batteries with 4 fresh, new “AAA/LR03” alkaline batteries.
The LED blinks 5 times every time you press a key and the LCD shows “BATTERY LOW”?
Replace batteries with 4 fresh, new “AAA/LR03” alkaline batteries.
You cannot enter programming mode by pressing and holding
Replace batteries with 4 fresh, new “AAA/LR03” alkaline batteries.
WWW.ONEFORALL.COM Pagina 28
If you still have questions about the operation of your URC-7781 universal remote and could not find the answer(s) in the Trouble-Shooting section, you may want to contact the customer service department for assistance. You may care to visit our Internet-site:
Before contacting us, by Fax, E-mail or Phone, make sure you have the required information available by filling in the table below.
What do we need to know when you contact us: 1
That you have the ONE FOR ALL URC-7781 (*) universal remote.
The date of purchase (//).
A list of your equipment/models: (see example below).
Type/model numbers can often be found in your equipment owner’s manual or on the factory plate behind the device.
Then Fax, E-mail or Dial us: In the UK E-mail : ofahelp@uebv.com (*) Fax : +31 53 432 9816 : 0901-5510010 (£ 0,50 per minute) Tel.
Just send a blank message, you’ll get auto-reply.
ONE FOR ALL Light Control Your ONE FOR ALL 12 Remote Control is compatible with ONE FOR ALL Light Control accessories, allowing you to control one or more of the lights in your house using the remote. To begin, you will need to purchase the ONE FOR ALL Light Control Starters Kit (HC-8300). The next step is to set up a code which will allow you to control up to 10 Light Control Receivers. To setup a code, simply follow the normal procedure on page 6 and set up one of the following codes as a Home Automation device (HOM).: ONE FOR ALL Light Control – 2200, 2201, 2202, 2203, 2204, 2205, 2206, 2207, 2208, 2209, 2210, 2211, 2212, 2213, 2214, 2215 It is recommended to use the first code listed. As the Light Control system works with Radio Frequency there is the possibility of interference. If your Light Control kit is not responding well, try one of the other codes listed.
Set up the HC Receiver
To set up your HC Receiver to work with your remote, you will need to assign a number to it. This is a one-time process that will allow you to control individual lights separately if you purchase additional HC Receivers in the future. To assign a number to the plug, follow these steps:
• Plug the lamp into the HC Receiver, and plug the HC Receiver into the wall outlet. If your lamp has a power switch it should be in the “ON” position.
• Plug the Command Centre in as close as possible to the HC Receiver, so that they are only 10-20 cm apart (the Command Centre can be moved after the initial setup).
• Set up a HOM code (see page 6 how to set up a code) and make sure that your remote control is in Light (HOM) Mode.
• Press the number you wish to assign to the HC Receiver. If this is your first Plug, number 1 is recommended, number 2 for the second etc. The LED (underneath the POWER key) should blink twice. • Press and hold the button on the HC Receiver until the red light begins to blink.
• Point your remote control towards the Command Centre and press the
Channel Up (+) key. The red light should stop flashing.
The remote should now operate the HC Receiver. To test it, check if the Channel
Up (+) and Channel Down (-) keys work to turn your light on and off respectively, or if you have the HC8010 Dimmer unit, see if the Volume up key begins to brighten or darken the light (press again to stop). Once set up with the Starters Kit, the following keys will perform the following functions on your ONE FOR ALL 12 Remote: Key Name
Turn Selected Receiver On
Turn Selected Receiver Off
Begin Dimming – Press Again To Stop*
Dimming feature is only available with the Light Control Dimmer unit (HC8010).
WWW.ONEFORALL.COM Pagina 30
CBL VAC CD PHO MIS HOM AMP RCV CAS LDP DAT DVD WW W.ONEFORA LL.COM
SET LANGUAGE DEUTSCH ENTER WW W.ONEFORA LL.COM
GERÄT HINZUFÜGEN PHO TV VCR ENTER
Video-Kassettenrecorder/TV/VCR Kombi/DVD/VCR V VCR Gerätetyp
Kombi/PVR SAT DVB-T/Freeview (UK)/TNT (F)/Digitenne (NL)/SAT/HDD AV-Wähler
CD Kassettenrecorder (Tape Deck)
K LDP ZU ERSETZ. GERÄT PHO TV VCR ERSETZEN DURCH PHO TV VCR WW W.ONEFORA LL.COM ZU BEWEGEND. GER.
DVD VCR SAT BEWEGEN NACH TV VCR DVD WÄHL MODUS&TASTE RCV TV DVD WÄHL MODUS&TASTE RCV TV
ZU VOL DIR. HINZU RCV TV VCR WW W.ONEFORA LL.COM
(skip-back, play, pause, skip-forward, rewind, stop, record, fast-forward
FASTEXT / TOP TEXT TV HT POWER DVD HTNA RCV HT NUMMERN DVD HTNA RCV HT PROGRAMME DVD HTNA RCV WW W.ONEFORA LL.COM
WÄHL MODUS&TASTE RCV TV
WÄHL MODUS&TASTE RCV TV ENTFERN LERN & KM IN EINEM MODUS ENTFERN LERN & KM IN ALLEN MODI SAT CBL VAC CD PHO MIS HOM AMP RCV CAS LDP DAT DVD SET LANGUAGE FRANÇAIS ENTER WW W.ONEFORA LL.COM
AJOUTER APPAREIL PHO TV VCR Combi DVD / DVD / HDD APP. À REMPLACER PHO TV VCR REMPLACER PAR PHO TV VCR WW W.ONEFORA LL.COM APP À DÉPLACER DVD VCR SAT DÉPLACER VERS TV VCR DVD CHOIX APP & TOUCHE RCV TV DVD
Press ENTER... will appear on the screen.
(point) p. ex. : TV.1
DÉVERROU. VOLUME RCV TV VCR
ENTER WW W.ONEFORA LL.COM
ENTER WW W.ONEFORA LL.COM
HT CHIFFRES DVD HTNA RCV HT CHAîNE DVD HTNA RCV Effacer le Home Theatre
Pour effacer la mode Home Theatre: 1
SOURCE KM DVD TV RCV
CBL VAC CD PHO MIS HOM AMP RCV CAS LDP DAT DVD CBL VAC CD PHO MIS HOM AMP RCV CAS LDP DAT DVD CBL VAC CD PHO MIS HOM AMP RCV CAS LDP DAT DVD WW W.ONEFORA LL.COM
SET LANGUAGE ENGLISH SET DAY SUN MON TUE ENTER
ENTER WW W.ONEFORA LL.COM
ADD DEVICE PHO TV VCR ENTER
DEV TO REPLACE PHO TV VCR REPLACE WITH PHO TV VCR WW W.ONEFORA LL.COM DEV TO MOVE DVD VCR SAT MOVE TO TV VCR DVD WW W.ONEFORA LL.COM
DELETE LEARNING FROM ONE KEY
ENTER DELETE LEARNING FROM ONE MODE WW W.ONEFORA LL.COM
SET VOLUME LOCK REMOVE DEVICE FROM VOLUME LOCK
ENTER REMOVE VOL LOCK RCV TV VCR SET VOLUME LOCK ADD DEVICE TO VOLUME LOCK
ENTER ADD TO VOL LOCK RCV TV VCR SET VOLUME LOCK RESET ALL VOLUME CONTROLS WW W.ONEFORA LL.COM
ADD TIMED MACRO SEL MACRO DAY TUE WED THU ADD TIMED MACRO WEEKLY TIMED MACRO
WWW. ONEFORALL.COM Pagina 108
DELETE TIMED MACRO DELETE TIMED MACRO ADD TIMED MACRO DELETE TIMED MACRO
RCV HT POWER DVD HTNA RCV HT DIGITS DVD HTNA RCV HT CHANNEL DVD HTNA RCV Borrar Home Theatre
Para borar la función Home Theatre Mode: 1
SET UP HOME THEATRE WW W.ONEFORA LL.COM
KM SOURCE DVD TV RCV
SAT CBL VAC CD PHO MIS HOM AMP RCV CAS LDP DAT DVD SET LANGUAGE ENGLISH ENTER SET DAY SET DAY SUN MON TUE ENTER
ADD DEVICE PHO TV VCR ENTER TV T0556
DEV TO REPLACE PHO TV VCR REPLACE WITH PHO TV VCR WW W.ONEFORA LL.COM DEV TO MOVE DVD VCR SAT MOVE TO TV VCR DVD WW W.ONEFORA LL.COM
DELETE LEARNING FROM ONE KEY
ENTER DELETE LEARNING FROM ONE MODE WW W.ONEFORA LL.COM
SET VOLUME LOCK REMOVE DEVICE FROM VOLUME LOCK
ENTER REMOVE VOL LOCK RCV TV VCR SET VOLUME LOCK ADD DEVICE TO VOLUME LOCK ADD TO VOL LOCK RCV TV VCR SET VOLUME LOCK RESET ALL VOLUME CONTROLS WW W.ONEFORA LL.COM
ADD TIMED MACRO SEL MACRO DAY TUE WED THU PROG SEQ & ENTER TV VCR RCV ADD TIMED MACRO WEEKLY TIMED MACRO WWW. ONEFORALL.COM Pagina 138
DELETE TIMED MACRO DELETE TIMED MACRO DELETE TIMED MACRO ADD TIMED MACRO DELETE TIMED MACRO WW W.ONEFORA LL.COM
VOLUME RCV HT POWER DVD HTNA RCV HT DIGITS DVD HTNA RCV HT CHANNEL DVD HTNA RCV SET UP HOME THEATRE WW W.ONEFORA LL.COM
KM SOURCE DVD TV RCV
SAT CBL VAC CD PHO MIS HOM AMP RCV CAS LDP DAT DVD WW W.ONEFORA LL.COM
SET LANGUAGE ENGLISH ENTER SET DAY SUN MON TUE ENTER
ADD DEVICE PHO TV VCR ENTER
Freeview (UK) / TNT (F) / Digitenne (NL) / SAT/HDD CBL VAC Accessori Video come Media Centres / Accessori AV /
N Selettori AV CD Audio / Miscellaneous Audio
M HOM DEV TO REPLACE PHO TV VCR REPLACE WITH PHO TV VCR WW W.ONEFORA LL.COM INITIAL SETUP ADD DEVICE DEV TO MOVE DVD VCR SAT MOVE TO TV VCR DVD WW W.ONEFORA LL.COM
DELETE LEARNING FROM ONE KEY
ENTER DELETE LEARNING FROM ONE MODE WW W.ONEFORA LL.COM
SET VOLUME LOCK REMOVE DEVICE FROM VOLUME LOCK REMOVE VOL LOCK RCV TV VCR SET VOLUME LOCK ADD DEVICE TO VOLUME LOCK
ENTER ADD TO VOL LOCK RCV TV VCR SET VOLUME LOCK RESET ALL VOLUME CONTROLS WW W.ONEFORA LL.COM
ADD TIMED MACRO SEL MACRO DAY TUE WED THU ADD TIMED MACRO WEEKLY TIMED MACRO WWW. ONEFORALL.COM Pagina 168
DELETE TIMED MACRO DELETE TIMED MACRO DELETE TIMED MACRO WW W.ONEFORA LL.COM
ADD TIMED MACRO DELETE TIMED MACRO
(skip-back, play, pause, skip-forward, rewind, stop, record, fast-forward
FASTEXT TV HT POWER DVD HTNA RCV HT DIGITS DVD HTNA RCV HT CHANNEL DVD HTNA RCV SET UP HOME THEATRE WW W.ONEFORA LL.COM
CBL VAC CD PHO MIS HOM AMP RCV CAS LDP DAT DVD WW W.ONEFORA LL.COM
SET LANGUAGE ENGLISH ENTER SET DAY SUN MON TUE ENTER
ADD DEVICE PHO TV VCR ENTER
Televisie / LCD / Plasma / Projector / Rear-projector
T Videorecorder / TV/VCR-combinatie / DVD/VCR-
V DEV TO REPLACE PHO TV VCR REPLACE WITH PHO TV VCR WW W.ONEFORA LL.COM INITIAL SETUP ADD DEVICE DEV TO MOVE DVD VCR SAT WW W.ONEFORA LL.COM
DELETE LEARNING FROM ONE KEY
ENTER DELETE LEARNING FROM ONE MODE WW W.ONEFORA LL.COM
UL: Unlock, SRC: Source
SET VOLUME LOCK REMOVE DEVICE FROM VOLUME LOCK
ENTER SET VOLUME LOCK ADD DEVICE TO VOLUME LOCK ADD TO VOL LOCK RCV TV VCR SET VOLUME LOCK RESET ALL VOLUME CONTROLS WW W.ONEFORA LL.COM
ADD TIMED MACRO SEL MACRO DAY TUE WED THU PROG SEQ & ENTER TV VCR RCV ADD TIMED MACRO WEEKLY TIMED MACRO WWW. ONEFORALL.COM Pagina 198
DELETE TIMED MACRO DELETE TIMED MACRO
ENTER DELETE TIMED MACRO ADD TIMED MACRO
DELETE TIMED MACRO HT POWER DVD HTNA RCV HT DIGITS DVD HTNA RCV HT CHANNEL DVD HTNA RCV SET UP HOME THEATRE WW W.ONEFORA LL.COM
KÓDOK TV VCR SAT CBL VAC CD PHO MIS HOM AMP RCV CAS LDP DAT DVD CBL VAC CD PHO MIS HOM AMP RCV CAS LDP DAT DVD WW W.ONEFORA LL.COM
SET LANGUAGE ENGLISH ENTER SET DAY SET DAY SUN MON TUE ENTER
ADD DEVICE PHO TV VCR ENTER
TNT (F) / Digitenne (NL) / SAT/HDD CBL VAC DEV TO REPLACE PHO TV VCR REPLACE WITH PHO TV VCR WW W.ONEFORA LL.COM CODE SETUP TV T0556
DEV TO MOVE DVD VCR SAT MOVE TO TV VCR DVD WW W.ONEFORA LL.COM
DELETE LEARNING FROM ONE KEY
ENTER DELETE LEARNING FROM ONE MODE SELECT MODE RCV TV WW W.ONEFORA LL.COM
SET VOLUME LOCK REMOVE DEVICE FROM VOLUME LOCK
ENTER REMOVE VOL LOCK RCV TV VCR SET VOLUME LOCK ADD DEVICE TO VOLUME LOCK ADD TO VOL LOCK RCV TV VCR
ENTER SET VOLUME LOCK RESET ALL VOLUME CONTROLS
ADD TIMED MACRO SEL MACRO DAY TUE WED THU ADD TIMED MACRO WEEKLY TIMED MACRO WWW. ONEFORALL.COM Pagina 228
ENTER DELETE TIMED MACRO DELETE TIMED MACRO WW W.ONEFORA LL.COM
ADD TIMED MACRO PROG SEQ & ENTER VCR TV SAT ADD KEY MACRO DELETE TIMED MACRO WW W.ONEFORA LL.COM
HT POWER DVD HTNA RCV
HT DIGITS DVD HTNA RCV HT CHANNEL DVD HTNA RCV SET UP HOME THEATRE WW W.ONEFORA LL.COM
KM SOURCE DVD TV RCV
KODY TV VCR SAT CBL VAC CD PHO MIS HOM AMP RCV CAS LDP DAT DVD CBL VAC CD PHO MIS HOM AMP RCV CAS LDP DAT DVD WW W.ONEFORA LL.COM
SET LANGUAGE ENGLISH ENTER SET DAY SET DAY SUN MON TUE ENTER
ADD DEVICE PHO TV VCR ENTER
Magnetowid / TV/VCR combo / DVD /VCR combo/PVR V SAT Odtwarzacz CD / CD-R / MD D PHO Gramofon
P MIS DEV TO REPLACE PHO TV VCR REPLACE WITH PHO TV VCR WW W.ONEFORA LL.COM DEV TO MOVE DVD VCR SAT MOVE TO TV VCR DVD WW W.ONEFORA LL.COM
DELETE LEARNING FROM ONE KEY
ENTER DELETE LEARNING FROM ONE MODE SELECT MODE RCV TV WW W.ONEFORA LL.COM
SET VOLUME LOCK REMOVE DEVICE FROM VOLUME LOCK
ENTER REMOVE VOL LOCK RCV TV VCR SET VOLUME LOCK ADD DEVICE TO VOLUME LOCK
ENTER ADD TO VOL LOCK RCV TV VCR SET VOLUME LOCK RESET ALL VOLUME CONTROLS WW W.ONEFORA LL.COM
ADD TIMED MACRO SEL MACRO DAY TUE WED THU PROG SEQ & ENTER TV VCR RCV ADD TIMED MACRO WEEKLY TIMED MACRO
WWW. ONEFORALL.COM Pagina 258
DELETE TIMED MACRO DELETE TIMED MACRO DELETE TIMED MACRO WW W.ONEFORA LL.COM
PROG SEQ & ENTER VCR TV SAT ADD KEY MACRO DELETE TIMED MACRO WW W.ONEFORA LL.COM
HT POWER DVD HTNA RCV HT DIGITS DVD HTNA RCV HT CHANNEL DVD HTNA RCV SET UP HOME THEATRE WW W.ONEFORA LL.COM
KM SOURCE DVD TV RCV
KÓDY TV VCR SAT CBL VAC CD PHO MIS HOM AMP RCV CAS LDP DAT DVD SAT CBL VAC CD PHO MIS HOM AMP RCV CAS LDP DAT DVD WW W.ONEFORA LL.COM
SET LANGUAGE ENGLISH ENTER SET DAY SET DAY SUN MON TUE ENTER
ADD DEVICE PHO TV VCR ENTER
DEV TO REPLACE PHO TV VCR REPLACE WITH PHO TV VCR WW W.ONEFORA LL.COM DEV TO MOVE DVD VCR SAT MOVE TO TV VCR DVD WW W.ONEFORA LL.COM
DELETE LEARNING FROM ONE KEY
ENTER DELETE LEARNING FROM ONE MODE SELECT MODE RCV TV WW W.ONEFORA LL.COM
UL: Unlock, SRC: Source
SET VOLUME LOCK REMOVE DEVICE FROM VOLUME LOCK
ENTER REMOVE VOL LOCK RCV TV VCR SET VOLUME LOCK ADD DEVICE TO VOLUME LOCK
ENTER ADD TO VOL LOCK RCV TV VCR SET VOLUME LOCK RESET ALL VOLUME CONTROLS WW W.ONEFORA LL.COM
ADD TIMED MACRO SEL MACRO DAY TUE WED THU PROG SEQ & ENTER TV VCR RCV ADD TIMED MACRO WEEKLY TIMED MACRO
WWW. ONEFORALL.COM Pagina 288
DELETE TIMED MACRO DELETE TIMED MACRO DELETE TIMED MACRO WW W.ONEFORA LL.COM
ADD TIMED MACRO DELETE TIMED MACRO WW W.ONEFORA LL.COM
HT POWER DVD HTNA RCV HT DIGITS DVD HTNA RCV HT CHANNEL DVD HTNA RCV SET UP HOME THEATRE WW W.ONEFORA LL.COM
KM SOURCE DVD TV RCV
Accent Adcom ADL Admiral Adyson AEA AEG Agashi Aiko
1037 0556 0556 1149 0264 0264 0037
0556 0556 0264 0282 0556 0216 0037 0820 0556 0109 0370 0264 0486 0370 0264 0009 0412 0037 0556 0606 0108 0264 1376
0163 0455 0009 0195 1505
1037 0698 0706 0264 0512 0037 0556
1037 0556 0606 0808 0037 0556 0418
0371 0714 0264 0606 1163
0163 0264 0820 0011 0264 0037
0370 0486 0037 0714 0606 0418 1037
0216 1137 1908 0698 0714 0264 0035 0216 0714 0606 1908 0556 1376 0264 0556 0548 1137 1908 0606 1189 0587 0009 0009 0825 0216 0820 0896
1149 0037 0037 0820 0037 0361 0880 0037 0009 0891 1363 Domeos 0668 0394 Domland Dream Vision 1704 0861 DSE 0009 DTS Dual 0343 1137 Dunai 0163 0037 Durabrand Dux 0037 0891 DVX 0037 Dynatron e:max 0606 1248 Easy Living Ecco 0773 Edison-Minerva 0487 Elbe 0370 0361 0163 Elcit Elekta 0009 1208 Elfunk ELG 0037 0216 Elin 0361 Elite 0037 0009 Elta Emerson 0714 0282 0163 0282 Emperor Enzer 0753 Erres 0037 0037 ESC Estèle 0163 Etron 0001 0163 Eurofeel 0264 EuroLine 0037 Euroman 0216 Europa 0037 Europhon 0037 Evesham 1248 Excel 0037 Expert 0163 Exquisit 0037 Fagor 0037 FairTec 1191 Family Life 0037 Fenner 0009 Ferguson 0625 0556 0361 Fidelity 0163 0412 Finlandia 0208 0343 Finlux 0105 0163 0606 Firstline 0037 0009 1037 Fisher 0208 Flint 0037 Force 1149 Formenti 0163 FormentiPhoenix 0216 Fortress 0093 Fraba 0037 Friac 0009 0610 Frontech 0264 Fuchsware 0780 Fujimaro 0865 Fujitsu 0853 0361 Fujitsu General 0009 Fujitsu Siemens 1298 Funai 0668
Digihome Digiline DigiLogic Digitex Digitor Digivision DigiX DiK Dixi DL
0037 0556 0371 1909 0486 0370
0556 0163 0556 0216 1259 0556 0556 0556
0335 0035 0548 0512 0216 0346
0343 0443 0037 0264 0548
0492 0808 0556 0216 1191 0370 0556
0480 0473 0418 0668 1909 0808 0361 0610
0653 1037 0556 1908 0361
0108 1908 0371 0361 0163
0037 0556 0370 0499 0009 0163 0163 0009 0037 0556 0163 1259 1248 1163 0808 0264 0412 1505
0668 0282 0455 1037 1191 0880 0508 0487 0037 0443 0556 0587 0009 0370 0178 1376 0343
0634 0370 0661 0808 0486 0625 0556
0412 0037 0556 0487 0556 0412 0037 0556 0418 0264 0037
0037 0487 0455 0208 0578 0499 0634 0492 1037 0037 0610 0865
0556 0264 0610 0698 0108 0037 0744 1481 1576 0556 0455 1163
1908 1908 0891 0473 0556 0178 0361 1149
0714 0860 0163 0109 1137 0512 0877
WWW.ONEFORALL.COM Pagina 302
0455 0037 Hyundai 0753 0037 Iberia ICE 0264 0216 Ices 0216 0037 Ict 1376 IISonic Iiyama 1217 0037 Imperial 0361 0037 Indiana Ingelen 0487 0009 Ingersoll 0009 Inno Hit Innovation 0037 0865 Innowert Inotech 0773 0037 Interactive 0361 0009 Interbuy 0037 Interfunk 0361 0037 Internal International 0216 0282 Intervision 0370 0009 0009 Irradio Isukai 0037 0037 ITS 0009 0163 ITT 0346 ITT Nokia 0361 0346 ITV 0264 0035 JEC JMB 0037 1908 Jocel 0712 Jubilee 0556 0653 JVC 0650 Kaisui 0282 0009 Kamp 0216 Kapsch 0163 Karcher 0037 0282 Kathrein 0556 Kawa 0371 Kawasho 0216 KB Aristocrat 0163 Kendo 0610 0370 Kennedy 0163 Kennex 1037 Kenwood 0105 Kingsley 0216 Kiota 0001 Kiton 0556 Kneissel 0037 1908 Kobra 1298 Kolster 0037 Konichi 0009 Konka 0037 0641 Kontakt 0487 Korpel 0037 Korting 0370 Kosmos 0037 Kotron 0412 Koyoda 0009 Kuba 0163 Kuba Electronic 0163 Kyoshu 0412 Kyoto 0163 L&S Electronic 0865 LaSAT 0486 Lavis 1037 Leader 0009 Lecson 0037 Legend 0009 Lenco 0037 1037 Lenoir 0009 Levis Austria 0037 Lexsor 1196
1908 0865 0698 0556 0037
1037 0668 0486 0556 0706 0860 1376 0371 0009 0556
0163 0370 0074 0556 0418 0556 0610 0714 0163 0361 0037 0556 1298 0820 0556 0370 0037 0556 0370 0556 0455 0394 0556 0037 0556 0371 0556 0480 0208 0548 0208 0037
0109 0264 0512 0109 0499
0512 0556 0327 0163 0200 1909
0487 0163 0264 0556 0371 0282 0455 0282 0264 0216 0361 0473 0548 0610 0163 0473 0480 0606 0610 0556
0226 0170 0037 0653 Neckermann 0037 0163 NEI 0037 0865 Neovia 1908 Nesco Netsat 0037 0037 Neufunk 0714 0037 New Tech Nicamagic 0216 0037 Nikkai 0009 Nikkei 0714 0178 Nikko Nobliko 0216 0109 Nogamatic Nokia 0361 0473 0109 Nordmende 0109 0195 1259 0163 Norfolk Normerel 0037 Novak 0037 0037 Novatronic NU-TEC 0455 0821 Nurnberg 0163 0163 Oceanic 0480 Odeon 0264 0370 Okano Olidata 1376 0264 Omega Omni 0780 1149 Onn Onwa 0371 Opera 0037 0650 Optimus Optonica 0093 Orbit 0037 Orion 0037 0009 1196 Orline 0037 Ormond 0668 Osaki 0264 Osio 0037 Osume 0037 Otto Versand 1505 0195 0282 Pace 1908 Pacific 0037 0443 Pael 0216 Palladium 0370 0200 Palsonic 0264 0773 Panama 0009 Panashiba 0001 Panasonic 0650 0037 0853 Panavision 0037 Papouw 0037 Pathe Cinema 0163 Pathe Marconi 0109 Pausa 0009 Perdio 0163 Perfekt 0037 Philco 0074 0556 Philex 0163 Philips 0556 0361 Phocus 1289 Phoenix 0037 0216 Phonola 0037 Pilot 0556 Pioneer 0760 0370 0486 Pionier 0370
0556 0661 0370 0327 0556 1376
0011 1704 0499 1505 0200 0556 0418 0512 0371 0163 1037
0009 0556 0610 0282 0009 0556 0343 0556 0264 0035 0216
0208 0606 0346 0610 0714 0891 0560 0343 0037 0556 0335 0163 1248 0556 0556 0105 0556 0698 0820 0037 0556 0361 0361 0208 0473 0548
0037 0714 Playsonic 0109 Policom 0282 Polytron 0009 Poppy Portland 1909 0487 Powerpoint Prandoni-Prince 0361 0009 Premier 0860 President Prima 0009 0698 Princess Prinston 1037 0361 Prinz Profex 0009 0009 Profi 0037 Profitronic Proline 0037 0037 Prosonic 0714 0037 Protech 0668 0178 Proton 0499 Provision PVision 1191 0037 Pye Pymi 0009 0650 Quasar Quelle 0037 0361 0556 0346 0037 R-Line Radialva 0109 0037 Radiola Radiomarelli 0037 RadioShack 0037 0009 Radiotone 0412 0602 Rank Arena RCA 0625 0753 Realistic 0178 Recor 0037 0037 Rectiligne Rediffusion 0361 Redstar 0037 Reflex 0037 Relisys 0865 Reoc 0714 Revox 0037 Rex 0163 RFT 0370 Rhapsody 0216 Ricoh 0037 Rinex 0773 Roadstar 1037 0714 1900 Rodex 0037 Rover 0877 Rowa 0264 0706 Royal 0418 Royal Lux 0370 Rukopir 0556 S-Media 1217 Saba 0625 0361 Sagem 0610 Saisho 0634 Saivod 0037 1037 Sakaï 0163 Sakyno 0455 Salora 0163 Salsa 0335 Samsung 0618 0093 0208 Sandra 0216 Sansui 0037 0727 Santon 0009 Sanyo 0208 0009 0486 Save 0037 Saville 1908 SBR 0037 Schaub Lorenz 0548 1191
0556 0556 0556 0216 0556 0282
0370 0371 0668 0009 0264 0418 0163 0486 1037
0556 0412 0865 1505 0074 0195 0009 0556 0163 0556 0556 0556 0037 0668 0753 0093 0825
0011 0109 0512 0327 0105 0668 0200 0264 1037
0556 0548 0556 0556 0877 0634 0556 0264 0264
0037 0556 0178 0556 0370 0418 0264 1037
0443 0556 0714 0011 0264 0412 1908 0880
1037 0037 0556 0556 0093 0361 0343
0037 0418 0412 0001 0264
0556 0163 0548 0001 0178 0556 0556 0216 0370 0037 0216 0282 0556 0556 0418 0163 0370 0037 0037 0343 0009 0200 0714 0556 0370 0486 0163 0556 0037 0011 0343 0512 0486
0712 0706 0037 0170 0556 0361 0109 0163
0418 0698 0264 0706 0009 0418 0037 0556 0668 0264 0282 1189 0556 0698 0587 0825 0412 0037
0587 0037 0178 0556 0009 0370 0264 0216 0163 0625 0729 0556 0706 0371 0602 0455 0861 0753 1208 0011 0370 0216 0163 0037 0108 0556 0170 1037 0556 0556 0714 0361 0606 0486
WWW.ONEFORALL.COM Pagina 304
Tech Lux Technics TechniSat Technisson Technol Ace Technosonic Techwood Tecnimagen Tedelex Teiron Tek Teleavia Telecor Telefunken
0556 0455 0037 0037 0418 0361 0606 0282
0361 0556 0556 0606 1505
0556 0163 0335 0163 0698 0037 0556
Telegazi Telemeister Telesonic Telestar Teletech Teleton Televideon Teleview Tempest Tennessee Tensai
1248 0714 0698 0712 1909 0418 1363 0009 0163 0037 1189 0650 0037 0714 0698 0037 1163 0556 0698 0009 0009 0820 0109 0037 0625 0698 0754 0556 0037 0037 0037 0037 0009 0037 0163 0163 0037 0009 0037 0037 0163 0009 0037 1248 0808 1037 0009 0625 0037 0108 0074 0335
1191 1289 0037 0668 0178 0170
0035 1196 0178 0037 1037 1037 0216 0282 0780 0698 0706 1037 0508 0109 0698 0009 0009
0486 0037 0264 0216 0037 0264 0346 0282 0556 0037 0480 0216 0037 0714 0587 0714
0556 0668 1163 0556 0163 1289 0264 0634 0216 0556 0499 0880 0606 0706 0037 0418 0208 0891 0587 0556 0037 0343 0556 0560 0343 0780 0486 0556 0163 0556 0556 0037 0556
0163 0074 0712 0891 0714
0556 0412 0668 0009 1037
0556 0037 0556 0264 0556 0556 0009 0105 0371 1037
0163 0548 0037 0556 0556
Tokyo Tomashi Tongtel Top Show Topline Toshiba Toyoda Trakton TRANScontinents Transonic Transtec Triad Tristar Triumph Tsoschi TVTEXT 95 Uher Ultravox Unic Line United Universal
0668 1289 0216 0560 0556 0109 0499 0512
0865 1137 0714 0343 0109 0335 0216 0343 0361 1505 0037 0556 0011 0035
0035 0587 0773 0418 0009 0264 0668 1508 0195 0037 0371 0264
0618 1908 0009 1163 0650 1704 0264
0698 0712 0418 0009 0556 0009 0556 0037 0556 0418 0486 0370 0163 0037 0556 0556 0473 0455 0037 0556 1908 1037 0037 0556
Allstar Amstrad Anitech Ansonic Aristona ASA Asuka Audiosonic AVP AWA
0072 0278 0000 0032 0037 0240 0072 0072 0072 0278 0348 0240 0081 0000 0072 0000 0081 0037 0072 0278 0352 0037
0045 0000 0240 0000 0072 0081 0037 0081 0348 0278
0240 0042 0043 0104 0043
0432 0166 0106 0042 0037
0072 0240 0278 0037 0348 0637 0352 0642 0240 0048 0042 0037 0081 0352
0000 0000 0278 0226 0320 0348 0742
0352 0278 0240 0166 0000 0240 0081 0642
WWW.ONEFORALL.COM Pagina 306
0037 0000 Imperial 0240 Ingersoll 0240 Inno Hit Interbuy 0037 0081 Interfunk Internal 0278 International 0278 0000 Intervision Irradio 0072 0106 ITT ITT Nokia 0048 0278 ITV JMB 0352 0000 Joyce 0067 JVC Kaisui 0072 0037 Kambrook Karcher 0278 0106 Kendo 0278 0000 KIC 0352 Kneissel Kolster 0348 0072 Korpel Kyoto 0072 0278 Lenco Leyco 0072 LG 0037 0348 Lifetec Loewe 0081 0240 Logik Lumatron 0278 0072 Lux May Luxor 0106 0315 0081 Magnavox Magnum 0642 0072 Manesth Marantz 0081 0278 Mark Mastec 0642 Master's 0278 0348 Matsui 0742 Mediator 0081 Medion 0348 Melectronic 0000 Memorex 0104 Memphis 0072 Metronic 0081 Metz 1562 0037 Micormay 0348 Micromaxx 0348 Migros 0000 Mitsubishi 0043 0642 Multitec 0037 Multitech 0000 Murphy 0000 Myryad 0081 NAD 0104 Naiko 0642 National 1562 NEC 0067 Neckermann 0081 Nesco 0072 Neufunk 0037 Nikkai 0072 Nokia 0104 0048 Nordmende 0320 NU-TEC 0348 Oceanic 0000 Okano 0315 Onimax 0642 Orbit 0072 Orion 0352 Orson 0000 Osaki 0000 Osume 0072 Otto Versand 0081 Pace 0352 Pacific 0000 Palladium 0072 0432 Palsonic 0072 Panasonic 1562 Pathe Cinema 0043 Perdio 0000
0480 0240 0278 0072 0104 0637 0037 0278 0037 0104
Bush Canal Digital Canal+ CanalSatellite CGV Cherokee Chess CityCom
S AT V C R S AT Tevion
Texet Thomson Thorn ThornFerguson Tokai Tokiwa Topline Toshiba Towada Tradex Tredex Triad Uher Ultravox Unitech United Universum
0072 0072 0348 0045 0072 0081 0278 0278 0037 0278 0240 0348 0000 0348 0067 Victor Video Technic 0000 0081 Watson 0037 Weltblick Wharfedale 0642 0348 World Yamishi 0072 0072 Yokan Yoko 0037 Yoshita 0072 0637 Zenith ZX 0348
0081 0240 0037 0106 0104
Telephone 1333 Audioline 1429 Aurora 0879 Austar 1259 Axil 1457 Axis 1111 B@ytronic 1412 Beko 0455 Bentley Walker 1017 Best 0369 Big Sat 1457 Black Diamond 1284 Blaupunkt 0173 Blue Sky 0713 Boca 0132 Boston 0132 Brainwave 1214 British Sky Broadcasting 0847 Broco 0713
1259 1367 1473 0713 1284 1017 1043
1853 0853 0167 1046 1853 1339 1853 1567 0713 1626 1232 0299 0818 0504
1473 1409 1767 0713 1611 1567 0369
0173 1161 0299 0262 1557 1176 0853 0369
WWW.ONEFORALL.COM Pagina 308
1232 0455 1284 0173 1473 1075 0369 0713 1300 1251 1413 Zenith 0856 Zeta Technology 0200 Zinwell 1176
0299 0455 0132 1214 1251 1214 0847 1323 1232 1334 1412 1075 0504 0818 0369
1230 ADB Amstrad 1222 1230 Auna 0276 Austar Canal Plus 0443 0443 Comcrypt Filmnet 0443 1222 Foxtel France Telecom 0817 freebox 1482 General Instrument 0276 Golden Channel 1110 HOT 1110 0276 Jerrold Macab 0817 Madritel 1230 0443 MNet Motorola 0276 0019 Multichoice Nokia 1569 0817 Noos NTL 1060 Oak 0019 Ono 1068 Optus 0276 Pace 1068 Philips 0817 Sagem 0817 Samsung 1060 Scientific Atlanta 0477 Tele+1 0443 Telepiu 0443 Telewest 1068 Thomson 1110 UPC 1582 Virgin Media 1060 Visiopass 0817
1106 0443 1624 1068 1060 1577 1060 1624 1666
0032 Arcam 0157 Audio Research 0157 Audiolab 0157 Audiomeca 0157 Audioton 0157 Balanced Audio Technology 0157 Cairn 0157 California Audio Labs 0029 Cambridge Audio 0157 Cyrus 0157 Denon 0003
WWW.ONEFORALL.COM Pagina 310
1389 1390 0121 1822 0609 1390 0744 0609 1089 1389 1089 1389 1390
Onkyo Optimus Orient Power Palladium Panasonic
0744 1390 1220 1614 1634
1518 1779 1309 1308 1389 1354 1089 1269 1289
All-Tel Amitech Amoi Amoisonic Amstrad AMW Ansonic Apex Digital Arena Aristona Asono ATACOM Audioworld Audix Autovox Auvio Avious AWA Axion Base Basic Line Baze BBK Bellagio Best Buy Biostek Black Diamond Blaupunkt Blu:sens Blue Sky BNI Boghe Boman Brainwave Brandt Bush
Clayton Coby Codex Compacks Conia Contel Continental Edison Crown Crypto Cybercom CyberHome Cytron D-Vision Daenyx Daewoo Dalton Dansai Dantax Daytek Dayton DCE DEC Decca Denon Denver
0770 1228 0831 0714 0651 1115 0872 0833 1436 1036 0770 0723 0872 0872 0831 0818 0770 0634 0788 1056 0665 0651 0790 0713 0713 0717 1421 1005 0672 0831 0788 0705 0831 0790 0831 1730 0831 0790 0831 0768 0723 1224 1233 0714 1152 0723 0770 0850 0770 0850 0770 1233 1321 0705 0665 0788 0651 0741 0713 0869 0695 1005 0717 1051 1224
0651 0816 0705 0831 1347 1483 0705 0770 0714 0872 1115 1695 0695 0713 1005
0898 0818 1107 1321 0672
DigiLogic digiRED Digitech Digitor Digitrex DiK Dinamic DiViDo DK digital DMTECH Dragon DSE Dual
DVX E-Boda E-Dem e:max EagleTec eBench Eclipse Electrohome Elfunk Elin Ellion Elta
Scan ScanMagic ScanSonic SCE Schaub Lorenz Schneider Schцntech Scientific Labs Scott Seeltech SEG Shanghai Sharp Sherwood Shinco Siemssen Sigmatek Silva Silva Schneider SilverCrest Singer Sinotec Sinudyne Sistemas Skymaster Skyworth Sliding Slim Art Slim Devices SM Electronic Smart Sonashi Soniko Sontech Sony Sound Color Soundmaster Soundmax Spectra Standard Star Clusters StarLogic Starmedia Strato Strong Sunfly Sunkai Sunstech Sunwood SuperDigital Supervision SVA Synn T.D.E. Systems Tandberg Tangent Targa Tatung Tchibo TCM Teac
1228 0670 0705 0730 0857 0789 0788 0831 0651 0713 0768 0651 1224 0713 0672 0630 0717 0717 1382 0857 0788 0831 1152 0723 0770 1140 0672 0730 0898 1115 0770 0533 0730 0705 0831 0788 1156 0533 1233 0768 0768 0872 0651 0768 1005 0818 1382 0713 0857 0770 0831 0788 1187 0730 0672 0768 1156 0713 1321 0741 0770 0741 0741 0717 0759 1227 0898 0490 0770 1051 0713 1233 1004 0790 1483 0713 0651 0651 0833 0571 0551 0665 0705 0789 1224 0503
1051 1115 0790 0873 0713 0850
0539 0705 0788 0713 0869 0790 0646 1227 1152 0672 1036 1233 1451 0665 0768 0872 0713 0695 1419 0741 1224 0898 0831 1906 0741 0768 0751 0768 1115 0768
P&B Pacific Packard Bell Palladium Palsonic Panasonic Panda Papouw peeKTON Philips Philo Phonotrend Pioneer Plu2 Pointer Portland Powerpoint Prima Prinz Prism Pro2 ProCaster Proline Proscan Proson Prosonic Provision Pye QONIX Radionette Radiotone Raite RCA REC Red Star Relisys Reoc Revoy Rex Richmond Rimax Roadstar Rocksonic Ronin Rotel Rowa Rownsonic Saba Sabaki Saivod Salora Sampo Samsung
1451 0790 0759 0713 0831
0672 0852 1056 0833 1908 1107 0898 0646 1818 0503 1158 1965 0631 0525
0539 0869 1906 0641 0651
0723 0551 0831 0770 0744 1932 0490
Universal Electronics BV Europe & International
P.O. Box 3332 7500 DH, Enschede The Netherlands
UNIVERSAL ELECTRONICS INC./ONE FOR ALL warrants to the original purchaser that this product will be free from defects in materials and workmanship under normal and correct use for a period of one (1) year from the date of original purchase. This product will be replaced free of charge if it has been proven to be defective within the one (1) year warranty period. This warranty does not cover cartons, carrying cases, batteries, broken or marred cabinets or any other item used in connection with the product. Any further obligation than listed above is excluded. To obtain warranty service during the warranty period, please call us at the number mentioned on the Customer Service page. Please notice that we need your purchase receipt so that we may establish your eligibility for service. If you have bought this product for purposes which are not related to your trade, business or profession, please remind that you may have legal rights under your national legislation governing the sale of consumer goods. This guarantee does not affect those rights.