
HPT 94D BS IT - Tumble dryer HOTPOINT - Free user manual and instructions
Find the device manual for free HPT 94D BS IT HOTPOINT in PDF.


| Product Type | Tumble Dryer |
| Brand | Hotpoint |
| Model | HPT 94D BS IT |
| Drying Capacity | 9 kg |
| Drying Type | Condenser Dryer with Heat Pump |
| Energy Efficiency Class | B |
| Annual Energy Consumption | 560 kWh |
| Number of Drying Programmes | 15 |
| Drying Levels | 3 (Cupboard Dry, Iron Dry, Extra Dry) |
| Condenser Water Tank Capacity | 4.8 L |
| Dimensions (W x D x H) | 596 x 624 x 850 mm |
| Weight | 42 kg |
| Rated Power | 2600 W |
| Voltage | 220-240 V ~ 50 Hz |
| Drum Volume | 120 L |
| Noise Level | 65 dB |
| Delay Start | Up to 24 hours |
| Moisture Sensor | Yes, auto-dry system |
| Child Lock | Yes |
| Filter Cleaning Indicator | Yes |
| Water Tank Full Indicator | Yes |
| Reversible Door | Yes |
| Drum Material | Stainless steel with hygienic coating |
| Repairability Index | 8.2 / 10 |
Frequently Asked Questions - HPT 94D BS IT HOTPOINT
User questions about HPT 94D BS IT HOTPOINT
0 question about this device. Answer the ones you know or ask your own.
Ask a new question about this device
Download the instructions for your Tumble dryer in PDF format for free! Find your manual HPT 94D BS IT - HOTPOINT and take your electronic device back in hand. On this page are published all the documents necessary for the use of your device. HPT 94D BS IT by HOTPOINT.
USER MANUAL HPT 94D BS IT HOTPOINT
HPT 94D BS IT
Caro cliente,



europeanappliances.com/
Please read this guide prior to use this product!
Thank you for choosing Hotpoint product. We would like you to achieve the optimal efficiency from this high quality product which been manufactured with state of the art technology. Please make sure you read and understand this guide and supplementary documentation fully before use.
Observe all warnings and information herein. Therefore you can protect both yourself and your product against potential damages.
Keep the manual. Include this guide with the unit if you hand it over to someone else.
Symbols and Remarks
The following symbols are used in the user guide:

Danger that may cause death or injury

Read the manual

Important information or useful usage tips

Warning against hot surfaces

Warning against electric shock

Warning against UV Radiation hazard

Warning against scalding

The product's packaging is made of recyclable materials, in accordance with the National Environment Legislation.

Warning against fire
NOTICE Danger that may cause material damage on the product or surrounding area

RECYCLED & RECYCLABLE PAPER
This product was manufactured using the latest technology in environmentally friendly conditions.
1 SAFETY INSTRUCTIONS .... 39
2 Environmental instructions.... 46
2.1 Compliance with the WEEE Regulations and Waste Disposal 46
2.2 Packaging information 46
2.3 Standard conformity and test information / EU declaration of conformity .....46
3 Your drying machine 47
3.1 Technical specifications ....47
3.2 General appearance ....48
3.3 Scope of delivery....48
4 Installation 49
4.1 Right place for installation....49
4.2 Removing the shipping safety group....49
4.3 Water connection ....50
4.4 Adjusting the stands....50
4.5 Moving the drying machine....50
4.6 Warning regarding the noise 50
4.7 Replacing the lighting bulb....50
5 Preparation 51
5.1 Laundry suitable for drying in drying machine ....51
5.2 Laundry not suitable for drying in drying machine ....51
5.3 Preparing the laundry to be dried....51
5.4 What to do for energy saving....51
5.5 Correct load capacity ....52
6 Running the product 53
6.1 Control Panel....53
6.2 Symbols....53
6.3. Preparation of drying machine 54
6.4 Program selection and consumption chart....55
6.5 Auxiliary functions....58
6.6 Warning indicators....58
6.7 Starting the program....59
6.8 Child Lock....59
6.9 Changing the program after it is started....59
6.10 Cancelling the program....60
6.11 End of program 60
6.12 Odour feature....60
6.13 PetHairCare cycle....60
7 Maintenance and cleaning 62
7.1 Lint filters (internal and external filters) / Cleaning of the Interior Surface of the Loading Door 62
7.2 Cleaning the sensor ....63
7.3 Emptying the water tank....63
7.4 Cleaning the condenser....64
8 Troubleshooting....66
9 Waiver Warning 68
9.1 I want to fix it myself 68
IMPORTANT TO BE READ AND OBSERVED

This symbol reminds you to read this instruction manual.
Before using the appliance, read these safety instructions. Keep them nearby for future reference. These instructions and the appliance itself provide important safety warnings, to be observed at all times. The manufacturer declines any liability for failure to observe these safety instructions, for inappropriate use of the appliance or incorrect setting of controls.

WARNING:
- This symbol shows that this appliance uses a flammable refrigerant. If the refrigerant is leaked and exposed to an external ignition source, there is a risk of fire.

This appliance contains R290 refrigerant that is flammable but nment-friendly.

Very young children (0-3 years) should be kept away from the nce. Young children (3-8 years) should be kept away from the nce unless continuously supervised. Children from 8 years old bove and persons with reduced physical, sensory or mental ilities or lack of experience and knowledge can use this appliance they are supervised or have been given instructions on safe use understand the hazards involved. Children must not play with the nce. Cleaning and user maintenance must not be carried out by en without supervision.

WARNING: Never stop a tumble dryer before the end of the cycle unless all items are quickly removed and spread out so that at is dissipated.
Items that have been soiled with substances such as cooking oil, acetone, alcohol, petrol, kerosene, spot removers, turpentine, waxes and wax removers and items such as foam rubber (latex foam), shower caps, waterproof textiles, rubber-backed articles and clothes or pillows fitted with foam rubber pads should not be dried in the tumble dryer. Remove all objects from pockets, such as lighters and matches. Do not use the tumble dryer if industrial chemicals have been used to clean it.
Oil-soaked items should not be dried in the tumble dryer due to their high flammability.
⚠️ Never open the door forcibly or use it as a step.
PERMITTED USE
CAUTION: The appliance is not intended to be operated by means of an external switching device, such as a timer, or separate remote controlled system.
This appliance is intended to be used in household and similar applications such as: staff kitchen areas in shops, offices and other working environments; farm houses; by clients in hotels, motels, bed & breakfast and other residential environments.
This appliance is not for professional use. Do not use the appliance outdoors.
Do not store explosive or flammable substances (e.g. gasoline or aerosol cans) inside or near the appliance - risk of fire.
Do not load the machine above the maximum capacity (kg of dry cloth) indicated in the programme table.
Do not dry unwashed items in the tumble dryer.
Take care that no lint or dust is accumulated around the dryer.

Fabric softeners, or similar products, should be used as specified fabric softener instructions.

Do not overdry the laundry.

Do not drink, reuse or prepare food with condensed water. It can mful to your health and cause property damage.

WARNING: Do not damage the appliance refrigerant circuit pipes.
INSTALLATION

The appliance must be handled and installed by two or more mins - risk of injury. Use protective gloves to unpack and install - risk of injuries.

Installation, including water supply (if any), electrical connections pairs must be carried out by a qualified technician. Do not repair place any part of the appliance unless specifically stated in the user al. Keep children away from the installation site. After unpacking appliance, make sure that it has not been damaged during transport. Event of problems, contact the dealer or your nearest After-sales e. Once installed, packaging waste (plastic, styrofoam parts must be stored out of reach of children - risk of suff ocation. Thence must be disconnected from the power supply before any tation operation - risk of electric shock. During installation, make the appliance does not damage the power cable - risk of fire or c shock. Only activate the appliance when the installation has been eted.

WARNING: In the appliance enclosure or in the built-in structure, ventilation openings clear of obstruction.
Install the dryer in rooms with adequate ventilation (open door, ventilation grid or slot larger than 500 cm2) in order to avoid the backflow of gases into the room from appliances burning other fuels, including open fires. If the dryer is installed under a worktop, provide a distance of 10 mm between the upper panel of the dryer and any objects above it, and 15 mm between the sides of the appliance and the walls or furniture units adjacent to it.

Make sure that the appliance is not installed near a heat source.

The appliance must not be installed behind a lockable door, a door or a door with a hinge on the opposite side to that of the dryer, in such a way that a full opening of the tumble dryer door is tested.

The appliance shall be placed against the wall to limit access to its de.

Take care not to use a carpet which obstructs ventilation openings base of the dryer.

If you want to stack the dryer on a washing machine, first contact ter-Sales Service or your specialist dealer to verify the complete list able models. The stacking is only possible if the dryer is attached to washing machine by means of the appropriate stacking kit available through our After-Sales Service or your specialist dealer. Instructions for correct assembly are supplied with the stacking kit.
ELECTRICAL WARNINGS

It must be possible to disconnect the appliance from the power by unplugging it if plug is accessible, or by a multi-pole switch ed upstream of the socket in accordance with the wiring rules and appliance must be earthed in conformity with national electrical safety wards.

Do not use extension leads, multiple sockets or adapters.
The electrical components must not be accessible to the user after installation. Do not use the appliance when you are wet or barefoot. Do not operate this appliance if it has a damaged power cable or plug, if it is not working properly, or if it has been damaged or dropped.
If the supply cord is damaged, it must be replaced with an identical one by the manufacturer, its service agent or similarly qualified persons in order to avoid a hazard - risk of electric shock..
CLEANING AND MAINTENANCE
WARNING: Ensure that the appliance is switched off and
disconnected from the power supply before performing any maintenance operation. To avoid risk of personal injury use protective gloves (risk of laceration) and safety shoes (risk of contusion); be sure to handle by two persons (reduce load); never use steam cleaning equipment (risk of electric shock). Non-professional repairs not authorized by the manufacturer could result in a risk to health and safety, for which the manufacturer cannot be held liable. Any defect or damage caused from non-professional repairs or maintenance will not be covered by the guarantee, the terms of which are outlined in the document delivered with the unit.

Make sure that all lint traps are cleaned before starting any drying
cycle.

Do not use any tool to clean the secondary filter, which can
damage the appliance leading to a gas leakage.
DISPOSAL OF PACKAGING MATERIALS
The packaging material is 100% recyclable and is marked with the recycle symbol.

The various parts of the packaging must therefore be disposed of responsibly and in full compliance with local authority regulations governing waste disposal.
DISPOSAL OF HOUSEHOLD APPLIANCES
This appliance is manufactured with recyclable or reusable materials. Dispose of it in accordance with local waste disposal regulations. For further information on the treatment, recovery and recycling of household electrical appliances, contact your local authority, the collection service for household waste or the store where you purchased the appliance. This appliance is marked in compliance with European Directive 2012/19/EU, Waste Electrical and Electronic Equipment (WEEE) and with the Waste Electrical and Electronic Equipment regulations 2013 (as amended). By ensuring this product is disposed of correctly, you will help prevent negative consequences for the environment and human health.
The symbol on the product or on the accompanying documentation indicates that it should not be treated as domestic waste but must be taken to an appropriate collection center for the recycling of electrical and electronic equipment.
- Washing machine cannot be placed on top of the drying machine.
| Installation Table for Washing Machine and Tumble Dryer | |
| Stacking Kit Type Depth Size (TD=Tumble Dryer, WM: Washing Machine) | |
| Plastic - 54/60cm w or w/o belt 60cm TD --> WM≥50cm / 54cm TD --> WM>45cm | |
| Plastic - 46cm w or w/o belt 46cm TD --> WM≥54cm | |
| With Shelf - 60cm 60cm TD --> WM≥50cm | |
| With Shelf - 54cm 54cm TD --> WM>45cm |

Policies, standard documentation, ordering of spare parts and additional product information can be found by:
Using QR code in your appliance.
Visiting our website docs.hotpoint.eu and parts-selfservice.europeanappliances.com
Alternatively, contact our After-sales Service (See phone number in the warranty booklet). When contacting our After-sales Service, please state the codes provided on your product's identification plate. You can find more information about your model online at https://eprel.ec.europa.eu/ which is the official EU EPREL product database. After selecting the Product Category, enter the Model Identifier of the product. The Model Identifier is made up of letters and numbers and can be found on the identification plate, as Mod. (see image on the right).
In order to receive a more complete assistance, please register your product on www.register10.eu

2.1 Compliance with the WEEE Regulations and Waste Disposal

This product does not contain the dangerous and prohibited materials indicated in the “Regulation on The Control of Waste Electrical and Electronic Equipment” published by Ministry of Environment and Urbanisation of Republic of Turkey. Complies WEEE Regulations. This product was manufactured from recyclable and reusable high quality parts and materials. Therefore, do not dispose of this product with other domestic wastes at the end of its life cycle. Take it to a collection point for electrical and electronic equipment. You can ask your local administration about these collection points. You can help protect the environment and natural resources by delivering the used products for recycling.

Also R290 is a flammable refrigerant. Therefore ensure that the system and pipes are not damaged during operation and transportation.
Keep the product from heat sources, otherwise it may catch fire if damaged.
Do not dispose of the product by throwing it into fire.
2.2 Packaging information
The product's packaging is made of recyclable materials, in accordance with the National Legislation. Do not dispose the packaging waste with the household waste or other wastes, dispose it to the packaging collection areas specified by local authorities.
2.3 Standard conformity and test information / EU declaration of conformity

The development, manufacturing and sales phases of this product is conducted in conformity with the safety rules specified in all related instructions of the European Union.
3 Your drying machine
3.1 Technical specifications
EN
| Height (Min. / Max.) 84,6 cm / 86,6 cm* | |
| Width 59,8 cm | |
| Depth 67,2 cm | |
| Capacity (max.) 9 kg** | |
| Net weight (± %10) 44 kg | |
| Voltage | See type label***Rated power input |
| Model code |

ENERG

SUPPLIER'S NAME
MODEL IDENTIFIER→(*)


The model information as stored in the product database can be reached by entering following website and searching for your model identifier (*) found on energy label.
https://eprel.ec.europa.eu/
* Min. height: Height with the adjustable stand closed.
Max. height: Height with the adjustable stand opened at maximum height.
** Weight of dry laundry before washing.
*** Data plate is under the door on the drying machine.

In order to increase the drying machine's quality, the technical specifications may be changed without prior notice.
Figures in this manual are schematic and may not exactly match the product.
The values provided with the drying machine or its accompanying documents are laboratory readings in accordance with the respective standards. These values may differ depending on the use and ambient conditions.
3.2 General appearance

- Top panel
- Control panel
- Loading door
- Toe board handle
- Ventilation grids
- Adjustable feet
- Toe board
- Rating plate
- Lint filter
- Water tank drawer
- Power cord
3.3 Scope of delivery
 | 1. Water discharge hose* | 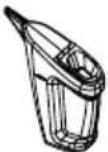 | 6. Water filling cap* |
 | 2. Filter drawer spare sponge* |  | 7. Pure Water* |
 | 3. User Manual | 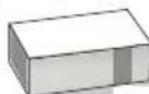 | 8. Odour Capsule Group* |
 | 4. Drying basket* |  | 9. Brush* |
 | 5. Drying basket user manual* |  | 10. Filter cloth* |
*Optional - may not be included, depends on model.
4 Installation

Read the "Safety Instructions" first!
Before consulting the nearest Authorized Service for installing the drying machine, see the information in the user guide and make sure the electric and water utilities are as required. If not, call an electrician and plumber to arrange the utilities as necessary.

It is customer's responsibility to prepare the location the drying machine shall be placed on and also have power and waste water installation prepared.

Check for any damage on the drying machine before installing it. If drying machine is damaged, do not get it installed. Damaged products cause a risk for your safety. Wait 12 hours prior to operating the drying machine.
NOTICE
The product includes a cooling agent and if the product is operated right after its transported, it may get damaged. After each time the product is moved, it shall be left to rest for 12 hours.
4.1 Right place for installation
- Install the drying machine on a flat and stable surface.
- Dryer machine is heavy. Do not move it by yourself.
- Operate the drying machine in an environment free of dust with good ventilation.
- The gap between the drying machine and the floor shall not be reduced via materials such as rugs, pieces of wood and bands.
- Do not block the ventilation grilles of the drying machine.
-
There shall not be doors that can be locked, sliding doors or hinged doors near the installation environment of the drying machine that may block the loading door to be opened.
-
Once the drying machine is installed, the connections must stay stable. After placing the drying machine, ensure that the back wall does not come in contact with any extrusion (a water tap, electrical outlet etc.).
- Place the drying machine with at least 1 cm space between the product and the furniture edges.
- Your drying machine is suitable to be operated between +5°C to +35°C. If operated outside this temperature range, your drying machine's operation may be compromised and get damaged.
- The drying machine shall not be placed with the back side against a wall.

Do not place the drying machine on its power cord.
* Ignore following warning if your product's system does not contains R290.

Dryer contains R290 refrigerant.* R290 is an environment-friendly, but flammable refrigerant.* Ensure that the air inlet of the dryer is open and it is well-ventilated.* Keep potential flame sources away from the dryer.*
4.2 Removing the shipping safety group


Remove the shipping safety group prior to first use the product.
NOTICE
Do not leave an accessory or any parts of the shipping safety group inside the drum.
4.3 Water connection
Instead of periodically draining the water accumulated in the water tank, you can discharge via the water discharge hose supplied with the drying machine.
Connecting the water drainage hose


1-2 Remove the hose behind the drying machine by pulling it manually from where it is attached. Do not use a tool to remove the hose.
3 Insert one end of the water discharge hose supplied with the drying machine to where you have removed the hose on the drying machine.
4 Fix the other end of the water discharge hose to directly waste water drainage or a sink.
| NOTICE | The water discharge hose shall be fixed at maximum 80 cm height.Ensure that the water discharge hose do not get kinked, collapsed or pressed on between the discharge and the drying machine.Hose shall be connected not to be disconnected from its location.Leaked water may cause damage.Do not extend the water drainage hose.Check whether the water runs at an appropriate flow. The drainage line shall not be closed or clogged. |

If an accessory package is provided with your product, check the detailed instructions.
4.4 Adjusting the stands
Until the drying machine stands level and sturdy, adjust the stands by turning them left and right.

4.5 Moving the drying machine
- Drain the water in the drying machine completely.
- If the product is connected via direct discharge, remove the hose connections.

The drying machine is recommended to be moved in upright position. Otherwise, tilt it to the right side when viewed from the front and move the drying machine. Wait 12 hours prior to operating the drying machine.
4.6 Warning regarding the noise


As the product is operated, metallic noises may come from the compressor from time to time, it is normal.

When the product is operated, the accumulated water is pumped to the water tank. It is normal to hear pumping sounds from the appliance during this operation.
4.7 Replacing the lighting bulb
If your drying machine has drum lighting lamp; Consult the authorized service to replace the bulb/LED used in lighting your drying machine. The bulb in this product is not suitable for home lighting. The intended use of this lamp is to ensure safely loading the laundry to the drying machine. The lamps used in this appliance is resistant to heavy physical conditions such as temperatures over 50°C.
5 Preparation

Read the "Safety Instructions" first!
5.1 Laundry suitable for drying in drying machine
| NOTICE | Laundry that are not drying machine safe may damage the appliance and the laundry during drying. Follow the instructions on the labels on the laundry to be dried. Only dry the laundry with “drying machine safe” written on their labels. |

Do not dry with dryer
5.2 Laundry not suitable for drying in drying machine
| NOTICE | Undergarments with metal supports shall not be dried in drying machine. If these metal supports get loose and ripped from the garment, it may damage the machine.Delicate embroidery textiles, cotton and silk garments, garments manufactured from delicate and valuable textiles, non breathing garments and tulle curtains shall not be dried in drying machine. |
5.3 Preparing the laundry to be dried
| NOTICE | Items such as coins, metal parts, needles, nails, screws, stones etc. may damage the drum group of the product or may cause functional operation issues. Therefore check all laundry that will be loaded to the product.Dry the laundry with metal accessories such as zippers by turning them inside out.Close the zippers, hooks and clasps, button up the covers' buttons, tie textile belts and apron belts. |
5.4 What to do for energy saving
- Use the highest possible wringing option as you wash the laundry. Therefore you can reduce the drying period and reduce energy consumption. Sort the laundry based on their types and thickness. Dry same types of laundry together. For instance kitchen towels and table cloths dry faster than bathroom towels.
- Follow the recommendations in the user manual for program selection.
- During drying do not open the loading door unless necessary. If you are required to open the loading door, do not keep it open for too long.
- Do not add wet laundry as the drying machine operates.
- Clean the Fibre Filter before and after each drying session.
- For condensation models, be sure to clean the condenser at least once a month or after each 30 drying sessions.
- Make sure the filters are clean. Refer to maintenance and cleaning for details.
- For models with flue, follow the flue connection rules specified in the guides and clean the flue.
- During drying session, properly ventilate the environment in which the drying machine is in.
-
On models with heat pump, check the condenser at least every six months and clean it if it is dirty.
-
The Eco program is the most energy-efficient program for drying wet cotton laundry and is used to assess compliance with environmentally conscious design regulations.
- Keep the loading door shut to prevent heat loss.
5.5 Correct load capacity
NOTICE

- Loading the domestic drying machine up to the maximum capacity specified by the manufacturer for the relevant programs will help save energy.
If the laundry in the product exceed maximum load capacity, it may not operate as intended and may cause material damage or damage the product. For each program, follow the maximum load capacity.
The weights below are provided as examples.
| Laundry | Approx. weight (g)* | Laundry | Approx. weight (g)* |
| Cotton bedding (double size) | 1500 Cotton dress 500 | ||
| Bedding (single size) | 1000 Dress 350 | ||
| Bed sheet (double size) | 500 Denim 700 | ||
| Bed sheet (single size) | 350 | Handkerchief (10 pcs) | 100 |
| Large table cloth | 700 T-Shirt 125 | ||
| Small table cloth | 250 Blouse 150 | ||
| Tea napkin | 100 Cotton shirt 300 | ||
| Bath towel | 700 Shirt 200 | ||
| Hand towel | 350 |
*Weight of dry laundry before washing.
6 Running the product
6.1 Control Panel

- On/Off/Program Selection button.
- Start / Stand-by button.
- End time selection button.
-
Time program selection button.
-
Low temperature selection button.
- Audible warning and child lock selection button.
- Wrinkle prevention selection button/ Drum light button.
- Dryness level selection button.
6.2 Symbols

6.3. Preparation of drying machine
- Plug the drying machine.
- Open the loading door.
- Remove any foreign material inside it.
- Place the laundry to the drying machine without jamming them.
- Push and close the loading door.
NOTICE
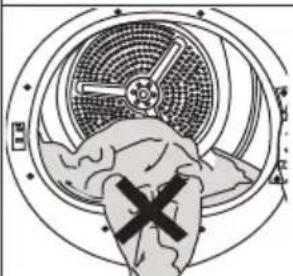
Ensure that no laundry is jammed to the loading door. Do not close the loading door with force.
- Select the desired program by using On/Off/Program Selection button, the machine will turn on.
| Selecting the program with the On/Off/Program Selection button does not mean that the program started. Press Start / Stand-by button to start the program. |
6.4 Program selection and consumption chart
| EN | ||||
| Programmes Programme Description | Capacity (kg) | Spin speed in washing machine (rpm) | Drying Time (minutes) | |
| Cotton | You can dry your heat-resistant cotton textiles with this programme. A drying setting suitable for the thickness of the products to be dried and the desired level of dryness should be selected. | 9 1000 | 210 | |
| Eco | It dries single layer, casual cotton textiles in the most economical way. | 9 1000 | 195 | |
| Cottons Iron dry*** | You may dry your cotton laundry to be ironed in this program to have them slightly damp for ease of ironing. (Shirt, T-shirt, tablecloth, etc.) | 9 1000 | 160 | |
| Synthetics | You can dry all your synthetic textiles with this programme. A drying setting suitable for the level of dryness you desire should be selected. | 4 800 | 80 | |
| Mixed | Use this programme to dry non-pigmenting synthetic and cotton laundry items together.Sports and fitness clothes may be dried with this program. | 6 1000 | 175 | |
| Wool | Use this programme to dry woolen garments such as jumpers that are washed according to the instructions.It is recommended that garments would be removed at the end of the programme. | 1,5 600 | 148 | |
| Extra silence | In this programme the level of noise emitted to the ambient will be the lowest.With this program you can dry your cotton or synthetic blend clothes quietly. | 8 1000 | 240 | |
| Delicates | You may dry your delicate laundry or laundry with hand wash symbol (silk blouses, thin underwear, etc.) at low temperature in this program. | 4 800 | 80 | |
| Timed drying PetHairCare | You may select from time programmes between 10 and 160 minutes to achieve the desired drying level at low temperature. In this programme, tumble drier's operation lasts for the set time independently from the dryness of laundry.PetHairCare is a refreshing function making ironing easier on less worn clothes and reducing odours (cigarette, food etc.) due to medium air. | --- | ||
| Jeans | You may dry denim pants, skirts, shirts or jackets in this program. | 4 1200 | 130 | |
| Sport | Use it to dry your clothes made of synthetics, cotton or mixed fabrics or waterproof products such as functional jacket, raincoat etc. Turn them inside out prior to drying. | 2 1000 | 135 | |
| Duvet Use it to dry your feather filled duvet - 800 165 | ||||
| Shirts | It dries the shirts in a more sensitive manner, and causes less creasing and easier ironing. | 1,5 1200 | 50 | |
| Rapid 30 Use this program to have 2 shirts ready for ironing. 0,5 1200 30 | ||||
| Extra heat | This program is designed to dry your washed textiles at a higher temperature than other cycles, making it ideal for items like baby clothes, underwear, towels, and similar fabrics. | 5 800 200 | ||
| Refresh | This program refreshes your dried clothes with warm air. | 1,5 - 120 | ||
| Energy consumption values | ||||
| Programmes Capacity (kg) | Spin speed in washing machine (rpm) | Approximate amount of remaining humidity | Energy consumption value KWh | |
| Cottons Eco* 9 1000 60% 1,69 | ||||
| Cottons Iron dry | 9 1000 60% 1,35 | |||
| Synthetics Cupboard Dry | 4 | 800 40% | 0,80 | |
 | “If you regularly dry the 9 Kg maximum load of Cottons we suggest to connect the drain hose to prevent the dryer stopping mid-cycle in order to empty the tank” (see Section “Connection to the drain”) | |||
* Above values have been specified under standard conditions. Consumption values may vary from the values in the chart depending on laundry type, spin speed, ambient conditions and voltage levels.
***The “Cotton Iron Dry” program can be set by selecting the “Cotton” program on the control panel and then choosing the “Iron Dry” drying level using the dryness level selection button. You can identify the “Iron Dry” symbol in section 6.2 Symbols.
| EN | ||||
| General Programs | ||||
| Programmes Capacity (kg) | Program period (hour:min) | Energy consumption (Kwh) | ||
| Cottons Eco 9 3:15 - | ||||
| Cottons Eco 4,5 2:00 - | ||||
| Cottons Iron dry 9 2:40 - | ||||
| Cottons Iron dry 4,5 1:36 - | ||||
| Cottons Cupboard Dry 9 3:30 - | ||||
| Cottons Cupboard Dry 4,5 2:15 - | ||||
| Cottons Cupboard Dry Plus 9 3:40 - | ||||
| Cottons Cupboard Dry Plus 4,5 2:25 - | ||||
| Cotton Cupboard Dry ++ 9 3:50 - | ||||
| Cotton Cupboard Dry ++ 4,5 2:35 - | ||||
| Synthetics Iron Dry 9 1:05 - | ||||
| Synthetics Cupboard Dry 9 1:20 - | ||||
| Synthetic Cupboard Dry +y | 9 1:30 - | |||
| Synthetic Cupboard Dry ++ | 9 0:00 - | |||
| GentleCare | 2 1:20 - | |||
| Wool protect | 1,5 2:28 - | |||
| The values given for the programs other than Eco are only indicative. | ||||
| Different modes of operation | ||||
| Power consumption (W) | Power off mode (W) (if present) | Delayed operation mode (W) (if present) | Stand-by mode (W) (if present) | Stand-by mode with connectivity function (W) (if present) |
| 0,47 | 4,00 | 0,47 | - | |
| Acoustic airborne noise emission of drying cycle dB(A): | 64 | |||
6.5 Auxiliary functions Dryness level
Dryness level button is used for adjusting to desired dryness. Program time may change depending on the selection.

You can activate this function only prior to start of program.
Wrinkle prevention
You can turn on and off the wrinkle prevention function by pressing the wrinkle prevention selection button. If you will not take the laundry out immediately after the program has completed, you may use Wrinkle prevention function to prevent wrinkling of your laundry.
Audible warning
Drying machine makes an audible warning when the program is completed. Press the "Audible Warning" button if you do not want audible warning. When you press the audible warning button, the light goes off and it does not sound when the program is completed.

You can select this function before the program starts or after the program starts.
Low temperature
You can activate this function only prior to start of a program. You can activate this function if you want to dry your laundry at a lower temperature. The program duration will be longer after it becomes activated.
End time
You can delay the end time of the program up to 24 hours with end time function.
- Open the loading door and place the laundry.
- Select the drying program.
- Press the End Time selection button and set the delay time you wish. End time LED turns on. (When pressed and hold the button, End Time proceeds non-stop).
- Press the Start / Stand-by button. End Time countdown begins. The “:” sign in the middle of displayed delay time flashes.

You can add or remove laundry within end time. Displayed time is the sum of normal drying time and end time. End Time LED turns off at the end of countdown, the drying starts and the drying LED turns on.
Changing the end time
If you want to change the duration during the countdown:
Pause the program and Turn the On/Off/Program Selection button and cancel the program. Select the desired program and repeat the End Time selection.
Cancelling the end time function
If you want to cancel the end time countdown and start the program immediately:
Pause the program and Turn the On/Off/Program Selection button and cancel the program. Select the desired program and press the "Start/Pause" button.
Drum Light
You can turn on and off the drum light by pressing this button. The light turns on when the button is pressed and turns off after certain time.
6.6 Warning indicators

Warning indicators may vary depending on the model of your drying machine.
Filter cleaning
When the program is completed, the warning indicator for filter cleaning turns on.
Water tank
If the water tank fills up while the program continues, the warning indicator starts flashing and the machine goes into stand-by. In this case, empty the water tank and start the program by pressing the Start / Stand-by button. Warning indicator turns off and program resumes.
Cleaning of filter drawer/heat exchanger
Warning symbol flashes periodically to remind that filter drawer must be cleaned.
6.7 Starting the program
Press the Start/Stand-by button to start the program.
Start/Stand-by and Drying indicators turn on to show that program started.
6.8 Child Lock
The drying machine has a child lock which prevents the program flow from being interrupted when the buttons are pressed during a program. When the Child Lock is activated, all buttons on the panel except the On/Off/Program Selection button are deactivated.
Press the Audible Warning button for 3 seconds in order to activate the child lock.
The child lock has to be deactivated to be able to start a new program after the current program is finished or to be able to interfere with the program. To deactivate the child lock, keep the same buttons pressed for 3 seconds.

When the child lock is activated, the child lock warning indicator on the screen turns on.
When the child lock is active:
The drying machine runs, or in stand-by state the indicator symbols will not change upon changing the position of the program selection button.

When the drying machine is operated and the child lock is active, if the program selection button is turned, a double beeping noise will be heard. If the child lock is deactivated before the program selection button is turned to its original place, the program will be terminated since the program selection button is displaced.
6.9 Changing the program after it is started
You can change the program you selected to dry your laundry with a different program after the drying machine starts running.
- For example, Pause the program and turn the On/Off/Program Selection button to select the Extra Dry program in order to select the Extra Dry program instead of Ironing Dryness.
- Press the Start/Stand-by button to start the program.
Adding and removing clothes during stand-by
If you want to add or remove clothes to/from the drying machine after the drying program starts:
- Press the Start/Stand-by button to put the drying machine in Stand-by state. The drying operation stops.
- Open the loading door while in Stand-by state, and close the door after you remove or add laundry.
- Press the Start/Stand-by button to start the program.

Adding laundry after the drying operation starts may cause the dried laundry inside the drying machine to mix with wet laundry and leave the laundry damp at the end of operation.
Adding or removing laundry during drying may be repeated as many times as you wish. But this operation continuously interrupts the drying operation, and thus increases program duration and energy consumption. So, it is recommended to add laundry before the program starts. If a new program is selected by turning the program selection button while the drying machine is in stand-by, the running program terminates.

Do not touch the inner surface of the drum while adding or removing clothes during a continuing program. The drum surface is hot.
6.10 Cancelling the program
If you want to cancel the program and terminate the drying operation for any reason after the drying machine starts running, Pause the program and turn the On/Off/Program Selection button; the program terminates.

The inside of the drying machine shall be extremely hot when you cancel the program during machine operation, so run the refreshing program to allow it to cool down.
6.11 End of program
When the program ends, the LED's of End/Wrinkle Prevention and Fibre Filter Cleaning Warning on the program follow-up indicator turn on. Loading door can be opened and drying machine is ready for another operation.
Turn the On/Off/Program Selection button to On/Off position in order to turn off the drying machine.

If the Wrinkle Prevention mode is active and the laundry is not removed after the program is completed, the wrinkle prevention function activates for 2 hours to prevent the laundry inside the machine to get wrinkled. The program tumbles the laundry with 10-minute intervals to prevent them from wrinkling.
6.12 Odour feature
If your drying machine has odour feature, read the ProScent manual to use this feature.
6.13 PetHairCare cycle
PetHairCare is a refreshing cycle designed to remove unwanted pet hair (certified by an independent institution, score 4.6/5), reduce airborne odours, and gently smooth out lightly worn dry clothes. Used on dry laundry.
For pet hair removal
Use with 1–3 pieces of dry clothing and run the program for 80 minutes
For odour and wrinkle reduction
Use with 1–5 pieces of dry clothing and run the program for 50 minutes.
Note: For clothes that have absorbed strong scents—such as perfumes, deodorants, or sweat—it's best to wash them to fully eliminate odours.
Drying Caution
Do not use this function with items that have sharp or hard accessories, or those made of leather.
Filling the water tank
1 blue wing in the machine performs the process of watering the laundry.
If the wing is on top, you can manually rotate the drum to the lower position and fill the water.
Before using the PetHairCare program, the water in the filling container at max. Level must be filled manually into the wing.
To remove wrinkles, tap or drinking water should be used.
A few drops of water that may overflow from the wing during filling will not cause any problem.


Additives or descaling agents should not be used.
Chemicals that can be dissolved with liquid chemicals and liquids should not be used.
Starting the Program
The wing should be brought to the lower position and should be filled with water up to the marked area with the filling container. The PetHairCare program must be selected.
When you select the program, the screen time will appear as 10 minutes. The time program is set to the desired time by pressing the selection button and the Start/Standy-By button is pressed.
Important Note
This function does not wash clothes. It is intended to remove pet hair, minimize odours, and freshen garments so they can be worn again.
7 Maintenance and cleaning
| Read the “Safety Instructions” first! |
7.1 Lint filters (internal and external filters) / Cleaning of the Interior Surface of the Loading Door
The hair and fibres that are separated from the laundry during drying process is collected by the Lint filter. Insufficient cleaning of filters can increase the drying duration and energy consumption level.
Insufficient cleaning of filters can cause damp laundries after drying cycle. While cleaning the filters, in order to prevent microplastics from spreading to the water system used, the dirt and hair should be removed. While cleaning the filters, the water should not be discharged towards the drains.
| After each drying cycle, clean the lint filter and the inner surface of the loading door. |
| NOTICE | Your drying machine has 2 lint filters with one placed inside the other. Do not operate the product without the lint filters. |
To clean the lint filter:
- Open the loading door.
- Hold the first part (inner filter) of the two part lint filter and remove it by pulling it upwards.

- Remove the second part (outer filter) by pulling it upwards.

| Ensure that hair, fibre and cotton balls do not fall into the slot where the filters are installed. |
- Open both of the lint filters (outer and inner) and remove the fibres with your hands or with the brush on the air deflector. You can clean the hair in the filters with a vacuum cleaner. The lint should be thrown in the garbage bin and not washed through the drain in order to avoid spreading microplastics in the used water system.


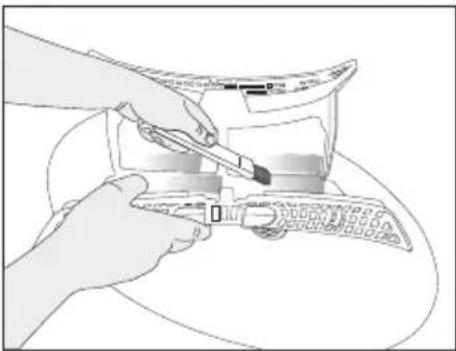
- Insert the lint filters on one another and place it back in its place.
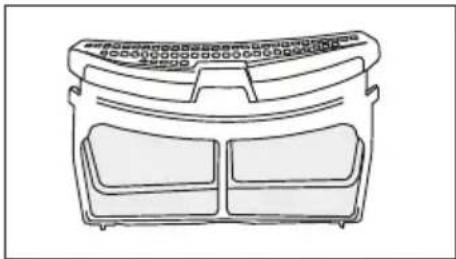
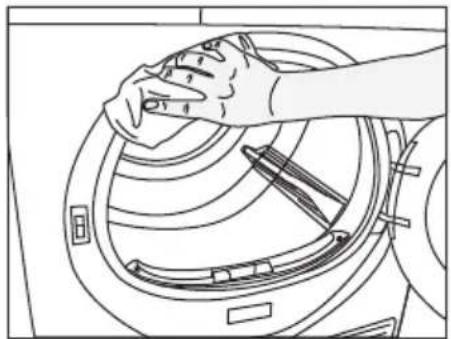
- Clean the inner surface of the loading door and the gasket with a soft damp cloth or the brush on the air deflector.

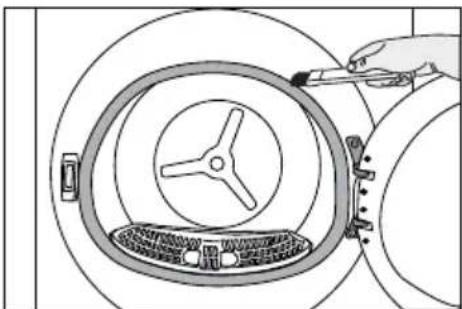

7.2 Cleaning the sensor
The drying machine has humidity sensors that detect whether the laundry is dry.
To clean the sensors:
Open the drying machine loading door.
If the machine is hot due to drying operation, wait until it cools.
Clean the metal surfaces of the sensor with a soft cloth dampened with vinegar and then dry.
| Clean the metal surfaces of the sensor 4 times a year.Do not use metal tools to clean the sensors' metal surfaces. |
| Due to fire and explosion hazard, do not use solutions, cleaning materials or similar tools to clean sensors. |

7.3 Emptying the water tank
During drying, the moisture is removed from the laundry and condensed, then the water is accumulated in the water tank. Empty the water tank after each drying session.
| Condensed water is not potable water!Do not remove the water tank as a program is running! |
If you do not empty the water tank, during the next drying sessions the machine will stop operating due to the water tank being full and a Water Tank warning icon will blink. In this case empty the water tank and to continue drying operation, press the Start / Stand-by button.
To drain the water tank:
Pull the water tank out from its drawer carefully.
Drain the water in the tank.
Remove the water tank in the drawer or the kickplate carefully.


If lint builds up in the funnel on the water tank, remove it under running water.
Place back the water tank.

If direct discharge option is used, water tank is not required to be drained.
7.4 Cleaning the condenser
The hair and the fibre that are not collected by the lint filter accumulates on the metal surface of the condenser behind the air deflector. These fibres shall be cleaned regularly.
If the condenser cleaning icon blinks, check the metal surface. If there is any fibre, clean it. It must be checked at least every 6 months.

Open the toe board by pulling its button.

Move the latches to open the air deflector lid.

Pull the brush to the left to remove it. You can use the cleaning brush to clean filter, condensing metal surface and accumulated fibre on the door.

The cleaning brush is inside the documentation bag. Get your brush from the documentation bag and insert it to its place on the air deflector to store it.

Clean the fibre on the metal surface of the condenser with damp cloth or the brush on the air deflector in up - down direction. Do not clean with left - right direction since it will damage the metal plates of the condenser.
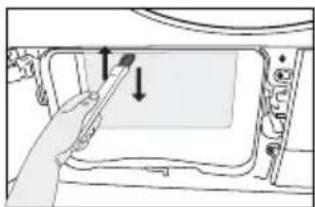
You can use a vacuum cleaner with a brush for cleaning. If the vacuum cleaner does not have a brush, it is not recommended to be used for condenser cleaning.

After cleaning the filter, door and the condenser, drag the brush to the right and lock it in its place.
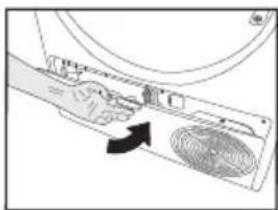
After the cleaning process is completed, place the air deflector cover to its place, move the latches to close it and close the toe board.

You can clean by hand, provided you wear protective gloves. Do not try to clean with bare hands. The condenser fins may damage your hands. Cleaning from left to right may damage the condenser fins. This may lead to drying issues.

 | When the air deflector cover is removed, it is normal to have water at the plastic section in front of the condenser. |


| NOTICE | Do not use abrasive materials or steel wool to clean the drum. |
8 Troubleshooting
| The drying takes too long. |
| Lint filter (interior and exterior filters) pores may be clogged. >>> Can be cleaned with vacuum cleaner.The front side of the condenser may be clogged. >>> Clean the front of the condenser.The ventilation grills in front of the machine might be closed. >>> Remove any object in front of the ventilation grills that blocks ventilation.Ventilation may be insufficient if the dryer is installed in a small space. Open the door or windows to prevent the room temperature from rising very high.If there is a humidity sensor;Limescale may have accumulated on the humidity sensor. >>> Clean the humidity sensor.The machine may be overloaded with laundry. >>> Do not load the drying machine excessively.The laundry may not have been spun enough. >>> Spin at a higher speed in the washing machine. |
| The laundry comes out damp after drying. |
| The right program for the type of laundry might not have been used. >>> Check the care labels on the laundry and select a program ideal for the kind of laundry or use longer programs.Lint filter (interior and exterior filters) pores may be clogged. >>> Can be cleaned with vacuum cleaner.The front side of the condenser may be clogged. >>> Clean the front of the condenser.The machine may be overloaded with laundry. >>> Do not load the drying machine excessively.The laundry may not have been spun enough. >>> Spin at a higher speed in the washing machine. |
| Drying machine does not turn on or program cannot be started. The dryer does not turn on when set. |
| The power plug may not be plugged in. >>> Make sure the power plug is plugged in.The loading door may be left open. >>> Make sure that the loading door is properly closed.The program may not have been set or the Start / Pause button may not have been pressed. >>> Make sure that the program is set and it is not in Standby position.Child lock may be activated. >>> Turn off the child lock. |
| The program was interrupted for no reason. |
| The loading door might not be closed properly. >>> Make sure that the loading door is properly closed.There might be a power outage. >>> Press the Start / Standby / Cancel button to start the program.The water tank may be full. >>> Empty the water tank. |
| Laundry shrunk, matted or spoiled. |
| The right program for the type of laundry may not have been used. Check the maintenance labels on the clothes and select a program suitable for the clothes. |
| Water is flowing from the loading door. |
| Lint might have gathered on the inner surfaces of the loading door and on the surfaces of the loading door gasket.>>> Clean the inner surfaces of the loading door and the loading door gasket surfaces. |
| The loading door opens by itself. |
| The loading door might not be closed properly. >>> Push the loading door until the closing sound is heard. |
| The water tank warning symbol is on/flashing. |
| The water tank may be full. >>> Empty the water tank.The water discharge hose might have folded. If the product is connected directly to the water drain check the water discharge hose. |
| The lighting inside the drying machine does not turn on. (in models with lamps) |
| The drying machine might not have been turned on by the On/Off button. >>> Check that the drying machine is turned on.Lamp might be broken. >>> Contact Authorized Service to replace the lamp. |
| Anti-Wrinkle icon or light is lit. |
| An anti-wrinkle program that prevents the laundry in the dryer from creasing may be activated. >>> Turn the drier off and remove the laundry. |
| Fiber filter cleaning icon is lit |
| Lint filters (interior and exterior filters) may be unclean. >>> Can be cleaned with vacuum cleaner.A layer may be formed in the lint filter pores, leading to clogging. >>> Can be cleaned with vacuum cleaner.A layer may be formed in the lint filter (inner and outer filters) pores that leads to clogging.<<Can be cleaned with vacuum cleaner.>>Lint filters might not be in place. >>> Insert the interior and exterior filters into their places.Eco-friendly filter cloth may not be installed on the plastic part, and the front of the condenser may have clogged.>>>Install the eco-friendly filter to the plastic part and place it on the filter housing.Eco-friendly filters may not have been replaced, although the warning symbol is illuminated. "Replace your filter." |
| The machine gives an audible warning, |
| Lint filters might not be in place. >>> Insert the interior and exterior filters into their places.Filters of the machine might not have been installed.>>> Install the lint filters (internal and external) or the environmentally-friendly filter in their housing. |
| The condenser warning icon is flashing. |
| Condenser front may be clogged with fibres. >>> Clean the front of the condenser.Lint filters might not be in place. >>> Insert the interior and exterior filters into their places. |
| The lighting inside the drying machine turns on. (in models with lamps) |
| If the drying machine is plugged to the power outlet, the On/Off button is pressed and the door is open; the light turns on. >>> Unplug the drying machine or bring the On/Off button to Off position. |
| Wi-Fi icon flashes continuously. (HomeWhiz Function models) |
| >>> The product may not be connected to the wireless network. Follow the instructions to connect to the network.The device the appliance uses to connect to the network may be faulty. Check it. The appliance might not be connected to the network due to being out of wi-fi range. |
| Check the steps below if you see "F L t" on the screen. |
| The filters may be dirty. Clean the internal and external filtersIn the loading door area, if you are using the inner and outer dual filters. >>> Make sure that both filters are installed.The front side of the condenser may be dirty. >>> Open and check the kick zone and make sure it is clean.Check out the Maintenance and Cleaning section.The foreign objects, if any, should be removed from the drying machine drum,Spare parts will be available for a period of up to 10 years, according to the specific Regulation requirements. |

If the problem persists after following the instructions in this section, contact your vendor or an Authorized Service. Never attempt to repair a malfunctioning product yourself.

If you experience a problem with any part of your appliance, you can request a replacement by consulting the nearest authorised service with the appliance model number. Operating the appliance with non-genuine parts may cause it to malfunction. The manufacturer and distributor are not responsible for malfunctions caused by non-genuine parts.
9 Waiver Warning

Some (simple) malfunctions can be fixed by the end-user without creating any safety issues or leading to unsafe operation provided these instructions are followed. (See the “I Want to Fix it Myself” Section.) Therefore, other than the parts in the “I Want to Fix it Myself” section that end-users are allowed to fix themselves, having the appliance fixed at an authorised service station is recommended in order to prevent safety issues and to maintain the Hotpoint product warranty.
9.1 I want to fix it myself
The repairs made by end-users may include the following spare parts. Loading door, door seal, door handles, door locking mechanism and hinges, lint filters, air filters, peripheral plastic parts, condenser tank. (You can find a current list of spare parts at https://parts-selfservice.europeanappliances.com/
as of 1 March 2021.) Furthermore, be sure to carry out your repairs by following the instructions at https://parts-selfservice.europeanappliances.com/
to ensure product safety and prevent serious injury. For your safety, unplug the product first before making any repairs. Hotpoint cannot be held responsible for safety issues that may arise because of repair work or attempted repairs on parts other than those on the current spare parts list or found at the https://parts-selfservice.europeanappliances.com/
address and carried out by end-users not following the instructions in the user manuals or found at the https://parts-selfservice.europeanappliances.com/
address. Such cases will void the Hotpoint warranty. We therefore strongly advise end-users to refrain from repairing parts other than the spare parts specified above and to apply to the authorised service station when required.
These kinds of repairs carried out by end-users can lead to safety issues, damage the product, and cause fires, flooding, electrocution and serious injury. Not limited to those listed above, the following parts must be repaired by the authorised station. Motor, pump, motherboard, motor board, screen card, etc. The manufacturer/seller cannot be held responsible for any situation caused by end-users not following what is written above. The repairs made by end-users may include the following spare parts. Loading door, door seal, door handles, door locking mechanism and hinges, lint filters, air filters, peripheral plastic parts, condenser tank. (You can find a current list of spare parts at https://parts-selfservice.europeanappliances.com/
as of 1 March 2021.) Furthermore, be sure to carry out your repairs by following the instructions at https://parts-selfservice.europeanappliances.com/
to ensure product safety and prevent serious injury. For your safety, unplug the product first before making any repairs. Hotpoint cannot be held responsible for safety issues that may arise because of repair work or attempted repairs on parts other than those on the current spare parts list or found at the https://parts-selfservice.europeanappliances.com/
address and carried out by end-users not following the instructions in the user manuals or found at the https://parts-selfservice.europeanappliances.com/
address. Such cases will void the Hotpoint warranty. We therefore strongly advise end-users to refrain from repairing parts other than the spare parts specified above and to apply to the authorised service station when required. These kinds of repairs carried out by end-users can lead to safety issues, damage the product, and cause fires, flooding, electrocution and serious injury. Not limited to those listed above, the following parts must be repaired by the authorised station. Motor, pump, motherboard, motor board, screen card, etc. The manufacturer/seller cannot be held responsible for any situation caused by end-users not following what is written above.
- CARO CLIENTE
- PLEASE READ THIS GUIDE PRIOR TO USE THIS PRODUCT
- SYMBOLS AND REMARKS
- SAFETY INSTRUCTIONS
- ENVIRONMENTAL INSTRUCTIONS
- YOUR DRYING MACHINE
- INSTALLATION
- PREPARATION
- IMPORTANT TO BE READ AND OBSERVED
- WARNING
- PERMITTED USE
- ELECTRICAL WARNINGS
- CLEANING AND MAINTENANCE
- DISPOSAL OF PACKAGING MATERIALS
- DISPOSAL OF HOUSEHOLD APPLIANCES
- POLICIES, STANDARD DOCUMENTATION, ORDERING OF SPARE PARTS AND ADDITIONAL PRODUCT INFORMATION CAN BE FOUND BY
- COMPLIANCE WITH THE WEEE REGULATIONS AND WASTE DISPOSAL
- PACKAGING INFORMATION
- STANDARD CONFORMITY AND TEST INFORMATION / EU DECLARATION OF CONFORMITY
- TECHNICAL SPECIFICATIONS
- ENERG
- GENERAL APPEARANCE
- SCOPE OF DELIVERY
- NOTICE
- RIGHT PLACE FOR INSTALLATION
- REMOVING THE SHIPPING SAFETY GROUP
- WATER CONNECTION
- CONNECTING THE WATER DRAINAGE HOSE
- ADJUSTING THE STANDS
- MOVING THE DRYING MACHINE
- WARNING REGARDING THE NOISE
- REPLACING THE LIGHTING BULB
- LAUNDRY SUITABLE FOR DRYING IN DRYING MACHINE
- LAUNDRY NOT SUITABLE FOR DRYING IN DRYING MACHINE
- PREPARING THE LAUNDRY TO BE DRIED
- WHAT TO DO FOR ENERGY SAVING
- CORRECT LOAD CAPACITY
- RUNNING THE PRODUCT
- CONTROL PANEL
- SYMBOLS
- PREPARATION OF DRYING MACHINE
- AUXILIARY FUNCTIONS DRYNESS LEVEL
- WRINKLE PREVENTION
- AUDIBLE WARNING
- LOW TEMPERATURE
- END TIME
- CHANGING THE END TIME
- DRUM LIGHT
- WARNING INDICATORS
- FILTER CLEANING
- WATER TANK
- CLEANING OF FILTER DRAWER/HEAT EXCHANGER
- STARTING THE PROGRAM
- CHILD LOCK
- CHANGING THE PROGRAM AFTER IT IS STARTED
- ADDING AND REMOVING CLOTHES DURING STAND-BY
- CANCELLING THE PROGRAM
- END OF PROGRAM
- ODOUR FEATURE
- PETHAIRCARE CYCLE
- FOR PET HAIR REMOVAL
- FOR ODOUR AND WRINKLE REDUCTION
- DRYING CAUTION
- FILLING THE WATER TANK
- IMPORTANT NOTE
- MAINTENANCE AND CLEANING
- LINT FILTERS (INTERNAL AND EXTERNAL FILTERS) / CLEANING OF THE INTERIOR SURFACE OF THE LOADING DOOR
- CLEANING THE SENSOR
- EMPTYING THE WATER TANK
- CLEANING THE CONDENSER
- TROUBLESHOOTING
- WAIVER WARNING
- I WANT TO FIX IT MYSELF
Brand : HOTPOINT
Model : HPT 94D BS IT
Category : Tumble dryer