
CSA-00301S - Digital video camera POLAROID - Free user manual and instructions
Find the device manual for free CSA-00301S POLAROID in PDF.
| Product type | Digital video camera |
| Brand | Polaroid |
| Model | CSA-00301S |
| Power supply | 2 AA batteries |
| Display | LCD screen |
| Zoom | Digital zoom (up/down buttons) |
| Flash | Automatic or disabled |
| Self-timer | 10 seconds |
| TV output | Yes, via AV cable (NTSC/PAL) |
| PC connection | USB |
| Storage | SD/MMC card (up to 2 GB) + internal memory |
| Main functions | Video recording, photo taking, playback, settings menu |
| Maintenance and cleaning | Wipe with a dry cloth; avoid water and high temperatures |
| Safety | Do not expose to water, do not disassemble, keep out of reach of children |
| Warranty | Void if disassembled or damaged due to improper use |
| Included accessories | AV cable, USB cable (not verified in the manual) |
Frequently Asked Questions - CSA-00301S POLAROID
User questions about CSA-00301S POLAROID
0 question about this device. Answer the ones you know or ask your own.
Ask a new question about this device
Download the instructions for your Digital video camera in PDF format for free! Find your manual CSA-00301S - POLAROID and take your electronic device back in hand. On this page are published all the documents necessary for the use of your device. CSA-00301S by POLAROID.
USER MANUAL CSA-00301S POLAROID
Digital Video Camera
User's Manual

Polaroid
pixie _tw
natural_image
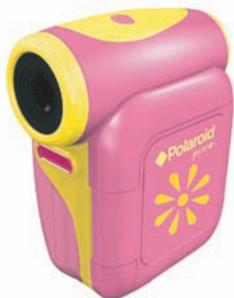
Pink and yellow Polaroid camera with a flower design (no visible text or symbols)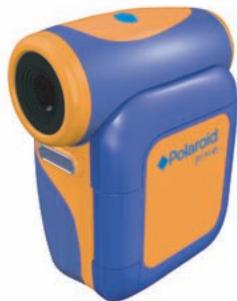
natural_image
Blue and orange Polaroid camera with lens (no visible text or symbols)FCC Compliance Statement:
This device complies with Part 15 of the FCC Rules. Operation is subjected to the following two conditions: (1) this device may not cause harmful interference, and (2) this device must accept any interference received, including interference that may cause undesired operation.
This equipment has been tested and found to comply with limits for a Class B digital device, pursuant to Part 15 of the FCC rules. These limits are designed to provide reasonable protection against harmful interference in residential installations.
This equipment generates, uses, and can radiate radio frequency energy, and if not installed and used in accordance with the instructions, may cause harmful interference to radio communications.
However, there is no guarantee that interference will not occur in a particular installation. If this equipment does cause interference to radio or television equipment reception, which can be determined by turning the equipment off and on, the user is encouraged to try to correct the interference by one or more of the following measures:
-Reorient or relocate the receiving antenna.
-Move the equipment away from the receiver.
-Plug the equipment into an outlet on a circuit different from that to which the receiver is connected.
-Consult the dealer or an experienced radio/television technician for additional suggestions.
You are cautioned that any change or modifications to the equipment not expressly approved by the party responsible for compliance could void Your authority to operate such equipment.
\* Environment:
Do not throw the appliance away with the normal household waste at the end of its life. Bring it to an official collection point for recycling.
By doing this you will help to preserve the environment.


natural_image
Simple black-and-white icon of a mobile phone with no text or symbolsWelcome:
Thanks for purchasing this product. Much time and effort has gone into this product's development, and our hope is it will give you many years of trouble-free service.
Safety Notice:
- Do not disassemble the camera; otherwise the warranty will be voided.
- Avoid all contact with water, and dry hands before using.
- Do not expose the camera to high temperature or leave it in direct sunlight. Doing so may damage the camera.
- Use the camera with care. Avoid pressing hard on the camera body.
- For your own safety, avoid using the camera when there is a storm or lightning.
- Do not use batteries of different types. Doing so may lead to the potential for serious damage.
- Remove the batteries during long periods of non-use, as a deteriorated battery may affect the functionality of the camera.
- Remove the battery if it shows signs of leaking or distortion.
- Use only the accessories supplied by the manufacturer.
- Keep the camera out of the reach of small children.
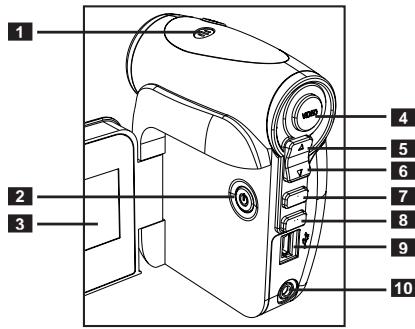
1 Microphone
2 Power Button ( ⏻ )
3 LCD Panel
4 Record Button (VIDEO)
5 Up Button (Zoom in)
6 Down Button (Zoom out)
7 OK Button
8 Mode/← Button
9 USB Port
10 TV-out Connector
Need help with your digital video camera?
Call our toll-free customer service number. Look for the insert with this icon:
Or visit www.polaroid.com.

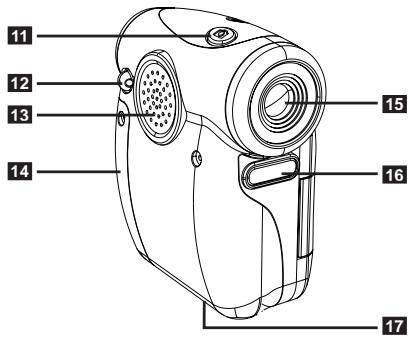
11 Shutter Button (☐)
12 Strap Holder
13 Speaker
14 Battery / Memory Card Slot
15 Lens
16 Flash Strobe
17 Tripod Port
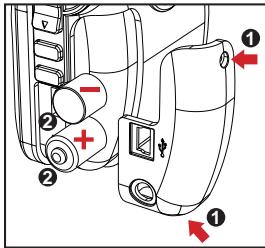
Loading the battery
Please use two AA batteries.
- Loosen the screws and remove the battery/card compartment cover as indicated.
- Load the batteries into the battery compartment with + and - ends correctly installed.
- Re-install the cover.
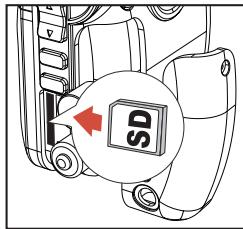
Inserting the SD/MMC card (optional)
- Loosen the screws and remove the battery/card compartment cover.
- Insert the card as indicated in the illustration until it reaches the end of the slot.
- When using a SD card, the built-in memory will become inaccessible.
- To remove the SD card, gently push the card until it pops up.
- Re-install the cover.
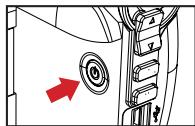
Turning on/off the video camera
Turning on the video camera:
Open the LCD panel; or press and hold down the Power button ( ⏻ ) for 3 seconds.
Turning off the video camera:
Close the LCD panel; or press and hold down the Power button ( ⏻ ) for 3 seconds.
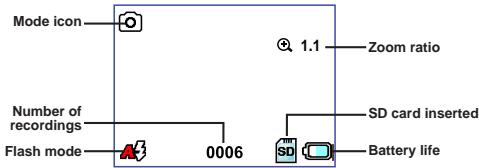
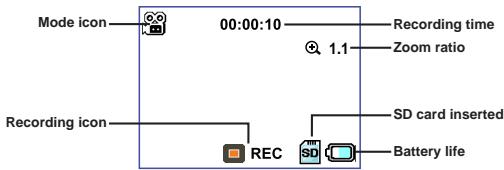
Battery life indicator
| Icon | Description |
| [16K7] | Full battery life |
| [6076] | Moderate battery life |
| [6224] | Low battery life |
| [2742] | Empty battery life |
Digital video camera mode:
Video REC mode:
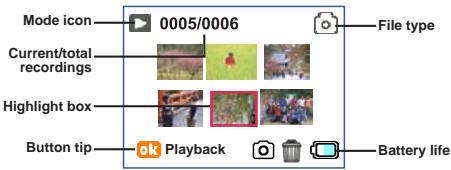
Playback thumbnail mode:
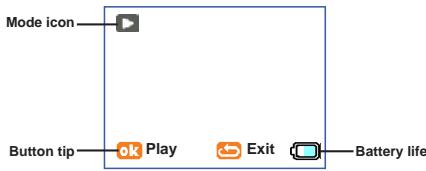
Playback full mode:
Recording a video clip
- Press the Record button (VIDED) to start recording.
- Use the Zoom buttons (▲) to zoom in or zoom out the screen.
- Press the Record button (VIDEO) again to stop recording.
Taking a still picture
- Use the Zoom buttons (▲) to zoom in or zoom out the screen.
- Press the Shutter button (☐) on the top of the camera to take a still picture.
Playing back your recordings
- Press the Mode button.
- Use the Zoom buttons (▲) to select Playback mode.
- Press the OK button to enter.
- Use the Zoom buttons (▲) to shift between files.
- Press the OK button to review/play the file.
To delete a picture
- You must be in the Playback mode.
- To delete a file, press the Shutter button (☐) and a prompt window will show up. Select (☐) to confirm the deletion or select (☐) to cancel.
Need help with your digital video camera?
Call our toll-free customer service number. Look for the insert with this icon:

Or visit www.polaroid.com.
Connecting the video camera to a TV
NOTE : TV systems differ for different countries. You may need to adjust the TV-out setting to display normally. (Taiwan: NTSC; America: NTSC; Europe: PAL; China: PAL)
Connect your video camera and TV via the accessory AV cable for real-time display. You can display your video clips and still pictures directly on your TV, sharing them with your friends and family.
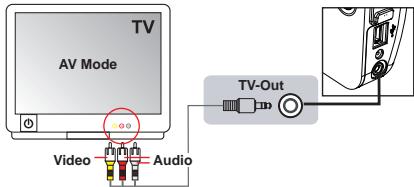
- Turn on your TV and switch to an appropriate AV input mode.
- Connect the audio and video ends of the AV cable to the TV.
- Turn on the video camera.
- Connect the other end of the AV cable to your video camera.
Connecting the video camera to your PC
- Turn on the video camera.
- Connect the video camera to your computer via the USB cable, and the video camera will become a removable disk in your computer.
- You can copy files from the video camera to your computer, and vice versa.
The menu items in Setting mode provide several options to fine-tune your video camera functions.
To enter a mode:
- Turn on the video camera.
- Press the Mode button.
- Use the Zoom buttons (▲) to select the desired item.
- Press the OK button to enter.
Basic operations in the menu:
| How to... | Action |
| Move the highlight bar | Use the Zoom buttons (▲) to move up or down. |
| Confirm an item | Press the OK button. |
| Exit menu / Go back to upper menu | Press the Mode/⇨ button. |
Menu items in Setting mode
Power-on → Press the Mode button → Enter Setting mode → Press the OK button.
| Item | Option | Description |
| Flash | Flash automatically fires when needed. | |
| Flash is disabled. | ||
| Selftimer | Selftimer is on. The video camera will have a ten second delay before recording when the Shutter button is pressed. | |
| Selftimer is off. | ||
| Flicker | Set flicker frequency to 50Hz or 60Hz. For more information, please refer to the “Flicker Settings” table below. | |
| TV-out | This option is suitable for America, Taiwan, Japan, and Korea areas. | |
| This option is suitable for Germany, England, Italy, Netherlands, China, Japan, and Hong Kong. |
Flicker Settings Table:
| Area | England | Germany | France | Italy | Spain | Russia |
| Setting | 50Hz | 50Hz | 50Hz | 50Hz | 50Hz | 50Hz |
| Area | Portugal | America | Taiwan | China | Japan | Korea |
| Setting | 50Hz | 60Hz | 60Hz | 50Hz | 50/60Hz | 60Hz |
| Memory | Video (min.) | Still picture |
| SD/MMC card (256MB) | 3 | 750 |
| SD/MMC card (512MB) | 6 | 1500 |
| SD/MMC card (1GB) | 12 | 3000 |
| SD/MMC card (2GB) | 24 | 6000 |
Note: The actual value of capacity may vary (up to ±30% ) depending on the color saturation and complexity of your subject and surroundings.
"Polaroid", "Polaroid and Pixel", and "Polaroid Pixie" are trademarks of Polaroid Corporation.
Need help with your digital video camera?
Call our toll-free customer service number. Look for the insert with this icon:
Or visit www.polaroid.com.

Bienvenu:
1 Microphone
2 Bouton d'alimentation ( ⏻ )
3 Ecran LCD
4 Bouton Enregistrer (VIDEO)
5 Bouton Haut (Zoom avant)
natural_image
Mechanical component diagram showing a valve with a red arrow pointing to a circular component (no text or symbols present)natural_image
Mechanical component diagram showing a valve with a red arrow pointing to a circular component (no text or symbols)- Digital Video Camera
- Polaroid
- FCC Compliance Statement:
- \* Environment:
- Welcome:
- Safety Notice:
- Need help with your digital video camera?
- Loading the battery
- Inserting the SD/MMC card (optional)
- Turning on/off the video camera
- Turning on the video camera:
- Turning off the video camera:
- Recording a video clip
- Taking a still picture
- Playing back your recordings
- To delete a picture
- Connecting the video camera to a TV
- Connecting the video camera to your PC
- To enter a mode:
- Menu items in Setting mode
- Bienvenu:
Brand : POLAROID
Model : CSA-00301S
Category : Digital video camera