
MICRON - Synthesizer ALESIS - Free user manual and instructions
Find the device manual for free MICRON ALESIS in PDF.
User questions about MICRON ALESIS
0 question about this device. Answer the ones you know or ask your own.
Ask a new question about this device
Download the instructions for your Synthesizer in PDF format for free! Find your manual MICRON - ALESIS and take your electronic device back in hand. On this page are published all the documents necessary for the use of your device. MICRON by ALESIS.
USER MANUAL MICRON ALESIS
Quick Start Owner's Manual
(ENGLISH)
BOX CONTENTS
SYNTHESIZER
POWER ADAPTER
This page intentionally left blank.
MICRON QUICK START OWNER'S MANUAL (ENGLISH)
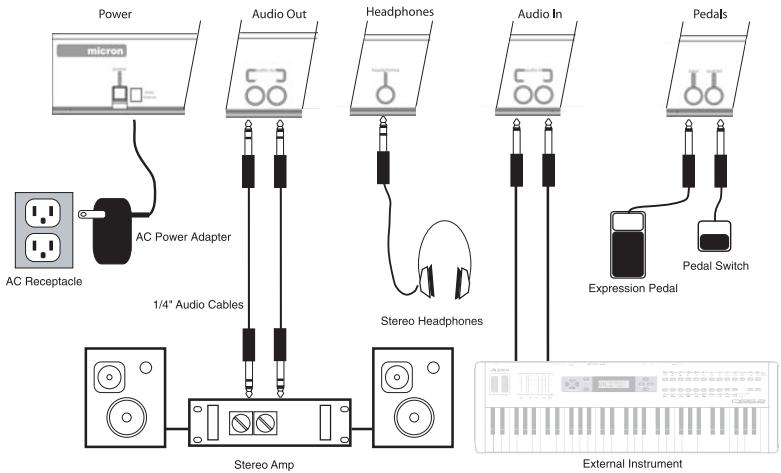
Connection Diagram
Connecting AC Power
Before making any power connections, make sure the Micron's power switch is turned off. Then, plug the power adapter into the Micron's power socket and into a power outlet.
Making Audio Connections
Stereo. Connect two cables from the Micron's left and right outputs to two inputs of an amp or mixer.
Headphones. Plug a set of headphones into the headphone jack on the rear panel.
Connecting the Foot Pedals
- Connect a keyboard sustain pedal (not included) to the (sustain) input.
When you turn the Micron on, the Micron will automatically sense and calibrate itself to the pedal.
- You can plug an optional continuous-controller expression pedal, such as the Roland EV-5 pedal, into the (expr) input.
The Micron's Main Controls
volume
real-time controllers
performance buttons
display control knob circle
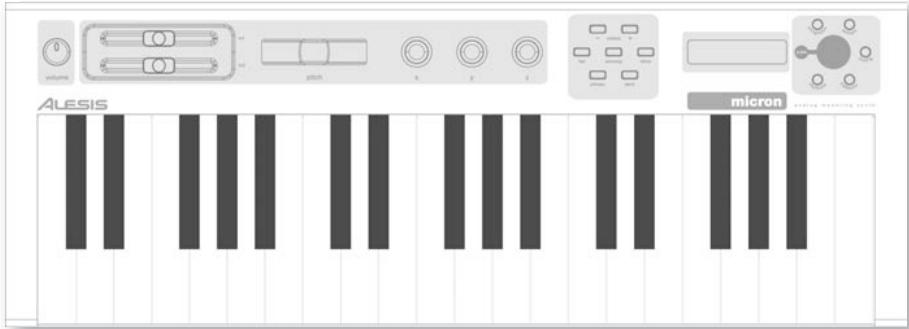
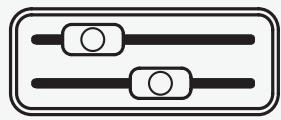
The Real-Time Controllers
Despite its small size, the Micron has six powerful real-time controllers. These controls put the incredible expressivity of virtual analog synthesis at your fingertips.
(m1) and (m2) sliders:
The (m1) slider generally adds vibrato. (m2) most often sweeps the filter.
(pitch) wheel:
The (pitch) wheel typically raises or lowers the pitch by a whole step, allowing you to gently or heavily detune your sound.

pitch

X

y

Z
(x/y/z) knobs:
The (x / y / z) knobs have different effects depending upon the program.
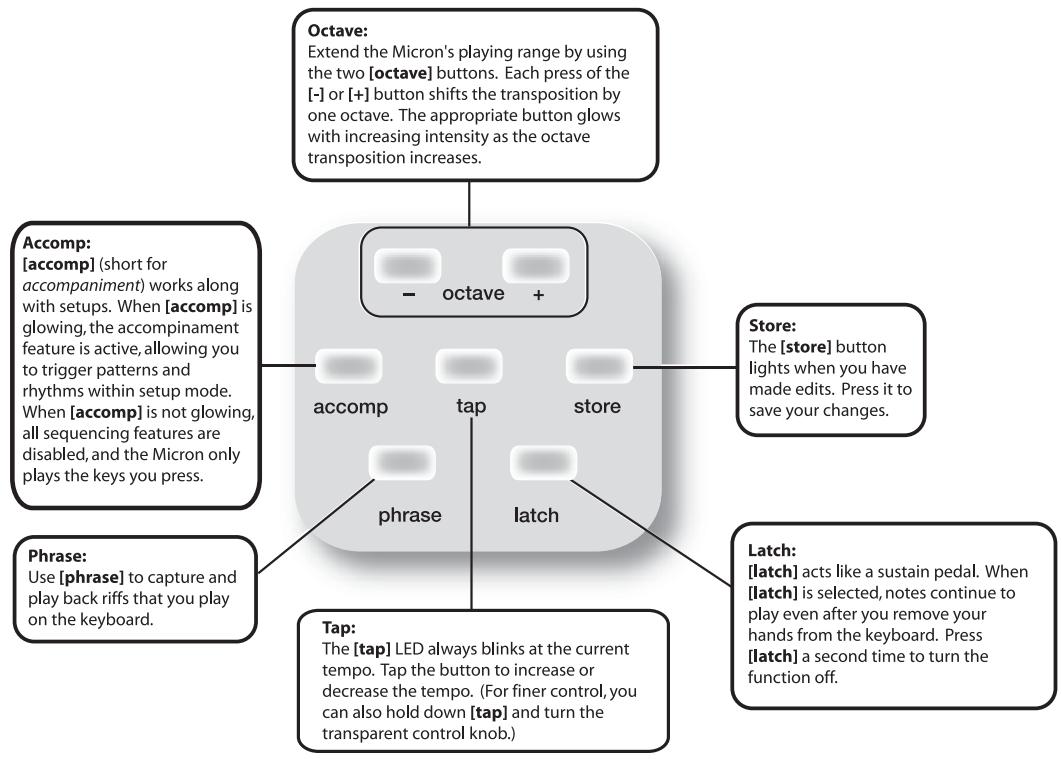
The Performance Buttons
The performance buttons are clustered together to the left of the display.
The Control Knob Circle
The Control Knob Circle's buttons access the Micron's five different modes: programs, rhythms, patterns, setups, and config (configuration).
Press one of the buttons to enter its mode. Then spin the clear control knob for different sounds.
Programs:
Programs are the heart of the Micron - its lead, bass, drum, pad, and other virtual analog sounds.
To jump to a Program category, hold down the [programs] button while pressing the appropriate white key on the keyboard.
The "recent" category remembers the most recent programs you've used.
Add a program to the "faves" category by pressing the control knob twice.
Setup:
The Micron's most powerful and sophisticated mode, simultaneously combining multiple programs, rhythms, patterns, and more into powerful and expressive combinations.
Config:
The Micron's configuration options. Global transposition and tuning, keyboard velocity curve, MIDI settings, and more.
Patterns:
Melodic passages that you can compose and then trigger chromatically, beginning on any key.
Rhythms:
Drum grooves comprised of one or more drum sounds, each playing its own rhythm.
Play the left side of the keyboard to hear the complete groove. Trigger individual drums using the keys on the right side.
Press-and-Hold Shortcuts for the Control Knob Circle
Hold down one of the [programs], [setup], [patterns], or [rhythms] buttons while playing the keyboard to access various editing and selection shortcuts.
The text printed just above the keyboard provides a key to many of these shortcuts.

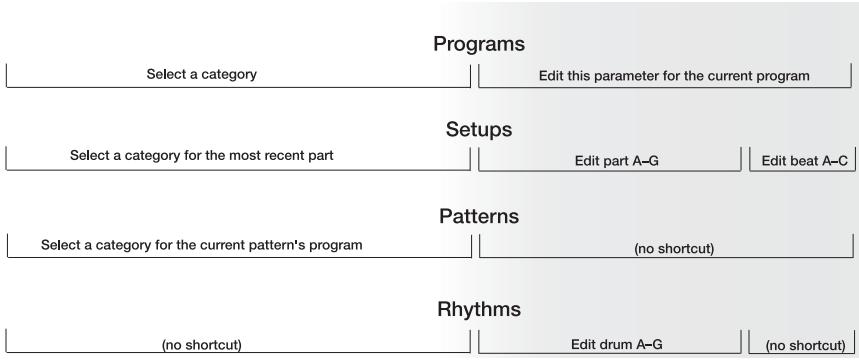
Mode Jumping Shortcuts
Access each of these shortcuts by holding one of the [programs], [ setups], [patterns], or [rhythms] buttons and then pressing one of the other buttons.
[programs]
Press [setup]: set the most recent part's program.
Press [patterns]: set the pattern's program.
Press [rhythms]: set the most recent drum's program (for drum programs only).
[setup]
Press [programs]: jump to the most recent part's program.
Press [patterns]: jump to the pattern of the most recent part (if any).
Press [rhythms]: jump to the rhythm of the most recent beat (if any).
[patterns]
Press [programs]: jump to the pattern's program.
Press [setup]: set the most recent part's pattern.
Press [rhythms]: (no shortcut).
[rhythms]
Press [programs]: jump to the program of the most recent drum.
Press [setup]: set the most recent beat's rhythm.
Press [patterns]: (no shortcut).
Other Shortcuts
In most areas, pressing the control knob twice (double click) restores the default value.
Button-specific shortcuts:
[octave]
Press both [octave] buttons simultaneously to return to the default octave range of C3 through C6.
[tap]
Hold [tap] and turn the control knob for fine control over the tempo.
[programs]
When editing a parameter, hold down the control knob and wiggle an (x / y / z) knob to assign the knob to that parameter.
[setup]
For each part, hold down [setups] and move a slider or the pitch wheel to jump to the controller assignment options for that part. Do the same with the (x / y / z) knobs.
Editing on the Micron
Right out of the box, the Micron offers all the great sounds and operation that most users will ever want. But, if you're a power user, you'll find a wealth of easy-to-access editing capabilities.
To dig deep into the Micron's capabilities, push the clear control knob to edit the parameters associated with the current operating mode (programs, setups, config, patterns, or rhythms). The current mode's light will glow red once you begin editing.
Turn the control knob to cycle through various parameters. Push and turn the knob to edit; push once more to accept your changes.
Push the control knob twice in quick succession to reset a parameter to its default (factory) value.
For much more detail on editing, see the reference manual.
The [store] button lights when you have made edits. Press it to save your changes.
MICRON - MANUAL DE INICIO RÁPIDO DEL USUARIO (ESPAÑOL)
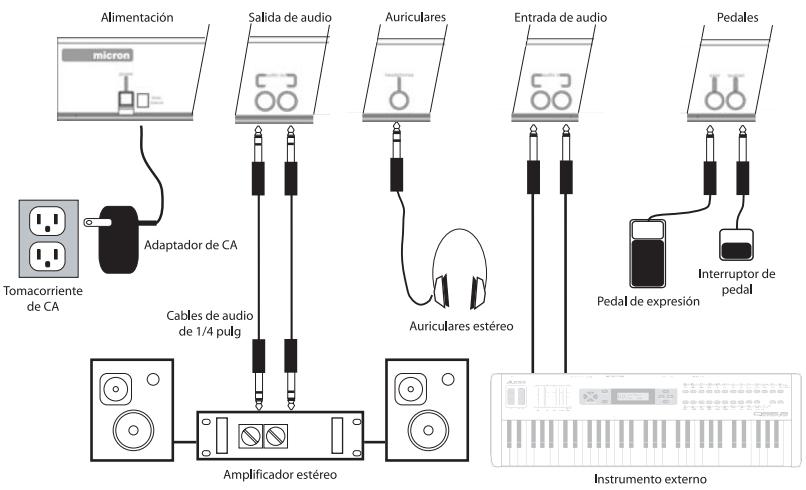
Diagrama de connexion