
AF-3S - Effect machine Antari - Free user manual and instructions
Find the device manual for free AF-3S Antari in PDF.
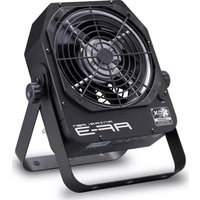


| Brand | Antari |
| Model | AF-3S |
| Type | Special Effects Smoke Machine |
| Power Supply | AC 220-240V, 50/60Hz |
| Power Consumption | 3000W |
| Heating Time | Approx. 3 minutes |
| Fluid Tank Capacity | 3 liters |
| Fluid Type | Water-based smoke fluid |
| Smoke Output | Approx. 120 cubic meters/minute |
| Control Method | Manual panel and wired remote control |
| Fan Speed | Adjustable, built-in fan |
| Dimensions (L×W×H) | 510×290×240 mm |
| Weight | Approx. 8.5 kg |
| Working Temperature | 5°C - 40°C |
| Housing Material | Metal and flame-retardant polymer |
| Safety Protection | Overheat protection, fuse |
| Cleaning and Maintenance | Regularly clean the heater |
| Applicable Scenarios | Stage, discotheque, theater |
Frequently Asked Questions - AF-3S Antari
User questions about AF-3S Antari
0 question about this device. Answer the ones you know or ask your own.
Ask a new question about this device
Download the instructions for your Effect machine in PDF format for free! Find your manual AF-3S - Antari and take your electronic device back in hand. On this page are published all the documents necessary for the use of your device. AF-3S by Antari.
USER MANUAL AF-3S Antari

- Introduction ...... 1
- Safety Information.... 1
- Package Contents & Inspection 2
- Machine Details....2
- Technical Label Information....4
- Machine Variation....4
- Setting and Manual Operation....4
- Control Settings 4
- DMX Connection 4
- Z-3 Cable Remote (Optional) 6
- WTR-10 Wireless Remote (Optional) 6
- Service and Maintenance....7
- Technical Specifications 8
- Warranty Disclaimer 8
- Machine Dimension....8
- 前言....9
- 安全注意事項....9
- 包裝內容與檢查....10
- 機器訊息....11
- 技術標籤資訊....12
- 機型比較....12
- 設定與手動操作說明 12
- 控制設定....13
- DMX 說明....13
- Z-3 有線控制器(選配).... 14
- WTR-10 無線控制器(選配) 14
- 維護和保養.... 15
- 技術規格....16
- 保固聲明....16
- 機器尺寸圖 16
Appendix I - Grounding Instruction 17
ANTARI FEN AF-3
User Manual
1. Introduction
Please read all the user manual before operating the machine, and place the manual where the user can refer to it at all time. The manual includes how to install and operate the machine under safe condition and explain all the labels printed on the machine. If you encounter any problem, contact your local Antari dealer for assistant immediately.
2. Safety Information
 | DANGER | If the danger is not avoided, it will cause death or serious injury |
 | WARNING | If the warning is not heeded, it can cause death or serious injury. |
 | CAUTION | If the precaution is not taken, it may cause minor or moderate injury. |

DANGER
- Must connect the machine to the correct rated voltage or it might lead to an electrical shock or a burn and may cause serious consequences.
- Must connect the machine to a protected circuit and ensure it is properly grounded to avoid the risk of electrocution. For grounding instruction, please refer to Appendix I on page 17.
● Do not operate the machine with a bundled power cord, it could lead to a fire hazard. - Do not use the fan in an environment full of flammable gas, susceptible to water or powder. Keep away from any fire and heat sources.
- When operating the machine, do not point at people, animals, or fire.

WARNING
- Please operate the machine on a flat, level hard and well ventilated surface area, reserve at least 50cm space around the machine and make sure there is no flammable gas or material nearby.
- Do not disassemble, repair or modify the machine, it may cause damages, malfunction, risk of electrical shock or result in fire.
● The machine can only be operated by adults or professionals, is not intended for use by person with reduced physical sensory, mental capabilities, or lack of experience and knowledge including children.
● Do not leave the machine running unattended, make sure all powers are off when leaving.
● Children should be supervised to ensure that they do not play with the machine. - Do not use the machine upside down or tilt it, it might cause damages or malfunction.
● Never allow any object or part of your body to enter path of the fan blades to prevent any injury or damages - Do not spray the fan with any liquid including cleaner and insecticide to avoid injury or damages.

CAUTION
- Keep the machine dry at all time. The machine is not waterproof, do not expose the machine to water, rain, or moisture environment.
- Please make sure the power outlet is not damaged or loose before plug in the power cord.
- If the power cord is damaged, it must be replaced by Antari or its local dealers, otherwise the warranty will be void.
● The machine is for indoor use only.
● Do not operate the machine in any area with unstable voltage. - If you experience strange sound or malfunction, turn off the power and unplug the power cord immediately and contact your local Antari dealer for assistant.
-
Do not contact any moving part.
● Only use accessories recommended or sold by Antari. -
Please make sure the power is off when not using the machine and unplug the power cord if not intend to use for a long period of time.
● To disconnect, turn all controls to the off position, then remove plug from outlet. - Do not unplug by pulling on cord. To unplug, grasp the plug, not the cord.
● Unplug from outlet before servicing or cleaning.
● Ensure that curtain, clothing, cables or other items cannot be suck into the fan. - Do not operate the machine with a damaged cord or plug, or after the machine malfunctions or is dropped or damaged in any manner. Return machine to the nearest authorized service facility for examination, repair, or electrical or mechanical adjustment.
● After a period of operation, abnormal noise and uneven air volume may appear because of dust blocking airflow. It will disappear after cleaning the air inlet and outlet.
Before operating the machine, please read all warning labels on the machine, description as below:
WARNING!
Do not allow any object or part of your body get near the protection grill while operating the fan.
Operate fan only with adult supervision.
Do not use fan without protection grill.
Do not use the fan in damp environment.
3. Package Contents & Inspection
Immediately upon receiving the machine, carefully unpack the carton, check the content to ensure it is the correct model and all parts are included. If any part appears to be damaged or missing during transportation, please contact your local dealer and return with original package for inspection.
3.1 Package Contents
| AF-3 Special Effects Fan | AF-3X Special Effects Fan | AF-3S Special Effects Fan |
| 1 x AF-3 Special Effects Fan | 1 x AF-3X Special Effects Fan | 1 x Special Effects Fan |
| 1 x Neutrik powerCON Power Cable | ||
| 1 x User Manual or Scan QR Code on the Machine | ||
3.2 Optional Accessories
| Item Code | Description |
| Z-3 | Cable Remote |
| WTR-10 | Wireless Remote (W-1 Wireless Transmitter/W-1 Wireless Receiver) |
4. Machine Details
AF-3

| 01. Adjusting Knob | 07. Wireless Connector |
| 02. Neutrik powerCON Connector IN (Power) | 08. Ring |
| 03. Neutrik powerCON Connector OUT (Power) | 09. Bracket |
| 04. XLR 5-Pin Connector (DMX) | 10. Air Inlet |
| 05. Cable Remote Connector | 11. Air Outlet |
| 06. Rotary Knob |
AF-3X

| 01. Adjust Knob | 07. Wireless Connector |
| 02. Fuse | 08. Ring |
| 03. Neutrik powerCON Connector (Power) | 09. Bracket |
| 04. XLR 5-Pin Connector (DMX) | 10. Air Inlet |
| 05. Cable Remote Connector | 11. Air Outlet |
| 06. Rotary Knob |
AF-3S

| 01. Adjusting Knob | 07. Neutrik powerCON Connector IN (Power) |
| 02. Ring | 08. Neutrik powerCON Connector OUT (Power) |
| 03. Wireless Connector | 09. Air Inlet |
| 04. Rotary Knob | 10. Air Outlet |
| 05. Cable Remote Connector | 11. Bracket |
| 06. XLR 5-Pin Connector (DMX) |
5. Technical Label Information
Please read the technical label information on the back of the machine before operating it.

6. Machine Variation
| AF-3 Special Effects Fan | AF-3X Special Effects Fan | AF-3S Special Effects Fan |
| Series Power Supply Available | Series Power Supply Unavailable | Design for CH-1 with Flight Case |
7. Setting and Manual Operation
Step 1. Place the machine on a flat, level hard and well ventilated surface area and reserve at least 50cm open space around the machine, and make sure there is no flammable gas or material nearby;
Step 2. Plug the machine to the power outlet. Please read the technical label on the back of the machine and make sure the power outlet has the correct rated voltage for the machine;
Step 3. Turn on the power, when the status indicator display green indicates the fan is in standby status and ready for operation;
Step 4. To start, turn the rotary knob to the right to increase fan speed and to the left to decrease the fan speed, to stop turn the rotary knob to minimum (-), when fan is in operation the indicator light show orange;
Step 5. To turn off the power, please make sure the machine is not operating. If you will not use the machine a long period of time, please unplug the power cord.
8. Control Settings
AF-3 Series Special Effects Fan can be operated in the following modes. The machine can only accept 1 type of signal at a time.
- Manual
- DMX512
- Wireless
- Cable Remote
9. DMX Connection
9.1 DMX Connector Pin Assignment
The machine has a XLR 5-Pin for DMX connection. The diagram below indicates pin assignment information.


5 Pin XLR
| Pin | Function |
| 1 | Ground |
| 2 | Data- |
| 3 | Data+ |
| 4 | N/A |
| 5 | N/A |
** There is a protection cap on DMX IN, please remove it with your finger before operation.

9.2 DMX Setting
| DMX Value | Function |
| 0~5 | Fan off |
| 6~254 | Speed up linearly |
| 255 | Maximum speed |
9.3 Addressing
Each device occupies 1 channel. To ensure that the control signals are properly directed to each device, they require addressing. This is to be adjusted for every single device by changing the DIP-switches as set out in the table below. The starting address is defined as the first channel from which the device will respond to the controller. Please make sure that you do not have any overlapping channels in order to control each device correctly and independently from any other fixture on the DMX data link.
Occupation of the DIP-Switches:
| DIP | 1 | 2 | 3 | 4 | 5 | 6 | 7 | 8 | 9 | 10 |
| Ch. | 1 | 2 | 4 | 8 | 16 | 32 | 64 | 128 | 256 | Wireless pairing, control on/off |
| SW. | 11 | 12 |
| ON | 2 CH Mode | Wireless Pairing |
| OFF | 1 CH Mode | No Function |
| Device Number & Channels | Staring Address | 1 | 2 | 4 | 8 | 16 | 32 | 64 | 128 | 256 |
| Device 1 – Channel 1 | On | ▲ | ||||||||
| Off | ▽ | ▽ | ▽ | ▽ | ▽ | ▽ | ▽ | ▽ | ||
| Device 2 – Channel 2 | On | ▲ | ||||||||
| Off | ▽ | ▽ | ▽ | ▽ | ▽ | ▽ | ▽ | ▽ | ||
| Device 3 – Channel 3 | On | ▲ | ▲ | |||||||
| Off | ▽ | ▽ | ▽ | ▽ | ▽ | ▽ | ▽ | |||
| Device 4 – Channel 4 | On | ▲ | ||||||||
| Off | ▽ | ▽ | ▽ | ▽ | ▽ | ▽ | ▽ | ▽ | ||
| Device 5 – Channel 5 | On | ▲ | ▲ | |||||||
| Off | ▽ | ▽ | ▽ | ▽ | ▽ | ▽ | ▽ |
10. Z-3 Cable Remote (Optional)

Z-3 Cable Remote is an optional accessory for AF-3/AF-3X Special Effects Fan, please see instruction below;
- Plug the cable remote to the connector on the back of the machine, red indicator light on (Power);
- Press the switch (Orange Indicator Light on); turn the knob to adjust the output of the fan;
- Press the switch (Orange Indicator Light Off); or turn the knob to far left to turn off the fan.
** If you encounter any problem, please contact your local Antari dealer for assistant
11. WTR-10 Wireless Remote (Optional)
WTR-10 Wireless Remote is an optional accessory for AF-3/AF-3X Special Effects Fan, it included a W-1 wireless transmitter and a W-1 wireless receiver. If you already purchased the wireless model, it's ready to use. If you purchase the WTR-10 Wireless Remote afterwards, please follow the instruction below. If you encounter any problem, please contact your local Antari dealer for assistant.
11.1 W-1 Wireless Transmitter & Receiver
● Battery : 27A 12V
● Effective Range : The effective range is approximately 50m, depends on actual condition, it may vary.
● If effective range is significantly shorter, please change battery.
● W-1 wireless transmitter has 2 buttons, each function as follow:
| Button | Function |
| [A] | Start Fan |
| [B] | Stop Fan |

W-1 Wireless Transmitter

W-1 Wireless Receiver
11.2 W-1 Wireless Receiver Installation
If you purchased the WTR-10 Wireless Remote afterwards, please follow the instructions below to install the receiver. If you encounter any problem, please contact your local Antari dealer for assistant.

Graph 1

Graph 2

Graph 3
- Please see graph 1, remove the cover from the pointed place;
- You will see a white cable like graph 2, pull it out and connect to the W-1 receiver;
- Screw it back to the machine like graph 3 and follow the instruction on 11.3 for pairing.
11.3 Pair & Unpair
Each receiver can pair up to 5 transmitters, please follow the steps below to pair or unpair the remote;
Step 1. Set DIP switch No.10 to "ON" position;
Step 2. Status will show red light for 10 seconds, press “A” or “B” on the transmitter to pair it; status indicator will show green light if pair is successful;
Step 3. If you want to pair extra transmitter, turn DIP switch No.10 to "OFF" position first and repeat Step 2.;
Step 4. To unpair, set DIP switch No.10 to "OFF" position;
12. Service and Maintenance

DANGER!
Disconnect the power cord before starting maintenance operation!
● Always keep the machine clean.
● Can use an air compressor, a vacuum or a soft brush to remove the dust on the machine.
● Can use a slightly damp cloth to clean the casing.
- It is recommended to run the machine at least once a month in order to maintain its best performance and output condition.
● Excessive dust will reduce the performance and cause overheat.
13. Technical Specifications
| AF-3/AF-3X | AF-3S | |
| Rated Voltage | US Model : AC 100-120V, 50/60Hz 1.5AEU Model : AC 220-240V, 50/60Hz 1.0A | |
| Rated Power | 127W | |
| Ambient Temp. Range | 0°C - 40°C (32°F - 104°F) | |
| Air Flow | 530 CFM (50Hz)、600 CFM (60Hz) | |
| Fan Speed | 750 - 2550 rpm (50Hz)、750 - 2800 rpm (60Hz) | |
| Noise Level | 72.6 dB (Max. Output) | |
| Control Methods | Manual、DMX512、Wireless (Optional)、Cable Remote (Optional) | |
| Interface | XLR 5-Pin Connector (DMX)、Neutrik powerCON Connector (Power) | |
| DMX Channel | 1 Channel | |
| Included Accessories | N/A | |
| Optional Accessories | Z-3 Cable Remote、WTR-10 Wireless Remote | |
| Dimension | L 124 W 316 H 368 mm(L 4.88 W 12.44 H 14.49 inch) | L 160 W 312 H 336 mm(L 6.29 W 12.28 H 13.24 inch) |
| Weight | 6.0 kg (13.23 lbs.) | 6.4 kg (14.00 lbs.) |
14. Warranty Disclaimer
We guarantee the merchandise manufactured by us to be free from defect in material and workmanship for a period of one year. Our obligation and liability under this warranty shall be restricted to repair or replacement at our factory or local authorized dealer. We assume no liability of the products that are improperly used or used for any purpose other than that for which they are specially designed. This warranty shall not apply to any merchandise which has been repaired, altered or assembled outside our factory in any way so as in our judgment to affect its performance, nor which has been subjected to misuse, negligence, or accident nor to any merchandise operated contrary to our printed instructions. We will not allow or be liable of any loss or any damages of any kind in connection with the use, sale, or repair of any merchandise purchased from us.
15. Machine Dimension

ANTARI PEN AF-3
中文使用說明書
1. 前言
Do not allow any object or part of your body get near the protection grill while operating the fan.
9.2 DMX 通道功能設定
W-1 無線接收器
11.2 W-1 無線接收器安裝說明
Graph 1

Graph 2

Graph 3
Appendix I - Grounding Instruction
This appliance must be grounded. In the event of malfunction or breakdown, grounding provides a path of least resistance for electric current to reduce the risk of electric shock. This appliance is equipped with a cord having an equipment-grounding conductor and a grounding plug. The plug must be plugged into an appropriate outlet that is properly installed and grounded in accordance with all local codes and ordinances.
DANGER – Improper connection of the equipment-grounding conductor can result in a risk of electric shock. The conductor with insulation having an outer surface that is green with or without yellow stripes is the equipment-grounding conductor. If repair or replacement of the cord or plug is necessary, do not connect the equipment-grounding conductor to a live terminal. Check with a qualified electrician or serviceman if the grounding instructions are not completely understood, or if in doubt as to whether the appliance is properly grounded. Do not modify the plug provided with the appliance – if it will not fit the outlet, have a proper outlet installed by a qualified electrician.
This appliance is for use on a nominal 120 V circuit, and has a grounding plug that looks like the plug illustrated in sketch A in Figure. A temporary adaptor, which looks like the adaptor illustrated in sketches B and C, may be used to connect this plug to a 2-pole receptacle as shown in sketch B if a properly grounded outlet is not available. The temporary adaptor should be used only until a properly grounded outlet can be installed by a qualified electrician. The green colored rigid ear, lug, and the like, extending from the adaptor must be connected to a permanent ground such as a properly grounded outlet box cover. Whenever the adaptor is used, it must be held in place by the metal screw.


(D)

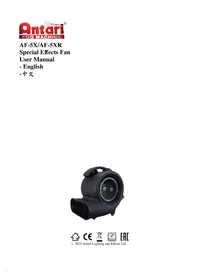

- ANTARI FEN AF
- USER MANUAL
- INTRODUCTION
- SAFETY INFORMATION
- DANGER
- WARNING
- CAUTION
- PACKAGE CONTENTS & INSPECTION
- MACHINE DETAILS
- AF-3X
- AF-3S
- TECHNICAL LABEL INFORMATION
- MACHINE VARIATION
- SETTING AND MANUAL OPERATION
- CONTROL SETTINGS
- DMX CONNECTION
- DMX CONNECTOR PIN ASSIGNMENT
- DMX SETTING
- ADDRESSING
- OCCUPATION OF THE DIP-SWITCHES
- Z-3 CABLE REMOTE (OPTIONAL)
- WTR-10 WIRELESS REMOTE (OPTIONAL)
- W-1 WIRELESS TRANSMITTER & RECEIVER
- W-1 WIRELESS RECEIVER INSTALLATION
- PAIR & UNPAIR
- SERVICE AND MAINTENANCE
- TECHNICAL SPECIFICATIONS
- WARRANTY DISCLAIMER
- MACHINE DIMENSION
- ANTARI PEN AF
- 中文使用說明書
- 前言
- DMX 通道功能設定
- W-1 無線接收器安裝說明
- APPENDIX I - GROUNDING INSTRUCTION
Brand : Antari
Model : AF-3S
Category : Effect machine