
KDL-70R551A - Television SONY - Free user manual and instructions
Find the device manual for free KDL-70R551A SONY in PDF.
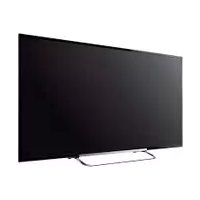


| Product type | Television (LED) |
| Brand | Sony |
| Model | KDL-70R551A |
| Screen size | 70 inches (177.8 cm) |
| Display resolution | 1920 x 1080 pixels (Full HD) |
| Display technology | LED |
| Aspect ratio | 16:9 |
| Smart TV functions | BRAVIA Internet Video, Netflix, Wi-Fi, screen mirroring |
| Number of HDMI ports | 4 |
| Number of USB ports | 3 |
| Audio power output | 20 W with ClearAudio+ |
| Power supply | AC 100-240 V, 50/60 Hz |
| Power consumption (standby) | Less than 0.5 W |
| Width (without stand) | Approx. 156.9 cm |
| Height (without stand) | Approx. 90.2 cm |
| Depth (without stand) | Approx. 6.9 cm |
| Weight (without stand) | Approx. 24.5 kg |
| VESA wall mounting | 400 x 300 mm |
| Included remote control | RM-GD025 with batteries |
| Package contents | TV, table-top stand, remote control, quick start guide, safety manual |
| Maintenance | Clean with soft dry cloth; avoid volatile solvents |
| Safety | Keep vents unobstructed; unplug before cleaning; install on stable surface |
| Spare parts and reparability | Authorized service centers; replacement remote, stand, and internal parts available; repair guidance in manual |
Frequently Asked Questions - KDL-70R551A SONY
User questions about KDL-70R551A SONY
0 question about this device. Answer the ones you know or ask your own.
Ask a new question about this device
Download the instructions for your Television in PDF format for free! Find your manual KDL-70R551A - SONY and take your electronic device back in hand. On this page are published all the documents necessary for the use of your device. KDL-70R551A by SONY.
USER MANUAL KDL-70R551A SONY
Sony Customer Support
U.S.A.: http://www.sony.com/lvsupport
Canada: http://www.sony.ca/support
United States 1.800.222.SONY
Canada 1.877.899.SONY
Please Do Not Return
the Product to the Store
For Your Convenience
| Online Registration: | Be sure to register your TV. | |
| United States | http://produclregistration.sony.com | |
| Canada | http://www.sony.ca/registration | |
BRAVIA
© 2013 Sony Corporation
Printed in Mexico
2 Running Initial Setup
Initial Setup instructions are displayed on the screen when your BRAVIA is powered on for the first time.
1 Select the language for the OSD (on screen display).
2 Choose your viewing country.
3 Select the type of use.
4 Connect either cable or antenna to your TV. You can connect both using an A-B RF switch (not supplied).

- If you are not using the CABLE/ANTENNA connection to TV (for example, if using a cable or satellite box), you can cancel the Auto Program by selecting Cancel.
5 Channels of the signal source (cable or antenna) connected in step 4 are automatically scanned and detected.
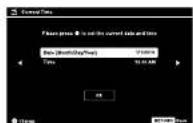
6 Set the current date and time.
7 If your BRAVIA is connected to a wired LAN or wireless LAN, make the network setting.
8 Select Automatic Software Download. If your BRAVIA is connected to a network, it is recommended to set to automatically download future available services.
If you did not follow the Initial Setup screen the first time you turned on your TV, refer to your Operating Instructions Manual. To change the signal source setting (cable to antenna or vice versa), press HOME and select
Settings, Channel, Signal Type to select signal source type, and then perform Auto Program.


To Do List
When the Initial Setup is completed, consider carrying out these items:
Set Closed Captions (CC) Set Parental Lock Show/Hide Channels
Manage Inputs (AV Setup) Set Speakers
For details, refer to your BRAVIA Operating Instructions Manual.
1 Your New BRAVIA® LCD HDTV
Congratulations! Your new BRAVIA" TV opens the door to the "Stunning HD Experience". This guide will explain how to get the most from your new High Definition TV.
Please take these steps before you power up your BRAVIA:
■ Register online at: http://productregistration.sony.com (from U.S.A.) http://www.sony.ca/registration (from Canada)
■ Make sure you've removed all accessory contents from packaging.
■ Install 2 AAA batteries (supplied separately) in your remote control.
■ Determine whether you will mount your TV on a wall or place it on the Table-Top Stand.
■ Give your TV 2 1/8 inches (6 cm) of space behind it to properly ventilate.
You must get HD programming to experience the stunning detail of HDTV.
■ The quality of the image you see on your BRAVIA can only be as high as the quality of the signal it is receiving.
- Contact your cable, satellite or HD Service provider to upgrade your service to HD. Receive over-the-air HD broadcasts with an HD-quality antenna (www.antennaweb.org) and discover the wealth of entertainment now available on super-high-resolution Blu-ray Disc™.
■ To learn more about HDTV, visit: U.S.A.: http://www.sony.com/HDTV Canada: http://www.sony.ca/hdtv
Connecting to Your TV
Your BRAVIA TV must be properly connected to components such as sound system and cable or satellite box.
■ Turn off and unplug all components before making connections.
■ Do not turn on the TV until connection setup is completed.
■ See reverse side of this poster for sample connection diagrams.
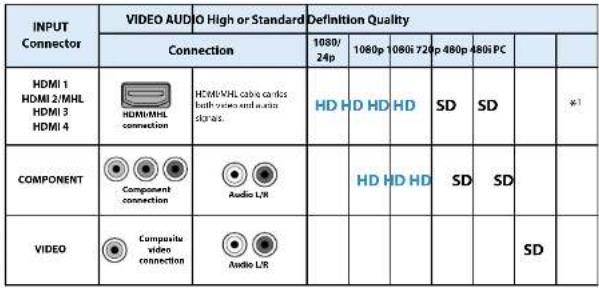 | |
| Audio/Video Performance | |
| Standard |
*1 For supported PC formats refer to the operating instruction manual.
3 Watching Your TV
Select Your Content Source
Whether you are watching cable, satellite or broadcast TV; playing a VCR, DVD or Blu-ray Disc; or connecting to your PC or other equipment, you need to choose the correct input using your remote control:
■ Press the INPUT button repeatedly until your selection is highlighted on-screen.
Adjust Screen Shape and Aspect Ratio
High Definition and Standard Definition signals are transmitted with different aspect ratios (the width-to-height ratio of the image).
The 16:9 aspect ratio (common to most HD signals) looks perfect on your BRAVIA.

The boxy 4:3 aspect ratio (common to most SD signals) must be adjusted to fill the screen.

- Press the WIDE button on your remote control to display the Wide Mode setting of your preference.
Customize Sound and Picture Quality
You can choose optimum sound and picture settings to match the content you are displaying on your TV:
- Press the remote control's HOME button, select Settings, then select the Picture and Sound settings to adjust the picture and sound quality of your content.
Refer to your Operating Instructions Manual for more information on adjusting or customizing your settings.
Basic Connection with HD Cable Box
![graph TD A["SAT (dish)"] --> B["HD Cable Box or HD Satellite Receiver"] B --> C["A/V Receiver"] B --> D["Home Theater System"] B --> E["Blu-ray Disc/DVD"] C --> F["Cable/Antenna"] D --> G["Composite PC"] D --> H["Digital Audio/ DVD/ Optical"] E --> I["Blu-ray Disc/DVD"] B --> J["HDMI N 1 + ATWD 2 +…](/content/2026/08/1573769/images/1a3492af3e6fefcf172db9d52d541e9948563e15ba514fb4a804e0c2fd7d9c2e.jpg)
Basic Connection with SD Cable Box
![graph TD A["Blu-ray Disc/DVD"] --> B["Cable/SAT (dish)"] A --> C["SD Cable Box or SD Satellite Receiver"] A --> D["A/V Receiver Home Theater System"] E["Rear of TV"] --> F["HDMI IV"] E --> G["COMPONENT IV"] E --> H["HD Antenna"] E --> I["yellow plug to VIO>0 IN"] E --> J["LISA"] E --> K["VIDEO OUT"]…](/content/2026/08/1573769/images/a8e798ec9ef82d60fa3b6efd8eb93bc704f04ad1c4eaa8f797b4bf3b061fd50d.jpg)
Required Cable Types for Connection


Notes on Connection:
- Your TV is equipped with multiple HDMI inputs; connect your incoming signal source (HD Cable Box, HD Satellite Box, or DVD) with HDMI/MHL or component video for the best possible picture quality.
Connecting a PC to Your BRAVIA® TV
- Press PC's FUNCTION Key + Select Output to transmit to TV. - Refer to your BRAVIA® Operating Instructions Manual for more information.
HD BRAVIA® Sync™ Basic Connection
![graph TD A["Rear of TV Side Panel"] --> B["COMPONENT IN"] B --> C["1.0V"] B --> D["2.0V"] B --> E["3.0V"] B --> F["4.0V"] B --> G["5.0V"] B --> H["6.0V"] B --> I["7.0V"] B --> J["8.0V"] B --> K["9.0V"] B --> L["10.0V"] B --> M["11.0V"] B --> N["12.0V"] B --> O["13.0V"] B --> P["14.0V"] B --> Q["15.0…](/content/2026/08/1573769/images/6bddc55591d6b44267ed3d67365f7647b929c9159d4003d90fde67164341f55f.jpg)
*1 Signifies a BRAVIA Sync capable device. *2 The optical connection is only needed for A/V receivers that do not support ARC (Audio Return Channel).
Built-in Wireless LAN Connection and Setup
![graph LR A["Internet"] --> B["Modem Wireless router"] B --> C["TV"] B --> D["access point"]](/content/2026/08/1573769/images/8ca282991557c8e3d48dd7e2fb0737fa1762d0c17bcbade0d036b9f229593a5d.jpg)
Wireless Network can be set during initial setup. Wireless Setup security type differs depending on the wireless router (access point) used. Follow the chart below and select the appropriate menu.

Security type of your Wireless router (access point)
WPS (*1)
PIN Code
WPS (*1)
Push Button
SSID with Security
Key (WEP/WPA 2 )
SSID without
Security Key
Select
WPS (PIN)
Select
WPS (Push
Button)
Select
Scan, then select
a network from
the list (*:
Select
Scan, then select
a network from
the list (*1)
*1 Wi-Fi Protected Setup™ (WPS) is a mark of the Wi-Fi Alliance. *2 Wi-Fi Protected Access™ (WPA) is a mark of the Wi-Fi Alliance. *3 Before scanning, be sure to make the wireless router (access point) settings (SSID/Key).
- SONY CUSTOMER SUPPORT
- BRAVIA
- RUNNING INITIAL SETUP
- TO DO LIST
- YOUR NEW BRAVIA® LCD HDTV
- YOU MUST GET HD PROGRAMMING TO EXPERIENCE THE STUNNING DETAIL OF HDTV
- CONNECTING TO YOUR TV
- WATCHING YOUR TV
- SELECT YOUR CONTENT SOURCE
- ADJUST SCREEN SHAPE AND ASPECT RATIO
- CUSTOMIZE SOUND AND PICTURE QUALITY
- NOTES ON CONNECTION
- CONNECTING A PC TO YOUR BRAVIA® TV
Brand : SONY
Model : KDL-70R551A
Category : Television