
24FL503 - Television FUNAI - Free user manual and instructions
Find the device manual for free 24FL503 FUNAI in PDF.


| Product Type | LED Television |
| Screen Size | 24 inches (measured diagonally) |
| Resolution | 1366 x 768 pixels (HD Ready) |
| Display Technology | LED backlit LCD |
| Tuner | ATSC | DVB-T (depending on region) |
| HDMI Ports | 2 HDMI inputs |
| USB Port | 1 USB port for media playback |
| Composite Input | 1 composite video input |
| Component Input | 1 component video input |
| Audio Output | 1 headphone jack, 1 optical audio output |
| Power Consumption | 30W (typical), standby <0.5W |
| Power Supply | AC 100–240V, 50/60Hz |
| Dimensions (W x H x D) with stand | 552 x 380 x 180 mm |
| Dimensions (W x H x D) without stand | 552 x 340 x 47 mm |
| Weight with stand | 3.1 kg (6.8 lbs) |
| Weight without stand | 2.9 kg (6.4 lbs) |
| VESA Mount Pattern | 75 x 75 mm |
| Remote Control | Yes, included |
| Energy Efficiency Class | A+ |
| Cleaning | Wipe with a soft, dry cloth. Do not apply liquids directly to the screen. |
| Safety | Place on a stable surface. Ensure proper ventilation. Do not expose to rain or moisture. |
| Spare Parts & Repairability | Replacement parts available through authorized service centers. |
Frequently Asked Questions - 24FL503 FUNAI
User questions about 24FL503 FUNAI
0 question about this device. Answer the ones you know or ask your own.
Ask a new question about this device
Download the instructions for your Television in PDF format for free! Find your manual 24FL503 - FUNAI and take your electronic device back in hand. On this page are published all the documents necessary for the use of your device. 24FL503 by FUNAI.
USER MANUAL 24FL503 FUNAI
If you need help, please contact us.
Funai India Pvt Ltd
Toll free telephone: 1-800-419-6708
Web site : www.funai-india.com
Email ID: customer.care@funai-india.com
INDEX
SAFETY INFORMATION ...... 2
START UP GUIDE 4
- Supplied Accessories.... 4
- Attaching the Base 5
- Mounting the Unit on Your Furniture 5
- Connections for Antenna and the Power...... 6
- Installing the Batteries.... 6
- Initial Setup.... 7
UNIT INFORMATION 8
Remote Control and Front Panel.... 8
Rear Panel 9
Hook-Up 9
OPERATIONS 11
Watching a TV Programme 11
[Sleep Timer] 11
Freeze Mode 11
[Teletext].... 11
Favourite 11
Switching the Input Source Mode.... 12
Sound Select.... 12
Picture Format.... 12
PLAYBACK MODE 13
Setup for Playback 13
[PHOTO].... 14
[MUSIC].... 15
[MOVIE].... 16
[TEXT] 17
DETAIL SETTINGS 18
Channel Settings 18
Screen Settings 19
Picture Adjustment 19
Sound Adjustment 20
Timer Settings 21
Option Settings.... 21
OTHER INFORMATION 22
Trademark Information 22
Cabinet Cleaning.... 22
Panel Cleaning 22
Servicing.... 22
TROUBLESHOOTING GUIDE ...... 23
SPECIFICATIONS...... 25
Dimensions.... 26
Input Resolution 26
Multimedia Format.... 27
SAFETY INFORMATION
WARNING: To prevent the spread of fire, keep candles or other open flames away from this product at all times.

CAUTION
RISK OF ELECTRIC SHOCK DO NOT OPEN

CAUTION:
TO REDUCE THE RISK OF ELECTRIC SHOCK, DO NOT REMOVE COVER (OR BACK). NO USER SERVICEABLE PARTS INSIDE. REFER SERVICING TO QUALIFIED SERVICE PERSONNEL.

The lightning flash with arrowhead symbol, within an equilateral triangle, is intended to alert the user to the presence of uninsulated “dangerous voltage” within the apparatus’s enclosure that may be of sufficient magnitude to constitute a risk of electric shock to persons.

The exclamation point within an equilateral triangle is intended to alert the user to the presence of important operating and maintenance (servicing) instructions in the literature accompanying the apparatus.
WHEN CARRYING THIS UNIT
- At least 2 people are required when carrying this unit.
- Make sure to hold the upper and bottom frames of the unit firmly as illustrated.

- Do not attempt to open the cabinet. There are no user serviceable parts inside. Refer all servicing to qualified service personnel.
- Slots and openings in the cabinet and the sides or bottom are provided for ventilation. To ensure reliable operation and to protect the unit from overheating, these openings must not be blocked or covered. Avoid installation in enclosed spaces such as bookcases unless proper ventilation is provided.
- Keep the unit away from radiators and other heat sources.
- Do not push objects of any kind into the unit through the cabinet slots or openings as they could touch electrically live parts or short circuit parts resulting in a fire or electric shock.
- To prevent fire or shock hazard, do not expose this unit to dripping or splashing, no objects filled with liquids, such as vases, should be placed on the unit.
- Use the unit on a horizontal (flat) surface only.
- Do not place any combustible objects on the unit (candles, etc.).
- The LCD panel used in this unit is made of glass. Therefore, it can break when the unit is dropped or applied with impact. Be careful not to be injured by broken glass pieces in case the LCD panel breaks. The LCD panel is a very high technology product with 921,600 thin film transistors, giving you fine picture details. Occasionally, a few non-active pixels may appear on the TV screen as a fixed point of blue, green or red. Please note that this does not affect the performance of your unit.
- Disconnect the mains plug to switch off when the unit becomes faulty or not in use.
- The mains plug shall remain readily operable.
- Read the manual instructions to ensure correct and safe installation and interconnection of the unit in multimedia systems.
- Keep a distance of 20cm around the ventilation openings of the unit.
- Batteries (battery pack or batteries installed) shall not be exposed to excessive heat such as sunshine, fire or the like.
POWER SUPPLY
The main power supply is engaged when the main plug is plugged into a 100-240 V~, 50Hz/60Hz AC outlet. To operate the unit, press (power) to turn on the unit.
WARNING:
- Never use a gas duster on this TV. The gas trapped inside of this unit may cause ignition and explosion. • TO REDUCE THE RISK OF FIRE OR ELECTRIC SHOCK, DO NOT EXPOSE THIS APPARATUS TO RAIN OR MOISTURE.
- Do not place the unit on furniture that can be tilted by a child or an adult leaning, pulling, standing, or climbing on it. A falling unit can cause serious injury or even death. • LIVE PARTS INSIDE. DO NOT REMOVE ANY SCREWS.
Battery Precautions
- Be sure to follow the correct polarity as indicated in the battery compartment. Reversed batteries may cause damage to the device.
- Do not mix different types of batteries together (e.g., Alkaline and Carbon-Zinc or rechargeable batteries like Ni-Cd, Ni-MH, etc.) or old batteries with fresh ones.
- If the device is not to be used for a long period of time, remove the batteries to prevent damage or injury from possible battery leakage.
- Do not try to recharge batteries; they can overheat and rupture.
A Note about Recycling

This unit's packaging materials are recyclable and can be reused. Please dispose of any materials in accordance with your local recycling regulations. This product consists of materials which can be recycled and reused if disassembled by a specialised company.

The crossed-out wheeled dust bin symbol indicates that batteries and/or accumulators must be collected and disposed of separately from household waste. If the battery or accumulator contains more than the specified values of lead (Pb), mercury (Hg), and/or cadmium (Cd) defined in the Battery Directive
(2006/66/EC), then the chemical symbols for lead (Pb), mercury (Hg) and/or cadmium (Cd) will appear below the crossed-out wheeled dust bin symbol. By participating in separate collection of batteries, you will help to assure the proper disposal of products and batteries and thus help to prevent potential negative consequences for the environment and human health. For more detailed information about the collection and recycling programmes available in your country, please contact your local city office or the shop where you purchased the product.

The use of the symbol indicates that this product may not be treated as household waste. By ensuring this product is disposed of correctly, you will help prevent potential negative consequences for the environment and human health, which could otherwise be caused by inappropriate waste handling of this product. For more detailed information about recycling of
this product, please contact your local city office, your household waste disposal service or the shop where you purchased the product.
Notice for customers

Disposal of the TV set
Disposal of Old Electrical & Electronic Equipment (Applicable in the European Union and other European countries with separate collection system)

Disposal of the TV set
Disposal of Old Electrical & Electronic Equipment (Applicable in the Republic of India)
1. Supplied Accessories
Base

Screws for attaching the base

Screw for mounting the unit on the furniture
• 39FD713 only
Batteries for remote control
- 2 x AAA Drycell


Remote control Manual
Installation of Wall Mount (Optional)
The Wall Mount Kit can help install the TV on the wall. For more information about wall mounting, please refer to the instructions provided along with the Wall Mount Kit.
CAUTION
When wall mounting the product, please contact qualified personnel. If users choose to install the TV on their own, the producer is not responsible for any damages caused either to the product or to the persons.

Holes for installation of Wall Mount bracket
| Length of holes distances(H/V) Recommended screw thread type | ||
| 39FD713 400 mm/ | 300 mm M4 | |
| 32FD513/32FD503 200 mm/ | 100 mm M4 | |
| 32FL513/32FL503 100 mm/ | 100 mm M4 | |
| 29FL513/29FL503 100 mm/ | 100 mm M4 | |
| 24FL513/24FL503 75 mm/ | 75 mm M4 | |
2. Attaching the Base


- When attaching the base, ensure that all screws are tightly fastened. If the base is not properly attached, it could cause the unit to fall, resulting in injuries as well as damage to the unit.
- Make sure the table is in a stable location.
3. Mounting the Unit on Your Furniture

WARNING
To prevent injury, this television must be securely attached to a TV stand or furniture in accordance with the instructions.
Screw this television on your furniture tightly using wood screw (supplied) in the hole at the back of the base as shown.
32FD513 / 32FD503 / 32FL513 / 32FL503 / 29FL513 / 29FL503 / 24FL513 / 24FL503
Screw this television on your furniture tightly using wood screw (not supplied) in the hole at the back of the base as shown.
- Recommended dimension : 5.1 x 20 mm
4. Connections for Antenna and the Power

- You can also connect a cable as a substitute for the antenna.
5. Installing the Batteries
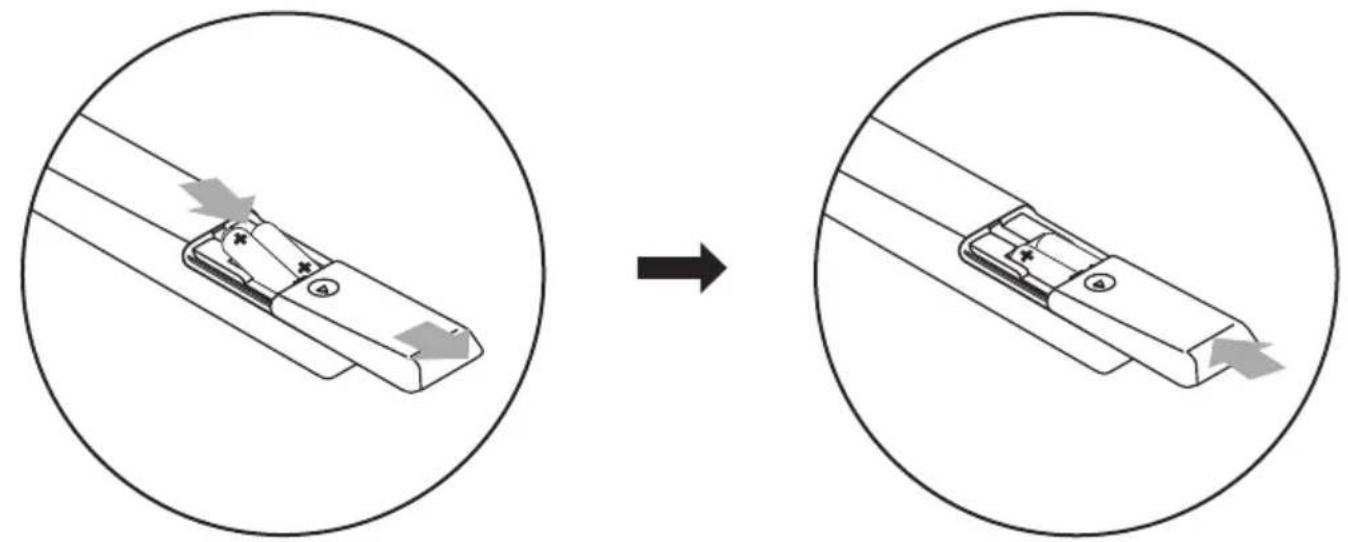
- 2 x AAA Dry Cell
6. Initial Setup
Turn on the Unit
After plugging in the unit and the power indicator lights up red, just press ⏻ on the remote or the TV to turn it on.
![graph TD A["Control Panel"] --> B["Monitor"] B --> C["Menu Source"] style A fill:#f9f,stroke:#333 style B fill:#ccf,stroke:#333 style C fill:#cfc,stroke:#333](/content/2026/07/1558229/images/2960290788b3f792a1c55ef5c0e9d84cba896dfcf3b8951e2fcd231ce8ae7cc2.jpg)
Language Selection
You can select the preferred on-screen language.
1. Press MENU to display the setup menu and use ◀ / ▶ to select [OPTION] in the setup menu. 2. Use ▲ / ▼ to select [OSD Language] in the option menu and then select the language you want using ◀ / ▶.
![graph TD A["Remote Control Panel"] --> B["Monitor"] B --> C["Tablet"] D["Access Window"] --> E["Remote Controller"] E --> B style A fill:#f9f,stroke:#333 style B fill:#ccf,stroke:#333 style C fill:#cfc,stroke:#333 style D fill:#fcc,stroke:#333](/content/2026/07/1558229/images/a5134ccbb72e2296a7e8141ba272f8174d7adc4628d46937e14c843058654849.jpg)
Auto Tuning
You have to set up channels to watch TV.
1. Press MENU to display the setup menu and use ◀ / ▶ to select [CHANNEL] in the setup menu. 2. Use ▲ / ▼ to select [Auto Tuning] in the channel menu, and press OK to start tuning to set up channels.
- For detailed operation procedure, refer to "Channel Settings" (p. 18).
![graph TD A["Remote Control Panel"] --> B["TV Screen"] B --> C["Digital Interface"]](/content/2026/07/1558229/images/424f6c95719a140df69ad164574a6eabbfd32f921b34262d061a007b194c5d63.jpg)
Remote Control and Front Panel


1. (Power) (p. 7)
Press once to turn the unit on and press it once more to put the unit into standby mode.
2. S MODE “[Sound Mode]” (p. 20)
3. P MODE “[Picture Mode]” (p. 19)
4. FREEZE "Freeze Mode" (p. 11)
5. AUDIO "Sound Select" (p. 12)
Display and change the current Audio mode.
6. Number buttons (p. 11)
7. PREV.P
Change channel to previous one.
8. (p.41) + / -
To adjust the volume.
- VOL ◀ / ▶ (Front panel) works same function as ◀ / ▶ (cursor) on the menu.
9. (Mute) (p. 11)
10. RED / GREEN / YELLOW / BLUE
"[Teletext]" (p. 11)/"[Programme Edit]" (p. 18)
11. EXIT (p. 11)
Exit the menu.
12. MENU (p. 18)
13. SOURCE
"Switching the Input Source Mode" (p. 12)
- SOURCE (Front panel) works same function as OK to determine the setting menu.
14. SLEEP “[Sleep Timer]” (p. 11)
15. ASPECT "Picture Format" (p. 12)
16. Playback function buttons (p. 13) / Teletext function buttons (p. 11)
◀◀ (Skip backward) / (Index)
▶▶ (Skip forward) / (Expand)
◀ (Rewind) / (Reveal)
(Fast-forward) / (Subpage)
(Stop) / (Hold)
▶II (Play/Pause) / ☐ (Text)
17. FAV "Favourite" (p. 11)
18. P + / - (p. 11)
To browse a channel.
- PROG ▲ / ▼ (Front panel) works same function as ▲ / ▼ (cursor) on the menu.
19. DISPLAY
Display the channel number or input source.
20. ▲ / ▼ / ◀ / ▶ (Cursor) (p. 11)
21. OK
22. Remote Control Sensor
23. Standby / Power indicator
(Power on : no light, Standby : red)
Rear Panel

- YPbPr (Component video) input jacks (p. 10)
- PC (VGA) input jack (p. 9)
- Audio input jack for PC / HDMI (DVI) connection (p. 9)
- Composite video input jack (p. 9)
- Audio (L/R) input jacks (p. 9, p. 10)
- HDMI (HDMI 1) input jack (p. 10)
- The HDMI socket is guaranteed to be used for single source only. It does not guarantee any adaptor, switches or other connecting device for the purpose of multiple sources. The usage of such device even if it is capable is at customer risk.
30. USB terminal (p. 10)
• Data input from USB flash memory only. - User should not connect any devices to the USB terminal such as digital camera, keyboard, mouse, etc. (because these will not work.) - The software update is, in most cases, handled by an authorised service person or in some circumstances the user may be asked to do the software update themselves.
- Antenna input jack (p. 6)
- Coaxial digital audio output (SPDIF) jack (p. 10)
- HDMI (HDMI 2 / HDMI 3) input jack (p. 10)
- Headphone audio output jack
- AC power cord
Hook-Up
![graph TD A["PC (VGA) input jack / Audio input jack for PC / HDMI (DVI) connection"] --> B["PC/HDMI AUDIO IN"] B --> C["Composite video input jack / Audio (L/R) input jacks"] D["Laptop"] --> E["PC-IN RGB"] E --> F["PC/HDMI AUDIO IN"] F --> G["Video"] G --> H["ACI"] H --> I["ACI"] I --> J["ACI"] J -->…](/content/2026/07/1558229/images/45cadc9472c19935cb914b66b84417442b9705e58fb0955d71f40de315cfcfb8.jpg)
Coaxial digital audio output jack![graph TD A["HDMI input jack"] --> B["USB terminal"] B --> C["Headphone audio output jack"] C --> D["Audio (L/R) input jacks"] D --> E["YPbPr (Component video) input jacks / Audio (L/R) input jacks"] E --> F["Headphone audio output jack"] F --> G["USB terminal"] G --> H["Headphone audio output jack"]…](/content/2026/07/1558229/images/5b70d42301dcba668089ce786981fe0dadc1eeecd242f0fb27b8b2ba368c97da.jpg)
OPERATIONS
Read this first
These operations are accessible by remote control. Some may also be accessible by controls on the main unit.
Watching a TV Programme
To select a channel
Use P repeatedly to select your desired channel, or use the Number buttons to enter a specific channel number, then press OK for quicker access.
(e.g.) If you want to select channel 24 without pressing OK, press 2 first, then press 4 within 3 seconds.
To adjust the volume
Use to increase / decrease the audio volume.
Press to turn the sound on / off temporarily.
- You can recover the original volume by pressing again or ▲ + / - .
[Sleep Timer]
The sleep timer can be set for the unit to go to the standby mode after an incremental period of time.
1 Press SLEEP repeatedly to change the sleep time period.
• Each time you press SLEEP, the timer increases from 10 minutes up to 240 minutes. - Press SLEEP repeatedly until [Off] appears to cancel the sleep timer. - If the unit goes into standby mode, the sleep timer will be cancelled.
Freeze Mode
Freeze Mode can freeze the image shown on the TV screen for 5 minutes.
1 Press FREEZE to freeze the image.
• The sound output will not be paused. • To cancel freeze mode, press any buttons except .
[Teletext]
1 Press to turn on the teletext decoder and display [Teletext] information. 2 Press repeatedly to show the teletext in transparent mode or picture and teletext mode.
- If you want to select other pages, use the Number buttons or ▲ / ▼. • To enlarge fonts, press . • To select the teletext subpages, press . • To directly select the page numbers shown at the bottom of the TV screen, use RED / GREEN / YELLOW / BLUE. • To call up the hidden information, press . • To hold the current page, press . • To go back to the start page, press .
3 Press EXIT to exit.
Favourite
You can easily locate a favourite channel.
- You can set favourite channel at “[Programme Edit]” (p. 18).
1 Press FAV while watching a programme to show the favourite channel list. 2 Use ▲ / ▼ to select the channel you want, then press OK.
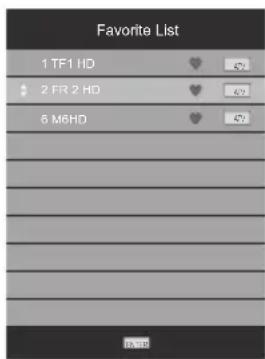
- Use to move to the previous or next page.
- This unit needs a few seconds to memorise the favourite setting.
- If you unplug the AC power cord immediately after the setting, it will not be registered in the memory.
3 Press EXIT to exit.
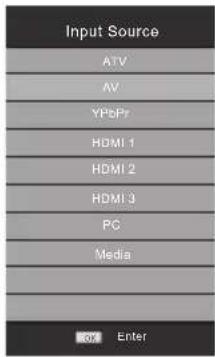
Switching the Input Source Mode
You can select a desired input source mode from the available sources.
1. Press SOURCE.
2. Use ▲ / ▼ to select the input source mode you want, then press OK.
Sound Select
Press AUDIO to display the currently selected audio mode, and press repeatedly to cycle through the available audio modes.

Picture Format
Display modes can be selected when your TV receives a 16:9 or 4:3 video signal. Three types of display modes can be selected for a PC input signal.
1. Press the ASPECT button repeatedly to switch the TV screen display mode.
- You cannot set the screen display mode in playback mode. - You can also set it via "[Aspect Ratio]" (p. 21).
For 16:9 video signal![graph LR A["Image 16:9"] --> B["Image 4:3"] --> C["Just Scan"]](/content/2026/07/1558229/images/61bffe336d048636f21db038b3ca16e2cc9de12737bfa2a8049cf0d3d48aafdd.jpg)
| [16:9] | Displays a 16:9 picture at its original size. |
| [4:3] | Displays a 16:9 picture at a 4:3 size; the picture is shortened horizontally. Sidebars appear on both edge of the TV screen. |
| [Just Scan] | Displays a proportionally stretched picture. |
For 4:3 video signal
![graph TD A["Original Image"] --> B["Step 1: [4:3"] [Zoom1] [16:9]] B --> C["Step 2: [Zoom2"]]](/content/2026/07/1558229/images/ce972dd2279d595db0b86ca757001ac92f90b6fbf236e3b9e48d5a4908d25fa0.jpg)
| [16:9] | Displays a 4:3 picture at a 16:9 size. This crops out the top and bottom of the picture. |
| [4:3] | Displays a 4:3 picture at its original size. Sidebars appear on both edge of the TV screen. |
| [Zoom1] | Displays a 4:3 picture at a 16:9 size; at its enlarged size without changing its horizontal and vertical ratio. |
| [Zoom2] | Displays a 4:3 picture at a 16:9 size; at its enlarged size bigger than [Zoom1] without changing its horizontal and vertical ratio. |
For PC input signal![graph LR A["Original Image"] --> B["Intermediate Image"] B --> C["Final Output"] note1[" [4:3"] [Dot by Dot][16:9] ] --> A](/content/2026/07/1558229/images/ef9457dc966b183812455b839d504966364d81dab23a689ac3a221c2d648dbbc.jpg)
| [16:9] | Displays a proportionally stretched picture. This crops out the top and bottom of the picture. |
| [4:3] | Displays a proportionally stretched picture. Mainly sidebars appear on both edges of the TV screen. |
| [Dot by Dot] | Displays a picture at its original size. |
- This unit can also be connected to your PC that has a DVI terminal. Use an HDMI-DVI conversion cable for this video connection, and it requires a stereo mini plug conversion cable for analog audio signal as well.
• Refer to 16:9 video signal on this page if the PC has HDMI output.
- PC resolution standards: 713 series - 1920 x 1080 503/513 series - 1360 x 768 For details, refer to "Input Resolution" (p. 26).
503 series
32FD503/ 32FL503/ 29FL503/ 24FL503
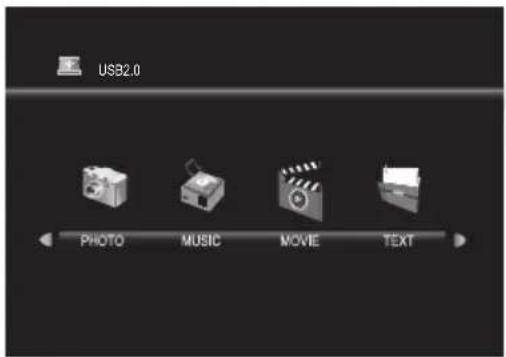
If your unit is one of the series, you can play pictures and watch text files from a USB flash drive.
713/ 513 series
39FD713/ 32FD513/ 32FL513/ 29FL513/ 24FL513
If your unit is one of the series, you can play pictures, music, videos, and watch text files from a USB flash drive.
Setup for Playback
You must connect the USB flash memory to the USB terminal of this unit (shown below).

1 Press SOURCE to display the input source mode and use ▲ / ▼ to select [Media], and then press OK.
- If you want to exit this mode, select any other input source mode. Refer to "Switching the Input Source Mode" (p. 12).
- You can check Multimedia Specification. Refer to "Multimedia Format" (p. 27).
Note for Playback
• The USB flash memory is not supplied with this unit. - The unit recognizes only a USB flash memory. Do not use a USB hub or an extension cord between the USB flash memory and the unit. Always connect the USB flash memory to this unit directly. - It is not guaranteed that all USB flash memory can be supported on this unit. - FUNAI cannot be held responsible if your USB flash memory is not supported, nor will FUNAI accept any liability for damage or loss of stored data. - A USB flash memory that requires its own driver or a device with a special system such as fingerprint recognition is not supported. - Be sure to keep a backup copy of the original files on your device before you play them back on this unit. We have no responsibility for damage or loss of your stored data. - To avoid damaging the USB flash memory and the unit, always turn off the unit before you remove the USB flash memory. - This unit is not allowed to use a USB flash memory that requires external power supply (500 mA or more). - The unit can recognize up to 198 files including directories under one directory, and it can recognize the depth of directory up to 30. - This unit may not recognize if the length of the file names is too long. Only English characters can be recognized. - This unit does not support NTFS or file systems other than FAT16 and FAT32. If the file is not supported, an error message appears. - When the unit does not recognize the USB flash memory, try reconnecting it. - Playing files recorded with high bit rates may cause images to be interrupted on some occasions. - This unit does not support external subtitles. - This unit cannot play back a file that exceeds the limit of file restrictions. - For USB input, the maximum resolution display is 1080p.
[PHOTO]
2 Use ◀ / ▶ to select [PHOTO] and press OK to enter.
503 series
32FD503/ 32FL503/ 29FL503/ 24FL503

713/513 series
39FD713/ 32FD513/ 32FL513/ 29FL513/ 24FL513

3 Use ◀ / ▶ to select [C] and press OK to enter your file.

4 Use ▲ / ▼ / ◀ / ▶ to select the desired file, then press OK.
![graph TD A["Input Image"] --> B["Return"] B --> C{Change} C -->|Yes| D["Process Step 1"] C -->|No| E["Process Step 2"] D --> F["Output Image"] E --> G["Output Image"] style A fill:#f9f,stroke:#333 style B fill:#ccf,stroke:#333 style C fill:#cfc,stroke:#333 style D fill:#fcc,stroke:#333 style E fill:…](/content/2026/07/1558229/images/676f14e74f099e86ddb58887b433ff80ec961a18b616f3e9b8bdea551eb2553e.jpg)
- The check box is displayed at the right bottom by pressing the OK. The files having the check box are played by pressing ▶ if they are not selected, then all playable files in the folder are played.
- If you put audio files into same folder of picture files, you can play music during the slideshow.
Operation in Slideshow
| ▶II :Press to play or pause the slideshow. | |
| ◀◀ / ▶▶!Press to skip the file backward or forward. | |
| ■ :Press to stop the slideshow. | |
| OK / DISPLAY :Press to display the menu. | |
| [Repeat] :Use ◀ / ▶ and press OK to select the repeat mode; [Repeat None], [Repeat 1] or [Repeat All] in order. | |
| [Music] :Use ◀ / ▶ to select [Music] and press OK to play, then the music file in the same folder play automatically. | |
| [Playlist] :Use ◀ / ▶ and press OK to select [Playlist] to show the playlist. | |
| [Info.] :Use ◀ / ▶ and press OK to select [Info.] to show the details. | |
| [Rotate] :Use ◀ / ▶ to select right-handed or left-handed rotate and press OK to turn the picture by 90 degrees. | |
| [Zoom In] :Use ◀ / ▶ to select [Zoom In] and press OK to zoom in the display. | |
| [Zoom Out] :Use ◀ / ▶ to select [Zoom Out] and press OK to zoom out the display. | |
| Move View:Use ◀ / ▶ and press OK to select [Move Vi..] to move viewing location during zoom in the display. | |
[MUSIC]
only 713/513 series
39FD713/ 32FD513/ 32FL513/ 29FL513/ 24FL513
2 Use ◀ / ▶ to select [MUSIC] and press OK to enter.
3 Use ◀ / ▶ to select [C] and press OK to enter your file.
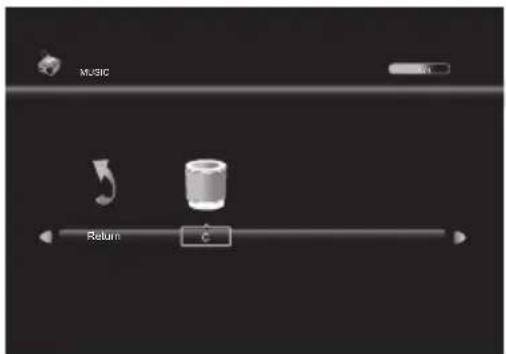
4 Use ▲ / ▼ / ◀ / ▶ to select the desired file, then press OK.
![graph TD A["Return"] --> B["State 1"] A --> C["State 2"] A --> D["State 3"] A --> E["State 4"] A --> F["State 5"] A --> G["State 6"] A --> H["State 7"] A --> I["State 8"] A --> J["State 9"] A --> K["State 10"] A --> L["State 11"] A --> M["State 12"] A --> N["State 13"] A --> O["State 14"] A --> P["S…](/content/2026/07/1558229/images/2086a3a9d93b43176b77932abc21d59ef03e5bee8818dbed44d5f7513c54cb45.jpg)
- The check box is displayed at the right bottom by pressing the OK. The files having the check box are played by pressing ▶ if they are not selected, then all playable files in the folder are played.
Operation in Playback
| ▶II:Press to play or pause the playback. | |
| ◀/ ▶:Press to rewind or fast-forward the playback. | |
| ◀/ ▶!Press to skip backward or forward the current file. | |
| ■:Press to stop the playback. | |
| OK / DISPLAY :Press to display the menu. | |
| [Repeat] :Use ◀/ ▶ and press OK to select the repeat mode; [Repeat None], [Repeat 1] or [Repeat All] in order. | |
| [MUTE] :Use ◀/ ▶ and press OK to select [MUTE] to mute. | |
| [Playlist] :Use ◀/ ▶ and press OK to select [Playlist] to show the playlist. | |
| [Info.] :Use ◀/ ▶ and press OK to select [Info.] to show the details. | |
| Goto Time :Use ◀/ ▶ and press OK to select [Goto Ti..] to move the time you want in the playback. | |
[MOVIE]
only 713/513 series
39FD713/ 32FD513/ 32FL513/ 29FL513/ 24FL513
2 Use ◀ / ▶ to select [MOVIE] and press OK to enter.

3 Use ◀ / ▶ to select [C] and press OK to enter your file.

4 Use ▲ / ▼ / ◀ / ▶ to select the desired file, then press OK.
![graph TD A["Return"] --> B{Change} B --> C["Action"] B --> D["Action"] B --> E["Action"] B --> F["Action"] B --> G["Action"] B --> H["Action"] B --> I["Action"] B --> J["Action"] B --> K["Action"] B --> L["Action"] B --> M["Action"] B --> N["Action"] B --> O["Action"] B --> P["Action"] B --> Q["Acti…](/content/2026/07/1558229/images/1898372936a04fa7ea2118fb99d1eb159081a09c277b26c862b20c1d3f43d6ca.jpg)
- The check box is displayed at the right bottom by pressing the OK. The files having the check box are played by pressing ▶ If they are not selected, then all playable files in the folder are played.
Operation in Playback
| ▶II:Press to play or pause the playback. | |
| ◀/▶:Press to rewind or fast-forward the playback. | |
| ◀/▶:Press to skip backward or forward the current file. | |
| ■:Press to stop the playback. | |
| OK / DISPLAY:Press to display the menu. | |
| [Repeat]:Use ◀/▶ and press OK to select the repeat mode; [Repeat None], [Repeat 1] or [Repeat All] in order. | |
| A-B Repeat:Use ◀/▶ and press OK to select the limited repeat mode; [Set A], [Set B] or [None] in order. | |
| [Playlist]:Use ◀/▶ and press OK to select [Playlist] to show the playlist. | |
| [Info.]:Use ◀/▶ and press OK to select [Info.] to show the details. | |
| Slow Forward:Use ◀/▶ and press OK to select [Slow F.] to play slow. | |
| Step Forward:Use ◀/▶ and press OK to select [Step Fo..] to play frame-by-frame playback. | |
| Goto Time:Use ◀/▶ and press OK to select [Goto Ti..] to move the time you want in the playback. | |
| [Zoom In]:Use ◀/▶ to select [Zoom In] and press OK to zoom in the display.• This function is not supported for resolution 1080p. | |
| [Zoom Out]:Use ◀/▶ to select [Zoom Out] and press OK to zoom out the display.• This function is not supported for resolution 1080p. | |
| [Aspect]:Use ◀/▶ to select [Aspect] and press OK to change the view format.: [Zoom1] / [Zoom2] / [4:3] / [16:9].• This function is not supported for resolution 1080p. | |
| Move View:Use ◀/▶ and press OK to select [Move Vi..] to move viewing location during zoom in the display. | |
[TEXT]
2 Use ◀ / ▶ to select [TEXT] and press OK to enter.
503 series
32FD503/ 32FL503/ 29FL503/ 24FL503

713/513 series
39FD713/ 32FD513/ 32FL513/ 29FL513/ 24FL513

3 Use ◀ / ▶ to select [C] and press OK to enter your file.

4 Use ▲ / ▼ / ◀ / ▶ to select the desired file, then press OK.
![graph TD A["Input Module"] --> B["Process Node"] C["Input Module"] --> B D["Input Module"] --> B E["Input Module"] --> B F["Input Module"] --> B G["Input Module"] --> B H["Input Module"] --> B I["Input Module"] --> B J["Input Module"] --> B K["Input Module"] --> B L["Input Module"] --> B M["Input Mo…](/content/2026/07/1558229/images/ee55a98723d8fe809ce9b28a17d74884051e5e496480b07c077a9a352feeb2e0.jpg)
- The check box is displayed at the right bottom by pressing the OK. The files having the check box are played by pressing ▶ if they are not selected, then all playable files in the folder are played.
- If you put audio files into same folder of text files, you can play music during the playback.
Operation in Playback
| ▶II:Press to play or pause the playback. | |
| ◀/▶.Press to move previous or next page in the file. | |
| ◀/▶.Press to skip backward or forward the file. | |
| ■:Press to stop the playback. | |
| OK / DISPLAY:Press to display the menu. | |
| [Music]:Use ◀/▶ and press OK to select [Music], then the music file in the same folder play automatically. | |
| [Playlist]:Use ◀/▶ and press OK to select [Playlist] to show the playlist. | |
| [Info.]:Use ◀/▶ and press OK to select [Info.] to show the details. | |
DETAIL SETTINGS
Read this first
Before adjust each setting, press MENU to display the menu.
To exit the menu, press EXIT.
Channel Settings
You can edit the channel settings.
1 Use ◀ / ▶ to select [CHANNEL].

[Auto Tuning]
You can scan the channels in your area automatically.
2 Use ▲ / ▼ to select [Auto Tuning], then press OK to start scanning.
- When the scanning is completed, the lowest memorised channel will be displayed.
- If you press MENU during the scanning, this operation will be stopped and a confirmation display will appear, then you can cancel scanning.
[ATV Manual Tuning]
You can search channels manually in your area.
2 Use ▲ / ▼ to select [ATV Manual Tuning], then press OK. 3 Use ▲ / ▼ to select [Current CH], then use ◀ / ▶ to select the channel you want. 4 Use ▲ / ▼ to select [Color System], then use ◀ / ▶ to select the system you want. 5 Use ▲ / ▼ to select [Sound System], then use ◀ / ▶ to select the system you want. 6 Use ▲ / ▼ to select [Fine Tune], then use ◀ / ▶ to adjust the setting. 7 Use ▲ / ▼ to select [AFC], then use ◀ / ▶ to select [On] or [Off].
- If you set to [On], this unit searches a near channel automatically.
8 Use ▲ / ▼ to select [Search], then use ◀ / ▶ to search a channel.
[Programme Edit]
You can edit the programme settings.
2 Use ▲ / ▼ to select [Programme Edit], then press OK to enter Programme Edit list.
| [Delete] (RED) :Press RED to delete the current channel. |
| [Rename] (GREEN) :Press GREEN and use ▲ / ▼ / ◀ / ▶ to change the current channel name. |
| [Move] (YELLOW) :Press YELLOW and use ▲ / ▼ to move the current channel. |
| [Skip] (BLUE) :Press BLUE to skip the current channel. |
| [FAV] (FAV) :Press FAV to register the current channel. |
Screen Settings
If your PC is connected with this unit, you can edit the screen settings.
1 Use ◀ / ▶ to select [SCREEN].

[Auto Adjust]
You can change the screen settings automatically.
2 Use ▲ / ▼ to select [Auto Adjust], then press OK.
[H-Offset] / [V-Offset] / [Clock] / [Phase]
You can change the screen settings manually.
[H-Offset] : horizontal picture adjustment [V-Offset] : vertical picture adjustment [Clock] : clock adjustment [Phase] : phase adjustment
2 Use ▲ / ▼ to select the item you want, then press OK, and then appear the setting display, adjust the setting using ◀ / ▶.
- While adjusting each setting, you can change the setting item using ▲ / ▼.
Picture Adjustment
You can adjust the picture settings according to your personal preference. These settings are automatically stored after exiting the picture menu.
1 Use ◀ / ▶ to select [PICTURE].
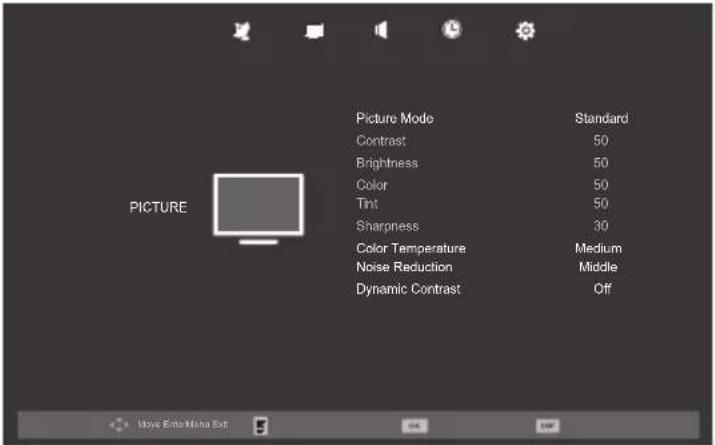
[Picture Mode]
You can change the picture adjustment style.
2 Use ▲ / ▼ to select [Picture Mode], then press OK.
3 Use ▲ / ▼ to select [Dynamic], [Standard], [Mild] or [Personal], then press OK.
[Dynamic] : higher contrast
[Standard] : standard
[Mild] : lower contrast
[Personal] : manual setting
- You can change picture mode easily using P MODE on the Remote Control. Press P MODE repeatedly to select the picture mode you want. In this function, you can also assign the picture mode individually to each input mode.
[Contrast] / [Brightness] / [Color] / [Tint] / [Sharpness]
You can change the screen settings manually. While adjusting each setting, you can change the setting item using ▲ / ▼.
[Contrast] : contrast adjustment [Brightness] : brightness adjustment [Color] : colorfulness adjustment [Tint] : redness/greenness adjustment [Sharpness] : sharpness adjustment
2 Use ▲ / ▼ to select the item you want. Then press OK, and the setting display will appear. 3 Adjust the setting using ◀ / ▶.
- You can adjust the settings, if you set [Personal] in [Picture Mode].
[Color Temperature]
You can change the color tone of the picture.
2 Use ▲ / ▼ to select [Color Temperature], then press OK. 3 Use ▲ / ▼ to select [Cool], [Medium] or [Warm], then press OK.
[Cool] : bluer tone
[Medium] : average tone
[Warm] : redder tone
[Noise Reduction]
You can reduce picture noise.
2 Use ▲ / ▼ to select [Noise Reduction], then press OK or ▶. 3 Use ▲ / ▼ to select [Off], [Low], [Middle] or [High], then press OK.
[Dynamic Contrast]
You can set the dynamic contrast mode.
2 Use ▲ / ▼ to select [Dynamic Contrast], then press OK. 3 Use ▲ / ▼ to select [On] or [Off], then press OK.
Sound Adjustment
You can adjust the sound settings according to your personal preferences.
1 Use ◀ / ▶ to select [SOUND].

[Sound Mode]
You can change the sound setting style. While adjusting each setting, you can change the setting item using ▲ / ▼.
2 Use ▲ / ▼ to select [Sound Mode], then press OK. 3 Use ▲ / ▼ to select [Standard], [Music], [Movie], [Sports] or [Personal], then press OK.
[Standard] : standard
[Music] : appropriate for listening to music
[Movie] : appropriate for watching a movie
[Sports]: appropriate for watching a sport programme
[Personal]: manual setting
- You can change sound mode easily using S MODE on the Remote Control.
- Press S MODE repeatedly to select the sound mode you want.
[Treble] / [Bass] / [Balance]
You can set left / right speaker setting.
While adjusting each setting, you can change the setting item using ▲ / ▼.
[Treble]: high pitched tone adjustment
[Bass]: low pitched tone adjustment
[Balance]: volume balance setting for left and right speakers
2 Use ▲ / ▼ to select the item you want. Then press OK, and the setting display will appear. 3 Adjust the setting using ◀ / ▶.
- You can adjust [Treble] and [Bass] settings, if you set [Personal] in [Sound Mode].
[Auto Volume]
If set to [On], sudden changes in volume will be reduced automatically, for example, during commercials or when switching channels.
2 Use ▲ / ▼ to select [Auto Volume], and then select [On] or [Off] using ◀ / ▶.
[SRS TruSurround XT]
You can set the sound modes for more spatial or surround sound reproduction.
2 Use ▲ / ▼ to select [SRS TruSurround XT], and then select [On] or [Off] using ◀ / ▶.
[SPDIF Mode]
If this unit is connected with coaxial digital audio output jack to your device, you can set this mode. 2 Use ▲ / ▼ to select [SPDIF Mode] and then select [PCM], [Auto] or [Off] using ◀ / ▶.
| AUTO:The SPDIF output is the same with the input sound format. |
| PCM:The SPDIF output is PCM format, regardless of the input sound format. |
| OFF:Turn OFF the SPDIF output. |
Timer Settings
You can change Timer setting.
1 Use ◀ / ▶ to select [TIMER].

[Sleep Timer]
The sleep timer can be set for the unit to go to the standby mode after an incremental period of time.
2 Use ▲ / ▼ to select [Sleep Timer], then press OK. 3 Use ▲ / ▼ to select the time you want, then press OK.
- You can also set it using the Remote Control. Refer to "[Sleep Timer]" (p. 11). • Available options are: Off / 10min / 20min / 30min / 60min / 90min / 120min / 180min / 240min.
[Auto Standby]
You can set the time to turn off the display power automatically.
In spite of this setting, the unit goes into standby mode automatically if there is no signal input from the antenna terminal and no user operation for 15 minutes.
2 Use ▲ / ▼ to select [Auto Standby], then press OK. 3 Use ▲ / ▼ to select the time you want, then press OK.
• Available options are: Off / 3hours / 4hours / 5hours.
[OSD Timer]
You can set the time to turn off the OSD display.
2 Use ▲ / ▼ to select [OSD Timer], then press OK. 3 Use ▲ / ▼ to select the time you want, then press OK.
- Available options are: Off / 5sec / 10sec / 15sec / 20sec / 25sec / 30sec.
Option Settings
You can change other settings.
1 Use ◀ / ▶ to select [OPTION].
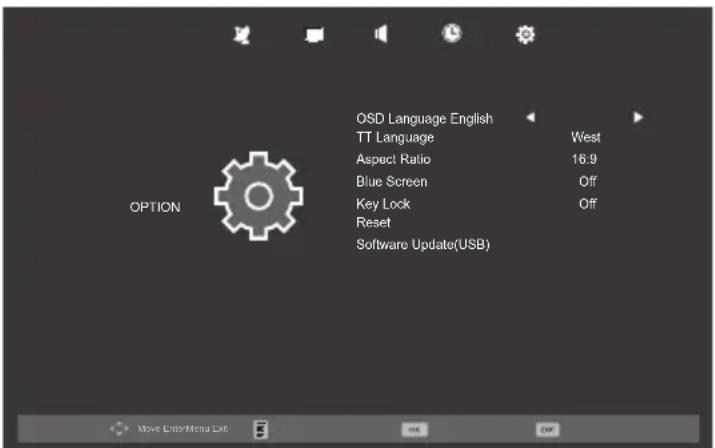
[OSD Language]
You can select the preferred on screen language.
2 Use ▲ / ▼ to select [OSD Language] and then select the language you want using ◀ / ▶.
• Available languages are: English, Thai, Malay, Simplified Chinese, Arabic, Persian, Indonesian, Vietnamese and French.
[TT Language]
You can select the preferred teletext language.
2 Use ▲ / ▼ to select [TT Language], then press OK. 3 Use ▲ / ▼ to select the language you want, then press OK.
• Available languages are: West, East, Russia, Arabic and Farsi.
[Aspect Ratio]
You can change TV Screen Display mode.
2 Use ▲ / ▼ to select [Aspect Ratio], then press OK. 3 Use ▲ / ▼ to select the display mode you want, then press OK.
• Available options are: [4:3] / [16:9] / [Zoom1] / [Zoom2] / [Just Scan] / [Dot by Dot]. - For details, refer to "Picture Format" (p. 12)
[Blue Screen]
If you set to [On], the background screen displays blue, during no input signal.
2 Use ▲ / ▼ to select [Blue Screen], then select [On] or [Off] using ◀ / ▶.
[Key Lock]
If you set to [On], you cannot use the buttons on the TV.
2 Use ▲ / ▼ to select [Key Lock], then select [On] or [Off] using ◀ / ▶.
[Reset]
You can restore the all settings.
2 Use ▲ / ▼ to select [Reset], then press OK.
3 Press ◀ to select Yes to reset the current settings.
- Channel setting has no change before and after reset.
[Software Update(USB)]
It is available to update software using USB.
2 Use ▲ / ▼ to select [Software Update(USB)], then press OK.
- If you use this function, connect USB flash memory with data for update before.
OTHER INFORMATION
Trademark Information Cabinet Cleaning

The terms HDMI and HDMI High-Definition Multimedia Interface, and the HDMI Logo are trademarks or registered trademarks of HDMI Licensing LLC in the United States and other countries.

Manufactured under license from Dolby Laboratories. Dolby and the double-D symbol are trademarks of Dolby Laboratories.

SRS is a trademark of SRS Labs, Inc. TruSurround XT technology is incorporated under license from SRS Labs, Inc. SRS TruSurround XT® creates a truly immersive surround sound experience with rich bass and clear dialog from only two speakers.
- Gently wipe the front panel and other exterior surfaces of the unit with a soft cloth.
- Never use a solvent or alcohol. Do not spray insecticide liquid near the unit. Such chemicals may cause damage and discoloration to the exposed surfaces.
Panel Cleaning
- If the LCD panel should require cleaning, wipe it with a cotton or soft cloth. Before cleaning the panel, disconnect the power cord.
Servicing
- Should your unit become inoperative, do not try to correct the problem yourself. There are no user-serviceable parts inside.
TROUBLESHOOTING GUIDE
If the unit does not perform properly when operated as instructed in this User Manual, check the following chart and all connections once before calling for service. It could save you time and money.
| Problem Possible Remedy | |
| General | |
| TV does not turn on. | •Check the AC power cord is plugged in. (p. 6)•Make sure that the AC outlet supplies the proper voltage, plug another electrical appliance into the AC outlet to ensure that AC outlet operates normally.• If a power failure occurs, unplug the AC power cord for 1 minute to allow the unit to reset itself. |
| TV turns off automatically. | • Check if the [Auto Standby] is activated. (p. 21)• If you do not connect any terminal and no user operation for 15 minutes, check whether the cable to the TV are connected. (p. 6, 9) |
| The remote control does not work. | •Check whether the (Power) indicator is red.•Re-insert the batteries with their polarities (+/- signs) as indicated. (p. 6)• When there is an infrared-equipped device near this unit, it may interrupt the remote control signal of this unit.•The batteries may be dead. Replace the new batteries.•Refer to the instruction manual of the universal remote control for the FUNAI code. |
| Picture | |
| No Picture, No Sound | •Check the AC power cord is plugged in. (p. 6)•Make sure that the AC outlet supplies the proper voltage, plug another electrical appliance into the AC outlet to ensure that AC outlet operates normally.• Check whether the connection of the antenna or cable receiver is connected correctly. (p. 6)•If the outside antenna is being used, check whether wire is broken.• Check whether all the cables to the unit are connected to the correct output jack of your device like Blu-ray / DVD recorder. (p. 9, 10)•Check if your computer is NOT in sleep mode when the input mode of this TV is in PC mode. Tap any key on the keyboard to wake up your computer.• Check if the correct input source mode is selected by pressing SOURCE. (p. 12) |
| Poor Picture, Sound OK | •Try another channel, if that is OK, then possibly due to poor channel reception.• Check whether the connection of the antenna or cable receiver is connected correctly. (p. 6)• Check whether all the cables to the unit are connected to the correct Output jack of your device like Blu-ray / DVD recorder. (p. 9, 10)•Surrounding temperature is too low, wait until the warms up.•Adjust [Picture Mode] setting. (p. 19)• Make sure the [Color System] is properly set. (p. 18) |
| Double Picture or ghost in Picture | •Try another channel, if that is OK, then possibly due to poor channel reception.• Check whether the connection of the antenna or cable receiver is connected correctly. (p. 6)•If the outside antenna is being used, check whether wire is broken. |
| Blurry or Distorted Picture | •Try another channel, if that is OK, then possibly due to poor channel reception.• Check whether the connection of the antenna or cable receiver is connected correctly. (p. 6)•If the outside antenna is being used, check whether wire is broken.•Surrounding temperature is too low, wait until the warms up. |
| White Spot or Shadow Picture (Noise) | •Try another channel, if that is OK, then possibly due to poor channel reception.• Check whether the connection of the antenna or cable receiver is connected correctly. (p. 6)•If the outside antenna is being used, check whether wire is broken.•Adjust [Noise Reduction] setting. (p. 20) |
| Lines or Streaks or Bars in Picture | •Try another channel, if that is OK, then possibly due to poor channel reception.• Check whether the connection of the antenna or cable receiver is connected correctly. (p. 6)•If the outside antenna is being used, check whether wire is broken. |
| The picture crops out the top and/or bottom. | •Adjust [Aspect Ratio] setting. Refer to “Picture Format” (p. 12)• If you are using the TV as a PC monitor, make sure that [H-Offset] and [V-Offset] in “Screen Settings” (p. 19) |
| Black or Luminous point on TV screen | •It is quality of the LCD Panel, this is not a sign of a malfunction. |
| Sound | |
| Picture OK, No Sound | Try another channel, if that is OK, then possibly due to poor channel reception.Check whether the connection of the antenna or cable receiver is connected correctly.(p. 6)If the outside antenna is being used, check whether wire is broken.The sound may be muted. Press +/− or (Mute) (p. 11) |
| Sound is distorted | Try another channel, if that is OK, then possibly due to poor channel reception.Check whether the connection of the antenna or cable receiver is connected correctly.(p. 6)If the outside antenna is being used, check whether wire is broken. |
| USB Playback | |
| Cannot read data in the USB flash memory | Check a USB flash memory is connected solidly.Make sure the format of your data is playable on this TV. Refer to “Multimedia Format”(p. 27) |
| No Picture, No Sound | Check a USB flash memory is connected solidly.Check if the correct input mode is selected by pressing SOURCE.Make sure the format of your data is playable on this TV. Refer to “Multimedia Format”(p. 27) |
| No Picture | Check a USB flash memory is connected solidly.Make sure the format of your data is playable on this TV. Refer to “Multimedia Format”(p. 27) |
| No Sound | Check a USB flash memory is connected solidly.Make sure the format of your data is playable on this TV. Refer to “Multimedia Format”(p. 27)The sound may be muted. Press +/− or (Mute) (p. 11) |
SPECIFICATIONS
| FULL HD Television | HD Television | ||||
| MODEL NUMBER 39FD713 | 32FD513 32F | L513 29FL513 24 | FL513 | ||
| 32FD503 32F | L503 29FL503 24 | FL503 | |||
| Panel make | |||||
| Screen size | 98 cm(38.6 inches) | 80 cm(31.5 inches) | 72 cm(28.5 inches) | 60 cm(23.5 inches) | |
| Resolution | 1920 x 1080 1360 x 768 | ||||
| Viewing angle (H/V) | 176 /176 178 | 178 176/176 | |||
| Power | |||||
| Power supply | AC 100-240V (50/60Hz) | ||||
| Audio output | 2 x 8W (8Ω) | 2 x 5W (8Ω) | |||
| Temperature | |||||
| Operating temperature | 0 °C (32 °F) to 40 °C (104 °F) | ||||
| Connectivity | |||||
| Antenna input | UHF/ VHF 75Ω x 1 | ||||
| Composite video input | x 1 | ||||
| YPbPr(Component video)input | x 1 | ||||
| HDMI | x 3 | ||||
| USB | x 1 | ||||
| PC(VGA) input | x 1 | ||||
| Audio input | Audio L/R (RCA) x 13.5mm mini jack for PC/ HDMI(DVI) x 1 | ||||
| Coaxial digital audio output(SPDIF) | x 1 | ||||
| Headphone | x 1 | ||||
| TV system | |||||
| Color system | PAL, SECAM, NTSC 4.43 | ||||
| TV system | B/G, D/K, I, M | ||||
| Value added features | |||||
| Teletext | Yes | ||||
| Surround | SRS TruSurround XT | ||||
| OSD Language | English, Thai, Malay, Simplified Chinese, Arabic, Persian, Indonesian, Vietnamese, French | ||||
| Accessories | |||||
| Remote control unit | x 1 | ||||
| Base | x 1 | ||||
| Batteries | 2 x AAA Drycell | ||||
| Instruction manual | x 1 | ||||
| Screw (for attaching the base) | x 3 | ||||
| Screw (for mounting the unit onthe furniture) | x 1 - | ||||
Dimensions
| Dimensional details (Protruding parts excluded.) | ||
| Model Number with base without base | ||
| 39FD713 | H: 596.1 mm/ W: 911.2 mm/ D: 194.0 mm H: | 556.6 mm/ W: 911.2 mm/ D: 95.7 mm |
| 32FD513 | H: 514.3 mm/ W: 752.6 mm/ D: 180.2 mm H: | 467.0 mm/ W: 752.6 mm/ D: 105.7 mm |
| 32FD503 | H: 514.3 mm/ W: 752.6 mm/ D: 180.2 mm H: | 467.0 mm/ W: 752.6 mm/ D: 105.7 mm |
| 32FL513 | H: 494.7 mm/ W: 754.6 mm/ D: 180.0 mm H: | 451.5 mm/ W: 754.6 mm/ D: 57.2 mm |
| 32FL503 | H: 494.7 mm/ W: 754.6 mm/ D: 180.0 mm H: | 451.5 mm/ W: 754.6 mm/ D: 57.2 mm |
| 29FL513 | H: 456.0 mm/ W: 686.5 mm/ D: 180.0 mm H: | 412.0 mm/ W: 686.5 mm/ D: 57.0 mm |
| 29FL503 | H: 456.0 mm/ W: 686.5 mm/ D: 180.0 mm H: | 412.0 mm/ W: 686.5 mm/ D: 57.0 mm |
| 24FL513 | H: 390.2 mm/ W: 576.9 mm/ D: 139.9 mm H: | 350.8 mm/ W: 576.9 mm/ D: 53.7 mm |
| 24FL503 | H: 390.2 mm/ W: 576.9 mm/ D: 139.9 mm H: | 350.8 mm/ W: 576.9 mm/ D: 53.7 mm |
| Weight | ||
| Model Number with base without base | ||
| 39FD713 | 9.30 kg 8.25 kg | |
| 32FD513 | 6.00 kg 5.68 kg | |
| 32FD503 | 6.00 kg 5.68 kg | |
| 32FL513 | 5.87 kg 5.65 kg | |
| 32FL503 | 5.87 kg 5.65 kg | |
| 29FL513 | 5.05 kg 4.85 kg | |
| 29FL503 | 5.05 kg 4.85 kg | |
| 24FL513 | 3.45 kg 3.30 kg | |
| 24FL503 | 3.45 kg 3.30 kg | |
Input Resolution
| YPbPr(Component video) IN HDMI | |
| Resolution Refresh rate Resolution Refresh | |
| 480i/p - 480i/p 60Hz | |
| 576i/p - 576i/p 50Hz | |
| 720p | - |
| 1080i/p - | |
| rate | |
| 720p | 50Hz |
| 60Hz | |
| 1080i/p | 50Hz |
| 60Hz | |
| 1080p 24Hz |
| PC(VGA) IN513/ 503 series | |||
| Resolution | Refresh rate | ||
| 640x480 | 60Hz | 72Hz | 75Hz |
| 720x400 | 70Hz | ||
| 800x600 | 60Hz | 72Hz | 75Hz |
| 848x480 | 60Hz | ||
| 1024x768 | 60Hz | 70Hz | 75Hz |
| 1280x768 | 60Hz | ||
| 1360x768 | 60Hz | ||
| PC(VGA) INonly 39FD713 | |||
| Resolution | Refresh rate | ||
| 640x480 | 60Hz | 72Hz | 75Hz |
| 720x400 | 70Hz | ||
| 800x600 | 60Hz | 72Hz | 75Hz |
| 848x480 | 60Hz | ||
| 1024x768 | 60Hz | 70Hz | 75Hz |
| 1280x768 | 60Hz | ||
| 1360x768 | 60Hz | ||
| 1280x1024 | 60Hz | ||
| 1400x1050 | 60Hz | ||
| 1440x900 | 60Hz | ||
| 1680x1050 | 60Hz | ||
| 1920x1080 | 60Hz | ||
Multimedia Format
| PHOTO | ||
| File Ext. Codec | Remark | |
| .jpg/.jpeg | Progressive JPEG Max Resolution: 1024 x 768 | |
| Baseline JPEG Max Resolution: 15360 x 8640 | ||
| .bmp --- | Max Resolution: 9600 x 6400Pixel Depth: 1/4/8/16/24/32 bpp | |
| .png | Non-interlaced Max Resolution: 9600 x 6400 | |
| Interlaced Max Resolution: 1200 x 800 | ||
| MUSIC *only 713/ 513 series (39FD713/ 32FD513/ 32FL513/ 29FL513/ 24FL513) | ||
| File Ext. AUDIO | Codec Remark | |
| .mp3 MP3 | Sample rate: 32k - 48kHzBit rate: 32k - 320kbpsChannel: Mono / Stereo | |
| .wav LPCM Sample rate : 44.1kHz - 48kHz | ||
| .aac AAC | Sample Rate:16k - 48kHzBit Rate:32k - 442kbpsChannel: Mono / Stereo | |
| VIDEO *only 713/ 513 series (39FD713/ 32FD513/ 32FL513/ 29FL513/ 24FL513) | ||||
| Container | File Ext. | VIDEO Codec | AUDIO Codec | Remark |
| AVI | .avi | MPEG 4H.264Xvid | PCMMP2 / MP3AACAC3 | Max Resolution: 1920x1080@30fpsMax Data Rate: 20Mbps |
| MOV | .mov | MPEG 4H.264 | MP3AAC | |
| MP4 | .mp4 | |||
| MKV | .mkv | MPEG 4H.264 | PCMMP2 / MP3AACAC3 | |
| Xvid | MP3AACAC3 | |||
| TS | .ts.trp.tp.m2ts | H.264 | PCMMP2 / MP3AACAC3 | |
| TEXT | ||
| File Ext. Codec | Remark | |
| .txt | ANSI/UNICODE GB/UTF8 File Size: Max. 1MB | |
| File system |
| Format |
| FAT32 / FAT16 |

- INDEX
- SAFETY INFORMATION
- START UP GUIDE
- UNIT INFORMATION
- OPERATIONS
- PLAYBACK MODE
- DETAIL SETTINGS
- OTHER INFORMATION
- TROUBLESHOOTING GUIDE
- SPECIFICATIONS
- WARNING: TO PREVENT THE SPREAD OF FIRE, KEEP CANDLES OR OTHER OPEN FLAMES AWAY FROM THIS PRODUCT AT ALL TIMES
- CAUTION
- WHEN CARRYING THIS UNIT
- POWER SUPPLY
- WARNING
- BATTERY PRECAUTIONS
- A NOTE ABOUT RECYCLING
- NOTICE FOR CUSTOMERS
- DISPOSAL OF THE TV SET
- SUPPLIED ACCESSORIES
- INSTALLATION OF WALL MOUNT (OPTIONAL)
- ATTACHING THE BASE
- MOUNTING THE UNIT ON YOUR FURNITURE
- CONNECTIONS FOR ANTENNA AND THE POWER
- INSTALLING THE BATTERIES
- INITIAL SETUP
- TURN ON THE UNIT
- LANGUAGE SELECTION
- AUTO TUNING
- REMOTE CONTROL AND FRONT PANEL
- (POWER) (P. 7)
- S MODE “[SOUND MODE]” (P. 20)
- P MODE “[PICTURE MODE]” (P. 19)
- FREEZE "FREEZE MODE" (P. 11)
- AUDIO "SOUND SELECT" (P. 12)
- NUMBER BUTTONS (P. 11)
- PREV.P
- (P.41)
- (MUTE) (P. 11)
- RED / GREEN / YELLOW / BLUE
- EXIT (P. 11)
- MENU (P. 18)
- SOURCE
- SLEEP “[SLEEP TIMER]” (P. 11)
- ASPECT "PICTURE FORMAT" (P. 12)
- PLAYBACK FUNCTION BUTTONS (P. 13) / TELETEXT FUNCTION BUTTONS (P. 11)
- FAV "FAVOURITE" (P. 11)
- P + / - (P. 11)
- DISPLAY
- ▲ / ▼ / ◀ / ▶ (CURSOR) (P. 11)
- OK
- REMOTE CONTROL SENSOR
- STANDBY / POWER INDICATOR
- REAR PANEL
- USB TERMINAL (P. 10)
- HOOK-UP
- READ THIS FIRST
- WATCHING A TV PROGRAMME
- TO SELECT A CHANNEL
- TO ADJUST THE VOLUME
- [SLEEP TIMER]
- FREEZE MODE
- [TELETEXT]
- FAVOURITE
- SWITCHING THE INPUT SOURCE MODE
- PRESS SOURCE
- SOUND SELECT
- PICTURE FORMAT
- SERIES
- FD503/ 32FL503/ 29FL503/ 24FL
- FD713/ 32FD513/ 32FL513/ 29FL513/ 24FL
- SETUP FOR PLAYBACK
- PRESS SOURCE TO DISPLAY THE INPUT SOURCE MODE AND USE ▲ / ▼ TO SELECT [MEDIA], AND THEN PRESS OK
- NOTE FOR PLAYBACK
- [PHOTO]
- OPERATION IN SLIDESHOW
- [MUSIC]
- ONLY 713/513 SERIES
- OPERATION IN PLAYBACK
- [MOVIE]
- [TEXT]
- CHANNEL SETTINGS
- [AUTO TUNING]
- [ATV MANUAL TUNING]
- [PROGRAMME EDIT]
- SCREEN SETTINGS
- [AUTO ADJUST]
- [H-OFFSET] / [V-OFFSET] / [CLOCK] / [PHASE]
- PICTURE ADJUSTMENT
- [PICTURE MODE]
- [CONTRAST] / [BRIGHTNESS] / [COLOR] / [TINT] / [SHARPNESS]
- [COLOR TEMPERATURE]
- [NOISE REDUCTION]
- [DYNAMIC CONTRAST]
- SOUND ADJUSTMENT
- [SOUND MODE]
- [TREBLE] / [BASS] / [BALANCE]
- [AUTO VOLUME]
- [SRS TRUSURROUND XT]
- [SPDIF MODE]
- TIMER SETTINGS
- [AUTO STANDBY]
- [OSD TIMER]
- OPTION SETTINGS
- [OSD LANGUAGE]
- [TT LANGUAGE]
- [ASPECT RATIO]
- [BLUE SCREEN]
- [KEY LOCK]
- [RESET]
- [SOFTWARE UPDATE(USB)]
- TRADEMARK INFORMATION CABINET CLEANING
- PANEL CLEANING
- SERVICING
Brand : FUNAI
Model : 24FL503
Category : Television