
TVCR-D1404 - Television FUNAI - Free user manual and instructions
Find the device manual for free TVCR-D1404 FUNAI in PDF.


| Product Type | CRT TV with built-in VHS VCR |
| Screen Size | 14 inches (35.6 cm) measured diagonally |
| Display Technology | Analog cathode ray tube (CRT) |
| Video System | NTSC |
| Tuner | VHF/UHF analog tuner with auto search |
| Built-in VCR | VHS playback and recording |
| Recording Speeds | SP, LP, EP |
| Max Recording Time | Up to 8 hours using a T-160 tape in EP mode |
| Audio Output | Mono, 1.5W built-in speaker |
| Remote Control | Full-function infrared remote with batteries |
| Antenna Input | 75 ohm coaxial RF input |
| Power Supply | AC 120V, 60Hz |
| Power Consumption | 85W |
| Dimensions (W x H x D) | 16.5 x 15.0 x 14.5 inches (420 x 380 x 370 mm) |
| Weight | 22.0 lbs (10.0 kg) |
| On-Screen Display | Menus in English, Spanish, French (selectable) |
| Timer Recording | Programmable up to 8 events |
| Sleep Timer | Yes, adjustable 30-120 minutes |
| Closed Captioning | Supported via TV tuner |
| Connections | RF in/out, composite AV in/out, headphone jack |
| VCR Maintenance | Use a dry head cleaning tape every 50 hours of playback |
| Safety Features | Ventilation slots, automatic power shut-off after 8h of inactivity |
| Spare Parts Availability | Remote control and internal belts available from authorized service centers |
| Repairability | User-replaceable fuses and remote; other repairs by qualified technician |
Frequently Asked Questions - TVCR-D1404 FUNAI
User questions about TVCR-D1404 FUNAI
0 question about this device. Answer the ones you know or ask your own.
Ask a new question about this device
Download the instructions for your Television in PDF format for free! Find your manual TVCR-D1404 - FUNAI and take your electronic device back in hand. On this page are published all the documents necessary for the use of your device. TVCR-D1404 by FUNAI.
USER MANUAL TVCR-D1404 FUNAI
TVCR-D1404 TVCR-D1404T
TVCR-D2104 TVCR-D2104T
Owner's Manual
Table of Contents
| Safety Information | 2 |
| Before Using This Product | 2 |
| Installation | 5 |
| TV Functions | 9 |
| Playback | 10 |
| Manual Recording | 11 |
| Timer Recording | 12 |
| Other Functions | 13 |
| Maintenance | 14 |
| Troubleshooting Guide | 15 |
| Specifications | 15 |
| Declaration of Conformity | 16 |
Features
• Automatic Operations
- On Screen Display
• Teletext Reception (TVCR-D1404T/TVCR-D2104T)
- Sleep Timer
• Auto Repeat Playback
Supplied Accessories
- Owner's manual
- Remote control
- Two R6 batteries
Important Copyright Information
Unauthorised recording or use of broadcast television programming, video tape, film or other copyrighted material may violate applicable copyright laws. We do not take responsibility for the unauthorised duplication, use, or other acts which infringe upon the rights of copyright owners.
A Note About Recycling
This product's packaging materials are recyclable and can be reused. Please dispose of any materials in accordance with your local recycling regulations.
• One Touch Recording
- Timer Recording
• Auto Head Clean
• NTSC Playback
• System Change Features
Batteries should never be thrown away or incinerated but disposed of in accordance with your local regulations concerning chemical wastes.
Model/Serial Number
This appliance has a serial number located on the rear panel. Please note down the model number and serial number and retain the information for your records.
Model number:
Serial number: ____
2004.3.31
0EMN02386
T6603RD/T6703RD/T6723RD*****
EN
Safety Information
WARNING:
• Live parts inside. Do not remove any screws.
• To avoid fire or electric shock, do not expose this unit to rain or moisture.
this unit to rain or moisture.
- As soon as the unit is connected to the power supply, some components are in constant operation. To power off the unit completely you must disconnect it from the mains or power it off with the main switch.
Precautions
- Use only cassettes with the VHS mark with this unit.
- Do not attempt to open the cabinet. There are no parts you can service inside. Refer all servicing to qualified service personnel.
- Slots and openings in the cabinet and the sides or bottom are provided for ventilation. To ensure reliable operation and to protect the unit from overheating, these openings must not be blocked or covered.
Before Using This Product
Video Cassette Tape
This unit will operate with any cassette that bears the VHS mark. For best results, we recommend the use of high-quality tapes. Do not use poor quality or damaged tapes.
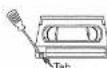
You can prevent accidental erasing of a recording by breaking off the erase-prevention tab on the back edge of the cassette. If you decide to record on the tape again, cover the hole with plastic tape.
Two Different Tape Speeds
Before recording, select the tape speed : SP mode (Standard Play) or LP mode (Long Play). The table below shows the maximum recording/playback time using E-60, E-120, E-180 or E-240 tapes in each mode.
| Tape Type | Recording/Playback Time | |
| Tape Speed | SP Mode | LP Mode |
| E-50 | 1 hour | 2 hours |
| E-120 | 2 hours | 4 hours |
| E-180 | 3 hours | 6 hours |
| E-240 | 4 hours | 8 hours |
- Avoid installation in enclosed spaces such as bookcases unless proper ventilation is provided.
- Keep the unit away from radiators and other heat sources.
- Avoid use near strong magnetic fields.
- Do not push objects of any kind into the unit through the cabinet slots or openings as they could touch electrically live parts or short circuit parts resulting in a fire or electric shock.
- Never spill liquid on this unit. If liquid is spilled and
penetrates into the unit, consult qualified service personnel. - Use this unit in a horizontal (flat) position only.
- Do not place any combustible objects on the device (candles, etc.).
Dew Warning
Moisture condensation may occur inside the unit when it is moved from a cold place to a warm place, after heating up a cold room, or under conditions of high humidity. Do not use the unit for at least 2 hours until it is dry inside.
TV Colour System
Different countries use different television colour systems. Tapes recorded in the PAL, MESECAM or NTSC system can be played back on this unit. Usually, the picture on the TV screen will be in black and white when you play back a tape that is recorded in a different colour system.
Tapes recorded in the NTSC system can be played back on this unit. This feature is only available in the SP and SLP mode. When playing back such tapes, the picture may roll up or down, shrink vertically and black bars may appear both at the top and bottom of the screen. If this occurs, you can adjust the tracking control manually by pressing PROG +/- until the streaks disappear.
Controls and Connections
This manual covers 14" and 21" models. The operation of both models are exactly same.
The appearances of 14" and 21" models are slightly different. The 21" model is illustrated in this manual.
All the buttons mentioned in this manual without specific notice are ones on the remote control.
Front Panel

- main power switch
- VIDEO input socket
- AUDIO input socket
- STANDBY-ON/O button
- VOL +/− buttons
- PROG +/- button
- Cassette compartimento
-
STANDRY indicator
-
□▲ (STOP/EJECT) button
- ← (Rewind) button
- ▶ (PLAY) button
- ▶▶ (Fast Forward) button
- ● (RECORD) button
- RECORD indicator
- HEADPHONE jack
(1) 2017年1月1日
Rear Panel
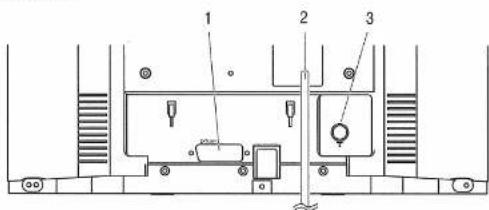
- EXT1/AV1 scart socket
- Power cord
- AERIAL socket
Caution: If you power off by pressing the main power switch, TIMER recordings are IMPOSSIBLE!
Remote Control

-
STANDBY-ON/O button
-
number buttons
-
SLEEP button
-
RECORD button
-
PAUSE burson
-
and button
-
STOP ■/— b
-
▶ ▶ ▶ ▶ ▶ ▶
-
PLAYD
-
FLAT ▶ ▲ button
-
CLEAR button
-
MENU button
-
SYSTEM button
-
VOL + / - button
-
PROG + / - button
-
STATUS button
-
MUTE button
-
These function buttons are for TVCR-D!404T and
TVCR-D2104T only.
Red button / Green button / Yellow button / Blue button
TEXT button
REVEAL button
EXPAND butter
SUBCODE button
HOLD HURGER
INDEX button
To insert the batteries:
Install two R6 batteries matching the polarity indicated inside
the battery compartment.

Caution
Do not mix old and new batteries. (Also never mix alkaline
batteries with manganese batteries.)
Installation
Connecting the TV-Video Combi
Connecting the Cable
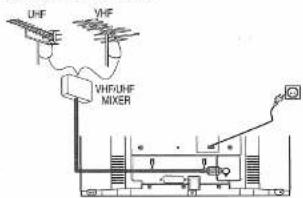
1) Insert the VHF/UHF TV aerial coaxial cable plug into the AERIAL socket at the back of the unit.
2) Plug this unit into an AC outlet.
3) If the little red STANDBY indicator on the front panel does not light on, power on the unit with the main power switch. The main power switch is located on the left side panel.
Connecting Additional Devices
You can connect an additional device such as decoder, satellite receiver, camcorder, etc. to the EXT1/AV1 scart socket. The scart socket to be connected is usually marked 'AV' or 'TV' on the decoder or satellite receiver,

You can also use the front AUDIO/VIDEO input sockets. Note:
• To receive the signals from an external source, select an input mode 'AV1' or 'AV2' on this unit by pressing PROG +/- or the number buttons
- If you are using the EXT1/AV1 scart socket, select 'AV1'. If you are using the front AUDIO/VIDEO input sockets, select 'AV2'.
Important Notes for Operation
Get Ready
Press the main power switch to power on the unit. Then the little red STANDBY indicator on the front panel comes on.(Stand-by mode)
Turn on the unit with STANDBY-ON/○ when the unit is in Stand-by mode.
- If you press PLAY ▶/▲, STOP □/▼, PROG +/-, ▶▶/▶, ◀◀/◀ or the number buttons while the unit is in Stand-by mode, the power will be automatically turned on. - The number buttons will be inactive for about 5 seconds just after having turned the unit off.
Channel information remains saved for up to 10 years, the time and timer information is saved for up to 1 minute.
Navigation in the screen menu
You can check/change many functions and settings of your unit via on-screen menu. The individual functions are selected, via the remote control as follows:
To call up the menu, press MENU.

To select, press PLAY ▶/▲ STOP ■/▼.
To enter or change your selection, press the number buttons or with PLAY ▶/▲ STOP ■/▼.
To save or confirm, press ▶▶/▶.
To cancel, press CLEAR.
To end, press MENU.
Initial Settings
Selecting the Language
- Use the remote control for this procedure.
1) Press MENU.
2) Press PLAY ▶/▲ or STOP ■/▼ to select "INITIAL", then press ▶/▲.
3) Press PLAY ▶/▲ or STOP ■/▼ to select "LANGUAGE", then press ▶▶/▶.
4) Press PLAY ▶/▲ or STOP ■/▼ repeatedly to select your desired language.
5) Press MENU to exit.
![graph TD A["MENU\nTIMER\nPICTURE\nSET UP\n→ INITIAL"] --> B["INITIAL\nCH TUNING\nCLOCK\n→ LANGUAGE"] B --> C["LANGUAGE\n→ [ENGLISH"]\NISHIUCHSCH\nMADYAR\nPOLSKI\nPICCIGRP]]](/content/2026/08/1579762/images/614e5860fc47b397763ffe62dc7926bfb8fd03c649c923c441f76d9711e28435.jpg)
Channel Setting (Automatic Channel Preset)
You can programme the tuner to scan all the channels that you can receive in your area.
- Execution of the "Automatic" channel presetting cancels all the preset channels. DO NOT use this feature if you intend to use some of the pre-tuned channels. Use the "Manual" channel presetting function to tune in the additional channels you require.
• Use the remote control for this procedure.
1) Press MENU.
2) Press PLAY ▶/▲ or STOP ■/▼ to select "INITIAL", then press ▶/▲
3) Press PLAY ▶/▲ or STOP ■/▼ to select "CH TUNING", then press ▶/▶.
4) Press PLAY ▶/▲ or STOP ■/▼ to select "AUTO", then press ▶/▲.
![graph TD A["MENU\nTMTB\nPICTURE\n→INTL"] --> B["INITIAL\n→CH TUNING\n→LOCK\n→LANGUAGE"] B --> C["↓"] C --> D["AUTO\n→AUTO MANUAL\n→MOVE"] D --> E["↓"]](/content/2026/08/1579762/images/c358820696e63a7fcb517620028a257452e7acf986b5aed040ab5585aebff4d7.jpg)
Note: After you have connected additional devices (satellite receiver, etc.) through the aerial cable, power them on. The automatic channel search will recognize them and save them.
Setting the Clock
This unit incorporates a 24-hour clock. The clock must be set for the Timer Recording function to operate correctly.
• Use the remote control for this procedure.
1) Press MENU.
2) Press PLAY ▶/▲ or STOP ■/▼ to select "INITIAL", then press ▶/▼.
3) Press PLAY ▶/▲ or STOP ■/▼ to select "CLOCK", then press ▶/▲.
4) Press PLAY ▶/▲ or STOP ■/▼ to select "YEAR", then press ▶/▼ or ◀/◀/◀ to select relevant year.
5) Select the month, day, hour and minute in the same way. 6) Press MENU to exit.
Note:
- Although seconds are not displayed, they begin counting from 00 when you exit by pressing MENU. Use this feature to synchronize the clock with the correct time.
- If the unit is unplugged or if there is a power failure for more than 1 minute, you may have to reset the clock.
![graph TD A["MENU\nTIMER\nFUTURE\nSET UP\n→ INITIAL"] --> B["INITIAL\nCH TUNING\n→ CLOCK\n→ LANGUAGE"] B --> C["CLOCK\n→ YEAR\n→ MONTH\n→ DAY\n→ HOUR\n→ MINUTE"]](/content/2026/08/1579762/images/bbf0f073acd8cfb361baf70cb59b5e7a817054a89c5b8b4d30649490f905448e.jpg)
Decoder Allocation
Some TV channels transmit encoded TV signals which can only be viewed with a purchased or hired decoder. You can connect such a decoder to this unit. The following function will automatically activate the connected decoder for the desired TV channel.
• Use the remote control for this procedure.
1) Press PROG +/- or the number buttons to select the TV channel which you would like to allocate the decoder to.
2) Press MENU.
3) Press PLAY ▶/▲ or STOP ■/▼ to select "INITIAL", then press ▶/▼
4) Press PLAY ▶/▲ or STOP ■/▼ to select "CH TUNING", then press ▶/▼.
5) Press PLAY ▶/▲ or STOP ■/▼ to select "MANUAL", then press ▶/▼.
6) Press PLAY ▶/▲ or STOP ■/▼ to select "DECODER". 7) Press ▶/▲ to select "ON" (Decoder switched on).
• To switch off the decoder, press ▶▶/▶ to select "OFF".
8) Press MENU to exit.
• The decoder has now been allocated to this TV channel.
Manual Channel Preset
In some cases it can occur that some TV channels are not found and saved during the first installation. In this case, the missing TV channels must be searched for and stored manually.
- Use the remote control for this procedure.
1) Press MENU.
2) Press PLAY ▶/▲ or STOP ■/▼ to select "INITIAL", then press ▶/▲.
3) Press PLAY ▶/▲ or STOP ■/▼ to select "CH TUNING", then press ▶/▼.
4) Press PLAY ▶/▲ or STOP ■/▼ to select "MANUAL", then press ▶/▼.
5) Press PLAY ▶/▲ or STOP □/▼ to select "POSITION", then press ▶/▼.
6) Press the number buttons, PLAY ▶/▲, or STOP □/▼ to select your desired position number, then press ▶/▼. • You can select position number 01-99.
- If [ON] appears on the right side of "SKIP", press PLAY ▶/▲ or STOP ■/▼ to point to "SKIP". Then, press ▶/▶ to select [OFF].
- If you want to remove scrambled signals, press PLAY ▶/▲ or STOP ■/▼ repeatedly to point to "DECODER". Then, press ▶/▶ to select [ON].
- If you want to change the video or audio mode, press PLAY ▶/▲ or STOP ▶/▼ repeatedly to point to "VIDEO MODE" or "AUDIO MODE". Then, press ▶/▶ to select your desired mode.
7) Press PLAY ▶/▲ or STOP ■/▼ to select "CHANNEL", then press ▶/▼.
Press PLAY ▶/△ or STOP □/▼. The unit tuner will begin to search up or down automatically. When a channel is found, the unit will stop searching and the picture will appear on the TV Screen.
- You can select desired channel number by using the number buttons. You must refer to the following Channel Plan table and press three digits to select the channel number. (To select channel 24, press "0" button first and then press "2" and "4".)
- If this is the channel you want, press ▶▶/▶.
| Channel Plan | |
| CH Indication | TV Channel |
| 02 – 12 | E2 – E12 |
| 21 – 69 | E21 – E69 |
| 74 – 78 | X, Y, Z, Z+1, Z+2 |
| 80 – 99, 100 | S1 – S20, GAP |
| 121 – 141 | S21 – S41 |
| 142 – 153 | R1 – R12 |
This unit can receive Hyper and Oscar frequency bands.
8) Press MENU to exit.
Note: To confirm that a channel has been added, press PROG +/-
![graph TD A["MENU<br>TIMER<br>PICTURE<br>SET UP<br>INITIAL"] --> B["INITIAL<br>CH TUNING<br>CLOCK<br>LANGUAGE"] B --> C["CH TUNING<br>AUTO<br>MANUAL<br>MOVE"] C --> D["MANUAL<br>POSITION<br>CHANNEL<br>DECUCUR<br>SUP<br>VIDEO MODE<br>AUDIO MODE"] D --> E["OFF<br>OFF<br>SEC/M<br>ON"]](/content/2026/08/1579762/images/9b7651758976613d36174548a4f2f57cb4942428d07198725ebe0bcadb4d31fe.jpg)
To Skip a Preset Channel
The channels you can no longer receive or seldom watch can be set to be skipped when you access channels by pressing PROG +/-
• Use the remote control for this procedure.
1) Press MENU.
2) Press PLAY ▶/▲ or STOP ■/▼ to select "INITIAL", then press ▶/▼.
3) Press PLAY ▶/▲ or STOP ■/▼ to select "CH TUNING", then press ▶/▼.
4) Press PLAY ▶/▲ or STOP ■/▼ to select "MANUAL", then press ▶/▼.
5) Press PLAY ▶/▲ or STOP ■/▼ to select "POSITION", then press ▶/▼.
6) Press the number buttons, PLAY ▶/▲, or STOP ■/▼ to select relevant position number, then press ▶/▼.
7) Press PLAY ▶/▲ or STOP ■/▼ to select "SKIP", then press ▶/▼ to select [ON]. • To memorize the channel again, press ▶/▼. "ON" will change to "OFF".
8) Press MENU to exit. Note: To confirm that a channel has been deleted, press PROG +/-.
![graph TD A["MENU\nTIMER\nPICTURE\nSET UP\n→ INITIAL"] --> B["INITIAL\n→ CH TUNING\n→ CLOCK\n→ LANGUAGE"] B --> C["CH TUNING\n→ AUTO\n→ MANUAL MODE"] C --> D["MANUAL\n→ MANUAL MODE\n→ POSITION\n→ CHANNEL\n→ DISCOVER\n→ SKIP\n→ VIDEO MODE\n→ AUDIO MODE\n→ USB"]](/content/2026/08/1579762/images/8b61ef7ef40a1a2dfb7c0b062254ebbf7fa9f794d253de4c85a6f3129c6f7599.jpg)
Channel Reprogramming
You can replace two channels.
• Use the remote control for this procedure.
1) Press MENU.
2) Press PLAY ▶/▲ or STOP ■/▼ to select "INITIAL", then press ▶/▼
3) Press PLAY ▶/▲ or STOP ■/▼ to select "CH TUNING", then press ▶/▼.
4) Press PLAY ▶/▲ or STOP ■/▼ repeatedly to select "MOVE", then press ▶/▲.
5) Press PLAY ▶/▲ or STOP ■/▼ repeatedly to select the position number you want to change the channel, then press ▶/▶.
- You cannot select a position number where “...” appears next to the number. This is because SKIP is set to [ON] for this position number.
6) Press PLAY ▶/▲ or STOP ■/▼ repeatedly until the channel move to another position number, then press ▶/▲.
7) Press MENU to exit.
![graph TD A["MENU<br>TIMER<br>PICTURE<br>SET: 07<br>INITIAL"] --> B["INITIAL<br>→ CH TUNING<br>CLOCK<br>LANGUAGE"] B --> C["CH TUNING<br>AUTO MANUAL<br>→ MOVE"] C --> D["MOVE<br>P01: 02 P06: 07<br>P02: 03 P07: 08<br>P03: 04 P08: 09<br>P04: 05 P09: 10<br>P05: 06 P10: 11"] D --> E["Position Number Chan…](/content/2026/08/1579762/images/4cf4c1e63c87ec67c455b5a465f1a5c600ef097ff077530d62a1be66f41a08c4.jpg)
TV Functions
To Select a Desired Channel
You can select a desired channel by using PROG +/-, or directly pressing the number buttons on the remote control.
- Enter a channel numbers as a two-digit number for the quickest results. For example, to select channel 6, press 0 and 6. If you only press 6, channel 6 will be selected after a brief delay.
You can only select channels 1-99.
Selection of the EXT1/AV1 Scart Socket
To select the EXT1/AV1 scart socket, enter 0,0,1, with the number buttons on the remote control. "AV1" appears on the screen.
Using the Satellite Receiver
You can receive channels from the satellite receiver via the EXT1/AV1 scart socket.
To do this, select the channel number "AV1" by pressing 0,0,1, with the number buttons on the remote control. You will have to select the channel you want to receive on the sat elite receiver itself.
Selection of the Front AUDIO/VIDEO Input Sockets
To select the front AUDIO/VIDEO input sockets, enter 0,0,2, with the number buttons on the remote control. "AV2" appears on the screen.
Volume Control
You can adjust the volume using VOL +/- on the remote control.
Note: • If you want to change the volume on the machine, press VOL +/- on the unit.
- If you want to mute the sound temporarily (e.g.: during a telephone call), press MUTE on the remote control. When you press MUTE again, the sound will return at its original volume level.
Picture Settings
The picture can be adjusted according to your personal preferences. These settings are automatically stored after exiting the main menu.
• Use the remote control for this procedure.
1) Press MENU.
2) Press PLAY ▶/▲ or STOP ■/▼ to select "PICTURE", then press ▶/▼.
3) Press PLAY ▶/▲ or STOP ■/▼ to select an item, and then modify with ◀◀/◀ or ▶▶/▶.

4) Press MENU to exit.
"TINT" appears only when receiving NTSC signals from an additional device connected by either EXT1/AV1 scart socket or front AUDIO/VIDEO input sockets.
Teletext Reception
Operation for TVCR-D1404T/TVCR-D2104T only
Many TV channels transmit Teletext information along with their TV channels. With this unit, you can retrieve and display it on the screen using the built-in Teletext decoder.
• Use the remote control for this procedure.
1) Press TEXT to switch the Teletext decoder on. Your unit now shows Teletext for the TV channel you have selected. Press TEXT again to show Teletext in transparent mode.
2) If you want to select another page, type in the number of the page with the number buttons.
Note: • To enlarge fonts, press EXPAND
• To select Teletext subpages, press SUBCODE.
• To directly select the page numbers shown at the
bottom of the TV screen, use a colour button.
• To call up the hidden information, press REVEAL.
• To stop turning pages, press HOLD.
• To go back to the start page, press INDEX.
3) Press TEXT to switch the Teletext decoder off.
Sleep Timer
This unit can be turned off automatically after a predetermined period.
• Use the remote control for this procedure.
1) Press SLEEP.
2) Press SLEEP repeatedly to extend the duration by 30-minute increment. The screen will show the remaining time, e.g.: "+0:30".
- The machine now counts backwards until the power is down.
Note: • The maximum to be set is 2 hours.
- To set this function off, press SLEEP on the remote control several times until “--:--” appears on the screen.
• To check the remaining time, press SLEEP on the
remote control. - If a recording is in process, this function will be cancelled.
Playback
Basic Playback
Your unit can record on and play standard VHS cassettes.
1) Put a cassette into the cassette slot. The cassette is inserted automatically.
The unit will turn on automatically. If the erase-prevention tab has been removed, the unit will start playback automatically.
2) Press PLAY ▶/▲ to begin playback.
3) To stop playback, press STOP □/▼ or □/▲
(STOP/EJECT) on the unit.
4) To eject the cassette, press ■/▲(STOP/EJECT) on the unit when the unit stops the playback.
Playback System Change
When you select AUTO by pressing SYSTEM, this unit will distinguish the system (MESECAM or PAL) automatically according to the format of recorded tape during playback.
If the picture on the TV screen is black and white, select the system MESECAM or PAL manually by using SYSTEM. Each time you press SYSTEM, TV screen will change as follows.

Tracking Adjustment
- Tracking adjustment will be activated automatically (Digital Tracking function) when you start playback
- When playing pre-recorded tapes or tapes recorded on units other than your own, noise lines (black and white streaks) may appear on the playback picture. If this occurs, you can adjust the tracking control manually by pressing PROG +/- until the streaks disappear. To return to the DTR function, stop the tape once and start playback again.
Speed Search
1) Press ▶▶▶ or ◀◀/◀ during playback to view a videotape at a high speed in either a forward or reverse direction. In this mode, the sound will be muted.
2) Press the button again, the unit will now search in super high speed. (This function will not operate for a cassette recorded in SP mode in the NTSC standard.)
3) Press PLAY ▶/▲ to return to normal playback.
on
c
(四)表决意见
super
issette
[Non-Text]
Still Picture
1) Press PAUSE during playback to view a still picture on the TV screen.
2) Press PLAY ▶/▲ to return to normal playback.
on the
(二)交易对方
[Non-Text]
- If you press PAUSE to freeze the picture, usually there will be noiselines on the TV screen. This is normal, however, each time you press PAUSE the lines will change position.
- When the picture begins to vibrate vertically, stabilize the picture by pressing PROG +/- on the unit in the Still mode.
- After the unit has been in Still mode for 5 minutes, it will stop automatically to protect the tape and the video head.
ere will
ever,
sition.
ze the
mode.
it will
head.
- Usually there will be video "noise" lines (black and white streaks or dots) on the screen. This is normal. The still picture will, in addition to containing the "noise" lines, be black and white. This is not a fault of the machine but merely a by-product of the technology involved in producing a unit with LP mode.
Fast Forward and Rewind
1) Press STOP □/▼ to stop the tape.
2) Press ◀◀/◀ or ▶▶/▶
3) Press STOP ▪/▼ to stop the tape.
[Non-Text]
[Non-Text]
[Non-Text]
[Non-Text]
[Non-Text]
[Non-Text]
[Non-Text]
[Non-Text]
[Non-Text]
[Non-Text]
( x - 2x) t - xy2 = ( x - 2x) f t
( x - 2x) t - xy2 = ( x - 2x) f t
∴ m = 3/11
- 2017年
1
1
( x - 2x) t - xy2 = ( x - 2x) f t
CMA
(1)
1
1
-
( x - 2x) t - xy2 = ( x - 2x) f t
1
•
The Ground Truth image displays a single, solid horizontal line. According to Rule 2 (UNDERSCORE & LINE RULES), this is a stylistic or background line, not a placeholder underscore. Therefore, the OCR result must ignore it and output nothing or only meaningful text. The provided OCR content is "____", which consists of four underscores. This is an incorrect interpretation of the line as a placeholder, violating the rule that stylistic lines must be ignored. The OCR has hallucinated placeholder underscores where none exist in the GT. Hence, the OCR result is inconsistent with the Ground Truth.
(二)
- 2017年1月1日
n units
reaks)
DOI: 730
(二) 本次股东大会的决议
e DTR
2.1.1
12.
[Non-Text]
[Non-Text]
[Non-Text]
[Non-Text]
中
Manual Recording
Recording
1) Insert a cassette tape with its erase-prevention tab in place. (If necessary, rewind or fast forward the tape to the point at which you want to begin recording.)
2) Press the number buttons or PROG +/- to select the channel to be recorded.
3) Press RECORD to begin recording.
• The RECORD indicator on the front panel comes on.
4) Press STOP ▼/▼ to stop recording.
Skipping Unwanted Programme Material During Recording
1) Press PAUSE when you want to temporarily hair recording.
•The RECORD indicator on the front panel flashes fast in the Pause mode.
• After 5 minutes, the unit will automatically switch to the
Stop mode to prevent tape damage.
2) Press PAUSE or RECORD to resume recording.
OTR (One Touch Recording)
This function enables you to set the duration of a recording simply by pressing RECORD.
1) Follow steps 1) to 2) in "Recording" section.
2) Press RECORD repeatedly until the desired recording length appears in the upper left corner of the TV screen.
\(Normal)→ (0: 3 0)\(OTR:\3 0 minutes)→ (1: 0 0) _ ...; rightarrow→ (7: 3 0); rightarrow→ (8: 0 0); rightarrow
Recording stops when 0:00 is reached.
• To check time remaining during an OTR
Press STATUS.
• To change the recording length during an OTR
Press RECORD repeatedly until the desired length appears.
• To stop an OTR before recording is finished
Hess Stop
- To cancel the OTK but continue recording
Press RECORD repeatedly until “●” appears without the recording length.
Assemble Function
When you add a further recording to a cassette, which already has a recording on it, a short blank (flicker) can appear between the old and the new recording or the picture itself can flicker. To help reduce these from occurring, proceed as follows:
1) Insert a pre-recorded tape. Press PLAY ▶/▲ to start playback
2) Press PAUSE at the desired point on the tape.
3) Press RECORD. The unit will be in the Recording Pause mode.
• The RECORD indicator on the front panel flashes fast.
4) Press PROG +f- to select the channel to be recorded.
5) Press RECORD or PAUSE. The recording will begin.
•The RECORD indicator on the front panel comes on.
6) Press STOP ▪/▼ to stop a recording.
Selecting the Recording Speed (SP or LP)
LP allows to double the recording duration on tape (for example 6 hours instead of 3 hours on a E180 cassette).
1) Press MENU.
2) Press PLAY ▶/▲ or STOP ■/▼ to select "SET UP".
3) Press PLAY ▶/▲ or STOP ■/▼ to select "RECORD SPEED".
4) Press ▶▶/▶ to select the required recording speed.
5) Press MENU to exit.

Timer Recording
Timer Recording
You may program the unit to start and end a recording while you are away. You can set 8 programmes to record on specific days, daily or weekly within a 1 year period.
- Use the remote control for this procedure.
- Insert a cassette tape with its erase-prevention tab in place. (If necessary, rewind or fast forward the tape to the point at which you want to begin recording.)
1) Press MENU. 2) Press PLAY ▶/▲ or STOP ■/▼ to select "TIMER", then press ▶/▲.
Note: If you have not set the clock yet, "CLOCK" setting menu appears. If so, follow the steps outlined in the "Setting the Clock" section. Then, set the timer. - When you press ▶▶/▶ after pressing PLAY ▶/▲ or STOP ■/▼ during steps 3) to 7), the input mode will move to the next step.
- Press ◀◀/◀ to go back one step from the current setting during steps 4) to 7). If CLEAR is pressed, the entire programme contents will be erased.
3) Press PLAY ▶/▲ or STOP ■/▼ repeatedly to select a programme row. Then, press ▶/▶.
4) Press PLAY ▶/▲ or STOP ■/▼ repeatedly until the relevant channel number appears.
5) For once-only recording: Press PLAY ▶/▲ or STOP ■/▼ repeatedly until the relevant date appears. For daily recording: To record a TV programme at the same time on the same channel from Monday through Friday. Press PLAY ▶/▲ or STOP ■/▼ repeatedly to select "MO-FR".
For weekly recording: To record a TV programme at the same time on the same channel every week. Press PLAY ▶/▲ or STOP ■/▼ repeatedly to select "W-MO" (Example: every monday).
6) Press PLAY ▶/▲ or STOP ■/▼ repeatedly until the relevant start hour appears. Next, enter the minute digit.
7) Press PLAY ▶/▲ or STOP ■/▼ repeatedly until the relevant end hour appears. Next, enter the minute digit.
8) Press ▶▶/▶. Programme is now completed. • To set another timer programme, repeat steps 3) to 8). 9) Press MENU to exit.
10) Press STANDBY-ON/ ☉ to activate the timer. • The RECORD indicator on the front panel flashes slow • If STANDBY-ON/ ☉ is not pressed, the Timer Recording cannot be performed and the RECORD indicator flashes fast 2 minutes before the TIMER Recording starts. Press STANDBY-ON/ ☉ to activate the timer.

To Stop a Timer Recording Which Has Already Started
Press □/▲(STOP/EJECT) on the unit.
Note: STOP ▪/▼ on the remote control will not function in the Timer Recording mode.
To Correct Timer Programmes
If you want to correct an automatic timer after you finished setting programme,
1) Repeat steps 1) to 3) in the "Timer Recording" section.
2) Select the setting you want to change using ▶/▶ or ◀/◀.
3) Enter the correct numbers using PLAY ▶/▲ or STOP ■/▼.
4) Press MENU to exit.
5) Press STANDBY-ON/ ○ to return to timer standby mode.
To Cancel or Check the Start/End Time
1) Repeat steps 1) to 2) in the "Timer Recording".
2) TIMER list appears on the TV screen and you can check programmes on the list.
Press PLAY ▶/▲ or STOP ■/▼ to select a programme and press CLEAR to cancel that.
3) Press MENU to exit.
Hint for Timer Recording
- If there is a power failure or if the unit is unplugged for more than 1 minute, the clock setting and all timer settings will be lost.
- If the tape runs out before the end time, the unit will switch to the Stop mode immediately, eject the tape and the unit will be turned off. The RECORD indicator will flash fast.
- If a tape is not in the unit, timer recording cannot be performed and the RECORD indicator flashes fast. If an erase-prevention tab of the tape is missing, the tape will be ejected and the RECORD indicator will flash fast. Please insert a recordable tape.
- The unit will only perform a timer recording after it has been placed into timer standby mode.
Other Functions
Auto Repeat Playback
This function can be used to play a cassette over and over again. When the end of the cassette is reached, it will rewind and start from the beginning again.
• Use the remote control for this procedure.
- Insert a pre-recorded tape.
1) Press MENU.
2) Press PLAY ▶/▲ or STOP ■/▼ to select "SET UP", then
press >> /
3) Press PLAY ▶/▲ or STOP ■/▼ to select "AUTO
REPEAT
4) Press ▶▶/▶ so that "ON" appears next to "AUTO REPEAT" on the TV screen.
When in Scop mode, Auto Repeat mode will start automatically.
If the on-screen menu still remains, press MENU to exit, then press PLAY ▶/▲.
![graph TD A["MENU\n• TIMER\n• PICTURE\n• SET UP\n• INITIAL"] --> B["MENU\n• TIMER\n• PICTURE\n• SET OF\n• INITIAL"] B --> C["SET UP\n• RECORD SPEED\n• AUTO REPEAT\n• SPI\n• ONI"]](/content/2026/08/1579762/images/ae6721e88e6d4eb969acbe5609d7e4570fe8e2d51404e1d180e95735f4a68d4a.jpg)
Your unit will automatically rewind and start playing the tape from the beginning when it recognizes a non-recorded part longer 10 seconds.
To Stop Playback
Press STOP □/▼
To Exit the Auto Repeat Mode
Repeat steps 1) to 3). Then, press ▶▶/▶.
"OFF" will appear next to "AUTO REPEAT" on the TV
screen. Press MENU to exit.
Automatic Operations
Automatic Rewind, Eject
When the end of a tape is reached during playback or fast-forward, the tape will automatically rewind to the beginning. After that, the unit will eject the tape.
- The tape will not auto-rewind during timer recording or One Touch Recording.
Real Time Tape Counter
- This shows the elapsed recording or playback time in hours, minutes, and seconds. (Nothing is shown in the case of blank portion.)
- Press STATUS repeatedly. The "-" indication will appear when the tape is rewound further than the tape counter position "0:00:00".
Copying a Video Tape
You can make copies of videotapes made by friends or relatives for your own enjoyment.
WARNING:
- Unauthorized recordings of copyrighted video tapes may be an infringement of copyright laws.
Connect this unit to the playback unit through the EXT1/AV1 scart socket or front AUDIO/VIDEO input sockets.
1) Insert a pre-recorded videocassette into the playback unit.
2) Insert a blank videocassette or one you want to record over into the cassette compartment of this unit.
3) Select an input mode 'AV1' or 'AV2' on this unit by pressing PROG +/-
If you are using the EXT1/AV1 scart socket, select 'AV1'. If you are using the front AUDIO/VIDEO input sockets, select 'AV2'.
4) Press ●(RECORD) on this unit.
5) Begin playback on the playback unit.
6) To stop recording, press □/▲(STOP/EJECT) on this unit first, and then stop playback on the playback unit.
Note: • For best results during dubbing, use the front panel controls. Using a remote control may affect the playback unit's operation.
• If picture or colour fades in or out, you may have copied a copy-guarded videocassette.
Maintenance
Cabinet Cleaning
- Wipe the front panel and other exterior surfaces of the unit with a soft cloth that has been immersed in lukewarm water and wrung dry.
- Never use a solvent or alcohol. Do not spray insecticide liquid near the unit. Such chemicals may cause damage and discolouration to the exposed surfaces.
Auto Head Cleaning
- This feature automatically cleans the heads as you insert or remove a cassette to ensure a clear picture.
- The playback picture may become blurred or interrupted even if the TV programme received is clear. This does not mean that the recorded programme has been erased. This problem is caused by dirt accumulated on the head after long periods of use, or usage of rental or old tapes. In this case, head cleaning requires highly technical expertise and the nearest dealer should therefore be consulted. Clean heads only when problems occur.
Service
Should your unit become inoperative, do not try to correct the problem by yourself. There are no user-serviceable parts inside. Turn the unit off, unplug the power cord, and take the unit to a Service Centre for servicing.
PAL/MESECAM
- This unit can be played as MESECAM system when in MESECAM position. (See "Playback" section.)
- Playback a tape recorded with SECAM broadcasts in Middle East areas are possible on this unit.
- When a recorded tape with a SECAM-VHS appliance or a SECAM recorded tape is replayed with this appliance, black and white pictures are produced.
- This appliance cannot be used in France: a SECAM system appliance must be used instead.
Troubleshooting Guide
If you have followed the instructions contained in this manual and have difficulty in operating your unit, locate the SYMPTOM in the left column below. Check the corresponding cell CORRECTIVE ACTION columns to remedy the problem.
| SYMPTOM | CORRECTIVE ACTION |
| Your unit does not respond to any button being pressed. | There is no power supply: check the power supply.There is a technical problem: disconnect from the mains power supply for 5 minutes then power-up again. (After disconnection, time and timer settings will be cleared.) |
| A cassette is jammed in the unit. | Do not use force. Disconnect the set from the mains and reconnect it again after a few seconds. |
| Remote control does not work. | Remote control is not pointed at the unit.Take out the batteries, wait for 10 seconds and place them back in the remote control.Batteries have run out. Change the batteries. |
| No picture when you play a cassette. | There is no recording on the cassette. |
| Poor picture quality when you play a cassette. | The cassette is badly worn-out or of poor quality. Use a new cassette.Tracking is not properly adjusted. Turn to section "Tracking Adjustment".Magnetism from nearby appliances and geo-magnetism might affect the colour of the TV picture. Move the unit away from such sources. The unit will readjust itself automatically. If you want to initiate an immediate readjustment, unplug the unit from the mains and plug it in again approximately 30 minutes later. |
| No recording possible. | The TV channel you want to record is not stored or you have selected the wrong programme number: check TV channels stored.A cassette was inserted that does not have the erase-prevention tab (cannot be used to record): Insert a cassette with the erase-prevention tab or change cassette. For more information, please see the section "Video Cassette Tape" in chapter "Before Using This Product" and "Hint for Timer Recording" in chapter "Timer Recording". |
Make your contribution to the environment!!!

Specifications
| TVCR-D1404 TVCR-D1404T | TVCR-D2104 TVCR-D2104T | |
| Voltage | 220-240V/50Hz | |
| Power consumption (Standby) | less than 5W | |
| Rewind time | less than 260 seconds (cassette E-180) | |
| Number of video heads | 2 | |
| Recording/playback time | 3 hours (SP) (cassette E-180)6 hours (LP) (cassette E-180) | |
| Weight without packing in kg | 11.1 | 22.1 |
| Dimensions in cm (HxWxD) | 40.1x37.9x38.0 | 51.2x51.0x50.1 |
| Power consumption | 52W | 65W |
Declaration of Conformity
CE Marking: 93 / 68 / EEC
EMC-Directive: 89 / 336 / EEC
Low Voltage Directive: 73 / 23 / EEC
We: Funai Electric Trading (Europe) GmbH
Bluecherstrasse 11
22/6/Hamburg/Germany
declare that the TV-Video Combi
TVCR-D1404, TVCR-D1404T
TVCR-D2104, TVCR-D2104T
are in compliance with following norms:
EN 55013:2001
EN 55020: 2002 EN 61000 3 2 2000
EN 6:000-3-2:2000 EN 6:000-3-2:1995
EN 6:000-3-3:1995 + A1:2001 EN 60065-1998
EN 00063:1998

© 2003-2004 Funai Electric Trading (Europe) GmbH. All rights reserved.
Printed on unchlorinated paper.

- OWNER'S MANUAL
- FEATURES
- SUPPLIED ACCESSORIES
- IMPORTANT COPYRIGHT INFORMATION
- A NOTE ABOUT RECYCLING
- MODEL/SERIAL NUMBER
- SAFETY INFORMATION
- WARNING
- PRECAUTIONS
- BEFORE USING THIS PRODUCT
- VIDEO CASSETTE TAPE
- TWO DIFFERENT TAPE SPEEDS
- DEW WARNING
- TV COLOUR SYSTEM
- CONTROLS AND CONNECTIONS
- FRONT PANEL
- REAR PANEL
- REMOTE CONTROL
- TO INSERT THE BATTERIES
- CAUTION
- INSTALLATION
- CONNECTING THE TV-VIDEO COMBI
- CONNECTING ADDITIONAL DEVICES
- IMPORTANT NOTES FOR OPERATION
- GET READY
- NAVIGATION IN THE SCREEN MENU
- INITIAL SETTINGS
- SELECTING THE LANGUAGE
- CHANNEL SETTING (AUTOMATIC CHANNEL PRESET)
- SETTING THE CLOCK
- NOTE
- DECODER ALLOCATION
- MANUAL CHANNEL PRESET
- TO SKIP A PRESET CHANNEL
- CHANNEL REPROGRAMMING
- TV FUNCTIONS
- TO SELECT A DESIRED CHANNEL
- SELECTION OF THE EXT1/AV1 SCART SOCKET
- USING THE SATELLITE RECEIVER
- SELECTION OF THE FRONT AUDIO/VIDEO INPUT SOCKETS
- VOLUME CONTROL
- PICTURE SETTINGS
- TELETEXT RECEPTION
- OPERATION FOR TVCR-D1404T/TVCR-D2104T ONLY
- SLEEP TIMER
- PLAYBACK
- BASIC PLAYBACK
- PLAYBACK SYSTEM CHANGE
- TRACKING ADJUSTMENT
- SPEED SEARCH
- STILL PICTURE
- FAST FORWARD AND REWIND
- MANUAL RECORDING
- RECORDING
- SKIPPING UNWANTED PROGRAMME MATERIAL DURING RECORDING
- PRESS PAUSE OR RECORD TO RESUME RECORDING
- OTR (ONE TOUCH RECORDING)
- ASSEMBLE FUNCTION
- SELECTING THE RECORDING SPEED (SP OR LP)
- TIMER RECORDING
- TO CORRECT TIMER PROGRAMMES
- TO CANCEL OR CHECK THE START/END TIME
- HINT FOR TIMER RECORDING
- OTHER FUNCTIONS
- AUTO REPEAT PLAYBACK
- TO STOP PLAYBACK
- TO EXIT THE AUTO REPEAT MODE
- AUTOMATIC OPERATIONS
- AUTOMATIC REWIND, EJECT
- REAL TIME TAPE COUNTER
- COPYING A VIDEO TAPE
- MAINTENANCE
- CABINET CLEANING
- AUTO HEAD CLEANING
- SERVICE
- PAL/MESECAM
- TROUBLESHOOTING GUIDE
- SPECIFICATIONS
- DECLARATION OF CONFORMITY
Brand : FUNAI
Model : TVCR-D1404
Category : Television