
T30 - Media player Nextar - Free user manual and instructions
Find the device manual for free T30 Nextar in PDF.


| Product type | Portable multimedia player |
| Brand | Nextar |
| Model | T30 |
| Display | 2.4-inch TFT LCD color screen |
| Storage capacity | 8 GB internal memory |
| Expandable storage | microSD card slot up to 32 GB |
| Supported video formats | MP4, AVI, RMVB, FLV |
| Supported audio formats | MP3, WMA, WAV, AAC |
| Supported image formats | JPEG, BMP, GIF |
| Interfaces | USB 2.0, 3.5mm headphone jack |
| Battery type | Built-in rechargeable lithium polymer battery |
| Battery life | Up to 10 hours music, up to 4 hours video |
| Charging time | About 2 hours via USB |
| Dimensions | 85 x 45 x 9 mm (approx.) |
| Weight | 55 g (approx.) |
| Functions | Video/music playback, photo viewer, FM radio, voice recorder, e-book reader |
| Maintenance and cleaning | Wipe with a soft, dry cloth; do not use solvents |
| Safety precautions | Keep away from water, heat, and strong magnetic fields |
| Parts and repairability | No user-serviceable parts; contact authorized service for repair |
| General information | Includes USB cable; black color finish |
Frequently Asked Questions - T30 Nextar
User questions about T30 Nextar
0 question about this device. Answer the ones you know or ask your own.
Ask a new question about this device
Download the instructions for your Media player in PDF format for free! Find your manual T30 - Nextar and take your electronic device back in hand. On this page are published all the documents necessary for the use of your device. T30 by Nextar.
USER MANUAL T30 Nextar
PORTABLE MEDIA PLAYER
ITEM#T30
TABLE OF CONTENTS
INTRODUCTION....5
SYSTEM REQUIREMENT 6
MAIN FEATURES....6
PLAYER OVERVIEW 8
DESCRIPTION OF BUTTONS 9
Connect to the PC....10
Download files 11
Loading DRM protected WMA audio tracks with Windows Media Player 10....11
Copying audio tracks to the player from PC 11
Disconnect from the PC....11
MANAGING BATTERY 12
Charging battery 12
Low battery 14
MAIN MENU....15
Volume Adjustment 17
Moving Previous/ Next File 17
Fast Forward/Fast Rewind....17
Section Repeat 17
Lyrics Synchronization 17
Music High-Fi Output 18
WATCHING VIDEO 19
Convert Video File 19
Install the AVI converter 19
Conversion: 21
Play Video....23
Pause 23
Volume Adjustment 23
Moving Previous/ Next File 23
Fast Forward/Fast Rewind....23
RADIO FUNCTION....24
Enter Radio....24
Submenu 24
FM Record....25
PHOTO....26
Viewing Image 26
Move Previous/Next File 26
Play/Pause....26
E-BOOK 26
Download Text 26
Reading Book 26
Page up/Page down....26
Auto slide show....26
Bookmark....27
Save bookmark 27
Load bookmark 27
Read book while listening to music....27
RECORD....28
EXPLORE 28
USB DEVICE....28
SD/MMC CARD....29
Note: Please do not insert or eject the Memory card while the PMP is in the ON state....29
DRM9 FUNCTION....29
SETTINGS 30
Setting music 30
Setting FM Radio 31
Setting Record....31
Setting Display....31
Setting Auto Slide Show....32
Setting System....32
Setting Sleep Timer....32
Load Default 32
UPGRADING THE PLAYER....32
TROUBLESHOOTING....39
PRODUCT SPECIFICATIONS....40
PRECAUTIONS AND MAINTENANCE....41
TAKING PRECAUTIONS 41
CLEANING THE DEVICE 41
FIRMWARE OF THE DEVICE 41
Listening Caution....43
Precautions 44
FCC Caution....45
FCC Compliance 45
INTRODUCTION
Congratulations on your purchase of this PMP (Portable Media Player).
Before operating the player, please read this manual thoroughly and keep it for future reference. This manual will help you use many of the exciting features to make your player view more enjoyable.
This manual contains important safety measures and information for correct usage. To avoid any unexpected accidents while using the PMP, please read this User's Guide carefully.
Every effort has been made to ensure that the information in this manual is accurate. We are not responsible for printing or other errors. We are also not responsible for any data or music loss occurring from the PMP.
Microsoft Windows Media and Windows are trademarks of the Microsoft Corporation.
Trademarks of other products mentioned in this user's manual are owned by their respective companies or organizations
SYSTEM REQUIREMENT
• Microsoft ® Windows 2000 and XP
• Pentium II 350MHz or Higher
• 64MB RAM (128MB Recommended)
- USB port
• 120MB Free Hard Disk Space or more
- CD-ROM driver
MAIN FEATURES
3.5" 262k color TFT QVGA (320×240)
---High-quality flat panel LCD, a brighter display and a smoother motion show, can be clear seen under sunshine.
1000 mAH Li-ion battery
---Can be charged by connecting with PC through USB port or by power adaptor (DC 5V).
USB2.0 High speed
High-Fi stereo output
MP3, WMA and DRM 9 playback
---Support digital music formats MP3 and WMA.
Video
---Support AVI video format. Other formats (RM/VOB/DAT/RMVB/MPG/MPEG/MP4/ASF/WMV/MKV) can be played after
conversing to AVI video format. (AVI converter software is in the bundled CD)
Photo preview: JEPG and BMP
E-BOOK
---Support txt.format e-book, listen to music while reading e-book, support bookmark function.
FM tuner
----FM-radio playback and recording.
Digital voice recorder
ID3 tag / Lyrics display
----Provide the basic information of titles, artists and albums of music file. Support lyrics display.
Lock up function
----Software controlled lock up function.
Built-in memory: 4GB
Support SD / MMC card (up to 2GB)
PLAYER OVERVIEW

1 Previous
2 Power
3 Record
4 USB port
5 Charging indicator
6 Earphone jack
7 Reset
8 Power supply
9 Next
10 SD / MMC card slot
11 Return
12 TFT display
13 Volume up
14 Play/pause
15 Volume down
16 Loud speaker
DESCRIPTION OF BUTTONS
| Button Function Function in Menu | ||
| POWERPress to turn the player on/off. | ||
| ▶/IIPress to start/pause playback.Press together with to hold/unhold player. | Press to enter a selected menu item or to confirm a chosen setting. | |
| RECIn music mode, press to create or release repeat section.In FM mode, press and hold to start FM recording.In E-book mode, press to save/load bookmark.In record mode, press to start/pause voice record.In folders/files navigation mode, press to pop out file delete window.▶/IIPress together with to hold/unhold player. | ||
| RETURNPress to exit menu | Press and hold to return to main menu. | |
| ◀/VPress to skip to previous/next track.Press and hold to rewind/fast forward within current track.In radio mode, press to search radio channels. | Press to select a setting or menu item when the items are listed horizontally. | |
| V+VPress to increase/decrease volume level. Press to select a setting or menu item when the items are listed vertically. | ||
Press the POWER for one second or more to turn on the player, then you can see the starting screen.
Power off
Press the POWER for three seconds or more to turn off the power. Then you can see the ending screen.
Lock & unlock
Press REC and ▶/II together for one second to make unavailable for the entire buttons.
Press REC and ▶/II together for three seconds to make available for the entire buttons.


CONNECTION AND DOWNLOAD
Make sure the player is connected properly to the PC in the process of formatting or uploading and downloading to avoid program mistakes.
Connect to the PC
- Connect the player to the PC with attached USB cable. Note that, do not using USB hub or USB extended line.
- The PC system detects "New hardware" and starts to install the driver automatically, if needed, and wait for the system to
finish the installation.
- Two new “Removable Disks” will appear. One for internal memory card and one for SD card. The removable disk for SD card is only available when SD card is inserted.
Download files
Note that this player will build the play list by scanning all files which are sorted by letter order. In Windows 2000 and Windows XP, music with DRM9 should be transferred by Windows Media Player version 9.0 or 10.0 later version (version 10.0 later version is for Windows XP only) to the PMP. Other download operation will probably cause the PMP not to read and play the music files with DRM protection.
Loading DRM protected WMA audio tracks with Windows Media Player 10
- Start the Windows Media Player and select the music library to manage your songs.
- In Windows Media Player 10, select the function "Sync".
- For further advice, please refer to the Windows Media Player FAQs regarding Microsoft® Windows Media DRM.
Copying audio tracks to the player from PC
• Find out your favorite MP3 or WMA music files in "My Computer".
- Use the mouse to select those music files and click those files with the right button of the mouse to select "Copy".
- Find Removable Drive in "My Computer" and enter it, then right click on the mouse to paste those files to the Removable Drive.
Caution: Do not disconnect the player from the PC during transferring data! It will damage the player.
Disconnect from the PC
• After the transmission is complete, disconnect the player from the PC as following steps.
- Double click the icon on the system tray on the bottom right corner of the Windows screen.

- After selecting the USB device, click the [Stop] button. When you see the [Safely Remove Hardware] window, click [OK] and then unplug the USB cable.


MANAGING BATTERY
Charging battery
● You can charge the battery either with the USB cable or power adaptor.
● If you charge the battery while player is connected to computer, it displays the following picture.

- If you safely remove the player from computer while keeping the USB cable connected or use power adapter to charge, it displays the following picture while the battery is charging.

Press any key now leads you to such a mode, in this mode you can use the normal function of the player such as listening to music or watching video while the charging is going on.

Low battery
If there is not enough energy in battery, the system will show you the following warning.

If you still use the player in low battery state, the player will turn off automatically with power off message.
Cautions:
- Make sure that the battery is fully charged before first use.
- Please recharge the battery when there is a message that battery voltage is low and when the player shuts down.
- Please fully charge the battery every two or three months when the player is not used for a long time. Otherwise, the battery voltage maybe too low to turn the player on.
MAIN MENU
The nine functions are showed in main menu. Press or to move in between, to confirm selection. To return to main menu, long press RETURN (When you are in Recording or Setting mode, press RETURN for a short time to return to main menu). If SD card is inserted, you can exchange between SD Card and Internal Memory when entering Music, Video, Photo, Text and Explore mode and press to confirm selection.

Music

Video

Radio

Photo

E-book

Record

Explorer

Settings
LISTENING TO MUSIC
Display in Play Mode

Playback
Press for a long time, select music mode, then press.
▶/II
Pause
Press to pause the playback. Press again to restart the playback.
Volume Adjustment
While a music file is in play, press / to adjust volume.
Moving Previous/ Next File
While a music file is in play, press ▶◀/▶▶ for a short time if you want to play previous/next music file.
Fast Forward/Fast Rewind
While a music file is in play, press ▶◀/▶▶ for a long time to move fast forward/rewind within the track.
Section Repeat
- Use section repeating function when you want to repeat a certain range of file in play. Define start point (A point) of the repeat range for the music file in play by pressing "A" icon is displayed on the screen.
- Press REC again at the point where you want to stop repeat. "A-B" will be displayed on screen. The defined range is repeatedly played.
- To release repeat range function, press REC again. And then "A-B" will be disappeared and section repeating is released.
Lyrics Synchronization
While playing the song which is in the same folder with lyric file (.LRC), the lyrics will be shown in the interface of Music mode automatically.
The player supports lyrics files in LRC format. Steps to operate it are as below:
- Choose an MP3 or WMA file, for example "lovemusic.mp3".
- Download a lyrics file from internet. The lyrics file must be with the file name extension LRC, example "lovemusic-2007.lrc".
- Rename the lyrics file, example "lovemusic.lrc". Make sure the lyrics filename is the same as the corresponding music filename.
- Copy both files into the same folder on the player.
- Start playback of the music file, the lyrics will be displayed synchronously on the screen while the music is being played.
Music High-Fi Output
Take out the earphone to have High-Fi music output.
WATCHING VIDEO
Convert Video File
This player only support AVI video format. Other formats such as RM/ VOB/ DAT/ RMVB/ MPG/ MPEG/ MP4/ ASF/ WMV/ MKV can be played after being converted to AVI video format. (AVI converter software is in the bundled CD) Install the AVI converter
- Insert the attached installation disk into the CD-ROM, select and run "AVIConverter Package Setup.exe", enter the installation interface, and then click [Next] to display the following dialogs:


-
Choose "Only for Win 2K/XP" and click Next.
-
After selecting the installation routine, click [Install] to complete installation (shown below)

- After the installation is complete, click [Finish] to finish the software installation.

Conversion:
This player can convert rm, rmvb, mpg, mpeg, mp4, asf, wmv, mkv, dat, and vob into AVI video format via the included video convert software.
- Run the "AVI Converter 2.0" program and click "Add", then select your desired video/audio file and the AVI video file routine to be generated, shown as follow:

- Select and set your desired parameters, click "Save". After finishing your selections, click "Close" to exit this window and click "Convert Now". The player will now begin to convert your files to AVI file format.

- After finishing the conversion, click "Close" to exit.
- The successfully converted AVI video files can now be played in the PMP.
Cautions: Choose 320×240 in resolution. If the size of the AVI file is not 320×240, it will be recognized as an error file format.
Play Video
Press RETURN for a long time, select video mode, then press ▶/II to enter the folder navigation. You can only choose the video files to play in video mode. Press V+ / V- to select the listed folders or files, press ▶/II to confirm.
Pause
Press to pause the playback. Press again to restart the playback.
Volume Adjustment
While a video file is in play, press / to adjust volume.
Moving Previous/ Next File
While a video file is in play, press ▶◀/▶ for a short time if you want to play previous/next video file.
Fast Forward/Fast Rewind
While a video file is in play, press ▶◀/▶ for a long time to move fast forward/rewind within the current track.
RADIO FUNCTION
Enter Radio
Press for a long time, select radio mode, then press.

Submenu
Press ▶/II to enter submenu. There are five settings in the submenu: manual, preset, save, delete, auto. Press V+ /to select, to confirm selection.
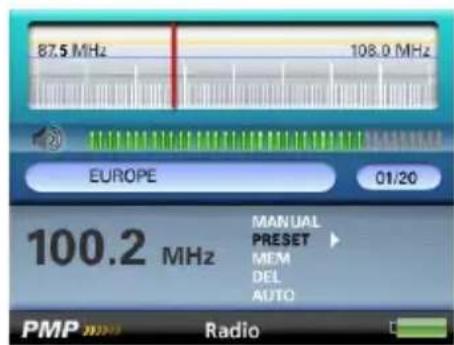
● Manual: To search channel manually. Press <</ >> to change the frequency by 0.1MHz.
- Preset: To listen to stored channels. Press <</→ to select channel.
- Save: To save current frequency to a certain channel. Up to 20 radio stations can be stored. Press V+ V- to select channel, ▶/11 to confirm. A warning window will pop out asking you whether to save or not. Press
A to move between "Yes" and "No", to confirm selection. After the frequency has been saved, press ▶/□ to enter submenu again, choose under which mode you would like to listen to FM radio, manual or preset.
- Delete: To delete a particular saved channel. Press V+ V- to select channel, ▶/□ to confirm. A warning window will pop out asking you whether to delete or not. Press <</▶ to move between "Yes" and "No", to confirm selection.
● Auto: To search for radio stations automatically. The player will search for and save radio stations automatically.
Note: Please plug in the earphone to the player before scanning radio station.
FM Record
In FM mode, press and hold REC to enter FM record interface. Press REC to start/pause record. Press RETURN to save file and go back to FM listening mode.
Cautions:
- FM region, stereo sound output and FM record quality can be set in Settings mode.
- Earphone serve as an extended antenna, so please keep them plugged in when searching for a channel.
PHOTO
Viewing Image
Press RETURN for a long time, select photo mode, then press ▶/II to enter the folder navigation. You can only choose photo files to play in photo mode. Press V+ V- to select the listed folders or files, press ▶/II to confirm.
Move Previous/Next File
During picture seeing, press □◀/▶ to see the previous/next picture.
Play/Pause
Press to start/pause picture slide show.
E-BOOK
Download Text
Connect player to the computer and select your desired file to download. Open the file with "Notepad" (Windows start→Program→Accessories→Notepad), then save as TXT format and ANSI format in your hard disk. Upload the text files to your player.
Please note: This player only supports the files with TXT format and does not support other formats.
Reading Book
Press RETURN for a long time, select E-book mode, then press ▶/II to enter the folder navigation. You can only choose the txt files to play in E-book mode. Press V+ V- to select the listed folders or files, press ▶/II to confirm.
Page up/Page down
While reading E-book, press V+ V- or < to read the previous/next page. Auto slide show
Press to start/pause text slide show.
Bookmark
Bookmark helps you to mark your place in the text.
Save bookmark
While reading text, long press REC to save bookmark. A window pops out at the left corner. Press ▶/II to mark current page. The tag changes from "Empty" to "xx% book name. TXT". "xx%" indicates the position of current page in the whole text.
Load bookmark
While reading text, press REC for a short time to load book mark. In the popped out window, press V+ / V- to select the saved page. Press ▶/II to confirm. Then the screen will change to the wanted page at once
Read book while listening to ious
While listening to music file, long press RETURN to go back to main menu. This will not stop the music playback. Select E-book in main menu and then choose the file you would like to read. To stop the music playback, return to main menu and operate in music playback interface.
Caution:
- There are nine vacancies for you to save bookmarks.
- The old bookmarks can be covered by new ones.
RECORD
Press RETURN for a long time, select record mode, then press ▶/□ to confirm. Press REC to start/pause recording in the same file. Press and hold REC to save file and make the player ready to record another file. Press RETURN to save file and return to main menu. Listen to the recorded files, enter "Music" mode, and choose files saved in "Voice" folde
EXPLORE
Press RETURN for a long time, select "Explore" mode, then press to confirm.
In explore mode, you can:
- Navigate all the fold ers and files stored in the player.
- Choose any format of file to play.
- Delete file. Move the highlight to the file you would like therefore press REC . A warning banner pops out asking you whether to delete the file. The default selection is "No". Press << / >> to choose from "Yes" or "No", ▶/II to confirm.
USB DEVICE
The player has a high-speed USB 2.0 port, and is a standard USB device. It supports the Windows Operating Systems from Windows 2000 & above. No driver installation is required.
SD/MMC CARD
After connecting the player to the computer, you will find two "Removable Devices". One is the built-in memory of the PMP and the other is the external SD / MMC card.
Inserting Memory Card: Insert the SD / MMC SD card with its top side up into the PMP.
Removing Memory Card: Push the SD / MMC SD card slightly to eject. Pull out the card completely after it ejects.
Note: Please do not insert or eject the Memory card while the PMP is in the ON state.
DRM9 FUNCTION
DRM music transfer function
In Windows ME / Windows 2K / Windows XP, music with DRM should be transferred by Windows Media Player version 9.0 or 10.0 (Version 10.0 is for Windows XP only) to the PMP.
Operation Instruction
In Windows ME / Windows 2K / Windows XP, users should upgrade Windows Media Player to version 9.0 or 10.0 (Version 10.0 is only for Windows XP). The system might request to download the license in case the user does not download the music with DRM properly from the website. In this case, the user needs to download the license from music publisher as instructed by Microsoft's website shown in the operating window.
In Windows Media Player version 10.0 (Windows XP only)
A. Connect player to PC.
B. Choose the desired music with DRM.
C. Right-click and select "Add to Sync list".
D. In the resulting dialog, select "Sync".
E. In the "Sync" window, select the desired music with DRM as step B and choose "Removable Disk".
F. Click "Start Sync" to transfer the music with DRM to the player.
SETTINGS
Press for a long time, select "Setting" mode, then press to confirm.
Setting music
- Repeat mode: seven options to choose from—Once, Repeat one, Folder, Folder Rep, Normal, Repeat all, Intro. Press V+ V to move in between, to confirm and return to music setting sub-menu.
● Play mode: Order/Shuffle
| Once | Play the current track once | |
| Repeat one | Play current track repeatedly | |
| Folder | Play music files in selected folder once | |
| Folder Rep | Play music files in selected folder repeatedly | |
| Normal | Play all music files by order once | |
| Repeat all | Play all music files repeatedly | |
| Intro(introduction) | Play the first 10 seconds of all music files | |
| Order |  | Play in order |
| Shuffle |  | Play in shuffle |
- Preset EQ: There are eight EQ effects to choose from—Normal/3D/Rock/Pop/Classic/Bass/Jazz/User EQ
- User EQ: You can set you own EQ effect here. Press ▶ to move between setting items, ▶/to adjust and to confirm.
Setting FM Radio
- Stereo SW: Choose to turn on stereo or not. If you choose "no", the sound output in FM will be monolateral.
● FM Region: Three regions to choose from—Europe (87.5-108.0MHz), Japan (76.0-90.0MHz) and U.S.A (87.5-108.0MHz).
Setting Record
● Record Quality: Set record quality to be high quality or general quality.
● Record volume: Five options to choose from (+1/+2/+3/+4/+5).
Setting Display
- Backlight: Set the time for how many seconds, when there is no operation, before the screen will turn dark. There are four options to choose from—10s/20s/30s/Always On.
● Brightness: Set the brightness of the screen. There are five standards (from 1 to 5) to choose from. The larger the number, the brighter the screen will be.
● Backlight mode: There are two options of Normal and Power Save. Select Normal, and the backlight of screen will be darker; select Power Save, and the backlight of screen will be off.
Setting Auto Slide Show
- Setting the auto slide show time alternation for text reading and photo seeing. Both have five options to choose from, from 1 second to 5 seconds.
Setting System
● Language: There are eight options in language—English/Dutch/Italian/Spanish/French/Portuguese/Korean
- About: Display the firmware version of the player, the date of firmware designing, the remain/total memory of flash memory and card memory. Press or to confirm and return.
- Update: To update firmware when connected to computer.
Setting Sleep Timer
- Set the sleep time for the player. The player will turn off automatically after that length of time. You can choose from—OFF / 10 Minutes / 15 Minutes / 30 Minutes / 60 Minutes / 120 Minutes.
Load Default
- To load the default setting of the player. Press <</▶ to move between "Yes" and "No", press ▶/II to confirm.
UPGRADING THE PLAYER
The player can be upgraded or a damaged player can be restored via the update tool in the included disk.
Install the upgrading tool
- The first time you upgrade the player, insert the disk into the CD-ROM drive of your computer. Open the "Customer upgrade tooling 2.8.1.6.rar" program, select the required language and enter the installation Interface.

- Click "I accept the terms in the license agreement" on the license agreement interface.

- Click Next as prompted until installation is complete (refer to Fig.).


Upgrading
When the installation of programs required by the computer is complete, you can begin the upgrade.
- Select and run the upgrading tool (shown below), then select and open the upgrading software.

- Hold the button and connect the player to the PC, Click "Open" to choose the latest firmware you want to update (shown as below).

Note: you can release button after connecting to the PC.
- Click "Update", and the device will check for the latest software and update it automatically. Update information appears in the "Update Info" area until it is successfully updated. When the update is finished, this area will display "Successful" (shown on as below).

- Click "Exit" and the update is complete.
Note: After updating, you must format the player before using it. A firmware upgrade is to improve and optimize the performance of the player. The normal operations of the player would not be affected even if the firmware isn't upgraded. If the firmware upgrade is interrupted, the PMP may not work. The firmware upgrade software is specific to this model of PMP and cannot be used for other PMP models.
TROUBLESHOOTING
If the player cannot be played normally, please check the following:
| Problem Solution | |
| Nothing shows on the screen | Check whether the PMP is in the ON state. |
| The player is frozen | Restart the PMP. If the problem persists, reset the PMP. |
| It cannot be played | Check whether the PMP is in the ON state. |
| Cannot transfer files, or the disk cannot be found in the computer | Insert USB cable fully into the Player after turning it ON.If problem persists, install the drivers. |
| Unable to record | Check that there is enough free memory in the PMP. |
| Text displayed is deformed | Make sure that you have selected the correct language. |
| PMP doesn't work after upgrading | Repeat the upgrading process. |
Note: Features and Specifications are subject to change without any prior notice.
PRODUCT SPECIFICATIONS
| Bit rate 32Kbs~480Kbs | ||
| Sample rate 8/16/32KHz Voice recording | ||
| DVR format WAV | ||
| Memory | Optional | |
| S/N | 85dB | |
| Distortion | <0.5% | |
| Output power 5mW*2 | ||
| Battery life 8 Hrs for MP3 usage / 4 Hrs for video usage | ||
| USB port USB 2.0 high speed | ||
| Music format MP3.WMA | ||
| Frequency response 20Hz~20KHz | ||
| Dynamic current <80mA | ||
| Power off current <30uA | ||
| Size | 104×74×12.8mm | |
| File-saving conditions Humidity<90%; normal temperature | |
| Work condition Humidity<85%; -10~40°C | |
| Weight: | About 105g |
PRECAUTIONS AND MAINTENANCE
TAKING PRECAUTIONS
- Before powering on the player, please plug in the earphone to avoid damaging the earphone as well as maintenance of the player. Turn off the player when you stop using it.
- Do not place it near a heat resource or subject to direct sunlight, dust, humidity or rain.
- Do not use it in extra-dry environments to avoid electrostatics.
CLEANING THE DEVICE
• Before cleaning the device, please make sure it is turned off.
- To clean the LCD screen or plastic casing, wipe it with a soft, slightly dampened cloth. Never use any alcohol or diluted detergent to clean the device.
• Never spray or pour liquid directly onto the screen or the casing.
FIRMWARE OF THE DEVICE
- Please make sure that the player will not be disconnected in the process of formatting or uploading and downloading to avoid program mistakes.
- When it is used as mobile disc, make sure to read and write files with correct method. Any mal-operation may lead to the
loss of data.
- Due to different memory calculating method and since the firmware is stored in the device flash memory, it will cause the difference between flash memory marked capacity and real capacity. The real flash memory capacity is lesser than the marked memory capacity of this device. With different firmware size, it has different flash memory capacity. Please refer the table as below for more details.
| Marked capacity Real capacity Free capacity after stored firmware | ||
| 512MB | 488MB~512MB | 417MB~511MB |
| 1GB | 953MB~1000MB | 858MB~999MB |
| 2GB | 1907MB~2000MB | 1765MB~1999MB |
| 4GB | 3815MB~4000MB | 3577MB~3999MB |
Please Backup Your Files!
We will not be liable for the loss of data caused by damaged products or damaged respectively unreadable memories or drives.
Please note: This device contains a built-in battery. Please ensure that it is disposed in accordance with local environmental legislation.
Listening Caution
Do not play your headphones or earphones at a high volume.
Hearing experts advise against continuous extended play.
If you experience a ringing in your ears, reduce volume or discontinue use.
Do not use while operating a motorized vehicle. It may create a traffic hazard and is illegal in many areas.
You should use extreme caution or temporarily discontinue use in potentially hazardous situations.
Even if your headphones or earphones are the open-air type designed to let you hear outside sounds, don't turn up the volume so high that you can't hear what's around you.
Sound can be deceiving. Over time your hearing “comfort level” adapts to higher volumes of sound. So what sounds “normal” can actually be loud and harmful to your hearing.
Guard against this by setting your equipment at a safe level BEFORE your hearing adapts.
To establish a safe level:
Start your volume control at a low setting.
Slowly increase the sound until you can hear it comfortably and clearly, and without distortion.
Once you have established a comfortable sound level:
Leave it there.
Precautions
1). When not using the player for an extended period of time, remove the batteries to avoid damage due to leakage. (Apply to Models that come with AAA or AA battery)
2). Do not use the player in extremely hot, cold, dusty or damp environments.
3). Make sure the HOLD key is in the unlock position before using the player (otherwise controls will not function).
4). Avoid dropping or striking the unit. This may cause external and internal physical damage to the player.
5). Replace battery with new one if: (Apply to Models that come with AAA or AA battery) a) The battery level icon displays
(An empty battery)
b) The players powers off automatically and off again when restarted.
c) No response when pressing keys with HOLD off and battery installed
6). To prevent damage from static shock, never use the player in very dry conditions.
7). When player is being formatted or transferring a file, do not interrupt the connection. Otherwise, data may be corrupt of lost.
8). When the player is used as a portable HD, please use only per instructions. Otherwise, permanent data loss could occur.
FCC Caution
This equipment has been tested and found to comply with the limits for a Class B digital device, pursuant to Part 15 of the FCC Rules.
These limits are designed to provide reasonable protection against harmful interference in a residential installation. This equipment generates uses and can radiate radio frequency energy and, if not installed and used in accordance with the instructions, may cause harmful interference to radio communications. However, there is no guarantee that interference will not occur in a particular installation. If this equipment does cause harmful interference to radio or television reception, which can be determined by turning the equipment off and on, the user is encouraged to try to correct the interference by one or more of the following measures:
◆ Reorient or relocate the receiving antenna.
◆ Increase the separation between the equipment and receiver.
◆ Consult the dealer or an experienced radio/TV technician for help.
◆ Connect the equipment into an outlet on a circuit different from that to which the receiver is connected.
FCC Compliance
◆ To assure continued compliance, following the attached installation instructions.
◆ Use only the provided shielded the interface cables when connecting to computer.
Any unauthorized changes or modifications to this equipment would void the user's authority to operate this device.
This device complies with Part 15 of the FCC Rules. Operation is subjected to the following two conditions: (1) This device may not cause harmful interference, and (2) this device must
accept any interference received, including interference that may cause undesired operation.
This product may receive radio interference caused by mobile telephones or other products during operation. If such interference is apparent, please increase separation between the product and the mobile telephone or other product.
This product may receive radio interference caused by mobile telephones or other products during operation. If such interference is apparent, please increase separation between the product and the mobile telephone or other product.
Industry Canada Requirement:
This Class B digital apparatus complies with Canadian ICES-003.
- Other names of system and products mentioned in these instructions are usually the registered trademarks or trademarks of the manufacturers who developed the system or product concerned.
The TM and are not used to identify registered trademarks and trademarks in these instructions.
This manual was correct and complete at the time of printing. However, the specifications and updates can occur at any time without prior notice.
No part of this manual may be copied, republished, reproduced, transmitted or distributed in any way without prior written consent of Nextar, Inc. Any unauthorized distribution of this manual is expressly forbidden.
Nextar TM a trademark of Nextar (Hong Kong) Limited
Nextar may find it necessary to modify, amend or otherwise change or update this manual. We reserve the right to do this at any time, without any prior notice. All specifications and features are subject to change without notice. All screen shots shown are simulated and may not represent the actual screen on production units sold to consumers.
For instruction manuals, updated drivers or other information, be sure to visit our website at:
www.Nextar.com
Or write us at:
Nextar
1661 Fairplex Dr.
LaVerne, CA USA 91750
Copyright © 2007



- TABLE OF CONTENTS
- INTRODUCTION
- SYSTEM REQUIREMENT
- MAIN FEATURES
- PLAYER OVERVIEW
- POWER OFF
- LOCK & UNLOCK
- CONNECTION AND DOWNLOAD
- CONNECT TO THE PC
- DOWNLOAD FILES
- LOADING DRM PROTECTED WMA AUDIO TRACKS WITH WINDOWS MEDIA PLAYER
- COPYING AUDIO TRACKS TO THE PLAYER FROM PC
- DISCONNECT FROM THE PC
- MANAGING BATTERY
- CHARGING BATTERY
- LOW BATTERY
- CAUTIONS
- MAIN MENU
- LISTENING TO MUSIC
- DISPLAY IN PLAY MODE
- PLAYBACK
- PAUSE
- VOLUME ADJUSTMENT
- MOVING PREVIOUS/ NEXT FILE
- FAST FORWARD/FAST REWIND
- SECTION REPEAT
- LYRICS SYNCHRONIZATION
- MUSIC HIGH-FI OUTPUT
- WATCHING VIDEO
- CONVERT VIDEO FILE
- CONVERSION
- PLAY VIDEO
- RADIO FUNCTION
- ENTER RADIO
- SUBMENU
- FM RECORD
- PHOTO
- VIEWING IMAGE
- MOVE PREVIOUS/NEXT FILE
- PLAY/PAUSE
- E-BOOK
- DOWNLOAD TEXT
- READING BOOK
- PAGE UP/PAGE DOWN
- BOOKMARK
- SAVE BOOKMARK
- LOAD BOOKMARK
- READ BOOK WHILE LISTENING TO IOUS
- CAUTION
- RECORD
- EXPLORE
- USB DEVICE
- SD/MMC CARD
- DRM9 FUNCTION
- DRM MUSIC TRANSFER FUNCTION
- OPERATION INSTRUCTION
- SETTINGS
- SETTING MUSIC
- SETTING FM RADIO
- SETTING RECORD
- SETTING DISPLAY
- SETTING AUTO SLIDE SHOW
- SETTING SYSTEM
- SETTING SLEEP TIMER
- LOAD DEFAULT
- UPGRADING THE PLAYER
- INSTALL THE UPGRADING TOOL
- UPGRADING
- TROUBLESHOOTING
- PRECAUTIONS AND MAINTENANCE
- TAKING PRECAUTIONS
- CLEANING THE DEVICE
- FIRMWARE OF THE DEVICE
- PLEASE BACKUP YOUR FILES
- LISTENING CAUTION
- PRECAUTIONS
- FCC CAUTION
- FCC COMPLIANCE
Brand : Nextar
Model : T30
Category : Media player