MA230 - Media player Nextar - Free user manual and instructions
Find the device manual for free MA230 Nextar in PDF.

User questions about MA230 Nextar
0 question about this device. Answer the ones you know or ask your own.
Ask a new question about this device
Download the instructions for your Media player in PDF format for free! Find your manual MA230 - Nextar and take your electronic device back in hand. On this page are published all the documents necessary for the use of your device. MA230 by Nextar.
USER MANUAL MA230 Nextar
nextar™

MA230 | Digital MP3 Player
Instruction Manual
Table of Contents
- Introduction....1
- Safety instructions....1
- Feature summary.... 3
- Contents....3
- Getting to know the player....3
- Getting started....4
- System functions....5
- Playback....10
- Recording....19
- Operating the FM radio....21
- Text view....22
- Image view....24
- How to use telephone book....25
- Video playback....27
- Specifications....27
- Install the software....28
- Connecting to the PC....30
- Software....30
- Troubleshooting....34
1. INTRODUCTION
Thank you for purchasing our MP3 player. Before using the unit please read this manual carefully to obtain the best possible performance from your player. Keep this manual for future reference
2. SAFETY INSTRUCTIONS
General instructions
Do not use the appliance while steering a motor-driven vehicle, e.g. when driving a car, or when riding a bike.
Never place the appliance on an uneven surface. People may be injured if it falls down.
Keep the appliance out of the reach of small children.
If you connect the appliance to other electronic equipment, read the safety information and the owners guides for this equipment as well.
In industrial facilities the accident prevention regulations of the association of industrial trade associations for electrical installations and equipment must be observed.
In schools, training institutions, hobby or self-help workshops operations of electronic products must be supervised by trained personnel.
If you have any questions regarding the appliance, how it works, safety or correct connections, please contact our technical support service or ask any specialist.
The seller does not assume any responsibility for damage caused when the appliance is used or for claims by third parties.
Never apply external voltage to the appliance unless this is provided directly for operations and is necessary.
Environmental conditions
Keep the appliance away from magnetic cards, such as credit cards, or clocks with
a balance, to prevent damage to the card information from the loudspeaker magnets. Keep the appliance away from heavy mechanical loads. Protect it from vibrations and severe impacts, and do not drop or shake it. Excessive pressure on the LCD may damage it.
Do not expose the appliance to high temperatures (above 60^ C) and severe temperature ectuations. Protect it from direct sunlight and keep it away from sources of heat.
Pro tect the appliance from damp. Do not use it in rooms with high humidity, e.g. bathrooms.
Do not use the appliance in dusty places and protect it from dust.
Parts of the appliance or asseccories may contain so-called softeners, which may damage sensitive furniture and plastic surfaces. Avoid direct contact with sensitive surfaces.
Technical problems
In case any foreign material or liquid gets into the product, please immediately remove the battery. Before you use it again, ask your authorised dealer to check the product carefully.
Please do not hesitate to contact our service center.
Most electronic appliances, such as lamps, adding machines, computers, telephones, etc., generate an electromagnetic eld. Do not place any electronic appliances next to the radio to avoid unwanted interference. Packaging material
Please don't Keep any packaging material within reach of small children. It can become a dangerous toy.
Cleaning and maintenance
For cleaning use dry and soft cloth.
3. FEATURE SUMMARY
• STN 64K color display
• Image, video and text display
• Automatic turn off (if the appliance is not in use)
• Automatic numbering of recording
• Built-in equalizer
- USB 2.0 full speed
• Multilingual menu guidance
• Photo, Im and video playback
• MP3- and WMA les playback
- Up to 10 hours of playback time (one cycle of charging)
• Built-in lithium battery
- CONTENTS
5. GETTING TO KNOW THE PLAYER
View of the player
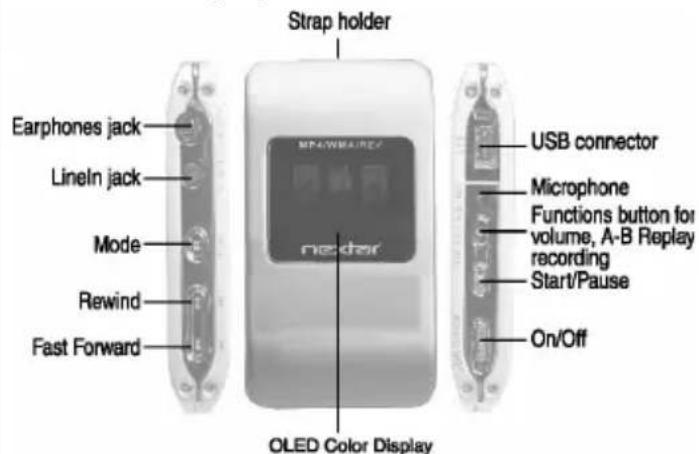
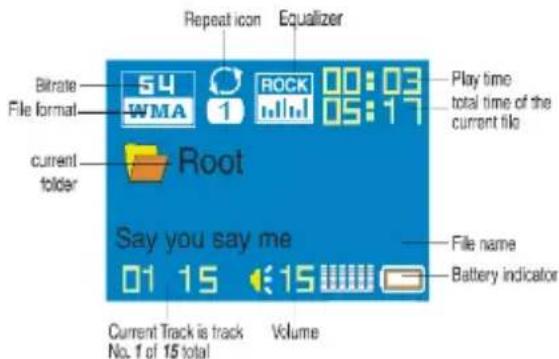
Display
6. GETTING STARTED
Turn on
Move the on/off switch in direction of the arrow to turn on the appliance. The appliance will need approximately 5 seconds to start to play.
The dnt logo appears on the display and the appliance will turn to Stop mode.
Turn off
Move the on/off switch against the direction of the arrow to turn off the power of the appliance. To put the V-Box into Standby mode, press the Start/Pause button until the display turns off.
Check battery condition
The appliance has a built-in Lithium battery. The battery charges whenever the appliance is connected to the USB interface. The battery icon blinks on the display.
Battery charging time: approximately 3 hours.
If the battery is empty, the appliance turns off or will not start.
Recharging the battery / Operation with external adapter
Connect the adapter to the USB connection port.
The display shows the battery status icon while charging.
Charging: Approx. 3 hours (at full discharge).
You can use the Q-Style during charging it you charge with the ext. adapter.
7. SYSTEM FUNCTIONS
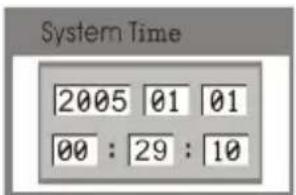
Clock
You should set date and time before you start recording with the appliance. The date will be set in US format: Year - Month - Day
Press the mode button for more than 3 seconds to get to the menu.
Use the Forward/Rewind buttons to select the menu item SYS.

Press the Mode button to confirm.
Use the Forward/Rewind buttons to select the menu item Systime time.
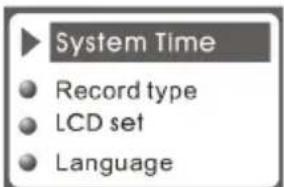
Press the Mode button to confirm.
Use the Forward/Rewind buttons to set the value.
Use the Start/pause button to get to the next position.
Press the Mode button again to exit.
The Recording time has to be set again every time.
LCD set with this function you can set the display.
Press the Mode button for more than 3 seconds to get to the menu.
Use the Forward/Rewind button to select the menu item SYS.
Press the Mode button to confirm.
Use the Forward/Rewind buttons to select the menu item LCD set.
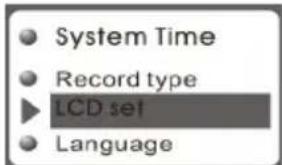
Press the Mode button to confirm.
Brightness
Select the menu item Brightness and press the Mode button to confirm.
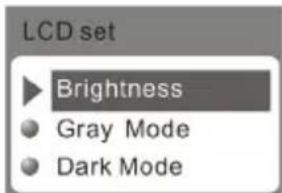
Use the Forward/Rewind buttons to select a value from 0 to 15.
Press the Mode button to confirm. Use the Forward/Rewind buttons to select the menu item Exit.
Dimming
To save battery power, the brightness of the display can be reduced with the time set.
Select the menu item darkle and press the Mode button to confirm.
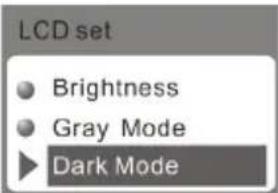
Use the Forward/Rewind buttons to select a value from 0 to 60 seconds where 0 means the function is disabled.
Press the Mode button to confirm.
Use the Forward/Rewind buttons to select the menu item Exit.
Black
To save battery power, the display can be turned off according to the time set.
Select the menu item Auto Power Off and press the Mode button to confirm.
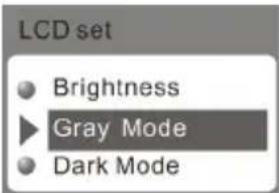
Use the Forward/Rewind buttons to select a value from 0 to 60 seconds, where 0 means the function is disabled.
Press the Mode button to confirm. Use the Forward/Rewind buttons to select the menu item Exit.
Language
With this function you can select the font and the displayed language respectively.
Press the Mode button for more than 3 seconds to get to the main menu.
Use the Forward/Rewind button to select the menu item SYS.
Press the Mode button to confirm.
Use the Forward/Rewind button to select the menu item Language.
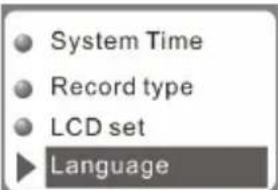
Press the Mode button to confirm.
Use the Forward/Rewind button to select the desired language.
Press the Mode button again to exit.
Power OFF
With this function you can set a turn-off time for the MP3 Player. Here you differentiate between the turn-off time if the appliance is not in use and a sleep timer. With the sleep timer the appliance turns off automatically according to the time programmed.
Press the Mode button to get to the menu.
Use the Forward/Rewind button to select the menu item SYS.
Press the Mode button to confirm.
Use the Forward/Rewind button to select the menu item Power off.
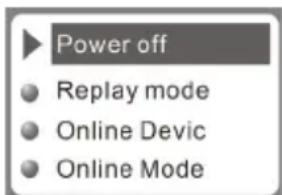
Press the Mode button to confirm.
Use the Forward/Rewind button to select from off time and Sleep time.
Press the Mode button to confirm.
Off time
Use the Forward/Rewind buttons to select a turn off time in 3 steps 0, 50 and 100 seconds.
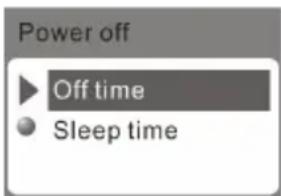
00 seconds means the function is disabled. Press the Mode button to confirm.
Use the Forward/Rewind buttons to select the menu item Exit.
The appliance switches off automatically if no button is pressed during the time programmed.
The appliance will not switch off if Auto off is set Inactive (0 seconds).
Replay mode
Select from automatic and manual A-B playback.
Press the Mode button for more than 3 seconds to get to the menu.
Use the Forward/Rewind button to select the menu item SYS.
Press the Mode button to confirm.
Use the Forward/Rewind button to select the menu item Replay mode.
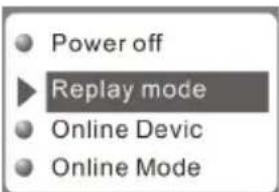
Press the Mode button to confirm.
Use the Forward/Rewind button to select from Manual replay and Auto replay.

Use the Forward/Rewind buttons to select the menu item Exit.
Memory info
In the menu item Memory info the display shows the memory in use.
Press the Mode button for more than 3 seconds to get to the main menu.
Use the Forward/Rewind button to select the menu item SYS.
Press the Mode button to confirm.
Use the Forward/Rewind button to select the menu item Memory info.

Press the Mode button to confirm.
The used memory appears on the display.
Press the Mode button to confirm and exit.
Use the Forward/Rewind buttons to select the menu item Exit to exit.
8. PLAYBACK
Online-Mode
Refer to chapter "Software".
Firmware version (F/WVersion)
With this function, the current software version is displayed.
Press the Mode button for more than 3 seconds to get to the main menu.
Use the Forward/Rewind button to select the menu item SYS.
Press the Mode button to confirm.
Use the Forward/Rewind button to select the menu item Firmware version.
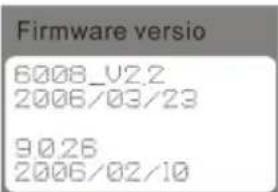
Press the Mode button to confirm.
Press the Mode button again to exit.
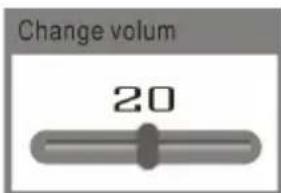
Volume setting
Set the volume of the appliance according to your personal needs.
Before you use the earphones and start playback, be aware that the volume is set to a comfortable level to avoid injuries.
Press the MODE button in the mode of music playing/FM/VOICE, you will find the below picture.
Select change volum mode and press Mode button to confirm then appearing the following picture:
Use the Forward/Rewind button to set the desired volume. Press the MODE button again.
Playback music
Use the Forward/Rewind buttons to select the menu item MUS from the main menu.
Press the Mode button to confirm.
Use the Forward/Rewind buttons to select a MP3 or WMA file.
Press the Play/Pause buttons to start playback. The time played appears right above on the display.
Press the Play/Pause button again to Stop.
Press the Play/Pause button another time to continue playback. The appliance has a Resume function, With this function, playback will continue at the position where it was stopped.
A lyric is available if the Lyrics icon is displayed.
If, during playback, you press the Mode button for approximately 2 seconds, lyrics, if available, are displayed.
How to play DRM music
System Requirement:
* Windows XP+SP2; * Windows Media Player 10.3646 or above (New install do not upgrade from old version);

Although you can copy music files from elsewhere, you can't get the DRM license. / Windows XP support MTP(Media transfer Protocol).
You can setup the player as a U-disk or MTP device.
How to add DRM music
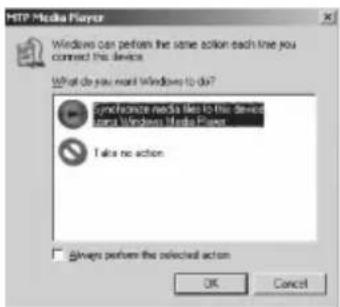
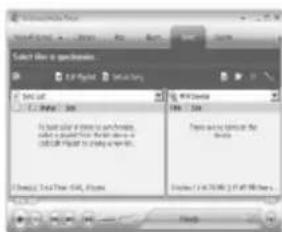
1). Connect player to PC, after 10 seconds a dialog will be appear, select "Take no action" or click "Cancel" button to continue. 2). Open "My Computer", clean up the device as the following steps:
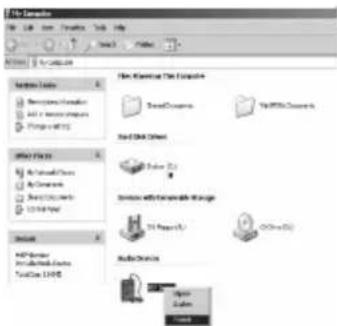
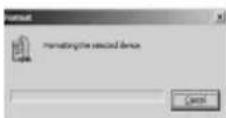
a). Click the MTP device icon use the right button of the mouse, and then select "Format"; b). Waiting for the format processing until finish.
3). Run "WMP10"(Windows Media Player 10), the "MTP" device will be discovered.
Select "Sync", and then open the local folder where your music files saved.
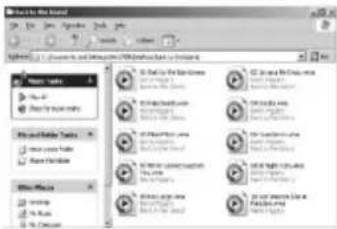
4). Select all music you want to sync to player, and drag them to the "Sync List" on the left side of WMP 10, click "Start Sync" to begin downloading:
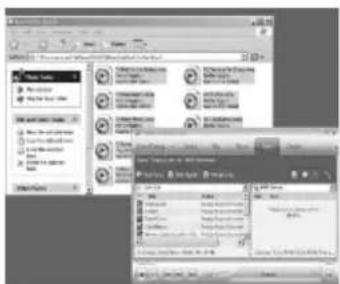
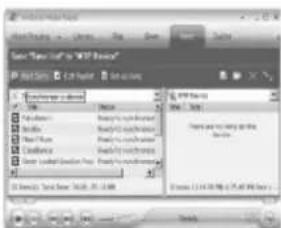
5). When finish downloading, you can see the music files on the right side of WMP 10.
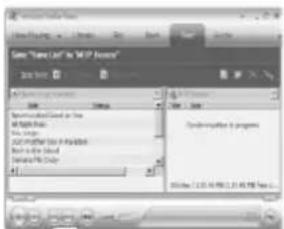

Browser "My Computer", you can see the files already downloaded to player.

6). Disconnect the player, it will make ID3 Playlist automatic, this will cost about 8 seconds.
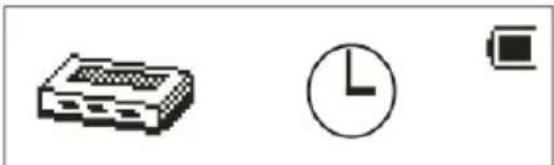
natural_image
Three pixelated icons: a battery, a clock face, and a pixelated device (no text or symbols)7). Then the player will process DRM licence, it will cost 5\~10 seconds.

How to play
At first, you must enter into System setup and set up the "DRM Time", set it to current time, otherwise the DRM music can't be played accurately.
After setting up "DRM Time", you can go back to music mode to play and listen to music.
Playback voice files.
Press the Mode button for more than 3 seconds to get to the menu.
Use the Forward/Rewind button to select the menu icon RECORD.

Press the Mode button to confirm. The Voice icon is displayed.
WAV will be displayed as file type for recorded voice recordings with 32kbps bitrate. ACT will be displayed for recordings with 8kbps bitrate.
Press the Play/pause button to start playback. The time played appears right above on the display.
Press the Play/pause button again for Pause.
Press the Play/pause button another time to continue playback.
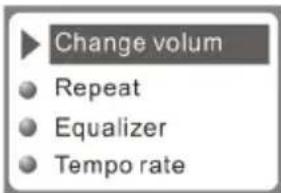
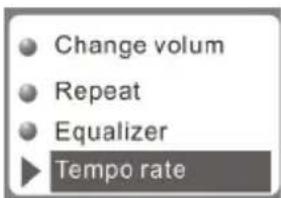
Playback menu
The playback menu has different setting. These settings are the repeat function, equalizer setting, tempo rate and A-B replay.
Use the Forward/Rewind button to select a track or a voice file.
Press the Start/stop button to start playback.
Press the Mode button to get to the playback menu.
Use the Forward/Rewind button to select from Repeat, Equalizer, Tempo rate, A-B Replay, Replay Times, Replay gap or Exit.
Press the Mode button briefly to confirm.
Repeat
You have the opportunity to select from playback all MP3 les of a folder for once, endless playback of a MP3, endless playback of all MP3 or playback in random mode.
Use the Forward/Rewind buttons to select menu item Repeat.
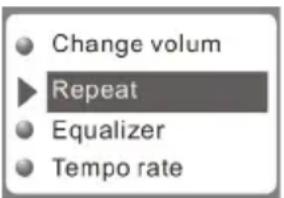
Press the Mode button to confirm.
Use the Forward/Rewind buttons to select one of the following menu items:

N Normal=No repeat

1 Repeat one=Endless playback

D Folder=Plays folder one time, no repeat

D Repeat folder=Endless playback of the folder

A Repeat all=Endless playback

R Random=Playback in random mode.

Intro=Playback of the first 10 seconds of a track.
Press the Mode button to confirm.
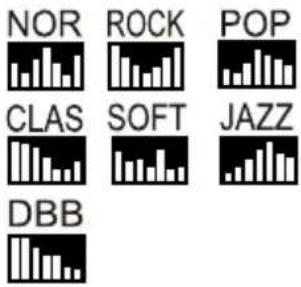
Equalizer (Music only)
Use the Forward/Rewind button to select the menu item Equalizer.
Press the Mode button to confirm.
Use the Forward/Rewind button to select one of the following menu items:
Tempo rate
Use the Forward/Rewind buttons to select menu item Tempo rate.
Press the Mode button to confirm.
Use the Forward/Rewind buttons to set the tempo rate you need.+ faster / - slower
A-B-Replay
Selective playback of a part of a track.
Use the Forward/Rewind buttons to select menu item A-B Replay.

Press the Forward button to mark the beginning A- of the section. A- blinks on the display.
Press the Forward button to mark the end. - B blinks on the display.
Press the Forward button again to start playback.

To stop playback, press the Mode button.
A-B Repeat time (music only)
With A-B Replay the number of repeats can be set.
Use the Forward/Rewind buttons to select menu item Replay time.
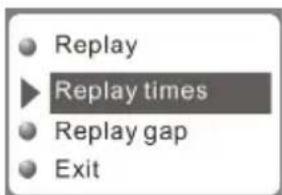
Press the Mode button to confirm.
Use the Forward/Rewind buttons to select the number from 0 to 10.
Press the Mode button to confirm.
A-B Replay gap (music only)
This function sets gap between repeats.
Use the Forward/Rewind buttons to select menu item Replay gap.

Press the Mode button to confirm.
You can set a gap from 1 to 10 using the Forward/Rewind buttons.
Press the Mode button to confirm.
You can start A-B Replay as well by pressing the Functions button during playback.
Forward/Rewind
There are two different possibilities to use forward or rewind mode.
Forward/Rewind to a specific track:
Press the Forward/Rewind buttons until a desired track appears on the display.
Forward/Rewind within a track:
Start playback. To look for a specific point within a track during playback, press the Forward/Rewind button until you find the desired point. The playback time appears in relation to the beginning of the track right above on the display.
The Mp3 Player has a so-called Follow Read mode.

Mark the part with the A-B Replay function..

Press the Forward button. The A-B display shows a microphone icon next.
Now you can sing the part that you have just listened to.

The A-B display changes and the original track is played.
Press the Forward button again to compare the original with your own recording. If you press the Rewind button at this point, the action is repeated.

The display changes and your recording is played.

If the playback of the recording ends, the original is played again.
The recording will be played next etc., until either the number of repeats, programmed in A-B Replay, is reached or the Mode button is pressed.
By using the the Rewind button, you will get back to the beginning. By using the Mode button playback is finished.
9. RECORDING
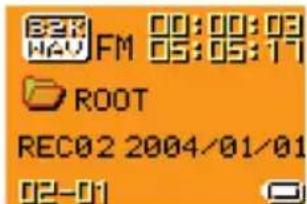
Directories
With this function you can select a directory to playback music or voice only from this directory.
Press the Mode button to get to the Playback menu.
Use the Forward/Rewind buttons to select menu item Folder.

Press the Mode button to confirm. If the choose folder contains music or voice and no folder is set, ROOT is displayed, otherwise the existing folders are displayed.
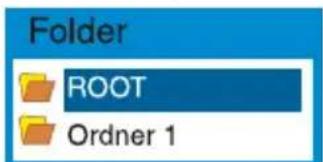
Use the Forward/Rewind buttons to select the desired folder.
Press the Mode button to confirm.
Recording
You can start recording using the menu or the Functions button.
Press the Mode button for more than 3 seconds to get to the menu.
Use the Forward/Rewind button to select menu item REC.
Press the Mode button to confirm. The appliance is ready to record.
Press the Mode button to show a sub menu to set the record settings.
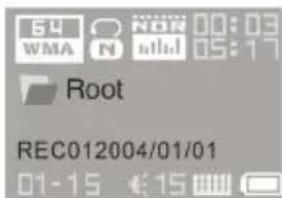
Use the Forward/Rewind buttons to select one of the following menu items:
Local Folder: Select the folder where you want to save the recordings.
Rec type:
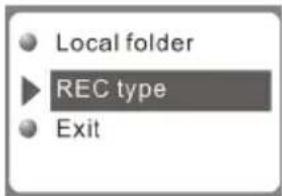
Fine REC=High quality
Long REC=Standard quality Long VOR=Standard qualityVoice activated recording. By absence of the signal the recording process will be automatically stopped. Otherwise, it will be continued
Fine VOR=High quality, voice-activated recording. By absence of the signal the recording process will be automatically stopped. Otherwise, it will be continued
Exit=The settings are stored.
Press the Functions button to start recording.
Press the Functions button again to Pause. The recorded time blinks on the display.
Press the Functions button another time for more than 3 seconds to Stop. Save... appears on the display.
natural_image
Abstract icon set with cloud and gear symbols on blue background, no text or labels present- Press ( switch to select FM Mode)

- Press MODE to enter FM mode
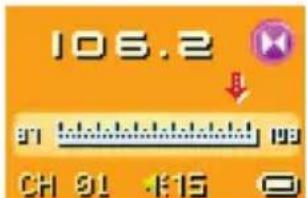
- Press Mode button to enter FM submenu
- Submenu options: Manual and Auto search
Manual and Auto search
Press ◀◀/▶▶ button and the player will step forward or backward in 100KHZsteps to manually search for stations
Press on ◀/▶ button for about 2 seconds, and the player scans forward or backward in 100KHz steps, and stops at the received station. If you want to stop scanning, press ◀/▶ switch to stop.
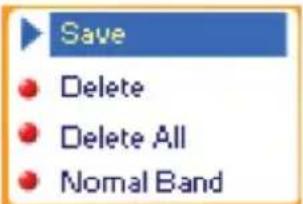
Saving the manually searched stations
Enter FM submenu and search "Save" option, and then Again press MODE button to save current station.
Listening to the saved stations
If there exist is more than one saved station, press the PLAY button to listen to the station in sequence.
FM Record
Press MODE button to enter FM submenu, and then press ▶ button to choose “Fine REC” or “Long REC” options. Then press MODE button to enter FM Record interface and start recording; Alternate method: press REC directly to start recording at main FM interface. (Other operations are same as the Voice Record section).
Record interface as follows:
Note: The player supports U.S. FM radio bands (FM87 - 108MHz) and Japan FM radio bands (FM76-90MHz)
* (Press MODE button to enter FM submenu, and press (button to select frequency channel.)
* If the current station is in STEREO the following icon: will be displayed on the LCD.
* To delete saved stations, see the "Delete Files" section of this manual.
11. TEXT VIEW
Text view
To start recording immediately by using the settings, press the Functions button.
① Voice recordings in ATC format can be converted into WAV by using the Sound Convert Tool (shipped with the product)
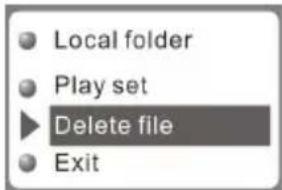
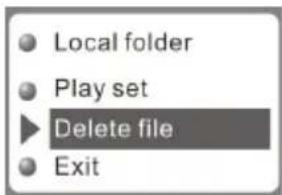
Delete
With this function you can delete a message or music.
Press the Mode button while the appliance is in Stop mode.
Use the Forward/Rewind buttons to select menu item Delete.
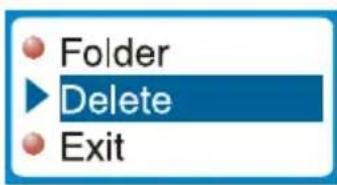
Press the Mode button to confirm.
Use the Forward/Rewind buttons to select from Delete and Delete all.

Press the Mode button to confirm. The message Delete appears on the display.
Exit: Abort
Text displayThe V-Box is able to display text files. The files need the files ending in "txt."
Press the Mode button for more than 3 seconds to get to the menu.
Use the Forward/Rewind buttons to select menu item TXT.

natural_image
Abstract icon showing an open book surrounded by circular icons with arrows, no text or symbols present.Press the Mode button to confirm.
Press the Mode button to show a sub menu to set the settings.
Use the Forward/Rewind buttons to select one of the following menu items:
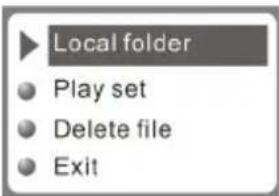
Folder: Select the folder in which you want to save the text files.
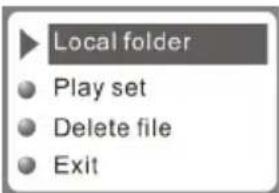
Play set:
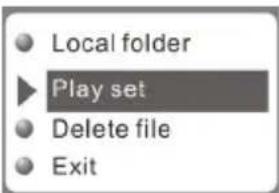
Manual: Use the Forward/Rewind buttons to continue to scroll in the document.
Automatic: Continue to scroll in the document automatically with the time set (in seconds)
Delete: Delete the selected document.
Exit: Return to text screen. If no text files are saved on the player, displayed.
12. IMAGE VIEW
Image View
The V-Box is able to display images and photos in JPG format.
Press the Mode button for more than 3 seconds to get to the main menu.
Use the Forward/Rewind buttons to select menu item JPG.

Press the Mode button to confirm.
Press the Mode button to show a sub menu.
Use the Forward/Rewind buttons to select one of the following menu items:
Folder: Select the folder in which you want to save the images.
Play set:
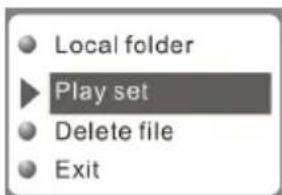
Manual: Use the Forward/Rewind buttons to continue to scroll in the document.
Automatic: Continue to scroll in the document automatically with the time set (in seconds) Delete: Delete the selected image.
Exit: Return to text screen. The larger the image, the longer it takes to appear.
13. HOW TO USE TELEPHONE BOOK
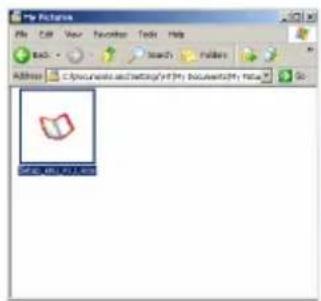
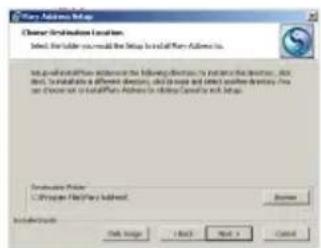
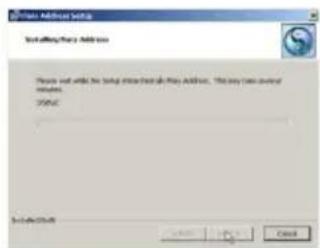
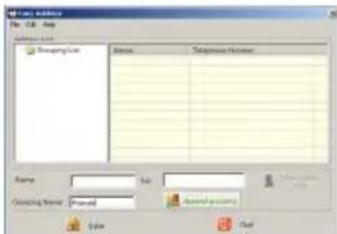
First time, the user can find the file 'Setup_enu_v1.1.exe' in drive disc CD.
Then install this software on the PC as following steps
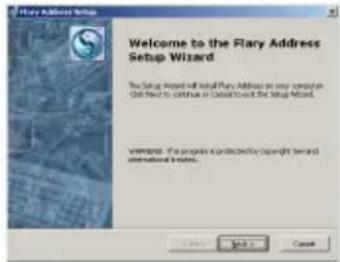
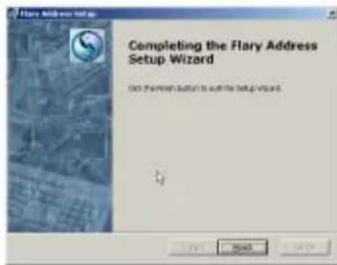
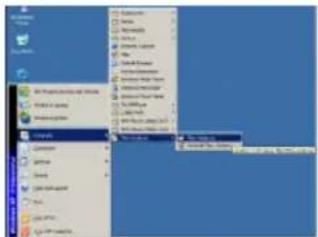
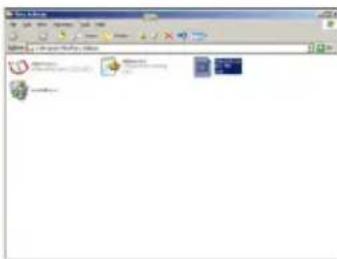
Connect the mp3 with the PC, press the start menu to find the Flary Address software:
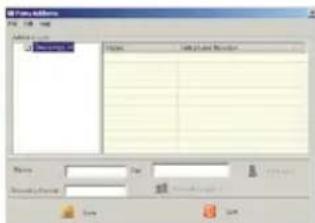
Select the file menu to choose the new, and then you will find the file 'C:\Program Files\Flary\TelAddbk.dat', then copy the file in your mp3
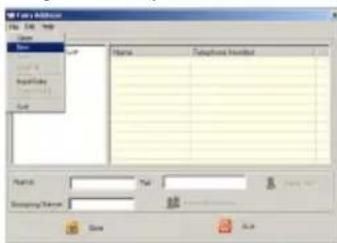
Select the file menu to choose the Input Data to find the file (TelAddbk.dat) in your mp3, and then press the open button. Fill in team name in the blank and press the Append Grouping button:
Select the team you added, and then key in the Name and the TEL you want to add. Press the New Card button and you can see the name and Tel No. in the right blank.
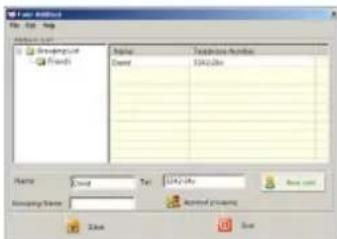
Add the whole information as the above steps: Press the Save button and Quit. Disconnect the mp3 to PC.
Enter the main menu to select Telephone mode and you will find your added Tel information.
14. VIDEO PLAYBACK
Video playback
The MP3 Player is able to display videos in AMV format. You can create videos in AMV format by using the Movie-Converter tool shipped with the product.AVI, WMV, ASF, RM, MPG, MPEG, MOV and VOB are accepted as source les. By using the converter the different frequencies and resolutions are converted into one format, the MP3 Player is able to show. For further details, take a look at the Windows help files.
Go to Music mode to playback videos (p. 16, Playback music).
Connecting external devices
The MP3 Player has a Line-In input where you can connect external devices for voice
recording. The recording quality is max. 32K in WAV format.
15. SPECIFICATIONS
Technical data Take a look at the delivery content on the giftbox to and out about the product properties.
- File format (Music): WMA, MP3 (8 - 320 Kbps)
- File format: (Video), AVI, WMV, ASF with Converter software, RM, MPG, AMV, MPEG, MOV, VOB
-
File format: (voice) ADPCM,WAV
• Frequency response: 20Hz-20KHz
• Memory size: 128MB/256MB/1512MB/1GB
• Memory: Flash memory
• Interface: USB 2.0 Full Speed
• LC-Display: STN 64K color display
• Audio Output Level: max. 2 x 10 mW / 32 Ohm
• S/N Ratio >85dB
• Distortion: <0,1%
• Output Jack: 3,5mm Stereo -
Input Jack: 2,5mm
• Weight: 30g (mit Akku)
• Dimensions: 68 x 37 x 13 mm (LxHxB) - Battery life: up to 10 hours playback
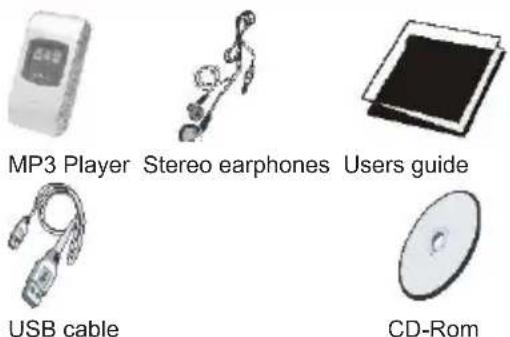
• Temperature range: -5^ — +40^ - Contents: MP3 Player, Stereo Earphones, users guide, USB cable, Audio cable, CD rom
16. INSTALL THE SOFTWARE
The driver installation will not be necessary if you use Windows ME/2000/XP. System conditions Computer: IBM compatible, min. Pentium 133 MHz Memory: min 64 MB RAM
Operating system: Microsoft Windows 98SE
Other: Sound card, 4 x CD-ROM, USB-Port Install USB driver (Windows 98SE) Close all applications before you start the setup.
Install software
- Insert the CD shipped with the product into the CD-ROM drive of your PC.
- Proceed as follows:
a. Click on the Start button on your desktop and select Run...
b. Enter the following:
Click Next and follow the installation instructions
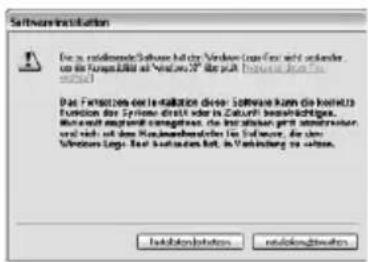
Click Continue installation if this window appears.
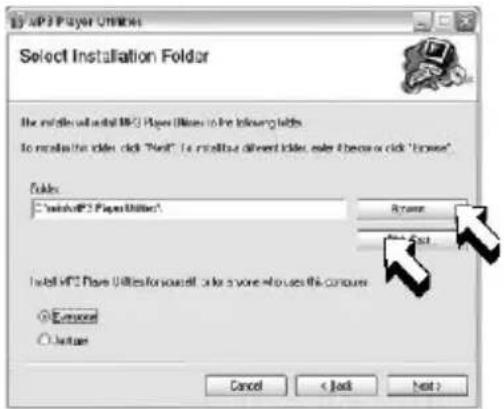
Select an installation folder and click Next.
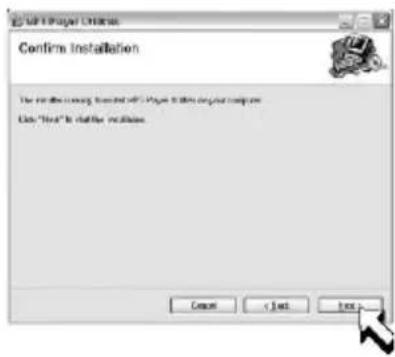
The software has gained all information needed now and is ready for installation.
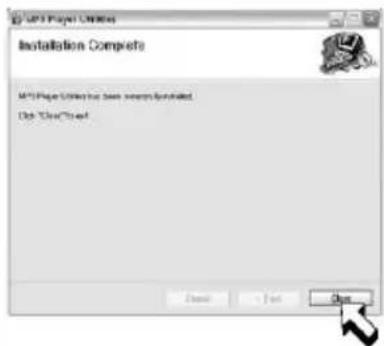
The software installation is completed successfully now.
17. CONNECTING TO THE PC
Connect your MP3 player and computer to transmit music/voice les from MP3 player to your computer or les from the computer to the MP3 V-Box
The display shows
The message New hardware found appears on your computer screen.
When the new hardware of the MP3 player is installed you can work with the MP3 player.
⚠️ If the message New hardware is not displayed, there are two possible reasons why:
- The USB port of your PC is deactivated. You can check this in the BIOS settings.
If you do not know how to get to BIOS at your PC, either check your PC users guide how to get to BIOS at your PC or contact your dealer.
- You have connected the MP3 player to your PC without installing the rest of the software.
In this case, you have to uninstall the whole software and search for an item of an unknown audio device under:
"Start > Properties > Control > System > Hardware > Device Manager".
Then you have to remove the item.
Next, you will restart your PC and install the software again.
Attention: 5 seconds after being connected with the PC, the player will be in screen protection (black display) automatically.
18. SOFTWARE
Sound convert tool
The sound converter serves to convert ACT voice files to WAV. Furthermore, you can listen to as well as control MP3 and WAV files with the integrated player.
To convert a voice file, click Open, select the ACT file and then click Convert.
Click Exit to exit.
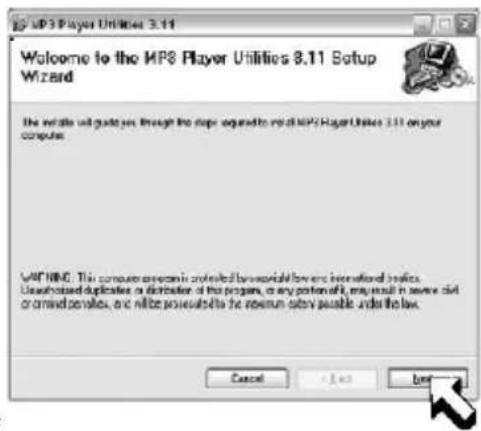
Firmware upgrade
To transmit new firmware (the software of the player) to the appliance you will need a spacial tool. You will find this software on the CD. For further installation instructions, p. 32.
Select SYS>Firmware-Upgrade in your V-Box and press the Mode button to confirm.
Connect the player with the USB interface of your PC and start the program START >PROGRAM FILES> MP3 Player UTILITIES 3.11 >MP3 Update Tool.
⚠ Do not remove the player during update.
Click Select new firmware file and select the firmware file in the following dialogue.
To start the upgrade click Begin upgrading.
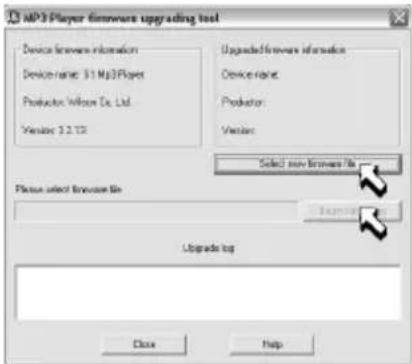
After the upgrade is finished the display shows:

Click Close to exit.
You can download new firmware, if available, at the download area at www.dnt.de.
Player Disk Tool
This tool serves for the player setting, formatting and partitioning.
Partitioning.
With partitioning you can divide the memory of the player into two parts, the first for music and videos, the second for data files. Set the desired partition sizes by using the regulator and then click Start.
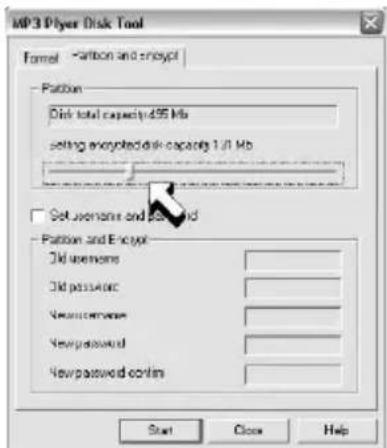
All files on the player will be deleted.
Windows-Version < Windows 2000 SP4: For 2 partitions set SYS > ONLINE MODE > Multidrive in the system menu of the player.
For 1 partition set SYS > ONLINE-MODE > Normal Only in the system menu of the player.
For 1 encrypted partition set SYS > ONLINE > MODE > Encrypted in the system menu of the player. Windows-Version >= Windows 2000 SP4: Settings on the player are unnecessary.
Create encrypted partition:
Set the desired partition sizes by using the bar, select Set username and password and then enter your username and password twice. Finally, click Start.
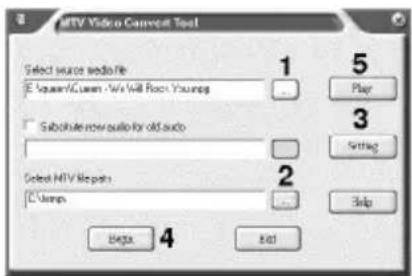
To convert: Select the file you want to convert (1).
Set the folder in which you want to save the MTV file (2).
Select the settings you need (3).
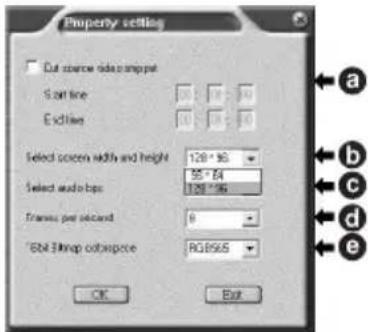
- Cut source video snipped, using start time and end time (a).
- Select screen width and height (b).
- Select audio quality (c)
- Frames per second (d)
- Color setting (e)
Start to convert (4).
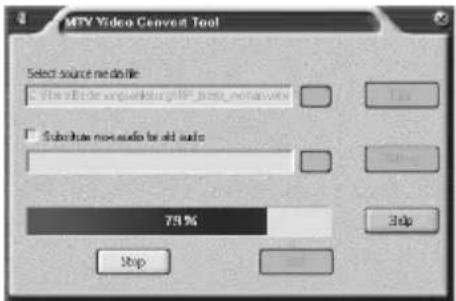
Play the video file with the integrated player (5).
When the converting is completed successfully you can transmit the created video file to the Mp3 player.
End the program with Exit.
You will need Windows Media Player 9.0 or upper and Microsoft DirectX 9.0 or upper to use the Cinema program.
19. TROUBLESHOOTING
The MP3 players program can fail due to external influences or electrostatic overload. In this case, the MP3 player has to be programmed again with the firmware, the operating system of the mp3 player. You will find the firmware either on the CD shipped with the product or at the download Area.
Formatting the MP3 player
To format the MP3 player using Windows use the FAT data system only. In case you have used NTFS or FAT32 by accident, the MP3 player does not start anymore. In this case you have to format the memory of your MP3 player again using the file system FAT.
How do I get the Mp3 files to the player?
Open up My Computer. Select the MP3-, WMA les you want to copy. Click the right mouse button and select copy. Open up the external drive (the drive icons of your player) on your Windows Explorer. Click the right mouse button and then select paste. The les will be copied now.
How can I create MP3 files?
Therefore you need a program that is able to create MP3 les.You can download such a program for free at www.nextar.com
You can also download the Mango program at the download area of NEXTAR at www.nextar.com . For further information and guidance, please take a look at Digital Audio/Video Guide.
I find strange signs on my display, when I play music.
Not all MP3 players are able to show German umlauts. You should try to refrain from using German umlauts in file names and in ID3 Tag or characters of other non-english languages.
file names and in ID3 Tag or characters of other non english languages.
I do have a Mac and have transmitted audio files to the player but the player is not able to play the files.
It all depends on which MAC OS you have installed on your computer. Audio les that have been created with iTunes cannot be played with a regular MP3 player.
No part of this manual may be copied, republished, reproduced, transmitted or distributed in any way without prior written consent of Nextar, Inc. Any unauthorized distribution of this manual is expressly forbidden.
Nextar is a registered trademark of Tofasco, Inc.
Nextar may find it necessary to modify, amend or other wise or update this manual. We reserve the right to do this at any time, without any prior notice. All specifications
and features are subject to change without notice. All specifications and features are subject to change without notice. All screen shots shown are sinulated and may not represent the actual screen on production units sold to consumers.
For instruction manuals, updated drivers or other information, be sure to visit our website at:
WWW.Nextar.com
or write us at:
Nextar
1661 Fairplex Dn
LaVerne, CA USA 91750
copyright © 2006