
DCC2650E - Coffee maker CUISINART - Free user manual and instructions
Find the device manual for free DCC2650E CUISINART in PDF.
| Brand | Cuisinart |
| Model | DCC2650E |
| Product type | Programmable drip coffee maker |
| Capacity | 1.8 L (12 cups) |
| Power supply | 220-240 V, 50 Hz |
| Display | Programmable LCD display 24 hours in advance |
| Main functions | Automatic programming (delayed start and stop), AROMA function for small quantities (< 5 cups), intensity selector (medium/strong), automatic shut-off up to 38 min, automatic descaling |
| Carafe | Glass, graduated, with lid |
| Water filter | Integrated charcoal filter (replace every 60 days or 60 uses) |
| Filter holder | For paper filter No. 4 |
| Warming plate | 3 keep-warm temperature levels |
| Control panel | Controls: On/Off, programming, intensity, AROMA, descaling, clock |
| Maintenance and cleaning | Filter holder, spoon, carafe and lid are dishwasher safe (top rack); exterior cleaned with damp sponge; regular descaling necessary |
| Safety | Automatic flow stop if carafe removed, hot surface indicator, short cord, instructions for children and persons with reduced abilities |
| Spare parts and repairability | Replaceable charcoal filter (ref. Cuisinart); repairs only by the manufacturer or authorized service center |
| Included accessories | Measuring spoon, water charcoal filter, instruction manual |
Frequently Asked Questions - DCC2650E CUISINART
User questions about DCC2650E CUISINART
0 question about this device. Answer the ones you know or ask your own.
Ask a new question about this device
Download the instructions for your Coffee maker in PDF format for free! Find your manual DCC2650E - CUISINART and take your electronic device back in hand. On this page are published all the documents necessary for the use of your device. DCC2650E by CUISINART.
USER MANUAL DCC2650E CUISINART
A. Control panel. 15
B.To set the time. 16
C. Manual programming 16
D. Automatic programming 16
E. Automatic descending 16
- Advice from the chefs 17
- Questions/Answers. 17
- Cleaning and storage 17
2. CARACTERISTIQUES PRODUIT
- CAUTION: The plastic bags used to cover the unit or packaging may be dangerous. To avoid all risk of suffocation, keep these bags out of the reach of babies and children. These bags are not toys.
- WARNING: Hot surface.
-
Do not touch hot surfaces.
-
Allow the unit to cool before storing.
- The temperature of accessible surfaces may be high when the appliance is operating.
Always use cold water to prepare coffee. - Never touch the heating plate.
- Do not remove the coffee pot for longer than 30 seconds before end of the cycle or the coffee may overflow the filter holder.
- Do not place the appliance on or near a hot appliance. Do not use on heat sensitive surfaces or near inflammable materials
- Do not let the cord hang over the edge of the kitchen worktop and avoid any contact with the heating plate or hot surfaces.
- Do not immerse in water or any other liquid.
- Always unplug the appliance after use and before cleaning. Never leave the appliance unattended when plugged in. Pull on the plug to unplug, never on the cord.
- Never wind the cord around the appliance.
- This appliance is not intended to be used with an external timer or a remote control system.
- Do not use the appliance if it has fallen or if it appears damaged.
- Stop using the machine immediately if the cord is damaged.
- If the supply cord is damaged, it must be replaced by the manufacturer, its service agent or similarly qualified persons in order to avoid a hazard.
- Do not try to repair the appliance yourself.
- Using any accessories not recommended or sold by Cuisinart® may cause a fire, electrocution and risk of injury.
- This appliance can be used by children aged from 8 years and above and persons with reduced physical, sensory or mental capabilities or lack of experience and knowledge if they have been
given supervision or instruction concerning use of the appliance in a safe way and understand the hazards involved. Children shall not play with the appliance. Cleaning and user maintenance shall not be made by children without supervision.
- Keep the appliance and its cord out of reach of children aged less than 8 years.
- Use this appliance only for preparing coffee, following the instructions of this manual.
- Do not use outdoors.
- For household use only.
Discarding electrical and electronic equipment at the end of life
In everyone's interest and to actively participate in the collective effort to protect the environment:
- Do not discard your products with household waste.
- Use the return and collection systems available in your area.

Some material can be recycled or recovered.
1. INTRODUCTION
Congratulations on your purchase!
For over 30 years, Cuisinart® has been developing a full range of kitchen appliances that allow both kitchen enthusiasts and great chefs to express their creativity to the fullest.
All Cuisinart® appliances are the result of a close working relationship between engineers and great names in Cuisine, like Paul Bocuse, the brand's charismatic ambassador. Every product combines strength, innovation, performance and ergonomics.
Made with professional materials like brushed stainless steel, our products fit easily into every kitchen thanks to a simple and elegant design.
2.PRODUCT FEATURES
- Lid
- Water reservoir
- Charcoal water filter: eliminate impurities and odours. Goes into the water filter holder.
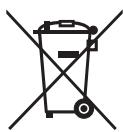
- Charcoal water filter holder
- Filter holder (not illustrated)
- LCD display, 24-hour programmability
- Control panel
- Coffee pot: 1,8 L capacity, equal to 12 cups
- Heating plate
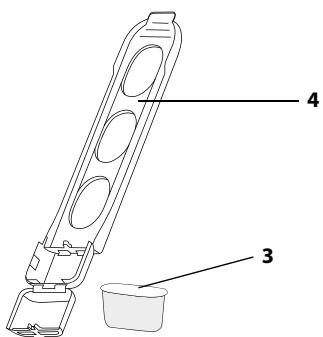
- Measuring scoop

3. ASSEMBLY
Before the first use or after an extended period of non-use, fill the reservoir with cold water up to its maximum level (without coffee nor filter). Put the coffee pot into position by pressing and let the water flow.
Insert the charcoal water filter
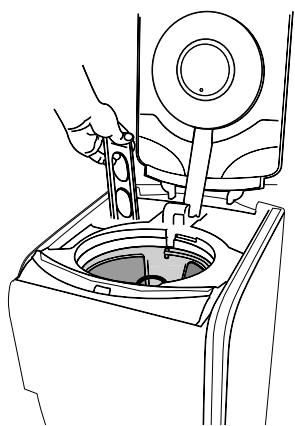
- Remove the filter from polybag and soak in cold tap water for 15 minutes.
- The water filter holder is located inside the water reservoir, on the left. Remove the water filter holder by lifting it out.
Pull toward you to open. - Place the filter at the bottom of the water filter holder with flat part upwards. Be careful, an inappropriate placement can tear it.
- Re-place the water filter holder.
- Note: Change the water filter every 60 days or after 60 uses, and more often if you have hard water. Replacement filters can be purchased by calling Cuisinart Customer Service, or at www.cuisinart.fr.
4. USE
A. Control panel

- On/Off switch
- Clock with LCD display: displays the time of the day and the AUTO On and AUTO OFF functions times.
- Hour (HR) and minute (MIN) buttons: to set the time and automatic on and off times.
- Strength selector: (regular coffee) and (bold coffee) buttons let you choose the intensity of coffee flavor you prefer. The intensity by default is
- AROMA setting: ensures optimum temperature whilst preparing smaller pots of coffee. To use for fewer than 5 cups.
- Descaling button with descending indicator light : Indicates time to clean coffeemaker to remove calcium buildup. The button uses a cycle-specific descending.
-
Heater plate temperature [ca]: 3 possible temperatures to keep coffee warm after brewing: l, l et lll.
-
Function knob:
a. PROG: to set the desired auto on time.
b. AUTO ON: auto-on feature to program the starting time of the brew cycle.
c. AUTO OFF: auto-off feature up to 38 minutes after brew cycle is finished.
d. button: to start the brew cycle directly.
e. ① button: to set the time of the day.
N.B. the flow of coffee from the basket is interrupted when coffee pot is removed from the heating plate to let you pour that first cup midbrew.
B.To set the time
- Turn the function knob on ① position.
- Press and hold the HR or MIN buttons until display blinks. Then push HR or MIN button to scroll through the digits. When the numbers stop blinking, time is set.
- Note: when the number count passes 12, "PM" will be displayed on the LCD to set the time from noon to midnight. When there is no indication, you will set AM times from 0 to noon.
C. No programming
- Fill the reservoir with cold water depending on the desired number of cups (see height markings inside the reservoir).
- The coffee pot height markings represent the number of cups obtained. The difference between this scale and the water reservoir marks results from the amount of water lost in wetting the grounds.
- Insert a #4 paper filter in the filter holder. Add the desired amount of ground coffee in the filter. Use one measuring scoop per cup. This average dose can be adjusted to suit your taste.
- Flip the lid close. Make sure the coffee pot is in its position on the heating plate before switching the coffeemaker on.
- Select coffee strength by pressing the button for regular coffee or button for bold coffee.
- Turn the function knob to 12 .
N.B. For fewer than 5 cups, turn the function knob to then push AROMA.
- Press . The red indicator light illuminates and the brewing cycle starts. The end of brewing cycle is signalled by 5 beep sounds.
- Press to switch the unit off. The red indicator light goes off.
D. Automatic programming
- Turn the function knob to PROG. The numbers blink 5 times then stop.
- Press and hold the HR or MIN buttons until display blinks. Then push HR or MIN button to scroll through the digits. When the numbers stop blinking, time is set.
- Turn the function knob to AUTO OFF. The numbers blink 5 times then stop.
- Press and hold the HR or MIN buttons until display blinks. Then push HR or MIN button to scroll through the digits. When the numbers stop blinking, time is set.
N.B. The maximum duration for coffee maker to shut off is 38 minutes.
- Turn the function knob to AUTO ON. The current time is now displayed.
N.B. For fewer than 5 cups, turn the function knob to then push AROMA .
- Select coffee strength by pressing the button for regular coffee or button for bold coffee.
- Press to engage the automatic programming. The button is switched off and the AUTO ON button is switched on.
- At the programmed time, the brewing cycle starts and the red indicator light will come on.
E. Automatic descending
Use after use, scaling builds up. Scaling interferes with fine mechanics and gives coffee a hard and bitter taste. That is why the appliance should be regularly descaled to ensure good quality coffee. The descending frequency depends upon the hardness of your tap water and how often you use the coffemaker.
-
When the coffeemaker needs descending, the descending indicator light next to the button begins to flash when the coffee is turned on.
-
Decalcify the coffee maker with a decalcification solution, following the instructions of the product.
- Press the button and press . The descending indicator light stays on. The coffeemaker is now in "automatic descending" mode.
- When the cycle is completed, 5 beeps sound.
- A single descending cycle is generally enough. Press to see if the descending light continues to flash. If not, the coffeemaker is descaled. If the indicator light continues to flash, repeat the descending operation.
- When the appliance is descaled, rinse by running a complete cycle with fresh water: fill the reservoir up to its maximum level with cold fresh water (without coffee nor filter). Press and let water flow.
- Note: pressing the descending button cancels all other settings. If it is pressed accidentally, press it again to return the coffeemaker to all its previous settings.
6. QUESTIONS/ANSWERS
| What to do if: | Answers: |
| My appliance doesn’t work? | The appliance has been unplugged. |
| The coffee isn’t flowing? | The coffee pot and the filter basket are not properly positioned. |
| There are coffee grounds on the inside of the machine? | Do not exceed the maximum recommended quantities |
| The programme function does not run? | Refer to section 4 (Use) |
5. ADVICE FROM THE CHEFS

- For a more flavourful coffee, use freshly ground coffee. Its flavour and aroma will develop even further when brewing.
- For a lightly flavoured coffee, place a cinnamon stick, some vanilla or a cardamom seed, for example, in the coffee pot.
- Reheating coffee that has gone cold is not recommended. Its taste will be altered and it will lose its aroma.
- Be sure to use the amounts of coffee recommended in the Cuisinart® recipe booklet.
7. CLEANING AND STORAGE
- To clean the outside of the coffeemaker, wipe clean with a sponge using a mild detergent, then dry carefully.
- The filter-holder, measuring scoop, coffee pot and its lid can be washed in the dishwasher (in the top tray only).
- Wipe the heating plate and the area under the filter-holder with a damp cloth.
- Do not dry the inside of the water reservoir with a cloth as lint may remain.
- Do not use abrasive sponges or products that might damage the coating.
SICHERHEITSHINWEISE
Fold Size: 210X210MM Saddle Stitched: 44PP
Material (Cover): 157gsm matt paper
(Inside): 120gsm art paper
Coating: Gloss Varnishing in cover
Color (Cover): 1C(BK)
(Inside): 1C(BK)+1C(BK)
Date: July-17-2014 Co-ordinator: Jason Wang
Hugo Description
PDF version : IB-14/282(0.0) BOOK
Hugo Code : SMT0263IB-1-1 Operator : HUAN
Color Series: Non IRP : BBJ
Remark: Quality request (1)
Black
- CARACTERISTIQUES PRODUIT
- Discarding electrical and electronic equipment at the end of life
- INTRODUCTION
- 2.PRODUCT FEATURES
- ASSEMBLY
- Insert the charcoal water filter
- USE
- Control panel
- B.To set the time
- No programming
- Automatic programming
- Automatic descending
- QUESTIONS/ANSWERS
- ADVICE FROM THE CHEFS
- CLEANING AND STORAGE
- SICHERHEITSHINWEISE
- Hugo Description
Brand : CUISINART
Model : DCC2650E
Category : Coffee maker