Bolero Hexa P506000 Glass A - Oven CECOTEC - Free user manual and instructions
Find the device manual for free Bolero Hexa P506000 Glass A CECOTEC in PDF.


| Product type | Multifunction electric oven |
| Brand | Cecotec |
| Model | Bolero Hexa P506000 Glass A |
| Volume | 70 litres |
| External dimensions (W x H x D) | 595 x 595 x 550 mm |
| Cavity dimensions (W x H x D) | 560 x 590 x 550 mm |
| Net weight | 32 kg |
| Supply voltage | 220-240 V ~ 50/60 Hz |
| Maximum power | 3000 W |
| Cooking functions | Fan-assisted, grill, bottom heat, top heat, defrost, keep warm |
| Cleaning | Pyrolytic |
| Interior lighting | Yes, halogen lamp |
| Door | Removable cool glass door |
| Installation type | Built-in |
| Energy class | A+ |
| Child safety | Control lock |
| Automatic shut-off | Yes, automatic shut-off |
| Accessories included | Rack, drip tray, rotisserie |
| Spare parts and repairability | Available through Cecotec after-sales service |
| Warranty | 2 years |
Frequently Asked Questions - Bolero Hexa P506000 Glass A CECOTEC
User questions about Bolero Hexa P506000 Glass A CECOTEC
0 question about this device. Answer the ones you know or ask your own.
Ask a new question about this device
Download the instructions for your Oven in PDF format for free! Find your manual Bolero Hexa P506000 Glass A - CECOTEC and take your electronic device back in hand. On this page are published all the documents necessary for the use of your device. Bolero Hexa P506000 Glass A by CECOTEC.
USER MANUAL Bolero Hexa P506000 Glass A CECOTEC
bolero
Safety instructions 7
-
Parts and components 56
-
Before use 56
-
Installation 57
-
Operation 58
-
Modes 61
-
Practical cooking tips 67
-
Cleaning and maintenance 72
-
Technical specifications 73
-
Disposal of old electrical and electronic appliances 74
-
Technical support and warranty 74
-
Copyright 75
SOMMAIRE
Read these instructions thoroughly before using the appliance. Keep this instruction manual for future reference or new users.
- This appliance can be used by children aged 8 years and above and people with reduced physical, sensory, or mental capabilities or lack of experience and knowledge if they have been given supervision or instruction concerning use of the appliance in a safe way and understand the hazards involved. Children must not play with the appliance. Cleaning and user maintenance should not be carried out by unsupervised children.
- This appliance is designed for domestic use only and is not intended for bars, restaurants, farmhouses, hotels, motels, and offices.
- This symbol means “caution, hot surface.” The temperature of the accessible surfaces may be high when the appliance is in operation.
- The appliance heats up during use. Avoid touching the heating elements inside.
- WARNING: all accessible parts of the appliance and the appliance itself may heat up during use. Do not touch the heating elements. Children under 8 years of age should be kept away from the appliance unless continuously supervised.
- Do not use abrasive cleaners or sharp metal scrapers to clean the oven door glass, as it may scratch the surface and cause subsequent glass breakage.
- Never clean the appliance with steam cleaners.
- WARNING: make sure that the appliance is unplugged from the mains before replacing the light bulb to avoid any risk of electric shock.
- Do not install the appliance behind a decorative panel to avoid overheating.
- Incorrect repairs can be dangerous. Refer only to authorised technical personnel for repairs and replacement of damaged power cables. If the appliance is defective, unplug it from the power supply or switch off your home circuit breaker. Contact the official Cecotec Technical Support Service.
- The appliance is not intended to be operated by means of an external timer or a separate remote-control system.
- Open the appliance door carefully. Keep children away from the appliance.
- If the door glass is damaged, it could crack. Do not use glass scrapers, cleaning agents, or abrasive detergents to clean the appliance door.
- The appliance hinges move when opening and closing the door: be careful not to get caught. Keep hands away from hinges.
- If you store flammable items inside the oven, they may catch fire. Never store flammable items inside the oven. Never open the door of the appliance if there is smoke inside. Unplug the appliance from the mains or switch off the circuit breaker of your home.
- The control panel and control elements use fixed magnets. These can affect electronic implants, such as pacemakers or insulin pumps. Users with electronic implants must stay at least at 10 cm from the control panel.
- Do not allow aluminium foil to come into contact with the glass door. This could cause permanent discolouration of the glass door.
- Do not use silicone frying pans, nor lids with silicone covers or silicone accessories. This could damage the oven sensor.
- Moisture inside the oven for a long period of time could
cause corrosion. Allow the appliance to dry after every use. Do not store wet food inside the oven while it is closed for long periods of time. Do not store food in the oven.
- When baking cakes with particularly juicy fruit, do not overfill the baking tray. If fruit juice drips from the baking tray, it could cause permanent stains. Use a deep tray if possible.
- If the gaskets are dirty, the appliance door will not close properly during operation. This could damage the front part of the adjacent appliances and furniture. Make sure that the gaskets are always clean.
- Do not sit on the appliance door or place or hang objects on it. Do not place tableware or accessories on the appliance door.
- Do not transport or hold the appliance by the door handle. The door handle cannot withstand the weight of the appliance and could break.
- If you use residual heat when the oven is off to keep food warm, you can create a high moisture content inside the oven. This could lead to condensation and corrosion damage in the appliance, as well as damage to your kitchen.
INSTRUCTIONS DE SÉCURITÉ
- Level 1
- Level 2
- Level 3
- Level 4
- Level 5
- Control panel
- Side guides
- Rack
- Baking tray
- Air fry basket
- Pizza tray
NOTE:
The graphics in this manual are schematic representations and may not exactly match the device.
2. BEFORE USE
- This appliance is packaged in a way as to protect it during transport. Take the appliance out of its box and remove all packaging materials. You can keep the original box and other packaging elements in a safe place. This will help you prevent damage to the appliance when transporting it in the future. In case the original packaging is disposed of, make sure all packaging materials are recycled accordingly.
- Make sure all parts and components are included and in good conditions. If there is any piece missing or in bad conditions, contact the official Cecotec Technical Support Service immediately.
Box content
- Pyrolytic oven
- Baking tray
- Rack
- Air fry basket
- Pizza tray
- Instruction manual
3. INSTALLATION
- To ensure the correct operation of the appliance, make sure the piece of furniture is suitable for built-in installation. Figure 2 shows the adequate size of the hole for installation under a workton or in a wall unit.
- To ensure adequate ventilation, the rear panel of the cabinet must be removed. It is preferable to install the oven so that it rests on two wooden slats. If the oven rests on a flat surface, there must be an opening of at least 45×560 mm, like shown in figure 3.
- Adjacent cabinet panels shall be made of heat-resistant material. In particular, enclosures with a veneered exterior must be assembled with glues that can withstand temperatures up to 100 °C.
- In compliance with current safety regulations, it must not be possible to come into contact with the electrical parts of the oven once it has been installed.
- All parts that ensure the safe operation of the appliance must only be removed with the aid of a tool.
- To fix the oven to the cabinet, open the oven door and fix it by inserting the 4 screws into the 4 holes on the perimeter of the frame.
Electrical connections
Ovens equipped with a three-pole power cable are designed to operate on alternating current. The earth wire of the appliance is yellow green.
Installing the power cable. Fig. 4
Opening the terminal board
- With a screwdriver, tighten the screw on the side tabs of the terminal board cover.
- Unscrew the screws on the side tabs of the cover and remove the latter.
To install the power cable, proceed as follows:
- Remove the cable clamp screw and the three contact screws.
- Fix the wires under the screw heads using the following colour scheme: Blue (N) Brown (L) Yellow Green.
- Secure the power cable with the cable clamp and close the terminal board cover.
Connecting the power cable to the mains
- When connecting the cable directly to the mains, install an omnipolar circuit breaker with a minimum contact opening of 3 mm between the appliance and the mains. The omnipolar circuit breaker must be sized according to the load and comply with the applicable regulations (the earth cable must not be interrupted by the circuit breaker).
- The power supply cable must be routed so that it does not reach a temperature above 50 °C above ambient temperature and must be protected by insulation with an appropriate rating. Before making the connection, check that:
ENGLISH
- The electrical safety of this appliance can only be guaranteed if the oven is correctly and effectively earthed in accordance with electrical safety regulations. Always make sure that the ground connection is effective; if in doubt, call a qualified technician to check the system. The manufacturer declines all liability for damage resulting from an ungrounded system.
- Before connecting the appliance to the mains, check that the specifications indicated on the rating plate (on the appliance and/or on the packaging) correspond to those of the mains supply at home.
- Check that the electrical capacity of the installation and the sockets can withstand the maximum power of the appliance. If in doubt, contact a qualified technician.
- If the socket and plug of the appliance are not compatible, ask a qualified technician to replace the socket with a suitable model. The latter, in particular, will also have to ensure that the cross-section of the socket cables is adequate for the power used by the appliance. The use of adapters, multiple sockets and/or extensions is not recommended. If their use cannot be avoided, remember to use only single or multiple adapters and extension cords that comply with current safety regulations. In these cases, never exceed the maximum current capacity indicated on the single adapter or extension lead and the maximum power indicated on the multiple adapter. The plug and socket shall be easily accessible
4. OPERATION
Setting the time
The first time the oven is switched on, the control panel display will light up briefly and show "12:00". The oven time can only be set in standby mode.
- The first time the oven is switched on, the display will show "12:00".
- Press the clock/time icon (1), "12:00" will flash on the display.
- Use the up/down icons to set the time.
- Press the clock/time icon 📋 again to confirm the settings.
Control panel. Fig. 5
Fig. 5 key:
| 1 | Symbol | Description |
| 2 | Cooking mode | Press this icon repeatedly to choose between the different functions of the oven. There are 13 different functions. |
| 3 | Quick preheating/Child safety lock | Press and hold the corresponding icon to lock the control panel. Press and hold again to unlock the control panel.The quick preheating function allows the oven to preheat in a short time. |
| 4 | Power | It is used to switch the oven on and off. |
| 5 | Quick cooking | Press the icon of the desired function directly to access it immediately. |
| 6 | Display | It shows the current oven settings. |
| 7 | Additional functions | Press the temperature icon to adjust the cooking temperature using the up/down icons.Press the clock/time icon to adjust the cooking start time and delay end time using the up/down icons.Press the bell/timer icon to activate the timer function.Press the memory icon to retrieve and memorise the chosen settings using the up/down icons. |
| 8 | Inside light | Press this icon to switch the oven light on and off. |
| 9 | Start/pause | Press this icon to activate and deactivate the selected function. |
Setting the cooking function
Once the time has been set, select the icon for the desired cooking function on the control panel. Next, press the start/pause icon ▷, the oven will start operating.
Setting the cooking temperature
Once the function has been chosen, press the temperature icon ⏻ to access the cooking temperature setting. Press the up/down icons △/▽ to set the oven to the desired temperature.
Switching on/off the oven
Press the power icon ⏻ to turn the appliance on and off.
Switching on/off the inside light
Press the light icon 🙏 to switch the oven light on and off.
Delay end
Press this icon to set the delayed end of cooking time.
- Press the clock/time icon ⚙ several times until the → icon flashes on the display.
ENGLISH
- Use the up/down icons △/▽ to set the desired end time.
- The oven will start automatically with the selected end time after confirming it by pressing the clock/time icon or waiting for about 3 seconds.
Setting the cooking time
You can adjust the cooking time during cooking.
- Press the clock/time icon ⏻ several times until the cooking time icon ➞ flashes on the display.
- Use the up/down icons △/▽ to set the desired cooking time.
- The oven will start automatically with the selected cooking time after confirming it by pressing the clock/time icon ⏻ or waiting for about 3 seconds.
Delay start
If the end time is entered after the cooking time has been set, the oven calculates the cooking time and the end time automatically and, if necessary, the oven sets a delayed start time.
Example: it is currently 15:00 and the desired cooking time is 1 hour.
- Press the clock/time icon ⏻, the →icon will start flashing on the display.
- Use the up/down icons / to set the desired cooking time.
Example: the desired cooking time is 1 hour, and you want the end time to be 20:30.
- Press the clock/time icon ⏻ several times until the ➡ icon flashes on the display.
- Use the up/down icons / to set the desired end time.
- Press the clock/time icon again. The oven will remain out of operation until the delay start time.
Timer
- Press the alarm/timer icon until the icon starts flashing on the display.
- Use the up/down icons △/▽ to set the desired time.
- Press the alarm/timer icon 📋 to start the timer. When the programmed time has elapsed, the oven will beep.
Safety child lock
- Press and hold the quick preheating icon 📄 for 3 seconds until the lock icon 🏠 appears on the display.
- Press and hold the quick preheating icon _3s again for 3 seconds to unlock the oven.
Quick preheating
The quick preheating function allows the oven to preheat in a short time.
Important: do not put food into the oven before the end of the quick preheating function and with the desired cooking mode in progress.
- Set the desired oven function and, if necessary, change the recommended temperature.
ENGLISH
- Press the quick preheating icon .... The oven will beep.
- When the selected temperature is reached, the oven will beep for 2 seconds.
- Once the preheating process is complete, place the food in the oven.
Memory function
Memorising the cooking mode
- When the cooking time is over and 📄 appears on the display, the current cooking mode can be memorised by pressing and holding the memory function icon 🎨 (without pressing any other icon). Up to 4 different cooking modes can be memorised.
- When more than 4 modes are memorised, the oldest cooking mode will be replaced.
Using a memorised cooking mode
- In standby mode, press the memory function icon, the display will show the 4 memorised cooking modes □□□□□□□□□□□□□□□□□□□□□□□□□□□□□□□□□□□□□□□□□□□□□□□□□□□□□□□□□□□□□□□□□□□□□□□□□□□□□□□□□□□□□□□□□□□□□□□□□□□□□○
- Use the up/down icons △/▽ to select the desired cooking mode and press the start/pause icon ▷|| to start the oven.
Automatic safety shut-off
If no cooking time is set, the oven will automatically switch off after two hours. The electrical circuit of this oven is equipped with a thermal protection system. If the oven heats up to abnormally high temperatures, the system will interrupt the power supply to the oven heating elements for a certain period of time.
Cooling fan
- To cool the outside of the oven, some models are equipped with a cooling system. When the oven heats up, the fan is automatically activated.
- While the fan is on, an airflow will circulate between the oven door and the control panel. Note: after cooking, the oven fan automatically switches on to cool the outside of the oven.
5. MODES

Conventional mode


Large surface grill mode


Bake mode

ENGLISH
 | Pizza mode |  / /  | AirFry mode |
 | Quick cooking mode |  | Steam Assist mode |
 | Defrost mode |  | Energy-saving baking mode |
 | Fermentation mode |  | Plate preheating mode |
 | Steam cleaning mode |  | Self-cleaning mode |
Conventional mode
The top and bottom heating elements are switched on. This is a type of oven that uses traditional methods, but with improved cooking to achieve better heat distribution and lower energy consumption. The convection oven is still unrivalled when it comes to cooking dishes with a wide variety of ingredients, such as cabbage with ribs, Spanish-style cod, Ancona-style cod, tender veal strips with rice, etc. Excellent results are also obtained when preparing beef or veal dishes that require slower cooking. It is still the best system for baking cakes, pies and fruit, as well as for baking in covered casseroles. When cooking in this mode, use only one tray or rack at a time to ensure an even heat distribution. By means of the different heights of the oven guides, you can distribute the amount of heat between the top and bottom of the oven. Select one of the different heights depending on whether the dish needs more or less heat from the top.
Grill & Fan mode
In this mode, the top heating element and the fan are switched on. This combination of features increases the efficiency of the unidirectional heat radiation of the heating elements by means of forced air circulation throughout the oven. This prevents the food from burning and allows the heat to penetrate inside. Excellent results are achieved with skewers made with meat and vegetables, sausages, ribs, lamb chops, chicken in spicy sauce, quail, pork chops, etc.
Cook food in grill & fan mode with the oven door closed.
This mode is also ideal for cooking fish fillets, such as swordfish, stuffed cuttlefish, etc.
Large surface grill mode
In this mode, the top and bottom heating elements are switched on. The large surface grill radiates heat onto the food from the top heating element. You can use the large surface grill mode to prepare tender cuts of meat, steaks, chops, sausages, fish, cheese sandwiches and other quick-cooking foods. It is recommended to grill with the oven door closed. This mode allows you to make the most of the oven's large cooking surface and will cook food faster
than the normal grill. Preheat the oven for 3 minutes for best results. This will help seal in the natural juices of the steaks, chops, etc. for better flavour.
Grill mode
- In this mode, the top central heating elements are switched on.
- The grill radiates heat onto the food from the top heating element. You can use the grill mode to prepare tender cuts of meat, steaks, chops, sausages, fish, cheese sandwiches and other quick-cooking foods. It is recommended to grill with the oven door closed. Preheat the oven for 3 minutes for best results. This will help seal in the natural juices of the steaks, chops, etc. for better flavour. You can place the food to be grilled on either of the two top oven guides.
Bake mode
- The back heating element and the fan switch on, ensuring constant heat evenly distributed throughout the oven.
- This mode is ideal for baking and cooking delicate foods, especially cakes, and for preparing certain tartlets in 3 oven heights at the same time. Here are some examples: cream puff pastries, sweet and savoury biscuits, savoury puff pastries, Swiss rolls, and small portions of vegetable gratin, etc.
Multiple cooking mode
- The top, circular and bottom heating elements, as well as the fan, will switch on alternately. As the heat remains constant and uniform throughout the oven, the air cooks and browns the food evenly over the entire surface of the oven. With this mode, you can also cook several dishes at the same time, as long as their respective cooking temperatures are the same. A maximum of 2 racks, trays or containers can be used at the same time, following the indications in the section: "Cooking at more than one height".
- This cooking mode is particularly suitable for dishes that require a gratin touch or fairly long cooking times, e.g. lasagne, pasta, chicken, and baked potatoes, etc. In addition, the excellent heat distribution allows lower temperatures to be used when grilling. This results in less loss of juices, more tender meat and reduced weight loss of the roast. The multiple cooking mode is specially designed for cooking fish, which can be prepared by adding spices or seasonings to maintain its flavour and appearance. Excellent results can also be obtained when cooking vegetable side dishes such as courgettes, aubergines, peppers, etc.
- This mode is also ideal for baking desserts.
- Moreover, this mode can also be used to defrost meat and bread by setting the temperature to 80 °C. For defrosting more delicate foods, set the temperature to 60 °C or only use the cold air circulation function by setting the temperature to 0 °C.
ENGLISH
Pizza mode
- The bottom and circular heating elements, as well as the fan, will switch on. This combination heats up the oven quickly due to the large amount of energy used by the appliance, which produces considerable heat mainly from the bottom heating element.
- The pizza mode is ideal for food that require high cooking temperatures, like pizzas and large roasts. It is recommended to only use one oven tray or rack at a time. However, if more than one is used, they should be interchanged in height halfway through the cooking process.
AirFry mode
- The top and circular heating elements, as well as the fan, will switch on.
- The AirFry mode allows advanced convection cooking without the need to turn the food, resulting in crispy and tasty results in less time and without oil. Suitable for chips, chicken wings, nuggets and similar foods.
Gentle cooking mode
- In this mode, the bottom heating element and the fan are switched on. Suitable for pastries, cakes and sweets in trays or baking tins. Excellent results are also obtained in cooking that requires mainly bottom heat.
- It is advisable to place the tray at a low height.
Quick cooking mode
- The top and bottom heating elements, as well as the fan, will switch on, ensuring constant heat evenly distributed throughout the oven.
- This mode is particularly recommended for quick cooking of pre-packaged food (as there is no need to pre-heat it), e.g. frozen or pre-cooked food, as well as for some homemade dishes.
- The best results when cooking using this mode are obtained if only one oven height is used (the second oven height starting from the bottom). See table in the section "Practical cooking tips".
Defrost mode
The fan at the bottom of the oven circulates room temperature air around the food. It is recommended for defrosting all types of food, but particularly for delicate foods that do not require heat, e.g. ice cream cakes, cream desserts, fruit tarts, etc. By using the fan, the defrosting time is reduced by approximately half. For meat, fish and bread, it is possible to speed up the process by using the baking mode and setting the temperature to 80 °C-100 °C.
Energy-saving baking mode
- The back heating element and the fan switch on, ensuring constant heat evenly distributed throughout the oven. The heating elements make maximum use of the heat inside the oven to reduce energy losses and achieve this energy-saving effect.
ENGLISH
- This mode is ideal for baking and cooking delicate foods, especially cakes, and for preparing certain tartlets in 3 oven heights at the same time. Here are some examples: cream puff pastries, sweet and savoury biscuits, savoury puff pastries, Swiss rolls, and small portions of vegetable gratin, etc.
Fermentation mode
In standby mode, you can select this mode to ferment doughs in the oven.
- Press the ferment mode icon and use the up/down icons △/▽ to set the cooking time.
- After these settings, press the start/pause icon ▷ to start the oven.
Dishware preheating mode
In standby mode, place the dishware in the oven.
- Press the plate preheating mode icon and use the up/down icons △/▽ to set both the cooking time and temperature.
- After these settings, press the start/pause icon ▷ to start the oven.
Steam cleaning mode
Use this mode to remove food remains from inside the oven. This method is only effective for the removal of light soiling. It is not effective to remove stubborn stains caused by cooking. This mode can only be used when the oven is cold.
Steam cleaning procedure
- Remove all trays, plates, and side racks.
- Prepare a solution of water (85%), white vinegar (10%), and dish detergent (5%) and spray generously on the door, side walls, and rear wall of the oven cavity.
- Pour 40 ml of water into the base of the oven cavity.
- Close the door. Activate the steam cleaning mode and set the temperature to 130^ C.
- Turn off the oven after 18 minutes.
- Allow the oven to cool down to a safe temperature before wiping it with a damp cloth.
Steam assist mode
You can use this function to add extra browning to pizza bases, pies, and cakes, or to cook different foods using a combination of bottom heat and steam.
If you wish, you can follow the steps below
- Add approximately 100 ml of water in the bottom cavity (Fig. 1). The approximate capacity of the cavity can be up to 1000 ml.
NOTE: the capacity may vary depending on the oven model.
- Activate the Steam assist mode by pressing the 📁 and select a temperature of 200 °C. Approximate cooking time: 20 minutes.
ENGLISH
- Be sure to remove any excess water from the oven cavity at the end of the cooking process.
NOTE: you can adjust the amount of water, the cooking time, and the temperature according to the needs of the food to be prepared.
WARNING: make sure that the interior is completely cool before removing excess water. Risk of burns.
Self-cleaning mode
Choose the self-cleaning mode and select the cleaning duration according to the soiling of the oven:
| Standard | Self-cleaning degree | Duration |
| 1 | Low | 2 hours (approx.) |
| 2 | Medium | 2.5 hours (approx.) |
| 3 | High | 3 hours (approx.) |
- For safety reasons, the oven locks automatically when you start this mode. The door can only be opened again when the temperature has fallen below 250 °C.
- The outside of the oven will be very hot. Make sure that nothing is placed against the front.
- Keep children away from the device.
- Never attempt to open the oven during the self-cleaning process. The process could be interrupted.
- Do not touch the door with your hands.
- You cannot switch on the oven inside light during self-cleaning.
Before self-cleaning
- Remove all accessories from the oven.
- There is a risk of fire. Food leftovers, fat and meat juices are flammable.
- Clean the oven and accessories with a damp cloth.
- Clean the door and the edges of the oven around the gasket. Do not rub the gasket.
- Make sure that the oven door is closed before starting to clean it.
NOTE:
- The rack is not suitable for self-cleaning mode.
- Never clean trays or non-stick dishes using the oven's self-cleaning mode (pyrolysis operation).
ENGLISH
- High temperatures can lead to the formation of toxic fumes from the non-stick coating, with the risk of serious damage to health.
Activating the self-cleaning mode
- Select the self-cleaning mode.
- Use the up/down icons △/▽ to set the desired time duration of the process.
- Press the start/pause icon ▷, the oven will start heating.
6. PRACTICAL COOKING TIPS
The oven offers a wide range of alternatives that allow any type of food to be cooked in the best possible way. Over time you will learn to get the most out of this versatile kitchen product and the following instructions are only a guide and may vary according to your own personal experience.
Oven guides
- The oven guides are numbered from bottom to top.
- 4th and 5th guides are mainly used for grill function.
Accessories
- Oven rack. For plates, cake tins, roasting and grilling trays.
-
Baking tray. For cakes and cookies.
-
The rack and baking tray must be placed correctly on the side guides. Be careful when removing the trays/containers from the oven, as they are very hot surfaces, and you could burn yourself.
- If you use a deep pan or baking tray to collect the fat that falls from the food, make sure that it is placed correctly on the side guides. Allowing these accessories to come into contact with the bottom surface of the oven may damage the enamel.
- If you place trays or containers on the first guide starting from the bottom, you must leave a distance of at least 2 cm from the bottom surface of the oven.
- Basket. Use this accessory with the Air Fry mode: this basket can be placed on the oven rack or on the side guides in the same way as the tray. Fig. 9
Fig. 9 key:
- Air fryer basket
- Grill tray
Cooking at more than one height
If you have to cook food using several oven guides, use the bake mode, as it is the only function that allows this.
ENGLISH
If you wish to cook delicate foods at more than one height, select the bake mode, as it allows you to cook at 3 different heights at the same time (1st, 3rd, and 5th from the bottom). Some examples are included in the table.
If you wish to cook other types of food at various heights, use the multiple cooking mode taking into account the following suggestions:
- The oven is equipped with 5 position guides. During fan-assisted cooking, use two of the three central guides. The lowest and highest heights receive the hot air directly, so delicate foods may burn.
- As a general rule, use the 2nd and 4th oven guides starting from the bottom, placing foods requiring higher heat on the 2nd rack. For example, when cooking roasts of meat together with other foods, place the roast on the 2nd level from the bottom and the more delicate foods on the 4th level.
- When cooking foods that require different times and temperatures, set an intermediate temperature between the two required temperatures, place the more delicate foods on the 4th from the bottom and remove foods that require less cooking time from the oven first.
- Use the grease-collection tray in the bottom guide and the racket in the top guide.
Using the quick cooking mode
Functional, fast, and practical for those who use pre-packaged food (e.g. frozen or pre-cooked food). You will find useful tips in the table.
Using the grill
- Use the grill/large surface grill mode by placing the food on the 3rd or 4th level starting from the bottom, as in these modes only the central part of the top heating element is lit.
- Use the bottom guide (1st from the bottom) to place the grease-collection tray in order to prevent the grease from the food from dripping onto the bottom of the oven. When using this mode, we recommend that you set the temperature to the highest setting. This does not mean that you cannot use lower temperatures, just adjust the temperature using the increase/decrease icons.
- Grill & Fan mode is very useful for grilling food quickly, as the heat distribution not only browns the surface, but also cooks the underside.
- It can also be used to brown food at the end of the cooking process, e.g., to cook pasta au gratin.
- When using this mode, place the rack in the 2nd or 3rd oven height from the bottom (see cooking table) and then, to prevent grease from dripping onto the bottom of the oven and forming smoke, place the grease-collection tray on the bottom guide.
- When using this mode, we advise you to set the thermostat to 200 °C, as this is the most efficient way of using the grill, which is based on the use of infrared rays. This does not
ENGLISH
mean that you cannot use lower temperatures, just adjust the temperature using the increase/decrease icons.
- Therefore, the best results in both grill modes can be obtained by inserting the tray on the lower guides (see the cooking table). To prevent fat from dripping onto the bottom of the oven and smoke from forming, insert the grease-collection tray on the bottom oven guide.
Using the AirFry mode
Use the AirFry mode by placing the food on the 3rd level of the oven starting from the bottom. As the top and circular heating elements are switched on, the AirFry mode allows advanced convection cooking without the need to turn the food, resulting in crispy and tasty results in less time and without oil. Suitable for chips, chicken wings, nuggets and similar foods. Place the grease-collection tray at the lowest level of the oven to catch any dripping fats. When using the AirFry mode, set the temperature to 230 °C.
| Cooking mode | Food to be cooked | Weight (kg) | Position of the guide from below | Preheating time (minutes) | Temperature (°C) | Cooking time (minutes) |
Conventional | Duck | 1 | 3 | 15 | 200 | 65-75 |
| Roast veal or beef | 1 | 3 | 15 | 200 | 70-75 | |
| Roast pork | 1 | 3 | 15 | 200 | 70-80 | |
| Biscuits | - | 3 | 15 | 180 | 15-20 | |
| Tartlet | 1 | 3 | 15 | 180 | 30-35 | |
Multiple cooking | Pizza (in 2 heights) | 1 | 2-4 | 15 | 220 | 15-20 |
| Lasagne | 1 | 3 | 10 | 200 | 30-35 | |
| Lamb | 1 | 2 | 10 | 180 | 50-60 | |
| Roast chicken with potatoes | 1 | 2-4 | 10 | 180 | 60-75 | |
| Mackerel | 1 | 2 | 10 | 180 | 30-35 | |
| Plum cake | 1 | 2 | 10 | 170 | 40-50 | |
| Cream buns (in 2 heights) | 0.5 | 2-4 | 10 | 190 | 20-25 | |
| Cookies (in 2 heights) | ||||||
| Sponge cake (in 1 height) | 0.5 | 2-4 | 10 | 180 | 10-15 | |
| Sponge cake (in 2 heights) | 0.5 | 2 | 10 | 170 | 15-20 | |
| Empanadas | 1.0 | 2-4 | 10 | 170 | 20-25 | |
| 1.5 | 3 | 15 | 200 | 25-30 |
ENGLISH
Grill | Sole and cuttlefish | 1 | 4 | 5 | Max. | 8-10 |
| Squid and prawn kebabs | 1 | 4 | 5 | Max. | 6-8 | |
| Cod fillet | ||||||
| Grilled vegetables | 1 | 4 | 5 | Max. | 10 | |
| Beef fillet | 1 | 3/4 | 5 | Max. | 10-15 | |
| Chops | 1 | 4 | 5 | Max. | 15-20 | |
| Hamburgers | 1 | 4 | 5 | Max. | 15-20 | |
| Mackerel | 1 | 4 | 5 | Max. | 7-10 | |
| Toasted sandwiches | 1 | 4 | 5 | Max. | 15-20 | |
| - | 4 | 5 | Max. | 2-3 | ||
Defrost | All frozen foods | |||||
Large surface grill | Sole and cuttlefish | 1 | 4 | 5 | 200 | 8-10 |
| Squid and prawn kebabs | 1 | 4 | 5 | 200 | 6-8 | |
| Cod fillet | ||||||
| Grilled vegetables | 1 | 4 | 5 | 200 | 10 | |
| Beef fillet | 1 | 3/4 | 5 | 200 | 10-15 | |
| Chops | 1 | 4 | 5 | 200 | 15-20 | |
| Hamburgers | 1 | 4 | 5 | 200 | 15-20 | |
| Mackerel | 1 | 4 | 5 | 200 | 7-10 | |
| Toasted sandwiches | 1 | 4 | 5 | 200 | 15-20 | |
| - | 4 | 5 | 200 | 2-3 | ||
| With rotisserie fork | ||||||
| Grilled veal | 1.0 | - | 5 | 200 | 80-90 | |
| Grilled chicken | 1.5 | - | 5 | 200 | 70-80 | |
| Grilled lamb | 1.0 | - | 5 | 200 | 70-80 | |
| Grill & Fan[KABT] | Roasted chicken | 1.5 | 3 | 5 | 200 | 55-60 |
| Cuttlefish | 1.5 | 3 | 5 | 200 | 30-35 | |
| With rotisserie fork | ||||||
| Grilled veal | 1.5 | - | 5 | 200 | 70-80 | |
| Grilled chicken | 2.0 | - | 5 | 200 | 70-80 | |
| Chicken (grilled) + Potatoes(baked) | 1.5 | - | 5 | 200 | 70-75 | |
| Grilled lamb | 1.5 | - | 5 | 200 | 70-75 | |
| Bake[cc3w] | Tartlet | 0.5 | 3 | 15 | 180 | 20-30 |
| Fruit pies | 1 | 2/3 | 15 | 180 | 40-45 | |
| Fruitcake | 0.7 | 3 | 15 | 180 | 40-50 | |
| Sponge cake | 0.5 | 3 | 15 | 160 | 25-30 | |
| Stuffed pancakes | 1.2 | 2-4 | 15 | 200 | 30-35 | |
| Cupcakes | 0.6 | 2-4 | 15 | 190 | 20-25 | |
| Cheese bites | 0.4 | 2-4 | 15 | 210 | 15-20 | |
| Cream buns | 0.7 | 1-3-5 | 15 | 180 | 20-25 | |
| Biscuits | 0.7 | 1-3-5 | 15 | 180 | 20-25 | |
| Meringue | 0.5 | 1-3-5 | 15 | 90 | 180 | |
Quick cooking | Frozen foods | |||||
| Pizza | 0.3 | 2 | - | 250 | 12 | |
| Courgette and prawn pie | 0.4 | 2 | - | 200 | 20 | |
| Spinach pie | ||||||
| Leftovers | 0.5 | 2 | - | 220 | 30-35 | |
| Lasagne | 0.3 | 2 | - | 200 | 25 | |
| Rolls | 0.5 | 2 | - | 200 | 35 | |
| Chicken Milanese | 0.4 | 2 | - | 180 | 25-30 | |
| 0.4 | 2 | - | 220 | 15-20 | ||
| Pre-cooked food | ||||||
| Browned chicken wings | 0.4 | 2 | - | 200 | 20-25 | |
| Fresh food | ||||||
| Biscuits | 0.3 | 2 | - | 200 | 15-18 | |
| Fruitcake | 0.6 | 2 | - | 180 | 45 | |
| Cheese bites | 0.2 | 2 | - | 210 | 10-12 | |
Pizza | Pizza | 0.5 | 2 | 15 | 220 | 15-20 |
| Roast veal or beef | 1 | 2 | 10 | 220 | 25-30 | |
| Chicken | 1 | 2/3 | 10 | 180 | 60-70 | |
Air fry | Scotch sirloin steak | 1 | 3 | 5 | 220 | 8 |
| Chips | 1 | 3 | 5 | 220 | 15 | |
| Chicken wings | 1 | 3 | 5 | 230 | 15 | |
| Breaded fillet | 1 | 3 | 5 | 230 | 15 | |
| Potatoes cut into wedges | 0.5 | 3 | 5 | 230 | 14 | |
| Frozen food(chicken nuggets/breaded fish) | 1 | 3 | 5 | 230 | 15 | |
| Mashed potatoes | 1.0 | 3 | 54 | 220 | 15 |
ENGLISH
Note: cooking times are approximate and may vary according to personal taste. When cooking with the grill or grill & fan, the grease-collection tray must always be placed on the bottom oven guide.
7. CLEANING AND MAINTENANCE
Initial cleaning
Clean the appliance thoroughly before using for the first time. Do not use abrasive cleaning agents nor sharp materials. They could damage the surface of the oven. Use special cleaning products to clean ovens with enamelled fronts.
- Open the door and switch on the inside light by pressing the icon.
- Clean the baking tray, accessories and side guides with warm water and liquid detergent and dry them with a soft, clean cloth.
- Wipe the inside of the oven with a soft, clean cloth.
- Wipe the front of the oven with a damp cloth.
- Make sure that the oven accessories are in place and operate the oven in convection mode at 200 °C for 1 hour before use.
NOTE:
Make sure that the room is well ventilated during this preparation process. It is possible that during the operation of the oven you will perceive a characteristic odour; this is normal.
Cleaning the door
In the case of normal use of the oven, it is not necessary to disassemble the door, but if it is necessary to disassemble it, e.g. for cleaning, follow these instructions. The oven door is heavy, so be careful when handling it.
Disassembling the oven door. Fig. 7
- Fully open the door.
- Fully open the left and right hinge lever.
- Hold the door as shown in the third picture in figure 7.
- Gently close the door until the left and right hinge levers are engaged in part B of the door.
- Remove the hinge hooks from their location following the arrow shown in Figure 7.
- Rest the door on a soft surface.
NOTE:
To replace the door, repeat the above steps in reverse order.
Removing the inner glass. Fig. 8
- Fold down the oven door and remove the gasket by unscrewing the screws.
-
Carefully remove the inner glass.
-
Clean the glass with a suitable cleaner. Dry it thoroughly and place it on a soft surface.
- Then you can also clean the inside of the outer glass.
8. TECHNICAL SPECIFICATIONS
Product reference: 01318/02818/02819
Product: Bolero Hexa P506000 Glass Black A+ / Bolero Hexa P506000 Edge A+ Bolero Hexa P506000 Matt A+
| Symbol | Value | Unit | |
| Model reference | 01318/02818 / 02819 | ||
| Type of oven | Electric oven | ||
| Mass of the appliance | M | 28 | Kg |
| Number of cavities | 1 | ||
| Heat source per cavity (electricity or gas) | Electricity | ||
| Volume per cavity | V | 81 | l |
| Energy consumption (electricity) required for heating a standardised charge in an electric furnace cavity for one cycle in conventional mode, per cavity (final electrical energy) | ECelectric cavity | 0.92 | kWh/cycle |
| Energy consumption required to heat a standardised load in a cavity of an electric heated oven during a cycle in fan-forced mode per cavity (electric final energy) | ECelectric cavity | 0.61 | kWh/cycle |
| Energy consumption required to heat a standardised load in a gas-fired cavity of an oven during a cycle in conventional mode per cavity (gas final energy) | ECgas cavity | N/AN/A | MJ/cycle kWh/cycle (1) |
ENGLISH
| Energy consumption required to heat a standardised load in a gas-fired cavity of an oven during a cycle in fan-forced mode per cavity (gas final energy) | ECgas cavity | N/AN/A | MJ/cyclekWh/cycle |
| Energy Efficiency Index per cavity | EEIcavity | 68.5 | |
| (1) 1 kWh/cycle = 3.6 MJ/cycle. |
power consumption in standby mode is 0.33 W using the guidelines of EN 50564:2011 and the European regulations 1275/2008/EC and 801/2013/EC. For this purpose, the device is connected to the mains without performing any function, waiting for the standby mode to be activated.
This appliance features a light source with an energy efficiency grade G.
Technical specifications may change without prior notification to improve product quality. Made in China | Designed in Spain
9. DISPOSAL OF OLD ELECTRICAL AND ELECTRONIC APPLIANCES

This symbol indicates that, according to the applicable regulations, the product and/or batteries must be disposed of separately from household waste. When this product reaches the end of its shelf life, you should dispose of the cells/batteries/accumulators and take them to a collection point designated by the local authorities.
Consumers must contact their local authorities or retailer for information concerning the correct disposal of old appliances and/or their batteries.
Compliance with the above guidelines will help protecting the environment.
10. TECHNICAL SUPPORT AND WARRANTY
Cecotec shall be liable to the end user or consumer for any lack of conformity that exists at the time of delivery of the product under the terms, conditions, and deadlines established by the applicable regulations.
It is recommended that repairs be carried out by qualified personnel.
If at any moment you detect any problem with your product or have any doubt, do not hesitate to contact the official Cecotec Technical Support Service at +34 963 210 728.
11. COPYRIGHT
The intellectual property rights over the texts in this manual belong to CECOTEC INNOVACIONES, S.L. All rights reserved. The contents of this publication may not, in whole or in part, be reproduced, stored in a retrieval system, transmitted, or distributed by any means (electronic, mechanical, photocopying, recording or similar) without the prior authorization of CECOTEC INNOVACIONES, S.L.
FRANÇAIS
1. PIÈCES ET COMPOSANTS
Img. 1

Fig./Img./Abb./Afb./Rys./Obr. 3


Fig./Img./Abb./Afb./Rys./Obr. 4

Fig./Img./Abb./Afb./ Rys./Obr. 5
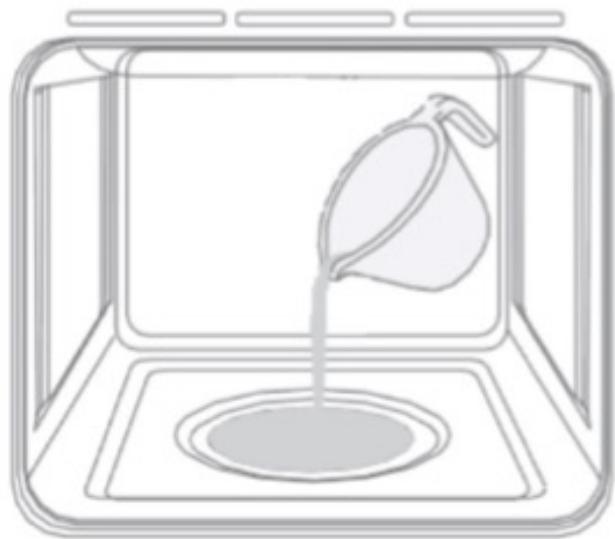
Fig./Img./Abb./Afb./Rys./Obr. 6

Fig./Img./Abb./Afb./ Rys./Obr. 7
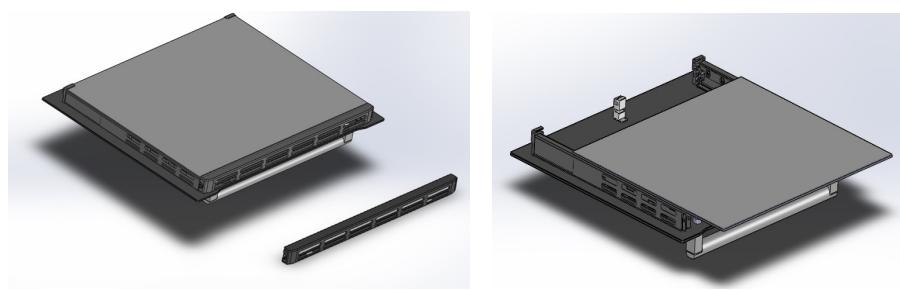
Fig./Img./Abb./Afb./Rys./Obr. 8
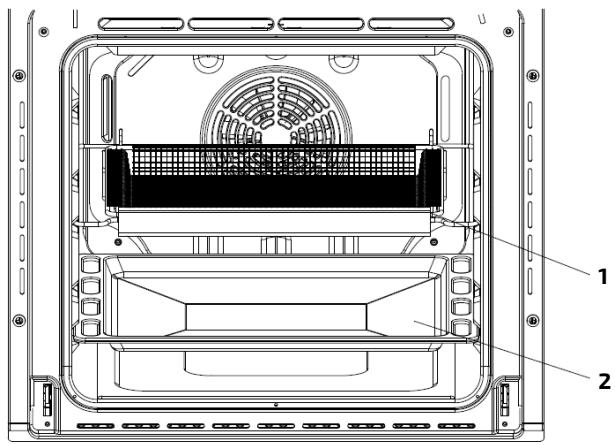
Fig./Img./Abb./Afb./Rys./Obr. 9
www.cecotec.es
46910, Alfafar, Spain
- SOMMAIRE
- INSTRUCTIONS DE SÉCURITÉ
- NOTE:
- BEFORE USE
- Box content
- INSTALLATION
- Electrical connections
- Installing the power cable. Fig. 4
- Opening the terminal board
- Connecting the power cable to the mains
- ENGLISH
- OPERATION
- Setting the time
- Control panel. Fig. 5
- Setting the cooking function
- Setting the cooking temperature
- Switching on/off the oven
- Switching on/off the inside light
- Delay end
- Setting the cooking time
- Delay start
- Timer
- Safety child lock
- Quick preheating
- Memory function
- Automatic safety shut-off
- Cooling fan
- MODES
- Conventional mode
- Grill & Fan mode
- Large surface grill mode
- Grill mode
- Bake mode
- Multiple cooking mode
- Pizza mode
- AirFry mode
- Gentle cooking mode
- Quick cooking mode
- Defrost mode
- Energy-saving baking mode
- Fermentation mode
- Dishware preheating mode
- Steam cleaning mode
- Steam cleaning procedure
- Steam assist mode
- Self-cleaning mode
- Before self-cleaning
- PRACTICAL COOKING TIPS
- Oven guides
- Accessories
- Fig. 9 key:
- Cooking at more than one height
- Using the quick cooking mode
- Using the grill
- Using the AirFry mode
- CLEANING AND MAINTENANCE
- Initial cleaning
- Cleaning the door
- Disassembling the oven door. Fig. 7
- Removing the inner glass. Fig. 8
- TECHNICAL SPECIFICATIONS
- DISPOSAL OF OLD ELECTRICAL AND ELECTRONIC APPLIANCES
- TECHNICAL SUPPORT AND WARRANTY
- COPYRIGHT
- FRANÇAIS
- PIÈCES ET COMPOSANTS
- Img. 1
Brand : CECOTEC
Model : Bolero Hexa P506000 Glass A
Category : Oven