Bolero Hexa M226001 Glass A - Oven CECOTEC - Free user manual and instructions
Find the device manual for free Bolero Hexa M226001 Glass A CECOTEC in PDF.


| Product type | Built-in oven |
| Brand | Cecotec |
| Model | Bolero Hexa M226001 Glass A |
| Overall dimensions (W x H x D) | 595 x 595 x 550 mm |
| Interior volume | 71 liters |
| Net weight | 30 kg |
| Power supply | 230 V, 50 Hz, 3400 W |
| Heating type | Convection, grill, bottom heat, top heat |
| Number of cooking modes | 8 modes |
| Control type | Mechanical rotary controls |
| Display | LED screen |
| Door | Removable cool glass |
| Interior light | Yes, halogen |
| Cleaning | Manual cleaning, easy enamel coating |
| Child safety | Control lock |
| Automatic shut-off | Yes, timer |
| Timer | Up to 120 minutes |
| Thermostat | 50-250 °C |
| Included accessories | Rack, drip tray, rotisserie spit |
| Energy class | A |
| Repairability index | 8.2/10 |
| Spare parts availability | 7 years after purchase |
| Warranty | 2 years, extension possible |
Frequently Asked Questions - Bolero Hexa M226001 Glass A CECOTEC
User questions about Bolero Hexa M226001 Glass A CECOTEC
0 question about this device. Answer the ones you know or ask your own.
Ask a new question about this device
Download the instructions for your Oven in PDF format for free! Find your manual Bolero Hexa M226001 Glass A - CECOTEC and take your electronic device back in hand. On this page are published all the documents necessary for the use of your device. Bolero Hexa M226001 Glass A by CECOTEC.
USER MANUAL Bolero Hexa M226001 Glass A CECOTEC
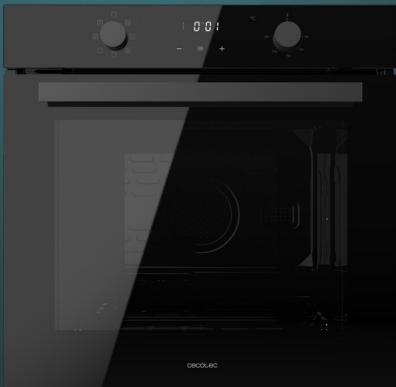
bolero
Safety instructions 7
-
Parts and components 54
-
Before use 54
-
Installation 55
-
Operation 58
-
Cleaning and maintenance 66
-
Troubleshooting 69
-
Technical specifications 71
-
Disposal of old electrical and electronic appliances 72
-
Technical support and warranty 72
-
Copyright 73
SOMMAIRE
Read these instructions thoroughly before using the appliance. Keep this instruction manual for future reference or new users.
- This appliance can be used by children aged 8 years and above and people with reduced physical, sensory, or mental capabilities or lack of experience and knowledge if they have been given supervision or instruction concerning use of the appliance in a safe way and understand the hazards involved. Children must not play with the appliance. Cleaning and user maintenance should not be carried out by unsupervised children.
- This appliance is designed for domestic use only and is not intended for bars, restaurants, farmhouses, hotels, motels, and offices.
- This symbol means “caution, hot surface.” The temperature of the accessible surfaces may be high when the appliance is in operation.
- The appliance heats up during use. Avoid touching the heating elements inside.
- WARNING: all accessible parts of the appliance and the appliance itself may heat up during use. Do not touch the heating elements. Children under 8 years of age should be kept away from the appliance unless continuously supervised.
- Do not use abrasive cleaners or sharp metal scrapers to
clean the oven door glass, as it may scratch the surface and cause subsequent glass breakage.
- Never clean the appliance with steam cleaners.
- WARNING: make sure that the appliance is unplugged from the mains before replacing the light bulb to avoid any risk of electric shock.
- Do not install the appliance behind a decorative panel to avoid overheating.
- Incorrect repairs can be dangerous. Refer only to authorised technical personnel for repairs and replacement of damaged power cables. If the appliance is defective, unplug it from the power supply or switch off your home circuit breaker. Contact the official Cecotec Technical Support Service.
- The appliance is not intended to be operated by means of an external timer or a separate remote-control system.
- Open the appliance door carefully. Keep children away from the appliance.
- If the door glass is damaged, it could crack. Do not use glass scrapers, cleaning agents, or abrasive detergents to clean the appliance door.
- The appliance hinges move when opening and closing the door: be careful not to get caught. Keep hands away from hinges.
- If you store flammable items inside the oven, they may catch fire. Never store flammable items inside the oven. Never open the door of the appliance if there is smoke inside. Unplug the appliance from the mains or switch off the circuit breaker of your home.
-
The control panel and control elements use fixed magnets. These can affect electronic implants, such as pacemakers or insulin pumps. Users with electronic implants must stay at least at 10 cm from the control panel.
-
Do not allow aluminium foil to come into contact with the glass door. This could cause permanent discolouration of the glass door.
- Do not use silicone frying pans, nor lids with silicone covers or silicone accessories. This could damage the oven sensor.
- Moisture inside the oven for a long period of time could cause corrosion. Allow the appliance to dry after every use. Do not store wet food inside the oven while it is closed for long periods of time. Do not store food in the oven.
- When baking cakes with particularly juicy fruit, do not overfill the baking tray. If fruit juice drips from the baking tray, it could cause permanent stains. Use a deep tray if possible.
- If the gaskets are dirty, the appliance door will not close properly during operation. This could damage the front part of the adjacent appliances and furniture. Make sure that the gaskets are always clean.
- Do not sit on the appliance door or place or hang objects on it. Do not place tableware or accessories on the appliance door.
- Do not transport or hold the appliance by the door handle. The door handle cannot withstand the weight of the appliance and could break.
- If you use residual heat when the oven is off to keep food warm, you can create a high moisture content inside the oven. This could lead to condensation and corrosion damage in the appliance, as well as damage to your kitchen.
INSTRUCTIONS DE SÉCURITÉ
The graphics in this manual are schematic representations and may not exactly match the device.
2. BEFORE USE
- This appliance is packaged in a way as to protect it during transport. Take the appliance out of its box and remove all packaging materials. You can keep the original box and other packaging elements in a safe place to prevent damage to the device if you need to transport it in the future. In case the original packaging is disposed of, make sure all packaging materials are recycled accordingly.
- Make sure all parts and components are included and in good conditions. If there is any piece missing or in bad conditions, contact the official Cecotec Technical Support Service immediately.
- Before cooking, be sure to remove all unnecessary accessories from the oven.
- Preheat the oven before using it.
- Place the baking trays in the centre of the oven and leave space between them when using more than one to allow air to circulate.
- Do not place the trays on the oven base or cover them with aluminium foil. This would lead to thermal build-up. This would cause heat build-up, which would affect the cooking time and damage the enamel of the oven.
- Try to open the oven door as little as possible to see the food (the oven light remains on during cooking).
- Be careful when opening the door to avoid contact with hot parts and steam.
Before using the oven for the first time
To remove the smell, heat the oven while it is empty and closed.
Make sure that no packaging remains inside the oven.
-
Use the mode knob to select the conventional mode ☐.
-
Set the temperature knob to 250^ C. After one hour, turn off the oven. To do this, turn the mode knob to the off position ☐.
Box content
- Multifunctional oven
- Instruction manual
- Tray
- Rack
3. INSTALLATION
Before installation
The appliance must be installed in a built-in cabinet. A safety distance must be maintained between the appliance and the kitchen walls.
- Surfaces, synthetic laminates and adhesives used must be heat resistant (100 °C minimum) and adjacent furniture must be resistant to at least 70 °C.
- Kitchen cabinets must be level and fixed. A space of 5 mm must be left between the oven and other appliances.
- If there is a drawer under the oven, a shelf must be installed between the oven and the drawer.
- In figure 2, you can see the dimensions required for the installation. Dimensions are in millimetres.
Installation and connection
Use caution, materials may get damaged.
The door and/or handle must not be used to lift or move the appliance.
- For installation, the appliance must be connected in accordance with all local gas and/or electrical regulations.
- Transport must be carried out by at least two people.
- Use the slots or handles on both sides to transport it.
Mains connection
This appliance must be connected to an earthed socket.
- Cecotec is not liable for any damage caused by the use of the appliance without an earth connection. If the installation is not carried out professionally, there is a risk of electric shock. The appliance must only be connected to the mains by an authorised qualified person. If this is not the case, the warranty will be voided.
- If the power cable is damaged, there is a risk of electric shock, short circuit and fire. The power cable must not be pinched, bent or trapped and must not come into contact with
ENGLISH
hot parts of the appliance. If the power cable is damaged, it must be replaced by a qualified electrician.
- The mains supply must correspond to the information on the rating plate of the appliance.
The power cable must correspond to the specifications and power consumption.
NOTE:
- Risk of electric shock.
- Before carrying out the electrical installation, switch off the appliance.
Installation
- Insert the oven through the hole in which it is to be installed, align it and fix it in place.
- Next, secure with 2 screws and washers as shown in figure 3.
Mounting the power cable
Opening the terminal box. (Fig. 4):
- Using a screwdriver, prise the bolt on the side tabs of the terminal box cover.
- Unscrew the screw and open the cover.
- To install the cable, proceed as follows:
- Remove the cable clamp screw and the three contact screws.
-
Fix the wires under the screw heads using the following colour scheme:
-
Blue - Neutral (N)
- Brown phase connector (L)
- Yellow-Green (Ground)
-
Secure the power cable with the cable clamp and close the terminal box cover.
-
Open the terminal box.
- With a screwdriver, tighten the screw on the side tabs of the terminal box cover.
- Unscrew the screws on the side tabs of the cover and remove the latter.
Connecting the power cable to the mains
- Install a standard plug (not included) corresponding to the load indicated on the rating plate. When connecting the cable directly to the mains, install an omnipolar circuit breaker with a minimum contact opening of 3 mm between the device and the mains. The omnipolar circuit breaker must be sized according to the load and comply with the applicable regulations (the earth wire must not be interrupted by the circuit breaker).
- The power supply cable must be routed so that it does not reach a temperature above 50 °C above room temperature and must be protected by insulation with an appropriate rating.
- Before connecting, check the following:
- The electrical safety of this appliance can only be guaranteed if the oven is correctly and effectively earthed in accordance with electrical safety regulations. Always make sure
that the ground connection is effective; if in doubt, call a qualified technician to check the system. Cecotec declines all liability for damage resulting from a system that has not been grounded.
- Before connecting the appliance to the mains, check that the specifications indicated on the rating plate (on the appliance and/or on the packaging) correspond to those of the mains supply at home.
- Check that the electrical capacity of the installation and the sockets can withstand the maximum power of the appliance. If in doubt, contact a qualified technician.
- If the socket and plug of the appliance are not compatible, ask a qualified technician to replace the socket with a suitable model.
- The latter, in particular, will also have to ensure that the cross-section of the socket cables is adequate for the power used by the appliance. The use of adapters, multiple sockets and/or extension leads is not recommended. If their use cannot be avoided, remember to use only single or multiple adapters and extension leads that comply with current safety regulations. In these cases, never exceed the maximum current capacity indicated on the single adapter or extension lead and the maximum power indicated on the multiple adapter. The plug and socket shall be easily accessible.
Check
- Connect the appliance to the mains and switch it on.
- Check that the oven works.
Accessories
- The provided accessories are suitable for preparing any type of food. Make sure to insert the accessories correctly when using the oven.
- There are optional accessories, with which you can enhance some of your favourite dishes, or simply cook in a more practical way.
Inserting the accessories
The oven has 5 different levels on which you can place the accessories. Insert them as far as they will go so that they do not touch the door panel.
Accessories can be removed approximately up to half way without tipping. This allows for easy food removal.
Note: accessories may deform when heated. When they have cooled down, they will return to their original shape. This does not affect its operation.
Tray
Use this accessory for moist cakes, pies, frozen food and large roasts. It can also be used to collect dripping fat when grilling directly on the rack.
Rack
It is used for roasting and for placing food to be baked.
Guides
This oven has 5 side guides so that you can place the accessories at the desired height.
If you need more space for cooking, you can remove the guides and place them on the base of the oven.
Note: when placing food on the oven base, do not use modes where the bottom heating element is lit, to prevent heat build-up (specific models only).
4. OPERATION
Fig. 5 key:
- Operation indicator light
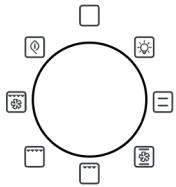
- Mode knob
- Display
- Preheating indicator
- Temperature knob
Mode knob
Use this knob to choose the desired mode.
| Symbol | Mode | Description |
 | Off | |
 | Light mode | Setting the knob to this position will switch on the oven light. |
 | Conventional mode (top and bottom heating elements) | Setting the knob to this position will switch on both heating elements (top and bottom). This mode is suitable for grilling and baking at one level. |
[O32A] | Intensive baking modeHalf-grill mode | In this mode, the heat from the oven is transferred from the top heating element to the bottom heating element, and the fan helps it circulate throughout the oven, for even baking.This mode only uses the inner part of the top heating element, which causes the heat to be directed downwards. Suitable for cooking small portions of bacon, toast, meat, among others. |
| [XCZW] | Full grill mode | This mode only uses both parts of the top heating element, which causes the heat to be directed downwards. This function is suitable for baking medium to large portions of sausages, bacon, meat, fish, among others. |
| [OXT2] | Fan & grill mode | This mode uses the top heating element together with the fan, which helps to circulate the heat. It is suitable when you want food to brown quickly and preserve its juices. |
 | ECO grill mode | In this mode, the outer part of the top heating element and the bottom heating element are used to control the temperature, thus reducing energy consumption. This function is suitable for baking large foods, as the oven temperature rises progressively, allowing the heat to fully penetrate the food. |
Display
Icons
| Symbol | Function |
| — | Decrease icon |
| + | Increase/sound type icon |
| ≡ | Settings icon |
Indicator lights
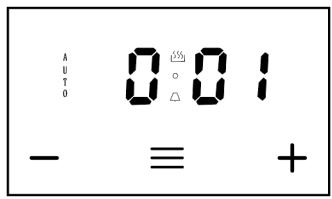
- Fig. 6 key:
- AUTO function
- Operation
- Hours and minute separator
- Alarm
- Time display
Oven status
There are three different modes: standby mode, set-up mode and cooking in progress.
- Standby mode: after connecting the oven to the mains, the display will show the time. The hours and minute separator will flash. If no operation is performed, after 10 seconds, the brightness of the display will be reduced. To return the display brightness to its previous state, press any icon.
- Set-up mode: to exit standby mode and access set-up mode, press and hold the settings icon ≡. The hours and minute separator shall remain fixed.
- Cooking in progress: after setting the clock, the cooking time or the delay end function, the display will show the time. Additionally, the operation indicator light will light up.
Oven settings
Press and hold the settings icon for 3 seconds to enter set-up mode. If no operation is performed, after 5 seconds, the time, the indicator light and the hour and minute separator will remain lit. Each time the settings icon is pressed, it shall change function according to the following cycle:
System time → Setting system time → Alarm setting → Delay end function → Delay start and end function → System time
Connecting the appliance to the mains
When the oven is connected to the mains for the first time, you will hear a beep and the oven will enter standby mode. The time will be shown on the display. After switching on the oven for the first time, the display will show "0-00", and the hour and minute separator will flash. At this point, you can press the + icon to choose the type of acoustic signal you want (3 options are available). By default, the oven will beep the number two option. Whenever the oven is in standby mode, you can change the type of acoustic signal by pressing the + icon.
Setting the oven
Press and hold the ≡ icon for 3 seconds to exit standby mode and enter settings mode. The 🎨 indicator light will light up and the hour and minute separator will flash. When ● is flashing, press the + or — icons to set the time. Once you have set the time, press and hold the icon for 5 seconds until the hour and minute separator stops flashing. This indicates that the time has been correctly configured. If you want to set the time again, when the oven display shows the same as in figure 7, press the ≡ icon. When the hour and minute separator flashes, you can set the time again.
If you want the oven to enter standby mode, press and hold the ≡ icon again for 3 seconds.
Note:
- The time setting range is from 0:00 to 23:59.
- To set the time for any mode or function, press the + or - icon. If pressed briefly, the
time will increase/decrease by one minute; if pressed and held, the time will increase/decrease more rapidly.
Alarm setting
- In settings mode, when the time appears on the display, and the 🎨 indicator light and the hour and minute separator ● remain fixed, press the ≡ icon twice. The 🔊 indicator light will flash, so you can set the alarm time (default is 0-00). When the 🔊 indicator light flashes, press the + or — icon to set the time.
- Once the time has been selected, release the icons and wait for 5 seconds. After this time, the indicator light shall stop flashing and remain steady. The system time shall be shown on the display and the indicator light and the hour and minute separator shall remain fixed. This indicates that the time has been correctly configured.
- When you want to reset the alarm time, in settings mode, press the ≡ icon twice. When the △ indicator light flashes, the display will show the set time or countdown. At this point, you can reset the time. When you have finished, the time will reappear on the display.
- For example, set the alarm to go off in 10 minutes. After this time, the display will show the time. The 🎨 indicator light and the hours and minute separator shall remain fixed. The 🔊 indicator light will flash. A beep will sound for 5 minutes to indicate that the countdown is over. Press any icon to stop the beeping and turn off the 🔊 indicator light.
Note:
The alarm time setting range is from 0:00 to 23:59.
Setting the cooking mode time
- In settings mode, press the ≡ icon three times. The AUTO indicator light and the operation indicator light 🎩 will flash. The display will show the cooking time (default is 0:00). The cooking time and the hour and minute separator will remain fixed. When the AUTO indicator light and the operation indicator light 🎩 flash, you can set the desired time by pressing the + or — icon.
- After selecting the time, stop pressing the icons. After 5 seconds, the AUTO indicator light and the operation indicator light 🎨 will stop flashing and remain fixed. This indicates that the time has been correctly set. If you want to reset the cooking time, in the settings mode, press the ≡ icon three times. When the AUTO indicator light and the operation indicator light 🎨 flash, the set time or the remaining time will be displayed. At this point, you can set the time again. When finished, the display will show the time. The hours and minute separator and the system time shall remain fixed.
- For example, select 30 minutes cooking time. After this time, the display will show the system time. The 🎨 indicator light will switch off, the time will remain fixed, the hour and minute separator and the AUTO indicator light will flash. A beep will sound for 5 minutes to indicate that the countdown is over. To stop the beeping, press any icon. When it does, the AUTO indicator light will switch off.
Note:
- The cooking time setting range is from 0:00 to 10:00.
- If you do not select the cooking time, the oven will switch off after 10 hours of cooking without beeping.
Delay end function
- In settings mode, press the ≡ icon four times. The AUTO indicator light and the operation indicator light ⌘ will flash. The display will show the delay end time (by default, the current time will be shown). Both the delay end time and the hour and minute separator will flash.
- When the AUTO indicator light and the operation indicator light 🎨 flash, you can set the delay end time by pressing the + or — icon.
- After selecting the time, stop pressing the icons. After 5 seconds, the AUTO indicator light and the operation indicator light 🎨 will stop flashing and remain fixed. The system time will be shown on the display. Both the time and the hour and minute separator shall remain fixed. This indicates that the delay end function has been correctly configured.
- If you want to reset the time of the delay end function, in the settings mode, press the icon four times. When the AUTO indicator light and the operation indicator light flash, the display will show the set time. At this point, you can set the time again. When you have finished, the system time will reappear on the display.
- For example, the current time is 0:00. The delay end time is 0:30. When it is 0:30, the display will show the system time. The indicator light will switch off, the time will remain fixed, the hour and minute separator and the AUTO indicator light will flash. A beep will sound for 5 minutes to indicate that the cooking is over. To stop the beeping, press any icon. When it does, the AUTO indicator light will switch off.
- Note: The delay end time is the current system time plus the cooking time. The maximum time setting range is 23:59.
Delay start and end function
- From the settings mode, this oven allows you to activate the Delay start and Delay end function.
- To do so, press the ≡ icon 3 times. The AUTO indicator light and the operation indicator light 🎩 will flash. The display will show the delay start time (default will be 0:00). When the AUTO indicator light and the operation indicator light 🎩 flash, you can set the delay start time. To do so, press the + or — icon.
- Next, press ≡ icon again. When the AUTO indicator light flashes, you can select the time at which you want cooking to end. To do so, press the + or - icon. Once this setting has been made, release the icon for 5 seconds, until the AUTO indicator light stops flashing. This indicates that the delay end time has been correctly configured. To set the delay start time again, press the ≡ icon three times. On the other hand, if you want to set the delay end time, press the ≡ icon four times. When you have finished, the system time will
reappear on the display.
- Let's say the system time is 0:00. To select cooking to start at 00:30 and end at 1:00, after which the oven will enter standby mode. When it is 0:30, the oven will start automatically. It will cook for 30 minutes and turn off at the programmed time (1:00). The 🎨 indicator light will switch off, the system time will remain fixed, the hour and minute separator and the AUTO indicator light will flash. A beep will sound for 5 minutes to indicate that the cooking is over. To stop the beeping, press any icon. When it does, the AUTO indicator light will switch off.
Note:
- The maximum selectable cooking time is 10 hours.
- With the Delay start and Delay end function in operation: If the oven door is closed, cooking will proceed normally. On the other hand, if the door is opened, the oven will display the system time and the system time will flash. The AUTO indicator light and the hours and minute separator shall remain fixed. Cooking will be paused until you close the door again. When it is the set delay end time, a beep will sound.
Selecting the desired sound type
- This oven features 3 types of sounds.
- When the oven is in standby mode, i.e. when the system time is displayed and the hour and minute separator is flashing, you can select the desired type of sound. To do so, press the increase/sound type icon. Each press selects a sound type. By default, the oven will use the second type.
Temperature knob
- The knob allows you to select the desired temperature. The temperature can be adjusted between 50 and 250 °C.
- Turn the knob clockwise.
Steam assisted cooking function (Steam Assist)
You can use this function to add extra browning to pizza bases, pies and cakes, or to cook different foods using a combination of bottom heat and steam.
If you wish, you can follow the steps below:
- Add approximately 100 ml of water in the bottom cavity (Fig. 7).
NOTE: the capacity may vary depending on the oven model. - Activate the function and select a temperature of 200 °C . Approximate cooking time: 20 minutes.
- Be sure to remove any excess water from the oven cavity at the end of the cooking process.
NOTE: you can adjust the amount of water, the cooking time and the temperature
ENGLISH
according to the needs of the food to be prepared.
WARNING: make sure that the interior is completely cool before removing excess water. Risk of burns.
Tips on energy saving
The following information will help you to save energy:
- Use dark-coloured or enamel-coated cookware, as heat transmission will be better.
- Preheat the oven before cooking food.
- Do not open the oven door frequently during cooking.
- Try to cook more than one dish in the oven at the same time. You can cook by placing two cooking containers on the rack.
- Cook more than one dish, one after the other. The oven will still be hot.
- You can save energy by switching off the oven a few minutes before the cooking time. Do not open the oven door.
- Defrost frozen dishes before cooking.
Baking tips
- Use suitable metal trays or aluminium containers with non-stick coating or heat-resistant silicone moulds.
- Make the best use of the rack space.
- It is recommended to place the food or cooking trays in the centre of the rack.
- Keep the door closed.
- How to know if a sponge cake is well baked.
About 10 minutes before the end of the baking time specified in the recipe, insert a toothpick into the highest point of the cake. If the toothpick comes out clean, the cake is ready.
- The sponge cake crumbles.
Use less liquid next time or adjust the oven temperature 10 degrees lower. Observe the mixing times specified in the recipe.
- The cake has risen in the centre but is lower at the edges.
Do not grease the sides of the mould. After baking, carefully remove the cake from the tin. Use a knife to do this.
- The top of the cake is too dark.
Place it lower in the oven, select a lower temperature and bake it for a little longer.
- The sponge cake is too dry.
When done, poke small holes in it with a toothpick. Then, sprinkle it with fruit juice or an alcoholic beverage. Next time, select a temperature 10 degrees higher and reduce the baking time.
- The bread or cake (e.g. cheesecake) looks good but is soggy inside.
Use a little less liquid next time and bake for a little longer at a lower temperature. For wet topping cakes, bake the base first. Sprinkle with almonds or breadcrumbs, then top with the
topping. Follow the recipe and baking times.
- The cake browns unevenly.
Select a slightly lower temperature so that the cake bakes more evenly. Bake delicate cakes on a single level using the Conventional mode. If the greaseproof paper protrudes, it can affect air circulation. For this reason, always cut the paper to the size of the baking tray to be used.
- The inside of a fruit cake is too light.
Place the cake on a lower level next time.
- The fruit juice overflows.
Next time, use a deeper container.
Bakery products made with yeast dough stick together during baking. There should be a space of about 2 cm between each product. In this way, there is enough space for them to expand well and brown on all sides.
- Multi-level baking.
The food in the upper tray is darker than the food in the lower tray. Always use 3D hot air for baking on more than one level. Just because you put several trays in the oven does not mean that they will all be ready at the same time.
- Condensation forms when baking moist cakes.
Cooking can lead to the formation of steam, which escapes over the door. Steam can settle and form water droplets on the control panel or on adjacent furniture elements. This is normal.
Roasting tips
- If you are cooking a whole chicken or turkey, or a large piece of meat, season it with a little lemon juice and black pepper.
- Meat with bones takes 15 to 30 minutes longer to cook than a roast of the same size without bones.
- You should allow 4 to 5 minutes of cooking time per centimetre of height of the meat.
- Let the meat rest in the oven for about 10 minutes after the cooking time. This way, the juices will be better distributed throughout the roast, and will not run out when the meat is cut.
- If you are cooking fish, set it to medium or low.
Tips for using the Grill mode
- This mode is ideal for cooking meat, fish and poultry, as these foods will be browned but not dry. Flat pieces, meat skewers and sausages are particularly suitable for grilling with the Grill function, as are vegetables with a high water content, such as tomatoes and onions.
- If you are going to use the Grill mode, preheat the oven for 4 minutes before putting in the food. When the oven is in operation, always close the door.
- As far as possible, the pieces of food to be grilled should be of the same thickness. This will allow them to brown evenly and remain tender and juicy.
- Turn the food you are grilling after 2/3 of the time has elapsed.
ENGLISH
- Do not add salt to the beef steaks until they have been grilled.
- Add a little liquid if the meat is lean. Cover the base of the dish with about 1/2 cm of liquid.
- Place the food to be grilled directly on the rack. If grilling a single piece, place it in the centre of the rack. Also, place the drip tray on level 1 to collect the fat.
- When grilling, do not insert the tray on levels 4 or 5, as this could deform it.
- The heating element switches on and off continuously. It is normal. The setting of the function determines how often this will occur.
- When the roast is ready, turn off the oven and leave to rest for a further 10 minutes. This allows a better distribution of the meat juices.
- If you are roasting pork with a crust, cut the crust crosswise and place the roast on the plate with the crust on the bottom.
- Place whole birds on the bottom rack, breast side down. Turn them over after 2/3 of the specified time.
- If cooking duck or goose, pierce the skin on the underside of the wings. This allows the fat to escape.
- If you are cooking fish pieces, turn them after 2/3 of the specified time. It is not necessary to do this if you cook the fish whole. Place the whole fish in the oven with the dorsal fin upwards. Placing half a potato or a small oven-safe container in the stomach cavity of the fish will make it more stable.
- How to tell if the roast is ready. Use a meat thermometer (available in specialised shops) or do the "spoon test". Press down on the roast with a spoon. If it's hard, it's ready. If, on the other hand, you can press it with a spoon, it needs a little more cooking.
- The roast is too dark in colour and some parts are slightly burnt. Check the height at which it is placed and the temperature.
- The roast looks good, but the juices are burnt. Next time, use a smaller baking dish or add more liquid.
- The roast looks good, but the juices are too clear and watery. Next time, use a bigger baking dish or add less liquid.
- Steam comes out of the roast. This is normal and is due to the laws of physics. Most of the steam escapes through the steam outlet. Steam can settle and form condensation on the knobs or on adjacent furniture elements.
5. CLEANING AND MAINTENANCE
Accessories cleaning
Before using the accessories for the first time, clean them thoroughly with hot water, soap and a soft cloth.
Cleaning and maintenance
- The oven must be cleaned after each use. When cleaning the oven, the light must be
switched on so that the surfaces can be seen better.
- The inside of the oven should only be washed with lukewarm water and a little liquid soap.
- After cleaning the inside of the oven, wipe it dry with a cloth.
- Never clean oven surfaces with steam.
- The inside of the oven should only be cleaned with warm soapy water, using a sponge or soft cloth. Abrasive cleaners must not be used.
- Any stains that may appear on the bottom of the oven will have been caused by splashes of food or spilled food. These splashes occur during the cooking process. They may be due to food being cooked at too high a temperature or placed in a container that is too small.
- You must select a temperature and cooking mode suitable for the food to be cooked. You should also make sure that you place the food in an appropriately sized dish and use the oven tray where appropriate.
- The exterior parts of the oven should only be cleaned with warm soapy water, using a sponge or soft cloth. Abrasive cleaners must not be used.
- If you use any type of oven cleaner, make sure that it is suitable for this appliance.
- Damage caused to the appliance by a cleaning agent will not be repaired free of charge, even if the appliance is within the warranty period.
- Do not use cleaning products containing abrasive materials for cleaning and maintenance of the glass front panel.
- No oven cleaner or other special cleaning agents are required to clean the oven. It is recommended to clean the oven with a damp cloth while it is hot.
- To clean the side walls and the oven door:
- Remove the side guides. To do this, press the bottom of the guides and pull them sideways at the same time. Then, push upwards and pull upwards until they are level. Finally, remove them.
- To reinstall the side guides after cleaning them, follow the reverse order.
Steam-assisted cleaning function
Use this mode to remove food remains from inside the oven. This method is only effective for the removal of light soiling. It is not effective to remove stubborn stains caused by cooking.
This function can only be used when the oven is cold.
- Make sure to empty the oven before cleaning it with this method.
- Prepare a solution of water (85%), white vinegar (10%), and dish detergent (5%) and spray generously on the door, side walls, and rear wall of the oven cavity.
- Pour 40 ml of water into the base of the cavity as shown in Figure 7.
- Close the door. Activate the function ② and set the temperature to 130 °C.
- Turn off the oven after 18 minutes.
- Allow the oven to cool down to a safe temperature before wiping it with a damp cloth.
Assembling and disassembling the oven door
- To clean the door, remove it. Each door hinge is fitted with a locking rod. When the door is closed, the door locks into place. To remove the door, you will need to open the locking rod.
- When the hinge is not locked, the door may suddenly close with great force. Therefore, make sure that the locking rod is closed at all times. It should only be open when the door is removed.
Disassembling the door
- Open the door completely.
- Lift both sides of the locking rod. Fig. 8
- Close the door as far as it will go. Hold it on both sides, then close it again. Move it up and down and pull it out.
Positioning the door
Follow the reverse order of disassembly of the door.
- When fitting the door, make sure that both hinges fit correctly.
- When opening the door, lower the locking rod. Fig. 9
- ⚠️ If the door accidentally falls down or the hinges suddenly close, do not reach into the hinges. Contact the official Cecotec Technical Support Service.
Disassembling and installing the door panel. Fig. 10
- Remove the oven door and place it on a piece of cloth.
- Press the button on the inside door glass bracket with both hands. The bracket will be released automatically.
- Remove the inner and centre panes.
Note:
- If the glass has some scratches, it may crack.
- Do not use a glass spatula or abrasive cleaning agents for cleaning.
Installation
- Fit the glass (previously placed in the frame) into the door opening.
- Both the right and left sides must be aligned with the opening. When they are, snap the glass into place.
- Position the oven door.
Replacing the oven light bulb
- If the oven light bulb fails, it must be replaced. ⚠️ Risk of electric shock.
-
Switch off the circuit breaker in the fuse box.
-
Place a kitchen towel in the oven when it is cold to prevent it from spoiling.
- Unscrew the glass cover by turning it counterclockwise.
- Replace the bulb with one of the same type.
- Screw the glass cover back on.
- Remove the tea towel and switch on the circuit breaker.
Periodic inspections
In addition to keeping the oven clean, you should:
- Conduct regular inspections. After the warranty period has expired, the oven must be inspected by a service centre at least once every two years.
- Repair any operational faults.
Warning
All repairs must be carried out by qualified personnel.
6. TROUBLESHOOTING
- The oven may malfunction during operation. Please check the list before contacting the official Cecotec Technical Support Service. You may be able to repair some faults yourself.
- Normal operation:
- When using the oven for the first time, it may release a peculiar smell and smoke for a few hours. Therefore, we recommend that you run it for one hour with nothing inside. After this time, allow it to cool and clean it.
- When the oven is in operation, you may hear some crackling, this is due to the metal bottom of the oven.
- If the food to be heated has some moisture in it, the heat emission orifice may give off steam during operation.
- The fan will start to run 15 minutes after the oven is switched on. Even if the oven is off, the fan will continue to run for 35 minutes.
- Preheat the oven before putting in the food.
- If you are going to bake for a long period of time, you can turn off the oven before the time is up. This will use the residual heat to finish cooking.
| Problem | Possible cause | Possible solution |
| The oven does not work | There has been a power cut. | Check the light in your kitchen or the operation of another appliance. |
| Circuit breaker failure. | Check if the circuit breaker is working. | |
| Forgot to select the desired mode. | Select a mode. | |
| The light does not switch on | The light bulb is faulty. | Replace the light bulb. |
| There is no power supply. | Check if the oven is powered by electricity. | |
| The device suddenly stops working | There has been a power cut. | Check if the kitchen light or any other appliances work. |
| Thermostat failure. | Check if the fan is working. If so, replace the thermostat with a new one. | |
| The oven does not heat | You have not selected the temperature. | Adjust the temperature. |
| If this model has a timer, you cannot set the time. | Set the timer. | |
| No power supply. | Check the power supply box. | |
| The heating element is damaged. | Replace the heating element for a new one. | |
| Water leaks out of the door when using the oven | Door seal is damaged. | Replace the door seal. |
| The hinge is not strong enough. | Replace the hinge. | |
| The oven stops working, but the motor does not | The oven has been running for a long period of time, so it needs time to cool down. | Place your hand on the air outlet. If you notice that the air comes out hot, it is not a problem. |
| Thermostat failure. | If you notice that the air comes out at room temperature, replace the thermostat. |
If the problem has not been solved:
- Remove the oven from the mains (switch off or disconnect the fuse).
- Contact the official Cecotec Technical Support Service. Do not try to repair the appliance on your own.
7. TECHNICAL SPECIFICATIONS
Product reference: 04731 / 04732
Product: Bolero Hexa M226001 Line A / Bolero Hexa M226001 Glass Black A
Voltage: 220 -240 V
Rated frequency: 50 - 60 Hz
Rated power: 2800 W
| Symbol | Value | Unit | |
| Model reference | 04731 / 04732 | ||
| Type of oven | Built-in electric oven | ||
| Mass of the appliance | M | 32.88 | Kg |
| Number of cavities | 1 | ||
| Heat source per cavity (electricity or gas) | Electricity | - | - |
| Volume per cavity | V | 70 | l |
| Energy consumption (electricity) required to heat a standardised load in a cavity of an electric heated oven during a cycle in conventional mode per cavity (electric final energy) | EC_electric cavity | 0.79 | kWh/cycle |
| Energy consumption required to heat a standardised load in a cavity of an electric heated oven during a cycle in fan-forced mode per cavity (electric final energy) | EC_electric cavity | 0.82 | kWh/cycle |
| Energy consumption required to heat a standardised load in a gas-fired cavity of an oven during a cycle in conventional mode per cavity (gas final energy) | EC_gas cavity | N/AN/A | MJ/cycle kWh/cycle (1) |
| Energy consumption required to heat a standardised load in a gas-fired cavity of an oven during a cycle in fan-forced mode per cavity (gas final energy) | EC_gas cavity | N/AN/A | MJ/cycle kWh/cycle |
| Energy Efficiency Index per cavity | EEI_cavity | 94.0 | - |
| Energy Efficiency Class | A | ||
| Standby mode | 0.72 | W | |
| (1) 1 kWh/cycle = 3.6 MJ/cycle. |
Technical specifications may change without prior notification to improve product quality. Made in China | Designed in Spain
8. DISPOSAL OF OLD ELECTRICAL AND ELECTRONIC APPLIANCES
This symbol indicates that, according to the applicable regulations, the product and/or batteries must be disposed of separately from household waste. When this product reaches the end of its shelf life, you should dispose of the cells/batteries/accumulators and take them to a collection point designated by the local authorities.
Consumers must contact their local authorities or retailer for information concerning the correct disposal of old appliances and/or their batteries.
Compliance with the above guidelines will help protecting the environment.
9. TECHNICAL SUPPORT AND WARRANTY
Cecotec shall be liable to the end user or consumer for any lack of conformity that exists at the time of delivery of the product under the terms, conditions, and deadlines established by the applicable regulations.
It is recommended that repairs be carried out by qualified personnel.
If at any moment you detect any problem with your product or have any doubt, do not hesitate to contact the official Cecotec Technical Support Service at +34 96 321 07 28.
10. COPYRIGHT
The intellectual property rights over the texts in this manual belong to CECOTEC INNOVACIONES, S.L. All rights reserved. The contents of this publication may not, in whole or in part, be reproduced, stored in a retrieval system, transmitted, or distributed by any means (electronic, mechanical, photocopying, recording or similar) without the prior authorization of CECOTEC INNOVACIONES, S.L.
1. PIÈCES ET COMPOSANTS
Img. 1
- Marron - Phase (L)
- De cake is te droog.
6. PROBLEEMOPLOSSING
Product: Bolero Hexa M226001 Line A / Bolero Hexa M226001 Glass Black A
Nominale spanning: 220 - 240 V
Nominale frequentie: 50 - 60 Hz
Nominaal vermogen: 2800 W
Fig./Img./Abb./Afb./Rys. 3

Fig./Img./Abb./Afb./Rys. 4
2
1
O
3
4
°C O

5
Fig./Img./Abb./Afb./Rys. 5
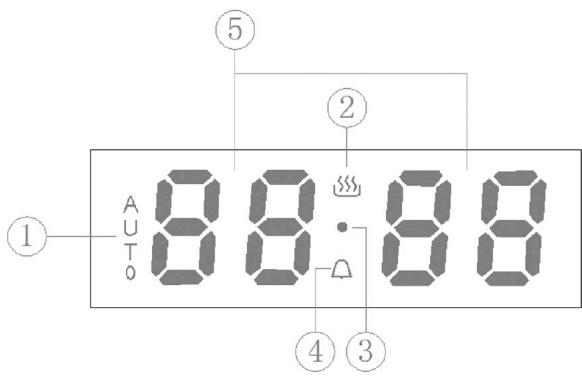
Fig./Img./Abb./Afb./Rys. 6

Fig./Img./Abb./Afb./Rys. 7
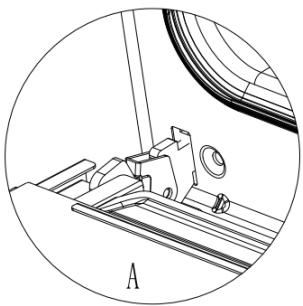
Fig./Img./Abb./Afb./ Rys. 8
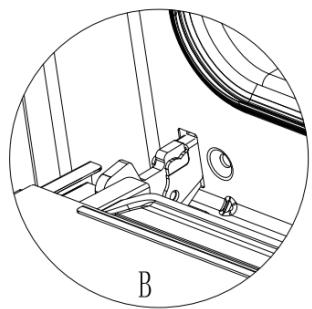
Fig./Img./Abb./Afb./Rys. 9

Fig./Img./Abb./Afb./Rys. 10
www.cecotec.es
- SOMMAIRE
- INSTRUCTIONS DE SÉCURITÉ
- BEFORE USE
- Before using the oven for the first time
- Box content
- INSTALLATION
- Before installation
- Installation and connection
- Mains connection
- ENGLISH
- NOTE:
- Installation
- Mounting the power cable
- Opening the terminal box. (Fig. 4):
- Connecting the power cable to the mains
- Check
- Accessories
- Inserting the accessories
- Tray
- Rack
- Guides
- OPERATION
- Fig. 5 key:
- Mode knob
- Display
- Indicator lights
- Oven status
- Oven settings
- Connecting the appliance to the mains
- Setting the oven
- Alarm setting
- Setting the cooking mode time
- Delay end function
- Delay start and end function
- Selecting the desired sound type
- Temperature knob
- Steam assisted cooking function (Steam Assist)
- Tips on energy saving
- Baking tips
- Roasting tips
- Tips for using the Grill mode
- CLEANING AND MAINTENANCE
- Accessories cleaning
- Cleaning and maintenance
- Steam-assisted cleaning function
- Assembling and disassembling the oven door
- Disassembling the door
- Positioning the door
- Disassembling and installing the door panel. Fig. 10
- Replacing the oven light bulb
- Periodic inspections
- TROUBLESHOOTING
- TECHNICAL SPECIFICATIONS
- DISPOSAL OF OLD ELECTRICAL AND ELECTRONIC APPLIANCES
- TECHNICAL SUPPORT AND WARRANTY
- COPYRIGHT
- PIÈCES ET COMPOSANTS
- Img. 1
- PROBLEEMOPLOSSING
Brand : CECOTEC
Model : Bolero Hexa M226001 Glass A
Category : Oven