, and the multi-function printer scans and stores the document into its memory. When the entire document is stored, the multi-function printer dials the receiving fax machine and sends the fax. If the receiving fax machine is busy or unable to receive the fax, the multi-function printer redials at a later time.
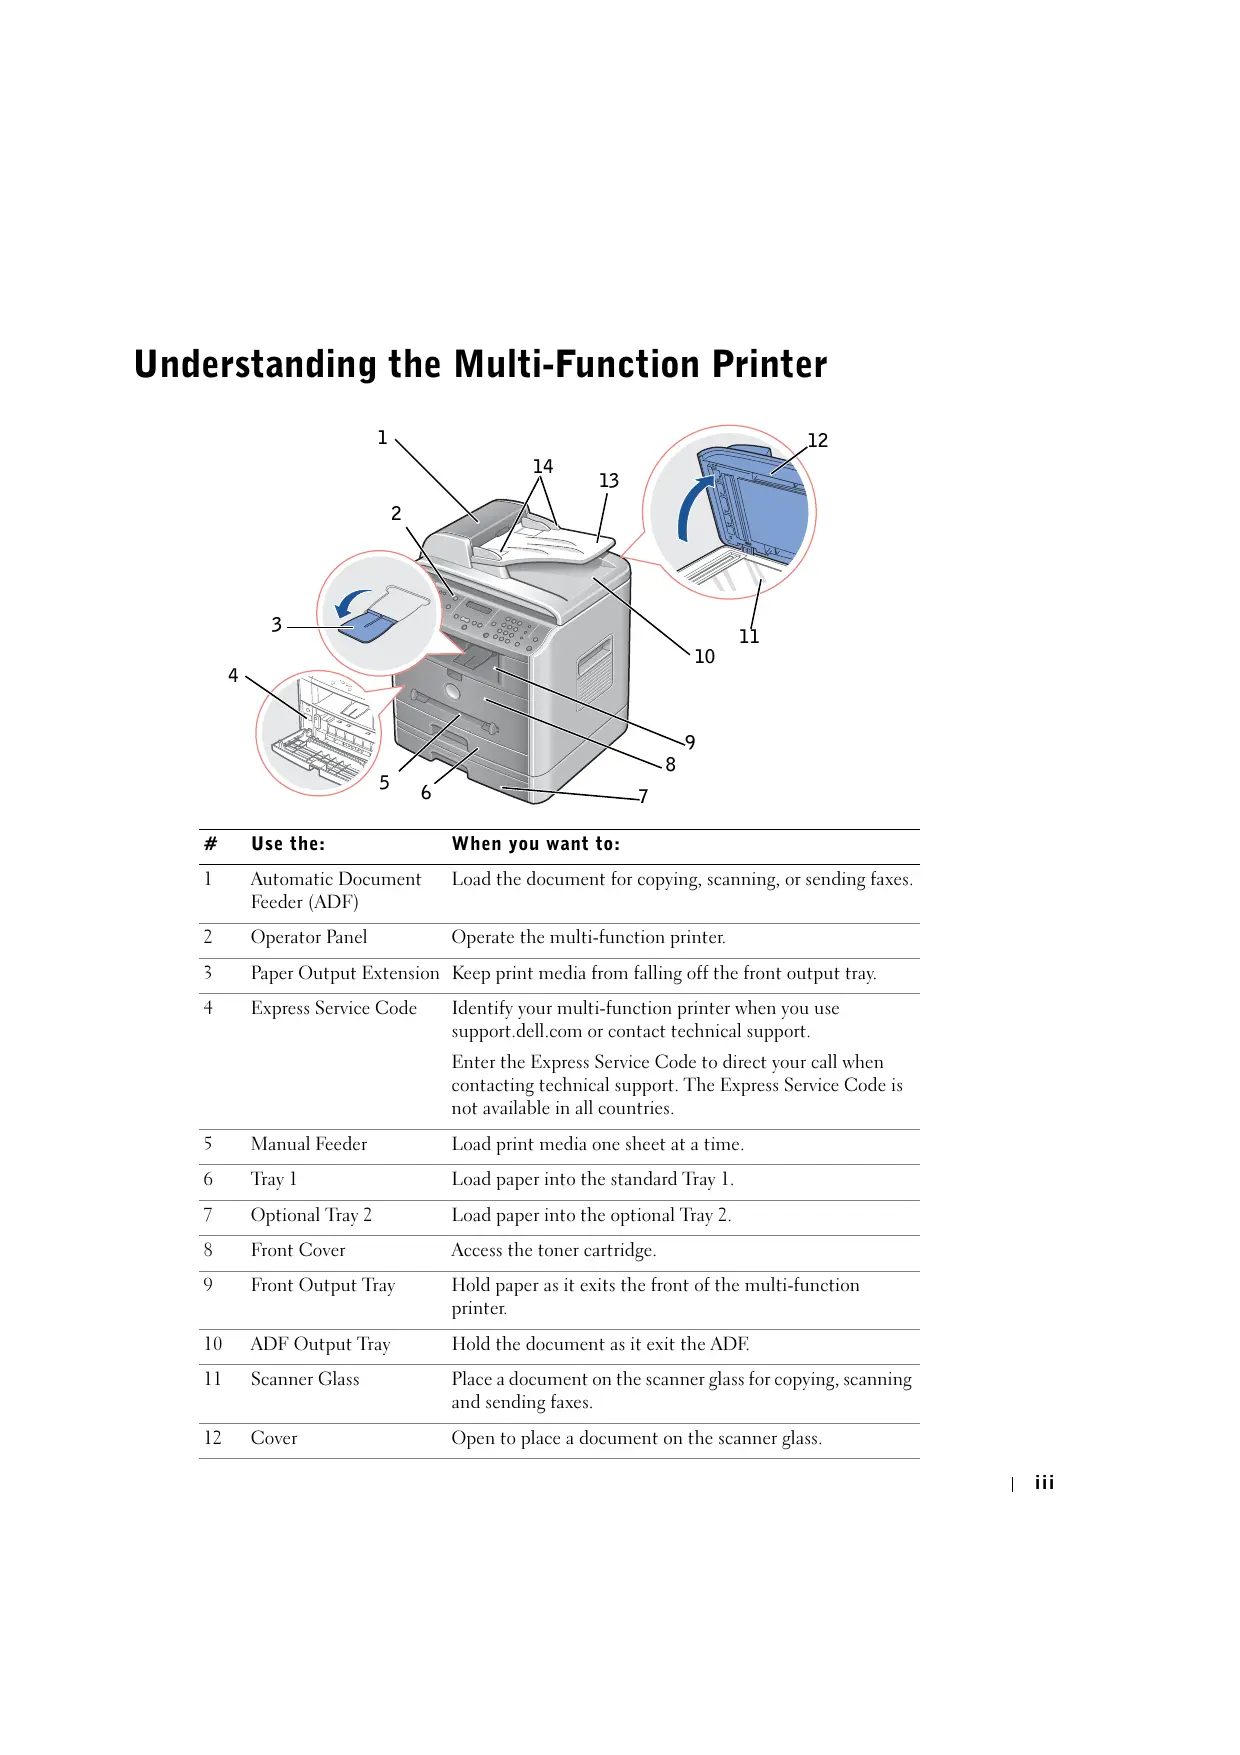
For more information about speed or group dial numbers, see page 9~10.
NOTE: Only one document at a time is sent from the fax queue.
NOTE: If you are faxing multiple pages automatically from the scanner glass, "Another Page?" appears on the display after the document is stored into memory. Remove the first page, place the next page on the glass, and select "1:Yes". Select "2:No" when all pages are faxed.
To send a fax manually, press and enter the fax number when you hear a dial tone. Press when you hear a high-pitched fax tone from the receiving fax machine.
NOTE: Use the ADF when manually sending multiple-page faxes. Multiple-page faxes cannot be sent manually from the scanner glass.
Your machines provide additional optional ways to send faxes such as Broadcasting, Delay Fax, Priority Fax, and Toll save. You can always cancel the scheduled fax. Refer to "Fax Feature" and "Advanced fax" in the fax menu options, see page 50~51.
Receiving a Fax
NOTE: The Dell Laser Multi-Function Printer 1600n cannot receive color faxes.
1 Press
until "Fax Setup" appears on the top line of the display. The first available menu item, "Receive Mode" displays on the bottom line.
2 Press.
3 Use the scroll button (or) to select the default receiving mode you want to use. You can select the following options:
Fax mode (automatic receive mode): The multi-function printer answers an incoming call and automatically goes into receive mode. The number of rings before the multi-function printer answers can be set in the Ring To Answer option. Please refer to the User's Guide. If the user memory is full, the multi-function printer is changed to Tel mode.
Tel mode (manual receive mode): Automatic fax reception is turned off. You can receive a fax by picking up the handset of the extension phone and then pressing the remote receive code (refer to the User's Guide), or by pressing (you can hear voice or fax tones from the remote machine) and then on the operator panel.
Ans/Fax mode: The multi-function printer can share one telephone line with an answering machine. In this mode, the multifunction printer will monitor the fax signal and pick up the line if there are fax tones. If the phone communication in your country is serial, this mode is not available.
DRPD mode: Before using the Distinctive Ring Pattern Detection (DRPD) option, distinctive ring service must be installed on your telephone line at your location to dial your fax number from outside.
4 Press <Select> to save the selection. .
Your machines provide an additional option, Secure Receive, to receive and print received faxes. Refer to "Advanced Fax" in the fax menu options, see page 51.
3. Fax Setup 4. Fax Feature 5. Advanced fax 6. Reports 8. Sound/Volume Receive Mode Delay Fax Send Forward Phone Book Speaker Ring to Answer Priority Fax RCV Forward Sent Report Ringer Contrast Add Page Toll Save RCV Report Key Sound Redial Term Cancel Job Junk Fax Setup System Data Alarm Sound Redials Ignore Toner Secure Receive Scheduled Jobs MSG Confirm Prefix Dial MSG Confirm Auto Report Stamp RCV Name Junk Fax List Auto Reduction Cover Page Discard Size ECM Mode Receive Code DRPD Mode
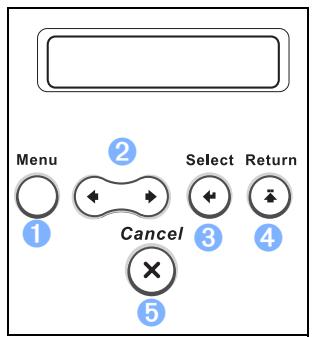
1 Press < Menu> to display the menu features.
Fax Setup
Receive Mode: Select the default fax receiving mode.
Fax mode: The fax machine answers an incoming call and automatically enters receive mode. The ring count required to enter receive mode is set in the System Data. If the fax machine memory is full, the receive mode is automatically changed to Tel mode.
Tel mode: The fax machine only answers the call if the extension phone is picked up and the remote receive code is pressed, or if <On Hook Dial> pressed and then the <Send Fax> button is pressed when fax tones are heard.
Ans/Fax mode: Share one phone line with Telephone Answering Device (TAD). The TAD picks up the line but the fax machine automatically monitors and takes the phone line if fax tones are received.
DRPD mode: Use one telephone line to answer different phone numbers using the Distinctive Ring Pattern Detection (DRPD). This selection is only available if the "DRPD Mode" is set to recognize the ring patterns to automatically answer as a fax call in the Fax Setup menu.
Ring to Answer: The number of incoming rings before the fax machine answers? see Available Fax Setup Options.
Contrast: Select the default contrast mode. This option is not used for Color Fax.
Lighter Use when the original document is too dark.
Redial Term: The fax machine automatically redials if the remote fax machine is busy.
MSG Confirm: A report that indicates a successful transmission.
Auto Report: A report that provides the previous 50 communications operations.
Auto Reduction: Automatically reduce the received fax page to fit the paper loaded in the fax machine.
Discard Size: Discard any excess at the bottom of the page when receiving a document longer than the paper. A received page outside the set margin is printed full size on two sheets.
Receive Code: Initiate fax reception (with a phone plugged into the back of the machine) by entering a receive code, 9 , when fax tones are heard. The receive code is preset at the factory. The digit "9" can be changed, 0-9.
DRPD Mode: See the description under Receive Mode.
Fax Feature
Broadcasting: Use the button to send a document to multiple locations. A second broadcast operation is not permitted until the first one is completed.
Delay Fax: Set the fax machine to send a fax at a later pre-defined time. The display reminds you that you are in Standby mode and that a delayed fax is set.
Priority Fax: Send a high priority document ahead of reserved operations.
Add Page: Add documents to the previously reserved delayed transmission in the fax machine's memory.
Cancel Job: Delete/cancel a scheduled fax job.
Ignore Toner: Set to print the incoming fax stored in memory when toner cartridge is nearly empty.
Printing Reports
The following reports are available:
Phonebook List: A speed dial list of the numbers stored in the memory.
Sent Fax Report: A list of recently sent faxes.
Received Fax Report: A list of recently received faxes.
System Data List: A status list of the user-selectable options.
Message Confirmation: Reports the fax number, the number of pages, the elapsed time of the job, the communication mode, and the communication results.
Junk Fax Number List: A list of numbers for blocking unwanted faxes, recognized by the last 6 digits of the junk fax numbers.
Multi-communication Report: Automatically printed after sending documents to multiple locations.
Advanced fax
The following options are available:
Send Forward: Set to always forward all outgoing faxes to the specified destination.
Print Local Copy: Set to print the fax, if fax forwarding is completed with no error.
Toll Save: Set to store ALL scanned faxes in memory and send at the pre-set time.
Junk Fax Setup: Set junk fax numbers for blocking any unwanted faxes.
Secure Receive: Set Secure Receive option with or without setting a pas-code to restrict a printout of received faxes. When a fax is received in this mode, the machine stores it into memory and displays "Secure Receive". To print received documents, access Secure Receive and select "Print" with the four-digit pass-code.
NOTE: When the mode is turned off, any stored faxes are printed.
NOTICE:
1 For memory transmission, the Super Fine resolution is unavailable. The resolution setting is automatically changed to Fine.
Using an Answering Machine
You can connect a telephone answering device (TAD) directly to the back of your multi-function printer as shown in Figure 1.
Set your multi-function printer to Ans/Fax mode and set the Ring to Answer to a digit greater than the rings to answer setting for the TAD.
When the TAD picks up the call, the multi-function printer monitors and takes the line if fax tones are received and then starts receiving the fax.
If the answering device is off, the printer automatically goes into Fax mode after a predefined number of rings.
If you answer the call and hear fax tones, the multi-function printer will answer the fax call if you
press and then button and hang up the receiver, or
press the remote receive code 9 and hang up the receiver.
Using a Computer Modem
If you want to use your computer modem for faxing or for a dial-up internet connection, connect the computer modem directly to the back of your multi-function printer with the TAD as shown here in Figure 2.
Set your multi-function printer to Ans/Fax mode and set the Ring to Answer to a digit greater than the rings to answer setting for the TAD.
Turn off the computer modem's fax-receive feature.
Do not use the computer modem if your multi-function printer is sending or receiving a fax.
Follow the instructions provided with your computer modem and fax application to fax via the computer modem.
Refer to the DELL Laser MFP 1600n User's Guide if you want to capture images using your printer and Dell ScanDirect™ and send images using your fax application with the computer modem.
SECTION 5
Maintenance
Replacing the ADF Rubber Pad
Ordering Supplies
Replacing the Toner Cartridge
Cleaning Your Multi-Function Printer
Replacing the ADF Rubber Pad
You can purchase a ADF rubber pad from the Dell™ Toner Management System or the Dell Printer Configuration Web Tool. See your User's Guide for more information.
1 Open the ADF Cover.
2 Rotate the bushing on one end of the ADF roller toward the ADF(①) and remove the roller from the slot(②).
3 Remove the ADF rubber pad from the ADF, as shown.
4 Insert a new ADF rubber pad into place.
6 Close the ADF cover.
Ordering Supplies
You can order supplies using the Dell™ Toner Management System or the Dell Printer Configuration Web Tool.
If your multi-function printer is connected to a network, type your printer's IP address in your Web browser or open the Network Status Monitor Center to launch the Dell Printer Configuration Web Tool and click the toner supplies link. For details, please refer to the User's Guide.
1 Click the Dell Toner Reorder Program icon on your desktop. OR
Replacing the Toner Cartridge
CAUTION: Before performing any of the procedures listed in this section, read and follow the safety information on page 1.
CAUTION: Do not touch the green underside of the toner cartridge. Use the handle on the cartridge to avoid touching this area.
When the toner cartridge is near the end of its life, the LCD displays the warning message "Toner Low". Additional pages may be printed, but white streaks or light print will occur. Gently shake the toner cartridge from side-to-side to distribute the toner evenly and temporarily improve print quality. When the LCD displays the warning message "Toner Empty Replace Toner", printing stops and you must insert a new cartridge.
NOTE: The Dell Laser Multi-Function Printer 1600n can print received faxes when the toner is empty. For more information, see your User's Guide.
To order more toner, go to www.dell.com/supplies.
CAUTION: For best results, use Dell toner cartridges. Print quality and printer reliability are not guaranteed if you do not use Dell supplies.
To replace the toner cartridge:
1 Open the front cover.
2 Lightly pull the toner cartridge straight out.
3 Unpack the new toner cartridge and hold the toner cartridge by the handle and gently roll it from side-to-side to distribute the toner evenly inside the cartridge.
Save the box and the cover for shipping.
NOTE: If toner comes into contact with your clothing, wipe the toner off with a dry cloth and wash your clothing in cold water. Hot water sets toner into fabric.
4 Align the toner cartridge with the labeled arrows, then slide it into the multifunction printer until it locks firmly into place.
5 Close the front cover.
Cleaning Your Multi-Function Printer
To maintain the print quality, follow the cleaning procedures below, each time the toner cartridge is replaced or if print quality problems occur.
NOTE: Do not touch the transfer roller located under the toner cartridge when cleaning inside the multi-function printer. Oil from your fingers may cause print quality problems.
Cleaning the Exterior
Clean the multi-function printer cabinet with a soft, damp, lint-free cloth. Do not let water drip onto the multi-function printer or inside the multi-function printer.
Cleaning the Interior
Paper, toner, and dust particles can accumulate inside the multi-function printer and cause print quality problems, such as smearing or toner specks. Clean inside the multi-function printer to prevent these problems.
1 Power the multi-function printer off and unplug the power cord. Specify the length of time it takes for the printer to cool down.
CAUTION: Do not touch the green underside of the toner cartridge. Use the handle on the cartridge to avoid touching this area.
CAUTION: To prevent damage, do not expose the toner cartridge to light for more than a few minutes.
3 With a dry and lint-free cloth, wipe away any dust and spilled toner from the toner cartridge area and the toner cartridge cavity.
CAUTION: Do not touch the transfer roller inside the multi-function printer. Oil from your fingers may cause print quality problems.
4 Locate the long strip of glass (LSU) inside the top of the cartridge compartment, and gently swab the glass to see if dirt turns the white cotton black.
5 Reinsert the toner cartridge and close the front cover.
Cleaning the scanner
Keeping the scanner clean helps ensure the best possible copies. Dell recommends cleaning the scanner at the start of each day and during the day, as needed.
1 Slightly dampen a soft lint-free cloth or paper towel with water.
3 Wipe the surface of the scanner glass and ADF glass until it is clean and dry.
1 White Sheet 2 Document Cover 3 ADF Glass 4 Scanner Glass
4 Wipe the underside of the white document cover and white sheet until it is clean and dry.
5 Close the document cover.
Cleaning the Drum
If there are streaks or spots on your print, the Organic Photo Conductor (OPC) drum of the cartridge may require cleaning.
1 Before setting the cleaning procedure, make sure that paper is loaded in the multi-function printer.
2 Press
on the operator panel until "Maintenance" appears on the top line of the display.
The first available menu item, "Clean Drum", displays on the bottom line.
3 Press.
The display confirms your selection.
The multi-function printer prints out a cleaning page. Toner particles on the drum surface are affixed to the paper.
If the problem remains, repeat steps 1 through 3 until toner particles are not affixed to the paper.
SECTION 6
Troubleshooting
Clearing Jams in the ADF
Clearing Jams in the Paper Tray
More Troubleshooting
Clearing Jams in the ADF
When a document jams while it passes through the Automatic Document Feeder (ADF), "Document Jam" appears on the display.
NOTE: To prevent document jams, use the scanner glass for thick, thin or mixed documents.
1 Remove the remaining documents from the ADF.
If the document is jammed in the paper feed area:
a Open the ADF cover.
b Remove the document by gently pulling it straight up.
c Close the ADF cover. Then reload the document into the ADF.
If the document is jammed in the paper exit area:
a Open the document cover and turn the release knob to remove the misfed documents from the ADF output tray.
b Close the document cover. Then load the documents back into the ADF.
2 If you cannot see the paper or the paper does not move when you pulled, open the document cover.
4 Close the document cover. Then load the documents back into the ADF.
Clearing Jams in the Paper Tray
Operator Panel Message Location of Jam Go to [Paper Jam 0]Open/Close Door Paper Feed Jam (Tray 1)Paper Feed Jam (optional Tray 2) Image below.page 73. [Paper Jam 1]Open/Close Door Paper Exit Jam page 70. [Paper Jam 2]Check Inside Fuser Area Jam page 71. [Manual F. Jam] Manual Feeder Jam page 73.
To avoid tearing the paper, pull the jammed paper out gently and slowly. Follow the steps below to clear the jam.
Paper Feed Jam (Tray 1)
1 Open and close the front cover. The jammed paper automatically exits the multi-function printer.
If the paper does not exit, continue to step 2.
2 Pull the paper tray open.
3 Remove the paper by gently pulling it straight out.
If you cannot see the paper or the paper does not move when pulled, check the fuser area. For more information, see page 71.
4 Insert the paper tray into the multi-function printer until it snaps into place.
5 Open and close the front cover to resume printing.
Paper Exit Jam
1 Open and close the front cover. The jammed paper automatically exits the multi-function printer. If the paper does not exit, continue to step 2.
3 If you cannot see the paper in the front output tray or the paper does not move when pulled, open the rear cover.
4 Remove the paper by gently pulling it straight out.
5 Close the rear cover.
Fuser Area Jam
NOTE: The fuser area is hot. Take care when removing paper from the multi-function printer.
1 Open the front cover and lightly pull the toner cartridge straight out.
2 Remove the paper by gently pulling it straight out.
3 Replace the toner cartridge and close the front cover. Printing automatically resumes.
Manual Feeder Jam
"Manual F. Jam" appears on the display when you try to print using the manual feeder and the multi-function printer does not detect paper, due to improper paper loading.
1 Locate the jammed paper in the manual feeder
Paper Feed Jam (Optional Tray 2)
1 Pull the optional Tray 2 open.
If you cannot see the paper in this area or the paper does not move when pulled, go to step 3.
3 Pull the standard Tray 1 open.
4 Pull the paper straight up and out.
5 Insert Tray 1 in the multi-function printer until it snaps into place.
Tips for Avoiding Paper Jams
By selecting the correct paper types, most paper jams can be avoided. When a paper jam occurs, follow the steps outlined in "Clearing Jams in the Paper Tray" on page 68~74.
Follow the procedures on page 27 to load paper correctly. Ensure that the adjustable guides are correctly positioned.
Do not overload the paper tray. Ensure that the paper is below the paper capacity mark on the inside wall of the paper tray.
Do not remove the paper from the tray while your multi-function printer is printing.
Flex, fan and straighten the paper before loading.
Do not use creased, damp or curled paper.
Do not mix paper types in the paper tray.
Use only recommended print materials. Please refer to the User's Guide.
Ensure that the recommended print side of print materials is facing down in the paper tray and facing up in the manual feeder.
More Troubleshooting
For more information about error messages or printing problems, see your User's Guide.
SECTION7
Installing Options
Precautions When Installing Printer Options
Installing Printer Memory
Installing an Optional Tray 2
Precautions When Installing Printer Options
DISCONNECTING THE POWER CORD:
Never remove the control board while the multi-function printer is plugged in.
To avoid the possibility of an electrical shock, always disconnect the power cord when installing or removing ANY internal or external printer option.
DISCHARGE OF STATIC ELECTRICITY:
The control board and internal printer memory are sensitive to static electricity. Before installing or removing an internal printer memory, discharge static electricity from your body by touching something metal on any device plugged into a grounded power source. If you walk around before finishing installation, discharge any static electricity once again.
Installing Printer Memory
Additional printer memory is provided on a Dual In-line Memory Module (DIMM).
NOTE: Your multifunction printer supports only Dell DIMMs. Order Dell DIMMs online at v.dell.com.
1 Power the multi-function printer off and unplug all cables from the multi-function printer.
3 Open the lever on each side of the DIMM slots completely.
4 Remove the memory DIMM from the antistatic package. Locate the alignment notches on the bottom edge of the DIMM.
NOTE: Avoid touching the connection points along the edge of the memory.
5 Hold the memory DIMM. Align the notches on the DIMM with the notches at the top of the DIMM slot.
6 Insert the ends of the memory DIMM into the slot on the levers.
7 Push the memory DIMM firmly in to make sure you fully insert it into the slot.
8 Replace the control board cover, as shown.
9 Reconnect the power cord and printer cable, and power the multi-function printer on.
Removing the Memory
1 Follow steps 1 and 2 on page 76 to access the control board.
3 Place the DIMM in its original packaging or wrap it with paper and store it in a box.
Installing an Optional Tray 2
You can increase the paper handling capacity of your multi-function printer by installing an optional Tray 2. This tray holds 250 sheets of paper.
1 Power the multi-function printer off and unplug all cables from the multi-function printer.
3 Find the location of the connector and the optional tray positioners.
4 Place the multi-function printer over the tray, aligning the feet on the multi-function printer with the positioners in the optional Tray2.
5 Connect the cable into the connector on the back of the multi-function printer.
6 Load paper in the optional Tray 2. For information about loading paper in this tray, see page 27.
When you print a document on paper loaded in the optional Tray 2, you must configure the properties of the printer driver.
To access the properties of the printer driver:
1 Click the Windows Start button.
For Windows XP/Server 2003, click Printers and Faxes.
3 Click the Dell Laser MFP 1600n printer.
In Windows 98/Me, click Properties.
In Windows 2000/XP/Server 2003, click Print Setup or click Properties and then point to Printing Preferences.
In Windows NT 4.0, click Document Default.
5 Click the Printer tab, and select Tray 2 from the Optional Tray drop-down list.
SECTION 8
Technical Assistance
Automated Order-Status Service
Contacting Dell
Technical Assistance
If you need help with a technical problem, Dell is ready to assist you.
1 Call technical support from a telephone near or at the printer so that technical support can assist you with any necessary procedures. When calling Dell, use your Express Service Code to help expedite the routing of your call to the proper support personnel.
The Express Service Code is located on the back of the multi-function printer, as shown below.
NOTE: Dell's Express Service Code system may not be available in all countries.
2 In the U.S., Business customers should call 1-877-459-7298, and Consumer (Home and Home Office) customers should call 1-800-624-9896.
If you are calling from a different country or are in a different Service area, see "Contacting Dell" on page 85 for your local telephone number.
3 Follow the menu prompts in the automated telephone system to speak with a technical support representative.
Automated Order-Status Service
To check on the status of any Dell™ products that you have ordered, you can go to support.dell.com, or you can call the automated order-status service. A recording prompts you for the information needed to locate and report on your order. See "Contacting Dell" for the telephone number to call for your region.
Dell™, Dimension™, OptiPlex™, Dell Precision™, Latitude™, Inspiron™, DellNet™, PowerApp™, PowerVault™, Axiim™, Dell ScanCenter™, Dell™ Toner Management System
To contact Dell electronically, you can access the following websites:
www.dell.com
For specific web addresses for your country, find the appropriate country section in the table below.
NOTE: Toll-free numbers are for use within the country for which they are listed.
When you need to contact Dell, use the electronic addresses, telephone numbers, and codes provided in the following table. If you need assistance in determining which codes to use, contact a local or an international operator.
Country (City) International Access Code Country Code City Code Department Name or Service Area, Website and E-Mail Address Area Codes, Local Numbers, and Toll-Free Numbers U.S.A. (Austin, Texas) Automated Order-Status Service toll-free: 1-800-433-9014 International Access Code: 011 AutoTech (portable and desktop computers) toll-free: 1-800-247-9362 Country Code: 1 Consumer (Home and Home Office) Technical Support toll-free: 1-800-624-9896 Customer Service toll-free: 1-800-624-9897 DellNet™ Service and Support toll-free: 1-877-Dellnet (1-877-335-5638) Employee Purchase Program (EPP) Customers toll-free: 1-800-695-8133 Financial Services website: www.dellfinancialservices.com Financial Services (lease/loans) toll-free: 1-877-577-3355 Financial Services (Dell Preferred Accounts [DPA]) toll-free: 1-800-283-2210 Business Customer Service and Technical Support toll-free: 1-877-459-7298 Employee Purchase Program (EPP) Customers toll-free: 1-800-695-8133 Projectors Technical Support toll-free: 1-877-459-7298 Public (government, education, and healthcare) Customer Service and Technical Support toll-free: 1-800-456-3355 Employee Purchase Program (EPP) Customers toll-free: 1-800-234-1490 Dell Sales toll-free: 1-800-289-3355 or toll-free: 1-800-879-3355 Dell Outlet Store (Dell refurbished computers) toll-free: 1-888-798-7561 Software and Peripherals Sales toll-free: 1-800-671-3355 Spare Parts Sales toll-free: 1-800-357-3355 Extended Service and Warranty Sales toll-free: 1-800-247-4618 Fax toll-free: 1-800-727-8320 Dell Services for the Deaf, Hard-of-Hearing, or Speech-Impaired toll-free: 1-877-DELLTTY (1-877-335-5889) Anguilla General Support toll-free: 800-335-0031 Antigua and Barbuda General Support 1-800-805-5924 Argentina (Buenos Aires) Website: www.dell.com.ar International Access Code: 00 Tech Support and Customer Care toll-free: 0-800-444-0733 Country Code: 54 Sales 0-810-444-3355 City Code: 11 Tech Support Fax 11 4515 7139 Customer Care Fax 11 4515 7138 Aruba General Support toll-free: 800-1578 Australia (Sydney) E-mail (Australia): au_tech_support@ Dell.com International Access Code: 0011 E-mail (New Zealand): nz_tech_support@ Dell.com Country Code: 61 Home and Small Business 1-300-65-55-33 City Code: 2 Government and Business toll-free: 1-800-633-559 Preferred Accounts Division (PAD) toll-free: 1-800-060-889 Customer Care toll-free: 1-800-819-339 Corporate Sales toll-free: 1-800-808-385 Transaction Sales toll-free: 1-800-808-312 Fax toll-free: 1-800-818-341 Austria (Vienna) Website: support.euro.dell.com International Access Code: 900 E-mail: tech_support_central_europe@ Dell.com Country Code: 43 Home/Small Business Sales 0820 240 530 00 City Code: 1 Home/Small Business Fax 0820 240 530 49 Home/Small Business Customer Care 0820 240 530 14 Preferred Accounts/Corporate Customer Care 0820 240 530 16 Home/Small Business Technical Support 0820 240 530 14 Preferred Accounts/Corporate Technical Support 0660 8779 Switchboard 0820 240 530 00 Bahamas General Support toll-free: 1-866-278-6818 Barbados General Support 1-800-534-3066 Belgium (Brussels) Website: support.euro.dell.com International Access Code: 00 E-mail: tech_be@dell.com Country Code: 32 E-mail for French Speaking Customers: support.euro.dell.com/be/fr/emaildell/ City Code: 2 Technical Support 02 481 92 88 Customer Care 02 481 91 19 Corporate Sales 02 481 91 00 Fax 02 481 92 99 Switchboard 02 481 91 00 Bermuda General Support 1-800-342-0671 Bolivia General Support toll-free: 800-10-0238 Brazil Website: www.dell.com.br International Access Code: 00 Customer Support, Technical Support 0800 90 3355 Country Code: 55 Tech Support Fax 51 481 5470 City Code: 51 Customer Care Fax 51 481 5480 Sales 0800 90 3390 British Virgin Islands General Support toll-free: 1-866-278-6820 Brunei Customer Technical Support (Penang, Malaysia) 604 633 4966 Country Code: 673 Customer Service (Penang, Malaysia) 604 633 4949 Transaction Sales (Penang, Malaysia) 604 633 4955 Canada (North York, Ontario) Online Order Status: www.dell.ca/ostatus International Access Code: 011 AutoTech (automated technical support) toll-free: 1-800-247-9362 TechFax toll-free: 1-800-950-1329 Customer Care (Home Sales/Small Business) toll-free: 1-800-847-4096 Customer Care (med./large business, government) toll-free: 1-800-326-9463 Technical Support (Home Sales/Small Business) toll-free: 1-800-847-4096 Technical Support (med./large bus., government) toll-free: 1-800-387-5757 Sales (Home Sales/Small Business) toll-free: 1-800-387-5752 Sales (med./large bus., government) toll-free: 1-800-387-5755 Spare Parts Sales & Extended Service Sales 1 866 440 3355 Cayman Islands General Support 1-800-805-7541 Chile (Santiago) Sales, Customer Support, and Technical Support toll-free: 1230-020-4823 Country Code: 56 City Code: 2 China (Xiamen) Tech Support website: support.ap.dell.com/china Country Code: 86 Tech Support E-mail: cn_support@dell.com City Code: 592 Tech Support Fax 818 1350 Home and Small Business Technical Support toll-free: 800 858 2437 Corporate Accounts Technical Support toll-free: 800 858 2333 Customer Experience toll-free: 800 858 2060 Home and Small Business toll-free: 800 858 2222 Preferred Accounts Division toll-free: 800 858 2557 Large Corporate Accounts GCP toll-free: 800 858 2055 Large Corporate Accounts Key Accounts toll-free: 800 858 2628 Large Corporate Accounts North toll-free: 800 858 2999 Large Corporate Accounts North Government and Education toll-free: 800 858 2955 Large Corporate Accounts East toll-free: 800 858 2020 Large Corporate Accounts East Government and Education toll-free: 800 858 2669 Large Corporate Accounts Queue Team toll-free: 800 858 2222 Large Corporate Accounts South toll-free: 800 858 2355 Large Corporate Accounts West toll-free: 800 858 2811 Large Corporate Accounts Spare Parts toll-free: 800 858 2621 Colombia General Support 980-9-15-3978 Costa Rica General Support 0800-012-0435 Czech Republic (Prague) Website: support.euro.dell.com International Access Code: 00 E-mail: czech_dell@dell.com Country Code: 420 Technical Support 02 2186 27 27 City Code: 2 Customer Care 02 2186 27 11 Fax 02 2186 27 14 TechFax 02 2186 27 28 Switchboard 02 2186 27 11 Denmark (Copenhagen) Website: support.euro.dell.com International Access Code: 00 E-mail Support (portable computers): den_nbk_support@dell.com Country Code: 45 E-mail Support (desktop computers): den_support@dell.com E-mail Support (servers): Nordic_server_support@dell.com Technical Support 7023 0182 Customer Care (Relational) 7023 0184 Home/Small Business Customer Care 3287 5505 Switchboard (Relational) 3287 1200 Fax Switchboard (Relational) 3287 1201 Switchboard (Home/Small Business) 3287 5000 Fax Switchboard (Home/Small Business) 3287 5001 Dominica General Support toll-free: 1-866-278-6821 Dominican Republic General Support 1-800-148-0530 Ecuador General Support toll-free: 999-119 El Salvador General Support 01-899-753-0777 Finland (Helsinki) Website: support.euro.dell.com International Access Code: 990 E-mail: fin_support@dell.com Country Code: 358 E-mail Support (servers): Nordic_support@dell.com City Code: 9 Technical Support 09 253 313 60 Technical Support Fax 09 253 313 81 Relational Customer Care 09 253 313 38 Home/Small Business Customer Care 09 693 791 94 Fax 09 253 313 99 Switchboard 09 253 313 00 France (Paris) (Montpellier) Website: support.euro.dell.com International Access Code: 00 E-mail: support.euro.dell.com/fr/fr/emaildell/ Country Code: 33 Home and Small Business City Codes: (1) (4) Technical Support 0825 387 270 Customer Care 0825 823 833 Switchboard 0825 004 700 Switchboard (calls from outside of France) 04 99 75 40 00 Sales 0825 004 700 Fax 0825 004 701 Fax (calls from outside of France) 04 99 75 40 01 Corporate Technical Support 0825 004 719 Customer Care 0825 338 339 Switchboard 01 55 94 71 00 Sales 01 55 94 71 00 Fax 01 55 94 71 01 Germany (Langen) Website: support.euro.dell.com International Access Code: 00 E-mail: tech_support_central_europe@dell.com Country Code: 49 Technical Support 06103 766-7200 City Code: 6103 Home/Small Business Customer Care 0180-5-224400 Global Segment Customer Care 06103 766-9570 Preferred Accounts Customer Care 06103 766-9420 Large Accounts Customer Care 06103 766-9560 Public Accounts Customer Care 06103 766-9555 Switchboard 06103 766-7000 Greece Website: support.euro.dell.com International Access Code: 00 E-mail: support.euro.dell.com/gr/en/emaildell/ Country Code: 30 Technical Support 080044149518 Gold Technical Support 08844140083 Switchboard 2108129800 Sales 2108129800 Fax 2108129812 Grenada General Support toll-free: 1-866-540-3355 Guatemala General Support 1-800-999-0136 Guyana General Support toll-free: 1-877-270-4609 Hong Kong Website: support.ap.dell.com International Access Code: 001 E-mail: ap_support@dell.com Country Code: 852 Technical Support (DimensionTM and InspironTM) 2969 3189 Technical Support (OptiPlexTM, LatitudeTM, and Dell PrecisionTM) 2969 3191 Technical Support (PowerAppTM and PowerVaultTM) 2969 3196 Gold Queue EEC Hotline 2969 3187 Customer Advocacy 3416 0910 Large Corporate Accounts 3416 0907 Global Customer Programs 3416 0908 Medium Business Division 3416 0912 Home and Small Business Division 2969 3105 India Technical Support 1600 33 8045 Sales 1600 33 8044 Ireland (Cherrywood) Website: support.euro.dell.com International Access Code: 16 E-mail: dell_direct_support@dell.com Country Code: 353 Technical Support 1850 543 543 City Code: 1 U.K. Technical Support (dial within U.K. only) 0870 908 0800 Home User Customer Care 01 204 4014 Small Business Customer Care 01 204 4014 U.K. Customer Care (dial within U.K. only) 0870 906 0010 Corporate Customer Care 1850 200 982 Corporate Customer Care (dial within U.K. only) 0870 907 4499 Ireland Sales 01 204 4444 U.K. Sales (dial within U.K. only) 0870 907 4000 Fax/SalesFax 01 204 0103 Switchboard 01 204 4444 Italy (Milan) Website: support.euro.dell.com International Access Code: 00 E-mail: support.euro.dell.com/it/it/emailldell/ Country Code: 39 Home and Small Business City Code: 02 Technical Support 02 577 826 90 Customer Care 02 696 821 14 Fax 02 696 821 13 Switchboard 02 696 821 12 Corporate Technical Support 02 577 826 90 Customer Care 02 577 825 55 Fax 02 575 035 30 Switchboard 02 577 821 Jamaica General Support (dial from within Jamaica only) 1-800-682-3639 Japan (Kawasaki) Website: support.jp.dell.com International Access Code: 001 Technical Support (servers) toll-free: 0120-198-498 Country Code: 81 Technical Support outside of Japan (servers) 81-44-556-4162 City Code: 44 Technical Support (DimensionTM and InspironTM) toll-free: 0120-198-226 Technical Support outside of Japan (Dimension and Inspiron) 81-44-520-1435 Technical Support (Dell PrecisionTM, OptiPlexTM, and LatitudeTM) toll-free:0120-198-433 Technical Support outside of Japan (Dell Precision, OptiPlex, and Latitude) 81-44-556-3894 Technical Support (AximTM) toll-free: 0120-981-690 Technical Support outside of Japan (Axim) 81-44-556-3468 Faxbox Service 044-556-3490 24-Hour Automated Order Service 044-556-3801 Customer Care 044-556-4240 Business Sales Division (up to 400 employees) 044-556-1465 Preferred Accounts Division Sales (over 400 employees) 044-556-3433 Large Corporate Accounts Sales (over 3500 employees) 044-556-3430 Public Sales (government agencies, educational institutions, and medical institutions) 044-556-1469 Global Segment Japan 044-556-3469 Individual User 044-556-1760 Switchboard 044-556-4300 Korea (Seoul) Technical Support toll-free: 080-200-3800 International Access Code: 001 Sales toll-free: 080-200-3600 Country Code: 82 Customer Service (Seoul, Korea) toll-free: 080-200-3800 City Code: 2 Customer Service (Penang, Malaysia) 604 633 4949 Fax 2194-6202 Switchboard 2194-6000 Latin America Customer Technical Support (Austin, Texas, U.S.A.) 512 728-4093 Customer Service (Austin, Texas, U.S.A.) 512 728-3619 Fax (Technical Support and Customer Service) (Austin, Texas, U.S.A.) 512 728-3883 Sales (Austin, Texas, U.S.A.) 512 728-4397 SalesFax (Austin, Texas, U.S.A.) 512 728-4600 or 512 728-3772 Luxembourg Website: support.euro.dell.com International Access Code: 00 E-mail: tech_be@ Dell.com Country Code: 352 Technical Support (Brussels, Belgium) 3420808075 Home/Small Business Sales (Brussels, Belgium) toll-free: 080016884 Corporate Sales (Brussels, Belgium) 02 481 91 00 Customer Care (Brussels, Belgium) 02 481 91 19 Fax (Brussels, Belgium) 02 481 92 99 Switchboard (Brussels, Belgium) 02 481 91 00 Macao Technical Support toll-free: 0800 582 Country Code: 853 Customer Service (Penang, Malaysia) 604 633 4949 Transaction Sales toll-free: 0800 581 Malaysia (Penang) Technical Support toll-free: 1 800 888 298 International Access Code: 00 Customer Service 04 633 4949 Country Code: 60 Transaction Sales toll-free: 1 800 888 202 City Code: 4 Corporate Sales toll-free: 1 800 888 213 Mexico Customer Technical Support 001-877-384-8979 International Access Code: 00 or 001-877-269-3383 Country Code: 52 Sales 50-81-8800 or 01-800-888-3355 Customer Service 001-877-384-8979 or 001-877-269-3383 Main 50-81-8800 or 01-800-888-3355 Montserrat General Support toll-free: 1-866-278-6822 Netherlands Antilles General Support 001-800-882-1519 Netherlands (Amsterdam) Website: support.euro.dell.com International Access Code: 00 E-mail (Technical Support): Country Code: 31 (Enterprise): nl_server_support@ Dell.com City Code: 20 (Latitude): nl Latitude_support@ Dell.com (Inspiron): nlInspiron_support@ Dell.com (Dimension): nl Dimension_support@ Dell.com (OptiPlex): nl_optiplex_support@ Dell.com (Dell Precision): nl_workstation_support@ Dell.com Technical Support 020 674 45 00 Technical Support Fax 020 674 47 66 Home/Small Business Customer Care 020 674 42 00 Relational Customer Care 020 674 4325 Home/Small Business Sales 020 674 55 00 Relational Sales 020 674 50 00 Home/Small Business Sales Fax 020 674 47 75 Relational Sales Fax 020 674 47 50 Switchboard 020 674 50 00 Switchboard Fax 020 674 47 50 New Zealand E-mail (New Zealand): nz_tech_support@ Dell.com International Access Code: 00 E-mail (Australia): au_tech_support@ Dell.com Country Code: 64 Home and Small Business 0800 446 255 Government and Business 0800 444 617 Sales 0800 441 567 Fax 0800 441 566 Nicaragua General Support 001-800-220-1006 Norway (Lysaker) Website: support.euro.dell.com International Access Code: 00 E-mail Support (portable computers): nor_nbk_support@ Dell.com Country Code: 47 E-mail Support (desktop computers): nor_support@ Dell.com E-mail Support (servers): nordic_server_support@ Dell.com Technical Support 671 16882 Relational Customer Care 671 17514 Home/Small Business Customer Care 23162298 Switchboard 671 16800 Fax Switchboard 671 16865 Panama General Support 001-800-507-0962 Peru General Support 0800-50-669 Poland (Warsaw) Website: support.euro.dell.com International Access Code: 011 E-mail: pl_support_tech@ Dell.com Country Code: 48 Customer Service Phone 57 95 700 City Code: 22 Customer Care 57 95 999 Sales 57 95 999 Customer Service Fax 57 95 806 Reception Desk Fax 57 95 998 Switchboard 57 95 999 Portugal Website: support.euro.dell.com International Access Code: 00 E-mail: support.euro.dell.com/pt/en/emaildell/ Country Code: 351 Technical Support 707200149 Customer Care 800 300 413 Sales 800 300 410 or 800 300 411 or 800 300 412 or 21 422 07 10 Fax 21 424 01 12 Puerto Rico General Support 1-800-805-7545 St. Kitts and Nevis General Support toll-free: 1-877-441-4731 St. Lucia General Support 1-800-882-1521 St. Vincent and the Grenadines General Support toll-free: 1-877-270-4609 Singapore (Singapore) Technical Support toll-free: 800 6011 051 International Access Code: 005 Customer Service (Penang, Malaysia) 604 633 4949 Country Code: 65 Transaction Sales toll-free: 800 6011 054 Corporate Sales toll-free: 800 6011 053 South Africa (Johannesburg) Website: support.euro.dell.com International Access Code: E-mail: dell_za_support@dell.com 09/091 Technical Support 011 709 7710 Country Code: 27 Customer Care 011 709 7707 City Code: 11 Sales 011 709 7700 Fax 011 706 0495 Switchboard 011 709 7700 Southeast Asian and Pacific Countries Customer Technical Support, Customer Service, and Sales (Penang, Malaysia) 604 633 4810 Spain (Madrid) Website: support.euro.dell.com International Access Code: 00 E-mail: support.euro.dell.com/es/es/emailldell/ Country Code: 34 Home and Small Business City Code: 91 Technical Support 902 100 130 Customer Care 902 118 540 Sales 902 118 541 Switchboard 902 118 541 Fax 902 118 539 Corporate Technical Support 902 100 130 Customer Care 902 118 546 Switchboard 91 722 92 00 Fax 91 722 95 83 Sweden (Upplands Vasby) Website: support.euro.dell.com International Access Code: 00 E-mail: swe_support@dell.com Country Code: 46 E-mail Support for Latitude and Inspiron: City Code: 8 Swe-nbk_kats@dell.com E-mail Support for OptiPlex: Swe_kats@dell.com E-mail Support for Servers: Nordic_server_support@dell.com Technical Support 08 590 05 199 Relational Customer Care 08 590 05 642 Home/Small Business Customer Care 08 587 70 527 Employee Purchase Program (EPP) Support 20 140 14 44 Fax Technical Support 08 590 05 594 Sales 08 590 05 185 Switzerland (Geneva) Website: support.euro.dell.com International Access Code: 00 E-mail: swistech@dell.com Country Code: 41 E-mail for French-speaking HSB and Corporate Customers: support.euro.dell.com/ch/fr/emaildell/ City Code: 22 Technical Support (Home and Small Business) 0844 811 411 Technical Support (Corporate) 0844 822 844 Customer Care (Home and Small Business) 0848 802 202 Customer Care (Corporate) 0848 821 721 Fax 022 799 01 90 Switchboard 022 799 01 01 Taiwan Technical Support (portable and desktop computers) toll-free: 00801 86 1011 International Access Code: 002 Technical Support (servers) toll-free: 0080 60 1256 Country Code: 886 Transaction Sales toll-free: 0080 651 228 Corporate Sales toll-free: 0080 651 227 Thailand Technical Support toll-free: 0880 060 07 International Access Code: 001 Customer Service (Penang, Malaysia) 604 633 4949 Country Code: 66 Sales toll-free: 0880 060 09 Trinidad/Tobago General Support 1-800-805-8035 Turks and Caicos Islands General Support toll-free: 1-866-540-3355 U.K. (Bracknell) Website: support.euro.dell.com International Access Code: 00 Customer Care website: support.euro.dell.com/uk/en/ECare/Form/Home.asp Country Code: 44 City Code: 1344 E-mail: dell_direct_support@dell.com Technical Support (Corporate/Preferred Accounts/PAD [1000+ employees]) 0870 908 0500 Technical Support (direct/PAD and general) 0870 908 0800 Global Accounts Customer Care 01344 373 186 Home and Small Business Customer Care 0870 906 0010 Corporate Customer Care 01344 373 185 Preferred Accounts (500-5000 employees) 0870 906 0010 Customer Care Central Government Customer Care 01344 373 193 Local Government & Education Customer Care 01344 373 199 Health Customer Care 01344 373 194 Home and Small Business Sales 0870 907 4000 Corporate/Public Sector Sales 01344 860 456 Home and Small Business Fax 0870 907 4006 Uruguay General Support toll-free: 000-413-598-2521 U.S. Virgin Islands General Support 1-877-673-3355 Venezuela General Support 8001-3605
SECTION 9
Appendix
Limited Warranties and Return Policy
Dell Inc. Ink and Toner Cartridges Limited Warranties
Regulatory Notices
Dell™ Software License Agreement
Limited Warranties and Return Policy
Dell-branded hardware products purchased in the U.S. or Canada come with either a 90-day, 1-year, 2-year, 3-year, or 4-year limited warranty. To determine which warranty came with your hardware product(s), see your packing slip or invoice. The following sections describe the limited warranties and return policy for the U.S., the limited warranties and return policy for Canada and the manufacturer guarantee for Latin America and the Caribbean.
Limited Warranty for Dell-Branded Hardware Products (U.S. Only)
What is covered by this limited warranty?
This limited warranty covers defects in materials and workmanship in your—our end-user customer's—Dell-branded hardware products, including Dell-branded peripheral products.
What is not covered by this limited warranty?
This limited warranty does not cover:
Software, including the operating system and software added to the Dell-branded hardware products through our factory-integration system, third-party software, or the reloading of software
Problems that result from:
External causes such as accident, abuse, misuse, or problems with electrical power
Products with missing or altered Service Tags or serial numbers
Products for which Dell has not received payment
THIS WARRANTY GIVES YOU SPECIFIC LEGAL RIGHTS, AND YOU MAY ALSO HAVE OTHER RIGHTS WHICH VARY FROM STATE TO STATE (OR JURISDICTION TO JURISDICTION). DELL'S RESPONSIBILITY FOR MALFUNCTIONS AND DEFECTS IN HARDWARE IS LIMITED TO REPAIR AND REPLACEMENT AS SET FORTH IN THIS WARRANTY STATEMENT. ALL EXPRESS AND IMPLIED WARRANTYES FOR THE PRODUCT, INCLUDING BUT NOT LIMITED TO ANY IMPLIED WARRANTYES AND CONDITIONS OF MERCHANTABILITY AND FITNESS FOR A PARTICULAR PURPOSE, ARE LIMITED IN TIME TO THE TERM OF THE LIMITED WARRANTY PERIOD REFLECTED ON YOUR PACKING SLIP OR INVOICE. NO WARRANTYES, WHETHER EXPRESS OR IMPLIED, WILL APPLY AFTER THE LIMITED WARRANTY PERIOD HAS EXPIRED. SOME STATES DO NOT ALLOW LIMITATIONS ON HOW LONG AN IMPLIED WARRANTY LASTS, SO THIS LIMITATION MAY NOT APPLY TO YOU.
WE DO NOT ACCEPT LIABILITY BEYOND THE REMEDIES PROVIDED FOR IN THIS LIMITED WARRANTY OR FOR CONSEQUENTIAL OR INCIDENTAL DAMAGES, INCLUDING, WITHOUT LIMITATION, ANY LIABILITY FOR THIRD-PARTY CLAIMS AGAINST YOU FOR DAMAGES, FOR PRODUCTS NOT BEING AVAILABLE FOR USE, OR FOR LOST DATA OR LOST SOFTWARE. OUR LIABILITY WILL BE NO MORE THAN THE AMOUNT YOU PAID FOR THE PRODUCT THAT IS THE SUBJECT OF A CLAIM. THIS IS THE MAXIMUM AMOUNT FOR WHICH WE ARE RESPONSIBLE.
SOME STATES DO NOT ALLOW THE EXCLUSION OR LIMITATION OF INCIDENTAL OR CONSEQUENTIAL DAMAGES, SO THE ABOVE LIMITATION OR EXCLUSION MAY NOT APPLY TO YOU.
How long does this limited warranty last?
This limited warranty lasts for the time period indicated on your packing slip or invoice, except for the following Dell-branded hardware:
Portable computer batteries carry a 1-year limited warranty.
The limited warranty on all Dell-branded products begins on the date of the packing slip or invoice. The warranty period is not extended if we repair or replace a warranted product or any parts. Dell may change the availability of limited warranties, at its discretion, but any changes will not be retroactive.
What do I do if I need warranty service?
Before the warranty expires, please call us at the relevant number listed in the following table. Please also have your Dell Service Tag or order number available.
Individual Home Consumers: U.S. Only Technical Support 1-800-624-9896 Customer Service 1-800-624-9897 Individual Home Consumers who purchased through an Employee Purchase Program: Technical Support and Customer Service 1-800-822-8965 Home and Small Business Commercial Customers: Technical Support and Customer Service 1-800-456-3355 Medium, Large, or Global Commercial Customers, Healthcare Customers, and Value-Added Resellers (VARs): Technical Support and Customer Service 1-800-822-8965 Government and Education Customers: Technical Support and Customer Service 1-800-234-1490 Dell-Branded Memory 1-888-363-5150
What will Dell do?
During the 90 days of the 90-day limited warranty and the first year of all other limited warranties: During the 90 days of the 90-day limited warranty and the first year of all other limited warranties, we will repair any Dell-branded hardware products returned to us that prove to be defective in materials or workmanship. If we are not able to repair the product, we will replace it with a comparable product that is new or refurbished.
When you contact us, we will issue a Return Material Authorization Number for you to include with your return. You must return the products to us in their original or equivalent packaging, prepay shipping charges, and insure the shipment or accept the risk if the product is lost or damaged in shipment. We will return the repaired or replacement products to you. We will pay to ship the repaired or replaced products to you if you use an address in the United States (excluding Puerto Rico and U.S. possessions and territories). Otherwise, we will ship the product to you freight collect.
If we determine that the product is not covered under this warranty, we will notify you and inform you of service alternatives that are available to you on a fee basis.
NOTE: Before you ship the product(s) to us, make sure to back up the data on the hard drive(s) and any other storage device(s) in the product(s). Remove any confidential, proprietary, or personal information and removable media such as floppy disks, CDs, or PC Cards. We are not responsible for any of your confidential, proprietary, or personal information; lost or corrupted data; or damaged or lost removable media.
During the remaining years: For the remaining period of the limited warranty, we will replace any defective part with new or refurbished parts, if we agree that it needs to be replaced. When you contact us, we will require a valid credit card number at the time you request a replacement part, but we will not charge you for the replacement part as long as you return the original part to us within 30 days after we ship the replacement part to you. If we do not receive the original part within 30 days, we will charge to your credit card the then-current standard price for that part.
We will pay to ship the part to you if you use an address in the United States (excluding Puerto Rico and U.S. possessions and territories). Otherwise, we will ship the part freight collect. We will also include a prepaid shipping container with each replacement part for your use in returning the replaced part to us.
NOTE: Before you replace parts, make sure to back up the data on the hard drive(s) and any other storage device(s) in the product(s). We are not responsible for lost or corrupted data.
What if I purchased a service contract?
If your service contract is with Dell, service will be provided to you under the terms of the service agreement. Please refer to that contract for details on how to obtain service.
If you purchased through us a service contract with one of our third-party service providers, please refer to that contract for details on how to obtain service.
How will you fix my product?
We use new and refurbished parts made by various manufacturers in performing warranty repairs and in building replacement parts and systems. Refurbished parts and systems are parts or systems that have been returned to Dell, some of which were never used by a customer. All parts and systems are inspected and tested for quality.
Replacement parts and systems are covered for the remaining period of the limited warranty for the product you bought. Dell owns all parts removed from repaired products.
May I transfer the limited warranty?
Limited warranties on systems may be transferred if the current owner transfers ownership of the system and records the transfer with us. The limited warranty on Dell-branded memory may not be transferred. You may record your transfer by going to Dell's website:
If you are an Individual Home Consumer, go to www.dell.com/us/en/dhs/topics/sbtopic_015_care.htm
If you do not have Internet access, call your customer care representative or call 1-800-624-9897.
Total Satisfaction" Return Policy (U.S. Only)
We value our relationship with you and want to make sure that you're satisfied with your purchases. That's why we offer a "Total Satisfaction" return policy for most products that you, the end-user customer, purchase directly from Dell. Under this policy, you may return to Dell products that you purchased directly from Dell for a credit or a refund of the purchase price paid, less shipping and handling and applicable return fees as follows:
New Hardware Products and Accessories — Unless you have a separate agreement with Dell, all hardware, accessories, peripherals, parts, and unopened software still in its sealed package, excluding the products listed below, may be returned within twenty-one (21) days from the date on the packing slip or invoice. New PowerEdge™, PowerConnect™ and PowerVault™ products may be returned within thirty (30) days from the date on the packing slip or invoice except that new PowerEdge™ SC servers and n series products purchased from the Small and Medium Business Sales Division may only be returned within fourteen (14) days from the date on the packing slip or invoice. To return applications software or an operating system that has been installed by Dell, you must return the entire computer. A different return policy applies to nondefective products purchased through Dell's Software and Peripherals division by customers of our Small and Medium Business divisions. Those products may be returned within twenty-one (21) days from the date on the packing slip or invoice, but a fifteen percent (15%) return fee will be deducted from any refund or credit. The "Total Satisfaction" Return Policy and Software and Peripherals division return policy are not available for Dell | EMC storage products, EMC-branded products, Unisys-branded products, PowerVault™, 160T tape libraries, enterprise software, non-Dell branded enterprise products, software and/or software licenses purchased under any type of volume purchase agreement or any non-Dell customized hardware and/or software product(s).
Reconditioned or Refurbished Dell-Branded Hardware Products and Parts — All reconditioned or refurbished PowerEdge™, PowerConnect™ and PowerVault™ products may be returned within thirty (30) days from the date on the packing slip or invoice. All other reconditioned or refurbished Dell-branded hardware products and parts may be returned within fourteen (14) days of the date on the packing slip or invoice.
How to Return — To return products, e-mail or call Dell customer service to receive a Credit Return Authorization Number within the return policy period applicable to the product you want to return. You must obtain a Credit Return Authorization Number in order to return the product. See "Contacting Dell" or "Getting Help" in your customer documentation (or www.dell.com/us/en/gen/contact.htm) to find the appropriate contact information for obtaining customer assistance. You must ship the products to Dell within five (5) days of the date that Dell issues the Credit Return Authorization Number. You must also return the products to Dell in their original packaging, in as-new condition along with any media, documentation, and all other items that were included in the original shipment, prepay shipping charges, and insure the shipment or accept the risk of loss or damage during shipment.
Limited Warranty Terms for Dell-Branded Hardware Products (Canada Only)
What is covered by this limited warranty?
This limited warranty covers defects in materials and workmanship in your—our end-user customer's—Dell-branded hardware products, including Dell-branded peripheral products.
What is not covered by this limited warranty?
This limited warranty does not cover:
Software, including the operating system and software added to the Dell-branded hardware products through our factory-integration system, or the reloading of the software
Problems that result from:
External causes such as accident, abuse, misuse, or problems with electrical power
Products with missing or altered Service Tags or serial numbers
Products for which Dell has not received payment
THIS WARRANTY GIVES YOU SPECIFIC LEGAL RIGHTS, AND YOU MAY ALSO HAVE OTHER RIGHTS WHICH VARY FROM PROVINCE TO PROVINCE. DELL'S RESPONSIBILITY FOR MALFUNCTIONS AND DEFECTS IN PRODUCT IS LIMITED TO REPAIR AND REPLACEMENT AS SET FORTH IN THIS WARRANTY STATEMENT, FOR THE TERM OF THE WARRANTY PERIOD REFLECTED ON YOUR PACKING SLIP OR INVOICE. EXCEPT FOR THE EXPRESS WARRANTYES CONTAINED IN THIS WARRANTY STATEMENT, DELL DISCLAIMS ALL OTHER WARRANTYES AND CONDITIONS, EXPRESS OR IMPLIED, INCLUDING WITHOUT LIMITATION IMPLIED WARRANTYES AND CONDITIONS OF MERCHANTABILITY AND FITNESS FOR A PARTICULAR PURPOSE, STATUTORY OR OTHERWISE. SOME PROVINCES DO NOT ALLOW THE EXCLUSION OF CERTAIN IMPLIED WARRANTYES OR CONDITIONS, OR LIMITATIONS ON HOW LONG AN IMPLIED WARRANTY OR CONDITION LASTS. THEREFORE, THE FOREGOING EXCLUSIONS AND LIMITATIONS MAY NOT APPLY TO YOU.
WE DO NOT ACCEPT LIABILITY BEYOND THE REMEDIES PROVIDED FOR IN THIS WARRANTY STATEMENT OR FOR SPECIAL, INDIRECT, CONSEQUENTIAL, OR INCIDENTAL DAMAGES, INCLUDING, WITHOUT LIMITATION, ANY LIABILITY FOR THIRD-PARTY CLAIMS AGAINST YOU FOR DAMAGES, FOR PRODUCTS NOT BEING AVAILABLE FOR USE, OR FOR LOST DATA OR LOST SOFTWARE. OUR LIABILITY WILL BE NO MORE THAN THE AMOUNT YOU PAID FOR THE PRODUCT THAT IS THE SUBJECT OF A CLAIM. THIS IS THE MAXIMUM AMOUNT FOR WHICH WE ARE RESPONSIBLE.
SOME PROVINCES DO NOT ALLOW THE EXCLUSION OR LIMITATION OF SPECIAL, INDIRECT, INCIDENTAL, OR CONSEQUENTIAL DAMAGES, SO THE ABOVE LIMITATION OR EXCLUSION MAY NOT APPLY TO YOU.
How long does this limited warranty last?
This limited warranty lasts for the time period indicated on your packing slip or invoice, except that the limited warranty on Dell-branded batteries lasts only 1 year and the limited warranty on the lamps for Dell-branded projectors lasts only 90 days. The limited warranty begins on the date of the packing slip or invoice. The warranty period is not extended if we repair or replace a warranted product or any parts. Dell may change the terms and availability of limited warranties, at its discretion, but any changes will not be retroactive (that is, the warranty terms in place at the time of purchase will apply to your purchase).
What do I do if I need warranty service?
Before the warranty expires, please call us at the relevant number listed in the following table. Please also have your Dell Service Tag or order number available.
Individual Home Consumers; Home Office and Small Business Customers: Canada Only Technical Support and Customer Service 1-800-847-4096 Medium, Large, and Global Commercial Customers; Government, Education, and Healthcare Customers; and Value-Added Resellers (VARs): Technical Support 1-800-387-5757 Customer Service 1-800-326-9463 Government or Education Consumers, or Individual Home Consumers who purchased through an Employee Purchase Program: Technical Support 1-800-387-5757 Customer Service 1-800-326-9463 (Extension 8221 for Individual Consumers) Dell-Branded Memory 1-888-363-5150
What will Dell do?
During the 90 days of the 90-day limited warranty and the first year of all other limited warranties: During the 90 days of the 90-day limited warranty and the first year of all other limited warranties, we will repair any Dell-branded hardware products returned to us that prove to be defective in materials or workmanship. If we are not able to repair the product, we will replace it with a comparable product that is new or refurbished.
When you contact us, we will issue a Return Material Authorization Number for you to include with your return. You must return the products to us in their original or equivalent packaging, prepay shipping charges, and insure the shipment or accept the risk if the product is lost or damaged in shipment. We will return the repaired or replacement products to you. We will pay to ship the repaired or replaced products to you if you use an address in Canada. Otherwise, we will ship the product to you freight collect.
If we determine that the problem is not covered under this warranty, we will notify you and inform you of service alternatives that are available to you on a fee basis.
NOTE: Before you ship the product(s) to us, make sure to back up the data on the hard drive(s) and any other storage device(s) in the product(s). Remove any confidential, proprietary or personal information, removable media, such as floppy disks, CDs, or PC Cards. We are not responsible for any of your confidential, proprietary or personal information; lost or corrupted data; or damaged or lost removable media.
During the remaining years following the first year of all limited warranties: We will replace any defective part with new or refurbished parts, if we agree that it needs to be replaced. When you contact us, we will require a valid credit card number at the time you request a replacement part, but we will not charge you for the replacement part as long as you return the original part to us within 30 days after we ship the replacement part to you. If we do not receive the original part within 30 days, we will charge to your credit card the then-current standard price for that part.
We will pay to ship the part to you if you use an address in Canada. Otherwise, we will ship the part freight collect. We will also include a prepaid shipping container with each replacement part for your use in returning the replaced part to us.
NOTE: Before you replace parts, make sure to back up the data on the hard drive(s) and any other storage device(s) in the product(s). We are not responsible for lost or corrupted data.
What if I purchased a service contract?
If your service contract is with Dell, service will be provided to you under the terms of the service contract. Please refer to that contract for details on how to obtain service. Dell's service contracts can be found online at www.dell.ca or by calling Customer Care at 1-800-847-4096. If you purchased through us a service contract with one of our third-party service providers, please refer to that contract (mailed to you with your packing slip or invoice) for details on how to obtain service.
How will you fix my product?
We use new and refurbished parts made by various manufacturers in performing warranty repairs and in building replacement parts and systems. Refurbished parts and systems are parts or systems that have been returned to Dell, some of which were never used by a customer. All parts and systems are inspected and tested for quality. Replacement parts and systems are covered for the remaining period of the limited warranty for the product you bought. Dell owns all parts removed from repaired products.
May I transfer the limited warranty?
Limited warranties on systems may be transferred if the current owner transfers ownership of the system and records the transfer with us. The limited warranty on Dell-branded memory may not be transferred. You may record your transfer by going to Dell's website:
For Canada-purchased computers (in-country transfers) and to transfer from one customer to another, go to www.dell.ca/ca/en/gen/topics/segtopic_ccare nav_013_ccare.htm
For out-of-country transfers (outside of the original country of purchase), go to www.dell.com/us/en/biz/topics/sbtopic_ccare nav_016_care.htm
If you do not have Internet access, call Dell at 1-800-847-4096 (Home Consumer customers) or 1-800-326-9463 (Corporate Commercial or Government customers).
"Total Satisfaction" Return Policy (Canada Only)
If you are an end-user customer who bought new products directly from Dell, you may return them to Dell up to 30 days after you receive them for a refund or credit of the product purchase price. If you are an end-user customer who bought reconditioned or refurbished products from Dell, you may return them to Dell within 14 days after the date on the packing slip or invoice for a refund or credit of the product purchase price. In either case, the refund or credit will not include any shipping and handling charges shown on your packing slip or invoice and will be subject to a fifteen percent (15%) restocking fee, unless otherwise prohibited by law. If you are an organization that bought the products under a written agreement with Dell, the agreement may contain different terms for the return of products than specified by this policy.
To return products, you must call Dell Customer Service at 1-800-847-4096 to receive a Credit Return Authorization Number. To expedite the process of your refund or credit, Dell expects you to return the products to Dell in their original packaging within 5 days of the date that Dell issues the Credit Return Authorization Number. You must also prepay shipping charges and insure the shipment or accept the risk of loss or damage during shipment. You may return software for a refund or credit only if the sealed package containing the floppy disk(s) or CD(s) is unopened. Returned products must be in as-new condition, and all of the manuals, floppy disk(s), CD(s), power cables, and other items included with a product must be returned with it. For customers who want to return, for refund or credit only, either application or operating system software that has been installed by Dell, the whole system must be returned, along with any media and documentation that may have been included in the original shipment.
The "Total Satisfaction" Return Policy does not apply to Dell | EMC storage products. It also does not apply to products purchased through Dell's Software and Peripherals division. For those products, please instead refer to Dell's Software and Peripheral's then-current return policy (see the following section, "Dell Software and Peripherals (Canada Only)").
Dell Software and Peripherals (Canada Only)
Third-Party Software and Peripherals Products
Similar to other resellers of software and peripherals, Dell does not warrant third-party products. Third-party software and peripheral products are covered by the warranties provided by the original manufacturer or publisher only. Third-party manufacturer warranties vary from product to product. Consult your product documentation for specific warranty information. More information may also be available from the manufacturer or publisher.
While Dell offers a wide selection of software and peripheral products, we do not specifically test or guarantee that all of the products we offer work with any or all of the various models of Dell computers, nor do we test or guarantee all of the products we sell on the hundreds of different brands of computers available today. If you have questions about compatibility, we recommend and encourage you to contact the third-party software and peripheral product manufacturer or publisher directly.
Dell-Branded Peripheral Products
Dell does provide a limited warranty for new Dell-branded peripheral products (products for which Dell is listed as the manufacturer) such as monitors, batteries, memory, docking stations, and projectors. To determine which limited warranty applies to the product you purchased, see the Dell packing slip or invoice and/or the product documentation that accompanied your product. Descriptions of Dell's limited warranties are described in preceding sections.
Return Policy
If you are an end-user customer who bought Dell Software and Peripherals products directly from a Dell company, you may return Dell Software and Peripherals products that are in as-new condition to Dell up to 30 days from the date on the packing slip or invoice for a refund of the product purchase price if already paid. This refund will not include any shipping and handling charges shown on your packing slip or invoice; you are responsible for those.
To return products, you must call Dell Customer Service at 1-800-387-5759 to receive a Credit Return Authorization Number. You must ship the Dell Software and Peripherals products back to Dell in their original manufacturer's packaging (which must be in as-new condition), prepay shipping charges, and insure the shipment or accept the risk of loss or damage during shipment.
To qualify for refund or replacement, returned products must be in as-new condition, software products must be unopened, and all of the manuals, floppy disk(s), CD(s), power cables, and other items included with a product must be returned with it.
1-Year End-User Manufacturer Guarantee (Latin America and the Caribbean Only)
Guarantee
Dell Computer Corporation ("Dell") warrants to the end user in accordance with the following provisions that its branded hardware products, purchased by the end user from a Dell company or an authorized Dell distributor in Latin America or the Caribbean, will be free from defects in materials, workmanship, and design affecting normal use, for a period of 1 year from the original purchase date. Products for which proper claims are made will, at Dell's option, be repaired or replaced at Dell's expense. Dell owns all parts removed from repaired products. Dell uses new and reconditioned parts made by various manufacturers in performing repairs and building replacement products.
Exclusions
This Guarantee does not apply to defects resulting from: improper or inadequate installation, use, or maintenance; actions or modifications by unauthorized third parties or the end user; accidental or willful damage; or normal wear and tear.
Making a Claim
Claims must be made in Latin America or the Caribbean by contacting the Dell point of sale within the guarantee period. The end user must always supply proof of purchase, indicating name and address of the seller, date of purchase, model and serial number, name and address of the customer, and details of symptoms and configuration at the time of malfunction, including peripherals and software used. Otherwise, Dell may refuse the guarantee claim. Upon diagnosis of a warranted defect, Dell will make arrangements and pay for ground freight and insurance to and from Dell's repair/replacement center. The end user must ensure that the defective product is available for collection properly packed in original or equally protective packaging together with the details listed above and the return number provided to the end user by Dell.
Limitation and Statutory Rights
Dell makes no other warranty, guarantee or like statement other than as explicitly stated above, and this Guarantee is given in place of all other guarantees whatsoever, to the fullest extent permitted by law. In the absence of applicable legislation, this Guarantee will be the end user's sole and exclusive remedy against Dell or any of its affiliates, and neither Dell nor any of its affiliates shall be liable for loss of profit or contracts, or any other indirect or consequential loss arising from negligence, breach of contract, or howsoever.
This Guarantee does not impair or affect mandatory statutory rights of the end user against and/or any rights resulting from other contracts concluded by the end user with Dell and/or any other seller.
Dell World Trade LP
One Dell Way, Round Rock, TX 78682, USA
Dell Computadores do Brasil Ltda (CNPJ No. 72.381.189/0001-10)
Avenida Industrial Belgraf, 400
92990-000 - Eldorado do Sul - RS - Brasil
Dell Computer de Chile Ltda
Coyancura 2283, Piso 3-Of.302
Providencia, Santiago - Chile
Dell Computer de Colombia Corporation
Carrera 7 #115-33 Oficina 603
Bogota, Colombia
Dell Computer de Mexico SA de CV
Paseo de la Reforma 2620 - 11^ Piso
Col. Lomas Altas
11950 Mexico, D.F.
Dell Inc. Ink and Toner Cartridges Limited Warranties
The following sections describe the limited warranty for ink and toner cartridges for the U.S., Canada, and Latin America. Refer to the appropriate limited warranty accordingly.
Ink and Toner Cartridges Limited Warranty (U.S. and Canada Only)
Dell Inc. warrants to the original purchaser of genuine Dell-branded toner cartridges that they will be free from defects in material and workmanship for the life of the cartridge and that for genuine Dell-branded ink cartridges they will be free from defects in material and workmanship for two years beginning on the date of invoice. If this product proves defective in either material or workmanship, it will be replaced without charge during the limited warranty period if returned to Dell. You must first call our toll-free number to get your return authorization. In the U.S., call 1-800-822-8965; in Canada, call 1-800-387-5757. If we are not able to replace the product because it has been discontinued or is not available, we will either replace it with a comparable product or reimburse you for the cartridge purchase cost, at Dell's sole option. This limited warranty does not apply to ink or toner cartridges that have been refilled or improperly stored or due to problems resulting from misuse, abuse, accident, neglect, mishandling, incorrect environments, or wear from ordinary use.
THIS WARRANTY GIVES YOU SPECIFIC LEGAL RIGHTS, AND YOU MAY ALSO HAVE OTHER RIGHTS WHICH VARY FROM STATE TO STATE (OR JURISDICTION TO JURISDICTION). DELES RESPONSIBILITY FOR MALFUNCTIONS AND DEFECTS IN HARDWARE IS LIMITED TO REPLACEMENT AS SET FORTH IN THIS WARRANTY STATEMENT. FOR CANADIAN CUSTOMERS, EXCEPT FOR THE EXPRESS WARRANTYES CONTAINED IN THIS WARRANTY STATEMENT, DELL DISCLAIMS ALL OTHER WARRANTYES AND CONDITIONS, EXPRESS OR IMPLIED, STATUTORY OR OTHERWISE, FOR THE PRODUCT. FOR U.S. CUSTOMERS, ALL EXPRESS AND IMPLIED WARRANTYES FOR THE PRODUCT, INCLUDING BUT NOT LIMITED TO ANY IMPLIED WARRANTYES AND CONDITIONS OF MERCHANTABILITY AND FITNESS FOR A PARTICULAR PURPOSE ARE LIMITED IN TIME TO THE TERM OF THIS LIMITED WARRANTY. NO WARRANTYES, WHETHER EXPRESS OR IMPLIED, WILL APPLY AFTER THE LIMITED WARRANTY PERIOD HAS EXPIRED. SOME STATES OR JURISDICTIONS DO NOT ALLOW THE EXCLUSION OF CERTAIN IMPLIED WARRANTYES OR CONDITIONS, OR LIMITATIONS ON HOW LONG AN IMPLIED WARRANTY OR CONDITION LASTS, SO THIS LIMITATION MAY NOT APPLY TO YOU. THIS WARRANTY COVERAGE TERMINATES IF YOU SELL OR OTHERWISE TRANSFER THIS PRODUCT TO ANOTHER PARTY.
DELL DOES NOT ACCEPT LIABILITY BEYOND THE REMEDIES PROVIDED FOR IN THIS LIMITED WARRANTY OR FOR SPECIAL, INDIRECT, CONSEQUENTIAL OR INCIDENTAL DAMAGES, INCLUDING, WITHOUT LIMITATION, ANY LIABILITY FOR THIRD-PARTY CLAIMS AGAINST YOU FOR DAMAGES, FOR PRODUCTS NOT BEING AVAILABLE FOR USE, OR FOR LOST DATA OR LOST SOFTWARE. DELL'S LIABILITY WILL BE NO MORE THAN THE AMOUNT YOU PAID FOR THE PRODUCT THAT IS THE SUBJECT OF A CLAIM. THIS IS THE MAXIMUM AMOUNT FOR WHICH DELL IS RESPONSIBLE.
SOME STATES OR JURISDICTIONS DO NOT ALLOW THE EXCLUSION OR LIMITATION OF SPECIAL, INDIRECT, INCIDENTAL OR CONSEQUENTIAL DAMAGES, SO THE ABOVE LIMITATION OR EXCLUSION MAY NOT APPLY TO YOU.
Ink and Toner Cartridges Limited Warranty (Latin America Only)
Dell Inc. warrants to the original purchaser of genuine Dell-branded toner cartridges that the cartridges will be free from defects resulting from material or manufacturing process for the life of the cartridge. For the original purchaser of genuine Dell-branded ink cartridges, Dell warrants that the cartridges will be free from defects resulting from material or manufacturing process for one year beginning from the date of delivery.
If this product presents defects resulting from either material or manufacturing process, it will be replaced without charge during the limited warranty period if returned to Dell.
In order to obtain the necessary information to enable the replacement, call the appropriate toll-free number. In Mexico, call 001-877-533-6230; in Puerto Rico, call 1-877-839-5123. In cases in which either the production of the cartridge has been discontinued or the cartridge is not available, Dell reserves the right, at its sole discretion, to choose between replacing it by a similar product or reimbursing you for the purchase cost.
This limited warranty does not apply to ink or toner cartridges that have been refilled or to defects resulting from misuse, abuse, accident, negligence, mishandling, improper storage or exposure to inappropriate environments.
Dell's liability for the malfunction or defect of hardware after the period of the legal warranty (and specifically the period of the legal warranty of defective products stated in the consumer protections rules), is limited to either the substitution of the product or the reimbursement as stated above. This warranty coverage terminates if you sell or otherwise transfer this product to a third party.
Dell does not accept any additional liability for patrimonial, emotional or any other kind of damage caused to the consumer and/or to a third party, which exceeds the established liability either in this limited warranty or in legal rules that may apply.
Regulatory Notices
Electromagnetic Interference (EMI) is any signal or emission, radiated in free space or conducted along power or signal leads, that endangers the functioning of a radio navigation or other safety service or seriously degrades, obstructs, or repeatedly interrupts a licensed radio communications service. Radio communications services include but are not limited to AM/FM commercial broadcast, television, cellular services, radar, air-traffic control, pager, and Personal Communication Services (PCS). These licensed services, along with unintentional radiators such as digital devices, including computers, contribute to the electromagnetic environment.
Electromagnetic Compatibility (EMC) is the ability of items of electronic equipment to function properly together in the electronic environment. While this computer has been designed and determined to be compliant with regulatory agency limits for EMI, there is no guarantee that interference will not occur in a particular installation. If this equipment does cause interference with radio communications services, which can be determined by turning the equipment off and on, you are encouraged to try to correct the interference by one or more of the following measures:
Reorient the receiving antenna.
If necessary, consult a Dell Technical Support representative or an experienced radio/television technician for additional suggestions.
Dell™ computers are designed, tested, and classified for their intended electromagnetic environment. These electromagnetic environment classifications generally refer to the following harmonized definitions:
Class A is typically for business or industrial environments.
Information Technology Equipment (ITE), including devices, expansion cards, printers, input/output (I/O) devices, monitors, and so on, that are integrated into or connected to the computer should match the electromagnetic environment classification of the computer.
A Notice About Shielded Signal Cables: Use only shielded cables for connecting devices to any Dell device to reduce the possibility of interference with radio communications services. Using shielded cables ensures that you maintain the appropriate EMC classification for the intended environment. For parallel printers, a cable is available from Dell. If you prefer, you can order a cable from Dell on the World Wide Web at accessories.us.dell.com/sna/category.asp?category_id=4117.
Most Dell computers are classified for Class B environments. However, the inclusion of certain options can change the rating of some configurations to Class A. To determine the electromagnetic classification for your computer or device, see the following sections specific for each regulatory agency. Each section provides country-specific EMC/EMI or product safety information.
FCC Notices (U.S. Only)
Most Dell computers are classified by the Federal Communications Commission (FCC) as Class B digital devices. To determine which classification applies to your computer, examine all FCC registration labels located on the bottom, side, or back panel of your computer, on card-mounting brackets, and on the cards themselves. If any one of the labels carries a Class A rating, your entire computer is considered to be a Class A digital device. If all labels carry an FCC Class B rating as distinguished by either an FCC ID number or the FCC logo, (FC), your computer is considered to be a Class B digital device.
Once you have determined your computer's FCC classification, read the appropriate FCC notice. Note that FCC regulations provide that changes or modifications not expressly approved by Dell could void your authority to operate this equipment.
This device complies with Part 15 of the FCC Rules. Operation is subject to the following two conditions:
This device may not cause harmful interference.
Class A
This equipment has been tested and found to comply with the limits for a Class A digital device pursuant to Part 15 of the FCC Rules. These limits are designed to provide reasonable protection against harmful interference when the equipment is operated in a commercial environment. This equipment generates, uses, and can radiate radio frequency energy and, if not installed and used in accordance with the manufacturer's instruction manual, may cause harmful interference with radio communications. Operation of this equipment in a residential area is likely to cause harmful interference, in which case you will be required to correct the interference at your own expense.
Class B
This equipment has been tested and found to comply with the limits for a Class B digital device pursuant to Part 15 of the FCC Rules. These limits are designed to provide reasonable protection against harmful interference in a residential installation. This equipment generates, uses, and can radiate radio frequency energy and, if not installed and used in accordance with the manufacturer's instruction manual, may cause interference with radio communications. However, there is no guarantee that interference will not occur in a particular installation. If this equipment does cause harmful interference to radio or television reception, which can be determined by turning the equipment off and on, you are encouraged to try to correct the interference by one or more of the following measures:
Reorient or relocate the receiving antenna.
The following information is provided on the device or devices covered in this document in compliance with FCC regulations:
Model number: Laser Multi-Function Printer 1600n
Dell Inc.
One Dell Way
Round Rock, Texas 78682 USA
512-338-4400
This equipment complies with Part 68 of the FCC Rules. On the bottom of your computer is a label that contains, among other information, the FCC registration number and ringer equivalence number (REN) for your equipment. If requested, you must provide this information to the telephone company.
The REN is used to determine the quantity of devices that may be connected to the telephone line. Excessive RENs on the telephone line may result in the devices not ringing in response to an incoming call. In most areas, the sum of all the RENs on your telephone line should be less than five to ensure proper service from the telephone company. To be certain of the number of devices that you may connect to a line, as determined by the total RENs, contact your local telephone company.
The registration jack Universal Service Order Code (USOC) used by this equipment is RJ-11C. An FCC compliant telephone cord and modular plug is provided with this equipment. This equipment is designed to be connected to the telephone network or premises wiring using a compatible modular jack that is Part 68 compliant.
This equipment cannot be used on public coin-phone service provided by the telephone company. Connection to party line service is subject to state tariffs.
There are no user serviceable parts on the modem contained in your computer.
If your telephone equipment causes harm to the telephone network, the telephone company will notify you in advance that service may be temporarily discontinued. If advance notice is not practical, the telephone company will notify you as soon as possible. Also, you will be advised of your right to file a complaint with the FCC if you believe it is necessary.
The telephone company may make changes in its facilities, equipment, operations, or procedures that could affect the operation of this equipment. If this happens, the telephone company will provide advance notice in order for you to make necessary modifications to maintain uninterrupted service.
If you experience trouble with this telephone equipment, see the section titled "Contacting Dell" to find the appropriate telephone number for obtaining customer assistance. If the equipment is causing harm to the telephone network, the telephone company may request that you disconnect the equipment until the problem is resolved.
Fax Branding
The Telephone Consumer Protection Act of 1991 makes it unlawful for any person to use a computer or other electronic device, including fax machines, to send any message unless such message clearly contains in a margin at the top or bottom of each transmitted page or on the first page of the transmission, the date and time it is sent, identification of the business, other entity, or individual sending the message, and the telephone number of the sending machine or such business, other entity, or individual. The telephone number provided may not be a 900 number or any other number for which charges exceed local or long-distance transmission charges.
The following information is provided on the device(s) described in this document in compliance with the requirements of the official Mexican standards (NOM):
Exporter: Dell Inc.
One Dell Way
Round Rock, TX 78682 Importer: Dell Computer de México, S.A. de C.V.
Paseo de la Reforma 2620 - 11° Piso
Col. Lomas Altas
11950 México, D.F. Ship to: Dell Computer de México, S.A. de C.V.
al Cuidado de Kuehne & Nagel de México S. de R.L.
Avenida Soles No. 55
Col. Peñon de los Baños
15520 México, D.F. Model number: Dell Laser MFP 1600n Supply voltage: 110-127 VAC Frequency: 50/60 Hz Current Consumption: 5.0 A Output voltage: 24 VDC, 5 VDC Output current: 2.0 A, 1.0 A
Dell™ Software License Agreement
This is a legal agreement between you, the user, and Dell Products, L.P ("Dell"). This agreement covers all software that is distributed with the Dell product, for which there is no separate license agreement between you and the manufacturer or owner of the software (collectively the "Software"). By opening or breaking the seal on the Software packet(s), installing or downloading the Software, or using the Software that has been preloaded or is embedded in your computer, you agree to be bound by the terms of this agreement. If you do not agree to these terms, promptly return all Software items (disks, written materials, and packaging) and delete any preloaded or embedded Software.
You may use one copy of the Software on only one computer at a time. If you have multiple licenses for the Software, you may use as many copies at any time as you have licenses. "Use" means loading the Software in temporary memory or permanent storage on the computer. Installation on a network server solely for distribution to other computers is not "use" if (but only if) you have a separate license for each computer to which the Software is distributed. You must ensure that the number of persons using the Software installed on a network server does not exceed the number of licenses that you have. If the number of users of Software installed on a network server will exceed the number of licenses, you must purchase additional licenses until the number of licenses equals the number of users before allowing additional users to use the Software. If you are a commercial customer of Dell or a Dell affiliate, you hereby grant Dell, or an agent selected by Dell, the right to perform an audit of your use of the Software during normal business hours, you agree to cooperate with Dell in such audit, and you agree to provide Dell with all records reasonably related to your use of the Software. The audit will be limited to verification of your compliance with the terms of this agreement.
The Software is protected by United States copyright laws and international treaties. You may make one copy of the Software solely for backup or archival purposes or transfer it to a single hard disk provided you keep the original solely for backup or archival purposes. You may not rent or lease the Software or copy the written materials accompanying the Software, but you may transfer the Software and all accompanying materials on a permanent basis if you retain no copies and the recipient agrees to the terms hereof. Any transfer must include the most recent update and all prior versions. You may not reverse engineer, decompile or disassemble the Software. If the package accompanying your computer contains compact discs, 3.5" and/or 5.25" disks, you may use only the disks appropriate for your computer. You may not use the disks on another computer or network, or loan, rent, lease, or transfer them to another user except as permitted by this agreement.
Limited Warranty
Dell warrants that the Software disks will be free from defects in materials and workmanship under normal use for ninety (90) days from the date you receive them. This warranty is limited to you and is not transferable. Any implied warranties are limited to ninety (90) days from the date you receive the Software. Some jurisdictions do not allow limits on the duration of an implied warranty, so this limitation may not apply to you. The entire liability of Dell and its suppliers, and your exclusive remedy, shall be (a) return of the price paid for the Software or (b) replacement of any disk not meeting this warranty that is sent with a return authorization number to Dell, at your cost and risk. This limited warranty is void if any disk damage has resulted from accident, abuse, misapplication, or service or modification by someone other than Dell. Any replacement disk is warranted for the remaining original warranty period or thirty (30) days, whichever is longer.
Dell does NOT warrant that the functions of the Software will meet your requirements or that operation of the Software will be uninterrupted or error free. You assume responsibility for selecting the Software to achieve your intended results and for the use and results obtained from the Software.
DELL, ON BEHALF OF ITSELF AND ITS SUPPLIERS, DISCLAIMS ALL OTHER WARRANTYES, EXPRESS OR IMPLIED, INCLUDING, BUT NOT LIMITED TO, IMPLIED WARRANTYES OF MERCHANTABILITY AND FITNESS FOR A PARTICULAR PURPOSE, FOR THE SOFTWARE AND ALL ACCOMPANYING WRITTEN MATERIALS. This limited warranty gives you specific legal rights; you may have others, which vary from jurisdiction to jurisdiction.
IN NO EVENT SHALL DELL OR ITS SUPPLIERS BE LIABLE FOR ANY DAMAGES WHATSOEVER (INCLUDING, WITHOUT LIMITATION, DAMAGES FOR LOSS OF BUSINESS PROFITS, BUSINESS INTERRUPTION, LOSS OF BUSINESS INFORMATION, OR OTHER PECUNIARY LOSS) ARISING OUT OF USE OR INABILITY TO USE THE SOFTWARE, EVEN IF ADVISED OF THE POSSIBILITY OF SUCH DAMAGES. Because some jurisdictions do not allow an exclusion or limitation of liability for consequential or incidental damages, the above limitation may not apply to you.
U.S. Government Restricted Rights
The software and documentation are "commercial items" as that term is defined at 48 C.F.R. 2.101, consisting of "commercial computer software" and "commercial computer software documentation" as such terms are used in 48 C.F.R. 12.212. Consistent with 48 C.F.R. 12.212 and 48 C.F.R. 227.7202-1 through 227.7202-4, all U.S. Government end users acquire the software and documentation with only those rights set forth herein. Contractor/manufacturer is Dell Products, L.P., One Dell Way, Round Rock, Texas 78682.
General
This license is effective until terminated. It will terminate upon the conditions set forth above or if you fail to comply with any of its terms. Upon termination, you agree that the Software and accompanying materials, and all copies thereof, will be destroyed. This agreement is governed by the laws of the State of Texas. Each provision of this agreement is severable. If a provision is found to be unenforceable, this finding does not affect the enforceability of the remaining provisions, terms, or conditions of this agreement. This agreement is binding on successors and assigns. Dell agrees and you agree to waive, to the maximum extent permitted by law, any right to a jury trial with respect to the Software or this agreement. Because this waiver may not be effective in some jurisdictions, this waiver may not apply to you. You acknowledge that you have read this agreement, that you understand it, that you agree to be bound by its terms, and that this is the complete and exclusive statement of the agreement between you and Dell regarding the Software.
Index
A
ADF (Automatic Document Feeder), loading, 36
C
canceling
print, 40-43
cartridge
ordering, 58
replacing, 59
changing
display language, 7
operator panel cover, 7
characters, entering, 8
cleaning
drum, 64
exterior, 61
interior, 62
scanner, 63
clearing
document jams,66
paper jams, 68
connecting
tel line, 5
contacting, Dell, 85
copy settings, 41
copying, 41
D
date and time, setting, 9
Dell
contacting, 85
display language, changing, 7
document
jam clearing, 66
loading
ADF, 37
scanner glass, 36
drum, cleaning, 64
E
envelopes
loading, 32
F
faxing, 47
manually, 47
G
group dial, faxing
setting, 10
H
hardware setup, 5
I
installing
memory, 76
optional tray2, 79
J
jam,clearing,68
L
loading
paper
in the manual feeder. 31
in the paper tray, 27
loading document
ADF, 37
scatter glass, 36
M
maintenance, 55
memory, installing, 76
0
operator panel, 5
operator panel cover,
changing, 7
option installing
memory, 76
optional tray, 79
ordering supplies, 58
P
paper
card stock, 34
custom size, 34
labels, 34
plain, 34
transparencies, 34
paper jams,clearing,68
paper size, setting, 35
paper type, setting, 41
paper, loading, 27
parts of your printer, iii
primer ID,setting,7
R
replacing toner cartridge, 59
s
safety information, 1
scatterer, cleaning, 63
scanning, 44
operator panel, 45
WIA driver, 46
setup, 5
supplies, ordering, 58
support
contacting Dell, 85
T
tel line, connecting, 5
toner cartridge
replacing, 59
tonerordering,ii
transparencies, loading, 27
troubleshooting, 65
U
uninstalling, software, 22