
SHOWCENTER - TV PINNACLE - Free user manual and instructions
Find the device manual for free SHOWCENTER PINNACLE in PDF.

| Product Type | Network Media Player (Streamer) with TV functionality |
| Brand / Model | PINNACLE / SHOWCENTER |
| Video Connectivity | SCART (RGB), S-Video, Composite Video, Component (YUV) |
| Audio Connectivity | Stereo Analog (RCA), Coaxial and Optical Digital |
| Network Connectivity | Ethernet 10/100 Base-T, Wi-Fi 802.11b/g (external antenna) |
| Additional Ports | USB 2.0 (front) |
| Supported Audio Formats | MP3, WMA, WAV, PCM (playback), Dolby Digital (via external decoder) |
| Supported Video Formats | MPEG-1, MPEG-2 (including VOB), MPEG-4 (AVI, Xvid), WMV, DV-AVI; HD: MPEG-2 HD, MPEG-4 HD, WMV HD |
| Supported Photo Formats | JPEG, PNG, GIF, BMP |
| Main Features | Play music, movies and photos from a PC over the network; create playlists; slideshows with background music; access to Rhapsody (subscription required) |
| Remote Control | Infrared with included batteries |
| Power Supply | Built-in, power cord included (depending on country) |
| Power Consumption | Approximately 15 W (estimate) |
| Dimensions (approx.) | 220 x 200 x 50 mm (estimate) |
| Weight (approx.) | 1 kg (estimate) |
| Maintenance and Cleaning | Unplug before cleaning; use a soft, dry cloth; do not use liquids or aerosols |
| Safety | Do not expose to moisture, excessive heat or dust; do not open the case; use only supplied accessories |
| Spare Parts and Repairability | No user-serviceable parts; contact the dealer in case of failure |
| General Information | Manual available in PDF (132 pages); requires a PC with Windows 2000/XP, processor ≥ 1.5 GHz, 256 MB RAM, DirectX 9 compatible graphics card |
Frequently Asked Questions - SHOWCENTER PINNACLE
User questions about SHOWCENTER PINNACLE
0 question about this device. Answer the ones you know or ask your own.
Ask a new question about this device
Download the instructions for your TV in PDF format for free! Find your manual SHOWCENTER - PINNACLE and take your electronic device back in hand. On this page are published all the documents necessary for the use of your device. SHOWCENTER by PINNACLE.
USER MANUAL SHOWCENTER PINNACLE
All rights reserved.
No part of this manual may be reproduced or transferred to other media without explicit written permission from Pinnacle Systems GmbH, Braunschweig, Germany.
All brand or product names are trademarks or registered trademarks of their respective holders.
Manufactured under license from Dolby Laboratories.
"Dolby" and the double-D symbol are trademarks of Dolby Laboratories.
This product incorporates copyright protection technology that is protected by U.S. patents and other intellectual property rights. Use of this copyright protection technology must be authorized by Macrovision, and is intended for home and other limited viewing uses only unless otherwise authorized by Macrovision. Reverse engineering or disassembly prohibited.
Content providers are using the digital rights management technology for Windows Media contained in this device ("WM-DRM") to protect the integrity of their content ("Secure Content") so that their intellectual property, including copyright, in such content is not misappropriated. This device uses WM-DRM software to play Secure Content ("WM-DRM Software"). If the security of the WM-DRM Software in this device has been compromised, owners of Secure Content ("Secure Content Owners") may request that Microsoft revoke the WM-DRM Software's right to acquire new licenses to copy, display and/or play Secure Content. Revocation does not alter the WM-DRM Software's ability to play unprotected content. A list of revoked WM-DRM Software is sent to your device whenever you download a license for Secure Content from the Internet or from a PC. Microsoft may, in conjunction with such license, also download revocation lists onto your device on behalf of Secure Content Owners.
This manual is printed on chlorine-free, bleached paper using solvent-free ink.
Pinnacle Systems GmbH has written this manual to the best of its knowledge, but does not guarantee that the programs/systems will fulfill the users' intended applications.
No warranty is made as to the specifications of features.
Pinnacle Systems GmbH retains the right to make alterations to the content of the manual without obligation to inform third parties.
All quotes, sales, supply and manufacturing contracts from Pinnacle Systems GmbH, including consulting, installation and other contractual services are subject exclusively to the General Sales and Delivery Terms of Pinnacle Systems GmbH.
Table Of Contents
Basics 1
Safety Instructions 1
The Idea in Words 4
The Idea in a Picture 5
The Components. 6
Package Contents 7
System Requirements 9
Setup Your ShowCenter System 11
Setup Your ShowCenter System in Two Steps - Overview 11
Installing the Software 12
Connecting Your Devices 14
Network Connection Configuration 20
Pinnacle MediaManager 27
Overview 27
The Media Library 30
The Media Player 36
Importing Media Files 38
Organizing Media Files 50
Using Playlists 54
Exporting Media Files 57
The Menus 63
Real Rhapsody Music Service 68
File Formats. 71
Television 75
Turning on the ShowCenter Player and the Television 75
Introduction to the TV Menu 77
TV Menu - Music 78
TV Menu - Movies 82
TV Menu - Photos 86
TV Menu - PCTV 90
TV Menu - Settings 93
Remote Control 99
Remote Control Keypad Layout 99
Button Descriptions in Detail 100
Troubleshooting for the Remote Control 105
Special Functions 107
Attaching USB Devices. 107
Dolby® Digital Sound Playback 107
HDPlayback 108
Album Cover Display 108
Playing Music Without Turning on the TV 108
Displaying Movie Subtitles 109
Automatic Playlists. 109
Detecting Missing or Modified Media 109
Music Information From Directory and File Names 110
Organizing Movies By "Series" 110
Specifications 111
Hardware 111
Technical Support. 113
Getting Technical Support. 113
License information 115
Pinnacle End User License Agreement 115
Glossary 119
Index 127
Safety Instructions

WARNING: This product contains chemicals, including lead, known to the
State of California to cause birth defects or other reproductive harm. Wash hands after handling.
Please read and follow these instructions for your own safety, and to ensure that your device functions properly.
Power Cable and Plug
Please make sure to obey the following instructions in order to prevent the device from malfunctioning and to prevent electrical shock, fires, and injuries:
- When disconnecting the power to your device, always unplug it by pulling the plug itself and not the cable.
- Don't ever plug in or unplug the power cable with wet hands.
- Keep the power cable away from heaters and radiators.
- Never put heavy objects on the power cable.
- Don't try to repair the power cable yourself or to modify it in any way, shape, or form.
- Regularly clean off the dust, dirt, etc. from the plug.
If you drop the device or damage it in any fashion, turn it off and disconnect the power plug. - If the device produces smoke, strange smells, or noises, turn it off and disconnect the power plug. Contact your dealer immediately.
Where Not to Install the Device
Do not install the device in any of the following locations:
- In direct sunlight, next to radiators or other heat sources or in vehicles parked in direct sunlight with all the windows rolled up and the doors closed.
- Locations with extremely high temperatures (95°F or greater) or levels of humidity (90% or greater).
- Very dusty or sandy locations.
- Locations where there are vibrations, shaking or slanted surfaces underneath. This could damage the components in the device.
-
On flammable surfaces such as cloth-covered tables.
-
Keep the device away from flower vases, bathtubs, sinks, etc., and from locations where the device is exposed to precipitation. The device may be severely damaged if any liquid enters it.
Problems With Other Devices
- Set up the device in a horizontal position and do not place any heavy objects on it.
- Do not place the device on an amplifier or any other device that gives off heat.
Housing and Internal Components
- Never remove or open any part of the housing and do not try to perform any repairs yourself. Any maintenance or repair work should be done by a qualified repair person.
- Keep fingers and objects away from the inside of the device. It is dangerous to touch any of the components inside the device. Doing so may injure you and damage the device.
- Do not place any foreign objects on the device.
Condensation
Condensation may develop in the device in the following circumstances:
- Right after a nearby heater or radiator has been turned on
In a very humid or steam-filled room. - If the device has been moved from a cold location to a warm one,
Condensation in the device may cause it to malfunction. In this case, turn off the device and wait around 1 hour until the condensation has evaporated. Then you can use it again.
Non-Use
- Turn off the device when you are not using it.
If you are not planning on using the device for a long period of time, you should unplug it from the power socket.
Accessories
Use only the accessories included with or recommended for the device in order to minimize the risk of fire, electrical shock or interference.
Batteries
-
Put in the batteries shipped with the device as shown in the remote control battery case.
-
NEVER combine old and new batteries or different types of batteries (alkaline and non-alkaline).
- Once the batteries are discharged, make sure to dispose of them in accordance with legal and environmental requirements.
Copyrights
Make sure not to violate any copyrights when you use music, movie and digital photo files.

Any changes or additions to the printed documentation can be found in the read-me file on the CD-ROM included with the device.

The CE Declaration of Compliance and the FCC Compliance Statement for Pinnacle ShowCenter are included as PDF files on the CD-ROM included with the device.
The Idea in Words
Pinnacle ShowCenter allows you to playback the following media types:
Music files
Movies and other video files
Digital photos
You can download them from various sources, including the Internet, and manage them on your PC, view them on your TV or play them back on your stereo system. And, so that you don't have to get up from the couch to switch files, it comes with a convenient remote control.
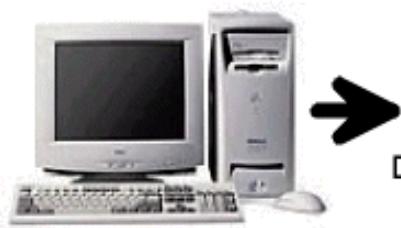
Pinnacle ShowCenter combines a living-room component, a home PC, a remote control, and media-management software.
Pinnacle ShowCenter organizes all your media files in an intelligent multimedia database on your PC so that you can easily find them and have easy, convenient access to them.
Do you use the broadband Internet access on your PC (DSL or cable modem) to download audio and video files, but would like to be able to organize them and play them back any time you want?
Do you want to archive your digital photos, movies, and audio CDs so that you have instant access to them?
Pinnacle ShowCenter is the perfect solution in both cases!
Pinnacle ShowCenter allows you to organize your media collection so that you can play back your favorite movies, view your favorite photos and listen to your favorite music on your stereo system any time you want.
Pinnacle ShowCenter allows you to create one simple system that keeps your PC out of your living room but still lets you enjoy all the benefits of modern media.

At the end of this manual is a section entitled "Glossary" where you can look up definitions of unfamiliar terms. If you're still not sure what to do, please consult the manuals for your television, your stereo system, and your PC components.
The Idea in a Picture
This overview shows one possible setup of the system components in your house:
Home office
Music
Movies
Digital photos
Living room
ShowCenter player


PC
=Multimedia server

Internet
Download movies and music
Audio CDs
Import music
Digital camera
Import photos
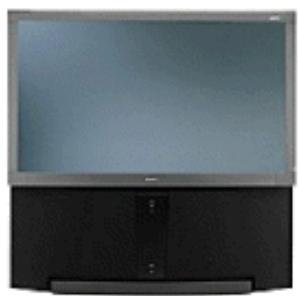
Television
AND/OR
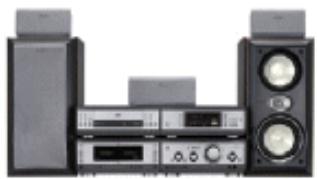
Stereo system
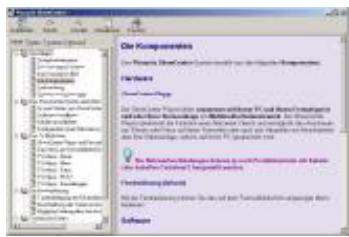
The Components
The Pinnacle ShowCenter system consists of the following components:
Hardware
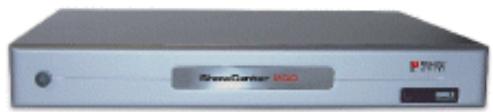
ShowCenter Player
The ShowCenter Player creates a multimedia home network together with your PC and your television and/or your stereo system. The ShowCenter Player acts like a network client, allowing you to view on your television or play back on your stereo system any movies, photos, and songs that are stored on your PC.

Depending your model, your network connection may be wired or wireless.
Remote control (infrared)
The remote control allows you to use the menu displayed on the television screen.
Software
Pinnacle MediaManager
The Pinnacle MediaManager application, which is installed on your PC, permits you to import, manage, and organize music files, movies, and digital photos in your continuously updated ShowCenter Database.
You can also create playlists where your favorite music, movies, or photos are organized according to your own special criteria.
The media files on your PC can come from the Internet, from your audio CDs or from your digital camera.
ShowCenter Server
The ShowCenter Server installed on your PC is what connects the ShowCenter application to the ShowCenter Player. The server delivers data selected in the TV menu to the ShowCenter Player so that you can play it back on your television set or stereo system.
ShowCenter Database
The ShowCenter Database is used by the Pinnacle MediaManager Application and the Server to exchange information across all media. The database contains all the information about storage locations and file types and stores any other available information (for example, playlists). This ensures that the Pinnacle MediaManager can easily find all the data and that the server can make any file available to be played back on your television and/or stereo system.
Package Contents
Before you start the installation, check to make sure that you have all the package contents. If a part is missing or damaged, contact your dealer immediately. Keep the packaging material in case you have to transport the original parts again.
Your Package Contains
Hardware
ShowCenter Player with integrated power supply
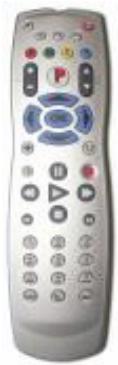
Remote control with batteries (Figure is an example)

WLAN antenna
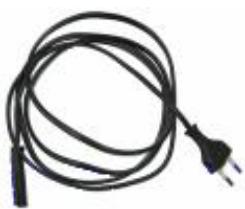
Power cable (different for each country)
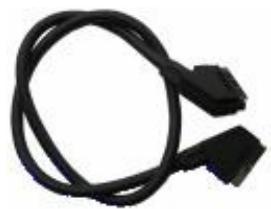
SCART cable (only in Europe)
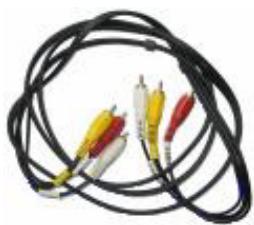
Video and audio cable (only outside Europe)

Ethernet cable (only for some models)

CD-ROM with applications, sample files and drivers
Documentation
QuickStart guide

User manual
Online Help

Note that some models may not have the same package contents as shown above.
Software
You will find the ShowCenter software for Windows 2000 or Windows XP on the CD-ROM included in the package.
You also need the following equipment:
Computer
- Television and/or stereo system
System Requirements
Your system must meet the following requirements for your Pinnacle ShowCenter to work properly:
Computer Hardware
Processor
You must have at least a Pentium® III 1.5 GHz, or a comparable AMD processor
- We recommend a Pentium® 4 1.8 GHz or a comparable AMD processor.
RAM
256 MB minimum - 512 MB recommended.
Hard drive
At least 5 GB available storage space on your hard drive.
Graphics card
DirectDraw-compatible graphics card (AGP graphics card with MPEG 2 decoding support recommended) with 16 Bit color depth (65536 colors) or greater and 800 × 600 pixel or better resolution.

DirectDraw support:
Before you can use the application, you must have a graphics card and DirectX 9.x installed. The installer will check to make sure that your system meets these requirements and, if necessary, will automatically install DirectX 9.x.
Sound card
DirectX 9.x-compatible sound card.
Ethernet connection
10BaseT - 100BaseT recommended.
- For setting up a wireless network connection your PC must have a WLAN adapter or must be connected to an existing access point.

If you are using a 10BaseT Ethernet connection, you may encounter
problems when streaming high-bandwidth video files. We strongly recommend that you have a 100BaseT connection, especially if you are using other network functions.
Computer Software
Windows 2000 with Service Pack 4 installed (or higher) or Windows XP with Service Pack 1 installed (or higher).
In order to play DRM-protected Windows Media files, Microsoft Windows Media Connect will be installed on your computer. This requires Windows XP with Service Pack 2 (or higher).
Set up Your ShowCenter System in Two Steps - Overview
This section provides an overview of how to set up your ShowCenter system. Each step will be explained in detail in the following chapters.
We recommend the following procedure:
1. Install the Software
First install the software on your computer.
You will install the following components:
Pinnacle MediaManager
ShowCenter Server
Sample files
2. Connect Your Devices
Now connect the ShowCenter Player to your computer as well as your television and/or stereo system.

Depending on your model, you may use wired or wireless network connections.
Installing the Software
This section explains how to install the ShowCenter software on your PC. The installer will create a Pinnacle ShowCenter program group with several subgroups where it will copy all the software components you need.

You will need administrator privileges to install the software under Windows 2000 / Windows XP. You must be a member of the "Power User" group or higher in order to use the applications.
1. Insert the Installation CD
Insert the installation CD in your CD drive. The setup program will either launch automatically or you will have to launch autorun.exe from the CD-ROM.
The installer will launch, and display the following dialog box:
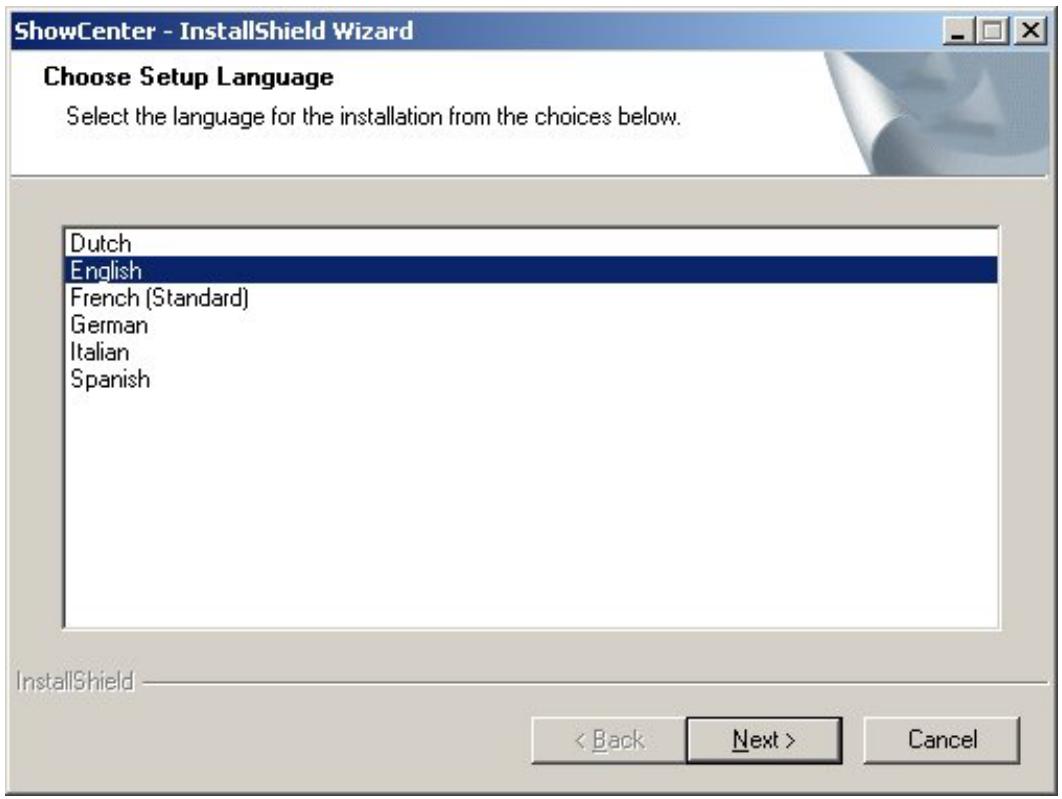
2. Choose Language, Click Next
Choose your language for the installation and the software and then click Next.
3. Click Next
Click Next again to continue with the installation.
4. Agree to the License Agreement and Click Next
Please read the license agreement carefully, agree to it by selecting the corresponding option, and then click Next.
5. Enter Your User Information and Click Next
Enter the user information and serial number (see CD case).
6. Select the Setup Type and Click Next
Next, you select a setup type.
Complete
The program is installed with full functionality. This option takes up the most space on your hard drive.
Custom
You can choose which options should be installed yourself. Recommended for advanced users. Among other things, you can also change the destination path for the directory where the software is installed.
Click Next once you are finished.
7. Select Components, Click Next
If you have chosen the Custom setup, you will be asked to select which components you want installed. Once you are finished with this, click Next.

This step is not necessary if you have opted for the Complete setup.
8. Start the Installation
The system is now ready to install. Click the Install button in order to start copying.
9. Reboot Your System
If Windows asks you to reboot, you should reboot your system now.
10. Install Third-Party Applications
After rebooting, you can install any other programs that you have selected as components (such as Acrobat® Reader).
Connecting Your Devices
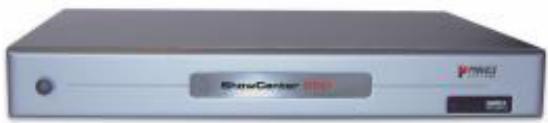
ShowCenter Player - Front View
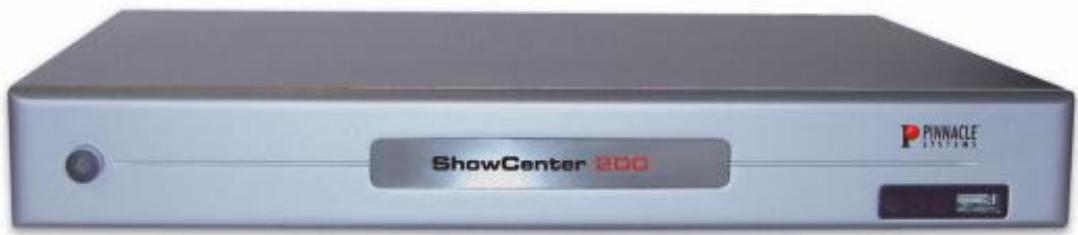
The following operating and signaling elements are located on the front of the ShowCenter Player:
Power on/off switch
- LED status indicator - stand by, on/off
Infrared receiver for the remote control
- LED indicator for signals (for example, "New files in watch folder")
USB2 connection (see the "Special Functions" section)
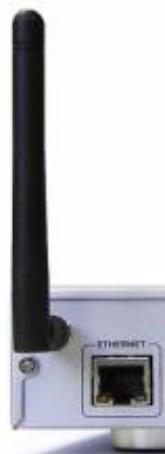
ShowCenter Player - Rear View

The connections on the rear of the ShowCenter Player are explained in detail in the following steps.
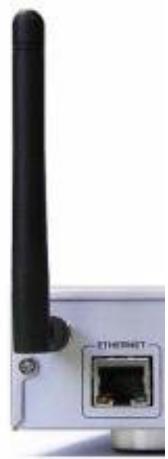
1. Connecting the WLAN Antenna to the ShowCenter Player
Firmly screw the WLAN antenna that came in the package into the connection hole on the rear side of the ShowCenter Player. Make sure the antenna is in an upright position.
2. Connecting the ShowCenter Player to the Television SCART out / video and audio out
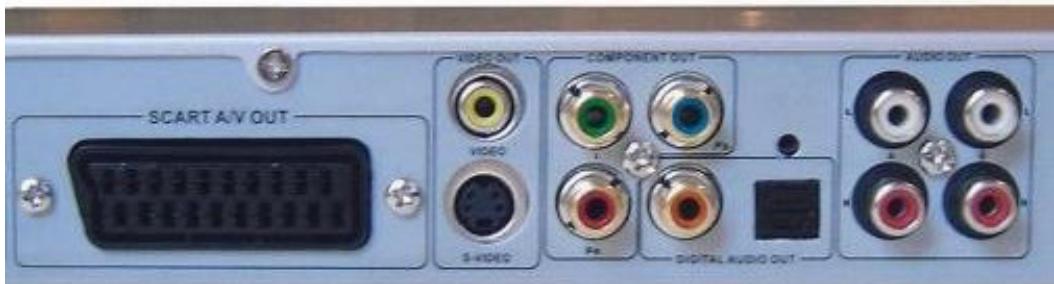
Europe: Connect the SCART cable included in the package to the SCART output on the ShowCenter Player and to an available SCART input on your television. If at all possible, select a SCART connection on your television that supports RGB signals, since this will provide the best possible image quality. Make sure to change the settings in the ShowCenter Player's Preferences menu to SCART RGB.
U.S.: Connect the analog video output to an analog video input on your television using the video cable (yellow plug) from the package. Next, connect the "A" analog audio out jacks to the stereo audio in jacks on your television using the stereo audio cable (red and white plugs) from the package.
More information on the video out jacks
S-Video Out: Offers better-quality images than the normal analog video out jack.
Component Video Out: This connector offers the best possible video quality because it transmits the video components separately.

HD formats as well as "PAL progressive" are only available via the component video out connector.

Note that the first time you turn on the ShowCenter Player, the only active connections will be the SCART out, the analog video out and the S-video out connectors. So you will see no picture if you have a VGA monitor or a television connected to other outputs. You can switch to the other outputs by pressing the "TV" button on the remote control. Just press the button and wait for five seconds. If you haven't gotten a picture yet, just press the button and wait again. You may have to repeat this process up to eleven times in order to cycle through all the video out modes.
The next time you turn off the ShowCenter Player, you will first have to select the correct video out from the Preferences menu since any setting made with the video out button is not permanent.
3. Connecting the ShowCenter Player to Your Stereo System
Analog audio out jacks
Connect the analog audio out jacks - for example the "B" jacks (left/right) - to the corresponding input jacks on your stereo system. Make sure to not mix the colors.
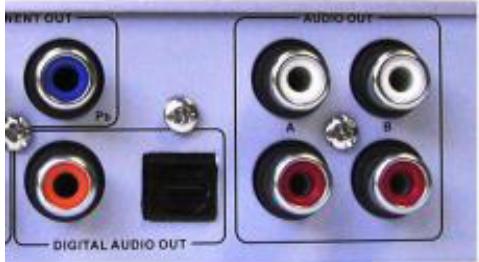
Digital audio out jacks
If you have a surround-sound system, you can use either the coax connector or the fiber-optic connector (optical) on the ShowCenter Player for these connections.

By default, the sound for movies with Dolby® Digital is delivered only over tal audio outputs, not over analog audio outputs. This means that to play
Dolby® Digital movies, you need a separate Dolby® Digital decoder connected to the digital audio outputs on the ShowCenter Player.
Or you can pay a fee to activate Dolby® Digital stereo through the analog audio outputs. This is done on the PC where the ShowCenter software is installed via
Start/Programs/Pinnacle ShowCenter/Options/Activate Dolby Digital soundtracks on analog audio outputs.
After this, you need still to select the function in the TV Menu under Settings/Movie options.
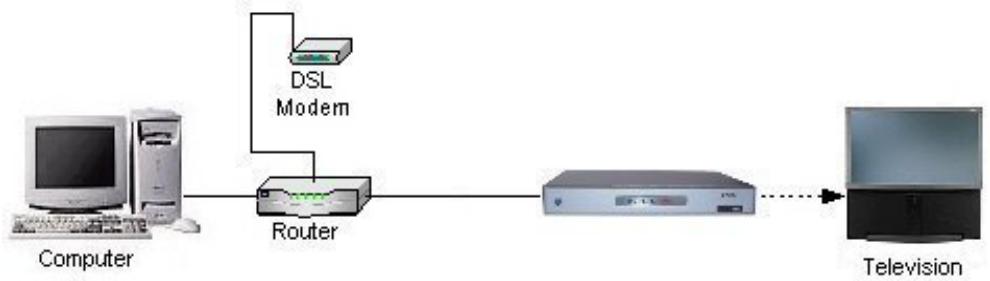
4. Connecting the ShowCenter Player to Your PC
There are various ways of connecting your PC and the ShowCenter Player through the network:
Network connection - wired with a direct connection between your PC and the ShowCenter Player (crossover)
- Network connection - wired, PC, and ShowCenter Player are connected via a router or similar device
Network connection - wireless ("wireless LAN" or "WLAN")
Select whichever option is the most suitable for you depending on your equipment setup.
Direct wired network connection (crossover)
Use a crossover cable to connect the Ethernet port of the ShowCenter Player to the network card on your PC.

Note that a crossover cable is NOT included in the package.
The following image shows how this connection essentially works:

Wired network connection via a router
If you have a network router attached to your PC, connect the ShowCenter Player's Ethernet port to an available Ethernet port on the router using an Ethernet cable.
The following image shows how this connection essentially works:
Network connection - wireless ("wireless LAN" or "WLAN")
Make sure that the WLAN antenna is installed and that no network cable is connected.
The WLAN configuration is described in detail in the following section.
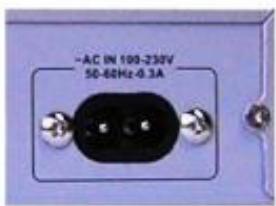
5. Connecting to the Power Outlet
Use the power cable from the package to connect the ShowCenter Player to the power outlet.
6. Putting Batteries in the Remote Control
Put the batteries from the package in the remote control as shown in the remote control battery case.
Once you have connected everything, you can turn on the ShowCenter Player and the other devices. Now you just have to sit back and enjoy your new Pinnacle ShowCenter!
Network Connection Configuration
After you turn on the ShowCenter Player, you see the following Server Selection menu on the connected television. The configuration differs depending on the type of connection (Ethernet cable or wireless).
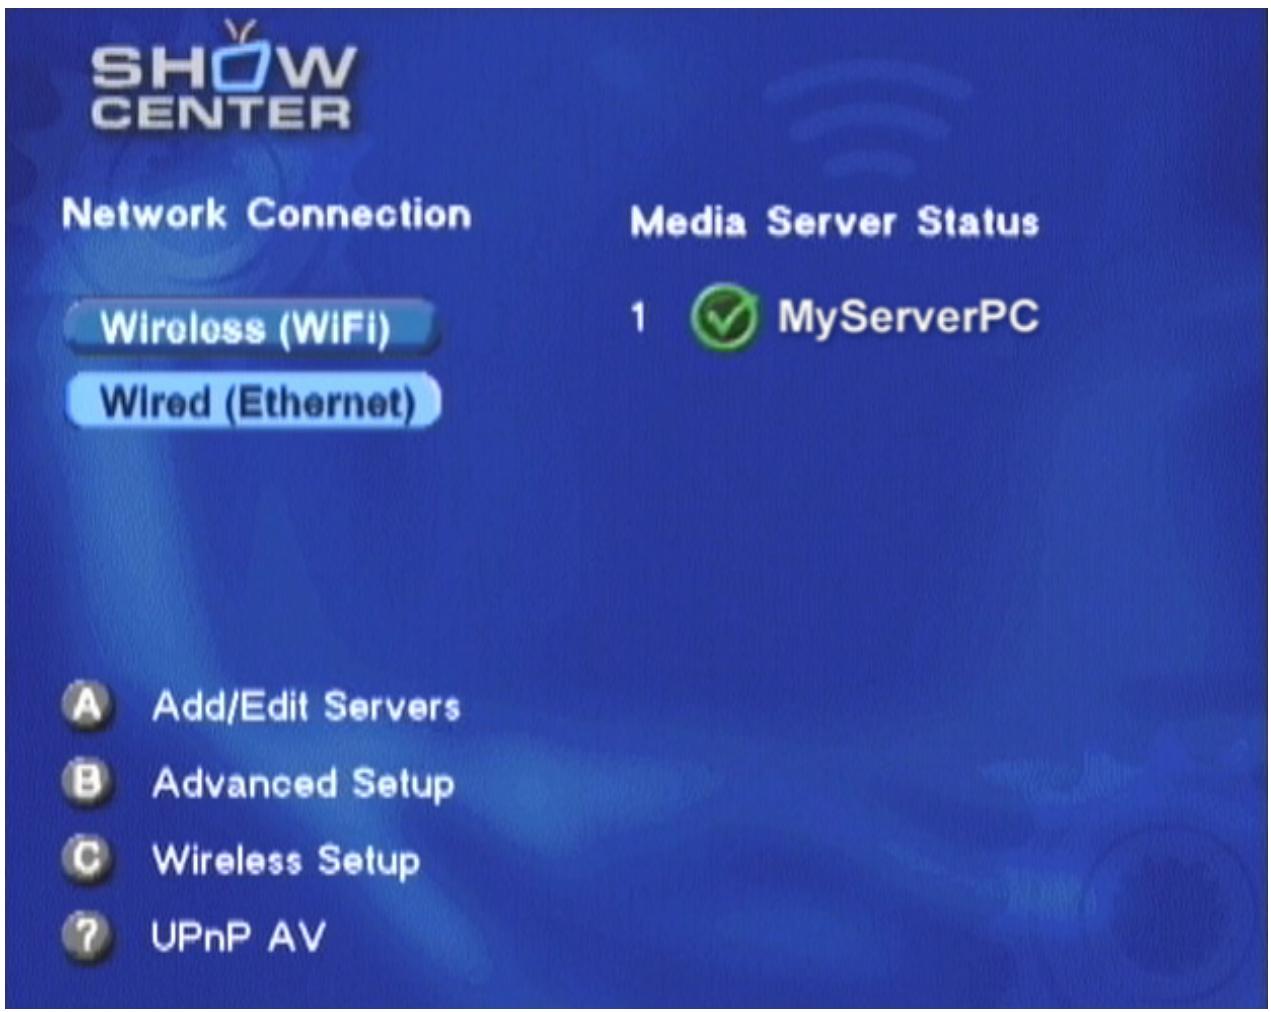
Ethernet Network Connection
For a network connection via an Ethernet cable, choose the Wired (Ethernet) button by selecting it with the arrow buttons on the remote control and then pressing the OK button. The ShowCenter now automatically detects the PCs in your network which have ShowCenter software running. They are listed on the right. Select one of these PCs and press OK to create the connection.
Pressing the B button lets you access further menu pages for the ShowCenter network configuration. This is only necessary for special settings, for example, if you want to manually configure the IP address of the ShowCenter Player.
Wireless Network Connection
A wireless network connection (WLAN) can be created in two ways.
The first way is to create a wireless connection directly between the ShowCenter Player and a PC. This is also called "ad-hoc mode" or a "wireless direct connection". For this, your PC must have a WLAN adapter.
The second way is to use "infrastructure mode" via a WLAN access point (WLAN router).
In the following, PC configuration for a wireless network is described first.
Wireless direct connection (ad-hoc mode)

The ShowCenter Player supports a high-speed 11g connection in ad-hoc mode. However, many 11g PC-WLAN adapters are not able to provide this and only offer low transmission rates in ad-hoc mode according to the 11b standard. With this connection, movies can only be played without any problems in just a few cases. Therefore, we recommend a wireless direct connection only in exceptional cases and urgently advise you to use a WLAN access point.
First make sure that the WLAN adapter on you PC is properly installed, activated, and functioning.
Open the control panel via Start/Settings.
Double-click the Network and Dial-up Connections icon and then the icon for the WLAN adapter on your PC.
Click Advanced and then Add. If you have installed Windows XP Service Pack 2, click Modify advanced settings, then click the Wireless Networks tab and then click Add.
In the following dialog window, enter a name for the network (letters and numbers without spaces) and then for the network authentication type, select Open.
If you would like to encrypt your network, select WEP as data encryption and deactivate the check box The key is provided for me automatically. Now enter a network key.
However, we recommend that you first deactivate the encryption to make it easier for you to check whether the wireless connection is functioning correctly.

The network key is the "password" for your wireless network. It has to be entered in hexadecimal format (digits 0 to 9 and letters a to f only). For 64-bit encryption, the key needs to be made up of exactly ten Hex characters. For 128-bit encryption, it is 26 Hex characters. Make a note of the key, since you will also need to enter it in the ShowCenter Player.
Finally, do not forget to activate the check box This is a computer-to-computer (ad-hoc) network and confirm it twice with OK. Your PC is now waiting for a wireless connection with the ShowCenter.
Connecting to an access point (infrastructure mode)
Make sure that your access point is activated and properly configured and that there is a network connection to the PC which has ShowCenter software running. If your wireless network uses WEP encryption, you need the WEP key as a Hex character string for the following.
Wireless network configuration for the ShowCenter Player
Disconnect the Ethernet cable. Select the Wireless (WiFi) button in the Server Selection menu of the ShowCenter Player by selecting it with the arrow buttons on the remote control and then pressing the OK button. Or you can press the C button to do this. The ShowCenter Player then performs a reset, scans for wireless networks, and after a few seconds, displays the results.
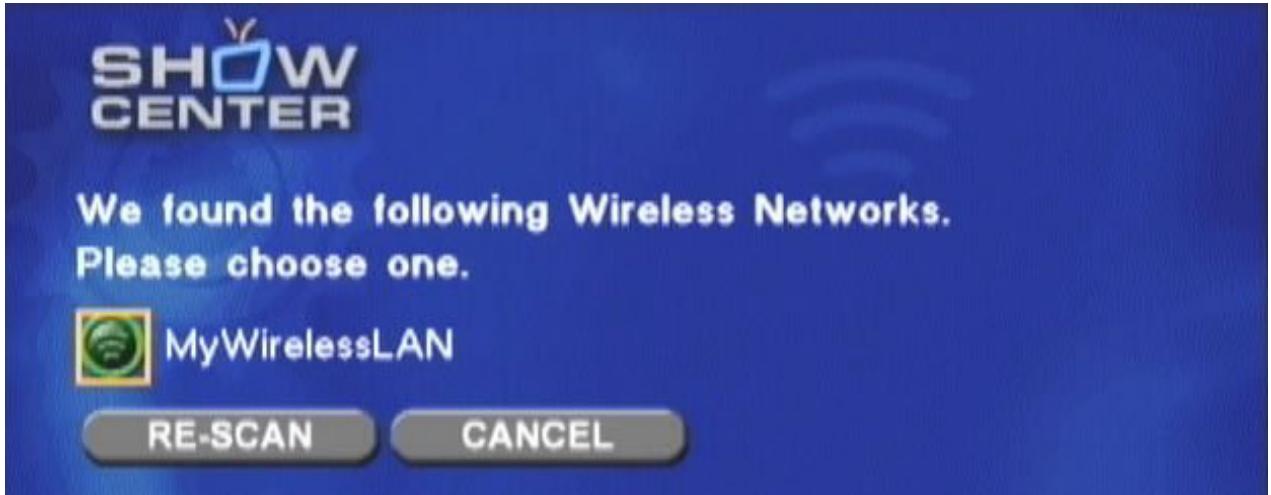
In this menu, choose the name (SSID) of your wireless network and press OK. If no network is displayed, check the configuration of your WLAN adapter or WLAN access point and select Re-Scan to perform a new search for wireless networks.
After choosing the network, you see the following menu:
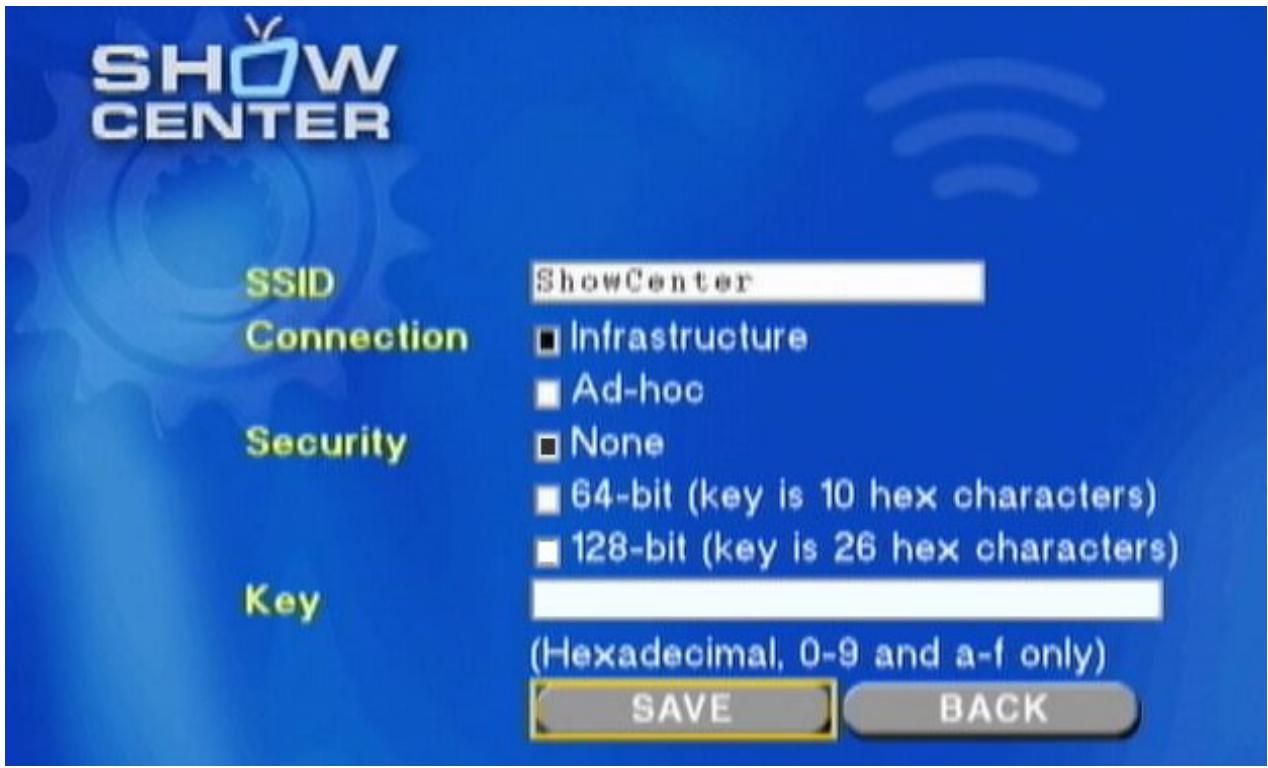
The network name (SSID) here has already been preset. Select the Ad-hoc check box if you are using a wireless direct connection. For a connection to an access point, select Infrastructure. If you use WEP encryption (here Security) in your network, select the key type and enter the key under Key.
When entering a hexadecimal key, you may only use the numbers 0 to 9 and the lower-case letters a to f. The C/N key can be used to switch between upper and lower-case letters and between letters and numbers.
After completing your entry, press the SAVE button. The ShowCenter Player restarts and after a few seconds the Server Selection menu appears again. An attempt is made to connect to the previously configured wireless network - this may take a few minutes. When the connection has been made, the PCs on your network, which have ShowCenter software running, are displayed on the right. Select one of these PCs and press OK to connect the ShowCenter Player with this server PC.
More Network Configuration Tips
Firmware updates
The latest versions of the ShowCenter software usually contain the latest version of the ShowCenter Player firmware. This is automatically loaded after the installation. After a firmware update, you may need to reconfigure a new wireless network, since the current settings can be deleted by the firmware update.
Manually adding a server
If your server PC is not automatically detected, you can add it manually. To do this, first open a command prompt on your server PC and enter the command ipconfig. Windows now displays the IP addresses of all the network adapters. Make a note of the IP address of the adapter, over which the connection to the ShowCenter Player should be made.
After this, press the A button in the Server Selection menu and then select Add a server. Enter a name for the server and the previously noted IP address, and save the settings. The new server PC now appears in the Server Selection menu.
Automatically connect with a server
If you only use one server PC, you can automatically connect to this server. To do this, press the A button in the Server Selection menu. Then select Edit a server and choose your server PC. Now select the check box Always connect to this server and save the setting.
Manual network configuration
You can access the setting pages for manually configuring Ethernet and wireless networks by pressing the B button in the Server Selection menu. We recommend using these settings only in special circumstances or when no connection can be made otherwise.
WLAN range and data rates
The range of wireless networks is limited and decreases drastically when devices are separated by walls. Many manufacturers of WLAN products indicate ranges based on measurements made on open fields and under ideal circumstances. In practice, actual performance does not even come close to the ranges indicated. In our tests, we have found that the distance of transmission is not more than eleven yards if there is a wall in the way.
In addition, you should also only use a single wireless transmission link, since each additional link cuts the data rate in half again. When the ShowCenter Player is connected via wireless to your access point, your PC should be connected to the access point per cable, not per wireless.
The maximum data rate possible for realtime video transmission with the 802.11g standard is about 10 to 12 MBit/sec. This is sufficient for almost all standard definition video formats as well as for DVD formats. In addition, this data rate is, in most cases, sufficient for MPEG 4 HD AVI files as well as for Windows Media Video HD up to 720P. On the other hand, MPEG 2 HD and Windows Media Video HD 1080I usually require an Ethernet cable connection.
Firewalls
If you use a firewall between your PC and ShowCenter, then ports 8000 (TCP) and 1900 (UDP) must be enabled because they are required for communication between the ShowCenter Player and the server. Many WLAN access points are at the same routers, that is, they establish connections to the Internet (for example, via DSL or cable modem). In this case, a firewall is integrated which only works "outward" (that is, in the direction of the Internet). These ports should not be enabled for this kind of firewall because the contents of your media database will otherwise be visible on the Internet.
Permanent IP address
By default, the ShowCenter Player uses an IP address assigned via DHCP. If no DHCP server is on the network, ShowCenter selects an IP address itself.
You can also manually assign a permanent IP address to the ShowCenter Player for special network configurations. To do this, press the B button on the remote control in the Server Selection menu. Now select IP Config and then Switch to manual. Now you can enter the values.
Overview
What the Pinnacle MediaManager Does
The Pinnacle MediaManager is installed on your PC so that you can import the following:
Music files
Movies and other video files
Digital photos
You can manage and organize these files in the MediaManager database which is constantly updated.
You can also create personal playlists – compilations of your favorite songs, movies or photos organized according to your own criteria. These playlists can also be exported so that, among other things, you can burn audio CDs.
Main Window of the Pinnacle MediaManager
You can launch the Pinnacle MediaManager from the Pinnacle program group in the Start Menu or by double-clicking the Desktop shortcut. The following window will open:
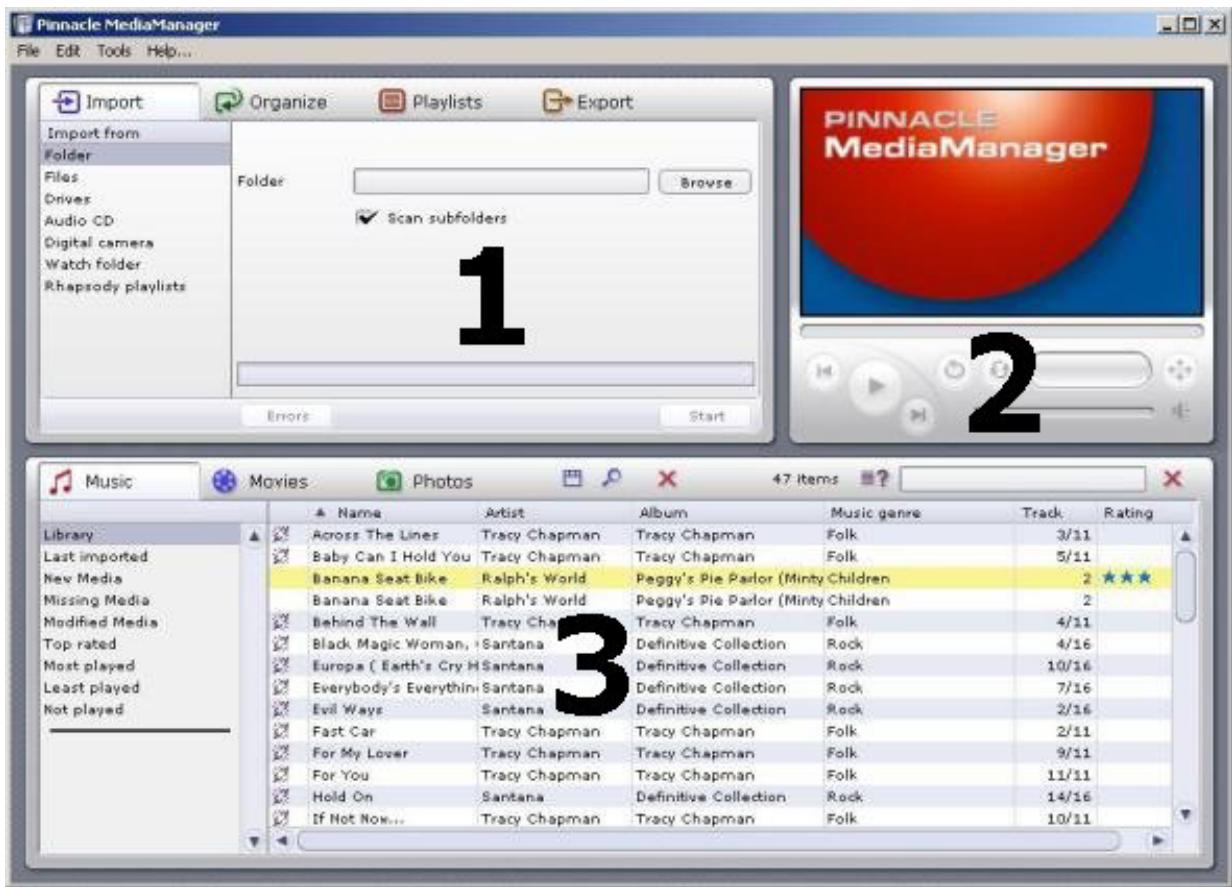
The window contains the following sections:
Section 1:
The Tools section with the Import, Organize, Playlists, and Export tabs, located in the upper left-hand corner.
Section 2:
The Media Player in the upper right-hand corner.
Section 3:
The Media Library with the Music, Movies, and Photos tabs, located in the bottom half of the window.
Menu Bar:
At the very top of the window is the menu bar, which contains the File, Edit, Tools, and Help menus.
The window layout varies depending on what tools and lists you have selected; the three sections work together closely and interactively. How the sections work individually is explained in detail in the following chapters.
We will first focus on the Media Library and the Media Player to give you the basic tools you need to use the program.
In later chapters, we will look at the more advanced functions – Import, Organize, Playlists and Export – as well as the menus.
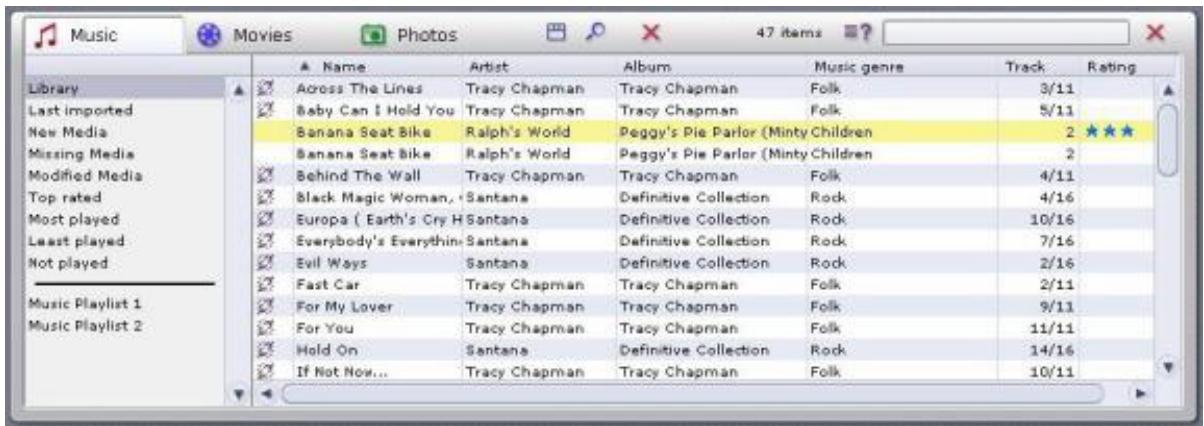
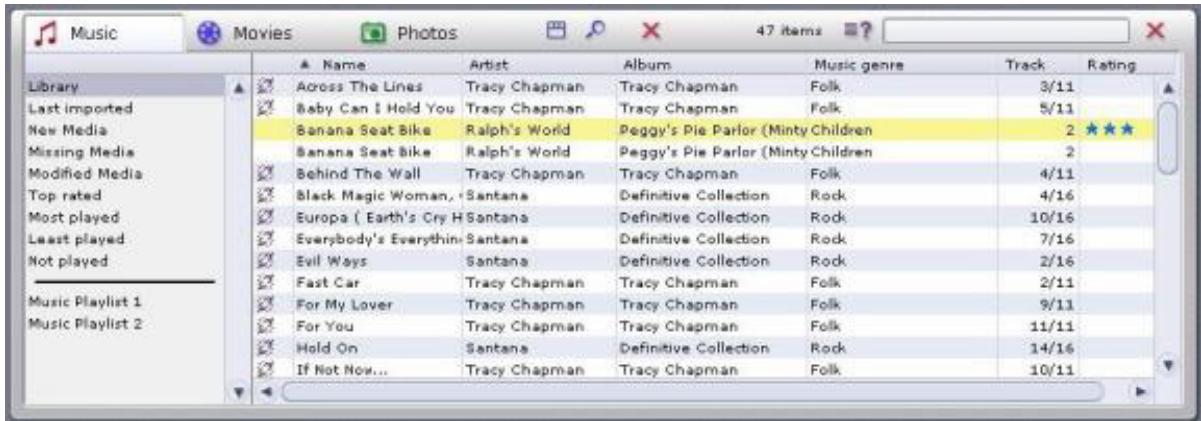
The Media Library
Introduction to the Media Library
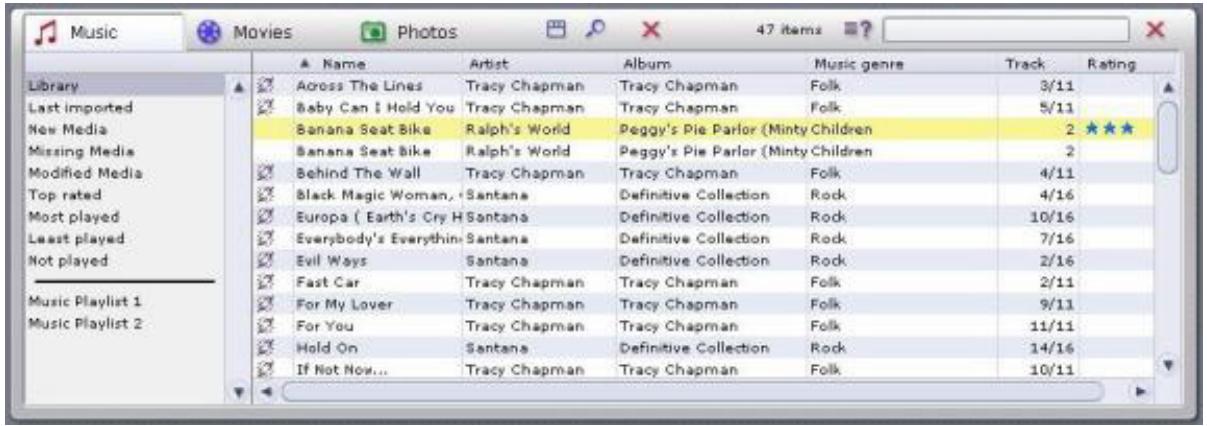
Media types
The Media Library displays the contents of the database sorted by media type. Access each media type by clicking on the corresponding tab:
Music tab
Movies tab
Photos tab
Categories
For each media type, you can toggle between the categories listed on the left-hand side.
Library
Displays all the files in the database.
Last imported
Displays the most recently imported files. For example, if you import 3 CDs in a row, you will only see the tracks from the third CD.
New Media
All the files imported over the past twenty-four hours.
Missing Media
Although the media displayed here exist as entries in the database, the associated files are no longer where they were saved originally. They can no longer be found because they have been either accidentally deleted, moved or renamed. These entries are marked in the left column of the Media Library with the corresponding icon.
The Pinnacle MediaManager automatically looks for missing media at certain time intervals. You can set the time interval via the File under Settings. If you want to do a manual search, select Find missing media from the Shortcut menu or via the Tools menu.
You can access the Shortcuts menu by right-clicking the entry you want in the Media Library list. From here, you can use the Repair missing media function to browse for missing files or you can "repair" broken links by entering the new file location or file name.
Modified Media (applies only to music files)
If you use a different software program to modify the ID3 tags of your music files, the data no longer corresponds to the values in the Pinnacle Media Manager database. This situation is automatically detected in a way similar to Missing Media. The entries are marked in the left column with the corresponding icon.
You can now enter new values for the ID3 tags via the function area Organize. Or you can update the database by reading the values of the modified ID3 tags from the file. To do this, select the entries, right-click and then select Update values from file in the Shortcut menu.
Top rated
Files given a four or five star rating are displayed here. The rating is assigned either via the Shortcut menu or via the function area Organize and displayed using star icons.
Playback counter
The Pinnacle MediaManager contains a playback counter, which displays and categorizes media files according to the following categories:
Most played:
The media files displayed are the ones you play most frequently.
Least played:
The media files displayed are the ones you play least frequently, but you have played them at least once.
Not played:
The media displayed are the ones, which have not yet ever been played.
The playback counter can be reset via the Shortcut menu.
Automatic playlists are created and constantly updated for the categories Top rated, Most played, Least played, and Not played.
User-defined playlists
The files in the selected playlist are displayed.
Details
The right-hand list displays details for individual files. These details will vary depending on whether you have selected the Music, Movies or Photos media type tab. These sorting criteria are also called tags.
Depending on which media type you select, you may see the following information: file status, track/movie/photo name, date created, etc.
As in Windows Explorer, you can left-click a column header to resort the files in the list.
You can change the order of the columns by left-clicking the column headers and dragging them to a new location.
Right-clicking a column header will open a pop-up menu where you can choose which columns to display and which not.
Icons
The icons in the left column of the Media Library have the following meanings:
The file has accidentally been deleted or moved or it can no longer be found because it has been renamed.
The original organizational identifiers of the file have been modified.
The file originates from the Rhapsody Music Service.
The file is currently being played back.
The playback of the file is currently on hold.
The file is protected by Microsoft DRM.

There are further icons associated with file conversion. They are explained in the section "File Conversion".
Shortcut menu
Please note that you only need to right-click a list entry in the Media Library to access the extensive Shortcut menu. Most Media Library functions are available here in order to access them more quickly. Simply select the option you want. Read the following sections carefully to learn how the Media Library can help you find, sort, and delete your media files.
The Sort View in the Media Library
You can toggle the sort view on and off by clicking the button to the right of the tabs.
Clicking this button will split the list horizontally into two new sections.
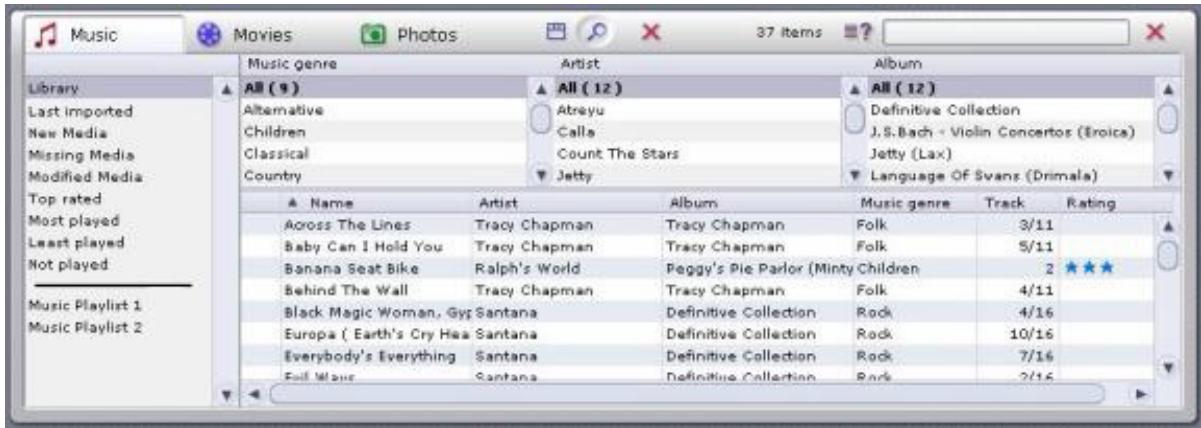
The upper half of the list can be used to sort or filter the media files displayed in the lower half. In other words, in the upper half you set a filter that selects which files can be displayed in the lower half.
Example: You have activated the Music tab and now want to display all the tracks in your database in the Soul genre.
You can open the menu with the button and determine which columns should be displayed in the sort view. We recommend listing photos, for example, according to date.
Searching in the Media Library

On the far right-hand side of the Media Library is the search field:

To quickly find a particular media file in the database, just enter any search term in the search field.
You can use the button to determine whether only certain ranges in the database should be searched, for example, according to "Name", "Artist" or "Album", or whether the entire database should be searched.
Any files that have names containing the search term will be displayed in the list. To enter a new search term, simply click in the search field and replace the old search term, or clear the field by clicking the × button.
Deleting Files in the Media Library

Deleting files
To the right of the tabs is a × button.
Select one or more files in the list and then click this button.
The entries are deleted from the database. The associated media files can also be deleted from the hard disk if you select the corresponding option in the dialog box displayed.
If you want to include the files in the database again, you will have to reimport them.
The Media Player
Using the Media Player and Its Controls
The Media Player plays the media files in the database on your PC. Video files and photos are played/displayed on its 16:9 screen. To toggle full-screen playback on your PC monitor, double-click the Media Player screen. Double-click the screen again to revert to the main Pinnacle MediaManager view. Audio files are played back using your sound card and computer speakers. Audio files also require you to use the Media Player controls.

To make them easier to use, all controls have a Tooltip field that appears when you move your mouse cursor over the buttons.
Individual Explanations of Controls:


Start/PausePlayback
Select a file in the Media Library and then double-click it. The movie or the photo will appear on the Media Player screen, and the button will change appearance. Click the button again to stop playback.
In the left column of the Media Library next to each entry, the corresponding icons appear in miniature.

Previous
Click this button to play back the previous file in the playlist.

Next
Click this button to play back the next file in the playlist.

Shuffle
The music, video or photo files will be played/displayed in random order.

Repeat
If you click this button while a playlist is being played, the list will be played back over and over until you deactivate the feature by clicking the button again.

Video format
While playing a movie, you can click this button to select the video format (standard 4:3, letterbox or widescreen 16:9. Note that a Tooltip field will appear when you place your mouse cursor over this button. The video format you select for a movie will be saved in the database – you won't have to reset it the next time you watch the movie.

Progress bar
This slider indicates by its position how much of the current audio or movie file you have heard or seen. You can also move back and forth to anywhere in the file by dragging the slider with your mouse.

Time display
This shows you how long the audio or video file has been playing.

Volume control
Located on the right-hand side of the screen section, this slider can be dragged up and down with the mouse to set the volume.

Mute
Click this button to turn the sound on and off.
Importing Media Files
Introduction to the Import Tab
You will see the following window if you select the Import tab in the Tools section:
You can import media files to the MediaManager Database from the following sources:
- Folder: From a folder on your PC.
- Files: One or more files from a selected folder.
- Drives: From any drive on your PC.
- Audio CD: From the audio CDs that you wish to archive in the MediaManager Database.
- Digital camera: Photos taken with your digital camera.
- Watch folder: From a watch folder on your PC.
- Rhapsody playlists: Download Rhapsody playlists onto your PC. Due to licensing restrictions, this function is not available in every version of the Pinnacle MediaManager.
In the tab for a particular media type in the Media Library, you can see the imported files in the Last imported category and in other categories.
Right-click the list and select the Display in Explorer option from the pop-up menu in order to open the folder on your PC hard drive where the files are stored.
The following sections explain the features for the individual categories in more detail.
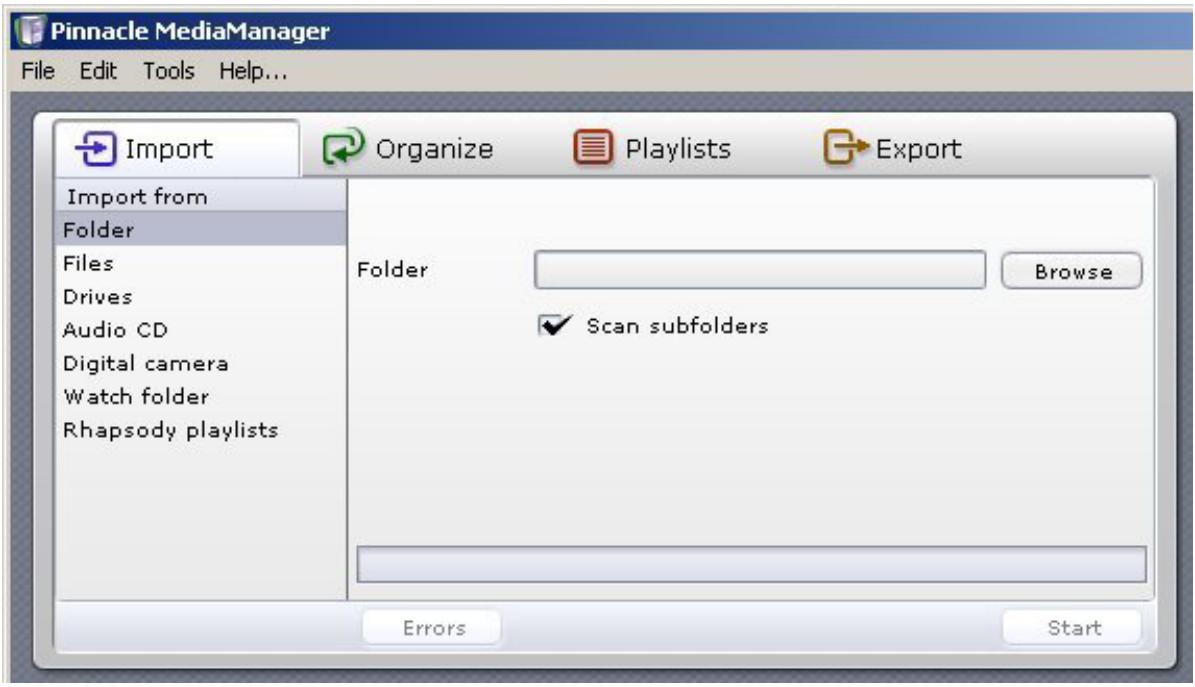
Import - Folder
You will see the following window if you select the Folder category in the Import tab in the Tools section:
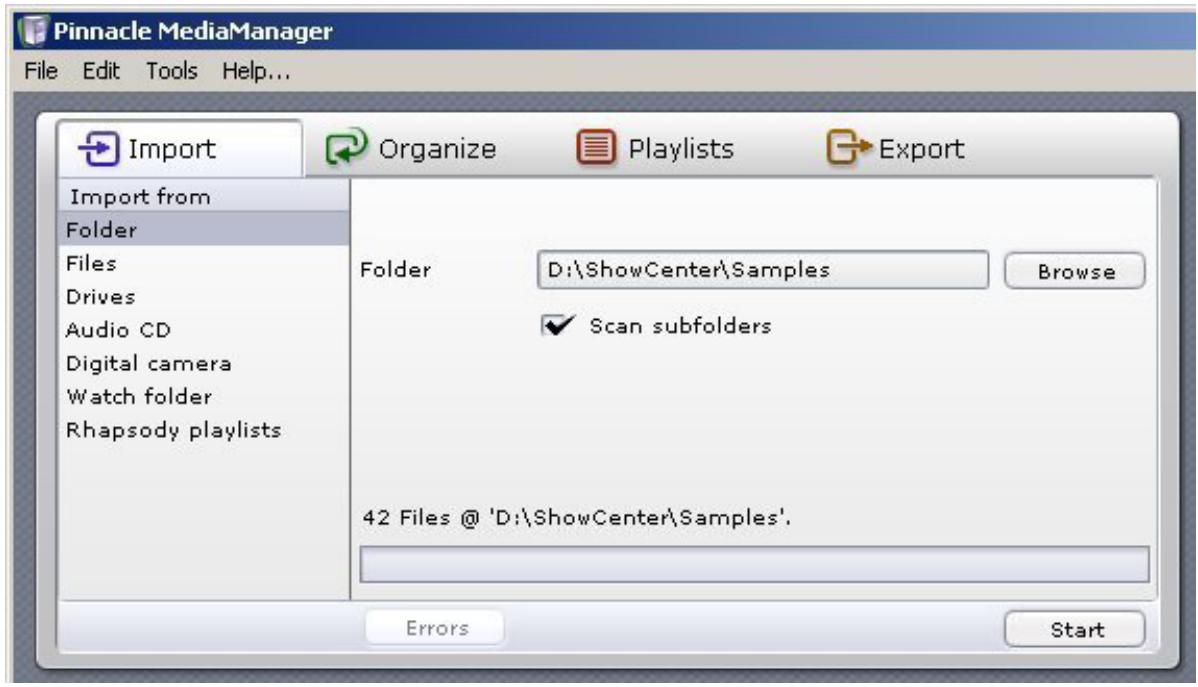
Folder
Click the Browse button to select which folder on your computer you want to import media files from. Once you have found the folder, click the Open button. The folder and the number of files selected will be displayed above the progress bar.
Scan sub folders
If you select this check box, the application will import any files it finds in the subFolders.
If you are importing photos, the names of the sub folders will also be imported as photo album names.
Movie titles act as names for collections. If a movie consists of several files, these files will be grouped together in a collection.
Start
When you are finished with your settings, click the Start button. The progress bar will display 100% when the import is complete. You will also be told how many files were imported and how many, if any, were rejected because their format wasn't supported or they were already listed in the database. All imported files will be displayed in the Media Library in the bottom half of the window, listed by media type and category.
Import - Files
You will see the following window if you select the Files category under the Import tab in the Tools section:
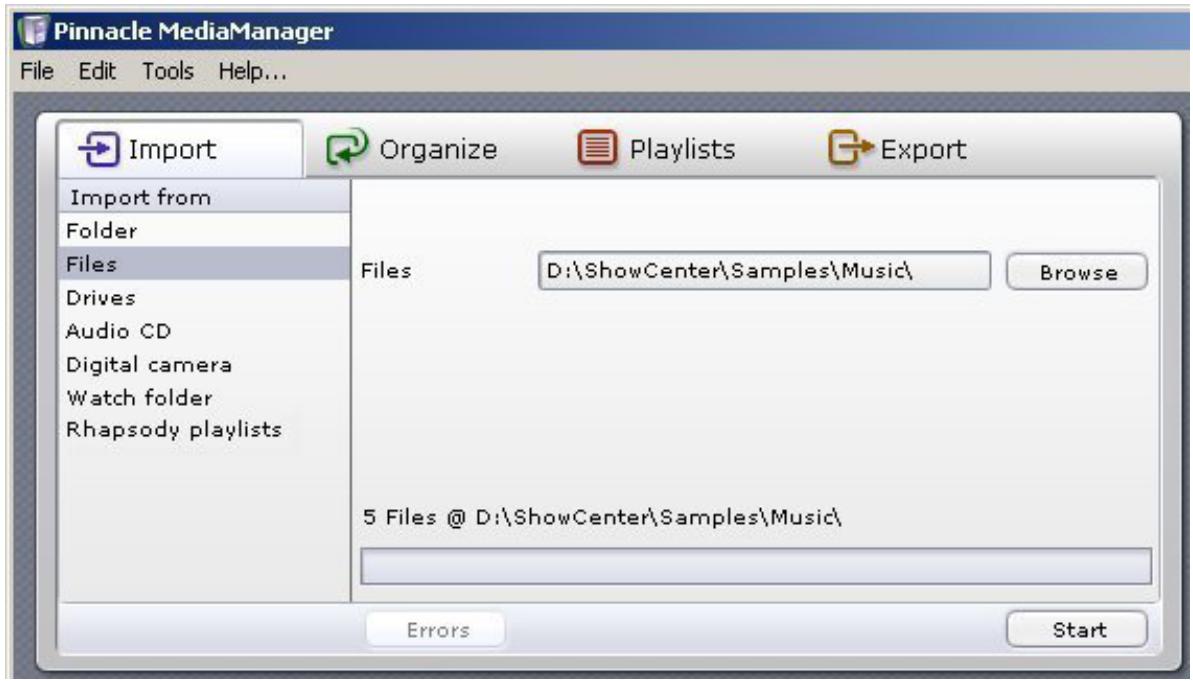
Files
Click the Browse button to select the files you want to import to the database from a folder on your hard drive. Once you have selected the files, click the Open button. The folder and the number of files selected will be displayed above the progress bar.
Start
When you have made your selection, click the Start button.
The progress bar will display 100% when the import is complete. You will also be told how many files were imported and how many, if any, were rejected because their format was not supported or they were already listed in the database.
All imported files will be displayed in the Media Library in the bottom half of the window, listed by media type and category.

Playlists from other programs can also be imported by using this function (M3U format).
Import - Drives
You will see the following window if you select the Files category under the Import tab in the Tools section:
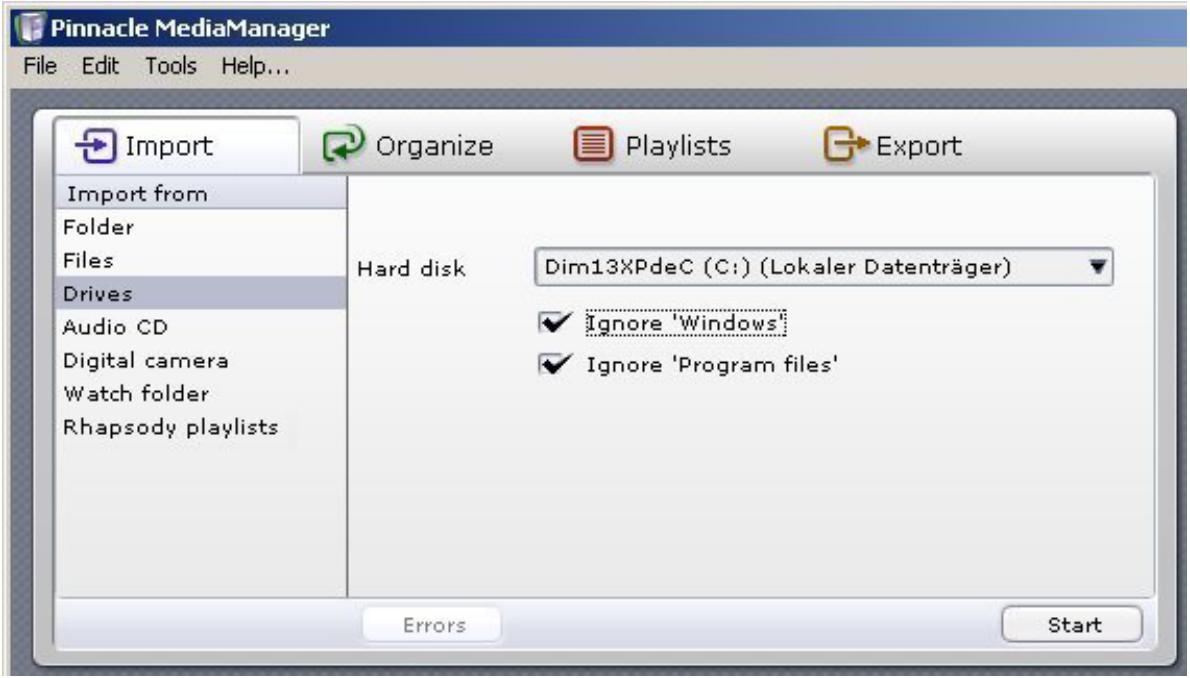
Hard disk
In the drop-down list, select the hard drive on your computer that you wish to import media files from.
Ignore 'Windows' and Ignore 'Program files'
If you have selected these check boxes, the program will not scan the Windows and/or Program files folders. This is usually a good idea because these folders generally do not contain any noteworthy media files.
If you are importing photos, the names of the sub folders will also be imported as photo album names.
Movie titles act as names for collections. If a movie consists of several files, these files will be grouped together in a collection.
Start
When you are finished with your settings, click the Start button.
You will be told how many files were imported and how many, if any, were rejected because their format wasn't supported or they were already listed in the database.
All imported files will be displayed in the Media Library in the bottom half of the window, listed by media type and category.
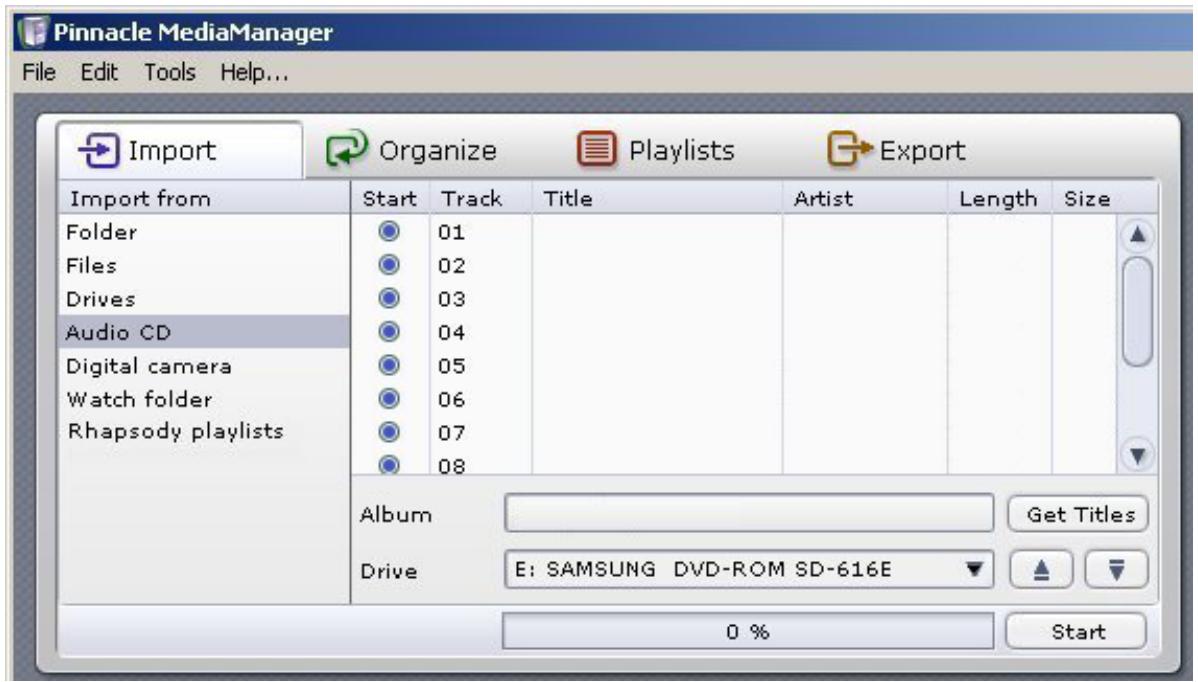
Import - Audio CD

Due to licensing issues, this function is not available in all versions of the Pinnacle MediaManager.
You will see the following window when you select the Audio CD category under the Import tab in the Tools section:
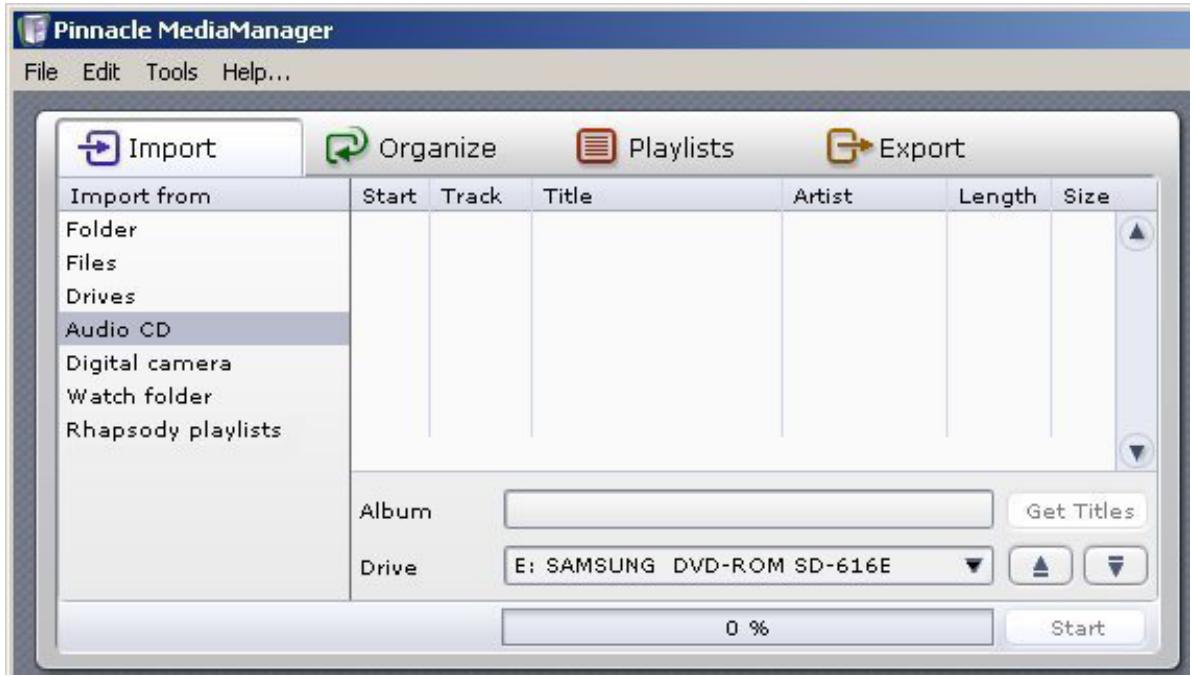
This feature allows you to import your audio CDs to the MediaManager Database. The tracks on each CD are read in and separated into individual MP3 files.

Audio CDs with copy protection cannot be imported.
Insert the CD and select the drive
Insert the audio CD into your CD drive. If your computer has several CD or DVD drives, you will have to select the drive from the Drive drop-down list. The application will read in the CD tracks and display them by number in the Track column.
Get Titles

You need an active Internet connection to use this feature.
The names and titles of all known audio CDs are stored in an internet database. The Get Titles feature allows you to import this information to the
MediaManager Database along with the tracks from the CD. If you click this button, the application will search for the data online and will display it immediately as shown below.
If you cannot connect to the Internet or if your CD is not listed in the Internet database, you can enter the titles as well as artist and album names manually. Left-click the corresponding fields to enter this information.
You can also play back individual CD tracks by double-clicking the title. The Media Player will display an icon indicating that you are playing a CD.
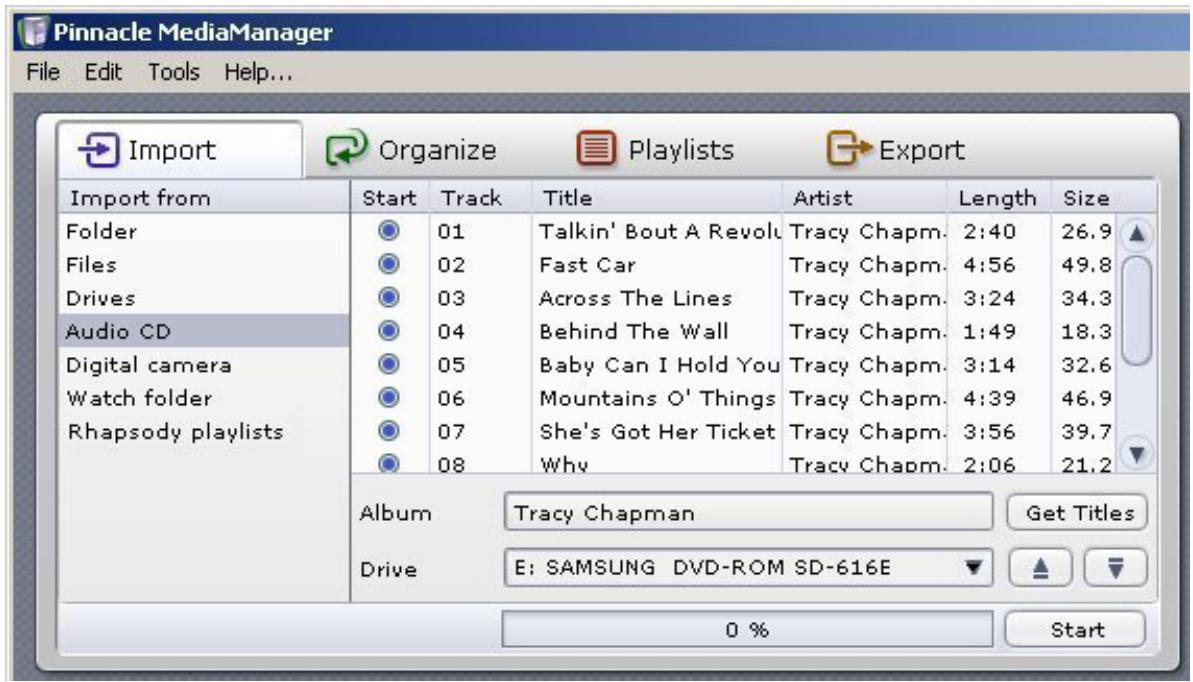
If you look in the Start column, you will see an option button for each track. Selecting these option buttons allows you to choose which tracks you want to import.
Here's a helpful tip: if you want to select all the tracks at once, right-click the Start column and choose Select all from the pop-up menu.
Start
When you are finished with your settings, click the Start button. During the import, each track is assigned its own progress bar.
The progress bar at the bottom will display 100% once all selected titles have been imported.
In the Music tab in the Media Library, you can see the files imported from your audio CD in the Last imported category and in other categories.
Unless you have already defined a folder in the Preferences item in the File menu, imported audio files will be saved by default to the ...\My Documents\My Music folder on the hard drive of your PC.

Ejecting the CD
Click this button to eject the CD from the drive.

Closing the CD drive
You can close the CD drive by clicking this button.
Import - Digital Camera

At present, only cameras with WIA drivers are supported. Since Windows 2000 does not support WIA, this feature is only available in Windows XP.
You will see the following window when you select the Digital camera category under the Import tab in the Tools section:
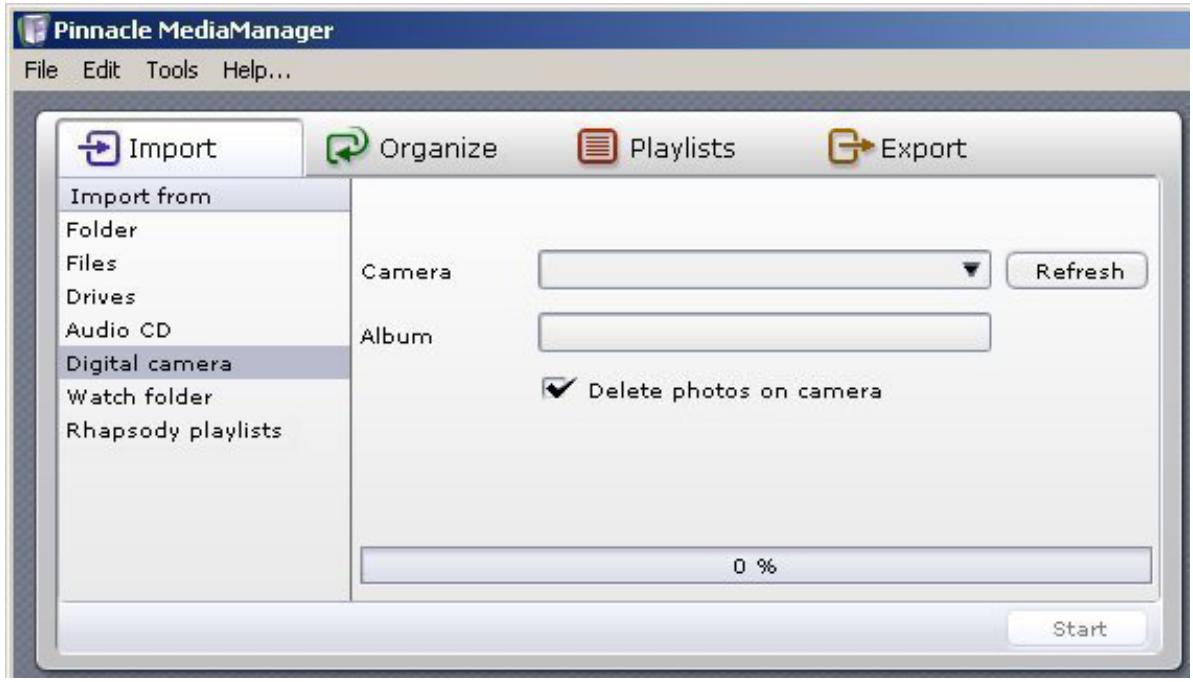
Camera
To import photos to the MediaManager Database directly from a digital camera, select the camera from the Camera drop-down list.
If you connected a new camera to your PC while the MediaManager was active, just click the Refresh button. It will then appear in the drop-down list.
Album
Enter a name for your album.
Delete photos on your camera
Select this check box to have the photo files removed from the camera memory after being imported.
Start
When you are finished with your settings, click the Start button. The progress bar will display 100% when all files have been imported.
In the Photos tab in the Media Library, you can see the imported files in the Last imported category and in other categories.
Unless you have already defined a folder in the Preferences item in the File menu, imported photo files will be saved by default to the ...\My Documents\My Pictures folder on the hard drive of your PC.
Import - Watch Folder
You will see the following window when you select the Watch folder category under the Import tab in the Tools section:
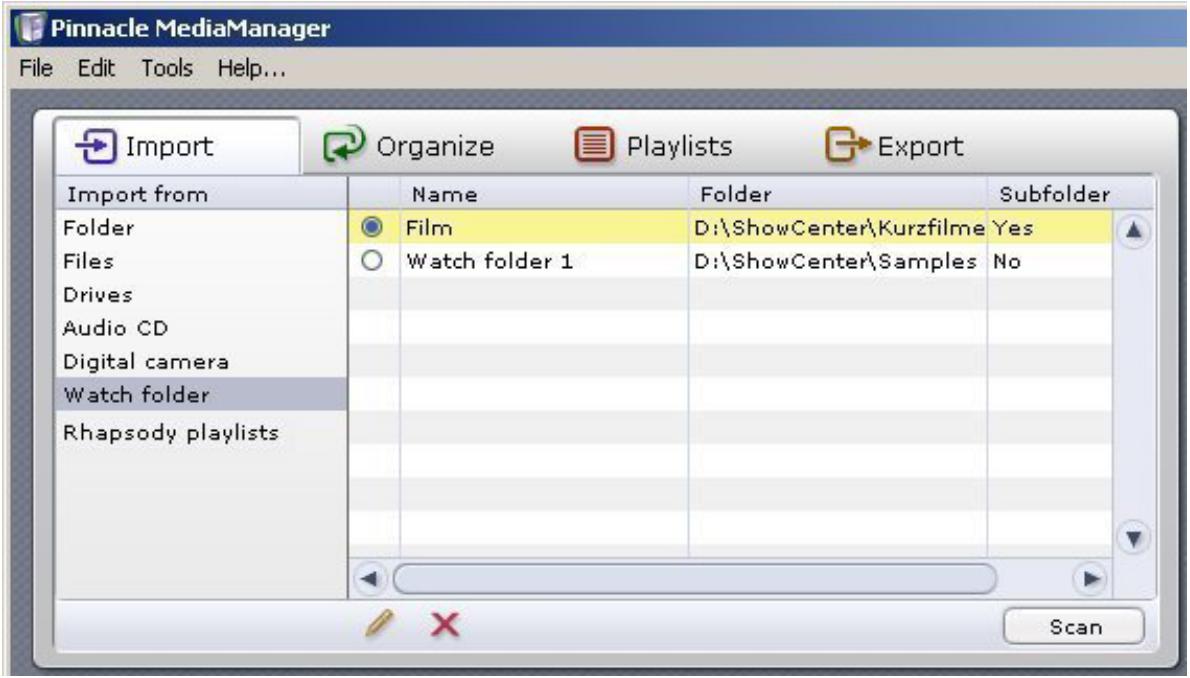
Here you can specify/add any number of directories as watched directories on your PC. The Media Server constantly checks these directories for new or deleted files and records this information to the database – even if the MediaManager is not active. You can designate the watched directories yourself and see them all in the list in the right half of the window.

Define/Create new watch folder
Click this button to define/create a new watch folder.
New watch folders start out active by default. To deactivate a watch folder, click the option button in the first column of the list.
Options for watch folders
If you click the last column in the list of watch folders, a menu will appear where you can select additional options for each watch folder:
Subfolder
If this option is activated, the server will watch all sub folders as well.
If you are watching folders with photos, the names of the sub folders will be imported as photo album names.
Movie titles act as names for collections. If a movie consists of several files, these files will be grouped together in a collection.

Delete watch folder
Click this button to delete a watch folder from the database.

Only the reference to the folder will be deleted from the database; the folder itself will still be stored on your hard drive. To make the folder appear again in the database, you will have to redefine it as a watch folder.

Scan watched directories again
Click this button to scan all of the watched directories again. This is useful if, for example, the Media Server has been switched off temporarily.
Import - Rhapsody Playlists

Due to licensing restrictions, this function is not available in every version of the Pinnacle MediaManager.
If you select the category Rhapsody Playlisten in the function area under the tab Import, the window will be structured as shown below. With the help of this function, you can import Rhapsody playlists into the MediaManager Database. The Real Rhapsody application needs to be active in order for the playlists to be displayed.
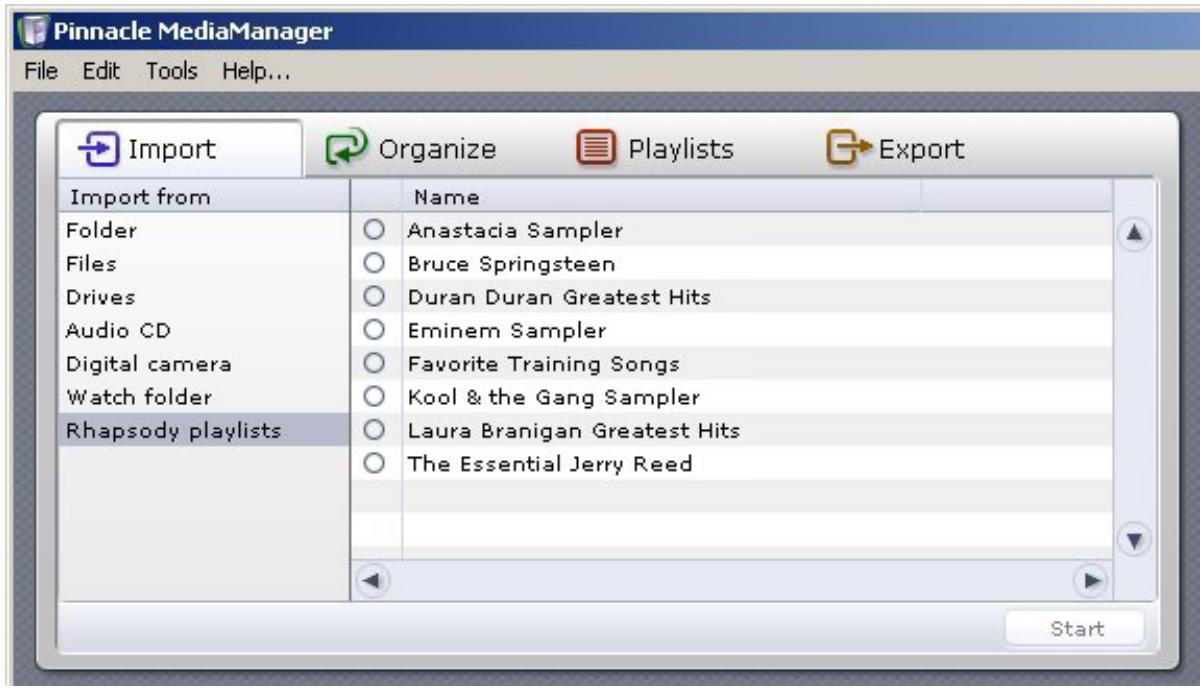
In the left column of the list, you see an option button for every playlist. Select the option button for any number of playlists you would like to have imported.
Start
When you are finished setting preferences, click the Start button.
You can now view the imported titles, for example, in the category Last imported under the tab Music in the Media Library.
Organizing Media Files
Organizing File Tags
Various organizing tags can be used to manage the three media types (music, movies, photos) in the Pinnacle MediaManager. These organizational criteria serve to rank all files of a specific media type.
Organizing tags are exclusive tags. That means that if a music file has been assigned to the Pop genre, it can't also be assigned to the Classical genre.
Music files
The original ID3 tags of the imported files are normally used to categorize these files according to name, artist, album, genre, etc.
If a music file is not categorized according to ID3 tags but according to folder and file names, select Update values using file/dictionary names via the Media Library Shortcut menu. Then select a category structure from the dialog displayed. Compare this to the display underneath and click OK.
Movies
When importing movies, the default categorization criteria for Genre is the name of the folder where the movie is found. If the movie is made up of multiple parts, these parts are automatically grouped together into a collection. The categorization criteria Series is not set by default. You can change this via the File/Preferences/Import menu. For example, you can fill the Genre and Series fields with the names of folders at different levels in the directory hierarchy.
Photos
If you import photos, the directory name is used as the photo album name by default. For the creation date, the date the photo was taken (found in the EXIF tag) is used.

Tip: If your photos do not have access to this date, the creation date is first displayed as
Customized File Tags (Keywords)
In addition to the organizing tags, you can also assign customized tags (keywords).
These non-exclusive tags will help you to organize your media files.
Assigning a keyword - an example
You can create the keyword "My Wedding" and assign all wedding-related media files to it. This will make it a snap at some later date to filter out all the files in "My Wedding" from the rest of the files in the Media Library.
Assigning several keywords - an example
You can assign several keywords to one file. For example, some of the files to which the "My Wedding" keyword has already been assigned can be assigned one or more additional keywords, such as "At the rehearsal dinner", "At the church" or "At the reception".
Display keywords
This button lets you open the context menu and switch on the keywords display in the Media Library sort view.
Introduction to the Organize Tab
You will see the following window when you select the Organize tab in the Tools section:
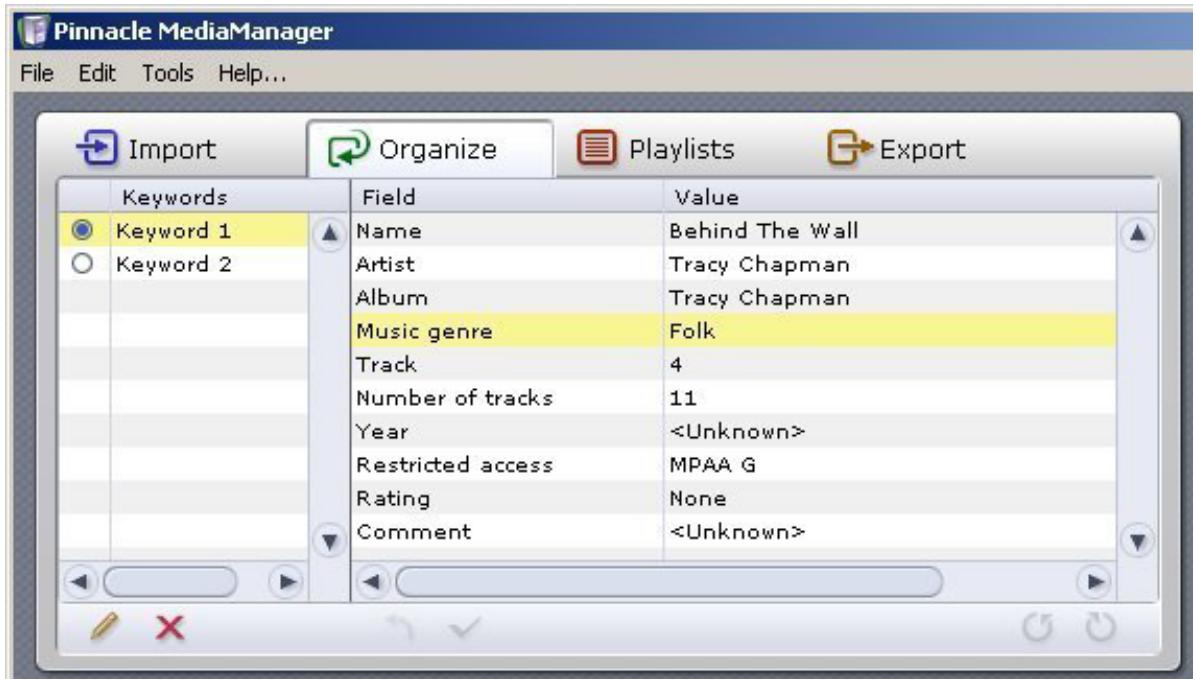
The Organize tab helps you change or add tags for your media files so you can better organize your files.
Defining a new keyword
On the left-hand side, you can assign keywords to the media files in the MediaManager Database. You can then use the keywords as search terms in order to find certain files quickly. You can assign several keywords to a single file.
Select one or more files in the Media Library list and click the button to create a new keyword for the selected files.
Deleting a keyword
Select the keyword you want to delete from the database and then click the × button.
Field and value - changing organizing tags
Whenever you select an entry in the Media Library list, you will also see the value assigned to each field. By double-clicking, you can access and modify the individual values.
For some organizing tags such as Genre, the application will suggest common terms (Pop, Rock, Classical) even if you haven't imported any files in this category. Just click the entry once to see the suggestions.
For music genres, you have the Rebuild this list via the Shortcut menu. If you select this option, unused entries are deleted from the list and only those genres are displayed whose media files are assigned in the database.
Once you are finished modifying the values for an entry in the list, click the button to have the values written to the database. The changes will be shown accordingly in the Media Library.

Changing tags that are associated with metadata (such as MP3 metadata) cause these changes to be made in the associated file as well.

Undo button
Click this button to undo previous changes. However, you can only undo changes if you have yet accepted them by clicking the button.

Rotate clockwise/counterclockwise (for photos)
Selecting a photo from the Media Library will open it in the Media Player. You can rotate the photo by clicking on these two buttons.
Next, click the button to have the new position saved to the database. The new position will be used whenever the photo is displayed on the television.
Restricted access
You have the option of setting the Restricted access value for each media file with the click of a mouse.
According to the setting value for a particular file, this may mean that the correct access code will have to be entered from the menu of the output device before the file can be played on the output device.

Note that the access code only applies to media playback from the menu of the output device. You can still access all the files from the MediaManager on your PC.
Using Playlists
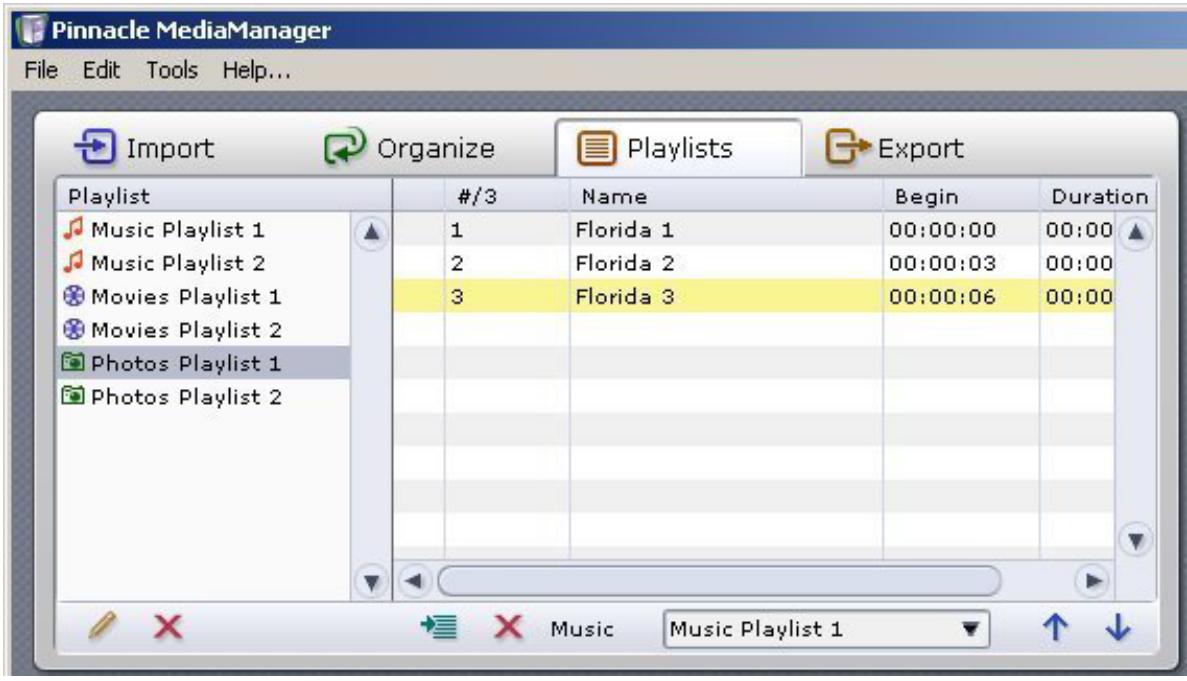
Introduction to the Playlists Tab
You will see the following window when you select the Playlists tab in the Tools section:
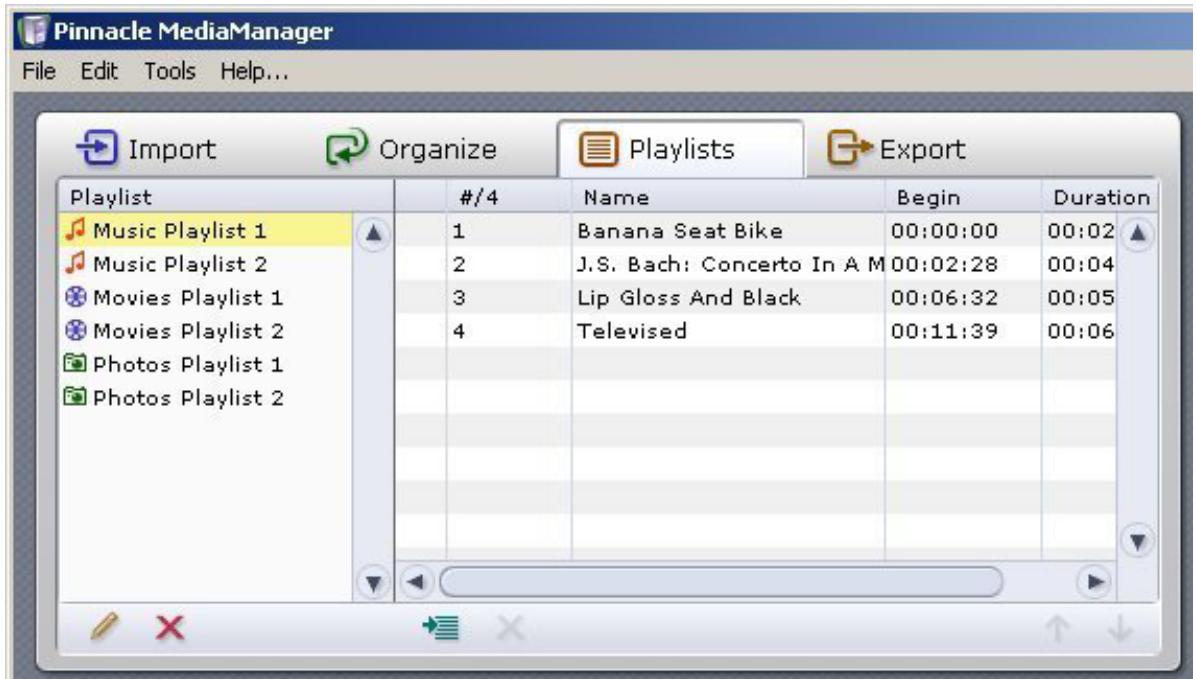
This section is where you create personal playlists in which you list your favorite music, movies, and photos, organized according to your own criteria.

Since each playlist can only contain one type of media, you will be creating playlists for music, movies or photos. You cannot mix these different types of media in one playlist.
[ \text{Playlist catalog} ]
All the playlists are displayed in the left column.
Individual playlist contents
The right column displays the contents of the individual playlists. Selecting a playlist in the left column will display detailed information in the right column about the media files in the playlist.
Creating and Editing Playlists
Creating a new playlist
Click the button to create a new playlist.
An input field, which is by default called ** Playlist**, will appear in the left-hand side of the list. Double-click the field to access it and enter a name for the new playlist.
Now it's time to put together the media files you want in this playlist. Select one or more files from the Media Library in the database and drag them up to the right-hand section.
If you do not want to drag with the mouse, you can use the button instead.
Organizing items in a playlist
Select the file you want to move within the playlist and drag it to its new position. Or, if you prefer, you can use the two and buttons instead.
Deleting playlists or items
If you want to delete a playlist or remove a file from the playlist, just select it and then click the × button.
Slideshow
There are two extra things to do when creating photo playlists ("slidesshows"):
- Click the last column for a given entry in order to specify the display time for a photo. If you select manual, the slideshow will not automatically continue after that particular photo. To change the display time for all photos at once, first right-click and choose Select all from the menu. Then, left-click on the display time for any entry in order to set the time for all photos.
- If you want to play background music during a slideshow, then select an appropriate music playlist from the drop-down list. This list will be played to your photos on the output device.
Playback in the Media Player
Double-click an entry in the playlist to play it back with the Media Player. Once that particular item is finished, the application will automatically move on the next entry in the playlist. You can also use the Next, Previous, Shuffle, and Repeat functions in the Media Player. When playing back a slideshow, the Media Player will only display the photos; it will not play any selected music playlists.
Exporting Media Files
Introduction to the Export Tab
You will see the following window when you select the Export tab in the Tools section:
In this section, you can export copies of media files from your MediaManager playlists to a:
New folder on your hard drive
M3U playlist
CD burner or DVD burner
The following sections explain the features for the individual categories in more detail.

DRM-protected files and music from the Rhapsody service cannot be exported.
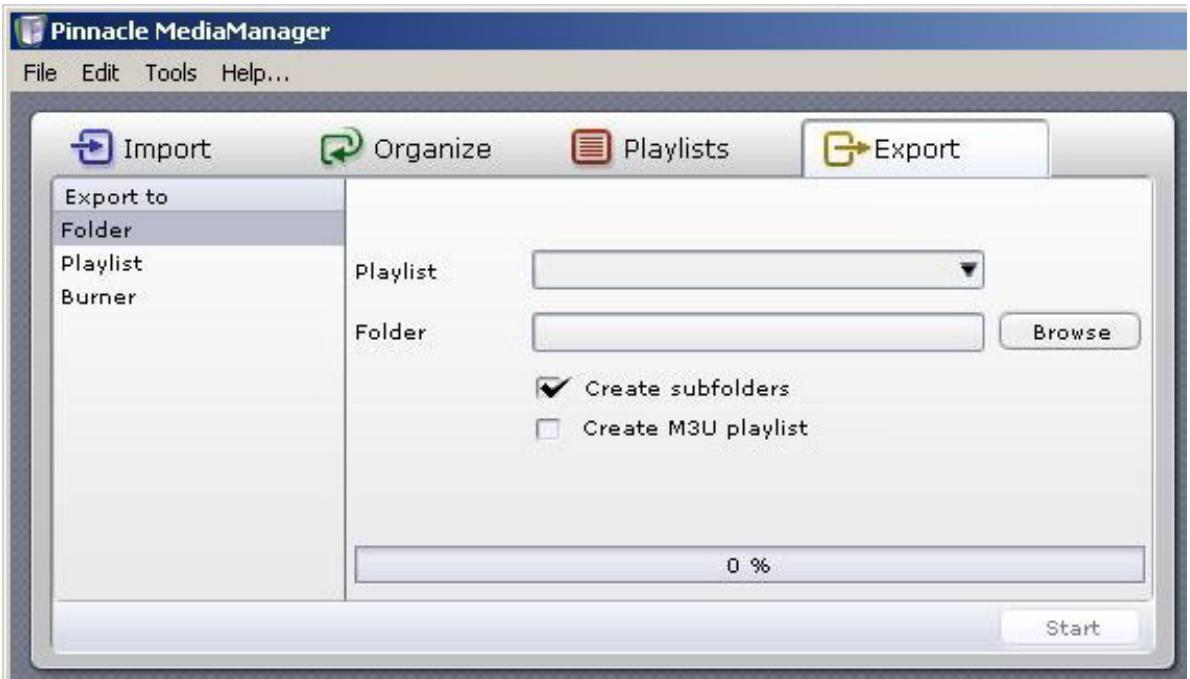
Exporting to a Folder
You will see the following window when you select the Folder category under the Export tab in the Tools section:

In this section, you can export the items in a playlist to a new folder on your hard drive. The export will create copies of the media files.
Playlist
Select a playlist from the drop-down menu.
Folder
Use the Browse button to the right to select the folder you want the playlist to be exported to.
Create sub folders
Select this check box to have sub folders created based on the sort criteria of the original files (for example, artist, album, photo album).
If a particular file does not have all the tags, this option will create a subfolder called Unknown.

Note that this option is not active when you export video playlists.
Create M3U Playlist
If this check box is selected, you will both export the selected playlist to a folder and create an M3U-compatible playlist.
Start
When you are finished with your settings, click the Start button. The progress bar will display 100% once all the files have been exported. You will also be told how many files were exported.
Exporting to an M3U Playlist
You will see the following window when you select the Playlist category under the Export tab in the Tools section:
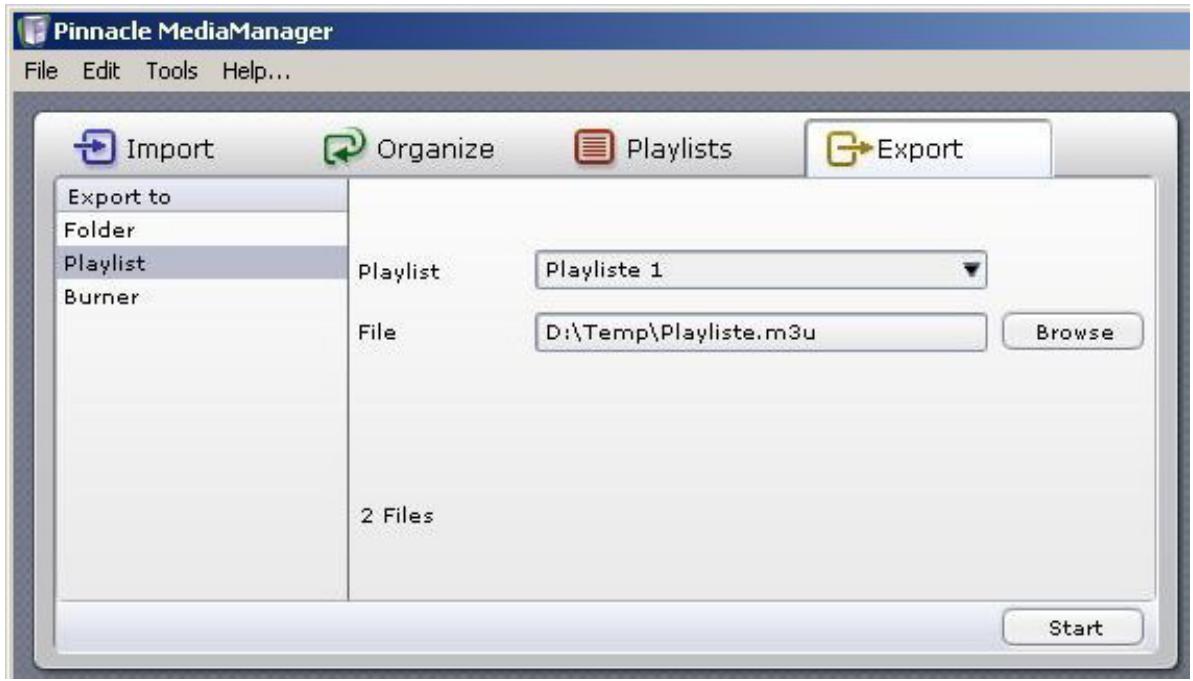
In this section, you can export a MediaManager playlist to an M3U playlist. The playlist will contain references to the actual location where your media files are stored.
Playlist
Select the playlist you want to export from the drop-down menu.
File
Use the Browse button to the right to select the file you want exported to the selected playlist. Then enter the name you want to give to the file.
Start
When you are finished with your settings, click the Start button.
Exporting to a Burner
You will see the following window when you select the Burner category under the Export tab in the Tools section:
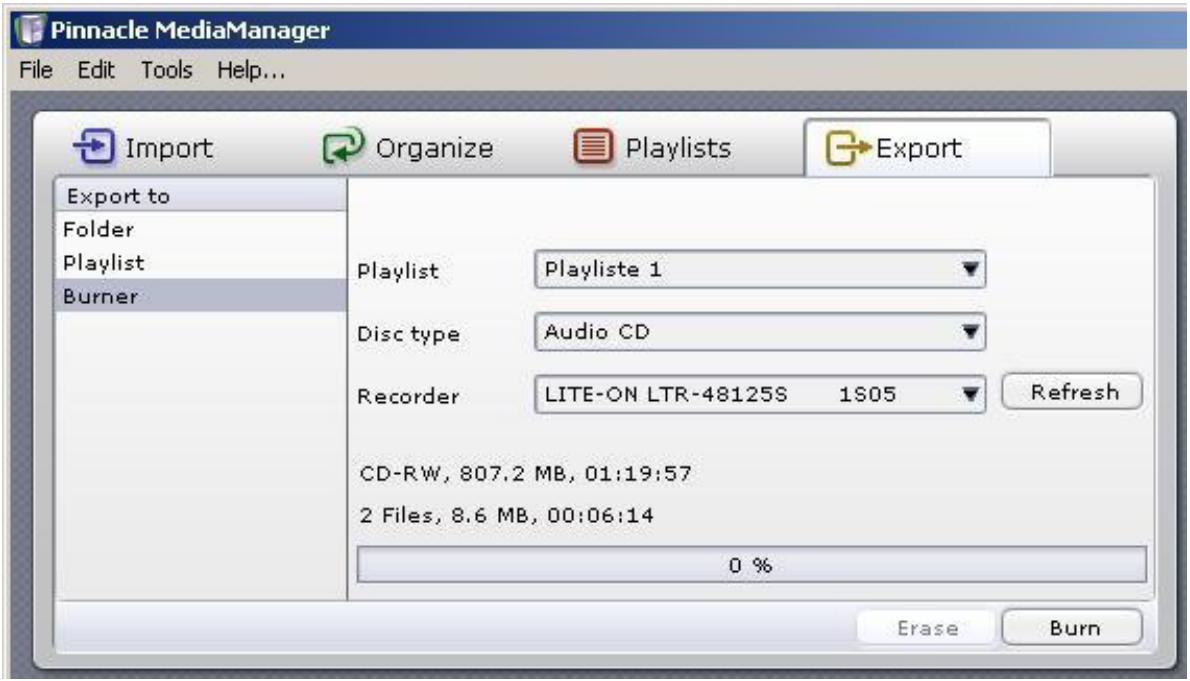
In this section, you can export a playlist to burn to CD or DVD.
Playlist
Select the playlist you want to export from the drop-down menu.
Disc type
The choice of output formats will depend on what kind of media files are in the playlist. Select a format from the drop-down list.
Music
Audio CD: You want to burn an audio CD that you can play on your stereo system or in your car's CD player. Any MP3 files will be automatically decoded.
MP3 Data CD/DVD: You want to burn MP3 files to a CD or a DVD. All the tracks in the playlist will have to be converted to the MP3 format.
Data CD/DVD: You want to burn original music files (MP3, WMA or WAV) to a CD. Any converted versions will not be used.
Movies
Depending on what format the media files are in and whether converted copies are available, you will be given the option of burning a VCD (VideoCD), SVCD (SuperVideoCD) or DVD. You can always select a data CD/DVD, which will burn the media files in their original format. You cannot start the burning process if the total size for all the files selected is too large for a CD or DVD.
Photos
Photos are always burned as original media files to a data CD/DVD.
Recorder
Select the burner you wish to use and click Start. The progress bar will display 100% when the burning process is complete.

The CD/DVD burner in the Pinnacle MediaManager is optimized for fast, easy burning. It cannot create DVD menus nor can it spread long files/playlists over several discs. If you need more sophisticated burning features, we recommend using Pinnacle Studio MediaSuite.
The Menus
The File Menu
| New Playlist From Selection | Ctrl+N |
| Play Selection | |
| Preferences... | |
| Key Commands... | |
| Quit | Ctrl+Q |
The File Menu Contains the Following Options:
New Playlist From Selection
If you have selected one or more files in the Media Library and then choose this option, the selected files will be used to create a new playlist.
On the left-hand side of the Media Library, you will see an input field with a default name. You can replace this default name with your choice of name for the new playlist.
For more information, refer to the Creating and Editing Playlists section.
Play Selection
Select one or more files from the Media Library and choose this option. The selection will now be played back or displayed in the Media Player.
Preferences
Choosing this menu option opens a dialog box where you can configure all the settings for the Pinnacle MediaManager:
Audio CD Import
Format (quality and bitrate)
Speed
General
Language
Data conversion settings
Skin settings
- Specify the access code (PIN) for restricted file access
- Define folders for audio, video, and image files, as well as for temporary files
Playback
- Playback settings: device and memory buffer
Key Commands
Choosing this menu option opens a dialog box where you can create, edit, and delete customized key commands and macros.
Quit
Choose this option to exit the Pinnacle MediaManager.
The Edit Menu
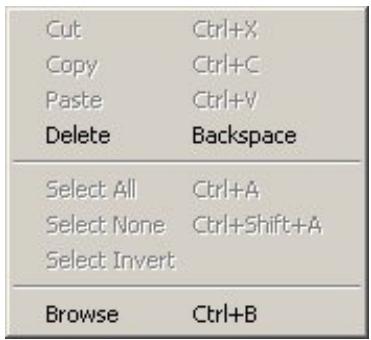
The Edit Menu Contains the Following Options:
Cut
Select the text you want to move and click Cut in the menu. Then, click the location where you want to paste the text and click Paste in the menu.
The text will be removed from its original location and inserted at the new location.
Copy
Select the text you want to copy and click Copy in the menu. Then, click the location where you want to paste the text and click Paste in the menu.
The text will remain at its current location and will also be inserted at the new location.
Paste
This command allows you to paste text at one location that you have cut or copied from another location using the Cut or Copy commands.
Delete
Select the files and then choose this option from the menu in order to permanently remove the files.
Select All
This option allows you to simultaneously select all the files in an active area (for example, the Media Library list).
Select None
This option allows you to undo the selection for files in an active area (for example, the Media Library list).
Select Invert
This option allows you to simultaneously select all the files in an active area (for example, the Media Library list), or to undo an existing selection.
Browse
This option brings you to the Media Library sort view. There is a separate, more detailed section in the manual for this feature.
The Tools Menu
| Import old Database... |
| Scan for missing or modified media |
| Backup database... |
| Restore database... |
In the Tools menu, you have the following options:
Import old Database
With this function, you can import a database created with version 1.5 or older of the ShowCenter program.
Scan for missing/modified media
To do a manual search for missing or modified media in the database, select this option. The search runs in the background and can take several minutes. The missing and modified media are then marked in the left column with their own icons.
Backup database
With of this function, you can save an existing database. Select the option and then indicate the desired target directory and file name. This procedure generates an XML file. You can also generate more than one XML file, for example, at different intervals.
Restore database
This function is used to restore a saved database. The Pinnacle MediaManger automatically chooses the correct target directory in order to make the previously saved XML files available again. The selected file is then loaded into the database so that the media files in the Media Library are visible again.
Real Rhapsody Music ServiceReal Rhapsody Music Service - Overv
The Rhapsody Service is currently not available in all areas. Check www.rhapsody.com for current information as to whether Rhapsody is available in you country.
The Rhapsody Music Service from RealNetworks gives you unlimited access to one of the largest legal music databases on the Internet. Choose from over 700,000 titles for your playlists and put your own radio stations together.
Used with the ShowCenter, you can now also listen to Rhapsody music in the comfort of you own living room. Pinnacle MediaManager automatically imports all the titles and radio stations in your Rhapsody Library and even lets you combine Rhapsody music with other titles to create new playlists.
Due to licensing restrictions, not every version of the Pinnacle MediaManager supports the Rhapsody Music Service.
Installation and registration
To use the music service, you need the Rhapsody application, as well as a subscription - you can get both at www.rhapsody.com. Download the Rhapsody application and install it on the same PC where the ShowCenter software is also installed
Configuring the Rhapsody application
After starting up and registering the program, open the Options menu and select User Settings... . In the dialog window, click the UPnP tab and select the Start UPnP Server once logged in check box. Then click Start to start the UPnP server.
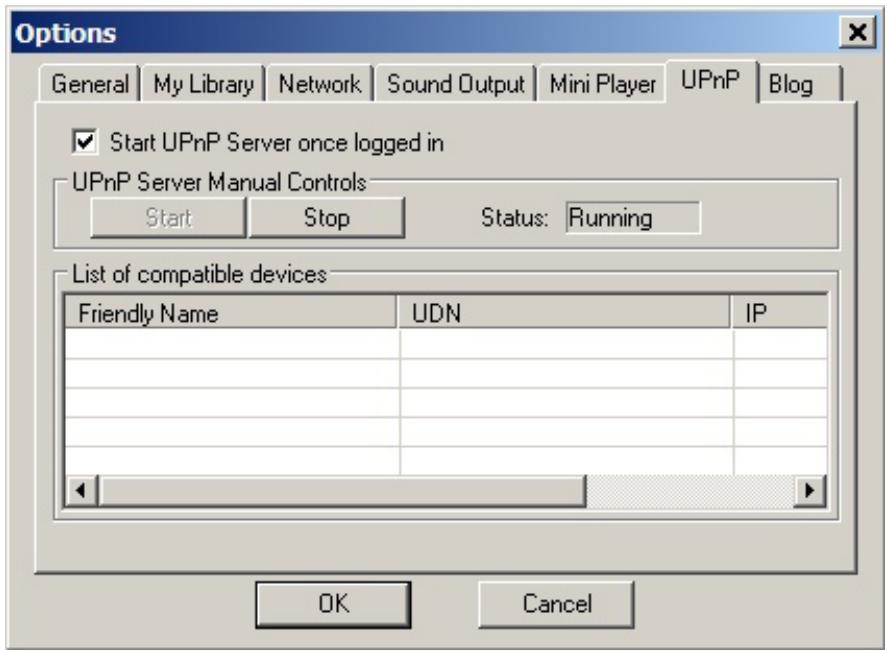
Now you can fill the Rhapsody application library with the music of your choice, as well as select radio stations and even configure the application yourself.
Rhapsody Music and the Pinnacle MediaManager
All the titles and albums in the Rhapsody Library are automatically imported into the Pinnacle MediaManager Media Library and are available as music under the genre Rhapsody. This synchronization is also done when the Pinnacle MediaManager is closed.
You can modify the synchronization settings or deactivate the synchronization process via File/Preferences/Rhapsody. Note that the synchronization of a large library can last several minutes.
In the Pinnacle MediaManager, Rhapsody titles are marked with their own icon. You can create playlists of Rhapsody titles, as well as mix playlists of Rhapsody music together with, for example, MP3 titles.
All the playlists created with the Rhapsody application are displayed and can be imported into the Pinnacle MediaManager, via Import/Rhapsody playlists. Older playlists with the same name are not overwritten.

Due to licensing restrictions, the playback of Rhapsody titles via the Pinnacle MediaManager on a PC is currently not possible.
Rhapsody Music and the ShowCenter Player
Just like other music, Rhapsody titles are displayed in the TV menu Music in the ShowCenter Player. However, Rhapsody titles are marked with their own icon. Note that it can take several minutes until newly added music is displayed in the ShowCenter Player.
Radio stations in the Rhapsody Library are automatically made available via Music/Internet Radio/Rhapsody Radio.

You can play back Rhapsody music via the ShowCenter Player only if the Rhapsody application has already been started and you have logged in.
File Formats
Supported File Formats
Supported audio file formats
MP3
MPA
PCM WAV
WMA
Supported video file formats (Standard Definition)
MPEG1
MPEG 2 (also VOB files)
MPEG 4 AVI (versions 3, 4, 5; simple profile)
Xvid AVI (simple profile)
DVAVI
WMV
Supported video file formats (High Definition)
MPEG 2 HD up to 1080i
MPEG 4 AVI HD up to 720p
WMV HD up to 1080i
Supported photo formats
JPG
PNG
GIF
BMP
Converting Files
The Pinnacle MediaManager can convert media into other formats. For example, you can convert an MPEG 2 movie file into the MPEG 1 VCD format for burning onto a CD.
If you use the Pinnacle ShowCenter, this file conversion function is useful for formats that you cannot directly play back in the ShowCenter Player such as, for example, DV-AVI video clips.
During conversion, a copy of the media is created, while the original file remains unchanged. You can define where to save this copy in the
File/Preferences menu of the Pinnacle MediaManager. Here you can also configure an automatic media conversion, as well as keep track of the current status of running conversions.
In order to convert a media file, select it in the Media Library, right-click and then select the format you want via the Shortcut menu Convert/Convert to. You can initiate conversions for more than one medium at a time. These conversions are then queued and processed one after the other. Conversion runs in the background and keeps going, even if you close the Pinnacle MediaManager.
File status
For each media type, the Media Library displays details for individual files in the list to the right. The first column shows the file status, which describes the conversion status of a file.
Any file in a given category can have one of the following file statuses (indicated by the icon):
!
This file needs to be converted before it can be displayed with a connected ShowCenter 1000 Player and be played back.
With a ShowCenter 200 Player, it is sometimes possible to get playback without having to convert.
L
The file can be found in the conversion queue.
#
The file is currently being converted.
#
The conversion of this file is completed.
Conversion options
Right-click a file in the list to bring up the pop-up menu, where you can choose from the following options:
Convert to
The selected file will be converted. You can choose from the following movie formats:
VCD (VideoCD)
The video is compressed using MPEG 1 to one-fourth of its original image size (352x240 or 288). The data rate is 1.15 Mbps in total. That means that one CD (650 MB) can hold a little over an hour's worth of video and audio. While the video quality is rather poor, VCDs can be played back in most DVD players.
SVCD (SuperVideoCD)
The video is compressed using MPEG 2 with full vertical resolution and 2/3 horizontal resolution. The data rate is 2.5 Mbps and one CD can only hold a little less than a half an hour's worth of video and audio. The video quality is much better than on a VCD, but only some DVD players accept the SVCD format.
DVD LongPlay
The video is compressed using MPEG 2 with full vertical resolution and 1/2 horizontal resolution. The data rate is 3.5 Mbps, which makes for very good-quality video. DVD LongPlay can be burned to DVDs and is accepted by virtually all DVD players. It is also an excellent format for converting high-data-rate video to a low enough data rate to be able to play it back over a wireless network.
DVD
The video is compressed with full resolution according to MPEG 2. The data rate is 6 Mbit/sec, which results in excellent video quality.
The audio is always compressed using the MPEG 1 layer 2 format (stereo).
Delete converted files
With of this function, you can delete the converted files. The original files remain unchanged.
Cancel conversion
A scheduled or already running conversion is cancelled. The original file remains unchanged.
Turning on the ShowCenter Player and the Television
After you turn on the ShowCenter Player, the television screen will show the ShowCenter logo for a few seconds and then the server options menu.
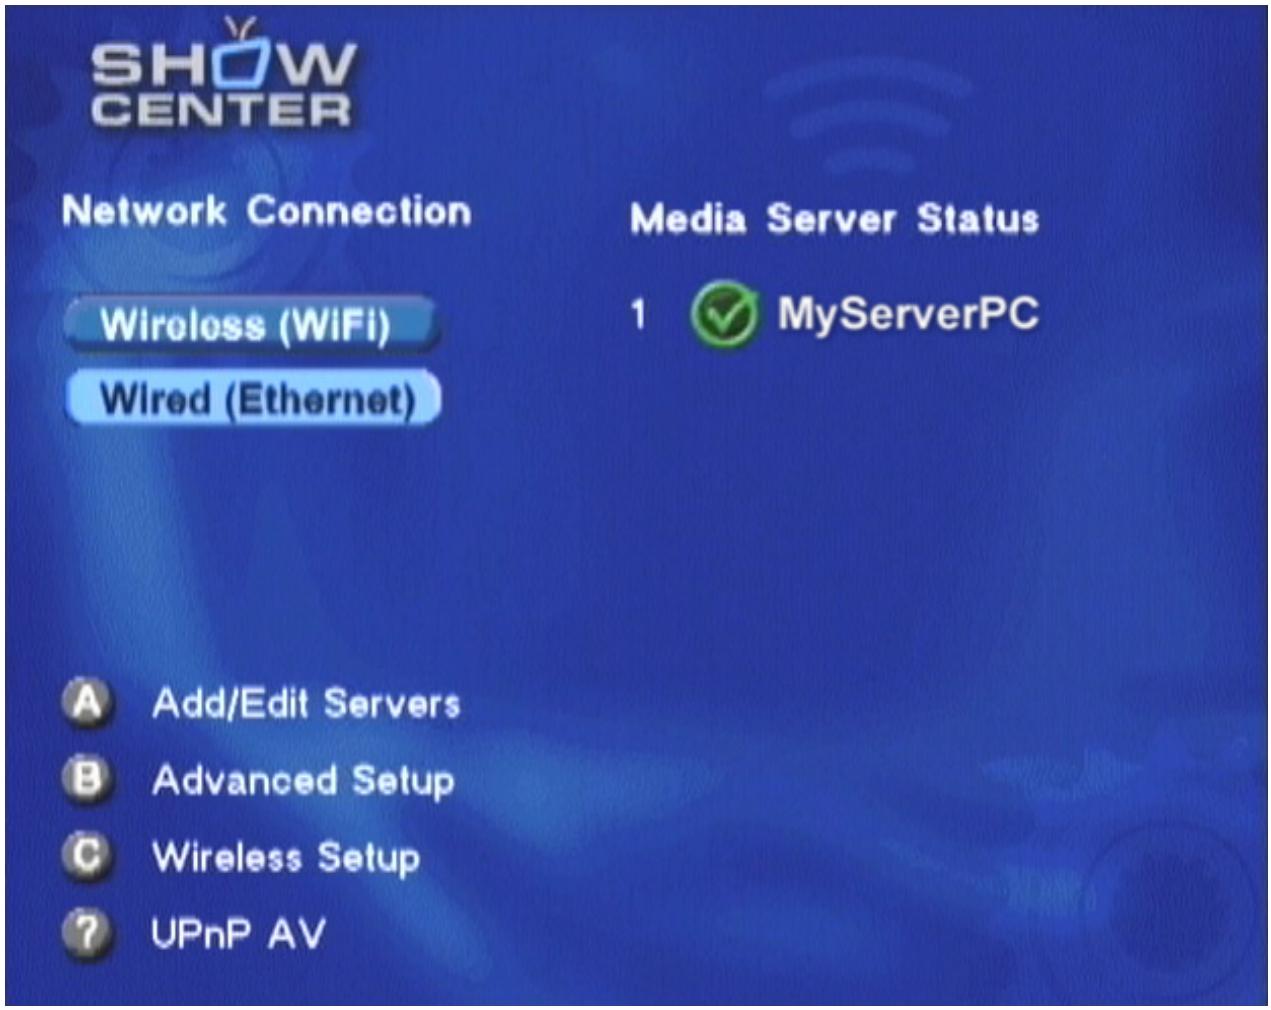
The ShowCenter Player will now automatically detect all available server PCs in the network. Server PCs are computers on which the ShowCenter software has been installed and the ShowCenter Server is active. They will be displayed after a few seconds on the right side, marked with a green checkmark. Select one of the servers with the arrow keys and press OK to connect to it.
Server PCs that are not currently active are marked with a red no-access icon. In general, you cannot connect to inactive servers.

When you connect the ShowCenter Player to a server PC for the first time, you are required to register due to security reasons. To do this, follow the instructions on the screen.
When you connect again, the ShowCenter Player is automatically detected and does not need be reregistered.
Introduction to the TV Menu
Once the computer, the television, and the ShowCenter Player have been turned on and the connection to a server PC has been established, the following menu will appear on the TV screen:
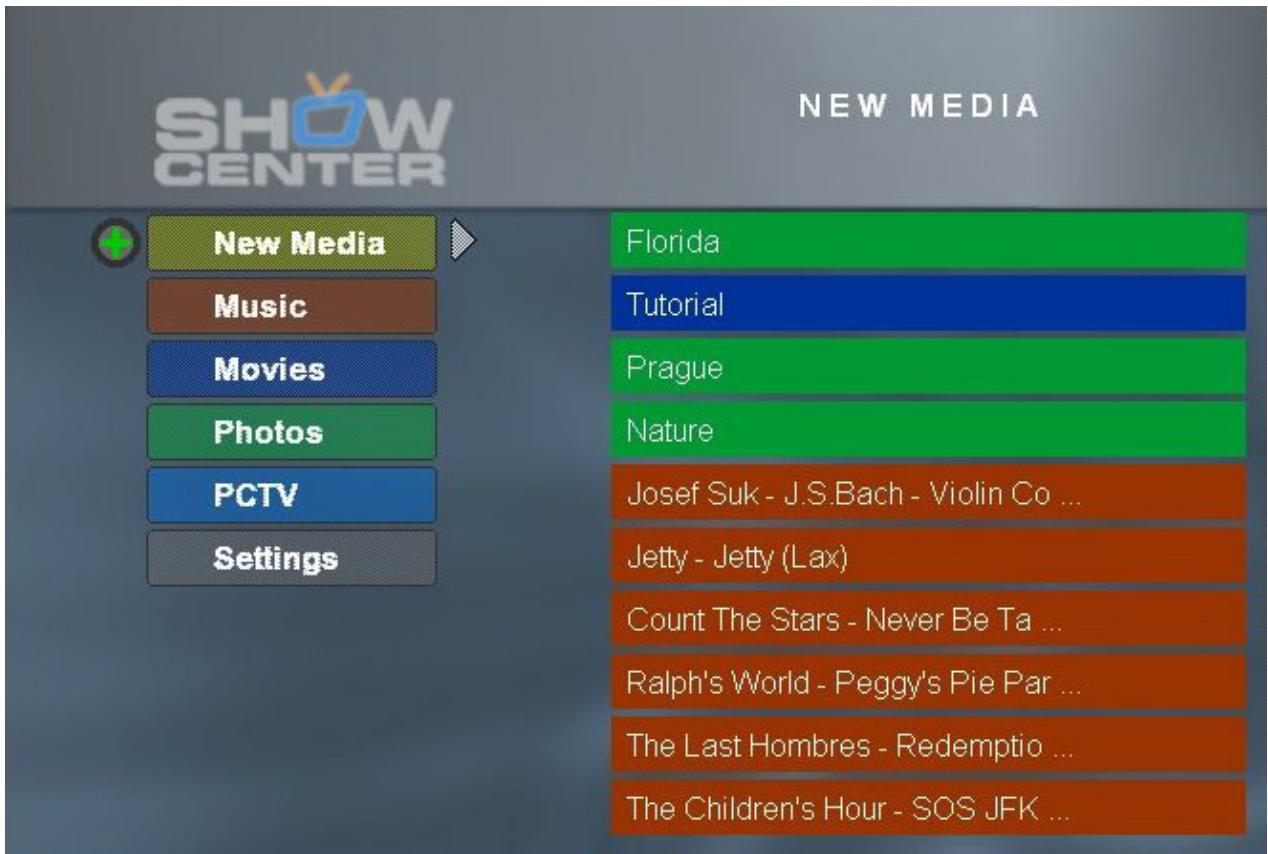
The left side of the screen lists the media types and some special features. The PCTV menu option is only available if you have installed a Pinnacle PCTV series product on your server PC.
The right side contains the index for the selected media type. It is easy to differentiate between media types because they are shown in different colors.
The main screen, which is always set to New Media, shows the ten most recently imported media files to the right. These files may be music, movie or photo files.

If new files have been imported since the last time you opened this menu, this is indicated by a symbol next to the "New Media" button.
You can use the remote control to navigate in the menu and choose which media you want to view.
The following sections provide more information about the menu structure of the individual media types as well as settings and special functions.
TV Menu - Music
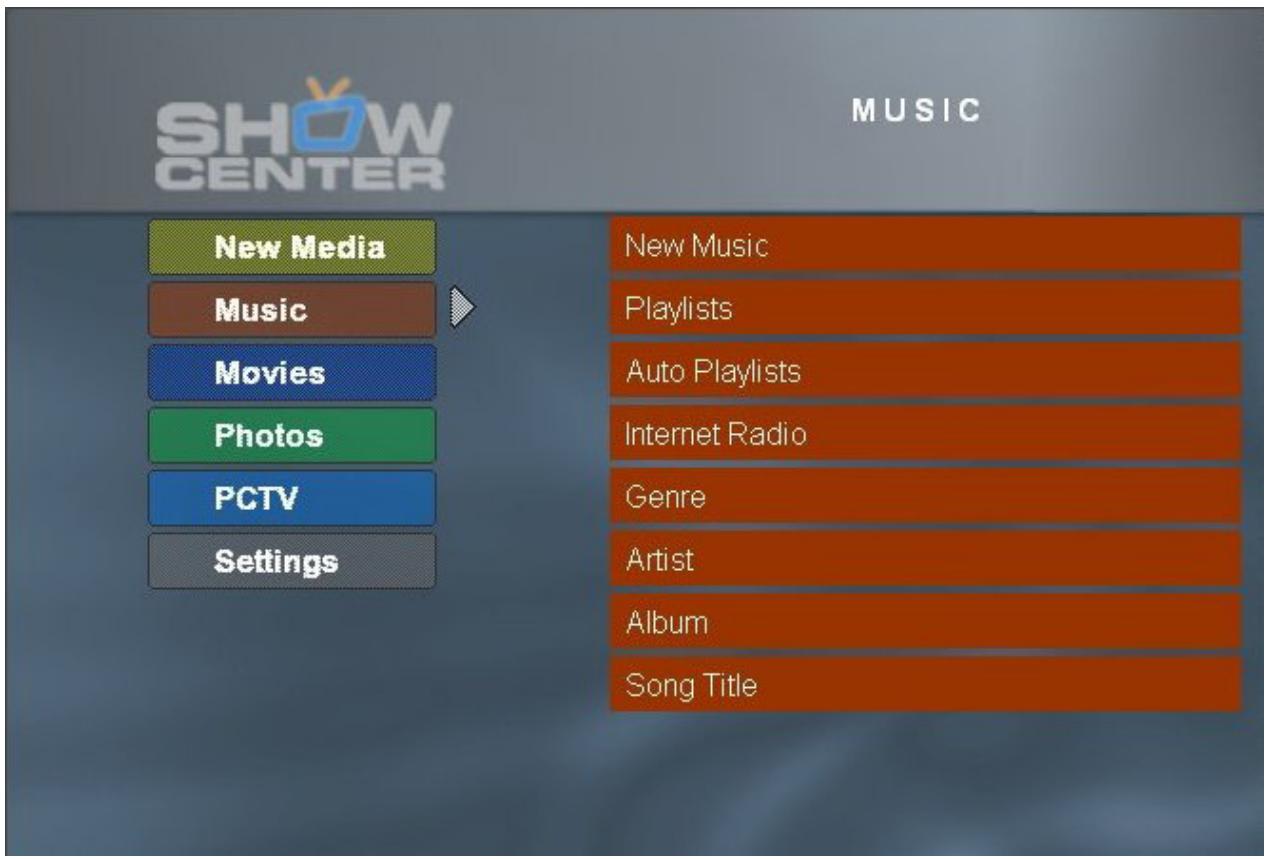
The Music Start Menu is divided up into the following categories:
New Music
The most recently imported music files are displayed in "Artist-Album" format. If you press OK on the remote control, then all of the titles of the album are shown.
Playlists
A list of all the playlists created with the Pinnacle MediaManager application is displayed. If you select a playlist and then press OK, then all of the titles in this playlist are shown.
Auto Playlists
Automatic playlists are created for the Pinnacle MediaManager categories Top rated, Most played, Least played, and Not played, which are then accessible via this menu option.
Internet Radio
While the ShowCenter is being installed on your PC, the ShowCenter Radio directory, which contains several links to sample radio stations, is created in Internet Explorer.
You can store additional radio stations from the Internet as favorites at any time, for example, from the Internet page www.shoutcast.com. Once you have opened the Internet page, right-click one of the "Tune In!" buttons, select "Add to Favorites..." from the context menu and then the ShowCenter Radio directory.
Any saved radio stations are displayed in the Internet Radio menu. Subdirectories located in the ShowCenter Radio directory are shown in square brackets.
Select the desired directory and/or radio station with the remote control and then press OK.

Internet Radio is not active unless you have Internet access. You can deactivate this menu option via "Music Options" in the "Settings" menu.

We recommend that you use the program "Winamp" from Nullsoft to listen to Internet radio on your PC. It is available on the Internet at www.winamp.com.
Genre
A list of the different music genres is displayed. You can access a list of the corresponding artists by selecting a music genre and pressing OK.
Artist
A list of the artists is shown. You can access the list of albums with OK.
Album
A list of the albums is shown. You can access the song title selection list with OK.
Song Title
All of the titles contained in the database are displayed. You can play a selected song by pressing OK.
Special Functions in the Music Menu
The A, B, and C buttons on the remote control and their functions in the Music menu are described below. Each set of functions is displayed on the lower left-hand side of the screen. Activate a function by pressing the corresponding button.

A - Play All
Any music titles currently displayed on the right are played one after the other.
B - Shuffle & Play
Any music titles currently displayed on the right are first shuffled in their order and then played.
C - Search
Selecting this function will open a text entry field. Enter a search term of your choice and then press OK. All files found containing the search term are then displayed in the list on the right-hand side of the screen.
You can also use the number keys 2 - 9 (or A - Z) to search for entries in alphabetical order. Press "1" to return to the previous list.
Remote Control Functions While Playing Music
"?" button
Detailed information about the current track is displayed when this button is pressed.
"Left Arrow" and "Right Arrow" buttons
These buttons let you jump to any position in the track currently being played.
Number keys 0 to 9
The number keys 0 to 9 let you enter a desired percentage in order to skip to another position in the track currently being played.
"Next Track" and "Previous Track" buttons
These buttons let you play the next/previous music title of the selection.

It is not possible to scroll through the music collection while music titles are being played.
TV Menu - Movies

The Movies Start Menu is divided into the following categories:
New Movies
The most recently imported movies are displayed with their titles. If you press OK on the remote control, the movie selected is played.
Resume
A list of paused movies is displayed. Press the OK button on your remote control to resume playing the selected movie. Use the A button on your remote control to delete entries from the list.
Playlists
Displays a list of all of the playlists that have been created. If you select a playlist and then press OK, all of the movies in this playlist are displayed.
Auto Playlists
Automatic playlists are created for the Pinnacle MediaManager categories Top rated, Most played, Least played, and Not played, which are then accessible via this menu option.
Genre
A list of the various movie genres is displayed. By selecting a genre and pressing OK, you can access the list of corresponding movies.
Series
A list of the various series is displayed. Select a series and press OK to access the list of the corresponding movies.
All Movies
All of the movies included in the database are displayed. You can play a selected movie by pressing OK.

The name of the collection is always displayed for movies. Therefore, movies which consist of several files are automatically grouped and the files are played successively. You can switch between the individual files during playback with the "Next Track" and "Previous Track" buttons on the remote control.
Special Functions in the Movies Menu
The buttons A, B, and C on the remote control and their functions in the Movies menu are described below. These buttons are displayed on the lower left-hand side of the screen. Each function is activated by pressing the corresponding button.
After opening the "Playlists" menu, you have the following options:

A - Play Selected
All of the movies included in the selected playlist are played one after another.
B - Shuffle & Play
Any movies included in the selected playlists are first shuffled and then played.

We recommend using this function for music videos.
C - Search
A text input field appears on the screen if you select this function. Enter any search term and then select OK. In the list on the right, the media, which match the search term, are then displayed.

You can also use the number keys 2 - 9 (or A - Z) to search for entries in a alphabetical order. Press "1" to return to the previous list.
Remote Control Functions While Watching a Movie
"A" button
This button lets you change the screen size of the movie currently being shown.

The standard setting is made in the "Settings" - "Video Start Size" menu.
"B" button
This button can be used to switch between soundtracks for movies with several different soundtracks.
"C" button
Subtitles can be displayed with this button.

The function can only be activated for VOB files with subtitle tracks.
"?" button
Pressing this button will display details about the current movie.
"Left Arrow" and "Right Arrow" buttons
These buttons let you to jump to any position in the movie currently being shown.
Number keys 1 to 9
Use the number keys 1 to 9 to enter a desired percentage value (10%, 20%, etc.) for skipping to another position in the movie currently being shown.
"Next Track" and "Previous Track" buttons
These keys are used to show the previous/next movie in a playlist or collection.
TV Menu - Photos
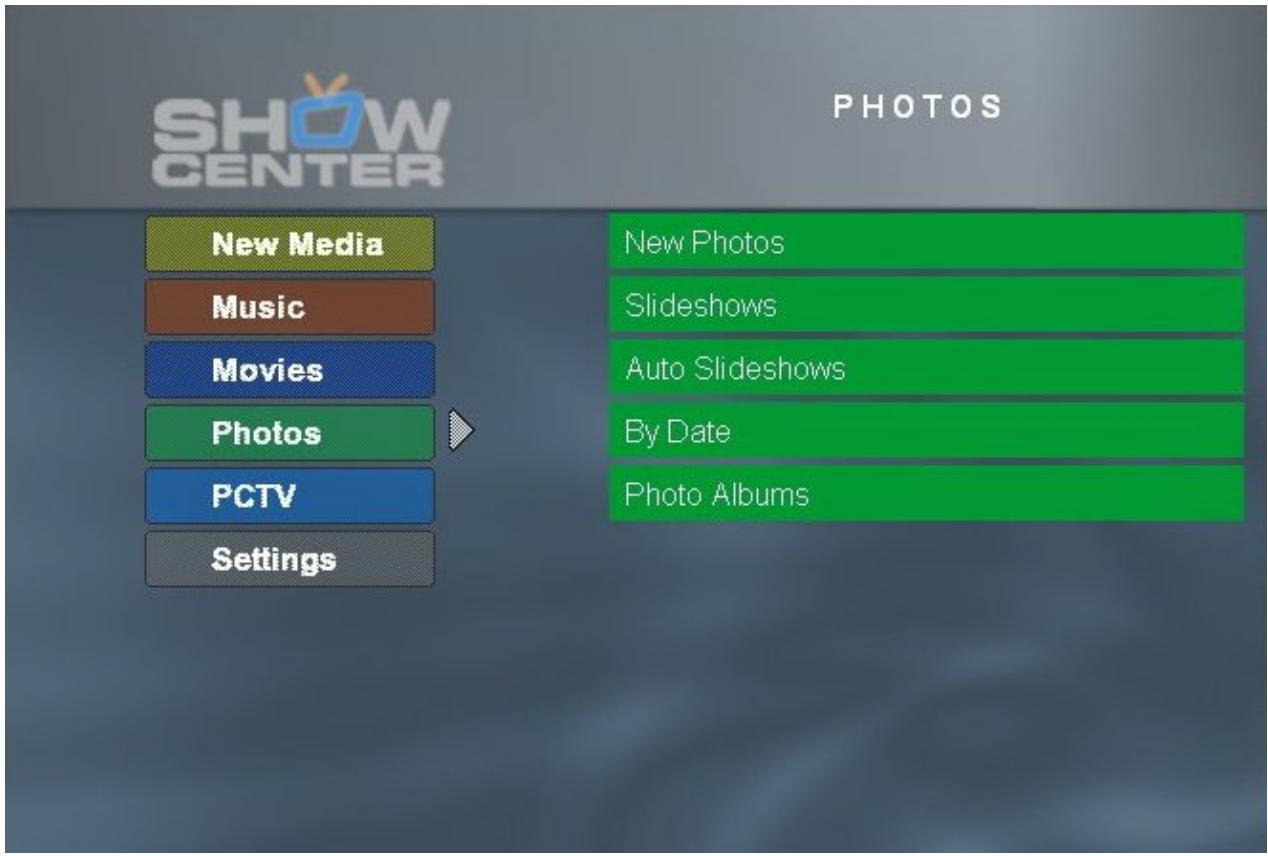
The Photos start menu is split into the following categories:
New Photos
The most recently imported photos are displayed in the form of a photo album list. To display a slideshow, select a photo album using the remote control and press OK.
Slideshow
This function displays a list of all slideshows stored. To see a slideshow on screen, select the slideshow and then press OK.
Auto Slideshow
Automatic slide shows are created for the Pinnacle MediaManager categories Top rated, Most played, Least played, and Not played, which are then accessible via this menu option.
By Date
This is where you can perform a search for photos according to chronological specifications (year, month, day).
Photo Albums
This function displays a list of all available photo albums. When you select a photo album, its contents will be displayed as thumbnails.
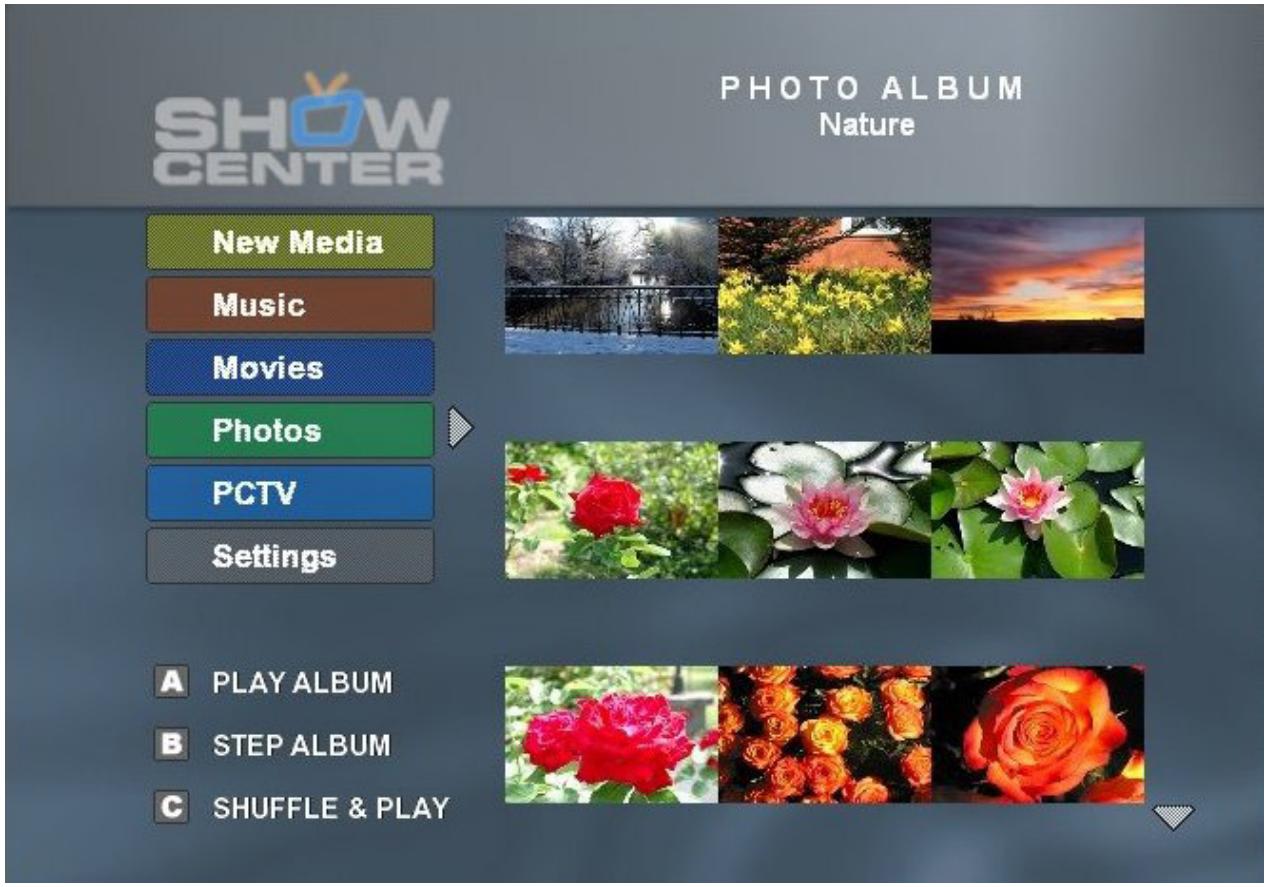
Special Functions in the Photos Menu
The A, B, and C buttons on the remote control change function according to which part of the menu you are currently in. The applicable functions are displayed in the bottom right section of the screen. Press the relevant button to perform the desired function.
After opening the Photo Album menu, you have the following options:

PLAY SELECTED

STEP SELECTED

SEARCH
A - Play Selected
All the photos contained in the selected album are displayed one after another.
B - Step Selected
The first photo from the album selected is displayed. Use Previous Track and Next Track to switch back and forth between photos.
C - Search
Selecting this function will display a text entry field. Enter a search term and then press OK. All files found using the search term are then displayed in the list on the right-hand side of the screen.

You can also use the number keys 2 - 9 (or A - Z) to search for entries alphabetically. Press 1 to return to the previous list.
After opening a photo album, you have the following options:

PLAY ALBUM

STEP ALBUM

SHUFFLE & PLAY
The A, B, and C buttons, which are displayed in the lower left-hand corner of the screen (or the corresponding buttons on the remote control), have the functions described below in the Photos menu. Press the relevant button to activate the desired function.
A - Play Album
All photos currently included in the list on the right are displayed one after another.
B - Step Album
The photos from the currently displayed list can be opened individually using the Previous Track and Next Track buttons.
C - Shuffle & Play
All photos currently displayed on the right are shuffled before being displayed.
Remote Control Functions During Slideshows/Photo Albums
"A" button
After pressing the A button, use the arrow buttons and the OK button on the remote control to alter the size of the image (zoom) or of a detail (pan). Press the Play button to move on to the next photo.

The background music is paused in this mode.
"B" button
Use this button to rotate the photo displayed. Press the Play button to move on to the next photo.

The background music is paused in this mode.
"C" button
Use this button to show or hide the title of the photo currently displayed.
"?" button
Pressing this button will show details about the photo currently displayed.
"Next Track" and "Previous Track" Buttons
These buttons are used to display the next/previous photo in a slideshow or photo album.
TV Menu - PCTV
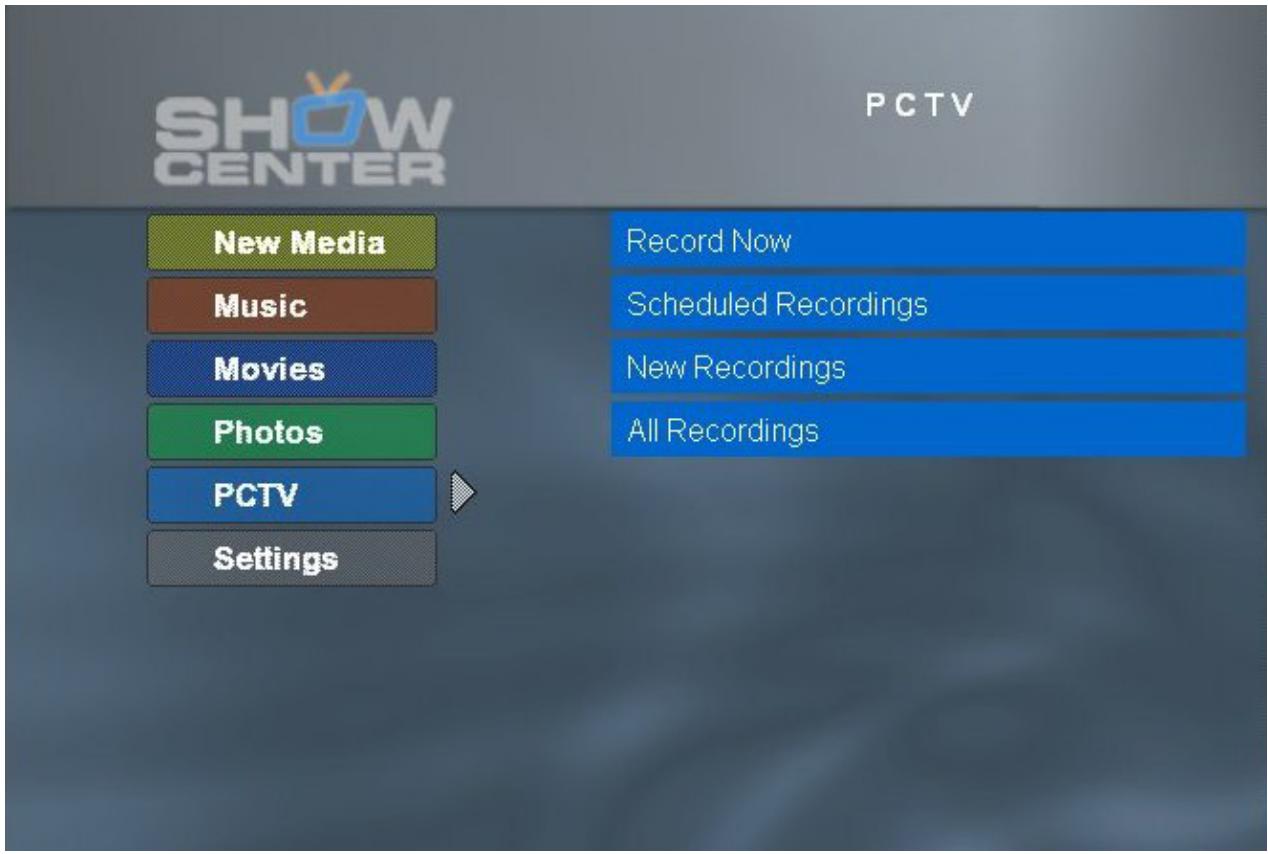

The "PCTV" option will only appear on the TV menu if a ShowCenter-compatible Pinnacle PCTV product has been installed on your PC. Please refer to our Internet site www.pinnaclesys.com for a full list of ShowCenter-compatible PCTV products.
Installing a PCTV Product
If a PCTV product has already been installed on your PC before you install ShowCenter, the system automatically detects the PCTV product and adds the PCTV option to the ShowCenter TV menu.
If the PCTV option does not appear in the TV menu, select Settings, General, and then PCTV Detection. The PCTV option will be available after a few seconds.
The PCTV start menu is divided into the following categories:
Record Now / Scheduled Recordings
If you want to begin recording immediately, select this option using the remote control and then press OK. Now select the desired channel and duration of the recording and confirm the recording details with Apply.
The recording will start immediately and the Record Now menu option will switch to Scheduled Recordings after some time.
If you want to watch a recording while it is still in progress, select this option. You can now use further standard playback functions (for example, pause, fast forward, rewind).
Scheduled Recordings
This menu allows you to schedule recordings. Press the A button on the remote control and set the desired recording date using the calendar displayed, configure the other options and the channel you want. Then confirm your recording details with Apply.
Press C to cancel the scheduled entry.
All the recordings currently scheduled are now listed in chronological order.
Press B to edit these entries or C to delete them.

If the recording you have scheduled does not appear on the list, check either any information is incorrect or missing. It may be the case, for example, a time limit has been exceeded.
New Recordings
Selecting this menu option displays all the new TV recordings listed according to date and time of recording.
All Recordings
Selecting this menu option displays a list of all the TV recordings in alphabetical order.
Further Information on TV Recordings
Channel list
The Pinnacle MediaManager application imports the channel list from the PCTV Vision or Pinnacle MediaCenter application.
Storage location for TV recordings
All TV recordings are stored in the Media Library of the Pinnacle MediaManager under Media Type/Movies and under the TV movie genre, where they can be organized or deleted.
Capture format
The capture (recording) format (for example, VCD or SVCD) can be configured in the PCTV Vision or Pinnacle MediaCenter settings.
TV Menu - Settings

The following settings can be made on this screen page:
Locks
If you have stored some of your media files with an access code (PIN number) and made the corresponding setting in the Pinnacle MediaManager application and now want to have full access to all files, proceed as follows:
First, confirm the Lock field, enter your PIN number, and then press OK. You now have unrestricted access to all media files.
If you want to reapply restricted access, press OK.

Media files that are to be subject to restricted access are selected separately in the Organize tab of the Pinnacle MediaManager application.
General
Language
Select the desired language for the TV menu and then press the OK button on the remote control.
Skin
This option allows you to choose from a range of designs for the TV menu.
Screen saver
Select the period of time that you want the system to wait prior to switching on the screen saver for your TV. The screen saver is normally deactivated while a movie, a song title or image is currently being displayed.
PCTV detection
This function detects the PCTV product installed on your computer. This takes a few seconds – if the process is successful, the PCTV functions will be available via the TV menu.
Reload firmware
This option is used to reload the firmware of the ShowCenter Player. This should only be performed in conjunction with a software update.
Music Options
Shortcut keys
Use this function to assign music playlists, auto playlists and Internet radio stations to the number keys 0-9 on the remote control. Using the menu option New media, you can play back recorded music with the number keys 0-9 without the television being on.
Visualization
You can select which type of image to display while listening to music on your TV screen. The screen can either remain black or moving text or a graphic can be displayed.
Internet radio
From here, you can switch the Internet Radio option off and on in the Music Menu.
Video Preferences
Subtitles
In this menu option, you can turn the subtitles for AVI movie files on and off. Subtitle files need to be in the same directory as the movie files themselves and they need to have the same name. Supported file formats include MicroDVD (SUB), SubRip (SRT), and Substation Alpha (SSA).
Movie display
This function lets you choose whether the size of the playback format for movies is, for example, to be adjusted to your TV, or whether another format is to be used.

You can also set the video output size while a movie is being played by pressing the "A" button on the remote control.
Dolby Digital output
By default, the ShowCenter Player plays movies with Dolby Digital sound only via the digital audio output jacks. If you would also like to play back Dolby Digital sound via analog audio connections, you will need to first pay a fee and activate this function. This occurs on the server PC via
Start/Programs/Pinnacle ShowCenter/Options/Activation of Dolby(R)
Digital soundtracks on analog audio outputs.
The menu option Dolby Digital Output is visible only after activation. Here you can decide whether Dolby Digital sound is to be made available either as a stereo signal via the analog and digital audio output jacks or as surround sound using the digital audio output jacks exclusively.
Photo Options – General
Filtering
This function is used to switch the flicker filter on or off and select the desired flicker filter level.
Pressing A on the remote control will display a comparative selection of photos from the Pinnacle MediaManager Database as they would appear with the filter switched on and off.

The filter should be switched on for TVs with picture tubes in order to minimize flicker. We recommend a setting of 25% .
In the case of plasma or LCD TVs, the filter should be deactivated to ensure maximum picture quality.
Color correction
The color correction function automatically improves the quality of the photos displayed.
Pressing B on the remote control displays a comparative selection of photos from the ShowCenter database as they would appear with and without color correction.
Photo titles
This function allows you to switch the photo titles on or off.

This function can also be activated while photos are being displayed by pressing the "C" button on the remote control.
Photo Options – Album Settings
Background music
This function allows you to select a music playlist to listen to while photos from an album are being displayed. The music titles in the relevant playlist are always shuffled before being played.

Note that the background music for a slideshow is selected in the Pinnacle MediaManager application, not via the TV menu!
Time per slide
This option allows you to set the display time for photos when they are viewed from photo albums.

Note that the duration of a slideshow currently being displayed is configured in the Pinnacle MediaManager application, not via the TV menu!
Video Output
Select the desired video output (for example, SCART, component).
Note that HD formats as well as "PAL progressive" are only available via the component video out connector.

After a new output has been selected, the ShowCenter uses this as the standard output and waits several seconds for you to confirm with OK. If it does not receive confirmation, the ShowCenter returns to the original output.
Menu Resolution
With this menu option, you can set the resolution of the TV menu on your device: "Standard Definition" or "High Definition" ("HD").
If an HD variant has been selected as a video output, we recommend also selecting "HD" for the menu resolution since this results in a sharper display.
If you have not selected HD format as the video output, the menu resolution should remain on "Standard".
Special Functions in the Settings Menu

SERVER

ADVANCED
A - Server
Press this button on the remote control to proceed to the server select function. Select the computer/server from which media are to be exported to the TV.
B - Advanced
Press this button on the remote control to proceed to the firmware settings page. This is where, for example, the network configuration settings are made.

Note that the A, B, and C buttons have additional functions depending on the media type and category selected. The categories are always displayed in the lower-left corner of the screen.
Remote Control Keypad Layout
This image gives you an overview of what functions you can perform with the ShowCenter remote control:
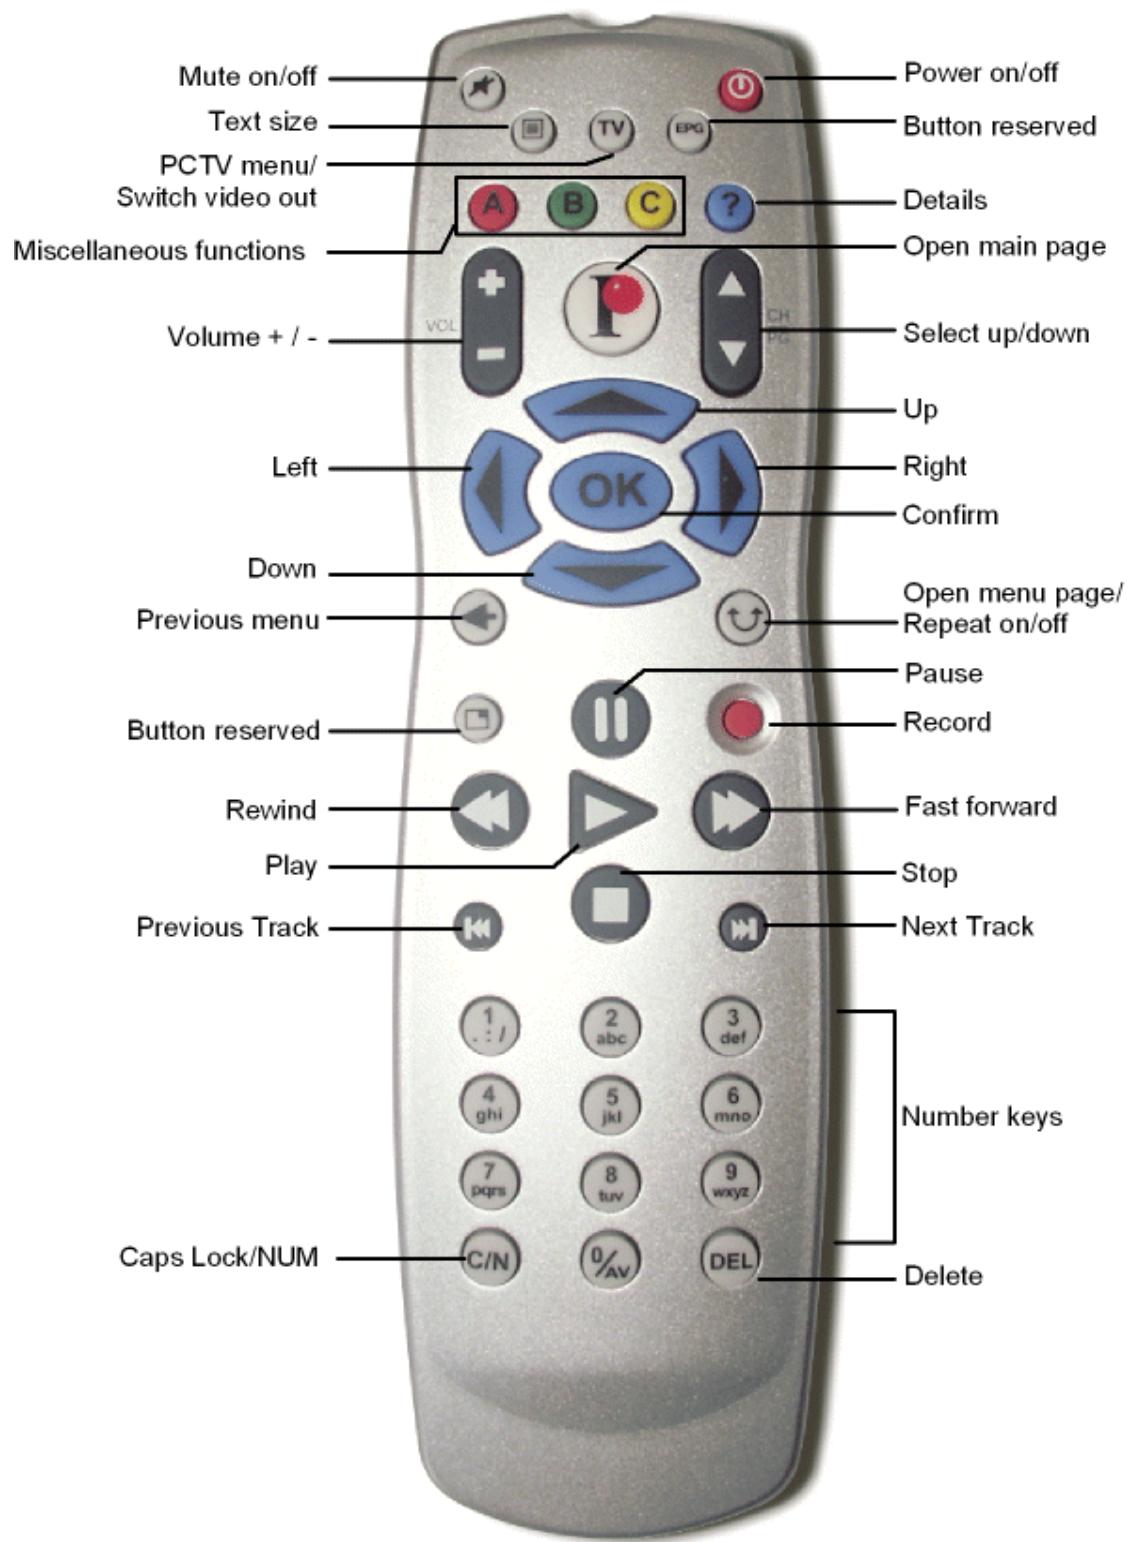
Button Descriptions in Detail
With your ShowCenter remote control in hand, you can access many ShowCenter features from the comfort of your recliner or sofa. The functions assigned to the individual buttons are described in detail below:

Power on/off
You can turn the ShowCenter on and off with this button.

Mute on/off
You can turn the sound in the ShowCenter on and off with this button.

Text size
This button lets you adjust the size of the text in the right-hand section of the menu.

PCTV/Switch video output
If a Pinnacle PCTV product supported by the ShowCenter is installed on your PC, you can use this button to display the PCTV menu.
When you are in the server selection menu, this button also lets you switch between the individual video outputs. The video output selected is displayed on the screen. If you do not see an image on your screen, press the button repeatedly until an image is displayed.

Using this button to switch the video output is meant for "emergencies".
The video output can also be selected in the TV menu via "Settings", then "Video Output".

Miscellaneous functions
Depending on the type of media selected and the category, these buttons have various functions, which are each displayed on the lower right edge of the screen. Pressing a certain button activates the corresponding function.
During movie playback
"A" button
The format size of the movie currently being shown is changed.

The standard setting is configured in the "Settings" menu in "Movie Display".
"B" button
This button can be used to switch between soundtracks for movies with several different soundtracks.
"C" button
Subtitles can be displayed with this button.

The function can only be activated for VOB files with subtitle tracks. It has no influence on the subtitles in AVI files.
While showing photos
"A" button
After pressing the A button, use the arrow buttons and the OK button on the remote control to alter the size of the image (zoom) or of a detail (pan). Press the Play button to move on to the next photo.

The background music is paused in this mode.
"B" button
Use this button to rotate the photo displayed.
Press the Play button to move on to the next photo.

The background music is paused in this mode.
"C" button
Use this button to show or hide the title of the photo currently displayed.

Details
If you press this button while playing music or a movie or while displaying a slide show or photo album, details about the corresponding media file are displayed.

Volume +/-
Use this button to adjust the volume while listening to music or watching a movie.

Open main page
This button opens the main page which lists the functions you can select.
Select up/down
This button displays a selection menu, a little bit larger than a window, in which you can scroll up and down (recognizable by the arrows above and below the selection menu). The entire table of contents is visible in this window.

Arrow buttons (Up, Down, Left, Right)
With these buttons, you can move back and forth within a window and select functions. You can see which function has been selected by its highlighted background.
You can use the right arrow and left arrow buttons to jump back and forth in small increments within a music title or a movie.

Confirm
Pressing this button activates the function you selected.

Previous menu
Press this button to return to the previously displayed menu.

Open menu page/Repeat on/off
Press this button to reload the menu page.
While you are playing music or a movie, you can also use this button to turn the repeat function on and off.

Button reserved
This button is reserved for future extensions.

Pause
With this button, you can pause the playback of a piece of music, a movie or a slideshow. To resume playback, press the Play button.

Record
If a Pinnacle PCTV product supported by the ShowCenter is installed on your PC, you can use this button to open the Record Now menu.

Fast forward,

Rewind
With the Fast forward/Rewind buttons, you can move forward or backward to a specific part in a movie.

Play
With this button and depending on the chosen medium, you can start the playback of a movie, a piece of music or a slideshow. Playback can be paused by pressing the Pause button. Press the Play button again to resume playback from the same point.

Next Track,

Previous Track
With the Next Track/Previous Track buttons, you can jump back and forth within a playlist, slideshow or movie collection.

Stop
With the Stop button, you can stop the playback of a medium.
Number keys, Caps Lock / NUM (C/N),
Delete (DEL)
Use the number keys to enter letters and numbers. You have several options available: Either repeatedly press a specific button until the number or letter you want appears according to the numbers or letters assigned to that button (similar to how a mobile phone works) or use the Caps Lock/NUM button (C/N):
Depending on how many times you press the C/N button, you have access to lower case letters, upper case letters or numbers.
You can delete the letters or numbers you just entered by pressing the Delete (DEL) button.
You can use the number keys 2 - 9 (or A - Z) to search for entries alphabetically when a list of media files is displayed on the right side of the TV menu. For example, if you press the "2" key once, all the entries starting with the letter "A", "B" or "C" are displayed.
Press the "1" key to return to the previous list.
While playing a movie, you can use the number keys 1 to 9 to enter a percentage value (10%, 20%, etc.) to jump to another position in the movie currently playing.
Troubleshooting for the Remote Control
You should check the following if your ShowCenter remote control does not work properly:
- Did you point the remote control right at the receiver? The angle to the receiver should not exceed 30^ .
- Is the remote control too far away from the receiver? The remote control has a range of around 16 feet.
- Is there a clear line of sight between the remote control and the receiver?
- Have the batteries been properly inserted in the remote control? Do the batteries still have enough power?
Attaching USB Devices
The ShowCenter USB port only supports "mass storage" devices, which use a file system. This includes, for example, USB memory sticks, USB hard drives, and digital cameras.
Other USB devices, for example, mouses, keyboards, CD/DVD drives, scanners, printers, and WiFi adapters are not supported. The devices must be formatted with a FAT32 file system and may not contain a USB hub. However, you can use the USB port as a power source as long as your power requirements do not exceed the USB standard of 500mA .
To connect USB devices, first go to the server options menu via Settings and then press the A button on your remote control. Then connect the USB device; the presence of the device is indicated on this page after a short time. Select the device and confirm by pressing the OK button. The directories and files on the device are displayed and can be played back individually. This works even without a connection to the server PC.

Note that DRM-protected files cannot be played via the USB connection.
Dolby® Digital Sound Playback
The ShowCenter provides Dolby Digital Sound for VOB and MPEG 4 AVI formatted movies via the digital audio outputs. For this, a Dolby receiver/decoder needs to be connected to the output jacks.
Due to licensing restrictions, Dolby Digital Sound is by default not available via the analog stereo output jacks. However, you can activate this feature by paying the applicable fees.
To activate this feature, select Start/Programs/Pinnacle ShowCenter/Options/Activate Dolby Digital soundtracks on analog audio outputs and follow the instructions on the screen.
After successful activation, turn you ShowCenter Player off and then on again and then select Settings/Movie options in the TV Menu. Under Dolby Digital Output, select the option Analog Output (Stereo).
HDPlayback
For HD output, you need a television with an HD-compatible component input jack. The other ShowCenter video outputs are not suitable for HD transmission.
Via the Settings/Video Output in the TV Menu, you can set the component output to HD output by selecting either mode "720P" or mode "1080I". Since most televisions have limited resolution, the "720P" setting usually results in a sharper picture. You should also switch the menu display to HD via
Settings/Menu Resolution.
The ShowCenter can play HD movies in the following formats: MPEG 2 (720P and 1080I), MPEG 4 AVI (up to 720P), and Windows Media Video (720P and 1080I). The maximum data rate is around 16Mbit/sec (Ethernet) or 12Mbit/sec (wireless connection).
You can also display photos in especially high quality using HD output. When you do this, try out the zoom function (press the A button, then the arrow buttons and then OK to switch between zoom and move).
Album Cover Display
To display album covers while listening to music, you need to organize you music files so that each album has its own directory. If you now put a JPG file named "AlbumArt.jpg" in a directory with music files, this image will be used as the album cover. When you play this album in the Pinnacle MediaManager or in the ShowCenter Player or on your TV, this image is displayed while you listen.
The search for album cover files is a background process, whose parameters are configured in the Pinnacle MediaManager File/Preferences.
When playing Rhapsody music, the Rhapsody server automatically displays the album cover. This does not apply to Rhapsody Radio.
Playing Music Without Turning on the TV
You can assign music playlists or Internet radio stations to the number keys 1 to 9 on your remote control using Settings/Music options/Shortcut Keys in the TV Menu. The keys retain this shortcut function in the New Media menu (that is, directly after connecting with the server PC).
Connecting to the server PC can also be automated. To do this, select Add/Edit Servers in the server options menu, then select your server PC, and then select Always connect to this server.
If the New Media menu is displayed on the TV screen, the yellow LED display on the ShowCenter Player shows you that a server connection exists. You can then start playing music using the number keys 1 to 9.
Displaying Movie Subtitles
Subtitles in VOB movies can be selected and displayed by pressing the C button on your remote control while the movie is playing.
For MPEG 4 AVI movies, subtitles are also supported in the following formats: MicroDVD ("SUB"), SubRip ("SRT"), and Substation Alpha ("SSA"). The subtitle files need to be placed in the same folder as the movie and the file name needs to be identical to the name of the movie (except for the file extension). Only West European character sets are supported.
In addition, the display needs to be turned on via Settings/Movie options in the TV Menu. For MPEG 4 AVI movies, the C button has no function.
Automatic Playlists
In the Pinnacle MediaManager, you can assign star ratings to media (0 to 5 stars), either by using the Organize tab or by right-clicking in the library view. Any medium with four or five stars is then automatically added to the Top rated playlist. This playlist is available not only in the Pinnacle MediaManager but also in the ShowCenter Player and on your TV via the Auto Playlists option.
The ShowCenter also counts how often specific media files are played and uses this information to generate Auto Playlists under the categories of Most played, Least played, and Not played.
Detecting Missing or Modified Media
If you delete, move or rename a media file, the corresponding ShowCenter database reference is displayed as empty. A new background process detects this "missing medium" and marks it with a broken link icon in the Pinnacle MediaManager library view. You can display all the missing files via the Missing Media category.
To restore the connection to a missing file, select the file in the library and then right-click Repair missing media. You can read more about scanning for missing media in the File menu via Preferences in the Pinnacle MediaManager. The scan can also be started manually using the tools/Scan for missing/modified media menu.
If you sometimes use a different program for organizing your music, it can happen that the ID3 information in your music files no longer corresponds to the contents of the ShowCenter database. These files are detected and marked with a question mark icon. These Modified Media are displayed in the category of the same name in the Pinnacle MediaManager. To restore the ID3 information, select the modified media, then right-click and select Update values from file.

Modified media detection applies only to music files.
Music Information From Directory and File Names
If you have not organized your music according to ID3 tags but according to directory and file names, you can transfer this information to the ShowCenter database.
First, import your music with the Pinnacle MediaManager as you normally do via Import/Folder or Import/Files. Now select the music in the library view and then right-click to select Update values using file/dictionary names. A dialog window appears and lets you select or enter a template that corresponds with your method of naming directories and files. Use the arrow buttons to browse through the selected music and check whether the template assignments are correct. When you activate Update ID3 tags in music files, your music files also updated.
Organizing Movies By "Series"
If you have a lot of movie files, there may be too many to reasonably organize them only according to Genre. You now have the option of activating an additional level of organization called Series. Go to the File menu in the Pinnacle MediaManager and select Preferences and then Import. You can now set how to display directory and file names for movies in the Genre, Series, and Name categories when they are imported into the database.
To see the Series in the library Sort view, click the button, and select a view that contains the Series category.
Hardware
Power Supply
- Multivoltage - for an adapter with automatic voltage switching (100 - 230 V / 50 - 60 Hz / 15 W).
Audio and Video Outputs
SCART (Europe) with FBAS and RGB support
Color Component Video Out, 3 x Cinch Output
Composite Video (Cinch)
S-Video (Mini DIN)
- 2x Stereo Audio (2x Cinch each)
- One set to hook up the television and one set to hook up the stereo system
Digital Audio Output: Toslink and S/PDIF
Ethernet Connection
10/100BaseT
Integrated WLAN adapter
802.11b/g
Processor
- Standard processor with MPEG/MP3 hardware decoder: Sigma Designs RealImage EM 8620
Getting Technical Support

If problems should occur with your Pinnacle Systems product, please check first that the latest version of the software has been installed on your computer system.
Pinnacle Systems provides a free, round-the-clock service, which enables users to rectify problems themselves. You will be able to find answers to your questions seven days a week, right around the clock.
You will find this technical support at:
http://www.pinnaclesys.com
Click Support and select your product from the product list. Select your product again in the Interactive Support category and you will then be able to choose from the following support options:
1. Frequently Asked Questions
This is the best way of obtaining answers to your questions. Here you will find hundreds of technical problems and their solutions sorted by subject areas.
These are shown in the order of the 20 most frequently read questions. In addition, you can also sort the documents according to problem categories. To do this, use the pull-down Category menu.
Please use the search function to obtain answers to special questions.
2. Ask a Question and Get an Answer
Simply enter your question or the symptoms of your problem and you will obtain a list of the most obvious solutions. If you do not obtain a satisfactory
solution, please rephrase your question. For example, instead of "I get error messages" you could enter "I get error messages when installing the software".
Instead of entering a specific question, you can select one of the main functions listed for your product or a general subject area from the pull-down Category
list. The ten most frequently asked questions and the appropriate solutions in the category that you have selected will then be displayed.
3. E-mail Support
If you are unable to find an answer to your questions with the help of our Web site, Pinnacle Systems also offers technical support by e-mail. E-mails will be answered as quickly as possible. Please use the Ask a Question box for this
purpose. Before the e-mail is submitted, five solutions to your problem will be suggested. Please read these carefully, as more than 70% of customers find suitable answers in these proposed solutions.
4. Discussion Forum
More than 100,000 registered users make use of this free service. Visit the Pinnacle Systems online discussion forum to see whether your question has already been asked and a suitable answer found. To use the service, ask your question in the discussion forum and you will receive help from Pinnacle Systems or other users.
A search function is provided in the discussion forum. If you enter "poor picture", for example, contributions on this subject will be displayed.

When you use Pinnacle Systems technical support, you should have all the technical information about your computer configuration ready beforehand.
Pinnacle End User License Agreement
This End User License Agreement ("License") is a legal agreement between you and Pinnacle Systems ("Pinnacle") regarding Pinnacle's software and the accompanying documentation (collectively, the "Software"). CAREFULLY READ THE FOLLOWING LICENSE. USING THIS SOFTWARE INDICATES YOUR ACCEPTANCE OF THIS LICENSE. IF YOU DO NOT ACCEPT OR UNDERSTAND THE TERMS OF THIS LICENSE, YOU SHOULD NOT INSTALL THE SOFTWARE AND PROMPTLY RETURN THIS PRODUCT TO YOUR VALUE-ADDED RESELLER.
-
License Grant. Subject to the restrictions set forth below, this License grants you a non-exclusive, perpetual license to (a) install the Software on only one computer; (b) use or authorize use of the Software on only one computer; (c) make one copy of the Software, in machine-readable form, solely for backup purposes; provided you include all copyright and other proprietary rights notices on the copy and (d) transfer the Software and this License to another party if the other party agrees to accept the terms and conditions of this License. If you transfer the Software, you must at the same time either transfer all copies to the same party or destroy any copies not transferred. If you transfer possession of any copy of the Software to another party, your License is automatically terminated.
-
License Restrictions. You may not, or allow any third party to, (a) rent, lease, sell, loan or otherwise transfer the Software or any of your rights and obligations under this License; (b) install the Software on a network for use by multiple users, unless each user has purchased a license; (c) reverse-engineer, decompile or disassemble the Software or hardware in whole or in part; (d) remove or destroy any copyright notices or other proprietary markings of the Software or any third-party software; (e) modify or adapt the Software, merge the Software into another program or create derivative works based on the Software; (f) make copies of or distribute, for profit or otherwise, the Software, except as expressly provided above; (g) make any alteration, modification, connection, disconnection, improvement or adjustment of any kind to or use the Software except as explicitly contemplated in the enclosed documentation and in this License and (h) use this product to distribute video content, which is protected by copy protection technology, via the Intranet or any wide area network (WAN) and (i) sublicense, transfer or assign this License or any of the rights and obligations granted under this License, except as explicitly contemplated in this License. Any purported transfer or assignment will be void.
-
Export Restrictions. The export and re-export of Pinnacle software products are controlled by the United States Export Administration Regulations and such software may not be exported or re-exported to any country to which the United States embargoes goods. In addition, Pinnacle software may not be distributed to persons on the Table of Denial Orders, the Entity List, or the List of Specially Designated Nationals. By downloading or using a Pinnacle software product you are certifying that you are not a national of any country to which the United States embargoes goods and that you are not a person on the Table of Denial Orders, the Entity List, or the List of Specially Designated Nationals.
- Ownership. The license granted hereunder does not constitute a transfer or sale of ownership rights in or to the Software. Except for the license rights granted above, Pinnacle retains all right title and interest in and to the Software including all intellectual property rights therein. The Software is protected by applicable intellectual property laws, including United States copyright laws and international treaties.
- Third Party Proprietary Property. This Software may contain the proprietary property of others, which has been licensed to Pinnacle, your use of the Software is expressly conditioned on your agreement not to remove any copyright notices or other proprietary markings of the third party software.
- Security. You acknowledge and agree that in order to protect the integrity of certain third party content, Pinnacle and/or its licensors may provide for Software security related updates that will be automatically downloaded and installed on your computer. Such security related updates may impair the Software (and any other software on your computer which specifically depends on the Software) including disabling your ability to copy and/or play "secure" content, i.e. content protected by digital rights management. In such an event, Pinnacle and/or its licensors shall use reasonable efforts to promptly post notices on Pinnacle's web site explaining the security update and providing instructions to end-users for obtaining new versions or further updates of the Software that restore access to secure content and related features.
- Term and Termination. This License shall be effective upon installation of the Software and shall terminate upon the earlier of (a) your failure to comply with any term of this License; (b) return, destruction or deletion of all copies of the Software in your possession or (c) transfer of the Software and this License to another party in accordance with Section 1(d). Pinnacle's rights and your obligations shall survive termination of this License.
- Limited Warranty. Pinnacle warrants to the original licensee that the Software, as delivered, will perform in accordance with the accompanying documentation for a period of 30 days from the date of the original purchase ("Limited Warranty"). Pinnacle's entire liability and your exclusive remedy for breach of the preceding Limited Warranty shall be, at Pinnacle's sole option, repair or replacement of the Software that does not meet the warranty set forth
herein and that is returned to Pinnacle. This limited warranty shall be void if failure of the Software has resulted from any accident, abuse, misuse or misapplication by you. Any replacement Software will be warranted for the remainder of the original warranty period or 30 days, whichever is longer.
-
NO OTHER WARRANTYES. EXCEPT AS SET FORTH ABOVE, THE SOFTWARE IS PROVIDED ON AN "AS IS" BASIS. YOU ASSUME ALL RESPONSIBILITIES FOR THE QUALITY AND PERFORMANCE OF THE SOFTWARE. TO THE MAXIMUM EXTENT PERMITTED BY APPLICABLE LAW, Pinnacle DISCLAIMS ALL WARRANTYES, EITHER EXPRESS OR IMPLIED, INCLUDING BUT NOT LIMITED TO IMPLIED WARRANTYES OF MERCHANTABILITY, NONINFRINGEMENT, AND FITNESS FOR A PARTICULAR PURPOSE. LICENSOR DOES NOT WARRANTY THAT THE FUNCTIONS CONTAINED IN THE SOFTWARE WILL MEET YOUR REQUIREMENTS, BE UNINTERRUPTED OR ERROR FREE.
-
LIMITATION OF LIABILITY. YOU AGREE THAT IN NO EVENT WILL Pinnacle BE LIABLE FOR ANY CONSEQUENTIAL, SPECIAL, INDIRECT, INCIDENTAL OR PUNITIVE DAMAGES WHATSOEVER, EVEN IF Pinnacle HAS BEEN ADVISED OF THE POSSIBILITY OF SUCH DAMAGES. IN NO EVENT SHALL Pinnacle'S LIABILITY EXCEED THE TOTAL AMOUNT OF THE FEES PAID FOR THE SOFTWARE. Some states/jurisdictions do not allow the limitation or exclusion of incidental or consequential damages in certain circumstances, so the above limitations may not apply in some circumstances.
-
General. This License is governed by the laws of the State of California and by the federal laws of the United States, without reference to conflict of laws principles. The federal and state courts within the County of Santa Clara, California shall have exclusive jurisdiction to adjudicate any dispute arising out of this License and you hereby consent to the personal jurisdiction of the federal and state courts within the County of Santa Clara, California. This License is the entire agreement between you and Pinnacle and supersedes any other communication with respect to the Software. No modification of or amendment to this License will be effective unless in writing signed by both parties. If any provision of this License is held invalid or unenforceable, the remainder of this License will continue in full force and effect.
#
16:9 format: Also called widescreen. Television format where the width-to-height ratio of the display area is 16:9 instead of 4:3. When broadcast for television, part of the picture is broadcast in black (black bars on top and bottom of the picture) to make it compatible with the traditional 4:3 format. The first line of the TV picture contains additional code that instructs any 16:9 television to enlarge the picture (see also "4:3 format")
4:3 format: This is the traditional television format. The width-to-height ratio of the display area is 4:3.(see also "16:9 format")
A
Aspect ratio: The width-to-height ratio of one pixel. Some video formats must have this ratio in order to display the picture properly. If the aspect ratio is 1, the pixel will be square. If the aspect ratio is not 1, the pixel will be rectangular. When rectangular pixels are used without adjustment, circles are displayed as ovals. This distortion can be eliminated by factoring in the aspect ratio. (see also "Pixel")
AVI: Abbreviation for "Audio Video Interleaved", the standard format for digital video on PCs. (see also "Video for Windows")
C
Client: A system (computer or program) in a network or on the Internet that requests files or services. The system (computer or program) that provides the files or services is called a server. The client can request a data transfer or a print job from the server.
Composite Video: The encoding of color and brightness information into a single signal. (see also "S-Video")
Content: Content is the information contained in a message or a Web site that does not consist of structures or formats. This term applies to all media, >from texts, data and images to audio information and videos.
D
Data rate: The data rate is also known as the bit rate. The bit rate measures how fast bits of data can be transferred over a medium in a given period of time. This rate is listed in bits per second (bps).
DHCP: Abbreviation for "Dynamic Host Configuration Protocol". Windows-Server software that assigns an IP address to each computer in a network (see also "IP Address")
Dial-up connection: A dial-up connection is the most common type of consumer Internet connection. A modem connects the computer to the Internet provider's system via the telephone line. The provider's system is normally connected to the Internet via an ISDN line. (see also "Modem" and "ISDN")
Digital video: Digital video stores information as bits in a file. This differs from the method used by analog storage media such as VCRs.
Dolby(R) Digital: Digital sound system developed by Dolby(R) Laboratories. Six or more channels piped through your loud speakers produce an excellent surround sound audio experience. Dolby(R)Digital is used in particular on DVDs. Transmission to a surround sound decoder or amplifier is usually done using a digital audio connection such as S/PDIF or Toslink.
DRM: Abbreviation for "Digital Rights Management". With this system, digital data, such as audio and video files, are distributed under controlled conditions. This is done with the aid of an encrypted data format and a corresponding player or decoder program, which can detect whether a user has the right to view or copy certain data.
DSL: Short for "Digital Subscriber Line". This technology allows users with DSL modems to download up to 6 Mbps and upload 0.6 Mbps over short distances of 3 miles or less. DSL connects using copper landlines.
DVD: Short for "Digital Versatile Disc", formerly known as "Digital Video Disc". An optical storage medium with more capacity and bandwidth than a CD-ROM. DVDs are commonly used for multimedia and data-storage applications.
E
Ethernet: The most common type of local-area network. Each node (computer or server) in the network checks whether any other computer is transmitting data. It then waits for the other computers to finish with their transmissions before it starts its own transmission. (see also "LAN")
F
Field: A video image consists of horizontal lines divided into two fields. All the odd-numbered lines make up one field; the even-numbered lines make up the other field.
Filesharing: Filesharing refers to any exchange of data between two or more computers over the Internet. There are currently many filesharing programs available on the Internet, many of which can be used for free.
Firmware: Firmware is system software stored in ROM or Flash memory. Firmware is not deleted when the system has been turned off.
Flash memory: Re-writeable permanent memory that behaves like a hybrid of RAM and a hard drive. Flash memory does not lose data even when its power supply has been turned off. (see also "RAM")
G
GIF: Abbreviation for Graphics Interchange Format. This graphics format was developed by CompuServe as a high-compression format for transmitting images without losing any data. The most important graphics element on the Internet. The GIF format only has 256 colors because only 8 bits go into storing each dot. GIFs are ideal formats for animations.
H
HD: Abbreviation for "High Definition". Name for video signals with a resolution that exceeds the Standard Definition. Typical examples are "720p" (1280x720 progressive) and "1080i" (1920x1080 with line interlacing). The transmission of HD signals requires components or digital (DVI, HDMI) inputs. FBAS, S-video and SCART are not suitable for this. The compression algorithms for HD are extensions to the methods used for SD, for example, MPEG 2 HD, MPEG 4 HD, and Windows Media Video HD. Since for HD, substantially more pixels and therefore more data accumulate, significantly higher processing power is required for compression and decompression. (see also "SD")
HTML: Abbreviation for "HyperText Markup Language". A document standard developed during the World Wide Web project that provides a simple logical structure for titles, headings, paragraphs, numbering, forms, tables and mathematical formulas as well as a language for defining hypertext links.
HTTP: Abbreviation for "HyperText Transfer Protocol". A standard mechanism used on the Internet to share documents between servers and clients.
1
IDE: Abbreviation for "Integrated Drive Electronics". IDE is a parallel interface used to connect hard-disk drives, CD drives, tape devices and floppy drives. Advanced IDE hard drives have a IDE controller built into the hard-drive housing.
Interlace: A method of creating an image used in PAL and other systems. Interlacing uses fields. Each field has 312 1/2 lines that are inserted one after another. (see also "Field")
IP Address: Abbreviation for "Internet Protocol". Every computer connected to the Internet receives a unique identification number that consists of four sections. This number is called an IP address. This allows other computers in the network to identify it, send data packets to it and to process data they have
received from it. IP addresses make sure that the right data packets are sent to the right recipient via the right path.
ISDN: Abbreviation for "Integrated Services Digital Network". A digital telephone network that, unlike analog modems, transmits digital data. With bit rates of 64 bps, ISDN transmits data much faster and more accurately than modems.
J
JPEG: Abbreviation for Joint Photographic Experts Group. The data extension is "JPG". Graphics-compression method developed by C-Cube Microsystems. This pixel image format offers 24-bit color depth and is especially suited for photos and photorealistic images with many different shades and hues. Because it exploits some of the physiological characteristics of human sight and permits data losses that are invisible to the naked eye, it attains extremely high compression rates.
JPG: See "JPEG".
L
LAN: Abbreviation for "Local-Area Network". A local network located in a building or on company premises that is based on private transmission media and equipment. Ethernet and Token Ring are common LAN technologies.
Letterbox: The letterbox format is created when an image recorded in 16:9 format (or wider) is displayed on a normal television (4:3). This format typically displays the picture between black bars on the top and bottom of the screen. This term was probably derived from the wide, thin format that looks a lot like the slot of a letterbox.
M
M3U Format: M3U (file extension ".m3u") is the standard data format in which Winamp and other playlists are saved.
Modem: Abbreviation for "MOdulator DEModulator". A device that converts digital signals ("the computer's language") to analog signals ("the telephone's language") and vice versa. Modems are used to connect to the Internet using a dial-up connection.
MOV: Name given to Quicktime-formatted videos.
MP3: MP3 is an audio format that provides relatively good sound (compared to the uncompressed original) and very high compression rates. It is an excellent way to store and share music data over the Internet. Many MP3 players support this format and allow users to store hours of sound at almost full-range HiFi quality in just a few megabytes.
MPEG: Abbreviation for Motion Pictures Experts Group. Video-compression standard. There are different formats for different types of compression, such as MPEG 1, MPEG 2, etc.
MPEG 4 AVI: Video format with extremely high compression.
N
NTSC: Abbreviation for "National Television Standards Committee". A television standard with 525 lines and 60 fields per second that is used in North and Central America. (see also "PAL", "SECAM", "Field")
P
PAL: Abbreviation for "Phase Alternation Line". Television standard developed in Germany that uses 625 lines and 50 fields per second. This is the main TV standard in Europe. (see also "NTSC", "SECAM", "Field")
PCMCIA: Abbreviation for "Personal Computer Memory Card International Association". A PCMCIA card is a lightweight, removable module about the size of a credit card that provides additional functionality to a portable computer. The module may expand existing RAM or hard-drive space or provide network functionality.
Peer-to-peer (P2P): Peer-to-peer filesharing sites are Internet forums that offer freely available media files. There are more than 70 such forums online.
PHP: The abbreviation PHP officially stands for "Hypertext Preprocessor". PHP is a widely used scripting language designed for general use. It can be embedded in HTML and is ideal for Web applications. PHP is easy to learn, offers excellent database and Internet-Protocol interfaces and supports many additional function libraries. PHP is the ideal development tool for creating dynamic Web content.
PIN: Abbreviation for "Personal Identification Number". A PIN is a secret code comprising several digits that identifies a given user.
PiP: Abbreviation for "Picture in Picture."
Pixel: Also known as a "picture element" or "pel". In a video-recording device (such as a camera) or a playback device (such as a monitor), a pixel is a light-sensitive or light-emitting surface with a specified height and width. When stored electronically, pixels contain brightness and color information for a given image element. The aspect ratio, which also plays a key role in video playback, is stored separately in the files for some data formats. (see also "Aspect ratio")
PNG: Abbreviation for Portable Network Graphics. Graphics format for bit-mapped images that supports interlacing and offers 24-bit color depth and lossless compression. (see also "Interlace")
R
RAM: Abbreviation for "Random Access Memory". The main memory of the computer. The RAM temporarily stores data and runs programs at the same time.
RGB: Abbreviation for "Red Green Blue". RGB values can be used to define a particular hue. The color is calculated based on the amount of red, blue and green in each pixel.
Ripping: Files or parts of files on an audio CD or movie DVD are "read in" and stored on the PC's hard drive, where they can be played back or processed further.
ROM: Abbreviation for "Read Only Memory". A memory chip that can be read from, but not written to.
Router: Routers, also known as "Intermediate Systems (IS)", are linking elements that interconnect two or more subnetworks. In addition to acting as a bridge, routers can expand the boundaries of a network (number of nodes, physical extension). Routers also control data traffic by not forwarding defective data packets.
s
S-VHS: Improved version of VHS based on the S-Video standard, but with better image definition. (see also "S-Video", "VHS")
S-Video: S-Video signals deliver brightness and color information separately through several cables. This means that the video does not need to be modulated and demodulated and image quality is not impaired as a result. (see also "Composite Video")
SCART: Type designation for the EuroAV plug, a 21-pin, standardized connector for all video and audio lines. Signals are not converted prior to transmission, which makes for a high quality standard.
SD: Abbreviation for "Standard Definition". When a resolution consists of up to 720 × 480 (NTSC) or 720 × 576 (PAL), we are talking about "Standard Definition". (see also "HD")
SECAM: Abbreviation for "Sequential Couleur à Mémoire". A color-television standard developed in France and Eastern Europe based on the PAL system. SECAM uses 625 lines and 50 fields per second. (see also "NTSC", "PAL", "Field")
Server: A computer or a program that offers storage, data-transfer and other services in a network or on the Internet. Servers often provide services for requestors (clients) located on other computers.
Set-top box: A set-top box is an additional device that receives digital television stations and data. It can be hooked up to any standard television set.
Streaming: The act of transferring compressed video and audio files over the Internet. Streaming does not download all the data at once, but downloads it in stages using a store-and-forward method. The data does not arrive as a continuous file, but is cached in the buffer, which can create delays at the start of transmission. The data can be transmitted live or it can be downloaded later. The computer receiving the data stream must have a program (player) installed on it that decompresses the data. Players are usually installed in browsers such as Internet Explorer. The speed and quality of the data depend heavily on how much bandwidth is available. In order to ensure smooth playback, the Internet connection should offer at least 300 Kbps in bandwidth. There are various file formats for audio and video streaming. The most popular formats are MP3, RealAudio and WMA.
SVCD: Expanded Video-CD standard. This image format offers a higher line resolution and uses MPEG-2 instead of MPEG-1 to compress the video data. (see also "VCD")
V
VCD: Abbreviation for "Video CD". A standard for writing MPEG-1-formatted videos to CDs. A Video CD can hold up to an hour of digital video and stereo-quality sound. The data rate of the MPEG-1 stream is constant - around 170~kB per second (224 kpbs sound, 138 kB video, PAL). This standard offers image and sound quality that is comparable to that of a HiFi VCR. (see also "SVCD")
VHS: Abbreviation for "Video Home System". System used by many VCRs for recording and playing back sound and video from magnetic tape. It uses a composite signal that combines brightness and color information into one signal. (see also "Composite Video", S-VHS)
Video-on-Demand (Vod): A multimedia application that allows users to access a video server and view photos/images or videos/movies.
Video for Windows: Video for Windows, a Microsoft Windows system expansion, allows users to record, store and play back digital video sequences. (see also "AVI")
W
Web Server: A computer on which HTML pages and network software are stored. Web servers constantly deliver content via the Internet or a network to Web browsers, where it is displayed on the user's monitor.
Wi-Fi: Abbreviation for "Wireless Fidelity". Wi-Fi is an 802.11-compliant certification for wireless local-area networks (LANs) issued by the WECA (Wireless Ethernet Compatibility Alliance). This certification confirms that all wireless network products that comply with the standard are interoperable.
WIA: Abbreviation for "Windows Imaging Architecture". An imaging architecture introduced by Microsoft for Windows Millennium Edition and Windows XP. WIA allows image-processing programs to communicate with, and receive data from, digital cameras, scanners and other devices.
Widescreen: See "16:9 format".
WLAN: Abbreviation for "Wireless Local Area Network". (see also "LAN")
WMA: Abbreviation for "Windows Media Audio". Microsoft's audio playback method that, unlike its rival, MP3, has an integrated rights-management system. (see also "MP3")
WMV: Abbreviation for "Windows Media Video". Video-file format developed by Microsoft.
X
XviD: Another version of the MPEG 4 AVI video-media format. (see also "MPEG 4 AVI")
Index
B
Batteries 1
Burner 61
C
Categories 30
Condensation 1
Connecting devices. 11, 14
Copyrights. 1
Customized File Tags 51
D
Database 4, 6
Deleting Files 35
Digital photos 27
DRM 30,57
E
Edit Menu 65
Ethernet Connection 9
Export 57, 58, 60, 61
Export Tab 57
F
File Formats 71, 72
File Menu 63
File Tags 50
Firmware 93
G
Get Titles 42
Graphics Card 9
H
Hard Drive 9
Hardware
Specifications 111
Hardware 6, 7
Housing 1
1
Import - Audio CD 42
Import - Digital Camera 45
Import - Drives. 41
Import - Files 40
Import - Folder 39
Import - Rhapsody Playlists 49
Import - Watch Folder 47
Import Tab. 38
Installing the Software 11, 12
Internal Components 1
K
Keywords 51, 52
L
License Agreement 115
M
M3U playlist 57, 60
Main Window 28
Media Library 30, 33, 34, 35
Media Player 36
Media Types. 30
Menus. 63, 65, 67
Movies 82
Movies and other video files......27
Music 78
N
Network Connection 20
0
Organize Tab. 52
Organizing File Tags 50
P
Package Contents 7
PCTV 90
Photos 86
Player 6
Playlists 54, 55
Playlists Tab. 54, 55
Power Cable 1
Power Plug. 1
Processor 9
R
RAM 9
Remote Control. 6, 99, 100, 105
Rhapsody 49, 68
s
Safety Instructions 1
Searching in the Media Library .... 34
Server 6
Settings 93
Showcenter,idea. 4,5
Software 6, 7
Sort View in the Media Library ....33
Sound Card. 9
Supported File Formats. 71
System Requirements. 9
T
Technical Support 113
Television.....77, 78, 82, 86, 90, 93
The Components 6
Tools Menu 67
Turning on the Television 75
TV Menu, Introduction .... 77, 78, 82, 86, 90, 93
U
USB. 14, 107
W
Watch Folder 47
Where to install the device. 1
WIA drivers. 45
Windows 2000 9
Windows XP 9
WLAN. 7, 14, 20