
Perfection 636U - Scanner EPSON - Free user manual and instructions
Find the device manual for free Perfection 636U EPSON in PDF.
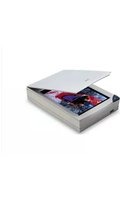


| Product Type | Flatbed Scanner |
| Model | Perfection 636U |
| Brand | Epson |
| Interface | USB 1.1, Parallel Port |
| Scan Resolution | Up to 2400 x 2400 dpi (interpolated) |
| Optical Resolution | 600 x 1200 dpi |
| Color Depth | 36-bit (input), 24-bit (output) |
| Scan Area (Max) | 8.5 x 11.7 inches (A4/Letter) |
| Light Source | Cold Cathode Fluorescent Lamp |
| Dimensions (W x D x H) | 17.1 x 12.4 x 4.3 inches |
| Weight | 6.6 lbs (3.0 kg) |
| Power Supply | AC Adapter, 100-240V, 50/60 Hz |
| Power Consumption | 30 W (max), 5 W (standby) |
| Main Functions | Color, grayscale, and monochrome scanning; image editing software included |
| Maintenance | Clean glass platen with soft, lint-free cloth; avoid abrasive cleaners |
| Safety | Use only supplied power adapter; keep away from liquids; unplug when not in use |
| Spare Parts and Reparability | Replacement lamps and power adapters available; limited user-serviceable parts |
| General Information | Compatible with Windows 98/ME/2000/XP, Mac OS 8.6-9.x; TWAIN compliant |
Frequently Asked Questions - Perfection 636U EPSON
User questions about Perfection 636U EPSON
0 question about this device. Answer the ones you know or ask your own.
Ask a new question about this device
Download the instructions for your Scanner in PDF format for free! Find your manual Perfection 636U - EPSON and take your electronic device back in hand. On this page are published all the documents necessary for the use of your device. Perfection 636U by EPSON.
USER MANUAL Perfection 636U EPSON

Scanner Basics
Copyright Notice
All rights reserved. No part of this publication may be reproduced, stored in a retrieval system, or transmitted in any form or by any means, electronic, mechanical, photocopying, recording, or otherwise, without the prior written permission of SEIKO EPSON CORPORATION. The information contained herein is designed only for use with this EPSON scanner. EPSON is not responsible for any use of this information as applied to other scanners.
Neither SEIKO EPSON CORPORATION nor its affiliates shall be liable to the purchaser of this product or third parties for damages, losses, costs, or expenses incurred by purchaser or third parties as a result of: accident, misuse, or abuse of this product or unauthorized modifications, repairs, or alterations to this product, or (excluding the U.S.) failure to strictly comply with SEIKO EPSON CORPORATION's operating and maintenance instructions.
SEIKO EPSON CORPORATION shall not be liable for any damages or problems arising from the use of any options or any consumable products other than those designated as Original EPSON Products or EPSON Approved Products by SEIKO EPSON CORPORATION.
A Note Concerning Responsible Use of Copyrighted Materials
Digital cameras and scanners, like photocopiers and conventional scanners, can be misused by improper copying of copyrighted material. While some countries' laws permit limited copying of copyrighted material in certain circumstances, those circumstances may not be as broad as some people assume. EPSON encourages each user to be responsible and respectful of the copyright laws when using digital cameras and scanners.
Trademarks
EPSON and EPSON Stylus are registered trademarks of SEIKO EPSON CORPORATION. EPSON SoundAdvice is a service mark, ColorTrue is a registered trademark, and Perfection, Micro Step Drive, and EPSON FaxAdvice are trademarks of Epson America, Inc.
General Notice: Other product names used herein are for identification purposes only and may be trademarks of their respective owners. EPSON disclaims any and all rights in those marks.
FCC Compliance Statement
For United States Users
This equipment has been tested and found to comply with the limits for a Class B digital device, pursuant to Part 15 of the FCC Rules. These limits are designed to provide reasonable protection against harmful interference in a residential installation. This equipment generates, uses, and can radiate radio frequency energy and, if not installed and used in accordance with the instructions, may cause harmful interference to radio or television reception. However, there is no guarantee that interference will not occur in a particular installation. If this equipment does cause interference to radio and television reception, which can be determined by turning the equipment off and on, the user is encouraged to try to correct the interference by one or more of the following measures.
■ Reorient or relocate the receiving antenna.
■ Increase the separation between the equipment and receiver.
■ Connect the equipment into an outlet on a circuit different from that to which the receiver is connected.
■ Consult the dealer or an experienced radio/TV technician for help.
Warning
The connection of a non-shielded equipment interface cable to this equipment will invalidate the FCC Certification of this device and may cause interference levels which exceed the limits established by the FCC for this equipment. It is the responsibility of the user to obtain and use a shielded equipment interface cable with this device. If this equipment has more than one interface connector, do not leave cables connected to unused interfaces. Changes or modifications not expressly approved by the manufacturer could void the user's authority to operate the equipment.
For Canadian Users
This Class B digital apparatus meets all requirements of the Canadian Interference-Causing Equipment Regulations.
About Your Scanner 1
About Your Software 2
About Your Documentation 3
Cautions, Notes, and Tips 3
System Requirements 4
Windows 98 4
iMac 5
Year 2000 Ready 5
Important Safety Instructions 6
SETTING UP YOUR SCANNER 7
Unpack Your Scanner 7
Choose a Good Place for Your Scanner 8
Unlock the Scanner 9
Connect the Scanner to Your Computer 10
Installing the Optional Equipment 11
Transparency Unit 11
Auto Document Feeder 12
Power On Your System 14
Install the Scanner Software 14
If You're Running Windows 98 . . . 14
If You're Using an iMac . . . 17
Install the Creative Software and Electronic Manuals 20
HOW TO SCAN 22
Preparing to Scan 22
Selecting Settings 24
Tips for Getting the Best Scan 26
Selecting Resolution 26
Scaling (Resizing) Images 27
One-Touch Scanning 27
Batch Scanning 27
Step-by-Step Scanning Instructions 28
Placing Your Original Document 28
Scanning Photographs with Adobe PhotoDeluxe and EPSON TWAIN 29
VIEWING YOUR ELECTRONIC MANUALS 31
Copying a Manual to Your Hard Drive 31
Navigating a Manual 32
SCANNER MAINTENANCE 33
Scanning Something That Doesn't Fit Under the Document Cover 33
Transporting the Scanner 34
Cleaning the Scanner 35
PROBLEMS? NEED HELP? 36
Identifying Scanner Parts 36
Light and Buttons 37
Problems and Solutions 38
Setup Problems 38
Scanner Problems 38
Software Problems 39
Scanning Problems 40
Where To Get Help 43
EPSON Technical Support 43
Software Technical Support 44
INDEX
45
A Complete Scanning Solution
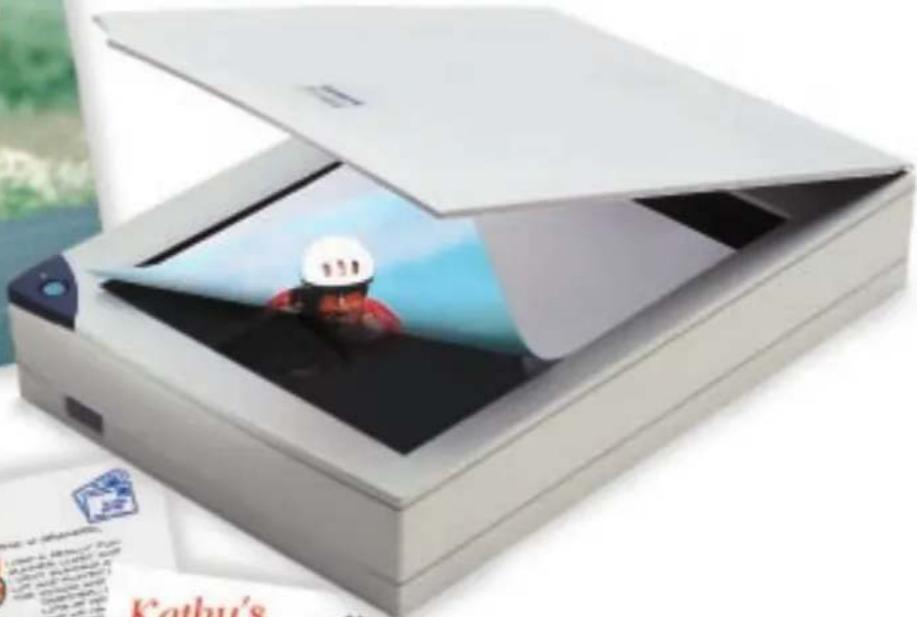
Your EPSON® Perfection™ 636U scanner is a professional-quality 36-bit scanner packed with easy-to-use features for practically any type of scanning—for business, home, or school. The “plug & play” USB connection is fast and easy with no extra hardware to install. Using EPSON’s ColorTrue® Imaging System, the scanner captures your images with amazing detail and accurate colors. Your scanner can achieve up to 600 · 2400 dpi hardware resolution with EPSON’s proprietary Micro Step Drive™ technology, delivering the kind of crisp, precise images you’d normally expect from a professional graphics scanner, and faster than any other scanner in its class.
About Your Scanner
Your EPSON Perfection 636U scanner includes the following features:
■ Superior image quality:
■ True optical resolution of 600 dots per inch (dpi)
■ Hardware resolution of 600 · 2400 dpi with Micro Step Drive technology
■ Maximum resolution of 9600 · 9600 dpi with interpolation
■ 36-bit color depth for capturing images with over 68 billion colors
■ EPSON TWAIN for high speed scanning and accurate optical character recognition (OCR)
■ Start button for one-touch scanning
■ Letter/A4 size scanning area (legal size documents can be scanned with the optional auto document feeder)
■ Optional transparency unit and auto document feeder
About Your Software
The EPSON Perfection 636U scanner includes these leading-edge applications for professional-quality scans:
EPSON®
EPSON TWAIN Driver
The scanning utility for producing professional quality images. Ideal for scanning text into OCR programs. Includes Text Enhancement Technology (TET) for more accurate OCR scanning and Auto Area Segmentation (AAS) to separate text from background colors.

Adobe
Adobe ® PhotoDeluxe ® Home Edition 3.0 (Windows ® ) or Adobe PhotoDeluxe version 2.0 (iMac TM )
Edit your photos with professional results. Add special effects, overlay titles and captions, restore old photos, and add many other creative enhancements to your photographs. Create invitations, flyers, and promotional items for business or fun.

Brøderbund®
Broderbund ® The Print Shop ® PressWriter ™
Use the built-in templates to easily and quickly create professional newsletters, brochures, resumes, and flyers.

NewSoft TM Presto! TM PageManager for EPSON
Use with the scanner's Start button feature to quickly scan single- or multi-page documents (with the optional auto document feeder) and save time. Then drag and drop your scanned images into almost any application. Or convert scanned text into editable documents using the built-in OCR software.
About Your Documentation
This guide includes instructions for setting up your scanner, scanning tips, and troubleshooting advice. It also includes instructions for viewing your electronic manuals and installing the optional equipment.
For details on using the scanner software, see your electronic EPSON TWAIN User's Guide. For additional maintenance and troubleshooting information, and scanner specifications, see your electronic EPSON Perfection 636U Reference Guide.
Cautions, Notes, and Tips
Please follow these guidelines as you read your documentation:

Cautions must be observed to avoid damage to your equipment.

Notes contain important information about your scanner.

Tips contain hints for great scanning.
System Requirements
The minimum system requirements for Windows and iMac are listed below. For optimum performance, a faster processor and more memory are recommended. If you are scanning high resolution images, you need more than the minimum available hard disk space listed.
Windows 98
■ An IBM compatible PC with a 486/66 MHz or faster processor
■ Microsoft ® Windows 98 preinstalled
■ 16MB RAM (32MB recommended)
■ 50MB available hard disk space
■ Available built-in USB port or hub connection
■ CD-ROM drive
■ Mouse or pointing device
■ VGA or higher resolution monitor with 640 · 480 resolution (800 · 600 or higher recommended) and 256 colors (65,000 colors or more recommended)

Color and tone reproduction are subject to the display capability of your computer system, including the video card, monitor, and software. See the documentation for these products for details.
iMac
You cannot use a serial interface to connect the scanner.
■Apple ® iMac computer running Mac OS 8.1 or later

If you are using Mac OS 8.1, you need to install the iMac Update before installing the scanner software. This is available online from the Apple web site. If you are using Mac OS 8.5 check the Apple web site for any updates.
■ Available USB port or hub connection
■ 32MB RAM (64MB recommended)
■ 50MB available hard disk space
■ CD-ROM drive
■ Mouse or pointing device
■ VGA color monitor with 640 · 480 screen resolution (or higher recommended) and 256 colors (32,000 colors or more recommended)

Color and tone reproduction are subject to the display capability of your computer system, including the video card, monitor, and software. See the documentation for these products for details.
EPSON TWAIN supports the Apple ColorSync TM 2.X color management system and QuickTime. TM These extensions are automatically installed during EPSON TWAIN installation.
Year 2000 Ready
Your EPSON scanner is Year 2000 Ready. However, be sure the other parts of your computer system are also ready for the year 2000.
Important Safety Instructions
Read all of these instructions and save them for later reference. Follow all warnings and instructions marked on the scanner.
■ Unplug the scanner before cleaning. Clean with a damp cloth only. Do not spill liquid on the scanner.
- Do not place the scanner on an unstable surface or near a radiator or heat source.
- Do not block or cover the openings in the scanner's cabinet. Do not insert objects through the slots.
- Use only the type of power source indicated on the scanner's label.
■ Connect all equipment to properly grounded power outlets. Avoid using outlets on the same circuit as photocopiers or air control systems that regularly switch on and off.
■ Do not let the power cord become damaged or frayed.
- If you use an extension cord with the scanner, make sure the total ampere rating of the devices plugged into the extension cord does not exceed the cord's ampere rating. Also, make sure the total ampere rating of all devices plugged into the wall outlet does not exceed the wall outlet's ampere rating.
■ Do not attempt to service the scanner yourself.
■ Unplug the scanner and refer servicing to qualified service personnel under the following conditions:
If the power cord or plug is damaged; if liquid has entered the scanner; if the scanner has been dropped or the cabinet damaged; if the scanner does not operate normally or exhibits a distinct change in performance. Do not adjust controls that are not covered by the operating instructions.

Setting Up Your Scanner
Setting up your scanner is easy—just follow the simple steps in this book in the order listed below.
- Unpack and choose a place for your scanner.
- Unlock the scanner.
- Connect the scanner to your computer.
- Power on your system.
-
Install the scanner software.
-
Install the creative software and view your electronic manuals.
If you purchased the optional transparency unit (B813132) or auto document feeder (B813142), see “Installing the Optional Equipment” on page 11 for installation instructions. You can purchase these options from EPSON Accessories at (800) 873-7766 or visit our web site at www.epsonsupplies.com (U.S. sales only). In Canada, please call (800) 873-7766 for dealer referral.
Unpack Your Scanner
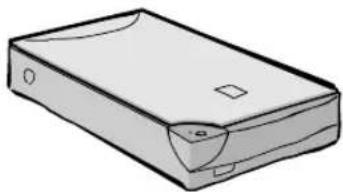
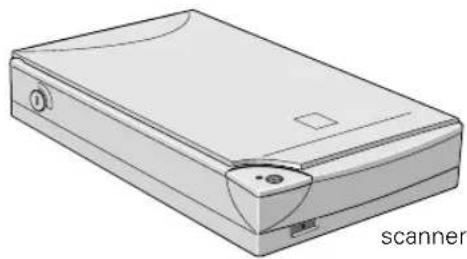
Remove the scanner from the box, then remove the packing material from your scanner. Save the packaging in case you need it later. Your EPSON Perfection 636U comes with the items shown to the right.

Scanner Basics
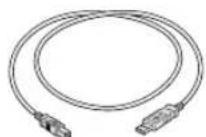
USB interface cable


CD-ROM with driver, electronic manuals, and creative software for Windows 98
CD-ROM with driver, electronic manuals, and creative software for iMac
Choose a Good Place for Your Scanner
Here are some points to consider:
- Place the scanner on a flat, stable surface. If the scanner is tilted, it can't operate properly.
■ Make sure to place the scanner where you can easily unplug the power cord, and where the USB cable can reach your computer.
- Keep the scanner away from direct sunlight and strong light sources.
■ Avoid places subject to shocks and vibrations, or high or rapidly changing temperatures and humidity.
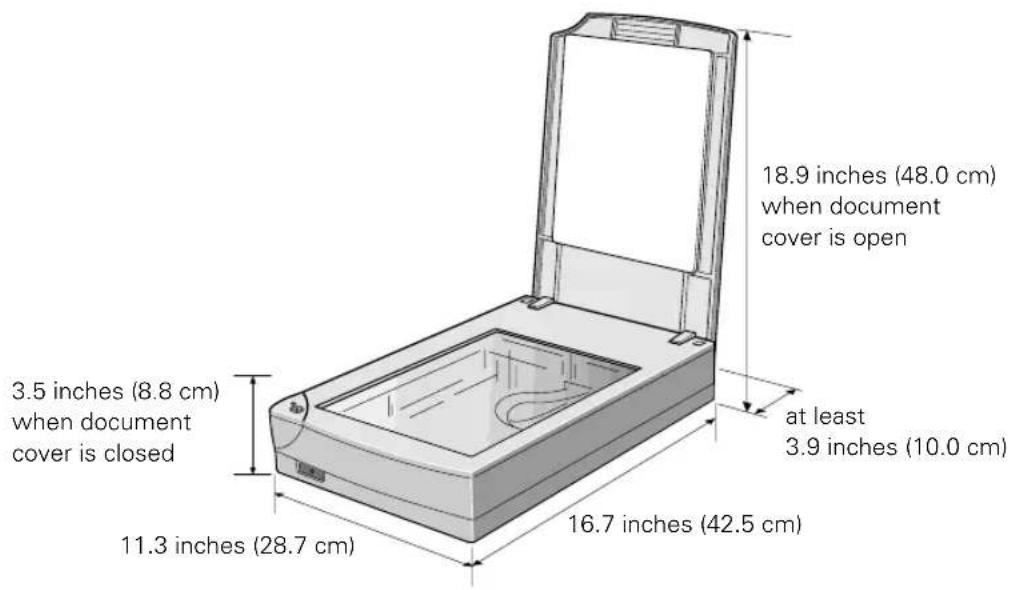
- Be sure there's enough room behind the scanner for the cables, and above the scanner so you can fully raise the document cover.
Unlock the Scanner
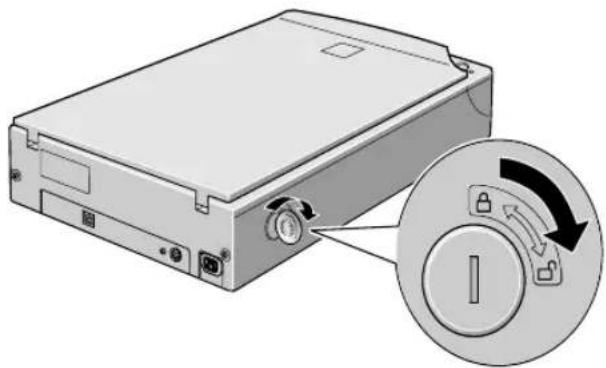
Before connecting the scanner to a power source, you must release the transportation lock, located on the side of the scanner.
Turn the transportation lock down to the unlocked position using a coin or similar object, as shown.
If you can't turn the transportation lock easily, turn the scanner on; then, after the operate light starts flashing red, turn the scanner off and try again.

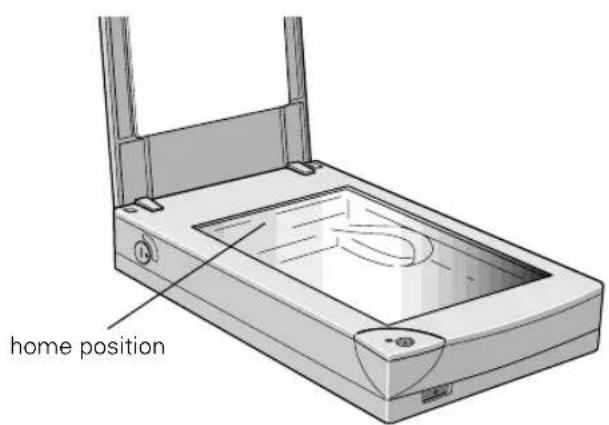
Always lock the scanner carriage before transporting it; otherwise, the scanner may be damaged. Be sure the scanner lamp is in the home position (toward the back of the scanner). To ensure this, always turn off the scanner before locking the carriage.
Connect the Scanner to Your Computer
If you are connecting to a PC, Windows 98 must be preinstalled on your system.
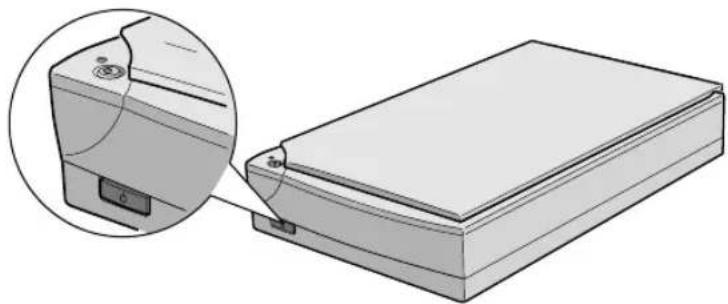
- Make sure the scanner, computer, and any USB devices connected to your computer are turned off. The scanner is off when the ⏻ operate button is up (not pushed down below the surface of the front panel).
-
Locate the USB cable that came with your scanner.
-
Plug the square connector on the USB cable into the USB connector on the back of the scanner. Then plug the flat connector into the USB port on your computer or USB hub.
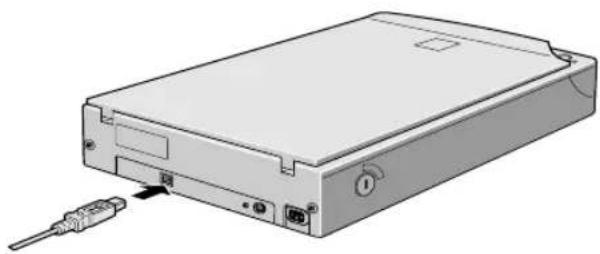

Your system may not work correctly if you use a USB cable other than the one supplied by EPSON or if you connect your scanner through more than one hub.
- Plug in the power cables for your computer, scanner, and other USB devices.
Installing the Optional Equipment
There are two options available for the EPSON Perfection 636U: a transparency unit (B813132) and an auto document feeder (B813142).
This section includes basic information on unpacking and installing the options. For instructions on using the optional equipment, see your electronic EPSON Perfection 636U Reference Guide and EPSON TWAIN User's Guide.
You can purchase these options from EPSON Accessories at (800) 873-7766 or visit our web site at www.epsonsupplies.com (U.S. sales only). In Canada, please call (800) 873-7766 for dealer referral.
Transparency Unit
The transparency unit lets you scan negative or positive film strips and slides on your scanner.
Unpacking the Transparency Unit
Make sure that all the items to the right are included in the transparency unit box. If any items are missing or damaged, contact your EPSON dealer immediately. Keep all the packing materials so you can use them for storage when you are not scanning transparencies.
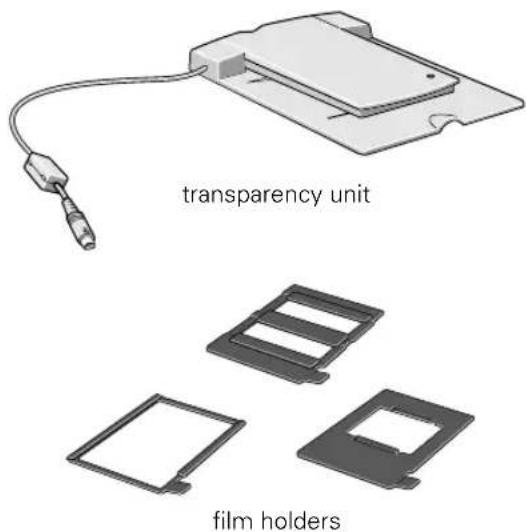
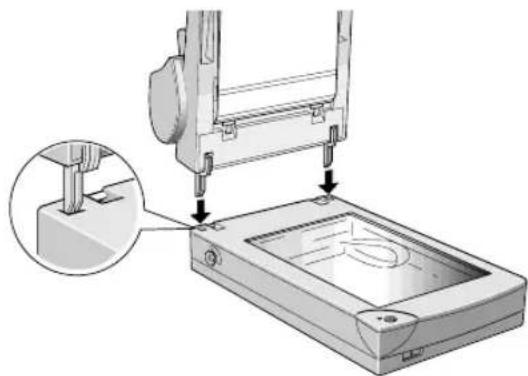
Installing the Transparency Unit
Follow the steps below to install the transparency unit on the scanner.
- Make sure the scanner is turned off.
- Remove the document cover from the scanner by lifting the back straight up.
-
Make sure the document table glass is clean and dust free.
-
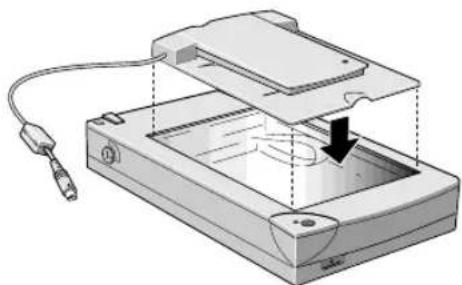
Place the transparency unit on the document table glass so that the hinges face the rear of the scanner and it fits on the document table glass.
-
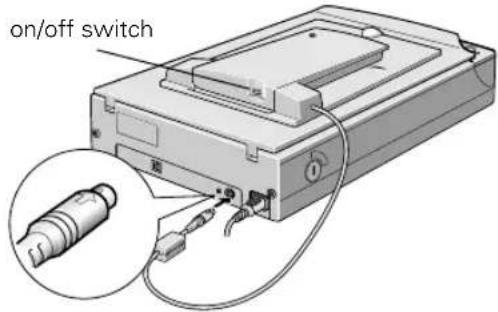
Connect the transparency unit connector (arrow faces up) to the scanner's option interface.
-
Turn on the scanner.
-
Turn on the transparency unit.
For information on loading transparencies and selecting driver settings, see your electronic EPSON Perfection 636U Reference Guide.
Auto Document Feeder
The auto document feeder (B813142) allows you to automatically load single-sided, multi-page documents into your scanner. The document feeder is particularly useful for OCR (optical character recognition) scanning or for creating an image database.
Unpacking the Auto Document Feeder
When you unpack your auto document feeder (ADF), make sure you have all the parts shown to the right. Remove the protective materials from the ADF. Keep all the packing materials so you can use them for storage when you are using the auto document feeder. If any items are missing or damaged, contact your EPSON dealer.
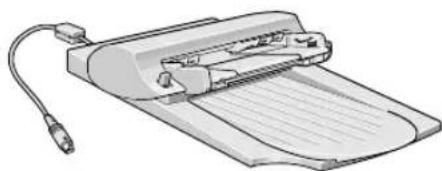
auto document feeder
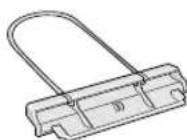
paper support
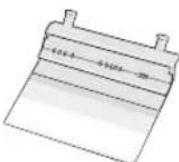
spare paper path guide
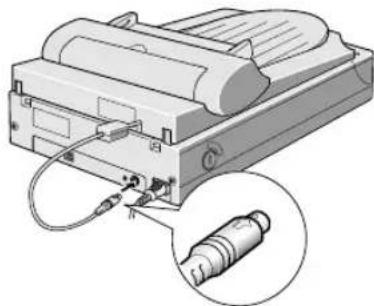
Installing the Auto Document Feeder
-
Make sure your scanner is turned off.
-
Remove your scanner's document cover by lifting the back straight up.
-
Make sure the document table is clean and dust free.
-
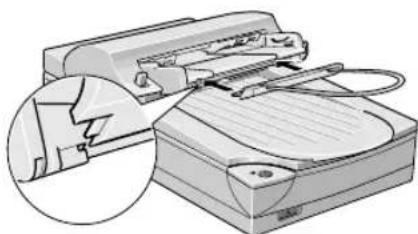
Insert the hinges on the ADF into the outer square holes at the back of the scanner and close the ADF.
-
Attach the ADF's connector (arrow faces up) to the scanner's option interface.
-
Attach the paper support to the ADF.
-
Turn on the scanner.
For information on loading paper in the ADF and selecting driver settings, see your electronic EPSON Perfection 636U Reference Guide.
Power On Your System
Always turn your scanner on before you turn on the computer. Otherwise, the computer may not recognize your EPSON scanner when you install your software.

The operate light on the top of the scanner blinks as the scanner initializes.
Whenever you turn off the scanner, wait at least 10 seconds before turning it back on. Rapidly turning the scanner on and off can damage the scanner.
Install the Scanner Software
The scanner software comes on two CD-ROMs: one for Windows 98 and one for the iMac. Check the CD-ROM label to make sure you have the correct CD-ROM for your operating system.
If You're Running Windows 98 . . .
You may be asked to insert your Windows 98 operating system CD-ROM during the scanner installation. Please have your Windows CD-ROM handy, in case it is needed.
-
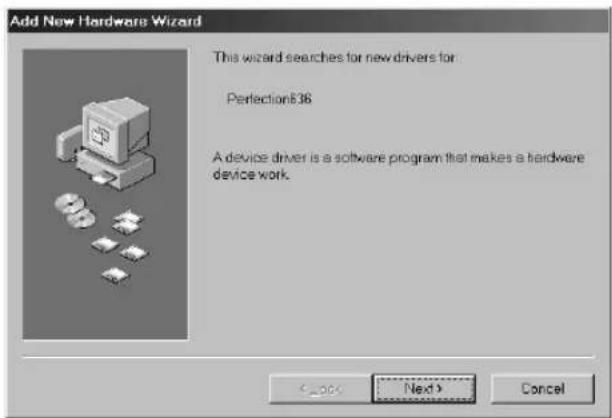
Turn on your scanner first; then turn on your computer. A screen appears saying that your system has detected new hardware. Then the Add New Hardware Wizard screen appears.
-
Insert the scanner software CD-ROM in the CD-ROM drive, then click Next.
-
Select the Search for the best driver for your device option, then click Next.
-
Make sure only the CD-ROM drive check box is selected, then click Next.
-
Click Next to continue with the driver installation.
-
Depending on your system, you may be asked to insert the Windows 98 CD-ROM. After inserting the CD-ROM, click OK. (If necessary, type D:\Win 98, where D is your CD-ROM drive letter, then click OK again.)
![Add New Hardware Wizard What do you want Windows to do? • Search for the best driver for your device [Recommended] • Display a list of all the drivers in a specific location, so you can select the driver you want. < Back Next > Cancel](/content/2026/07/1523692/images/4a82d03d14c2f72317735d1b6413c8dad1b22b1b2f9283af69468a06aa1b7470.jpg)
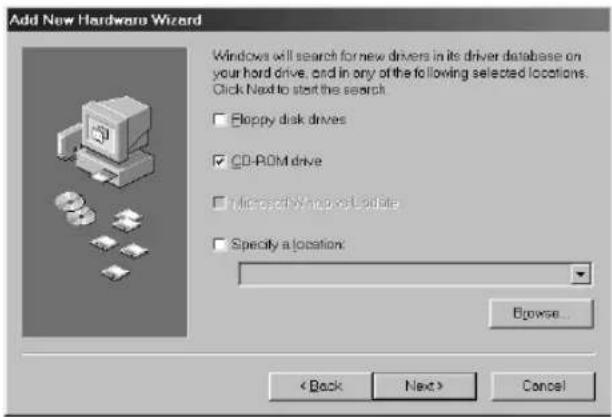
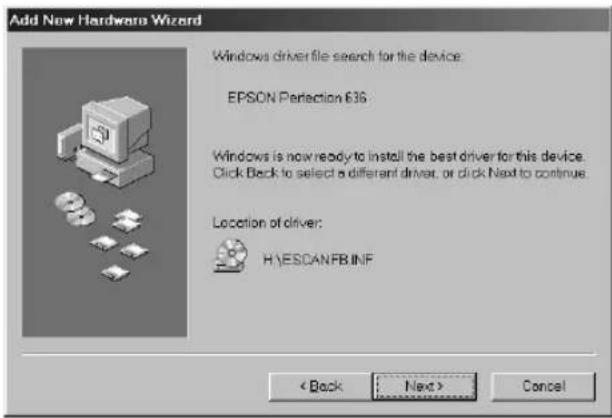
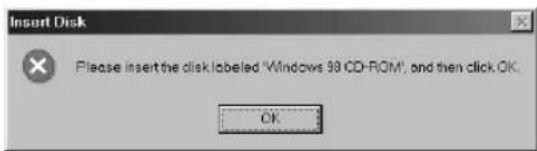
- After the scanner software installation is complete, the EPSON Screen Calibration utility automatically starts. You must calibrate your screen and scanner to reproduce images closely matching the originals.

You don't need to change the screen calibration again so long as you continue to use the same monitor. If you need to recalibrate your screen at a later time, click Scanners and Cameras in the Control Panel. On the Devices tab, select Scanner. Click Properties, then click the Calibration button.
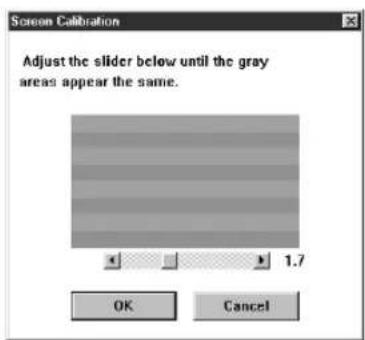
In the following window, move the slider to the right or left until the shades of the horizontal gray stripes appear similar. View the screen from a short distance. The gray stripes will not perfectly blend together; however, try to make the two tones match as closely as possible.
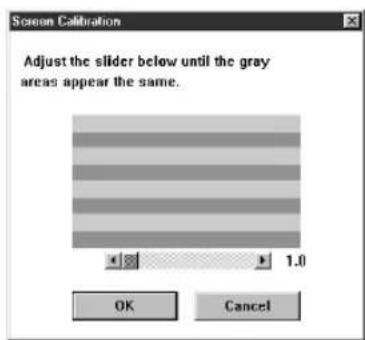
before calibration after calibration
-
Click OK to register the calibration setting.
-
Click Finish to exit the Add New Hardware Wizard.
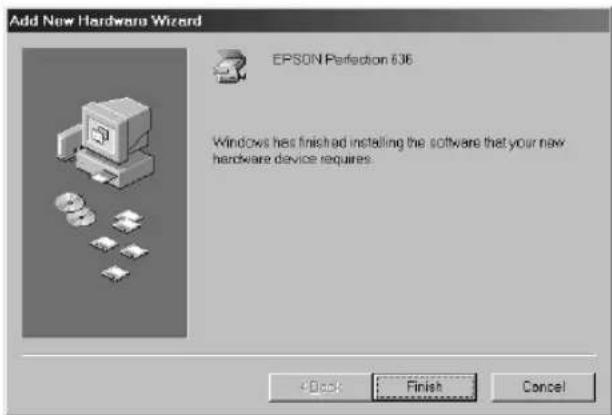

You will find the Scanners and Cameras icon in the Control Panel after EPSON TWAIN is installed.

- Now you can install your creative software and view your electronic manuals as described on page 20.
If You're Using an iMac . . .

If you are using Mac OS 8.1, you need to install the iMac Update before installing the scanner software. This is available online from the Apple web site. If you are using Mac OS 8.5 check the Apple web site for any updates.
- Turn on your scanner first. Then turn on your iMac and turn off any virus protection programs.
If you see the following message, click OK and continue with step 2.

The software needed to use the device "Perfection636" cannot be found. Please refer to the device documentation to install the necessary software.

-
Insert the scanner software CD-ROM in the CD-ROM drive. (If necessary, double-click the EPSON CD-ROM icon to open it.)
-
Double-click the EPSON Installer icon.
-
The EPSON screen and software License Agreement screen appear. After reading the license agreement, click AGREE to continue with the installation.
-
When the Scanner Software Installation screen appears, click Install.
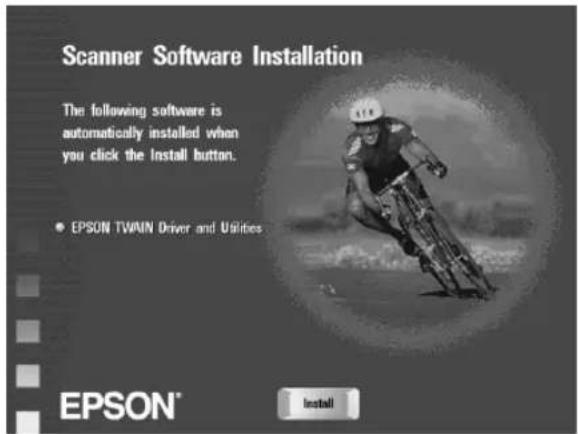
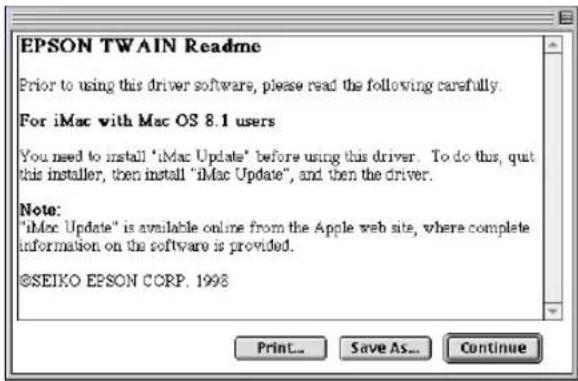
- Before the software is installed, you see the following screen. If you already installed the iMac Update or if you are using Mac OS 8.5, click Continue.
-
When the EPSON TWAIN Installer screen appears, click Install for the default installation.
-
When the scanner software installation is complete, you see this screen:
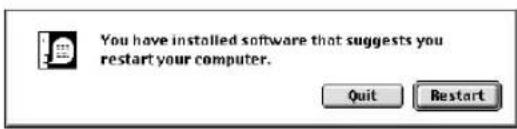
Click Restart. The Screen Calibration utility starts. (Your iMac will not restart until after you calibrate your screen.) You must calibrate your screen and scanner to reproduce images closely matching the originals.
- In the following window, move the slider to the right or left until the shades of the horizontal gray stripes appear similar. View the screen from a short distance. The gray stripes will not perfectly blend together; however, try to make the two tones match as closely as possible.
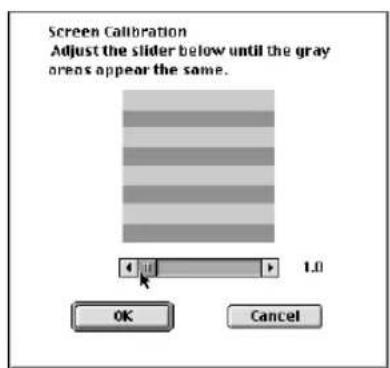
before calibration after calibration
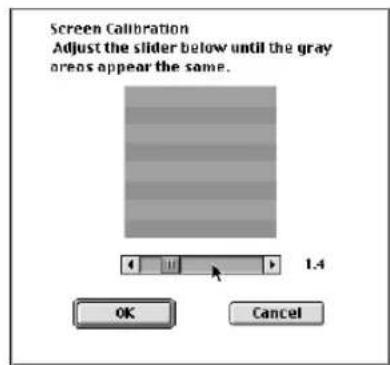
- Click OK to register the calibration setting. Then your iMac automatically restarts.

You will not need to change the screen calibration again as long as you continue to use the same monitor. If you need to recalibrate your screen at a later time, select Screen Calibration in the EPSON Scanner folder.
- Now you can install your creative software and view your electronic manuals as described on page 20.
Install the Creative Software and Electronic Manuals
Before you begin:
-
Check the CD-ROM label to make sure you have the correct CD-ROM for your operating system.
■ Be sure any virus protection programs are turned off. -
Insert the scanner software CD-ROM in your CD-ROM drive.
-
Windows: Click Start, Run, and type D:\EPSON, where D is your CD-ROM drive letter, then click OK.
iMac: Double-click the EPSON CD-ROM icon to open it, if necessary, then double-click the EPSON Installer icon.
The Main Menu appears on your screen.
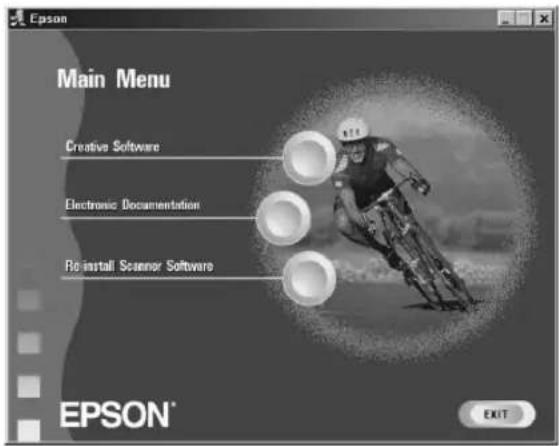
- Click Creative Software. The Creative Software screen appears.
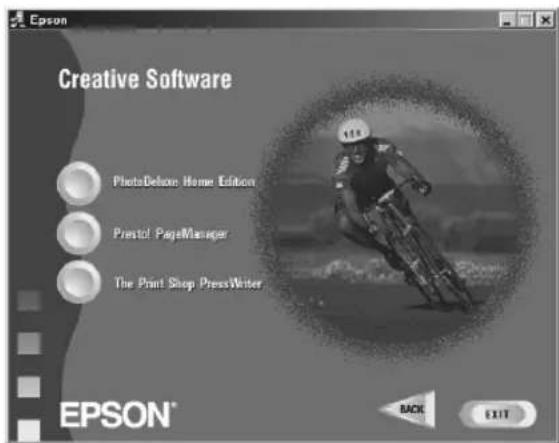
- Click the application name or button for the program you want to install.
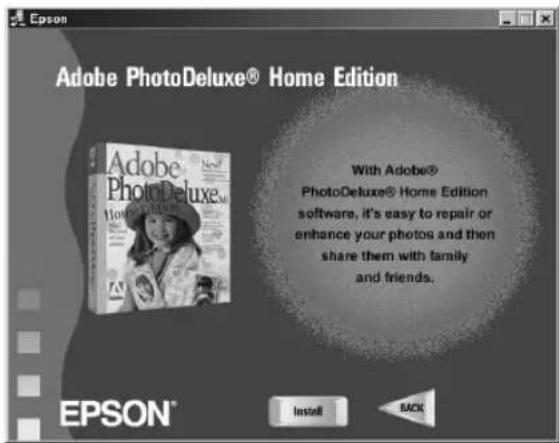
The install screen appears for the application you selected (the example shown is for Adobe PhotoDeluxe Home Edition for Windows).
Click the install button to install the selected software. (You can skip the installation by clicking the BACK button at the bottom of the window.)
-
Some applications include the option to install Adobe Acrobat Reader . If you do not have Acrobat Reader on your system, go ahead and install it so you can read your electronic manuals.
-
If the application requires a restart, go back to step 2 after restarting to install another application. If the application did not require a restart, you return to the Creative Software screen. Select another application to install or click BACK to return to the Main Menu.
-
After you install your applications you can view and install your electronic manuals. At the Main Menu, click Electronic Documentation.
-
On the Electronic Documentation screen, click the name or button of the manual you want to view. If you don't have Adobe Acrobat Reader 3.0 installed, you have the option to install it from the CD-ROM. For more information, see "Viewing Your Electronic Manuals" on page 31.
-
If you install Acrobat Reader on your iMac, you need to restart the computer. To get back to the Main Menu, double-click the EPSON Installer icon.
-
After viewing an electronic manual, close Acrobat Reader and click the Electronic Documentation window to highlight it. You can select another manual to view, click BACK to return to the Main Menu, or click EXIT to quit the installer.

If any of the software you installed requires a restart and you did not restart when you installed the software, you should restart your computer now.
How to Scan
This section gives you an overview of the scanning process and some tips for getting the best scan. It also includes step-by-step scanning instructions.
Preparing to Scan
Scanning an image allows you to reproduce it many times with little or no loss of quality. You can also enlarge, reduce, or change the color of the image without affecting your original.
Scans are always performed from within a host application (the application into which you plan to import the scanned image or document, such as Adobe PhotoDeluxe). You have to start this application before you can access your scanner software. Once you’ve started your application, you need to select the scanner “source” you want to scan with. Your EPSON Perfection 636U scanner comes with the EPSON TWAIN driver. You need to select this driver as the source in your application.
As with most projects, planning ahead can save you time. Scanning is a multi-step process, as shown in the following chart.
![graph TD A["Select an image to scan\nThe type of image you're scanning determines what input setting you select in your software."] --> B["Open your host application\nThis is the software application where you'll import your scanned image."] B --> C["Select your scanner source\nThis is the scanner d…](/content/2026/07/1523692/images/358fef5aaa388641e2fd0910bc5a8c5f7ad6d54c03436afa58ed688a3b526649.jpg)
Selecting Settings
Here is a brief overview of the scanning steps using EPSON TWAIN. When you select EPSON TWAIN 3 as your scanner source, you see the EPSON TWAIN window. The following window is the Advanced window in Windows 98 (the iMac steps are the same); there is also an Easy window with just the basic settings. Detailed steps are given in “Step-by-Step Scanning Instructions” on page 28.
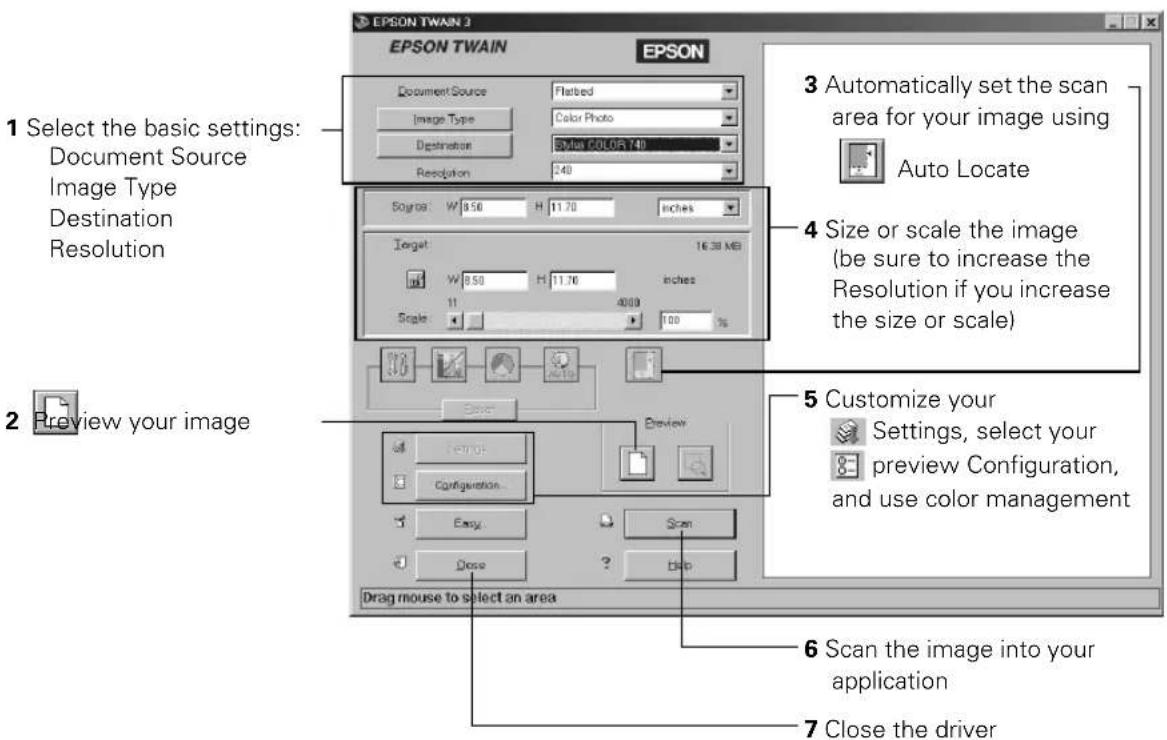
Special scanning features:
■ Batch scanning: select Settings, save several setting groups, and click Batch Scan
■ Color management: select Configuration and click ICM/sRGB (Windows 98) or ColorSync (iMac)
■ Image corrections: use the Image Controls, Color Adjustment, Tone Correction, and Auto Exposure tools. Availability of these tools depends on the Image Type selected. If ICM/sRGB is selected on the Configuration screen, these tools are not available.
For more information, see your electronic EPSON TWAIN User's Guide.
Here are some recommended settings for different types of scans.
| Image type | Recommended application | Recommended Image Type | Scanning resolution for printing1,2 |
| Photograph PhotoDeluxe Color Photo 300 dpi | |||
| Small photograph to be enlarged | PhotoDeluxe Color Photo 300 dpi to 2400 dpi | 3 | |
| Magazine PhotoDeluxe Color Photo 300 dpi | |||
| Newspaper (text only) | PageManager OCR(automatically selects Text Enhancement Technology [TET]) | 400 dpi | |
| Text for OCR Page Manager OCR | (automatically selects Text Enhancement Technology [TET]) | 400 dpi | |
| Text with images PageManager Copy & Fax(automatically selects Auto Area Segmentation [AAS]) | 400 dpi | ||
| Line art PhotoDeluxe Line Art 300 to 2400 dpi | 3 | ||
| 35 mm film (negative) | PhotoDeluxe TPU for neg.Film 300 to 2400 dpi | 3 | |
| 4 x 5 or Brownie film (negative) | PhotoDeluxe TPU for neg.Film 300 to 2400 dpi | 3 | |
| 35 mm slide or 4 x 5 transparency | PhotoDeluxe TPU for pos.Film 300 to 2400 dpi | 3 | |
1 If your final output is for on-screen viewing (for example, on a web page), select 72 dpi for your resolution.
2 If you are enlarging your image, you must manually increase the resolution (dpi) proportionally to maintain the resolution of your original.
3 If you are scanning between 1201 and 2400 dpi, EPSON recommends you keep your scan area to 4 · 11.7 inches to maintain true hardware resolution. Above 2400 dpi, you will be using software interpolation to increase the resolution.

PressWriter for iMac does not have a TWAIN scan function, but you can import a scanned image from another application using the Object, Import Image function.
Tips for Getting the Best Scan
Getting the best scan possible depends on several factors, including the quality of your original and the resolution you select. The better your original is, the better your scan will be. While you can make some corrections in your scanning software, you'll need to do major photo retouching in a program such as Adobe PhotoDeluxe to correct or mask problems such as a coffee stain on the original image.
Selecting Resolution
Resolution refers to how many dots per inch (dpi) or dots per centimeter (dpcm) your image contains. The best resolution for a scanned image depends on the type of image you're scanning and your final output device.
As a rule of thumb for most images except line art, use a scanning resolution that is approximately one third of your output resolution. For example, use a scanning resolution up to 100 dpi with a 300 dpi laser printer, and up to 200 dpi with a 600 dpi laser printer. For 1440 dpi ink jet printers, such as the EPSON Stylus® COLOR or Photo series, use a scanning resolution of approximately 300 dpi. Try a scanning resolution of 240 dpi for 720 dpi printing.
Keep the following in mind when you choose a resolution:
■ The higher a resolution you select, the larger the resulting image file will be. For example, an 8.5 · 11-inch original scanned at 300 dpi can produce a 24MB file. The same original scanned at 72 dpi creates only a 1.3MB file. Large files take longer to process and print, so consider the practical limitations of your computer system and hard disk drive when selecting a resolution. To keep your file size manageable, select the lowest possible resolution that gives acceptable quality. If your final output is for on-screen viewing, you can scan at 72 dpi and reduce your file size.
- If you need to scan at a higher resolution, you can reduce the size of the resulting image file by scanning only part of the image. For information about selecting part of an image, see “Using Marquees” in your electronic EPSON TWAIN User’s Guide.
The EPSON Perfection 636U's maximum hardware resolution of 600 · 2400 dpi is achieved through EPSON's advanced Micro Step Drive technology. This technology enables the EPSON Perfection 636U to achieve a maximum sub-scan or vertical resolution of 1200 dpi or 2400 dpi using “half-stepping” and “quarter-stepping” of the scanning carriage to double and quadruple the optical resolution. To prevent enormous file sizes when scanning at the maximum hardware resolution, EPSON recommends a maximum scan window of 4 · 11.7 inches. Full 8.5 · 11.7 inch scanning is available at a sub-scan resolution of 1200 dpi or 9600 dpi interpolated.
Scaling (Resizing) Images
If you plan to enlarge your image, it is better to enlarge it when you're scanning rather than in your application. Each time you modify an image, you lose some quality.
Keep in mind when you enlarge a small photo, such as a 35 mm slide or wallet-size photo, you'll need to scan at a high enough resolution to retain your image quality, but not so high that your file size is too large to be efficient.
You must manually adjust the resolution (dpi) to maintain the same image quality when you resize your image. For example, if you have a 300 dpi 2 · 2-inch image that you want to enlarge to 4 · 4 (a factor of 200%), increase the Scale setting to 200% and change the resolution to 600 dpi.
One-Touch Scanning
Your EPSON Perfection 636U features a one-touch scanning button. With one-touch scanning, you can just load a document in the scanner, press the scanner's ◆Start button, and then PageManager opens EPSON TWAIN automatically. To use this option, you must first install Presto! PageManager (or another application that supports linking to scanner events with the Start button on Windows 98) and enable the scanner monitor utility. For details on how to set up one-touch scanning, see “Using the Start Button” in your EPSON TWAIN User’s Guide.
Batch Scanning
You can use batch scanning to save time. Batch scanning lets you scan the same image with several different settings. See “Batch Scanning” in your EPSON TWAIN User's Guide for details.
Step-by-Step Scanning Instructions
This section contains step-by-step instructions for using the scanner drivers and creative software in Windows 98 and iMac. For more details on using the scanner software, see the EPSON TWAIN User's Guide on your CD-ROM. For instructions on using the creative software, see your application's electronic manual ("Viewing Your Electronic Manuals" on page 31) or online help.

If your computer fails to recognize the scanner, you won't see the EPSON TWAIN driver when you try to select a scanner source from your host application. In addition, an error message may appear. If this happens, turn off your scanner and then turn it back on. Then restart the computer.
Do not connect or disconnect the USB cable while you are using EPSON TWAIN.
Placing Your Original Document
-
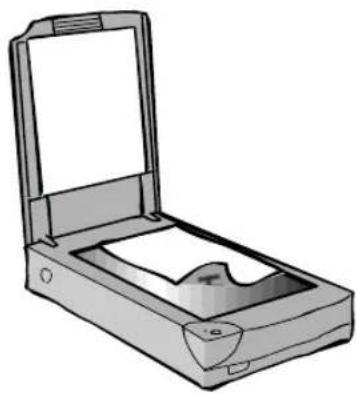
Raise the scanner cover and place your document face down on the document table glass. If you're scanning a transparency, the optional transparency unit should be installed and turned on.
-
Position the document so the horizontal and vertical edges are carefully aligned with the scales on the top and right side of the document table.
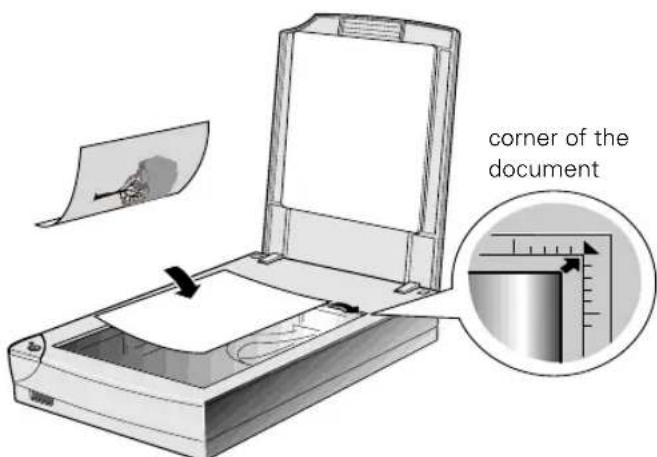
- Close the document cover slowly. Be careful not to move the document.

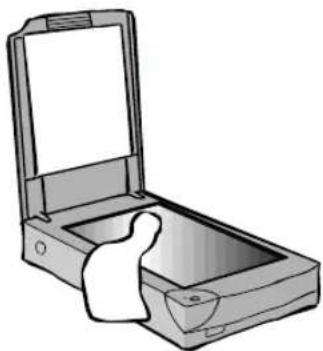
The self-adjusting scanner cover allows you to place thick documents on the document table glass without removing the cover. But if your document is too thick to fit under the cover, you can remove the cover as described on page 33.
Scanning Photographs with Adobe PhotoDeluxe and EPSON TWAIN
This example explains how to scan a photograph using the EPSON TWAIN scanner driver and Adobe PhotoDeluxe. For more information on how to use EPSON TWAIN or Adobe PhotoDeluxe, see their electronic user's guides.
- Turn on your scanner, then turn on your computer. Position your document on the scanner's document table and close the document cover.
- Start Adobe PhotoDeluxe.
- Select your scanner source. (Unless you change your source, you can skip this step the next time you open Adobe PhotoDeluxe.)
Windows:
a. Click the Get & Fix Photo button; then click Get Photo.
b. Select Scanners.
c. Click the 1 Scanners tab.
d. Click Choose Scanner.
e. In the Select Input Source window, select EPSON TWAIN 3(32-bit). Then click OK.
f. Click the Done tab.
iMac:
a. Choose the Get Photo button, then click the Get Photo tab at the top of the screen.
b. Click the Snappers allow at the bottom of the Scanners button. In the Select Input Source window, highlight EPSON TWAIN 3U and click OK.
- Open the scanner software (EPSON TWAIN).
Windows:
a. Click the Get & Fix Photo button; then click Get Photo.
b. Select Scanners.
c. Click the 1 Scanners tab.
d. Click Choose Scanner.
e. Click the 2 Mode tab, then click the Custom icon. The EPSON TWAIN main window opens.
iMac:
Click the icon at the top of the Scanners button on the toolbar. The EPSON TWAIN main window opens.
- Make the appropriate selections for your scan. (If you're scanning a positive transparency, such as a 35 mm slide, select TPU for pos. Film in the Image Type box. If you're scanning a negative transparency, such as 35 mm film, select TPU for neg. Film in the Image Type box.
- Click the Preview icon to preview your scan. You see a preview of your scan in the preview area on the right side of your screen.
- Make the changes you want to adjust the image, then click the Scan button to scan your image.
The operate light on the top of the scanner blinks for several seconds while it's scanning. In a few moments, the scanned image is imported into Adobe PhotoDeluxe. (On the iMac, you see a dialog box that lets you name your file and add it to an EasyPhoto gallery, or save it to a folder on your hard disk.) You must close EPSON TWAIN to view the application window.
If the operate light continues to blink, it may indicate an error condition. See “Scanner operate light” on page 37 for more information.

Don't leave documents, especially photographs, on the document table for long periods of time. They may stick to the glass or deteriorate from the warmth of the scanner.

Viewing Your Electronic Manuals
You always have easy access to your electronic manuals—just go to the Main Menu screen on your scanner software CD-ROM and click the Electronic Documentation button. If you already have Adobe Acrobat Reader 3.0 on your system, the manual opens in Acrobat Reader automatically. If you don’t have Acrobat Reader, it is automatically installed from the CD-ROM and then the manual you selected opens.
Your scanner software CD-ROM includes the following manuals:
■ EPSON Perfection 636U Reference Guide (636Uref.pdf)
■ EPSON TWAIN User's Guide (636Utwain.pdf)
- Adobe PhotoDeluxe Home Edition User's Guide (Windows, PhotoDeluxe.pdf) or Adobe PhotoDeluxe 2.0 User's Guide (iMac, PhotoDeluxe.pdf)
■ NewSoft Presto! PageManager User's Guide (PageManager.pdf)
■ Br øderbund The Print Shop PressWriter User's Guide (PressWriter.pdf)
For guidelines on viewing your electronic manuals using Acrobat Reader, see "Navigating a Manual" on the next page.
Copying a Manual to Your Hard Drive
If you prefer to view the electronic manuals from your hard drive instead of the CD-ROM, you can copy them from the Manuals folder on the CD-ROM. The file names are listed above.

The manuals for some software applications are automatically copied to your hard drive when you install the software. You can access these manuals by clicking Start, Programs, the program name, then the manual name.
Navigating a Manual
When you open an electronic manual, you'll see this toolbar:
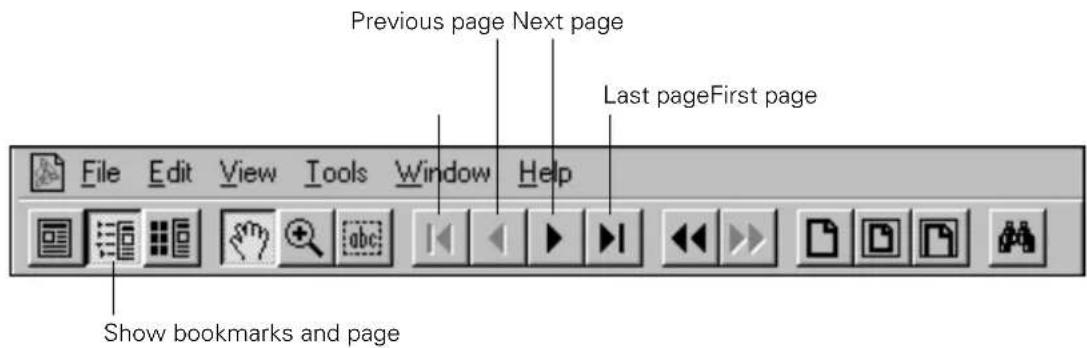
With Acrobat Reader, you have several ways to navigate through text:
- Click on hot topics, which are usually underlined or displayed in a different color. To find out if a topic is hot, move your cursor over it. If the cursor turns into a pointing hand, the topic is hot—you can jump to it by clicking once.
■ Use the bookmark section on the left side of the screen to move quickly to the topic of your choice. Click the Show Bookmarks icon on the toolbar to see the bookmark section, if the manual has bookmarks. Some manuals only have a table of contents, but you can also use this to navigate the manual if the topics are hot.
■ Use the arrow buttons in the toolbar or the vertical scroll bar on the right side of the document to move through a manual. (The box to the left of the scroll bar displays the current page number.)
For more information, see your Acrobat Reader online guide.
Scanner Maintenance
This section gives you basic maintenance instructions and tells you how to transport your scanner safely.
Scanning Something That Doesn't Fit Under the Document Cover
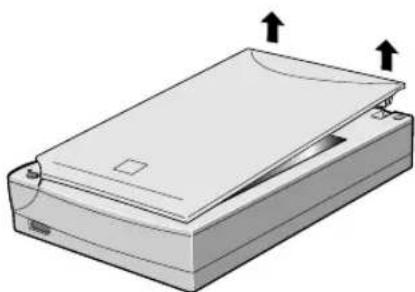
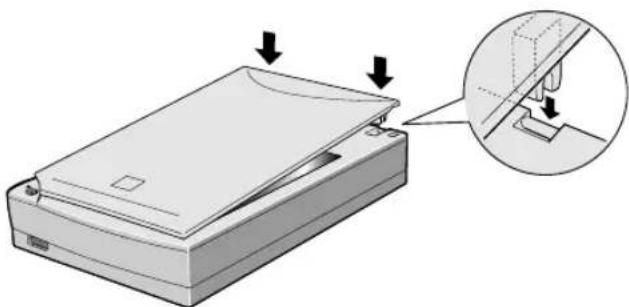
The self-adjusting scanner cover allows you to place thick documents on the document table glass without removing the cover. If your document is too thick to fit under the cover—such as a photo in an album—you can remove the document cover. To do this, simply lift the back of the document cover straight up.
When scanning with the cover removed, make sure no area of the document table is exposed. This prevents interference from external light.
When reattaching the document cover, be sure to hold the cover so the hinges are in a vertical position. Then push straight down until the cover clicks into place.
Transporting the Scanner
When you transport the scanner a long distance or store it for an extended time, follow the steps below to secure the carriage.
- Remove any optional equipment and replace the document cover.
- Turn on the scanner and wait until the carriage moves to the home position (toward the back of the scanner). Then turn off the scanner.
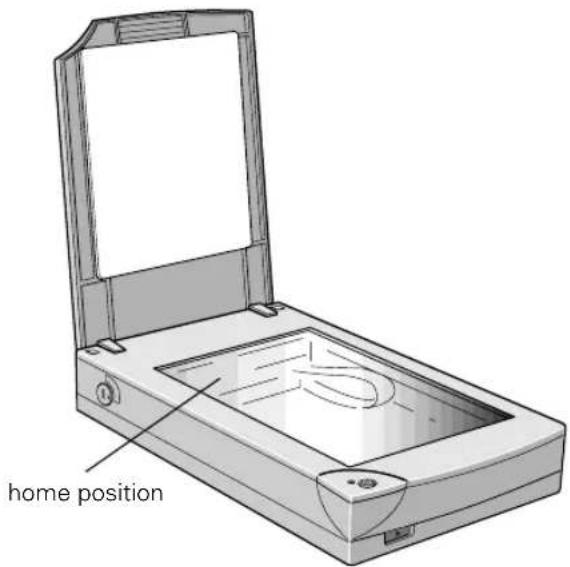

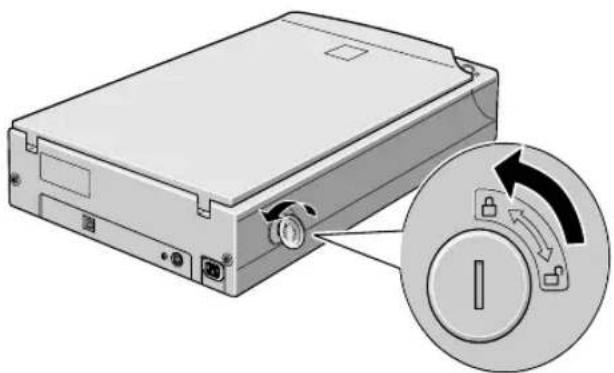
If the carriage does not automatically return to the home position, slowly raise the front of the scanner and hold it up until the carriage comes to rest in the home position. Then turn the transportation lock to the locked position.
If you are using the transparency unit and it is switched on, the carriage will not move to the home position. Remove the transparency unit first, then perform the steps above.
- Use a coin or screwdriver to turn the transportation lock to the locked position (toward the top of the scanner).
Cleaning the Scanner
To keep your scanner operating at its best, you should clean it periodically. Before cleaning, unplug the power cord.
Use a soft cloth to clean the outer case with mild detergent dissolved in water.
If the document table glass gets dirty, clean it with a soft, dry cloth. If the glass is stained with grease or other hard-to-remove material, use a small amount of glass cleaner on a soft cloth to remove it. Wipe off any remaining liquid with a dry cloth.
Be sure there's no dust on your document table. Dust can cause white spots to appear in your scanned image.

Never use a harsh or abrasive brush or cleaning product to clean the document table. A damaged glass surface can decrease the scanning quality.
Never use alcohol, thinner, or corrosive solvent to clean the scanner. These chemicals can damage the scanner components as well as the case.
Be careful not to spill liquid into the scanner mechanism or electronic components. This could permanently damage them.
Don't spray lubricants inside the scanner.
Never open the scanner case. If you think repairs or adjustments are necessary, consult your dealer or contact EPSON.

Problems? Need Help?
This chapter identifies the scanner parts including its light and buttons, and gives you the basics for diagnosing and solving scanner problems. For solutions to common setup and software problems, see “Problems and Solutions” on page 38.
For more troubleshooting tips, see the “Troubleshooting” sections of your electronic EPSON TWAIN User’s Guide and EPSON Perfection 636U Reference Guide.
Identifying Scanner Parts
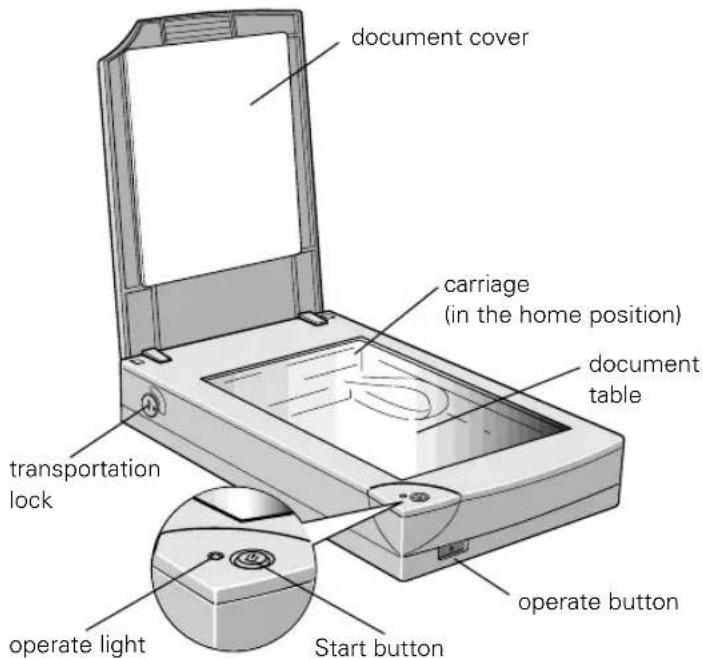
Here are the parts of your scanner:
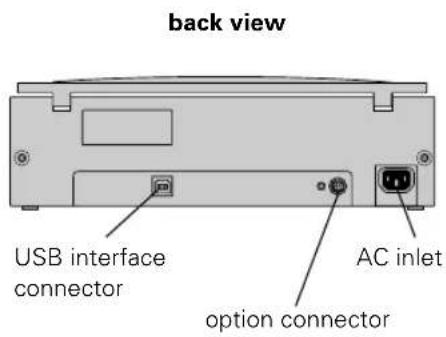
Light and Buttons
The scanner has one light and two buttons. The tables below provide details about the light status and button functions.
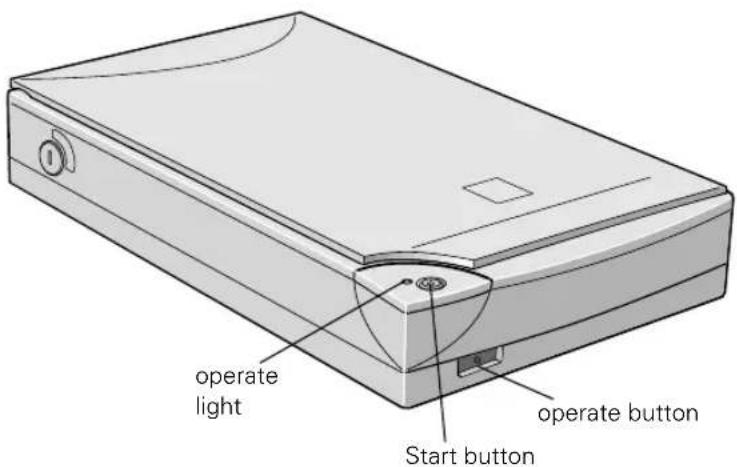
Scanner operate light
| Light status | Color Scanner status |
| Ö (slowly flashing) Green | Initializing or busy scanning |
| ○ | Green Ready to scan images |
| Ö (rapidly flashing) Red | The scanner is locked. Turn off the scanner, unlock the transportation lock, then turn the scanner on. |
| ● | N/A The scanner is turned off |
= on, = off, = flashing
Scanner buttons
| Button Function | |
| Operate | Turns the scanner on and off. |
| Start | Lets you scan directly to an application with one touch. You must set up the scanner monitor and a compatible application to use this button. See your EPSON TWAIN User's Guide for more information. |
Problems and Solutions
If you're having problems, this section answers some of the most common questions.
Setup Problems
If your system doesn't recognize the scanner ...
■ Make sure your scanner is turned on. If you opened your host application before you turned on your scanner, close your application and reopen it.
■ Check the USB cable connection or try using another USB cable.
■ If you get the message, “No push button scanner found,” turn off your scanner, shut down your computer, turn on your scanner, and then turn on your computer.
Scanner Problems
If the operate light doesn't come on or blinks slowly . . .
Check the scanner power cord. Make sure the power cord is securely plugged into the power outlet, and that the scanner is turned on. Also, check that the power outlet is working and provides sufficient power for the scanner.
If the scanner doesn't scan your image ...
■ Check your scanner source setting. Make sure you selected EPSON TWAIN 3(32-bit) (Windows 98) or EPSON TWAIN 3U (iMac).
If you see the message “Scanner Not Ready” (Windows 98) or “Cannot find the scanner on the bus” (iMac)” ...
■ Make sure the scanner is turned on. You may need to restart your computer after turning on your scanner.
■ Make sure your scanner cable is securely connected. Then open and close the scanner monitoring utility to manually check for the scanner (see “Enabling Scanner Monitoring” in your EPSON TWAIN User’s Guide). If you still see the message, turn off your scanner, then turn it on again, and restart your system.
■ To turn off scanner monitoring, see “Enabling Scanner Monitoring” in your EPSON TWAIN User’s Guide.
If you're having trouble scanning while using the optional equipment...
- Make sure the option is correctly installed and connected to the scanner's option interface.
■ Make sure you select the correct Document Source setting (Auto Document Feeder (ADF), TPU for neg. Film, TPU for pos. Film) for the option and your image.
■ Make sure the unit is completely closed. - If you're using the transparency unit, make sure it is turned on.
Software Problems
If you can't open the EPSON TWAIN driver . . .
- Check the USB cable connection. Also, make sure the scanner's operate light is on. The scanner must be turned on before you start your computer. If necessary, turn on the scanner and restart your computer.
■ Check that your system recognizes your scanner. Check System Device Manager in the Windows Control Panel.
■ Check your scanner source setting. Make sure you selected EPSON TWAIN 3(32-bit) (Windows 98) or EPSON TWAIN 3U (iMac).
If the scanner software doesn't work properly . . .
■ Make sure your computer meets the system requirements listed on pages 4 and 5, and supports any software applications you are using.
- Check your computer's memory. See if the computer has enough memory for your software. If you're running other software at the same time, using RAM resident programs, or have many device drivers, the computer may not have enough memory. (See your software and computer manuals.) If you are scanning a large image or scanning at a high resolution, your computer may not have enough memory to process the image.
- Check your software installation. Make sure that your software is correctly installed and set up. If all else fails, uninstall your software, then reinstall it.
If you need to reinstall your scanner software ...
Note: If you are using an iMac, you must uninstall EPSON TWAIN before reinstalling it. See page 40 for instructions.
-
Insert your scanner CD-ROM in your CD-ROM drive.
-
Windows: Click Start and Run. At the prompt, type D:\EPSON (where D is your CD-ROM drive letter); then click OK.
iMac: Double-click the EPSON Installer icon.
-
On the Main Menu, select Re-install Scanner Software.
-
On the Re-install screen, click the Re-install button.
-
Windows: When the reinstallation is complete, click OK to restart your computer.
iMac: Click Yes at the “Are you sure . . . ?” screen. Then follow steps 6 through 9 below.
-
iMac: Read the next screen, then click INSTALL.
-
iMac: At the EPSON TWAIN Readme screen, click Continue if you installed the iMac Update or if you are using Mac OS 8.5.
-
iMac: On the TWAIN Installer screen, make sure Easy Install is selected for the default installation, then click Install.
-
iMac: After the installation is complete, click Restart. If necessary, recalibrate your screen. Then your iMac automatically restarts.
Uninstalling the Scanner Software on an iMac:
a. Follow steps 1 through 7 above.
b. On the TWAIN Installer screen, click the arrow in the list showing Easy Install, and select Remove. Then click the Remove button at the bottom of the screen.
c. Click OK at "The remove was successful screen."
d. Reinstall your software following steps 1 through 9 above.
Scanning Problems

If the file size is too big . . .
Adjust your scan settings. Try selecting a lower resolution (dpi), or scan only part of the image.

If your scanned image is faint or has gaps . . .
- Check the brightness. Decrease the software or driver's brightness setting.
■ Try adjusting the Gamma setting.
■ Check the condition of your original. If the document is damaged, dirty, or wrinkled, these imperfections will show up in your scan.

If your scanned image is blurred or distorted . . .
- Check the position and condition of your document. Make sure the document is placed flat against the scanner's document table glass. If only part of the image is blurred, part of your document may be wrinkled or warped.
■ Make sure the document table glass is clean.

If the edges of the document are not scanned . . .
Check the position of your source document. Adjust your document's position so that the image is within the glass area.

If your image scans at an angle . . .
Check the position of your source document. It may be placed at an angle on the document table. Align it so the horizontal and vertical edges are carefully aligned with the scales on the top and side of the document table.
Where To Get Help
EPSON Technical Support
EPSON provides technical assistance through electronic support services and automated telephone services 24 hours a day. The following tables list the contact information:
Electronic support services
| Service Access | |
| World Wide Web From | the Internet, you can reach EPSON’s Home Page at http://www.epson.com. |
| EPSON Internet FTP Site | If you have Internet FTP capability, use your Web browser (or other software for FTP downloading) to log onto ftp.epson.com with the user name anonymous and your e-mail address as the password. |
| EPSON Forum on CompuServe® | Members of CompuServe can type GO EPSON at the menu prompt to reach the Epson America Forum. For a free introductory CompuServe membership, call (800) 848-8199 and ask for representative #529. |
Automated telephone services
| Service Access | |
| EPSON SoundAdviceSM | For pre-recorded answers to commonly asked questions about EPSON products 24 hours a day, seven days a week, call (800) 922-8911. |
| EPSON FaxAdviceTM | Access EPSON's technical information library by calling (800) 922-8911. You must provide a return fax number to use this service. |
| EPSON Referral Service | For the location of your nearest Authorized EPSON Reseller or Customer Care Center, call (800) 922-8911. |
To speak to a technical support representative, dial (310) 974-1970 (U.S.) or (905) 709-3839 (Canada), 6 AM to 6 PM, Pacific Time, Monday through Friday. Toll or long distance charges may apply.
Before you call, please have the following information ready:
■ Product name (EPSON Perfection 636U)
■ Product serial number (located on the back of the scanner)
■ Computer configuration
■ Description of the problem
You can purchase genuine EPSON supplies and accessories from EPSON Accessories at (800) 873-7766 or visit our web site at www.epsonsupplies.com (U.S. sales only). In Canada, please call (800) 873-7766 for dealer referral.

If you need help using another manufacturer's software with an EPSON product, see the documentation for that software for technical support information.
Software Technical Support
| Software Telephone Fax Online and E-mail | |||
| EPSON TWAIN driver | US:(310) 974-1970 Canada:(905) 709-3839 | (800) 922-8911 fax-on-demand system | www.epson.com |
| Adobe PhotoDeluxe | (206) 675-6371 (206) 675-6137 fax-on-demand system | www.adobe.com/prodindex/photodeluxe.gethelp.html techdocs@adobe.com | |
| NewSoft Presto! PageManager | (510) 445-8616 (510) 445-8601 www | newsoftinc.com | |
| Broderbund The Print Shop PressWriter | (423) 670-2032 (423) 670-2021 www | broderbund.com/support | |
Index
A
Accessories, 11, 44
Adobe Acrobat Reader, using, 32
Auto document feeder, 12 to 13
B
Blurred image, 41
Buttons, 37
C
Cleaning the scanner, 35
Connecting the scanner to your computer, 10
D
Document cover, removing, 33
Document position, 28, 42
Documentation, how to use, 3, 31 to 32
Driver, selecting, 24 to 25
E
EPSON
Accessories, 11, 44
help, 43 to 44
F
File size, 40
H
Help
EPSON, 43 to 44
software, 44
Home position, 9, 34
I
Image quality problems, 40 to 42
Installing
creative software and electronic manuals, 20 to 21
scanner software, 14 to 19
L
Light, scanner, 37, 38
Lock, transportation, 9
M
Macintosh
installing software, 17 to 21
screen calibration, 18
system requirements, 5
Maintenance, 35
Manuals, viewing electronic, 31 to 32
Moving the scanner, 34
O
One-touch scanning, 27
Operate
button, 37
light, 37, 38
Options
auto document feeder, 12 to 13
purchasing, 11
transparency unit, 11 to 12
P
Paper support, 13
Photographs, scanning, 25, 29 to 30
Power-on sequence, 14
R
Recommended settings, 25
Removing document cover, 33
Resizing images, 27
Resolution, choosing, 25, 26
S
Safety instructions, 6
Scaling images, 27
Scanning, 22 to 30
Screen calibration
Macintosh, 18
Windows 98, 16
Selecting a driver, 24 to 25
Service, 43 to 44
Settings, software, 25
Setup problems, 38
Software installation
Macintosh, 17 to 21
Windows, 14 to 17, 20 to 21
Software problems, 39
Software settings, 25
Space requirements, 8
Start button, 27, 37
Support, 43 to 44
System requirements, 4 to 5
T
Technical support, 43 to 44
Text Enhancement Technology (TET), 2
Text, scanning, 25
Thick documents, 33
Transparency unit, 11 to 12
Transparency, scanning, 25
Transportation lock, 9, 37
Transporting the scanner, 34
Troubleshooting
image quality, 40 to 42
scanner, 38
setup, 38
software, 39
U
Unlocking the scanner, 9
Unpacking the scanner, 7
USB, 4, 5
V
Viewing electronic manuals, 31 to 32
W
Windows
installing software, 14 to 17, 20 to 21
screen calibration, 16
system requirements, 4
World Wide Web, 43, 44
Y
Year 2000, 5

- SCANNER BASICS
- COPYRIGHT NOTICE
- A NOTE CONCERNING RESPONSIBLE USE OF COPYRIGHTED MATERIALS
- TRADEMARKS
- FCC COMPLIANCE STATEMENT
- FOR UNITED STATES USERS
- WARNING
- FOR CANADIAN USERS
- SETTING UP YOUR SCANNER
- HOW TO SCAN
- VIEWING YOUR ELECTRONIC MANUALS
- SCANNER MAINTENANCE
- PROBLEMS? NEED HELP
- INDEX
- A COMPLETE SCANNING SOLUTION
- ABOUT YOUR SCANNER
- ABOUT YOUR SOFTWARE
- EPSON®
- EPSON TWAIN DRIVER
- ADOBE ® PHOTODELUXE ® HOME EDITION 3.0 (WINDOWS ® ) OR ADOBE PHOTODELUXE VERSION 2.0 (IMAC TM )
- BRØDERBUND®
- BRODERBUND ® THE PRINT SHOP ® PRESSWRITER ™
- NEWSOFT TM PRESTO! TM PAGEMANAGER FOR EPSON
- ABOUT YOUR DOCUMENTATION
- CAUTIONS, NOTES, AND TIPS
- SYSTEM REQUIREMENTS
- WINDOWS
- IMAC
- YEAR 2000 READY
- IMPORTANT SAFETY INSTRUCTIONS
- UNPACK YOUR SCANNER
- CHOOSE A GOOD PLACE FOR YOUR SCANNER
- UNLOCK THE SCANNER
- CONNECT THE SCANNER TO YOUR COMPUTER
- INSTALLING THE OPTIONAL EQUIPMENT
- TRANSPARENCY UNIT
- UNPACKING THE TRANSPARENCY UNIT
- INSTALLING THE TRANSPARENCY UNIT
- AUTO DOCUMENT FEEDER
- UNPACKING THE AUTO DOCUMENT FEEDER
- INSTALLING THE AUTO DOCUMENT FEEDER
- POWER ON YOUR SYSTEM
- INSTALL THE SCANNER SOFTWARE
- IF YOU'RE RUNNING WINDOWS
- IF YOU'RE USING AN IMAC
- INSTALL THE CREATIVE SOFTWARE AND ELECTRONIC MANUALS
- PREPARING TO SCAN
- SELECTING SETTINGS
- TIPS FOR GETTING THE BEST SCAN
- SELECTING RESOLUTION
- SCALING (RESIZING) IMAGES
- ONE-TOUCH SCANNING
- BATCH SCANNING
- STEP-BY-STEP SCANNING INSTRUCTIONS
- PLACING YOUR ORIGINAL DOCUMENT
- SCANNING PHOTOGRAPHS WITH ADOBE PHOTODELUXE AND EPSON TWAIN
- COPYING A MANUAL TO YOUR HARD DRIVE
- NAVIGATING A MANUAL
- SCANNING SOMETHING THAT DOESN'T FIT UNDER THE DOCUMENT COVER
- TRANSPORTING THE SCANNER
- CLEANING THE SCANNER
- IDENTIFYING SCANNER PARTS
- LIGHT AND BUTTONS
- PROBLEMS AND SOLUTIONS
- SETUP PROBLEMS
- SCANNER PROBLEMS
- IF YOU'RE HAVING TROUBLE SCANNING WHILE USING THE OPTIONAL EQUIPMENT
- SOFTWARE PROBLEMS
- IF YOU CAN'T OPEN THE EPSON TWAIN DRIVER
- IF THE SCANNER SOFTWARE DOESN'T WORK PROPERLY
- IF YOU NEED TO REINSTALL YOUR SCANNER SOFTWARE
- SCANNING PROBLEMS
- IF THE FILE SIZE IS TOO BIG
- IF YOUR SCANNED IMAGE IS FAINT OR HAS GAPS
- IF YOUR SCANNED IMAGE IS BLURRED OR DISTORTED
- IF THE EDGES OF THE DOCUMENT ARE NOT SCANNED
- IF YOUR IMAGE SCANS AT AN ANGLE
- WHERE TO GET HELP
- EPSON TECHNICAL SUPPORT
- SOFTWARE TECHNICAL SUPPORT
- A
- B
- C
- D
- E
- F
- H
- I
- L
- M
- O
- P
- R
- S
- T
- U
- V
- W
- Y
Brand : EPSON
Model : Perfection 636U
Category : Scanner