Conga Animal X - Robot vacuum CECOTEC - Free user manual and instructions
Find the device manual for free Conga Animal X CECOTEC in PDF.


| Product Type | Vacuum and mop robot with mopping function |
| Reference | 08604 |
| Power supply | Charger 19 V DC 0.6 A, Li-ion battery 14.4 V 2000 mAh |
| Estimated autonomy | Approximately 90 minutes |
| Charging time | Approximately 4-6 hours (full charge) |
| Cleaning modes | Auto, Random, Spiral, Edge, Manual, Floor cleaning |
| Suction levels | 2 (Eco and Normal) |
| Water levels | 2 (Low and High) |
| Dust tank | Estimated capacity 0.5 L |
| Water tank | Estimated capacity 0.3 L |
| Filters | High-efficiency filter, primary mesh filter, sponge filter, cotton filter |
| Brushes | 2 side brushes, 1 main brush |
| Sensors | Anti-drop, proximity, anti-collision, infrared (base) |
| Auto-return to base | Yes, with base detection |
| Remote control | Yes, with AAA batteries included |
| Floor cleaning | Yes, with water tank and cloth holder |
| Safety | Anti-drop sensors, bumper, automatic stop on obstacle |
| Filter maintenance | Clean every 160 hours of use; replace if worn |
| Brush maintenance | Clean side brushes weekly; replace every 220 hours |
| Sensor maintenance | Clean every 35 hours of use with a soft cloth |
| Noise level | Approximately 55 dB (estimate) |
| Estimated dimensions | 33 x 33 x 8 cm |
| Estimated weight | 3 kg |
| Origin | Made in China, designed in Spain |
Frequently Asked Questions - Conga Animal X CECOTEC
User questions about Conga Animal X CECOTEC
0 question about this device. Answer the ones you know or ask your own.
Ask a new question about this device
Download the instructions for your Robot vacuum in PDF format for free! Find your manual Conga Animal X - CECOTEC and take your electronic device back in hand. On this page are published all the documents necessary for the use of your device. Conga Animal X by CECOTEC.
USER MANUAL Conga Animal X CECOTEC
Instrucciones de seguridad 4
Safety instructions 8
Instructions de sécurité 11
Sicherheitshinweise 15
Istruzioni di sicurezza 19
Instruções de segurança 23
Veiligheidsinstructies 27
Instrukcje bezpieczeństwa 31
Bezpečnostní pokyny 35
ÍNDICE
- Parts and components 48
- Before use 49
- Installation 50
- Operation 50
- Cleaning and maintenance 52
- Troubleshooting 54
- Technical specifications 55
- Disposal of old electrical and electronic appliances 56
- Technical support and warranty 56
- Copyright 56
SOMMAIRE
Read these instructions thoroughly before using the appliance. Keep this instruction manual for future reference or new users.
- All safety instructions must be closely followed when using the appliance.
- This appliance is designed for domestic use only and is not intended for bars, restaurants, farmhouses, hotels, motels, and offices.
- Inspect the cable and housing of the charging base regularly for visible damage. Do not use the appliance if the cable, socket, or structure are damaged, do not work properly, or have fallen, and contact the official Cecotec Technical Support Service immediately.
- If the power cable is damaged, it must be replaced with a special cable or set to be supplied by the official Cecotec Technical Support Service.
- The appliance must be powered at a low safety voltage as stated on the marking.
- This appliance can be used by children aged 8 years old and above and persons with reduced physical, sensory, or mental capabilities or lack of experience and knowledge if they have been given supervision or instruction concerning the use of the appliance in a safe way and understand the hazards involved. Children must not play with the appliance. Cleaning and user maintenance should not be carried out by unsupervised children.
- Do not use the appliance with non-rechargeable batteries.
- Unplug the appliance from the mains before removing the battery.
-
Unplug the power cable of the charging base before cleaning or maintenance.
-
Before turning the appliance on, make sure to remove objects and cords that may get in the way and affect proper operation of the appliance.
- This icon means: do not use the power cable if the plug is damaged.
- CAUTION: hazards may occur if the appliance runs over the power cable.
- WARNING: the appliance has rotating parts which may pose a risk of entrapment. Exercise extreme caution.
- Supervise children to prevent them from playing with the appliance. Close supervision is necessary when the appliance is being used by or near children.
- This appliance must be used in accordance with this instruction manual. Cecotec will not be held liable or responsible for any damages or injuries caused by improper use.
- Make sure that the mains voltage matches the voltage stated on the appliance marking and that the wall outlet is earthed.
- This appliance can only be disassembled by qualified personnel.
- Do not touch the cable, the socket, or the charging base with wet hands.
- Keep the robot vacuum cleaner away from clothing, curtains, and any other similar materials.
- Do not expose the robot to direct sunlight, open fire, or wet environments.
- Do not sit or place heavy or sharp objects on top of the appliance.
-
Always place the appliance on a flat and stable surface. Avoid placing it on unstable surfaces it could fall from (such as tables or chairs).
-
Turn off the robot vacuum cleaner if it's not going to be used for an extended period of time.
- Before turning the robot vacuum cleaner on, check that all connections, both on the robot and on the charging base, are in good condition.
- Avoid operating the robot vacuum cleaner under extremely high or low temperatures.
- Use only the charging base supplied with the appliance.
- Do not use accessories that are not compatible and/or not approved by Cecotec.
- Disconnect the appliance from the power socket before removing the battery or carrying out any maintenance tasks.
- Remove the battery from the appliance interior before disposing of the robot vacuum cleaner.
- The charging base must not be plugged to the mains socket when cleaning or maintenance tasks are to be carried out.
Battery instructions
- The appliance includes a Li-ion battery. Do not incinerate or expose it to high temperatures, as it may explode.
- Batteries may leak under extreme conditions. Do not touch any liquid that leaks from the battery. If the liquid gets into contact with skin, wash immediately with soap and water. If the liquid gets into the eyes, wash them immediately with clean water for a minimum of 10 minutes and seek medical attention. Wear gloves to handle the battery and dispose of it immediately in accordance with local regulations.
- Avoid contact between the battery and small metallic objects such as paper clips, coins, keys, nails, or screws.
- Before a new battery is used or the battery is used for the first time after long-term storage, fully charge the battery.
- After long periods of storage, it may be necessary to charge
and discharge the battery several times to obtain maximum performance.
- Keep batteries out of the reach of children when there is a risk of ingestion.
- Battery ingestion can cause burns, soft tissue perforation, and death. It can cause severe burns within two hours of the ingestion.
- In case of battery ingestion, please seek medical help immediately.
- Keep the original instruction manual for future reference.
- Use the battery only for its intended purpose.
- WARNING: to recharge the battery, use only the power supply included with the appliance, with reference BZ015-190060-AG.
INSTRUCTIONS DE SÉCURITÉ
Robot vacuum cleaner Fig. 1.1:
- Back Home
- Start/Pause button
- Top cover
- Anti-collision sensor
- Water-tank release button
- Dirt tank
- Free-detection sensor
- Side brushes
- Drive wheels
- Charging terminals
- Omnidirectional wheel
- Battery
- Suction mouth
Robot vacuum cleaner light indicators
- Steady blue light: the robot is cleaning or charge is complete
- Flashing blue light: Standby
- Steady white light: the robot is looking for the charging base
- Flashing white light: charging
- Flashing blue/white light: error
Charging base. Fig. 1.2:
- Operation indicator light
- Charging connector
- Charging terminals
Remote control. Fig. 1.3:
- Power button
- Auto mode
- Edge Mode
- Manual mode
- Random mode
- Suction power level
- Scrubbing level
- Start/Pause button
- Spiral mode
- Back Home
Note:
The graphics in this manual are schematic representations and may not exactly match the product.
2. BEFORE USE
- This robot vacuum cleaner includes a package designed to protect it during transport. Take the robot vacuum cleaner out of the box. Keep the original box and other elements in a safe place, as this will help you prevent product damage when transporting it in the future. In case the original packaging is disposed of, make sure all packaging materials are recycled accordingly.
- Make sure all parts and components are included and in good conditions. If there is any piece missing or in bad conditions, contact the official Cecotec Technical Support Service immediately.
Box content. Fig. 1.4:
- Robot vacuum cleaner
- Charging base
- Charger
- Mop and mop bracket
- Water tank
- Dirt tank
- Self-cleaning brush
- 2 side brushes
- 4 cotton filters
- Remote control
- AAA batteries
- Instruction manual
Warnings
- Remove all objects around the robot vacuum cleaner such as clothing, papers, cables, curtains, or other fragile objects which may block or slow down the operation of the robot vacuum cleaner. Fig. 2
- If the room to be cleaned is near a balcony or stairs, a physical barrier must be placed to prevent product damage and ensure safe operation. Fig. 3
- Direct exposure to sunlight or heavy light contrasts may affect the correct operation of the sensors. If this happens, the robot vacuum cleaner will cease operation. Move it to a new location for it to start running again.
3. INSTALLATION
- Place the charging base against a wall and leave a minimum free space of 1.5 metres to the front and 0.5 metre to each side. Fig. 4
- Connect the charging base to a power socket. Wind and store the remaining cable in the lower part of the charging base to prevent accidents.
- Install both side brushes in their corresponding slots, located on the bottom part of the robot vacuum cleaner. Press until they click well into place. Fig. 5
- Place the robot vacuum cleaner in the charging base and make sure the charging terminals on the robot match those of the base. Once the robot vacuum cleaner is properly placed, it will beep once and the indicator light will come on. If the light is flashing, it means the battery is not completely charged. To ensure the maximum cleaning time, wait until the light turns steady, as this will indicate the battery is fully charged and the robot vacuum cleaner is ready to clean. Fig. 6
4. OPERATION
Start cleaning
- Hold down the Start/Pause button on the robot vacuum cleaner to turn it on.
- Press the Start/Pause button on the robot vacuum cleaner or on the remote control to start cleaning.
Note
- If the robot vacuum cleaner runs out of battery while cleaning, it will automatically return to the charging base. Once the battery is fully charged, the robot can start a new cleaning cycle.
- If there is no good access to the charging base, the robot vacuum cleaner will not be able to return to it. If this happens, place it manually on the charging base.
End cleaning
- Press the Start/Pause button on the robot vacuum cleaner or on the remote control to pause the cleaning process.
- Press the Start/Pause button on the robot vacuum cleaner or on the remote control to resume the cleaning process.
Return to the charging base
Press the Back home button on the robot vacuum cleaner or on the remote control (with a house icon) in order to send the robot to the charging base. The robot vacuum cleaner will stop vacuuming until it reaches the base.
Switch-off
Hold down the Start/Pause button on the robot vacuum cleaner to turn it off.
Warning
If you are not going to use the robot vacuum cleaner for an extended period of time, it is advisable to leave it switched off until new use.
Cleaning modes
This robot vacuum cleaner includes different modes and functions that can be activated from the remote control.
Auto Mode
- Press the Start/Pause button on the robot vacuum cleaner or the Auto Mode button on the remote control: the robot vacuum cleaner will start cleaning automatically.
- The robot vacuum cleaner will clean the whole surface, edges, around objects such as tables, chairs etc., until the battery is low, then it will return to the charging base.
Random mode
- The robot vacuum cleaner will clean randomly until the battery percentage is low and it will return to the charge base.
- To activate this mode, press the random cleaning button on remote control.
Spiral mode
- When you select this mode, the robot vacuum cleaner will intensively clean a specific spot at maximum power. It will start cleaning at a specific spot and will move outwards in a spiral motion (1 metre). Then, it will return to the starting spot in an inwards spiral motion again.
- Before using this mode, place it in the spot you wish to clean.
- When it finishes and returns to the starting point, the robot vacuum cleaner will stop at the same point where it started cleaning.
- Press the Spiral cleaning button on the remote control to activate this mode.
Edge Mode
- When you select this mode, the robot vacuum cleaner will clean along the wall and around furniture (table legs, chair legs, etc.) until it goes back to the charging base.
- Press the edge cleaning button on the remote control.
Scrubbing mode. Fig. 7
- Remove the water tank.
- Lift the tank silicone lid and fill it with water.
-
Refit the water tank.
-
Attach the mop to the mop holder and the latter to the robot vacuum cleaner.
- Select the scrubbing level on the remote control. There are two scrubbing levels: Low and High.
- Once the desired scrubbing level has been selected, the robot vacuum cleaner will enter All in One mode to simultaneously vacuum, scrub, sweep, mop, and dry.
Note
- If you only wish to mop, do not fill the water tank.
- If the tank is full, the robot vacuum cleaner will rotate on its own to moisten the mop as it leaves the base.
- To ensure perfect mopping right from the start, it is recommended to evenly dampen the mop before fixing it in place. It is also recommended to wash the mop after every use.
- It is recommended to be present when the robot vacuum cleaner is scrubbing.
- When the robot vacuum cleaner returns to the charging base, you must remove the mop. Do not leave the robot vacuum cleaner charging with the mop assembled.
Back Home mode
Press the Back Home button on the robot vacuum cleaner or on the remote control in order to send the robot to the charging base. The robot vacuum cleaner will stop vacuuming until it reaches the base.
Manual mode
Use the directional arrows on the remote control to manually control your robot vacuum cleaner.
Power Level function
Select the power level on the remote control to control the robot suction power level during cleaning. There are 2 suction power levels: Eco and Normal.
5. CLEANING AND MAINTENANCE
Dirt tank. Fig. 8
- Lift the top cover of the robot vacuum cleaner and remove the dirt tank.
- Open the tank by unlocking the side flap and empty it.
High-efficiency filter. Fig. 9
- The high-efficiency filter is designed with fibres that help trap dust particles, dust mites, pollen... It is very important to periodically clean the filter, to prevent these particles from building up in the filter, causing efficiency loss. It is convenient to carry out this maintenance once a week.
- It is recommended to replace the high-efficiency filter with a new one without exceeding 160 cleaning hours.
Recommendation
You can remove dirt from the high-efficiency filter with a small brush or gently shake the filter on a hard surface to remove the dust. The high-efficiency filter cannot be washed.
Primary mesh filter and sponge filter. Fig. 9
The filtering system is featured with a primary mesh filter and a sponge filter, located next to the high-efficiency filter. It is suggested to replace them either after a maximum of 160 hours of use or when they are worn out due to operation.
Recommendation
Dirt can be removed with a small brush or by shaking carefully against a hard surface for dust to fall off. You can also use warm water without detergents to obtain better results. Always make sure they are completely dry before installing them again; otherwise, moisture can reach the robot vacuum cleaner's motor and damage it.
Cleaning the fall-detection sensors. Fig. 10
Use a clean, dry, and soft cloth to wipe off any dust from the fall-detection sensors located on the robot vacuum cleaner's lower part.
Warning
Do not apply cleaning products directly on the sensors.
Side brushes.
Side brushes are designed with multiple bristles and are used to push dirt towards the suction mouth and to thoroughly clean edges and corners. These brushes can wear out over time, negatively affecting cleaning efficiency. For this reason, it is suggested to replace each side brush after a maximum of 220 hours or less.
Recommendation
It is recommended to clean the side brushes once a week with the help of the self-cleaning brush.
Sensors
- The robot vacuum cleaner has different types of sensors, for example, proximity sensors that allow the robot to move around while detecting obstacles, or fall-detection sensors that help the robot detect slopes or possible gaps/unevenness such as staircases. These sensors are always in contact with dust particles, and therefore can deteriorate over time, causing possible navigation errors.
- It is suggested to clean all the robot sensors with a dry and soft cloth after a maximum of 35 hours of operation or less.
Cleaning the drive wheels and the omnidirectional wheel Fig. 11
Use a clean, dry, soft cloth to wipe dust off the drive wheels and the omnidirectional wheel located on the bottom of the robot vacuum cleaner.
Changing the cotton filter. Fig. 12
- Remove the silicone plug from the bottom of the water tank.
- Remove the cotton filter from the silicone plug.
- Replace the cotton filter with a new one and refit the silicone plug in the tank.
Charging base. Fig. 13
Use a clean, dry, soft cloth to wipe dust off the infrared lens and charging terminals. It is recommended to clean them once a month.
Charging and replacing the battery. Fig. 14
- To lengthen the battery shelf life, leave the robot vacuum cleaner to charge in the charging base when not in use.
- Remove the battery and store it in a safe, dry place if the robot vacuum cleaner will not be used for a long period of time.
To replace the battery, follow the instructions below:
- Unscrew the screws on the battery compartment, remove the battery cover, and the battery itself.
- Insert the new battery with the battery label facing up.
- Put the battery and the battery cover in back in place and properly fix the screws back again.
6. TROUBLESHOOTING
| Beeps | Error | Solution |
| 1 | Low battery | Place the robot in the charging base. |
| Drive wheel fault. | Check if the drive wheel is blocked. | |
| 2 | Side brush error. | Check if the side brushes are blocked and clean them. |
| 3 | Suction motor error. | Check if there are obstructions blocking the air inlet. Empty the tank. Clean the filters with a vacuum cleaner or a self-cleaning brush. Check if the filters are wet. Dry the filters in a natural way before using them. Make sure they are completely dry. IF there are any moisture remains they could reach the motor and damage the robot vacuum cleaner. |
| 4 | Main-brush fault. | Check if the main brush is blocked or tangled and clean it. |
| 5 | Bumper error. | Carefully clean the sensors with a clean, dry cloth. Restart the robot vacuum cleaner. To do this, switch the robot off and on. |
| Fall-detection sensor error. | Carefully clean the sensors with a clean, dry cloth. Restart the robot vacuum cleaner. To do this, switch the robot off and on. | |
| Main brush error. | Clean the main brush. Check if the main brush is installed correctly. | |
| 6 | Charging error. | Check if the charging base indicators are on. Otherwise, contact the official Technical Support Service of Cecotec. Clean the charging terminals with a clean, dry cloth. Check if the robot vacuum cleaner beeps when it gets to the charging base. Contact the official Technical Support Service of Cecotec. |
7. TECHNICAL SPECIFICATIONS
Conga Animal X
Product reference: 08604
Input: 19 V DC 0.6 A
Battery: 14.4 V DC Li-ion 2000 mAh
Technical specifications may change without prior notification to improve product quality.
Made in China | Designed in Spain
8. DISPOSAL OF OLD ELECTRICAL AND ELECTRONIC APPLIANCES

This symbol indicates that, according to the applicable regulations, the appliance and/or batteries must be disposed of separately from household waste. When this product reaches the end of its shelf life, you should dispose of the batteries/accumulators and take them to a collection point designated by the local authorities.

Consumers must contact their local authorities or retailer for information concerning the correct disposal of old electrical and electronic appliances and/or their batteries.
Compliance with the above guidelines will help protecting the environment.
9. TECHNICAL SUPPORT AND WARRANTY
Cecotec shall be liable to the end user or consumer for any lack of conformity that exists at the time of delivery of the product under the terms, conditions, and deadlines established by the applicable regulations.
It is recommended that repairs be carried out by qualified personnel.
If at any moment you detect any problem with your product or have any doubt, do not hesitate to contact the official Cecotec Technical Support Service at +34 96 321 07 28.
10. COPYRIGHT
The intellectual property rights over the texts in this manual belong to CECOTEC INNOVACIONES, S.L. All rights reserved. The contents of this publication may not, in whole or in part, be reproduced, stored in a retrieval system, transmitted, or distributed by any means (electronic, mechanical, photocopying, recording or similar) without the prior authorization of CECOTEC INNOVACIONES, S.L.
1. PIÈCES ET COMPOSANTS
6. PROBLEEMOPLOSSING


Fig./Img./Abb./Afb./Rys./Obr. 1.1
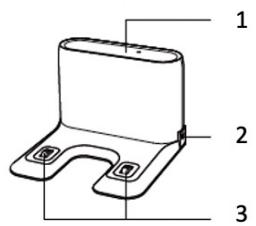
Fig./Img./Abb./Afb./Rys./Obr. 1.2

Fig./Img./Abb./Afb./Rys./Obr. 1.3
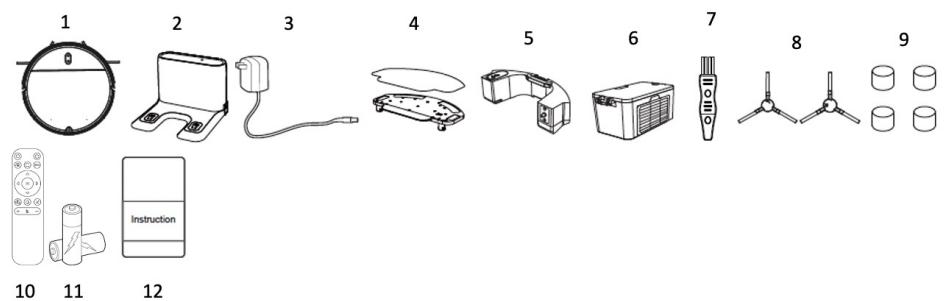
Fig./Img./Abb./Afb./Rys./Obr. 1.4

Fig./Img./Abb./Afb./Rys./Obr. 2

Fig./Img./Abb./Afb./Rys./Obr. 3

Fig./Img./Abb./Afb./Rys./Obr. 4

Fig./Img./Abb./Afb./Rys./Obr. 5

Fig./Img./Abb./Afb./Rys./Obr. 6
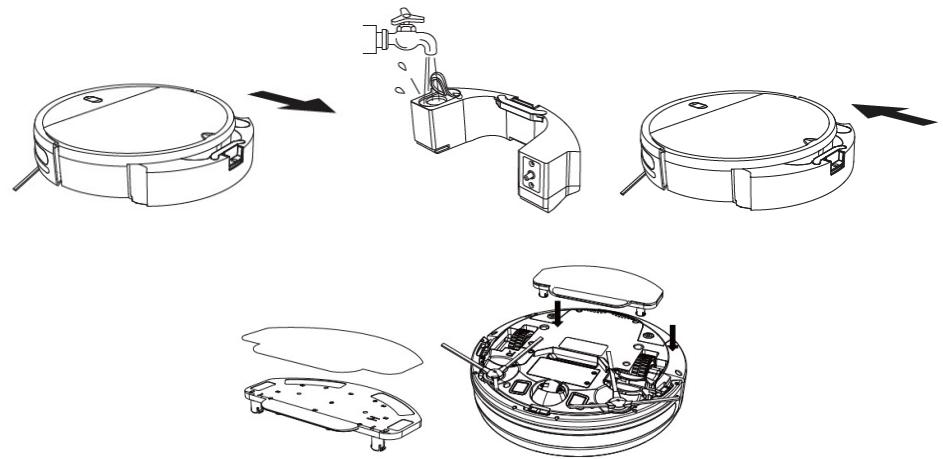
Fig./Img./Abb./Afb./Rys./Obr. 7

Fig./Img./Abb./Afb./Rys./Obr. 8

Fig./Img./Abb./Afb./Rys./Obr. 9

Fig./Img./Abb./Afb./Rys./Obr. 10
Fig./Img./Abb./Afb./Rys./Obr. 11
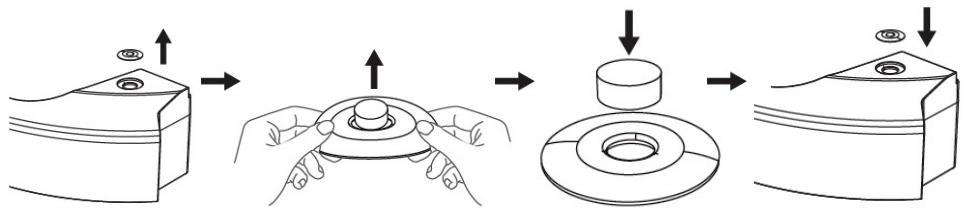
Fig./Img./Abb./Afb./Rys./Obr. 12
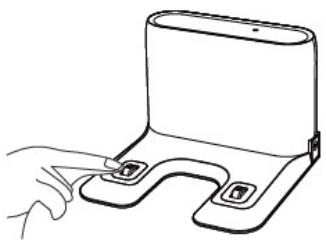
Fig./Img./Abb./Afb./Rys./Obr. 13

Fig./Img./Abb./Afb./Rys./Obr. 14
www.cecotec.es
- ÍNDICE
- SOMMAIRE
- Battery instructions
- INSTRUCTIONS DE SÉCURITÉ
- Robot vacuum cleaner Fig. 1.1:
- Robot vacuum cleaner light indicators
- Charging base. Fig. 1.2:
- Remote control. Fig. 1.3:
- BEFORE USE
- Box content. Fig. 1.4:
- Warnings
- INSTALLATION
- OPERATION
- Start cleaning
- Note
- End cleaning
- Return to the charging base
- Switch-off
- Warning
- Cleaning modes
- Auto Mode
- Random mode
- Spiral mode
- Edge Mode
- Scrubbing mode. Fig. 7
- Back Home mode
- Manual mode
- Power Level function
- CLEANING AND MAINTENANCE
- Dirt tank. Fig. 8
- High-efficiency filter. Fig. 9
- Recommendation
- Primary mesh filter and sponge filter. Fig. 9
- Cleaning the fall-detection sensors. Fig. 10
- Side brushes.
- Sensors
- Cleaning the drive wheels and the omnidirectional wheel Fig. 11
- Changing the cotton filter. Fig. 12
- Charging base. Fig. 13
- Charging and replacing the battery. Fig. 14
- To replace the battery, follow the instructions below:
- TROUBLESHOOTING
- TECHNICAL SPECIFICATIONS
- DISPOSAL OF OLD ELECTRICAL AND ELECTRONIC APPLIANCES
- TECHNICAL SUPPORT AND WARRANTY
- COPYRIGHT
- PIÈCES ET COMPOSANTS
- PROBLEEMOPLOSSING
Brand : CECOTEC
Model : Conga Animal X
Category : Robot vacuum