Bolero Dresscode Top Max 80 Inverter A - Washing machine CECOTEC - Free user manual and instructions
Find the device manual for free Bolero Dresscode Top Max 80 Inverter A CECOTEC in PDF.


| Product type | Top-loading washing machine |
| Brand | Cecotec |
| Model | Bolero Dresscode Top Max 80 Inverter A |
| Washing capacity | 8 kg |
| Energy class | A (new energy scale) |
| Motor type | Inverter motor with electronic speed variation |
| Maximum spin speed | 1,200 rpm |
| Dimensions (H x W x D) | 85.0 x 60.0 x 60.0 cm |
| Net weight | 67 kg |
| Power supply | 230 V ~ 50 Hz |
| Annual water consumption | Approximately 9,900 L (depending on use) |
| Noise level (wash/spin) | 54 dB / 74 dB |
| Wash programs | 15 programs (including Cotton, Synthetic, Delicate, Quick 15 min, etc.) |
| Additional options | Prewash, Extra rinse, Delayed start |
| Anti-unbalance system | Yes, with electronic control |
| Child safety | Control panel lock function |
| Maintenance and cleaning | Regular cleaning of filter and drum |
| Spare parts available | Yes, via after-sales service and online parts |
| Repairability index | 7.5 / 10 |
| Manufacturer warranty | 2 years |
Frequently Asked Questions - Bolero Dresscode Top Max 80 Inverter A CECOTEC
User questions about Bolero Dresscode Top Max 80 Inverter A CECOTEC
0 question about this device. Answer the ones you know or ask your own.
Ask a new question about this device
Download the instructions for your Washing machine in PDF format for free! Find your manual Bolero Dresscode Top Max 80 Inverter A - CECOTEC and take your electronic device back in hand. On this page are published all the documents necessary for the use of your device. Bolero Dresscode Top Max 80 Inverter A by CECOTEC.
USER MANUAL Bolero Dresscode Top Max 80 Inverter A CECOTEC
Safety instructions 10
-
Parts and components 76
-
Before use 76
-
Installation 77
-
Operation 79
-
Control panel 82
-
Cleaning and maintenance 88
-
Troubleshooting 89
-
Technical specifications 91
-
Disposal of old electrical and electronic appliances 92
-
Technical support and warranty 92
-
Copyright 92
SOMMAIRE
Read the following instructions carefully before using the product and follow the safety instructions to minimise the risk of fire or explosion, electric shock and to avoid property damage, personal injury, or death. Keep this instruction manual for future reference or new users. Non-compliance with these instructions will void any guarantee.
- Warning: this word indicates a potentially hazardous situation which can cause serious injuries or death.
- Caution: this word indicates a potentially hazardous situation which can cause moderate injuries or damage to property and the environment.
- Note: this word indicates a potentially hazardous situation which can cause minor or moderate injuries.
Warning: risk of electric shock
- If the cable is damaged, it must be replaced by the manufacturer, the supplier, or qualified personnel to avoid hazards.
- If the device is damaged, it can only be handled by the manufacturer, technical service, or qualified personnel. Risk of electric shock.
-
This appliance can be used by children aged 8 and above and persons with reduced physical, sensory, or mental capabilities or lack of experience and knowledge, as long as they have been given supervision or instruction concerning the use of the appliance in a safe way and understand the hazards involved. Do not allow children to play with the device. The cleaning and maintenance of the appliance should not be carried out by children without supervision.
-
Keep children under 3 years old away from the device or under continuous supervision.
- Animals and children could climb on the machine. Check it before every washing.
- Do not climb nor sit on the unit.
Installation location and surrounding
- Do not install the washing machine on a surface in which the base cannot air properly, like a carpet. Blockage of the openings can damage the machine.
- Keep the device away from heat sources and direct sunlight to prevent the plastic and rubber pieces from getting damaged.
- Do not use the device on wet areas or rooms containing explosive or corrosive gases. In case of water leakage or splashes, let the device dry on its own.
- The appliance must not be installed behind a lockable door, a sliding door, or a door with a hinge on the opposite side to that of the washing machine.
- Do not use the machine in rooms with a temperature below 5 °C. This can damage its parts. If inevitable, make sure to completely drain the water in the device after every use (check the 'Maintenance - Drain pump filter cleaning' section) to prevent frost damage.
- Never use sprays or flammable substances near the device.
Installation
- Remove all the packaging material and the transport bolts before using the device. Otherwise, it could cause serious damage.
-
WARNING: do not connect the washing machine to a hot water supply.
-
The plug must be accessible after the installation.
- Before using the wash machine, the product shall be calibrated.
- Do not place excessively heavy objects on the device, as water containers or heating appliances.
- You must use the new hose set provided with the device, do not reuse old hoses.
- The maximum inlet water pressure is 1 MPa. The minimum inlet water pressure is 0.1 MPa.
Electrical connections
- Make sure that the mains voltage matches the voltage stated on the rating label of the appliance and that the wall outlet is grounded.
- Check the power cable regularly for visible damage. If the cable is damaged, it must be replaced by the official Technical Support Service of Cecotec in order to avoid any type of danger.
- Do not operate the product if its cord, plug, or structure show visible damage or do not operate properly.
- In case of anomalies (abnormal noises, burning smell, smoke, etc.), immediately disconnect the power plug to stop the machine and contact the Cecotec Customer Service.
- Make sure the power cord is not trapped under the machine, as it could be damaged.
- The installation of an earthed socket must be carried out by a qualified electrician.
- Make sure the machine is installed according to local regulations.
- We recommend water and electrical devices are connected by qualified personnel in accordance with the manufacturer instructions and local safety regulations.
Do not use an extension cord or multiple sockets.
- This device must not be controlled by external switching elements such as timers, or connected to electrical circuits that are continuously switched on and off.
- Do not disconnect the plug from the socket if there is flammable gas near them.
- Pull from the plug, not the cable, to unplug it. Do not touch the cable or appliance with wet hands.
Water connection
- Check the water supply hose, the tap and the drain hose to detect any possible problem due to water pressure changes. If the connections are loose or leaking, close the tap and seek technical assistance. Do not use the device before the hoses are installed by qualified personnel.
- The glass door may reach high temperatures during operation. Keep children and pets away from the machine while in use.
- The water inlet and outlet hoses must be installed securely and undamaged. Otherwise, there may be water leakage.
- Do not remove the drain pump filter while there is water in the device. Large quantities of water may be released, which may cause a risk of burns due to the hot water.
Operation and maintenance
- Never use flammable, explosive or toxic solvents. Petrol, alcohol, etc. should not be used as detergents. Use only detergents for washing machines.
- Make sure that all pockets are empty. Sharp and rigid items such as coins, brooches, nails, screws, or stones may cause serious damage to this machine.
-
Thoroughly rinse items that have been washed by hand.
-
Items with stains from substances such as oils, acetone, alcohol, petroleum, paraffin, stain removers, turpentine, wax, and wax cleaners should be washed hot with an extra amount of detergent before drying with the appliance.
- Never try to force the door open. The door will unlock shortly after the end of a cycle.
- Do not close the door with excessive force. If it is found difficult to close the door, please check if the clothes are put in or distributed well.
- Always unplug the device from the mains and close the water tap before carrying out any cleaning or maintenance task and after every use.
- Do not pour water on the device to clean it. Risk of electric shock.
- Repairs should only be carried out by the manufacturer or its service or similar qualified personnel in order to avoid possible hazards. The manufacturer shall not be liable for damage caused by unauthorised persons.
Transporting
- Before transporting the product, you must place the transport bolts again in the machine and drain the water out of the machine.
- The washing machine is very heavy. Transport it with care. Do not hold the appliance by its protruding parts to lift it. Do not use the machine door as a handle.
Recommended use
- The product is exclusive for household use and moderate loads, and is designed for machine washable laundry only. Install the machine in the interior of a well-ventilated room. This product is not designed for installation as a built-in appliance.
- Do not install the washing machine on humid areas.
- Any other use will be considered an incorrect use. Cecotec shall not be liable for any damage or injury resulting therefrom.
INSTRUCTIONS DE SÉCURITÉ
- Power cable
- Control panel
- Drain hose
- Door
- Detergent drawer
- Drum
- Drain pump filter
Accessories
Fig. 2
- Plastic cups for the transport bolt holes
- Cold water supply hose
- Instruction manual
- Acoustic foam
NOTE:
the graphics in this manual are schematic representations and may not exactly match the device.
2. BEFORE USE
- This appliance includes a safety package to protect it during transport. Remove the washer from its box, and store the original box and other packaging in a safe place. It will help prevent any damage if the appliance needs to be transported in the future. In case the original packaging is disposed of, make sure all packaging materials are recycled accordingly.
- Make sure all parts and components are included and in good conditions. If there is any piece missing or not in good condition, immediately contact the official Cecotec Technical Support Service.
Box content
- Top loading washing machine
- Drain hose
- Water supply hose
- Plastic cups for the transport bolt holes
- Acoustic foam
- Instruction manual
3. INSTALLATION
Installation area
Fig. 3
Previous steps
- Place the washing machine on a stable, flat, and dry surface. Make sure the product does not stand on the power cord.
- Avoid direct sunlight and ensure sufficient ventilation.
• The room temperature must be over 5 °C. - Choose a location away from heat sources, like gas or coal.
- Remove the cardboard box and every packaging protecting the washing machine. Make sure to remove the small foam at the bottom. If not, carefully position the washing machine sideways and remove it by hand.
- Remove the tape securing the power supply cord and drain hose.
- Remove the water supply hose from the drum.
Step 1. Acoustic foam
Fig. 4
Note:
Make sure to install the acoustic foam before using the washing machine for the first time. The foam is designed to effectively reduce noise during washing, which will help provide you with a quieter and more peaceful living environment.
- Place the washer on the floor, using some soft material, such as foam or clothing, between the washer and the floor for protection.
- Attach the longer foam to the longer bottom edges of the washer and the shorter foam to the shorter bottom edges.
Step 2. Removing the transport bolts
Warning
- The transport bolts must be removed from the backside of the device before using the washing machine. The guarantee does not cover faults that occur due to the use of the machine without removing the transport bolts.
- If you do not remove the bolts there may be strong vibrations, noise, and defective operation.
- Keep the transport bolts for future transport.
Fig. 5-6
- Loosen the transport bolts by turning them counterclockwise with a suitable spanner.
- Remove the transport bolts by pulling them.
- Insert the plastic caps provided in the holes where the transport bolts were located.
Step 3. Feet adjustment
Warning
The lock nuts on all four feet must be screwed tightly against the housing.
Fig. 7
- Loosen the lock nut.
- Turn the feet until they touch the ground.
- Adjust the feet and fix the lock nuts with a spanner. Make sure the machine is levelled and does not move.
Step 4. Water supply hose connection
Warning
- Do not twist, crush, or modify the water supply hose.
Connect the water supply hose to the water inlet valve (Fig. 8) and to a cold-water tap (Fig. 9) as shown in the figures.
Please note
Do not use tools for the connection, do it manually. Check the connection is firm.
Step 5. Drain hose connection
Warning
- Do not kink or protract the drain hose.
- Place the drain hose correctly; otherwise, there could be leaks.
You can connect the end of the drain hose in 2 ways:
- To a drain. Fig. 10
- In a drain pipe located in a sink. The pipe height must be between 60 and 100 cm. Fig. 11
Please note
If the machine is equipped with a drain hose bracket, install it as shown in figure 12.
Warning
- When installing the drain hose, fix it properly.
- If drain hose is too long, do not force it into washing machine as it will cause abnormal noises.
4. OPERATION
Quick Start
Warning
- Before using the washing machine for the first time, make sure it is correctly installed.
- Your device was thoroughly checked before leaving the factory. To remove any water residue and to neutralise possible odours, it is recommended to clean the appliance before using it for the first time. To do so, start the Cotton programme at 60 °C without laundry or detergent.
Before washing
Fig. 13
- Plug in the washing machine.
- Open the tap.
- Load.
- Add detergent.
- Close the drum door.
- Close the washing machine door.
Please note
- Make sure the drum flaps are correctly locked. Fig. 14
- All metal hooks must be securely hooked inside the flap of the rear door. Fig. 15
- Check the drum before each wash, it should roll smoothly.
Washing
- Turn on the washing machine.
- Select a programme.
- Select an additional function or do not modify the default settings.
- Press the Start/Pause button to start the programme.
Please note
If any of the default options is selected, step 3 can be skipped.
After washing
All the lights on the control panel will turn off.
Before each washing
- The washing machine must be used in a place where the temperature is between 5 °C and 40 °C. If used under 0 °C, the inlet valve and draining system may get damaged. If the machine is installed at low temperatures, it should be moved to a normal room
temperature to ensure that the water supply hose and drain hose can be defrosted before use.
- Check the care labels and detergent instructions before washing. Use non-foaming or less-foaming detergent suitable for machine washing.
Fig. 16
- Check the care label.
- Sort laundry by colour and type of fabric.
- Remove all the objects from the pockets.
- Knot long textile straps and belts and fasten zips and buttons.
- Put small textiles in a laundry bag.
- Turn over garments that are easily shredded and have long hair.
Warning
- Do not wash items that have been cleaned, soaked, or dampened with combustible or explosive substances such as wax, oil, paint, petrol, alcohol, paraffin, and other flammable materials.
- Washing too few items can easily create a large eccentricity and cause an imbalance alarm. Therefore, it is recommended that you add more items to the laundry so that the spin cycle runs smoothly.
Detergent drawer
Fig. 17
- Pre-wash detergent compartment.
- Softener compartment.
- Main detergent compartment.
Warning
Do not exceed the MAX mark when pouring detergents, softener, or other additives.
| Programme | Pre-wash detergent | Main wash detergent | Softener |
| Cotton | Optional | Necessary | Optional |
| Synthetics | Optional | Necessary | Optional |
| Mix | Optional | Necessary | Optional |
| Jeans | Optional | Necessary | Optional |
| Sportswear | Optional | Necessary | Optional |
| AutoClean | - | - | - |
| 20 °C | - | Necessary | Optional |
| Steam | Optional | Necessary | Optional |
| Spin Only | - | - | - |
| Rinse&Spin | - | - | Optional |
| Wool | - | Necessary | Optional |
| Baby Care | Optional | Necessary | Optional |
| Quick 15' | - | Necessary | Optional |
| ECO 40-60 | - | Necessary | Optional |
| Quick 45' | - | Necessary | Optional |
Detergent recommendations
| Recommended detergent | Wash cycles | Washing temp. | Garment and textile type |
| Strong detergent with bleaching agent and optical brighteners | Cotton, Mix | 20/40/60 | White cotton or boil-resistant linen clothes |
| Colour detergent without bleaching agent nor optical brighteners | Cotton, Mix | Cold/20/40 | Coloured laundry made of cotton or linen |
| Colour or mild detergent without optical brighteners | Synthetics | Cold/20/40 | Colour clothes made from easy-care fibres or synthetic materials |
| Mild washing detergent | Synthetics | 20/40 | Delicate fabrics, silk, viscose |
| Special wool detergent | Wool | 20/40 | Wool |
Please note
- You can dilute concentrated detergents or additives in a little water before pouring them into the detergent drawer, to avoid clogging the detergent drawer inlet and causing water overflow.
- Choose the adequate detergent to get the maximum washing performance and the minimum water and energy consumption.
- To obtain the best washing results it is important to use a correct detergent dose.
- Use a reduced amount of detergent if the drum is not fully loaded.
- Always adjust the detergent amount to the water hardness, if tap water is soft, use less detergent.
ENGLISH
- Dose according to the soiling level of the laundry. The less soiled laundry requires less detergent.
- The highly concentrated compact detergent requires particularly precise dosing.
The following anomalies occur due to the use of a high detergent dose:
- Abundant foaming.
- Poor washing and rinsing results.
The following anomalies occur due to the use of a low detergent dose:
- Laundry turns grey.
- Build-up of limescale deposits on the drum, heating element and/or laundry.
5. CONTROL PANEL
Fig. 18
- On/off. It turns on or off the washing machine.
- Start/Pause. Press the button to start or pause the washing cycle.
- Additional functions. This button allows you to select an additional function which will light up when selected.
- Programmes. It is used to select a programme according to the type of laundry and its soiling.
- Display. The display shows the settings, estimated time remaining, options, and status messages of the washing machine. The display will remain on through the cycle.
Fig. 19
A: Display
B: Door Lock
C: Delay Start
D: Pre-Wash
E: Extra rinse
| Programme | Max. recommended load (kg) | Display time |
| Cotton | 8.0 | 2:40 |
| Synthetics | 4.0 | 2:20 |
| Mix | 8.0 | 1:20 |
| Jeans | 8.0 | 1:40 |
ENGLISH
| Sportswear | 4.0 | 0:47 |
| 20 °C | 4.0 | 1:01 |
| Baby Care | 8.0 | 2:01 |
| AutoClean | - | 1:18 |
| Spin Only | 8.0 | 0:12 |
| Rinse&Spin | 8.0 | 0:20 |
| Wool | 2.0 | 1:07 |
| Steam | 4.0 | 1:47 |
| ECO 40-60 | 8.0 | 3:38 |
| Quick 45' | 2.0 | 0:45 |
| Quick 15' | 2.0 | 0:15 |
| Cycle | Normal capacity (kg) | Set temperature (°C) | Cycle time (h: min) | Energy consumption (kWh/cycle) | Water consumption (l/cycle) | Maximum temperature (°C) ^(1) | Residual moisture/spin speed (%/ rpm) ^(2) |
| Quick 15' | 2.0 | Cold | 0:15 | 0.026 | 34 | Cold | 53%/800 |
| 20 °C | 4.0 | 20 | 1:01 | 0.183 | 47 | 20 | 70%/800 |
| Cotton | 8.0 | 60 | 2:45 | 1.394 | 71 | 60 | 53%/1300 |
| Synthetics | 4.0 | 40 | 2:20 | 0.625 | 34 | 40 | 35%/800 |
| Mix | 8.0 | 40 | 1:20 | 0.754 | 44 | 40 | 70%/800 |
| ECO 40-60(3) | 8.0 | -- | 3:38 | 0.739 | 71 | 38 | 53.9%/1250 |
| 4.0 | -- | 2:48 | 0.456 | 47 | 32 | 53.9%/1250 | |
| 2.0 | -- | 2:48 | 0.196 | 38 | 23 | 53.9%/1250 |
(1) The highest temperature reached by the laundry in a washing cycle for at least 5 minutes.
(2) Residual moisture after the wash cycle in percentage of water content and the spin speed at which it was reached.
(3) The ECO 40-60 programme is able to clean normally soiled cotton laundry declared as washable at 40^ C or 60^ C, together in the same cycle.
- The length, and energy and water consumption of each programme may vary according to the weight and type of laundry, the additional functions active, water and room temperature.
- It is recommended the use of liquid detergent for washing programmes at low temperature. You can vary the quantity of detergent according to the quantity of laundry and its soiling level. Follow the detergent manufacturer recommendations for the quantity of detergent you must use.
- The information above are just references and can change according to the different use conditions.
- The information given for the different programmes of the ECO 40-60 programme are just indicative.
- The most efficient programmes in terms of energy consumption are generally those that are carried out at lower temperatures and longer duration.
- Loading the washing machine up to the recommended capacity for the respective programmes will contribute to saving energy and water.
- Noise and residual moisture content are influenced by the spin speed: the higher the spin speed, the higher the noise and the lower the residual moisture content.
Warning
If there is an outage in the power supply while the appliance is in operation, the appliance will continue the programme when the power supply is restored.
| Programmes | |
| Cotton | Hard-wearing textiles, heat-resistant textiles made of cotton or linen. |
| Synthetics | Wash synthetic articles, for example shirts, coats, mix.While washing the knitting textiles, detergent quantity shall be reduced as the soft fabric is more prone to bubbles. |
| Baby Care | It ensures cleaner baby clothes; the rinse cycle is more intense, so the baby skin is protected. |
| Quick 45' | It can be used to wash a few items of laundry or clothes that are not too dirty. |
| Mix | Mixed loads with cotton and synthetic clothes. |
| Sportswear | For washing sports clothes. |
| Jeans | Specially designed for denim clothing. |
| Quick 15' | Extra-short programme, suitable for lightly soiled washing or for small amounts of laundry. |
| Wool | Hand or machine-washable wool or rich-wool textiles. Gentle washing programme to prevent shrinkage, with longer programme pauses (with textiles soaking). |
| Spin Only | Extra spin with selectable spin speed. |
| Rinse&Spin | Extra rinse with spin. |
| AutoClean | Programme to clean the drum and hoses. Sterilisation temperature of 90 °C to make the wash more environmentally friendly. When running this programme, you should not introduce laundry or clothes in general.If you use the appropriate amount of chlorine bleach product, the cleaning will be much more effective. The user can use this programme as many times as necessary. |
| ECO 60-40 | 40 °C by default, not selectable, suitable for washing clothes at about 40 °C-60 °C. |
| Steam | This programme penetrates deep into the fibre, which effectively eliminates bacteria and germs, preventing odours and protecting health. |
| 20 °C | For washing brightly coloured clothes, as it protects the colours better. |
| Cycle | Default temp. (°C) | Default spin speed in rpm | Additional functions |
| Cotton | 40 | 800 | |
| Synthetics | 40 | 800 | |
| Mix | 40 | 800 | |
| Jeans | 40 | 800 | |
| Sportswear | 20 | 800 | |
| 20 °C | 20 | 800 | |
| Baby Care | 60 | 800 | |
| AutoClean | 90 | -- | |
| Spin Only | -- | 800 | |
| Rinse&Spin | -- | 800 | |
| Wool | 40 | 600 | |
| Steam | 40 | 800 | |
| ECO 40-60 | -- | -- | |
| Quick 45' | 20 | 800 | |
| Quick 15' | Cold | 800 |
The table shows the setting options for each cycle. Not all settings are possible for every cycle.
Please note
- To know the maximum spin speed, the programme time and other ECO 40-60 programme details, refer to the contents of the Product Sheet page.
- You can find more information on this model by scanning the QR code of the reference of your product (you will also find the energy label).
| Reference | 02166 |
| Model | Bolero DressCode Top Max 80 Inverter A |
| QR code |  |
Pre-Wash
The pre-wash function is used to perform an extra wash before the main wash, it is suitable for washing the dust on the surface of the laundry; you should pour detergent into compartment I when you select it.
Extra rinse
The laundry will undergo extra rinse once after you select it.
Delay Start
To set the Delay Start function:
- Select a programme, press the Delay start button to choose the time (the delay time can be set in 0-24 hours).
- To activate the delay start, press the Start/Pause button.
To cancel the delay start function:
Press the Delay start button until the display shows OH. You must do it before starting the programme. If the programme has already started, switch off programme to reset a new one.
Temp.
Press this button to select the desired temperature (Cold, 20 °C, 40 °C, 60 °C, 90 °C).
Spin
Press this button to change the spin speed: 0, 600, 800, 1000 and 1300 rpm.
Child Lock
It is used to prevent children from operating the device.
- Select a programme.
- Press the Start/Pause button
- Press and hold the Spin and Delay end buttons for 2 seconds until the appliance beeps.
Warning
- When the child lock function is activated, the device will beep 3 times when the buttons are pressed.
- Hold down both buttons for 3 seconds to deactivate the child lock.
- The child lock disables all the buttons except for the on/off button.
- If the mains power is off, the child lock will be deactivated.
Mute
- Choose a programme.
- Press and hold the Spin button for 3 seconds to silence the mute.
To activate the sound again, press and hold the same button for 3 seconds.
Warning
The setting will stay activated until you restart the device.
If you mute the machine, the sounds will no longer be active.
Favourites
This function is used to save a frequently used programme.
Once you have selected the programme and set the desired additional options, hold down the Temp. button for 3 seconds before starting the washing. By default, this setting is the Cotton programme.
6. CLEANING AND MAINTENANCE
Warning
Before starting any maintenance task, unplug the machine and close the tap.
Cleaning the exterior
- Proper maintenance on the washing machine can extend its working life. The surface can be cleaned with diluted non-abrasive neutral detergents when necessary. If there is any water overflow, use a cloth to wipe it off immediately.
- Do not use sharp objects.
Please note
Formic acid and its solvents or any equivalent material such as alcohol, solvents, chemicals, etc. should not be used to clean the exterior of the product.
Cleaning the drum
- The rusts left inside the drum by the metal articles shall be removed immediately with chlorine-free detergents.
- Do not use steel wool pads.
Please note
Do not put laundry in the washing machine during the drum cleaning.
Cleaning the inlet filter
Please note
Decreasing water flow is a signal to clean the filter.
Fig. 20
- Remove the water supply hose from the tap.
-
Clean the filter in the hose with a brush.
-
Loosen the water supply hose from the rear part of the washing machine. Remove the filter with a long nose pliers.
- Use a brush to clean the filter.
- Install the filter again in the water supply and connect the water supply hose again.
- Clean the inlet filter every 3 months to guarantee the normal operation of the device.
Cleaning the detergent drawer
Fig. 21
- Press the softener cover in the direction of the arrow as shown in figure 21.
- Lift the tab, remove the softener compartment cover, and wash all the slots with water.
- Place the softener cover again and gently push the drawer into position.
Please note
- Do not use abrasive or corrosive detergents to clean the detergent drawer.
- Clean the detergent drawer every 3 months to guarantee the normal operation of the device.
Cleaning the drain pump filter
Warning
- Make sure the machine has finished the washing cycle and is empty. Turn it off and unplug it from the mains supply before cleaning the drain pump filter.
- Be careful with hot water as when cleaning the drain pump filter, it is common for water to be released. Wait for the water to cool down before cleaning this filter. Risk of burns.
- Clean the filter periodically every 3 months to guarantee the normal operation of the device.
Fig. 22
- Remove the cover in the lower part of the washing machine.
- Remove the filter by turning it counterclockwise.
- Remove any strange object.
- Refit the cover.
7. TROUBLESHOOTING
- Follow the indications on this table to try and solve the problem on your own before contacting Cecotec's Technical Support Service.
| Problem description | Possible causes | Possible solutions |
| The washing machine does not start | The door is not closed properly. | Restart after the door is closed.Check if there are clothes stuck. |
| You cannot open the door | The protection system of the washing machine is active. | Unplug and restart the washing machine. |
| Water leakage | Poor connection between the inlet pipe and the drain hose. | Check the hoses and connect them properly.Clean up outlet hose. |
| Detergent residues in the detergent drawer | Detergent is dampened or agglomerated. | Clean and wipe the detergent drawer. |
| Indicator or display does not light | The printed circuit board is disconnected or there is a connection problem in the wiring. | Check if the power is shut down and the power plug is connected correctly. |
| Abnormal noise | Check you have removed the transport bolts.Check it is installed in a level and solid surface.Check the washing machine is level. |
Display warnings
| Error on the display | Cause | Solution |
| E30 | The door is not closed properly. | Restart after the door is closed. |
| Check if there are clothes stuck. | ||
| E10 | Water injecting problem while washing. | Check if the water pressure is too low. |
| Check the water supply hose is not twisted, rolled, or crushed. | ||
| Check if the inlet valve filter is blocked. |
| E21 | Overtime water draining. | Check if the drain hose is blocked. |
| E12 | Water overflow. | Restart the washing machine. |
| EXX | Other models. | Try again and contact Cecotec's Technical Support Service if the warning does not disappear. |
Please note
After performing the necessary checks, restart the machine. If the problem persists or the display shows another error code, contact the Technical Support Service.
Transporting
Important steps you must follow to transport the device:
• Unplug the device and close the water inlet tap.
- Check if the door and the detergent drawer are properly closed.
- Remove the water supply hose and drain hose from your home installation.
- Let the water drain completely out of the appliance (check the 'Drain pump filter cleaning' section).
Please note:
- Place the 4 transport bolts again in the rear part of the washing machine.
- The washing machine is very heavy. Transport it with care. Do not hold the appliance by its protruding parts to lift it. Do not use the machine door as a handle.
8. TECHNICAL SPECIFICATIONS
| Reference | 02166 |
| Model | Bolero DressCode Top Max 80 Inverter A |
| QR code |  |
| Voltage | 220-240 V~ |
| Rated frequency | 50 Hz |
| Rated Washing Power | 1900 W |
| Maximum power | 10 A |
| Maximum water pressure | 1 Mpa |
| Minimum water pressure | 0.1 MPa |
| Degree of waterproofing | IPX4 |
| Nominal wash load (dry clothes) | 8 kg |
Technical specifications may change without prior notification to improve product quality.
Made in China | Designed in Spain
9. DISPOSAL OF OLD ELECTRICAL AND ELECTRONIC APPLIANCES

This symbol indicates that, according to the applicable regulations, the product and/or battery must be disposed of separately from household waste. When this product reaches the end of its shelf life, you should dispose of the cells/batteries/accumulators and take them to a collection point designated by the local authorities.
Consumers must contact their local authorities or retailer for information concerning the correct disposal of old appliances and/or their batteries.
Compliance with the above guidelines will help protecting the environment.
10. TECHNICAL SUPPORT AND WARRANTY
Cecotec shall be liable to the end user or consumer for any lack of conformity that exists at the time of delivery of the product under the terms, conditions, and deadlines established by the applicable regulations.
It is recommended that repairs are carried out by qualified personnel.
If at any moment you detect any problem with your product or have any doubt, do not hesitate to contact the official Cecotec Technical Support Service at +34 963 210 728.
11. COPYRIGHT
The intellectual property rights over the texts in this manual belong to CECOTEC
INNOVACIONES, S.L. All rights reserved. The contents of this publication may not, in whole or
in part, be reproduced, stored in a retrieval system, transmitted, or distributed by any means (electronic, mechanical, photocopying, recording or similar) without the prior authorization of CECOTEC INNOVACIONES, S.L.
1. PIÈCES ET COMPOSANTS
Img. 1
| Programma | Carico massimo raccomandato (kg) | Tempo sul display |
| Cotone (Cotton) | 8,0 | 2:40 |
| Sintetici (Synthetics) | 4,0 | 2:20 |
| Mix | 8,0 | 1:20 |
| Jeans | 8,0 | 1:40 |
| Sportswear | 4,0 | 0:47 |
| 20 °C | 4,0 | 1:01 |
| Cura bambini (Baby Care) | 8,0 | 2:01 |
| Pulizia cestello (AutoClean) | - | 1:18 |
| Centrifuga (Spin Only) | 8,0 | 0:12 |
| Risciacquo (Rinse&Spin) | 8,0 | 0:20 |
| Lana (Wool) | 2,0 | 1:07 |
| Steam (Vapore) | 4,0 | 1:47 |
| ECO 40-60 | 8,0 | 3:38 |
| Rapido 45' | 2,0 | 0:45 |
| Quick 15' | 2,0 | 0:15 |
| Ciclo | Capacità normale (kg) | Temperatura impostata (°C) | Durata del ciclo (h:min) | Consumo di energia (kWh/ciclo) | Consumo di acqua (l/ciclo) | Temperatura massima (°C) (1) | Umidità residua/ velocità di rotazione (%/ rpm) (2) |
| Quick 15' | 2,0 | Fredda | 0:15 | 0.026 | 34 | Fredda | 53%/800 |
| 20°C | 4.0 | 20 | 1:01 | 0.183 | 47 | 20 | 70 %/800 |
| Cotton (cotone) | 8.0 | 60 | 2:45 | 1.394 | 71 | 60 | 53%/1300 |
| Sintetici (Synthetics) | 4.0 | 40 | 2:20 | 0.625 | 34 | 40 | 35 %/800 |
| Mix | 8.0 | 40 | 1:20 | 0.754 | 44 | 40 | 70 %/800 |
| Eco 40-60 (3) | 8.0 | -- | 3:38 | 0.739 | 71 | 38 | 53.9%/1250 |
| 4.0 | -- | 2:48 | 0.456 | 47 | 32 | 53.9%/1250 | |
| 2,0 | -- | 2:48 | 0.196 | 38 | 23 | 53.9%/1250 |
7. PROBLEEMOPLOSSING
Fig./Img./Abb./Afb./Rys./Obr.5

Fig./Img./Abb./Afb./Rys./Obr.6
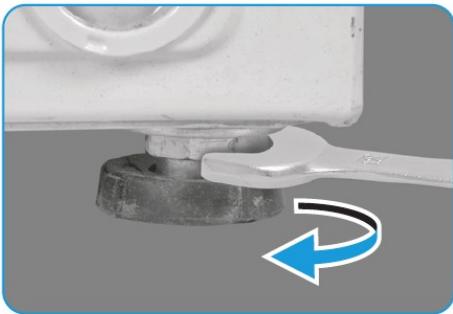
Fig./Img./Abb./Afb./Rys./Obr.7
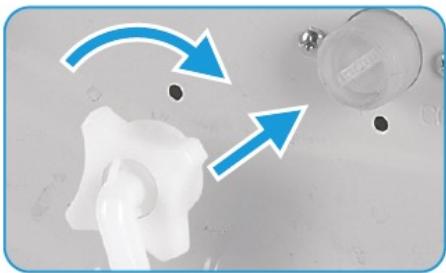
Fig./Img./Abb./Afb./Rys./Obr.8

Fig./Img./Abb./Afb./Rys./Obr.9

Fig./Img./Abb./Afb./Rys./Obr.10

Fig./Img./Abb./Afb./Rys./Obr.11


Fig./Img./Abb./Afb./Rys./Obr.12
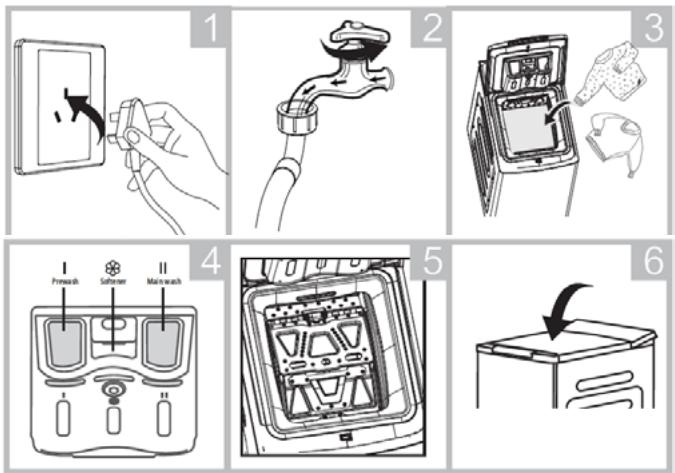
Fig./Img./Abb./Afb./Rys./Obr.13

Fig./Img./Abb./Afb./Rys./Obr.14
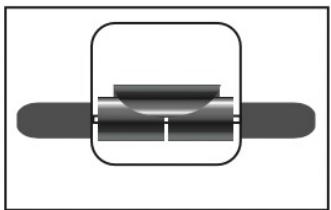
Fig./Img./Abb./Afb./Rys./Obr.15
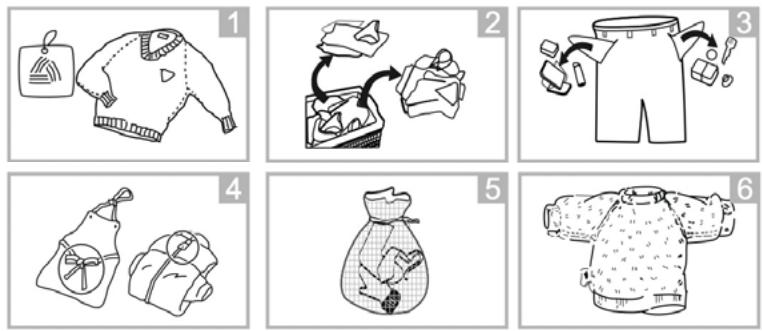
Fig./Img./Abb./Afb./Rys./Obr.16

Fig./Img./Abb./Afb./Rys./Obr.17
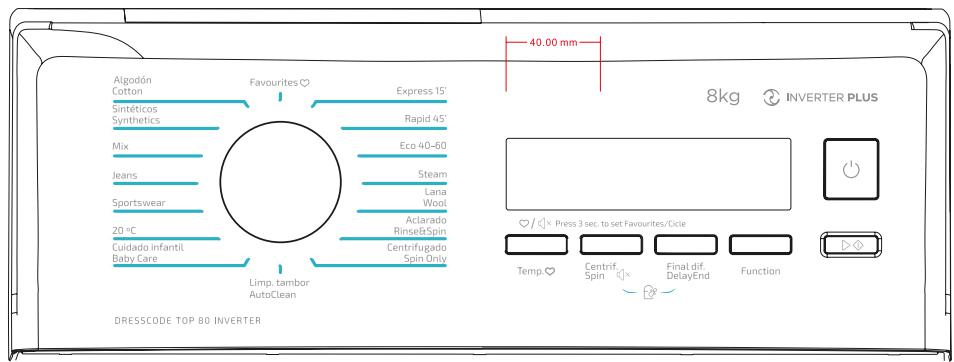
Fig./Img./Abb./Afb./Rys./Obr.18

Fig./Img./Abb./Afb./Rys./Obr.19
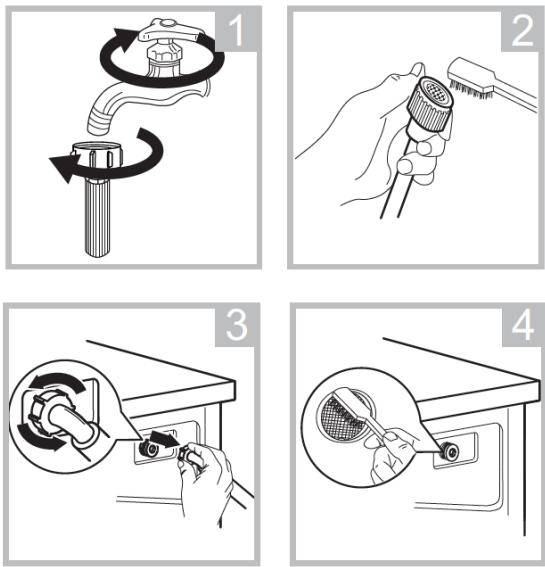
Fig./Img./Abb./Afb./Rys./Obr.20


Fig./Img./Abb./Afb./Rys./Obr.21
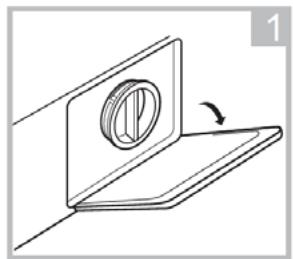


Fig./Img./Abb./Afb./ Rys./Obr.22
www.cecotec.es
- SOMMAIRE
- Warning: risk of electric shock
- Installation location and surrounding
- Installation
- Electrical connections
- Do not use an extension cord or multiple sockets.
- Water connection
- Operation and maintenance
- Transporting
- Recommended use
- INSTRUCTIONS DE SÉCURITÉ
- Accessories
- Fig. 2
- NOTE:
- BEFORE USE
- Box content
- INSTALLATION
- Installation area
- Previous steps
- Step 1. Acoustic foam
- Fig. 4
- Step 2. Removing the transport bolts
- Warning
- Step 3. Feet adjustment
- Step 4. Water supply hose connection
- Please note
- Step 5. Drain hose connection
- OPERATION
- Quick Start
- Before washing
- Washing
- After washing
- Before each washing
- Fig. 16
- Detergent drawer
- Fig. 17
- ENGLISH
- CONTROL PANEL
- Fig. 18
- Fig. 19
- Pre-Wash
- Extra rinse
- Delay Start
- To cancel the delay start function:
- Temp.
- Spin
- Child Lock
- Mute
- Favourites
- CLEANING AND MAINTENANCE
- Cleaning the exterior
- Cleaning the drum
- Cleaning the inlet filter
- Cleaning the detergent drawer
- Fig. 21
- Cleaning the drain pump filter
- Fig. 22
- TROUBLESHOOTING
- TECHNICAL SPECIFICATIONS
- DISPOSAL OF OLD ELECTRICAL AND ELECTRONIC APPLIANCES
- TECHNICAL SUPPORT AND WARRANTY
- COPYRIGHT
- PIÈCES ET COMPOSANTS
- PROBLEEMOPLOSSING
Brand : CECOTEC
Model : Bolero Dresscode Top Max 80 Inverter A
Category : Washing machine