
HTC-V10X - Headphones ONKYO - Free user manual and instructions
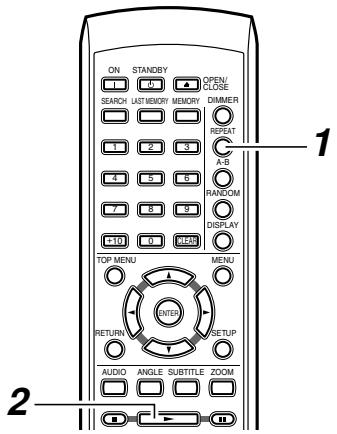
Find the device manual for free HTC-V10X ONKYO in PDF.

| Product type | DVD player / 5.1 home theater system controller |
| Dimensions (W x H x D) | 155 x 94 x 297 mm |
| Weight | 1.9 kg |
| Power supply | AC 230-240 V, 50 Hz |
| Power consumption | 11 W (standby: 0.65 W) |
| Playable formats | DVD-video, DVD-R/RW, audio CD, CD-R/RW, Video CD, MP3, WMA, JPEG |
| Video outputs | Composite, S-Video, component video (Y/Pb/Pr) |
| Audio outputs | Optical digital, coaxial digital, stereo analog (RCA) |
| Playback functions | Programmed (32 steps), random, repeat (title/chapter/disc), A-B, zoom, Last Memory, time search |
| Maintenance and cleaning | Clean with a soft dry cloth. Do not use solvents. |
| Safety | Do not expose to moisture. Do not open the casing (Class 1 laser product). |
| Spare parts and repairability | Contact Onkyo after-sales service. No user-serviceable parts. |
| General information | Brand: ONKYO. Model: HTC-V10X. Made in Japan. |
Frequently Asked Questions - HTC-V10X ONKYO
User questions about HTC-V10X ONKYO
0 question about this device. Answer the ones you know or ask your own.
Ask a new question about this device
Download the instructions for your Headphones in PDF format for free! Find your manual HTC-V10X - ONKYO and take your electronic device back in hand. On this page are published all the documents necessary for the use of your device. HTC-V10X by ONKYO.
USER MANUAL HTC-V10X ONKYO
Advanced Operation 43
About Discs 74
Troubleshooting 79
Thank you for purchasing the Onkyo HTC-V10X DVD Player. Read this manual carefully before using your new DVD Player. A good understanding of its features and operation will allow you to achieve optimum performance and enjoyment.
Glossary 82
Specifications 84
Keep this manual for future reference.

WARNING:
TO REDUCE THE RISK OF FIRE OR ELECTRIC SHOCK,DO NOT EXPOSE THIS APPARATUS TO RAIN OR MOISTURE.
CAUTION:
TO REDUCE THE RISK OF ELECTRIC SHOCK, DO NOT REMOVE COVER (OR BACK). NO USER-SERVICEABLE PARTS INSIDE. REFER SERVICING TO QUALIFIED SERVICE PERSONNEL.

WARNING
OF ELECTRICS DO NOT OPEN
AVIS
RISQUE DE CHOC ELECTROIQUE NE PAS OUIVIER


The lightning flash with arrowhead symbol, within an equilateral triangle, is intended to alert the user to the presence of uninsulated "dangerous voltage" within the product's enclosure that may be of sufficient magnitude to constitute a risk of electric shock to persons.

The exclamation point within an equilateral triangle is intended to alert the user to the presence of important operating and maintenance (servicing) instructions in the literature accompanying the appliance.
Important Safety Instructions
-
Read these instructions.
-
Keep these instructions.
-
Heed all warnings.
-
Follow all instructions.
-
Do not use this apparatus near water.
-
Clean only with dry cloth.
-
Do not block any ventilation openings. Install in accordance with the manufacturer's instructions.
-
Do not install near any heat sources such as radiators, heat registers, stoves, or other apparatus (including amplifiers) that produce heat.
-
Do not defeat the safety purpose of the polarized or grounding-type plug. A polarized plug has two blades with one wider than the other. A grounding type plug has two blades and a third grounding prong. The wide blade or the third prong are provided for your safety. If the provided plug does not fit into your outlet, consult an electrician for replacement of the obsolete outlet.
-
Protect the power cord from being walked on or pinched particularly at plugs, convenience receptacles, and the point where they exit from the apparatus.
-
Only use attachments/accessories specified by the manufacturer.
-
Use only with the cart, stand, tripod, bracket, or table specified by the manufacturer, or sold with the apparatus. When a cart is used, use caution when moving the cart/apparatus combination to avoid injury from tip-over.
PORTABLE CART WARNING
-
Unplug this apparatus during lightning storms or when unused for long periods of time.
-
Refer all servicing to qualified service personnel. Servicing is required when the apparatus has been damaged in any way, such as power-supply cord or plug is damaged, liquid has been spilled or objects have fallen into the apparatus, the apparatus has been exposed to rain or moisture, does not operate normally, or has been dropped.
-
Damage Requiring Service
Unplug the apparatus from the wall outlet and refer servicing to qualified service personnel under the following conditions:
A. When the power-supply cord or plug is damaged,
B. If liquid has been spilled, or objects have fallen into the apparatus,
C. If the apparatus has been exposed to rain or water,
D. If the apparatus does not operate normally by following the operating instructions. Adjust only those controls that are covered by the operating instructions as an improper adjustment of other controls may result in damage and will often require extensive work by a qualified technician to restore the apparatus to its normal operation,
E. If the apparatus has been dropped or damaged in any way, and
F. When the apparatus exhibits a distinct change in performance this indicates a need for service.
- Object and Liquid Entry
Never push objects of any kind into the apparatus through openings as they may touch dangerous voltage points or short-out parts that could result in a fire or electric shock.
The apparatus shall not be exposed to dripping or splashing and no objects filled with liquids, such as vases shall be placed on the apparatus.
Don't put candles or other burning objects on top of this unit.
- Batteries
Always consider the environmental issues and follow local regulations when disposing of batteries.
- If you install the apparatus in a built-in installation, such as a bookcase or rack, ensure that there is adequate ventilation.
Leave 20cm (8") of free space at the top and sides and 10~cm (4^ ) at the rear. The rear edge of the shelf or board above the apparatus shall be set 10 cm (4^ ) away from the rear panel or wall, creating a flue-like gap for warm air to escape.


Precautions
For British models
Replacement and mounting of an AC plug on the power supply cord of this unit should be performed only by qualified service personnel.
IMPORTANT
The wires in the mains lead are coloured in accordance with the following code:
Blue: Neutral
Brown: Live
As the colours of the wires in the mains lead of this apparatus may not correspond with the coloured markings identifying the terminals in your plug, proceed as follows:
The wire which is coloured blue must be connected to the terminal which is marked with the letter N or coloured black.
The wire which is coloured brown must be connected to the terminal which is marked with the letter L or coloured red.
IMPORTANT
The plug is fitted with an appropriate fuse. If the fuse needs to be replaced, the replacement fuse must approved by ASTA or BSI to BS1362 and have the same ampere rating as that indicated on the plug. Check for the ASTA mark or the BSI mark on the body of the fuse.
IF THE FITTED MOULDED PLUG IS UNSUITABLE FOR THE SOCKET OUTLET IN YOUR HOME THEN THE FUSE SHOULD BE REMOVED AND THE PLUG CUT OFF AND DISPOSED OF SAFELY. THERE IS A DANGER OF SEVERE ELECTRICAL SHOCK IF THE CUT OFF PLUG IS INSERTED INTO ANY 13 AMPERE SOCKET.
If in any doubt, consult a qualified electrician.
For European Models
Declaration of Conformity
We. ONKYO EUROPE ELECTRONICS GmbH LIEGNITZERSTRASSE 6, 82194 GROEBENZELL, GERMANY

declare in own responsibility, that the ONKYO product described in this instruction manual is in compliance with the corresponding technical standards such as EN60065, EN55013, EN55020 and EN61000-3-2, -3-3.
GROEBENZELL, GERMANY

ONKYO EUROPE ELECTRONICS GmbH

1. Region Numbers
The DVD standard uses region numbers to control how discs can be played around the world, the world being divided into six regions. This unit will only play DVD discs that match its region number, which can be found on its rear panel (e.g., ①).
2. About this Manual
This manual explains how to use all of this unit's functions. Although the DVD standard offers many special features, not all discs use them all, so depending on the disc being played, this unit may not respond to certain functions. See the disc's sleeve notes for supported features.
When you attempt to use a DVD feature that is not available, this logo may appear onscreen, indicating that the feature is not supported by the current disc or this unit.

3. Recording Copyright
Unless it's for personal use only, recording copyrighted material is illegal without the permission of the copyright holder.
4. Power
WARNING
BEFORE PLugging IN THE UNIT FOR THE FIRST TIME, READ THE FOLLOWING SECTION CAREFULLY.
AC outlet voltages vary from country to country. Make sure that the voltage in your area meets the voltage requirements printed on this unit's rear panel (e.g., AC 230-240 V, 50 Hz).
Setting the [STANDBY/ON] switch to STANDBY does not fully shutdown the DV-S155X. If you do not intend to use the DV-S155X for an extended period, remove the power cord from the AC outlet.
5. Never Touch this Unit with Wet Hands
Never handle this unit or its power cord while your hands are wet or damp. If water or any other liquid gets inside this unit, have it checked by your Onkyo dealer.
6. Installing this Unit
- Install this unit in a well-ventilated location. Ensure that there's adequate ventilation all around this unit, especially if it's installed in an audio rack. If the ventilation is inadequate, the unit may overheat, leading to malfunction.
- Do not expose this unit to direct sunlight or heat sources, because its internal temperature may rise, shortening the life of the optical pickup.
- Avoid damp and dusty places, and places subject to vibrations from loudspeakers. Never put the unit on top of, or directly above a loudspeaker.

Precautions—Continued
- Install this unit horizontally. Never use it on its side or on a sloping surface, because it may cause a malfunction.
- If you install this unit near a TV, radio, or VCR, the picture and sound quality may be affected. If this occurs, move this unit away from the TV, radio, or VCR.
7. Care
Occasionally, you should dust this unit all over with a soft cloth. For stubborn stains, use a soft cloth dampened with a weak solution of mild detergent and water. Dry the unit immediately afterwards with a clean cloth. Do not use abrasive cloths, thinners, alcohol, or other chemical solvents, because they may damage the finish or remove the panel lettering.
8. Handling Notes
- If you need to transport this unit, use the original packaging to pack it how it was when you originally bought it.
- Do not use volatile liquids, such as insect sprays, near this unit. Do not leave rubber or plastic items on this unit for a long time, because they may leave marks on the case.
- This unit's top and rear panels may get warm after prolonged use. This is normal.
- When you've finished using this unit, remove all discs and turn off the power.
- If you do not use this unit for a long time, it may not work properly the next time you turn it on, so be sure to use it occasionally.
9. To Obtain a Clear Picture
This unit is a high-tech, precision device. If the lens on the optical pickup, or the disc drive mechanism becomes dirty or worn, the picture quality may be affected. To maintain the best picture quality, we recommend regular inspection and maintenance (cleaning or worn part replacement) every 1,000 hours of use depending on the operating environment. Contact your Onkyo dealer for details.
10. Moisture Condensation
Moisture condensation may damage this unit.
Read the following carefully:
When you take a glass containing a cold drink outside on a summer's day, drops of water, called condensation, form on the outside of the glass.
Similarly, moisture may condense on the lens of the optical pickup, one of the most important parts inside this unit.
- Moisture condensation can occur in the following situations:
The unit is moved from a cold place to a warm place.
A heater is turned on, or cold air from an air conditioner is hitting the unit.
In the summer, when this unit is moved from an air conditioned room to a hot and humid place.
The unit is used in a humid place.
- Do not use this unit when there's the possibility of moisture condensation occurring. Doing so may damage your discs and certain parts inside this unit.
If condensation does occur, remove all discs and leave this unit turned on for two to three hours.
By this time, the unit will have warmed up and any condensation will have evaporated. To reduce the risk of condensation, keep this unit connected to a wall outlet.
This unit contains a semiconductor laser system and is classified as a "CLASS 1 LASER PRODUCT". So, to use this model properly, read this Instruction Manual carefully. In case of any trouble, please contact the store where you purchased the unit.
To prevent being exposed to the laser beam, do not try to open the enclosure.
DANGER:
VISIBLE AND INVISIBLE LASER RADIATION WHEN OPEN AND INTERLOCK FAILED OR DEFEATED. DO NOT STARE INTO BEAM.
CAUTION:
THIS PRODUCT UTILizes A LASER. USE OF CONTROLS OR ADJUSTMENTS OR PERFORMANCE OF PROCEDURES OTHER THAN THOSE SPECIFIED HEREIN MAY RESULT IN HAZARDOUS RADIATION EXPOSURE.
The label on the right is applied on the rear panel.

- This unit is a CLASS 1 LASER PRODUCT
and employs a laser inside the cabinet. - To prevent the laser from being exposed, do not remove the cover. Refer servicing to qualified personnel.
Features
- Plays DVD video, DVD-R/DVD-RW (video mode), music CD/CD-R/CD-RW, video CD, MP3 CD, WMA ^*1 , and JPEG
- Component video output jacks for high-quality playback images
- Progressive scan is supported for smoother video playback (NTSC only)
- Program playback lets you store up to 32 steps
- Resume function lets you continue playback from where you stopped, and Last Memory function lets you play back the rest of a previously-viewed disc
- DLA Link (Digital Rec Level Adjustment) function automatically sets the recording level when recording from CD to MD
- Dolby ^2 Digital/DTS ^3 /PCM digital audio output jack
- Two digital output jacks that can be individually set to different digital output formats
1 Windows Media, and the Windows logo are trademarks, or registered trademarks of Microsoft Corporation in the United States and/or other countries.
2 Manufactured under license from Dolby Laboratories. "Dolby", "Pro Logic" and the double-D symbol are trademarks of Dolby Laboratories.
*3 "DTS" and "DTS Digital Out" are trademarks of Digital Theater Systems, Inc.

In catalogs and on packaging, the letter added to the end of the product name indicates the color of the DV-S155X. Specifications and operation are the same regardless of color.
Table of Contents
Important Safety Instructions 2
Precautions 3
Features 5
Table of Contents 6
Index to Parts and Controls 8
Front panel 8
Display section 9
Rear panel 10
Remote control (RC-522DV) 11
Preparing the Remote Controller 12
Inserting the batteries 12
Using the remote controller 12
Connections 13
Before Making Any Connections 13
AV Cables & Sockets 14
Connecting your television 15
Connecting your amp 17
Connecting the RI cable 18
Connecting to the Onkyo Separate Collection Series components 19
System functions 19
Connections and settings when using with the PR-155X 20
Connecting the power cord 21
Turning on the power 21
Initial DVD setup 22
DVD playback (Basic playback) 24
Playing a DVD 24
Selecting audio, subtitles, and angles 27
Finding the location you want to watch or hear 29
Audio formats and sound effects 31
Playing a CD or video CD (Basic playback) 32
Playing a CD or video CD 32
Switching the audio 35
Searching for a location 36
Playing MP3, WMA, and JPEG (Basic playback) 38
Playing MP3 or WMA 38
Selecting a track 40
Playing a JPEG CD 41
About the included items
The Amplifier and Speaker Section of this Instruction Manual contains a complete list of the included items. Please refer to this list and make sure that no items are missing.
Table of Contents—Continued
Advanced DVD playback 43
Memory playback. 43
Random playback 45
Repeat playback 46
Repeatedly playing a selected segment (A-B Repeat Playback). 47
Last Memory. 48
Zoom 49
Advanced CD or video CD playback 50
Memory playback. 50
Random playback 52
Repeat playback 53
Repeatedly playing a selected segment (A-B Repeat Playback) 54
Last Memory. 55
Zoom 56
Advanced MP3, WMA, or JPEG playback 57
Memory playback. 57
Random playback 58
Repeat playback 59
Viewing disc information 60
Advanced setup 61
About Discs 74
Playable discs 74
Non-playable discs 74
DVD control limitations 75
About video CDs 75
DVD-R/DVD-RW playback 75
Regarding CD-R/CD-RW playback 76
Regarding MP3/WMA/JPEG playback 76
Regarding MP3 playback 76
Regarding WMA playback 76
Regarding JPEG playback 76
Differences in disc composition 77
Handling discs 78
Cleaning discs 78
Storing discs 78
Copyrights 78
A note regarding condensation 78
Troubleshooting 79
Glossary 82
Specifications 84


Index to Parts and Controls
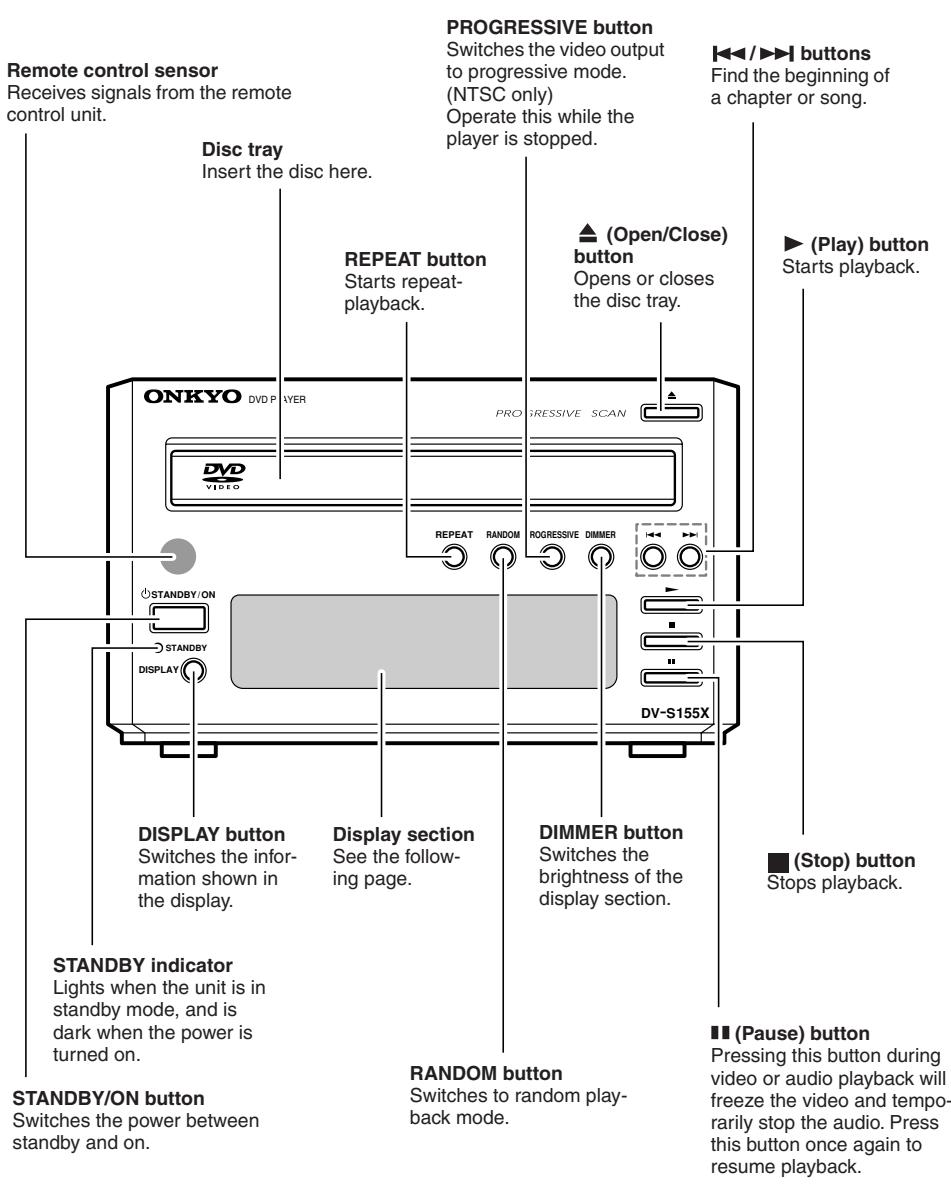
Front panel
Index to Parts and Controls—Continued
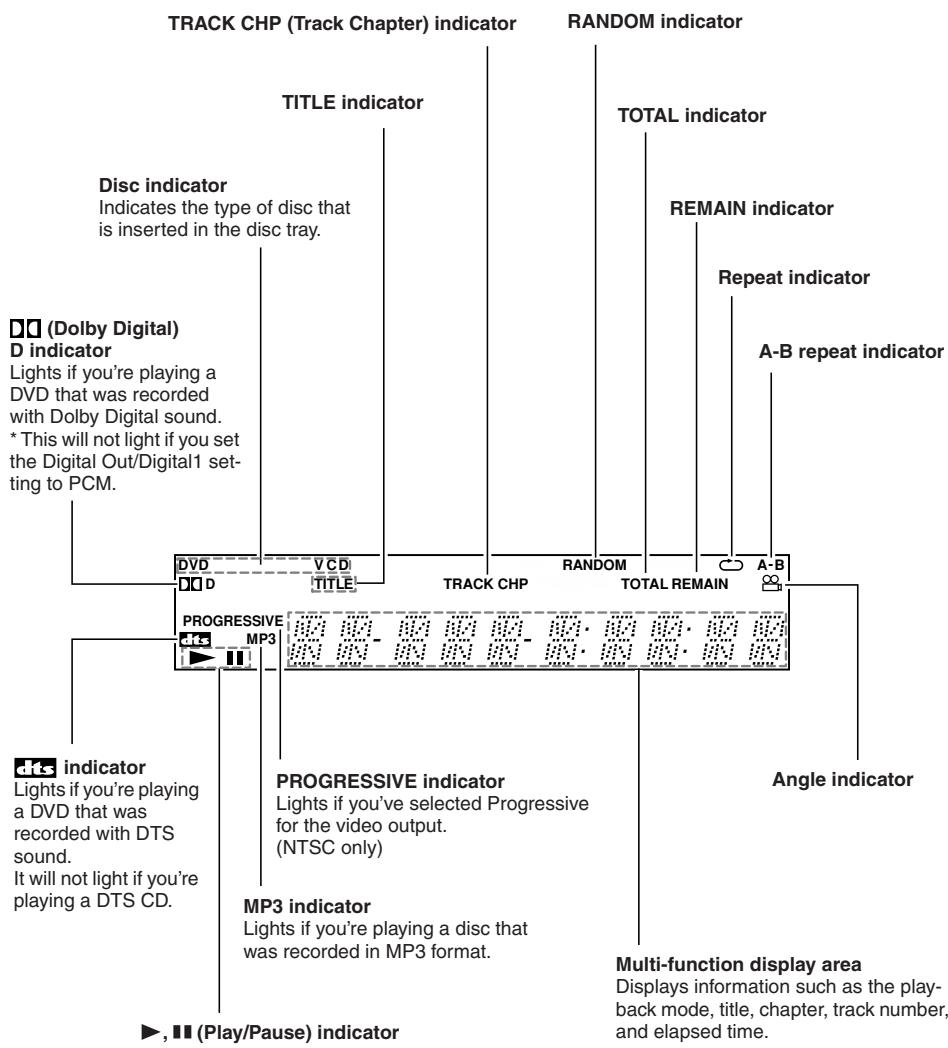
Display section

Index to Parts and Controls—Continued
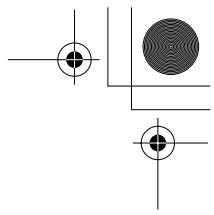
Rear panel
RIjacks
These jacks allow you to connect an Onkyo component (cassette deck, etc.) that has R1 jacks, so that its operation will be linked with the DV-S155X player. Connecting only the R1 cable is not enough to make your component work as a system.
You will also need to connect the audio connection cable for audio.
AUDIO OUTPUT (DIGITAL OPTICAL) jack
This is an optical digital output jack.
Use the included optical digital audio cable to connect this jack to your PR-155X.
SVIDEO OUTPUT jack
This connector outputs the video signal. If your television has an S-video jack, use the included S-video connection cable to connect this jack to your television.
VIDEO OUTPUT jack
This connector outputs the video signal. Use the included composite video connection cable to connect this jack to your television.
Index to Parts and Controls—Continued
Remote control (RC-522DV)
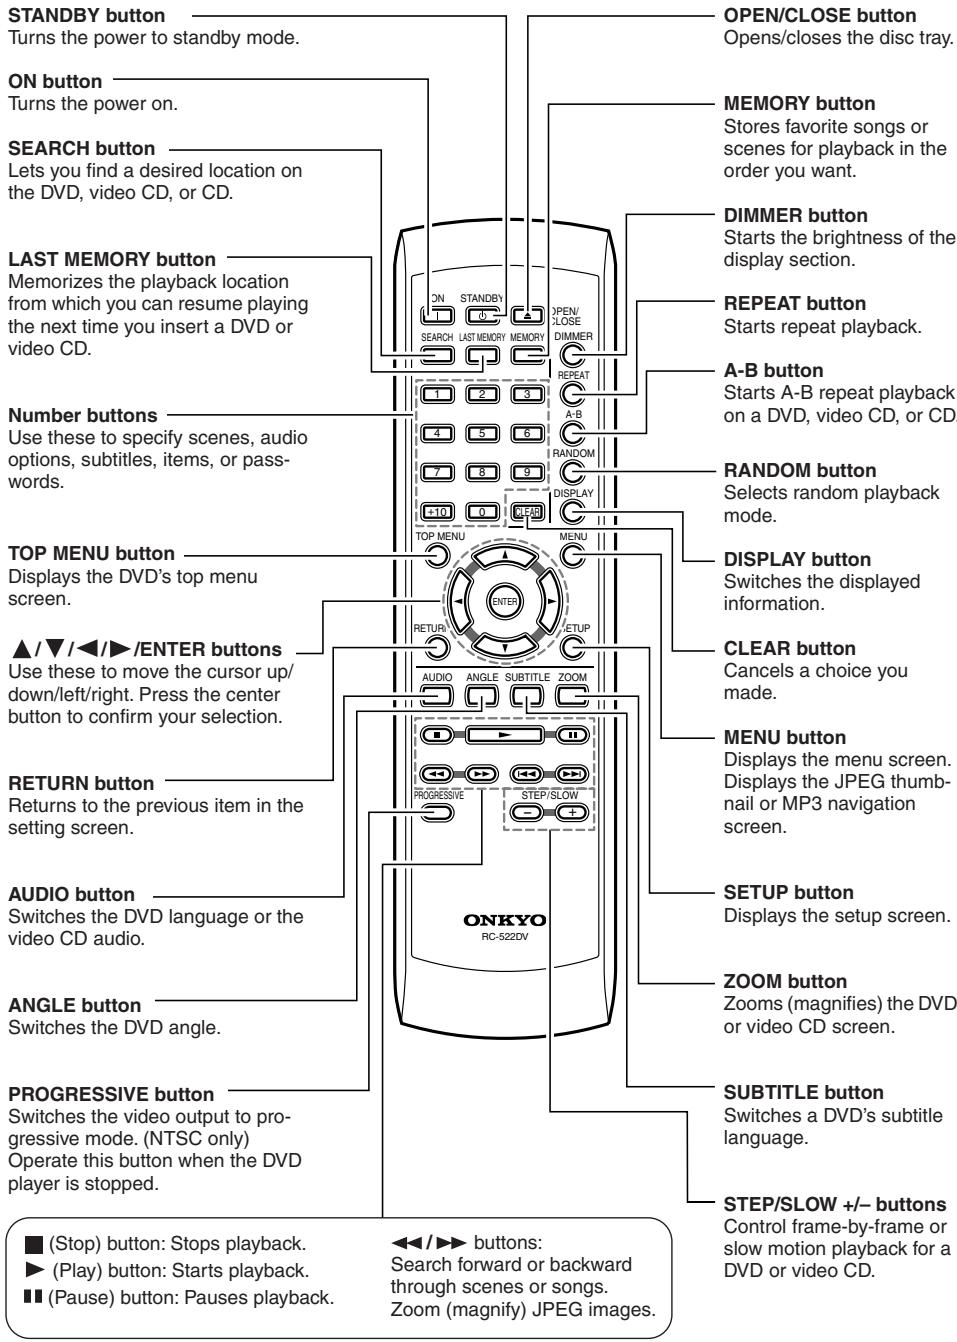
Preparing the Remote Controller
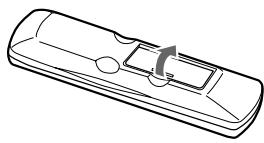
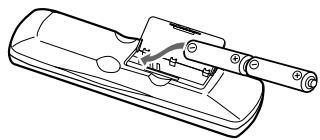
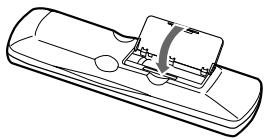
Inserting the batteries
①
②
(3)
① Detach the battery cover.
② Insert two size-AA/R6 batteries.
Be sure to match the + and - ends of the batteries with to diagram inside the battery compartment.
③ Attach the battery cover.
- Do not mix new batteries with old batteries or different kinds of batteries.
- To avoid corrosion, remove the batteries if you do not intend to use the remote controller for a long time.
- Remove dead batteries immediately to avoid damage from corrosion. If the remote controller does not operate smoothly, replace both batteries at the same time.
- The batteries should last for about six months, although this will vary with usage.
Using the remote controller
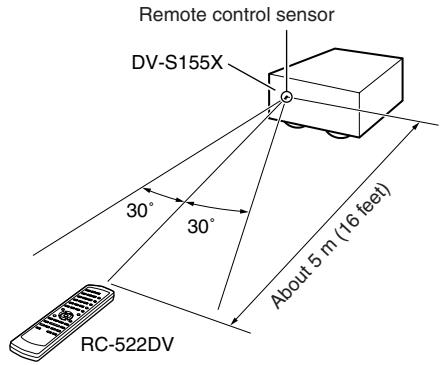
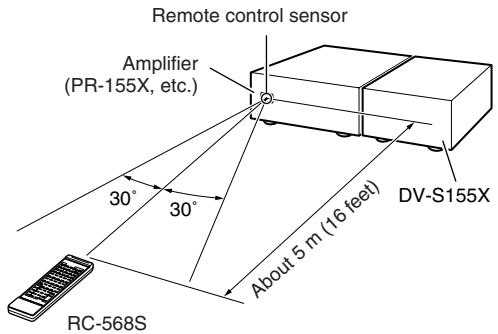
Point the remote controller toward the remote control sensor.
- Place the unit away from strong light, such as direct sunlight or inverted fluorescent light, which can prevent proper operation of the remote controller.
- Using another remote controller of the same type in the same room or using the unit near equipment that uses infrared rays may cause operational interference.
- Do not put any object (such as a book) on the remote controller. The buttons of the remote controller may be pressed by mistake, which drains the batteries.
- Make sure the audio rack doors do not have colored glass. Placing the unit behind such doors may prevent proper remote controller operation.
- If there is an obstacle between the remote controller and the remote control sensor, the remote controller will not operate.
Connections
Before Making Any Connections
- Read the manuals supplied with your AV components.
- Don't connect the power cord until you've completed and double-checked all audio and video connections.
Optical Digital Inputs
The DV-S155X's optical digital inputs have shutter-type covers that open when an optical plug is inserted and close when it's removed. Push plugs in all the way.
Caution: To prevent shutter damage, hold the optical plug straight when inserting and removing.
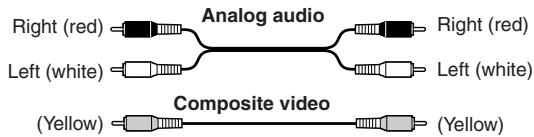
RCA AV Connection Color Coding
RCA-type AV connections are usually color coded: red, white, and yellow. Use red plugs to connect right-channel audio inputs and outputs (typically labeled "R"). Use white plugs to connect left-channel audio inputs and outputs (typically labeled "L"). And use yellow plugs to connect composite video inputs and outputs.
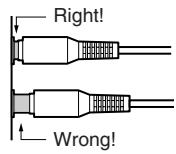
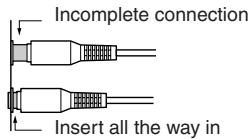
- Push plugs in all the way to make good connections (loose connections can cause noise or malfunctions).
- To prevent interference, keep audio and video connection cables away from power cords and speaker cables.
Connections—Continued
AV Cables & Sockets
Video
| Cable | Socket | Description | |
| Component video connection cable | Y Y Y P B P B P R | COMPONENT Y Y P B P R | Component video separates the luminance (Y) and color difference signals (PR, PB), providing the best picture quality. (Some TV manufacturers label their component video sockets slightly differently.) |
| S-video connection cable | S SVIDEO | SVIDEO | S-Video separates the luminance and color signals and provides better picture quality than composite video. |
| Composite video connection cable | VIDEO | VIDEO | Composite video is commonly used on TVs, VCRs, and other video equipment. Use only dedicated composite video connection cables. |
Audio
| Cable | Socket | Description | |
| Optical cable | OPTICAL | Offers the best sound quality and allows you to enjoy surround sound (e.g., Dolby Digital, DTS). The audio quality is the same as for coaxial. | |
| Coaxial cable | COAXIAL | Offers the best sound quality and allows you to enjoy surround sound (e.g., Dolby Digital, DTS). The audio quality is the same as for optical. | |
| Audio connection cable | L R | This cable carries analog audio. It's the most common connection format for analog audio, and can be found on virtually all AV components. | |
Connections—Continued
Connecting your television
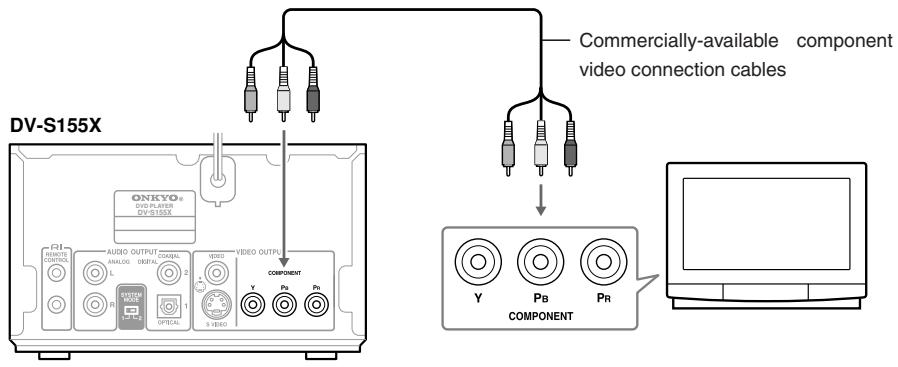
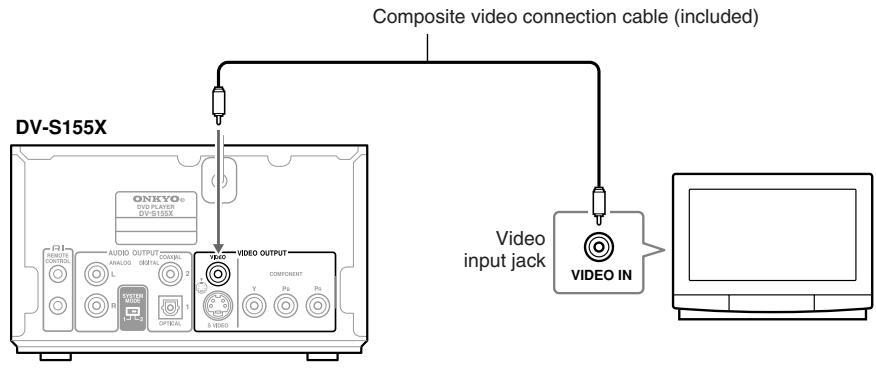
Here's how to connect the DV-S155X to your television so you can view DVD and other images. The connection method depends on the type of connector you use. Depending on the connectors that your television has, connect either the component jacks, the S-video jack, or the composite jack.
If your television has component video input jacks
Use commercially-available component video connection cables to connect the DV-S155X's component video output jacks to the component video inputs of your television.


To switch the video output type
If your television supports progressive-scan video, you can use the PROGRESSIVE button on the DV-S155X or on the remote to switch the video output type. Do this while playback is stopped.
Progressive (NTSC only):
This is the higher-quality mode that produces a sharper image. Choose this if you've connected a television that supports progressive input. The "PROGRESSIVE" indicator in the display area will light.
Interlaced (default setting):
Choose this if you've connected a television that does not support progressive video input.
Note
- If you choose Progressive when the DV-S155X is connected to a television that doesn't support progressive input, the image will not be output correctly. Press the remote's PROGRESSIVE button to turn off progressive mode.
- The image may be garbled when you switch between progressive and interlaced modes.
Regarding the DV-S155X's compatibility with progressive-scan televisions
At present, some progressive-scan televisions are not completely compatible with the DV-S155X, and can produce garbled images. If you experience problems when using progressive playback, turn off progressive mode on the DV-S155X and use the progressive function provided on your television.


Connections—Continued
If your television has an S-video jack
Connect the included S-video connection cable to the S-video jack.

If your television has neither component jacks nor a S-video jack
Connect the included yellow composite video connection cable to the video jack.


Connections—Continued
Connecting your amp
- Refer to the Instruction Manual of your amp as well as the instructions given here.
- Before you make connections, turn off the power of all the equipment you're going to connect, and disconnect all power cords from electrical outlets. Don't plug in the DV-S155X's power cord yet.
- When making connections, make sure that the plug is inserted all the way into the jack.
Note
Since the DV-S155X contains components that are vulnerable to heat, don't place it on top of an amp or other source of heat. Doing so can cause malfunctions.
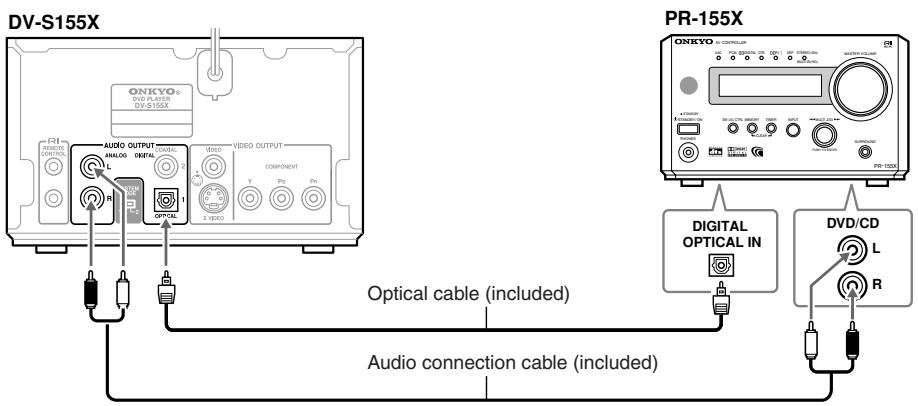
① Connect an amp that supports Dolby Digital or DTS, such as the PR-155X. This allows you to enjoy Dolby Digital or DTS audio.
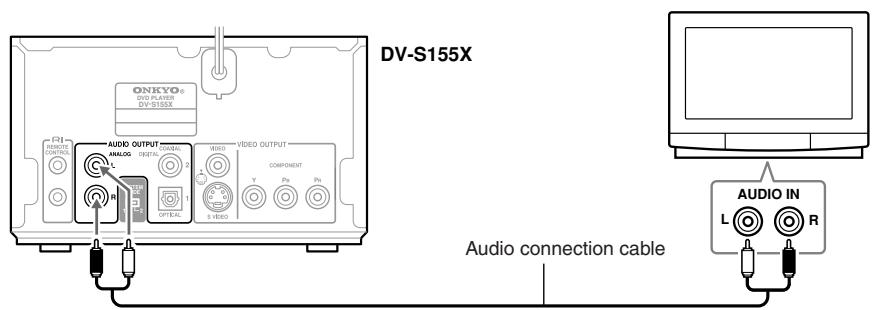
② Connect the audio inputs of your television
Connecting the PR-155X
Use an optical cable to connect the DV-S155X's AUDIO OUTPUT DIGITAL OPTICAL jack to the optical digital input jack of your amp.
Use the included audio connection cable to connect the DV-S155X's AUDIO OUTPUT ANALOG jacks to the audio input jacks of your amp.
Tip
You can enjoy 5.1 ch playback with DVD video simply by connecting the digital jack. However, you will need to make the analog connections as well if you want to perform analog recording from the DV-S155X onto an MD recorder or other device connected to the amp, or in order to enable system operation with an Onkyo-manufactured amp.
Connections—Continued
Connecting to the audio inputs of your television
The audio will be heard from the built-in speakers of your television.
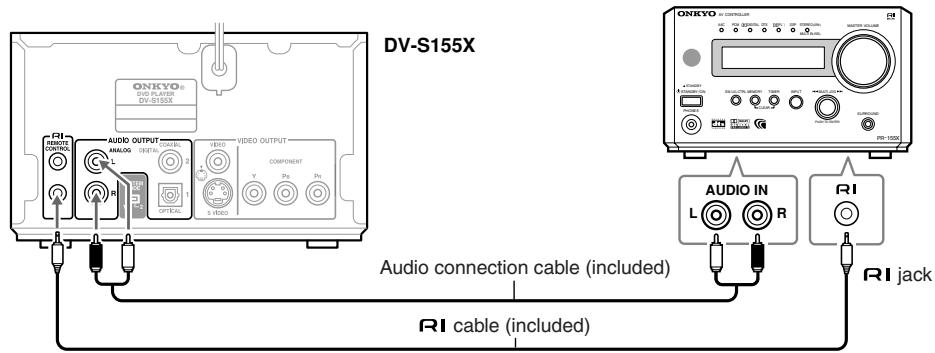
Connecting the RI cable
If you use the included RI cable to connect the DV-S155X to an Onkyo-manufactured amp or tuner amp that has an RI connector, you will be able to use the tuner amp's remote to control the DV-S155X.
- For details on the R system functions that are available, refer to the Instruction Manual for your device.
- If your device has two RI jacks, both have the identical function. You may connect the cable to either jack.
- Simply connecting the RI jacks is not enough to make your component operate as a system. You must also connect the audio connection cable correctly.

Connecting to the Onkyo Separate Collection Series components
System functions
If you're using the DV-S155X together with a PR-155X or an Onkyo separate collection series, connecting the RI cable and audio connection cable will allow you to perform the following RI system functions. RI cables allow Onkyo products to operate as a system.
To make system connections

Refer to the DV-S155X Instruction Manual.
Auto power-on
When you turn on the power of the DV-S155X or begin playback, the PR-155X's power will automatically turn on. If you don't want to use the DV-S155X, you can turn off just the DV-S155X.
Direct change
When you press the DV-S155X's (Play) button, the PR-155X's input will automatically switch to DVD.
Remote control operation
The PR-155X's remote can control the DV-S155X.

Refer to the PR-155X Instruction Manual for details.
Timer operation
You can use timer playback (CDs only).

Refer to the PR-155X Instruction Manual for details.


- These functions will not work unless connections are correct. You must connect the audio connection cable and RI cables correctly.
- For more about system functions, please also refer to the Instruction Manuals for your other component.


Connecting to the Onkyo Separate Collection Series components—Continued
Connections and settings when using with the PR-155X
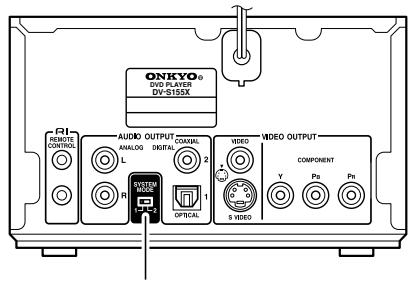
SYSTEM MODE switch
1 Make system connections between the DV-S155X and the PR-155X
Make sure that the DV-S155X's AUDIO OUTPUT ANALOG jacks are connected to the PR-155X's DVD/CD jacks, and that the RI jacks are connected (see pages 17, 18).
2 SYSTEM MODE Make sure that the DV-S155X's SYSTEM MODE switch is set to "1."
This is set to "1" when you purchased the unit.
3 Set the PR-155X's input display name to "DVD."
For details on how to switch the input display name, refer to the PR-155X's Instruction Manual.

Connections—Continued
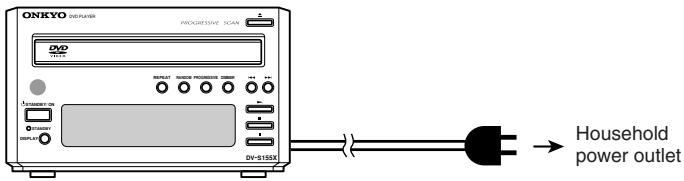
Connecting the power cord
Make sure that you've completed all connections. When you connect the power cord, the DV-S155X will enter standby mode, and the STANDBY indicator will light.
Example:

Turning on the power
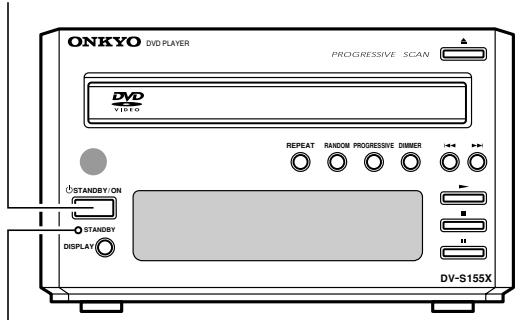
STANDBY/ON

STANDBY

STANDBY indicator
The DV-S155X
STANDBY/ON
or

Remote control
Press the DV-S155X's STANDBY/ON button or the remote control's ON button
To turn the power off, press the DV-S155X's STANDBY/ON button or the remote control's STANDBY button.

Initial DVD setup
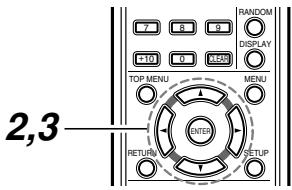
You'll use your television screen to make basic DVD settings. (You can't do this during playback.) Turn on the power of your television, and switch it to the input to which you've connected the DV-S155X. When you power-on the DV-S155X, the setup screen will appear.
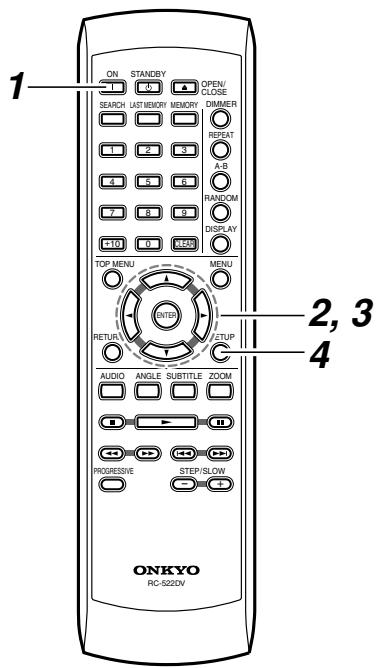
1

Press the ON button to turn on the power.
The Initial Setup screen appears on your television.
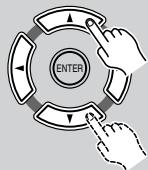
If it doesn't appear, press the SETUP button.
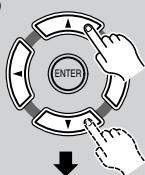
Use the / buttons to select Initial Setup ( ) and press the ENTER button.
Continues to next page


Initial DVD setup—Continued
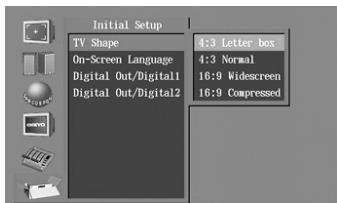
Select the shape of the connected television
Use the / buttons to select the shape of your television, and press the ENTER button.
4:3 Letter box
Choose this if you've connected a television with a 4 to 3 width-to-height ratio (standard size) television. Wide-screen images will have a black bar displayed at the top and bottom.
4:3 Normal
Choose this if you've connected a television with a 4 to 3 width-to-height ratio (standard size) television. The image is displayed using the full area of the screen, and the left and right edges of the image are cut off. If the DVD you're watching does not support this method, it will be shown in Letterbox format.
16:9 Widescreen
Choose this if you've connected a television with a 16 to 9 width-to-height ratio (widescreen).
16:9 Compressed
Choose this if you've connected a television with a 16 to 9 width-to-height ratio (widescreen) but video recorded in 4:3 format is "stretched" horizontally (to a 16:9 ratio) and you're unable to select a 4:3 ratio on your television. Video recorded in 4:3 format will be output as 4:3.
Tip
These settings may not work for some discs. For details refer to the package of the disc you are watching.
Select the On-Screen Language
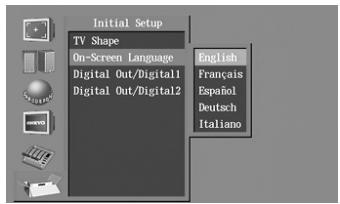
Use the / buttons to select the language that you want to view on screen, and press the ENTER button.
English: The on-screen display appears in English. (Default setting)
Français: The on-screen display appears in French.
Espanol: The on-screen display appears in Spanish.
Deutsch: The on-screen display appears in German.
Italiano: The on-screen display appears in Italian.
Note
When the DV-S155X is connected to the PR-155X, you don't need to set the Digital Out settings. See page 66 for more information.
Exit the Initial Setup screen
If the Initial Setup screen does not disappear on its own, press the SETUP button.
DVD playback (Basic playback)
Playing a DVD
To watch DVD video, turn on the power of your television, and switch the input select setting of your television to the input that the DV-S155X is connected to.

1
Loading the DVD
① Press the (Open/Close) button to open the tray
② Place the DVD on the tray
Place the disc on the tray with the label facing upward.
Tip
When in Standby mode, pressing the DVD's button will automatically turn on the power.
2
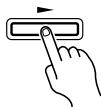
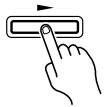
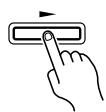
Press the (Play) button
The tray will close, the player will read the disc, and then playback will begin.
- The display shows the type of disc you inserted. It may take some time for the disc to be read.

To remove the DVD
Press the button.

DVD playback (Basic playback)—Continued
Stopping playback
Press the button.
This activates the "Resume" function.
When you press the button, playback will resume from the point where the disc stopped.
If you press the button once again, the disc will stop. (The Resume function will be cleared.)
Pausing playback

An indicator appears in the display area. Press the button once again to resume play
back from where the disc was paused.
Skipping to a chapter
To advance to a chapter
Player

Remote

During playback, press the button on the player or remote
To return to a chapter
Player

Remote

During playback, press the button on the player or remote
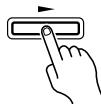
Searching forward/backward
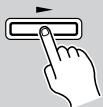
To search forward

During playback, press the
button on the remote
You can press the button repeatedly to cycle through five different speeds.
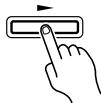
To search backward

During playback, press the
button on the remote You can press the button
repeatedly to cycle through five different speeds.
To resume normal playback
Press the button
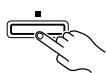
Frame advance playback
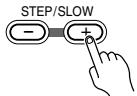
While paused, press the STEP/SLOW+ button on the remote
The picture will advance one frame each time you press the button.
Frame advance backward playback
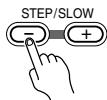
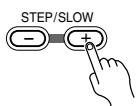
While paused, press the STEP/SLOW- button on the remote
The picture will move backward one frame each time you press the button.
To resume normal playback
Press the button.
Tip
- No sound will be heard during frame advance playback.
- For some discs, frame advance playback may cause the picture to be unstable.
- If the still image is jittery, you can adjust the image in the setup screen (see page 72).
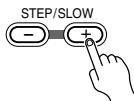
Slow motion playback
During playback, press the STEP/SLOW+ button on the remote
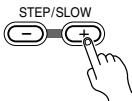
The screen will indicate "Slow 1" and the video will play in slow motion.
You can press the button
repeatedly to cycle through four different slow-motion speeds.
To play backward in slow motion
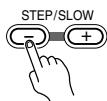
During playback, press the STEP/SLOW- button. You can press the button repeatedly to cycle through
four different slow-motion speeds.
To resume normal playback
Press the button.
Tip
No sound will be heard during slow motion playback.

DVD playback (Basic playback)—Continued
About the disc menu
Many DVDs provide a menu that lets you choose the language of the soundtrack or subtitles, to select titles or chapters, or to view special disc features. The way in which to operate the menu will depend on the disc, so please refer to the operation guide included with the disc.
To access the menu
Press the MENU button or the TOP MENU button.
Some discs may not provide a menu.
If the menu appears on your television screen when you play a DVD
Use the / / buttons or the number buttons to choose the desired language, audio format, title, or chapter, and press the ENTER button to confirm your choice.

Selecting audio, subtitles, and angles
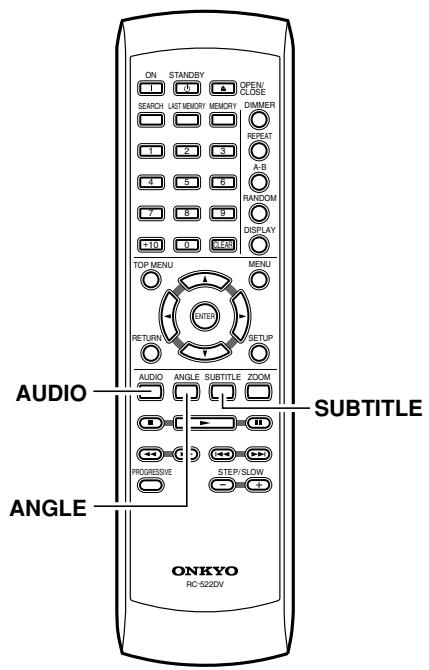
Switching the audio during playback
If the DVD contains soundtracks in more than one language, you can switch the soundtrack.

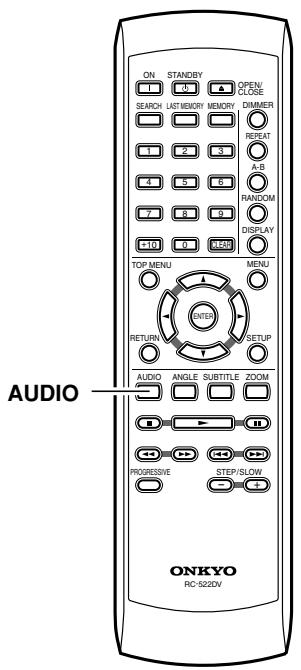
During playback, press the AUDIO button
The current audio selection is displayed. The audio selection will switch each time you press the button.
Tip
- The audio selection you choose here will revert to the original setting when you defeat the Resume function (see page 33).
- On some discs, switching the audio selection during playback will cause the video to freeze for a moment.
- To hear only the accompaniment on a karaoke DVD, choose the appropriate audio selection as listed on the disc package.
- Some DVDs do not allow you to use the remote AUDIO button to switch the audio selection during playback. If so, use the disc menu screen to make the desired selection (see page 26).
DVD playback (Basic playback)—Continued
Switching the subtitles during playback
If the DVD contains subtitles in more than one language, you can switch the subtitle language.

During playback, press the SUBTITLE button
The currently selected subtitle language is shown.
Press the button repeatedly to switch the subtitle selection.
To hide the subtitles
Press the SUBTITLE button repeatedly to choose "no subtitles."
Tip
- The subtitle setting you choose here will revert to the original setting when you defeat the Resume function (see page 33).
- Some DVDs do not allow you to use the remote SUBTITLE button to switch the subtitles during playback. If so, use the disc menu screen to make the desired selection.
Switching the camera angle
Some DVD contain multiple angles (perspectives) of the same scene, and allow you to switch angles during playback. Such DVDs carry a logo on their packaging.

When the icon appears, press the ANGLE button
When you come to a point where multiple angles have been recorded, the icon appears in the display section of the player. The angle will switch each time you press the button.
Tip
- On some discs, you may be unable to switch the angle even though the logo is displayed.
- On some discs you can use the disc menu screen to switch angles.
- Some discs prohibit you from switching angles while paused.

DVD playback (Basic playback)—Continued
Finding the location you want to watch or hear
Selecting a title/chapter for playback
Here's how to play a specific title/chapter on the DVD.
1

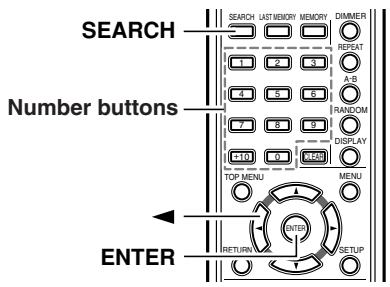
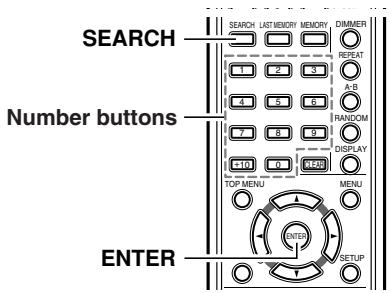
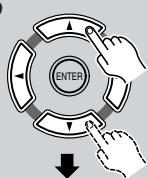
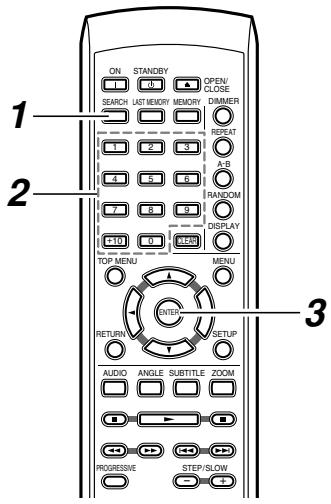
During playback, press the SEARCH button
The Disc Navigator screen appears.

2
Choose the desired title/chapter or track
To select a title on the DVD, press the button and use the number buttons to specify a number
Examples:
- To specify 3, press "3".
To specify 10, press "1" and then "0". - To specify 37, press "3" and then "7".
If you decide to cancel, press the CLEAR button.
3

Press the ENTER button
Playback will begin.
Tip
- You can also use the number buttons to select a chapter or track directly, without displaying the Disc Navigator screen. (To select 10, press “+10” and the “0”).
- If the DVD has only one title or chapter, you can't select the title or chapter.
- On some DVDs you can select titles and chapters from a menu on the DVD.
- Some DVDs may allow you to select only titles, or may not allow you to select titles.
Note
You can't select titles/chapters while using Random Playback.

DVD playback (Basic playback)—Continued
Selecting a specific time location for playback
Here's how to specify a time from which playback will start (the Time Search function).
1

During playback, press the SEARCH button twice
The Disc Navigator screen appears.

2

Use the numeric keys to specify the time location you want to play
Examples:
- To specify 21 minutes 43 seconds, press "2," "1," "4," and "3".
- To specify one hour 14 minutes (= 74 minutes 00 seconds), press "7," "4," "0," "0".
3

Press the ENTER button
Playback will begin.
Tip
- On some discs you can search from the menu. Access the menu screen and choose the desired location.
- On some discs, playback may begin from a location that is slightly different than the time you specified.
- Some DVDs disable the search function.
- You can't use the Time Search function while using Random Playback.
- This function specifies the time within the title.
DVD playback (Basic playback)—Continued
Audio formats and sound effects
5.1 channel digital surround formats such as DTS and Dolby Digital store five channels and a low-frequency effects channel, and play each of these channels back independently to replicate the auditory experience of a movie theater or concert hall.
Dolby Digital
DVD video titles bearing the DOLBY logo are encoded in this format.
DTS
DVD video titles and music CDs bearing the logo are encoded in this format.
Dolby Pro Logic
DVD video titles bearing the DOLBY SURROUND logo are encoded in this format.
Playing a CD or video CD (Basic playback)
Playing a CD or video CD
To watch a video CD, turn on your television and switch it to the input to which you connected the DV-S155X.

1

Loading a disc
① Press the (Open/Close) button to open the tray
② Place the disc on the tray
Place the disc on the tray with the label facing upward.
If you're playing a CD single, place it in the center depression of the tray.
Tip
In standby mode, pressing the button automatically turns the power on.
2
Press the (Play) button
The tray will close, the disc will be read, and playback will begin.
- The display area shows the type of disc you inserted. It may take some time for the player to read the disc.

To remove the disc
Press the button.

Playing a CD or video CD (Basic playback)—Continued
Stopping playback CD

Press the (Stop) button
Stopping playback VCD

Press the button
The "Resume" function will activ
When you press the (Play) button, playback will resume from the point where the disc stopped.
If you press the button once again, the disc will stop.
(The Resume function will be cleared.)
Pausing playback VCD CD

Press the (Pause) button.
An indicator appears in the display area. Press the button
once again to resume playback from where the disc was paused.
Skipping to a track VCD CD
To advance to a track
Player

Remote

During playback, press the button on the player or remote.
To return to a track
Player

Remote

During playback, press the button on the player or remote.
Searching forward/backward

To search forward

During playback, press the
button on the remote
You can press the button
repeatedly to cycle through
three different forward-search speeds. (The setting is shown on the television screen.)
To search backward

During playback, press the
一 button on the remote
You can press the button
repeatedly to cycle through
three different forward-search speeds. (The setting is shown on the television screen.)
Tip
No sound will be heard while searching forward or backward on a video CD.
To resume normal playback

Press the button
Frame advance playback VCD
While paused, press the STEP/SLOW+ button on the remote.
The picture will advance one frame each time you press the button.
Note
Frame advance backward playback is not available.
To resume normal playback
Press the button
Tip
- No sound will be heard during frame advance playback.
- For some discs, frame advance playback may cause the picture to be unstable.
- If the still image is jittery, you can adjust the image in the setup screen (see page 72).

Playing a CD or video CD (Basic playback)—Continued
Slow motion playback
During playback, press the STEP/SLOW+ button on the remote
The screen will indicate "Slow1" and the video will
play in slow motion.
You can press the button repeatedly to cycle through three different slow-motion speeds.
Note
Backward slow motion playback is not available.
To resume normal playback
Press the button
Tip
- No sound will be heard during slow motion playback.
Menu VCD
If a video CD has PBC (Playback Control) functionality (see "About video CDs" on page 75), you can use the menu to select tracks.
If a menu appears on your television screen while playing a video CD
Use the number buttons to select items or settings.
To play without seeing a menu screen (i.e., to defeat PBC playback)
Press the TOP MENU button while stopped. Use the number buttons to select the track you want to play.
To return to the menu during PBC
Press the RETURN button.
You'll need to turn PBC on in the Operation Setting (see page 73).


Playing a CD or video CD (Basic playback)—Continued
Switching the audio VCD
Switching the audio during playback VCD
You can switch between Stereo, Mono L, and Mono R.

During playback, press the AUDIO button
The currently selected audio setting is displayed. The setting will switch each time you press the button.
Tip
- Depending on the disc that is playing, the video may freeze for a moment when you switch the audio.
- If you are playing a karaoke title and want to hear only the accompaniment, select the audio setting as directed on the disc packaging.
Playing a CD or video CD (Basic playback)—Continued
Searching for a location
Searching for a track VCD CD
Here's how you can play back a specific track of a video CD or CD.

1
During playback, press the SEARCH button
The Disc Navigator screen appears.

Disc Navigator
1
Search
Trac
Current/Total
m = 311
m = 311 ;
412
Specify the desired track
Examples:
- To specify 3, press "3".
To specify 10, press "1" and then "0".
To specify 37, press "3" and then "7".
If you decide to cancel, press the CLEAR button.

3
Press the ENTER button.
Playback will begin.
Tip
- You can also use the number buttons to select a chapter or track directly, without displaying the Disc Navigator screen. (To select 10, press “+10” and the “0”).
- On some video CDs you can select titles and chapters from a menu on the disc.
- You can't specify a playback track or use the number buttons to select a track during PBC playback of a video CD.
Note
You can't specify playback tracks while using Random Playback.

Playing a CD or video CD (Basic playback)—Continued
Selecting a specific time location for playback VCD CD
Here's how to specify a time from which playback will start (the Time Search function).
1

During playback, press the SEARCH button twice
The Disc Navigator screen appears.

2

Use the number buttons to specify the time location you want to play.
Examples:
- To specify 21 minutes 43 seconds, press "2," "1," "4," and "3".
- To specify one hour 14 minutes (= 74 minutes 00 seconds), press "7," "4," "0," "0".
3

Press the ENTER button
Playback will begin.
Tip
- On some discs you can search from the menu. Access the menu screen and choose the desired location.
- On some discs, playback may begin from a location that is slightly different than the time you specified.
- You can't perform Time Search during PBC playback on a video CD.
You'll need to defeat PBC playback first. - Some discs disable the search function.
- You can't use the Time Search function while using Random Playback.
- This function specifies the time within the track.
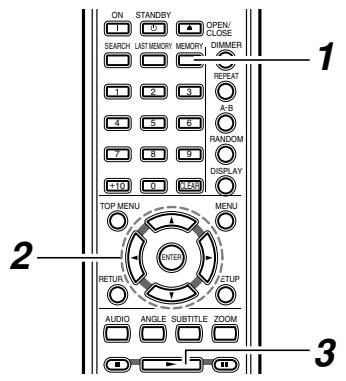
Playing MP3, WMA, and JPEG (Basic playback)
Playing MP3 or WMA
Here's how to play MP3 or WMA music files. MP3 and WMA are audio compression formats. Some types of recording or data may not be playable (see page 76).
1
Loading a disc
The Disc Navigator screen appears automatically.
2

Use the / buttons to select a folder, and press the ENTER button
The folder will open, and the Track column will show the contents of the folder.
To close the folder and return to the previous step
Press the RETURN button.
3

Use the / buttons to select the desired track, and press the ENTER button
Playback will begin.
During playback, the folder number, track number, and elapsed time are shown in the upper right.
Tip
If you use the Disc Navigator during random playback, the / / / buttons will not be available.
■ Assigned numbers
Numbers are shown automatically.

Folders
001
MF
30012000
MP3 002
MP3 003
:
…
.
MP
3001


Playing MP3, WMA, and JPEG (Basic playback)—Continued
Skipping to the desired track
MP3 WMA
To advance to a track
Player

Remote

During playback, press the button on the player or remote
To return to a previous track
Player

Remote

During playback, press the button on the player or remote
Searching forward/backward
MP3 WMA
To search forward

During playback, press the
button on the remote
You can press the button repeatedly to cycle through
three different speeds. (The television screen indicates the current search speed.)
To search backward

During playback, press the
button on the remote
You can press the button
repeatedly to cycle through
three different speeds. (The television screen indicates the current search speed.)
Tip
You can't search backward in a WMA song.
To resume normal playback

Press the (Play) button

Playing MP3, WMA, and JPEG (Basic playback)—Continued
Selecting a track MP3 WMA
1

During playback, press the SEARCH button
The Disc Navigator screen appears.

Disc Navigator
Search
Track Current/Total 020
Use the number buttons to specify a track number within the folder
Examples:
To specify 003, press "3".
To specify 010, press "1" and then "0".
- To specify 037, press "3" and then "7".
3

Press the ENTER button
Playback will begin.
Tip
- You can also use the number buttons to select a track directly, without displaying the Disc Navigator screen. (To select 10, press “+10” and the “0”).
- You can't use the search functions while using Random Playback.
Playing MP3, WMA, and JPEG (Basic playback)—Continued
Playing a JPEG CD JPEG
You can view JPEG images on your television screen. JPEG is a compression format for still images. Depending on the recording method or on the data, there may be some images that cannot be played, or for which certain operations are unavailable.
Insert a disc containing JPEG (image) data
When you insert the disc, the Disc Navigator screen will appear automatically. Depending on the disc, thumbnail images may also be shown.
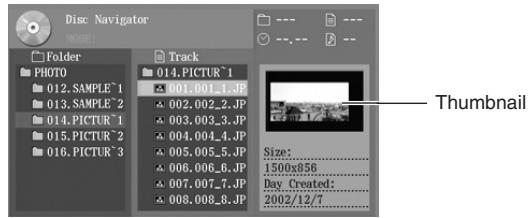
Tip
- Thumbs nails are shown only if the JPEG resolution is 640/480 pixels or lower.
- If the resolution is higher than 640/480, thumbnails will be shown only if thumbnail data exists.
- If the television screen is set to 16:9 Compressed, thumbnails are not shown in the Disc Navigator.
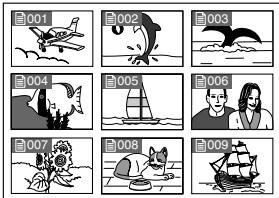
To view a list of thumbnails
Press the MENU button.
A list of thumbnails appears.
To view the Disc Navigator
Use the / / / buttons to select a folder icon, and press the ENTER button.
To view a slide show
You can automatically switch the images and view them as a slide show.
Select the screen at which you want to start, and press the ENTER button. When all images have been shown, the slide show will stop automatically.
Playing MP3, WMA, and JPEG (Basic playback)—Continued
Functions available during a slide show
To view the next page
Press the button.
To view the previous page
Press the button.
To rotate the image
Press the I I buttons on the remote.
Tip
You can't do this while zooming.
To zoom (magnify)
Press the button or button.
You can use the / / / buttons to adjust the position. The slide show will pause when you zoom.
To cancel zoom
Press the (Play) button.
To pause the slide show
Press the button.
Press the button once again to resume playback from where you paused.
To stop the slide show
Press the Stop) button or the MENU button.
Tip
- Depending on their data format or file size, some images cannot be zoomed.
- Zoom is not possible if the video output is set to Progressive. You'll have to switch to Interlaced output.

Advanced DVD playback
You can use a variety of playback and repeat functions in addition to basic DVD playback.
Memory playback
This function plays back DVD titles and chapters in the order you specify. You can memorize up to 32 steps. Memory will be cleared if you put the player in standby mode.

1

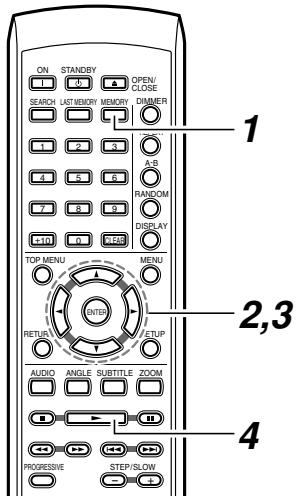
Press the MEMORY button
The Memory Play Setup screen will appear.
Use the / buttons to select the chapter or title area.
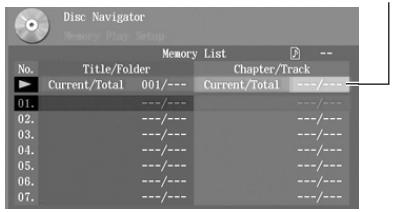
Memory input area
2
Use the / buttons to specify the chapter or track you want to memorize
If you select "All," all titles and chapters on the disc will be memorized.
Tip
You can also use the number buttons for input.
Examples:
To specify 10, press "1" and then "0".
To specify 37, press "3" and then "7".
- To cancel, press the CLEAR button.
To select all items, press "0".
Continues to next page

Advanced DVD playback—Continued
3

Press the ENTER button
If you want to continue specifying additional items, repeat steps 2 and 3.
4
Press the (Play) button
Memory playback will begin.
To stop memory playback
Press the (Stop) button twice.
To insert an item into memory
1 Access the Memory Play Setup screen
2 The memory input area is selected, but press the button to move to the list below
3 Use the / buttons to select the location at which you want to insert an item, and press the ENTER button
4 Specify the title or chapter you want to memorize, and press the ENTER button
To remove an item from memory
1 Access the Memory Play Setup screen
2 The memory input area is selected, but press the button to move to the list below
3 Use the / buttons to select the item you want to remove, and press the CLEAR button
To exit the memory setup screen
Press the MEMORY button.
MEMORY

Tip
- Some discs prohibit memory playback.
- When the chapter changes, you may see an image from a chapter that was not memorized. This is not a malfunction.
- The search functions are not available during memory playback.
Advanced DVD playback—Continued
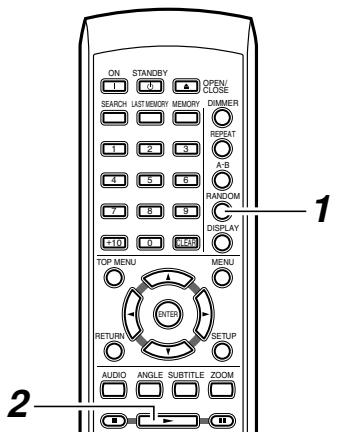
Random playback
This function plays back titles or chapters in random order. It will be cleared when the player enters standby mode.

1
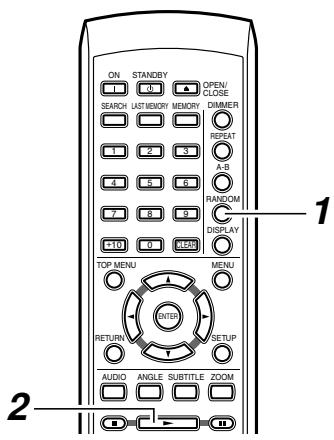
RANDOM

Press the RANDOM button several times to select the desired type of random playback
You can choose Title Random or Disc Random playback.
Title Random (Randomly plays the chapters within a title.)
Disc Random (Randomly plays the titles and chapters within a disc.)
Tip
The Title Random options can be selected only during playback.
2

Press the (Play) button
Random playback will begin.
Tip
- During random playback, you can press the button to select and play the next song or scene in the random order.
- Some discs prohibit random playback.
- On some discs, playback may begin at a slightly different location than specified.
- You can't use random playback during Memory Playback.
To return to normal playback
Press the RANDOM button several times until the screen indicates "Random Off".
Advanced DVD playback—Continued
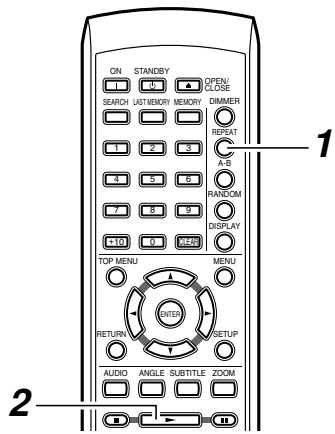
Repeat playback
This function repeatedly plays the selected title or chapter, or the entire disc. This function will be cleared when the player enters standby mode.
You can use this in conjunction with memory playback, random playback, or normal playback.
1

Press the REPEAT button several times to select the desired type of repeat playback.
You can choose Chapter Repeat, Title Repeat, or Disc Repeat playback.
Chapter Repeat (Repeatedly plays the selected chapter.)
Title Repeat (Repeatedly plays the chapters within the title.)
Disc Repeat (Repeatedly plays the disc.)
Tip
The Chapter Repeat and Title Repeat options can be selected only during playback.
2
Press the (Play) button
Playback will begin.
Tip
- Some discs prohibit repeat playback.
- If you press the REPEAT button during memory playback, the memorized sequence will play repeatedly.
To return to normal playback
Press the REPEAT button several times until the screen indicates "Random
Off' or the "REPEAT" indication disappears from the display area.
Advanced DVD playback—Continued
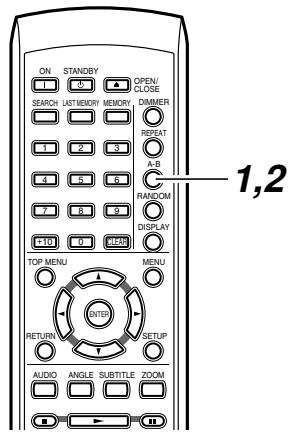
Repeatedly playing a selected segment (A-B Repeat Playback)
This function repeatedly plays the segment between the A and B points you specify.
1

During playback, press the A-B button at the beginning (point A) of the segment you want to repeat
2

Press the A-B button at the end (point B) of the segment you want to repeat
The segment between points A and B will play repeatedly.
Tip
- On some discs, playback may begin at a slightly different location than specified.
- Some discs prohibit A-B repeat playback.
- If you switch the angle (see page 28) during A-B repeat playback, you will return to the original angle when playback begins from point A.
To return to normal playback
Press the CLEAR button
You can also return to normal playback by pressing the REPEAT button several times until the screen indicates "Repeat Off".
Advanced DVD playback—Continued
Last Memory
You can memorize the current location and settings for up to six discs so that the next time you insert that disc, you can resume playing from that location with those settings.

During playback, press the LAST MEMORY button
The display section indicates "LAST MEM," and the location and settings will be memorized.
The memorized location will change each time you press the button.
To continue viewing
1 Insert the disc for which you memorized a location for continued viewing
Some DVDs will automatically begin playing when the disc is inserted.
2 Press the (Play) button

3 Using the / buttons, select "No" if you simply want to play the disc, or "Yes" if you want to continue viewing from the memorized location.
4 Press the ENTER button
The disc will continue playing from the memorized location.
If the Resume function is active, playback will begin from the location at which you last stopped. Press the Stop button once again if you want to use the Last Memory function.
To clear the last memory
Choose "Memory Clear" in step 3, and press the ENTER button.
Tip
- Last Memory may not work with some discs.
- The Last Memory function can't be used while the menu screen is displayed.
- If you store memories for more than six discs, the oldest memory will be erased.
- This function may not work correctly for DVD-R/DVD-RW discs.

Advanced DVD playback—Continued
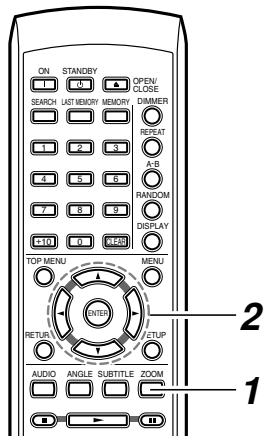
Zoom DVD
You can zoom-in (magnify) a desired portion of the image.
1

During playback or while paused, press the ZOOM button.
If you press the ZOOM button during playback, the playback will be paused.
Each time you press the button, the zoom setting will switch as follows.
x1 (normal) x2 (double) x4 (four times) back to normal playback
2
Use the / / / buttons to move the cursor to the desired position
Note
You can't zoom if the video output is set to Progressive mode. You'll need to switch the video output to Interlaced (see page 64).

Advanced CD or video CD playback
You can use a variety of playback and repeat functions in addition to basic playback.
Memory playback VCD CD
This function plays video CD or CD tracks in the order you specify. You can memorize up to 32 steps. Memory will be cleared if you put the player in standby mode.

1
Press the MEMORY button
The Memory Play Setup screen will appear.
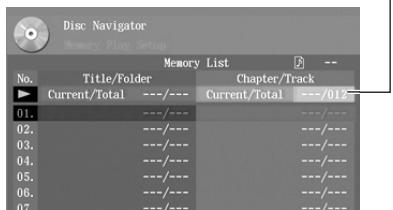
Memory input area
2
Use the / buttons to specify the track you want to memorize
If you select "All," all tracks on the disc will be memorized.
Tip
You can also use the number buttons for input.
Examples:
To specify 10, press "1" and then "0".
To specify 37, press "3" and then "7".
- To cancel, press the CLEAR button.
To select all items, press "0".

Advanced CD or video CD playback—Continued

Press the ENTER button
If you want to continue specifying additional items, repeat steps 2 and 3.
Press the (Play) button
Memory playback will begin
To stop memory playback

Press the (Stop) button twice.
To insert an item into memory
1 Access the Memory Play Setup screen
2 The memory input area is selected, but press the button to move to the list below
3 Use the / buttons to select the location at which you want to insert an item, and press the ENTER button
4 Specify the track you want to memorize, and press the ENTER button
To remove an item from memory
1 Access the Memory Play Setup screen
2 The memory input area is selected, but press the button to move to the list below
3 Use the / buttons to select the item you want to remove, and press the CLEAR button
To exit the memory setup screen
Press the MEMORY button.

Tip
- Some discs prohibit memory playback.
- The search functions are not available during memory playback.


Advanced CD or video CD playback—Continued
Random playback VCD CD
This function plays back tracks in random order. It will be cleared when the player enters standby mode.
1
RANDOM

Press the RANDOM button several times
Disc Random (Randomly plays the tracks within a disc.)
2

Press the (Play) button
Random playback will begin.
Tip
- During random playback, you can press the▶按钮 to select and play the next song or scene in the random order.
- Some discs prohibit random playback.
- On some discs, playback may begin at a slightly different location than specified.
- You can't use random playback during memory playback.
- You can't use the search function during random playback.
- You can't use random playback during PBC playback on a video CD. Turn off PBC playback before pressing the RANDOM button (see page 34).
To return to normal playback
Press the RANDOM button several times until the screen indicates "Random Off".
Advanced CD or video CD playback—Continued
Repeat playback VCD CD
This function repeatedly plays the selected track or the entire disc. This function will be cleared when the player enters standby mode.
You can use this in conjunction with memory playback, random playback, or normal playback.
1

Press the REPEAT button several times
You can choose Track Repeat or Disc Repeat playback.
Track Repeat (Repeatedly plays the selected track.)
Disc Repeat (Repeatedly plays the disc.)
Tip
The Track Repeat options can be selected only during playback.
2
Press the
(Play) button
Playback will begin.
Tip
- You can't use repeat playback during PBC playback on a video CD. Turn off PBC playback before pressing the REPEAT button (see page 34).
- Some discs prohibit repeat playback.
- If you press the REPEAT button during memory playback, the memorized sequence will play repeatedly.
To return to normal playback
Press the REPEAT button several times until the screen indicates "Repeat Off" or the "REPEAT" indication disappears from the display area.


Advanced CD or video CD playback—Continued
Repeatedly playing a selected segment (A-B Repeat Playback)

This function repeatedly plays the segment between the A and B points you specify.
1

During playback, press the A-B button at the beginning (point A) of the segment you want to repeat
2

Press the A-B button at the end (point B) of the segment you want to repeat
The segment between points A and B will play repeatedly.
Tip
- On some discs, playback may begin at a slightly different location than specified.
- Some discs prohibit A-B repeat playback.
To return to normal playback
Press the CLEAR button
You can also return to normal playback by pressing the REPEAT button several times until the screen indicates "Repeat Off".
Advanced CD or video CD playback—Continued
Last Memory VCD
You can memorize the current location and settings for a disc so that the next time you insert that disc, you can resume playing from that location with those settings.


During playback, press the LAST MEMORY button
The display section indicates "LAST MEM," and the location and settings will be memorized.
The memorized location will change each time you press the button.
To continue viewing
1 Insert the disc for which you memorized a location for continued viewing
2 Press the (Play) button

3 Using the / buttons, select "No" if you simply want to play the disc, or "Yes" if you want to continue viewing from the memorized location.
4 Press the ENTER button The disc will continue playing from the memorized location.
If the Resume function is active, playback will begin from the location at which you last stopped. Press the (Stop) button once again if you want to use the Last Memory function.
To clear the last memory
Choose "Memory Clear" in step 3, and press the ENTER button.
Tip
- The Last Memory function can't be used while the menu screen is displayed.
- The Last Memory function can't be used for some locations if you're using PBC playback on a video CD. Turn off PBC playback (see page 34).


Advanced CD or video CD playback—Continued
Zoom VCD
You can zoom-in (magnify) a desired portion of the image.
1
During playback or while paused, press the ZOOM button.
If you press the ZOOM button during playback, the playback will be paused.
Each time you press the button, the zoom setting will switch as follows.
x1 (normal) x2 (double) x4 (four times) back to normal playback
2

Use the / / / buttons to move the cursor to the desired position
Note
You can't zoom if the video output is set to Progressive mode. You'll need to switch the video output to Interlaced (see page 64).

Advanced MP3, WMA, or JPEG playback
You can use a variety of playback and repeat functions in addition to basic playback.
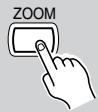
Memory playback MP3 WMA JPEG
1

Press the MEMORY button
The Play List will appear.
Folder column Track column
2
Use the / / / buttons to specify the track you want to memorize, and press the ENTER button
Tip
If you select a folder icon in the track column, the Play List will indicate "All" and all tracks in the folder will be memorized.
3

Press the (Play) button.
Playback will begin.
Advanced MP3, WMA, or JPEG playback—Continued
Random playback MP3 WMA JPEG
This function plays back tracks or folders in random order. It will be cleared when the player enters standby mode.
1

Press the RANDOM button several times to select the desired type of random playback
You can choose either Folder Random or Disc Random playback.
Folder Random (Randomly plays the tracks within a folder.)
Disc Random (Randomly plays the tracks within a disc.)
However, the contents of subFolders will not be played.
2

Press the (Play) button
Random playback will begin.
Tip
- During random playback, you can press the▶按钮 to select and play the next song or scene in the random order.
- Some discs prohibit random playback.
- On some discs, playback may begin at a slightly different location than specified.
- You can't use random playback during memory playback.
- You can't use the search functions during random playback.
- You can't use the / / buttons in the Disc Navigator screen during random playback.
To return to normal playback
Press the RANDOM button several times until the screen no longer indicates "Folder Random" or "Disc Random".

Advanced MP3, WMA, or JPEG playback—Continued
Repeat playback MP3 WMA
This function repeatedly plays the selected folder or track. This function will be cleared when the player enters standby mode.
You can use this in conjunction with memory playback or random playback.

1

Press the REPEAT button several times
You can choose Track Repeat, Folder Repeat, or Disc Repeat playback.
Track Repeat (Repeatedly plays the selected track.)
Folder Repeat (Repeatedly plays the selected folder.)
Disc Repeat (Repeatedly plays the disc.)
2
Press the (Play) button
Playback will begin.
Tip
- Some discs prohibit repeat playback.
- If you press the REPEAT button during memory playback, the memorized sequence will play repeatedly.
To return to normal playback
Press the REPEAT button several times until the screen no longer indicates "Track Repeat", "Folder Repeat" or "Disc Repeat".
Viewing disc information
Here's how to view information such as a DVD's chapter/title data, a video CD or CD's track data, and MP3 folder/track data. The information that is displayed will depend on the type of disc.

During playback, press the DISPLAY button
Press it once again, and the following information will appear.
DVD
| >Play | DVD | ||
| Title | Current/Total | Elapsed | Remain Total |
| 1/3 | 0.08 | 2.54.16 2.54.24 | |
| Audio | 1.English/Dolby Digital 3/2.1ch | ||
| Subtitle | 2. Japanese | ||
| >Play | DVD | |||
| Chapter | Current/Total | Elapsed | Remain | Total |
| 1/60 | 0.18 | 0.59 | 1.15 | |
| Bit-rate | 5.4Mbps | |||
MP3
| >Play DISC MP3 | ||
| 2) Track | Current/Total | Elapsed |
| 01_L00~2.NP3 | 1/20 | 0.5T |
| Folder | Current/Total | |
| ROOT | 1/5 | |
| ① Disc | |||
| Title | My Favorite songs | ||
| Artist Name | Great Artist | ||
| Album Name | Dream | ||
| Year | Genre | Blues | |
| Comment | |||
The Bit-rate indicates the amount of information recorded on the DVD. Higher bit rates mean a greater amount of information, but this does not always mean better image quality.
CD/Video CD
| >Play | DISC | |||
| >Track | Current/Total | Elapsed | Remain | Total |
| 1/12 | 0.05 | 8.31 | 8.36 | |
| Play | DISC | CO | ||
| Disc | Current/Total | Elapsed | Reown | Total |
| 1/12 | 0.11 | 77.58 | 78.08 | |
To hide the disc information
Press the DISPLAY button.
Note
When the PBC setting on the Operation Setting menu is set to On, the DISPLAY button doesn't work with video CDs with PBC.
Advanced setup
Here you can make advanced settings that are not included in the initial setup. Make these settings when necessary or desired.
| Setup icon | Setup items | Contents | Page |
| Picture | TV Shape | Select the aspect ratio (vertical/horizontal proportion) appropriate for the connected television. | 23 |
| Interlaced Setting | Adjust the interlaced output image. | 64 | |
| Progressive Setting | Adjust the progressive output image. | 65 | |
| PAL Output Setting | Specify how the DV-S155X outputs video signals when playing NTSC discs. | 66 | |
| Audio | Digital Out/Digital1 | Make settings for the digital signal output from the DIGITAL OPTICAL jack. | 66 |
| Dolby Digital Out | Specify whether Dolby Digital audio will be converted. | ||
| MPEG Out | Specify whether MPEG audio will be converted. | ||
| Digital Out | Specify whether digital audio will be sent from the digital jack. | ||
| Digital Out/Digital2 | Make settings for the digital signal output from the DIGITAL COAXIAL jack. | ||
| Dolby Digital Out | Specify whether Dolby Digital audio will be converted. | ||
| MPEG Out | Specify whether MPEG audio will be converted. | ||
| Digital Out | Specify whether digital audio will be sent from the digital jack. | ||
| Linear PCM Out | Specify whether linear PCM audio will be converted. | 67 | |
| Dynamic Range Control | Make dynamic range settings. | 67 | |
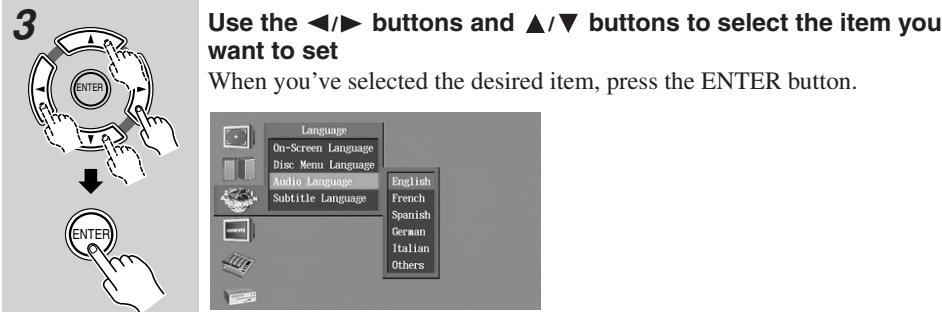
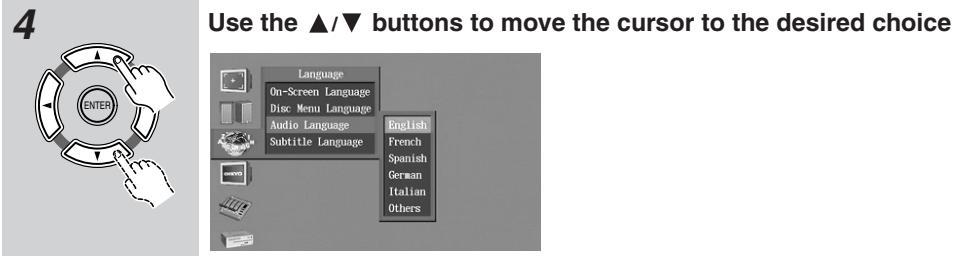
| Language | On-Screen Language | Select the language used for on-screen display. | 68 |
| Disc Menu Language | Select the language of menus displayed from the disc. | 68 | |
| Audio Language | Select the language of the soundtrack. | 69 | |
| Subtitle Language | Select the language of the subtitles. | 69 | |
| Diaplay | On-Screen Display | Specify whether operation status is shown on the screen. | 71 |
| On-Screen Display Color | Specify the background color of the on-screen setup menus. | 71 | |
| Background | Specify the color or graphic of the setup menu and navigator screens. | 71 | |
| Screen Saver | Make screen saver settings to prevent image burn-in. | 71 |
Advanced setup—Continued
| Setup icon | Setup items | Contents | Page |
| Operation Setting | Pause/Still | Adjust the image when video is paused. | 72 |
| Parental Lock | Make rating control settings to block playback of certain DVDs. | 72 | |
| PBC | Make settings for menu playback on video CDs with PBC. | 73 | |
| Auto power off | Specify whether the player will enter standby mode if no operation is performed for twenty minutes after playback stops. | 73 | |
| Initial Setup | TV Shape On-Screen Language Digital Out/Digital1 Digital Out/Digital2 | This is the group of settings that you make when turning on the power for the first time. | 22 |
You'll use your television screen to make advanced DVD settings. Turn on the power of your television, and switch it to the input to which you've connected the DV-S155X.
1
SETUP

Press the SETUP button
The Picture screen appears.


Advanced setup—Continued


Note
Some items cannot be set while a disc is playing. Such items are grayed-out.
Advanced setup—Continued
Video settings
Here you can make video-related settings such as television size and image adjustments. For both interlaced output and progressive output, you can memorize three separate sets of video-related settings. For example you might memorize one set of settings for use during the day when the sun is coming in through the windows, another for use at night when the curtains are closed, and another for use with room lighting.
■ Interlaced video settings
Here you can make video settings for when interlaced output is used.
1 Use the / buttons to select either Interlaced Setting "1, 2 or 3" and press the ENTER button
The Interlaced Setting menu will appear.
2 Use the / buttons to select the setting you want to adjust, and press the ENTER button
3 Use the / buttons to adjust the setting, and press the ENTER button
Repeat steps 2 and 3 to adjust the desired settings.
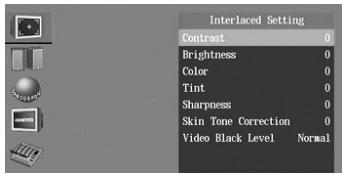
Contrast:
Adjusts the brightness ratio between the lightest and darkest portions of the image. The default setting is 0, but you can adjust this in a range of -7 - +7 .
Brightness:
Adjusts the brightness. The default setting is 0, but you can adjust this in a range of -7 to +7 .
Color:
Adjusts the color depth. The default setting is 0, but you can adjust this in a range of -7 and +7 .
Tint:
Adjusts the hue. The default setting is 0, but you can adjust this in a range of -7 - +7 .
Sharpness:
Adjusts the sharpness. The default setting is 0, but you can adjust this in a range of -7 to +8 .
Skin Tone Correction:
Adjusts the skin tones. The default setting is 0, but you can adjust this in a range of 0 - +7.
Video Black Level:
Adjusts the brightness of black images. The default setting is "Normal," but you can change this to "Light" if desired.
Tip
These settings are effective when using interlaced output.
4 Press the SETUP button
The setup will be completed, and the video setup screen will disappear.
Advanced setup—Continued
Progressive video settings
Here you can make video settings for when progressive output is used (NTSC only).
1 Use the / buttons to select either Progressive Setting "1, 2 or 3" and press the ENTER button
The Progressive Setting menu will appear.
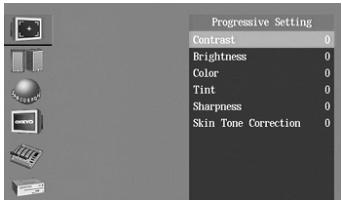
2 Use the / buttons to select the setting you want to adjust, and press the ENTER button
3 Use the / buttons to adjust the setting, and press the ENTER button
Repeat steps 2 and 3 to adjust the desired settings.
Contrast:
Adjusts the brightness ratio between the lightest and darkest portions of the image. The default setting is 0, but you can adjust this in a range of -7 - +7 .
Brightness:
Adjusts the brightness. The default setting is 0, but you can adjust this in a range of -7 - +7 .
Color:
Adjusts the color depth. The default setting is 0, but you can adjust this in a range of -7 - + 7
Tint:
Adjusts the hue. The default setting is 0, but you can adjust this in a range of -7 - +7 .
Sharpness:
Adjusts the sharpness. The default setting is 0, but you can adjust this in a range of 0 - +8.
Skin Tone Correction:
Adjusts the skin tones. The default setting is 0, but you can adjust this in a range of -7 - +7 .
Tip
These settings are effective when using progressive output.
4 Press the SETUP button.
The setup will be completed, and the video setup screen will disappear.

Advanced setup—Continued
PAL Output Setting
With this setting you can specify how the DV-S155X outputs video signals when playing NTSC format discs.
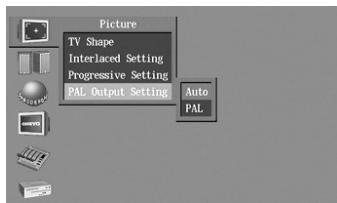
Auto (default):
Use this option if your TV or projector supports PAL and NTSC. When you play a PAL disc, the video output will be PAL. When you play an NTSC disc, it'll be NTSC. The DV-S155X does not convert the format.
PAL:
Use this option if your TV doesn't support NTSC playback, or the picture is distorted when watching NTSC discs. The DV-S155X will convert NTSC format video to a PAL-compatible format known as Mod PAL or 60Hz PAL.
Note
This setting can be changed only when playback is stopped.
Audio Settings
Digital Out/Digital1
Digital Out/Digital2
You'll need to perform this procedure if you've connected the DV-S155X to an amp that does not support digital signals, or to an MD recorder. The signal you specify for Digital Out/Digital1 will be output from the DIGITAL OPTICAL jack. The signal you specify for Digital Out/Digital2 will be output from the DIGITAL COAXIAL jack.
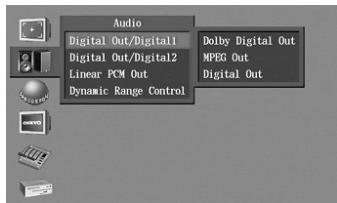
- Dolby Digital output
Dolby Digital:
Choose this setting if you've connected the DV-S155X to an AV amp or decoder that supports Dolby Digital. (This is the default setting.)
Dolby Digital > PCM:
Dolby Digital signals will be converted to linear PCM signals for output. Choose this setting if you've connected the DV-S155X to an AV amp that doesn't support Dolby Digital.
Tip
If you've connected the DV-S155X to an MD recorder, choosing the "Dolby Digital > PCM" setting for the digital jack (Digital 1 or 2) to which the recorder is connected will allow you to convert the Dolby Digital signal into PCM and record it on your MD recorder.
- MPEG output
MPEG:
Choose this if you've connected the DV-S155X to an AV amp that supports MPEG.
MPEG>PCM:
MPEG signals will be converted to linear PCM for output. Choose this if you've connected the DV-S155X to an AV amp that doesn't support MPEG. (This is the default setting.)
Advanced setup—Continued
- Digital output
This specifies whether digital audio will be output from the DV-S155X's digital output jack.
On: The digital jack will output digital audio signals.
Off: The digital jack will not output digital audio signals.
Linear PCM Out setting
Down Sample On:
Choose this setting if you've connected the DV-S155X to an AV amp that does not support 96 kHz audio. (This is the default setting.)
Down Sample Off:
Choose this setting if you've connected the DV-S155X to an AV amp that supports 96kHz audio.
Note
- Some discs will forcibly convert to 48/44.1kHz even if you choose "Down Sample Off," or may not produce digital output.
- 96 kHz linear PCM audio from a copy-protected DVD video is automatically converted to 48kHz for output, or is output as analog audio.
- This setting applies to both "Digital Out/Digital1" and "Digital Out/Digital2."
Dynamic Range Control setting
The Dynamic Range Control setting lets you compress the audio so that loud sounds will be softer and soft sounds will be louder. This is convenient when you find it difficult to hear the dialog of a movie, or when watching a movie late at night.
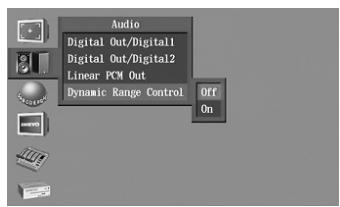
Off (default):
Dynamic Range Control will be off.
On:
Dynamic Range Control will be on. Loud sounds such as explosions will be softer, and dialog will be easier to hear.
Note
- Dynamic Range Control only works for Dolby Digital sound.
- This setting automatically reverts to Off when the DV-S155X is turned on.

Advanced setup—Continued
Language settings
Some DVDs contain subtitles or soundtracks in more than one language, allowing you to choose the desired language. Here's how to make language-related settings. For the procedure of using the setup menu, refer to page 62.
Tip
- On some discs, you use the disc menu to select the language.
- Some discs do not provide a choice of languages. If so, the language with which the disc was produced will be used.
- Some discs may not operate as you specify even though they contain more than one languages.
On-Screen Language
This selects the language used for on-screen display.
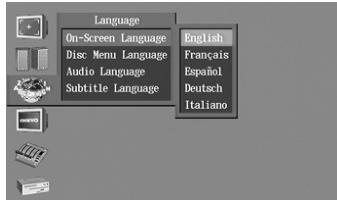
English (default): The on-screen display will be in English.
Français: The on-screen display will be in French
Espanol: The on-screen display will be in Spanish
Deutsch: The on-screen display will be in German
Italiano: The on-screen display will be in Italian
Disc Menu Language
This selects the language of the menus shown by the disc when you play a DVD that contains disc menus in multiple languages.
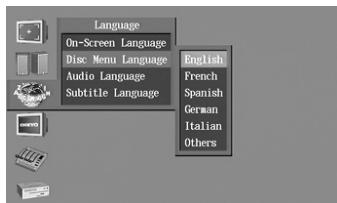
English (default)
French
Spanish
German
Italian
Others: Choose the desired language from the language code table on page 70.

Advanced setup—Continued
Audio Language
This selects the language of the soundtrack that will play automatically when you play a DVD that contains soundtracks in multiple languages.
English
French
Spanish
German
Italian
Others: Choose the desired language from the language code list on page 70.
Subtitle Language
This selects the language of the subtitles that will be displayed automatically when you play a DVD that contains subtitles in multiple languages.
English
French
Spanish
German
Italian
No Subtitle: Subtitles will not be displayed.
Others: Choose the desired language from the language code list on page 70.

If you select "Others"
1 Select "Others" and press the ENTER button.
A list of language codes will appear.
2 Use the / buttons to select the input field.
3 Use the / buttons to input the desired language code.
Refer to the language code list on page 70.
4 Press the ENTER button.


Advanced setup—Continued
Language Code List
Use this list when specifying other languages.
| Language | Code |
| Japanese | JA |
| English | EN |
| French | FR |
| German | DE |
| Italian | IT |
| Spanish | ES |
| Chinese | ZH |
| Dutch | NL |
| Portuguese | PT |
| Swedish | SV |
| Russian | RU |
| Korean | KO |
| Greek | EL |
| Afar | AA |
| Abkhazian | AB |
| Afrikaans | AF |
| Amharic | AM |
| Arabic | AR |
| Assamese | AS |
| Aymara | AY |
| Azerbaijani | AZ |
| Bashkir | BA |
| Byelorussian | BE |
| Bulgarian | BG |
| Bihari | BH |
| Bislama | BI |
| Bengali | BN |
| Tibetan | BO |
| Breton | BR |
| Catalan | CA |
| Corsican | CO |
| Czech | CS |
| Welsh | CY |
| Danish | DA |
| Bhutani | DZ |
| Esperanto | EO |
| Estonian | ET |
| Basque | EU |
| Persian | FA |
| Finnish | FI |
| Fiji | FJ |
| Faroese | FO |
| Frisian | FY |
| Irish | GA |
| Scots-Gaelic | GD |
| Galician | GL |
| Guarani | GN |
| Language | Code |
| Kirghiz | KY |
| Latin | LA |
| Lingala | LN |
| Laothian | LO |
| Lithuanian | LT |
| Latvian | LV |
| Malagasy | MG |
| Maori | MI |
| Macedonian | MK |
| Malayalam | ML |
| Mongolian | MN |
| Moldavian | MO |
| Marathi | MR |
| Malay | MS |
| Maltese | MT |
| Burmese | MY |
| Nauru | NA |
| Nepali | NE |
| Norwegian | NO |
| Occitan | OC |
| Oromo | OM |
| Oriya | OR |
| Panjabi | PA |
| Polish | PL |
| Pashto, Pushto | PS |
| Quechua | QU |
| Rhaeto-Romance | RM |
| Kirundi | RN |
| Romanian | RO |
| Kinyarwanda | RW |
| Sanskrit | SA |
| Sindhi | SD |
| Sangho | SG |
| Serbo-Croatian | SH |
| Sinhalese | SI |
| Slovak | SK |
| Slovenian | SL |
| Samoan | SM |
| Shona | SN |
| Somali | SO |
| Albanian | SQ |
| Serbian | SR |
| Siswati | SS |
| Sesotho | ST |
| Sundanese | SU |
| Swahili | SW |
| Tamil | TA |
| Language | Code |
| Gujarati | GU |
| Hausa | HA |
| Hindi | HI |
| Croatian | HR |
| Hungarian | HU |
| Armenian | HY |
| Interlingua | IA |
| Interlingue | IE |
| Inupiak | IK |
| Indonesian | IN |
| Icelandic | IS |
| Hebrew | IW |
| Yiddish | JI |
| Javanese | JW |
| Georgian | KA |
| Kazakh | KK |
| Greenlandic | KL |
| Cambodian | KM |
| Kannada | KN |
| Kashmiri | KS |
| Kurdish | KU |
| Telugu | TE |
| Tajik | TG |
| Thai | TH |
| Tigrinya | TI |
| Turkmen | TK |
| Tagalog | TL |
| Setswana | TN |
| Tonga | TO |
| Turkish | TR |
| Tsonga | TS |
| Tatar | TT |
| Twi | TW |
| Ukrainian | UK |
| Urdu | UR |
| Uzbek | UZ |
| Vietnamese | VI |
| Volapük | VO |
| Wolof | WO |
| Xhosa | XH |
| Yoruba | YO |
| Zulu | ZU |

Advanced setup—Continued
Diaplay
Here you can make display-related settings.
On-Screen Display
This specifies whether the operating status such as "Stop" or "Play" will be shown on the screen when you play a DVD.
Off:
Operating status is not displayed.
On(Default setting):
Operating status is displayed.
On-Screen Display Color
This specifies the color or graphic of the setup menu and navigator screens.
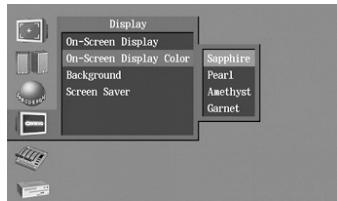
Sapphire (Default setting)
Pearl
Amethyst
Garnet
Background
This specifies the background color of the on-screen setup menus.

Blue
Gray
Graphic (Default setting)
Screen Saver
This enables the screen saver function which prevents image burn-in on the television screen.
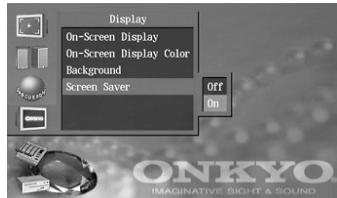
Off:
The screen saver will not operate.
On:
The screen saver will operate. (Default setting)


Advanced setup—Continued
Operation Setting
Here you can make settings for various functions of the DV-S155X.
Pause/Still
This setting specifies how the image will be frozen when you pause playback. The "Frame" setting generally provides higher quality, but may be blurry in some cases. The "Field" setting is not as high quality as "Frame," but will not be blurred.

Auto:
The "Field" or "Frame" setting will be chosen automatically depending on the disc. (Default setting)
Frame:
This is the normal mode.
Parental Lock
Some DVDs containing violence or other potentially inappropriate material utilize a viewer rating system. (The rating level is indicated on the packaging of the disc.) By setting the DV-S155X's rating level lower than the level indicated on the package of a DVD, you can prevent children from watching that DVD.
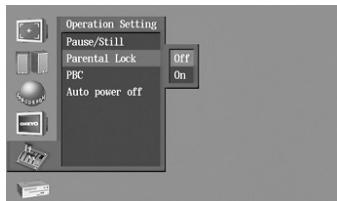
1 Choose Parental Lock "On," and press the ENTER button
A password entry screen will appear.
2 Use the number buttons to input a four-digit password, and press the ENTER button
The rating level setting screen will appear.
3 Use the / buttons to select a level, and press the ENTER button
The rating level will be set.
4 Press the SETUP button
This completes the setting; the setting screen will disappear.
Tip
- You can change this setting only while the player is stopped.
- If you make a mistake while entering the password, press the CLEAR button.
- If you forget the password, press the Stop button four times instead of entering the password in the procedure described above.
- You'll need to input the password in order to defeat the viewing restriction or change the level.
- The packaging of the disc will indicate whether a disc supports viewing restriction levels.

Advanced setup—Continued
PBC
This setting enables menu playback for video CDs with PBC.
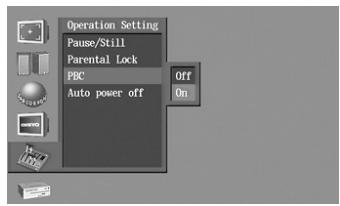
Off:
PBC playback is disabled.
On(Default setting):
PBC playback is enabled. (Default setting)
Tip
- PBC playback functionality differs between discs; please refer to the packaging of the disc.
- The DV-S155X may not support PBC playback of some video CD discs.
Auto
Auto power-off is a function that automatically puts the DV-S155X in standby mode if no operation is performed for twenty minutes after playback stops.
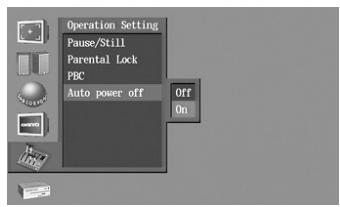
Off (Default setting):
Auto power-off is disabled.
On:
Auto power-off is enabled.


About Discs
Playable discs
The DV-S155X can only play back discs with the following marks on the disc labels, packaging, or jackets.
| Disc mark | |
| DVD videos | |
| DVD-R | DVD-RW |
| DVD | DVD |
| R | RW |
| VIDEO CDs | CD*1 |
| COMPACT DISC | COMPACT DISC |
| DIGITAL VIDEO | DIGITAL AUDIO |
| CD-R*2 | |
| COMPACT DISC | COMPACT DISC |
| DIGITAL AUDIO Recordable | Recordable |
| CD-RW*2 | |
| COMPACT DISC | COMPACT DISC |
| DIGITAL AUDIO (ReWritable) | (ReWritable) |
1 About playing copy-controlled CDs Some copy-controlled CDs may not conform to official CD standards. They are special discs and may not play on the DV-S155X.
2 The DV-S155X supports CD-R and CD-RW discs recorded in Video CD format, audio CD format, or ISO9660 Level 2 format with MP3, WMA and JPEG files. It also supports DVD-R and DVD-RW discs recorded in DVD-Video format. However, some CD-R/RW and DVD-R/RW discs may not work properly for any of the following reasons: incomplete disc finalization, disc burner characteristics, disc characteristics, the disc is damaged or dirty. See the manual supplied with your disc burner for more
information. Condensation or dirt on the optical pickup lens can also affect playback.
Non-playable discs
- You cannot play back discs other than those listed above.
- You cannot play discs such as Super Audio CD, DVD-Audio, DVD-ROM, DVD+R, DVD+RW, DVD-RAM, Photo CD, CD-G etc., even if the marks in the above table are labeled on those discs.
- The DV-S155X uses the PAL/NTSC color system, and cannot play back DVD videos recorded in any other color system (SECAM, etc.).
- Avoid using heart-shaped or octagonal discs. Playing irregularly-shaped discs may damage the internal mechanism of the DV-S155X.


- Do not use discs that have residue from adhesive tape, rental discs that have peeling labels, or discs that have custom labels or stickers. Otherwise, you may not be able to eject the discs, or the DV-S155X may become inoperative.
About Discs—Continued
DVD control limitations
The controls on certain DVD discs may be prohibited or disabled. The DV-S155X will display an icon ( ) that means a function is "prohibited by the disc" if you try to execute such a function.
On discs that enable interactive controls from the menu or during playback, certain functions (such as repeat play or programming) may not be available. In these cases, the DV-S155X will display an icon (☑) that means the function is "prohibited by the player."
About video CDs
The DV-S155X supports Video CDs with or without PBC (Version 2.0). (PBC is an abbreviation for Playback Control.)
Video CDs without PBC (Version 1.1)
Video CDs that do not utilize PBC allow you to play sound and movies on the DV-S155X using the same operations you would use to play an audio CD.
Video CDs with PBC (Version 2.0)
Video CDs that utilize PBC also allow you to play sound and movies on the DV-S155X. In addition, these discs enable you to use interactive software and search functions from a menu displayed on the TV screen (Menu Playback). Some of the functions described in this Instruction Manual may not work with some discs.
DVD-R/DVD-RW playback
The DV-S155X supports DVD-R and DVDRW discs recorded in DVD Video format.
DVD-R/DVD-RW discs recorded in DVD-VR format cannot be played.
- Unfinalized DVD-R/DVD-RW discs cannot be played.
- The DV-S155X is a playback only component, the DV-S155X cannot record onto DVD-R/DVD-RW discs.
* Refer to a manual comes with DVD video recorder for DVD video recording format (VR mode) and DVD video format (video mode).
About Discs—Continued
Regarding CD-R/CD-RW playback
The DV-S155X can play back CD-R/CD-RW discs containing music CD data, music data in formats such as MP3, and image data in formats such as JPEG. However depending on the disc, you may occasionally experience problems such as inability to play back, audible noise, or distorted sound.
- For details, refer to the owner's manual for your recorder.
Regarding MP3/WMA/JPEG playback
- Use discs that are recorded according in compliance with the ISO9660 level 2 CD-ROM file system. (However, only eight levels of folder hierarchy are supported, as in ISO9660 level 1.)
- Up to 999 folders and 671 tracks can be recognized and played.
- When displayed on the screen, a three-digit number is added to each folder and track.
- In the case of a multi-session disc, only the first session is played.
- If you attempt to play back a disc that the DV-S155X does not support, a message of "This format cannot be played" will appear.
- The disc must be finalized.
Caution
In some cases, a DVD-R/DVD-RW or CD-R/ CD-RW recorded on a recorder or computer may not be playable. (Possible causes: the characteristics of the disc, scratches, dirt on the disc, dirt on the lens of the player, condensation, etc.)
Regarding MP3 playback
- Only MP3 files with a filename extension of“.mp3” or“.MP3” can be played back.
- MPEG1 audio layer 3 (64--384 kbps) files recorded with a sampling frequency of 44.1/48kHz are supported.
- Variable bit rate (VBR) files from 64 kbps through 384 kbps are supported. The time indication in the display area may not be shown correctly during VBR playback.
Regarding WMA playback
WMA stands for "Windows Media Audio," and is an audio compression technology developed by Microsoft Corporation USA.
- Only WMA files with a filename extension of ".wma", ".WMA" or ".ASF" can be played back.
- Files recorded with a sampling frequency of 44.1/48kHz are supported.
- Variable bit rate (VBR) files from 16 kbps through 192 kbps are supported. The time indication in the display area may not be shown correctly during VBR playback.
- Defeat WMA content protection when recorded the WMA data to disc.
Regarding JPEG playback
- JPEG is a graphic format used for saving image files such as photos and illustrations. JPEG still images with a filename extension of“.jpg”,“.JPG” or“.JPEG” can be displayed.
- The following JPEG files of 5 Mbytes or less are supported.
- Brightness/color difference ratios of 4:4:4, 4:2:2, and 4:1:1 are supported.
Progressive JPEG is not supported.
About Discs—Continued
Differences in disc composition
DVDs
All discs are divided into smaller, more manageable sections so that you can find specific content more easily.
More specifically, discs are divided into one or more titles. Each title may be further divided into several chapters. Occasionally, a chapter may contain index points, effectively dividing the chapter into several parts as well.
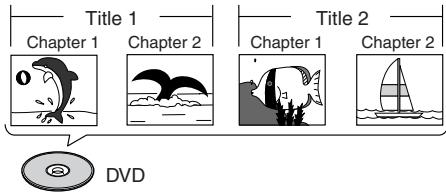
Video CDs and audio CDs
Video CDs and audio CDs are divided into a number of tracks. In rare cases, a track may contain a number of index points, effectively dividing the track into several parts.
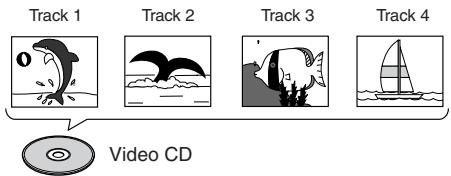
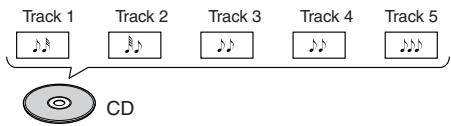
MP3/WMA and JPEG Files
WMA/MP3 folder/track names and JPEG folder/track names are shown in the screen.
About Discs—Continued
Handling discs
- Do not touch the playback side of a disc.

- Do not attach paper or tape to discs.

Cleaning discs
- Fingersprints and dust on a disc can cause picture and sound deterioration. Wipe the disc from the center outwards with a soft cloth. Always keep discs clean.
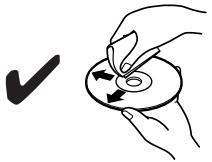
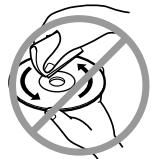
- If you cannot wipe off the dust with a soft cloth, wipe the disc lightly with a slightly moistened soft cloth and finish with a dry cloth.
- Do not use any type of solvent, such as thinner, benzene, commercial cleaners or antistatic spray for vinyl LPs. These solvents may damage discs.
Storing discs
- Do not store discs in locations subject to direct sunlight or near heat sources.
- Do not store discs in locations subject to moisture or dust, such as a bathroom or near a humidifier.
- Store discs in cases. Store each case vertically. Stacking or placing objects directly on a disc may cause it to warp.
Copyrights
It is forbidden by law to copy, broadcast, show, broadcast on cable, play in public, or rent copyrighted material without permission. DVD videos are copy-protected, and any recordings made from these discs will be distorted.
This product incorporates copyright protection technology that is protected by method claims of certain U.S. patents and other intellectual property rights owned by Macrovision Corporation and other rights owners. Use of this copyright-protection technology must be authorized by Macrovision Corporation, and is intended for home and other limited viewing uses only, unless otherwise authorized by Macrovision Corporation. Reverse engineering or disassembly is prohibited.
A note regarding condensation
If you move this DVD player from a cold place into a warm room, or use a heater to rapidly warm a cold room, small droplets of water ("condensation") may form inside the player. Condensation will prevent the player from working properly, and will also damage the disc or parts inside. If condensation occurs, leave the power turned on for one or two hours before you use the player. When not using the player, we recommend that you remove the disc.

Troubleshooting
Please check the following points first. It is possible that the cause may lie with other connected equipment, so refer to the Instruction Manual of your other equipment as well.
The numbers shown at the end of a line indicate pages for reference.
Power-related problems
Power does not turn on
- Make sure that the power cord has not fallen out of the outlet.
- Unplug the power cord from the outlet, wait at least five seconds, and plug it back in again.
Sound-related problems
No sound
- Could the power cord have fallen out of the outlet?
- Make sure that the connecting cables are firmly connected. (page 13)
- Insert RCA-type plugs all the way into the jack.
- It is possible that the player is being affected by a strong magnetic field, such as produced by a television. Move the player away from the television.
About the sound quality
- Changing the polarity of the power plug will sometimes improve the sound. The sound quality will stabilize ten to thirty minutes after the power is turned on. Please note that the sound quality will deteriorate if you bundle the audio connection cable together with speaker cables.
Video-related problems
Playback image is occasionally distorted
- Check whether the disc is dirty.
- The image may be somewhat distorted while searching forward or backward. This is not a malfunction of the player.
Frozen image is blurred
- Use the Operation Setting to adjust the Pause/Still. (page 72)
Brightness of the playback image is unsteady. Or, noise is present in the playback image
- If you've connected the DV-S155X via a video deck or a television with built-in video recorder, copy-protection is being applied. Connect the DV-S155X directly to your television.
- On some televisions or monitors, the color level may become slightly lighter or the tint may change during playback. Also, some discs may produce noise in the image because of their high resolution. In such cases, adjust your television or monitor to get the optimal picture.
Picture does not appear on the television screen
- Make sure that the correct input is selected on the television to which the DV-S155X is connected.
- If the same image is displayed for an extended time while the player is stopped or paused, the screen saver function will operate. In this case, press the button to defeat the screen saver. Press the button once again to begin playback. The screen saver will operate even if a television is not connected, such as when playing a CD.
- If you've connected the DV-S155X to the component jacks of your television, select the "Interlaced" setting. (page 64)
Picture is stretched vertically or horizontally
- The TV Shape setting is not appropriate for your television. Make settings as explained in "Initial setup" or "Advanced setup." (pages 23, 64)
Mesh-like noise appears on the television screen
- Keep the television antenna cable at a distance from the DV-S155X's power cord and connection cables.

Troubleshooting—Continued
Problems with disc playback
Disc won't play
- When playing a disc recorded in DTS format, you must connect the digital output jack to a DTS-compatible decoder. If a DTS-compatible decoder is not connected to the digital output jack when you play back, an extreme level of noise will be output from the DV-S155X's analog audio output jacks.
- Make sure that the disc is a type that the DV-S155X is able to play. (page 74)
- Check the region number. (page 3)
- If the Parental Lock function is active, defeat it or change the level. (page 72)
There's a time lag before playback begins
- For DVDs and for CDs that contain a large number of songs, a certain amount of time is required for the disc to be read.
Skips occur in the sound
- The sound may skip if the player is subjected to vibration, if the disc has a large scratch, or if the disc is dirty.
Can't memorize songs or scenes
- Make sure that a disc is inserted in the player, and that the song or scene you are attempting to memorize is on that disc. Some DVDs prohibit memory operations.
Disc is inserted, but won't play
- Make sure that the correct side of the disc is facing upward.
- Make sure that the disc is not badly soiled or scratched.
- If you suspect that condensation has occurred, leave the player for approximately one hour before attempting to operate it. (page 78)
Disc doesn't play in the correct order
- Defeat special playback modes such as Repeat Play, Memory Playback, and Random Playback. (pages 57-59)
The specified language, subtitle, or soundtrack is not output
- The disc does not contain the language you specified.
When you play back a DVD or video CD, playback begins from the middle
- The Resume function is active. If you want to play the disc from the beginning, press the (Stop) button twice and then play back.
- If you press the (Open/Close) button to open the tray while a DVD or video CD is playing, the DV-S155X will remember that location. The next time you play back that disc, it will begin playing from the location at which you pressed the button. A DVD-R/DVD-RW disc will play back from the location at which you pressed the button, whether it is the same disc or another DVD-R/DVD-RW disc. If you want to play the disc from the beginning, press the (Stop) button twice and then play back.
"Prohibited by the disc" symbol appears on the television screen
- The operation you selected is prohibited by the disc. (page 75)
"Prohibited by the player" symbol appears on the television screen
- The operation you selected is prohibited by the DV-S155X. (page 75)
Playing a Copy Control music CD
Noise or skips occur during playback / Player fails to recognize disc ("NO DISC" indication) / First song is not played / Finding the beginning of a song takes longer than normal / Plays from the middle of a song / Some portions won't play / Stops mid-way through playback / Indicator display is wrong
- The disc you are attempting to play is a music CD with Copy Control technology. Some music CDs with Copy Control do not comply with the CD specification. These are non-standard discs, and may not be playable on the DV-S155X.

Troubleshooting—Continued
Problems with MP3/WMA/JPEG playback
Can't play back a disc that contains MP3/WMA/JPEG files
- Make sure that the recorded disc is ISO 9660 compliant. (page 76)
- Make sure that the disc containing the files has been finalized.
Can't select a track (file) recorded on the disc
- Files will not be recognized if they have a non-standard filename extension. Change the filename extension. (page 76)
- The DV-S155X cannot recognize more than 999 folders or 671 tracks. (page 76)
- The DV-S155X does not support multi-session discs. Only the first session of a multi-session disc will be played. (page 76)
Problems with the remote control
The remote control doesn't work
- Are the batteries inserted with the correct polarity (+, -) as indicated? (page 12)
- Try replacing both batteries with fresh batteries. (Avoid mixing batteries of differing types, or old and new batteries.)
- Could the remote control be too far from the DV-S155X?
- Is there an obstruction between the remote control and the DV-S155X?
- Is strong light (fluorescent light or direct sunlight) shining on the DV-S155X's remote control optical sensor?
- If the door of your audio rack is made of colored glass, the remote control may not operate correctly.
Problems with connections to external devices
System functions don't work with other connected Onkyo products
- Make sure that both the RI cable and the audio connection cable are connected correctly. The system will not work if only the RI cable is connected. (page 18)
Problems with settings
Your settings have disappeared
- Your settings will be lost if there is a power failure or the power cord is disconnected while the player is powered-on.
Can't change the settings
- Some settings can't be changed during playback. In this case, stop playback before you change the settings.
Sound is output in monaural
- While playing a video CD, the output will be monaural if you pressed the remote control's AUDIO button to select Mono L or Mono R. To return to stereo, press the remote control's AUDIO button once again to select stereo. (page 27)
- The status of this setting is shown in the video output, so you'll need to connect a television to check the current status.
Troubleshooting—Continued
The manufacturer expressly disclaims any responsibility for damages (including but not limited to CD rental fees) incurred because of your inability to make a satisfactory recording due to a malfunction of this device. Before making an important recording, you should verify that recording occurs correctly.
This device contains sophisticated microcomputer functionality that in rare cases may malfunction due to interference, noise, or static electricity from an external source. If this occurs, unplug the power cord, wait at least five seconds, and then connect the power cord once again.
To return DVD-related settings to their default state (the factory settings)
1 Remove the disc so that the display section indicates "No Disc"
2 While holding down the (Stop) button, press the STANDBY/ON button
The display will indicate "INITIALIZE" for approximately seven seconds, and will then indicate "COMPLETE."
DVD-related settings have now been set to their default state (the factory settings).
Glossary
Analog audio
An electrical signal that directly represents sound. Compare this to digital audio which can be an electrical signal, but is an indirect representation of sound. See also "Digital audio".
Aspect ratio
The width of a TV screen relative to its height. Conventional TVs are 4:3 (in other words, the screen is almost square); wide-screen models are 16:9 (the screen is almost twice as wide as it is high).
Digital audio
An indirect representation of sound by numbers. During recording, the sound is measured at discrete intervals (44,100 times a second for CD audio) by an analog-to-digital converter, generating a stream of numbers.
On playback, a digital-to-analog converter generates an analog signal based on these numbers. See also "Sampling frequency" and "Analog audio".
Dolby Digital

Using a maximum of 5.1 channels Digital of audio, this high quality surround system is used in many of the finer movie theaters around the world.
The on-screen display shows which channels are active, for example showing 3/2.1. The 3 being the two front channels and the center channel; the 2 being the surround channels, and the .1 being the LFE channel.
DRM
DRM (digital rights management) is a type of server software developed to enable secure distribution of paid content over the web, recently incorporated by WMA (Windows Media Audio).
DTS

DTS stands for Digital Theater Systems. DTS is a surround system different from Dolby Digital that has become a popular surround sound format for movies.


Glossary—Continued
Dynamic range
The difference between the quietest and loudest sounds possible in an audio signal (without distorting or getting lost in noise).
Dolby Digital and DTS soundtracks are capable of a very wide dynamic range, delivering dramatic cinema-like effects.
EXIF (Exchangeable Image File)
A file format developed by Fuji Photo Film for digital still cameras. Digital cameras from various manufacturers use this compressed file format which carries date, time and thumbnail information, as well as the picture data.
File extension
A tag added to the end of a filename to indicate the type of file. For example, ".mp3" indicates an MP3 file.
ISO 9660 format
International standard for the volume and file structure of CD-ROM discs.
JPEG
A file format used for still images, such as photographs and illustrations. JPEG files are identified by the file extension .jpg" or .JPG". Most digital cameras use this format.
MP3
MP3 (MPEG1 audio layer 3) is a compressed audio file format. Files are recognized by their file extension ".mp3" or ".MP3".
MPEG audio
An audio format used on Video CDs and some DVD discs. This unit can convert MPEG audio to PCM format for wider compatibility with digital recorders and AV amplifiers. See also "PCM (Pulse Code Modulation)".
MPEG video
The video format used for Video CDs and DVDs. Video CD uses the older MPEG-1 standard, while DVD uses the newer and much better quality MPEG-2 standard.
PBC (PlayBack Control) (Video CD only)
A system of navigating a Video CD through on-screen menus recorded onto the disc. Especially good for discs that you would nor
mally not watch from beginning to end all at once—karaoke discs, for example.
PCM (Pulse Code Modulation)
The most common system of encoding digital audio, found on CDs and DAT. Excellent quality, but requires a lot of data compared to formats such as Dolby Digital and MPEG audio. For compatibility with digital audio recorders (CD, MD and DAT) and AV amplifiers with digital inputs, this unit can convert Dolby Digital, DTS and MPEG audio to PCM. See also "Digital audio".
Regions (DVD-Video only)
These associate discs and players with particular areas of the world. This unit will only play discs that have compatible region codes. You can find the region code of your unit by looking on the rear panel. Some discs are compatible with more than one region (or all regions).
Sampling frequency
The rate at which sound is measured to be turned into digital audio data. The higher the rate, the better the sound quality, but the more digital information is generated. Standard CD audio has a sampling frequency of 44.1kHz which means 44,100 samples (measurements) per second. See also "Digital audio".
WMA
WMA is short for Windows Media Audio and refers to an audio compression technology developed by Microsoft Corporation. WMA data can be encoded by using Windows Media Player version 8 or Windows Media Player for Windows XP.
Specifications
| Signal System | PAL/AUTO | |
| Composite Video Output/Impedance | 1.0 V (p-p)/75 Ω negative sync, RCA/phono | |
| S-Video Output/Impedance | Y: 0.7 V (p-p)/75 Ω negative sync, 4-pin mini DIN C: 0.286 V (p-p)/75 Ω | |
| Component Video Output/Impedance | Y: 1.0 V (p-p)/75 Ω, PB/PR: 0.7 V (p-p)/75 Ω RCA/ phono | |
| AV Connector (European model only) | 1.0 V (p-p)/75 Ω, Scart | |
| Component Video Frequency Response | 5 Hz–50 MHz | |
| Frequency response | DVD Linear Sound | 4 Hz–44 kHz (96kHz), 4 Hz–22 kHz (48kHz) |
| Audio CD | 4 Hz–20 kHz (44.1kHz) | |
| S/N Ratio | 106 dB | |
| Audio Dynamic Range | 96 dB | |
| THD (Total Harmonic Distortion) | 0.001 % (1kHz) | |
| Wow and Flutter | Below threshold of measurability | |
| Audio Output (Digital/Optical) | -22.5 dBm | |
| Audio Output/Impedance (Digital/Coaxial) | 0.5 p-p/75 Ω | |
| Audio Output/Impedance (Analog) | 2.0 V (rms)/320 Ω | |
General
| Power Supply | AC 230–240V, 50 Hz |
| Power Consumption | 11 W |
| Stand-by Power Consumption | 0.65 W |
| Dimensions (W x H x D) | 155 W x 94 H x 297 D mm |
| Weight | 1.9 kg |
| Operation Condition Temperature | 5°C–35°C |
| Disc Compatibility | DVD-video, DVD-R/RW, Audio CD, CD-R/RW, Video CD, MP3, WMA, JPEG Disc that have not been property finalized may only be partially play-able or not playable at all |
Specifications and features subject to change without notice.
ONKYO CORPORATION
Sales & Product Planning Div.: 2-1, Nissin-cho, Neyagawa-shi, OSAKA 572-8540, JAPAN
Tel: 072-831-8023 Fax: 072-831-8124
18 Park Way, Upper Saddle River, N.J. 07458, U.S.A.
Tel: 201-785-2600 Fax: 201-785-2650 http://www.onkyousa.com
ONKYO EUROPE ELECTRONICS GmbH
Liegnitzerstrasse 6, 82194 Groebenzell, GERMANY
Tel: +49-8142-4401-0 Fax: +49-8142-4401-555 http://www.onkyo.net
ONKYO EUROPE UK Office
Suite 1, Gregories Court, Gregories Road, Beaconsfield, Buckinghamshire, HP9 1HQ
UNITED KINGDOM Tel: +44-(0)1494-681515 Fax: +44(0)-1494-680452

ONKYO CHINA LIMITED
Units 2102-2107, Metroplaza Tower I, 223 Hing Fong Road, Kwai Chung,
N.T., HONG KONG Tel: 852-2429-3118 Fax: 852-2428-9039
Printed in Japan
10407-1
SN 29343862
(C) Copyright 2004 ONKYO CORPORATION Japan. All rights reserved.


- WARNING:
- CAUTION:
- Important Safety Instructions
- Precautions
- For British models
- IMPORTANT
- For European Models
- Region Numbers
- About this Manual
- Recording Copyright
- Power
- WARNING
- Never Touch this Unit with Wet Hands
- Installing this Unit
- Precautions—Continued
- Care
- Handling Notes
- To Obtain a Clear Picture
- Moisture Condensation
- Moisture condensation may damage this unit.
- DANGER:
- Features
- Table of Contents
- Table of Contents—Continued
- Advanced DVD playback 43
- Advanced CD or video CD playback 50
- Advanced MP3, WMA, or JPEG playback 57
- Viewing disc information 60
- Advanced setup 61
- About Discs 74
- Troubleshooting 79
- Glossary 82
- Specifications 84
- Index to Parts and Controls
- Front panel
- Index to Parts and Controls—Continued
- Display section
- Rear panel
- RIjacks
- SVIDEO OUTPUT jack
- VIDEO OUTPUT jack
- Remote control (RC-522DV)
- Preparing the Remote Controller
- Inserting the batteries
- Using the remote controller
- Connections
- Before Making Any Connections
- Optical Digital Inputs
- RCA AV Connection Color Coding
- Connections—Continued
- AV Cables & Sockets
- Connecting your television
- If your television has component video input jacks
- To switch the video output type
- Progressive (NTSC only):
- Interlaced (default setting):
- Note
- Regarding the DV-S155X's compatibility with progressive-scan televisions
- If your television has an S-video jack
- If your television has neither component jacks nor a S-video jack
- Connecting your amp
- Connecting the PR-155X
- Tip
- Connecting to the audio inputs of your television
- Connecting the RI cable
- Connecting to the Onkyo Separate Collection Series components
- System functions
- Auto power-on
- Direct change
- Remote control operation
- Timer operation
- Connecting to the Onkyo Separate Collection Series components—Continued
- Connecting the power cord
- Turning on the power
- Press the DV-S155X's STANDBY/ON button or the remote control's ON button
- Initial DVD setup
- Press the ON button to turn on the power.
- Initial DVD setup—Continued
- Select the shape of the connected television
- 4:3 Letter box
- 4:3 Normal
- 16:9 Widescreen
- 16:9 Compressed
- Select the On-Screen Language
- Exit the Initial Setup screen
- DVD playback (Basic playback)
- Playing a DVD
- Loading the DVD
- Press the (Play) button
- To remove the DVD
- DVD playback (Basic playback)—Continued
- Stopping playback
- Pausing playback
- Skipping to a chapter
- To advance to a chapter
- To return to a chapter
- Searching forward/backward
- To search forward
- To search backward
- To resume normal playback
- Frame advance playback
- Frame advance backward playback
- Slow motion playback
- During playback, press the STEP/SLOW+ button on the remote
- To play backward in slow motion
- About the disc menu
- To access the menu
- If the menu appears on your television screen when you play a DVD
- Selecting audio, subtitles, and angles
- Switching the audio during playback
- During playback, press the AUDIO button
- Switching the subtitles during playback
- During playback, press the SUBTITLE button
- To hide the subtitles
- Switching the camera angle
- When the icon appears, press the ANGLE button
- Finding the location you want to watch or hear
- Selecting a title/chapter for playback
- During playback, press the SEARCH button
- Choose the desired title/chapter or track
- Examples:
- Press the ENTER button
- Selecting a specific time location for playback
- During playback, press the SEARCH button twice
- Use the numeric keys to specify the time location you want to play
- Audio formats and sound effects
- Dolby Digital
- DTS
- Dolby Pro Logic
- Playing a CD or video CD (Basic playback)
- Playing a CD or video CD
- Loading a disc
- To remove the disc
- Playing a CD or video CD (Basic playback)—Continued
- Stopping playback CD
- Stopping playback VCD
- Pausing playback VCD CD
- Skipping to a track VCD CD
- To advance to a track
- To return to a track
- Frame advance playback VCD
- While paused, press the STEP/SLOW+ button on the remote.
- Menu VCD
- If a menu appears on your television screen while playing a video CD
- To play without seeing a menu screen (i.e., to defeat PBC playback)
- To return to the menu during PBC
- Switching the audio during playback VCD
- Searching for a location
- Searching for a track VCD CD
- Specify the desired track
- Press the ENTER button.
- Selecting a specific time location for playback VCD CD
- Use the number buttons to specify the time location you want to play.
- Playing MP3, WMA, and JPEG (Basic playback)
- Playing MP3 or WMA
- Use the / buttons to select a folder, and press the ENTER button
- Use the / buttons to select the desired track, and press the ENTER button
- ■ Assigned numbers
- Playing MP3, WMA, and JPEG (Basic playback)—Continued
- Skipping to the desired track
- To return to a previous track
- Use the number buttons to specify a track number within the folder
- Playing a JPEG CD JPEG
- Insert a disc containing JPEG (image) data
- To view a list of thumbnails
- To view the Disc Navigator
- To view a slide show
- Functions available during a slide show
- To zoom (magnify)
- To cancel zoom
- To pause the slide show
- To stop the slide show
- Advanced DVD playback
- Memory playback
- Press the MEMORY button
- Use the / buttons to specify the chapter or track you want to memorize
- Advanced DVD playback—Continued
- To stop memory playback
- To insert an item into memory
- To remove an item from memory
- To exit the memory setup screen
- Random playback
- Press the RANDOM button several times to select the desired type of random playback
- To return to normal playback
- Repeat playback
- Press the REPEAT button several times to select the desired type of repeat playback.
- Repeatedly playing a selected segment (A-B Repeat Playback)
- Last Memory
- During playback, press the LAST MEMORY button
- To continue viewing
- To clear the last memory
- Advanced CD or video CD playback
- Memory playback VCD CD
- Use the / buttons to specify the track you want to memorize
- Advanced CD or video CD playback—Continued
- Random playback VCD CD
- Press the RANDOM button several times
- Repeat playback VCD CD
- Press the REPEAT button several times
- Last Memory VCD
- Zoom VCD
- Advanced MP3, WMA, or JPEG playback
- Advanced MP3, WMA, or JPEG playback—Continued
- Random playback MP3 WMA JPEG
- Repeat playback MP3 WMA
- Viewing disc information
- During playback, press the DISPLAY button
- To hide the disc information
- Advanced setup
- Advanced setup—Continued
- Press the SETUP button
- Video settings
- ■ Interlaced video settings
- Use the / buttons to select either Interlaced Setting "1, 2 or 3" and press the ENTER button
- Use the / buttons to select the setting you want to adjust, and press the ENTER button
- Use the / buttons to adjust the setting, and press the ENTER button
- Contrast:
- Brightness:
- Color:
- Tint:
- Sharpness:
- Skin Tone Correction:
- Video Black Level:
- Press the SETUP button
- Progressive video settings
- Press the SETUP button.
- PAL Output Setting
- Auto (default):
- PAL:
- Audio Settings
- Digital Out/Digital1
- Digital Out/Digital2
- - Dolby Digital output
- Dolby Digital:
- Dolby Digital > PCM:
- - MPEG output
- MPEG:
- MPEG>PCM:
- - Digital output
- Linear PCM Out setting
- Down Sample On:
- Down Sample Off:
- Dynamic Range Control setting
- Off (default):
- On:
- Language settings
- On-Screen Language
- Disc Menu Language
- Audio Language
- Subtitle Language
- If you select "Others"
- Language Code List
- Diaplay
- On-Screen Display
- Off:
- On-Screen Display Color
- Pearl
- Background
- Blue
- Screen Saver
- Operation Setting
- Pause/Still
- Auto:
- Frame:
- Parental Lock
- PBC
- Auto
- Off (Default setting):
- About Discs
- Playable discs
- Non-playable discs
- About Discs—Continued
- DVD control limitations
- About video CDs
- Video CDs without PBC (Version 1.1)
- Video CDs with PBC (Version 2.0)
- DVD-R/DVD-RW playback
- Regarding CD-R/CD-RW playback
- Regarding MP3/WMA/JPEG playback
- Caution
- Regarding MP3 playback
- Regarding WMA playback
- Regarding JPEG playback
- Differences in disc composition
- DVDs
- Video CDs and audio CDs
- MP3/WMA and JPEG Files
- Handling discs
- Cleaning discs
- Storing discs
- Copyrights
- A note regarding condensation
- Troubleshooting
- Power-related problems
- Power does not turn on
- Sound-related problems
- No sound
- About the sound quality
- Video-related problems
- Playback image is occasionally distorted
- Frozen image is blurred
- Brightness of the playback image is unsteady. Or, noise is present in the playback image
- Picture does not appear on the television screen
- Picture is stretched vertically or horizontally
- Mesh-like noise appears on the television screen
- Troubleshooting—Continued
- Problems with disc playback
- Disc won't play
- There's a time lag before playback begins
- Skips occur in the sound
- Can't memorize songs or scenes
- Disc is inserted, but won't play
- Disc doesn't play in the correct order
- The specified language, subtitle, or soundtrack is not output
- When you play back a DVD or video CD, playback begins from the middle
- "Prohibited by the disc" symbol appears on the television screen
- "Prohibited by the player" symbol appears on the television screen
- Playing a Copy Control music CD
- Problems with MP3/WMA/JPEG playback
- Problems with the remote control
- The remote control doesn't work
- Problems with connections to external devices
- Problems with settings
- Your settings have disappeared
- Can't change the settings
- Sound is output in monaural
- To return DVD-related settings to their default state (the factory settings)
- Glossary
- Analog audio
- Aspect ratio
- Digital audio
- DRM
- Glossary—Continued
- Dynamic range
- EXIF (Exchangeable Image File)
- File extension
- ISO 9660 format
- JPEG
- MP3
- MPEG audio
- MPEG video
- PBC (PlayBack Control) (Video CD only)
- PCM (Pulse Code Modulation)
- Regions (DVD-Video only)
- Sampling frequency
- WMA
- ONKYO CORPORATION
Brand : ONKYO
Model : HTC-V10X
Category : Headphones