Bolero Dresscode 9155 Inverter - Washing machine CECOTEC - Free user manual and instructions
Find the device manual for free Bolero Dresscode 9155 Inverter CECOTEC in PDF.


| Product type | Front-load washing machine |
| Brand | Cecotec |
| Model | Bolero Dresscode 9155 Inverter |
| Maximum capacity | 9 kg |
| Maximum spin speed | 1400 rpm |
| Power supply | 220-240 V ~ 50 Hz, 10 A |
| Motor type | Inverter (brushless) |
| Number of programs | 12 |
| Main programs | Cotton, Eco 40-60, Sportswear, Bedding, Baby Care, Steam, Mixed, Quick 15', 20°C, Wool, Rinse+Spin, Spin |
| Special functions | Delay start (3-24 h), Child lock, Prewash, Drum Clean, Stop&Go (add laundry during cycle) |
| Available settings | Temperature (cold, 20, 40, 60, 90 °C) and spin speed (0, 400, 800, 1000, 1400 rpm) depending on program |
| Digital display | Remaining time, error codes, door lock and child lock indicators |
| Detergent drawer type | 3 compartments: prewash, main wash, fabric softener |
| Required water pressure | 0.03 to 1 MPa |
| Drain height | 0.85 to 1.25 m above floor |
| Cleaning and maintenance | Regular cleaning of pump filter, detergent drawer, door seal, drum (Drum Clean program) and water inlet filters |
| Safety | Automatic door lock, child lock, leak protection, automatic shutdown in case of fault |
| Installation | Mandatory removal of transport bolts before use, leveling with adjustable feet |
| Box contents | Washing machine, water inlet hose, wrench, transport bolt caps, manual |
Frequently Asked Questions - Bolero Dresscode 9155 Inverter CECOTEC
User questions about Bolero Dresscode 9155 Inverter CECOTEC
0 question about this device. Answer the ones you know or ask your own.
Ask a new question about this device
Download the instructions for your Washing machine in PDF format for free! Find your manual Bolero Dresscode 9155 Inverter - CECOTEC and take your electronic device back in hand. On this page are published all the documents necessary for the use of your device. Bolero Dresscode 9155 Inverter by CECOTEC.
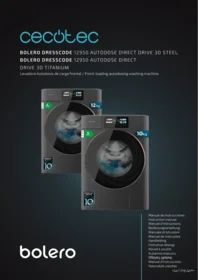
USER MANUAL Bolero Dresscode 9155 Inverter CECOTEC
Instrucciones de seguridad 5
Safety instructions 11
Instructions de sécurité 17
Sicherheitshinweise 23
Istruzioni di sicurezza 30
Instruções de segurança 37
Veiligheidsinstructies 43
ÍNDICE
- Parts and components 74
- Before use 74
- Installation 75
- Operation 78
- Cleaning and maintenance 90
- Troubleshooting 92
- Recycling of electrical and electronic equipment 95
- Copyright 96
- Simplified EU Declaration of Conformity 96
SOMMAIRE
EN • The coding in this manual is generic and applies to all code variants of the appliance.
Read the following instructions carefully before using the appliance. Keep this instruction manual for future reference or new users.
- Make sure that the mains voltage matches the voltage specified on the product's rating label and that the plug is earthed.
- If the power cord is damaged, it must be replaced by the official Cecotec Technical Support Service or by a similarly qualified person to prevent hazards.
- This appliance is for indoor use only.
- Make sure the device is installed in places where the temperature is above 0 °C.
- The appliance is not designed for built-in installation.
-
Use the hose set supplied with the appliance. Do not reuse old hoses.
-
Check hose connections regularly to ensure that no water leaks out.
- Do not use the appliance if parts are missing or defective or if the power cord or plug is damaged.
- Do not use the appliance until you are sure that it is installed in accordance with the instructions provided in this manual and all water, drain, electrical and grounding connections comply with all applicable local regulations and/or other requirements.
- Before carrying out any maintenance or cleaning in the device, unplug the appliance from the mains.
- As a safety measure, we advise you to unplug the appliance and cut the water supply after every use. Maximum water inlet pressure: 1 MPa. Minimum water-inlet pressure: 0.03 MPa.
- Never unplug the appliance with wet hands.
- For safety, be sure to connect the plug to a 3-pin socket. Check carefully and make sure that your socket is properly and reliably earthed.
- It must be possible to disconnect the appliance from the power supply by unplugging it if the plug is accessible, or by means of an all-pole switch upstream of the plug, in accordance with national electrical safety regulations.
- The maximum current of the device is 10 A, make sure that the power supply system (voltage, current and cable) is applicable to the load of the device.
- Make sure that the socket outlet is capable of supporting the Maximum Power rating of the appliance as indicated on the rating plate.
-
Water and electrical devices must be connected by a qualified technician in accordance with the manufacturer's instructions and local safety regulations.
-
The glass door may reach high temperatures during operation. Keep children and pets away from the glass door. Never open the door during the washing stage.
- Do not operate the appliance in very wet rooms or in rooms with explosive or caustic gas.
- Adequate ventilation must be provided to avoid the back flow of gases into the room from appliances burning other fuels, including open fires.
- Do not dry unwashed items in the appliance.
- Do not wash items that have been soiled with substances such as cooking oil, acetone, alcohol, petrol, kerosene, spot removers, turpentine, waxes, and wax removers.
- Do not wash articles that have been cleaned in, washed in, soaked in, or stained with flammable or explosive substances, like wax, oil, paint, petrol, degreasers, dry-cleaning solvents, kerosene, etc., which may result in fire or explosion.
- Fabric softeners or similar products should be used as specified by manufacturer.
- Do not wash or dry articles that have been cleaned in, washed in, soaked in, or dabbed with combustible or explosive substances (such as wax, oil, paint, petrol, degreasers, dry-cleaning solvents, kerosene, etc.). This may result in fire or explosion.
- When washing fabrics that contain vegetable or cooking oil or have been contaminated by hair care products, they should first be washed in hot water with extra detergent. This will reduce, but not eliminate, the hazard.
- The exhaust air must not be discharged into a flue which is for exhausting fumes from appliances burning gas or other fuels.
- The air openings must not be obstructed by a carpet.
- Appliances with a single inlet valve can only be connected
to a cold water supply. Appliances with a double inlet valve must be correctly connected to a hot water and cold water supply (depending on the washing machine model).
- The plug must be accessible after installation.
- The appliance must not be installed behind a lockable door, a sliding door, or a door with a hinge on the opposite side to that of the device.
- The appliance shall not be installed in a humid place.
- Do not place other items or appliances (such as microwaves) or objects under pressure on the device.
- The product is exclusive for household use and is only designed for the textiles suitable for machine washing.
- The product cannot be used for commercial or industrial purposes. Do not use the appliance outdoors, even if the area is protected, as it may be exposed to moisture, rain or thunderstorms.
- Do not insert more laundry load than the allowed load (maximum allowed load indicated in the product data tables).
- The device is not designed to be operated by external switching devices such as timers or remote control systems.
- Do not use an extension lead or multiple sockets.
- Do not wash garments containing glass fibre, such as certain curtains or blinds, as particles may remain in the washing machine and adhere to other types of garments, causing skin irritation.
- Do not stand or sit on the appliance.
- Do not lean against appliance door.
-
Flammable and explosive or toxic solvents are forbidden. Do not use detergents containing petrol, alcohol, etc. Use only detergents suitable for machine washing, especially for the drum.
-
Garments containing oil may catch fire spontaneously, especially when exposed to heat sources such as a washing machine. The garments are heated, causing an oxidation reaction in the oil. Oxidation generates heat. If heat cannot escape, garments may become hot enough to catch fire. Piling, stacking or storing garments containing oil retains heat and therefore creates a fire hazard.
- Garments containing vegetable cooking oil or hair care products should first be washed in hot water with extra detergent, this will reduce the hazard, but will not completely eliminate it.
- Make sure that no objects such as lighters, matches, etc. are introduced.
- Close the door properly, if it is difficult to close, check that clothing does not prevent proper closing.
- Make sure that there is no water in the drum before opening the door.
- Once the washing cycle has finished, we recommend removing the laundry as soon as possible to prevent creases.
- This appliance can be used by children aged 8 and above and people with reduced physical, sensory, or mental capabilities or lack of experience and knowledge, as long as they have been given supervision or instruction concerning the use of the appliance in a safe way and understand the hazards involved. Do not allow children to play with the appliance. Cleaning and maintenance should not be carried out by children without supervision.
- Children of less than 3 years should be supervised to ensure that they do not play with the appliance.
- Children should be supervised to make sure that they do not play with the appliance.
-
Cleaning and maintenance should not be carried out by children without supervision.
-
Be sure to use the child lock functions and to switch off the appliance when not in use.
- Keep the cleaning products out of the reach of children.
Cautions during the handling of the appliance
- If you wish to change the location of the washing machine, make sure you install the transport bolts again in the appliance, as they will ensure the interior of the product is not damaged during transport.
- Water accumulated inside the appliance must be drained out.
- Handle the machine carefully. Never hold each protruded part on the machine while lifting. Do not use the door of the appliance as a handle during transport.
- The device is heavy. Transport it with care.
- Secure the drain and water-supply hose correctly.
- Do not insert hands into the running water extracting tub.
- Do not close the door with excessive force. If it is found difficult to close the door, please check if the clothes are put in or distributed well.
- It is forbidden to wash carpets.
- Never refill the water by hand during washing.
Installation
- The appliance must be handled and installed by 2 or more people to avoid risk of injury. Wear protective gloves when unpacking and installing the product to avoid cutting hazards.
- Keep children away during installation process.
- During installation, make sure that the power cable is not damaged to avoid possible risk of fire or electric shock.
- Before using the device, it is imperative to remove the transport screws.
- Keep the room dry and ventilated.
- Never place the appliance over the opening of an uncovered drain.
- Do not expose the device to temperatures below 5^ C or above 35^ C.
- Do not install in bathrooms or very damp rooms.
- Check that it is correctly levelled on the floor by means of the feet.
- WARNING! Cecotec accepts no liability for incidents caused by improper use outside the rules set out in this instruction manual.
INSTRUCTIONS DE SÉCURITÉ
- Detergent drawer
- Door
- Drum
- Adjustable feet
- Water inlet valve
- Control panel
- Power cord
- Main body
Note:
The graphics in this manual are schematic representations and may not exactly match the product.
2. BEFORE USE
- This appliance comes in a packaging designed to protect it during transport. Remove the appliance from its box. You can keep the original box and other packaging materials in a safe place to prevent damage to the appliance if you need to transport it in the future. If you wish to dispose of the original packaging, make sure all items are recycled properly.
- Check that all parts and components are included and in good condition. If any of them are missing or damaged, please contact Cecotec's Official Technical Support Service immediately.
Box content
- Washing machine
- Water supply hose
- Spanner
-
Caps for transport bolt holes
-
Do not remove the product's serial number in order to keep proper traceability if technical assistance is required.
- To remove the lower part of the packaging, do not tilt the appliance on its front side.
Carefully tilt to the side. Never place the appliance directly on the floor on its back or front part. - Keep all packaging materials away from children.
- Before the first wash, you must perform a complete washing cycle without laundry (i.e. with an empty drum).
3. INSTALLATION
- Ensure that the washing machine's installation location temperature is above 0^ . Do not install outdoors.
- Place the washing machine correctly according to regulations and standards.
- Keep the washing machine base ventilated if installed on carpet.
- Keep a clean environment to prevent pest damage, as such damage is not covered under warranty.
Transit bolts
Washing machines are delivered with transit bolts installed to prevent internal damage during shipping.
Removing the transit bolts
Fig. 2
- To prevent internal damage during transport, the washing machine comes with 4 bolts installed. Before using the washing machine, remove these bolts (A).
- Important: If the bolts are not removed, the washing machine will suffer from excessive vibration, noise and possible malfunction.
- Use the supplied spanner to loosen the 4 bolts (B).
- Slightly rotate the bolt rubber and then remove the bolts. Keep the bolts and spanner for possible future use (C).
Note: The bolts must always be reinstalled whenever the washing machine is transported.
- Use the supplied caps to seal the bolt holes (D).

Warning: do not remove the drain hose fixing device.
Location requirements
- The washing machine's inclination must be less than 1 degree.
- The distance between any side of the washing machine and the power socket must be less than 1.5 metres.
- Do not connect too many electrical appliances to the same socket.
- The wall, door and floor in the installation area must be clean.
- Install the washing machine on a hard, stable surface with floor drainage, rather than on soft carpet or wooden flooring.
- Do not place dirty clothes or other items on the washing machine's top cover, as this could affect its normal operation.
Appliance levelling
The appliance uses high spin speeds to remove water at the end of the washing cycle. It is important that it is level and the adjustable feet press with equal
ENGLISH
pressure against the floor. This will help ensure the quietest and least vibrating operation.
Follow these steps:
- Install the appliance on level, solid surfaces. Preferably in a corner of the room.
- If the floor is not level (or uneven), adjust the appliance's adjustable feet as needed to level it. Do not place anything under the appliance's adjustable feet to help level it.
- Do not extend the appliance's adjustable feet more than necessary. The more extended the legs are, the more vibration the device will experience. Start with the adjustable legs fully threaded and adjust each leg as needed.
- Use a spirit level (not supplied) to check the top of the appliance and ensure it is level from side to side and front to back.
- Press down on each corner of the appliance's top to ensure it does not wobble. There should be no yielding or movement. All adjustable feet must press equally against the floor. This is just as important as ensuring that the appliance is level to avoid vibrations.
- When the appliance is level and does not wobble, lock the adjustable feet in place by tightening the locknuts against the bottom of the washing machine. Ensure you do this without changing the foot height (hold the foot while tightening the locknut).
Procedure to adjust the adjustable feet
- After determining which adjustable legs of the fixture need to be extended, have someone lift the fixture slightly to take pressure off the leg to be adjusted.
- Rotate the adjustable leg of the fixture to extend it downward as necessary to raise the corner of the fixture the correct amount and level it.
- When the foot height is correct, use the spanner (supplied) to tighten the locknut against the bottom of the appliance and secure the foot in place. Fig. 3
Electric connection
- Do not use power strips or similar devices for connection.
- If the power cables are damaged, contact professionals for repair.
- After using the washing machine, unplug it and turn off the water tap.
- Connect the washing machine to a grounded outlet, following the wiring principles.
- Place the washing machine in a place where connection to the power outlet is easy.
Water inlet connection
Fig. 4
- The water supply pressure must be between 30 kPa and 1000 kPa.
- Do not damage the thread when connecting the inlet pipes to the valves.
-
Install a pressure reducing device if water supply pressure exceeds 1000 kPa.
-
Two seals are supplied in the connectors at both ends of the pipe to prevent water leaks.
-
Open the tap and check for leaks at the connectors.
-
Check the pipes regularly. Replace them if necessary.
- Make sure that the pipes are not damaged or entangled with each other.
Figure 4 key
A. Standard faucet
B. Long faucet
C. Square faucet
Inlet hoses and taps connection
- Check the rubber seals on both sides of the hose. Insert a rubber gasket in the threaded fittings of each hose to prevent leakage. Fig. 5.
Fig. 5 key
- Rubber seal
-
Water hose for washing machine water inlet
-
Connect the water supply hoses to the water taps by hand-tightening firmly and then turning another 2/3 turn with pliers. Fig. 6.
! WARNING: Do not over-tighten. It could damage the connection.
3. After connecting the inlet hose to water taps, open them to flush out foreign substances (dirt, sand or sawdust) from the water lines. Let the water drain into a bucket and check the water temperature. Fig. 7
4. Connect the hoses to the washing machine's water inlet by hand-tightening firmly and then turning another 2/3 turn with pliers. Fig. 8
Figure 8 key
- Water inlet
WARNING: Do not over-tighten hoses. Excessive tightening can damage the valves, leading to leakage and material damage.
5. Check for leaks by opening the faucets. If leaking, recheck steps 1 through 4.
Drain hose installation
Fig. 9
- Secure the drain pipe with a bracket.
- To avoid damage or leakage on the floor, position the drain pipe correctly.
- To prevent siphoning, the drain hose height must be between 0.85 m and 1.25 m. In addition, the end of the drain pipe should not be submerged in water.
ENGLISH
- If the drain pipe is too long, do not force or bend it to insert it, as this may cause abnormal noises or poor drainage.
4. OPERATION
Detergent compartment
Figure 10
- Pre-wash detergent compartment
- Synthetic powder detergent/ Liquid/ Bleach compartment
- Fabric softener compartment

Pre-wash detergent
Add a moderate amount of detergent after selecting the prewash function if the laundry is very dirty.

Synthetic powder detergent/liquid detergent/ Bleach
- If the detergent to be used is synthetic, dissolve the detergent before inserting it in the box.
- When using liquid detergents, use those that contain little foam. Use twice as much water to dilute the concentrated detergent before inserting it into the dispenser.

Fabric softener
Put the softener in before washing; it will be automatically poured into the drum at the last rinse.
When using concentrated fabric softener, dilute it with the appropriate amount of water. Do not exceed the MAX mark.
- Use special detergent.
- Do not use too much detergent, as this will cause excessive foam, affecting washing quality or causing malfunction.
- Select the detergent according to the type of fabric, color, water temperature and soiling level of the laundry.
- Use a moderate amount of detergent to obtain a good washing result and protect the environment.
Recommendations for detergent use at different temperatures
- For heavily soiled linen, we recommend using cotton programs at 60^ C or higher, and a normal powder detergent (for heavily soiled linen) containing bleaching agents, as these give excellent results at medium/high temperatures.
- For washes between 40°C and 60°C, the type of detergent used should be suitable for the fabric type and soil level. Normal powder detergents are suitable for heavily soiled whites or colorfast colored fabrics, while liquid or powder «color-protecting» detergents are suitable for lightly soiled colored fabrics.
- For washes below 40^ C, we recommend using liquid detergents or detergents specifically labelled as suitable for low-temperature washing.
| PROGRAMME | MAXIMUM LOAD (kg) | TYPE OF WASHING MACHINE DETERGENT | FABRIC SOFTENER | |
| 9 kg | ANY FABRIC | SPECIFIC FABRIC | ||
| Cotton | 9 | L/P | - | 0 |
| ECO 40-60 | 9 | L/P | - | 0 |
| Sportswear | 4 | L/P | - | 0 |
| Bedding | 2 | L/P | L/P | 0 |
| Baby Care | 3 | L/P | - | 0 |
| Steam | 2 | L/P | - | 0 |
| Mix | 4 | L/P | - | 0 |
| Quick 15' | 2 | L/P | - | 0 |
| 20 °C | 2 | L/P | - | 0 |
| Wool | 2 | L/P | L/P | 0 |
| Rinse + Spin | 9 | - | - | 0 |
| Spin | 9 | - | - | - |
L: liquid detergent (if you use liquid detergent, it is not recommended to enable Delay start).
P: powder detergent.
O: optional.
-: no detergent or softener.
Use recommendations:
Use powder detergent from 20°C to 90°C.
Use wool detergent from 20 °C to 40 °C.
NOTE: The maximum load values are approximate and recommended to achieve optimal results.
ENGLISH
Control panel
Fig. 11
1. ON/OFF button

- Press the power button to switch on the appliance.
- When the washing cycle is finished, press the power button again to switch off the appliance.
2. Start/Pause button

- Press to start the washing cycle.
- Press it to pause during operation, press it again to resume operation.
3. Delay Start button

When using the Delay start function for washing, you can select a delay time between 3 and 24 hours. Press the Delay Start icon button (-) repeatedly to select the desired time in 1-hour intervals.
You must select this function after selecting a washing programme on the knob and before pressing the Start/Pause button.
4. KidLock function

You can lock and unlock this function by pressing the delay start icon button for approximately 3 seconds while the machine is running.
Once the child lock function has been set, all other buttons will be locked except the power button.
When the washing programme is finished, press the power button. The child lock function will not be unlocked. This means that the child lock function must be unlocked manually. When the washing machine is operating with the Child Lock activated (Child Lock icon illuminated), you can press the Delay Start icon button for 3 seconds to unlock it and then continue with the washing programme.
5. Spin speed button

You can change the spin speed according to the capacity (Kg) in each washing cycle.
Press the Speed button repeatedly to select the desired option.
You must select this function after selecting a washing programme on the knob and before pressing the Start/Pause button.
6. Pre-wash function (Pre-wash)

If the laundry is too dirty, you can select this function to have the appliance perform a prewash before the main washing cycle.
Press the Speed button for more than 3 seconds to activate/deactivate the pre-wash function.
You must select this function after selecting a washing programme on the knob and before pressing the Start/Pause button.
7. Temperature button

You can select different temperatures depending on the type of fabric and the soiling degree of the items to be washed.
Press the Temperature button repeatedly to select the desired option.
You must select this function after selecting a washing programme on the knob and before pressing the Start/Pause button.
8. Drum Clean function
It is advisable to periodically clean, sterilise and disinfect the drum.
To do this, press the Temperature button for more than 3 seconds.
NOTE: the drum must be empty to perform this function and no detergent or softener should be poured into the drawer.
9. Programmes knob
Turn the knob to choose one of the 12 washing programmes according to the type of fabric and the degree of soiling of the laundry.
Special functions
Add or remove garments (Stop function&Go)
If you want to add laundry during a washing cycle, press the Start/Pause button to stop operation.
After about 5 seconds ^* , you will hear an unlocking sound, while the door lock indicator light on the display disappears, then you can open the door.
NOTE*: the time may vary depending on multiple factors.
Add the additional garment inside the drum.
Do not force the door while opening it, as you may damage it. If there is water inside the appliance while you are opening the door, water may spill out of the washing machine.
Exercise extreme caution. RISK OF BURNS.
If the water temperature is above 45^ C and there is a lot of water inside the drum, the door will not open for safety reasons. If you want to open the door, follow the instructions below:
-
Press the Start/Pause button (wait until the drum stops turning).
-
Wait until the water temperature cools down to less than 45^ C.
-
If you want to open the door when the water temperature is above 45 °C , turn off the appliance and open the door after about 5 minutes. Exercise extreme caution. RISK OF BURNS.
ENGLISH
The water level must be below the door gasket and the spin speed must be 0.
The door lock indicator light should switch off on the display.
Digital display
Fig. 12
- Display: shows the time of the washing cycle as well as possible errors.
- Door lock: this indicator light shows the open and closed status of the door.
- Child Lock: this indicator light shows the status of the Child lock function.
- Spin speed: 1400, 1000, 800, 400 rpm
- Water temperature (90 °C, 60 °C, 40 °C, 20 °C)
Introduction to functions and programmes
Use for regular clothes
-
Preparing for the washing cycle.
-
Open the door, put the laundry in and close the door.
- Open the detergent drawer, add detergent and close the drawer.
-
Connect the inlet hose and make sure the tap is open.
-
Press the power button.
- The programmes can be selected depending on the laundry and the degree of soiling.
- Press the Start/Pause button to start washing.
- At the end of the washing cycle:
- Open the door to remove the clothes.
- Switch the appliance off and close the tap.
Cotton programme
Use this programme to wash light to moderately soiled laundry such as cotton, bed linen, underwear, towels and shirts, etc.
-
Preparing for the washing cycle.
-
Open the door, put the laundry in and close the door.
- Open the detergent drawer and add detergent/softener (if applicable) and then close it.
-
Make sure that the hose connections are correct and that the tap is open.
-
Press the power button.
- Turn the knob to select the Cotton programme.
- The washing programme will be selected automatically.
- Choose the required water temperature and spin speed (if applicable).
- Press the Start/Pause button to start the washing cycle.
- When the programme is finished, the appliance will beep.
Eco 40-60 programme
This programme is suitable for washing cotton laundry with normal soiling, labelled as washable at 40 °C and 60 °C, in the same cycle, saving time and water. This programme is used to assess compliance with EU eco-design legislation.
-
Preparing for the washing cycle.
-
Open the door, put the laundry in and close the door.
- Open the detergent drawer and add detergent/softener (if applicable) and then close it.
- Make sure that the hose connections are correct and that the tap is open.
- Press the power button.
- Turn the knob to select the Eco 40-60 programme.
- The washing programme will be selected automatically.
- Choose the required water temperature and spin speed (if applicable).
-
Press the Start/Pause button to start the washing cycle.
-
When the programme is finished, the appliance will beep.
Sportswear programme
Use this programme to wash machine washable sportswear.
-
Preparing for the washing cycle.
-
Open the door, put the laundry in and close the door.
- Open the detergent drawer and add detergent/softener (if applicable) and then close it.
-
Make sure that the hose connections are correct and that the tap is open.
-
Press the power button.
-
Turn the knob to select the Sportwear programme.
-
The washing programme will be selected automatically.
- Choose the required water temperature and spin speed (if applicable).
- Press the Start/Pause button to start the washing cycle.
- When the programme is finished, the appliance will beep.
Bedding programme
Suitable for machine washable clothes, e.g. bed linen, sheets, curtains, etc.
- Preparing for the washing cycle.
- Open the door, put the laundry in and close the door.
- Open the detergent drawer and add detergent/softener (if applicable) and then close it.
- Make sure that the hose connections are correct and that the tap is open.
- Press the power button.
- Turn the knob to select the Bedding programme.
- The washing programme will be selected automatically.
- Choose the required water temperature and spin speed (if applicable).
ENGLISH
- Press the Start/Pause button to start the washing cycle.
-
When the programme is finished, the appliance will beep.
-
Electric blankets and carpets cannot be washed (they will damage the appliance and clothes).
- Place the laundry in the drum properly and evenly, to avoid high vibrations during spinning.
- The drying time can be extended in this programme.
- Heavy laundry should not be put in the washing machine rolled or tangled, instead, it should be put in after shaking it out.
Baby care programme
This programme is specific for washing children's clothes, allergic people's clothes or clothes that need a high temperature to eliminate bacteria and dust mites.
-
Preparing for the washing cycle.
-
Open the door, put the laundry in and close the door.
- Open the detergent drawer and add detergent/softener (if applicable) and then close it.
-
Make sure that the hose connections are correct and that the tap is open.
-
Press the power button.
-
Turn the knob to select the Baby care programme.
-
The washing programme will be selected automatically.
-
Choose the required water temperature and spin speed (if applicable).
-
Press the Start/Pause button to start the washing cycle.
- When the programme is finished, the appliance will beep.
- When removing the laundry from the drum, pay attention to the internal steam. To avoid burns, first open the door, wait a few minutes and then remove the clothes.
Steam programme
This programme is activated to heat the inside of the drum, improving wash performance and removing dirt more efficiently.
-
Preparing for the washing cycle.
-
Open the door, put the laundry in and close the door.
- Open the detergent drawer and add detergent/softener (if applicable) and then close it.
-
Make sure that the hose connections are correct and that the tap is open.
-
Press the power button.
-
Turn the knob to select the Steam programme.
-
The washing programme will be selected automatically.
-
Choose the required water temperature and spin speed (if applicable).
-
Press the Start/Pause button to start the washing cycle.
- When the programme is finished, the appliance will beep.
Note: When removing the laundry from the drum, pay attention to the internal steam. To avoid burns, first open the door, wait a few minutes and then remove the clothes.
Mix programme
Use this programme to wash mixed laundry such as cotton and synthetics (do not mix laundry that fades easily or tears in the washing machine).
-
Preparing for the washing cycle.
-
Open the door, put the laundry in and close the door.
- Open the detergent drawer and add detergent/softener (if applicable) and then close it.
-
Make sure that the hose connections are correct and that the tap is open.
-
Press the power button.
- Turn the knob to select the Mix programme.
- The washing programme will be selected automatically.
- Choose the required water temperature and spin speed (if applicable).
- Press the Start/Pause button to start the washing cycle.
- When the programme is finished, the appliance will beep.
- Separate white or brightly coloured clothes from dark clothes.
Quick 15' programme
For washing clothes that are frequently used, not too dirty and delicate.
-
Preparing for the washing cycle.
-
Open the door, put the laundry in and close the door.
- Open the detergent drawer and add detergent/softener (if applicable) and then close it.
-
Make sure that the hose connections are correct and that the tap is open.
-
Press the power button.
- Turn the knob to select the Quick 15' programme.
- The washing programme will be selected automatically.
- Choose the required water temperature and spin speed (if applicable).
- Press the Start/Pause button to start the washing cycle.
- When the programme is finished, the appliance will beep.
ENGLISH
- To ensure optimal results, it is recommended not to wash more than 2 kg of laundry in this programme.
Introduction to the 20°C programme
Use this programme to wash lightly stained and lightly used laundry.
-
Preparing for the washing cycle.
-
Open the door, put the laundry in and close the door.
- Open the detergent drawer and add detergent/softener (if applicable) and then close it.
-
Make sure that the hose connections are correct and that the tap is open.
-
Press the power button.
- Turn the knob to select the 20 °C programme.
- The washing programme will be selected automatically.
- Choose the required water temperature and spin speed (if applicable).
- Press the Start/Pause button to start the washing cycle.
- When the programme is finished, the appliance will beep.
Wool programme
Use this programme to wash wool fibre texture, such as machine washable woollen fabrics, etc.
-
Preparing for the washing cycle.
-
Open the door, put the laundry in and close the door.
- Open the detergent drawer and add detergent/softener (if applicable) and then close it.
-
Make sure that the hose connections are correct and that the tap is open.
-
Press the power button.
- Turn the knob to select the Wool programme.
- The washing programme will be selected automatically.
- Choose the required water temperature and spin speed (if applicable).
- Press the Start/Pause button to start the washing cycle.
- When the programme is finished, the appliance will beep.
- After the washing cycle is finished, do not leave the laundry in the washing machine for a long time. Dry it as quickly as possible.
- Separate white or brightly coloured clothes from dark clothes for washing.
- The use of special detergent for wool can reduce the damage of the laundry and improve the washing effect.
Rinse & Spin programme
Use this programme so that the appliance does not perform a washing cycle, but only rinses and spins.
-
Preparing for the washing cycle.
-
Open the door, put the laundry in and close the door.
- Open the detergent drawer and add detergent/softener (if applicable) and then close it.
-
Make sure that the hose connections are correct and that the tap is open.
-
Press the power button.
-
Turn the knob to choose the Rinse&Spin programme.
- The washing programme will be selected automatically.
-
Press the Start/Pause button to start the rinse and spin cycle.
-
When the programme is finished, the appliance will beep.
- The highest spin speed can be selected, but the temperature cannot be adjusted.
Spin programme
The machine does not wash or rinse, it will only spin.
-
Preparing for the washing cycle.
-
Open the door, put the laundry in and close the door.
-
Make sure that the hose connections are correct and that the tap is open.
-
Press the power button.
-
Turn the knob to choose the Spin programme.
- The washing programme will be selected automatically.
- Press the Start/Pause button to start the spin cycle.
-
When the programme is finished, the appliance will beep.
-
The highest spin speed can be selected, but the temperature cannot be adjusted.
- During the spin process, the actual spin speed may not match the programme speed, which is due to the fact that the appliance adjusts the speed according to the weight of the laundry.
- There may be a rhythmic buzzing noise during the spin process, which is the normal noise of the drain. This is not a fault of the washing machine.
NOTE:
- If you want to change the current setting during the washing cycle, first press the Start/Pause button to stop the cycle temporarily, change the settings and then press the button again to restart (not available for all programmes).
- washing programmes may vary depending on the washing machine model.
- some functions, such as spin speed and temperature, are not configurable in certain programmes.
Washing programmes
| Programme | Temperature (°C) | Spin speed (r/min) | Time (min) |
| Cotton | Cold (20 °C-40 °C-60 °C-90 °C) | 1000 (0, 400, 800, 1400) | 94 |
| Eco 40-60 | 40 °C (cold water, 20 °C, 60 °C) | 1400 (0, 400, 800, 1000) | 228 |
| Sportswear | 20 °C (cold water, 40 °C) | 1000 (0, 400, 800) | 83 |
| Bedding | 60 °C (cold water, 20 °C, 40 °C, 90 °C) | 1400 (0, 400, 800, 1000) | 125 |
| Baby care | 60 °C (40 °C, 90 °C) | 1000 (0, 400, 800) | 130 |
| Steam | 20 °C (cold water, 40 °C, 60 °C, 90 °C) | 800 (0, 400, 1000, 1400) | 83 |
| Mix | Cold water (20 °C, 40 °C) | 1000 (0, 400, 800) | 73 |
| Quick 15' | Cold water (20 °C, 40 °C) | 800 (0, 400, 1000) | 15 |
| 20 °C | 20 °C | 1000 (0, 400, 800, 1400) | 63 |
| Wool | Cold water (20 °C, 40 °C) | 800 (0, 400, 1000) | 57 |
| Rinse&Spin | - | 1000 (0, 400, 800, 1400) | 38 |
| Spin | - | 1000 (0, 400, 800, 1400) | 14 |
WARNINGS:
- Check whether the water inside the drum has been drained before opening its door. Do not open the door if there is still water inside the machine.
- Do not wash one garment only, as this could destabilise the washing machine. Always introduce at least 3 or 4 clothes so that draining can be done smoothly. For a better efficiency and water and energy save, we recommend filling two thirds of the drum with laundry.
- The information given for programmes other than the ECO 40-60 programme are indicative only.
- The eco 40-60 programme can clean normally soiled cotton clothes declared as washable at 40 °C or 60 °C, together in the same cycle. This programme is used to assess compliance with EU eco-design legislation.
- The times indicated for each programme match the length with standard loads and temperatures. Other loads and temperatures will need different programme length.
- The most efficient programmes in terms of energy consumption are generally those that are carried out at lower temperatures and longer length.
-
Load the washing machine to the quantity estimated for each programme, this will help you save energy and water.
-
The length, and energy and water consumption of each programme may vary according to the weight and type of laundry, the additional functions active, water, and ambient temperature.
- It is recommended the use of liquid detergent for washing programmes at low temperature. You can vary the quantity of detergent according to the quantity of laundry and its soiling level. Follow the detergent manufacturer recommendations for the quantity of detergent you must use.
- Noise and remaining moisture level depend on the spin speed. The higher the spin speed, the higher the noise and the lower the residual moisture content.
- You can access the product database, where the information on this model defined in Delegated Regulation (EU) 2019/2014 is stored, by scanning the QR code (also found on the energy label).
Notice before washing
1. Washing labels
Please check the washing labels on the clothes, which show the type of fabric and washing method.
(Available on garment labelling).
2. Washing classification
Please wash clothes of the same texture, as different textures need different water temperature, speed and washing programme, separate brightly coloured clothes from white ones. Separate dyed cotton clothes from whites, otherwise the latter will be dyed. If possible, do not wash heavily soiled clothes together with less soiled ones.
Degree of soiling (high, medium, light)
Sort and wash clothes according to soiling degree
Colour (white, light colours, dark colours)
Sort and wash
Velvet (easy deterioration)
Sort into white and dark colours
Notes:
- When putting small and large clothes together, put the large clothes first, they should be less than half of the total number of clothes. Do not wash a single cloth as this may cause imbalance problems.
- Add one or two similar items.
ENGLISH
- It is advisable to use 34 of the drum for each wash.
- Small items of clothing, such as silk stockings and handkerchiefs, should be stored in mesh laundry bags. Before washing a bra with steel rings, remove the rings. If this is not convenient, place them in mesh bags to prevent the bra from slipping into the space between the inner and outer drums.
- Check all pockets and make sure there is nothing inside them. Nails, hairpins, matches, pens, coins and keys will damage the washer and clothes.
- Zip all clothing, fasten the button and hook and tie the belt loosely, to ensure that they do not damage other garments.
- First use water with a little detergent to wash the parts with too many stains, such as collar and cuffs.
- Check the door seal and make sure that there is nothing in it.
- Make sure that there is nothing in the drum before washing.
- Use low-foaming detergent.
Door lock / unlock
- The door will automatically lock when starting a washing programme. At this point, the door lock indicator light will illuminate.
- Press the Start/Pause touch icon and wait a few seconds after the wash/spin drum stops rotating. If the opening conditions are met, the door lock will be released automatically and the display will show that the door lock indicator light is off.
- The door cannot be opened either during high temperature operations or when the water level in the wash is high.
- If you open the door during operation and foam overflow occurs, collect the foam with a towel.
- When the door cannot be opened, the emergency opening device of the door can be used if necessary.
5. CLEANING AND MAINTENANCE
Maintenance
- Proper maintenance prolongs the lifespan of the appliance.
- Before maintenance, unplug the appliance.
Appliance body
After washing, wipe with a soft cloth. If there is a lot of dirt, use a suitable neutral detergent or soap.
- Do not wet directly.
- Do not use putty powder, thinner, petrol or alcohol to clean the body of the machine.
Door gasket
After washing, remove dirt, paper waste, etc., if there is any foreign matter, remove it.
Cleaning the detergent drawer
Clean the detergent drawer regularly. Take it out and wash it with clean water, then replace it.
Fig. 13
- Push down
- Remove
Cleaning the water inlet of the water hose
Fig. 14
(Suggestion: once every six months)
If debris accumulates, it will influence the water inlet speed.
- Disconnect the water inlet hose.
- Remove the coupling device according to the shown arrow.
- Clean the inside of the coupling device.
- Reinstall the hose after cleaning.
Cleaning the water inlet valve
of the washing machine (Suggestion: once / half a year).
- Disconnect the hose from the washing machine.
- Remove the filter net from the water valve.
- Clean the filter mesh with a soft bristle toothbrush.
- Reinstall the hose after cleaning.
Figure 15
- Water inlet valve
In case of freezing
- Cover the tap and the coupling device with a hot towel.
- Remove the inlet hose and place it in 50 degree water.
- Pour approximately 2 - 3 l of water at 50 degrees into the drum.
- Connect the inlet hose, open the tap and switch on the washing machine, check if the inlet and outlet are normal.
Figure 16
a.-
- Beer tap
- Connection pipe
- Inlet tube
ENGLISH
b.- Remove the inlet tube and place it in water at 50 °C.
- Water at 50 °C
c.- Pour approximately 2 - 3 l of water at 50 °C into the drum.
- Water at 50^ C
Cleaning of the drain pump filter (Suggestion: once a month)
- Press the lock on the pump after draining (with the washing machine switched off), open the water pump filter cover. (Attention: if there is hot water inside, wait for it to cool down).
- Remove the filter counterclockwise.
- Wash the filter.
- Go to the pump and insert the filter, tighten it clockwise and tighten the cap.
Caution:
- Secure the filter tightly to prevent leakage.
- Do not clean during operation.
NOTE: use extreme caution as spillage may occur. Use a container to collect the water.
Drum cleaning (Suggestion: one a month)
After use over a period of time, some dirt may remain. You can clean the inside and outside of the drum using the Drum Cleaning programme.
Caution: do not insert laundry nor detergent/softener when using this function.
6. TROUBLESHOOTING
Non-faulty conditions
The door cannot be opened
- Programme is running.
- There is clothing between the door and the door seal.
A slight odour is produced
There may be a rubber odour from some components, the odour will disappear with use. It is recommended to leave the door ajar after each wash until the inside of the drum is completely dry, this will prevent odours and the formation of mould.
There is too little water when washing and rinsing
The washing machine only needs a little water during operation.
No water inlet
- Is the water supply tap open?
- Is the inlet hose frozen?
- Are the filters blocked or dirty?
- Is there sufficient water pressure?
Water inlet at half
If the water level is low, the appliance will automatically supply water.
Water comes out when washing
Check if you added detergent with too much foam or too much quantity.
Remaining time change
If the laundry is not evenly placed inside the drum when spinning, the spin time will be increased, in order to even out the imbalance and correct the deviation.
There is an abnormal noise when spinning
Have the transport bolts been removed?
Are there pieces of metal or coins in the drum?
Washing machine cannot work after a power failure
The washing machine will stop working after a power failure. When power is restored, for safety reasons, it will not start up. Press the power button and restart the programme.
Troubleshooting Guide
| Incident | POSSIBLE CAUSE | TROUBLESHOOTING |
| The washing machine does not switch on | It is not plugged in. | Plug it in |
| You have not pressed the Start/Pause button. | Press the Start/Pause button. | |
| Power outage | Check the power supply | |
| Blown fuse | Activate the differential of your electrical panel | |
| Spinning fault, display shows “UE”. | Make sure that the transport bolts have been removed | Remove the transport bolts. |
| Make sure that the machine is positioned in a stable position. | Place the machine in a fixed and stable position. | |
| Garments may be too small or too lightweight. | Add more clothes. | |
| Appliance feet are not correctly adjusted. | Position the feet correctly. | |
| Water inlet fault, display shows “IE”. | Check if the tap is open | Open the tap |
| Check that the water supply is not cut off. | Contact your water supplier. | |
| Check that the pipes are not frozen. | Use hot water for thawing. | |
| Check that the filters are not clogged. | Remove filters and clean them | |
| Water outlet fault, display shows “OE”. | Water outlet pipes may be too high | Reposition the pipes correctly within a height of 1 m |
| Pipes may be frozen. | Make sure that the pipes are not frozen. | |
| Pipes may be blocked. | Remove clogging and clean the pipes. | |
| Drainage pump blocked. | Remove clogging and clean the drain pump. | |
| Door fault, display shows “DE” | Drum door may not be properly closed. | Make sure that no objects block the door. |
| No heating, display shows “FE”. | Unplug the washing machine. | Contact the official Cecotec Technical Support Service. |
| Water keeps entering the drum, the display shows “FE” | Incidence on solenoid valve or pressure switch | Contact the official Cecotec Technical Support Service. |
| Drum does not spin, display shows “LE” or “CE”. | Unplug the washing machine. | Contact the official Cecotec Technical Support Service. |
| Too much foam | You have added too much detergent You are using low sudsing detergent, especially for front-loading washing machines | Add the appropriate amount of detergent. Use detergent correctly. |
If none of these situations match your problem, do not attempt to disassemble or repair the device by yourself. Repairs carried out by unqualified people may result in injury or serious malfunctions. Contact Cecotec's Official Technical Support Service. Repairs must be carried out by an authorised technician using only original spare parts.
Unauthorised self-maintenance or maintenance will affect the safe use of the product and the application of the warranty policy.
WARNING:

Any electrical repairs to this appliance must conform to local and/or state laws. Please contact Cecotec's Official Technical Support Service in case of doubt and before performing any of the above operations. Always disconnect the device from the power supply when opening it.
7. RECYCLING OF ELECTRICAL AND ELECTRONIC EQUIPMENT

This symbol indicates that, according to the applicable regulations, the product and/or battery must be disposed of separately from household waste. When this product reaches the end of its shelf life, you should dispose of the batteries/accumulators and take them to a collection point designated by the local authorities.
For detailed information on how to properly dispose of electrical and electronic equipment and/or the corresponding batteries, consumers should contact their local authorities.
Compliance with the above guidelines will help protecting the environment.
Information regarding national packaging recycling systems and their marking can be found on our website.
ENGLISH
8. COPYRIGHT
The intellectual property rights over the texts in this manual belong to CECOTEC INNOVACIONES, S.L. All rights reserved. The content of this publication may not, either in part or in its entirety, be reproduced, stored in a retrieval system, transmitted or distributed by any means (electronic, mechanical, photocopying, recording or similar) without prior authorisation from CECOTEC INNOVACIONES, S.L.
9. SIMPLIFIED EU DECLARATION OF CONFORMITY
CE Cecotec Innovaciones hereby declares that this appliance complies with the essential requirements and other relevant provisions of applicable European Union regulations. This appliance has been designed, manufactured and tested in compliance with required safety and quality standards. The full text of the EU
Declaration of Conformity can be found on the following website: https://cecotec.es/es/information/declaration-of-conformity
1. PIÈCES ET COMPOSANTS
Image 1
6. PROBLEEMOPLOSSING
Fig./Img./Abb./Afb./Rys.1

Fig./Img./Abb./Afb./Rys. 2

Fig./Img./Abb./Afb./Rys. 3
| A |  |
| B |  |
| C |  |

Fig./Img./Abb./Afb./Rys. 4

Fig./Img./Abb./Afb./Rys. 5

Fig./Img./Abb./Afb./Rys. 6

Fig./Img./Abb./Afb./Rys. 7
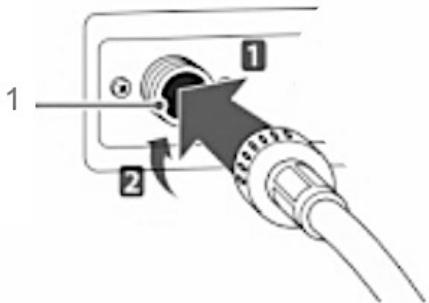
Fig./Img./Abb./Afb./Rys. 8
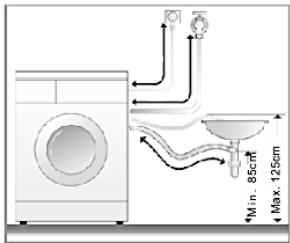


Fig./Img./Abb./Afb./Rys. 9
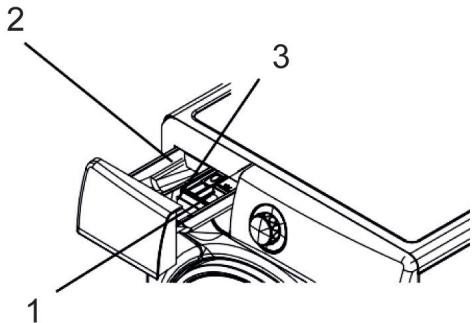
Fig./Img./Abb./Afb./ Rys. 10


Fig./Img./Abb./Afb./Rys. 11

Fig./Img./Abb./Afb./Rys. 12

Fig./Img./Abb./Afb./Rys. 13

Fig./Img./Abb./Afb./Rys. 14

Fig./Img./Abb./Afb./Rys. 15

Fig./Img./Abb./Afb./ Rys. 16
www.cecotec.es
- ÍNDICE
- SOMMAIRE
- Cautions during the handling of the appliance
- Installation
- INSTRUCTIONS DE SÉCURITÉ
- Note:
- BEFORE USE
- Box content
- INSTALLATION
- Transit bolts
- Removing the transit bolts
- Fig. 2
- Location requirements
- Appliance levelling
- ENGLISH
- Procedure to adjust the adjustable feet
- Electric connection
- Water inlet connection
- Figure 4 key
- Inlet hoses and taps connection
- Fig. 5 key
- Figure 8 key
- Drain hose installation
- Fig. 9
- OPERATION
- Detergent compartment
- Figure 10
- Pre-wash detergent
- Synthetic powder detergent/liquid detergent/ Bleach
- Fabric softener
- Recommendations for detergent use at different temperatures
- Control panel
- ON/OFF button
- Start/Pause button
- Delay Start button
- KidLock function
- Spin speed button
- Pre-wash function (Pre-wash)
- Temperature button
- Drum Clean function
- Programmes knob
- Special functions
- Digital display
- Fig. 12
- Introduction to functions and programmes
- Cotton programme
- Eco 40-60 programme
- Sportswear programme
- Bedding programme
- Baby care programme
- Steam programme
- Mix programme
- Quick 15' programme
- Introduction to the 20°C programme
- Wool programme
- Rinse & Spin programme
- Spin programme
- WARNINGS:
- Notice before washing
- Washing labels
- Washing classification
- Notes:
- Door lock / unlock
- CLEANING AND MAINTENANCE
- Maintenance
- Appliance body
- Door gasket
- Cleaning the detergent drawer
- Fig. 13
- Cleaning the water inlet of the water hose
- Fig. 14
- Cleaning the water inlet valve
- Figure 15
- In case of freezing
- Figure 16
- Cleaning of the drain pump filter (Suggestion: once a month)
- Caution:
- Drum cleaning (Suggestion: one a month)
- TROUBLESHOOTING
- Non-faulty conditions
- The door cannot be opened
- A slight odour is produced
- There is too little water when washing and rinsing
- No water inlet
- Water inlet at half
- Water comes out when washing
- Remaining time change
- There is an abnormal noise when spinning
- Washing machine cannot work after a power failure
- WARNING:
- RECYCLING OF ELECTRICAL AND ELECTRONIC EQUIPMENT
- COPYRIGHT
- SIMPLIFIED EU DECLARATION OF CONFORMITY
- PIÈCES ET COMPOSANTS
- Image 1
- PROBLEEMOPLOSSING
Brand : CECOTEC
Model : Bolero Dresscode 9155 Inverter
Category : Washing machine